Search Results: "tpo"

18 April 2024

Jonathan McDowell: Sorting out backup internet #2: 5G modem

Having setup recursive DNS it was time to actually sort out a backup internet connection. I live in a Virgin Media area, but I still haven t forgiven them for my terrible Virgin experiences when moving here. Plus it involves a bigger contractual commitment. There are no altnets locally (though I m watching youfibre who have already rolled out in a few Belfast exchanges), so I decided to go for a 5G modem. That gives some flexibility, and is a bit easier to get up and running. I started by purchasing a ZTE MC7010. This had the advantage of being reasonably cheap off eBay, not having any wifi functionality I would just have to disable (it s going to plug it into the same router the FTTP connection terminates on), being outdoor mountable should I decide to go that way, and, finally, being powered via PoE. For now this device sits on the window sill in my study, which is at the top of the house. I printed a table stand for it which mostly does the job (though not as well with a normal, rather than flat, network cable). The router lives downstairs, so I ve extended a dedicated VLAN through the study switch, down to the core switch and out to the router. The PoE study switch can only do GigE, not 2.5Gb/s, but at present that s far from the limiting factor on the speed of the connection. The device is 3 branded, and, as it happens, I ve ended up with a 3 SIM in it. Up until recently my personal phone was with them, but they ve kicked me off Go Roam, so I ve moved. Going with 3 for the backup connection provides some slight extra measure of resiliency; we now have devices on all 4 major UK networks in the house. The SIM is a preloaded data only SIM good for a year; I don t expect to use all of the data allowance, but I didn t want to have to worry about unexpected excess charges. 
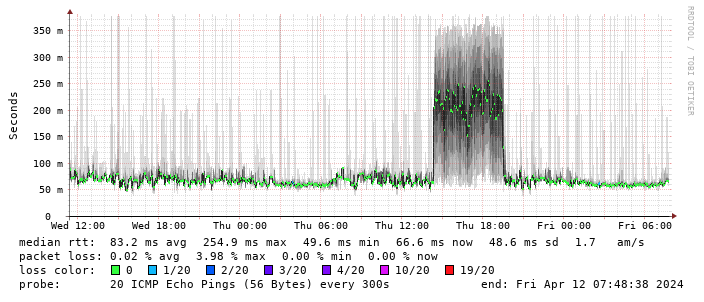
Performance turns out to be disappointing; I end up locking the device to 4G as the 5G signal is marginal - leaving it enabled results in constantly switching between 4G + 5G and a significant extra latency. The smokeping graph below shows a brief period where I removed the 4G lock and allowed 5G: Smokeping 4G vs 5G graph (There s a handy zte.js script to allow doing this from the device web interface.) I get about 10Mb/s sustained downloads out of it. EE/Vodafone did not lead to significantly better results, so for now I m accepting it is what it is. I tried relocating the device to another part of the house (a little tricky while still providing switch-based PoE, but I have an injector), without much improvement. Equally pinning the 4G to certain bands provided a short term improvement (I got up to 40-50Mb/s sustained), but not reliably so. speedtest.net results This is disappointing, but if it turns out to be a problem I can look at mounting it externally. I also assume as 5G is gradually rolled out further things will naturally improve, but that might be wishful thinking on my part. 
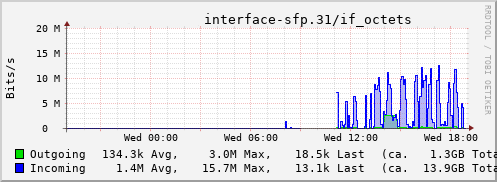
Rather than wait until my main link had a problem I decided to try a day working over the 5G connection. I spend a lot of my time either in browser based apps or accessing remote systems via SSH, so I m reasonably sensitive to a jittery or otherwise flaky connection. I picked a day that I did not have any meetings planned, but as it happened I ended up with an adhoc video call arranged. I m pleased to say that it all worked just fine; definitely noticeable as slower than the FTTP connection (to be expected), but all workable and even the video call was fine (at least from my end). Looking at the traffic graph shows the expected ~ 10Mb/s peak (actually a little higher, and looking at the FTTP stats for previous days not out of keeping with what we see there), and you can just about see the ~ 3Mb/s symmetric use by the video call at 2pm: 4G traffic during the work day The test run also helped iron out the fact that the content filter was still enabled on the SIM, but that was easily resolved. Up next, vaguely automatic failover.

Thomas Koch: Minimal overhead VMs with Nix and MicroVM

Posted on March 17, 2024
Joachim Breitner wrote about a Convenient sandboxed development environment and thus reminded me to blog about MicroVM. I ve toyed around with it a little but not yet seriously used it as I m currently not coding. MicroVM is a nix based project to configure and run minimal VMs. It can mount and thus reuse the hosts nix store inside the VM and thus has a very small disk footprint. I use MicroVM on a debian system using the nix package manager. The MicroVM author uses the project to host production services. Otherwise I consider it also a nice way to learn about NixOS after having started with the nix package manager and before making the big step to NixOS as my main system. The guests root filesystem is a tmpdir, so one must explicitly define folders that should be mounted from the host and thus be persistent across VM reboots. I defined the VM as a nix flake since this is how I started from the MicroVM projects example:
 
  description = "Haskell dev MicroVM";
  inputs.impermanence.url = "github:nix-community/impermanence";
  inputs.microvm.url = "github:astro/microvm.nix";
  inputs.microvm.inputs.nixpkgs.follows = "nixpkgs";
  outputs =   self, impermanence, microvm, nixpkgs  :
    let
      persistencePath = "/persistent";
      system = "x86_64-linux";
      user = "thk";
      vmname = "haskell";
      nixosConfiguration = nixpkgs.lib.nixosSystem  
          inherit system;
          modules = [
            microvm.nixosModules.microvm
            impermanence.nixosModules.impermanence
            ( pkgs, ...  :  
            environment.persistence.$ persistencePath  =  
                hideMounts = true;
                users.$ user  =  
                  directories = [
                    "git" ".stack"
                  ];
                 ;
               ;
              environment.sessionVariables =  
                TERM = "screen-256color";
               ;
              environment.systemPackages = with pkgs; [
                ghc
                git
                (haskell-language-server.override   supportedGhcVersions = [ "94" ];  )
                htop
                stack
                tmux
                tree
                vcsh
                zsh
              ];
              fileSystems.$ persistencePath .neededForBoot = nixpkgs.lib.mkForce true;
              microvm =  
                forwardPorts = [
                    from = "host"; host.port = 2222; guest.port = 22;  
                    from = "guest"; host.port = 5432; guest.port = 5432;   # postgresql
                ];
                hypervisor = "qemu";
                interfaces = [
                    type = "user"; id = "usernet"; mac = "00:00:00:00:00:02";  
                ];
                mem = 4096;
                shares = [  
                  # use "virtiofs" for MicroVMs that are started by systemd
                  proto = "9p";
                  tag = "ro-store";
                  # a host's /nix/store will be picked up so that no
                  # squashfs/erofs will be built for it.
                  source = "/nix/store";
                  mountPoint = "/nix/.ro-store";
                   
                  proto = "virtiofs";
                  tag = "persistent";
                  source = "~/.local/share/microvm/vms/$ vmname /persistent";
                  mountPoint = persistencePath;
                  socket = "/run/user/1000/microvm-$ vmname -persistent";
                 
                ];
                socket = "/run/user/1000/microvm-control.socket";
                vcpu = 3;
                volumes = [];
                writableStoreOverlay = "/nix/.rwstore";
               ;
              networking.hostName = vmname;
              nix.enable = true;
              nix.nixPath = ["nixpkgs=$ builtins.storePath <nixpkgs> "];
              nix.settings =  
                extra-experimental-features = ["nix-command" "flakes"];
                trusted-users = [user];
               ;
              security.sudo =  
                enable = true;
                wheelNeedsPassword = false;
               ;
              services.getty.autologinUser = user;
              services.openssh =  
                enable = true;
               ;
              system.stateVersion = "24.11";
              systemd.services.loadnixdb =  
                description = "import hosts nix database";
                path = [pkgs.nix];
                wantedBy = ["multi-user.target"];
                requires = ["nix-daemon.service"];
                script = "cat $ persistencePath /nix-store-db-dump nix-store --load-db";
               ;
              time.timeZone = nixpkgs.lib.mkDefault "Europe/Berlin";
              users.users.$ user  =  
                extraGroups = [ "wheel" "video" ];
                group = "user";
                isNormalUser = true;
                openssh.authorizedKeys.keys = [
                  "ssh-rsa REDACTED"
                ];
                password = "";
               ;
              users.users.root.password = "";
              users.groups.user =  ;
             )
          ];
         ;
    in  
      packages.$ system .default = nixosConfiguration.config.microvm.declaredRunner;
     ;
 
I start the microVM with a templated systemd user service:
[Unit]
Description=MicroVM for Haskell development
Requires=microvm-virtiofsd-persistent@.service
After=microvm-virtiofsd-persistent@.service
AssertFileNotEmpty=%h/.local/share/microvm/vms/%i/flake/flake.nix
[Service]
Type=forking
ExecStartPre=/usr/bin/sh -c "[ /nix/var/nix/db/db.sqlite -ot %h/.local/share/microvm/nix-store-db-dump ]   nix-store --dump-db >%h/.local/share/microvm/nix-store-db-dump"
ExecStartPre=ln -f -t %h/.local/share/microvm/vms/%i/persistent/ %h/.local/share/microvm/nix-store-db-dump
ExecStartPre=-%h/.local/state/nix/profile/bin/tmux new -s microvm -d
ExecStart=%h/.local/state/nix/profile/bin/tmux new-window -t microvm: -n "%i" "exec %h/.local/state/nix/profile/bin/nix run --impure %h/.local/share/microvm/vms/%i/flake"
The above service definition creates a dump of the hosts nix store db so that it can be imported in the guest. This is necessary so that the guest can actually use what is available in /nix/store. There is an effort for an overlayed nix store that would be preferable to this hack. Finally the microvm is started inside a tmux session named microvm . This way I can use the VM with SSH or through the console and also access the qemu console. And for completeness the virtiofsd service:
[Unit]
Description=serve host persistent folder for dev VM
AssertPathIsDirectory=%h/.local/share/microvm/vms/%i/persistent
[Service]
ExecStart=%h/.local/state/nix/profile/bin/virtiofsd \
 --socket-path=$ XDG_RUNTIME_DIR /microvm-%i-persistent \
 --shared-dir=%h/.local/share/microvm/vms/%i/persistent \
 --gid-map :995:%G:1: \
 --uid-map :1000:%U:1:

13 April 2024

Paul Tagliamonte: Domo Arigato, Mr. debugfs

Years ago, at what I think I remember was DebConf 15, I hacked for a while on debhelper to write build-ids to debian binary control files, so that the build-id (more specifically, the ELF note .note.gnu.build-id) wound up in the Debian apt archive metadata. I ve always thought this was super cool, and seeing as how Michael Stapelberg blogged some great pointers around the ecosystem, including the fancy new debuginfod service, and the find-dbgsym-packages helper, which uses these same headers, I don t think I m the only one. At work I ve been using a lot of rust, specifically, async rust using tokio. To try and work on my style, and to dig deeper into the how and why of the decisions made in these frameworks, I ve decided to hack up a project that I ve wanted to do ever since 2015 write a debug filesystem. Let s get to it.

Back to the Future Time to admit something. I really love Plan 9. It s just so good. So many ideas from Plan 9 are just so prescient, and everything just feels right. Not just right like, feels good like, correct. The bit that I ve always liked the most is 9p, the network protocol for serving a filesystem over a network. This leads to all sorts of fun programs, like the Plan 9 ftp client being a 9p server you mount the ftp server and access files like any other files. It s kinda like if fuse were more fully a part of how the operating system worked, but fuse is all running client-side. With 9p there s a single client, and different servers that you can connect to, which may be backed by a hard drive, remote resources over something like SFTP, FTP, HTTP or even purely synthetic. The interesting (maybe sad?) part here is that 9p wound up outliving Plan 9 in terms of adoption 9p is in all sorts of places folks don t usually expect. For instance, the Windows Subsystem for Linux uses the 9p protocol to share files between Windows and Linux. ChromeOS uses it to share files with Crostini, and qemu uses 9p (virtio-p9) to share files between guest and host. If you re noticing a pattern here, you d be right; for some reason 9p is the go-to protocol to exchange files between hypervisor and guest. Why? I have no idea, except maybe due to being designed well, simple to implement, and it s a lot easier to validate the data being shared and validate security boundaries. Simplicity has its value. As a result, there s a lot of lingering 9p support kicking around. Turns out Linux can even handle mounting 9p filesystems out of the box. This means that I can deploy a filesystem to my LAN or my localhost by running a process on top of a computer that needs nothing special, and mount it over the network on an unmodified machine unlike fuse, where you d need client-specific software to run in order to mount the directory. For instance, let s mount a 9p filesystem running on my localhost machine, serving requests on 127.0.0.1:564 (tcp) that goes by the name mountpointname to /mnt.
$ mount -t 9p \
-o trans=tcp,port=564,version=9p2000.u,aname=mountpointname \
127.0.0.1 \
/mnt
Linux will mount away, and attach to the filesystem as the root user, and by default, attach to that mountpoint again for each local user that attempts to use it. Nifty, right? I think so. The server is able to keep track of per-user access and authorization along with the host OS.

WHEREIN I STYX WITH IT Since I wanted to push myself a bit more with rust and tokio specifically, I opted to implement the whole stack myself, without third party libraries on the critical path where I could avoid it. The 9p protocol (sometimes called Styx, the original name for it) is incredibly simple. It s a series of client to server requests, which receive a server to client response. These are, respectively, T messages, which transmit a request to the server, which trigger an R message in response (Reply messages). These messages are TLV payload with a very straight forward structure so straight forward, in fact, that I was able to implement a working server off nothing more than a handful of man pages. Later on after the basics worked, I found a more complete spec page that contains more information about the unix specific variant that I opted to use (9P2000.u rather than 9P2000) due to the level of Linux specific support for the 9P2000.u variant over the 9P2000 protocol.

MR ROBOTO The backend stack over at zoo is rust and tokio running i/o for an HTTP and WebRTC server. I figured I d pick something fairly similar to write my filesystem with, since 9P can be implemented on basically anything with I/O. That means tokio tcp server bits, which construct and use a 9p server, which has an idiomatic Rusty API that partially abstracts the raw R and T messages, but not so much as to cause issues with hiding implementation possibilities. At each abstraction level, there s an escape hatch allowing someone to implement any of the layers if required. I called this framework arigato which can be found over on docs.rs and crates.io.
/// Simplified version of the arigato File trait; this isn't actually
/// the same trait; there's some small cosmetic differences. The
/// actual trait can be found at:
///
/// https://docs.rs/arigato/latest/arigato/server/trait.File.html
trait File  
/// OpenFile is the type returned by this File via an Open call.
 type OpenFile: OpenFile;
/// Return the 9p Qid for this file. A file is the same if the Qid is
 /// the same. A Qid contains information about the mode of the file,
 /// version of the file, and a unique 64 bit identifier.
 fn qid(&self) -> Qid;
/// Construct the 9p Stat struct with metadata about a file.
 async fn stat(&self) -> FileResult<Stat>;
/// Attempt to update the file metadata.
 async fn wstat(&mut self, s: &Stat) -> FileResult<()>;
/// Traverse the filesystem tree.
 async fn walk(&self, path: &[&str]) -> FileResult<(Option<Self>, Vec<Self>)>;
/// Request that a file's reference be removed from the file tree.
 async fn unlink(&mut self) -> FileResult<()>;
/// Create a file at a specific location in the file tree.
 async fn create(
&mut self,
name: &str,
perm: u16,
ty: FileType,
mode: OpenMode,
extension: &str,
) -> FileResult<Self>;
/// Open the File, returning a handle to the open file, which handles
 /// file i/o. This is split into a second type since it is genuinely
 /// unrelated -- and the fact that a file is Open or Closed can be
 /// handled by the  arigato  server for us.
 async fn open(&mut self, mode: OpenMode) -> FileResult<Self::OpenFile>;
 
/// Simplified version of the arigato OpenFile trait; this isn't actually
/// the same trait; there's some small cosmetic differences. The
/// actual trait can be found at:
///
/// https://docs.rs/arigato/latest/arigato/server/trait.OpenFile.html
trait OpenFile  
/// iounit to report for this file. The iounit reported is used for Read
 /// or Write operations to signal, if non-zero, the maximum size that is
 /// guaranteed to be transferred atomically.
 fn iounit(&self) -> u32;
/// Read some number of bytes up to  buf.len()  from the provided
 ///  offset  of the underlying file. The number of bytes read is
 /// returned.
 async fn read_at(
&mut self,
buf: &mut [u8],
offset: u64,
) -> FileResult<u32>;
/// Write some number of bytes up to  buf.len()  from the provided
 ///  offset  of the underlying file. The number of bytes written
 /// is returned.
 fn write_at(
&mut self,
buf: &mut [u8],
offset: u64,
) -> FileResult<u32>;
 

Thanks, decade ago paultag! Let s do it! Let s use arigato to implement a 9p filesystem we ll call debugfs that will serve all the debug files shipped according to the Packages metadata from the apt archive. We ll fetch the Packages file and construct a filesystem based on the reported Build-Id entries. For those who don t know much about how an apt repo works, here s the 2-second crash course on what we re doing. The first is to fetch the Packages file, which is specific to a binary architecture (such as amd64, arm64 or riscv64). That architecture is specific to a component (such as main, contrib or non-free). That component is specific to a suite, such as stable, unstable or any of its aliases (bullseye, bookworm, etc). Let s take a look at the Packages.xz file for the unstable-debug suite, main component, for all amd64 binaries.
$ curl \
https://deb.debian.org/debian-debug/dists/unstable-debug/main/binary-amd64/Packages.xz \
  unxz
This will return the Debian-style rfc2822-like headers, which is an export of the metadata contained inside each .deb file which apt (or other tools that can use the apt repo format) use to fetch information about debs. Let s take a look at the debug headers for the netlabel-tools package in unstable which is a package named netlabel-tools-dbgsym in unstable-debug.
Package: netlabel-tools-dbgsym
Source: netlabel-tools (0.30.0-1)
Version: 0.30.0-1+b1
Installed-Size: 79
Maintainer: Paul Tagliamonte <paultag@debian.org>
Architecture: amd64
Depends: netlabel-tools (= 0.30.0-1+b1)
Description: debug symbols for netlabel-tools
Auto-Built-Package: debug-symbols
Build-Ids: e59f81f6573dadd5d95a6e4474d9388ab2777e2a
Description-md5: a0e587a0cf730c88a4010f78562e6db7
Section: debug
Priority: optional
Filename: pool/main/n/netlabel-tools/netlabel-tools-dbgsym_0.30.0-1+b1_amd64.deb
Size: 62776
SHA256: 0e9bdb087617f0350995a84fb9aa84541bc4df45c6cd717f2157aa83711d0c60
So here, we can parse the package headers in the Packages.xz file, and store, for each Build-Id, the Filename where we can fetch the .deb at. Each .deb contains a number of files but we re only really interested in the files inside the .deb located at or under /usr/lib/debug/.build-id/, which you can find in debugfs under rfc822.rs. It s crude, and very single-purpose, but I m feeling a bit lazy.

Who needs dpkg?! For folks who haven t seen it yet, a .deb file is a special type of .ar file, that contains (usually) three files inside debian-binary, control.tar.xz and data.tar.xz. The core of an .ar file is a fixed size (60 byte) entry header, followed by the specified size number of bytes.
[8 byte .ar file magic]
[60 byte entry header]
[N bytes of data]
[60 byte entry header]
[N bytes of data]
[60 byte entry header]
[N bytes of data]
...
First up was to implement a basic ar parser in ar.rs. Before we get into using it to parse a deb, as a quick diversion, let s break apart a .deb file by hand something that is a bit of a rite of passage (or at least it used to be? I m getting old) during the Debian nm (new member) process, to take a look at where exactly the .debug file lives inside the .deb file.
$ ar x netlabel-tools-dbgsym_0.30.0-1+b1_amd64.deb
$ ls
control.tar.xz debian-binary
data.tar.xz netlabel-tools-dbgsym_0.30.0-1+b1_amd64.deb
$ tar --list -f data.tar.xz   grep '.debug$'
./usr/lib/debug/.build-id/e5/9f81f6573dadd5d95a6e4474d9388ab2777e2a.debug
Since we know quite a bit about the structure of a .deb file, and I had to implement support from scratch anyway, I opted to implement a (very!) basic debfile parser using HTTP Range requests. HTTP Range requests, if supported by the server (denoted by a accept-ranges: bytes HTTP header in response to an HTTP HEAD request to that file) means that we can add a header such as range: bytes=8-68 to specifically request that the returned GET body be the byte range provided (in the above case, the bytes starting from byte offset 8 until byte offset 68). This means we can fetch just the ar file entry from the .deb file until we get to the file inside the .deb we are interested in (in our case, the data.tar.xz file) at which point we can request the body of that file with a final range request. I wound up writing a struct to handle a read_at-style API surface in hrange.rs, which we can pair with ar.rs above and start to find our data in the .deb remotely without downloading and unpacking the .deb at all. After we have the body of the data.tar.xz coming back through the HTTP response, we get to pipe it through an xz decompressor (this kinda sucked in Rust, since a tokio AsyncRead is not the same as an http Body response is not the same as std::io::Read, is not the same as an async (or sync) Iterator is not the same as what the xz2 crate expects; leading me to read blocks of data to a buffer and stuff them through the decoder by looping over the buffer for each lzma2 packet in a loop), and tarfile parser (similarly troublesome). From there we get to iterate over all entries in the tarfile, stopping when we reach our file of interest. Since we can t seek, but gdb needs to, we ll pull it out of the stream into a Cursor<Vec<u8>> in-memory and pass a handle to it back to the user. From here on out its a matter of gluing together a File traited struct in debugfs, and serving the filesystem over TCP using arigato. Done deal!

A quick diversion about compression I was originally hoping to avoid transferring the whole tar file over the network (and therefore also reading the whole debug file into ram, which objectively sucks), but quickly hit issues with figuring out a way around seeking around an xz file. What s interesting is xz has a great primitive to solve this specific problem (specifically, use a block size that allows you to seek to the block as close to your desired seek position just before it, only discarding at most block size - 1 bytes), but data.tar.xz files generated by dpkg appear to have a single mega-huge block for the whole file. I don t know why I would have expected any different, in retrospect. That means that this now devolves into the base case of How do I seek around an lzma2 compressed data stream ; which is a lot more complex of a question. Thankfully, notoriously brilliant tianon was nice enough to introduce me to Jon Johnson who did something super similar adapted a technique to seek inside a compressed gzip file, which lets his service oci.dag.dev seek through Docker container images super fast based on some prior work such as soci-snapshotter, gztool, and zran.c. He also pulled this party trick off for apk based distros over at apk.dag.dev, which seems apropos. Jon was nice enough to publish a lot of his work on this specifically in a central place under the name targz on his GitHub, which has been a ton of fun to read through. The gist is that, by dumping the decompressor s state (window of previous bytes, in-memory data derived from the last N-1 bytes) at specific checkpoints along with the compressed data stream offset in bytes and decompressed offset in bytes, one can seek to that checkpoint in the compressed stream and pick up where you left off creating a similar block mechanism against the wishes of gzip. It means you d need to do an O(n) run over the file, but every request after that will be sped up according to the number of checkpoints you ve taken. Given the complexity of xz and lzma2, I don t think this is possible for me at the moment especially given most of the files I ll be requesting will not be loaded from again especially when I can just cache the debug header by Build-Id. I want to implement this (because I m generally curious and Jon has a way of getting someone excited about compression schemes, which is not a sentence I thought I d ever say out loud), but for now I m going to move on without this optimization. Such a shame, since it kills a lot of the work that went into seeking around the .deb file in the first place, given the debian-binary and control.tar.gz members are so small.

The Good First, the good news right? It works! That s pretty cool. I m positive my younger self would be amused and happy to see this working; as is current day paultag. Let s take debugfs out for a spin! First, we need to mount the filesystem. It even works on an entirely unmodified, stock Debian box on my LAN, which is huge. Let s take it for a spin:
$ mount \
-t 9p \
-o trans=tcp,version=9p2000.u,aname=unstable-debug \
192.168.0.2 \
/usr/lib/debug/.build-id/
And, let s prove to ourselves that this actually mounted before we go trying to use it:
$ mount   grep build-id
192.168.0.2 on /usr/lib/debug/.build-id type 9p (rw,relatime,aname=unstable-debug,access=user,trans=tcp,version=9p2000.u,port=564)
Slick. We ve got an open connection to the server, where our host will keep a connection alive as root, attached to the filesystem provided in aname. Let s take a look at it.
$ ls /usr/lib/debug/.build-id/
00 0d 1a 27 34 41 4e 5b 68 75 82 8E 9b a8 b5 c2 CE db e7 f3
01 0e 1b 28 35 42 4f 5c 69 76 83 8f 9c a9 b6 c3 cf dc E7 f4
02 0f 1c 29 36 43 50 5d 6a 77 84 90 9d aa b7 c4 d0 dd e8 f5
03 10 1d 2a 37 44 51 5e 6b 78 85 91 9e ab b8 c5 d1 de e9 f6
04 11 1e 2b 38 45 52 5f 6c 79 86 92 9f ac b9 c6 d2 df ea f7
05 12 1f 2c 39 46 53 60 6d 7a 87 93 a0 ad ba c7 d3 e0 eb f8
06 13 20 2d 3a 47 54 61 6e 7b 88 94 a1 ae bb c8 d4 e1 ec f9
07 14 21 2e 3b 48 55 62 6f 7c 89 95 a2 af bc c9 d5 e2 ed fa
08 15 22 2f 3c 49 56 63 70 7d 8a 96 a3 b0 bd ca d6 e3 ee fb
09 16 23 30 3d 4a 57 64 71 7e 8b 97 a4 b1 be cb d7 e4 ef fc
0a 17 24 31 3e 4b 58 65 72 7f 8c 98 a5 b2 bf cc d8 E4 f0 fd
0b 18 25 32 3f 4c 59 66 73 80 8d 99 a6 b3 c0 cd d9 e5 f1 fe
0c 19 26 33 40 4d 5a 67 74 81 8e 9a a7 b4 c1 ce da e6 f2 ff
Outstanding. Let s try using gdb to debug a binary that was provided by the Debian archive, and see if it ll load the ELF by build-id from the right .deb in the unstable-debug suite:
$ gdb -q /usr/sbin/netlabelctl
Reading symbols from /usr/sbin/netlabelctl...
Reading symbols from /usr/lib/debug/.build-id/e5/9f81f6573dadd5d95a6e4474d9388ab2777e2a.debug...
(gdb)
Yes! Yes it will!
$ file /usr/lib/debug/.build-id/e5/9f81f6573dadd5d95a6e4474d9388ab2777e2a.debug
/usr/lib/debug/.build-id/e5/9f81f6573dadd5d95a6e4474d9388ab2777e2a.debug: ELF 64-bit LSB shared object, x86-64, version 1 (SYSV), dynamically linked, interpreter *empty*, BuildID[sha1]=e59f81f6573dadd5d95a6e4474d9388ab2777e2a, for GNU/Linux 3.2.0, with debug_info, not stripped

The Bad Linux s support for 9p is mainline, which is great, but it s not robust. Network issues or server restarts will wedge the mountpoint (Linux can t reconnect when the tcp connection breaks), and things that work fine on local filesystems get translated in a way that causes a lot of network chatter for instance, just due to the way the syscalls are translated, doing an ls, will result in a stat call for each file in the directory, even though linux had just got a stat entry for every file while it was resolving directory names. On top of that, Linux will serialize all I/O with the server, so there s no concurrent requests for file information, writes, or reads pending at the same time to the server; and read and write throughput will degrade as latency increases due to increasing round-trip time, even though there are offsets included in the read and write calls. It works well enough, but is frustrating to run up against, since there s not a lot you can do server-side to help with this beyond implementing the 9P2000.L variant (which, maybe is worth it).

The Ugly Unfortunately, we don t know the file size(s) until we ve actually opened the underlying tar file and found the correct member, so for most files, we don t know the real size to report when getting a stat. We can t parse the tarfiles for every stat call, since that d make ls even slower (bummer). Only hiccup is that when I report a filesize of zero, gdb throws a bit of a fit; let s try with a size of 0 to start:
$ ls -lah /usr/lib/debug/.build-id/e5/9f81f6573dadd5d95a6e4474d9388ab2777e2a.debug
-r--r--r-- 1 root root 0 Dec 31 1969 /usr/lib/debug/.build-id/e5/9f81f6573dadd5d95a6e4474d9388ab2777e2a.debug
$ gdb -q /usr/sbin/netlabelctl
Reading symbols from /usr/sbin/netlabelctl...
Reading symbols from /usr/lib/debug/.build-id/e5/9f81f6573dadd5d95a6e4474d9388ab2777e2a.debug...
warning: Discarding section .note.gnu.build-id which has a section size (24) larger than the file size [in module /usr/lib/debug/.build-id/e5/9f81f6573dadd5d95a6e4474d9388ab2777e2a.debug]
[...]
This obviously won t work since gdb will throw away all our hard work because of stat s output, and neither will loading the real size of the underlying file. That only leaves us with hardcoding a file size and hope nothing else breaks significantly as a result. Let s try it again:
$ ls -lah /usr/lib/debug/.build-id/e5/9f81f6573dadd5d95a6e4474d9388ab2777e2a.debug
-r--r--r-- 1 root root 954M Dec 31 1969 /usr/lib/debug/.build-id/e5/9f81f6573dadd5d95a6e4474d9388ab2777e2a.debug
$ gdb -q /usr/sbin/netlabelctl
Reading symbols from /usr/sbin/netlabelctl...
Reading symbols from /usr/lib/debug/.build-id/e5/9f81f6573dadd5d95a6e4474d9388ab2777e2a.debug...
(gdb)
Much better. I mean, terrible but better. Better for now, anyway.

Kilroy was here Do I think this is a particularly good idea? I mean; kinda. I m probably going to make some fun 9p arigato-based filesystems for use around my LAN, but I don t think I ll be moving to use debugfs until I can figure out how to ensure the connection is more resilient to changing networks, server restarts and fixes on i/o performance. I think it was a useful exercise and is a pretty great hack, but I don t think this ll be shipping anywhere anytime soon. Along with me publishing this post, I ve pushed up all my repos; so you should be able to play along at home! There s a lot more work to be done on arigato; but it does handshake and successfully export a working 9P2000.u filesystem. Check it out on on my github at arigato, debugfs and also on crates.io and docs.rs. At least I can say I was here and I got it working after all these years.

8 April 2024

Bastian Blank: Python dataclasses for Deb822 format

Python includes some helping support for classes that are designed to just hold some data and not much more: Data Classes. It uses plain Python type definitions to specify what you can have and some further information for every field. This will then generate you some useful methods, like __init__ and __repr__, but on request also more. But given that those type definitions are available to other code, a lot more can be done. There exists several separate packages to work on data classes. For example you can have data validation from JSON with dacite. But Debian likes a pretty strange format usually called Deb822, which is in fact derived from the RFC 822 format of e-mail messages. Those files includes single messages with a well known format. So I'd like to introduce some Deb822 format support for Python Data Classes. For now the code resides in the Debian Cloud tool. Usage Setup It uses the standard data classes support and several helper functions. Also you need to enable support for postponed evaluation of annotations.
from __future__ import annotations
from dataclasses import dataclass
from dataclasses_deb822 import read_deb822, field_deb822
Class definition start Data classes are just normal classes, just with a decorator.
@dataclass
class Package:
Field definitions You need to specify the exact key to be used for this field.
    package: str = field_deb822('Package')
    version: str = field_deb822('Version')
    arch: str = field_deb822('Architecture')
Default values are also supported.
    multi_arch: Optional[str] = field_deb822(
        'Multi-Arch',
        default=None,
    )
Reading files
for p in read_deb822(Package, sys.stdin, ignore_unknown=True):
    print(p)
Full example
from __future__ import annotations
from dataclasses import dataclass
from debian_cloud_images.utils.dataclasses_deb822 import read_deb822, field_deb822
from typing import Optional
import sys
@dataclass
class Package:
    package: str = field_deb822('Package')
    version: str = field_deb822('Version')
    arch: str = field_deb822('Architecture')
    multi_arch: Optional[str] = field_deb822(
        'Multi-Arch',
        default=None,
    )
for p in read_deb822(Package, sys.stdin, ignore_unknown=True):
    print(p)
Known limitations

10 March 2024

Thorsten Alteholz: My Debian Activities in February 2024

FTP master This month I accepted 242 and rejected 42 packages. The overall number of packages that got accepted was 251.

This was just a short month and the weather outside was not really motivating. I hope it will be better in March. Debian LTS This was my hundred-sixteenth month that I did some work for the Debian LTS initiative, started by Raphael Hertzog at Freexian. During my allocated time I uploaded: I also started to work on qtbase-opensource-src (an update is needed for ELTS, so an LTS update seems to be appropriate as well, especially as there are postponed CVE). Debian ELTS This month was the sixty-seventth ELTS month. During my allocated time I uploaded: The upload of bind9 was a bit exciting, but all occuring issues with the new upload workflow could be quickly fixed by Helmut and the packages finally reached their destination. I wonder why it is always me who stumbles upon special cases? This month I also worked on the Jessie and Stretch updates for exim4. I also started to work on an update for qtbase-opensource-src in Stretch (and LTS and other releases as well). Debian Printing This month I uploaded new upstream versions of: This work is generously funded by Freexian! Debian Matomo I started a new team debian-matomo-maintainers. Within this team all matomo related packages should be handled. PHP PEAR or PECL packages shall be still maintained in their corresponding teams. This month I uploaded: This work is generously funded by Freexian! Debian Astro This month I uploaded a new upstream version of: Debian IoT This month I uploaded new upstream versions of:

9 March 2024

Valhalla's Things: Elastic Neck Top Two: MOAR Ruffles

Posted on March 9, 2024
Tags: madeof:atoms, craft:sewing, FreeSoftWear
A woman wearing a white top with a wide neck with ruffles and puffy sleeves that are gathered at the cuff. The top is tucked in the trousers to gather the fullness at the waist. After making my Elastic Neck Top I knew I wanted to make another one less constrained by the amount of available fabric. I had a big cut of white cotton voile, I bought some more swimsuit elastic, and I also had a spool of n 100 sewing cotton, but then I postponed the project for a while I was working on other things. Then FOSDEM 2024 arrived, I was going to remote it, and I was working on my Augusta Stays, but I knew that in the middle of FOSDEM I risked getting to the stage where I needed to leave the computer to try the stays on: not something really compatible with the frenetic pace of a FOSDEM weekend, even one spent at home. I needed a backup project1, and this was perfect: I already had everything I needed, the pattern and instructions were already on my site (so I didn t need to take pictures while working), and it was mostly a lot of straight seams, perfect while watching conference videos. So, on the Friday before FOSDEM I cut all of the pieces, then spent three quarters of FOSDEM on the stays, and when I reached the point where I needed to stop for a fit test I started on the top. Like the first one, everything was sewn by hand, and one week after I had started everything was assembled, except for the casings for the elastic at the neck and cuffs, which required about 10 km of sewing, and even if it was just a running stitch it made me want to reconsider my lifestyle choices a few times: there was really no reason for me not to do just those seams by machine in a few minutes. Instead I kept sewing by hand whenever I had time for it, and on the next weekend it was ready. We had a rare day of sun during the weekend, so I wore my thermal underwear, some other layer, a scarf around my neck, and went outside with my SO to have a batch of pictures taken (those in the jeans posts, and others for a post I haven t written yet. Have I mentioned I have a backlog?). And then the top went into the wardrobe, and it will come out again when the weather will be a bit warmer. Or maybe it will be used under the Augusta Stays, since I don t have a 1700 chemise yet, but that requires actually finishing them. The pattern for this project was already online, of course, but I ve added a picture of the casing to the relevant section, and everything is as usual #FreeSoftWear.

  1. yes, I could have worked on some knitting WIP, but lately I m more in a sewing mood.

11 February 2024

Marco d'Itri: Extending access to the systemd RuntimeDirectory with a POSIX ACL

inn2 uses ephemeral UNIX domain sockets in /run/news/ to communicate with the ctlinnd program. Since the directory is only writeable by the "news" user, other unprivileged users are not able to use the command. I solved this by extending the inn2.service systemd unit with a drop-in file which uses setfacl to give access to my user "md" to the RuntimeDirectory created by systemd. This is the content of /etc/systemd/system/inn2.service.d/md-ctlinnd.conf:
[Service]
# innd will change the permissions of /run/news/ when started: without
# creating it now with mode 0775 then that will change the ACL mask.
RuntimeDirectoryMode=0775
# allow user md to run ctlinnd(8), which creates sockets in /run/news/
ExecStartPost=/usr/bin/setfacl --modify user:md:rwx $RUNTIME_DIRECTORY
The non-obvious issue here is that the innd daemon on startup will change the directory permissions in a way which sets a more restrictive (non group-writeable) ACL mask, and this would make the newly created user ACL ineffective. The solution is to create the directory group-writeable from start. (Beware: this creates a trivial privileges escalation from md to news.)

31 January 2024

Valhalla's Things: Macrame Bookbag

Posted on January 31, 2024
Tags: madeof:atoms, craft:macrame
a macrame bag in ~3 mm ecru yarn, with very irregular knots of different types, holding a book with a blue cover. The bottom part has a rigid single layer triangle and a fringe. 
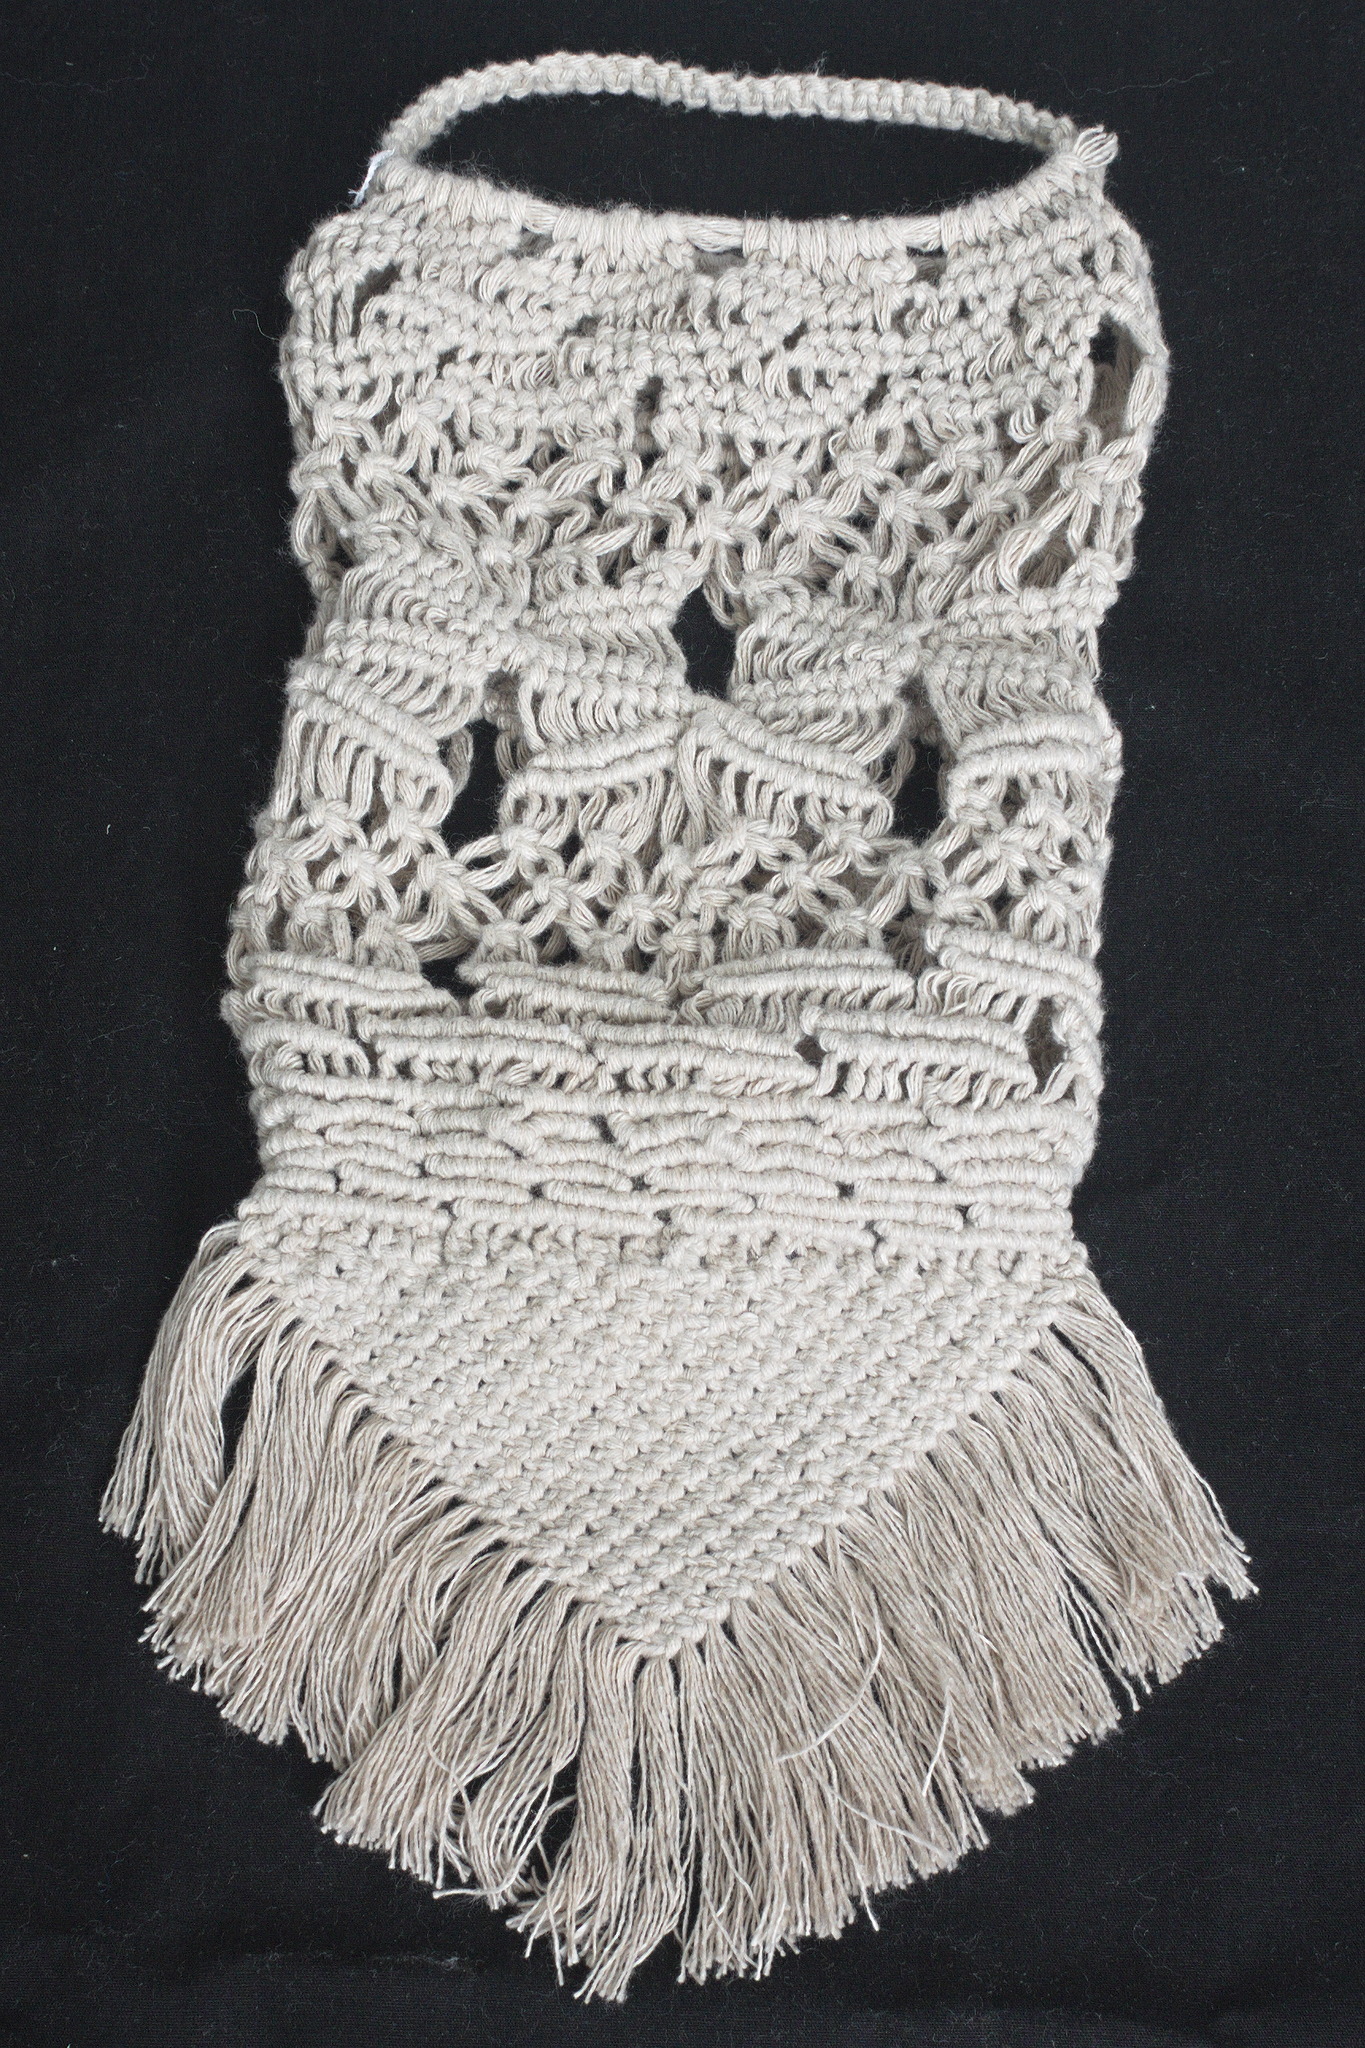
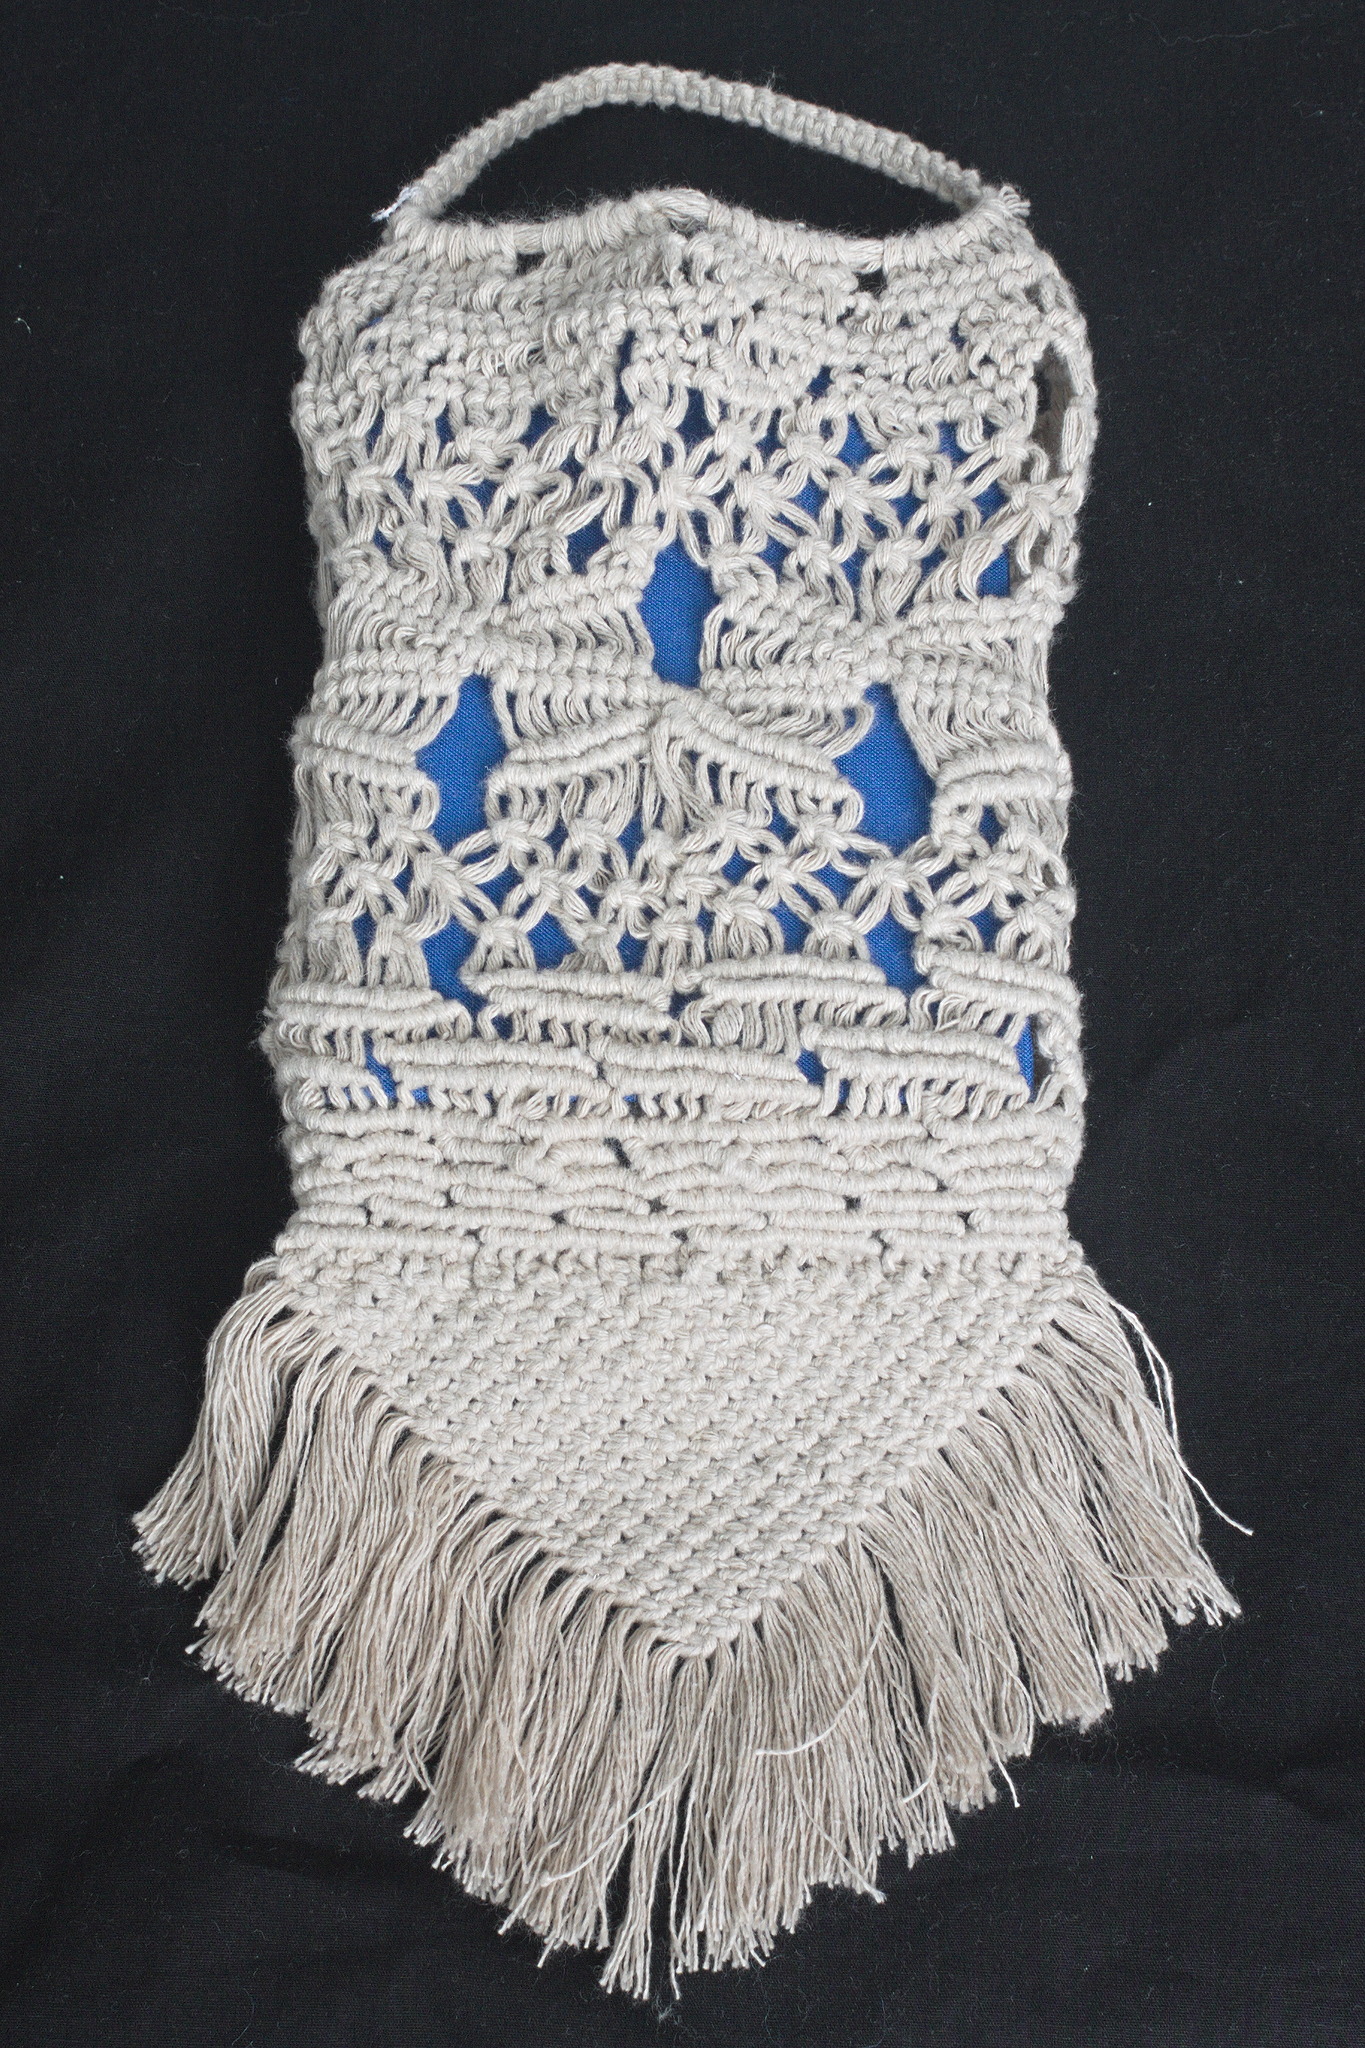
In late 2022 I prepared a batch of drawstring backpacks in cotton as reusable wrappers for Christmas gifts; however I didn t know what cord to use, didn t want to use paracord, and couldn t find anything that looked right in the local shops. With Christmas getting dangerously closer, I visited a craft materials website for unrelated reasons, found out that they sold macrame cords, and panic-bought a few types in the hope that at least one would work for the backpacks. I got lucky, and my first choice fitted just fine, and I was able to finish the backpacks in time for the holidays. And then I had a box full of macrame cords in various sizes and types that weren t the best match for the drawstring in a backpack, and no real use for them. I don t think I had ever done macrame, but I have made friendship bracelets in primary school, and a few Friendship Bracelets, But For Real Men So We Call Them Survival Bracelets(TM) more recently, so I didn t bother reading instructions or tutorials online, I just grabbed the Ashley Book of Knots to refresh myself on the knots used, and decided to make myself a small bag for an A6 book. I choose one of the thin, ~3 mm cords, Tre Sfere Macram Barbante, of which there was plenty, so that I could stumble around with no real plan. A loop of four cords, with a handle made of square knots that keeps it together. I started by looping 5 m of cord, making iirc 2 rounds of a loop about the right size to go around the book with a bit of ease, then used the ends as filler cords for a handle, wrapped them around the loop and worked square knots all over them to make a handle. Then I cut the rest of the cord into 40 pieces, each 4 m long, because I had no idea how much I was going to need (spoiler: I successfully got it wrong :D ) I joined the cords to the handle with lark head knots, 20 per side, and then I started knotting without a plan or anything, alternating between hitches and square knots, sometimes close together and sometimes leaving some free cord between them. And apparently I also completely forgot to take in-progress pictures. I kept working on this for a few months, knotting a row or two now and then, until the bag was long enough for the book, then I closed the bottom by taking one cord from the front and the corresponding on the back, knotting them together (I don t remember how) and finally I made a rigid triangle of tight square knots with all of the cords, progressively leaving out a cord from each side, and cutting it in a fringe. I then measured the remaining cords, and saw that the shortest ones were about a meter long, but the longest ones were up to 3 meters, I could have cut them much shorter at the beginning (and maybe added a couple more cords). The leftovers will be used, in some way. And then I postponed taking pictures of the finished object for a few months. The same bag, empty and showing how the sides aren't straight. Now the result is functional, but I have to admit it is somewhat ugly: not as much for the lack of a pattern (that I think came out quite fine) but because of how irregular the knots are; I m not confident that the next time I will be happy with their regularity, either, but I hope I will improve, and that s one important thing. And the other important thing is: I enjoyed making this, even if I kept interrupting the work, and I think that there may be some other macrame in my future.

24 January 2024

Dirk Eddelbuettel: RApiDatetime 0.0.9 on CRAN: Maintenance

A new maintenance release of our RApiDatetime package is now on CRAN RApiDatetime provides a number of entry points for C-level functions of the R API for Date and Datetime calculations. The functions asPOSIXlt and asPOSIXct convert between long and compact datetime representation, formatPOSIXlt and Rstrptime convert to and from character strings, and POSIXlt2D and D2POSIXlt convert between Date and POSIXlt datetime. Lastly, asDatePOSIXct converts to a date type. All these functions are rather useful, but were not previously exported by R for C-level use by other packages. Which this package aims to change. This release responds to a CRAN request to clean up empty macros and sections in Rd files. Moreover, because the windows portion of the corresponding R-internal code underwent some changes, our (#ifdef conditional) coverage here is a little behind and created a warning under the newer UCRT setup. So starting with this release we are back to OS_type: unix meaning there will not be any Windows builds at CRAN. If you would like that to change, and ideally can work in the Windows portion, do not hesitate to get in touch. Details of the release follow based on the NEWS file.

Changes in RApiDatetime version 0.0.9 (2024-01-23)
  • Replace auto-generated stale RApitDatetime-package.Rd with macro-filled stanza to satisfy CRAN request.

Courtesy of my CRANberries, there is also a diffstat report for this release. If you like this or other open-source work I do, you can sponsor me at GitHub.

This post by Dirk Eddelbuettel originated on his Thinking inside the box blog. Please report excessive re-aggregation in third-party for-profit settings.

7 January 2024

Valhalla's Things: A Corset or Two

Posted on January 7, 2024
Tags: madeof:atoms, craft:sewing, period:victorian, FreeSoftWear
a black coutil midbust corset, from a 3/4 front view, showing the busk closure, a waist tape and external boning channels made of the same twill tape and placed about 1-2 cm from each other at waist level. 
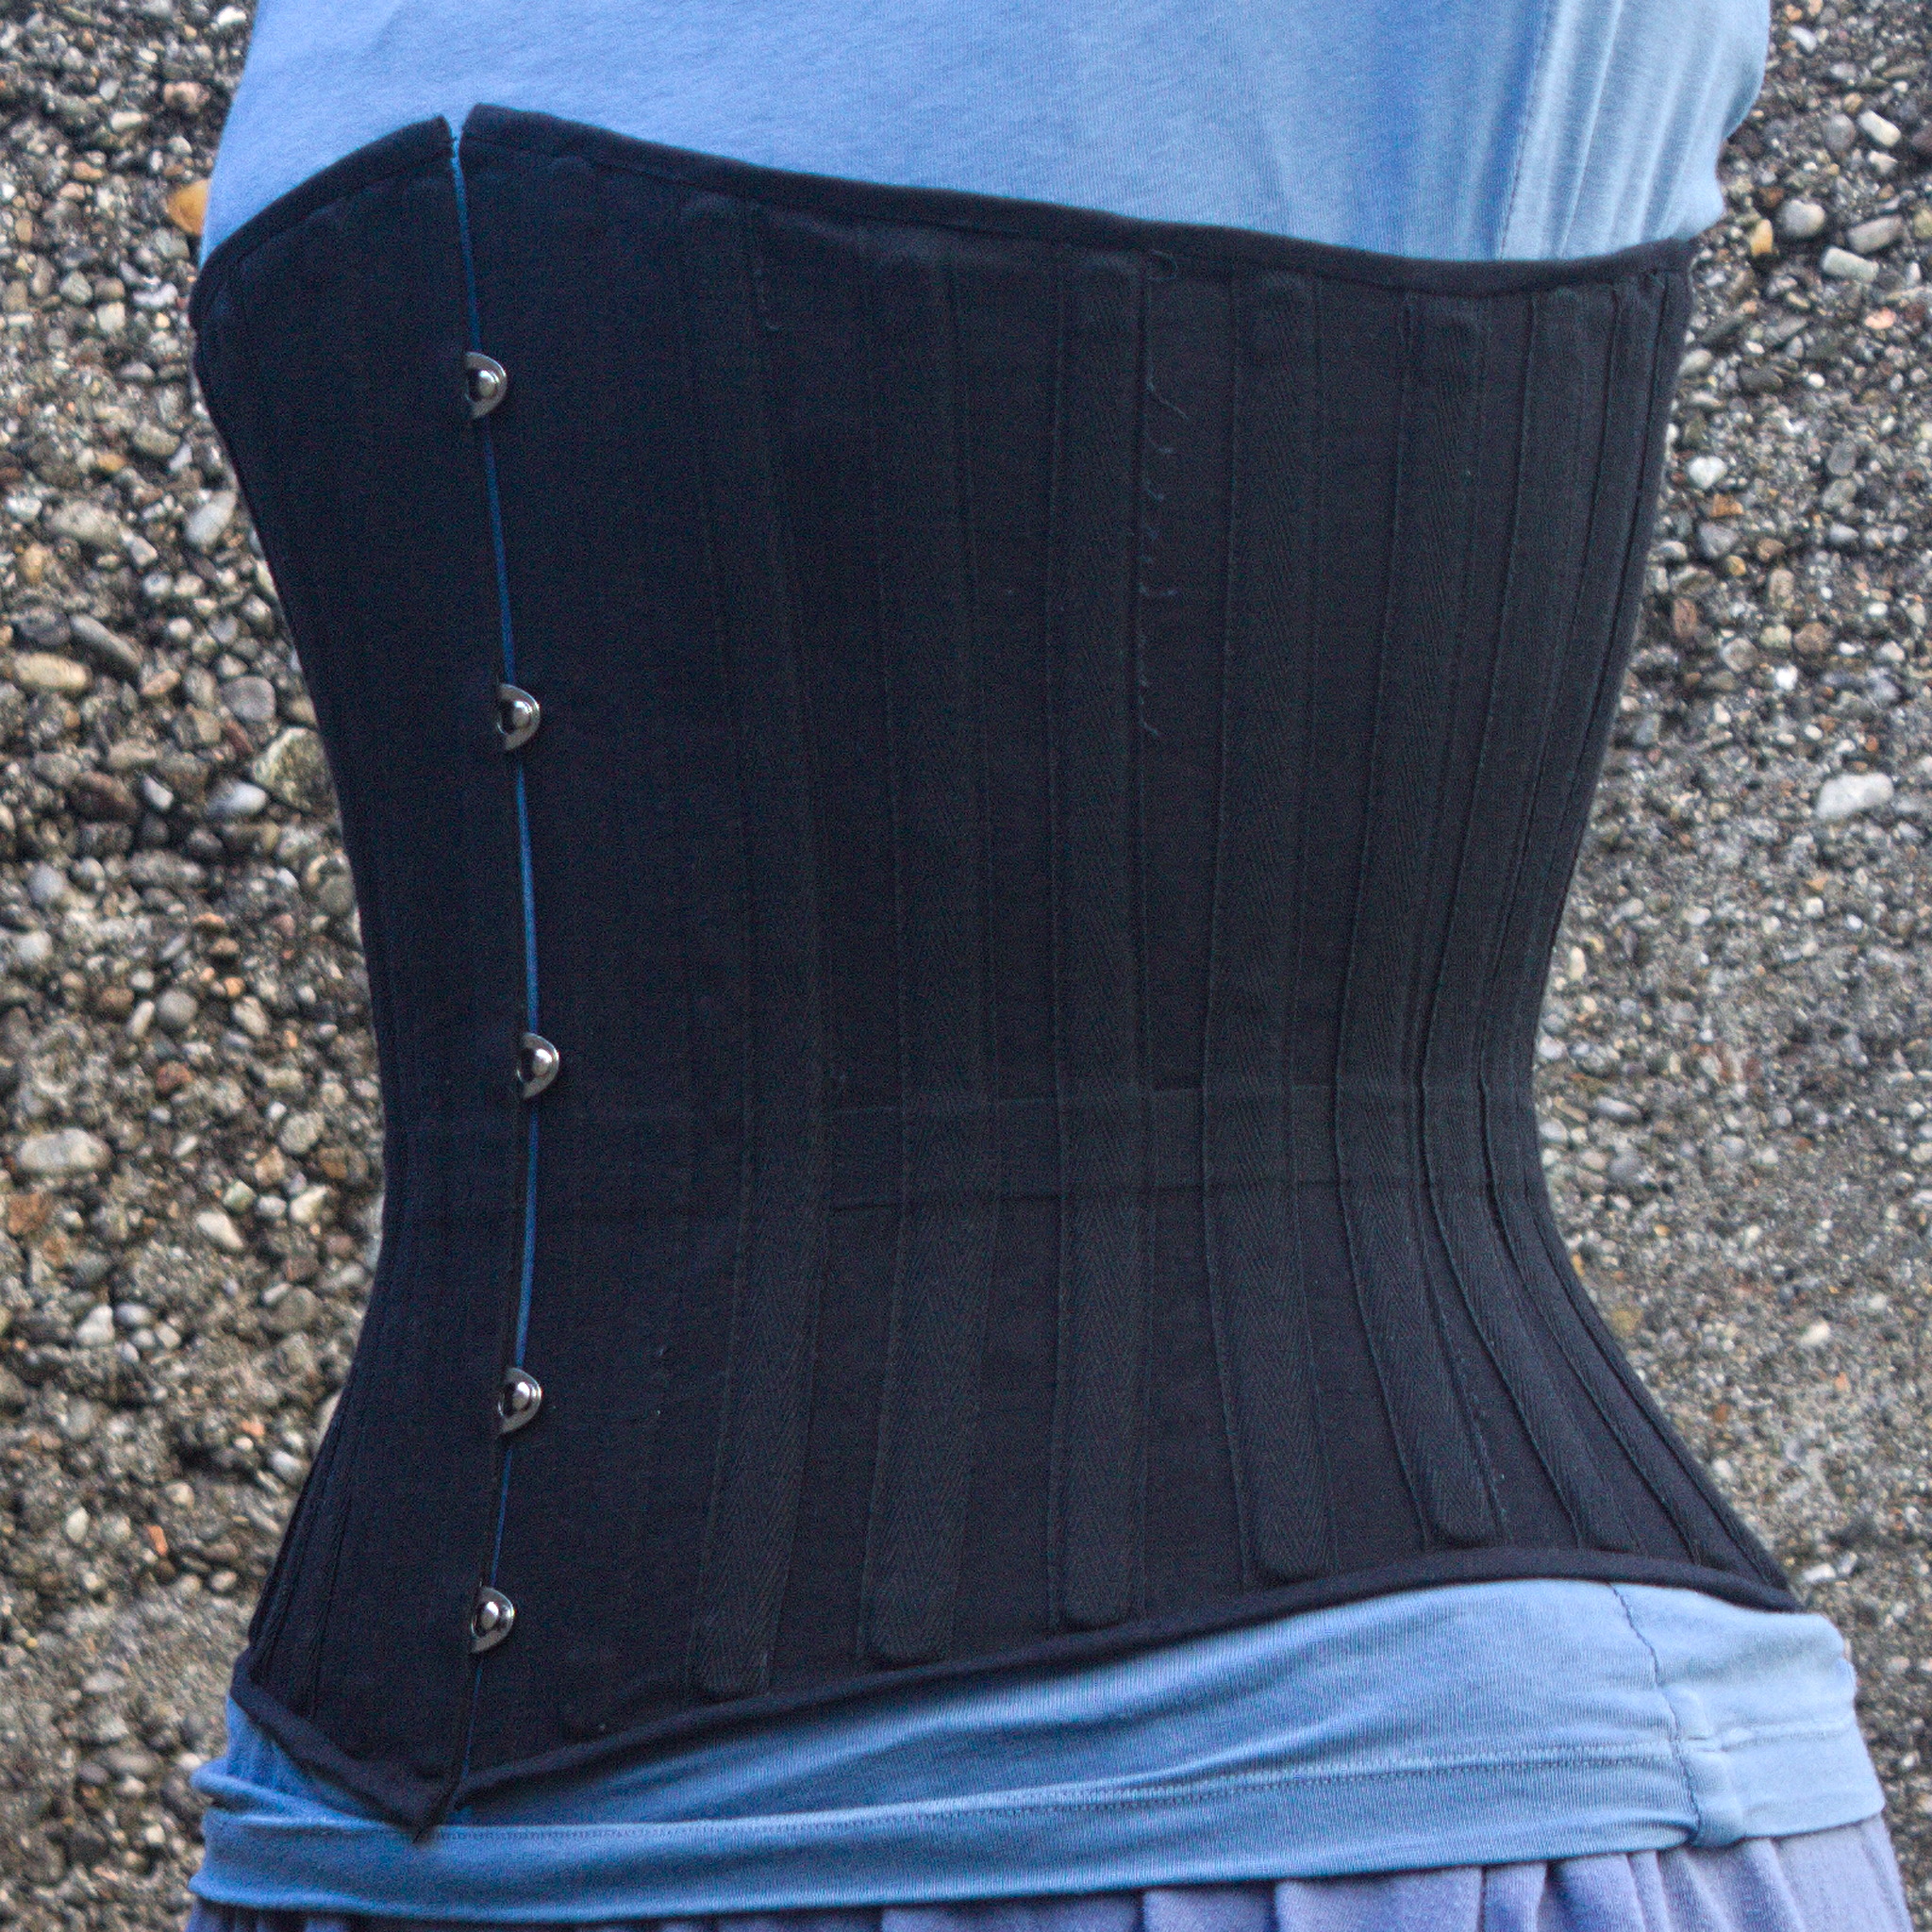
CW for body size change mentions I needed a corset, badly. Years ago I had a chance to have my measurements taken by a former professional corset maker and then a lesson in how to draft an underbust corset, and that lead to me learning how nice wearing a well-fitted corset feels. Later I tried to extend that pattern up for a midbust corset, with success. And then my body changed suddenly, and I was no longer able to wear either of those, and after a while I started missing them. Since my body was still changing (if no longer drastically so), and I didn t want to use expensive materials for something that had a risk of not fitting after too little time, I decided to start by making myself a summer lightweight corset in aida cloth and plastic boning (for which I had already bought materials). It fitted, but not as well as the first two ones, and I ve worn it quite a bit. I still wanted back the feeling of wearing a comfy, heavy contraption of coutil and steel, however. After a lot of procrastination I redrafted a new pattern, scrapped everything, tried again, had my measurements taken by a dressmaker [#dressmaker], put them in the draft, cut a first mock-up in cheap cotton, fixed the position of a seam, did a second mock-up in denim [#jeans] from an old pair of jeans, and then cut into the cheap herringbone coutil I was planning to use. And that s when I went to see which one of the busks in my stash would work, and realized that I had used a wrong vertical measurement and the front of the corset was way too long for a midbust corset. a corset busk basted to a mock-up with scraps of fabric between each stud / loop. 
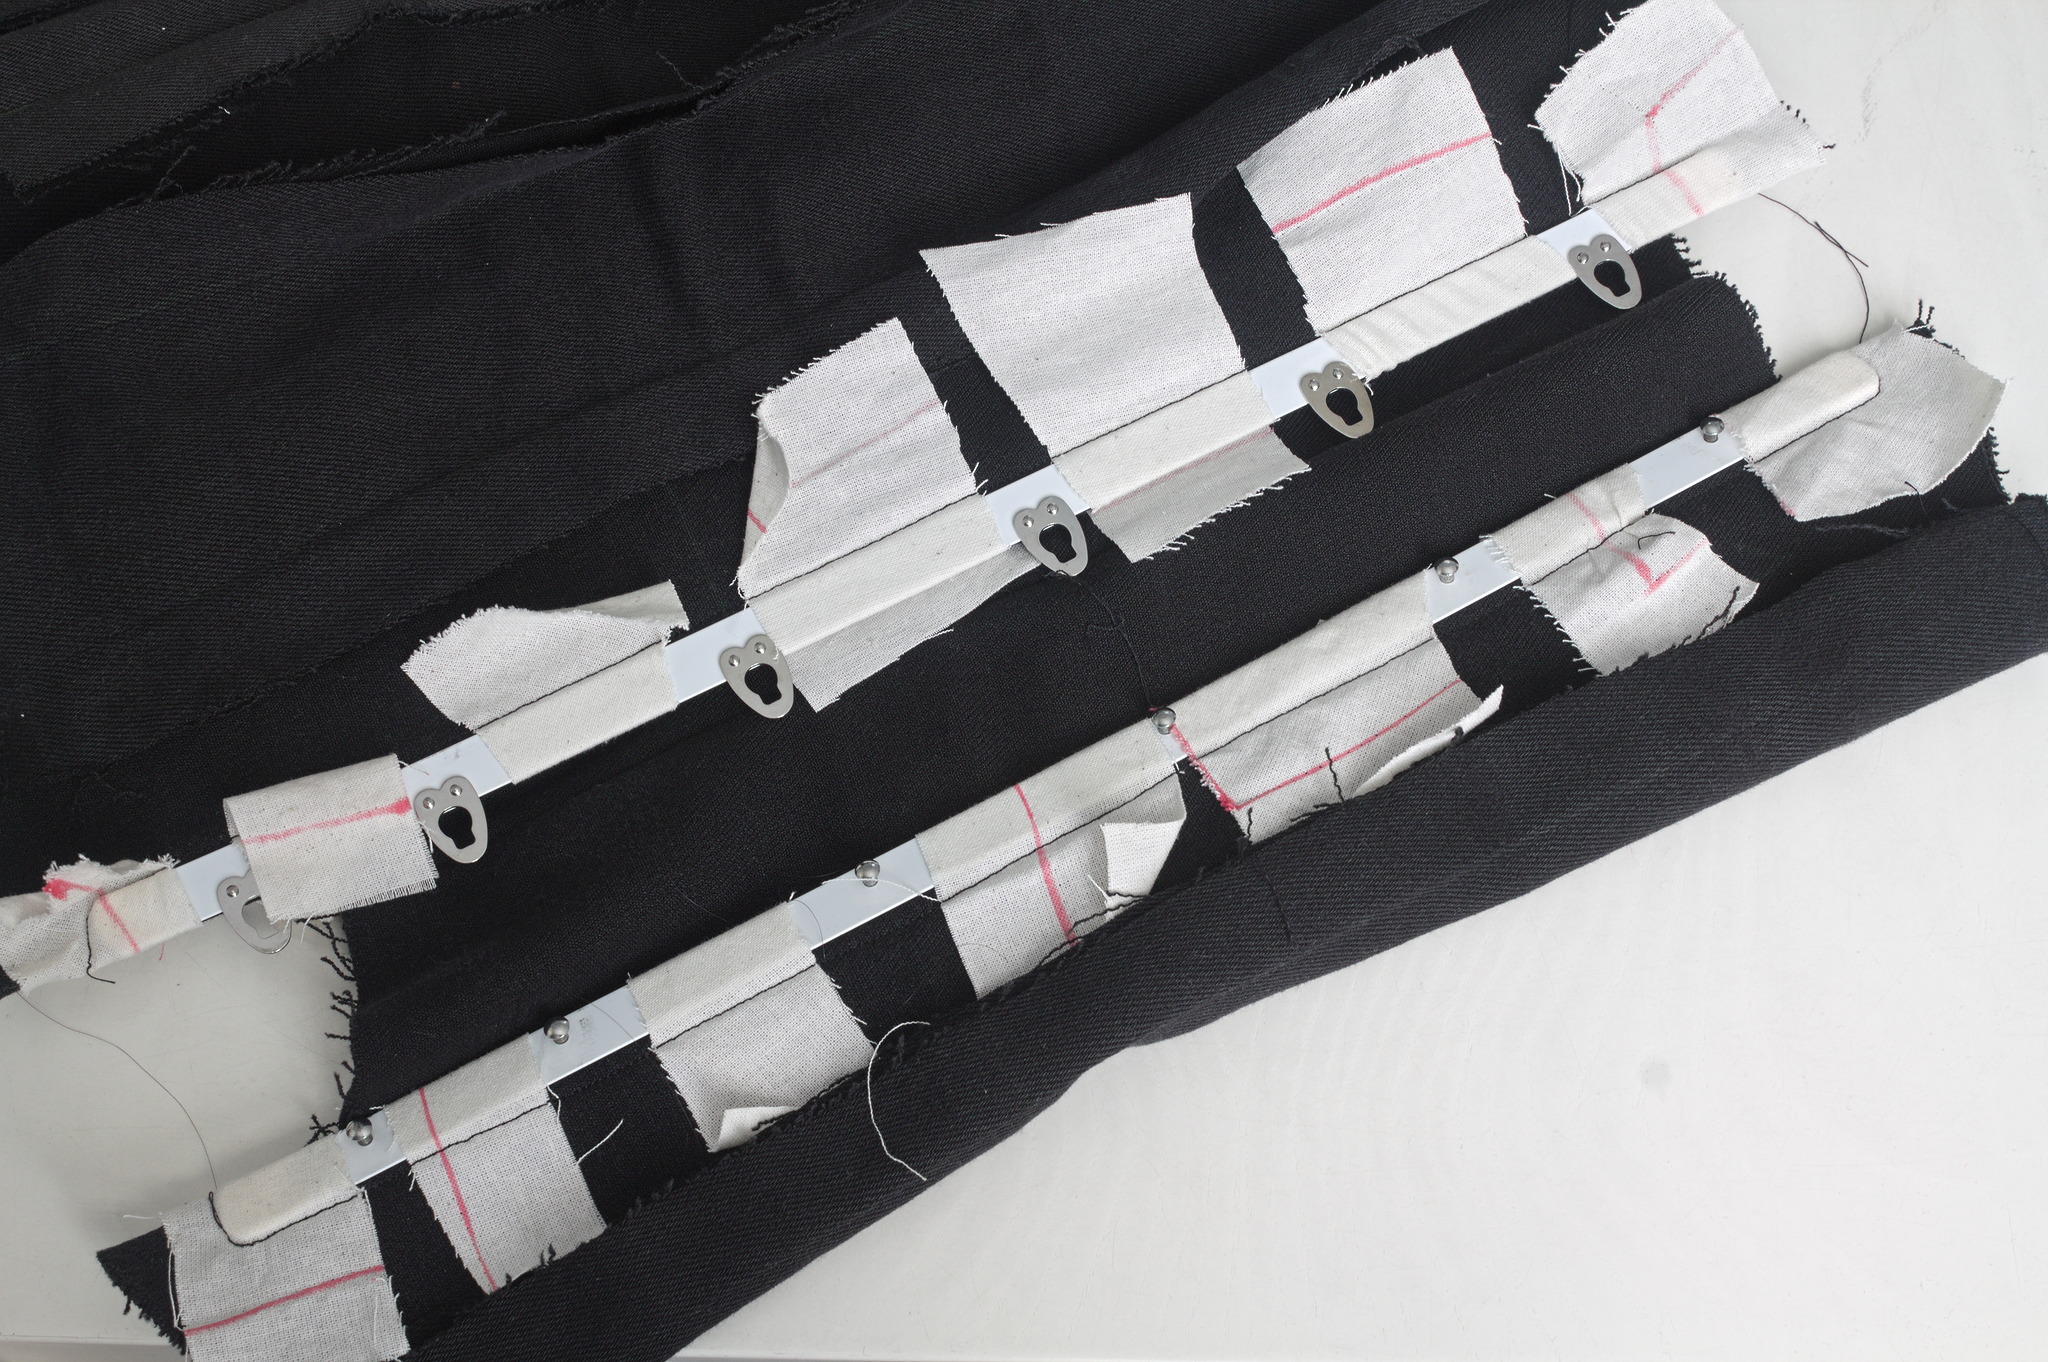
Luckily I also had a few longer busks, I basted one to the denim mock up and tried to wear it for a few hours, to see if it was too long to be comfortable. It was just a bit, on the bottom, which could be easily
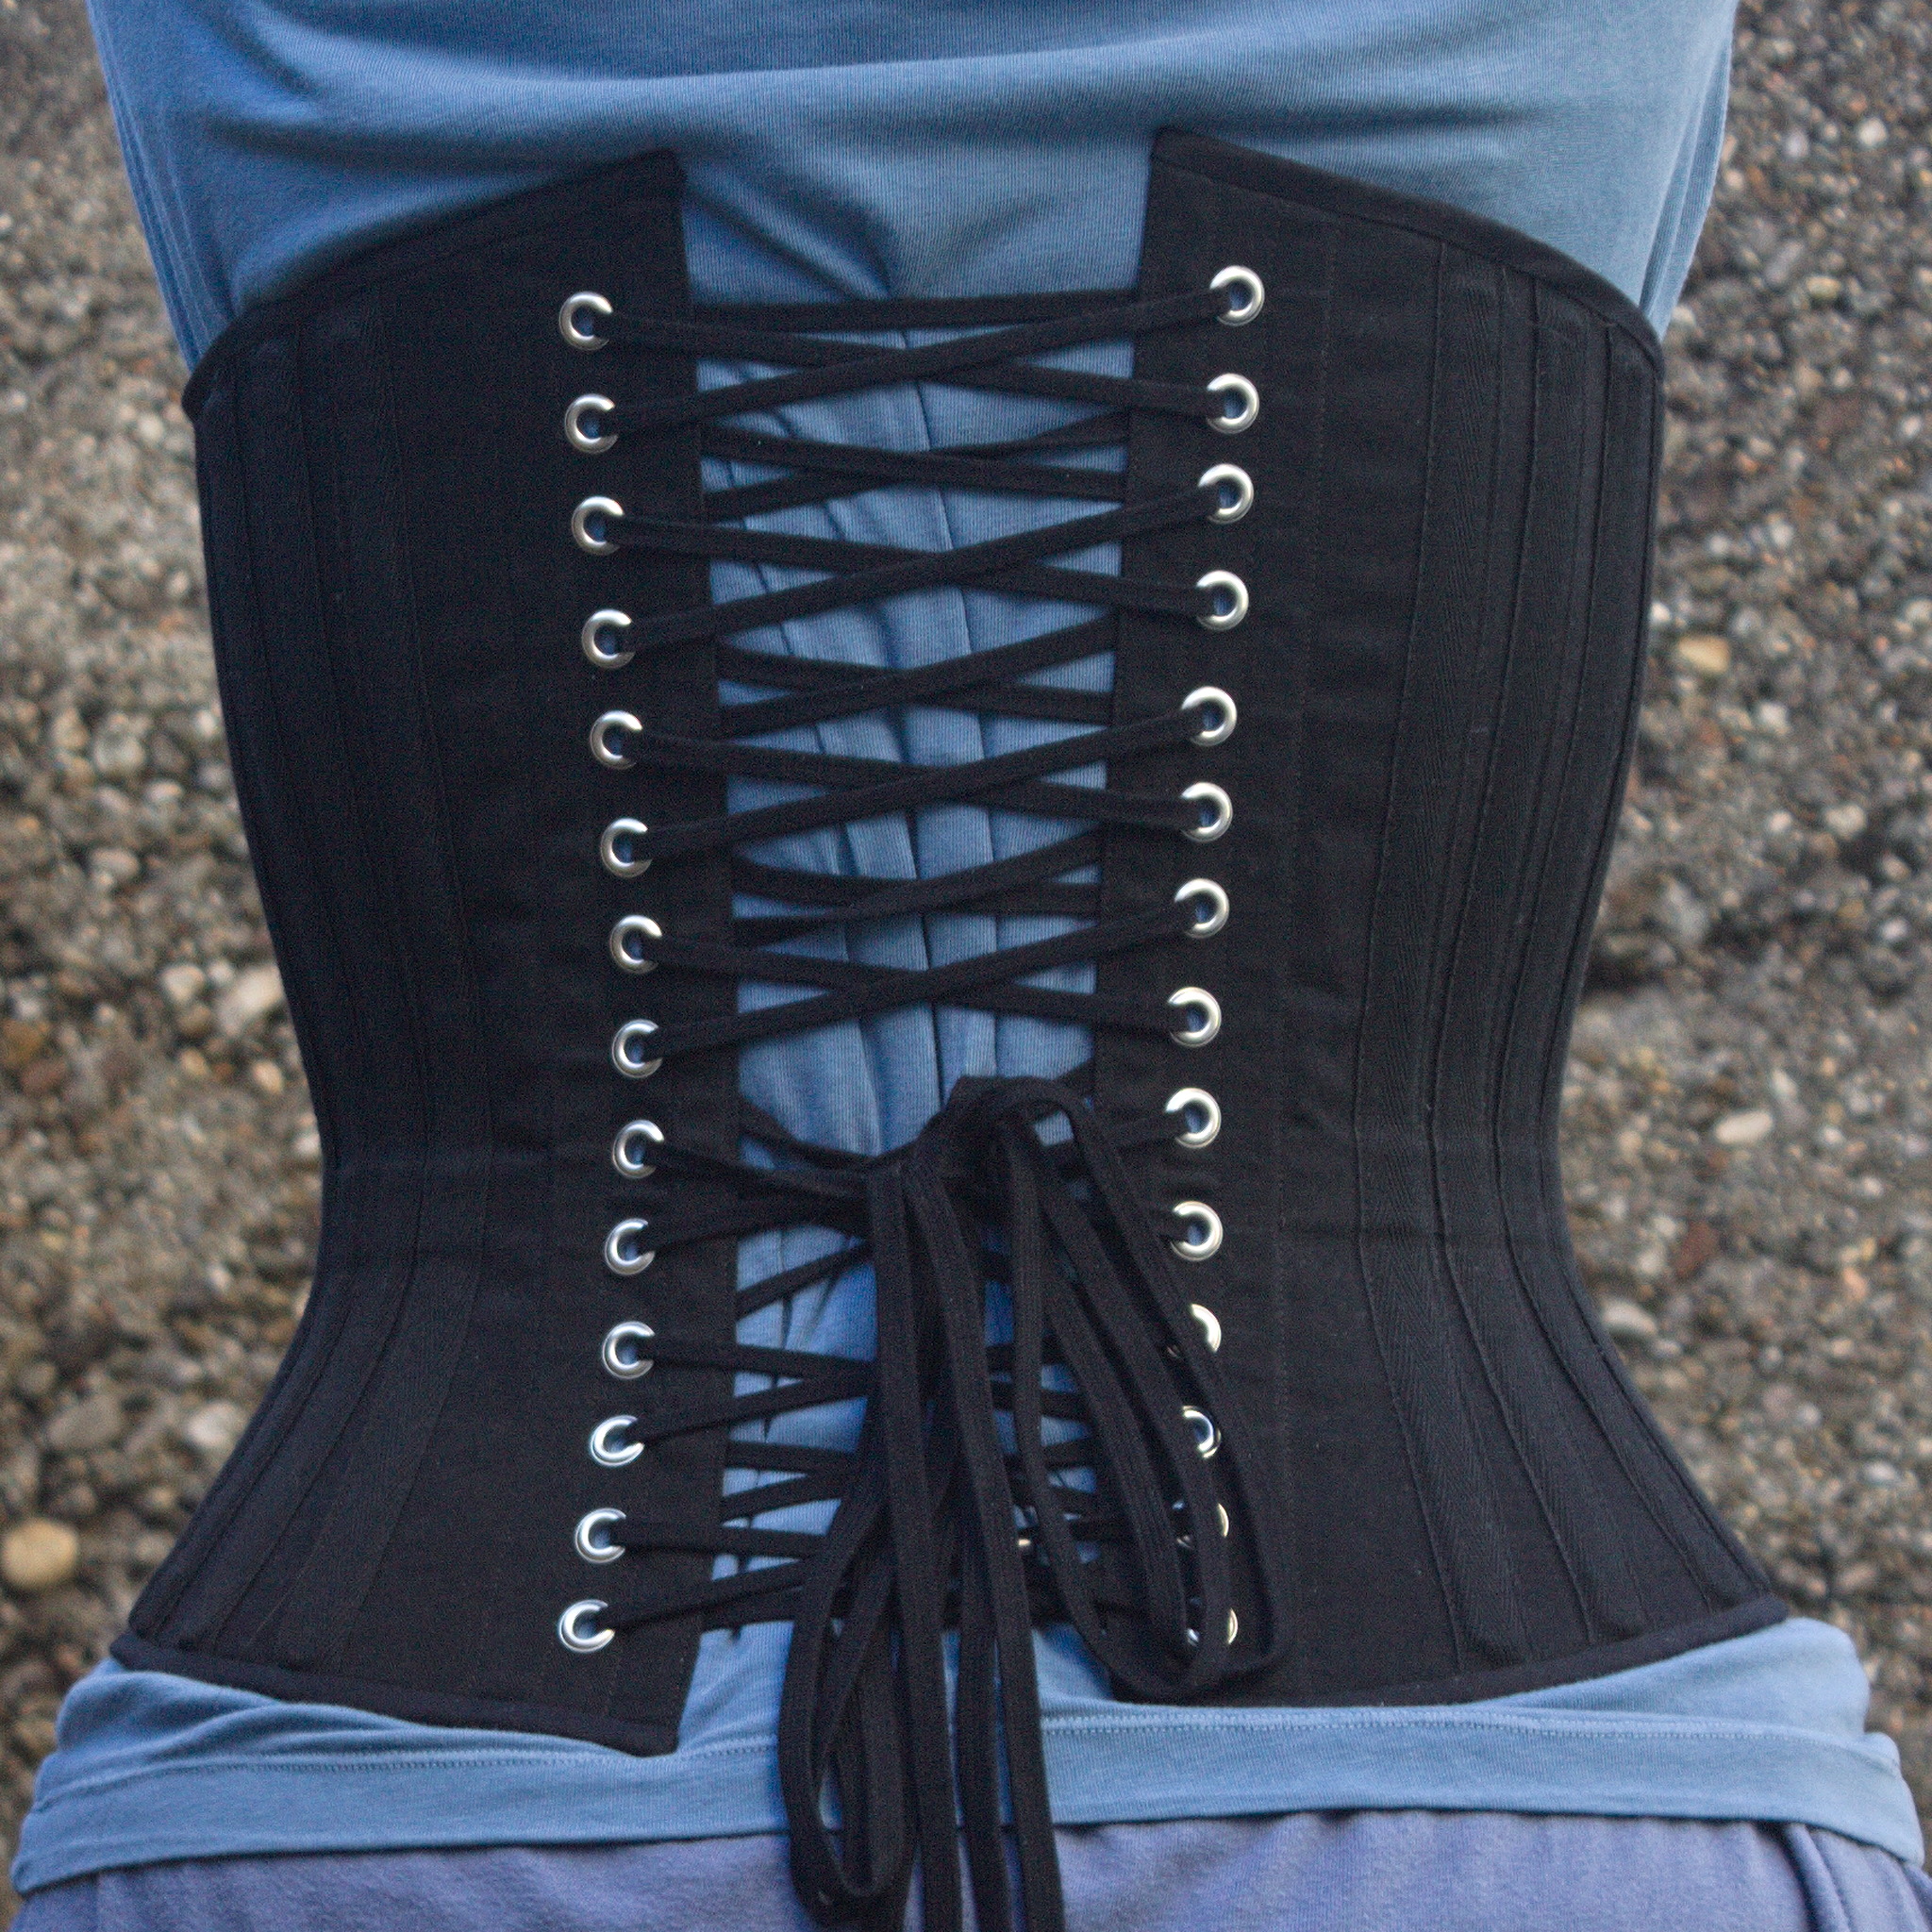
 fixed with the Power Tools1. Except, the more I looked at it the more doing this felt wrong: what I needed most was a midbust corset, not an overbust one, which is what this was starting to be. I could have trimmed it down, but I knew that I also wanted this corset to be a wearable mockup for the pattern, to refine it and have it available for more corsets. And I still had more than half of the cheap coutil I was using, so I decided to redo the pattern and cut new panels. And this is where the or two comes in: I m not going to waste the overbust panels: I had been wanting to learn some techniques to make corsets with a fashion fabric layer, rather than just a single layer of coutil, and this looks like an excellent opportunity for that, together with a piece of purple silk that I know I have in the stash. This will happen later, however, first I m giving priority to the underbust. Anyway, a second set of panels was cut, all the seam lines marked with tailor tacks, and I started sewing by inserting the busk. And then realized that the pre-made boning channel tape I had was too narrow for the 10 mm spiral steel I had plenty of. And that the 25 mm twill tape was also too narrow for a double boning channel. On the other hand, the 18 mm twill tape I had used for the waist tape was good for a single channel, so I decided to put a single bone on each seam, and then add another piece of boning in the middle of each panel. Since I m making external channels, making them in self fabric would have probably looked better, but I no longer had enough fabric, because of the cutting mishap, and anyway this is going to be a strictly underwear only corset, so it s not a big deal. Once the boning channel situation was taken care of, everything else proceeded quite smoothly and I was able to finish the corset during the Christmas break, enlisting again my SO to take care of the flat steel boning while I cut the spiral steels myself with wire cutters. The same corset straight from the front: the left side is a few mm longer than the right side I could have been a bit more precise with the binding, as it doesn t align precisely at the front edge, but then again, it s underwear, nobody other than me and everybody who reads this post is going to see it and I was in a hurry to see it finished. I will be more careful with the next one. The same corset from the back, showing cross lacing with bunny ears at the waist and a lacing gap of about 8 cm. I also think that I haven t been careful enough when pressing the seams and applying the tape, and I ve lost about a cm of width per part, so I m using a lacing gap that is a bit wider than I planned for, but that may change as the corset gets worn, and is still within tolerance. Also, on the morning after I had finished the corset I woke up and realized that I had forgotten to add garter tabs at the bottom edge. I don t know whether I will ever use them, but I wanted the option, so maybe I ll try to add them later on, especially if I can do it without undoing the binding. The next step would have been flossing, which I proceeded to postpone until I ve worn the corset for a while: not because there is any reason for it, but because I still don t know how I want to do it :) What was left was finishing and uploading the pattern and instructions, that are now on my sewing pattern website as #FreeSoftWear, and finally I could post this on the blog.

  1. i.e. by asking my SO to cut and sand it, because I m lazy and I hate doing that part :D

15 October 2023

Aigars Mahinovs: Figuring out finances part 2

A week ago I started to migrate my financial planning from a closed source system to a new system based on an open source, self-hosted solution. Main candidate is Firefly III - a relatively simple financial planner with a rather rich feature set and a solid user base and developer support. Starting it up with a Docker-Compose file was quite easy, following the official documentation. The same Compose file also managed the MySQL database, the importer app and a cron container for regular imports. The separate importer app allows both imports from CSV files and also from external bank account connection services. For whatever weird reason both of those services support exporting data from my regular bank accounts, but not from my credit cards for exactly the same bank. So for those cards I would need to periodically download CVS transaction exports and feed them into the importer. The combination of the cron container and the importer app allows for both of these functions. To do this you first do the import via the Web UI first and configure all the mappings - configure file and date formats, map account names in the bank output to account names that you added in Firefly, configure what otehr columns mean and what is the mapping of other values, like expense and income accounts. At the end of the process you can download a json file representing all the settings of the import you just did. Putting such a json config file in the input folder of the cron container and telling it to do an import (weekly, for example) would do such import periodically. Putting a credit card CSV file along with a config file for credit card import would also auto-import that. So far so good. However, when I tried importing exports from MoneyWiz or even when I tried re-creating account history directly from the bank data, I hit a very annoying problem. Transfers. Thing is detecting transfers between the real (asset) accounts that you are managing is really essential. For one those are not real expenses and incomes, so failing to mark them as transfers would show weird income/expense numbers. But if you do detect them as transfers and correctly map the destination account, but fail to match the transations between another you get a double-transaction. This becomes really hard when transactions happen on different dates and have different descriptions. So you get both a +1000 transaction "Credit card reset" on 14.09.2023 in the credit card account and a -1000$ transaction "Repayment of own credit card" on 24.09.2023 in the main account of the bank. Matching them to recognise that it is just one transfer and not two is ... non-trivial. The best solution I could come up with so far is to always map the "Opposing account name" for such transfers to a virtual "Transfers" asset account. That has the benefit of being actually able to correctly represent transfers that take several days to move between accounts and showing you how much money is still in transit at any point in time. So after I figured this out, finally the account balances started matching up with reality. Setting up spending categories required another change - the author of the Firefly III does not like complexity so it does not support nesting categories. Categories can only be in a single, flat list. It is suggested that if you do need to track multiple categories and also their combination, then category groups might help you. I will survive for now by simplifying the categories that I do actually use. Might actually make the reports more usable. A new feature for me will be the ability to use automation rules to assign transactions to categories based on their contents, like expense accounts of keywords in descriptions. Setting up regular bills (with matching rules to assign incoming transactions to those bills) is another feature that is very important to me. The feature itself works just fine in Firefly III, but it has two restrictions that the author of the software does not actually want to be changed. For one it can not be used to track prodictable incomes (like salary), presumably because it is only there for bills (subscriptions in v3 UI). And for other, there is nothing in the base software that actually uses the data from bills to look forward. The author does not like to try to predict the future. Which for me is basically the one of two reasons to use this kind of software at all. I want to know - given all manually entered regular and 100% predictable expenses and incomes, what will be the state of my accounts at particular date? It seems that to get at that I will need to write my own oracle script using the rich Firefly III API. The last question I had for this week was - how will I enter a new cash puchace of potatoes on a farmers market into the system that sits in a private server in my home network? Turns out there are actually multiple Android apps for Firefly III that can be easily used for this using a robust OAuth or shared token authentification. Except the web UI needs to be exposed online for this to work (and ideally protected by HTTPS). Other users have also created Telegram bots that allow using chat messages to create transaction entries. This is a bit harder to use and more narrow scope, but should be easier to setup. Will have to try both apporaches. But before I really get going on this, I need to fix another thing that I have been postponing for a while: I will need to migrate my Home Assistant installation from a Docker container installation to a Home Assistant OS installation so that I can install Addons, including Firefly III, MySQL and Portainer to have a bit more organised and less hand-knitted home server setup. Let's see how that goes next week :D

9 August 2023

Antoine Beaupr : OpenPGP key transition

This is a short announcement to say that I have changed my main OpenPGP key. A signed statement is available with the cryptographic details but, in short, the reason is that I stopped using my old YubiKey NEO that I have worn on my keyring since 2015. I now have a YubiKey 5 which supports ED25519 which features much shorter keys and faster decryption. It allowed me to move all my secret subkeys on the key (including encryption keys) while retaining reasonable performance. I have written extensive documentation on how to do that OpenPGP key rotation and also YubiKey OpenPGP operations.

Warning on storing encryption keys on a YubiKey People wishing to move their private encryption keys to such a security token should be very careful as there are special precautions to take for disaster recovery. I am toying with the idea of writing an article specifically about disaster recovery for secrets and backups, dealing specifically with cases of death or disabilities.

Autocrypt changes One nice change is the impact on Autocrypt headers, which are considerably shorter. Before, the header didn't even fit on a single line in an email, it overflowed to five lines:
Autocrypt: addr=anarcat@torproject.org; prefer-encrypt=nopreference;
 keydata=xsFNBEogKJ4BEADHRk8dXcT3VmnEZQQdiAaNw8pmnoRG2QkoAvv42q9Ua+DRVe/yAEUd03EOXbMJl++YKWpVuzSFr7IlZ+/lJHOCqDeSsBD6LKBSx/7uH2EOIDizGwfZNF3u7X+gVBMy2V7rTClDJM1eT9QuLMfMakpZkIe2PpGE4g5zbGZixn9er+wEmzk2mt20RImMeLK3jyd6vPb1/Ph9+bTEuEXi6/WDxJ6+b5peWydKOdY1tSbkWZgdi+Bup72DLUGZATE3+Ju5+rFXtb/1/po5dZirhaSRZjZA6sQhyFM/ZhIj92mUM8JJrhkeAC0iJejn4SW8ps2NoPm0kAfVu6apgVACaNmFb4nBAb2k1KWru+UMQnV+VxDVdxhpV628Tn9+8oDg6c+dO3RCCmw+nUUPjeGU0k19S6fNIbNPRlElS31QGL4H0IazZqnE+kw6ojn4Q44h8u7iOfpeanVumtp0lJs6dE2nRw0EdAlt535iQbxHIOy2x5m9IdJ6q1wWFFQDskG+ybN2Qy7SZMQtjjOqM+CmdeAnQGVwxowSDPbHfFpYeCEb+Wzya337Jy9yJwkfa+V7e7Lkv9/OysEsV4hJrOh8YXu9a4qBWZvZHnIO7zRbz7cqVBKmdrL2iGqpEUv/x5onjNQwpjSVX5S+ZRBZTzah0w186IpXVxsU8dSk0yeQskblrwARAQABzSlBbnRvaW5lIEJlYXVwcsOpIDxhbmFyY2F0QHRvcnByb2plY3Qub3JnPsLBlAQTAQgAPgIbAwULCQgHAwUVCgkICwUWAgMBAAIeAQIXgBYhBI3JAc5kFGwEitUPu3khUlJ7dZIeBQJihnFIBQkacFLiAAoJEHkhUlJ7dZIeXNAP/RsX+27l9K5uGspEaMH6jabAFTQVWD8Ch1om9YvrBgfYtq2k/m4WlkMh9IpT89Ahmlf0eq+V1Vph4wwXBS5McK0dzoFuHXJa1WHThNMaexgHhqJOs
 S60bWyLH4QnGxNaOoQvuAXiCYV4amKl7hSuDVZEn/9etDgm/UhGn2KS3yg0XFsqI7V/3RopHiDT+k7+zpAKd3st2V74w6ht+EFp2Gj0sNTBoCdbmIkRhiLyH9S4B+0Z5dUCUEopGIKKOSbQwyD5jILXEi7VTZhN0CrwIcCuqNo7OXI6e8gJd8McymqK4JrVoCipJbLzyOLxZMxGz8Ki0b9O844/DTzwcYcg9I1qogCsGmZfgVze2XtGxY+9zwSpeCLeef6QOPQ0uxsEYSfVgS+onCesSRCgwAPmppPiva+UlGuIMun87gPpQpV2fqFg/V8zBxRvs6YTGcfcQjfMoBHmZTGb+jk1//QAgnXMO7fGG38YH7iQSSzkmodrH2s27ZKgUTHVxpBL85ptftuRqbR7MzIKXZsKdA88kjIKKXwMmez9L1VbJkM4k+1Kzc5KdVydwi+ujpNegF6ZU8KDNFiN9TbDOlRxK5R+AjwdS8ZOIa4nci77KbNF9OZuO3l/FZwiKp8IFJ1nK7uiKUjmCukL0od/6X2rJtAzJmO5Co93ZVrd5r48oqUvjklzzsBNBFmeC3oBCADEV28RKzbv3dEbOocOsJQWr1R0EHUcbS270CrQZfb9VCZWkFlQ/1ypqFFQSjmmUGbNX2CG5mivVsW6Vgm7gg8HEnVCqzL02BPY4OmylskYMFI5Bra2wRNNQBgjg39L9XU4866q3BQzJp3r0fLRVH8gHM54Jf0FVmTyHotR/Xiw5YavNy2qaQXesqqUv8HBIha0rFblbuYI/cFwOtJ47gu0QmgrU0ytDjlnmDNx4rfsNylwTIHS0Oc7Pezp7MzLmZxnTM9b5VMprAXnQr4rewXCOUKBSto+j4rD5/77DzXw96bbueNruaupb2Iy2OHXNGkB0vKFD3xHsXE2x75NBovtABEBAAHCwqwEGAEIACAWIQSNyQHOZBRsBIrVD7t5IVJSe3WSHgUCWZ4LegIbAgFACRB5IV
 JSe3WSHsB0IAQZAQgAHRYhBHsWQgTQlnI7AZY1qz6h3d2yYdl7BQJZngt6AAoJED6h3d2yYdl7CowH/Rp7GHEoPZTSUK8Ss7crwRmuAIDGBbSPkZbGmm4bOTaNs/gealc2tsVYpoMx7aYgqUW+t+84XciKHT+bjRv8uBnHescKZgDaomDuDKc2JVyx6samGFYuYPcGFReRcdmH0FOoPCn7bMW5mTPztV/wIA80LZD9kPKIXanfUyI3HLP0BPwZG4WTpKzJaalR1BNwu2oF6kEK0ymH3LfDiJ5Sr6emI2jrm4gH+/19ux/x+ST4tvm2PmH3BSQOPzgiqDiFd7RZoAIhmwr3FW4epsK9LtSxsi9gZ2vATBKO1oKtb6olW/keQT6uQCjqPSGojwzGRT2thEANH+5t6Vh0oDPZhrKUXRAAxHMBNHEaoo/M0sjZo+5OF3Ig1rMnI6XbKskLv6hu13cCymW0w/5E4XuYnyQ1cNC3pLvqDQbDx5mAPfBVHuqxJdRLQ3yDM/D2QIsxnkzQwi0FsJuni4vuJzWK/NHHDCvxMCh0YmSgbptUtgW8/niatd2Y6MbfRGxUHoctKtzqzivC8hKMTFrj4AbZhg/e9QVCsh5zSXtpWP0qFDJsxRMx0/432n9d4XUiy4U672r9Q09SsynB3QN6nTaCTWCIxGxjIb+8kJrRqTGwy/PElHX6kF0vQUWZNf2ITV1sd6LK/s/7sH+x4rzgUEHrsKr/qPvY3rUY/dQLd+owXesY83ANOu6oMWhSJnPMksbNa4tIKKbjmw3CFIOfoYHOWf3FtnydHNXoXfj4nBX8oSnkfhLILTJgf6JDFXfw6mTsv/jMzIfDs7PO1LK2oMK0+prSvSoM8bP9dmVEGIurzsTGjhTOBcb0zgyCmYVD3S48vZlTgHszAes1zwaCyt3/tOwrzU5JsRJVns+B/TUYaR/u3oIDMDygvE5ObWxXaFVnCC59r+zl0FazZ0ouyk2AYIR
 zHf+n1n98HCngRO4FRel2yzGDYO2rLPkXRm+NHCRvUA/i4zGkJs2AV0hsKK9/x8uMkBjHAdAheXhY+CsizGzsKjjfwvgqf84LwAzSDdZqLVE2yGTOwU0ESiArJwEQAJhtnC6pScWjzvvQ6rCTGAai6hrRiN6VLVVFLIMaMnlUp92EtgVSNpw6kANtRTpKXUB5fIPZVUrVdfEN06t96/6LE42tgifDAFyFTZY5FdHHri1GG/Cr39MpW2VqCDCtTTPVWHTUlU1ZG631BJ+9NB+ce58TmLr6wBTQrT+W367eRFBC54EsLNb7zQAspCn9pw1xf1XNHOGnrAQ4r9BXhOW5B8CzRd4nLRQwVgtw/c5M/bjemAOoq2WkwN+0mfJe4TSfHwFUozXuN274X+0Gr10fhp8xEDYuQM0qu6W3aDXMBBwIu0jTNudEELsTzhKUbqpsBc9WjwNMCZoCuSw/RTpFBV35mXbqQoQgbcU7uWZslLl9Wvv/C6rjXgd+GeX8SGBjTqq1ZkTv5UXLHTNQzPnbkNEExzqToi/QdSjFMIACnakeOSxc0ckfnsd9pfGv1PUyPyiwrHiqWFzBijzGIZEHxhNGFxAkXwTJR7Pd40a7RDxwbO6p/TSIIum41JtteehLHwTRDdQNMoyfLxuNLEtNYS0uR2jYI1EPQfCNWXCdT2ZK/l6GVP6jyB/olHBIOr+oVXqJh+48ki8cATPczhq3fUr7UivmguGwD67/4omZ4PCKtz1hNndnyYFS9QldEGo+AsB3AoUpVIA0XfQVkxD9IZr+Zu6aJ6nWq4M2bsoxABEBAAHCwXYEGAEIACACGwwWIQSNyQHOZBRsBIrVD7t5IVJSe3WSHgUCWPerZAAKCRB5IVJSe3WSHkIgEACTpxdn/FKrwH0/LDpZDTKWEWm4416l13RjhSt9CUhZ/Gm2GNfXcVTfoF/jKXXgjHcV1DHjfLUPmPVwMdqlf5ACOiFqIUM2ag/OEARh356w
 YG7YEobMjX0CThKe6AV2118XNzRBw/S2IO1LWnL5qaGYPZONUa9Pj0OaErdKIk/V1wge8Zoav2fQPautBcRLW5VA33PH1ggoqKQ4ES1hc9HC6SYKzTCGixu97mu/vjOa8DYgM+33TosLyNy+bCzw62zJkMf89X0tTSdaJSj5Op0SrRvfgjbC2YpJOnXxHr9qaXFbBZQhLjemZi6zRzUNeJ6A3Nzs+gIc4H7s/bYBtcd4ugPEhDeCGffdS3TppH9PnvRXfoa5zj5bsKFgjqjWolCyAmEvd15tXz5yNXtvrpgDhjF5ozPiNp/1EeWX4DxbH2i17drVu4fXwauFZ6lcsAcJxnvCA28RlQlmEQu/gFOx1axVXf6GIuXnQSjQN6qJbByUYrdc/cFCxPO2/lGuUxnufN9Tvb51Qh54laPgGLrlD2huQeSD9Sxa0MNUjNY0qLqaReT99Ygb2LPYGSLoFVx9iZz6sZNt07LqCx9qNgsJwsdmwYsNpMuFbc7nkWjtlEqzsXZHTvYN654p43S+hcAhmmOzQZcew6h71fAJLciiqsPBnCEdgCGFAWhZZdPkMA==
After the change, the entire key fits on a single line, neat!
Autocrypt: addr=anarcat@torproject.org; prefer-encrypt=nopreference;
 keydata=xjMEZHZPzhYJKwYBBAHaRw8BAQdAWdVzOFRW6FYVpeVaDo3sC4aJ2kUW4ukdEZ36UJLAHd7NKUFudG9pbmUgQmVhdXByw6kgPGFuYXJjYXRAdG9ycHJvamVjdC5vcmc+wpUEExYIAD4WIQS7ts1MmNdOE1inUqYCKTpvpOU0cwUCZHZgvwIbAwUJAeEzgAULCQgHAwUVCgkICwUWAgMBAAIeAQIXgAAKCRACKTpvpOU0c47SAPdEqfeHtFDx9UPhElZf7nSM69KyvPWXMocu9Kcu/sw1AQD5QkPzK5oxierims6/KUkIKDHdt8UcNp234V+UdD/ZB844BGR2UM4SCisGAQQBl1UBBQEBB0CYZha2IMY54WFXMG4S9/Smef54Pgon99LJ/hJ885p0ZAMBCAfCdwQYFggAIBYhBLu2zUyY104TWKdSpgIpOm+k5TRzBQJkdlDOAhsMAAoJEAIpOm+k5TRzBg0A+IbcsZhLx6FRIqBJCdfYMo7qovEo+vX0HZsUPRlq4HkBAIctCzmH3WyfOD/aUTeOF3tY+tIGUxxjQLGsNQZeGrQI
Note that I have implemented my own kind of ridiculous Autocrypt support for the Notmuch Emacs email client I use, see this elisp code. To import keys, I pipe the message into this script which is basically just:
sq autocrypt decode   gpg --import
... thanks to Sequoia best-of-class Autocrypt support.

Note on OpenPGP usage While some have claimed OpenPGP's death, I believe those are overstated. Maybe it's just me, but I still use OpenPGP for my password management, to authenticate users and messages, and it's the interface to my YubiKey for authenticating with SSH servers. I understand people feel that OpenPGP is possibly insecure, counter-intuitive and full of problems, but I think most of those problems should instead be attributed to its current flagship implementation, GnuPG. I have tried to work with GnuPG for years, and it keeps surprising me with evilness and oddities. I have high hopes that the Sequoia project can bring some sanity into this space, and I also hope that RFC4880bis can eventually get somewhere so we have a more solid specification with more robust crypto. It's kind of a shame that this has dragged on for so long, but Update: there's a separate draft called openpgp-crypto-refresh that might actually be adopted as the "OpenPGP RFC" soon! And it doesn't keep real work from happening in Sequoia and other implementations. Thunderbird rewrote their OpenPGP implementation with RNP (which was, granted, a bumpy road because it lost compatibility with GnuPG) and Sequoia now has a certificate store with trust management (but still no secret storage), preliminary OpenPGP card support and even a basic GnuPG compatibility layer. I'm also curious to try out the OpenPGP CA capabilities. So maybe it's just because I'm becoming an old fart that doesn't want to change tools, but so far I haven't seen a good incentive in switching away from OpenPGP, and haven't found a good set of tools that completely replace it. Maybe OpenSSH's keys and CA can eventually replace it, but I suspect they will end up rebuilding most of OpenPGP anyway, just more slowly. If they do, let's hope they avoid the mistakes our community has done in the past at least...

17 July 2023

Shirish Agarwal: WordPress Cookies, Debdelta, RISC, Manipur, Libraries in Kerala.

WordPress Cookies, Debdelta One of the most irritating things about WordPress is whenever I start a firefox session, WordPress aks for cookie selection. I make my choices but it s not persistent. The next session the same thing happens again. It does keep my identity but for some unknown reason doesn t respect the Cookie selection. I usually use Firefox ESR (102.13.0esr-1) on Testing. Also, for more than a week I have found debdelta not working as it should. To give a brief history, the idea of debdelta is to save bandwidth, whether it 100 kbps or 1 mbit or whatever, the moment you give debdelta-upgrade it will try to see if there is a delta of the debs that you want to upgrade. The sequence is as follows or at least that is what I do
  1. $sudo apt update (updates the index files of apt and tells you how many packages are upgradable). IIRC, every 4-5 hours there is an index runs that basically catches any new debian packages. You can see the index generated dynamically each time you run the above command in /var/lib/apt/lists
2. $ sudo debdelta-upgrade Now the debdelta algorithim goes to work. Debdelta has its own mirror. I think sometime after the indexes are updated, debdelta does it own run, probably an hour or two later. The algorithim sees how big the diff between the two packages and generates a delta. If the generated delta (diff.) between the old and the new is less than 70% then the generated delta is kept or otherwise thrown. The delta is kept in debdelta mirror. You can from 1 day history how big it is. And AFAIK, it is across all the hardware and platforms that Debian supports. My issue has been simply that debdelta just doesn t work and even after debdelta-upgrade I am forced to get all the files from the server. Have shared more details here. 3. The last step is $ sudo aptitude upgrade or $ sudo aptitude install and give package names if you know some packages are broken or non-resolvable or have some bugs.

RISC I had shared about RISC chips couple of weeks back. One of the things that I had forgotten to share that Android is also supporting RISC-V few months back. How I forgot that crucial bit of info. is beyond me. There are number of RISC-V coming out in the next few months to early 2024. One of the more interesting boards that came up in 2021/2022 was HiFive Unmatched. The problem is that the board although interesting on specs is out of reach of most Indians. I am sure most people would be aware of the chicken and egg problem and that is where it is. Pricing will be key component. If they get the pricing right and are able to produce in good numbers, we might see more of these boards soon. At least with Android that issue gets somewhat resolved. There is possibility that we may see more Android set-top boxes and whatnot paired with RISC paving more money for RISC development and a sort of virtuous cycle. While I m in two minds, I decide not to share what chips are coming unless and until we know what the pricing is, otherwise they just become part of a hype cycle. But it s definitely something to watch out for. One of the more interesting articles that I read last week also tells how Linux has crossed 3% desktop space and his views on the same. I do very much agree with his last paragraph but at the same time biased as am an old time desktop user. I just don t find myself happy on small factor keyboards. I will leave the rest for some other time depending how things happen.

Manipur Before I start sharing about Manipur, I should thank Praveen A. few years back, Praveen wanted to see the 7 sisters and in fact had even proposed to partially sponsor me so that we could together visit the 7 states of North-East. For reasons I don t remember, I just wasn t able to go. Probably some work and responsibilities at home. For almost 2.5 months now, Manipur, one of the States in the 7 states has been burning. There have been talks and sharing of genocidial murder of Christians in Manipur. This is not just me or some random person talking about, even BJP (the ruling party in the Center), their functionaries both in Manipur and its neighboring state Mizoram have been sharing. Mizoram s State BJP President in fact resigned just few days back saying it s state sponsored activity. Couple of days back, European Parliament held a session about Manipur and even passed a resolution. The BJP tried to hit back saying Colonial Mindset but when asked if it s the same when India invited European Parliamentarians to visit Kashmir in 2019, the silence is deafening. The Wire has interviewed all the prominent leaders and sort of players in Manipur politics but apart from calling Kukis foreigners they have no proof. In one of the interviews one of the Meitei leaders calls Kuki s foreigners but doesn t have any Government data to support his belief. The census of India was last held in 2011. People from the civil society have time and again asked the Government to do the census but GOI has been giving one excuse after another. They in fact, wanted to do a caste census but that too they themselves took on back foot probably as they believe that both census may give results not to their liking. In fact, this Government is also known as No Data Government as almost in everything, it denies data. I am not going to go to that otherwise would not be able to complete blog post till couple of days. I will just share this bit of info. that this Govt. hasn t given Household Consumption Survey data for last four years. Going back to the topic though, neither the Prime Minister, the Home Minister, the Defence Minister nobody has been able to utter the word Manipur till date. I have no idea when they will wake up. People from all ethnicities have tried to make representations to GOI but no one has been able to meet them, neither the Kukis, nor the Nagas, nor the Meiteis even though it is a sensitive border area.

Libraries in Kerala I wanted to end on a somewhat positive note. So just a few days back, the Miinistry of Culture shared the number of Libraries per state. As can be seen from the infographic, Kerala is a giant in that. If I do find a table, would share that as well, so those who can t see can hear the data. Till later.

9 July 2023

Vasudev Kamath: Using LUKS-Encrypted USB Stick with TPM2 Integration

I use a LUKS-encrypted USB stick to store my GPG and SSH keys, which acts as a backup and portable key setup when working on different laptops. One inconvenience with LUKS-encrypted USB sticks is that you need to enter the password every time you want to mount the device, either through a Window Manager like KDE or using the cryptsetup luksOpen command. Fortunately, many laptops nowadays come equipped with TPM2 modules, which can be utilized to automatically decrypt the device and subsequently mount it. In this post, we'll explore the usage of systemd-cryptenroll for this purpose, along with udev rules and a set of scripts to automate the mounting of the encrypted USB. First, ensure that your device has a TPM2 module. You can run the following command to check:
sudo journalctl -k --grep=tpm2
The output should resemble the following:
Jul 08 18:57:32 bhairava kernel: ACPI: SSDT 0x00000000BBEFC000 0003C6 (v02
LENOVO Tpm2Tabl 00001000 INTL 20160422) Jul 08 18:57:32 bhairava kernel:
ACPI: TPM2 0x00000000BBEFB000 000034 (v03 LENOVO TP-R0D 00000830
PTEC 00000002) Jul 08 18:57:32 bhairava kernel: ACPI: Reserving TPM2 table
memory at [mem 0xbbefb000-0xbbefb033]
You can also use the systemd-cryptenroll command to check for the availability of a TPM2 device on your laptop:
systemd-cryptenroll --tpm2-device=list
The output will be something like following:
blog git:(master) systemd-cryptenroll --tpm2-device=list
PATH        DEVICE      DRIVER
/dev/tpmrm0 MSFT0101:00 tpm_tis
   blog git:(master)
Next, ensure that you have connected your encrypted USB device. Note that systemd-cryptenroll only works with LUKS2 and not LUKS1. If your device is LUKS1-encrypted, you may encounter an error while enrolling the device, complaining about the LUKS2 superblock not found. To determine if your device uses a LUKS1 header or LUKS2, use the cryptsetup luksDump <device> command. If it is LUKS1, the header will begin with:
LUKS header information for /dev/sdb1
Version:        1
Cipher name:    aes
Cipher mode:    xts-plain64
Hash spec:      sha256
Payload offset: 4096
Converting from LUKS1 to LUKS2 is a simple process, but for safety, ensure that you backup the header using the cryptsetup luksHeaderBackup command. Once backed up, use the following command to convert the header to LUKS2:
sudo cryptsetup convert --type luks2 /dev/sdb1
After conversion, the header will look like this:
Version:        2
Epoch:          4
Metadata area:  16384 [bytes]
Keyslots area:  2064384 [bytes]
UUID:           000b2670-be4a-41b4-98eb-9adbd12a7616
Label:          (no label)
Subsystem:      (no subsystem)
Flags:          (no flags)
The next step is to enroll the new LUKS key for the encrypted device using systemd-cryptenroll. Run the following command:
sudo systemd-cryptenroll --tpm2-device=/dev/tpmrm0 --tpm2-pcrs="0+7" /dev/sdb1
This command will prompt you to provide the existing key to unseal the device. It will then add a new random key to the volume, allowing it to be unlocked in addition to the existing keys. Additionally, it will bind this new key to PCRs 0 and 7, representing the system firmware and Secure Boot state. If there is only one TPM device on the system, you can use --tpm2-device=auto to automatically select the device. To confirm that the new key has been enrolled, you can dump the LUKS configuration and look for a systemd-tpm2 token entry, as well as an additional entry in the Keyslots section. To test the setup, you can use the /usr/lib/systemd/systemd-cryptsetup command. Additionally, you can check if the device is unsealed by using lsblk:
sudo /usr/lib/systemd/systemd-cryptsetup attach GPG_USB "/dev/sdb1" - tpm2-device=auto
lsblk
The lsblk command should display the unsealed and mounted device, like this:
NAME        MAJ:MIN RM   SIZE RO TYPE  MOUNTPOINTS
sda           8:0    0 223.6G  0 disk
 sda1        8:1    0   976M  0 part  /boot/efi
 sda2        8:2    0 222.6G  0 part
   root    254:0    0 222.6G  0 crypt /
sdb           8:16   1   7.5G  0 disk
 sdb1        8:17   1   7.5G  0 part
   GPG_USB 254:1    0   7.5G  0 crypt /media/vasudev/GPG_USB
Auto Mounting the device Now that we have solved the initial problem of unsealing the USB device using TPM2 instead of manually entering the key, the next step is to automatically mount the device upon insertion and remove the mapping when the device is removed. This can be achieved using the following udev rules:
ACTION=="add", KERNEL=="sd*", ENV DEVTYPE =="partition", ENV ID_BUS =="usb", ENV SYSTEMD_WANTS ="mount-gpg-usb@$env DEVNAME .service"
ACTION=="remove", KERNEL=="sd*", ENV DEVTYPE =="partition", ENV ID_BUS =="usb", RUN+="/usr/local/bin/umount_enc_usb.sh '%E ID_FS_UUID '"
When a device is added, a systemd service is triggered to mount the device at a specific location. Initially, I used a script with the RUN directive, but it resulted in an exit code of 32. This might be due to systemd-cryptsetup taking some time to return, causing udev to time out. To address this, I opted to use a systemd service instead. For device removal, even though the physical device is no longer present, the mapping may still remain, causing issues upon reinsertion. To resolve this, I created a script to close the luks mapping upon device removal. Below are the systemd service and script files: mount_enc_usb.sh:
#!/bin/bash
set -x
if [[ "$#" -ne 1 ]]; then
    echo "$(basename $0) <device>"
    exit 1
fi
device_uuid="$(blkid --output udev $1   grep ID_FS_UUID=   cut -d= -f2)"
if [[ "$device_uuid" == 000b2670-be4a-41b4-98eb-9adbd12a7616 ]]; then
    # Found our device, let's trigger systemd-cryptsetup
    /usr/lib/systemd/systemd-cryptsetup attach GPG_USB "$1" - tpm2-device=auto
    [[ -d /media/vasudev/GPG_USB ]]   (mkdir -p /media/vasudev/GPG_USB/ && chown vasudev:vasudev /media/vasudev/GPG_USB)
    mount /dev/mapper/GPG_USB /media/vasudev/GPG_USB
else
    echo "Not the interested device. Ignoring."
    exit 0
fi
umount_enc_usb.sh:
#!/bin/bash
if [[ "$#" -ne 1 ]]; then
  echo "$(basename $0) <fsuuid>"
  exit 1
fi
if [[ "$1" == "000b2670-be4a-41b4-98eb-9adbd12a7616" ]]; then
  # Our device is removed, let's close the luks mapping
  [[ -e /dev/mapper/GPG_USB ]] && cryptsetup luksClose /dev/mapper/GPG_USB
else
  echo "Not our device."
  exit 0
fi
mount-gpg-usb@.service:
[Unit]
Description=Mount the encrypted USB device service
[Service]
Type=simple
ExecStart=/usr/local/bin/mount_enc_usb.sh
With this setup, plugging in the USB device will automatically unseal and mount it, and upon removal, the luks mapping will be closed.

Note

This can be even done for LUKS2 encrypted root disk but will need some tweaking in initramfs.

16 June 2023

John Goerzen: Using git-annex for Data Archiving

In my recent post about data archiving to removable media, I laid out the difference between backing up and archiving, and also said I d evaluate git-annex and dar. This post evaluates git-annex. The next will look at dar, and then I ll make a comparison post. What is git-annex? git-annex is a fantastic and versatile program that does well, it s one of those things that can do so much that it s a bit hard to describe. Its homepage says:
git-annex allows managing large files with git, without storing the file contents in git. It can sync, backup, and archive your data, offline and online. Checksums and encryption keep your data safe and secure. Bring the power and distributed nature of git to bear on your large files with git-annex.
I think the particularly interesting features of git-annex aren t actually included in that list. Among the features of git-annex that make it shine for this purpose, its location tracking is key. git-annex can know exactly which device has which file at which version at all times. Combined with its preferred content settings, this lets you very easily say things like: git-annex can be set to allow a configurable amount of free space to remain on a device, and it will fill it up with whatever copies are necessary up until it hits that limit. Very convenient! git-annex will store files in a folder structure that mirrors the origin folder structure, in plain files just as they were. This maximizes the ability for a future person to access the content, since it is all viewable without any special tool at all. Of course, for things like optical media, git-annex will essentially be creating what amounts to incrementals. To obtain a consistent copy of the original tree, you would still need to use git-annex to process (export) the archives. git-annex challenges In my prior post, I related some challenges with git-annex. The biggest of them quite poor performance of the directory special remote when dealing with many files has been resolved by Joey, git-annex s author! That dramatically improves the git-annex use scenario here! The fixing commit is in the source tree but not yet in a release. git-annex no doubt may still have performance challenges with repositories in the 100,000+-range, but in that order of magnitude it now looks usable. I m not sure about 1,000,000-file repositories (I haven t tested); there is a page about scalability. A few other more minor challenges remain: I worked around the timestamp issue by using the mtree-netbsd package in Debian. mtree writes out a summary of files and metadata in a tree, and can restore them. To save: mtree -c -R nlink,uid,gid,mode -p /PATH/TO/REPO -X <(echo './.git') > /tmp/spec And, after restoration, the timestamps can be applied with: mtree -t -U -e < /tmp/spec Walkthrough: initial setup To use git-annex in this way, we have to do some setup. My general approach is this: Let's get started! I've set all these shell variables appropriately for this example, and REPONAME to "testdata". We'll begin by setting up the metadata-only tracking repo.
$ REPONAME=testdata
$ mkdir "$METAREPO"
$ cd "$METAREPO"
$ git init
$ git config annex.thin true
There is a sort of complicated topic of how git-annex stores files in a repo, which varies depending on whether the data for the file is present in a given repo, and whether the file is locked or unlocked. Basically, the options I use here cause git-annex to mostly use hard links instead of symlinks or pointer files, for maximum compatibility with non-POSIX filesystems such as NTFS and UDF, which might be used on these devices. thin is part of that. Let's continue:
$ git annex init 'local hub'
init local hub ok
(recording state in git...)
$ git annex wanted . "include=* and exclude=$REPONAME/*"
wanted . ok
(recording state in git...)
In a bit, we are going to import the source data under the directory named $REPONAME (here, testdata). The wanted command says: in this repository (represented by the bare dot), the files we want are matched by the rule that says eveyrthing except what's under $REPONAME. In other words, we don't want to make an unnecessary copy here. Because I expect to use an mtree file as documented above, and it is not under $REPONAME/, it will be included. Let's just add it and tweak some things.
$ touch mtree
$ git annex add mtree
add mtree
ok
(recording state in git...)
$ git annex sync
git-annex sync will change default behavior to operate on --content in a future version of git-annex. Recommend you explicitly use --no-content (or -g) to prepare for that change. (Or you can configure annex.synccontent)
commit
[main (root-commit) 6044742] git-annex in local hub
1 file changed, 1 insertion(+)
create mode 120000 mtree
ok
$ ls -l
total 9
lrwxrwxrwx 1 jgoerzen jgoerzen 178 Jun 15 22:31 mtree -> .git/annex/objects/pX/ZJ/...
OK! We've added a file, and it got transformed into a symlink. That's the thing I said we were going to avoid, so:
git annex adjust --unlock-present
adjust
Switched to branch 'adjusted/main(unlockpresent)'
ok
$ ls -l
total 1
-rw-r--r-- 2 jgoerzen jgoerzen 0 Jun 15 22:31 mtree
You'll notice it transformed into a hard link (nlinks=2) file. Great! Now let's import the source data. For that, we'll use the directory special remote.
$ git annex initremote source type=directory directory=$SOURCEDIR importtree=yes \
encryption=none
initremote source ok
(recording state in git...)
$ git annex enableremote source directory=$SOURCEDIR
enableremote source ok
(recording state in git...)
$ git config remote.source.annex-readonly true
$ git config annex.securehashesonly true
$ git config annex.genmetadata true
$ git config annex.diskreserve 100M
$ git config remote.source.annex-tracking-branch main:$REPONAME
OK, so here we created a new remote named "source". We enabled it, and set some configuration. Most notably, that last line causes files from "source" to be imported under $REPONAME/ as we wanted earlier. Now we're ready to scan the source.
$ git annex sync
At this point, you'll see git-annex computing a hash for every file in the source directory. I can verify with du that my metadata-only repo only uses 14MB of disk space, while my source is around 4GB. Now we can see what git-annex thinks about file locations:
$ git-annex whereis less
whereis mtree (1 copy)
8aed01c5-da30-46c0-8357-1e8a94f67ed6 -- local hub [here]
ok
whereis testdata/[redacted] (0 copies)
The following untrusted locations may also have copies:
9e48387e-b096-400a-8555-a3caf5b70a64 -- [source]
failed
... many more lines ...
So remember we said we wanted mtree, but nothing under testdata, under this repo? That's exactly what we got. git-annex knows that the files under testdata can be found under the "source" special remote, but aren't in any git-annex repo -- yet. Now we'll start adding them. Walkthrough: removable drives I've set up two 500MB filesystems to represent removable drives. We'll see how git-annex works with them.
$ cd $DRIVE01
$ df -h .
Filesystem Size Used Avail Use% Mounted on
acrypt/no-backup/annexdrive01 500M 1.0M 499M 1% /acrypt/no-backup/annexdrive01
$ git clone $METAREPO
Cloning into 'testdata'...
done.
$ cd $REPONAME
$ git config annex.thin true
$ git annex init "test drive #1"
$ git annex adjust --hide-missing --unlock
adjust
Switched to branch 'adjusted/main(hidemissing-unlocked)'
ok
$ git annex sync
OK, that's the initial setup. Now let's enable the source remote and configure it the same way we did before:
$ git annex enableremote source directory=$SOURCEDIR
enableremote source ok
(recording state in git...)
$ git config remote.source.annex-readonly true
$ git config remote.source.annex-tracking-branch main:$REPONAME
$ git config annex.securehashesonly true
$ git config annex.genmetadata true
$ git config annex.diskreserve 100M
Now, we'll add the drive to a group called "driveset01" and configure what we want on it:
$ git annex group . driveset01
$ git annex wanted . '(not copies=driveset01:1)'
What this does is say: first of all, this drive is in a group named driveset01. Then, this drive wants any files for which there isn't already at least one copy in driveset01. Now let's load up some files!
$ git annex sync --content
As the messages fly by from here, you'll see it mentioning that it got mtree, and then various files from "source" -- until, that is, the filesystem had less than 100MB free, at which point it complained of no space for the rest. Exactly like we wanted! Now, we need to teach $METAREPO about $DRIVE01.
$ cd $METAREPO
$ git remote add drive01 $DRIVE01/$REPONAME
$ git annex sync drive01
git-annex sync will change default behavior to operate on --content in a future version of git-annex. Recommend you explicitly use --no-content (or -g) to prepare for that change. (Or you can configure annex.synccontent)
commit
On branch adjusted/main(unlockpresent)
nothing to commit, working tree clean
ok
merge synced/main (Merging into main...)
Updating d1d9e53..817befc
Fast-forward
(Merging into adjusted branch...)
Updating 7ccc20b..861aa60
Fast-forward
ok
pull drive01
remote: Enumerating objects: 214, done.
remote: Counting objects: 100% (214/214), done.
remote: Compressing objects: 100% (95/95), done.
remote: Total 110 (delta 6), reused 0 (delta 0), pack-reused 0
Receiving objects: 100% (110/110), 13.01 KiB 1.44 MiB/s, done.
Resolving deltas: 100% (6/6), completed with 6 local objects.
From /acrypt/no-backup/annexdrive01/testdata
* [new branch] adjusted/main(hidemissing-unlocked) -> drive01/adjusted/main(hidemissing-unlocked)
* [new branch] adjusted/main(unlockpresent) -> drive01/adjusted/main(unlockpresent)
* [new branch] git-annex -> drive01/git-annex
* [new branch] main -> drive01/main
* [new branch] synced/main -> drive01/synced/main
ok
OK! This step is important, because drive01 and drive02 (which we'll set up shortly) won't necessarily be able to reach each other directly, due to not being plugged in simultaneously. Our $METAREPO, however, will know all about where every file is, so that the "wanted" settings can be correctly resolved. Let's see what things look like now:
$ git annex whereis less
whereis mtree (2 copies)
8aed01c5-da30-46c0-8357-1e8a94f67ed6 -- local hub [here]
b46fc85c-c68e-4093-a66e-19dc99a7d5e7 -- test drive #1 [drive01]
ok
whereis testdata/[redacted] (1 copy)
b46fc85c-c68e-4093-a66e-19dc99a7d5e7 -- test drive #1 [drive01]
The following untrusted locations may also have copies:
9e48387e-b096-400a-8555-a3caf5b70a64 -- [source]
ok
If I scroll down a bit, I'll see the files past the 400MB mark that didn't make it onto drive01. Let's add another example drive! Walkthrough: Adding a second drive The steps for $DRIVE02 are the same as we did before, just with drive02 instead of drive01, so I'll omit listing it all a second time. Now look at this excerpt from whereis:
whereis testdata/[redacted] (1 copy)
b46fc85c-c68e-4093-a66e-19dc99a7d5e7 -- test drive #1 [drive01]
The following untrusted locations may also have copies:
9e48387e-b096-400a-8555-a3caf5b70a64 -- [source]
ok
whereis testdata/[redacted] (1 copy)
c4540343-e3b5-4148-af46-3f612adda506 -- test drive #2 [drive02]
The following untrusted locations may also have copies:
9e48387e-b096-400a-8555-a3caf5b70a64 -- [source]
ok
Look at that! Some files on drive01, some on drive02, some neither place. Perfect! Walkthrough: Updates So I've made some changes in the source directory: moved a file, added another, and deleted one. All of these were copied to drive01 above. How do we handle this? First, we update the metadata repo:
$ cd $METAREPO
$ git annex sync
$ git annex dropunused all
OK, this has scanned $SOURCEDIR and noted changes. Let's see what whereis says:
$ git annex whereis less
...
whereis testdata/cp (0 copies)
The following untrusted locations may also have copies:
9e48387e-b096-400a-8555-a3caf5b70a64 -- [source]
failed
whereis testdata/file01-unchanged (1 copy)
b46fc85c-c68e-4093-a66e-19dc99a7d5e7 -- test drive #1 [drive01]
The following untrusted locations may also have copies:
9e48387e-b096-400a-8555-a3caf5b70a64 -- [source]
ok
So this looks right. The file I added was a copy of /bin/cp. I moved another file to one named file01-unchanged. Notice that it realized this was a rename and that the data still exists on drive01. Well, let's update drive01.
$ cd $DRIVE01/$REPONAME
$ git annex sync --content
Looking at the testdata/ directory now, I see that file01-unchanged has been renamed, the deleted file is gone, but cp isn't yet here -- probably due to space issues; as it's new, it's undefined whether it or some other file would fill up free space. Let's work along a few more commands.
$ git annex get --auto
$ git annex drop --auto
$ git annex dropunused all
And now, let's make sure metarepo is updated with its state.
$ cd $METAREPO
$ git annex sync
We could do the same for drive02. This is how we would proceed with every update. Walkthrough: Restoration Now, we have bare files at reasonable locations in drive01 and drive02. But, to generate a consistent restore, we need to be able to actually do an export. Otherwise, we may have files with old names, duplicate files, etc. Let's assume that we lost our source and metadata repos and have to restore from scratch. We'll make a new $RESTOREDIR. We'll begin with drive01 since we used it most recently.
$ mv $METAREPO $METAREPO.disabled
$ mv $SOURCEDIR $SOURCEDIR.disabled
$ git clone $DRIVE01/$REPONAME $RESTOREDIR
$ cd $RESTOREDIR
$ git config annex.thin true
$ git annex init "restore"
$ git annex adjust --hide-missing --unlock
Now, we need to connect the drive01 and pull the files from it.
$ git remote add drive01 $DRIVE01/$REPONAME
$ git annex sync --content
Now, repeat with drive02:
$ git remote add drive02 $DRIVE02/$REPONAME
$ git annex sync --content
Now we've got all our content back! Here's what whereis looks like:
whereis testdata/file01-unchanged (3 copies)
3d663d0f-1a69-4943-8eb1-f4fe22dc4349 -- restore [here]
9e48387e-b096-400a-8555-a3caf5b70a64 -- source
b46fc85c-c68e-4093-a66e-19dc99a7d5e7 -- test drive #1 [origin]
ok
...
I was a little surprised that drive01 didn't seem to know what was on drive02. Perhaps that could have been remedied by adding more remotes there? I'm not entirely sure; I'd thought would have been able to do that automatically. Conclusions I think I have demonstrated two things: First, git-annex is indeed an extremely powerful tool. I have only scratched the surface here. The location tracking is a neat feature, and being able to just access the data as plain files if all else fails is nice for future users. Secondly, it is also a complex tool and difficult to get right for this purpose (I think much easier for some other purposes). For someone that doesn't live and breathe git-annex, it can be hard to get right. In fact, I'm not entirely sure I got it right here. Why didn't drive02 know what files were on drive01 and vice-versa? I don't know, and that reflects some kind of misunderstanding on my part about how metadata is synced; perhaps more care needs to be taken in restore, or done in a different order, than I proposed. I initially tried to do a restore by using git annex export to a directory special remote with exporttree=yes, but I couldn't ever get it to actually do anything, and I don't know why. These two cut against each other. On the one hand, the raw accessibility of the data to someone with no computer skills is unmatched. On the other hand, I'm not certain I have the skill to always prepare the discs properly, or to do a proper consistent restore.

14 May 2023

Holger Levsen: 20230514-fwupd

How-To use fwupd As one cannot use fwupd on Qubes OS to update firmwares this is a quick How-To for using fwupd on Grml for future me. (Qubes 4.2 will bring qubes-fwupd.)

10 April 2023

Simon Josefsson: Trisquel is 42% Reproducible!

The absolute number may not be impressive, but what I hope is at least a useful contribution is that there actually is a number on how much of Trisquel is reproducible. Hopefully this will inspire others to help improve the actual metric. tl;dr: go to reproduce-trisquel. When I set about to understand how Trisquel worked, I identified a number of things that would improve my confidence in it. The lowest hanging fruit for me was to manually audit the package archive, and I wrote a tool called debdistdiff to automate this for me. That led me to think about apt archive transparency more in general. I have made some further work in that area (hint: apt-verify) that deserve its own blog post eventually. Most of apt archive transparency is futile if we don t trust the intended packages that are in the archive. One way to measurable increase trust in the package are to provide reproducible builds of the packages, which should by now be an established best practice. Code review is still important, but since it will never provide positive guarantees we need other processes that can identify sub-optimal situations automatically. The way reproducible builds easily identify negative results is what I believe has driven much of its success: its results are tangible and measurable. The field of software engineering is in need of more such practices. The design of my setup to build Trisquel reproducible are as follows. I did not expect to be able to use the GitLab shared runners to do the building, however they turned out to work quite well and I postponed setting up my own runner. There is a manually curated lists/disabled-aramo.txt with some packages that all required too much disk space or took over two hours to build. Today I finally took the time to setup a GitLab runner using podman running Trisquel aramo, and I expect to complete builds of the remaining packages soon one of my Dell R630 server with 256GB RAM and dual 2680v4 CPUs should deliver sufficient performance. Current limitations and ideas on further work (most are filed as project issues) include: Happy Easter Hacking! Update 2023-04-17: The original project reproduce-trisquel that was announced here has been archived and replaced with two projects, one generic debdistreproduce and one with results for Trisquel: reproduce/trisquel .

22 March 2023

Michael Prokop: Automatically unlocking a LUKS encrypted root filesystem during boot

Update on 2023-03-23: thanks to Daniel Roschka for mentioning the Mandos and TPM approaches, which might be better alternatives, depending on your options and needs. Peter Palfrader furthermore pointed me towards clevis-initramfs and tang. A customer of mine runs dedicated servers inside a foreign data-center, remote hands only. In such an environment you might need a disk replacement because you need bigger or faster disks, though also a disk might (start to) fail and you need a replacement. One has to be prepared for such a scenario, but fully wiping your used disk then might not always be an option, especially once disks (start to) fail. On the other hand you don t want to end up with (partial) data on your disk handed over to someone unexpected. By encrypting the data on your disks upfront you can prevent against this scenario. But if you have a fleet of servers you might not want to manually jump on servers during boot and unlock crypto volumes manually. It s especially annoying if it s about the root filesystem where a solution like dropbear-initramfs needs to be used for remote access during initramfs boot stage. So my task for the customer was to adjust encrypted LUKS devices such that no one needs to manually unlock the encrypted device during server boot (with some specific assumptions about possible attack vectors one has to live with, see the disclaimer at the end). The documentation about this use-case was rather inconsistent, especially because special rules apply for the root filesystem (no key file usage), we see different behavior between what s supported by systemd (hello key file again), initramfs-tools and dracut, not to mention the changes between different distributions. Since tests with this tend to be rather annoying (better make sure to have a Grml live system available :)), I m hereby documenting what worked for us (Debian/bullseye with initramfs-tools and cryptsetup-initramfs). The system was installed with LVM on-top of an encrypted Software-RAID device, only the /boot partition is unencrypted. But even if you don t use Software-RAID nor LVM the same instructions apply. The system looks like this:
% mount -t ext4 -l
/dev/mapper/foobar-root_1 on / type ext4 (rw,relatime,errors=remount-ro)
% sudo pvs
  PV                    VG     Fmt  Attr PSize   PFree
  /dev/mapper/md1_crypt foobar lvm2 a--  445.95g 430.12g
% sudo vgs
  VG     #PV #LV #SN Attr   VSize   VFree
  foobar   1   2   0 wz--n- 445.95g 430.12g
% sudo lvs
  LV     VG     Attr       LSize   Pool Origin Data%  Meta%  Move Log Cpy%Sync Convert
  root_1 foobar -wi-ao---- <14.90g
% lsblk
NAME                  MAJ:MIN RM   SIZE RO TYPE  MOUNTPOINT
[...]
sdd                     8:48   0 447.1G  0 disk
 sdd1                  8:49   0   571M  0 part  /boot/efi
 sdd2                  8:50   0   488M  0 part
   md0                 9:0    0   487M  0 raid1 /boot
 sdd3                  8:51   0 446.1G  0 part
   md1                 9:1    0   446G  0 raid1
     md1_crypt       253:0    0   446G  0 crypt
       foobar-root_1 253:1    0  14.9G  0 lvm   /
[...]
sdf                     8:80   0 447.1G  0 disk
 sdf1                  8:81   0   571M  0 part
 sdf2                  8:82   0   488M  0 part
   md0                 9:0    0   487M  0 raid1 /boot
 sdf3                  8:83   0 446.1G  0 part
   md1                 9:1    0   446G  0 raid1
     md1_crypt       253:0    0   446G  0 crypt
       foobar-root_1 253:1    0  14.9G  0 lvm   /
The actual crypsetup configuration is:
% cat /etc/crypttab
md1_crypt UUID=77246138-b666-4151-b01c-5a12db54b28b none luks,discard
Now, to automatically open the crypto device during boot we can instead use:
% cat /etc/crypttab 
md1_crypt UUID=77246138-b666-4151-b01c-5a12db54b28b none luks,discard,keyscript=/etc/initramfs-tools/unlock.sh
# touch /etc/initramfs-tools/unlock.sh
# chmod 0700 /etc/initramfs-tools/unlock.sh
# $EDITOR etc/initramfs-tools/unlock.sh
# cat /etc/initramfs-tools/unlock.sh
#!/bin/sh
echo -n "provide_the_actual_password_here"
# update-initramfs -k all -u
[...]
The server will then boot without prompting for a crypto password. Note that initramfs-tools by default uses an insecure umask of 0022, resulting in the initrd being accessible to everyone. But if you have the dropbear-initramfs package installed, its /usr/share/initramfs-tools/conf-hooks.d/dropbear sets UMASK=0077 , so the resulting /boot/initrd* file should automatically have proper permissions (0600). The cryptsetup hook warns about a permissive umask configuration during update-initramfs runs, but if you want to be sure, explicitly set it via e.g.:
# cat > /etc/initramfs-tools/conf.d/umask << EOF
# restrictive umask to avoid non-root access to initrd:
UMASK=0077
EOF
# update-initramfs -k all -u
Disclaimer: Of course you need to trust users with access to /etc/initramfs-tools/unlock.sh as well as the initramfs/initrd on your system. Furthermore you should wipe the boot partition (to destroy the keyfile information) before handing over such a disk. But that is a risk my customer can live with, YMMV.

13 March 2023

Antoine Beaupr : Framework 12th gen laptop review

The Framework is a 13.5" laptop body with swappable parts, which makes it somewhat future-proof and certainly easily repairable, scoring an "exceedingly rare" 10/10 score from ifixit.com. There are two generations of the laptop's main board (both compatible with the same body): the Intel 11th and 12th gen chipsets. I have received my Framework, 12th generation "DIY", device in late September 2022 and will update this page as I go along in the process of ordering, burning-in, setting up and using the device over the years. Overall, the Framework is a good laptop. I like the keyboard, the touch pad, the expansion cards. Clearly there's been some good work done on industrial design, and it's the most repairable laptop I've had in years. Time will tell, but it looks sturdy enough to survive me many years as well. This is also one of the most powerful devices I ever lay my hands on. I have managed, remotely, more powerful servers, but this is the fastest computer I have ever owned, and it fits in this tiny case. It is an amazing machine. On the downside, there's a bit of proprietary firmware required (WiFi, Bluetooth, some graphics) and the Framework ships with a proprietary BIOS, with currently no Coreboot support. Expect to need the latest kernel, firmware, and hacking around a bunch of things to get resolution and keybindings working right. Like others, I have first found significant power management issues, but many issues can actually be solved with some configuration. Some of the expansion ports (HDMI, DP, MicroSD, and SSD) use power when idle, so don't expect week-long suspend, or "full day" battery while those are plugged in. Finally, the expansion ports are nice, but there's only four of them. If you plan to have a two-monitor setup, you're likely going to need a dock. Read on for the detailed review. For context, I'm moving from the Purism Librem 13v4 because it basically exploded on me. I had, in the meantime, reverted back to an old ThinkPad X220, so I sometimes compare the Framework with that venerable laptop as well. This blog post has been maturing for months now. It started in September 2022 and I declared it completed in March 2023. It's the longest single article on this entire website, currently clocking at about 13,000 words. It will take an average reader a full hour to go through this thing, so I don't expect anyone to actually do that. This introduction should be good enough for most people, read the first section if you intend to actually buy a Framework. Jump around the table of contents as you see fit for after you did buy the laptop, as it might include some crucial hints on how to make it work best for you, especially on (Debian) Linux.

Advice for buyers Those are things I wish I would have known before buying:
  1. consider buying 4 USB-C expansion cards, or at least a mix of 4 USB-A or USB-C cards, as they use less power than other cards and you do want to fill those expansion slots otherwise they snag around and feel insecure
  2. you will likely need a dock or at least a USB hub if you want a two-monitor setup, otherwise you'll run out of ports
  3. you have to do some serious tuning to get proper (10h+ idle, 10 days suspend) power savings
  4. in particular, beware that the HDMI, DisplayPort and particularly the SSD and MicroSD cards take a significant amount power, even when sleeping, up to 2-6W for the latter two
  5. beware that the MicroSD card is what it says: Micro, normal SD cards won't fit, and while there might be full sized one eventually, it's currently only at the prototyping stage
  6. the Framework monitor has an unusual aspect ratio (3:2): I like it (and it matches classic and digital photography aspect ratio), but it might surprise you

Current status I have the framework! It's setup with a fresh new Debian bookworm installation. I've ran through a large number of tests and burn in. I have decided to use the Framework as my daily driver, and had to buy a USB-C dock to get my two monitors connected, which was own adventure. Update: Framework just (2023-03-23) just announced a whole bunch of new stuff: The recording is available in this video and it's not your typical keynote. It starts ~25 minutes late, audio is crap, lightning and camera are crap, clapping seems to be from whatever staff they managed to get together in a room, decor is bizarre, colors are shit. It's amazing.

Specifications Those are the specifications of the 12th gen, in general terms. Your build will of course vary according to your needs.
  • CPU: i5-1240P, i7-1260P, or i7-1280P (Up to 4.4-4.8 GHz, 4+8 cores), Iris Xe graphics
  • Storage: 250-4000GB NVMe (or bring your own)
  • Memory: 8-64GB DDR4-3200 (or bring your own)
  • WiFi 6e (AX210, vPro optional, or bring your own)
  • 296.63mm X 228.98mm X 15.85mm, 1.3Kg
  • 13.5" display, 3:2 ratio, 2256px X 1504px, 100% sRGB, >400 nit
  • 4 x USB-C user-selectable expansion ports, including
    • USB-C
    • USB-A
    • HDMI
    • DP
    • Ethernet
    • MicroSD
    • 250-1000GB SSD
  • 3.5mm combo headphone jack
  • Kill switches for microphone and camera
  • Battery: 55Wh
  • Camera: 1080p 60fps
  • Biometrics: Fingerprint Reader
  • Backlit keyboard
  • Power Adapter: 60W USB-C (or bring your own)
  • ships with a screwdriver/spludger
  • 1 year warranty
  • base price: 1000$CAD, but doesn't give you much, typical builds around 1500-2000$CAD

Actual build This is the actual build I ordered. Amounts in CAD. (1CAD = ~0.75EUR/USD.)

Base configuration
  • CPU: Intel Core i5-1240P (AKA Alder Lake P 8 4.4GHz P-threads, 8 3.2GHz E-threads, 16 total, 28-64W), 1079$
  • Memory: 16GB (1 x 16GB) DDR4-3200, 104$

Customization
  • Keyboard: US English, included

Expansion Cards
  • 2 USB-C $24
  • 3 USB-A $36
  • 2 HDMI $50
  • 1 DP $50
  • 1 MicroSD $25
  • 1 Storage 1TB $199
  • Sub-total: 384$

Accessories
  • Power Adapter - US/Canada $64.00

Total
  • Before tax: 1606$
  • After tax and duties: 1847$
  • Free shipping

Quick evaluation This is basically the TL;DR: here, just focusing on broad pros/cons of the laptop.

Pros

Cons
  • the 11th gen is out of stock, except for the higher-end CPUs, which are much less affordable (700$+)
  • the 12th gen has compatibility issues with Debian, followup in the DebianOn page, but basically: brightness hotkeys, power management, wifi, the webcam is okay even though the chipset is the infamous alder lake because it does not have the fancy camera; most issues currently seem solvable, and upstream is working with mainline to get their shit working
  • 12th gen might have issues with thunderbolt docks
  • they used to have some difficulty keeping up with the orders: first two batches shipped, third batch sold out, fourth batch should have shipped (?) in October 2021. they generally seem to keep up with shipping. update (august 2022): they rolled out a second line of laptops (12th gen), first batch shipped, second batch shipped late, September 2022 batch was generally on time, see this spreadsheet for a crowdsourced effort to track those supply chain issues seem to be under control as of early 2023. I got the Ethernet expansion card shipped within a week.
  • compared to my previous laptop (Purism Librem 13v4), it feels strangely bulkier and heavier; it's actually lighter than the purism (1.3kg vs 1.4kg) and thinner (15.85mm vs 18mm) but the design of the Purism laptop (tapered edges) makes it feel thinner
  • no space for a 2.5" drive
  • rather bright LED around power button, but can be dimmed in the BIOS (not low enough to my taste) I got used to it
  • fan quiet when idle, but can be noisy when running, for example if you max a CPU for a while
  • battery described as "mediocre" by Ars Technica (above), confirmed poor in my tests (see below)
  • no RJ-45 port, and attempts at designing ones are failing because the modular plugs are too thin to fit (according to Linux After Dark), so unlikely to have one in the future Update: they cracked that nut and ship an 2.5 gbps Ethernet expansion card with a realtek chipset, without any firmware blob (!)
  • a bit pricey for the performance, especially when compared to the competition (e.g. Dell XPS, Apple M1)
  • 12th gen Intel has glitchy graphics, seems like Intel hasn't fully landed proper Linux support for that chipset yet

Initial hardware setup A breeze.

Accessing the board The internals are accessed through five TorX screws, but there's a nice screwdriver/spudger that works well enough. The screws actually hold in place so you can't even lose them. The first setup is a bit counter-intuitive coming from the Librem laptop, as I expected the back cover to lift and give me access to the internals. But instead the screws is release the keyboard and touch pad assembly, so you actually need to flip the laptop back upright and lift the assembly off (!) to get access to the internals. Kind of scary. I also actually unplugged a connector in lifting the assembly because I lifted it towards the monitor, while you actually need to lift it to the right. Thankfully, the connector didn't break, it just snapped off and I could plug it back in, no harm done. Once there, everything is well indicated, with QR codes all over the place supposedly leading to online instructions.

Bad QR codes Unfortunately, the QR codes I tested (in the expansion card slot, the memory slot and CPU slots) did not actually work so I wonder how useful those actually are. After all, they need to point to something and that means a URL, a running website that will answer those requests forever. I bet those will break sooner than later and in fact, as far as I can tell, they just don't work at all. I prefer the approach taken by the MNT reform here which designed (with the 100 rabbits folks) an actual paper handbook (PDF). The first QR code that's immediately visible from the back of the laptop, in an expansion cord slot, is a 404. It seems to be some serial number URL, but I can't actually tell because, well, the page is a 404. I was expecting that bar code to lead me to an introduction page, something like "how to setup your Framework laptop". Support actually confirmed that it should point a quickstart guide. But in a bizarre twist, they somehow sent me the URL with the plus (+) signs escaped, like this:
https://guides.frame.work/Guide/Framework\+Laptop\+DIY\+Edition\+Quick\+Start\+Guide/57
... which Firefox immediately transforms in:
https://guides.frame.work/Guide/Framework/+Laptop/+DIY/+Edition/+Quick/+Start/+Guide/57
I'm puzzled as to why they would send the URL that way, the proper URL is of course:
https://guides.frame.work/Guide/Framework+Laptop+DIY+Edition+Quick+Start+Guide/57
(They have also "let the team know about this for feedback and help resolve the problem with the link" which is a support code word for "ha-ha! nope! not my problem right now!" Trust me, I know, my own code word is "can you please make a ticket?")

Seating disks and memory The "DIY" kit doesn't actually have that much of a setup. If you bought RAM, it's shipped outside the laptop in a little plastic case, so you just seat it in as usual. Then you insert your NVMe drive, and, if that's your fancy, you also install your own mPCI WiFi card. If you ordered one (which was my case), it's pre-installed. Closing the laptop is also kind of amazing, because the keyboard assembly snaps into place with magnets. I have actually used the laptop with the keyboard unscrewed as I was putting the drives in and out, and it actually works fine (and will probably void your warranty, so don't do that). (But you can.) (But don't, really.)

Hardware review

Keyboard and touch pad The keyboard feels nice, for a laptop. I'm used to mechanical keyboard and I'm rather violent with those poor things. Yet the key travel is nice and it's clickety enough that I don't feel too disoriented. At first, I felt the keyboard as being more laggy than my normal workstation setup, but it turned out this was a graphics driver issues. After enabling a composition manager, everything feels snappy. The touch pad feels good. The double-finger scroll works well enough, and I don't have to wonder too much where the middle button is, it just works. Taps don't work, out of the box: that needs to be enabled in Xorg, with something like this:
cat > /etc/X11/xorg.conf.d/40-libinput.conf <<EOF
Section "InputClass"
      Identifier "libinput touch pad catchall"
      MatchIsTouchpad "on"
      MatchDevicePath "/dev/input/event*"
      Driver "libinput"
      Option "Tapping" "on"
      Option "TappingButtonMap" "lmr"
EndSection
EOF
But be aware that once you enable that tapping, you'll need to deal with palm detection... So I have not actually enabled this in the end.

Power button The power button is a little dangerous. It's quite easy to hit, as it's right next to one expansion card where you are likely to plug in a cable power. And because the expansion cards are kind of hard to remove, you might squeeze the laptop (and the power key) when trying to remove the expansion card next to the power button. So obviously, don't do that. But that's not very helpful. An alternative is to make the power button do something else. With systemd-managed systems, it's actually quite easy. Add a HandlePowerKey stanza to (say) /etc/systemd/logind.conf.d/power-suspends.conf:
[Login]
HandlePowerKey=suspend
HandlePowerKeyLongPress=poweroff
You might have to create the directory first:
mkdir /etc/systemd/logind.conf.d/
Then restart logind:
systemctl restart systemd-logind
And the power button will suspend! Long-press to power off doesn't actually work as the laptop immediately suspends... Note that there's probably half a dozen other ways of doing this, see this, this, or that.

Special keybindings There is a series of "hidden" (as in: not labeled on the key) keybindings related to the fn keybinding that I actually find quite useful.
Key Equivalent Effect Command
p Pause lock screen xset s activate
b Break ? ?
k ScrLk switch keyboard layout N/A
It looks like those are defined in the microcontroller so it would be possible to add some. For example, the SysRq key is almost bound to fn s in there. Note that most other shortcuts like this are clearly documented (volume, brightness, etc). One key that's less obvious is F12 that only has the Framework logo on it. That actually calls the keysym XF86AudioMedia which, interestingly, does absolutely nothing here. By default, on Windows, it opens your browser to the Framework website and, on Linux, your "default media player". The keyboard backlight can be cycled with fn-space. The dimmer version is dim enough, and the keybinding is easy to find in the dark. A skinny elephant would be performed with alt PrtScr (above F11) KEY, so for example alt fn F11 b should do a hard reset. This comment suggests you need to hold the fn only if "function lock" is on, but that's actually the opposite of my experience. Out of the box, some of the fn keys don't work. Mute, volume up/down, brightness, monitor changes, and the airplane mode key all do basically nothing. They don't send proper keysyms to Xorg at all. This is a known problem and it's related to the fact that the laptop has light sensors to adjust the brightness automatically. Somehow some of those keys (e.g. the brightness controls) are supposed to show up as a different input device, but don't seem to work correctly. It seems like the solution is for the Framework team to write a driver specifically for this, but so far no progress since July 2022. In the meantime, the fancy functionality can be supposedly disabled with:
echo 'blacklist hid_sensor_hub'   sudo tee /etc/modprobe.d/framework-als-blacklist.conf
... and a reboot. This solution is also documented in the upstream guide. Note that there's another solution flying around that fixes this by changing permissions on the input device but I haven't tested that or seen confirmation it works.

Kill switches The Framework has two "kill switches": one for the camera and the other for the microphone. The camera one actually disconnects the USB device when turned off, and the mic one seems to cut the circuit. It doesn't show up as muted, it just stops feeding the sound. Both kill switches are around the main camera, on top of the monitor, and quite discreet. Then turn "red" when enabled (i.e. "red" means "turned off").

Monitor The monitor looks pretty good to my untrained eyes. I have yet to do photography work on it, but some photos I looked at look sharp and the colors are bright and lively. The blacks are dark and the screen is bright. I have yet to use it in full sunlight. The dimmed light is very dim, which I like.

Screen backlight I bind brightness keys to xbacklight in i3, but out of the box I get this error:
sep 29 22:09:14 angela i3[5661]: No outputs have backlight property
It just requires this blob in /etc/X11/xorg.conf.d/backlight.conf:
Section "Device"
    Identifier  "Card0"
    Driver      "intel"
    Option      "Backlight"  "intel_backlight"
EndSection
This way I can control the actual backlight power with the brightness keys, and they do significantly reduce power usage.

Multiple monitor support I have been able to hook up my two old monitors to the HDMI and DisplayPort expansion cards on the laptop. The lid closes without suspending the machine, and everything works great. I actually run out of ports, even with a 4-port USB-A hub, which gives me a total of 7 ports:
  1. power (USB-C)
  2. monitor 1 (DisplayPort)
  3. monitor 2 (HDMI)
  4. USB-A hub, which adds:
  5. keyboard (USB-A)
  6. mouse (USB-A)
  7. Yubikey
  8. external sound card
Now the latter, I might be able to get rid of if I switch to a combo-jack headset, which I do have (and still need to test). But still, this is a problem. I'll probably need a powered USB-C dock and better monitors, possibly with some Thunderbolt chaining, to save yet more ports. But that means more money into this setup, argh. And figuring out my monitor situation is the kind of thing I'm not that big of a fan of. And neither is shopping for USB-C (or is it Thunderbolt?) hubs. My normal autorandr setup doesn't work: I have tried saving a profile and it doesn't get autodetected, so I also first need to do:
autorandr -l framework-external-dual-lg-acer
The magic:
autorandr -l horizontal
... also works well. The worst problem with those monitors right now is that they have a radically smaller resolution than the main screen on the laptop, which means I need to reset the font scaling to normal every time I switch back and forth between those monitors and the laptop, which means I actually need to do this:
autorandr -l horizontal &&
eho Xft.dpi: 96   xrdb -merge &&
systemctl restart terminal xcolortaillog background-image emacs &&
i3-msg restart
Kind of disruptive.

Expansion ports I ordered a total of 10 expansion ports. I did manage to initialize the 1TB drive as an encrypted storage, mostly to keep photos as this is something that takes a massive amount of space (500GB and counting) and that I (unfortunately) don't work on very often (but still carry around). The expansion ports are fancy and nice, but not actually that convenient. They're a bit hard to take out: you really need to crimp your fingernails on there and pull hard to take them out. There's a little button next to them to release, I think, but at first it feels a little scary to pull those pucks out of there. You get used to it though, and it's one of those things you can do without looking eventually. There's only four expansion ports. Once you have two monitors, the drive, and power plugged in, bam, you're out of ports; there's nowhere to plug my Yubikey. So if this is going to be my daily driver, with a dual monitor setup, I will need a dock, which means more crap firmware and uncertainty, which isn't great. There are actually plans to make a dual-USB card, but that is blocked on designing an actual board for this. I can't wait to see more expansion ports produced. There's a ethernet expansion card which quickly went out of stock basically the day it was announced, but was eventually restocked. I would like to see a proper SD-card reader. There's a MicroSD card reader, but that obviously doesn't work for normal SD cards, which would be more broadly compatible anyways (because you can have a MicroSD to SD card adapter, but I have never heard of the reverse). Someone actually found a SD card reader that fits and then someone else managed to cram it in a 3D printed case, which is kind of amazing. Still, I really like that idea that I can carry all those little adapters in a pouch when I travel and can basically do anything I want. It does mean I need to shuffle through them to find the right one which is a little annoying. I have an elastic band to keep them lined up so that all the ports show the same side, to make it easier to find the right one. But that quickly gets undone and instead I have a pouch full of expansion cards. Another awesome thing with the expansion cards is that they don't just work on the laptop: anything that takes USB-C can take those cards, which means you can use it to connect an SD card to your phone, for backups, for example. Heck, you could even connect an external display to your phone that way, assuming that's supported by your phone of course (and it probably isn't). The expansion ports do take up some power, even when idle. See the power management section below, and particularly the power usage tests for details.

USB-C charging One thing that is really a game changer for me is USB-C charging. It's hard to overstate how convenient this is. I often have a USB-C cable lying around to charge my phone, and I can just grab that thing and pop it in my laptop. And while it will obviously not charge as fast as the provided charger, it will stop draining the battery at least. (As I wrote this, I had the laptop plugged in the Samsung charger that came with a phone, and it was telling me it would take 6 hours to charge the remaining 15%. With the provided charger, that flew down to 15 minutes. Similarly, I can power the laptop from the power grommet on my desk, reducing clutter as I have that single wire out there instead of the bulky power adapter.) I also really like the idea that I can charge my laptop with a power bank or, heck, with my phone, if push comes to shove. (And vice-versa!) This is awesome. And it works from any of the expansion ports, of course. There's a little led next to the expansion ports as well, which indicate the charge status:
  • red/amber: charging
  • white: charged
  • off: unplugged
I couldn't find documentation about this, but the forum answered. This is something of a recurring theme with the Framework. While it has a good knowledge base and repair/setup guides (and the forum is awesome) but it doesn't have a good "owner manual" that shows you the different parts of the laptop and what they do. Again, something the MNT reform did well. Another thing that people are asking about is an external sleep indicator: because the power LED is on the main keyboard assembly, you don't actually see whether the device is active or not when the lid is closed. Finally, I wondered what happens when you plug in multiple power sources and it turns out the charge controller is actually pretty smart: it will pick the best power source and use it. The only downside is it can't use multiple power sources, but that seems like a bit much to ask.

Multimedia and other devices Those things also work:
  • webcam: splendid, best webcam I've ever had (but my standards are really low)
  • onboard mic: works well, good gain (maybe a bit much)
  • onboard speakers: sound okay, a little metal-ish, loud enough to be annoying, see this thread for benchmarks, apparently pretty good speakers
  • combo jack: works, with slight hiss, see below
There's also a light sensor, but it conflicts with the keyboard brightness controls (see above). There's also an accelerometer, but it's off by default and will be removed from future builds.

Combo jack mic tests The Framework laptop ships with a combo jack on the left side, which allows you to plug in a CTIA (source) headset. In human terms, it's a device that has both a stereo output and a mono input, typically a headset or ear buds with a microphone somewhere. It works, which is better than the Purism (which only had audio out), but is on par for the course for that kind of onboard hardware. Because of electrical interference, such sound cards very often get lots of noise from the board. With a Jabra Evolve 40, the built-in USB sound card generates basically zero noise on silence (invisible down to -60dB in Audacity) while plugging it in directly generates a solid -30dB hiss. There is a noise-reduction system in that sound card, but the difference is still quite striking. On a comparable setup (curie, a 2017 Intel NUC), there is also a his with the Jabra headset, but it's quieter, more in the order of -40/-50 dB, a noticeable difference. Interestingly, testing with my Mee Audio Pro M6 earbuds leads to a little more hiss on curie, more on the -35/-40 dB range, close to the Framework. Also note that another sound card, the Antlion USB adapter that comes with the ModMic 4, also gives me pretty close to silence on a quiet recording, picking up less than -50dB of background noise. It's actually probably picking up the fans in the office, which do make audible noises. In other words, the hiss of the sound card built in the Framework laptop is so loud that it makes more noise than the quiet fans in the office. Or, another way to put it is that two USB sound cards (the Jabra and the Antlion) are able to pick up ambient noise in my office but not the Framework laptop. See also my audio page.

Performance tests

Compiling Linux 5.19.11 On a single core, compiling the Debian version of the Linux kernel takes around 100 minutes:
5411.85user 673.33system 1:37:46elapsed 103%CPU (0avgtext+0avgdata 831700maxresident)k
10594704inputs+87448000outputs (9131major+410636783minor)pagefaults 0swaps
This was using 16 watts of power, with full screen brightness. With all 16 cores (make -j16), it takes less than 25 minutes:
19251.06user 2467.47system 24:13.07elapsed 1494%CPU (0avgtext+0avgdata 831676maxresident)k
8321856inputs+87427848outputs (30792major+409145263minor)pagefaults 0swaps
I had to plug the normal power supply after a few minutes because battery would actually run out using my desk's power grommet (34 watts). During compilation, fans were spinning really hard, quite noisy, but not painfully so. The laptop was sucking 55 watts of power, steadily:
  Time    User  Nice   Sys  Idle    IO  Run Ctxt/s  IRQ/s Fork Exec Exit  Watts
-------- ----- ----- ----- ----- ----- ---- ------ ------ ---- ---- ---- ------
 Average  87.9   0.0  10.7   1.4   0.1 17.8 6583.6 5054.3 233.0 223.9 233.1  55.96
 GeoMean  87.9   0.0  10.6   1.2   0.0 17.6 6427.8 5048.1 227.6 218.7 227.7  55.96
  StdDev   1.4   0.0   1.2   0.6   0.2  3.0 1436.8  255.5 50.0 47.5 49.7   0.20
-------- ----- ----- ----- ----- ----- ---- ------ ------ ---- ---- ---- ------
 Minimum  85.0   0.0   7.8   0.5   0.0 13.0 3594.0 4638.0 117.0 111.0 120.0  55.52
 Maximum  90.8   0.0  12.9   3.5   0.8 38.0 10174.0 5901.0 374.0 362.0 375.0  56.41
-------- ----- ----- ----- ----- ----- ---- ------ ------ ---- ---- ---- ------
Summary:
CPU:  55.96 Watts on average with standard deviation 0.20
Note: power read from RAPL domains: package-0, uncore, package-0, core, psys.
These readings do not cover all the hardware in this device.

memtest86+ I ran Memtest86+ v6.00b3. It shows something like this:
Memtest86+ v6.00b3        12th Gen Intel(R) Core(TM) i5-1240P
CLK/Temp: 2112MHz    78/78 C   Pass  2% #
L1 Cache:   48KB    414 GB/s   Test 46% ##################
L2 Cache: 1.25MB    118 GB/s   Test #3 [Moving inversions, 1s & 0s] 
L3 Cache:   12MB     43 GB/s   Testing: 16GB - 18GB [1GB of 15.7GB]
Memory  :  15.7GB  14.9 GB/s   Pattern: 
--------------------------------------------------------------------------------
CPU: 4P+8E-Cores (16T)    SMP: 8T (PAR))    Time:  0:27:23  Status: Pass     \
RAM: 1600MHz (DDR4-3200) CAS 22-22-22-51    Pass:  1        Errors: 0
--------------------------------------------------------------------------------
Memory SPD Information
----------------------
 - Slot 2: 16GB DDR-4-3200 - Crucial CT16G4SFRA32A.C16FP (2022-W23)
                          Framework FRANMACP04
 <ESC> Exit  <F1> Configuration  <Space> Scroll Lock            6.00.unknown.x64
So about 30 minutes for a full 16GB memory test.

Software setup Once I had everything in the hardware setup, I figured, voil , I'm done, I'm just going to boot this beautiful machine and I can get back to work. I don't understand why I am so na ve some times. It's mind boggling. Obviously, it didn't happen that way at all, and I spent the best of the three following days tinkering with the laptop.

Secure boot and EFI First, I couldn't boot off of the NVMe drive I transferred from the previous laptop (the Purism) and the BIOS was not very helpful: it was just complaining about not finding any boot device, without dropping me in the real BIOS. At first, I thought it was a problem with my NVMe drive, because it's not listed in the compatible SSD drives from upstream. But I figured out how to enter BIOS (press F2 manically, of course), which showed the NVMe drive was actually detected. It just didn't boot, because it was an old (2010!!) Debian install without EFI. So from there, I disabled secure boot, and booted a grml image to try to recover. And by "boot" I mean, I managed to get to the grml boot loader which promptly failed to load its own root file system somehow. I still have to investigate exactly what happened there, but it failed some time after the initrd load with:
Unable to find medium containing a live file system
This, it turns out, was fixed in Debian lately, so a daily GRML build will not have this problems. The upcoming 2022 release (likely 2022.10 or 2022.11) will also get the fix. I did manage to boot the development version of the Debian installer which was a surprisingly good experience: it mounted the encrypted drives and did everything pretty smoothly. It even offered me to reinstall the boot loader, but that ultimately (and correctly, as it turns out) failed because I didn't have a /boot/efi partition. At this point, I realized there was no easy way out of this, and I just proceeded to completely reinstall Debian. I had a spare NVMe drive lying around (backups FTW!) so I just swapped that in, rebooted in the Debian installer, and did a clean install. I wanted to switch to bookworm anyways, so I guess that's done too.

Storage limitations Another thing that happened during setup is that I tried to copy over the internal 2.5" SSD drive from the Purism to the Framework 1TB expansion card. There's no 2.5" slot in the new laptop, so that's pretty much the only option for storage expansion. I was tired and did something wrong. I ended up wiping the partition table on the original 2.5" drive. Oops. It might be recoverable, but just restoring the partition table didn't work either, so I'm not sure how I recover the data there. Normally, everything on my laptops and workstations is designed to be disposable, so that wasn't that big of a problem. I did manage to recover most of the data thanks to git-annex reinit, but that was a little hairy.

Bootstrapping Puppet Once I had some networking, I had to install all the packages I needed. The time I spent setting up my workstations with Puppet has finally paid off. What I actually did was to restore two critical directories:
/etc/ssh
/var/lib/puppet
So that I would keep the previous machine's identity. That way I could contact the Puppet server and install whatever was missing. I used my Puppet optimization trick to do a batch install and then I had a good base setup, although not exactly as it was before. 1700 packages were installed manually on angela before the reinstall, and not in Puppet. I did not inspect each one individually, but I did go through /etc and copied over more SSH keys, for backups and SMTP over SSH.

LVFS support It looks like there's support for the (de-facto) standard LVFS firmware update system. At least I was able to update the UEFI firmware with a simple:
apt install fwupd-amd64-signed
fwupdmgr refresh
fwupdmgr get-updates
fwupdmgr update
Nice. The 12th gen BIOS updates, currently (January 2023) beta, can be deployed through LVFS with:
fwupdmgr enable-remote lvfs-testing
echo 'DisableCapsuleUpdateOnDisk=true' >> /etc/fwupd/uefi_capsule.conf 
fwupdmgr update
Those instructions come from the beta forum post. I performed the BIOS update on 2023-01-16T16:00-0500.

Resolution tweaks The Framework laptop resolution (2256px X 1504px) is big enough to give you a pretty small font size, so welcome to the marvelous world of "scaling". The Debian wiki page has a few tricks for this.

Console This will make the console and grub fonts more readable:
cat >> /etc/default/console-setup <<EOF
FONTFACE="Terminus"
FONTSIZE=32x16
EOF
echo GRUB_GFXMODE=1024x768 >> /etc/default/grub
update-grub

Xorg Adding this to your .Xresources will make everything look much bigger:
! 1.5*96
Xft.dpi: 144
Apparently, some of this can also help:
! These might also be useful depending on your monitor and personal preference:
Xft.autohint: 0
Xft.lcdfilter:  lcddefault
Xft.hintstyle:  hintfull
Xft.hinting: 1
Xft.antialias: 1
Xft.rgba: rgb
It my experience it also makes things look a little fuzzier, which is frustrating because you have this awesome monitor but everything looks out of focus. Just bumping Xft.dpi by a 1.5 factor looks good to me. The Debian Wiki has a page on HiDPI, but it's not as good as the Arch Wiki, where the above blurb comes from. I am not using the latter because I suspect it's causing some of the "fuzziness". TODO: find the equivalent of this GNOME hack in i3? (gsettings set org.gnome.mutter experimental-features "['scale-monitor-framebuffer']"), taken from this Framework guide

Issues

BIOS configuration The Framework BIOS has some minor issues. One issue I personally encountered is that I had disabled Quick boot and Quiet boot in the BIOS to diagnose the above boot issues. This, in turn, triggers a bug where the BIOS boot manager (F12) would just hang completely. It would also fail to boot from an external USB drive. The current fix (as of BIOS 3.03) is to re-enable both Quick boot and Quiet boot. Presumably this is something that will get fixed in a future BIOS update. Note that the following keybindings are active in the BIOS POST check:
Key Meaning
F2 Enter BIOS setup menu
F12 Enter BIOS boot manager
Delete Enter BIOS setup menu

WiFi compatibility issues I couldn't make WiFi work at first. Obviously, the default Debian installer doesn't ship with proprietary firmware (although that might change soon) so the WiFi card didn't work out of the box. But even after copying the firmware through a USB stick, I couldn't quite manage to find the right combination of ip/iw/wpa-supplicant (yes, after repeatedly copying a bunch more packages over to get those bootstrapped). (Next time I should probably try something like this post.) Thankfully, I had a little USB-C dongle with a RJ-45 jack lying around. That also required a firmware blob, but it was a single package to copy over, and with that loaded, I had network. Eventually, I did managed to make WiFi work; the problem was more on the side of "I forgot how to configure a WPA network by hand from the commandline" than anything else. NetworkManager worked fine and got WiFi working correctly. Note that this is with Debian bookworm, which has the 5.19 Linux kernel, and with the firmware-nonfree (firmware-iwlwifi, specifically) package.

Battery life I was having between about 7 hours of battery on the Purism Librem 13v4, and that's after a year or two of battery life. Now, I still have about 7 hours of battery life, which is nicer than my old ThinkPad X220 (20 minutes!) but really, it's not that good for a new generation laptop. The 12th generation Intel chipset probably improved things compared to the previous one Framework laptop, but I don't have a 11th gen Framework to compare with). (Note that those are estimates from my status bar, not wall clock measurements. They should still be comparable between the Purism and Framework, that said.) The battery life doesn't seem up to, say, Dell XPS 13, ThinkPad X1, and of course not the Apple M1, where I would expect 10+ hours of battery life out of the box. That said, I do get those kind estimates when the machine is fully charged and idle. In fact, when everything is quiet and nothing is plugged in, I get dozens of hours of battery life estimated (I've seen 25h!). So power usage fluctuates quite a bit depending on usage, which I guess is expected. Concretely, so far, light web browsing, reading emails and writing notes in Emacs (e.g. this file) takes about 8W of power:
Time    User  Nice   Sys  Idle    IO  Run Ctxt/s  IRQ/s Fork Exec Exit  Watts
-------- ----- ----- ----- ----- ----- ---- ------ ------ ---- ---- ---- ------
 Average   1.7   0.0   0.5  97.6   0.2  1.2 4684.9 1985.2 126.6 39.1 128.0   7.57
 GeoMean   1.4   0.0   0.4  97.6   0.1  1.2 4416.6 1734.5 111.6 27.9 113.3   7.54
  StdDev   1.0   0.2   0.2   1.2   0.0  0.5 1584.7 1058.3 82.1 44.0 80.2   0.71
-------- ----- ----- ----- ----- ----- ---- ------ ------ ---- ---- ---- ------
 Minimum   0.2   0.0   0.2  94.9   0.1  1.0 2242.0  698.2 82.0 17.0 82.0   6.36
 Maximum   4.1   1.1   1.0  99.4   0.2  3.0 8687.4 4445.1 463.0 249.0 449.0   9.10
-------- ----- ----- ----- ----- ----- ---- ------ ------ ---- ---- ---- ------
Summary:
System:   7.57 Watts on average with standard deviation 0.71
Expansion cards matter a lot in the battery life (see below for a thorough discussion), my normal setup is 2xUSB-C and 1xUSB-A (yes, with an empty slot, and yes, to save power). Interestingly, playing a video in a (720p) window in a window takes up more power (10.5W) than in full screen (9.5W) but I blame that on my desktop setup (i3 + compton)... Not sure if mpv hits the VA-API, maybe not in windowed mode. Similar results with 1080p, interestingly, except the window struggles to keep up altogether. Full screen playback takes a relatively comfortable 9.5W, which means a solid 5h+ of playback, which is fine by me. Fooling around the web, small edits, youtube-dl, and I'm at around 80% battery after about an hour, with an estimated 5h left, which is a little disappointing. I had a 7h remaining estimate before I started goofing around Discourse, so I suspect the website is a pretty big battery drain, actually. I see about 10-12 W, while I was probably at half that (6-8W) just playing music with mpv in the background... In other words, it looks like editing posts in Discourse with Firefox takes a solid 4-6W of power. Amazing and gross. (When writing about abusive power usage generates more power usage, is that an heisenbug? Or schr dinbug?)

Power management Compared to the Purism Librem 13v4, the ongoing power usage seems to be slightly better. An anecdotal metric is that the Purism would take 800mA idle, while the more powerful Framework manages a little over 500mA as I'm typing this, fluctuating between 450 and 600mA. That is without any active expansion card, except the storage. Those numbers come from the output of tlp-stat -b and, unfortunately, the "ampere" unit makes it quite hard to compare those, because voltage is not necessarily the same between the two platforms.
  • TODO: review Arch Linux's tips on power saving
  • TODO: i915 driver has a lot of parameters, including some about power saving, see, again, the arch wiki, and particularly enable_fbc=1
TL:DR; power management on the laptop is an issue, but there's various tweaks you can make to improve it. Try:
  • powertop --auto-tune
  • apt install tlp && systemctl enable tlp
  • nvme.noacpi=1 mem_sleep_default=deep on the kernel command line may help with standby power usage
  • keep only USB-C expansion cards plugged in, all others suck power even when idle
  • consider upgrading the BIOS to latest beta (3.06 at the time of writing), unverified power savings
  • latest Linux kernels (6.2) promise power savings as well (unverified)
Update: also try to follow the official optimization guide. It was made for Ubuntu but will probably also work for your distribution of choice with a few tweaks. They recommend using tlpui but it's not packaged in Debian. There is, however, a Flatpak release. In my case, it resulted in the following diff to tlp.conf: tlp.patch.

Background on CPU architecture There were power problems in the 11th gen Framework laptop, according to this report from Linux After Dark, so the issues with power management on the Framework are not new. The 12th generation Intel CPU (AKA "Alder Lake") is a big-little architecture with "power-saving" and "performance" cores. There used to be performance problems introduced by the scheduler in Linux 5.16 but those were eventually fixed in 5.18, which uses Intel's hardware as an "intelligent, low-latency hardware-assisted scheduler". According to Phoronix, the 5.19 release improved the power saving, at the cost of some penalty cost. There were also patch series to make the scheduler configurable, but it doesn't look those have been merged as of 5.19. There was also a session about this at the 2022 Linux Plumbers, but they stopped short of talking more about the specific problems Linux is facing in Alder lake:
Specifically, the kernel's energy-aware scheduling heuristics don't work well on those CPUs. A number of features present there complicate the energy picture; these include SMT, Intel's "turbo boost" mode, and the CPU's internal power-management mechanisms. For many workloads, running on an ostensibly more power-hungry Pcore can be more efficient than using an Ecore. Time for discussion of the problem was lacking, though, and the session came to a close.
All this to say that the 12gen Intel line shipped with this Framework series should have better power management thanks to its power-saving cores. And Linux has had the scheduler changes to make use of this (but maybe is still having trouble). In any case, this might not be the source of power management problems on my laptop, quite the opposite. Also note that the firmware updates for various chipsets are supposed to improve things eventually. On the other hand, The Verge simply declared the whole P-series a mistake...

Attempts at improving power usage I did try to follow some of the tips in this forum post. The tricks powertop --auto-tune and tlp's PCIE_ASPM_ON_BAT=powersupersave basically did nothing: I was stuck at 10W power usage in powertop (600+mA in tlp-stat). Apparently, I should be able to reach the C8 CPU power state (or even C9, C10) in powertop, but I seem to be stock at C7. (Although I'm not sure how to read that tab in powertop: in the Core(HW) column there's only C3/C6/C7 states, and most cores are 85% in C7 or maybe C6. But the next column over does show many CPUs in C10 states... As it turns out, the graphics card actually takes up a good chunk of power unless proper power management is enabled (see below). After tweaking this, I did manage to get down to around 7W power usage in powertop. Expansion cards actually do take up power, and so does the screen, obviously. The fully-lit screen takes a solid 2-3W of power compared to the fully dimmed screen. When removing all expansion cards and making the laptop idle, I can spin it down to 4 watts power usage at the moment, and an amazing 2 watts when the screen turned off.

Caveats Abusive (10W+) power usage that I initially found could be a problem with my desktop configuration: I have this silly status bar that updates every second and probably causes redraws... The CPU certainly doesn't seem to spin down below 1GHz. Also note that this is with an actual desktop running with everything: it could very well be that some things (I'm looking at you Signal Desktop) take up unreasonable amount of power on their own (hello, 1W/electron, sheesh). Syncthing and containerd (Docker!) also seem to take a good 500mW just sitting there. Beyond my desktop configuration, this could, of course, be a Debian-specific problem; your favorite distribution might be better at power management.

Idle power usage tests Some expansion cards waste energy, even when unused. Here is a summary of the findings from the powerstat page. I also include other devices tested in this page for completeness:
Device Minimum Average Max Stdev Note
Screen, 100% 2.4W 2.6W 2.8W N/A
Screen, 1% 30mW 140mW 250mW N/A
Backlight 1 290mW ? ? ? fairly small, all things considered
Backlight 2 890mW 1.2W 3W? 460mW? geometric progression
Backlight 3 1.69W 1.5W 1.8W? 390mW? significant power use
Radios 100mW 250mW N/A N/A
USB-C N/A N/A N/A N/A negligible power drain
USB-A 10mW 10mW ? 10mW almost negligible
DisplayPort 300mW 390mW 600mW N/A not passive
HDMI 380mW 440mW 1W? 20mW not passive
1TB SSD 1.65W 1.79W 2W 12mW significant, probably higher when busy
MicroSD 1.6W 3W 6W 1.93W highest power usage, possibly even higher when busy
Ethernet 1.69W 1.64W 1.76W N/A comparable to the SSD card
So it looks like all expansion cards but the USB-C ones are active, i.e. they draw power with idle. The USB-A cards are the least concern, sucking out 10mW, pretty much within the margin of error. But both the DisplayPort and HDMI do take a few hundred miliwatts. It looks like USB-A connectors have this fundamental flaw that they necessarily draw some powers because they lack the power negotiation features of USB-C. At least according to this post:
It seems the USB A must have power going to it all the time, that the old USB 2 and 3 protocols, the USB C only provides power when there is a connection. Old versus new.
Apparently, this is a problem specific to the USB-C to USB-A adapter that ships with the Framework. Some people have actually changed their orders to all USB-C because of this problem, but I'm not sure the problem is as serious as claimed in the forums. I couldn't reproduce the "one watt" power drains suggested elsewhere, at least not repeatedly. (A previous version of this post did show such a power drain, but it was in a less controlled test environment than the series of more rigorous tests above.) The worst offenders are the storage cards: the SSD drive takes at least one watt of power and the MicroSD card seems to want to take all the way up to 6 watts of power, both just sitting there doing nothing. This confirms claims of 1.4W for the SSD (but not 5W) power usage found elsewhere. The former post has instructions on how to disable the card in software. The MicroSD card has been reported as using 2 watts, but I've seen it as high as 6 watts, which is pretty damning. The Framework team has a beta update for the DisplayPort adapter but currently only for Windows (LVFS technically possible, "under investigation"). A USB-A firmware update is also under investigation. It is therefore likely at least some of those power management issues will eventually be fixed. Note that the upcoming Ethernet card has a reported 2-8W power usage, depending on traffic. I did my own power usage tests in powerstat-wayland and they seem lower than 2W. The upcoming 6.2 Linux kernel might also improve battery usage when idle, see this Phoronix article for details, likely in early 2023.

Idle power usage tests under Wayland Update: I redid those tests under Wayland, see powerstat-wayland for details. The TL;DR: is that power consumption is either smaller or similar.

Idle power usage tests, 3.06 beta BIOS I redid the idle tests after the 3.06 beta BIOS update and ended up with this results:
Device Minimum Average Max Stdev Note
Baseline 1.96W 2.01W 2.11W 30mW 1 USB-C, screen off, backlight off, no radios
2 USB-C 1.95W 2.16W 3.69W 430mW USB-C confirmed as mostly passive...
3 USB-C 1.95W 2.16W 3.69W 430mW ... although with extra stdev
1TB SSD 3.72W 3.85W 4.62W 200mW unchanged from before upgrade
1 USB-A 1.97W 2.18W 4.02W 530mW unchanged
2 USB-A 1.97W 2.00W 2.08W 30mW unchanged
3 USB-A 1.94W 1.99W 2.03W 20mW unchanged
MicroSD w/o card 3.54W 3.58W 3.71W 40mW significant improvement! 2-3W power saving!
MicroSD w/ card 3.53W 3.72W 5.23W 370mW new measurement! increased deviation
DisplayPort 2.28W 2.31W 2.37W 20mW unchanged
1 HDMI 2.43W 2.69W 4.53W 460mW unchanged
2 HDMI 2.53W 2.59W 2.67W 30mW unchanged
External USB 3.85W 3.89W 3.94W 30mW new result
Ethernet 3.60W 3.70W 4.91W 230mW unchanged
Note that the table summary is different than the previous table: here we show the absolute numbers while the previous table was doing a confusing attempt at showing relative (to the baseline) numbers. Conclusion: the 3.06 BIOS update did not significantly change idle power usage stats except for the MicroSD card which has significantly improved. The new "external USB" test is also interesting: it shows how the provided 1TB SSD card performs (admirably) compared to existing devices. The other new result is the MicroSD card with a card which, interestingly, uses less power than the 1TB SSD drive.

Standby battery usage I wrote some quick hack to evaluate how much power is used during sleep. Apparently, this is one of the areas that should have improved since the first Framework model, let's find out. My baseline for comparison is the Purism laptop, which, in 10 minutes, went from this:
sep 28 11:19:45 angela systemd-sleep[209379]: /sys/class/power_supply/BAT/charge_now                      =   6045 [mAh]
... to this:
sep 28 11:29:47 angela systemd-sleep[209725]: /sys/class/power_supply/BAT/charge_now                      =   6037 [mAh]
That's 8mAh per 10 minutes (and 2 seconds), or 48mA, or, with this battery, about 127 hours or roughly 5 days of standby. Not bad! In comparison, here is my really old x220, before:
sep 29 22:13:54 emma systemd-sleep[176315]: /sys/class/power_supply/BAT0/energy_now                     =   5070 [mWh]
... after:
sep 29 22:23:54 emma systemd-sleep[176486]: /sys/class/power_supply/BAT0/energy_now                     =   4980 [mWh]
... which is 90 mwH in 10 minutes, or a whopping 540mA, which was possibly okay when this battery was new (62000 mAh, so about 100 hours, or about 5 days), but this battery is almost dead and has only 5210 mAh when full, so only 10 hours standby. And here is the Framework performing a similar test, before:
sep 29 22:27:04 angela systemd-sleep[4515]: /sys/class/power_supply/BAT1/charge_full                    =   3518 [mAh]
sep 29 22:27:04 angela systemd-sleep[4515]: /sys/class/power_supply/BAT1/charge_now                     =   2861 [mAh]
... after:
sep 29 22:37:08 angela systemd-sleep[4743]: /sys/class/power_supply/BAT1/charge_now                     =   2812 [mAh]
... which is 49mAh in a little over 10 minutes (and 4 seconds), or 292mA, much more than the Purism, but half of the X220. At this rate, the battery would last on standby only 12 hours!! That is pretty bad. Note that this was done with the following expansion cards:
  • 2 USB-C
  • 1 1TB SSD drive
  • 1 USB-A with a hub connected to it, with keyboard and LAN
Preliminary tests without the hub (over one minute) show that it doesn't significantly affect this power consumption (300mA). This guide also suggests booting with nvme.noacpi=1 but this still gives me about 5mAh/min (or 300mA). Adding mem_sleep_default=deep to the kernel command line does make a difference. Before:
sep 29 23:03:11 angela systemd-sleep[3699]: /sys/class/power_supply/BAT1/charge_now                     =   2544 [mAh]
... after:
sep 29 23:04:25 angela systemd-sleep[4039]: /sys/class/power_supply/BAT1/charge_now                     =   2542 [mAh]
... which is 2mAh in 74 seconds, which is 97mA, brings us to a more reasonable 36 hours, or a day and a half. It's still above the x220 power usage, and more than an order of magnitude more than the Purism laptop. It's also far from the 0.4% promised by upstream, which would be 14mA for the 3500mAh battery. It should also be noted that this "deep" sleep mode is a little more disruptive than regular sleep. As you can see by the timing, it took more than 10 seconds for the laptop to resume, which feels a little alarming as your banging the keyboard to bring it back to life. You can confirm the current sleep mode with:
# cat /sys/power/mem_sleep
s2idle [deep]
In the above, deep is selected. You can change it on the fly with:
printf s2idle > /sys/power/mem_sleep
Here's another test:
sep 30 22:25:50 angela systemd-sleep[32207]: /sys/class/power_supply/BAT1/charge_now                     =   1619 [mAh]
sep 30 22:31:30 angela systemd-sleep[32516]: /sys/class/power_supply/BAT1/charge_now                     =   1613 [mAh]
... better! 6 mAh in about 6 minutes, works out to 63.5mA, so more than two days standby. A longer test:
oct 01 09:22:56 angela systemd-sleep[62978]: /sys/class/power_supply/BAT1/charge_now                     =   3327 [mAh]
oct 01 12:47:35 angela systemd-sleep[63219]: /sys/class/power_supply/BAT1/charge_now                     =   3147 [mAh]
That's 180mAh in about 3.5h, 52mA! Now at 66h, or almost 3 days. I wasn't sure why I was seeing such fluctuations in those tests, but as it turns out, expansion card power tests show that they do significantly affect power usage, especially the SSD drive, which can take up to two full watts of power even when idle. I didn't control for expansion cards in the above tests running them with whatever card I had plugged in without paying attention so it's likely the cause of the high power usage and fluctuations. It might be possible to work around this problem by disabling USB devices before suspend. TODO. See also this post. In the meantime, I have been able to get much better suspend performance by unplugging all modules. Then I get this result:
oct 04 11:15:38 angela systemd-sleep[257571]: /sys/class/power_supply/BAT1/charge_now                     =   3203 [mAh]
oct 04 15:09:32 angela systemd-sleep[257866]: /sys/class/power_supply/BAT1/charge_now                     =   3145 [mAh]
Which is 14.8mA! Almost exactly the number promised by Framework! With a full battery, that means a 10 days suspend time. This is actually pretty good, and far beyond what I was expecting when starting down this journey. So, once the expansion cards are unplugged, suspend power usage is actually quite reasonable. More detailed standby tests are available in the standby-tests page, with a summary below. There is also some hope that the Chromebook edition specifically designed with a specification of 14 days standby time could bring some firmware improvements back down to the normal line. Some of those issues were reported upstream in April 2022, but there doesn't seem to have been any progress there since. TODO: one final solution here is suspend-then-hibernate, which Windows uses for this TODO: consider implementing the S0ix sleep states , see also troubleshooting TODO: consider https://github.com/intel/pm-graph

Standby expansion cards test results This table is a summary of the more extensive standby-tests I have performed:
Device Wattage Amperage Days Note
baseline 0.25W 16mA 9 sleep=deep nvme.noacpi=1
s2idle 0.29W 18.9mA ~7 sleep=s2idle nvme.noacpi=1
normal nvme 0.31W 20mA ~7 sleep=s2idle without nvme.noacpi=1
1 USB-C 0.23W 15mA ~10
2 USB-C 0.23W 14.9mA same as above
1 USB-A 0.75W 48.7mA 3 +500mW (!!) for the first USB-A card!
2 USB-A 1.11W 72mA 2 +360mW
3 USB-A 1.48W 96mA <2 +370mW
1TB SSD 0.49W 32mA <5 +260mW
MicroSD 0.52W 34mA ~4 +290mW
DisplayPort 0.85W 55mA <3 +620mW (!!)
1 HDMI 0.58W 38mA ~4 +250mW
2 HDMI 0.65W 42mA <4 +70mW (?)
Conclusions:
  • USB-C cards take no extra power on suspend, possibly less than empty slots, more testing required
  • USB-A cards take a lot more power on suspend (300-500mW) than on regular idle (~10mW, almost negligible)
  • 1TB SSD and MicroSD cards seem to take a reasonable amount of power (260-290mW), compared to their runtime equivalents (1-6W!)
  • DisplayPort takes a surprising lot of power (620mW), almost double its average runtime usage (390mW)
  • HDMI cards take, surprisingly, less power (250mW) in standby than the DP card (620mW)
  • and oddly, a second card adds less power usage (70mW?!) than the first, maybe a circuit is used by both?
A discussion of those results is in this forum post.

Standby expansion cards test results, 3.06 beta BIOS Framework recently (2022-11-07) announced that they will publish a firmware upgrade to address some of the USB-C issues, including power management. This could positively affect the above result, improving both standby and runtime power usage. The update came out in December 2022 and I redid my analysis with the following results:
Device Wattage Amperage Days Note
baseline 0.25W 16mA 9 no cards, same as before upgrade
1 USB-C 0.25W 16mA 9 same as before
2 USB-C 0.25W 16mA 9 same
1 USB-A 0.80W 62mA 3 +550mW!! worse than before
2 USB-A 1.12W 73mA <2 +320mW, on top of the above, bad!
Ethernet 0.62W 40mA 3-4 new result, decent
1TB SSD 0.52W 34mA 4 a bit worse than before (+2mA)
MicroSD 0.51W 22mA 4 same
DisplayPort 0.52W 34mA 4+ upgrade improved by 300mW
1 HDMI ? 38mA ? same
2 HDMI ? 45mA ? a bit worse than before (+3mA)
Normal 1.08W 70mA ~2 Ethernet, 2 USB-C, USB-A
Full results in standby-tests-306. The big takeaway for me is that the update did not improve power usage on the USB-A ports which is a big problem for my use case. There is a notable improvement on the DisplayPort power consumption which brings it more in line with the HDMI connector, but it still doesn't properly turn off on suspend either. Even worse, the USB-A ports now sometimes fails to resume after suspend, which is pretty annoying. This is a known problem that will hopefully get fixed in the final release.

Battery wear protection The BIOS has an option to limit charge to 80% to mitigate battery wear. There's a way to control the embedded controller from runtime with fw-ectool, partly documented here. The command would be:
sudo ectool fwchargelimit 80
I looked at building this myself but failed to run it. I opened a RFP in Debian so that we can ship this in Debian, and also documented my work there. Note that there is now a counter that tracks charge/discharge cycles. It's visible in tlp-stat -b, which is a nice improvement:
root@angela:/home/anarcat# tlp-stat -b
--- TLP 1.5.0 --------------------------------------------
+++ Battery Care
Plugin: generic
Supported features: none available
+++ Battery Status: BAT1
/sys/class/power_supply/BAT1/manufacturer                   = NVT
/sys/class/power_supply/BAT1/model_name                     = Framewo
/sys/class/power_supply/BAT1/cycle_count                    =      3
/sys/class/power_supply/BAT1/charge_full_design             =   3572 [mAh]
/sys/class/power_supply/BAT1/charge_full                    =   3541 [mAh]
/sys/class/power_supply/BAT1/charge_now                     =   1625 [mAh]
/sys/class/power_supply/BAT1/current_now                    =    178 [mA]
/sys/class/power_supply/BAT1/status                         = Discharging
/sys/class/power_supply/BAT1/charge_control_start_threshold = (not available)
/sys/class/power_supply/BAT1/charge_control_end_threshold   = (not available)
Charge                                                      =   45.9 [%]
Capacity                                                    =   99.1 [%]
One thing that is still missing is the charge threshold data (the (not available) above). There's been some work to make that accessible in August, stay tuned? This would also make it possible implement hysteresis support.

Ethernet expansion card The Framework ethernet expansion card is a fancy little doodle: "2.5Gbit/s and 10/100/1000Mbit/s Ethernet", the "clear housing lets you peek at the RTL8156 controller that powers it". Which is another way to say "we didn't completely finish prod on this one, so it kind of looks like we 3D-printed this in the shop".... The card is a little bulky, but I guess that's inevitable considering the RJ-45 form factor when compared to the thin Framework laptop. I have had a serious issue when trying it at first: the link LEDs just wouldn't come up. I made a full bug report in the forum and with upstream support, but eventually figured it out on my own. It's (of course) a power saving issue: if you reboot the machine, the links come up when the laptop is running the BIOS POST check and even when the Linux kernel boots. I first thought that the problem is likely related to the powertop service which I run at boot time to tweak some power saving settings. It seems like this:
echo 'on' > '/sys/bus/usb/devices/4-2/power/control'
... is a good workaround to bring the card back online. You can even return to power saving mode and the card will still work:
echo 'auto' > '/sys/bus/usb/devices/4-2/power/control'
Further research by Matt_Hartley from the Framework Team found this issue in the tlp tracker that shows how the USB_AUTOSUSPEND setting enables the power saving even if the driver doesn't support it, which, in retrospect, just sounds like a bad idea. To quote that issue:
By default, USB power saving is active in the kernel, but not force-enabled for incompatible drivers. That is, devices that support suspension will suspend, drivers that do not, will not.
So the fix is actually to uninstall tlp or disable that setting by adding this to /etc/tlp.conf:
USB_AUTOSUSPEND=0
... but that disables auto-suspend on all USB devices, which may hurt other power usage performance. I have found that a a combination of:
USB_AUTOSUSPEND=1
USB_DENYLIST="0bda:8156"
and this on the kernel commandline:
usbcore.quirks=0bda:8156:k
... actually does work correctly. I now have this in my /etc/default/grub.d/framework-tweaks.cfg file:
# net.ifnames=0: normal interface names ffs (e.g. eth0, wlan0, not wlp166
s0)
# nvme.noacpi=1: reduce SSD disk power usage (not working)
# mem_sleep_default=deep: reduce power usage during sleep (not working)
# usbcore.quirk is a workaround for the ethernet card suspend bug: https:
//guides.frame.work/Guide/Fedora+37+Installation+on+the+Framework+Laptop/
108?lang=en
GRUB_CMDLINE_LINUX="net.ifnames=0 nvme.noacpi=1 mem_sleep_default=deep usbcore.quirks=0bda:8156:k"
# fix the resolution in grub for fonts to not be tiny
GRUB_GFXMODE=1024x768
Other than that, I haven't been able to max out the card because I don't have other 2.5Gbit/s equipment at home, which is strangely satisfying. But running against my Turris Omnia router, I could pretty much max a gigabit fairly easily:
[ ID] Interval           Transfer     Bitrate         Retr
[  5]   0.00-10.00  sec  1.09 GBytes   937 Mbits/sec  238             sender
[  5]   0.00-10.00  sec  1.09 GBytes   934 Mbits/sec                  receiver
The card doesn't require any proprietary firmware blobs which is surprising. Other than the power saving issues, it just works. In my power tests (see powerstat-wayland), the Ethernet card seems to use about 1.6W of power idle, without link, in the above "quirky" configuration where the card is functional but without autosuspend.

Proprietary firmware blobs The framework does need proprietary firmware to operate. Specifically:
  • the WiFi network card shipped with the DIY kit is a AX210 card that requires a 5.19 kernel or later, and the firmware-iwlwifi non-free firmware package
  • the Bluetooth adapter also loads the firmware-iwlwifi package (untested)
  • the graphics work out of the box without firmware, but certain power management features come only with special proprietary firmware, normally shipped in the firmware-misc-nonfree but currently missing from the package
Note that, at the time of writing, the latest i915 firmware from linux-firmware has a serious bug where loading all the accessible firmware results in noticeable I estimate 200-500ms lag between the keyboard (not the mouse!) and the display. Symptoms also include tearing and shearing of windows, it's pretty nasty. One workaround is to delete the two affected firmware files:
cd /lib/firmware && rm adlp_guc_70.1.1.bin adlp_guc_69.0.3.bin
update-initramfs -u
You will get the following warning during build, which is good as it means the problematic firmware is disabled:
W: Possible missing firmware /lib/firmware/i915/adlp_guc_69.0.3.bin for module i915
W: Possible missing firmware /lib/firmware/i915/adlp_guc_70.1.1.bin for module i915
But then it also means that critical firmware isn't loaded, which means, among other things, a higher battery drain. I was able to move from 8.5-10W down to the 7W range after making the firmware work properly. This is also after turning the backlight all the way down, as that takes a solid 2-3W in full blast. The proper fix is to use some compositing manager. I ended up using compton with the following systemd unit:
[Unit]
Description=start compositing manager
PartOf=graphical-session.target
ConditionHost=angela
[Service]
Type=exec
ExecStart=compton --show-all-xerrors --backend glx --vsync opengl-swc
Restart=on-failure
[Install]
RequiredBy=graphical-session.target
compton is orphaned however, so you might be tempted to use picom instead, but in my experience the latter uses much more power (1-2W extra, similar experience). I also tried compiz but it would just crash with:
anarcat@angela:~$ compiz --replace
compiz (core) - Warn: No XI2 extension
compiz (core) - Error: Another composite manager is already running on screen: 0
compiz (core) - Fatal: No manageable screens found on display :0
When running from the base session, I would get this instead:
compiz (core) - Warn: No XI2 extension
compiz (core) - Error: Couldn't load plugin 'ccp'
Thanks to EmanueleRocca for figuring all that out. See also this discussion about power management on the Framework forum. Note that Wayland environments do not require any special configuration here and actually work better, see my Wayland migration notes for details.
Also note that the iwlwifi firmware also looks incomplete. Even with the package installed, I get those errors in dmesg:
[   19.534429] Intel(R) Wireless WiFi driver for Linux
[   19.534691] iwlwifi 0000:a6:00.0: enabling device (0000 -> 0002)
[   19.541867] iwlwifi 0000:a6:00.0: firmware: failed to load iwlwifi-ty-a0-gf-a0-72.ucode (-2)
[   19.541881] iwlwifi 0000:a6:00.0: firmware: failed to load iwlwifi-ty-a0-gf-a0-72.ucode (-2)
[   19.541882] iwlwifi 0000:a6:00.0: Direct firmware load for iwlwifi-ty-a0-gf-a0-72.ucode failed with error -2
[   19.541890] iwlwifi 0000:a6:00.0: firmware: failed to load iwlwifi-ty-a0-gf-a0-71.ucode (-2)
[   19.541895] iwlwifi 0000:a6:00.0: firmware: failed to load iwlwifi-ty-a0-gf-a0-71.ucode (-2)
[   19.541896] iwlwifi 0000:a6:00.0: Direct firmware load for iwlwifi-ty-a0-gf-a0-71.ucode failed with error -2
[   19.541903] iwlwifi 0000:a6:00.0: firmware: failed to load iwlwifi-ty-a0-gf-a0-70.ucode (-2)
[   19.541907] iwlwifi 0000:a6:00.0: firmware: failed to load iwlwifi-ty-a0-gf-a0-70.ucode (-2)
[   19.541908] iwlwifi 0000:a6:00.0: Direct firmware load for iwlwifi-ty-a0-gf-a0-70.ucode failed with error -2
[   19.541913] iwlwifi 0000:a6:00.0: firmware: failed to load iwlwifi-ty-a0-gf-a0-69.ucode (-2)
[   19.541916] iwlwifi 0000:a6:00.0: firmware: failed to load iwlwifi-ty-a0-gf-a0-69.ucode (-2)
[   19.541917] iwlwifi 0000:a6:00.0: Direct firmware load for iwlwifi-ty-a0-gf-a0-69.ucode failed with error -2
[   19.541922] iwlwifi 0000:a6:00.0: firmware: failed to load iwlwifi-ty-a0-gf-a0-68.ucode (-2)
[   19.541926] iwlwifi 0000:a6:00.0: firmware: failed to load iwlwifi-ty-a0-gf-a0-68.ucode (-2)
[   19.541927] iwlwifi 0000:a6:00.0: Direct firmware load for iwlwifi-ty-a0-gf-a0-68.ucode failed with error -2
[   19.541933] iwlwifi 0000:a6:00.0: firmware: failed to load iwlwifi-ty-a0-gf-a0-67.ucode (-2)
[   19.541937] iwlwifi 0000:a6:00.0: firmware: failed to load iwlwifi-ty-a0-gf-a0-67.ucode (-2)
[   19.541937] iwlwifi 0000:a6:00.0: Direct firmware load for iwlwifi-ty-a0-gf-a0-67.ucode failed with error -2
[   19.544244] iwlwifi 0000:a6:00.0: firmware: direct-loading firmware iwlwifi-ty-a0-gf-a0-66.ucode
[   19.544257] iwlwifi 0000:a6:00.0: api flags index 2 larger than supported by driver
[   19.544270] iwlwifi 0000:a6:00.0: TLV_FW_FSEQ_VERSION: FSEQ Version: 0.63.2.1
[   19.544523] iwlwifi 0000:a6:00.0: firmware: failed to load iwl-debug-yoyo.bin (-2)
[   19.544528] iwlwifi 0000:a6:00.0: firmware: failed to load iwl-debug-yoyo.bin (-2)
[   19.544530] iwlwifi 0000:a6:00.0: loaded firmware version 66.55c64978.0 ty-a0-gf-a0-66.ucode op_mode iwlmvm
Some of those are available in the latest upstream firmware package (iwlwifi-ty-a0-gf-a0-71.ucode, -68, and -67), but not all (e.g. iwlwifi-ty-a0-gf-a0-72.ucode is missing) . It's unclear what those do or don't, as the WiFi seems to work well without them. I still copied them in from the latest linux-firmware package in the hope they would help with power management, but I did not notice a change after loading them. There are also multiple knobs on the iwlwifi and iwlmvm drivers. The latter has a power_schmeme setting which defaults to 2 (balanced), setting it to 3 (low power) could improve battery usage as well, in theory. The iwlwifi driver also has power_save (defaults to disabled) and power_level (1-5, defaults to 1) settings. See also the output of modinfo iwlwifi and modinfo iwlmvm for other driver options.

Graphics acceleration After loading the latest upstream firmware and setting up a compositing manager (compton, above), I tested the classic glxgears. Running in a window gives me odd results, as the gears basically grind to a halt:
Running synchronized to the vertical refresh.  The framerate should be
approximately the same as the monitor refresh rate.
137 frames in 5.1 seconds = 26.984 FPS
27 frames in 5.4 seconds =  5.022 FPS
Ouch. 5FPS! But interestingly, once the window is in full screen, it does hit the monitor refresh rate:
300 frames in 5.0 seconds = 60.000 FPS
I'm not really a gamer and I'm not normally using any of that fancy graphics acceleration stuff (except maybe my browser does?). I installed intel-gpu-tools for the intel_gpu_top command to confirm the GPU was engaged when doing those simulations. A nice find. Other useful diagnostic tools include glxgears and glxinfo (in mesa-utils) and (vainfo in vainfo). Following to this post, I also made sure to have those settings in my about:config in Firefox, or, in user.js:
user_pref("media.ffmpeg.vaapi.enabled", true);
Note that the guide suggests many other settings to tweak, but those might actually be overkill, see this comment and its parents. I did try forcing hardware acceleration by setting gfx.webrender.all to true, but everything became choppy and weird. The guide also mentions installing the intel-media-driver package, but I could not find that in Debian. The Arch wiki has, as usual, an excellent reference on hardware acceleration in Firefox.

Chromium / Signal desktop bugs It looks like both Chromium and Signal Desktop misbehave with my compositor setup (compton + i3). The fix is to add a persistent flag to Chromium. In Arch, it's conveniently in ~/.config/chromium-flags.conf but that doesn't actually work in Debian. I had to put the flag in /etc/chromium.d/disable-compositing, like this:
export CHROMIUM_FLAGS="$CHROMIUM_FLAGS --disable-gpu-compositing"
It's possible another one of the hundreds of flags might fix this issue better, but I don't really have time to go through this entire, incomplete, and unofficial list (!?!). Signal Desktop is a similar problem, and doesn't reuse those flags (because of course it doesn't). Instead I had to rewrite the wrapper script in /usr/local/bin/signal-desktop to use this instead:
exec /usr/bin/flatpak run --branch=stable --arch=x86_64 org.signal.Signal --disable-gpu-compositing "$@"
This was mostly done in this Puppet commit. I haven't figured out the root of this problem. I did try using picom and xcompmgr; they both suffer from the same issue. Another Debian testing user on Wayland told me they haven't seen this problem, so hopefully this can be fixed by switching to wayland.

Graphics card hangs I believe I might have this bug which results in a total graphical hang for 15-30 seconds. It's fairly rare so it's not too disruptive, but when it does happen, it's pretty alarming. The comments on that bug report are encouraging though: it seems this is a bug in either mesa or the Intel graphics driver, which means many people have this problem so it's likely to be fixed. There's actually a merge request on mesa already (2022-12-29). It could also be that bug because the error message I get is actually:
Jan 20 12:49:10 angela kernel: Asynchronous wait on fence 0000:00:02.0:sway[104431]:cb0ae timed out (hint:intel_atomic_commit_ready [i915]) 
Jan 20 12:49:15 angela kernel: i915 0000:00:02.0: [drm] GPU HANG: ecode 12:0:00000000 
Jan 20 12:49:15 angela kernel: i915 0000:00:02.0: [drm] Resetting chip for stopped heartbeat on rcs0 
Jan 20 12:49:15 angela kernel: i915 0000:00:02.0: [drm] GuC firmware i915/adlp_guc_70.1.1.bin version 70.1 
Jan 20 12:49:15 angela kernel: i915 0000:00:02.0: [drm] HuC firmware i915/tgl_huc_7.9.3.bin version 7.9 
Jan 20 12:49:15 angela kernel: i915 0000:00:02.0: [drm] HuC authenticated 
Jan 20 12:49:15 angela kernel: i915 0000:00:02.0: [drm] GuC submission enabled 
Jan 20 12:49:15 angela kernel: i915 0000:00:02.0: [drm] GuC SLPC enabled
It's a solid 30 seconds graphical hang. Maybe the keyboard and everything else keeps working. The latter bug report is quite long, with many comments, but this one from January 2023 seems to say that Sway 1.8 fixed the problem. There's also an earlier patch to add an extra kernel parameter that supposedly fixes that too. There's all sorts of other workarounds in there, for example this:
echo "options i915 enable_dc=1 enable_guc_loading=1 enable_guc_submission=1 edp_vswing=0 enable_guc=2 enable_fbc=1 enable_psr=1 disable_power_well=0"   sudo tee /etc/modprobe.d/i915.conf
from this comment... So that one is unsolved, as far as the upstream drivers are concerned, but maybe could be fixed through Sway.

Weird USB hangs / graphical glitches I have had weird connectivity glitches better described in this post, but basically: my USB keyboard and mice (connected over a USB hub) drop keys, lag a lot or hang, and I get visual glitches. The fix was to tighten the screws around the CPU on the motherboard (!), which is, thankfully, a rather simple repair.

USB docks are hell Note that the monitors are hooked up to angela through a USB-C / Thunderbolt dock from Cable Matters, with the lovely name of 201053-SIL. It has issues, see this blog post for an in-depth discussion.

Shipping details I ordered the Framework in August 2022 and received it about a month later, which is sooner than expected because the August batch was late. People (including me) expected this to have an impact on the September batch, but it seems Framework have been able to fix the delivery problems and keep up with the demand. As of early 2023, their website announces that laptops ship "within 5 days". I have myself ordered a few expansion cards in November 2022, and they shipped on the same day, arriving 3-4 days later.

The supply pipeline There are basically 6 steps in the Framework shipping pipeline, each (except the last) accompanied with an email notification:
  1. pre-order
  2. preparing batch
  3. preparing order
  4. payment complete
  5. shipping
  6. (received)
This comes from the crowdsourced spreadsheet, which should be updated when the status changes here. I was part of the "third batch" of the 12th generation laptop, which was supposed to ship in September. It ended up arriving on my door step on September 27th, about 33 days after ordering. It seems current orders are not processed in "batches", but in real time, see this blog post for details on shipping.

Shipping trivia I don't know about the others, but my laptop shipped through no less than four different airplane flights. Here are the hops it took: I can't quite figure out how to calculate exactly how much mileage that is, but it's huge. The ride through Alaska is surprising enough but the bounce back through Winnipeg is especially weird. I guess the route happens that way because of Fedex shipping hubs. There was a related oddity when I had my Purism laptop shipped: it left from the west coast and seemed to enter on an endless, two week long road trip across the continental US.

Other resources

10 March 2023

Antoine Beaupr : how to audit for open services with iproute2

The computer world has a tendency of reinventing the wheel once in a while. I am not a fan of that process, but sometimes I just have to bite the bullet and adapt to change. This post explains how I adapted to one particular change: the netstat to sockstat transition. I used to do this to show which processes where listening on which port on a server:
netstat -anpe
It was a handy mnemonic as, in France, ANPE was the agency responsible for the unemployed (basically). That would list all sockets (-a), not resolve hostnames (-n, because it's slow), show processes attached to the socket (-p) with extra info like the user (-e). This still works, but sometimes fail to find the actual process hooked to the port. Plus, it lists a whole bunch of UNIX sockets and non-listening sockets, which are generally irrelevant for such an audit. What I really wanted to use was really something like:
netstat -pleunt   sort
... which has the "pleut" mnemonic ("rains", but plural, which makes no sense and would be badly spelled anyway). That also only lists listening (-l) and network sockets, specifically UDP (-u) and TCP (-t). But enough with the legacy, let's try the brave new world of sockstat which has the unfortunate acronym ss. The equivalent sockstat command to the above is:
ss -pleuntO
It's similar to the above, except we need the -O flag otherwise ss does that confusing thing where it splits the output on multiple lines. But I actually use:
ss -plunt0
... i.e. without the -e as the information it gives (cgroup, fd number, etc) is not much more useful than what's already provided with -p (service and UID). All of the above also show sockets that are not actually a concern because they only listen on localhost. Those one should be filtered out. So now we embark into that wild filtering ride. This is going to list all open sockets and show the port number and service:
ss -pluntO --no-header   sed 's/^\([a-z]*\) *[A-Z]* *[0-9]* [0-9]* *[0-9]* */\1/'   sed 's/^[^:]*:\(:\]:\)\?//;s/\([0-9]*\) *[^ ]*/\1\t/;s/,fd=[0-9]*//'   sort -gu
For example on my desktop, it looks like:
anarcat@angela:~$ sudo ss -pluntO --no-header   sed 's/^\([a-z]*\) *[A-Z]* *[0-9]* [0-9]* *[0-9]* */\1/'   sed 's/^[^:]*:\(:\]:\)\?//;s/\([0-9]*\) *[^ ]*/\1\t/;s/,fd=[0-9]*//'   sort -gu
          [::]:* users:(("unbound",pid=1864))        
22  users:(("sshd",pid=1830))           
25  users:(("master",pid=3150))        
53  users:(("unbound",pid=1864))        
323 users:(("chronyd",pid=1876))        
500 users:(("charon",pid=2817))        
631 users:(("cups-browsed",pid=2744))   
2628    users:(("dictd",pid=2825))          
4001    users:(("emacs",pid=3578))          
4500    users:(("charon",pid=2817))        
5353    users:(("avahi-daemon",pid=1423))  
6600    users:(("systemd",pid=3461))       
8384    users:(("syncthing",pid=232169))   
9050    users:(("tor",pid=2857))            
21027   users:(("syncthing",pid=232169))   
22000   users:(("syncthing",pid=232169))   
33231   users:(("syncthing",pid=232169))   
34953   users:(("syncthing",pid=232169))   
35770   users:(("syncthing",pid=232169))   
44944   users:(("syncthing",pid=232169))   
47337   users:(("syncthing",pid=232169))   
48903   users:(("mosh-client",pid=234126))  
52774   users:(("syncthing",pid=232169))   
52938   users:(("avahi-daemon",pid=1423))  
54029   users:(("avahi-daemon",pid=1423))  
anarcat@angela:~$
But that doesn't filter out the localhost stuff, lots of false positive (like emacs, above). And this is where it gets... not fun, as you need to match "localhost" but we don't resolve names, so you need to do some fancy pattern matching:
ss -pluntO --no-header   \
    sed 's/^\([a-z]*\) *[A-Z]* *[0-9]* [0-9]* *[0-9]* */\1/;s/^tcp//;s/^udp//'   \
    grep -v -e '^\[fe80::' -e '^127.0.0.1' -e '^\[::1\]' -e '^192\.' -e '^172\.'   \
    sed 's/^[^:]*:\(:\]:\)\?//;s/\([0-9]*\) *[^ ]*/\1\t/;s/,fd=[0-9]*//'  \
    sort -gu
This is kind of horrible, but it works, those are the actually open ports on my machine:
anarcat@angela:~$ sudo ss -pluntO --no-header           sed 's/^\([a-
z]*\) *[A-Z]* *[0-9]* [0-9]* *[0-9]* */\1/;s/^tcp//;s/^udp//'        
   grep -v -e '^\[fe80::' -e '^127.0.0.1' -e '^\[::1\]' -e '^192\.' -
e '^172\.'           sed 's/^[^:]*:\(:\]:\)\?//;s/\([0-9]*\) *[^ ]*/\
1\t/;s/,fd=[0-9]*//'          sort -gu
22  users:(("sshd",pid=1830))           
500 users:(("charon",pid=2817))        
631 users:(("cups-browsed",pid=2744))   
4500    users:(("charon",pid=2817))        
5353    users:(("avahi-daemon",pid=1423))  
6600    users:(("systemd",pid=3461))       
21027   users:(("syncthing",pid=232169))   
22000   users:(("syncthing",pid=232169))   
34953   users:(("syncthing",pid=232169))   
35770   users:(("syncthing",pid=232169))   
48903   users:(("mosh-client",pid=234126))  
52938   users:(("avahi-daemon",pid=1423))  
54029   users:(("avahi-daemon",pid=1423))
Surely there must be a better way. It turns out that lsof can do some of this, and it's relatively straightforward. This lists all listening TCP sockets:
lsof -iTCP -sTCP:LISTEN +c 15   grep -v localhost   sort
A shorter version from Adam Shand is:
lsof -i @localhost
... which basically replaces the grep -v localhost line. In theory, this would do the equivalent on UDP
lsof -iUDP -sUDP:^Idle
... but in reality, it looks like lsof on Linux can't figure out the state of a UDP socket:
lsof: no UDP state names available: UDP:^Idle
... which, honestly, I'm baffled by. It's strange because ss can figure out the state of those sockets, heck it's how -l vs -a works after all. So we need something else to show listening UDP sockets. The following actually looks pretty good after all:
ss -pluO
That will list localhost sockets of course, so we can explicitly ask ss to resolve those and filter them out with something like:
ss -plurO   grep -v localhost
oh, and look here! ss supports pattern matching, so we can actually tell it to ignore localhost directly, which removes that horrible sed line we used earlier:
ss -pluntO '! ( src = localhost )'
That actually gives a pretty readable output. One annoyance is we can't really modify the columns here, so we still need some god-awful sed hacking on top of that to get a cleaner output:
ss -nplutO '! ( src = localhost )'    \
    sed 's/\(udp\ tcp\).*:\([0-9][0-9]*\)/\2\t\1\t/;s/\([0-9][0-9]*\t[udtcp]*\t\)[^u]*users:(("/\1/;s/".*//;s/.*Address:Port.*/Netid\tPort\tProcess/'   \
    sort -nu
That looks horrible and is basically impossible to memorize. But it sure looks nice:
anarcat@angela:~$ sudo ss -nplutO '! ( src = localhost )'    sed 's/\(udp\ tcp\).*:\([0-9][0-9]*\)/\2\t\1\t/;s/\([0-9][0-9]*\t[udtcp]*\t\)[^u]*users:(("/\1/;s/".*//;s/.*Address:Port.*/Port\tNetid\tProcess/'   sort -nu
Port    Netid   Process
22  tcp sshd
500 udp charon
546 udp NetworkManager
631 udp cups-browsed
4500    udp charon
5353    udp avahi-daemon
6600    tcp systemd
21027   udp syncthing
22000   udp syncthing
34953   udp syncthing
35770   udp syncthing
48903   udp mosh-client
52938   udp avahi-daemon
54029   udp avahi-daemon
Better ideas welcome.

Next.