Search Results: "smp"

25 April 2024

Lukas M rdian: Creating a Netplan enabled system through Debian-Installer

With the work that has been done in the debian-installer/netcfg merge-proposal !9 it is possible to install a standard Debian system, using the normal Debian-Installer (d-i) mini.iso images, that will come pre-installed with Netplan and all network configuration structured in /etc/netplan/. In this write-up I d like to run you through a list of commands for experiencing the Netplan enabled installation process first-hand. For now, we ll be using a custom ISO image, while waiting for the above-mentioned merge-proposal to be landed. Furthermore, as the Debian archive is going through major transitions builds of the unstable branch of d-i don t currently work. So I implemented a small backport, producing updated netcfg and netcfg-static for Bookworm, which can be used as localudebs/ during the d-i build. Let s start with preparing a working directory and installing the software dependencies for our virtualized Debian system:
$ mkdir d-i_bookworm && cd d-i_bookworm
$ apt install ovmf qemu-utils qemu-system-x86
Now let s download the custom mini.iso, linux kernel image and initrd.gz containing the Netplan enablement changes, as mentioned above. TODO: localudebs/
$ wget https://people.ubuntu.com/~slyon/d-i/bookworm/mini.iso
$ wget https://people.ubuntu.com/~slyon/d-i/bookworm/linux
$ wget https://people.ubuntu.com/~slyon/d-i/bookworm/initrd.gz
Next we ll prepare a VM, by copying the EFI firmware files, preparing some persistent EFIVARs file, to boot from FS0:\EFI\debian\grubx64.efi, and create a virtual disk for our machine:
$ cp /usr/share/OVMF/OVMF_CODE_4M.fd .
$ cp /usr/share/OVMF/OVMF_VARS_4M.fd .
$ qemu-img create -f qcow2 ./data.qcow2 5G
Finally, let s launch the installer using a custom preseed.cfg file, that will automatically install Netplan for us in the target system. A minimal preseed file could look like this:
# Install minimal Netplan generator binary
d-i preseed/late_command string in-target apt-get -y install netplan-generator
For this demo, we re installing the full netplan.io package (incl. Python CLI), as the netplan-generator package was not yet split out as an independent binary in the Bookworm cycle. You can choose the preseed file from a set of different variants to test the different configurations: We re using the custom linux kernel and initrd.gz here to be able to pass the PRESEED_URL as a parameter to the kernel s cmdline directly. Launching this VM should bring up the normal debian-installer in its netboot/gtk form:
$ export U=https://people.ubuntu.com/~slyon/d-i/bookworm/netplan-preseed+networkd.cfg
$ qemu-system-x86_64 \
	-M q35 -enable-kvm -cpu host -smp 4 -m 2G \
	-drive if=pflash,format=raw,unit=0,file=OVMF_CODE_4M.fd,readonly=on \
	-drive if=pflash,format=raw,unit=1,file=OVMF_VARS_4M.fd,readonly=off \
	-device qemu-xhci -device usb-kbd -device usb-mouse \
	-vga none -device virtio-gpu-pci \
	-net nic,model=virtio -net user \
	-kernel ./linux -initrd ./initrd.gz -append "url=$U" \
	-hda ./data.qcow2 -cdrom ./mini.iso;
Now you can click through the normal Debian-Installer process, using mostly default settings. Optionally, you could play around with the networking settings, to see how those get translated to /etc/netplan/ in the target system.
After you confirmed your partitioning changes, the base system gets installed. I suggest not to select any additional components, like desktop environments, to speed up the process.
During the final step of the installation (finish-install.d/55netcfg-copy-config) d-i will detect that Netplan was installed in the target system (due to the preseed file provided) and opt to write its network configuration to /etc/netplan/ instead of /etc/network/interfaces or /etc/NetworkManager/system-connections/.
Done! After the installation finished you can reboot into your virgin Debian Bookworm system. To do that, quit the current Qemu process, by pressing Ctrl+C and make sure to copy over the EFIVARS.fd file that was written by grub during the installation, so Qemu can find the new system. Then reboot into the new system, not using the mini.iso image any more:
$ cp ./OVMF_VARS_4M.fd ./EFIVARS.fd
$ qemu-system-x86_64 \
        -M q35 -enable-kvm -cpu host -smp 4 -m 2G \
        -drive if=pflash,format=raw,unit=0,file=OVMF_CODE_4M.fd,readonly=on \
        -drive if=pflash,format=raw,unit=1,file=EFIVARS.fd,readonly=off \
        -device qemu-xhci -device usb-kbd -device usb-mouse \
        -vga none -device virtio-gpu-pci \
        -net nic,model=virtio -net user \
        -drive file=./data.qcow2,if=none,format=qcow2,id=disk0 \
        -device virtio-blk-pci,drive=disk0,bootindex=1
        -serial mon:stdio
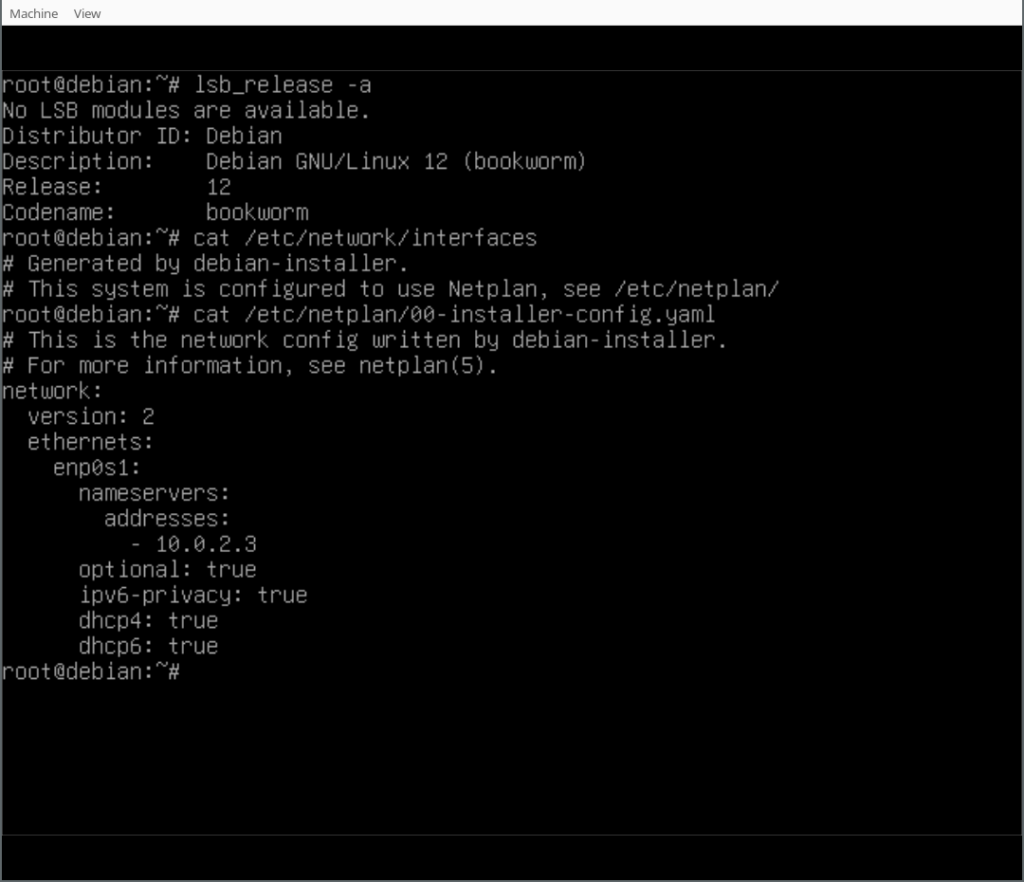
Finally, you can play around with your Netplan enabled Debian system! As you will find, /etc/network/interfaces exists but is empty, it could still be used (optionally/additionally). Netplan was configured in /etc/netplan/ according to the settings given during the d-i installation process.
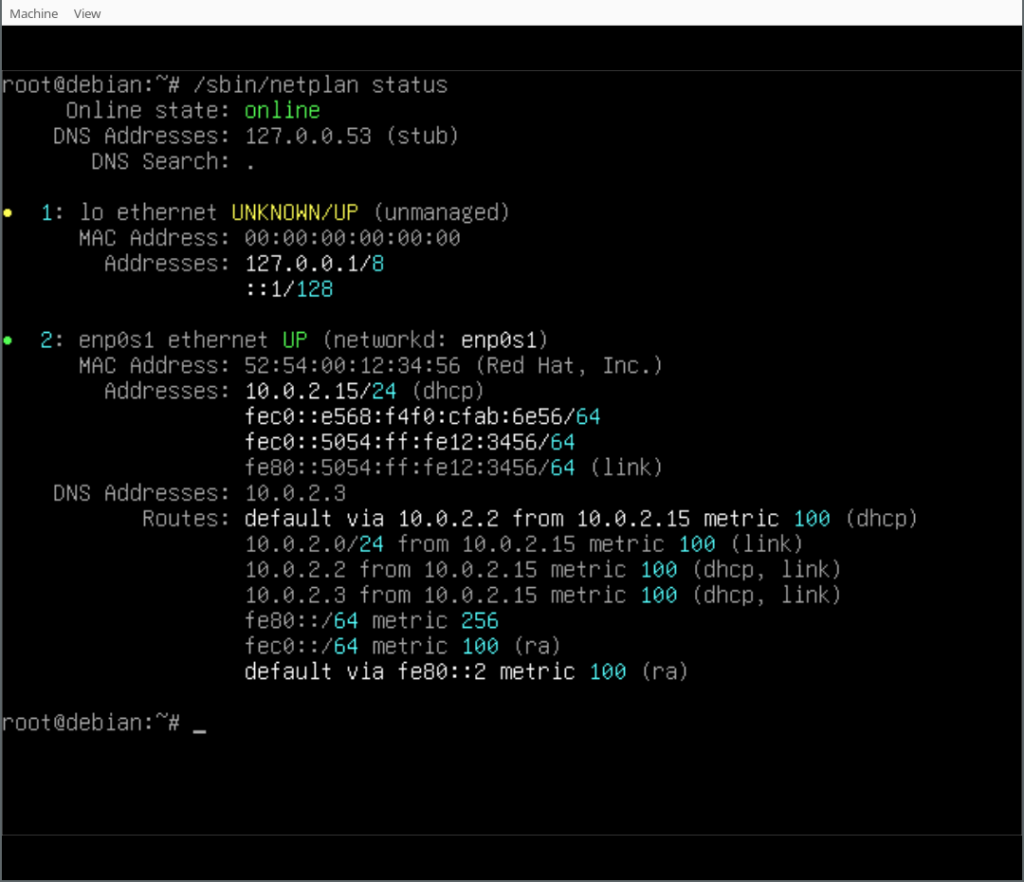
In our case we also installed the Netplan CLI, so we can play around with some of its features, like netplan status:
Thank you for following along the Netplan enabled Debian installation process and happy hacking! If you want to learn more join the discussion at Salsa:installer-team/netcfg and find us at GitHub:netplan.

19 December 2023

Antoine Beaupr : (Re)introducing screentest

I have accidentally rewritten screentest, an old X11/GTK2 program that I was previously using to, well, test screens.

Screentest is dead It was removed from Debian in May 2023 but had already missed two releases (Debian 11 "bullseye" and 12 "bookworm") due to release critical bugs. The stated reason for removal was:
The package is orphaned and its upstream is no longer developed. It depends on gtk2, has a low popcon and no reverse dependencies.
So I had little hope to see this program back in Debian. The git repository shows little activity, the last being two years ago. Interestingly, I do not quite remember what it was testing, but I do remember it to find dead pixels, confirm native resolution, and various pixel-peeping. Here's a screenshot of one of the screentest screens: screentest screenshot showing a white-on-black checkered background, with some circles in the corners, shades of gray and colors in the middle Now, I think it's safe to assume this program is dead and buried, and anyways I'm running wayland now, surely there's something better? Well, no. Of course not. Someone would know about it and tell me before I go on a random coding spree in a fit of procrastination... riiight? At least, the Debconf video team didn't seem to know of any replacement. They actually suggested I just "invoke gstreamer directly" and "embrace the joy of shell scripting".

Screentest reborn So, I naively did exactly that and wrote a horrible shell script. Then I realized the next step was to write an command line parser and monitor geometry guessing, and thought "NOPE, THIS IS WHERE THE SHELL STOPS", and rewrote the whole thing in Python. Now, screentest lives as a ~400-line Python script, half of which is unit test data and command-line parsing.

Why screentest Some smarty pants is going to complain and ask why the heck one would need something like that (and, well, someone already did), so maybe I can lay down a list of use case:
  • testing color output, in broad terms (answering the question of "is it just me or this project really yellow?")
  • testing focus and keystone ("this looks blurry, can you find a nice sharp frame in that movie to adjust focus?")
  • test for native resolution and sharpness ("does this projector really support 4k for 30$? that sounds like bullcrap")
  • looking for dead pixels ("i have a new monitor, i hope it's intact")

What does screentest do? Screentest displays a series of "patterns" on screen. The list of patterns is actually hardcoded in the script, copy-pasted from this list from the videotestsrc gstreamer plugin, but you can pass any pattern supported by your gstreamer installation with --patterns. A list of patterns relevant to your installation is available with the gst-inspect-1.0 videotestsrc command. By default, screentest goes through all patterns. Each pattern runs indefinitely until the you close the window, then the next pattern starts. You can restrict to a subset of patterns, for example this would be a good test for dead pixels:
screentest --patterns black,white,red,green,blue
This would be a good sharpness test:
screentest --patterns pinwheel,spokes,checkers-1,checkers-2,checkers-4,checkers-8
A good generic test is the classic SMPTE color bars and is the first in the list, but you can run only that test with:
screentest --patterns smpte
(I will mention, by the way, that as a system administrator with decades of experience, it is nearly impossible to type SMPTE without first typing SMTP and re-typing it again a few times before I get it right. I fully expect this post to have numerous typos.)
Here's an example of the SMPTE pattern from Wikipedia: SMPTE color bars For multi-monitor setups, screentest also supports specifying which output to use as a native resolution, with --output. Failing that, it will try to look at the outputs and use the first it will find. If it fails to find anything, you can specify a resolution with --resolution WIDTHxHEIGHT. I have tried to make it go full screen by default, but stumbled a bug in Sway that crashes gst-launch. If your Wayland compositor supports it, you can possibly enable full screen with --sink waylandsink fullscreen=true. Otherwise it will create a new window that you will have to make fullscreen yourself. For completeness, there's also an --audio flag that will emit the classic "drone", a sine wave at 440Hz at 40% volume (the audiotestsrc gstreamer plugin. And there's a --overlay-name option to show the pattern name, in case you get lost and want to start with one of them again.

How this works Most of the work is done by gstreamer. The script merely generates a pipeline and calls gst-launch to show the output. That both limits what it can do but also makes it much easier to use than figuring out gst-launch. There might be some additional patterns that could be useful, but I think those are better left to gstreamer. I, for example, am somewhat nostalgic of the Philips circle pattern that used to play for TV stations that were off-air in my area. But that, in my opinion, would be better added to the gstreamer plugin than into a separate thing. The script shows which command is being ran, so it's a good introduction to gstreamer pipelines. Advanced users (and the video team) will possibly not need screentest and will design their own pipelines with their own tools. I've previously worked with ffmpeg pipelines (in another such procrastinated coding spree, video-proxy-magic), and I found gstreamer more intuitive, even though it might be slightly less powerful. In retrospect, I should probably have picked a new name, to avoid crashing the namespace already used by the project, which is now on GitHub. Who knows, it might come back to life after this blog post; it would not be the first time. For now, the project lives along side the rest of my scripts collection but if there's sufficient interest, I might move it to its own git repositories. Comments, feedback, contributions are as usual welcome. And naturally, if you know something better for this kind of stuff, I'm happy to learn more about your favorite tool! So now I have finally found something to test my projector, which will likely confirm what I've already known all along: that it's kind of a piece of crap and I need to get a proper one.

9 December 2023

Thorsten Alteholz: My Debian Activities in November 2023

FTP master This month I accepted 276 and rejected 25 packages. The overall number of packages that got accepted was 276. I also handled several RM bugs, so the archive did not grow that much :-). Debian LTS This was my hundred-thirteenth month that I did some work for the Debian LTS initiative, started by Raphael Hertzog at Freexian. During my allocated time I uploaded: The update of libde265 was a bit unusual this time. The security tracker had three CVEs listed for it and the maintainer was looking for a sponsor to fix them in Unstable. So far, so good! I sponsored the upload and suddenly a fourth CVE appeared in the security tracker. As the debian/changelog mentioned a different CVE, it was automatically added. Indeed upstreams changelog contained a patch for a CVE that was reserved but not yet published (hence the security tracker could not connect it to libde265). I informed upstream and as things turned out marking the CVE as public was just forgotten. Luckily there was some time left for the upcoming point release and all four patches finally arrived in Bookworm. Debian ELTS This month was the sixty-fourth ELTS month. During my allocated time I uploaded: In order to check whether the patch for the standalone version of minizip was ok, I used a test from the embedded minizip version in chromium and it worked. Debian Printing This month I uploaded a new upstream version of: Within the context of preserving old printing packages, I adopted: If you know of any other package that is also needed and still maintained by the QA team, please tell me. This work is generously funded by Freexian! Debian Astro This month I uploaded a new upstream version of: Debian IoT This month I uploaded a new upstream version of: Debian Mobcom This month I uploaded a package to fix one or the other issue: Other stuff This month I uploaded new upstream version of packages, did a source upload for the transition or uploaded it to fix one or the other issue:

7 November 2023

Melissa Wen: AMD Driver-specific Properties for Color Management on Linux (Part 2)

TL;DR: This blog post explores the color capabilities of AMD hardware and how they are exposed to userspace through driver-specific properties. It discusses the different color blocks in the AMD Display Core Next (DCN) pipeline and their capabilities, such as predefined transfer functions, 1D and 3D lookup tables (LUTs), and color transformation matrices (CTMs). It also highlights the differences in AMD HW blocks for pre and post-blending adjustments, and how these differences are reflected in the available driver-specific properties. Overall, this blog post provides a comprehensive overview of the color capabilities of AMD hardware and how they can be controlled by userspace applications through driver-specific properties. This information is valuable for anyone who wants to develop applications that can take advantage of the AMD color management pipeline. Get a closer look at each hardware block s capabilities, unlock a wealth of knowledge about AMD display hardware, and enhance your understanding of graphics and visual computing. Stay tuned for future developments as we embark on a quest for GPU color capabilities in the ever-evolving realm of rainbow treasures.
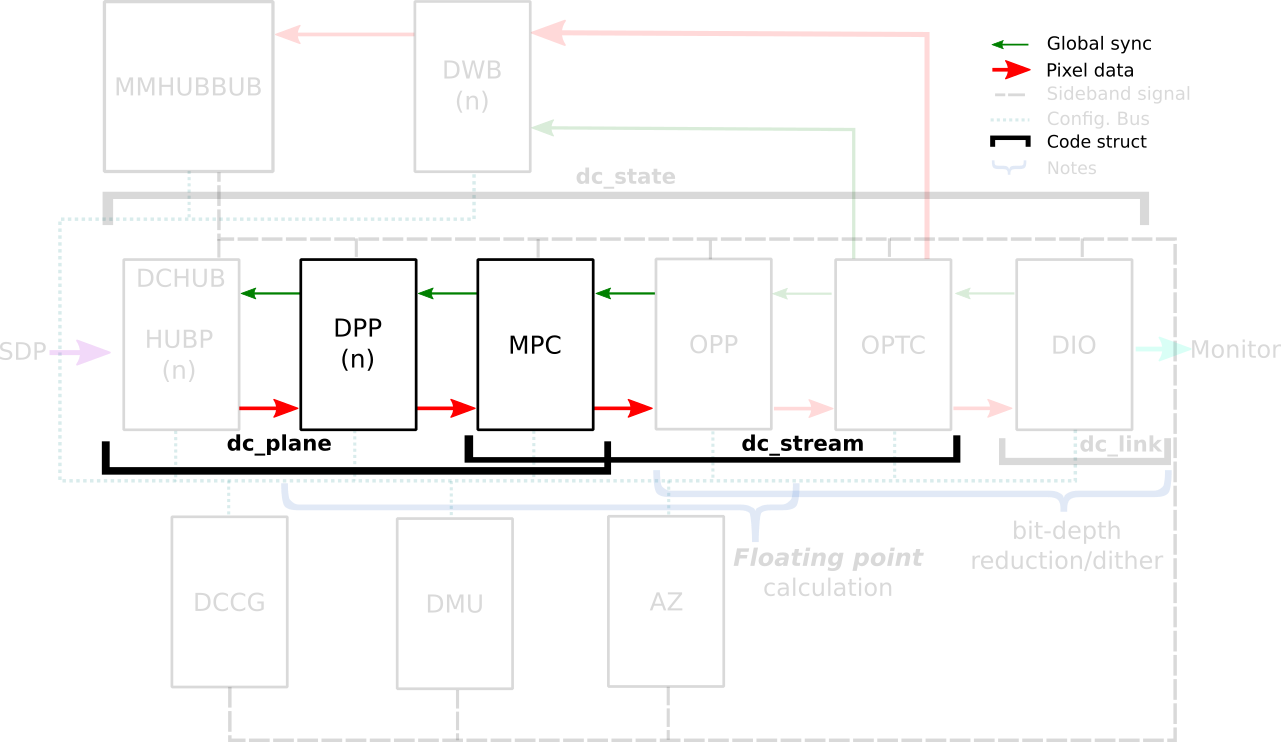
Operating Systems can use the power of GPUs to ensure consistent color reproduction across graphics devices. We can use GPU-accelerated color management to manage the diversity of color profiles, do color transformations to convert between High-Dynamic-Range (HDR) and Standard-Dynamic-Range (SDR) content and color enhacements for wide color gamut (WCG). However, to make use of GPU display capabilities, we need an interface between userspace and the kernel display drivers that is currently absent in the Linux/DRM KMS API. In the previous blog post I presented how we are expanding the Linux/DRM color management API to expose specific properties of AMD hardware. Now, I ll guide you to the color features for the Linux/AMD display driver. We embark on a journey through DRM/KMS, AMD Display Manager, and AMD Display Core and delve into the color blocks to uncover the secrets of color manipulation within AMD hardware. Here we ll talk less about the color tools and more about where to find them in the hardware. We resort to driver-specific properties to reach AMD hardware blocks with color capabilities. These blocks display features like predefined transfer functions, color transformation matrices, and 1-dimensional (1D LUT) and 3-dimensional lookup tables (3D LUT). Here, we will understand how these color features are strategically placed into color blocks both before and after blending in Display Pipe and Plane (DPP) and Multiple Pipe/Plane Combined (MPC) blocks. That said, welcome back to the second part of our thrilling journey through AMD s color management realm!

AMD Display Driver in the Linux/DRM Subsystem: The Journey In my 2022 XDC talk I m not an AMD expert, but , I briefly explained the organizational structure of the Linux/AMD display driver where the driver code is bifurcated into a Linux-specific section and a shared-code portion. To reveal AMD s color secrets through the Linux kernel DRM API, our journey led us through these layers of the Linux/AMD display driver s software stack. It includes traversing the DRM/KMS framework, the AMD Display Manager (DM), and the AMD Display Core (DC) [1]. The DRM/KMS framework provides the atomic API for color management through KMS properties represented by struct drm_property. We extended the color management interface exposed to userspace by leveraging existing resources and connecting them with driver-specific functions for managing modeset properties. On the AMD DC layer, the interface with hardware color blocks is established. The AMD DC layer contains OS-agnostic components that are shared across different platforms, making it an invaluable resource. This layer already implements hardware programming and resource management, simplifying the external developer s task. While examining the DC code, we gain insights into the color pipeline and capabilities, even without direct access to specifications. Additionally, AMD developers provide essential support by answering queries and reviewing our work upstream. The primary challenge involved identifying and understanding relevant AMD DC code to configure each color block in the color pipeline. However, the ultimate goal was to bridge the DC color capabilities with the DRM API. For this, we changed the AMD DM, the OS-dependent layer connecting the DC interface to the DRM/KMS framework. We defined and managed driver-specific color properties, facilitated the transport of user space data to the DC, and translated DRM features and settings to the DC interface. Considerations were also made for differences in the color pipeline based on hardware capabilities.
Exploring Color Capabilities of the AMD display hardware Now, let s dive into the exciting realm of AMD color capabilities, where a abundance of techniques and tools await to make your colors look extraordinary across diverse devices. First, we need to know a little about the color transformation and calibration tools and techniques that you can find in different blocks of the AMD hardware. I borrowed some images from [2] [3] [4] to help you understand the information.

Predefined Transfer Functions (Named Fixed Curves): Transfer functions serve as the bridge between the digital and visual worlds, defining the mathematical relationship between digital color values and linear scene/display values and ensuring consistent color reproduction across different devices and media. You can learn more about curves in the chapter GPU Gems 3 - The Importance of Being Linear by Larry Gritz and Eugene d Eon. ITU-R 2100 introduces three main types of transfer functions:
  • OETF: the opto-electronic transfer function, which converts linear scene light into the video signal, typically within a camera.
  • EOTF: electro-optical transfer function, which converts the video signal into the linear light output of the display.
  • OOTF: opto-optical transfer function, which has the role of applying the rendering intent .
AMD s display driver supports the following pre-defined transfer functions (aka named fixed curves):
  • Linear/Unity: linear/identity relationship between pixel value and luminance value;
  • Gamma 2.2, Gamma 2.4, Gamma 2.6: pure power functions;
  • sRGB: 2.4: The piece-wise transfer function from IEC 61966-2-1:1999;
  • BT.709: has a linear segment in the bottom part and then a power function with a 0.45 (~1/2.22) gamma for the rest of the range; standardized by ITU-R BT.709-6;
  • PQ (Perceptual Quantizer): used for HDR display, allows luminance range capability of 0 to 10,000 nits; standardized by SMPTE ST 2084.
These capabilities vary depending on the hardware block, with some utilizing hardcoded curves and others relying on AMD s color module to construct curves from standardized coefficients. It also supports user/custom curves built from a lookup table.

1D LUTs (1-dimensional Lookup Table): A 1D LUT is a versatile tool, defining a one-dimensional color transformation based on a single parameter. It s very well explained by Jeremy Selan at GPU Gems 2 - Chapter 24 Using Lookup Tables to Accelerate Color Transformations It enables adjustments to color, brightness, and contrast, making it ideal for fine-tuning. In the Linux AMD display driver, the atomic API offers a 1D LUT with 4096 entries and 8-bit depth, while legacy gamma uses a size of 256.

3D LUTs (3-dimensional Lookup Table): These tables work in three dimensions red, green, and blue. They re perfect for complex color transformations and adjustments between color channels. It s also more complex to manage and require more computational resources. Jeremy also explains 3D LUT at GPU Gems 2 - Chapter 24 Using Lookup Tables to Accelerate Color Transformations

CTM (Color Transformation Matrices): Color transformation matrices facilitate the transition between different color spaces, playing a crucial role in color space conversion.

HDR Multiplier: HDR multiplier is a factor applied to the color values of an image to increase their overall brightness.

AMD Color Capabilities in the Hardware Pipeline First, let s take a closer look at the AMD Display Core Next hardware pipeline in the Linux kernel documentation for AMDGPU driver - Display Core Next In the AMD Display Core Next hardware pipeline, we encounter two hardware blocks with color capabilities: the Display Pipe and Plane (DPP) and the Multiple Pipe/Plane Combined (MPC). The DPP handles color adjustments per plane before blending, while the MPC engages in post-blending color adjustments. In short, we expect DPP color capabilities to match up with DRM plane properties, and MPC color capabilities to play nice with DRM CRTC properties. Note: here s the catch there are some DRM CRTC color transformations that don t have a corresponding AMD MPC color block, and vice versa. It s like a puzzle, and we re here to solve it!

AMD Color Blocks and Capabilities We can finally talk about the color capabilities of each AMD color block. As it varies based on the generation of hardware, let s take the DCN3+ family as reference. What s possible to do before and after blending depends on hardware capabilities describe in the kernel driver by struct dpp_color_caps and struct mpc_color_caps. The AMD Steam Deck hardware provides a tangible example of these capabilities. Therefore, we take SteamDeck/DCN301 driver as an example and look at the Color pipeline capabilities described in the file: driver/gpu/drm/amd/display/dcn301/dcn301_resources.c
/* Color pipeline capabilities */
dc->caps.color.dpp.dcn_arch = 1; // If it is a Display Core Next (DCN): yes. Zero means DCE.
dc->caps.color.dpp.input_lut_shared = 0;
dc->caps.color.dpp.icsc = 1; // Intput Color Space Conversion  (CSC) matrix.
dc->caps.color.dpp.dgam_ram = 0; // The old degamma block for degamma curve (hardcoded and LUT).  Gamma correction  is the new one.
dc->caps.color.dpp.dgam_rom_caps.srgb = 1; // sRGB hardcoded curve support
dc->caps.color.dpp.dgam_rom_caps.bt2020 = 1; // BT2020 hardcoded curve support (seems not actually in use)
dc->caps.color.dpp.dgam_rom_caps.gamma2_2 = 1; // Gamma 2.2 hardcoded curve support
dc->caps.color.dpp.dgam_rom_caps.pq = 1; // PQ hardcoded curve support
dc->caps.color.dpp.dgam_rom_caps.hlg = 1; // HLG hardcoded curve support
dc->caps.color.dpp.post_csc = 1; // CSC matrix
dc->caps.color.dpp.gamma_corr = 1; // New  Gamma Correction  block for degamma user LUT;
dc->caps.color.dpp.dgam_rom_for_yuv = 0;
dc->caps.color.dpp.hw_3d_lut = 1; // 3D LUT support. If so, it's always preceded by a shaper curve. 
dc->caps.color.dpp.ogam_ram = 1; //  Blend Gamma  block for custom curve just after blending
// no OGAM ROM on DCN301
dc->caps.color.dpp.ogam_rom_caps.srgb = 0;
dc->caps.color.dpp.ogam_rom_caps.bt2020 = 0;
dc->caps.color.dpp.ogam_rom_caps.gamma2_2 = 0;
dc->caps.color.dpp.ogam_rom_caps.pq = 0;
dc->caps.color.dpp.ogam_rom_caps.hlg = 0;
dc->caps.color.dpp.ocsc = 0;
dc->caps.color.mpc.gamut_remap = 1; // Post-blending CTM (pre-blending CTM is always supported)
dc->caps.color.mpc.num_3dluts = pool->base.res_cap->num_mpc_3dlut; // Post-blending 3D LUT (preceded by shaper curve)
dc->caps.color.mpc.ogam_ram = 1; // Post-blending regamma.
// No pre-defined TF supported for regamma.
dc->caps.color.mpc.ogam_rom_caps.srgb = 0;
dc->caps.color.mpc.ogam_rom_caps.bt2020 = 0;
dc->caps.color.mpc.ogam_rom_caps.gamma2_2 = 0;
dc->caps.color.mpc.ogam_rom_caps.pq = 0;
dc->caps.color.mpc.ogam_rom_caps.hlg = 0;
dc->caps.color.mpc.ocsc = 1; // Output CSC matrix.
I included some inline comments in each element of the color caps to quickly describe them, but you can find the same information in the Linux kernel documentation. See more in struct dpp_color_caps, struct mpc_color_caps and struct rom_curve_caps. Now, using this guideline, we go through color capabilities of DPP and MPC blocks and talk more about mapping driver-specific properties to corresponding color blocks.

DPP Color Pipeline: Before Blending (Per Plane) Let s explore the capabilities of DPP blocks and what you can achieve with a color block. The very first thing to pay attention is the display architecture of the display hardware: previously AMD uses a display architecture called DCE
  • Display and Compositing Engine, but newer hardware follows DCN - Display Core Next.
The architectute is described by: dc->caps.color.dpp.dcn_arch

AMD Plane Degamma: TF and 1D LUT Described by: dc->caps.color.dpp.dgam_ram, dc->caps.color.dpp.dgam_rom_caps,dc->caps.color.dpp.gamma_corr AMD Plane Degamma data is mapped to the initial stage of the DPP pipeline. It is utilized to transition from scanout/encoded values to linear values for arithmetic operations. Plane Degamma supports both pre-defined transfer functions and 1D LUTs, depending on the hardware generation. DCN2 and older families handle both types of curve in the Degamma RAM block (dc->caps.color.dpp.dgam_ram); DCN3+ separate hardcoded curves and 1D LUT into two block: Degamma ROM (dc->caps.color.dpp.dgam_rom_caps) and Gamma correction block (dc->caps.color.dpp.gamma_corr), respectively. Pre-defined transfer functions:
  • they are hardcoded curves (read-only memory - ROM);
  • supported curves: sRGB EOTF, BT.709 inverse OETF, PQ EOTF and HLG OETF, Gamma 2.2, Gamma 2.4 and Gamma 2.6 EOTF.
The 1D LUT currently accepts 4096 entries of 8-bit. The data is interpreted as an array of struct drm_color_lut elements. Setting TF = Identity/Default and LUT as NULL means bypass. References:

AMD Plane 3x4 CTM (Color Transformation Matrix) AMD Plane CTM data goes to the DPP Gamut Remap block, supporting a 3x4 fixed point (s31.32) matrix for color space conversions. The data is interpreted as a struct drm_color_ctm_3x4. Setting NULL means bypass. References:

AMD Plane Shaper: TF + 1D LUT Described by: dc->caps.color.dpp.hw_3d_lut The Shaper block fine-tunes color adjustments before applying the 3D LUT, optimizing the use of the limited entries in each dimension of the 3D LUT. On AMD hardware, a 3D LUT always means a preceding shaper 1D LUT used for delinearizing and/or normalizing the color space before applying a 3D LUT, so this entry on DPP color caps dc->caps.color.dpp.hw_3d_lut means support for both shaper 1D LUT and 3D LUT. Pre-defined transfer function enables delinearizing content with or without shaper LUT, where AMD color module calculates the resulted shaper curve. Shaper curves go from linear values to encoded values. If we are already in a non-linear space and/or don t need to normalize values, we can set a Identity TF for shaper that works similar to bypass and is also the default TF value. Pre-defined transfer functions:
  • there is no DPP Shaper ROM. Curves are calculated by AMD color modules. Check calculate_curve() function in the file amd/display/modules/color/color_gamma.c.
  • supported curves: Identity, sRGB inverse EOTF, BT.709 OETF, PQ inverse EOTF, HLG OETF, and Gamma 2.2, Gamma 2.4, Gamma 2.6 inverse EOTF.
The 1D LUT currently accepts 4096 entries of 8-bit. The data is interpreted as an array of struct drm_color_lut elements. When setting Plane Shaper TF (!= Identity) and LUT at the same time, the color module will combine the pre-defined TF and the custom LUT values into the LUT that s actually programmed. Setting TF = Identity/Default and LUT as NULL works as bypass. References:

AMD Plane 3D LUT Described by: dc->caps.color.dpp.hw_3d_lut The 3D LUT in the DPP block facilitates complex color transformations and adjustments. 3D LUT is a three-dimensional array where each element is an RGB triplet. As mentioned before, the dc->caps.color.dpp.hw_3d_lut describe if DPP 3D LUT is supported. The AMD driver-specific property advertise the size of a single dimension via LUT3D_SIZE property. Plane 3D LUT is a blog property where the data is interpreted as an array of struct drm_color_lut elements and the number of entries is LUT3D_SIZE cubic. The array contains samples from the approximated function. Values between samples are estimated by tetrahedral interpolation The array is accessed with three indices, one for each input dimension (color channel), blue being the outermost dimension, red the innermost. This distribution is better visualized when examining the code in [RFC PATCH 5/5] drm/amd/display: Fill 3D LUT from userspace by Alex Hung:
+	for (nib = 0; nib < 17; nib++)  
+		for (nig = 0; nig < 17; nig++)  
+			for (nir = 0; nir < 17; nir++)  
+				ind_lut = 3 * (nib + 17*nig + 289*nir);
+
+				rgb_area[ind].red = rgb_lib[ind_lut + 0];
+				rgb_area[ind].green = rgb_lib[ind_lut + 1];
+				rgb_area[ind].blue = rgb_lib[ind_lut + 2];
+				ind++;
+			 
+		 
+	 
In our driver-specific approach we opted to advertise it s behavior to the userspace instead of implicitly dealing with it in the kernel driver. AMD s hardware supports 3D LUTs with 17-size or 9-size (4913 and 729 entries respectively), and you can choose between 10-bit or 12-bit. In the current driver-specific work we focus on enabling only 17-size 12-bit 3D LUT, as in [PATCH v3 25/32] drm/amd/display: add plane 3D LUT support:
+		/* Stride and bit depth are not programmable by API yet.
+		 * Therefore, only supports 17x17x17 3D LUT (12-bit).
+		 */
+		lut->lut_3d.use_tetrahedral_9 = false;
+		lut->lut_3d.use_12bits = true;
+		lut->state.bits.initialized = 1;
+		__drm_3dlut_to_dc_3dlut(drm_lut, drm_lut3d_size, &lut->lut_3d,
+					lut->lut_3d.use_tetrahedral_9,
+					MAX_COLOR_3DLUT_BITDEPTH);
A refined control of 3D LUT parameters should go through a follow-up version or generic API. Setting 3D LUT to NULL means bypass. References:

AMD Plane Blend/Out Gamma: TF + 1D LUT Described by: dc->caps.color.dpp.ogam_ram The Blend/Out Gamma block applies the final touch-up before blending, allowing users to linearize content after 3D LUT and just before the blending. It supports both 1D LUT and pre-defined TF. We can see Shaper and Blend LUTs as 1D LUTs that are sandwich the 3D LUT. So, if we don t need 3D LUT transformations, we may want to only use Degamma block to linearize and skip Shaper, 3D LUT and Blend. Pre-defined transfer function:
  • there is no DPP Blend ROM. Curves are calculated by AMD color modules;
  • supported curves: Identity, sRGB EOTF, BT.709 inverse OETF, PQ EOTF, HLG inverse OETF, and Gamma 2.2, Gamma 2.4, Gamma 2.6 EOTF.
The 1D LUT currently accepts 4096 entries of 8-bit. The data is interpreted as an array of struct drm_color_lut elements. If plane_blend_tf_property != Identity TF, AMD color module will combine the user LUT values with pre-defined TF into the LUT parameters to be programmed. Setting TF = Identity/Default and LUT to NULL means bypass. References:

MPC Color Pipeline: After Blending (Per CRTC)

DRM CRTC Degamma 1D LUT The degamma lookup table (LUT) for converting framebuffer pixel data before apply the color conversion matrix. The data is interpreted as an array of struct drm_color_lut elements. Setting NULL means bypass. Not really supported. The driver is currently reusing the DPP degamma LUT block (dc->caps.color.dpp.dgam_ram and dc->caps.color.dpp.gamma_corr) for supporting DRM CRTC Degamma LUT, as explaning by [PATCH v3 20/32] drm/amd/display: reject atomic commit if setting both plane and CRTC degamma.

DRM CRTC 3x3 CTM Described by: dc->caps.color.mpc.gamut_remap It sets the current transformation matrix (CTM) apply to pixel data after the lookup through the degamma LUT and before the lookup through the gamma LUT. The data is interpreted as a struct drm_color_ctm. Setting NULL means bypass.

DRM CRTC Gamma 1D LUT + AMD CRTC Gamma TF Described by: dc->caps.color.mpc.ogam_ram After all that, you might still want to convert the content to wire encoding. No worries, in addition to DRM CRTC 1D LUT, we ve got a AMD CRTC gamma transfer function (TF) to make it happen. Possible TF values are defined by enum amdgpu_transfer_function. Pre-defined transfer functions:
  • there is no MPC Gamma ROM. Curves are calculated by AMD color modules.
  • supported curves: Identity, sRGB inverse EOTF, BT.709 OETF, PQ inverse EOTF, HLG OETF, and Gamma 2.2, Gamma 2.4, Gamma 2.6 inverse EOTF.
The 1D LUT currently accepts 4096 entries of 8-bit. The data is interpreted as an array of struct drm_color_lut elements. When setting CRTC Gamma TF (!= Identity) and LUT at the same time, the color module will combine the pre-defined TF and the custom LUT values into the LUT that s actually programmed. Setting TF = Identity/Default and LUT to NULL means bypass. References:

Others

AMD CRTC Shaper and 3D LUT We have previously worked on exposing CRTC shaper and CRTC 3D LUT, but they were removed from the AMD driver-specific color series because they lack userspace case. CRTC shaper and 3D LUT works similar to plane shaper and 3D LUT but after blending (MPC block). The difference here is that setting (not bypass) Shaper and Gamma blocks together are not expected, since both blocks are used to delinearize the input space. In summary, we either set Shaper + 3D LUT or Gamma.

Input and Output Color Space Conversion There are two other color capabilities of AMD display hardware that were integrated to DRM by previous works and worth a brief explanation here. The DC Input CSC sets pre-defined coefficients from the values of DRM plane color_range and color_encoding properties. It is used for color space conversion of the input content. On the other hand, we have de DC Output CSC (OCSC) sets pre-defined coefficients from DRM connector colorspace properties. It is uses for color space conversion of the composed image to the one supported by the sink. References:

The search for rainbow treasures is not over yet If you want to understand a little more about this work, be sure to watch Joshua and I presented two talks at XDC 2023 about AMD/Steam Deck colors on Gamescope: In the time between the first and second part of this blog post, Uma Shashank and Chaitanya Kumar Borah published the plane color pipeline for Intel and Harry Wentland implemented a generic API for DRM based on VKMS support. We discussed these two proposals and the next steps for Color on Linux during the Color Management workshop at XDC 2023 and I briefly shared workshop results in the 2023 XDC lightning talk session. The search for rainbow treasures is not over yet! We plan to meet again next year in the 2024 Display Hackfest in Coru a-Spain (Igalia s HQ) to keep up the pace and continue advancing today s display needs on Linux. Finally, a HUGE thank you to everyone who worked with me on exploring AMD s color capabilities and making them available in userspace.

25 September 2023

Michael Prokop: Postfix failing with no shared cipher

I m one of the few folks left who run and maintain mail servers. Recently I had major troubles receiving mails from the mail servers used by a bank, and when asking my favourite search engine, I m clearly not the only one who ran into such an issue. Actually, I should have checked off the issue and not become a customer at that bank, but the tech nerd in me couldn t resist getting to the bottom of the problem. Since I got it working and this might be useful for others, here we are. :) I was trying to get an online banking account set up, but the corresponding account creation mail didn t arrive me, at all. Looking at my mail server logs, my postfix mail server didn t accept the mail due to:
postfix/smtpd[3319640]: warning: TLS library problem: error:1417A0C1:SSL routines:tls_post_process_client_hello:no shared cipher:../ssl/statem/statem_srvr.c:2283:
postfix/smtpd[3319640]: lost connection after STARTTLS from mx01.arz.at[193.110.182.61]
Huh, what s going on here?! Let s increase the TLS loglevel (setting smtpd_tls_loglevel = 2) and retry. But how can I retry receiving yet another mail? Luckily, on the registration website of the bank there was a URL available, that let me request a one-time password. This triggered another mail, so I did that and managed to grab this in the logs:
postfix/smtpd[3320018]: initializing the server-side TLS engine
postfix/tlsmgr[3320020]: open smtpd TLS cache btree:/var/lib/postfix/smtpd_scache
postfix/tlsmgr[3320020]: tlsmgr_cache_run_event: start TLS smtpd session cache cleanup
postfix/smtpd[3320018]: connect from mx01.arz.at[193.110.182.61]
postfix/smtpd[3320018]: setting up TLS connection from mx01.arz.at[193.110.182.61]
postfix/smtpd[3320018]: mx01.arz.at[193.110.182.61]: TLS cipher list "aNULL:-aNULL:HIGH:MEDIUM:+RC4:@STRENGTH"
postfix/smtpd[3320018]: SSL_accept:before SSL initialization
postfix/smtpd[3320018]: SSL3 alert write:fatal:handshake failure
postfix/smtpd[3320018]: SSL_accept:error in error
postfix/smtpd[3320018]: SSL_accept error from mx01.arz.at[193.110.182.61]: -1
postfix/smtpd[3320018]: warning: TLS library problem: error:1417A0C1:SSL routines:tls_post_process_client_hello:no shared cipher:../ssl/statem/statem_srvr.c:2283:
postfix/smtpd[3320018]: lost connection after STARTTLS from mx01.arz.at[193.110.182.61]
postfix/smtpd[3320018]: disconnect from mx01.arz.at[193.110.182.61] ehlo=1 starttls=0/1 commands=1/2
postfix/smtpd[3320018]: connect from mx01.arz.at[193.110.182.61]
postfix/smtpd[3320018]: disconnect from mx01.arz.at[193.110.182.61] ehlo=1 quit=1 commands=2
Ok, so this TLS cipher list aNULL:-aNULL:HIGH:MEDIUM:+RC4:@STRENGTH looked like the tls_medium_cipherlist setting in postfix, but which ciphers might we expect? Let s see what their SMTP server would speak to us:
% testssl --cipher-per-proto -t=smtp mx01.arz.at:25
[...]
Hexcode  Cipher Suite Name (OpenSSL)       KeyExch.   Encryption  Bits     Cipher Suite Name (IANA/RFC)
-----------------------------------------------------------------------------------------------------------------------------
SSLv2
SSLv3
TLS 1
TLS 1.1
TLS 1.2
 xc030   ECDHE-RSA-AES256-GCM-SHA384       ECDH 256   AESGCM      256      TLS_ECDHE_RSA_WITH_AES_256_GCM_SHA384
 xc028   ECDHE-RSA-AES256-SHA384           ECDH 256   AES         256      TLS_ECDHE_RSA_WITH_AES_256_CBC_SHA384
 xc014   ECDHE-RSA-AES256-SHA              ECDH 256   AES         256      TLS_ECDHE_RSA_WITH_AES_256_CBC_SHA
 x9d     AES256-GCM-SHA384                 RSA        AESGCM      256      TLS_RSA_WITH_AES_256_GCM_SHA384
 x3d     AES256-SHA256                     RSA        AES         256      TLS_RSA_WITH_AES_256_CBC_SHA256
 x35     AES256-SHA                        RSA        AES         256      TLS_RSA_WITH_AES_256_CBC_SHA
 xc02f   ECDHE-RSA-AES128-GCM-SHA256       ECDH 256   AESGCM      128      TLS_ECDHE_RSA_WITH_AES_128_GCM_SHA256
 xc027   ECDHE-RSA-AES128-SHA256           ECDH 256   AES         128      TLS_ECDHE_RSA_WITH_AES_128_CBC_SHA256
 xc013   ECDHE-RSA-AES128-SHA              ECDH 256   AES         128      TLS_ECDHE_RSA_WITH_AES_128_CBC_SHA
 x9c     AES128-GCM-SHA256                 RSA        AESGCM      128      TLS_RSA_WITH_AES_128_GCM_SHA256
 x3c     AES128-SHA256                     RSA        AES         128      TLS_RSA_WITH_AES_128_CBC_SHA256
 x2f     AES128-SHA                        RSA        AES         128      TLS_RSA_WITH_AES_128_CBC_SHA
TLS 1.3
Looks like a very small subset of ciphers, and they don t seem to be talking TLS v1.3 at all? Not great. :( A nice web service to verify the situation from another point of view is checktls, which also confirmed this:
[000.705] 	<-- 	220 2.0.0 Ready to start TLS
[000.705] 		STARTTLS command works on this server
[001.260] 		Connection converted to SSL
		SSLVersion in use: TLSv1_2
		Cipher in use: ECDHE-RSA-AES256-GCM-SHA384
		Perfect Forward Secrecy: yes
		Session Algorithm in use: Curve P-256 DHE(256 bits)
		Certificate #1 of 3 (sent by MX):
		Cert VALIDATED: ok
		Cert Hostname VERIFIED (mx01.arz.at = *.arz.at   DNS:*.arz.at   DNS:arz.at)
[...]
[001.517] 		TLS successfully started on this server
I got distracted by some other work, and when coming back to this problem, the one-time password procedure no longer worked, as the password reset URL was no longer valid. :( I managed to find the underlying URL, and with some web developer tools tinkering I could still use the website to let me trigger sending further one-time password mails, phew. Let s continue, so my mail server was running Debian/bullseye with postfix v3.5.18-0+deb11u1 and openssl v1.1.1n-0+deb11u5, let s see what it offers:
% testssl --cipher-per-proto -t=smtp mail.example.com:25
[...]
Hexcode  Cipher Suite Name (OpenSSL)       KeyExch.   Encryption  Bits     Cipher Suite Name (IANA/RFC)
-----------------------------------------------------------------------------------------------------------------------------
SSLv2
SSLv3
TLS 1
 xc00a   ECDHE-ECDSA-AES256-SHA            ECDH 253   AES         256      TLS_ECDHE_ECDSA_WITH_AES_256_CBC_SHA
 xc019   AECDH-AES256-SHA                  ECDH 253   AES         256      TLS_ECDH_anon_WITH_AES_256_CBC_SHA
 x3a     ADH-AES256-SHA                    DH 2048    AES         256      TLS_DH_anon_WITH_AES_256_CBC_SHA
 x89     ADH-CAMELLIA256-SHA               DH 2048    Camellia    256      TLS_DH_anon_WITH_CAMELLIA_256_CBC_SHA
 xc009   ECDHE-ECDSA-AES128-SHA            ECDH 253   AES         128      TLS_ECDHE_ECDSA_WITH_AES_128_CBC_SHA
 xc018   AECDH-AES128-SHA                  ECDH 253   AES         128      TLS_ECDH_anon_WITH_AES_128_CBC_SHA
 x34     ADH-AES128-SHA                    DH 2048    AES         128      TLS_DH_anon_WITH_AES_128_CBC_SHA
 x9b     ADH-SEED-SHA                      DH 2048    SEED        128      TLS_DH_anon_WITH_SEED_CBC_SHA
 x46     ADH-CAMELLIA128-SHA               DH 2048    Camellia    128      TLS_DH_anon_WITH_CAMELLIA_128_CBC_SHA
TLS 1.1
 xc00a   ECDHE-ECDSA-AES256-SHA            ECDH 253   AES         256      TLS_ECDHE_ECDSA_WITH_AES_256_CBC_SHA
 xc019   AECDH-AES256-SHA                  ECDH 253   AES         256      TLS_ECDH_anon_WITH_AES_256_CBC_SHA
 x3a     ADH-AES256-SHA                    DH 2048    AES         256      TLS_DH_anon_WITH_AES_256_CBC_SHA
 x89     ADH-CAMELLIA256-SHA               DH 2048    Camellia    256      TLS_DH_anon_WITH_CAMELLIA_256_CBC_SHA
 xc009   ECDHE-ECDSA-AES128-SHA            ECDH 253   AES         128      TLS_ECDHE_ECDSA_WITH_AES_128_CBC_SHA
 xc018   AECDH-AES128-SHA                  ECDH 253   AES         128      TLS_ECDH_anon_WITH_AES_128_CBC_SHA
 x34     ADH-AES128-SHA                    DH 2048    AES         128      TLS_DH_anon_WITH_AES_128_CBC_SHA
 x9b     ADH-SEED-SHA                      DH 2048    SEED        128      TLS_DH_anon_WITH_SEED_CBC_SHA
 x46     ADH-CAMELLIA128-SHA               DH 2048    Camellia    128      TLS_DH_anon_WITH_CAMELLIA_128_CBC_SHA
TLS 1.2
 xc02c   ECDHE-ECDSA-AES256-GCM-SHA384     ECDH 253   AESGCM      256      TLS_ECDHE_ECDSA_WITH_AES_256_GCM_SHA384
 xc024   ECDHE-ECDSA-AES256-SHA384         ECDH 253   AES         256      TLS_ECDHE_ECDSA_WITH_AES_256_CBC_SHA384
 xc00a   ECDHE-ECDSA-AES256-SHA            ECDH 253   AES         256      TLS_ECDHE_ECDSA_WITH_AES_256_CBC_SHA
 xcca9   ECDHE-ECDSA-CHACHA20-POLY1305     ECDH 253   ChaCha20    256      TLS_ECDHE_ECDSA_WITH_CHACHA20_POLY1305_SHA256
 xc0af   ECDHE-ECDSA-AES256-CCM8           ECDH 253   AESCCM8     256      TLS_ECDHE_ECDSA_WITH_AES_256_CCM_8
 xc0ad   ECDHE-ECDSA-AES256-CCM            ECDH 253   AESCCM      256      TLS_ECDHE_ECDSA_WITH_AES_256_CCM
 xc073   ECDHE-ECDSA-CAMELLIA256-SHA384    ECDH 253   Camellia    256      TLS_ECDHE_ECDSA_WITH_CAMELLIA_256_CBC_SHA384
 xc019   AECDH-AES256-SHA                  ECDH 253   AES         256      TLS_ECDH_anon_WITH_AES_256_CBC_SHA
 xa7     ADH-AES256-GCM-SHA384             DH 2048    AESGCM      256      TLS_DH_anon_WITH_AES_256_GCM_SHA384
 x6d     ADH-AES256-SHA256                 DH 2048    AES         256      TLS_DH_anon_WITH_AES_256_CBC_SHA256
 x3a     ADH-AES256-SHA                    DH 2048    AES         256      TLS_DH_anon_WITH_AES_256_CBC_SHA
 xc5     ADH-CAMELLIA256-SHA256            DH 2048    Camellia    256      TLS_DH_anon_WITH_CAMELLIA_256_CBC_SHA256
 x89     ADH-CAMELLIA256-SHA               DH 2048    Camellia    256      TLS_DH_anon_WITH_CAMELLIA_256_CBC_SHA
 xc05d   ECDHE-ECDSA-ARIA256-GCM-SHA384    ECDH 253   ARIAGCM     256      TLS_ECDHE_ECDSA_WITH_ARIA_256_GCM_SHA384
 xc02b   ECDHE-ECDSA-AES128-GCM-SHA256     ECDH 253   AESGCM      128      TLS_ECDHE_ECDSA_WITH_AES_128_GCM_SHA256
 xc023   ECDHE-ECDSA-AES128-SHA256         ECDH 253   AES         128      TLS_ECDHE_ECDSA_WITH_AES_128_CBC_SHA256
 xc009   ECDHE-ECDSA-AES128-SHA            ECDH 253   AES         128      TLS_ECDHE_ECDSA_WITH_AES_128_CBC_SHA
 xc0ae   ECDHE-ECDSA-AES128-CCM8           ECDH 253   AESCCM8     128      TLS_ECDHE_ECDSA_WITH_AES_128_CCM_8
 xc0ac   ECDHE-ECDSA-AES128-CCM            ECDH 253   AESCCM      128      TLS_ECDHE_ECDSA_WITH_AES_128_CCM
 xc072   ECDHE-ECDSA-CAMELLIA128-SHA256    ECDH 253   Camellia    128      TLS_ECDHE_ECDSA_WITH_CAMELLIA_128_CBC_SHA256
 xc018   AECDH-AES128-SHA                  ECDH 253   AES         128      TLS_ECDH_anon_WITH_AES_128_CBC_SHA
 xa6     ADH-AES128-GCM-SHA256             DH 2048    AESGCM      128      TLS_DH_anon_WITH_AES_128_GCM_SHA256
 x6c     ADH-AES128-SHA256                 DH 2048    AES         128      TLS_DH_anon_WITH_AES_128_CBC_SHA256
 x34     ADH-AES128-SHA                    DH 2048    AES         128      TLS_DH_anon_WITH_AES_128_CBC_SHA
 xbf     ADH-CAMELLIA128-SHA256            DH 2048    Camellia    128      TLS_DH_anon_WITH_CAMELLIA_128_CBC_SHA256
 x9b     ADH-SEED-SHA                      DH 2048    SEED        128      TLS_DH_anon_WITH_SEED_CBC_SHA
 x46     ADH-CAMELLIA128-SHA               DH 2048    Camellia    128      TLS_DH_anon_WITH_CAMELLIA_128_CBC_SHA
 xc05c   ECDHE-ECDSA-ARIA128-GCM-SHA256    ECDH 253   ARIAGCM     128      TLS_ECDHE_ECDSA_WITH_ARIA_128_GCM_SHA256
TLS 1.3
 x1302   TLS_AES_256_GCM_SHA384            ECDH 253   AESGCM      256      TLS_AES_256_GCM_SHA384
 x1303   TLS_CHACHA20_POLY1305_SHA256      ECDH 253   ChaCha20    256      TLS_CHACHA20_POLY1305_SHA256
 x1301   TLS_AES_128_GCM_SHA256            ECDH 253   AESGCM      128      TLS_AES_128_GCM_SHA256
Not so bad, but sadly no overlap with any of the ciphers that mx01.arz.at offers. What about disabling STARTTLS for the mx01.arz.at (+ mx02.arz.at being another one used by the relevant domain) mail servers when talking to mine? Let s try that:
% sudo postconf -nf smtpd_discard_ehlo_keyword_address_maps
smtpd_discard_ehlo_keyword_address_maps =
    hash:/etc/postfix/smtpd_discard_ehlo_keywords
% cat /etc/postfix/smtpd_discard_ehlo_keywords
# *disable* starttls for mx01.arz.at / mx02.arz.at:
193.110.182.61 starttls
193.110.182.62 starttls
But the remote mail server doesn t seem to send mails without TLS:
postfix/smtpd[4151799]: connect from mx01.arz.at[193.110.182.61]
postfix/smtpd[4151799]: discarding EHLO keywords: STARTTLS
postfix/smtpd[4151799]: disconnect from mx01.arz.at[193.110.182.61] ehlo=1 quit=1 commands=2
Let s verify this further, but without fiddling with the main mail server too much. We can add a dedicated service to postfix (see serverfault), and run it in verbose mode, to get more detailled logging:
% sudo postconf -Mf
[...]
10025      inet  n       -       -       -       -       smtpd
    -o syslog_name=postfix/smtpd/badstarttls
    -o smtpd_tls_security_level=none
    -o smtpd_helo_required=yes
    -o smtpd_helo_restrictions=pcre:/etc/postfix/helo_badstarttls_allow,reject
    -v
[...]
% cat /etc/postfix/helo_badstarttls_allow
/mx01.arz.at/ OK
/mx02.arz.at/ OK
/193.110.182.61/ OK
/193.110.182.62/ OK
We redirect the traffic from mx01.arz.at + mx02.arz.at towards our new postfix service, listening on port 10025:
% sudo iptables -t nat -A PREROUTING -p tcp -s 193.110.182.61 --dport 25 -j REDIRECT --to-port 10025
% sudo iptables -t nat -A PREROUTING -p tcp -s 193.110.182.62 --dport 25 -j REDIRECT --to-port 10025
With this setup we get very detailed logging, and it seems to confirm our suspicion that the mail server doesn t want to talk unencrypted with us:
[...]
postfix/smtpd/badstarttls/smtpd[3491900]: connect from mx01.arz.at[193.110.182.61]
[...]
postfix/smtpd/badstarttls/smtpd[3491901]: disconnect from mx01.arz.at[193.110.182.61] ehlo=1 quit=1 commands=2
postfix/smtpd/badstarttls/smtpd[3491901]: master_notify: status 1
postfix/smtpd/badstarttls/smtpd[3491901]: connection closed
[...]
Let s step back and revert those changes, back to our original postfix setup. Might the problem be related to our Let s Encrypt certificate? Let s see what we have:
% echo QUIT   openssl s_client -connect mail.example.com:25 -starttls
[...]
issuer=C = US, O = Let's Encrypt, CN = R3
---
No client certificate CA names sent
Peer signing digest: SHA384
Peer signature type: ECDSA
Server Temp Key: X25519, 253 bits
---
SSL handshake has read 4455 bytes and written 427 bytes
Verification: OK
---
New, TLSv1.3, Cipher is TLS_AES_256_GCM_SHA384
Server public key is 384 bit
[...]
We have an ECDSA based certificate, what about switching to RSA instead? Thanks to the wonderful dehydrated, this is as easy as:
% echo KEY_ALGO=rsa > certs/mail.example.com/config
% ./dehydrated -c --domain mail.example.com --force
% sudo systemctl reload postfix
With switching to RSA type key we get:
% echo QUIT   openssl s_client -connect mail.example.com:25 -starttls smtp
CONNECTED(00000003)
[...]
issuer=C = US, O = Let's Encrypt, CN = R3
---
No client certificate CA names sent
Peer signing digest: SHA256
Peer signature type: RSA-PSS
Server Temp Key: X25519, 253 bits
---
SSL handshake has read 5295 bytes and written 427 bytes
Verification: OK
---
New, TLSv1.3, Cipher is TLS_AES_256_GCM_SHA384
Server public key is 4096 bit
Which ciphers do we offer now? Let s check:
% testssl --cipher-per-proto -t=smtp mail.example.com:25
[...]
Hexcode  Cipher Suite Name (OpenSSL)       KeyExch.   Encryption  Bits     Cipher Suite Name (IANA/RFC)
-----------------------------------------------------------------------------------------------------------------------------
SSLv2
SSLv3
TLS 1
 xc014   ECDHE-RSA-AES256-SHA              ECDH 253   AES         256      TLS_ECDHE_RSA_WITH_AES_256_CBC_SHA
 x39     DHE-RSA-AES256-SHA                DH 2048    AES         256      TLS_DHE_RSA_WITH_AES_256_CBC_SHA
 x88     DHE-RSA-CAMELLIA256-SHA           DH 2048    Camellia    256      TLS_DHE_RSA_WITH_CAMELLIA_256_CBC_SHA
 xc019   AECDH-AES256-SHA                  ECDH 253   AES         256      TLS_ECDH_anon_WITH_AES_256_CBC_SHA
 x3a     ADH-AES256-SHA                    DH 2048    AES         256      TLS_DH_anon_WITH_AES_256_CBC_SHA
 x89     ADH-CAMELLIA256-SHA               DH 2048    Camellia    256      TLS_DH_anon_WITH_CAMELLIA_256_CBC_SHA
 x35     AES256-SHA                        RSA        AES         256      TLS_RSA_WITH_AES_256_CBC_SHA
 x84     CAMELLIA256-SHA                   RSA        Camellia    256      TLS_RSA_WITH_CAMELLIA_256_CBC_SHA
 xc013   ECDHE-RSA-AES128-SHA              ECDH 253   AES         128      TLS_ECDHE_RSA_WITH_AES_128_CBC_SHA
 x33     DHE-RSA-AES128-SHA                DH 2048    AES         128      TLS_DHE_RSA_WITH_AES_128_CBC_SHA
 x9a     DHE-RSA-SEED-SHA                  DH 2048    SEED        128      TLS_DHE_RSA_WITH_SEED_CBC_SHA
 x45     DHE-RSA-CAMELLIA128-SHA           DH 2048    Camellia    128      TLS_DHE_RSA_WITH_CAMELLIA_128_CBC_SHA
 xc018   AECDH-AES128-SHA                  ECDH 253   AES         128      TLS_ECDH_anon_WITH_AES_128_CBC_SHA
 x34     ADH-AES128-SHA                    DH 2048    AES         128      TLS_DH_anon_WITH_AES_128_CBC_SHA
 x9b     ADH-SEED-SHA                      DH 2048    SEED        128      TLS_DH_anon_WITH_SEED_CBC_SHA
 x46     ADH-CAMELLIA128-SHA               DH 2048    Camellia    128      TLS_DH_anon_WITH_CAMELLIA_128_CBC_SHA
 x2f     AES128-SHA                        RSA        AES         128      TLS_RSA_WITH_AES_128_CBC_SHA
 x96     SEED-SHA                          RSA        SEED        128      TLS_RSA_WITH_SEED_CBC_SHA
 x41     CAMELLIA128-SHA                   RSA        Camellia    128      TLS_RSA_WITH_CAMELLIA_128_CBC_SHA
TLS 1.1
 xc014   ECDHE-RSA-AES256-SHA              ECDH 253   AES         256      TLS_ECDHE_RSA_WITH_AES_256_CBC_SHA
 x39     DHE-RSA-AES256-SHA                DH 2048    AES         256      TLS_DHE_RSA_WITH_AES_256_CBC_SHA
 x88     DHE-RSA-CAMELLIA256-SHA           DH 2048    Camellia    256      TLS_DHE_RSA_WITH_CAMELLIA_256_CBC_SHA
 xc019   AECDH-AES256-SHA                  ECDH 253   AES         256      TLS_ECDH_anon_WITH_AES_256_CBC_SHA
 x3a     ADH-AES256-SHA                    DH 2048    AES         256      TLS_DH_anon_WITH_AES_256_CBC_SHA
 x89     ADH-CAMELLIA256-SHA               DH 2048    Camellia    256      TLS_DH_anon_WITH_CAMELLIA_256_CBC_SHA
 x35     AES256-SHA                        RSA        AES         256      TLS_RSA_WITH_AES_256_CBC_SHA
 x84     CAMELLIA256-SHA                   RSA        Camellia    256      TLS_RSA_WITH_CAMELLIA_256_CBC_SHA
 xc013   ECDHE-RSA-AES128-SHA              ECDH 253   AES         128      TLS_ECDHE_RSA_WITH_AES_128_CBC_SHA
 x33     DHE-RSA-AES128-SHA                DH 2048    AES         128      TLS_DHE_RSA_WITH_AES_128_CBC_SHA
 x9a     DHE-RSA-SEED-SHA                  DH 2048    SEED        128      TLS_DHE_RSA_WITH_SEED_CBC_SHA
 x45     DHE-RSA-CAMELLIA128-SHA           DH 2048    Camellia    128      TLS_DHE_RSA_WITH_CAMELLIA_128_CBC_SHA
 xc018   AECDH-AES128-SHA                  ECDH 253   AES         128      TLS_ECDH_anon_WITH_AES_128_CBC_SHA
 x34     ADH-AES128-SHA                    DH 2048    AES         128      TLS_DH_anon_WITH_AES_128_CBC_SHA
 x9b     ADH-SEED-SHA                      DH 2048    SEED        128      TLS_DH_anon_WITH_SEED_CBC_SHA
 x46     ADH-CAMELLIA128-SHA               DH 2048    Camellia    128      TLS_DH_anon_WITH_CAMELLIA_128_CBC_SHA
 x2f     AES128-SHA                        RSA        AES         128      TLS_RSA_WITH_AES_128_CBC_SHA
 x96     SEED-SHA                          RSA        SEED        128      TLS_RSA_WITH_SEED_CBC_SHA
 x41     CAMELLIA128-SHA                   RSA        Camellia    128      TLS_RSA_WITH_CAMELLIA_128_CBC_SHA
TLS 1.2
 xc030   ECDHE-RSA-AES256-GCM-SHA384       ECDH 253   AESGCM      256      TLS_ECDHE_RSA_WITH_AES_256_GCM_SHA384
 xc028   ECDHE-RSA-AES256-SHA384           ECDH 253   AES         256      TLS_ECDHE_RSA_WITH_AES_256_CBC_SHA384
 xc014   ECDHE-RSA-AES256-SHA              ECDH 253   AES         256      TLS_ECDHE_RSA_WITH_AES_256_CBC_SHA
 x9f     DHE-RSA-AES256-GCM-SHA384         DH 2048    AESGCM      256      TLS_DHE_RSA_WITH_AES_256_GCM_SHA384
 xcca8   ECDHE-RSA-CHACHA20-POLY1305       ECDH 253   ChaCha20    256      TLS_ECDHE_RSA_WITH_CHACHA20_POLY1305_SHA256
 xccaa   DHE-RSA-CHACHA20-POLY1305         DH 2048    ChaCha20    256      TLS_DHE_RSA_WITH_CHACHA20_POLY1305_SHA256
 xc0a3   DHE-RSA-AES256-CCM8               DH 2048    AESCCM8     256      TLS_DHE_RSA_WITH_AES_256_CCM_8
 xc09f   DHE-RSA-AES256-CCM                DH 2048    AESCCM      256      TLS_DHE_RSA_WITH_AES_256_CCM
 x6b     DHE-RSA-AES256-SHA256             DH 2048    AES         256      TLS_DHE_RSA_WITH_AES_256_CBC_SHA256
 x39     DHE-RSA-AES256-SHA                DH 2048    AES         256      TLS_DHE_RSA_WITH_AES_256_CBC_SHA
 xc077   ECDHE-RSA-CAMELLIA256-SHA384      ECDH 253   Camellia    256      TLS_ECDHE_RSA_WITH_CAMELLIA_256_CBC_SHA384
 xc4     DHE-RSA-CAMELLIA256-SHA256        DH 2048    Camellia    256      TLS_DHE_RSA_WITH_CAMELLIA_256_CBC_SHA256
 x88     DHE-RSA-CAMELLIA256-SHA           DH 2048    Camellia    256      TLS_DHE_RSA_WITH_CAMELLIA_256_CBC_SHA
 xc019   AECDH-AES256-SHA                  ECDH 253   AES         256      TLS_ECDH_anon_WITH_AES_256_CBC_SHA
 xa7     ADH-AES256-GCM-SHA384             DH 2048    AESGCM      256      TLS_DH_anon_WITH_AES_256_GCM_SHA384
 x6d     ADH-AES256-SHA256                 DH 2048    AES         256      TLS_DH_anon_WITH_AES_256_CBC_SHA256
 x3a     ADH-AES256-SHA                    DH 2048    AES         256      TLS_DH_anon_WITH_AES_256_CBC_SHA
 xc5     ADH-CAMELLIA256-SHA256            DH 2048    Camellia    256      TLS_DH_anon_WITH_CAMELLIA_256_CBC_SHA256
 x89     ADH-CAMELLIA256-SHA               DH 2048    Camellia    256      TLS_DH_anon_WITH_CAMELLIA_256_CBC_SHA
 x9d     AES256-GCM-SHA384                 RSA        AESGCM      256      TLS_RSA_WITH_AES_256_GCM_SHA384
 xc0a1   AES256-CCM8                       RSA        AESCCM8     256      TLS_RSA_WITH_AES_256_CCM_8
 xc09d   AES256-CCM                        RSA        AESCCM      256      TLS_RSA_WITH_AES_256_CCM
 x3d     AES256-SHA256                     RSA        AES         256      TLS_RSA_WITH_AES_256_CBC_SHA256
 x35     AES256-SHA                        RSA        AES         256      TLS_RSA_WITH_AES_256_CBC_SHA
 xc0     CAMELLIA256-SHA256                RSA        Camellia    256      TLS_RSA_WITH_CAMELLIA_256_CBC_SHA256
 x84     CAMELLIA256-SHA                   RSA        Camellia    256      TLS_RSA_WITH_CAMELLIA_256_CBC_SHA
 xc051   ARIA256-GCM-SHA384                RSA        ARIAGCM     256      TLS_RSA_WITH_ARIA_256_GCM_SHA384
 xc053   DHE-RSA-ARIA256-GCM-SHA384        DH 2048    ARIAGCM     256      TLS_DHE_RSA_WITH_ARIA_256_GCM_SHA384
 xc061   ECDHE-ARIA256-GCM-SHA384          ECDH 253   ARIAGCM     256      TLS_ECDHE_RSA_WITH_ARIA_256_GCM_SHA384
 xc02f   ECDHE-RSA-AES128-GCM-SHA256       ECDH 253   AESGCM      128      TLS_ECDHE_RSA_WITH_AES_128_GCM_SHA256
 xc027   ECDHE-RSA-AES128-SHA256           ECDH 253   AES         128      TLS_ECDHE_RSA_WITH_AES_128_CBC_SHA256
 xc013   ECDHE-RSA-AES128-SHA              ECDH 253   AES         128      TLS_ECDHE_RSA_WITH_AES_128_CBC_SHA
 x9e     DHE-RSA-AES128-GCM-SHA256         DH 2048    AESGCM      128      TLS_DHE_RSA_WITH_AES_128_GCM_SHA256
 xc0a2   DHE-RSA-AES128-CCM8               DH 2048    AESCCM8     128      TLS_DHE_RSA_WITH_AES_128_CCM_8
 xc09e   DHE-RSA-AES128-CCM                DH 2048    AESCCM      128      TLS_DHE_RSA_WITH_AES_128_CCM
 xc0a0   AES128-CCM8                       RSA        AESCCM8     128      TLS_RSA_WITH_AES_128_CCM_8
 xc09c   AES128-CCM                        RSA        AESCCM      128      TLS_RSA_WITH_AES_128_CCM
 x67     DHE-RSA-AES128-SHA256             DH 2048    AES         128      TLS_DHE_RSA_WITH_AES_128_CBC_SHA256
 x33     DHE-RSA-AES128-SHA                DH 2048    AES         128      TLS_DHE_RSA_WITH_AES_128_CBC_SHA
 xc076   ECDHE-RSA-CAMELLIA128-SHA256      ECDH 253   Camellia    128      TLS_ECDHE_RSA_WITH_CAMELLIA_128_CBC_SHA256
 xbe     DHE-RSA-CAMELLIA128-SHA256        DH 2048    Camellia    128      TLS_DHE_RSA_WITH_CAMELLIA_128_CBC_SHA256
 x9a     DHE-RSA-SEED-SHA                  DH 2048    SEED        128      TLS_DHE_RSA_WITH_SEED_CBC_SHA
 x45     DHE-RSA-CAMELLIA128-SHA           DH 2048    Camellia    128      TLS_DHE_RSA_WITH_CAMELLIA_128_CBC_SHA
 xc018   AECDH-AES128-SHA                  ECDH 253   AES         128      TLS_ECDH_anon_WITH_AES_128_CBC_SHA
 xa6     ADH-AES128-GCM-SHA256             DH 2048    AESGCM      128      TLS_DH_anon_WITH_AES_128_GCM_SHA256
 x6c     ADH-AES128-SHA256                 DH 2048    AES         128      TLS_DH_anon_WITH_AES_128_CBC_SHA256
 x34     ADH-AES128-SHA                    DH 2048    AES         128      TLS_DH_anon_WITH_AES_128_CBC_SHA
 xbf     ADH-CAMELLIA128-SHA256            DH 2048    Camellia    128      TLS_DH_anon_WITH_CAMELLIA_128_CBC_SHA256
 x9b     ADH-SEED-SHA                      DH 2048    SEED        128      TLS_DH_anon_WITH_SEED_CBC_SHA
 x46     ADH-CAMELLIA128-SHA               DH 2048    Camellia    128      TLS_DH_anon_WITH_CAMELLIA_128_CBC_SHA
 x9c     AES128-GCM-SHA256                 RSA        AESGCM      128      TLS_RSA_WITH_AES_128_GCM_SHA256
 x3c     AES128-SHA256                     RSA        AES         128      TLS_RSA_WITH_AES_128_CBC_SHA256
 x2f     AES128-SHA                        RSA        AES         128      TLS_RSA_WITH_AES_128_CBC_SHA
 xba     CAMELLIA128-SHA256                RSA        Camellia    128      TLS_RSA_WITH_CAMELLIA_128_CBC_SHA256
 x96     SEED-SHA                          RSA        SEED        128      TLS_RSA_WITH_SEED_CBC_SHA
 x41     CAMELLIA128-SHA                   RSA        Camellia    128      TLS_RSA_WITH_CAMELLIA_128_CBC_SHA
 xc050   ARIA128-GCM-SHA256                RSA        ARIAGCM     128      TLS_RSA_WITH_ARIA_128_GCM_SHA256
 xc052   DHE-RSA-ARIA128-GCM-SHA256        DH 2048    ARIAGCM     128      TLS_DHE_RSA_WITH_ARIA_128_GCM_SHA256
 xc060   ECDHE-ARIA128-GCM-SHA256          ECDH 253   ARIAGCM     128      TLS_ECDHE_RSA_WITH_ARIA_128_GCM_SHA256
TLS 1.3
 x1302   TLS_AES_256_GCM_SHA384            ECDH 253   AESGCM      256      TLS_AES_256_GCM_SHA384
 x1303   TLS_CHACHA20_POLY1305_SHA256      ECDH 253   ChaCha20    256      TLS_CHACHA20_POLY1305_SHA256
 x1301   TLS_AES_128_GCM_SHA256            ECDH 253   AESGCM      128      TLS_AES_128_GCM_SHA256
With switching our SSL certificate to RSA, we gained around 51 new cipher options, amongst them being ones that also mx01.arz.at claimed to support. FTR, the result from above is what you get with the default settings for postfix v3.5.18, being:
smtpd_tls_ciphers = medium
smtpd_tls_mandatory_ciphers = medium
smtpd_tls_mandatory_exclude_ciphers =
smtpd_tls_mandatory_protocols = !SSLv2, !SSLv3
But the delay between triggering the password reset mail and getting a mail server connect was getting bigger and bigger. Therefore while waiting for the next mail to arrive, I decided to capture the network traffic, to be able to look further into this if it should continue to be failing:
% sudo tshark -n -i eth0 -s 65535 -w arz.pcap -f "host 193.110.182.61 or host 193.110.182.62"
A few hours later the mail server connected again, and the mail went through!
postfix/smtpd[4162835]: connect from mx01.arz.at[193.110.182.61]
postfix/smtpd[4162835]: Anonymous TLS connection established from mx01.arz.at[193.110.182.61]: TLSv1.2 with cipher ECDHE-RSA-AES256-GCM-SHA384 (256/256 bits)
postfix/smtpd[4162835]: E50D6401E6: client=mx01.arz.at[193.110.182.61]
postfix/smtpd[4162835]: disconnect from mx01.arz.at[193.110.182.61] ehlo=2 starttls=1 mail=1 rcpt=1 data=1 quit=1 commands=7
Now also having the captured network traffic, we can check the details there:
[...]
% tshark -o smtp.decryption:true -r arz.pcap
    1 0.000000000 193.110.182.61   203.0.113.42 TCP 74 24699   25 [SYN] Seq=0 Win=29200 Len=0 MSS=1460 SACK_PERM=1 TSval=2261106119 TSecr=0 WS=128
    2 0.000042827 203.0.113.42   193.110.182.61 TCP 74 25   24699 [SYN, ACK] Seq=0 Ack=1 Win=65160 Len=0 MSS=1460 SACK_PERM=1 TSval=3233422181 TSecr=2261106119 WS=128
    3 0.020719269 193.110.182.61   203.0.113.42 TCP 66 24699   25 [ACK] Seq=1 Ack=1 Win=29312 Len=0 TSval=2261106139 TSecr=3233422181
    4 0.022883259 203.0.113.42   193.110.182.61 SMTP 96 S: 220 mail.example.com ESMTP
    5 0.043682626 193.110.182.61   203.0.113.42 TCP 66 24699   25 [ACK] Seq=1 Ack=31 Win=29312 Len=0 TSval=2261106162 TSecr=3233422203
    6 0.043799047 193.110.182.61   203.0.113.42 SMTP 84 C: EHLO mx01.arz.at
    7 0.043811363 203.0.113.42   193.110.182.61 TCP 66 25   24699 [ACK] Seq=31 Ack=19 Win=65280 Len=0 TSval=3233422224 TSecr=2261106162
    8 0.043898412 203.0.113.42   193.110.182.61 SMTP 253 S: 250-mail.example.com   PIPELINING   SIZE 20240000   VRFY   ETRN   AUTH PLAIN   AUTH=PLAIN   ENHANCEDSTATUSCODES   8BITMIME   DSN   SMTPUTF8   CHUNKING
    9 0.064625499 193.110.182.61   203.0.113.42 SMTP 72 C: QUIT
   10 0.064750257 203.0.113.42   193.110.182.61 SMTP 81 S: 221 2.0.0 Bye
   11 0.064760200 203.0.113.42   193.110.182.61 TCP 66 25   24699 [FIN, ACK] Seq=233 Ack=25 Win=65280 Len=0 TSval=3233422245 TSecr=2261106183
   12 0.085573715 193.110.182.61   203.0.113.42 TCP 66 24699   25 [FIN, ACK] Seq=25 Ack=234 Win=30336 Len=0 TSval=2261106204 TSecr=3233422245
   13 0.085610229 203.0.113.42   193.110.182.61 TCP 66 25   24699 [ACK] Seq=234 Ack=26 Win=65280 Len=0 TSval=3233422266 TSecr=2261106204
   14 1799.888108373 193.110.182.61   203.0.113.42 TCP 74 10330   25 [SYN] Seq=0 Win=29200 Len=0 MSS=1460 SACK_PERM=1 TSval=2262906007 TSecr=0 WS=128
   15 1799.888161311 203.0.113.42   193.110.182.61 TCP 74 25   10330 [SYN, ACK] Seq=0 Ack=1 Win=65160 Len=0 MSS=1460 SACK_PERM=1 TSval=3235222069 TSecr=2262906007 WS=128
   16 1799.909030335 193.110.182.61   203.0.113.42 TCP 66 10330   25 [ACK] Seq=1 Ack=1 Win=29312 Len=0 TSval=2262906028 TSecr=3235222069
   17 1799.956621011 203.0.113.42   193.110.182.61 SMTP 96 S: 220 mail.example.com ESMTP
   18 1799.977229656 193.110.182.61   203.0.113.42 TCP 66 10330   25 [ACK] Seq=1 Ack=31 Win=29312 Len=0 TSval=2262906096 TSecr=3235222137
   19 1799.977229698 193.110.182.61   203.0.113.42 SMTP 84 C: EHLO mx01.arz.at
   20 1799.977266759 203.0.113.42   193.110.182.61 TCP 66 25   10330 [ACK] Seq=31 Ack=19 Win=65280 Len=0 TSval=3235222158 TSecr=2262906096
   21 1799.977351663 203.0.113.42   193.110.182.61 SMTP 267 S: 250-mail.example.com   PIPELINING   SIZE 20240000   VRFY   ETRN   STARTTLS   AUTH PLAIN   AUTH=PLAIN   ENHANCEDSTATUSCODES   8BITMIME   DSN   SMTPUTF8   CHUNKING
   22 1800.011494861 193.110.182.61   203.0.113.42 SMTP 76 C: STARTTLS
   23 1800.011589267 203.0.113.42   193.110.182.61 SMTP 96 S: 220 2.0.0 Ready to start TLS
   24 1800.032812294 193.110.182.61   203.0.113.42 TLSv1 223 Client Hello
   25 1800.032987264 203.0.113.42   193.110.182.61 TLSv1.2 2962 Server Hello
   26 1800.032995513 203.0.113.42   193.110.182.61 TCP 1266 25   10330 [PSH, ACK] Seq=3158 Ack=186 Win=65152 Len=1200 TSval=3235222214 TSecr=2262906151 [TCP segment of a reassembled PDU]
   27 1800.053546755 193.110.182.61   203.0.113.42 TCP 66 10330   25 [ACK] Seq=186 Ack=3158 Win=36096 Len=0 TSval=2262906172 TSecr=3235222214
   28 1800.092852469 193.110.182.61   203.0.113.42 TCP 66 10330   25 [ACK] Seq=186 Ack=4358 Win=39040 Len=0 TSval=2262906212 TSecr=3235222214
   29 1800.092892905 203.0.113.42   193.110.182.61 TLSv1.2 900 Certificate, Server Key Exchange, Server Hello Done
   30 1800.113546769 193.110.182.61   203.0.113.42 TCP 66 10330   25 [ACK] Seq=186 Ack=5192 Win=41856 Len=0 TSval=2262906232 TSecr=3235222273
   31 1800.114763363 193.110.182.61   203.0.113.42 TLSv1.2 192 Client Key Exchange, Change Cipher Spec, Encrypted Handshake Message
   32 1800.115000416 203.0.113.42   193.110.182.61 TLSv1.2 117 Change Cipher Spec, Encrypted Handshake Message
   33 1800.136070200 193.110.182.61   203.0.113.42 TLSv1.2 113 Application Data
   34 1800.136155526 203.0.113.42   193.110.182.61 TLSv1.2 282 Application Data
   35 1800.158854473 193.110.182.61   203.0.113.42 TLSv1.2 162 Application Data
   36 1800.159254794 203.0.113.42   193.110.182.61 TLSv1.2 109 Application Data
   37 1800.180286407 193.110.182.61   203.0.113.42 TLSv1.2 144 Application Data
   38 1800.223005960 203.0.113.42   193.110.182.61 TCP 66 25   10330 [ACK] Seq=5502 Ack=533 Win=65152 Len=0 TSval=3235222404 TSecr=2262906299
   39 1802.230300244 203.0.113.42   193.110.182.61 TLSv1.2 146 Application Data
   40 1802.251994333 193.110.182.61   203.0.113.42 TCP 2962 [TCP segment of a reassembled PDU]
   41 1802.252034015 203.0.113.42   193.110.182.61 TCP 66 25   10330 [ACK] Seq=5582 Ack=3429 Win=63616 Len=0 TSval=3235224433 TSecr=2262908371
   42 1802.252279083 193.110.182.61   203.0.113.42 TLSv1.2 1295 Application Data
   43 1802.252288316 203.0.113.42   193.110.182.61 TCP 66 25   10330 [ACK] Seq=5582 Ack=4658 Win=64128 Len=0 TSval=3235224433 TSecr=2262908371
   44 1802.272816060 193.110.182.61   203.0.113.42 TLSv1.2 833 Application Data, Application Data
   45 1802.272827542 203.0.113.42   193.110.182.61 TCP 66 25   10330 [ACK] Seq=5582 Ack=5425 Win=64128 Len=0 TSval=3235224453 TSecr=2262908392
   46 1802.338807683 203.0.113.42   193.110.182.61 TLSv1.2 131 Application Data
   47 1802.398968611 193.110.182.61   203.0.113.42 TCP 66 10330   25 [ACK] Seq=5425 Ack=5647 Win=44800 Len=0 TSval=2262908518 TSecr=3235224519
   48 1863.257457500 193.110.182.61   203.0.113.42 TLSv1.2 101 Application Data
   49 1863.257495688 203.0.113.42   193.110.182.61 TCP 66 25   10330 [ACK] Seq=5647 Ack=5460 Win=64128 Len=0 TSval=3235285438 TSecr=2262969376
   50 1863.257654942 203.0.113.42   193.110.182.61 TLSv1.2 110 Application Data
   51 1863.257721010 203.0.113.42   193.110.182.61 TLSv1.2 97 Encrypted Alert
   52 1863.278242216 193.110.182.61   203.0.113.42 TCP 66 10330   25 [ACK] Seq=5460 Ack=5691 Win=44800 Len=0 TSval=2262969397 TSecr=3235285438
   53 1863.278464176 193.110.182.61   203.0.113.42 TCP 66 10330   25 [RST, ACK] Seq=5460 Ack=5723 Win=44800 Len=0 TSval=2262969397 TSecr=3235285438
% tshark -O tls -r arz.pcap
[...]
Transport Layer Security
    TLSv1 Record Layer: Handshake Protocol: Client Hello
        Content Type: Handshake (22)
        Version: TLS 1.0 (0x0301)
        Length: 152
        Handshake Protocol: Client Hello
            Handshake Type: Client Hello (1)
            Length: 148
            Version: TLS 1.2 (0x0303)
            Random: 4575d1e7c93c09a564edc00b8b56ea6f5d826f8cfe78eb980c451a70a9c5123f
                GMT Unix Time: Dec  5, 2006 21:09:11.000000000 CET
                Random Bytes: c93c09a564edc00b8b56ea6f5d826f8cfe78eb980c451a70a9c5123f
            Session ID Length: 0
            Cipher Suites Length: 26
            Cipher Suites (13 suites)
                Cipher Suite: TLS_ECDHE_RSA_WITH_AES_256_GCM_SHA384 (0xc030)
                Cipher Suite: TLS_ECDHE_RSA_WITH_AES_128_GCM_SHA256 (0xc02f)
                Cipher Suite: TLS_ECDHE_RSA_WITH_AES_256_CBC_SHA384 (0xc028)
                Cipher Suite: TLS_ECDHE_RSA_WITH_AES_128_CBC_SHA256 (0xc027)
                Cipher Suite: TLS_ECDHE_RSA_WITH_AES_256_CBC_SHA (0xc014)
                Cipher Suite: TLS_ECDHE_RSA_WITH_AES_128_CBC_SHA (0xc013)
                Cipher Suite: TLS_RSA_WITH_AES_256_GCM_SHA384 (0x009d)
                Cipher Suite: TLS_RSA_WITH_AES_128_GCM_SHA256 (0x009c)
                Cipher Suite: TLS_RSA_WITH_AES_256_CBC_SHA256 (0x003d)
                Cipher Suite: TLS_RSA_WITH_AES_128_CBC_SHA256 (0x003c)
                Cipher Suite: TLS_RSA_WITH_AES_256_CBC_SHA (0x0035)
                Cipher Suite: TLS_RSA_WITH_AES_128_CBC_SHA (0x002f)
                Cipher Suite: TLS_EMPTY_RENEGOTIATION_INFO_SCSV (0x00ff)
[...]
Transport Layer Security
    TLSv1.2 Record Layer: Handshake Protocol: Server Hello
        Content Type: Handshake (22)
        Version: TLS 1.2 (0x0303)
        Length: 89
        Handshake Protocol: Server Hello
            Handshake Type: Server Hello (2)
            Length: 85
            Version: TLS 1.2 (0x0303)
            Random: cf2ed24e3300e95e5f56023bf8b4e5904b862bb2ed8a5796444f574e47524401
                GMT Unix Time: Feb 23, 2080 23:16:46.000000000 CET
                Random Bytes: 3300e95e5f56023bf8b4e5904b862bb2ed8a5796444f574e47524401
            Session ID Length: 32
            Session ID: 63d041b126ecebf857d685abd9d4593c46a3672e1ad76228f3eacf2164f86fb9
            Cipher Suite: TLS_ECDHE_RSA_WITH_AES_256_GCM_SHA384 (0xc030)
[...]
In this network dump we see what cipher suites are offered, and the TLS_ECDHE_RSA_WITH_AES_256_GCM_SHA384 here is the Cipher Suite Name in IANA/RFC speak. Whis corresponds to the ECDHE-RSA-AES256-GCM-SHA384 in openssl speak (see Mozilla s Mozilla s cipher suite correspondence table), which we also saw in the postfix log. Mission accomplished! :) Now, if we re interested in avoiding certain ciphers and increase security level, we can e.g. get rid of the SEED, CAMELLIA and all anonymous ciphers, and could accept only TLS v1.2 + v1.3, by further adjusting postfix s main.cf:
smtpd_tls_ciphers = high
smtpd_tls_exclude_ciphers = aNULL CAMELLIA
smtpd_tls_mandatory_ciphers = high
smtpd_tls_mandatory_protocols = TLSv1.2 TLSv1.3
smtpd_tls_protocols = TLSv1.2 TLSv1.3
Which would then gives us:
% testssl --cipher-per-proto -t=smtp mail.example.com:25
[...]
Hexcode  Cipher Suite Name (OpenSSL)       KeyExch.   Encryption  Bits     Cipher Suite Name (IANA/RFC)
-----------------------------------------------------------------------------------------------------------------------------
SSLv2
SSLv3
TLS 1
TLS 1.1
TLS 1.2
 xc030   ECDHE-RSA-AES256-GCM-SHA384       ECDH 253   AESGCM      256      TLS_ECDHE_RSA_WITH_AES_256_GCM_SHA384
 xc028   ECDHE-RSA-AES256-SHA384           ECDH 253   AES         256      TLS_ECDHE_RSA_WITH_AES_256_CBC_SHA384
 xc014   ECDHE-RSA-AES256-SHA              ECDH 253   AES         256      TLS_ECDHE_RSA_WITH_AES_256_CBC_SHA
 x9f     DHE-RSA-AES256-GCM-SHA384         DH 2048    AESGCM      256      TLS_DHE_RSA_WITH_AES_256_GCM_SHA384
 xcca8   ECDHE-RSA-CHACHA20-POLY1305       ECDH 253   ChaCha20    256      TLS_ECDHE_RSA_WITH_CHACHA20_POLY1305_SHA256
 xccaa   DHE-RSA-CHACHA20-POLY1305         DH 2048    ChaCha20    256      TLS_DHE_RSA_WITH_CHACHA20_POLY1305_SHA256
 xc0a3   DHE-RSA-AES256-CCM8               DH 2048    AESCCM8     256      TLS_DHE_RSA_WITH_AES_256_CCM_8
 xc09f   DHE-RSA-AES256-CCM                DH 2048    AESCCM      256      TLS_DHE_RSA_WITH_AES_256_CCM
 x6b     DHE-RSA-AES256-SHA256             DH 2048    AES         256      TLS_DHE_RSA_WITH_AES_256_CBC_SHA256
 x39     DHE-RSA-AES256-SHA                DH 2048    AES         256      TLS_DHE_RSA_WITH_AES_256_CBC_SHA
 x9d     AES256-GCM-SHA384                 RSA        AESGCM      256      TLS_RSA_WITH_AES_256_GCM_SHA384
 xc0a1   AES256-CCM8                       RSA        AESCCM8     256      TLS_RSA_WITH_AES_256_CCM_8
 xc09d   AES256-CCM                        RSA        AESCCM      256      TLS_RSA_WITH_AES_256_CCM
 x3d     AES256-SHA256                     RSA        AES         256      TLS_RSA_WITH_AES_256_CBC_SHA256
 x35     AES256-SHA                        RSA        AES         256      TLS_RSA_WITH_AES_256_CBC_SHA
 xc051   ARIA256-GCM-SHA384                RSA        ARIAGCM     256      TLS_RSA_WITH_ARIA_256_GCM_SHA384
 xc053   DHE-RSA-ARIA256-GCM-SHA384        DH 2048    ARIAGCM     256      TLS_DHE_RSA_WITH_ARIA_256_GCM_SHA384
 xc061   ECDHE-ARIA256-GCM-SHA384          ECDH 253   ARIAGCM     256      TLS_ECDHE_RSA_WITH_ARIA_256_GCM_SHA384
 xc02f   ECDHE-RSA-AES128-GCM-SHA256       ECDH 253   AESGCM      128      TLS_ECDHE_RSA_WITH_AES_128_GCM_SHA256
 xc027   ECDHE-RSA-AES128-SHA256           ECDH 253   AES         128      TLS_ECDHE_RSA_WITH_AES_128_CBC_SHA256
 xc013   ECDHE-RSA-AES128-SHA              ECDH 253   AES         128      TLS_ECDHE_RSA_WITH_AES_128_CBC_SHA
 x9e     DHE-RSA-AES128-GCM-SHA256         DH 2048    AESGCM      128      TLS_DHE_RSA_WITH_AES_128_GCM_SHA256
 xc0a2   DHE-RSA-AES128-CCM8               DH 2048    AESCCM8     128      TLS_DHE_RSA_WITH_AES_128_CCM_8
 xc09e   DHE-RSA-AES128-CCM                DH 2048    AESCCM      128      TLS_DHE_RSA_WITH_AES_128_CCM
 xc0a0   AES128-CCM8                       RSA        AESCCM8     128      TLS_RSA_WITH_AES_128_CCM_8
 xc09c   AES128-CCM                        RSA        AESCCM      128      TLS_RSA_WITH_AES_128_CCM
 x67     DHE-RSA-AES128-SHA256             DH 2048    AES         128      TLS_DHE_RSA_WITH_AES_128_CBC_SHA256
 x33     DHE-RSA-AES128-SHA                DH 2048    AES         128      TLS_DHE_RSA_WITH_AES_128_CBC_SHA
 x9c     AES128-GCM-SHA256                 RSA        AESGCM      128      TLS_RSA_WITH_AES_128_GCM_SHA256
 x3c     AES128-SHA256                     RSA        AES         128      TLS_RSA_WITH_AES_128_CBC_SHA256
 x2f     AES128-SHA                        RSA        AES         128      TLS_RSA_WITH_AES_128_CBC_SHA
 xc050   ARIA128-GCM-SHA256                RSA        ARIAGCM     128      TLS_RSA_WITH_ARIA_128_GCM_SHA256
 xc052   DHE-RSA-ARIA128-GCM-SHA256        DH 2048    ARIAGCM     128      TLS_DHE_RSA_WITH_ARIA_128_GCM_SHA256
 xc060   ECDHE-ARIA128-GCM-SHA256          ECDH 253   ARIAGCM     128      TLS_ECDHE_RSA_WITH_ARIA_128_GCM_SHA256
TLS 1.3
 x1302   TLS_AES_256_GCM_SHA384            ECDH 253   AESGCM      256      TLS_AES_256_GCM_SHA384
 x1303   TLS_CHACHA20_POLY1305_SHA256      ECDH 253   ChaCha20    256      TLS_CHACHA20_POLY1305_SHA256
 x1301   TLS_AES_128_GCM_SHA256            ECDH 253   AESGCM      128      TLS_AES_128_GCM_SHA256
Don t forget to also adjust the smpt_tls_* accordingly (for your sending side). For further information see the Postfix TLS Support documentation. Also check out options like tls_ssl_options (setting it to e.g. NO_COMPRESSION) and tls_preempt_cipherlist (setting it to yes would prefer the servers order of ciphers over clients). Conclusions:

6 July 2023

Thorsten Alteholz: My Debian Activities in June 2023

FTP master This month I accepted 221 and rejected 33 packages. The overall number of packages that got accepted was 221. Yeah, Bookworm was released this month. Thanks a lot to everybody who was involved in doing this. Debian LTS This was my hundred-eighth month that I did some work for the Debian LTS initiative, started by Raphael Hertzog at Freexian. This month my all in all workload has been 14h. During that time I uploaded: I also did some work on security-master to inject missing dependencies for some packages and processed NEW. Last but not least I did some days on frontdesk duties and took part in the LTS meeting. Debian ELTS This month was the fifty ninth ELTS month. I also made some progress with the openssl1.0 update. Last but not least I did some days on frontdesk duties. Debian Astro This month I uploaded some packages to fix one or the other issue: This month I even uploaded a new package c-munipack, which is more or less the successor of munipack, and can be used for example to analyse light curves of variable stars.
Another new package is virtualgps, where the name says it all. Debian Printing This month I did a security upload of cpdb-libs to fix a CVE in Unstable, Bookworm and Bullseye.
This work is generously funded by Freexian! Debian Mobcom This month I could upload a new version of: Other stuff This month I restarted DOPOM (Debian Orphaned Package Of the Month) and adopted: Hopefully this will result in a new upload of vdr-plugin-live. I would like to have this package for my personal VDR. I also did an upload of:

30 June 2023

Abhijith PA: Running Debian on my phone

You might have already read my blog titled Running PostmarketOS on my phone . After running pmOS on phone, my mind kept talking run Debian . So I started preparing for that. At the moment no straight way tool exist in Debian like postmarketOS s pmbootstrap. Well I can compile what is already available, do debootstrap rootfs. But I don t know how to build the final image that can be flashed from recovery. One crooked idea I had is, extract the pmOS image, find the packages and its configurations. For eg: usbmodem package in postmarketos are configured to connect to host network when plugged. I deboostrap ed the rootfs, compared with postmarketos and installed extra packages and copied configuration. I repacked and compressed to new image. Then flashed with twrp. The phone was booting. So I connected the usb cable and run,
ssh abhijith@172.16.42.1
abhijith@172.16.42.1's password: 
Linux arm64 3.10.107-Cherry #1-postmarketOS SMP PREEMPT Sat Dec 18 13:08:52 UTC 2021 aarch64
The programs included with the Debian GNU/Linux system are free software;
the exact distribution terms for each program are described in the
individual files in /usr/share/doc/*/copyright.
Debian GNU/Linux comes with ABSOLUTELY NO WARRANTY, to the extent
permitted by applicable law.
abhijith@arm64:$ 
Yay!. I have a working Debian phone. I quickly installed lxde and that is working perfectly. debian-leeco

29 June 2023

C.J. Collier: Converting a windows install to a libvirt VM

Reduce the size of your c: partition to the smallest it can be and then turn off windows with the understanding that you will never boot this system on the iron ever again.
Boot into a netinst installer image (no GUI). hold alt and press left arrow a few times until you get to a prompt to press enter. Press enter. In this example /dev/sda is your windows disk which contains the c: partition
and /dev/disk/by-id/usb0 is the USB-3 attached SATA controller that you have your SSD attached to (please find an example attached). This SSD should be equal to or larger than the windows disk for best compatability. A photo of a USB-3 attached SATA controller To find the literal path names of your detected drives you can run fdisk -l. Pay attention to the names of the partitions and the sizes of the drives to help determine which is which. Once you have a shell in the netinst installer, you should maybe be able to run a command like the following. This will duplicate the disk located at if (in file) to the disk located at of (out file) while showing progress as the status.
dd if=/dev/sda of=/dev/disk/by-id/usb0 status=progress
If you confirm that dd is available on the netinst image and the previous command runs successfully, test that your windows partition is visible in the new disk s partition table. The start block of the windows partition on each should match, as should the partition size.
fdisk -l /dev/disk/by-id/usb0
fdisk -l /dev/sda
If the output from the first is the same as the output from the second, then you are probably safe to proceed. Once you confirm that you have made and tested a full copy of the blocks from your windows drive saved on your usb disk, nuke your windows partition table from orbit.
dd if=/dev/zero of=/dev/sda bs=1M count=42
You can press alt-f1 to return to the Debian installer now. Follow the instructions to install Debian. Don t forget to remove all attached USB drives. Once you install Debian, press ctrl-alt-f3 to get a root shell. Add your user to the sudoers group:
# adduser cjac sudoers
log out
# exit
log in as your user and confirm that you have sudo
$ sudo ls
Don t forget to read the spider man advice enter your password you ll need to install virt-manager. I think this should help:
$ sudo apt-get install virt-manager libvirt-daemon-driver-qemu qemu-system-x86
insert the USB drive. You can now create a qcow2 file for your virtual machine.
$ sudo qemu-img convert -O qcow2 \
/dev/disk/by-id/usb0 \
/var/lib/libvirt/images/windows.qcow2
I personally create a volume group called /dev/vg00 for the stuff I want to run raw and instead of converting to qcow2 like all of the other users do, I instead write it to a new logical volume.
sudo lvcreate /dev/vg00 -n windows -L 42G # or however large your drive was
sudo dd if=/dev/disk/by-id/usb0 of=/dev/vg00/windows status=progress
Now that you ve got the qcow2 file created, press alt-left until you return to your GDM session. The apt-get install command above installed virt-manager, so log in to your system if you haven t already and open up gnome-terminal by pressing the windows key or moving your mouse/gesture to the top left of your screen. Type in gnome-terminal and either press enter or click/tap on the icon. I like to run this full screen so that I feel like I m in a space ship. If you like to feel like you re in a spaceship, too, press F11. You can start virt-manager from this shell or you can press the windows key and type in virt-manager and press enter. You ll want the shell to run commands such as virsh console windows or virsh list When virt-manager starts, right click on QEMU/KVM and select New.
In the New VM window, select Import existing disk image
When prompted for the path to the image, use the one we created with sudo qemu-img convert above.
Select the version of Windows you want.
Select memory and CPUs to allocate to the VM.
Tick the Customize configuration before install box
If you re prompted to enable the default network, do so now.
The default hardware layout should probably suffice. Get it as close to the underlying hardware as it is convenient to do. But Windows is pretty lenient these days about virtualizing licensed windows instances so long as they re not running in more than one place at a time. Good luck! Leave comments if you have questions.

11 May 2023

Shirish Agarwal: India Press freedom, Profiteering, AMD issues in the wild.

India Press Freedom Just about a week back, India again slipped in the Freedom index, this time falling to 161 out of 180 countries. The RW again made lot of noise as they cannot fathom why it has been happening so. A recent news story gives some idea. Every year NCRB (National Crime Records Bureau) puts out its statistics of crimes happening across the country. The report is in public domain. Now according to report shared, around 40k women from Gujarat alone disappeared in the last five years. This is a state where BJP has been ruling for the last 30 odd years. When this report became viral, almost all national newspapers the news was censored/blacked out. For e.g. check out newindianexpress.com, likewise TOI and other newspapers, the news has been 404. The only place that you can get that news is in minority papers like siasat. But the story didn t remain till there. While the NCW (National Commission of Women) pointed out similar stuff happening in J&K, Gujarat Police claimed they got almost 39k women back. Now ideally, it should have been in NCRB data as an addendum as the report can be challenged. But as this news was made viral, nobody knows the truth or false in the above. What BJP has been doing is whenever they get questioned, they try to muddy the waters like that. And most of the time, such news doesn t make to court so the party gets a freebie in a sort as they are not legally challenged. Even if somebody asks why didn t Gujarat Police do it as NCRB report is jointly made with the help of all states, and especially with BJP both in Center and States, they cannot give any excuse. The only excuse you see or hear is whataboutism unfortunately

Profiteering on I.T. Hardware I was chatting with a friend yesterday who is an enthusiast like me but has been more alert about what has been happening in the CPU, motherboard, RAM world. I was simply shocked to hear the prices of motherboards which are three years old, even a middling motherboard. For e.g. the last time I bought a mobo, I spent about 6k but that was for an ATX motherboard. Most ITX motherboards usually sold for around INR 4k/- or even lower. I remember Via especially as their mobos were even cheaper around INR 1.5-2k/-. Even before pandemic, many motherboard manufacturers had closed down shop leaving only a few in the market. As only a few remained, prices started going higher. The pandemic turned it to a seller s market overnight as most people were stuck at home and needed good rigs for either work or leisure or both. The manufacturers of CPU, motherboards, GPU s, Powersupply (SMPS) named their prices and people bought it. So in 2023, high prices remained while warranty periods started coming down. Governments also upped customs and various other duties. So all are in hand in glove in the situation. So as shared before, what I have been offered is a 4 year motherboard with a CPU of that time. I haven t bought it nor do I intend to in short-term future but extremely disappointed with the state of affairs

AMD Issues It s just been couple of hard weeks apparently for AMD. The first has been the TPM (Trusted Platform Module) issue that was shown by couple of security researchers. From what is known, apparently with $200 worth of tools and with sometime you can hack into somebody machine if you have physical access. Ironically, MS made a huge show about TPM and also made it sort of a requirement if a person wanted to have Windows 11. I remember Matthew Garett sharing about TPM and issues with Lenovo laptops. While AMD has acknowledged the issue, its response has been somewhat wishy-washy. But this is not the only issue that has been plaguing AMD. There have been reports of AMD chips literally exploding and again AMD issuing a somewhat wishy-washy response.  Asus though made some changes but is it for Zen4 or only 5 parts, not known. Most people are expecting a recession in I.T. hardware this year as well as next year due to high prices. No idea if things will change, if ever

13 March 2023

Antoine Beaupr : Framework 12th gen laptop review

The Framework is a 13.5" laptop body with swappable parts, which makes it somewhat future-proof and certainly easily repairable, scoring an "exceedingly rare" 10/10 score from ifixit.com. There are two generations of the laptop's main board (both compatible with the same body): the Intel 11th and 12th gen chipsets. I have received my Framework, 12th generation "DIY", device in late September 2022 and will update this page as I go along in the process of ordering, burning-in, setting up and using the device over the years. Overall, the Framework is a good laptop. I like the keyboard, the touch pad, the expansion cards. Clearly there's been some good work done on industrial design, and it's the most repairable laptop I've had in years. Time will tell, but it looks sturdy enough to survive me many years as well. This is also one of the most powerful devices I ever lay my hands on. I have managed, remotely, more powerful servers, but this is the fastest computer I have ever owned, and it fits in this tiny case. It is an amazing machine. On the downside, there's a bit of proprietary firmware required (WiFi, Bluetooth, some graphics) and the Framework ships with a proprietary BIOS, with currently no Coreboot support. Expect to need the latest kernel, firmware, and hacking around a bunch of things to get resolution and keybindings working right. Like others, I have first found significant power management issues, but many issues can actually be solved with some configuration. Some of the expansion ports (HDMI, DP, MicroSD, and SSD) use power when idle, so don't expect week-long suspend, or "full day" battery while those are plugged in. Finally, the expansion ports are nice, but there's only four of them. If you plan to have a two-monitor setup, you're likely going to need a dock. Read on for the detailed review. For context, I'm moving from the Purism Librem 13v4 because it basically exploded on me. I had, in the meantime, reverted back to an old ThinkPad X220, so I sometimes compare the Framework with that venerable laptop as well. This blog post has been maturing for months now. It started in September 2022 and I declared it completed in March 2023. It's the longest single article on this entire website, currently clocking at about 13,000 words. It will take an average reader a full hour to go through this thing, so I don't expect anyone to actually do that. This introduction should be good enough for most people, read the first section if you intend to actually buy a Framework. Jump around the table of contents as you see fit for after you did buy the laptop, as it might include some crucial hints on how to make it work best for you, especially on (Debian) Linux.

Advice for buyers Those are things I wish I would have known before buying:
  1. consider buying 4 USB-C expansion cards, or at least a mix of 4 USB-A or USB-C cards, as they use less power than other cards and you do want to fill those expansion slots otherwise they snag around and feel insecure
  2. you will likely need a dock or at least a USB hub if you want a two-monitor setup, otherwise you'll run out of ports
  3. you have to do some serious tuning to get proper (10h+ idle, 10 days suspend) power savings
  4. in particular, beware that the HDMI, DisplayPort and particularly the SSD and MicroSD cards take a significant amount power, even when sleeping, up to 2-6W for the latter two
  5. beware that the MicroSD card is what it says: Micro, normal SD cards won't fit, and while there might be full sized one eventually, it's currently only at the prototyping stage
  6. the Framework monitor has an unusual aspect ratio (3:2): I like it (and it matches classic and digital photography aspect ratio), but it might surprise you

Current status I have the framework! It's setup with a fresh new Debian bookworm installation. I've ran through a large number of tests and burn in. I have decided to use the Framework as my daily driver, and had to buy a USB-C dock to get my two monitors connected, which was own adventure. Update: Framework just (2023-03-23) just announced a whole bunch of new stuff: The recording is available in this video and it's not your typical keynote. It starts ~25 minutes late, audio is crap, lightning and camera are crap, clapping seems to be from whatever staff they managed to get together in a room, decor is bizarre, colors are shit. It's amazing.

Specifications Those are the specifications of the 12th gen, in general terms. Your build will of course vary according to your needs.
  • CPU: i5-1240P, i7-1260P, or i7-1280P (Up to 4.4-4.8 GHz, 4+8 cores), Iris Xe graphics
  • Storage: 250-4000GB NVMe (or bring your own)
  • Memory: 8-64GB DDR4-3200 (or bring your own)
  • WiFi 6e (AX210, vPro optional, or bring your own)
  • 296.63mm X 228.98mm X 15.85mm, 1.3Kg
  • 13.5" display, 3:2 ratio, 2256px X 1504px, 100% sRGB, >400 nit
  • 4 x USB-C user-selectable expansion ports, including
    • USB-C
    • USB-A
    • HDMI
    • DP
    • Ethernet
    • MicroSD
    • 250-1000GB SSD
  • 3.5mm combo headphone jack
  • Kill switches for microphone and camera
  • Battery: 55Wh
  • Camera: 1080p 60fps
  • Biometrics: Fingerprint Reader
  • Backlit keyboard
  • Power Adapter: 60W USB-C (or bring your own)
  • ships with a screwdriver/spludger
  • 1 year warranty
  • base price: 1000$CAD, but doesn't give you much, typical builds around 1500-2000$CAD

Actual build This is the actual build I ordered. Amounts in CAD. (1CAD = ~0.75EUR/USD.)

Base configuration
  • CPU: Intel Core i5-1240P (AKA Alder Lake P 8 4.4GHz P-threads, 8 3.2GHz E-threads, 16 total, 28-64W), 1079$
  • Memory: 16GB (1 x 16GB) DDR4-3200, 104$

Customization
  • Keyboard: US English, included

Expansion Cards
  • 2 USB-C $24
  • 3 USB-A $36
  • 2 HDMI $50
  • 1 DP $50
  • 1 MicroSD $25
  • 1 Storage 1TB $199
  • Sub-total: 384$

Accessories
  • Power Adapter - US/Canada $64.00

Total
  • Before tax: 1606$
  • After tax and duties: 1847$
  • Free shipping

Quick evaluation This is basically the TL;DR: here, just focusing on broad pros/cons of the laptop.

Pros

Cons
  • the 11th gen is out of stock, except for the higher-end CPUs, which are much less affordable (700$+)
  • the 12th gen has compatibility issues with Debian, followup in the DebianOn page, but basically: brightness hotkeys, power management, wifi, the webcam is okay even though the chipset is the infamous alder lake because it does not have the fancy camera; most issues currently seem solvable, and upstream is working with mainline to get their shit working
  • 12th gen might have issues with thunderbolt docks
  • they used to have some difficulty keeping up with the orders: first two batches shipped, third batch sold out, fourth batch should have shipped (?) in October 2021. they generally seem to keep up with shipping. update (august 2022): they rolled out a second line of laptops (12th gen), first batch shipped, second batch shipped late, September 2022 batch was generally on time, see this spreadsheet for a crowdsourced effort to track those supply chain issues seem to be under control as of early 2023. I got the Ethernet expansion card shipped within a week.
  • compared to my previous laptop (Purism Librem 13v4), it feels strangely bulkier and heavier; it's actually lighter than the purism (1.3kg vs 1.4kg) and thinner (15.85mm vs 18mm) but the design of the Purism laptop (tapered edges) makes it feel thinner
  • no space for a 2.5" drive
  • rather bright LED around power button, but can be dimmed in the BIOS (not low enough to my taste) I got used to it
  • fan quiet when idle, but can be noisy when running, for example if you max a CPU for a while
  • battery described as "mediocre" by Ars Technica (above), confirmed poor in my tests (see below)
  • no RJ-45 port, and attempts at designing ones are failing because the modular plugs are too thin to fit (according to Linux After Dark), so unlikely to have one in the future Update: they cracked that nut and ship an 2.5 gbps Ethernet expansion card with a realtek chipset, without any firmware blob (!)
  • a bit pricey for the performance, especially when compared to the competition (e.g. Dell XPS, Apple M1)
  • 12th gen Intel has glitchy graphics, seems like Intel hasn't fully landed proper Linux support for that chipset yet

Initial hardware setup A breeze.

Accessing the board The internals are accessed through five TorX screws, but there's a nice screwdriver/spudger that works well enough. The screws actually hold in place so you can't even lose them. The first setup is a bit counter-intuitive coming from the Librem laptop, as I expected the back cover to lift and give me access to the internals. But instead the screws is release the keyboard and touch pad assembly, so you actually need to flip the laptop back upright and lift the assembly off (!) to get access to the internals. Kind of scary. I also actually unplugged a connector in lifting the assembly because I lifted it towards the monitor, while you actually need to lift it to the right. Thankfully, the connector didn't break, it just snapped off and I could plug it back in, no harm done. Once there, everything is well indicated, with QR codes all over the place supposedly leading to online instructions.

Bad QR codes Unfortunately, the QR codes I tested (in the expansion card slot, the memory slot and CPU slots) did not actually work so I wonder how useful those actually are. After all, they need to point to something and that means a URL, a running website that will answer those requests forever. I bet those will break sooner than later and in fact, as far as I can tell, they just don't work at all. I prefer the approach taken by the MNT reform here which designed (with the 100 rabbits folks) an actual paper handbook (PDF). The first QR code that's immediately visible from the back of the laptop, in an expansion cord slot, is a 404. It seems to be some serial number URL, but I can't actually tell because, well, the page is a 404. I was expecting that bar code to lead me to an introduction page, something like "how to setup your Framework laptop". Support actually confirmed that it should point a quickstart guide. But in a bizarre twist, they somehow sent me the URL with the plus (+) signs escaped, like this:
https://guides.frame.work/Guide/Framework\+Laptop\+DIY\+Edition\+Quick\+Start\+Guide/57
... which Firefox immediately transforms in:
https://guides.frame.work/Guide/Framework/+Laptop/+DIY/+Edition/+Quick/+Start/+Guide/57
I'm puzzled as to why they would send the URL that way, the proper URL is of course:
https://guides.frame.work/Guide/Framework+Laptop+DIY+Edition+Quick+Start+Guide/57
(They have also "let the team know about this for feedback and help resolve the problem with the link" which is a support code word for "ha-ha! nope! not my problem right now!" Trust me, I know, my own code word is "can you please make a ticket?")

Seating disks and memory The "DIY" kit doesn't actually have that much of a setup. If you bought RAM, it's shipped outside the laptop in a little plastic case, so you just seat it in as usual. Then you insert your NVMe drive, and, if that's your fancy, you also install your own mPCI WiFi card. If you ordered one (which was my case), it's pre-installed. Closing the laptop is also kind of amazing, because the keyboard assembly snaps into place with magnets. I have actually used the laptop with the keyboard unscrewed as I was putting the drives in and out, and it actually works fine (and will probably void your warranty, so don't do that). (But you can.) (But don't, really.)

Hardware review

Keyboard and touch pad The keyboard feels nice, for a laptop. I'm used to mechanical keyboard and I'm rather violent with those poor things. Yet the key travel is nice and it's clickety enough that I don't feel too disoriented. At first, I felt the keyboard as being more laggy than my normal workstation setup, but it turned out this was a graphics driver issues. After enabling a composition manager, everything feels snappy. The touch pad feels good. The double-finger scroll works well enough, and I don't have to wonder too much where the middle button is, it just works. Taps don't work, out of the box: that needs to be enabled in Xorg, with something like this:
cat > /etc/X11/xorg.conf.d/40-libinput.conf <<EOF
Section "InputClass"
      Identifier "libinput touch pad catchall"
      MatchIsTouchpad "on"
      MatchDevicePath "/dev/input/event*"
      Driver "libinput"
      Option "Tapping" "on"
      Option "TappingButtonMap" "lmr"
EndSection
EOF
But be aware that once you enable that tapping, you'll need to deal with palm detection... So I have not actually enabled this in the end.

Power button The power button is a little dangerous. It's quite easy to hit, as it's right next to one expansion card where you are likely to plug in a cable power. And because the expansion cards are kind of hard to remove, you might squeeze the laptop (and the power key) when trying to remove the expansion card next to the power button. So obviously, don't do that. But that's not very helpful. An alternative is to make the power button do something else. With systemd-managed systems, it's actually quite easy. Add a HandlePowerKey stanza to (say) /etc/systemd/logind.conf.d/power-suspends.conf:
[Login]
HandlePowerKey=suspend
HandlePowerKeyLongPress=poweroff
You might have to create the directory first:
mkdir /etc/systemd/logind.conf.d/
Then restart logind:
systemctl restart systemd-logind
And the power button will suspend! Long-press to power off doesn't actually work as the laptop immediately suspends... Note that there's probably half a dozen other ways of doing this, see this, this, or that.

Special keybindings There is a series of "hidden" (as in: not labeled on the key) keybindings related to the fn keybinding that I actually find quite useful.
Key Equivalent Effect Command
p Pause lock screen xset s activate
b Break ? ?
k ScrLk switch keyboard layout N/A
It looks like those are defined in the microcontroller so it would be possible to add some. For example, the SysRq key is almost bound to fn s in there. Note that most other shortcuts like this are clearly documented (volume, brightness, etc). One key that's less obvious is F12 that only has the Framework logo on it. That actually calls the keysym XF86AudioMedia which, interestingly, does absolutely nothing here. By default, on Windows, it opens your browser to the Framework website and, on Linux, your "default media player". The keyboard backlight can be cycled with fn-space. The dimmer version is dim enough, and the keybinding is easy to find in the dark. A skinny elephant would be performed with alt PrtScr (above F11) KEY, so for example alt fn F11 b should do a hard reset. This comment suggests you need to hold the fn only if "function lock" is on, but that's actually the opposite of my experience. Out of the box, some of the fn keys don't work. Mute, volume up/down, brightness, monitor changes, and the airplane mode key all do basically nothing. They don't send proper keysyms to Xorg at all. This is a known problem and it's related to the fact that the laptop has light sensors to adjust the brightness automatically. Somehow some of those keys (e.g. the brightness controls) are supposed to show up as a different input device, but don't seem to work correctly. It seems like the solution is for the Framework team to write a driver specifically for this, but so far no progress since July 2022. In the meantime, the fancy functionality can be supposedly disabled with:
echo 'blacklist hid_sensor_hub'   sudo tee /etc/modprobe.d/framework-als-blacklist.conf
... and a reboot. This solution is also documented in the upstream guide. Note that there's another solution flying around that fixes this by changing permissions on the input device but I haven't tested that or seen confirmation it works.

Kill switches The Framework has two "kill switches": one for the camera and the other for the microphone. The camera one actually disconnects the USB device when turned off, and the mic one seems to cut the circuit. It doesn't show up as muted, it just stops feeding the sound. Both kill switches are around the main camera, on top of the monitor, and quite discreet. Then turn "red" when enabled (i.e. "red" means "turned off").

Monitor The monitor looks pretty good to my untrained eyes. I have yet to do photography work on it, but some photos I looked at look sharp and the colors are bright and lively. The blacks are dark and the screen is bright. I have yet to use it in full sunlight. The dimmed light is very dim, which I like.

Screen backlight I bind brightness keys to xbacklight in i3, but out of the box I get this error:
sep 29 22:09:14 angela i3[5661]: No outputs have backlight property
It just requires this blob in /etc/X11/xorg.conf.d/backlight.conf:
Section "Device"
    Identifier  "Card0"
    Driver      "intel"
    Option      "Backlight"  "intel_backlight"
EndSection
This way I can control the actual backlight power with the brightness keys, and they do significantly reduce power usage.

Multiple monitor support I have been able to hook up my two old monitors to the HDMI and DisplayPort expansion cards on the laptop. The lid closes without suspending the machine, and everything works great. I actually run out of ports, even with a 4-port USB-A hub, which gives me a total of 7 ports:
  1. power (USB-C)
  2. monitor 1 (DisplayPort)
  3. monitor 2 (HDMI)
  4. USB-A hub, which adds:
  5. keyboard (USB-A)
  6. mouse (USB-A)
  7. Yubikey
  8. external sound card
Now the latter, I might be able to get rid of if I switch to a combo-jack headset, which I do have (and still need to test). But still, this is a problem. I'll probably need a powered USB-C dock and better monitors, possibly with some Thunderbolt chaining, to save yet more ports. But that means more money into this setup, argh. And figuring out my monitor situation is the kind of thing I'm not that big of a fan of. And neither is shopping for USB-C (or is it Thunderbolt?) hubs. My normal autorandr setup doesn't work: I have tried saving a profile and it doesn't get autodetected, so I also first need to do:
autorandr -l framework-external-dual-lg-acer
The magic:
autorandr -l horizontal
... also works well. The worst problem with those monitors right now is that they have a radically smaller resolution than the main screen on the laptop, which means I need to reset the font scaling to normal every time I switch back and forth between those monitors and the laptop, which means I actually need to do this:
autorandr -l horizontal &&
eho Xft.dpi: 96   xrdb -merge &&
systemctl restart terminal xcolortaillog background-image emacs &&
i3-msg restart
Kind of disruptive.

Expansion ports I ordered a total of 10 expansion ports. I did manage to initialize the 1TB drive as an encrypted storage, mostly to keep photos as this is something that takes a massive amount of space (500GB and counting) and that I (unfortunately) don't work on very often (but still carry around). The expansion ports are fancy and nice, but not actually that convenient. They're a bit hard to take out: you really need to crimp your fingernails on there and pull hard to take them out. There's a little button next to them to release, I think, but at first it feels a little scary to pull those pucks out of there. You get used to it though, and it's one of those things you can do without looking eventually. There's only four expansion ports. Once you have two monitors, the drive, and power plugged in, bam, you're out of ports; there's nowhere to plug my Yubikey. So if this is going to be my daily driver, with a dual monitor setup, I will need a dock, which means more crap firmware and uncertainty, which isn't great. There are actually plans to make a dual-USB card, but that is blocked on designing an actual board for this. I can't wait to see more expansion ports produced. There's a ethernet expansion card which quickly went out of stock basically the day it was announced, but was eventually restocked. I would like to see a proper SD-card reader. There's a MicroSD card reader, but that obviously doesn't work for normal SD cards, which would be more broadly compatible anyways (because you can have a MicroSD to SD card adapter, but I have never heard of the reverse). Someone actually found a SD card reader that fits and then someone else managed to cram it in a 3D printed case, which is kind of amazing. Still, I really like that idea that I can carry all those little adapters in a pouch when I travel and can basically do anything I want. It does mean I need to shuffle through them to find the right one which is a little annoying. I have an elastic band to keep them lined up so that all the ports show the same side, to make it easier to find the right one. But that quickly gets undone and instead I have a pouch full of expansion cards. Another awesome thing with the expansion cards is that they don't just work on the laptop: anything that takes USB-C can take those cards, which means you can use it to connect an SD card to your phone, for backups, for example. Heck, you could even connect an external display to your phone that way, assuming that's supported by your phone of course (and it probably isn't). The expansion ports do take up some power, even when idle. See the power management section below, and particularly the power usage tests for details.

USB-C charging One thing that is really a game changer for me is USB-C charging. It's hard to overstate how convenient this is. I often have a USB-C cable lying around to charge my phone, and I can just grab that thing and pop it in my laptop. And while it will obviously not charge as fast as the provided charger, it will stop draining the battery at least. (As I wrote this, I had the laptop plugged in the Samsung charger that came with a phone, and it was telling me it would take 6 hours to charge the remaining 15%. With the provided charger, that flew down to 15 minutes. Similarly, I can power the laptop from the power grommet on my desk, reducing clutter as I have that single wire out there instead of the bulky power adapter.) I also really like the idea that I can charge my laptop with a power bank or, heck, with my phone, if push comes to shove. (And vice-versa!) This is awesome. And it works from any of the expansion ports, of course. There's a little led next to the expansion ports as well, which indicate the charge status:
  • red/amber: charging
  • white: charged
  • off: unplugged
I couldn't find documentation about this, but the forum answered. This is something of a recurring theme with the Framework. While it has a good knowledge base and repair/setup guides (and the forum is awesome) but it doesn't have a good "owner manual" that shows you the different parts of the laptop and what they do. Again, something the MNT reform did well. Another thing that people are asking about is an external sleep indicator: because the power LED is on the main keyboard assembly, you don't actually see whether the device is active or not when the lid is closed. Finally, I wondered what happens when you plug in multiple power sources and it turns out the charge controller is actually pretty smart: it will pick the best power source and use it. The only downside is it can't use multiple power sources, but that seems like a bit much to ask.

Multimedia and other devices Those things also work:
  • webcam: splendid, best webcam I've ever had (but my standards are really low)
  • onboard mic: works well, good gain (maybe a bit much)
  • onboard speakers: sound okay, a little metal-ish, loud enough to be annoying, see this thread for benchmarks, apparently pretty good speakers
  • combo jack: works, with slight hiss, see below
There's also a light sensor, but it conflicts with the keyboard brightness controls (see above). There's also an accelerometer, but it's off by default and will be removed from future builds.

Combo jack mic tests The Framework laptop ships with a combo jack on the left side, which allows you to plug in a CTIA (source) headset. In human terms, it's a device that has both a stereo output and a mono input, typically a headset or ear buds with a microphone somewhere. It works, which is better than the Purism (which only had audio out), but is on par for the course for that kind of onboard hardware. Because of electrical interference, such sound cards very often get lots of noise from the board. With a Jabra Evolve 40, the built-in USB sound card generates basically zero noise on silence (invisible down to -60dB in Audacity) while plugging it in directly generates a solid -30dB hiss. There is a noise-reduction system in that sound card, but the difference is still quite striking. On a comparable setup (curie, a 2017 Intel NUC), there is also a his with the Jabra headset, but it's quieter, more in the order of -40/-50 dB, a noticeable difference. Interestingly, testing with my Mee Audio Pro M6 earbuds leads to a little more hiss on curie, more on the -35/-40 dB range, close to the Framework. Also note that another sound card, the Antlion USB adapter that comes with the ModMic 4, also gives me pretty close to silence on a quiet recording, picking up less than -50dB of background noise. It's actually probably picking up the fans in the office, which do make audible noises. In other words, the hiss of the sound card built in the Framework laptop is so loud that it makes more noise than the quiet fans in the office. Or, another way to put it is that two USB sound cards (the Jabra and the Antlion) are able to pick up ambient noise in my office but not the Framework laptop. See also my audio page.

Performance tests

Compiling Linux 5.19.11 On a single core, compiling the Debian version of the Linux kernel takes around 100 minutes:
5411.85user 673.33system 1:37:46elapsed 103%CPU (0avgtext+0avgdata 831700maxresident)k
10594704inputs+87448000outputs (9131major+410636783minor)pagefaults 0swaps
This was using 16 watts of power, with full screen brightness. With all 16 cores (make -j16), it takes less than 25 minutes:
19251.06user 2467.47system 24:13.07elapsed 1494%CPU (0avgtext+0avgdata 831676maxresident)k
8321856inputs+87427848outputs (30792major+409145263minor)pagefaults 0swaps
I had to plug the normal power supply after a few minutes because battery would actually run out using my desk's power grommet (34 watts). During compilation, fans were spinning really hard, quite noisy, but not painfully so. The laptop was sucking 55 watts of power, steadily:
  Time    User  Nice   Sys  Idle    IO  Run Ctxt/s  IRQ/s Fork Exec Exit  Watts
-------- ----- ----- ----- ----- ----- ---- ------ ------ ---- ---- ---- ------
 Average  87.9   0.0  10.7   1.4   0.1 17.8 6583.6 5054.3 233.0 223.9 233.1  55.96
 GeoMean  87.9   0.0  10.6   1.2   0.0 17.6 6427.8 5048.1 227.6 218.7 227.7  55.96
  StdDev   1.4   0.0   1.2   0.6   0.2  3.0 1436.8  255.5 50.0 47.5 49.7   0.20
-------- ----- ----- ----- ----- ----- ---- ------ ------ ---- ---- ---- ------
 Minimum  85.0   0.0   7.8   0.5   0.0 13.0 3594.0 4638.0 117.0 111.0 120.0  55.52
 Maximum  90.8   0.0  12.9   3.5   0.8 38.0 10174.0 5901.0 374.0 362.0 375.0  56.41
-------- ----- ----- ----- ----- ----- ---- ------ ------ ---- ---- ---- ------
Summary:
CPU:  55.96 Watts on average with standard deviation 0.20
Note: power read from RAPL domains: package-0, uncore, package-0, core, psys.
These readings do not cover all the hardware in this device.

memtest86+ I ran Memtest86+ v6.00b3. It shows something like this:
Memtest86+ v6.00b3        12th Gen Intel(R) Core(TM) i5-1240P
CLK/Temp: 2112MHz    78/78 C   Pass  2% #
L1 Cache:   48KB    414 GB/s   Test 46% ##################
L2 Cache: 1.25MB    118 GB/s   Test #3 [Moving inversions, 1s & 0s] 
L3 Cache:   12MB     43 GB/s   Testing: 16GB - 18GB [1GB of 15.7GB]
Memory  :  15.7GB  14.9 GB/s   Pattern: 
--------------------------------------------------------------------------------
CPU: 4P+8E-Cores (16T)    SMP: 8T (PAR))    Time:  0:27:23  Status: Pass     \
RAM: 1600MHz (DDR4-3200) CAS 22-22-22-51    Pass:  1        Errors: 0
--------------------------------------------------------------------------------
Memory SPD Information
----------------------
 - Slot 2: 16GB DDR-4-3200 - Crucial CT16G4SFRA32A.C16FP (2022-W23)
                          Framework FRANMACP04
 <ESC> Exit  <F1> Configuration  <Space> Scroll Lock            6.00.unknown.x64
So about 30 minutes for a full 16GB memory test.

Software setup Once I had everything in the hardware setup, I figured, voil , I'm done, I'm just going to boot this beautiful machine and I can get back to work. I don't understand why I am so na ve some times. It's mind boggling. Obviously, it didn't happen that way at all, and I spent the best of the three following days tinkering with the laptop.

Secure boot and EFI First, I couldn't boot off of the NVMe drive I transferred from the previous laptop (the Purism) and the BIOS was not very helpful: it was just complaining about not finding any boot device, without dropping me in the real BIOS. At first, I thought it was a problem with my NVMe drive, because it's not listed in the compatible SSD drives from upstream. But I figured out how to enter BIOS (press F2 manically, of course), which showed the NVMe drive was actually detected. It just didn't boot, because it was an old (2010!!) Debian install without EFI. So from there, I disabled secure boot, and booted a grml image to try to recover. And by "boot" I mean, I managed to get to the grml boot loader which promptly failed to load its own root file system somehow. I still have to investigate exactly what happened there, but it failed some time after the initrd load with:
Unable to find medium containing a live file system
This, it turns out, was fixed in Debian lately, so a daily GRML build will not have this problems. The upcoming 2022 release (likely 2022.10 or 2022.11) will also get the fix. I did manage to boot the development version of the Debian installer which was a surprisingly good experience: it mounted the encrypted drives and did everything pretty smoothly. It even offered me to reinstall the boot loader, but that ultimately (and correctly, as it turns out) failed because I didn't have a /boot/efi partition. At this point, I realized there was no easy way out of this, and I just proceeded to completely reinstall Debian. I had a spare NVMe drive lying around (backups FTW!) so I just swapped that in, rebooted in the Debian installer, and did a clean install. I wanted to switch to bookworm anyways, so I guess that's done too.

Storage limitations Another thing that happened during setup is that I tried to copy over the internal 2.5" SSD drive from the Purism to the Framework 1TB expansion card. There's no 2.5" slot in the new laptop, so that's pretty much the only option for storage expansion. I was tired and did something wrong. I ended up wiping the partition table on the original 2.5" drive. Oops. It might be recoverable, but just restoring the partition table didn't work either, so I'm not sure how I recover the data there. Normally, everything on my laptops and workstations is designed to be disposable, so that wasn't that big of a problem. I did manage to recover most of the data thanks to git-annex reinit, but that was a little hairy.

Bootstrapping Puppet Once I had some networking, I had to install all the packages I needed. The time I spent setting up my workstations with Puppet has finally paid off. What I actually did was to restore two critical directories:
/etc/ssh
/var/lib/puppet
So that I would keep the previous machine's identity. That way I could contact the Puppet server and install whatever was missing. I used my Puppet optimization trick to do a batch install and then I had a good base setup, although not exactly as it was before. 1700 packages were installed manually on angela before the reinstall, and not in Puppet. I did not inspect each one individually, but I did go through /etc and copied over more SSH keys, for backups and SMTP over SSH.

LVFS support It looks like there's support for the (de-facto) standard LVFS firmware update system. At least I was able to update the UEFI firmware with a simple:
apt install fwupd-amd64-signed
fwupdmgr refresh
fwupdmgr get-updates
fwupdmgr update
Nice. The 12th gen BIOS updates, currently (January 2023) beta, can be deployed through LVFS with:
fwupdmgr enable-remote lvfs-testing
echo 'DisableCapsuleUpdateOnDisk=true' >> /etc/fwupd/uefi_capsule.conf 
fwupdmgr update
Those instructions come from the beta forum post. I performed the BIOS update on 2023-01-16T16:00-0500.

Resolution tweaks The Framework laptop resolution (2256px X 1504px) is big enough to give you a pretty small font size, so welcome to the marvelous world of "scaling". The Debian wiki page has a few tricks for this.

Console This will make the console and grub fonts more readable:
cat >> /etc/default/console-setup <<EOF
FONTFACE="Terminus"
FONTSIZE=32x16
EOF
echo GRUB_GFXMODE=1024x768 >> /etc/default/grub
update-grub

Xorg Adding this to your .Xresources will make everything look much bigger:
! 1.5*96
Xft.dpi: 144
Apparently, some of this can also help:
! These might also be useful depending on your monitor and personal preference:
Xft.autohint: 0
Xft.lcdfilter:  lcddefault
Xft.hintstyle:  hintfull
Xft.hinting: 1
Xft.antialias: 1
Xft.rgba: rgb
It my experience it also makes things look a little fuzzier, which is frustrating because you have this awesome monitor but everything looks out of focus. Just bumping Xft.dpi by a 1.5 factor looks good to me. The Debian Wiki has a page on HiDPI, but it's not as good as the Arch Wiki, where the above blurb comes from. I am not using the latter because I suspect it's causing some of the "fuzziness". TODO: find the equivalent of this GNOME hack in i3? (gsettings set org.gnome.mutter experimental-features "['scale-monitor-framebuffer']"), taken from this Framework guide

Issues

BIOS configuration The Framework BIOS has some minor issues. One issue I personally encountered is that I had disabled Quick boot and Quiet boot in the BIOS to diagnose the above boot issues. This, in turn, triggers a bug where the BIOS boot manager (F12) would just hang completely. It would also fail to boot from an external USB drive. The current fix (as of BIOS 3.03) is to re-enable both Quick boot and Quiet boot. Presumably this is something that will get fixed in a future BIOS update. Note that the following keybindings are active in the BIOS POST check:
Key Meaning
F2 Enter BIOS setup menu
F12 Enter BIOS boot manager
Delete Enter BIOS setup menu

WiFi compatibility issues I couldn't make WiFi work at first. Obviously, the default Debian installer doesn't ship with proprietary firmware (although that might change soon) so the WiFi card didn't work out of the box. But even after copying the firmware through a USB stick, I couldn't quite manage to find the right combination of ip/iw/wpa-supplicant (yes, after repeatedly copying a bunch more packages over to get those bootstrapped). (Next time I should probably try something like this post.) Thankfully, I had a little USB-C dongle with a RJ-45 jack lying around. That also required a firmware blob, but it was a single package to copy over, and with that loaded, I had network. Eventually, I did managed to make WiFi work; the problem was more on the side of "I forgot how to configure a WPA network by hand from the commandline" than anything else. NetworkManager worked fine and got WiFi working correctly. Note that this is with Debian bookworm, which has the 5.19 Linux kernel, and with the firmware-nonfree (firmware-iwlwifi, specifically) package.

Battery life I was having between about 7 hours of battery on the Purism Librem 13v4, and that's after a year or two of battery life. Now, I still have about 7 hours of battery life, which is nicer than my old ThinkPad X220 (20 minutes!) but really, it's not that good for a new generation laptop. The 12th generation Intel chipset probably improved things compared to the previous one Framework laptop, but I don't have a 11th gen Framework to compare with). (Note that those are estimates from my status bar, not wall clock measurements. They should still be comparable between the Purism and Framework, that said.) The battery life doesn't seem up to, say, Dell XPS 13, ThinkPad X1, and of course not the Apple M1, where I would expect 10+ hours of battery life out of the box. That said, I do get those kind estimates when the machine is fully charged and idle. In fact, when everything is quiet and nothing is plugged in, I get dozens of hours of battery life estimated (I've seen 25h!). So power usage fluctuates quite a bit depending on usage, which I guess is expected. Concretely, so far, light web browsing, reading emails and writing notes in Emacs (e.g. this file) takes about 8W of power:
Time    User  Nice   Sys  Idle    IO  Run Ctxt/s  IRQ/s Fork Exec Exit  Watts
-------- ----- ----- ----- ----- ----- ---- ------ ------ ---- ---- ---- ------
 Average   1.7   0.0   0.5  97.6   0.2  1.2 4684.9 1985.2 126.6 39.1 128.0   7.57
 GeoMean   1.4   0.0   0.4  97.6   0.1  1.2 4416.6 1734.5 111.6 27.9 113.3   7.54
  StdDev   1.0   0.2   0.2   1.2   0.0  0.5 1584.7 1058.3 82.1 44.0 80.2   0.71
-------- ----- ----- ----- ----- ----- ---- ------ ------ ---- ---- ---- ------
 Minimum   0.2   0.0   0.2  94.9   0.1  1.0 2242.0  698.2 82.0 17.0 82.0   6.36
 Maximum   4.1   1.1   1.0  99.4   0.2  3.0 8687.4 4445.1 463.0 249.0 449.0   9.10
-------- ----- ----- ----- ----- ----- ---- ------ ------ ---- ---- ---- ------
Summary:
System:   7.57 Watts on average with standard deviation 0.71
Expansion cards matter a lot in the battery life (see below for a thorough discussion), my normal setup is 2xUSB-C and 1xUSB-A (yes, with an empty slot, and yes, to save power). Interestingly, playing a video in a (720p) window in a window takes up more power (10.5W) than in full screen (9.5W) but I blame that on my desktop setup (i3 + compton)... Not sure if mpv hits the VA-API, maybe not in windowed mode. Similar results with 1080p, interestingly, except the window struggles to keep up altogether. Full screen playback takes a relatively comfortable 9.5W, which means a solid 5h+ of playback, which is fine by me. Fooling around the web, small edits, youtube-dl, and I'm at around 80% battery after about an hour, with an estimated 5h left, which is a little disappointing. I had a 7h remaining estimate before I started goofing around Discourse, so I suspect the website is a pretty big battery drain, actually. I see about 10-12 W, while I was probably at half that (6-8W) just playing music with mpv in the background... In other words, it looks like editing posts in Discourse with Firefox takes a solid 4-6W of power. Amazing and gross. (When writing about abusive power usage generates more power usage, is that an heisenbug? Or schr dinbug?)

Power management Compared to the Purism Librem 13v4, the ongoing power usage seems to be slightly better. An anecdotal metric is that the Purism would take 800mA idle, while the more powerful Framework manages a little over 500mA as I'm typing this, fluctuating between 450 and 600mA. That is without any active expansion card, except the storage. Those numbers come from the output of tlp-stat -b and, unfortunately, the "ampere" unit makes it quite hard to compare those, because voltage is not necessarily the same between the two platforms.
  • TODO: review Arch Linux's tips on power saving
  • TODO: i915 driver has a lot of parameters, including some about power saving, see, again, the arch wiki, and particularly enable_fbc=1
TL:DR; power management on the laptop is an issue, but there's various tweaks you can make to improve it. Try:
  • powertop --auto-tune
  • apt install tlp && systemctl enable tlp
  • nvme.noacpi=1 mem_sleep_default=deep on the kernel command line may help with standby power usage
  • keep only USB-C expansion cards plugged in, all others suck power even when idle
  • consider upgrading the BIOS to latest beta (3.06 at the time of writing), unverified power savings
  • latest Linux kernels (6.2) promise power savings as well (unverified)
Update: also try to follow the official optimization guide. It was made for Ubuntu but will probably also work for your distribution of choice with a few tweaks. They recommend using tlpui but it's not packaged in Debian. There is, however, a Flatpak release. In my case, it resulted in the following diff to tlp.conf: tlp.patch.

Background on CPU architecture There were power problems in the 11th gen Framework laptop, according to this report from Linux After Dark, so the issues with power management on the Framework are not new. The 12th generation Intel CPU (AKA "Alder Lake") is a big-little architecture with "power-saving" and "performance" cores. There used to be performance problems introduced by the scheduler in Linux 5.16 but those were eventually fixed in 5.18, which uses Intel's hardware as an "intelligent, low-latency hardware-assisted scheduler". According to Phoronix, the 5.19 release improved the power saving, at the cost of some penalty cost. There were also patch series to make the scheduler configurable, but it doesn't look those have been merged as of 5.19. There was also a session about this at the 2022 Linux Plumbers, but they stopped short of talking more about the specific problems Linux is facing in Alder lake:
Specifically, the kernel's energy-aware scheduling heuristics don't work well on those CPUs. A number of features present there complicate the energy picture; these include SMT, Intel's "turbo boost" mode, and the CPU's internal power-management mechanisms. For many workloads, running on an ostensibly more power-hungry Pcore can be more efficient than using an Ecore. Time for discussion of the problem was lacking, though, and the session came to a close.
All this to say that the 12gen Intel line shipped with this Framework series should have better power management thanks to its power-saving cores. And Linux has had the scheduler changes to make use of this (but maybe is still having trouble). In any case, this might not be the source of power management problems on my laptop, quite the opposite. Also note that the firmware updates for various chipsets are supposed to improve things eventually. On the other hand, The Verge simply declared the whole P-series a mistake...

Attempts at improving power usage I did try to follow some of the tips in this forum post. The tricks powertop --auto-tune and tlp's PCIE_ASPM_ON_BAT=powersupersave basically did nothing: I was stuck at 10W power usage in powertop (600+mA in tlp-stat). Apparently, I should be able to reach the C8 CPU power state (or even C9, C10) in powertop, but I seem to be stock at C7. (Although I'm not sure how to read that tab in powertop: in the Core(HW) column there's only C3/C6/C7 states, and most cores are 85% in C7 or maybe C6. But the next column over does show many CPUs in C10 states... As it turns out, the graphics card actually takes up a good chunk of power unless proper power management is enabled (see below). After tweaking this, I did manage to get down to around 7W power usage in powertop. Expansion cards actually do take up power, and so does the screen, obviously. The fully-lit screen takes a solid 2-3W of power compared to the fully dimmed screen. When removing all expansion cards and making the laptop idle, I can spin it down to 4 watts power usage at the moment, and an amazing 2 watts when the screen turned off.

Caveats Abusive (10W+) power usage that I initially found could be a problem with my desktop configuration: I have this silly status bar that updates every second and probably causes redraws... The CPU certainly doesn't seem to spin down below 1GHz. Also note that this is with an actual desktop running with everything: it could very well be that some things (I'm looking at you Signal Desktop) take up unreasonable amount of power on their own (hello, 1W/electron, sheesh). Syncthing and containerd (Docker!) also seem to take a good 500mW just sitting there. Beyond my desktop configuration, this could, of course, be a Debian-specific problem; your favorite distribution might be better at power management.

Idle power usage tests Some expansion cards waste energy, even when unused. Here is a summary of the findings from the powerstat page. I also include other devices tested in this page for completeness:
Device Minimum Average Max Stdev Note
Screen, 100% 2.4W 2.6W 2.8W N/A
Screen, 1% 30mW 140mW 250mW N/A
Backlight 1 290mW ? ? ? fairly small, all things considered
Backlight 2 890mW 1.2W 3W? 460mW? geometric progression
Backlight 3 1.69W 1.5W 1.8W? 390mW? significant power use
Radios 100mW 250mW N/A N/A
USB-C N/A N/A N/A N/A negligible power drain
USB-A 10mW 10mW ? 10mW almost negligible
DisplayPort 300mW 390mW 600mW N/A not passive
HDMI 380mW 440mW 1W? 20mW not passive
1TB SSD 1.65W 1.79W 2W 12mW significant, probably higher when busy
MicroSD 1.6W 3W 6W 1.93W highest power usage, possibly even higher when busy
Ethernet 1.69W 1.64W 1.76W N/A comparable to the SSD card
So it looks like all expansion cards but the USB-C ones are active, i.e. they draw power with idle. The USB-A cards are the least concern, sucking out 10mW, pretty much within the margin of error. But both the DisplayPort and HDMI do take a few hundred miliwatts. It looks like USB-A connectors have this fundamental flaw that they necessarily draw some powers because they lack the power negotiation features of USB-C. At least according to this post:
It seems the USB A must have power going to it all the time, that the old USB 2 and 3 protocols, the USB C only provides power when there is a connection. Old versus new.
Apparently, this is a problem specific to the USB-C to USB-A adapter that ships with the Framework. Some people have actually changed their orders to all USB-C because of this problem, but I'm not sure the problem is as serious as claimed in the forums. I couldn't reproduce the "one watt" power drains suggested elsewhere, at least not repeatedly. (A previous version of this post did show such a power drain, but it was in a less controlled test environment than the series of more rigorous tests above.) The worst offenders are the storage cards: the SSD drive takes at least one watt of power and the MicroSD card seems to want to take all the way up to 6 watts of power, both just sitting there doing nothing. This confirms claims of 1.4W for the SSD (but not 5W) power usage found elsewhere. The former post has instructions on how to disable the card in software. The MicroSD card has been reported as using 2 watts, but I've seen it as high as 6 watts, which is pretty damning. The Framework team has a beta update for the DisplayPort adapter but currently only for Windows (LVFS technically possible, "under investigation"). A USB-A firmware update is also under investigation. It is therefore likely at least some of those power management issues will eventually be fixed. Note that the upcoming Ethernet card has a reported 2-8W power usage, depending on traffic. I did my own power usage tests in powerstat-wayland and they seem lower than 2W. The upcoming 6.2 Linux kernel might also improve battery usage when idle, see this Phoronix article for details, likely in early 2023.

Idle power usage tests under Wayland Update: I redid those tests under Wayland, see powerstat-wayland for details. The TL;DR: is that power consumption is either smaller or similar.

Idle power usage tests, 3.06 beta BIOS I redid the idle tests after the 3.06 beta BIOS update and ended up with this results:
Device Minimum Average Max Stdev Note
Baseline 1.96W 2.01W 2.11W 30mW 1 USB-C, screen off, backlight off, no radios
2 USB-C 1.95W 2.16W 3.69W 430mW USB-C confirmed as mostly passive...
3 USB-C 1.95W 2.16W 3.69W 430mW ... although with extra stdev
1TB SSD 3.72W 3.85W 4.62W 200mW unchanged from before upgrade
1 USB-A 1.97W 2.18W 4.02W 530mW unchanged
2 USB-A 1.97W 2.00W 2.08W 30mW unchanged
3 USB-A 1.94W 1.99W 2.03W 20mW unchanged
MicroSD w/o card 3.54W 3.58W 3.71W 40mW significant improvement! 2-3W power saving!
MicroSD w/ card 3.53W 3.72W 5.23W 370mW new measurement! increased deviation
DisplayPort 2.28W 2.31W 2.37W 20mW unchanged
1 HDMI 2.43W 2.69W 4.53W 460mW unchanged
2 HDMI 2.53W 2.59W 2.67W 30mW unchanged
External USB 3.85W 3.89W 3.94W 30mW new result
Ethernet 3.60W 3.70W 4.91W 230mW unchanged
Note that the table summary is different than the previous table: here we show the absolute numbers while the previous table was doing a confusing attempt at showing relative (to the baseline) numbers. Conclusion: the 3.06 BIOS update did not significantly change idle power usage stats except for the MicroSD card which has significantly improved. The new "external USB" test is also interesting: it shows how the provided 1TB SSD card performs (admirably) compared to existing devices. The other new result is the MicroSD card with a card which, interestingly, uses less power than the 1TB SSD drive.

Standby battery usage I wrote some quick hack to evaluate how much power is used during sleep. Apparently, this is one of the areas that should have improved since the first Framework model, let's find out. My baseline for comparison is the Purism laptop, which, in 10 minutes, went from this:
sep 28 11:19:45 angela systemd-sleep[209379]: /sys/class/power_supply/BAT/charge_now                      =   6045 [mAh]
... to this:
sep 28 11:29:47 angela systemd-sleep[209725]: /sys/class/power_supply/BAT/charge_now                      =   6037 [mAh]
That's 8mAh per 10 minutes (and 2 seconds), or 48mA, or, with this battery, about 127 hours or roughly 5 days of standby. Not bad! In comparison, here is my really old x220, before:
sep 29 22:13:54 emma systemd-sleep[176315]: /sys/class/power_supply/BAT0/energy_now                     =   5070 [mWh]
... after:
sep 29 22:23:54 emma systemd-sleep[176486]: /sys/class/power_supply/BAT0/energy_now                     =   4980 [mWh]
... which is 90 mwH in 10 minutes, or a whopping 540mA, which was possibly okay when this battery was new (62000 mAh, so about 100 hours, or about 5 days), but this battery is almost dead and has only 5210 mAh when full, so only 10 hours standby. And here is the Framework performing a similar test, before:
sep 29 22:27:04 angela systemd-sleep[4515]: /sys/class/power_supply/BAT1/charge_full                    =   3518 [mAh]
sep 29 22:27:04 angela systemd-sleep[4515]: /sys/class/power_supply/BAT1/charge_now                     =   2861 [mAh]
... after:
sep 29 22:37:08 angela systemd-sleep[4743]: /sys/class/power_supply/BAT1/charge_now                     =   2812 [mAh]
... which is 49mAh in a little over 10 minutes (and 4 seconds), or 292mA, much more than the Purism, but half of the X220. At this rate, the battery would last on standby only 12 hours!! That is pretty bad. Note that this was done with the following expansion cards:
  • 2 USB-C
  • 1 1TB SSD drive
  • 1 USB-A with a hub connected to it, with keyboard and LAN
Preliminary tests without the hub (over one minute) show that it doesn't significantly affect this power consumption (300mA). This guide also suggests booting with nvme.noacpi=1 but this still gives me about 5mAh/min (or 300mA). Adding mem_sleep_default=deep to the kernel command line does make a difference. Before:
sep 29 23:03:11 angela systemd-sleep[3699]: /sys/class/power_supply/BAT1/charge_now                     =   2544 [mAh]
... after:
sep 29 23:04:25 angela systemd-sleep[4039]: /sys/class/power_supply/BAT1/charge_now                     =   2542 [mAh]
... which is 2mAh in 74 seconds, which is 97mA, brings us to a more reasonable 36 hours, or a day and a half. It's still above the x220 power usage, and more than an order of magnitude more than the Purism laptop. It's also far from the 0.4% promised by upstream, which would be 14mA for the 3500mAh battery. It should also be noted that this "deep" sleep mode is a little more disruptive than regular sleep. As you can see by the timing, it took more than 10 seconds for the laptop to resume, which feels a little alarming as your banging the keyboard to bring it back to life. You can confirm the current sleep mode with:
# cat /sys/power/mem_sleep
s2idle [deep]
In the above, deep is selected. You can change it on the fly with:
printf s2idle > /sys/power/mem_sleep
Here's another test:
sep 30 22:25:50 angela systemd-sleep[32207]: /sys/class/power_supply/BAT1/charge_now                     =   1619 [mAh]
sep 30 22:31:30 angela systemd-sleep[32516]: /sys/class/power_supply/BAT1/charge_now                     =   1613 [mAh]
... better! 6 mAh in about 6 minutes, works out to 63.5mA, so more than two days standby. A longer test:
oct 01 09:22:56 angela systemd-sleep[62978]: /sys/class/power_supply/BAT1/charge_now                     =   3327 [mAh]
oct 01 12:47:35 angela systemd-sleep[63219]: /sys/class/power_supply/BAT1/charge_now                     =   3147 [mAh]
That's 180mAh in about 3.5h, 52mA! Now at 66h, or almost 3 days. I wasn't sure why I was seeing such fluctuations in those tests, but as it turns out, expansion card power tests show that they do significantly affect power usage, especially the SSD drive, which can take up to two full watts of power even when idle. I didn't control for expansion cards in the above tests running them with whatever card I had plugged in without paying attention so it's likely the cause of the high power usage and fluctuations. It might be possible to work around this problem by disabling USB devices before suspend. TODO. See also this post. In the meantime, I have been able to get much better suspend performance by unplugging all modules. Then I get this result:
oct 04 11:15:38 angela systemd-sleep[257571]: /sys/class/power_supply/BAT1/charge_now                     =   3203 [mAh]
oct 04 15:09:32 angela systemd-sleep[257866]: /sys/class/power_supply/BAT1/charge_now                     =   3145 [mAh]
Which is 14.8mA! Almost exactly the number promised by Framework! With a full battery, that means a 10 days suspend time. This is actually pretty good, and far beyond what I was expecting when starting down this journey. So, once the expansion cards are unplugged, suspend power usage is actually quite reasonable. More detailed standby tests are available in the standby-tests page, with a summary below. There is also some hope that the Chromebook edition specifically designed with a specification of 14 days standby time could bring some firmware improvements back down to the normal line. Some of those issues were reported upstream in April 2022, but there doesn't seem to have been any progress there since. TODO: one final solution here is suspend-then-hibernate, which Windows uses for this TODO: consider implementing the S0ix sleep states , see also troubleshooting TODO: consider https://github.com/intel/pm-graph

Standby expansion cards test results This table is a summary of the more extensive standby-tests I have performed:
Device Wattage Amperage Days Note
baseline 0.25W 16mA 9 sleep=deep nvme.noacpi=1
s2idle 0.29W 18.9mA ~7 sleep=s2idle nvme.noacpi=1
normal nvme 0.31W 20mA ~7 sleep=s2idle without nvme.noacpi=1
1 USB-C 0.23W 15mA ~10
2 USB-C 0.23W 14.9mA same as above
1 USB-A 0.75W 48.7mA 3 +500mW (!!) for the first USB-A card!
2 USB-A 1.11W 72mA 2 +360mW
3 USB-A 1.48W 96mA <2 +370mW
1TB SSD 0.49W 32mA <5 +260mW
MicroSD 0.52W 34mA ~4 +290mW
DisplayPort 0.85W 55mA <3 +620mW (!!)
1 HDMI 0.58W 38mA ~4 +250mW
2 HDMI 0.65W 42mA <4 +70mW (?)
Conclusions:
  • USB-C cards take no extra power on suspend, possibly less than empty slots, more testing required
  • USB-A cards take a lot more power on suspend (300-500mW) than on regular idle (~10mW, almost negligible)
  • 1TB SSD and MicroSD cards seem to take a reasonable amount of power (260-290mW), compared to their runtime equivalents (1-6W!)
  • DisplayPort takes a surprising lot of power (620mW), almost double its average runtime usage (390mW)
  • HDMI cards take, surprisingly, less power (250mW) in standby than the DP card (620mW)
  • and oddly, a second card adds less power usage (70mW?!) than the first, maybe a circuit is used by both?
A discussion of those results is in this forum post.

Standby expansion cards test results, 3.06 beta BIOS Framework recently (2022-11-07) announced that they will publish a firmware upgrade to address some of the USB-C issues, including power management. This could positively affect the above result, improving both standby and runtime power usage. The update came out in December 2022 and I redid my analysis with the following results:
Device Wattage Amperage Days Note
baseline 0.25W 16mA 9 no cards, same as before upgrade
1 USB-C 0.25W 16mA 9 same as before
2 USB-C 0.25W 16mA 9 same
1 USB-A 0.80W 62mA 3 +550mW!! worse than before
2 USB-A 1.12W 73mA <2 +320mW, on top of the above, bad!
Ethernet 0.62W 40mA 3-4 new result, decent
1TB SSD 0.52W 34mA 4 a bit worse than before (+2mA)
MicroSD 0.51W 22mA 4 same
DisplayPort 0.52W 34mA 4+ upgrade improved by 300mW
1 HDMI ? 38mA ? same
2 HDMI ? 45mA ? a bit worse than before (+3mA)
Normal 1.08W 70mA ~2 Ethernet, 2 USB-C, USB-A
Full results in standby-tests-306. The big takeaway for me is that the update did not improve power usage on the USB-A ports which is a big problem for my use case. There is a notable improvement on the DisplayPort power consumption which brings it more in line with the HDMI connector, but it still doesn't properly turn off on suspend either. Even worse, the USB-A ports now sometimes fails to resume after suspend, which is pretty annoying. This is a known problem that will hopefully get fixed in the final release.

Battery wear protection The BIOS has an option to limit charge to 80% to mitigate battery wear. There's a way to control the embedded controller from runtime with fw-ectool, partly documented here. The command would be:
sudo ectool fwchargelimit 80
I looked at building this myself but failed to run it. I opened a RFP in Debian so that we can ship this in Debian, and also documented my work there. Note that there is now a counter that tracks charge/discharge cycles. It's visible in tlp-stat -b, which is a nice improvement:
root@angela:/home/anarcat# tlp-stat -b
--- TLP 1.5.0 --------------------------------------------
+++ Battery Care
Plugin: generic
Supported features: none available
+++ Battery Status: BAT1
/sys/class/power_supply/BAT1/manufacturer                   = NVT
/sys/class/power_supply/BAT1/model_name                     = Framewo
/sys/class/power_supply/BAT1/cycle_count                    =      3
/sys/class/power_supply/BAT1/charge_full_design             =   3572 [mAh]
/sys/class/power_supply/BAT1/charge_full                    =   3541 [mAh]
/sys/class/power_supply/BAT1/charge_now                     =   1625 [mAh]
/sys/class/power_supply/BAT1/current_now                    =    178 [mA]
/sys/class/power_supply/BAT1/status                         = Discharging
/sys/class/power_supply/BAT1/charge_control_start_threshold = (not available)
/sys/class/power_supply/BAT1/charge_control_end_threshold   = (not available)
Charge                                                      =   45.9 [%]
Capacity                                                    =   99.1 [%]
One thing that is still missing is the charge threshold data (the (not available) above). There's been some work to make that accessible in August, stay tuned? This would also make it possible implement hysteresis support.

Ethernet expansion card The Framework ethernet expansion card is a fancy little doodle: "2.5Gbit/s and 10/100/1000Mbit/s Ethernet", the "clear housing lets you peek at the RTL8156 controller that powers it". Which is another way to say "we didn't completely finish prod on this one, so it kind of looks like we 3D-printed this in the shop".... The card is a little bulky, but I guess that's inevitable considering the RJ-45 form factor when compared to the thin Framework laptop. I have had a serious issue when trying it at first: the link LEDs just wouldn't come up. I made a full bug report in the forum and with upstream support, but eventually figured it out on my own. It's (of course) a power saving issue: if you reboot the machine, the links come up when the laptop is running the BIOS POST check and even when the Linux kernel boots. I first thought that the problem is likely related to the powertop service which I run at boot time to tweak some power saving settings. It seems like this:
echo 'on' > '/sys/bus/usb/devices/4-2/power/control'
... is a good workaround to bring the card back online. You can even return to power saving mode and the card will still work:
echo 'auto' > '/sys/bus/usb/devices/4-2/power/control'
Further research by Matt_Hartley from the Framework Team found this issue in the tlp tracker that shows how the USB_AUTOSUSPEND setting enables the power saving even if the driver doesn't support it, which, in retrospect, just sounds like a bad idea. To quote that issue:
By default, USB power saving is active in the kernel, but not force-enabled for incompatible drivers. That is, devices that support suspension will suspend, drivers that do not, will not.
So the fix is actually to uninstall tlp or disable that setting by adding this to /etc/tlp.conf:
USB_AUTOSUSPEND=0
... but that disables auto-suspend on all USB devices, which may hurt other power usage performance. I have found that a a combination of:
USB_AUTOSUSPEND=1
USB_DENYLIST="0bda:8156"
and this on the kernel commandline:
usbcore.quirks=0bda:8156:k
... actually does work correctly. I now have this in my /etc/default/grub.d/framework-tweaks.cfg file:
# net.ifnames=0: normal interface names ffs (e.g. eth0, wlan0, not wlp166
s0)
# nvme.noacpi=1: reduce SSD disk power usage (not working)
# mem_sleep_default=deep: reduce power usage during sleep (not working)
# usbcore.quirk is a workaround for the ethernet card suspend bug: https:
//guides.frame.work/Guide/Fedora+37+Installation+on+the+Framework+Laptop/
108?lang=en
GRUB_CMDLINE_LINUX="net.ifnames=0 nvme.noacpi=1 mem_sleep_default=deep usbcore.quirks=0bda:8156:k"
# fix the resolution in grub for fonts to not be tiny
GRUB_GFXMODE=1024x768
Other than that, I haven't been able to max out the card because I don't have other 2.5Gbit/s equipment at home, which is strangely satisfying. But running against my Turris Omnia router, I could pretty much max a gigabit fairly easily:
[ ID] Interval           Transfer     Bitrate         Retr
[  5]   0.00-10.00  sec  1.09 GBytes   937 Mbits/sec  238             sender
[  5]   0.00-10.00  sec  1.09 GBytes   934 Mbits/sec                  receiver
The card doesn't require any proprietary firmware blobs which is surprising. Other than the power saving issues, it just works. In my power tests (see powerstat-wayland), the Ethernet card seems to use about 1.6W of power idle, without link, in the above "quirky" configuration where the card is functional but without autosuspend.

Proprietary firmware blobs The framework does need proprietary firmware to operate. Specifically:
  • the WiFi network card shipped with the DIY kit is a AX210 card that requires a 5.19 kernel or later, and the firmware-iwlwifi non-free firmware package
  • the Bluetooth adapter also loads the firmware-iwlwifi package (untested)
  • the graphics work out of the box without firmware, but certain power management features come only with special proprietary firmware, normally shipped in the firmware-misc-nonfree but currently missing from the package
Note that, at the time of writing, the latest i915 firmware from linux-firmware has a serious bug where loading all the accessible firmware results in noticeable I estimate 200-500ms lag between the keyboard (not the mouse!) and the display. Symptoms also include tearing and shearing of windows, it's pretty nasty. One workaround is to delete the two affected firmware files:
cd /lib/firmware && rm adlp_guc_70.1.1.bin adlp_guc_69.0.3.bin
update-initramfs -u
You will get the following warning during build, which is good as it means the problematic firmware is disabled:
W: Possible missing firmware /lib/firmware/i915/adlp_guc_69.0.3.bin for module i915
W: Possible missing firmware /lib/firmware/i915/adlp_guc_70.1.1.bin for module i915
But then it also means that critical firmware isn't loaded, which means, among other things, a higher battery drain. I was able to move from 8.5-10W down to the 7W range after making the firmware work properly. This is also after turning the backlight all the way down, as that takes a solid 2-3W in full blast. The proper fix is to use some compositing manager. I ended up using compton with the following systemd unit:
[Unit]
Description=start compositing manager
PartOf=graphical-session.target
ConditionHost=angela
[Service]
Type=exec
ExecStart=compton --show-all-xerrors --backend glx --vsync opengl-swc
Restart=on-failure
[Install]
RequiredBy=graphical-session.target
compton is orphaned however, so you might be tempted to use picom instead, but in my experience the latter uses much more power (1-2W extra, similar experience). I also tried compiz but it would just crash with:
anarcat@angela:~$ compiz --replace
compiz (core) - Warn: No XI2 extension
compiz (core) - Error: Another composite manager is already running on screen: 0
compiz (core) - Fatal: No manageable screens found on display :0
When running from the base session, I would get this instead:
compiz (core) - Warn: No XI2 extension
compiz (core) - Error: Couldn't load plugin 'ccp'
Thanks to EmanueleRocca for figuring all that out. See also this discussion about power management on the Framework forum. Note that Wayland environments do not require any special configuration here and actually work better, see my Wayland migration notes for details.
Also note that the iwlwifi firmware also looks incomplete. Even with the package installed, I get those errors in dmesg:
[   19.534429] Intel(R) Wireless WiFi driver for Linux
[   19.534691] iwlwifi 0000:a6:00.0: enabling device (0000 -> 0002)
[   19.541867] iwlwifi 0000:a6:00.0: firmware: failed to load iwlwifi-ty-a0-gf-a0-72.ucode (-2)
[   19.541881] iwlwifi 0000:a6:00.0: firmware: failed to load iwlwifi-ty-a0-gf-a0-72.ucode (-2)
[   19.541882] iwlwifi 0000:a6:00.0: Direct firmware load for iwlwifi-ty-a0-gf-a0-72.ucode failed with error -2
[   19.541890] iwlwifi 0000:a6:00.0: firmware: failed to load iwlwifi-ty-a0-gf-a0-71.ucode (-2)
[   19.541895] iwlwifi 0000:a6:00.0: firmware: failed to load iwlwifi-ty-a0-gf-a0-71.ucode (-2)
[   19.541896] iwlwifi 0000:a6:00.0: Direct firmware load for iwlwifi-ty-a0-gf-a0-71.ucode failed with error -2
[   19.541903] iwlwifi 0000:a6:00.0: firmware: failed to load iwlwifi-ty-a0-gf-a0-70.ucode (-2)
[   19.541907] iwlwifi 0000:a6:00.0: firmware: failed to load iwlwifi-ty-a0-gf-a0-70.ucode (-2)
[   19.541908] iwlwifi 0000:a6:00.0: Direct firmware load for iwlwifi-ty-a0-gf-a0-70.ucode failed with error -2
[   19.541913] iwlwifi 0000:a6:00.0: firmware: failed to load iwlwifi-ty-a0-gf-a0-69.ucode (-2)
[   19.541916] iwlwifi 0000:a6:00.0: firmware: failed to load iwlwifi-ty-a0-gf-a0-69.ucode (-2)
[   19.541917] iwlwifi 0000:a6:00.0: Direct firmware load for iwlwifi-ty-a0-gf-a0-69.ucode failed with error -2
[   19.541922] iwlwifi 0000:a6:00.0: firmware: failed to load iwlwifi-ty-a0-gf-a0-68.ucode (-2)
[   19.541926] iwlwifi 0000:a6:00.0: firmware: failed to load iwlwifi-ty-a0-gf-a0-68.ucode (-2)
[   19.541927] iwlwifi 0000:a6:00.0: Direct firmware load for iwlwifi-ty-a0-gf-a0-68.ucode failed with error -2
[   19.541933] iwlwifi 0000:a6:00.0: firmware: failed to load iwlwifi-ty-a0-gf-a0-67.ucode (-2)
[   19.541937] iwlwifi 0000:a6:00.0: firmware: failed to load iwlwifi-ty-a0-gf-a0-67.ucode (-2)
[   19.541937] iwlwifi 0000:a6:00.0: Direct firmware load for iwlwifi-ty-a0-gf-a0-67.ucode failed with error -2
[   19.544244] iwlwifi 0000:a6:00.0: firmware: direct-loading firmware iwlwifi-ty-a0-gf-a0-66.ucode
[   19.544257] iwlwifi 0000:a6:00.0: api flags index 2 larger than supported by driver
[   19.544270] iwlwifi 0000:a6:00.0: TLV_FW_FSEQ_VERSION: FSEQ Version: 0.63.2.1
[   19.544523] iwlwifi 0000:a6:00.0: firmware: failed to load iwl-debug-yoyo.bin (-2)
[   19.544528] iwlwifi 0000:a6:00.0: firmware: failed to load iwl-debug-yoyo.bin (-2)
[   19.544530] iwlwifi 0000:a6:00.0: loaded firmware version 66.55c64978.0 ty-a0-gf-a0-66.ucode op_mode iwlmvm
Some of those are available in the latest upstream firmware package (iwlwifi-ty-a0-gf-a0-71.ucode, -68, and -67), but not all (e.g. iwlwifi-ty-a0-gf-a0-72.ucode is missing) . It's unclear what those do or don't, as the WiFi seems to work well without them. I still copied them in from the latest linux-firmware package in the hope they would help with power management, but I did not notice a change after loading them. There are also multiple knobs on the iwlwifi and iwlmvm drivers. The latter has a power_schmeme setting which defaults to 2 (balanced), setting it to 3 (low power) could improve battery usage as well, in theory. The iwlwifi driver also has power_save (defaults to disabled) and power_level (1-5, defaults to 1) settings. See also the output of modinfo iwlwifi and modinfo iwlmvm for other driver options.

Graphics acceleration After loading the latest upstream firmware and setting up a compositing manager (compton, above), I tested the classic glxgears. Running in a window gives me odd results, as the gears basically grind to a halt:
Running synchronized to the vertical refresh.  The framerate should be
approximately the same as the monitor refresh rate.
137 frames in 5.1 seconds = 26.984 FPS
27 frames in 5.4 seconds =  5.022 FPS
Ouch. 5FPS! But interestingly, once the window is in full screen, it does hit the monitor refresh rate:
300 frames in 5.0 seconds = 60.000 FPS
I'm not really a gamer and I'm not normally using any of that fancy graphics acceleration stuff (except maybe my browser does?). I installed intel-gpu-tools for the intel_gpu_top command to confirm the GPU was engaged when doing those simulations. A nice find. Other useful diagnostic tools include glxgears and glxinfo (in mesa-utils) and (vainfo in vainfo). Following to this post, I also made sure to have those settings in my about:config in Firefox, or, in user.js:
user_pref("media.ffmpeg.vaapi.enabled", true);
Note that the guide suggests many other settings to tweak, but those might actually be overkill, see this comment and its parents. I did try forcing hardware acceleration by setting gfx.webrender.all to true, but everything became choppy and weird. The guide also mentions installing the intel-media-driver package, but I could not find that in Debian. The Arch wiki has, as usual, an excellent reference on hardware acceleration in Firefox.

Chromium / Signal desktop bugs It looks like both Chromium and Signal Desktop misbehave with my compositor setup (compton + i3). The fix is to add a persistent flag to Chromium. In Arch, it's conveniently in ~/.config/chromium-flags.conf but that doesn't actually work in Debian. I had to put the flag in /etc/chromium.d/disable-compositing, like this:
export CHROMIUM_FLAGS="$CHROMIUM_FLAGS --disable-gpu-compositing"
It's possible another one of the hundreds of flags might fix this issue better, but I don't really have time to go through this entire, incomplete, and unofficial list (!?!). Signal Desktop is a similar problem, and doesn't reuse those flags (because of course it doesn't). Instead I had to rewrite the wrapper script in /usr/local/bin/signal-desktop to use this instead:
exec /usr/bin/flatpak run --branch=stable --arch=x86_64 org.signal.Signal --disable-gpu-compositing "$@"
This was mostly done in this Puppet commit. I haven't figured out the root of this problem. I did try using picom and xcompmgr; they both suffer from the same issue. Another Debian testing user on Wayland told me they haven't seen this problem, so hopefully this can be fixed by switching to wayland.

Graphics card hangs I believe I might have this bug which results in a total graphical hang for 15-30 seconds. It's fairly rare so it's not too disruptive, but when it does happen, it's pretty alarming. The comments on that bug report are encouraging though: it seems this is a bug in either mesa or the Intel graphics driver, which means many people have this problem so it's likely to be fixed. There's actually a merge request on mesa already (2022-12-29). It could also be that bug because the error message I get is actually:
Jan 20 12:49:10 angela kernel: Asynchronous wait on fence 0000:00:02.0:sway[104431]:cb0ae timed out (hint:intel_atomic_commit_ready [i915]) 
Jan 20 12:49:15 angela kernel: i915 0000:00:02.0: [drm] GPU HANG: ecode 12:0:00000000 
Jan 20 12:49:15 angela kernel: i915 0000:00:02.0: [drm] Resetting chip for stopped heartbeat on rcs0 
Jan 20 12:49:15 angela kernel: i915 0000:00:02.0: [drm] GuC firmware i915/adlp_guc_70.1.1.bin version 70.1 
Jan 20 12:49:15 angela kernel: i915 0000:00:02.0: [drm] HuC firmware i915/tgl_huc_7.9.3.bin version 7.9 
Jan 20 12:49:15 angela kernel: i915 0000:00:02.0: [drm] HuC authenticated 
Jan 20 12:49:15 angela kernel: i915 0000:00:02.0: [drm] GuC submission enabled 
Jan 20 12:49:15 angela kernel: i915 0000:00:02.0: [drm] GuC SLPC enabled
It's a solid 30 seconds graphical hang. Maybe the keyboard and everything else keeps working. The latter bug report is quite long, with many comments, but this one from January 2023 seems to say that Sway 1.8 fixed the problem. There's also an earlier patch to add an extra kernel parameter that supposedly fixes that too. There's all sorts of other workarounds in there, for example this:
echo "options i915 enable_dc=1 enable_guc_loading=1 enable_guc_submission=1 edp_vswing=0 enable_guc=2 enable_fbc=1 enable_psr=1 disable_power_well=0"   sudo tee /etc/modprobe.d/i915.conf
from this comment... So that one is unsolved, as far as the upstream drivers are concerned, but maybe could be fixed through Sway.

Weird USB hangs / graphical glitches I have had weird connectivity glitches better described in this post, but basically: my USB keyboard and mice (connected over a USB hub) drop keys, lag a lot or hang, and I get visual glitches. The fix was to tighten the screws around the CPU on the motherboard (!), which is, thankfully, a rather simple repair.

USB docks are hell Note that the monitors are hooked up to angela through a USB-C / Thunderbolt dock from Cable Matters, with the lovely name of 201053-SIL. It has issues, see this blog post for an in-depth discussion.

Shipping details I ordered the Framework in August 2022 and received it about a month later, which is sooner than expected because the August batch was late. People (including me) expected this to have an impact on the September batch, but it seems Framework have been able to fix the delivery problems and keep up with the demand. As of early 2023, their website announces that laptops ship "within 5 days". I have myself ordered a few expansion cards in November 2022, and they shipped on the same day, arriving 3-4 days later.

The supply pipeline There are basically 6 steps in the Framework shipping pipeline, each (except the last) accompanied with an email notification:
  1. pre-order
  2. preparing batch
  3. preparing order
  4. payment complete
  5. shipping
  6. (received)
This comes from the crowdsourced spreadsheet, which should be updated when the status changes here. I was part of the "third batch" of the 12th generation laptop, which was supposed to ship in September. It ended up arriving on my door step on September 27th, about 33 days after ordering. It seems current orders are not processed in "batches", but in real time, see this blog post for details on shipping.

Shipping trivia I don't know about the others, but my laptop shipped through no less than four different airplane flights. Here are the hops it took: I can't quite figure out how to calculate exactly how much mileage that is, but it's huge. The ride through Alaska is surprising enough but the bounce back through Winnipeg is especially weird. I guess the route happens that way because of Fedex shipping hubs. There was a related oddity when I had my Purism laptop shipped: it left from the west coast and seemed to enter on an endless, two week long road trip across the continental US.

Other resources

7 January 2023

Reproducible Builds: Reproducible Builds in December 2022

Welcome to the December 2022 report from the Reproducible Builds project.
We are extremely pleased to announce that the dates for the Reproducible Builds Summit in 2023 have been announced in 2022 already: We plan to spend three days continuing to the grow of the Reproducible Builds effort. As in previous events, the exact content of the meeting will be shaped by the participants. And, as mentioned in Holger Levsen s post to our mailing list, the dates have been booked and confirmed with the venue, so if you are considering attending, please reserve these dates in your calendar today.
R my Gr nblatt, an associate professor in the T l com Sud-Paris engineering school wrote up his pain points of using Nix and NixOS. Although some of the points do not touch on reproducible builds, R my touches on problems he has encountered with the different kinds of reproducibility that these distributions appear to promise including configuration files affecting the behaviour of systems, the fragility of upstream sources as well as the conventional idea of binary reproducibility.
Morten Linderud reported that he is quietly optimistic that if Go programming language resolves all of its issues with reproducible builds (tracking issue) then the Go binaries distributed from Google and by Arch Linux may be bit-for-bit identical. It s just a bit early to sorta figure out what roadblocks there are. [But] Go bootstraps itself every build, so in theory I think it should be possible.
On December 15th, Holger Levsen published an in-depth interview he performed with David A. Wheeler on supply-chain security and reproducible builds, but it also touches on the biggest challenges in computing as well. This is part of a larger series of posts featuring the projects, companies and individuals who support the Reproducible Builds project. Other instalments include an article featuring the Civil Infrastructure Platform project and followed this up with a post about the Ford Foundation as well as a recent ones about ARDC, the Google Open Source Security Team (GOSST), Jan Nieuwenhuizen on Bootstrappable Builds, GNU Mes and GNU Guix and Hans-Christoph Steiner of the F-Droid project.
A number of changes were made to the Reproducible Builds website and documentation this month, including FC Stegerman adding an F-Droid/apksigcopier example to our embedded signatures page [ ], Holger Levsen making a large number of changes related to the 2022 summit in Venice as well as 2023 s summit in Hamburg [ ][ ][ ][ ] and Simon Butler updated our publications page [ ][ ].
On our mailing list this month, James Addison asked a question about whether there has been any effort to trace the files used by a build system in order to identify the corresponding build-dependency packages. [ ] In addition, Bernhard M. Wiedemann then posed a thought-provoking question asking How to talk to skeptics? , which was occasioned by a colleague who had published a blog post in May 2021 skeptical of reproducible builds. The thread generated a number of replies.

Android news obfusk (FC Stegerman) performed a thought-provoking review of tools designed to determine the difference between two different .apk files shipped by a number of free-software instant messenger applications. These scripts are often necessary in the Android/APK ecosystem due to these files containing embedded signatures so the conventional bit-for-bit comparison cannot be used. After detailing a litany of issues with these tools, they come to the conclusion that:
It s quite possible these messengers actually have reproducible builds, but the verification scripts they use don t actually allow us to verify whether they do.
This reflects the consensus view within the Reproducible Builds project: pursuing a situation in language or package ecosystems where binaries are bit-for-bit identical (over requiring a bespoke ecosystem-specific tool) is not a luxury demanded by purist engineers, but rather the only practical way to demonstrate reproducibility. obfusk also announced the first release of their own set of tools on our mailing list. Related to this, obfusk also posted to an issue filed against Mastodon regarding the difficulties of creating bit-by-bit identical APKs, especially with respect to copying v2/v3 APK signatures created by different tools; they also reported that some APK ordering differences were not caused by building on macOS after all, but by using Android Studio [ ] and that F-Droid added 16 more apps published with Reproducible Builds in December.

Debian As mentioned in last months report, Vagrant Cascadian has been organising a series of online sprints in order to clear the huge backlog of reproducible builds patches submitted by performing NMUs (Non-Maintainer Uploads). During December, meetings were held on the 1st, 8th, 15th, 22nd and 29th, resulting in a large number of uploads and bugs being addressed: The next sprint is due to take place this coming Tuesday, January 10th at 16:00 UTC.

Upstream patches The Reproducible Builds project attempts to fix as many currently-unreproducible packages as possible. This month, we wrote a large number of such patches, including:

Testing framework The Reproducible Builds project operates a comprehensive testing framework at tests.reproducible-builds.org in order to check packages and other artifacts for reproducibility. In October, the following changes were made by Holger Levsen:
  • The osuosl167 machine is no longer a openqa-worker node anymore. [ ][ ]
  • Detect problems with APT repository signatures [ ] and update a repository signing key [ ].
  • reproducible Debian builtin-pho: improve job output. [ ]
  • Only install the foot-terminfo package on Debian systems. [ ]
In addition, Mattia Rizzolo added support for the version of diffoscope in Debian stretch which doesn t support the --timeout flag. [ ][ ]

diffoscope diffoscope is our in-depth and content-aware diff utility. Not only can it locate and diagnose reproducibility issues, it can provide human-readable diffs from many kinds of binary formats. This month, Chris Lamb made the following changes to diffoscope, including preparing and uploading versions 228, 229 and 230 to Debian:
  • Fix compatibility with file(1) version 5.43, with thanks to Christoph Biedl. [ ]
  • Skip the test_html.py::test_diff test if html2text is not installed. (#1026034)
  • Update copyright years. [ ]
In addition, Jelle van der Waa added support for Berkeley DB version 6. [ ] Orthogonal to this, Holger Levsen bumped the Debian Standards-Version on all of our packages, including diffoscope [ ], strip-nondeterminism [ ], disorderfs [ ] and reprotest [ ].
If you are interested in contributing to the Reproducible Builds project, please visit our Contribute page on our website. You can get in touch with us via:

7 December 2022

Thorsten Alteholz: My Debian Activities in November 2022

FTP master This month I accepted 292 and rejected 43 packages. The overall number of packages that got accepted was 295. Debian LTS This was my hundred-first month that I did some work for the Debian LTS initiative, started by Raphael Hertzog at Freexian. This month my all in all workload has been 14h. During that time I uploaded: I also started to work on ring, but this seems to be a pile of work. Not least because at the moment the package does not migrate to testing. Further I started to investigate what packages are really affected by CVE-2018-17942. It looks like some upstreams and their corresponding maintainers did not care about that CVE in the embedded gnulib. Last but not least I did some days of frontdesk duties. Debian ELTS This month was the fifty second ELTS month. During my allocated time I uploaded: Last but not least I did some days of frontdesk duties. Debian Mobcom This month I uploaded improved packages of: Other stuff This month I uploaded improved packages of:

29 September 2022

Antoine Beaupr : Detecting manual (and optimizing large) package installs in Puppet

Well this is a mouthful. I recently worked on a neat hack called puppet-package-check. It is designed to warn about manually installed packages, to make sure "everything is in Puppet". But it turns out it can (probably?) dramatically decrease the bootstrap time of Puppet bootstrap when it needs to install a large number of packages.

Detecting manual packages On a cleanly filed workstation, it looks like this:
root@emma:/home/anarcat/bin# ./puppet-package-check -v
listing puppet packages...
listing apt packages...
loading apt cache...
0 unmanaged packages found
A messy workstation will look like this:
root@curie:/home/anarcat/bin# ./puppet-package-check -v
listing puppet packages...
listing apt packages...
loading apt cache...
288 unmanaged packages found
apparmor-utils beignet-opencl-icd bridge-utils clustershell cups-pk-helper davfs2 dconf-cli dconf-editor dconf-gsettings-backend ddccontrol ddrescueview debmake debootstrap decopy dict-devil dict-freedict-eng-fra dict-freedict-eng-spa dict-freedict-fra-eng dict-freedict-spa-eng diffoscope dnsdiag dropbear-initramfs ebtables efibootmgr elpa-lua-mode entr eog evince figlet file file-roller fio flac flex font-manager fonts-cantarell fonts-inconsolata fonts-ipafont-gothic fonts-ipafont-mincho fonts-liberation fonts-monoid fonts-monoid-tight fonts-noto fonts-powerline fonts-symbola freeipmi freetype2-demos ftp fwupd-amd64-signed gallery-dl gcc-arm-linux-gnueabihf gcolor3 gcp gdisk gdm3 gdu gedit gedit-plugins gettext-base git-debrebase gnome-boxes gnote gnupg2 golang-any golang-docker-credential-helpers golang-golang-x-tools grub-efi-amd64-signed gsettings-desktop-schemas gsfonts gstreamer1.0-libav gstreamer1.0-plugins-base gstreamer1.0-plugins-good gstreamer1.0-plugins-ugly gstreamer1.0-pulseaudio gtypist gvfs-backends hackrf hashcat html2text httpie httping hugo humanfriendly iamerican-huge ibus ibus-gtk3 ibus-libpinyin ibus-pinyin im-config imediff img2pdf imv initramfs-tools input-utils installation-birthday internetarchive ipmitool iptables iptraf-ng jackd2 jupyter jupyter-nbextension-jupyter-js-widgets jupyter-qtconsole k3b kbtin kdialog keditbookmarks keepassxc kexec-tools keyboard-configuration kfind konsole krb5-locales kwin-x11 leiningen lightdm lintian linux-image-amd64 linux-perf lmodern lsb-base lvm2 lynx lz4json magic-wormhole mailscripts mailutils manuskript mat2 mate-notification-daemon mate-themes mime-support mktorrent mp3splt mpdris2 msitools mtp-tools mtree-netbsd mupdf nautilus nautilus-sendto ncal nd ndisc6 neomutt net-tools nethogs nghttp2-client nocache npm2deb ntfs-3g ntpdate nvme-cli nwipe obs-studio okular-extra-backends openstack-clients openstack-pkg-tools paprefs pass-extension-audit pcmanfm pdf-presenter-console pdf2svg percol pipenv playerctl plymouth plymouth-themes popularity-contest progress prometheus-node-exporter psensor pubpaste pulseaudio python3-ldap qjackctl qpdfview qrencode r-cran-ggplot2 r-cran-reshape2 rake restic rhash rpl rpm2cpio rs ruby ruby-dev ruby-feedparser ruby-magic ruby-mocha ruby-ronn rygel-playbin rygel-tracker s-tui sanoid saytime scrcpy scrcpy-server screenfetch scrot sdate sddm seahorse shim-signed sigil smartmontools smem smplayer sng sound-juicer sound-theme-freedesktop spectre-meltdown-checker sq ssh-audit sshuttle stress-ng strongswan strongswan-swanctl syncthing system-config-printer system-config-printer-common system-config-printer-udev systemd-bootchart systemd-container tardiff task-desktop task-english task-ssh-server tasksel tellico texinfo texlive-fonts-extra texlive-lang-cyrillic texlive-lang-french texlive-lang-german texlive-lang-italian texlive-xetex tftp-hpa thunar-archive-plugin tidy tikzit tint2 tintin++ tipa tpm2-tools traceroute tree trocla ucf udisks2 unifont unrar-free upower usbguard uuid-runtime vagrant-cachier vagrant-libvirt virt-manager vmtouch vorbis-tools w3m wamerican wamerican-huge wfrench whipper whohas wireshark xapian-tools xclip xdg-user-dirs-gtk xlax xmlto xsensors xserver-xorg xsltproc xxd xz-utils yubioath-desktop zathura zathura-pdf-poppler zenity zfs-dkms zfs-initramfs zfsutils-linux zip zlib1g zlib1g-dev
157 old: apparmor-utils clustershell davfs2 dconf-cli dconf-editor ddccontrol ddrescueview decopy dnsdiag ebtables efibootmgr elpa-lua-mode entr figlet file-roller fio flac flex font-manager freetype2-demos ftp gallery-dl gcc-arm-linux-gnueabihf gcolor3 gcp gdu gedit git-debrebase gnote golang-docker-credential-helpers golang-golang-x-tools gtypist hackrf hashcat html2text httpie httping hugo humanfriendly iamerican-huge ibus ibus-pinyin imediff input-utils internetarchive ipmitool iptraf-ng jackd2 jupyter-qtconsole k3b kbtin kdialog keditbookmarks keepassxc kexec-tools kfind konsole leiningen lightdm lynx lz4json magic-wormhole manuskript mat2 mate-notification-daemon mktorrent mp3splt msitools mtp-tools mtree-netbsd nautilus nautilus-sendto nd ndisc6 neomutt net-tools nethogs nghttp2-client nocache ntpdate nwipe obs-studio openstack-pkg-tools paprefs pass-extension-audit pcmanfm pdf-presenter-console pdf2svg percol pipenv playerctl qjackctl qpdfview qrencode r-cran-ggplot2 r-cran-reshape2 rake restic rhash rpl rpm2cpio rs ruby-feedparser ruby-magic ruby-mocha ruby-ronn s-tui saytime scrcpy screenfetch scrot sdate seahorse shim-signed sigil smem smplayer sng sound-juicer spectre-meltdown-checker sq ssh-audit sshuttle stress-ng system-config-printer system-config-printer-common tardiff tasksel tellico texlive-lang-cyrillic texlive-lang-french tftp-hpa tikzit tint2 tintin++ tpm2-tools traceroute tree unrar-free vagrant-cachier vagrant-libvirt vmtouch vorbis-tools w3m wamerican wamerican-huge wfrench whipper whohas xdg-user-dirs-gtk xlax xmlto xsensors xxd yubioath-desktop zenity zip
131 new: beignet-opencl-icd bridge-utils cups-pk-helper dconf-gsettings-backend debmake debootstrap dict-devil dict-freedict-eng-fra dict-freedict-eng-spa dict-freedict-fra-eng dict-freedict-spa-eng diffoscope dropbear-initramfs eog evince file fonts-cantarell fonts-inconsolata fonts-ipafont-gothic fonts-ipafont-mincho fonts-liberation fonts-monoid fonts-monoid-tight fonts-noto fonts-powerline fonts-symbola freeipmi fwupd-amd64-signed gdisk gdm3 gedit-plugins gettext-base gnome-boxes gnupg2 golang-any grub-efi-amd64-signed gsettings-desktop-schemas gsfonts gstreamer1.0-libav gstreamer1.0-plugins-base gstreamer1.0-plugins-good gstreamer1.0-plugins-ugly gstreamer1.0-pulseaudio gvfs-backends ibus-gtk3 ibus-libpinyin im-config img2pdf imv initramfs-tools installation-birthday iptables jupyter jupyter-nbextension-jupyter-js-widgets keyboard-configuration krb5-locales kwin-x11 lintian linux-image-amd64 linux-perf lmodern lsb-base lvm2 mailscripts mailutils mate-themes mime-support mpdris2 mupdf ncal npm2deb ntfs-3g nvme-cli okular-extra-backends openstack-clients plymouth plymouth-themes popularity-contest progress prometheus-node-exporter psensor pubpaste pulseaudio python3-ldap ruby ruby-dev rygel-playbin rygel-tracker sanoid scrcpy-server sddm smartmontools sound-theme-freedesktop strongswan strongswan-swanctl syncthing system-config-printer-udev systemd-bootchart systemd-container task-desktop task-english task-ssh-server texinfo texlive-fonts-extra texlive-lang-german texlive-lang-italian texlive-xetex thunar-archive-plugin tidy tipa trocla ucf udisks2 unifont upower usbguard uuid-runtime virt-manager wireshark xapian-tools xclip xserver-xorg xsltproc xz-utils zathura zathura-pdf-poppler zfs-dkms zfs-initramfs zfsutils-linux zlib1g zlib1g-dev
Yuck! That's a lot of shit to go through. Notice how the packages get sorted between "old" and "new" packages. This is because popcon is used as a tool to mark which packages are "old". If you have unmanaged packages, the "old" ones are likely things that you can uninstall, for example. If you don't have popcon installed, you'll also get this warning:
popcon stats not available: [Errno 2] No such file or directory: '/var/log/popularity-contest'
The error can otherwise be safely ignored, but you won't get "help" prioritizing the packages to add to your manifests. Note that the tool ignores packages that were "marked" (see apt-mark(8)) as automatically installed. This implies that you might have to do a little bit of cleanup the first time you run this, as Debian doesn't necessarily mark all of those packages correctly on first install. For example, here's how it looks like on a clean install, after Puppet ran:
root@angela:/home/anarcat# ./bin/puppet-package-check -v
listing puppet packages...
listing apt packages...
loading apt cache...
127 unmanaged packages found
ca-certificates console-setup cryptsetup-initramfs dbus file gcc-12-base gettext-base grub-common grub-efi-amd64 i3lock initramfs-tools iw keyboard-configuration krb5-locales laptop-detect libacl1 libapparmor1 libapt-pkg6.0 libargon2-1 libattr1 libaudit-common libaudit1 libblkid1 libbpf0 libbsd0 libbz2-1.0 libc6 libcap-ng0 libcap2 libcap2-bin libcom-err2 libcrypt1 libcryptsetup12 libdb5.3 libdebconfclient0 libdevmapper1.02.1 libedit2 libelf1 libext2fs2 libfdisk1 libffi8 libgcc-s1 libgcrypt20 libgmp10 libgnutls30 libgpg-error0 libgssapi-krb5-2 libhogweed6 libidn2-0 libip4tc2 libiw30 libjansson4 libjson-c5 libk5crypto3 libkeyutils1 libkmod2 libkrb5-3 libkrb5support0 liblocale-gettext-perl liblockfile-bin liblz4-1 liblzma5 libmd0 libmnl0 libmount1 libncurses6 libncursesw6 libnettle8 libnewt0.52 libnftables1 libnftnl11 libnl-3-200 libnl-genl-3-200 libnl-route-3-200 libnss-systemd libp11-kit0 libpam-systemd libpam0g libpcre2-8-0 libpcre3 libpcsclite1 libpopt0 libprocps8 libreadline8 libselinux1 libsemanage-common libsemanage2 libsepol2 libslang2 libsmartcols1 libss2 libssl1.1 libssl3 libstdc++6 libsystemd-shared libsystemd0 libtasn1-6 libtext-charwidth-perl libtext-iconv-perl libtext-wrapi18n-perl libtinfo6 libtirpc-common libtirpc3 libudev1 libunistring2 libuuid1 libxtables12 libxxhash0 libzstd1 linux-image-amd64 logsave lsb-base lvm2 media-types mlocate ncurses-term pass-extension-otp puppet python3-reportbug shim-signed tasksel ucf usr-is-merged util-linux-extra wpasupplicant xorg zlib1g
popcon stats not available: [Errno 2] No such file or directory: '/var/log/popularity-contest'
Normally, there should be unmanaged packages here. But because of the way Debian is installed, a lot of libraries and some core packages are marked as manually installed, and are of course not managed through Puppet. There are two solutions to this problem:
  • really manage everything in Puppet (argh)
  • mark packages as automatically installed
I typically chose the second path and mark a ton of stuff as automatic. Then either they will be auto-removed, or will stop being listed. In the above scenario, one could mark all libraries as automatically installed with:
apt-mark auto $(./bin/puppet-package-check   grep -o 'lib[^ ]*')
... but if you trust that most of that stuff is actually garbage that you don't really want installed anyways, you could just mark it all as automatically installed:
apt-mark auto $(./bin/puppet-package-check)
In my case, that ended up keeping basically all libraries (because of course they're installed for some reason) and auto-removing this:
dh-dkms discover-data dkms libdiscover2 libjsoncpp25 libssl1.1 linux-headers-amd64 mlocate pass-extension-otp pass-otp plocate x11-apps x11-session-utils xinit xorg
You'll notice xorg in there: yep, that's bad. Not what I wanted. But for some reason, on other workstations, I did not actually have xorg installed. Turns out having xserver-xorg is enough, and that one has dependencies. So now I guess I just learned to stop worrying and live without X(org).

Optimizing large package installs But that, of course, is not all. Why make things simple when you can have an unreadable title that is trying to be both syntactically correct and click-baity enough to flatter my vain ego? Right. One of the challenges in bootstrapping Puppet with large package lists is that it's slow. Puppet lists packages as individual resources and will basically run apt install $PKG on every package in the manifest, one at a time. While the overhead of apt is generally small, when you add things like apt-listbugs, apt-listchanges, needrestart, triggers and so on, it can take forever setting up a new host. So for initial installs, it can actually makes sense to skip the queue and just install everything in one big batch. And because the above tool inspects the packages installed by Puppet, you can run it against a catalog and have a full lists of all the packages Puppet would install, even before I even had Puppet running. So when reinstalling my laptop, I basically did this:
apt install puppet-agent/experimental
puppet agent --test --noop
apt install $(./puppet-package-check --debug \
    2>&1   grep ^puppet\ packages 
      sed 's/puppet packages://;s/ /\n/g'
      grep -v -e onionshare -e golint -e git-sizer -e github-backup -e hledger -e xsane -e audacity -e chirp -e elpa-flycheck -e elpa-lsp-ui -e yubikey-manager -e git-annex -e hopenpgp-tools -e puppet
) puppet-agent/experimental
That massive grep was because there are currently a lot of packages missing from bookworm. Those are all packages that I have in my catalog but that still haven't made it to bookworm. Sad, I know. I eventually worked around that by adding bullseye sources so that the Puppet manifest actually ran. The point here is that this improves the Puppet run time a lot. All packages get installed at once, and you get a nice progress bar. Then you actually run Puppet to deploy configurations and all the other goodies:
puppet agent --test
I wish I could tell you how much faster that ran. I don't know, and I will not go through a full reinstall just to please your curiosity. The only hard number I have is that it installed 444 packages (which exploded in 10,191 packages with dependencies) in a mere 10 minutes. That might also be with the packages already downloaded. In any case, I have that gut feeling it's faster, so you'll have to just trust my gut. It is, after all, much more important than you might think.

Similar work The blueprint system is something similar to this:
It figures out what you ve done manually, stores it locally in a Git repository, generates code that s able to recreate your efforts, and helps you deploy those changes to production
That tool has unfortunately been abandoned for a decade at this point. Also note that the AutoRemove::RecommendsImportant and AutoRemove::SuggestsImportant are relevant here. If it is set to true (the default), a package will not be removed if it is (respectively) a Recommends or Suggests of another package (as opposed to the normal Depends). In other words, if you want to also auto-remove packages that are only Suggests, you would, for example, add this to apt.conf:
AutoRemove::SuggestsImportant false;
Paul Wise has tried to make the Debian installer and debootstrap properly mark packages as automatically installed in the past, but his bug reports were rejected. The other suggestions in this section are also from Paul, thanks!

5 July 2022

Alberto Garc a: Running the Steam Deck s OS in a virtual machine using QEMU

SteamOS desktop Introduction The Steam Deck is a handheld gaming computer that runs a Linux-based operating system called SteamOS. The machine comes with SteamOS 3 (code name holo ), which is in turn based on Arch Linux. Although there is no SteamOS 3 installer for a generic PC (yet), it is very easy to install on a virtual machine using QEMU. This post explains how to do it. The goal of this VM is not to play games (you can already install Steam on your computer after all) but to use SteamOS in desktop mode. The Gamescope mode (the console-like interface you normally see when you use the machine) requires additional development to make it work with QEMU and will not work with these instructions. A SteamOS VM can be useful for debugging, development, and generally playing and tinkering with the OS without risking breaking the Steam Deck. Running the SteamOS desktop in a virtual machine only requires QEMU and the OVMF UEFI firmware and should work in any relatively recent distribution. In this post I m using QEMU directly, but you can also use virt-manager or some other tool if you prefer, we re emulating a standard x86_64 machine here. General concepts SteamOS is a single-user operating system and it uses an A/B partition scheme, which means that there are two sets of partitions and two copies of the operating system. The root filesystem is read-only and system updates happen on the partition set that is not active. This allows for safer updates, among other things. There is one single /home partition, shared by both partition sets. It contains the games, user files, and anything that the user wants to install there. Although the user can trivially become root, make the root filesystem read-write and install or change anything (the pacman package manager is available), this is not recommended because A simple way for the user to install additional software that survives OS updates and doesn t touch the root filesystem is Flatpak. It comes preinstalled with the OS and is integrated with the KDE Discover app. Preparing all necessary files The first thing that we need is the installer. For that we have to download the Steam Deck recovery image from here: https://store.steampowered.com/steamos/download/?ver=steamdeck&snr= Once the file has been downloaded, we can uncompress it and we ll get a raw disk image called steamdeck-recovery-4.img (the number may vary). Note that the recovery image is already SteamOS (just not the most up-to-date version). If you simply want to have a quick look you can play a bit with it and skip the installation step. In this case I recommend that you extend the image before using it, for example with truncate -s 64G steamdeck-recovery-4.img or, better, create a qcow2 overlay file and leave the original raw image unmodified: qemu-img create -f qcow2 -F raw -b steamdeck-recovery-4.img steamdeck-recovery-extended.qcow2 64G But here we want to perform the actual installation, so we need a destination image. Let s create one: $ qemu-img create -f qcow2 steamos.qcow2 64G Installing SteamOS Now that we have all files we can start the virtual machine:
$ qemu-system-x86_64 -enable-kvm -smp cores=4 -m 8G \
    -device usb-ehci -device usb-tablet \
    -device intel-hda -device hda-duplex \
    -device VGA,xres=1280,yres=800 \
    -drive if=pflash,format=raw,readonly=on,file=/usr/share/ovmf/OVMF.fd \
    -drive if=virtio,file=steamdeck-recovery-4.img,driver=raw \
    -device nvme,drive=drive0,serial=badbeef \
    -drive if=none,id=drive0,file=steamos.qcow2
Note that we re emulating an NVMe drive for steamos.qcow2 because that s what the installer script expects. This is not strictly necessary but it makes things a bit easier. If you don t want to do that you ll have to edit ~/tools/repair_device.sh and change DISK and DISK_SUFFIX. SteamOS installer shortcuts Once the system has booted we ll see a KDE Plasma session with a few tools on the desktop. If we select Reimage Steam Deck and click Proceed on the confirmation dialog then SteamOS will be installed on the destination drive. This process should not take a long time. Now, once the operation finishes a new confirmation dialog will ask if we want to reboot the Steam Deck, but here we have to choose Cancel . We cannot use the new image yet because it would try to boot into the Gamescope session, which won t work, so we need to change the default desktop session. SteamOS comes with a helper script that allows us to enter a chroot after automatically mounting all SteamOS partitions, so let s open a Konsole and make the Plasma session the default one in both partition sets:
$ sudo steamos-chroot --disk /dev/nvme0n1 --partset A
# steamos-readonly disable
# echo '[Autologin]' > /etc/sddm.conf.d/zz-steamos-autologin.conf
# echo 'Session=plasma.desktop' >> /etc/sddm.conf.d/zz-steamos-autologin.conf
# steamos-readonly enable
# exit
$ sudo steamos-chroot --disk /dev/nvme0n1 --partset B
# steamos-readonly disable
# echo '[Autologin]' > /etc/sddm.conf.d/zz-steamos-autologin.conf
# echo 'Session=plasma.desktop' >> /etc/sddm.conf.d/zz-steamos-autologin.conf
# steamos-readonly enable
# exit
After this we can shut down the virtual machine. Our new SteamOS drive is ready to be used. We can discard the recovery image now if we want. Booting SteamOS and first steps To boot SteamOS we can use a QEMU line similar to the one used during the installation. This time we re not emulating an NVMe drive because it s no longer necessary.
$ cp /usr/share/OVMF/OVMF_VARS.fd .
$ qemu-system-x86_64 -enable-kvm -smp cores=4 -m 8G \
   -device usb-ehci -device usb-tablet \
   -device intel-hda -device hda-duplex \
   -device VGA,xres=1280,yres=800 \
   -drive if=pflash,format=raw,readonly=on,file=/usr/share/ovmf/OVMF.fd \
   -drive if=pflash,format=raw,file=OVMF_VARS.fd \
   -drive if=virtio,file=steamos.qcow2 \
   -device virtio-net-pci,netdev=net0 \
   -netdev user,id=net0,hostfwd=tcp::2222-:22
(the last two lines redirect tcp port 2222 to port 22 of the guest to be able to SSH into the VM. If you don t want to do that you can omit them) If everything went fine, you should see KDE Plasma again, this time with a desktop icon to launch Steam and another one to Return to Gaming Mode (which we should not use because it won t work). See the screenshot that opens this post. Congratulations, you re running SteamOS now. Here are some things that you probably want to do: Updating the OS to the latest version The Steam Deck recovery image doesn t install the most recent version of SteamOS, so now we should probably do a software update. Note: if the last step fails after reaching 100% with a post-install handler error then go to Connections in the system settings, rename Wired Connection 1 to something else (anything, the name doesn t matter), click Apply and run steamos-update again. This works around a bug in the update process. Recent images fix this and this workaround is not necessary with them. As we did with the recovery image, before rebooting we should ensure that the new update boots into the Plasma session, otherwise it won t work:
$ sudo steamos-chroot --partset other
# steamos-readonly disable
# echo '[Autologin]' > /etc/sddm.conf.d/zz-steamos-autologin.conf
# echo 'Session=plasma.desktop' >> /etc/sddm.conf.d/zz-steamos-autologin.conf
# steamos-readonly enable
# exit
After this we can restart the system. If everything went fine we should be running the latest SteamOS release. Enjoy! Reporting bugs SteamOS is under active development. If you find problems or want to request improvements please go to the SteamOS community tracker. Edit 06 Jul 2022: Small fixes, mention how to install the OS without using NVMe.

1 June 2022

Daniel Lange: Get Youtube Channel ID from username

Youtube has a really nice RSS feature that is extremely well hidden. If you postfix a Channel ID to
https://www.youtube.com/feeds/videos.xml?channel_id=<id goes here>
you get a really nice Atom 1.0 (~RSS) feed for your feedreader. Unfortunately the Channel ID is hard to find while you are navigating Youtube with usernames in the URL. E.g. https://www.youtube.com/c/TED is TED's channel, full of interesting and worth-to-watch content (and some assorted horse toppings, of course). But you have to read a lot of ugly HTML / JSON in that page to find and combine https://www.youtube.com/feeds/videos.xml?channel_id=UCAuUUnT6oDeKwE6v1NGQxug which is the related RSS feed. Jeff Keeling wrote a simple Youtube RSS Extractor that does well if you have a ../playlist?... or a .../channel/... URL but it will (currently) fail on user name channels or Youtube landing pages. So how do we get the Channel ID for a Youtube user we are interested to follow? Youtube has a great API but that is gated by API keys even for the most simple calls (that came only with v3 of the API but the previous version is depreciated since 2015)1:
dl@laptop:~$ curl 'https://www.googleapis.com/youtube/v3/channels?part=contentDetails&forUsername=DebConfVideos'

"error":
"code": 403,
"message": "The request is missing a valid API key.",
"errors": [

"message": "The request is missing a valid API key.",
"domain": "global",
"reason": "forbidden"

],
"status": "PERMISSION_DENIED"

Luckily we can throw the same (example) user name DebConfVideos at curl and grep:
dl@laptop:~$ curl -s "https://www.youtube.com/c/DebConfVideos/videos" grep -Po '"channelId":".+?"'
"channelId":"UC7SbfAPZf8SMvAxp8t51qtQ"
So https://www.youtube.com/feeds/videos.xml?channel_id=UC7SbfAPZf8SMvAxp8t51qtQ is the RSS feed for DebConfVideos. We can use individual Youtube video URLs as well. With the hack above, it'll work to find us the Chanel ID from a Youtube video URL: Working around the Youtube API restrictions to still make use of their RSS feed Now, some user pages may have multiple valid RSS feeds because they contain multiple channels. Remember the TED page from above? Well run:
dl@laptop:~$ curl -s "https://www.youtube.com/c/TED" grep -Po '"channelId":".+?"' cut -d \" -f 4 while read -r YTID ; do echo -n "Youtube-ID: $YTID " ; curl -s "https://www.youtube.com/feeds/videos.xml?channel_id=$YTID" grep -m 1 -P -o "(?<=<title>).+(?=</title>)" ; done
This will iterate through the Channel IDs found and show you the titles. That way you can assess which one you want to add to your feedreader. screenshot of the above You probably want the last Channel ID listed above, the non-selective "TED" one. And that's the one from the example above. Update 02.06.2022: smpl wrote in and has the much better solution for the most frequent use cases:
You can also use get a feed directly with a username:
https://www.youtube.com/feeds/videos.xml?user=<username>
The one I use most is the one for playlists (if creators remember to
use them).
https://www.youtube.com/feeds/videos.xml?playlist_id=<playlist id>
For the common case you don't even need the channel ID that way. But it is also conveniently given in a <yt:channelId> tag (or the topmost <id> tag) within the Atom XML document. Thanks, smpl!

  1. Actually it is even more complicated as some channels, like our DebConfVideos example, will only get you an incomplete result, cf. this StackOverflow entry. I.e. the forUsername iterator may not even work and the "best practice" seems to be mucking around with the search call.

27 April 2022

Antoine Beaupr : building Debian packages under qemu with sbuild

I've been using sbuild for a while to build my Debian packages, mainly because it's what is used by the Debian autobuilders, but also because it's pretty powerful and efficient. Configuring it just right, however, can be a challenge. In my quick Debian development guide, I had a few pointers on how to configure sbuild with the normal schroot setup, but today I finished a qemu based configuration.

Why I want to use qemu mainly because it provides better isolation than a chroot. I sponsor packages sometimes and while I typically audit the source code before building, it still feels like the extra protection shouldn't hurt. I also like the idea of unifying my existing virtual machine setup with my build setup. My current VM is kind of all over the place: libvirt, vagrant, GNOME Boxes, etc?). I've been slowly converging over libvirt however, and most solutions I use right now rely on qemu under the hood, certainly not chroots... I could also have decided to go with containers like LXC, LXD, Docker (with conbuilder, whalebuilder, docker-buildpackage), systemd-nspawn (with debspawn), unshare (with schroot --chroot-mode=unshare), or whatever: I didn't feel those offer the level of isolation that is provided by qemu. The main downside of this approach is that it is (obviously) slower than native builds. But on modern hardware, that cost should be minimal.

How Basically, you need this:
sudo mkdir -p /srv/sbuild/qemu/
sudo apt install sbuild-qemu
sudo sbuild-qemu-create -o /srv/sbuild/qemu/unstable.img unstable https://deb.debian.org/debian
Then to make this used by default, add this to ~/.sbuildrc:
# run autopkgtest inside the schroot
$run_autopkgtest = 1;
# tell sbuild to use autopkgtest as a chroot
$chroot_mode = 'autopkgtest';
# tell autopkgtest to use qemu
$autopkgtest_virt_server = 'qemu';
# tell autopkgtest-virt-qemu the path to the image
# use --debug there to show what autopkgtest is doing
$autopkgtest_virt_server_options = [ '--', '/srv/sbuild/qemu/%r-%a.img' ];
# tell plain autopkgtest to use qemu, and the right image
$autopkgtest_opts = [ '--', 'qemu', '/srv/sbuild/qemu/%r-%a.img' ];
# no need to cleanup the chroot after build, we run in a completely clean VM
$purge_build_deps = 'never';
# no need for sudo
$autopkgtest_root_args = '';
Note that the above will use the default autopkgtest (1GB, one core) and qemu (128MB, one core) configuration, which might be a little low on resources. You probably want to be explicit about this, with something like this:
# extra parameters to pass to qemu
# --enable-kvm is not necessary, detected on the fly by autopkgtest
my @_qemu_options = ['--ram-size=4096', '--cpus=2'];
# tell autopkgtest-virt-qemu the path to the image
# use --debug there to show what autopkgtest is doing
$autopkgtest_virt_server_options = [ @_qemu_options, '--', '/srv/sbuild/qemu/%r-%a.img' ];
$autopkgtest_opts = [ '--', 'qemu', @qemu_options, '/srv/sbuild/qemu/%r-%a.img'];
This configuration will:
  1. create a virtual machine image in /srv/sbuild/qemu for unstable
  2. tell sbuild to use that image to create a temporary VM to build the packages
  3. tell sbuild to run autopkgtest (which should really be default)
  4. tell autopkgtest to use qemu for builds and for tests
Note that the VM created by sbuild-qemu-create have an unlocked root account with an empty password.

Other useful tasks
  • enter the VM to make test, changes will be discarded (thanks Nick Brown for the sbuild-qemu-boot tip!):
     sbuild-qemu-boot /srv/sbuild/qemu/unstable-amd64.img
    
    That program is shipped only with bookworm and later, an equivalent command is:
     qemu-system-x86_64 -snapshot -enable-kvm -object rng-random,filename=/dev/urandom,id=rng0 -device virtio-rng-pci,rng=rng0,id=rng-device0 -m 2048 -nographic /srv/sbuild/qemu/unstable-amd64.img
    
    The key argument here is -snapshot.
  • enter the VM to make permanent changes, which will not be discarded:
     sudo sbuild-qemu-boot --readwrite /srv/sbuild/qemu/unstable-amd64.img
    
    Equivalent command:
     sudo qemu-system-x86_64 -enable-kvm -object rng-random,filename=/dev/urandom,id=rng0 -device virtio-rng-pci,rng=rng0,id=rng-device0 -m 2048 -nographic /srv/sbuild/qemu/unstable-amd64.img
    
  • update the VM (thanks lavamind):
     sudo sbuild-qemu-update /srv/sbuild/qemu/unstable-amd64.img
    
  • build in a specific VM regardless of the suite specified in the changelog (e.g. UNRELEASED, bookworm-backports, bookworm-security, etc):
     sbuild --autopkgtest-virt-server-opts="-- qemu /var/lib/sbuild/qemu/bookworm-amd64.img"
    
    Note that you'd also need to pass --autopkgtest-opts if you want autopkgtest to run in the correct VM as well:
     sbuild --autopkgtest-opts="-- qemu /var/lib/sbuild/qemu/unstable.img" --autopkgtest-virt-server-opts="-- qemu /var/lib/sbuild/qemu/bookworm-amd64.img"
    
    You might also need parameters like --ram-size if you customized it above.
And yes, this is all quite complicated and could be streamlined a little, but that's what you get when you have years of legacy and just want to get stuff done. It seems to me autopkgtest-virt-qemu should have a magic flag starts a shell for you, but it doesn't look like that's a thing. When that program starts, it just says ok and sits there. Maybe because the authors consider the above to be simple enough (see also bug #911977 for a discussion of this problem).

Live access to a running test When autopkgtest starts a VM, it uses this funky qemu commandline:
qemu-system-x86_64 -m 4096 -smp 2 -nographic -net nic,model=virtio -net user,hostfwd=tcp:127.0.0.1:10022-:22 -object rng-random,filename=/dev/urandom,id=rng0 -device virtio-rng-pci,rng=rng0,id=rng-device0 -monitor unix:/tmp/autopkgtest-qemu.w1mlh54b/monitor,server,nowait -serial unix:/tmp/autopkgtest-qemu.w1mlh54b/ttyS0,server,nowait -serial unix:/tmp/autopkgtest-qemu.w1mlh54b/ttyS1,server,nowait -virtfs local,id=autopkgtest,path=/tmp/autopkgtest-qemu.w1mlh54b/shared,security_model=none,mount_tag=autopkgtest -drive index=0,file=/tmp/autopkgtest-qemu.w1mlh54b/overlay.img,cache=unsafe,if=virtio,discard=unmap,format=qcow2 -enable-kvm -cpu kvm64,+vmx,+lahf_lm
... which is a typical qemu commandline, I'm sorry to say. That gives us a VM with those settings (paths are relative to a temporary directory, /tmp/autopkgtest-qemu.w1mlh54b/ in the above example):
  • the shared/ directory is, well, shared with the VM
  • port 10022 is forward to the VM's port 22, presumably for SSH, but not SSH server is started by default
  • the ttyS1 and ttyS2 UNIX sockets are mapped to the first two serial ports (use nc -U to talk with those)
  • the monitor UNIX socket is a qemu control socket (see the QEMU monitor documentation, also nc -U)
In other words, it's possible to access the VM with:
nc -U /tmp/autopkgtest-qemu.w1mlh54b/ttyS2
The nc socket interface is ... not great, but it works well enough. And you can probably fire up an SSHd to get a better shell if you feel like it.

Nitty-gritty details no one cares about

Fixing hang in sbuild cleanup I'm having a hard time making heads or tails of this, but please bear with me. In sbuild + schroot, there's this notion that we don't really need to cleanup after ourselves inside the schroot, as the schroot will just be delted anyways. This behavior seems to be handled by the internal "Session Purged" parameter. At least in lib/Sbuild/Build.pm, we can see this:
my $is_cloned_session = (defined ($session->get('Session Purged')) &&
             $session->get('Session Purged') == 1) ? 1 : 0;
[...]
if ($is_cloned_session)  
$self->log("Not cleaning session: cloned chroot in use\n");
  else  
if ($purge_build_deps)  
    # Removing dependencies
    $resolver->uninstall_deps();
  else  
    $self->log("Not removing build depends: as requested\n");
 
 
The schroot builder defines that parameter as:
    $self->set('Session Purged', $info-> 'Session Purged' );
... which is ... a little confusing to me. $info is:
my $info = $self->get('Chroots')->get_info($schroot_session);
... so I presume that depends on whether the schroot was correctly cleaned up? I stopped digging there... ChrootUnshare.pm is way more explicit:
$self->set('Session Purged', 1);
I wonder if we should do something like this with the autopkgtest backend. I guess people might technically use it with something else than qemu, but qemu is the typical use case of the autopkgtest backend, in my experience. Or at least certainly with things that cleanup after themselves. Right? For some reason, before I added this line to my configuration:
$purge_build_deps = 'never';
... the "Cleanup" step would just completely hang. It was quite bizarre.

Disgression on the diversity of VM-like things There are a lot of different virtualization solutions one can use (e.g. Xen, KVM, Docker or Virtualbox). I have also found libguestfs to be useful to operate on virtual images in various ways. Libvirt and Vagrant are also useful wrappers on top of the above systems. There are particularly a lot of different tools which use Docker, Virtual machines or some sort of isolation stronger than chroot to build packages. Here are some of the alternatives I am aware of: Take, for example, Whalebuilder, which uses Docker to build packages instead of pbuilder or sbuild. Docker provides more isolation than a simple chroot: in whalebuilder, packages are built without network access and inside a virtualized environment. Keep in mind there are limitations to Docker's security and that pbuilder and sbuild do build under a different user which will limit the security issues with building untrusted packages. On the upside, some of things are being fixed: whalebuilder is now an official Debian package (whalebuilder) and has added the feature of passing custom arguments to dpkg-buildpackage. None of those solutions (except the autopkgtest/qemu backend) are implemented as a sbuild plugin, which would greatly reduce their complexity. I was previously using Qemu directly to run virtual machines, and had to create VMs by hand with various tools. This didn't work so well so I switched to using Vagrant as a de-facto standard to build development environment machines, but I'm returning to Qemu because it uses a similar backend as KVM and can be used to host longer-running virtual machines through libvirt. The great thing now is that autopkgtest has good support for qemu and sbuild has bridged the gap and can use it as a build backend. I originally had found those bugs in that setup, but all of them are now fixed:
  • #911977: sbuild: how do we correctly guess the VM name in autopkgtest?
  • #911979: sbuild: fails on chown in autopkgtest-qemu backend
  • #911963: autopkgtest qemu build fails with proxy_cmd: parameter not set
  • #911981: autopkgtest: qemu server warns about missing CPU features
So we have unification! It's possible to run your virtual machines and Debian builds using a single VM image backend storage, which is no small feat, in my humble opinion. See the sbuild-qemu blog post for the annoucement Now I just need to figure out how to merge Vagrant, GNOME Boxes, and libvirt together, which should be a matter of placing images in the right place... right? See also hosting.

pbuilder vs sbuild I was previously using pbuilder and switched in 2017 to sbuild. AskUbuntu.com has a good comparative between pbuilder and sbuild that shows they are pretty similar. The big advantage of sbuild is that it is the tool in use on the buildds and it's written in Perl instead of shell. My concerns about switching were POLA (I'm used to pbuilder), the fact that pbuilder runs as a separate user (works with sbuild as well now, if the _apt user is present), and setting up COW semantics in sbuild (can't just plug cowbuilder there, need to configure overlayfs or aufs, which was non-trivial in Debian jessie). Ubuntu folks, again, have more documentation there. Debian also has extensive documentation, especially about how to configure overlays. I was ultimately convinced by stapelberg's post on the topic which shows how much simpler sbuild really is...

Who Thanks lavamind for the introduction to the sbuild-qemu package.

12 April 2022

Sven Hoexter: Emulating Raspi2 like hardware with RaspiOS in 2022

Update of my notes from 2020.
# Download a binary device tree file and matching kernel a good soul uploaded to github
wget https://github.com/vfdev-5/qemu-rpi2-vexpress/raw/master/kernel-qemu-4.4.1-vexpress
wget https://github.com/vfdev-5/qemu-rpi2-vexpress/raw/master/vexpress-v2p-ca15-tc1.dtb
# Download the official Rasbian image without X
wget https://downloads.raspberrypi.org/raspios_lite_armhf/images/raspios_lite_armhf-2022-04-07/2022-04-04-raspios-bullseye-armhf-lite.img.xz
unxz 2022-04-04-raspios-bullseye-armhf-lite.img.xz
# Convert it from the raw image to a qcow2 image and add some space
qemu-img convert -f raw -O qcow2 2022-04-04-raspios-bullseye-armhf-lite.img rasbian.qcow2
qemu-img resize rasbian.qcow2 4G
# make sure we get a user account setup
echo "me:$(echo 'test123' openssl passwd -6 -stdin)" > userconf
sudo guestmount -a rasbian.qcow2 -m /dev/sda1 /mnt
sudo mv userconf /mnt
sudo guestunmount /mnt
# start qemu
qemu-system-arm -m 2048M -M vexpress-a15 -cpu cortex-a15 \
 -kernel kernel-qemu-4.4.1-vexpress -no-reboot \
 -smp 2 -serial stdio \
 -dtb vexpress-v2p-ca15-tc1.dtb -sd rasbian.qcow2 \
 -append "root=/dev/mmcblk0p2 rw rootfstype=ext4 console=ttyAMA0,15200 loglevel=8" \
 -nic user,hostfwd=tcp::5555-:22
# login at the serial console as user me with password test123
sudo -i
# enable ssh
systemctl enable ssh
systemctl start ssh
# resize partition and filesystem
parted /dev/mmcblk0 resizepart 2 100%
resize2fs /dev/mmcblk0p2
Now I can login via ssh and start to play:
ssh me@localhost -p 5555

9 January 2022

Russell Coker: Video Conferencing (LCA)

I ve just done a tech check for my LCA lecture. I had initially planned to do what I had done before and use my phone for recording audio and video and my PC for other stuff. The problem is that I wanted to get an external microphone going and plugging in a USB microphone turned off the speaker in the phone (it seemed to direct audio to a non-existent USB audio output). I tried using bluetooth headphones with the USB microphone and that didn t work. Eventually a viable option seemed to be using USB headphones on my PC with the phone for camera and microphone. Then it turned out that my phone (Huawei Mate 10 Pro) didn t support resolutions higher than VGA with Chrome (it didn t have the advanced settings menu to select resolution), this is probably an issue of Android build features. So the best option is to use a webcam on the PC, I was recommended a Logitech C922 but OfficeWorks only has a Logitech C920 which is apparently OK. The free connection test from freeconference.com [1] is good for testing out how your browser works for videoconferencing. It tests each feature separately and is easy to run. After buying the C920 webcam I found that it sometimes worked and sometimes caused a kernel panic like the following (partial panic log included for the benefit of people Googling this Logitech C920 problem):
[95457.805417] BUG: kernel NULL pointer dereference, address: 0000000000000000
[95457.805424] #PF: supervisor read access in kernel mode
[95457.805426] #PF: error_code(0x0000) - not-present page
[95457.805429] PGD 0 P4D 0 
[95457.805431] Oops: 0000 [#1] SMP PTI
[95457.805435] CPU: 2 PID: 75486 Comm: v4l2src0:src Not tainted 5.15.0-2-amd64 #1  Debian 5.15.5-2
[95457.805438] Hardware name: HP ProLiant ML110 Gen9/ProLiant ML110 Gen9, BIOS P99 02/17/2017
[95457.805440] RIP: 0010:usb_ifnum_to_if+0x3a/0x50 [usbcore]
...
[95457.805481] Call Trace:
[95457.805484]  
[95457.805485]  usb_hcd_alloc_bandwidth+0x23d/0x360 [usbcore]
[95457.805507]  usb_set_interface+0x127/0x350 [usbcore]
[95457.805525]  uvc_video_start_transfer+0x19c/0x4f0 [uvcvideo]
[95457.805532]  uvc_video_start_streaming+0x7b/0xd0 [uvcvideo]
[95457.805538]  uvc_start_streaming+0x2d/0xf0 [uvcvideo]
[95457.805543]  vb2_start_streaming+0x63/0x100 [videobuf2_common]
[95457.805550]  vb2_core_streamon+0x54/0xb0 [videobuf2_common]
[95457.805555]  uvc_queue_streamon+0x2a/0x40 [uvcvideo]
[95457.805560]  uvc_ioctl_streamon+0x3a/0x60 [uvcvideo]
[95457.805566]  __video_do_ioctl+0x39b/0x3d0 [videodev]
It turns out that Ubuntu Launchpad bug #1827452 has great information on this problem [2]. Apparently if the device decides it doesn t have enough power then it will reconnect and get a different USB bus device number and this often happens when the kernel is initialising it. There s a race condition in the kernel code in which the code to initialise the device won t realise that the device has been detached and will dereference a NULL pointer and then mess up other things in USB device management. The end result for me is that all USB devices become unusable in this situation, commands like lsusb hang, and a regular shutdown/reboot hangs because it can t kill the user session because something is blocked on USB. One of the comments on the Launchpad bug is that a powered USB hub can alleviate the problem while a USB extension cable (which I had been using) can exacerbate it. Officeworks currently advertises only one powered USB hub, it s described as USB 3 but also maximum speed 480 Mbps (USB 2 speed). So basically they are selling a USB 2 hub for 4* the price that USB 2 hubs used to sell for. When debugging this I used the cheese webcam utility program and ran it in a KVM virtual machine. The KVM parameters -device qemu-xhci -usb -device usb-host,hostbus=1,hostaddr=2 (where 1 and 2 are replaced by the Bus and Device numbers from lsusb ) allow the USB device to be passed through to the VM. Doing this meant that I didn t have to reboot my PC every time a webcam test failed. For audio I m using the Sades Wand gaming headset I wrote about previously [3].

5 December 2021

Reproducible Builds: Reproducible Builds in November 2021

Welcome to the November 2021 report from the Reproducible Builds project. As a quick recap, whilst anyone may inspect the source code of free software for malicious flaws, almost all software is distributed to end users as pre-compiled binaries. The motivation behind the reproducible builds effort is therefore to ensure no flaws have been introduced during this compilation process by promising identical results are always generated from a given source, thus allowing multiple third-parties to come to a consensus on whether a build was compromised. If you are interested in contributing to our project, please visit our Contribute page on our website.
On November 6th, Vagrant Cascadian presented at this year s edition of the SeaGL conference, giving a talk titled Debugging Reproducible Builds One Day at a Time:
I ll explore how I go about identifying issues to work on, learn more about the specific issues, recreate the problem locally, isolate the potential causes, dissect the problem into identifiable parts, and adapt the packaging and/or source code to fix the issues.
A video recording of the talk is available on archive.org.
Fedora Magazine published a post written by Zbigniew J drzejewski-Szmek about how to Use Diffoscope in packager workflows, specifically around ensuring that new versions of a package do not introduce breaking changes:
In the role of a packager, updating packages is a recurring task. For some projects, a packager is involved in upstream maintenance, or well written release notes make it easy to figure out what changed between the releases. This isn t always the case, for instance with some small project maintained by one or two people somewhere on GitHub, and it can be useful to verify what exactly changed. Diffoscope can help determine the changes between package releases. [ ]

kpcyrd announced the release of rebuilderd version 0.16.3 on our mailing list this month, adding support for builds to generate multiple artifacts at once.
Lastly, we held another IRC meeting on November 30th. As mentioned in previous reports, due to the global events throughout 2020 etc. there will be no in-person summit event this year.

diffoscope diffoscope is our in-depth and content-aware diff utility. Not only can it locate and diagnose reproducibility issues, it can provide human-readable diffs from many kinds of binary formats. This month, Chris Lamb made the following changes, including preparing and uploading versions 190, 191, 192, 193 and 194 to Debian:
  • New features:
    • Continue loading a .changes file even if the referenced files do not exist, but include a comment in the returned diff. [ ]
    • Log the reason if we cannot load a Debian .changes file. [ ]
  • Bug fixes:
    • Detect XML files as XML files if file(1) claims if they are XML files or if they are named .xml. (#999438)
    • Don t duplicate file lists at each directory level. (#989192)
    • Don t raise a traceback when comparing nested directories with non-directories. [ ]
    • Re-enable test_android_manifest. [ ]
    • Don t reject Debian .changes files if they contain non-printable characters. [ ]
  • Codebase improvements:
    • Avoid aliasing variables if we aren t going to use them. [ ]
    • Use isinstance over type. [ ]
    • Drop a number of unused imports. [ ]
    • Update a bunch of %-style string interpolations into f-strings or str.format. [ ]
    • When pretty-printing JSON, mark the difference as being reformatted, additionally avoiding including the full path. [ ]
    • Import itertools top-level module directly. [ ]
Chris Lamb also made an update to the command-line client to trydiffoscope, a web-based version of the diffoscope in-depth and content-aware diff utility, specifically only waiting for 2 minutes for try.diffoscope.org to respond in tests. (#998360) In addition Brandon Maier corrected an issue where parts of large diffs were missing from the output [ ], Zbigniew J drzejewski-Szmek fixed some logic in the assert_diff_startswith method [ ] and Mattia Rizzolo updated the packaging metadata to denote that we support both Python 3.9 and 3.10 [ ] as well as a number of warning-related changes[ ][ ]. Vagrant Cascadian also updated the diffoscope package in GNU Guix [ ][ ].

Distribution work In Debian, Roland Clobus updated the wiki page documenting Debian reproducible Live images to mention some new bug reports and also posted an in-depth status update to our mailing list. In addition, 90 reviews of Debian packages were added, 18 were updated and 23 were removed this month adding to our knowledge about identified issues. Chris Lamb identified a new toolchain issue, absolute_path_in_cmake_file_generated_by_meson.
Work has begun on classifying reproducibility issues in packages within the Arch Linux distribution. Similar to the analogous effort within Debian (outlined above), package information is listed in a human-readable packages.yml YAML file and a sibling README.md file shows how to classify packages too. Finally, Bernhard M. Wiedemann posted his monthly reproducible builds status report for openSUSE and Vagrant Cascadian updated a link on our website to link to the GNU Guix reproducibility testing overview [ ].

Software development The Reproducible Builds project detects, dissects and attempts to fix as many currently-unreproducible packages as possible. We endeavour to send all of our patches upstream where appropriate. This month, we wrote a large number of such patches, including: Elsewhere, in software development, Jonas Witschel updated strip-nondeterminism, our tool to remove specific non-deterministic results from a completed build so that it did not fail on JAR archives containing invalid members with a .jar extension [ ]. This change was later uploaded to Debian by Chris Lamb. reprotest is the Reproducible Build s project end-user tool to build the same source code twice in widely different environments and checking whether the binaries produced by the builds have any differences. This month, Mattia Rizzolo overhauled the Debian packaging [ ][ ][ ] and fixed a bug surrounding suffixes in the Debian package version [ ], whilst Stefano Rivera fixed an issue where the package tests were broken after the removal of diffoscope from the package s strict dependencies [ ].

Testing framework The Reproducible Builds project runs a testing framework at tests.reproducible-builds.org, to check packages and other artifacts for reproducibility. This month, the following changes were made:
  • Holger Levsen:
    • Document the progress in setting up snapshot.reproducible-builds.org. [ ]
    • Add the packages required for debian-snapshot. [ ]
    • Make the dstat package available on all Debian based systems. [ ]
    • Mark virt32b-armhf and virt64b-armhf as down. [ ]
  • Jochen Sprickerhof:
    • Add SSH authentication key and enable access to the osuosl168-amd64 node. [ ][ ]
  • Mattia Rizzolo:
    • Revert reproducible Debian: mark virt(32 64)b-armhf as down - restored. [ ]
  • Roland Clobus (Debian live image generation):
    • Rename sid internally to unstable until an issue in the snapshot system is resolved. [ ]
    • Extend testing to include Debian bookworm too.. [ ]
    • Automatically create the Jenkins view to display jobs related to building the Live images. [ ]
  • Vagrant Cascadian:
    • Add a Debian package set group for the packages and tools maintained by the Reproducible Builds maintainers themselves. [ ]


If you are interested in contributing to the Reproducible Builds project, please visit our Contribute page on our website. However, you can get in touch with us via:

6 November 2021

Reproducible Builds: Reproducible Builds in October 2021

Welcome to the October 2021 report from the Reproducible Builds project!
This month Samanta Navarro posted to the oss-security security mailing on a novel category of exploit in the .tar archive format, where a single .tar file contains different contents depending on the tar utility being used. Naturally, this has consequences for reproducible builds as Samanta goes onto reply:

Arch Linux uses libarchive (bsdtar) in its build environment. The default tar program installed is GNU tar. It is possible to create a source distribution which leads to different files seen by the build environment than compared to a careful reviewer and other Linux distributions.
Samanta notes that addressing the tar utilities themselves will not be a sufficient fix:
I have submitted bug reports and patches to some projects but eventually I had to conclude that the problem itself cannot be fixed by these implementations alone. The best choice for these tools would be to only allow archives which are fully compatible to standards but this in turn would render a lot of archives broken.
Reproducible builds, with its twin ideas of reaching consensus on the build outputs as well as precisely recording and describing the build environment, would help address this problem at a higher level.
Codethink announced that they had achieved ISO-26262 ASIL D Tool Certification, a way of determining specific safety standards for software. Codethink used open source tooling to achieve this, but they also leverage:
Reproducibility, repeatability and traceability of builds, drawing heavily on best-practices championed by the Reproducible Builds project.

Elsewhere on the internet, according to a comment on Hacker News, Microsoft are now comparing NPM Javascript packages with their original source repositories:
I got a PR in my repository a few days ago leading back to a team trying to make it easier for packages to be reproducible from source.

Lastly, Martin Monperrus started an interesting thread on our mailing list about Github, specifically that their autogenerated release tarballs are not deterministic . The thread generated a significant number of replies that are worth reading.

Events and presentations

Community news On our mailing list this month:
There were quite a few changes to the Reproducible Builds website and documentation this month as well, including Feng Chai updating some links on our publications page [ ] and marco updated our project metadata around the Bitcoin Core building guide [ ].
Lastly, we ran another productive meeting on IRC during October. A full set of notes from the meeting is available to view.

Distribution work Qubes was heavily featured in the latest edition of Linux Weekly News, and a significant section was dedicated to discussing reproducibility. For example, it was mentioned that the Qubes project has been working on incorporating reproducible builds into its continuous integration (CI) infrastructure . But the LWN article goes on to describe that:
The current goal is to be able to build the Qubes OS Debian templates solely from packages that can be built reproducibly. Templates in Qubes OS are VM images that can be used to start an application qube quickly based on the template. The qube will have read-only access to the root filesystem of the template, so that the same root filesystem can be shared with multiple application qubes. There are official templates for several variants of both Fedora and Debian, as well as community maintained templates for several other distributions.
You can view the whole article on LWN, and Fr d ric also published a lengthy summary about their work on reproducible builds in Qubes as well for those wishing to learn more.
In Debian this month, 133 reviews of Debian packages were added, 81 were updated and 24 were removed this month, adding to Debian s ever-growing knowledge about identified issues. A number of issues were categorised and added by Chris Lamb and Vagrant Cascadian too [ ][ ][ ]. In addition, work on alternative snapshot service has made progress by Fr d ric Pierret and Holger Levsen this month, including moving from the existing host (snapshot.notset.fr) to snapshot.reproducible-builds.org (more info) thanks to OSUOSL for the machine and hosting and Debian for the disks.
Finally, Bernhard M. Wiedemann posted his monthly reproducible builds status report.

diffoscope diffoscope is our in-depth and content-aware diff utility. Not only can it locate and diagnose reproducibility issues, it can provide human-readable diffs from many kinds of binary formats. This month, Chris Lamb made the following changes, including preparing and uploading versions 186, 187, 188 and 189 to Debian
  • New features:
    • Add support for Python Sphinx inventory files (usually named objects.inv on-disk). [ ]
    • Add support for comparing .pyc files. Thanks to Sergei Trofimovich for the inspiration. [ ]
    • Try some alternative suffixes (e.g. .py) to support distributions that strip or retain them. [ ][ ]
  • Bug fixes:
    • Fix Python decompilation tests under Python 3.10+ [ ] and for Python 3.7 [ ].
    • Don t raise a traceback if we cannot unmarshal Python bytecode. This is in order to support Python 3.7 failing to load .pyc files generated with newer versions of Python. [ ]
    • Skip Python bytecode testing where we do not have an expected diff. [ ]
  • Codebase improvements:
    • Use our file_version_is_lt utility instead of accepting both versions of uImage expected diff. [ ]
    • Split out a custom call to assert_diff for a .startswith equivalent. [ ]
    • Use skipif instead of manual conditionals in some tests. [ ]
In addition, Jelle van der Waa added external tool references for Arch Linux for ocamlobjinfo, openssl and ffmpeg [ ][ ][ ] and added Arch Linux as a Continuous Integration (CI) test target. [ ] and Vagrant Cascadian updated the testsuite to skip Python bytecode comparisons when file(1) is older than 5.39. [ ] as well as added external tool references for the Guix distribution for dumppdf and ppudump. [ ][ ]. Vagrant Cascadian also updated the diffoscope package in GNU Guix [ ][ ]. Lastly, Guangyuan Yang updated the FreeBSD package name on the website [ ], Mattia Rizzolo made a change to override a new Lintian warning due to the new test files [ ], Roland Clobus added support to detect and log if the GNU_BUILD_ID field in an ELF binary been modified [ ], Sandro J ckel updated a number of helpful links on the website [ ] and Sergei Trofimovich made the uImage test output support file() version 5.41 [ ].

reprotest reprotest is the Reproducible Build s project end-user tool to build same source code twice in widely differing environments, checking the binaries produced by the builds for any differences. This month, reprotest version 0.7.18 was uploaded to Debian unstable by Holger Levsen, which also included a change by Holger to clarify that Python 3.9 is used nowadays [ ], but it also included two changes by Vasyl Gello to implement realistic CPU architecture shuffling [ ] and to log the selected variations when the verbosity is configured at a sufficiently high level [ ]. Finally, Vagrant Cascadian updated reprotest to version 0.7.18 in GNU Guix.

Upstream patches The Reproducible Builds project detects, dissects and attempts to fix unreproducible packages. We try to send all of our patches upstream where appropriate. We authored a large number of such patches this month, including:

Testing framework The Reproducible Builds project runs a testing framework at tests.reproducible-builds.org, to check packages and other artifacts for reproducibility. This month, the following changes were made:
  • Holger Levsen:
    • Debian-related changes:
      • Incorporate a fix from bremner into builtin-pho related to binary-NMUs. [ ]
      • Keep bullseye environments around longer, in an attempt to fix a Jenkins issue. [ ]
      • Improve the documentation of buildinfos.debian.net. [ ]
      • Improve documentation for the builtin-pho setup. [ ][ ]
    • OpenWrt-related changes:
      • Also use -j1 for better debugging. [ ]
      • Document that that Python 3.x is now used. [ ]
      • Enable further debugging for the toolchain build. [ ]
    • New snapshot.reproducible-builds.org service:
      • Actually add new node. [ ][ ]
      • Install xfsprogs on snapshot.reproducible-builds.org. [ ]
      • Create account for fpierret on new node. [ ]
      • Run node_health_check job on new node too. [ ]
  • Mattia Rizzolo:
    • Debian-related changes:
      • Handle schroot errors when invoking diffoscope instead of masking them. [ ][ ]
      • Declare and define some variables separately to avoid masking the subshell return code. [ ]
      • Fix variable name. [ ]
      • Improve log reporting. [ ]
      • Execute apt-get update with the -q argument to get more decent logs. [ ]
      • Set the Debian HTTP mirror and proxy for snapshot.reproducible-builds.org. [ ]
      • Install the libarchive-tools package (instead of bsdtar) when updating Jenkins nodes. [ ]
    • Be stricter about errors when starting the node agent [ ] and don t overwrite NODE_NAME so that we can expect Jenkins to properly set for us [ ].
    • Explicitly warn if the NODE_NAME is not a fully-qualified domain name (FQDN). [ ]
    • Document whether a node runs in the future. [ ]
    • Disable postgresql_autodoc as it not available in bullseye. [ ]
    • Don t be so eager when deleting schroot internals, call to schroot -e to terminate the schroots instead. [ ]
    • Only consider schroot underlays for deletion that are over a month old. [ ][ ]
    • Only try to unmount /proc if it s actually mounted. [ ]
    • Move the db_backup task to its own Jenkins job. [ ]
Lastly, Vasyl Gello added usage information to the reproducible_build.sh script [ ].

Contributing If you are interested in contributing to the Reproducible Builds project, please visit our Contribute page on our website. However, you can get in touch with us via:

Next.