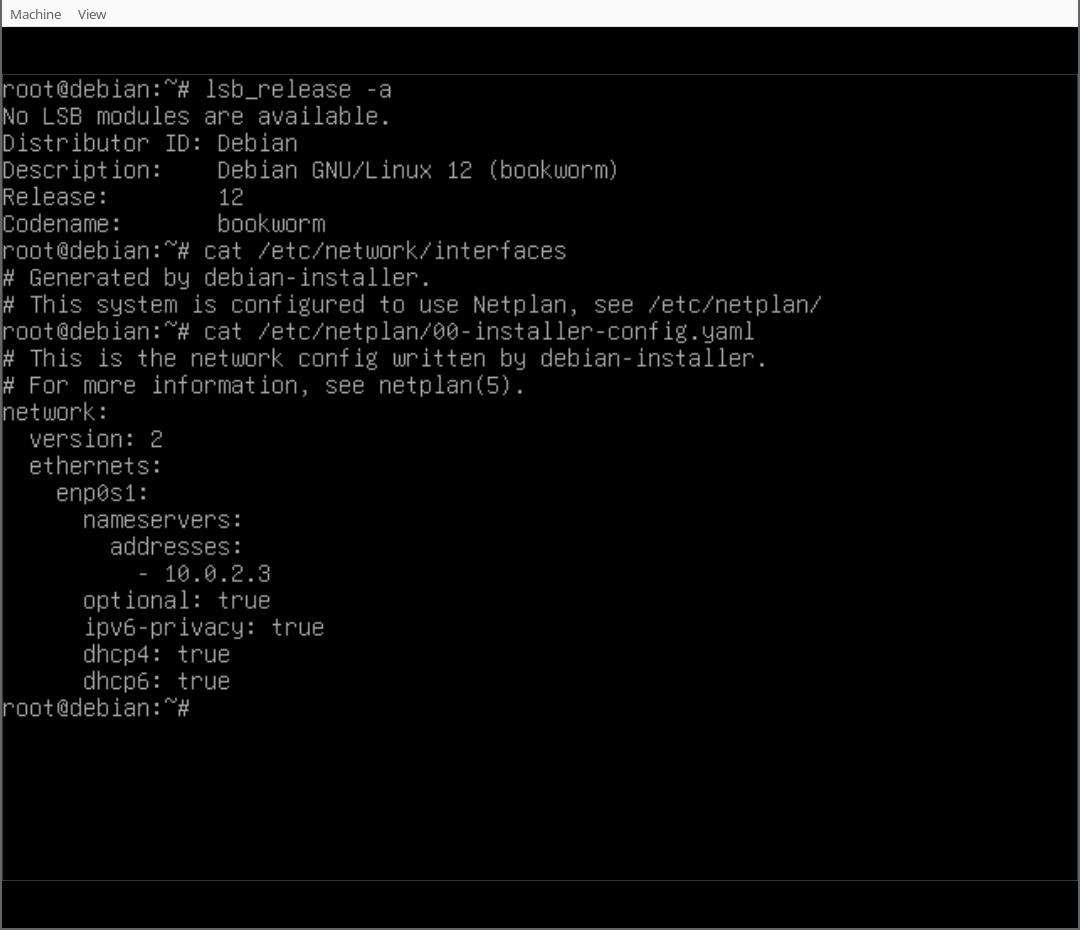
With the work that has been done in the debian-installer/netcfg merge-proposal !9 it is possible to install a standard Debian system, using the normal Debian-Installer (d-i) mini.iso images, that will come pre-installed with Netplan and all network configuration structured in /etc/netplan/.
In this write-up I d like to run you through a list of commands for experiencing the Netplan enabled installation process first-hand. For now, we ll be using a custom ISO image, while waiting for the above-mentioned merge-proposal to be landed. Furthermore, as the Debian archive is going through major transitions builds of the unstable branch of d-i don t currently work. So I implemented a small backport, producing updated netcfg and netcfg-static for Bookworm, which can be used as localudebs/ during the d-i build.
Let s start with preparing a working directory and installing the software dependencies for our virtualized Debian system:
Now let s download the custom mini.iso, linux kernel image and initrd.gz containing the Netplan enablement changes, as mentioned above.
TODO: localudebs/
Next we ll prepare a VM, by copying the EFI firmware files, preparing some persistent EFIVARs file, to boot from FS0:\EFI\debian\grubx64.efi, and create a virtual disk for our machine:
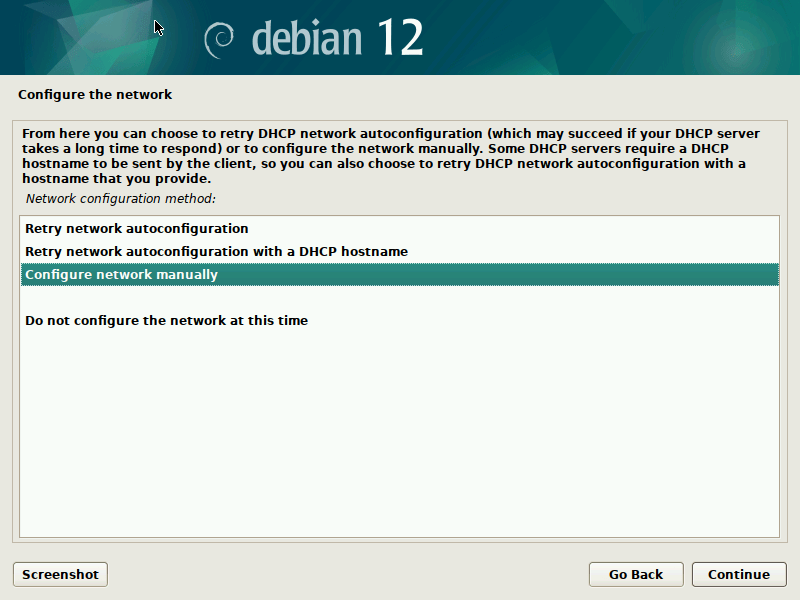
Finally, let s launch the installer using a custom preseed.cfg file, that will automatically install Netplan for us in the target system. A minimal preseed file could look like this:
For this demo, we re installing the full netplan.io package (incl. Python CLI), as the netplan-generator package was not yet split out as an independent binary in the Bookworm cycle. You can choose the preseed file from a set of different variants to test the different configurations:
We re using the custom linux kernel and initrd.gz here to be able to pass the PRESEED_URL as a parameter to the kernel s cmdline directly. Launching this VM should bring up the normal debian-installer in its netboot/gtk form:
Now you can click through the normal Debian-Installer process, using mostly default settings. Optionally, you could play around with the networking settings, to see how those get translated to /etc/netplan/ in the target system.
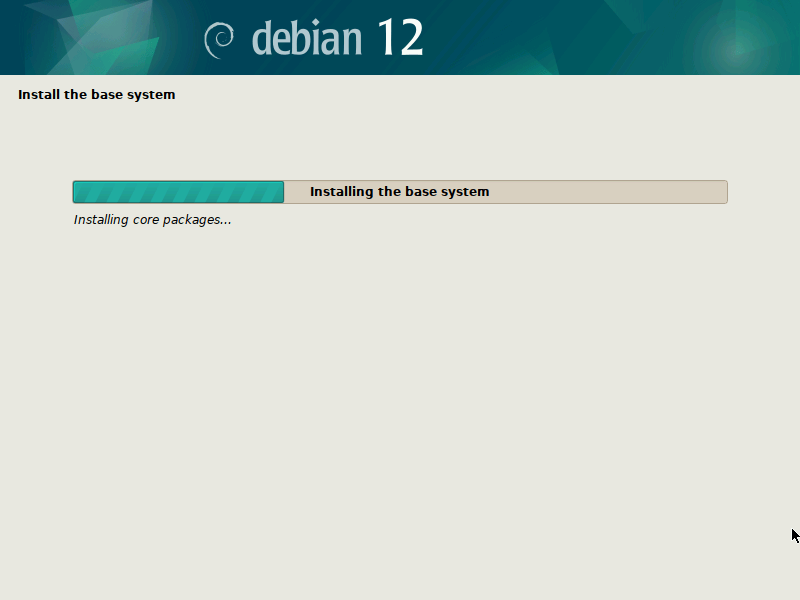
After you confirmed your partitioning changes, the base system gets installed. I suggest not to select any additional components, like desktop environments, to speed up the process.
During the final step of the installation (finish-install.d/55netcfg-copy-config) d-i will detect that Netplan was installed in the target system (due to the preseed file provided) and opt to write its network configuration to /etc/netplan/ instead of /etc/network/interfaces or /etc/NetworkManager/system-connections/.
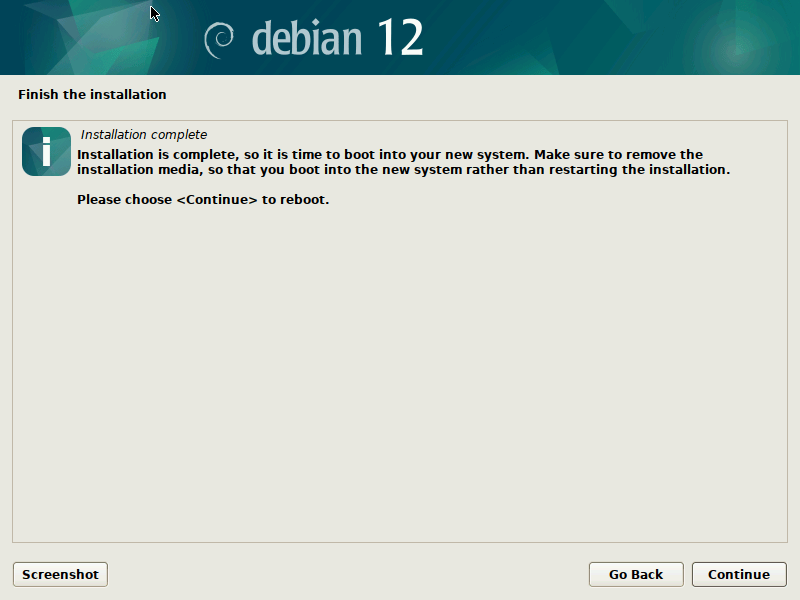
Done! After the installation finished you can reboot into your virgin Debian Bookworm system.
To do that, quit the current Qemu process, by pressing Ctrl+C and make sure to copy over the EFIVARS.fd file that was written by grub during the installation, so Qemu can find the new system. Then reboot into the new system, not using the mini.iso image any more:
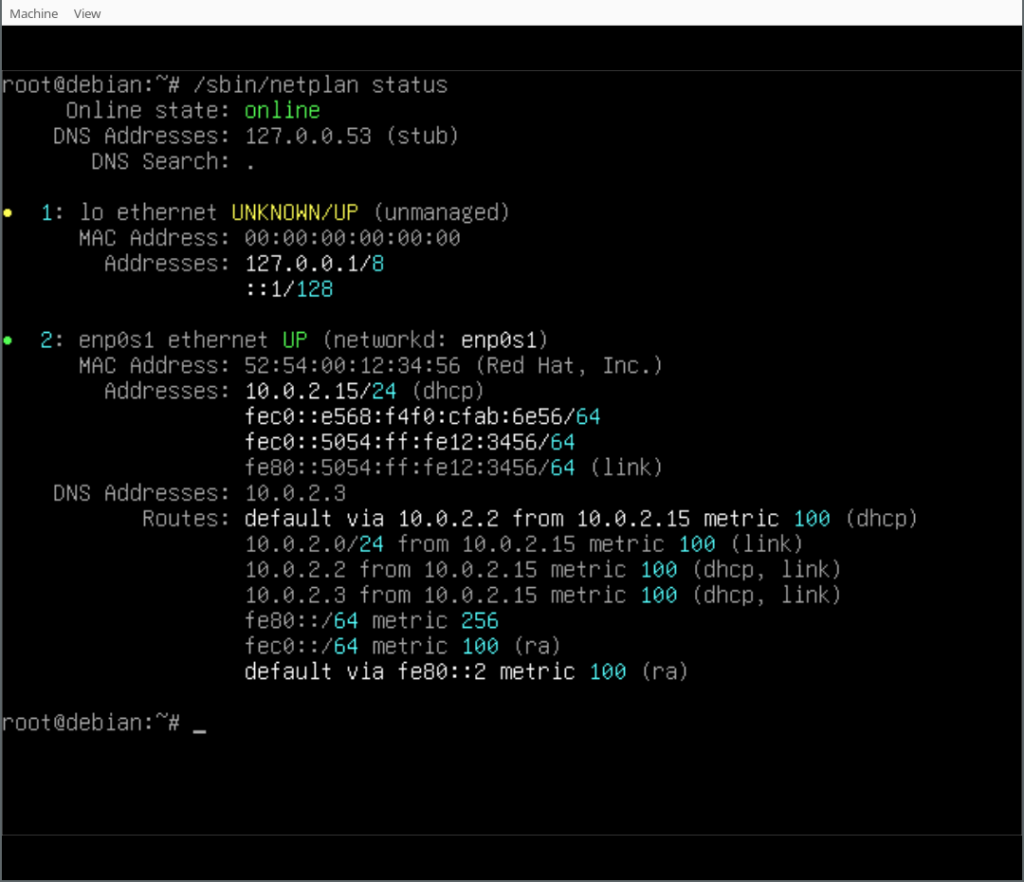
Finally, you can play around with your Netplan enabled Debian system! As you will find, /etc/network/interfaces exists but is empty, it could still be used (optionally/additionally). Netplan was configured in /etc/netplan/ according to the settings given during the d-i installation process.
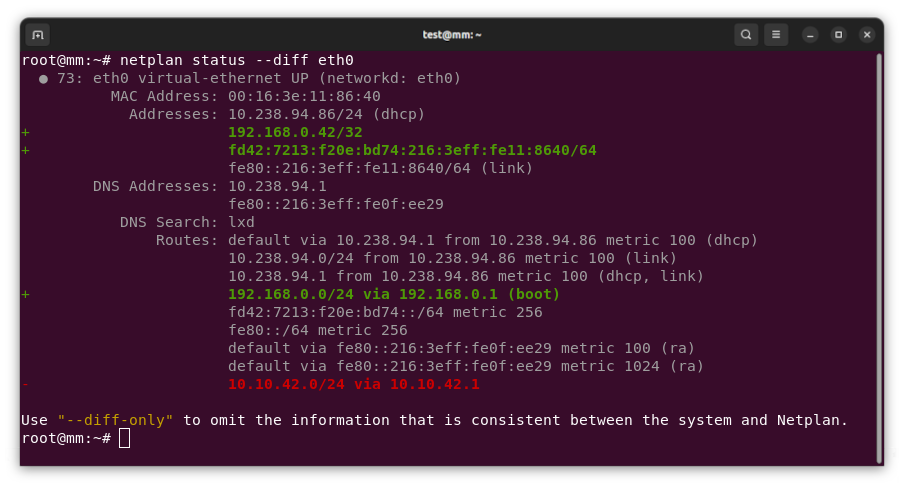
In our case we also installed the Netplan CLI, so we can play around with some of its features, like netplan status:
Thank you for following along the Netplan enabled Debian installation process and happy hacking! If you want to learn more join the discussion at Salsa:installer-team/netcfg and find us at GitHub:netplan.
New netplan status diff subcommand, finding differences between configuration and system state
As the maintainer and lead developer for Netplan, I m proud to announce the general availability of Netplan v1.0 after more than 7 years of development efforts. Over the years, we ve so far had about 80 individual contributors from around the globe. This includes many contributions from our Netplan core-team at Canonical, but also from other big corporations such as Microsoft or Deutsche Telekom. Those contributions, along with the many we receive from our community of individual contributors, solidify Netplan as a healthy and trusted open source project. In an effort to make Netplan even more dependable, we started shipping upstream patch releases, such as 0.106.1 and 0.107.1, which make it easier to integrate fixes into our users custom workflows.
With the release of version 1.0 we primarily focused on stability. However, being a major version upgrade, it allowed us to drop some long-standing legacy code from the libnetplan1 library. Removing this technical debt increases the maintainability of Netplan s codebase going forward. The upcoming Ubuntu 24.04 LTS and Debian 13 releases will ship Netplan v1.0 to millions of users worldwide.
Highlights of version 1.0
In addition to stability and maintainability improvements, it s worth looking at some of the new features that were included in the latest release:
Simultaneous WPA2 & WPA3 support.
Introduction of a stable libnetplan1 API.
Mellanox VF-LAG support for high performance SR-IOV networking.
New hairpin and port-mac-learning settings, useful for VXLAN tunnels with FRRouting.
New netplan status diff subcommand, finding differences between configuration and system state.
Besides those highlights of the v1.0 release, I d also like to shed some light on new functionality that was integrated within the past two years for those upgrading from the previous Ubuntu 22.04 LTS which used Netplan v0.104:
We added support for the management of new network interface types, such as veth, dummy, VXLAN, VRF or InfiniBand (IPoIB).
Wireless functionality was improved by integrating Netplan with NetworkManager on desktop systems, adding support for WPA3 and adding the notion of a regulatory-domain, to choose proper frequencies for specific regions.
To improve maintainability, we moved to Meson as Netplan s buildsystem, added upstream CI coverage for multiple Linux distributions and integrations (such as Debian testing, NetworkManager, snapd or cloud-init), checks for ABI compatibility, and automatic memory leak detection.
We increased consistency between the supported backend renderers (systemd-networkd and NetworkManager), by matching physical network interfaces on permanent MAC address, when the match.macaddress setting is being used, and added new hardware offloading functionality for high performance networking, such as Single-Root IO Virtualisation virtual function link-aggregation (SR-IOV VF-LAG).
The much improved Netplan documentation, that is now hosted on Read the Docs , and new command line subcommands, such as netplan status, make Netplan a well vested tool for declarative network management and troubleshooting.
Integrations
Those changes pave the way to integrate Netplan in 3rd party projects, such as system installers or cloud deployment methods. By shipping the new python3-netplan Python bindings to libnetplan, it is now easier than ever to access Netplan functionality and network validation from other projects. We are proud that the Debian Cloud Team chose Netplan to be the default network management tool in their official cloud-images for Debian Bookworm and beyond. Ubuntu s NetworkManager package now uses Netplan as it s default backend on Ubuntu 23.10 Desktop systems and beyond. Further integrations happened with cloud-init and the Calamares installer.
Please check out the Netplan version 1.0 release on GitHub! If you want to learn more, follow our activities on Netplan.io, GitHub, Launchpad, IRC or our Netplan Developer Diaries blog on discourse.
Today at $WORK I needed to add the private company Certificate Authority (CA) to Firefox, and I found the steps were unnecessarily complex.
Time to blog about that, and I also made a Debian wiki article of that post, so that future generations can update the information, when Firefox 742 is released on Debian 17.
The cacert certificate authority is not included in Debian and Firefox, and is thus a good example of adding a private CA.
Note that this does not mean I specifically endorse that CA.
Test that SSL connections to a site signed by the private CA is failing
$ gnutls-cli wiki.cacert.org:443
...
- Status: The certificate is NOT trusted. The certificate issuer is unknown.
*** PKI verification of server certificate failed...
*** Fatal error: Error in the certificate.
Download the private CA
$ wget http://www.cacert.org/certs/root_X0F.crt
test that a connection works with the private CA
$ gnutls-cli --x509cafile root_X0F.crt wiki.cacert.org:443
...
- Status: The certificate is trusted.
- Description: (TLS1.2-X.509)-(ECDHE-SECP256R1)-(RSA-SHA256)-(AES-256-GCM)
- Session ID: 37:56:7A:89:EA:5F:13:E8:67:E4:07:94:4B:52:23:63:1E:54:31:69:5D:70:17:3C:D0:A4:80:B0:3A:E5:22:B3
- Options: safe renegotiation,
- Handshake was completed
...
add the private CA to the Debian trust store located in /etc/ssl/certs/ca-certificates.crt
verify that we can connect without passing the private CA on the command line
$ gnutls-cli wiki.cacert.org:443
...
 - Status: The certificate is trusted.
At that point most applications are able to connect to systems with a certificate signed by the private CA (curl, Gnome builtin Browser ). However Firefox is using its own
trust store and will still display a security error if connecting to https://wiki.cacert.org. To make Firefox trust the Debian trust store, we need to add a so called security device, in fact an extra library wrapping the Debian trust store. The library will wrap the Debian trust store in the PKCS#11 industry format that Firefox supports.
install the pkcs#11 wrapping library and command line tools
$ sudo apt install p11-kit p11-kit-modules
verify that the private CA is accessible via PKCS#11
$ trust list   grep --context 2 'CA Cert'
pkcs11:id=%16%B5%32%1B%D4%C7%F3%E0%E6%8E%F3%BD%D2%B0%3A%EE%B2%39%18%D1;type=cert
    type: certificate
    label: CA Cert Signing Authority
    trust: anchor
    category: authority
now we need to add a new security device in Firefox pointing to the pkcs11 trust store. The pkcs11 trust store is located in /usr/lib/x86_64-linux-gnu/pkcs11/p11-kit-trust.so
in Firefox (tested in version 115 esr), go to Settings -> Privacy & Security -> Security -> Security Devices.
Then click Load , in the popup window use My local trust as a module name, and /usr/lib/x86_64-linux-gnu/pkcs11/p11-kit-trust.so as a module filename.
After adding the module, you should see it in the list of Security Devices, having /etc/ssl/certs/ca-certificates.crt as a description.
now restart Firefox and you should be able to browse https://wiki.cacert.org without security errors
Earlier today, I have just released debputy version 0.1.21
to Debian unstable. In the blog post, I will highlight some
of the new features.
Package boilerplate reduction with automatic relationship substvar
Last month, I started a discussion on rethinking how we do
relationship substvars such as the $ misc:Depends . These
generally ends up being boilerplate runes in the form of
Depends: $ misc:Depends , $ shlibs:Depends where you
as the packager has to remember exactly which runes apply
to your package.
My proposed solution was to automatically apply these substvars
and this feature has now been implemented in debputy. It is
also combined with the feature where essential packages should
use Pre-Depends by default for dpkg-shlibdeps related
dependencies.
I am quite excited about this feature, because I noticed with
libcleri that we are now down to 3-5 fields for defining
a simple library package. Especially since most C library
packages are trivial enough that debputy can auto-derive
them to be Multi-Arch: same.
As an example, the libcleric1 package is down to 3
fields (Package, Architecture, Description)
with Section and Priority being inherited from the
Source stanza. I have submitted a MR to show case the
boilerplate reduction at
https://salsa.debian.org/siridb-team/libcleri/-/merge_requests/3.
The removal of libcleric1 (= $ binary:Version ) in that MR
relies on another existing feature where debputy can auto-derive
a dependency between an arch:any-dev package and the library
package based on the .so symlink for the shared library.
The arch:any restriction comes from the fact that arch:all and
arch:any packages are not built together, so debputy cannot
reliably see across the package boundaries during the build (and
therefore refuses to do so at all).
Packages that have already migrated to debputy can use
debputy migrate-from-dh to detect any unnecessary
relationship substitution variables in case you want to clean
up. The removal of Multi-Arch: same and intra-source
dependencies must be done manually and so only be done so
when you have validated that it is safe and sane to do. I was
willing to do it for the show-case MR, but I am less confident
that would bother with these for existing packages in general.
Note: I summarized the discussion of the automatic relationship
substvar feature earlier this month in
https://lists.debian.org/debian-devel/2024/03/msg00030.html
for those who want more details.
PS: The automatic relationship substvars feature will also
appear in debhelper as a part of compat 14.
Language Server (LSP) and Linting
I have long been frustrated by our poor editor support for Debian packaging files.
To this end, I started working on a Language Server (LSP) feature in debputy
that would cover some of our standard Debian packaging files. This release
includes the first version of said language server, which covers the following
files:
debian/control
debian/copyright (the machine readable variant)
debian/changelog (mostly just spelling)
debian/rules
debian/debputy.manifest (syntax checks only; use debputy check-manifest
for the full validation for now)
Most of the effort has been spent on the Deb822 based files such as debian/control,
which comes with diagnostics, quickfixes, spellchecking (but only for relevant fields!),
and completion suggestions.
Since not everyone has a LSP capable editor and because sometimes you just want
diagnostics without having to open each file in an editor, there is also a batch
version for the diagnostics via debputy lint. Please see debputy(1) for
how debputy lint compares with lintian if you are curious about which
tool to use at what time.
To help you getting started, there is a now debputy lsp editor-config command that
can provide you with the relevant editor config glue. At the moment, emacs (via
eglot) and vim with vim-youcompleteme are supported.
For those that followed the previous blog posts on writing the language server, I would
like to point out that the command line for running the language server has changed
to debputy lsp server and you no longer have to tell which format it is. I have
decided to make the language server a "polyglot" server for now, which I will
hopefully not regret... Time will tell. :)
Anyhow, to get started, you will want:
Specifically for emacs, I also learned two things after the upload. First, you
can auto-activate eglot via eglot-ensure. This badly feature interacts with
imenu on debian/changelog for reasons I do not understand (causing a several
second start up delay until something times out), but it works fine for the other
formats. Oddly enough, opening a changelog file and then activating eglot does
not trigger this issue at all. In the next version, editor config for emacs will
auto-activate eglot on all files except debian/changelog.
The second thing is that if you install elpa-markdown-mode, emacs will accept
and process markdown in the hover documentation provided by the language server.
Accordingly, the editor config for emacs will also mention this package from
the next version on.
Finally, on a related note, Jelmer and I have been looking at moving some of this
logic into a new package called debpkg-metadata. The point being to support
easier reuse of linting and LSP related metadata - like pulling a list of known
fields for debian/control or sharing logic between lintian-brush and
debputy.
Minimal integration mode for Rules-Requires-Root
One of the original motivators for starting debputy was to be able to get rid of
fakeroot in our build process. While this is possible, debputy currently does
not support most of the complex packaging features such as maintscripts and debconf.
Unfortunately, the kind of packages that need fakeroot for static ownership tend
to also require very complex packaging features.
To bridge this gap, the new version of debputy supports a very minimal integration
with dh via the dh-sequence-zz-debputy-rrr. This integration mode keeps
the vast majority of debhelper sequence in place meaning most dh add-ons
will continue to work with dh-sequence-zz-debputy-rrr. The sequence only
replaces the following commands:
dh_fixperms
dh_gencontrol
dh_md5sums
dh_builddeb
The installations feature of the manifest will be disabled in this integration
mode to avoid feature interactions with debhelper tools that expect
debian/<pkg> to contain the materialized package.
On a related note, the debputy migrate-from-dh command now supports a
--migration-target option, so you can choose the desired level of integration
without doing code changes. The command will attempt to auto-detect the desired
integration from existing package features such as a build-dependency on a relevant
dh sequence, so you do not have to remember this new option every time once
the migration has started. :)
I ve been using Pyblosxom here for nearly 17 years, but have become
increasingly dissatisfied with having to write HTML instead of
Markdown.
Today I looked at upgrading my web server and discovered that
Pyblosxom was removed from Debian after Debian 10, presumably because
it wasn t updated for Python 3.
I keep hearing about Jekyll as a static site generator for blogs, so I
finally investigated how to use that and how to convert my existing
entries. Fortunately it supports both HTML and Markdown (and probably
other) input formats, so this was mostly a matter of converting
metadata.
I have my own crappy script for drafting, publishing, and listing
blog entries, which also needed a bit of work to update, but that is
now done.
If all has gone to plan, you should be seeing just one new entry in
the feed but all permalinks to older entries still working.
I have spent some more time on improving my language server for debian/control. Today,
I managed to provide the following features:
The X- style prefixes for field names are now understood and handled. This means
the language server now considers XC-Package-Type the same as Package-Type.
More diagnostics:
Fields without values now trigger an error marker
Duplicated fields now trigger an error marker
Fields used in the wrong paragraph now trigger an error marker
Typos in field names or values now trigger a warning marker. For field names,
X- style prefixes are stripped before typo detection is done.
The value of the Section field is now validated against a dataset of known sections
and trigger a warning marker if not known.
The "on-save trim end of line whitespace" now works. I had a logic bug in the server
side code that made it submit "no change" edits to the editor.
The language server now provides "hover" documentation for field names. There is a small
screenshot of this below. Sadly, emacs does not support markdown or, if it does, it
does not announce the support for markdown. For now, all the documentation is always in
markdown format and the language server will tag it as either markdown or plaintext
depending on the announced support.
The language server now provides quick fixes for some of the more trivial problems such
as deprecated fields or typos of fields and values.
Added more known fields including the XS-Autobuild field for non-free packages
along with a link to the relevant devref section in its hover doc.
This covers basically all my known omissions from last update except spellchecking of the
Description field.
Spellchecking
Personally, I feel spellchecking would be a very welcome addition to the current feature set.
However, reviewing my options, it seems that most of the spellchecking python libraries out
there are not packaged for Debian, or at least not other the name I assumed they would be.
The alternative is to pipe the spellchecking to another program like aspell list. I did not
test this fully, but aspell list does seem to do some input buffering that I cannot easily
default (at least not in the shell). Though, either way, the logic for this will not be trivial
and aspell list does not seem to include the corrections either. So best case, you would get
typo markers but no suggestions for what you should have typed. Not ideal.
Additionally, I am also concerned with the performance for this feature. For d/control, it
will be a trivial matter in practice. However, I would be reusing this for d/changelog which
is 99% free text with plenty of room for typos. For a regular linter, some slowness is
acceptable as it is basically a batch tool. However, for a language server, this potentially
translates into latency for your edits and that gets annoying.
While it is definitely on my long term todo list, I am a bit afraid that it can easily become
a time sink. Admittedly, this does annoy me, because I wanted to cross off at least one of
Otto's requested features soon.
On wrap-and-sort support
The other obvious request from Otto would be to automate wrap-and-sort formatting. Here,
the problem is that "we" in Debian do not agree on the one true formatting of
debian/control. In fact, I am fairly certain we do not even agree on whether we should
all use wrap-and-sort. This implies we need a style configuration.
However, if we have a style configuration per person, then you get style "ping-pong" for
packages where the co-maintainers do not all have the same style configuration. Additionally,
it is very likely that you are a member of multiple packaging teams or groups that all have
their own unique style. Ergo, only having a personal config file is doomed to fail.
The only "sane" option here that I can think of is to have or support "per package" style
configuration. Something that would be committed to git, so the tooling would automatically
pick up the configuration. Obviously, that is not fun for large packaging teams where you
have to maintain one file per package if you want a consistent style across all packages.
But it beats "style ping-pong" any day of the week.
Note that I am perfectly open to having a personal configuration file as a fallback for when
the "per package" configuration file is absent.
The second problem is the question of which format to use and what to name this file.
Since file formats and naming has never been controversial at all, this will obviously be
the easy part of this problem. But the file should be parsable by both wrap-and-sort
and the language server, so you get the same result regardless of which tool you use. If
we do not ensure this, then we still have the style ping-pong problem as people use
different tools.
This also seems like time sink with no end. So, what next then...?
What next?
On the language server front, I will have a look at its support for providing semantic
hints to the editors that might be used for syntax highlighting. While I think most
common Debian editors have built syntax highlighting already, I would like this language
server to stand on its own. I would like us to be in a situation where we do not have
implement yet another editor extension for Debian packaging files. At least not for
editors that support the LSP spec.
On a different front, I have an idea for how we go about relationship related substvars.
It is not directly related to this language server, except I got triggered by the language
server "missing" a diagnostic for reminding people to add the magic
Depends: $ misc:Depends [, $ shlibs:Depends ] boilerplate. The magic boilerplate that
you have to write even though we really should just fix this at a tooling level instead.
Energy permitting, I will formulate a proposal for that and send it to debian-devel.
Beyond that, I think I might start adding support for another file. I also need to wrap
up my python-debian branch, so I can get the position support into the Debian
soon, which would remove one papercut for using this language server.
Finally, it might be interesting to see if I can extract a "batch-linter" version of
the diagnostics and related quickfix features. If nothing else, the "linter" variant
would enable many of you to get a "mini-Lintian" without having to do a package
build first.
My web pages are (still) in ikiwiki, but lately I have started
authoring things like assignments and lectures in org-mode so that I
can have some literate programming facilities. There is is org-mode
export built-in, but it just exports source blocks as examples
(i.e. unhighlighted verbatim). I added a custom exporter to mark up
source blocks in a way ikiwiki can understand. Luckily this is not too
hard the second time.
(with-eval-after-load"ox-md"(org-export-define-derived-backend'ik 'md
:translate-alist '((src-block . ik-src-block)):menu-entry '(?m 1((?i "ikiwiki" ik-export-to-ikiwiki)))))(defunik-normalize-language(str)(cond((string-equal str "plait")"racket")((string-equal str "smol")"racket")(t str)))(defunik-src-block(src-block contents info)"Transcode a SRC-BLOCK element from Org to beamer CONTENTS is nil. INFO is a plist used as a communication channel."(let* ((body(org-element-property:value src-block))(lang(ik-normalize-language(org-element-property:language src-block))))(format"[[!format <span class="error">Error: unsupported page format %s</span>]]" lang body)))(defunik-export-to-ikiwiki(&optional async subtreep visible-only body-only ext-plist)"Export current buffer as an ikiwiki markdown file. See org-md-export-to-markdown for full docs"(require'ox)(interactive)(let((file(org-export-output-file-name".mdwn" subtreep)))(org-export-to-file'ik file
async subtreep visible-only body-only ext-plist)))
Delighted to announce a new package that arrived on CRAN today: tinythemes. It
repackages the theme_ipsum_rc() function by Bob Rudis from his hrbrthemes
package in a zero (added) dependency way. A simple example is (also
available as a demo inside the packages in the next update) contrasts
the default style (on left) with the one added by this package (on the
right):
The GitHub
repo also shows this little example: total dependencies of hrbrthemes
over what ggplot2
installs:
Ubuntu 23.10 Mantic Minotaur Desktop, showing network settings
We released Ubuntu 23.10 Mantic Minotaur on 12 October 2023, shipping its proven and trusted network stack based on Netplan. Netplan is the default tool to configure Linux networking on Ubuntu since 2016. In the past, it was primarily used to control the Server and Cloud variants of Ubuntu, while on Desktop systems it would hand over control to NetworkManager. In Ubuntu 23.10 this disparity in how to control the network stack on different Ubuntu platforms was closed by integrating NetworkManager with the underlying Netplan stack.
Netplan could already be used to describe network connections on Desktop systems managed by NetworkManager. But network connections created or modified through NetworkManager would not be known to Netplan, so it was a one-way street. Activating the bidirectional NetworkManager-Netplan integration allows for any configuration change made through NetworkManager to be propagated back into Netplan. Changes made in Netplan itself will still be visible in NetworkManager, as before. This way, Netplan can be considered the single source of truth for network configuration across all variants of Ubuntu, with the network configuration stored in /etc/netplan/, using Netplan s common and declarative YAML format.
Netplan Desktop integration
On workstations, the most common scenario is for users to configure networking through NetworkManager s graphical interface, instead of driving it through Netplan s declarative YAML files. Netplan ships a libnetplan library that provides an API to access Netplan s parser and validation internals, which is now used by NetworkManager to store any network interface configuration changes in Netplan. For instance, network configuration defined through NetworkManager s graphical UI or D-Bus API will be exported to Netplan s native YAML format in the common location at /etc/netplan/. This way, the only thing administrators need to care about when managing a fleet of Desktop installations is Netplan. Furthermore, programmatic access to all network configuration is now easily accessible to other system components integrating with Netplan, such as snapd. This solution has already been used in more confined environments, such as Ubuntu Core and is now enabled by default on Ubuntu 23.10 Desktop.
Migration of existing connection profiles
On installation of the NetworkManager package (network-manager >= 1.44.2-1ubuntu1) in Ubuntu 23.10, all your existing connection profiles from /etc/NetworkManager/system-connections/ will automatically and transparently be migrated to Netplan s declarative YAML format and stored in its common configuration directory /etc/netplan/.
The same migration will happen in the background whenever you add or modify any connection profile through the NetworkManager user interface, integrated with GNOME Shell. From this point on, Netplan will be aware of your entire network configuration and you can query it using its CLI tools, such as sudo netplan get or sudo netplan status without interrupting traditional NetworkManager workflows (UI, nmcli, nmtui, D-Bus APIs). You can observe this migration on the apt-get command line, watching out for logs like the following:
Setting up network-manager (1.44.2-1ubuntu1.1) ...
Migrating HomeNet (9d087126-ae71-4992-9e0a-18c5ea92a4ed) to /etc/netplan
Migrating eduroam (37d643bb-d81d-4186-9402-7b47632c59b1) to /etc/netplan
Migrating DebConf (f862be9c-fb06-4c0f-862f-c8e210ca4941) to /etc/netplan
In order to prepare for a smooth transition, NetworkManager tests were integrated into Netplan s continuous integration pipeline at the upstream GitHub repository. Furthermore, we implemented a passthrough method of handling unknown or new settings that cannot yet be fully covered by Netplan, making Netplan future-proof for any upcoming NetworkManager release.
The future of Netplan
Netplan has established itself as the proven network stack across all variants of Ubuntu Desktop, Server, Cloud, or Embedded. It has been the default stack across many Ubuntu LTS releases, serving millions of users over the years. With the bidirectional integration between NetworkManager and Netplan the final piece of the puzzle is implemented to consider Netplan the single source of truth for network configuration on Ubuntu. With Debian choosing Netplan to be the default network stack for their cloud images, it is also gaining traction outside the Ubuntu ecosystem and growing into the wider open source community.
Within the development cycle for Ubuntu 24.04 LTS, we will polish the Netplan codebase to be ready for a 1.0 release, coming with certain guarantees on API and ABI stability, so that other distributions and 3rd party integrations can rely on Netplan s interfaces. First steps into that direction have already been taken, as the Netplan team reached out to the Debian community at DebConf 2023 in Kochi/India to evaluate possible synergies.
Conclusion
Netplan can be used transparently to control a workstation s network configuration and plays hand-in-hand with many desktop environments through its tight integration with NetworkManager. It allows for easy network monitoring, using common graphical interfaces and provides a single source of truth to network administrators, allowing for configuration of Ubuntu Desktop fleets in a streamlined and declarative way. You can try this new functionality hands-on by following the Access Desktop NetworkManager settings through Netplan tutorial.
If you want to learn more, feel free to follow our activities on Netplan.io, GitHub, Launchpad, IRC or our Netplan Developer Diaries blog on discourse.
Meeting Debian people for having a good time together, for some good hacking,
for learning, for teaching Is always fun and welcome. It brings energy, life
and joy. And this year, due to the six-months-long relocation my family and me
decided to have to Argentina, I was unable to attend the real deal, DebConf23 at
India.
And while I know DebConf is an experience like no other, this year I took part
in two miniDebConfs. One I have already shared in this same blog: I was in
MiniDebConf Tamil Nadu in
India, followed by
some days of pre-DebConf preparation and scouting in Kochi proper, where I got
to interact with the absolutely great and loving team that prepared DebConf.
The other one is still ongoing (but close to finishing). Some months ago, I
talked with Santiago Ruano, jokin as we were Spanish-speaking DDs announcing to
the debian-private mailing list we d be relocating to around R o de la
Plata. And things worked out normally: He has been for several months in
Uruguay already, so he decided to rent a house for some days, and invite Debian
people to do what we do best.
I left Paran Tuesday night (and missed my online class at UNAM! Well, you
cannot have everything, right?). I arrived early on Wednesday, and around noon
came to the house of the keysigning (well, the place is properly called Casa
Key , it s a publicity agency that is also rented as a guesthouse in a very nice
area of Montevideo, close to Nuevo Pocitos beach).
In case you don t know it, Montevideo is on the Northern (or Eastern) shore of
R o de la Plata, the widest river in the world (up to 300Km wide, with current
and non-salty water). But most important for some Debian contributors: You can
even come here by boat!
That first evening, we received Ilu, who was in Uruguay by chance for other
issues (and we were very happy about it!) and a young and enthusiastic
Uruguayan, Felipe, interested in getting involved in Debian. We spent the
evening talking about life, the universe and everything Which was a bit
tiring, as I had to interface between Spanish and English, talking with two
friends that didn t share a common language
On Thursday morning, I went out for an early walk at the beach. And lets say, if
only just for the narrative, that I found a lost penguin emerging from R o de la
Plata!
For those that don t know (who d be most of you, as he has not been seen at
Debian events for 15 years), that s Lisandro Dami n Nicanor P rez Meyer (or just
lisandro), long-time maintainer of the Qt ecosystem, and one of our embedded
world extraordinaires. So, after we got him dry and fed him fresh river fishes,
he gave us a great impromptu talk about understanding and finding our way around
the Device Tree Source files for development boards and similar machines, mostly
in the ARM world.
From Argentina, we also had Emanuel (eamanu) crossing all the way from La
Rioja.
I spent most of our first workday getting my laptop in shape to be useful as
the driver for my online class on Thursday (which is no small feat people that
know the particularities of my much loved ARM-based laptop will understand), and
running a set of tests again on my Raspberry Pi labortory, which I had not
updated in several months.
I am happy to say we are also finally also building Raspberry images for Trixie
(Debian 13, Testing)! Sadly, I managed
to burn my USB-to-serial-console (UART) adaptor, and could neither test those,
nor the oldstable ones we are still building (and will probably soon be dropped,
if not for anything else, to save disk space).
We enjoyed a lot of socialization time. An important highlight of the conference
for me was that we reconnected with a long-lost DD, Eduardo Tr pani, and got him
interested in getting involved in the project again! This second day, another
local Uruguayan, Mauricio, joined us together with his girlfriend,
Alicia, and Felipe came again to hang out with us. Sadly, we didn t get
photographic evidence of them (nor the permission to post it).
The nice house Santiago got for us was very well equipped for a
miniDebConf. There were a couple of rounds of pool played by those that enjoyed
it (I was very happy just to stand around, take some photos and enjoy the
atmosphere and the conversation).
Today (Saturday) is the last full-house day of miniDebConf; tomorrow we will be
leaving the house by noon. It was also a very productive day! We had a long,
important conversation about an important discussion that we are about to
present on debian-vote@lists.debian.org.
It has been a great couple of days! Sadly, it s coming to an end But this at
least gives me the opportunity (and moral obligation!) to write a long blog
post. And to thank Santiago for organizing this, and Debian, for sponsoring our
trip, stay, foods and healthy enjoyment!
All the books I have published so far has been using
DocBook somewhere in the process.
For the first book, the source format was DocBook, while for every
later book it was an intermediate format used as the stepping stone to
be able to present the same manuscript in several formats, on paper,
as ebook in ePub format, as a HTML page and as a PDF file either for
paper production or for Internet consumption. This is made possible
with a wide variety of free software tools with DocBook support in
Debian. The source format of later books have been docx via rst,
Markdown, Filemaker and Asciidoc, and for all of these I was able to
generate a suitable DocBook file for further processing using
pandoc,
a2x and
asciidoctor,
as well as rendering using
xmlto,
dbtoepub,
dblatex,
docbook-xsl and
fop.
Most of the books I
have published are translated books, with English as the source
language. The use of
po4a to
handle translations using the gettext PO format has been a blessing,
but publishing translated books had triggered the need to ensure the
DocBook tools handle relevant languages correctly. For every new
language I have published, I had to submit patches dblatex, dbtoepub
and docbook-xsl fixing incorrect language and country specific issues
in the framework themselves. Typically this has been missing keywords
like 'figure' or sort ordering of index entries. After a while it
became tiresome to only discover issues like this by accident, and I
decided to write a DocBook "test framework" exercising various
features of DocBook and allowing me to see all features exercised for
a given language. It consist of a set of DocBook files, a version 4
book, a version 5 book, a v4 book set, a v4 selection of problematic
tables, one v4 testing sidefloat and finally one v4 testing a book of
articles. The DocBook files are accompanied with a set of build rules
for building PDF using dblatex and docbook-xsl/fop, HTML using xmlto
or docbook-xsl and epub using dbtoepub. The result is a set of files
visualizing footnotes, indexes, table of content list, figures,
formulas and other DocBook features, allowing for a quick review on
the completeness of the given locale settings. To build with a
different language setting, all one need to do is edit the lang= value
in the .xml file to pick a different ISO 639 code value and run
'make'.
The test framework
source code is available from Codeberg, and a generated set of
presentations of the various examples is available as Codeberg static
web pages at
https://pere.codeberg.page/docbook-example/.
Using this test framework I have been able to discover and report
several bugs and missing features in various tools, and got a lot of
them fixed. For example I got Northern Sami keywords added to both
docbook-xsl and dblatex, fixed several typos in Norwegian bokm l and
Norwegian Nynorsk, support for non-ascii title IDs added to pandoc,
Norwegian index sorting support fixed in xindy and initial Norwegian
Bokm l support added to dblatex. Some issues still remains, though.
Default index sorting rules are still broken in several tools, so the
Norwegian letters , and are more often than not sorted properly
in the book index.
The test framework recently received some more polish, as part of
publishing my latest book. This book contained a lot of fairly
complex tables, which exposed bugs in some of the tools. This made me
add a new test file with various tables, as well as spend some time to
brush up the build rules. My goal is for the test framework to
exercise all DocBook features to make it easier to see which features
work with different processors, and hopefully get them all to support
the full set of DocBook features. Feel free to send patches to extend
the test set, and test it with your favorite DocBook processor.
Please visit these two URLs to learn more:
Over the last few months, I upgraded my Debian machines from
bullseye to
bookworm. The process was
uneventful, but I ended up reconfiguring several things afterwards in
order to modernize my upgraded machines.
Logcheck
I noticed in this release that the transition to
journald is essentially
complete. This means that rsyslog is no longer needed on most of my systems:
apt purge rsyslog
Once that was done, I was able to comment out the following lines in
/etc/logcheck/logcheck.logfiles.d/syslog.logfiles:
#/var/log/syslog
#/var/log/auth.log
I did have to adjust some of my custom logcheck rules, particularly the ones that
deal with kernel messages:
Then I moved local entries from /etc/logcheck/logcheck.logfiles to /etc/logcheck/logcheck.logfiles.d/local.logfiles
(/var/log/syslog and /var/log/auth.log are enabled by default when
needed) and removed some files that are no longer used:
Finally, I had to fix any unescaped characters in my local rules. For example
error == NULL \*error == NULL must now be written as error == NULL \ \ \*error == NULL.
Networking
After the upgrade, I got a notice that the isc-dhcp-client is now
deprecated and so I removed if from my system:
apt purge isc-dhcp-client
This however meant that I need to ensure that my network configuration
software does not depend on the now-deprecated DHCP client.
On my laptop, I was already using
NetworkManager for my main
network interfaces and that has built-in DHCP support.
Migration to systemd-networkd
On my backup server, I took this opportunity to switch from ifupdown to
systemd-networkd by
removing ifupdown:
apt purge ifupdown
rm /etc/network/interfaces
putting the following in /etc/systemd/network/20-wired.network:
Migration to predictacle network interface names
On my Linode server, I did the same as on the backup server, but I put the
following in /etc/systemd/network/20-wired.network since it has a static
IPv6 allocation:
and rebooted the virtual machine.
Giving systemd-resolved control of /etc/resolv.conf
After reading this history of DNS resolution on
Linux, I decided to
modernize my resolv.conf setup and let systemd-resolved handle
/etc/resolv.conf.
I installed the package:
I verified that mDNS is enabled and LLMNR is disabled:
$ resolvectl mdns
Global: yes
Link 2 (enp0s25): yes
Link 3 (wlp3s0): yes
$ resolvectl llmnr
Global: no
Link 2 (enp0s25): no
Link 3 (wlp3s0): no
Note that if you want auto-discovery of local printers using CUPS, you need
to keep avahi-daemon since cups-browsed doesn't support
systemd-resolved. You can
verify that it works using:
chkrootkit
I moved my customizations in /etc/chkrootkit.conf to
/etc/chkrootkit/chkrootkit.conf after seeing this message in my logs:
WARNING: /etc/chkrootkit.conf is deprecated. Please put your
settings in /etc/chkrootkit/chkrootkit.conf instead: /etc/chkrootkit.conf
will be ignored in a future release and should be deleted.
ssh
As mentioned in Debian bug#1018106,
to silence the following warnings:
sshd[6283]: pam_env(sshd:session): deprecated reading of user environment enabled
I changed the following in /etc/pam.d/sshd:
--- a/pam.d/sshd
+++ b/pam.d/sshd
@@ -44,7 +44,7 @@ session    required     pam_limits.so
 session    required     pam_env.so # [1]
 # In Debian 4.0 (etch), locale-related environment variables were moved to
 # /etc/default/locale, so read that as well.
-session    required     pam_env.so user_readenv=1 envfile=/etc/default/locale
+session    required     pam_env.so envfile=/etc/default/locale
 # SELinux needs to intervene at login time to ensure that the process starts
 # in the proper default security context.  Only sessions which are intended
I also made the following changes to /etc/ssh/sshd_config.d/local.conf
based on the advice of ssh-audit 2.9.0:
I m happy to announce that Netplan version 0.107 is now available on GitHub and is soon to be deployed into a Linux installation near you! Six months and more than 200 commits after the previous version (including a .1 stable release), this release is brought to you by 8 free software contributors from around the globe.
Highlights
Highlights of this release include the new configuration types for veth and dummy interfaces:
Furthermore, we implemented CFFI based Python bindings on top of libnetplan s API, that can easily be consumed by 3rd party applications (see full cffi-bindings.py example):
from netplan import Parser, State, NetDefinition
from netplan import NetplanException, NetplanParserException

parser = Parser()
# Parse the full, existing YAML config hierarchy
parser.load_yaml_hierarchy(rootdir='/')
# Validate the final parser state
state = State()
try:
    # validation of current state + new settings
    state.import_parser_results(parser)
except NetplanParserException as e:
    print('Error in', e.filename, 'Row/Col', e.line, e.column, '->', e.message)
except NetplanException as e:
    print('Error:', e.message)
# Walk through ethernet NetdefIDs in the state and print their backend
# renderer, to demonstrate working with NetDefinitionIterator &
# NetDefinition
for netdef in state.ethernets.values():
    print('Netdef', netdef.id, 'is managed by:', netdef.backend)
    print('Is it configured to use DHCP?', netdef.dhcp4 or netdef.dhcp6)
and then adding a script for the
routable
state in /etc/networkd-dispatcher/routable.d/iptables:
#!/bin/sh
LOGFILE=/var/log/iptables.log
if [ "$IFACE" = lo ]; then
    echo "$0: ignoring $IFACE for \ $STATE'" >> $LOGFILE
    exit 0
fi
case "$STATE" in
    routable)
        echo "$0: restoring iptables rules for $IFACE" >> $LOGFILE
        /sbin/iptables-restore /etc/network/iptables.up.rules >> $LOGFILE 2>&1
        /sbin/ip6tables-restore /etc/network/ip6tables.up.rules >> $LOGFILE 2>&1
        ;;
    *)
        echo "$0: nothing to do with $IFACE for \ $STATE'" >> $LOGFILE
        ;;
esac
before finally making that script executable (otherwise it won't run):
With this in place, I can put my iptables rules in the usual place
(/etc/network/iptables.up.rules and /etc/network/ip6tables.up.rules) and
use the handy iptables-apply and ip6tables-apply commands to test
any changes to my firewall rules.
Looking at /var/log/iptables.log confirms that it is being called
correctly for each network interface as they are started.
Photo by Taylor Vick (Unsplash)
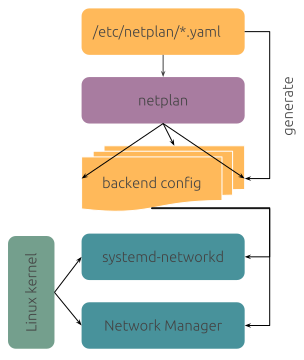
Linux networking can be confusing due to the wide range of technology stacks and tools in use, in addition to the complexity of the surrounding network environment. The configuration of bridges, bonds, VRFs or routes can be done programmatically, declaratively, manually or with automated with tools like ifupdown, ifupdown2, ifupdown-ng, iproute2, NetworkManager, systemd-networkd and others. Each of these tools use different formats and locations to store their configuration files. Netplan, a utility for easily configuring networking on a Linux system, is designed to unify and standardise how administrators interact with these underlying technologies. Starting from a YAML description of the required network interfaces and what each should be configured to do, Netplan will generate all the necessary configuration for your chosen tool.
In this article, we will provide an overview of how Ubuntu uses Netplan to manage Linux networking in a unified way. By creating a common interface across two disparate technology stacks, IT administrators benefit from a unified experience across both desktops and servers whilst retaining the unique advantages of the underlying tech.
But first, let s start with a bit of history and show where we are today.
The history of Netplan in Ubuntu
Starting with Ubuntu 16.10 and driven by the need to express network configuration in a common way across cloud metadata and other installer systems, we had the opportunity to switch to a network stack that integrates better with our dependency-based boot model. We chose systemd-networkd on server installations for its active upstream community and because it was already part of Systemd and therefore included in any Ubuntu base installation. It has a much better outlook for the future, using modern development techniques, good test coverage and CI integration, compared to the ifupdown tool we used previously. On desktop installations, we kept using NetworkManager due to its very good integration with the user interface.
Having to manage and configure two separate network stacks, depending on the Ubuntu variant in use, can be confusing, and we wanted to provide a streamlined user experience across any flavour of Ubuntu. Therefore, we introduced Netplan.io as a control layer above systemd-networkd and NetworkManager. Netplan takes declarative YAML files from /etc/netplan/ as an input and generates corresponding network configuration for the relevant network stack backend in /run/systemd/network/ or /run/NetworkManager/ depending on the system configuration. All while keeping full flexibility to control the underlying network stack in its native way if need be.
Who is using Netplan?
Recent versions of Netplan are available and ready to be installed on many distributions, such as Ubuntu, Fedora, RedHat Enterprise Linux, Debian and Arch Linux.
Ubuntu
As stated above, Netplan has been installed by default on Ubuntu systems since 2016 and is therefore being used by millions of users across multiple long-term support versions of Ubuntu (18.04, 20.04, 22.04) on a day-to-day basis. This covers Ubuntu server scenarios primarily, such as bridges, bonding, VLANs, VXLANs, VRFs, IP tunnels or WireGuard tunnels, using systemd-networkd as the backend renderer.
On Ubuntu desktop systems, Netplan can be used manually through its declarative YAML configuration files, and it will handle those to configure the NetworkManager stack. Keep reading to get a glimpse of how this will be improved through automation and integration with the desktop stack in the future.
Cloud
It might not be as obvious, but many people have been using Netplan without knowing about it when configuring a public cloud instance on AWS, Google Cloud or elsewhere through cloud-init. This is because cloud-init s Networking Config Version 2 is a passthrough configuration to Netplan, which will then set up the underlying network stack on the given cloud instance. This is why Netplan is also a key package on the Debian distribution, for example, as it s being used by default on Debian cloud images, too.
Our vision for Linux networking
We know that Linux networking can be a beast, and we want to keep simple things simple. But also allow for custom setups of any complexity. With Netplan, the day-to-day networking needs are covered through easily comprehensible and nicely documented YAML files, that describe the desired state of the local network interfaces, which will be rendered into corresponding configuration files for the relevant network stack and applied at (re-)boot or at runtime, using the netplan apply CLI. For example /etc/netplan/lan.yaml:
Having a single source of truth for network configuration is also important for administrators, so they do not need to understand multiple network stacks, but can rely on the declarative data given in /etc/netplan/ to configure a system, independent of the underlying network configuration backend. This is also very helpful to seed the initial network configuration for new Linux installations, for example through installation systems such as Subiquity, Ubuntu s desktop installer or cloud-init across the public and private clouds.
In addition to describing and applying network configuration, the netplan status CLI can be used to query relevant data from the underlying network stack(s), such as systemd-networkd, NetworkManager or iproute2, and present them in a unified way.
At the Netplan project we strive for very high test automation and coverage with plenty of unit tests, integration tests and linting steps, across multiple Linux distros, which gives high confidence in also supporting more advanced networking use cases, such as Open vSwitch or SR-IOV network virtualization, in addition to normal wired (static IP, DHCP, routing), wireless (e.g. wwan modems, WPA2/3 connections, WiFi hotspot, controlling the regulatory domain, ) and common server scenarios.
Should there ever be a scenario that is not covered by Netplan natively, it allows for full flexibility to control the underlying network stack directly through systemd override configurations or NetworkManager passthrough settings in addition to having manual configuration side-by-side with interfaces controlled through Netplan.
The future of Netplan desktop integration
On workstations, the most common scenario is for end users to configure NetworkManager through its user interface tools, instead of driving it through Netplan s declarative YAML files, which makes use of NetworkManager s native configuration files. To avoid Netplan just handing over control to NetworkManager on such systems, we re working on a bidirectional integration between NetworkManager and Netplan to further improve the single source of truth use case on Ubuntu desktop installations.
Netplan is shipping a libnetplan library that provides an API to access Netplan s parser and validation internals, that can be used by NetworkManager to write back a network interface configuration. For instance, configuration given through NetworkManager s UI tools or D-Bus API can be exported to Netplan s native YAML format in the common location at /etc/netplan/. This way, administrators just need to care about Netplan when managing a fleet of Desktop installations. This solution is currently being used in more confined environments, like Ubuntu Core, when using the NetworkManager snap, and we will deliver it to generic Ubuntu desktop systems in 24.04 LTS.
In addition to NetworkManager, libnetplan can also be used to integrate with other tools in the networking space, such as cloud-init for improved validation of user data or installation systems when seeding new Linux images.
Conclusion
Overall, Netplan can be considered to be a good citizen within a network environment that plays hand-in-hand with other networking tools and makes it easy to control modern network stacks, such as systemd-networkd or NetworkManager in a common, streamlined and declarative way. It provides a single source of truth to network administrators about the network state, while keeping simple things simple, but allowing for arbitrarily complex custom setups. If you want to learn more, feel free to follow our activities on Netplan.io, GitHub, Launchpad, IRC or our Netplan Developer Diaries blog on discourse.
Laptop + Workstation
My workstation was initially installed with Debian 8 back in the day, so I might have carried a lot of configuration cruft.
Indeed. I followed the recommended upgrades documentation (apt upgrade --without-new-pkgs followed by apt full-upgrade).
And when executing apt full-upgrade I had the following error:
Preparing to unpack .../71-python3-numpy_1%3a1.24.2-1_amd64.deb ...
Unpacking python3-numpy (1:1.24.2-1) over (1:1.19.5-1) ...
dpkg: error processing archive /tmp/apt-dpkg-install-ibI85v/71-python3-numpy_1%3a1.24.2-1_amd64.deb (--unpack):
 trying to overwrite '/usr/bin/f2py', which is also in package python-numpy 1:1.16.5-5
Deleting the python-numpy package and resuming the upgrade with apt --fix-broken install followed by apt full-upgrade allowed the upgrade to complete successfully.
This was already metioned in a Debian bug report and would have been avoided if I had purged the locally obsolete packages after upgrading to Debian 11.
On laptop and workstation, after the upgrade, for unclear reasons, the gnome3 user extensions were disabled.
I reenabled the extensions manually with
gsettings set org.gnome.shell disable-user-extensions false
Finally podman, had a major upgrade from 3 to 4, and a backward-incompatible configuration change. If a custom configuration file was in place in /etc/containers/storage.conf to override the default storage options, you need now to add the following stanza
in that file.
Otherwise you ll get the error Failed to obtain podman configuration: runroot must be set when running any podman command.
This was discussed upstream.
Cloud server (VM)
Everything worked flawlessly, nothing to report.
Conclusion
Again a great Debian release, very happy that I could update three systems with ten thousands of packages with so little fuss.
For my small home server running RHEL 8 (with the no cost sub) I will do a reinstall on newer hardware.
Debian s cloud-images are using systemd-networkd as their default network stack in Bookworm. A slim and feature rich networking daemon that comes included with Systemd itself. Debian s cloud-images are deploying Netplan on top of this as an easy-to-use, declarative control layer.
If you want to experiment with systemd-networkd and Netplan on Debian, this can be done easily in QEMU using the official images. To start, you need to download the relevant .qcow2 Debian cloud-image from: https://cloud.debian.org/images/cloud/bookworm/latest/
Prepare a cloud image
Next, you need to prepare some configuration files for cloud-init and Netplan, to prepare a data-source (seed.img) for your local cloud-image.
Launch the local VM
Now, everything is prepared to launch a QEMU VM with two NICs and do some experimentation! The following command will launch an ephemeral environment for you, keeping the original Debian cloud-image untouched. If you want to preserve any changes on disk, you can remove the trailing -snapshot parameter.
We set up the default debian user account through cloud-init s user-data configuration above, so you can now login to the system, using that user with the (very unsafe!) password test .
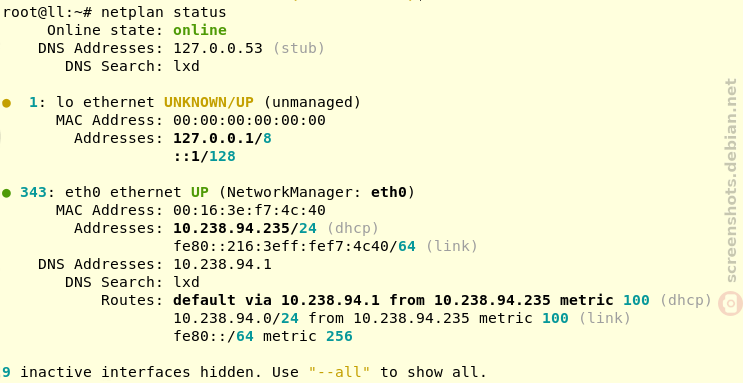
Experience Netplan and systemd-networkd
Once logged in successfully, you can execute the netplan status command to check the system s network configuration, as configured through cloud-init s netplan.yaml passthrough. So you ve already used Netplan at this point implicitly and it did all the configuration of systemd-networkd for you in the background!
debian@cloudimg:~$ sudo netplan status -a
     Online state: online
    DNS Addresses: 10.0.2.3 (compat)
       DNS Search: .
   1: lo ethernet UNKNOWN/UP (unmanaged)
      MAC Address: 00:00:00:00:00:00
        Addresses: 127.0.0.1/8
                   ::1/128
           Routes: ::1 metric 256
   2: enp0s2 ethernet DOWN (unmanaged)
      MAC Address: f0:0d:ca:fe:00:bb (Red Hat, Inc.)
   3: lan0 ethernet UP (networkd: id0)
      MAC Address: ca:fe:ca:fe:00:aa (Red Hat, Inc.)
        Addresses: 10.0.2.15/24 (dhcp)
                   fec0::c8fe:caff:fefe:aa/64
                   fe80::c8fe:caff:fefe:aa/64 (link)
    DNS Addresses: 10.0.2.3
           Routes: default via 10.0.2.2 from 10.0.2.15 metric 100 (dhcp)
                   10.0.2.0/24 from 10.0.2.15 metric 100 (link)
                   10.0.2.2 from 10.0.2.15 metric 100 (dhcp, link)
                   10.0.2.3 from 10.0.2.15 metric 100 (dhcp, link)
                   fe80::/64 metric 256
                   fec0::/64 metric 100 (ra)
                   default via fe80::2 metric 100 (ra)
As you can see from this output, the lan0 interface is configured via the id0 Netplan ID to be managed by systemd-networkd. Compare this data to the netplan.yaml file above, the networkctl output, the local Netplan configuration in /etc/netplan/ and the auto-generated systemd-networkd configuration.
Now you can go ahead and try something more advanced, like link aggregation, using the second NIC that you configured for this QEMU VM and explore all the possibilities of Netplan on Debian, by checking the Netplan YAML documentation.
I've moved to having containers be first-class citizens on my home network, so
any local machine (laptop, phone,tablet) can communicate directly with them all,
but they're not (by default) exposed to the wider Internet. Here's why, and how.
After I moved containers from docker to Podman and
systemd, it became much more convenient to run web apps on
my home server, but the default approach to networking
(each container gets an address on a private network between the host server
and containers) meant tedious work (maintaining and reconfiguring a HTTP
reverse proxy) to make them reachable by other devices. A more attractive
arrangement would be if each container received an IP from the range used by
my home LAN, and were automatically addressable from any device on it.
To make the containers first-class citizens on my home LAN, first I needed to
configure a Linux network bridge and attach the host machine's interface to it
(I've done that many times before);
then define a new Podman network, of type "bridge". podman-network-create
(1)
serves as reference, but the blog post Exposing Podman containers fully on the
network
is an easier read (skip past the macvlan bit).
I've opted to choose IP addresses for each container by hand. The Podman
network is narrowly defined to a range of IPs that are within the subnet that
my ISP-provided router uses, but outside the range of IPs that it allocates.
When I start up a container by hand for the first time, I choose a free IP from
the sub-range by hand and add a line to /etc/avahi/hosts on the parent
machine, e.g.
192.168.1.33 octoprint.local
I then start the container specifying that address, e.g.
I can now access that container from any device in my house (laptop, phone,
tablet...) via octoprint.local.
What's next
Although it's not a huge burden, it would be nice to not need to statically
define the addresses in /etc/avahi/hosts (perhaps via "IPAM"). I've also been
looking at
WireGuard
(which should be the subject of a future blog post) and combining this with
that would be worthwhile.
I previously wrote that when Firefox receives a file whose
media type is text/markdown, it prompts the user to download it, whereas
other browsers display rendered results.
Now it is possible to upvote a proposal on
connect.mozilla.org
asking that Firefox renders Markdown by default.
It seems I'm having a theme recently on this blog, of making emacs-related posts. Here's another.
I write a bunch of stuff in markdown, such as my emacs init-file, blog-posts and other documents. I try to be quite consistent about vertical spacing, for example a post might look like this:
# header1
Some top-level stuff.
## header2
Some more details.
## header2
Some more things on a related topic.
# header2
Here I'm trying to breakup sections, so there is a "big gap" between H1 and smaller gaps between the lesser-level headings.
After going over my init file recently, making some changes, I noticed that the spacing was not at all consistent. So I figured "How hard could it be to recognize headers and insert/remove newlines before them?"
A trivial regexp search for "^#" identifies headers, and that counting the "#" characters lets you determine their depth. From their removing any previous newlines is the work of a moment, and inserting the appropriate number to ensure consistency is simple.
I spent 15 minutes writing the initial implementation, which was markdown-specific, then another 30 minutes adding support for org-mode files - because my work-diary is written using the org-diary package (along with other helpers, such as the org-tag-cloud.
Anyway the end result is that now when I save a markdown/org file the headers are updated automatically:


 I ve been using Pyblosxom here for nearly 17 years, but have become
increasingly dissatisfied with having to write HTML instead of
Markdown.
Today I looked at upgrading my web server and discovered that
Pyblosxom was removed from Debian after Debian 10, presumably because
it wasn t updated for Python 3.
I keep hearing about Jekyll as a static site generator for blogs, so I
finally investigated how to use that and how to convert my existing
entries. Fortunately it supports both HTML and Markdown (and probably
other) input formats, so this was mostly a matter of converting
metadata.
I have my own crappy script for drafting, publishing, and listing
blog entries, which also needed a bit of work to update, but that is
now done.
If all has gone to plan, you should be seeing just one new entry in
the feed but all permalinks to older entries still working.
I ve been using Pyblosxom here for nearly 17 years, but have become
increasingly dissatisfied with having to write HTML instead of
Markdown.
Today I looked at upgrading my web server and discovered that
Pyblosxom was removed from Debian after Debian 10, presumably because
it wasn t updated for Python 3.
I keep hearing about Jekyll as a static site generator for blogs, so I
finally investigated how to use that and how to convert my existing
entries. Fortunately it supports both HTML and Markdown (and probably
other) input formats, so this was mostly a matter of converting
metadata.
I have my own crappy script for drafting, publishing, and listing
blog entries, which also needed a bit of work to update, but that is
now done.
If all has gone to plan, you should be seeing just one new entry in
the feed but all permalinks to older entries still working.

 My web pages are (still) in ikiwiki, but lately I have started
authoring things like assignments and lectures in org-mode so that I
can have some literate programming facilities. There is is org-mode
export built-in, but it just exports source blocks as examples
(i.e. unhighlighted verbatim). I added a custom exporter to mark up
source blocks in a way ikiwiki can understand. Luckily this is not too
hard the
My web pages are (still) in ikiwiki, but lately I have started
authoring things like assignments and lectures in org-mode so that I
can have some literate programming facilities. There is is org-mode
export built-in, but it just exports source blocks as examples
(i.e. unhighlighted verbatim). I added a custom exporter to mark up
source blocks in a way ikiwiki can understand. Luckily this is not too
hard the  Delighted to announce a new package that arrived on
 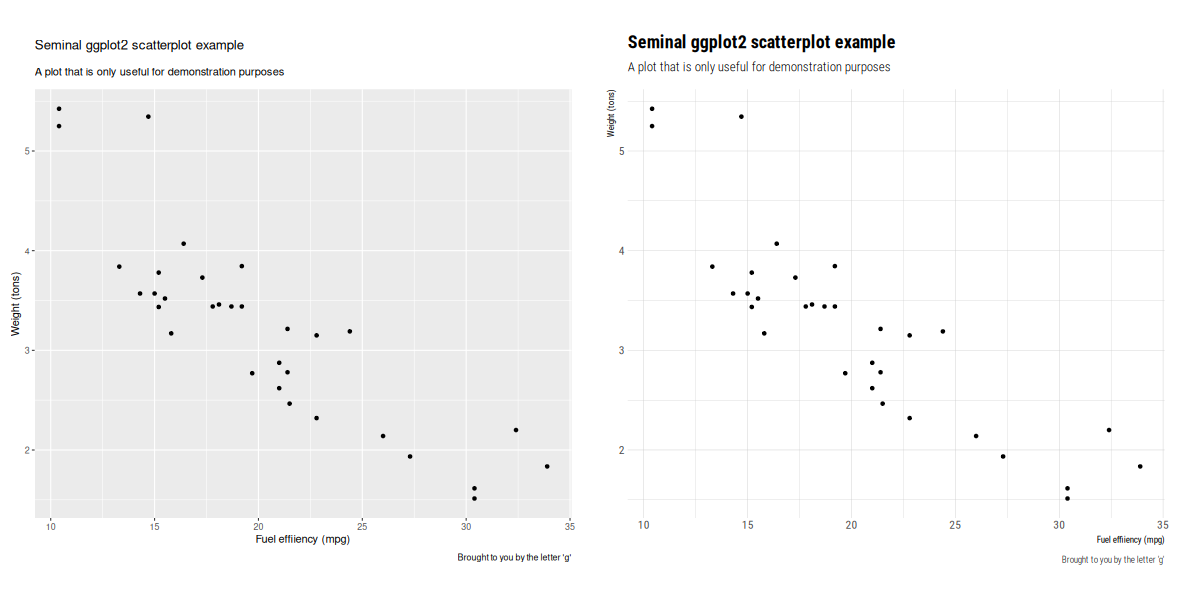 The
The 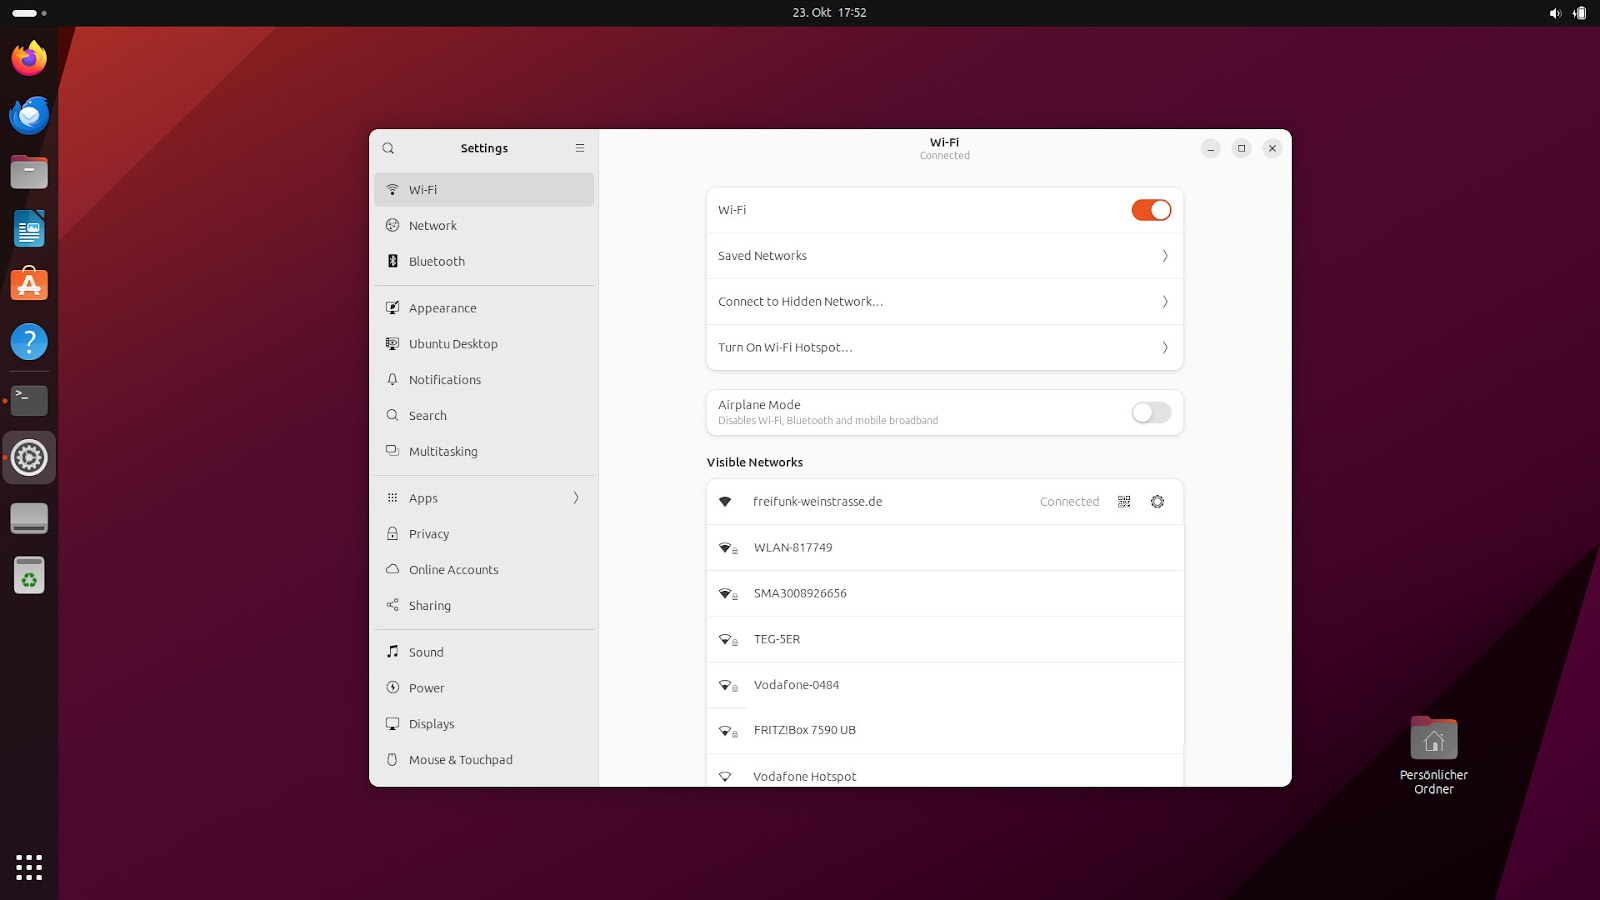
 Meeting Debian people for having a good time together, for some good hacking,
for learning, for teaching Is always fun and welcome. It brings energy, life
and joy. And this year, due to the six-months-long relocation my family and me
decided to have to Argentina, I was unable to attend the real deal, DebConf23 at
India.
And while I know DebConf is an experience like no other, this year I took part
in two miniDebConfs. One I have already shared in this same blog: I was in
Meeting Debian people for having a good time together, for some good hacking,
for learning, for teaching Is always fun and welcome. It brings energy, life
and joy. And this year, due to the six-months-long relocation my family and me
decided to have to Argentina, I was unable to attend the real deal, DebConf23 at
India.
And while I know DebConf is an experience like no other, this year I took part
in two miniDebConfs. One I have already shared in this same blog: I was in


 I've moved to having containers be first-class citizens on my home network, so
any local machine (laptop, phone,tablet) can communicate directly with them all,
but they're not (by default) exposed to the wider Internet. Here's why, and how.
After
I've moved to having containers be first-class citizens on my home network, so
any local machine (laptop, phone,tablet) can communicate directly with them all,
but they're not (by default) exposed to the wider Internet. Here's why, and how.
After  I
I  It seems I'm having a theme recently on this blog, of making emacs-related posts. Here's another.
I write a bunch of stuff in markdown, such as
It seems I'm having a theme recently on this blog, of making emacs-related posts. Here's another.
I write a bunch of stuff in markdown, such as