As promised, on this post I m going to explain how I ve configured this blog
using hugo, asciidoctor and the papermod theme, how I publish it using
nginx, how I ve integrated the remark42 comment system and how I ve
automated its publication using gitea and json2file-go.
It is a long post, but I hope that at least parts of it can be interesting for
some, feel free to ignore it if that is not your case
Hugo Configuration
Theme settingsThe site is using the PaperMod theme and as I m
using asciidoctor to publish my content I ve adjusted
the settings to improve how things are shown with it.
The current config.yml file is the one shown below (probably some of the
settings are not required nor being used right now, but I m including the
current file, so this post will have always the latest version of it):
config.yml
disableHLJS and assets.disableHLJS are set to true; we plan to use
rouge on adoc and the inclusion of the hljs assets adds styles that
collide with the ones used by rouge.
ShowToc is set to true and the TocOpen setting is set to false to
make the ToC appear collapsed initially. My plan was to use the asciidoctor
ToC, but after trying I believe that the theme one looks nice and I don t
need to adjust styles, although it has some issues with the html5s
processor (the admonition titles use <h6> and they are shown on the ToC,
which is weird), to fix it I ve copied the layouts/partial/toc.html to my
site repository and replaced the range of headings to end at 5 instead of
6 (in fact 5 still seems a lot, but as I don t think I ll use that heading
level on the posts it doesn t really matter).
params.profileMode values are adjusted, but for now I ve left it disabled
setting params.profileMode.enabled to false and I ve set the
homeInfoParams to show more or less the same content with the latest posts
under it (I ve added some styles to my custom.css style sheet to center the
text and image of the first post to match the look and feel of the profile).
On the asciidocExt section I ve adjusted the backend to use html5s,
I ve added the asciidoctor-html5s and asciidoctor-diagram extensions to
asciidoctor and adjusted the workingFolderCurrent to true to make
asciidoctor-diagram work right (haven t tested it yet).
Theme customisationsTo write in asciidoctor using the html5s processor I ve added some files to
the assets/css/extended directory:
As said before, I ve added the file assets/css/extended/custom.css to
make the homeInfoParams look like the profile page and I ve also changed a
little bit some theme styles to make things look better with the html5s
output:custom.css
/* Fix first entry alignment to make it look like the profile */.first-entrytext-align:center;.first-entryimgdisplay:inline;/**
* Remove margin for .post-content code and reduce padding to make it look
* better with the asciidoctor html5s output.
**/.post-contentcodemargin:auto0;padding:4px;
I ve also added the file assets/css/extended/adoc.css with some styles
taken from the asciidoctor-default.css, see this
blog
post about the original file; mine is the same after formatting it with
css-beautify and editing it to use variables for
the colors to support light and dark themes:adoc.css
The previous file uses variables from a partial copy of the theme-vars.css
file that changes the highlighted code background color and adds the color
definitions used by the admonitions:theme-vars.css
The previous styles use font-awesome, so I ve downloaded its resources for
version 4.7.0 (the one used by asciidoctor) storing the
font-awesome.css into on the assets/css/extended dir (that way it is
merged with the rest of .css files) and copying the fonts to the
static/assets/fonts/ dir (will be served directly):
FA_BASE_URL="https://cdnjs.cloudflare.com/ajax/libs/font-awesome/4.7.0"
curl "$FA_BASE_URL/css/font-awesome.css"\> assets/css/extended/font-awesome.css
for f in FontAwesome.otf fontawesome-webfont.eot \
fontawesome-webfont.svg fontawesome-webfont.ttf \
fontawesome-webfont.woff fontawesome-webfont.woff2;do
curl "$FA_BASE_URL/fonts/$f">"static/assets/fonts/$f"done
As already said the default highlighter is disabled (it provided a css
compatible with rouge) so we need a css to do the highlight styling; as
rouge provides a way to export them, I ve created the
assets/css/extended/rouge.css file with the thankful_eyes theme:
To support the use of the html5s backend with admonitions I ve added a
variation of the example found on this
blog
post to assets/js/adoc-admonitions.js:adoc-admonitions.js
// replace the default admonitions block with a table that uses a format// similar to the standard asciidoctor ... as we are using fa-icons here there// is no need to add the icons: font entry on the document.window.addEventListener('load',function()constadmonitions=document.getElementsByClassName('admonition-block')for(leti=admonitions.length-1;i>=0;i--)constelm=admonitions[i]consttype=elm.classList[1]consttitle=elm.getElementsByClassName('block-title')[0];constlabel=title.getElementsByClassName('title-label')[0].innerHTML.slice(0,-1);elm.removeChild(elm.getElementsByClassName('block-title')[0]);consttext=elm.innerHTMLconstparent=elm.parentNodeconsttempDiv=document.createElement('div')tempDiv.innerHTML= <div class="admonitionblock $ type">
<table>
<tbody>
<tr>
<td class="icon">
<i class="fa icon-$ type" title="$ label"></i>
</td>
<td class="content">
$ text
</td>
</tr>
</tbody>
</table>
</div> constinput=tempDiv.childNodes[0]parent.replaceChild(input,elm) )
and enabled its minified use on the layouts/partials/extend_footer.html file
adding the following lines to it:
Remark42 configurationTo integrate Remark42 with the PaperMod theme I ve
created the file layouts/partials/comments.html with the following content
based on the remark42
documentation, including extra code to sync the dark/light setting with the
one set on the site:
comments.html
<divid="remark42"></div><script>varremark_config=host:.Site.Params.remark42Url ,site_id:.Site.Params.remark42SiteID ,url:.Permalink ,locale:.Site.Language.Lang ;(function(c)/* Adjust the theme using the local-storage pref-theme if set */if(localStorage.getItem("pref-theme")==="dark")remark_config.theme="dark";elseif(localStorage.getItem("pref-theme")==="light")remark_config.theme="light";/* Add remark42 widget */for(vari=0;i<c.length;i++) vard=document,s=d.createElement('script');s.src=remark_config.host+'/web/'+c[i]+'.js';s.defer=true;(d.headd.body).appendChild(s); )(remark_config.components['embed']);</script>
In development I use it with anonymous comments enabled, but to avoid SPAM
the production site uses social logins (for now I ve only enabled Github
& Google, if someone requests additional services I ll check them, but those
were the easy ones for me initially).
To support theme switching with remark42 I ve also added the following inside
the layouts/partials/extend_footer.html file:
- if (not site.Params.disableThemeToggle)
<script>/* Function to change theme when the toggle button is pressed */document.getElementById("theme-toggle").addEventListener("click",()=>if(typeofwindow.REMARK42!="undefined")if(document.body.className.includes('dark'))window.REMARK42.changeTheme('light');elsewindow.REMARK42.changeTheme('dark'); );</script>
- end
With this code if the theme-toggle button is pressed we change the remark42
theme before the PaperMod one (that s needed here only, on page loads the
remark42 theme is synced with the main one using the code from the
layouts/partials/comments.html shown earlier).
Development setupTo preview the site on my laptop I m using docker-compose with the following
configuration:
docker-compose.yaml
To run it properly we have to create the .env file with the current user ID
and GID on the variables APP_UID and APP_GID (if we don t do it the files
can end up being owned by a user that is not the same as the one running the
services):
$echo"APP_UID=$(id-u)\nAPP_GID=$(id-g)"> .env
The Dockerfile used to generate the sto/hugo-adoc is:
Dockerfile
FROM asciidoctor/docker-asciidoctor:latestRUN gem install--no-document asciidoctor-html5s &&\
apk update && apk add --no-cache curl libc6-compat &&\
repo_path="gohugoio/hugo"&&\
api_url="https://api.github.com/repos/$repo_path/releases/latest"&&\
download_url="$(\
curl -sL"$api_url"\
sed-n"s/^.*download_url\": \"\\(.*.extended.*Linux-64bit.tar.gz\)\"/\1/p"\
)"&&\
curl -sL"$download_url"-o /tmp/hugo.tgz &&\
tar xf /tmp/hugo.tgz hugo &&\
install hugo /usr/bin/ &&\
rm-f hugo /tmp/hugo.tgz &&\
/usr/bin/hugo version &&\
apk del curl &&rm-rf /var/cache/apk/*# Expose port for live serverEXPOSE 1313ENTRYPOINT ["/usr/bin/hugo"]CMD [""]
If you review it you will see that I m using the
docker-asciidoctor image as
the base; the idea is that this image has all I need to work with asciidoctor
and to use hugo I only need to download the binary from their latest release
at github (as we are using an
image based on alpine we also need to install the
libc6-compat package, but once that is done things are working fine for me so
far).
The image does not launch the server by default because I don t want it to; in
fact I use the same docker-compose.yml file to publish the site in production
simply calling the container without the arguments passed on the
docker-compose.yml file (see later).
When running the containers with docker-compose up (or docker compose up if
you have the docker-compose-plugin package installed) we also launch a nginx
container and the remark42 service so we can test everything together.
The Dockerfile for the remark42 image is the original one with an updated
version of the init.sh script:
Dockerfile
FROM umputun/remark42:latestCOPY init.sh /init.sh
The updated init.sh is similar to the original, but allows us to use an
APP_GID variable and updates the /etc/group file of the container so the
files get the right user and group (with the original script the group is
always 1001):
init.sh
#!/sbin/dinit /bin/shuid="$(id-u)"if["$ uid"-eq"0"];then
echo"init container"# set container's time zonecp"/usr/share/zoneinfo/$ TIME_ZONE" /etc/localtime
echo"$ TIME_ZONE">/etc/timezone
echo"set timezone $ TIME_ZONE ($(date))"# set UID & GID for the appif["$ APP_UID"]["$ APP_GID"];then["$ APP_UID"]APP_UID="1001"["$ APP_GID"]APP_GID="$ APP_UID"echo"set custom APP_UID=$ APP_UID & APP_GID=$ APP_GID"sed-i"s/^app:x:1001:1001:/app:x:$ APP_UID:$ APP_GID:/" /etc/passwd
sed-i"s/^app:x:1001:/app:x:$ APP_GID:/" /etc/group
else
echo"custom APP_UID and/or APP_GID not defined, using 1001:1001"fi
chown-R app:app /srv /home/app
fi
echo"prepare environment"# replace % REMARK_URL % by content of REMARK_URL variable
find /srv -regex'.*\.\(html\ js\ mjs\)$'-print\-execsed-i"s % REMARK_URL % $ REMARK_URL g"\;if[-n"$ SITE_ID"];then#replace "site_id: 'remark'" by SITE_IDsed-i"s 'remark' '$ SITE_ID' g" /srv/web/*.html
fi
echo"execute \"$*\""if["$ uid"-eq"0"];then
exec su-exec app "$@"else
exec"$@"fi
The environment file used with remark42 for development is quite minimal:
env.dev
Production setupThe VM where I m publishing the blog runs Debian GNU/Linux
and uses binaries from local packages and applications packaged inside
containers.
To run the containers I m using
docker-ce (I could have used
podman instead, but I already had it installed on the
machine, so I stayed with it).
The binaries used on this project are included on the following packages from
the main Debian repository:
git to clone & pull the repository,
jq to parse json files from shell scripts,
json2file-go to save the webhook messages to files,
inotify-tools to detect when new files are stored by json2file-go and
launch scripts to process them,
nginx to publish the site using HTTPS and work as proxy for
json2file-go and remark42 (I run it using a container),
task-spool to queue the scripts that update the deployment.
And I m using docker and docker compose from the debian packages on the
docker repository:
docker-ce to run the containers,
docker-compose-plugin to run docker compose (it is a plugin, so no - in
the name).
Repository checkoutTo manage the git repository I ve created a deploy key, added it to gitea
and cloned the project on the /srv/blogops PATH (that route is owned by a
regular user that has permissions to run docker, as I said before).
Compiling the site with hugoTo compile the site we are using the docker-compose.yml file seen before, to
be able to run it first we build the container images and once we have them we
launch hugo using docker compose run:
$cd /srv/blogops
$git pull
$docker compose build
$if[-d"./public"];then rm-rf ./public;fi$docker compose run hugo --
The compilation leaves the static HTML on /srv/blogops/public (we remove the
directory first because hugo does not clean the destination folder as
jekyll does).
The deploy script re-generates the site as described and moves the public
directory to its final place for publishing.
Running remark42 with dockerOn the /srv/blogops/remark42 folder I have the following docker-compose.yml:
docker-compose.yml
The ../.env file is loaded to get the APP_UID and APP_GID variables that
are used by my version of the init.sh script to adjust file permissions and
the env.prod file contains the rest of the settings for remark42, including
the social network tokens (see the
remark42 documentation for
the available parameters, I don t include my configuration here because some of
them are secrets).
Nginx configurationThe nginx configuration for the blogops.mixinet.net site is as simple as:
On this configuration the certificates are managed by
certbot and the server root directory is on
/srv/blogops/nginx/public_html and not on /srv/blogops/public; the reason
for that is that I want to be able to compile without affecting the running
site, the deployment script generates the site on /srv/blogops/public and if
all works well we rename folders to do the switch, making the change feel almost
atomic.
json2file-go configurationAs I have a working WireGuard VPN between the
machine running gitea at my home and the VM where the blog is served, I m
going to configure the json2file-go to listen for connections on a high port
using a self signed certificate and listening on IP addresses only reachable
through the VPN.
To do it we create a systemd socket to run json2file-go and adjust its
configuration to listen on a private IP (we use the FreeBind option on its
definition to be able to launch the service even when the IP is not available,
that is, when the VPN is down).
The following script can be used to set up the json2file-go configuration:
setup-json2file.sh
#!/bin/shset-e# ---------# VARIABLES# ---------BASE_DIR="/srv/blogops/webhook"J2F_DIR="$BASE_DIR/json2file"TLS_DIR="$BASE_DIR/tls"J2F_SERVICE_NAME="json2file-go"J2F_SERVICE_DIR="/etc/systemd/system/json2file-go.service.d"J2F_SERVICE_OVERRIDE="$J2F_SERVICE_DIR/override.conf"J2F_SOCKET_DIR="/etc/systemd/system/json2file-go.socket.d"J2F_SOCKET_OVERRIDE="$J2F_SOCKET_DIR/override.conf"J2F_BASEDIR_FILE="/etc/json2file-go/basedir"J2F_DIRLIST_FILE="/etc/json2file-go/dirlist"J2F_CRT_FILE="/etc/json2file-go/certfile"J2F_KEY_FILE="/etc/json2file-go/keyfile"J2F_CRT_PATH="$TLS_DIR/crt.pem"J2F_KEY_PATH="$TLS_DIR/key.pem"# ----# MAIN# ----# Install packages used with json2file for the blogops sitesudo apt update
sudo apt install-y json2file-go uuid
if[-z"$(type mkcert)"];then
sudo apt install-y mkcert
fi
sudo apt clean
# Configuration file valuesJ2F_USER="$(id-u)"J2F_GROUP="$(id-g)"J2F_DIRLIST="blogops:$(uuid)"J2F_LISTEN_STREAM="172.31.31.1:4443"# Configure json2file[-d"$J2F_DIR"]mkdir"$J2F_DIR"sudo sh -c"echo '$J2F_DIR' >'$J2F_BASEDIR_FILE'"[-d"$TLS_DIR"]mkdir"$TLS_DIR"if[!-f"$J2F_CRT_PATH"][!-f"$J2F_KEY_PATH"];then
mkcert -cert-file"$J2F_CRT_PATH"-key-file"$J2F_KEY_PATH""$(hostname-f)"fi
sudo sh -c"echo '$J2F_CRT_PATH' >'$J2F_CRT_FILE'"sudo sh -c"echo '$J2F_KEY_PATH' >'$J2F_KEY_FILE'"sudo sh -c"cat >'$J2F_DIRLIST_FILE'"<<EOF$(echo"$J2F_DIRLIST"tr';''\n')EOF
# Service override[-d"$J2F_SERVICE_DIR"]sudo mkdir"$J2F_SERVICE_DIR"sudo sh -c"cat >'$J2F_SERVICE_OVERRIDE'"<<EOF
[Service]
User=$J2F_USER
Group=$J2F_GROUPEOF
# Socket override[-d"$J2F_SOCKET_DIR"]sudo mkdir"$J2F_SOCKET_DIR"sudo sh -c"cat >'$J2F_SOCKET_OVERRIDE'"<<EOF
[Socket]
# Set FreeBind to listen on missing addresses (the VPN can be down sometimes)
FreeBind=true
# Set ListenStream to nothing to clear its value and add the new value later
ListenStream=
ListenStream=$J2F_LISTEN_STREAMEOF
# Restart and enable servicesudo systemctl daemon-reload
sudo systemctl stop "$J2F_SERVICE_NAME"sudo systemctl start "$J2F_SERVICE_NAME"sudo systemctl enable"$J2F_SERVICE_NAME"# ----# vim: ts=2:sw=2:et:ai:sts=2
Warning: The script uses mkcert to create the temporary certificates, to install the
package on bullseye the backports repository must be available.
Gitea configurationTo make gitea use our json2file-go server we go to the project and enter into
the hooks/gitea/new page, once there we create a new webhook of type gitea
and set the target URL to https://172.31.31.1:4443/blogops and on the secret
field we put the token generated with uuid by the setup script:
sed-n-e's/blogops://p' /etc/json2file-go/dirlist
The rest of the settings can be left as they are:
Trigger on: Push events
Branch filter: *
Warning: We are using an internal IP and a self signed certificate, that means that we
have to review that the webhook section of the app.ini of our gitea
server allows us to call the IP and skips the TLS verification (you can see the
available options on the
gitea
documentation).
The [webhook] section of my server looks like this:
Once we have the webhook configured we can try it and if it works our
json2file server will store the file on the
/srv/blogops/webhook/json2file/blogops/ folder.
The json2file spooler scriptWith the previous configuration our system is ready to receive webhook calls
from gitea and store the messages on files, but we have to do something to
process those files once they are saved in our machine.
An option could be to use a cronjob to look for new files, but we can do
better on Linux using inotify we will use the inotifywait command from
inotify-tools to watch the json2file output directory and execute a script
each time a new file is moved inside it or closed after writing
(IN_CLOSE_WRITE and IN_MOVED_TO events).
To avoid concurrency problems we are going to use task-spooler to launch the
scripts that process the webhooks using a queue of length 1, so they are
executed one by one in a FIFO queue.
The spooler script is this:
blogops-spooler.sh
#!/bin/shset-e# ---------# VARIABLES# ---------BASE_DIR="/srv/blogops/webhook"BIN_DIR="$BASE_DIR/bin"TSP_DIR="$BASE_DIR/tsp"WEBHOOK_COMMAND="$BIN_DIR/blogops-webhook.sh"# ---------# FUNCTIONS# ---------
queue_job()echo"Queuing job to process file '$1'"TMPDIR="$TSP_DIR"TS_SLOTS="1"TS_MAXFINISHED="10"\
tsp -n"$WEBHOOK_COMMAND""$1"# ----# MAIN# ----INPUT_DIR="$1"if[!-d"$INPUT_DIR"];then
echo"Input directory '$INPUT_DIR' does not exist, aborting!"exit 1
fi[-d"$TSP_DIR"]mkdir"$TSP_DIR"echo"Processing existing files under '$INPUT_DIR'"
find "$INPUT_DIR"-type f sortwhile read-r _filename;do
queue_job "$_filename"done# Use inotifywatch to process new filesecho"Watching for new files under '$INPUT_DIR'"
inotifywait -q-m-e close_write,moved_to --format"%w%f"-r"$INPUT_DIR"while read-r _filename;do
queue_job "$_filename"done# ----# vim: ts=2:sw=2:et:ai:sts=2
To run it as a daemon we install it as a systemd service using the following
script:
setup-spooler.sh
#!/bin/shset-e# ---------# VARIABLES# ---------BASE_DIR="/srv/blogops/webhook"BIN_DIR="$BASE_DIR/bin"J2F_DIR="$BASE_DIR/json2file"SPOOLER_COMMAND="$BIN_DIR/blogops-spooler.sh '$J2F_DIR'"SPOOLER_SERVICE_NAME="blogops-j2f-spooler"SPOOLER_SERVICE_FILE="/etc/systemd/system/$SPOOLER_SERVICE_NAME.service"# Configuration file valuesJ2F_USER="$(id-u)"J2F_GROUP="$(id-g)"# ----# MAIN# ----# Install packages used with the webhook processorsudo apt update
sudo apt install-y inotify-tools jq task-spooler
sudo apt clean
# Configure process servicesudo sh -c"cat > $SPOOLER_SERVICE_FILE"<<EOF
[Install]
WantedBy=multi-user.target
[Unit]
Description=json2file processor for $J2F_USER
After=docker.service
[Service]
Type=simple
User=$J2F_USER
Group=$J2F_GROUP
ExecStart=$SPOOLER_COMMANDEOF
# Restart and enable servicesudo systemctl daemon-reload
sudo systemctl stop "$SPOOLER_SERVICE_NAME"true
sudo systemctl start "$SPOOLER_SERVICE_NAME"sudo systemctl enable"$SPOOLER_SERVICE_NAME"# ----# vim: ts=2:sw=2:et:ai:sts=2
The gitea webhook processorFinally, the script that processes the JSON files does the following:
First, it checks if the repository and branch are right,
Then, it fetches and checks out the commit referenced on the JSON file,
Once the files are updated, compiles the site using hugo with docker
compose,
If the compilation succeeds the script renames directories to swap the old
version of the site by the new one.
If there is a failure the script aborts but before doing it or if the swap
succeeded the system sends an email to the configured address and/or the user
that pushed updates to the repository with a log of what happened.
The current script is this one:
blogops-webhook.sh
#!/bin/shset-e# ---------# VARIABLES# ---------# ValuesREPO_REF="refs/heads/main"REPO_CLONE_URL="https://gitea.mixinet.net/mixinet/blogops.git"MAIL_PREFIX="[BLOGOPS-WEBHOOK] "# Address that gets all messages, leave it empty if not wantedMAIL_TO_ADDR="blogops@mixinet.net"# If the following variable is set to 'true' the pusher gets mail on failuresMAIL_ERRFILE="false"# If the following variable is set to 'true' the pusher gets mail on successMAIL_LOGFILE="false"# gitea's conf/app.ini value of NO_REPLY_ADDRESS, it is used for email domains# when the KeepEmailPrivate option is enabled for a userNO_REPLY_ADDRESS="noreply.example.org"# DirectoriesBASE_DIR="/srv/blogops"PUBLIC_DIR="$BASE_DIR/public"NGINX_BASE_DIR="$BASE_DIR/nginx"PUBLIC_HTML_DIR="$NGINX_BASE_DIR/public_html"WEBHOOK_BASE_DIR="$BASE_DIR/webhook"WEBHOOK_SPOOL_DIR="$WEBHOOK_BASE_DIR/spool"WEBHOOK_ACCEPTED="$WEBHOOK_SPOOL_DIR/accepted"WEBHOOK_DEPLOYED="$WEBHOOK_SPOOL_DIR/deployed"WEBHOOK_REJECTED="$WEBHOOK_SPOOL_DIR/rejected"WEBHOOK_TROUBLED="$WEBHOOK_SPOOL_DIR/troubled"WEBHOOK_LOG_DIR="$WEBHOOK_SPOOL_DIR/log"# FilesTODAY="$(date +%Y%m%d)"OUTPUT_BASENAME="$(date +%Y%m%d-%H%M%S.%N)"WEBHOOK_LOGFILE_PATH="$WEBHOOK_LOG_DIR/$OUTPUT_BASENAME.log"WEBHOOK_ACCEPTED_JSON="$WEBHOOK_ACCEPTED/$OUTPUT_BASENAME.json"WEBHOOK_ACCEPTED_LOGF="$WEBHOOK_ACCEPTED/$OUTPUT_BASENAME.log"WEBHOOK_REJECTED_TODAY="$WEBHOOK_REJECTED/$TODAY"WEBHOOK_REJECTED_JSON="$WEBHOOK_REJECTED_TODAY/$OUTPUT_BASENAME.json"WEBHOOK_REJECTED_LOGF="$WEBHOOK_REJECTED_TODAY/$OUTPUT_BASENAME.log"WEBHOOK_DEPLOYED_TODAY="$WEBHOOK_DEPLOYED/$TODAY"WEBHOOK_DEPLOYED_JSON="$WEBHOOK_DEPLOYED_TODAY/$OUTPUT_BASENAME.json"WEBHOOK_DEPLOYED_LOGF="$WEBHOOK_DEPLOYED_TODAY/$OUTPUT_BASENAME.log"WEBHOOK_TROUBLED_TODAY="$WEBHOOK_TROUBLED/$TODAY"WEBHOOK_TROUBLED_JSON="$WEBHOOK_TROUBLED_TODAY/$OUTPUT_BASENAME.json"WEBHOOK_TROUBLED_LOGF="$WEBHOOK_TROUBLED_TODAY/$OUTPUT_BASENAME.log"# Query to get variables from a gitea webhook jsonENV_VARS_QUERY="$(printf"%s"\'(. @sh "gt_ref=\(.ref);"),'\'(. @sh "gt_after=\(.after);"),'\'(.repository @sh "gt_repo_clone_url=\(.clone_url);"),'\'(.repository @sh "gt_repo_name=\(.name);"),'\'(.pusher @sh "gt_pusher_full_name=\(.full_name);"),'\'(.pusher @sh "gt_pusher_email=\(.email);")')"# ---------# Functions# ---------
webhook_log()echo"$(date-R)$*">>"$WEBHOOK_LOGFILE_PATH"
webhook_check_directories()for _d in"$WEBHOOK_SPOOL_DIR""$WEBHOOK_ACCEPTED""$WEBHOOK_DEPLOYED"\"$WEBHOOK_REJECTED""$WEBHOOK_TROUBLED""$WEBHOOK_LOG_DIR";do[-d"$_d"]mkdir"$_d"done
webhook_clean_directories()# Try to remove empty dirsfor _d in"$WEBHOOK_ACCEPTED""$WEBHOOK_DEPLOYED""$WEBHOOK_REJECTED"\"$WEBHOOK_TROUBLED""$WEBHOOK_LOG_DIR""$WEBHOOK_SPOOL_DIR";do
if[-d"$_d"];then
rmdir"$_d" 2>/dev/null true
fi
done
webhook_accept()
webhook_log "Accepted: $*"mv"$WEBHOOK_JSON_INPUT_FILE""$WEBHOOK_ACCEPTED_JSON"mv"$WEBHOOK_LOGFILE_PATH""$WEBHOOK_ACCEPTED_LOGF"WEBHOOK_LOGFILE_PATH="$WEBHOOK_ACCEPTED_LOGF"
webhook_reject()[-d"$WEBHOOK_REJECTED_TODAY"]mkdir"$WEBHOOK_REJECTED_TODAY"
webhook_log "Rejected: $*"if[-f"$WEBHOOK_JSON_INPUT_FILE"];then
mv"$WEBHOOK_JSON_INPUT_FILE""$WEBHOOK_REJECTED_JSON"fi
mv"$WEBHOOK_LOGFILE_PATH""$WEBHOOK_REJECTED_LOGF"exit 0
webhook_deployed()[-d"$WEBHOOK_DEPLOYED_TODAY"]mkdir"$WEBHOOK_DEPLOYED_TODAY"
webhook_log "Deployed: $*"mv"$WEBHOOK_ACCEPTED_JSON""$WEBHOOK_DEPLOYED_JSON"mv"$WEBHOOK_ACCEPTED_LOGF""$WEBHOOK_DEPLOYED_LOGF"WEBHOOK_LOGFILE_PATH="$WEBHOOK_DEPLOYED_LOGF"
webhook_troubled()[-d"$WEBHOOK_TROUBLED_TODAY"]mkdir"$WEBHOOK_TROUBLED_TODAY"
webhook_log "Troubled: $*"mv"$WEBHOOK_ACCEPTED_JSON""$WEBHOOK_TROUBLED_JSON"mv"$WEBHOOK_ACCEPTED_LOGF""$WEBHOOK_TROUBLED_LOGF"WEBHOOK_LOGFILE_PATH="$WEBHOOK_TROUBLED_LOGF"
print_mailto()_addr="$1"_user_email=""# Add the pusher email address unless it is from the domain NO_REPLY_ADDRESS,# which should match the value of that variable on the gitea 'app.ini' (it# is the domain used for emails when the user hides it).# shellcheck disable=SC2154if[-n"$ gt_pusher_email##*@"$ NO_REPLY_ADDRESS""]&&[-z"$ gt_pusher_email##*@*"];then
_user_email="\"$gt_pusher_full_name <$gt_pusher_email>\""fi
if["$_addr"]&&["$_user_email"];then
echo"$_addr,$_user_email"elif["$_user_email"];then
echo"$_user_email"elif["$_addr"];then
echo"$_addr"fi
mail_success()to_addr="$MAIL_TO_ADDR"if["$MAIL_LOGFILE"="true"];then
to_addr="$(print_mailto "$to_addr")"fi
if["$to_addr"];then# shellcheck disable=SC2154subject="OK - $gt_repo_name updated to commit '$gt_after'"
mail -s"$ MAIL_PREFIX $ subject""$to_addr"\
<"$WEBHOOK_LOGFILE_PATH"fi
mail_failure()to_addr="$MAIL_TO_ADDR"if["$MAIL_ERRFILE"=true];then
to_addr="$(print_mailto "$to_addr")"fi
if["$to_addr"];then# shellcheck disable=SC2154subject="KO - $gt_repo_name update FAILED for commit '$gt_after'"
mail -s"$ MAIL_PREFIX $ subject""$to_addr"\
<"$WEBHOOK_LOGFILE_PATH"fi# ----# MAIN# ----# Check directories
webhook_check_directories
# Go to the base directorycd"$BASE_DIR"# Check if the file existsWEBHOOK_JSON_INPUT_FILE="$1"if[!-f"$WEBHOOK_JSON_INPUT_FILE"];then
webhook_reject "Input arg '$1' is not a file, aborting"fi# Parse the file
webhook_log "Processing file '$WEBHOOK_JSON_INPUT_FILE'"eval"$(jq -r"$ENV_VARS_QUERY""$WEBHOOK_JSON_INPUT_FILE")"# Check that the repository clone url is right# shellcheck disable=SC2154if["$gt_repo_clone_url"!="$REPO_CLONE_URL"];then
webhook_reject "Wrong repository: '$gt_clone_url'"fi# Check that the branch is the right one# shellcheck disable=SC2154if["$gt_ref"!="$REPO_REF"];then
webhook_reject "Wrong repository ref: '$gt_ref'"fi# Accept the file# shellcheck disable=SC2154
webhook_accept "Processing '$gt_repo_name'"# Update the checkoutret="0"
git fetch >>"$WEBHOOK_LOGFILE_PATH" 2>&1 ret="$?"if["$ret"-ne"0"];then
webhook_troubled "Repository fetch failed"
mail_failure
fi# shellcheck disable=SC2154
git checkout "$gt_after">>"$WEBHOOK_LOGFILE_PATH" 2>&1 ret="$?"if["$ret"-ne"0"];then
webhook_troubled "Repository checkout failed"
mail_failure
fi# Remove the build dir if presentif[-d"$PUBLIC_DIR"];then
rm-rf"$PUBLIC_DIR"fi# Build site
docker compose run hugo -->>"$WEBHOOK_LOGFILE_PATH" 2>&1 ret="$?"# go back to the main branch
git switch main && git pull
# Fail if public dir was missingif["$ret"-ne"0"][!-d"$PUBLIC_DIR"];then
webhook_troubled "Site build failed"
mail_failure
fi# Remove old public_html copies
webhook_log 'Removing old site versions, if present'
find $NGINX_BASE_DIR-mindepth 1 -maxdepth 1 -name'public_html-*'-type d \-execrm-rf\;>>"$WEBHOOK_LOGFILE_PATH" 2>&1 ret="$?"if["$ret"-ne"0"];then
webhook_troubled "Removal of old site versions failed"
mail_failure
fi# Switch site directoryTS="$(date +%Y%m%d-%H%M%S)"if[-d"$PUBLIC_HTML_DIR"];then
webhook_log "Moving '$PUBLIC_HTML_DIR' to '$PUBLIC_HTML_DIR-$TS'"mv"$PUBLIC_HTML_DIR""$PUBLIC_HTML_DIR-$TS">>"$WEBHOOK_LOGFILE_PATH" 2>&1 ret="$?"fi
if["$ret"-eq"0"];then
webhook_log "Moving '$PUBLIC_DIR' to '$PUBLIC_HTML_DIR'"mv"$PUBLIC_DIR""$PUBLIC_HTML_DIR">>"$WEBHOOK_LOGFILE_PATH" 2>&1 ret="$?"fi
if["$ret"-ne"0"];then
webhook_troubled "Site switch failed"
mail_failure
else
webhook_deployed "Site deployed successfully"
mail_success
fi# ----# vim: ts=2:sw=2:et:ai:sts=2
The first install of a Gentoo kernel needs to be somewhat manual if you want to optimize the kernel for the (virtual) system it boots on.
In part 1 I laid out how to improve the subsequent emerges of sys-kernel/gentoo-sources with a small drop in script to build the kernel as part of the ebuild.
Since end of last year Gentoo also supports a less manual way of emerging a kernel:
The following kernel blends are available:
sys-kernel/gentoo-kernel (the Gentoo kernel you can configure and compile locally - typically this is what you want if you run Gentoo)
sys-kernel/gentoo-kernel-bin (a pre-compiled Gentoo kernel similar to what genkernel would get you)
sys-kernel/vanilla-kernel (the upstream Linux kernel, again configurable and locally compiled)
So a quick walk-through for the gentoo-kernel variant:
1. Set up the correct package USE flags
We do not want an initrd and we want our own config to be re-used so:
4. Update grub and reboot
Unfortunately this ebuild does not update grub, so we have to run grub-mkconfig manually. This can again be automated via a post_pkg_postinst() script. See the step 7 below.
But for now, let's do it manually:
grub-mkconfig -o/boot/grub/grub.cfg # All fine? Time to reboot the machine: reboot
5. (Optional) Prepare for the next kernel build
Run etc-update and merge the new kernel config entries into your savedconfig.
The kernel should auto-build once new versions become available via portage.
Again the etc-update can be automated if you feel that is sufficiently safe to do in your environment. See step 7 below for details.
6. (Optional) Remove the old kernel sources
If you want to switch from the method based on gentoo-sources to the gentoo-kernel one, you can remove the kernel sources:
emerge -C"=sys-kernel/gentoo-sources-5*"
Be sure to update the /usr/src/linux symlink to the new kernel sources directory from gentoo-kernel, e.g.:
This may be a good time for a bit more house-keeping: Clean up a bit in /usr/src/ to remove old build artefacts, /boot/ to remove old kernels and /lib/modules/ to get rid of old kernel modules.
7. (Optional) Further automate the ebuild
In part 1 we automated the kernel compile, install and a bit more via a helper function for post_pkg_postinst().
We can do the similarly for what is (currently) missing from the gentoo-kernel ebuilds:
Create /etc/portage/env/sys-kernel/gentoo-kernel with the following:
The upside of gentoo-kernel over gentoo-sources is that you can put "config override files" in /etc/kernel/config.d/. That way you theoretically profit from config improvements made by the upstream developers. See the Gentoo distribution kernel documentation for a sample snippet. I am fine with savedconfig for now but it is nice that Gentoo provides the flexibility to support both approaches.
Gentoo emerges of sys-kernel/gentoo-sources will nicely install the current kernel into /usr/src/linux-* but it will not compile them.
The Gentoo wiki kernel documentation has a script snippet to automate the kernel build with genkernel.
I do not like to use genkernel as it brings in lots of firmware files to build initrds that are not needed on virtual hardware. It also makes building the kernel slower.
So, the plain approach:
Make emerge sys-kernel/gentoo-sources symlink the latest kernel to
/usr/src/linux so we can find it easily:
This will compile the next kernel on the basis of the config of the currently running kernel, install the modules and the kernel bzImage and update grub so it knows about the new kernel for the next reboot.
If you forget to unset ARCH the Linux build system will complain like:
Makefile:583: arch/amd64/Makefile: No such file or directory
make: *** No rule to make target 'arch/amd64/Makefile'.  Stop.
You can test the new magic by re-emerging the latest kernel, e.g. currently
emerge =sys-kernel/gentoo-sources-5.4.80-r1:
I have been using btrfs, a modern modern copy on write filesystem for Linux, since many years now. But only recently I realized how amateurish my usage has been. Over the last day I switched to multiple devices and threw in a RAID1 level at the same time.
For the last years, I have been using btrfs in a completely naive way, simply creating new filesystems, mounting them, moving data over, linking the directories into my home dir, etc etc. It all became a huge mess over time. I have heard of multi-device support , but always thought that this is for the big players in the data centers not realizing that it works trivially on your home system, too. Thanks to an article by Mark McBride I learned how to better use it!
Btrfs has an impressive list of features, and is often compared to (Open)ZFS (btw, they domain openzfs.org has a botched SSL certificate .. umpf, my trust disappears even more) due to the high level of data security. I have been playing around with the idea to use ZFS for quite some time, but first of all it requires compiling extra modules all the time, because ZFS cannot be included in the kernel source. And much more, I realized that ZFS is simply too inflexible with respect to disks of different sizes in a storage pool.
Btrfs on the other hand allows adding and removing devices to the filesystem on a running system. I just added a 2TB disk to my rig, and called:
btrfs device add /dev/sdh1 /
and with that alone, my root filesystem grew immediately. At the end I have consolidated data from 4 extra SSDs into this new filesystem spanning multiple disks, and got rid of all the links and loops.
For good measure, and since I had enough space left, I also switched to RAID1 for this filesystem. This again, surprisingly, works on a running system!
Here, both data and metadata are mirrored on the devices. With 6TB of total disk space, the balancing operation took quite some time, about 6h in my case, but finished without a hiccup.
After all that, the filesystem now looks like this:
$ sudo btrfs fi show /
Label: none  uuid: XXXXXX
	Total devices 5 FS bytes used 2.19TiB
	devid    1 size 899.01GiB used 490.03GiB path /dev/sdb3
	devid    2 size 489.05GiB used 207.00GiB path /dev/sdd1
	devid    3 size 1.82TiB used 1.54TiB path /dev/sde1
	devid    4 size 931.51GiB used 649.00GiB path /dev/sdf1
	devid    5 size 1.82TiB used 1.54TiB path /dev/sdc1
and using btrfs fi usage / I can get detailed information about the device usage and status.
Stumbling blocks
You wouldn t expect such a deep rebuilding of the intestines of a system to go without a few bumps, and indeed, there are a few:
First of all, update-grub is broken when device names are used. If you have GRUB_DISABLE_LINUX_UUID=true, so that actual device nodes are used in grub.cfg, the generated entries are broken because they list all the devices. This comes from the fact that grub-mkconfig uses grub-probe --target=device / to determine the root device, and this returns in our case:
This is of course an invalid entry, but fortunately grub still boots, but ignores the rest of the command line options.
So I decided to turn back to using UUID for the root entry, which should be better supported. But alas, what happened, I couldn t even boot anymore. Grub gave me very cryptic messages like cannot find UUID device and dropping you into the grub rescue shell, then having the grub rescue shell being unable to read any filesystem at all (not even FAT or ext2!). The most cryptic one was grub header bytenr is not equal node addr, where even Google gave up on it.
At the end I booted into a rescue image (you always have something like SystemRescueCD on an USB stick next to you during these operations, right?), mounted the filesystem manually, and reinstalled grub, which fixed the problem, and now the grub config file contains only the UUID for root.
I don t blame btrfs for that, this is more like we are, after sooo many years, we still don t have a good boot system
All in all, a very smooth transition, and at least for some time I don t have to worry about which partition has still some space left.
Thanks btrfs and Open Source!
Use deb.debian.org over httpredir.debian.org. (commit)
Made a number of improvements to travis.debian.net, my hosted service for projects that host their Debian packaging on GitHub to use the Travis CI continuous integration platform to test builds on every code change) travis.debian.net, including:
Correctly detecting the distribution to build with for some tags. (commit)
Use Lintian from the backports repository where appropriate. (#44)
Don't build upstream/ branches even if they contain .travis.yml files. (commit)
Fixed an issue in django-staticfiles-dotd, my Django staticfiles adaptor to concatentate .d-style directories, where some .d directories were being skipped. This was caused by modifying the contents of a Python list during iteration. (#3)
Performed some miscelleanous cleanups in django12factor, a Django utility to make projects adhere better to the 12-factor web-application philosophy. (#58)
Submitted a pull request for Doomsday-Engine, a portable, enhanced source port of Doom, Heretic and Hexen, to make the build reproducible (#16)
Created a pull request for gdata-python-client (a Python client library for Google APIs) to make the build reproducible. (#56)
Authored a pull request for the MochaJS JavaScript test framework to make the build reproducible. (#2727)
Filed a pull request against vine, a Python promises library, to avoid non-determinstic default keyword argument appearing in the documentation. (#12)
Filed an issue for the Redis key-value database addressing build failures on the MIPS architecture. (#3874)
Submitted a bug report against xdotool a tool to automate window and keyboard interactions reporting a crash when searching after binding an action with behave. (#169)
Reviewed a pull request from Dan Palmer for django-email-from-template, a library to send emails in Django generated entirely from the templating system, which intends to add an option to send mails upon transaction commit.
Reproducible builds
Whilst anyone can inspect the source code of free software for malicious flaws, most software is distributed pre-compiled to end users.
The motivation behind the Reproducible Builds effort is to permit verification that no flaws have been introduced either maliciously or accidentally during this compilation process by promising identical results are always generated from a given source, thus allowing multiple third-parties to come to a consensus on whether a build was compromised.
I have generously been awarded a grant from the Core Infrastructure Initiative to fund my work in this area.
This month I:
Submitted the following patches to fix reproducibility-related toolchain issues within Debian:
3:3.2.8-2 Avoid conflict between RuntimeDirectory and tmpfiles.d(5) both attempting to create /run/redis with differing permissions. (#856116)
3:3.2.8-3 Revert the creation of a /usr/bin/redis-check-rdb to /usr/bin/redis-server symlink to avoid a dangling symlink if only the redis-tools package is installed. (#858519)
gunicorn19.7.0-1 & 19.7.1-1 New upstream releases.
cpio (2.12+dfsg-4) Add missing autoconf to Build-Depends (#855572)
pygoocanvas (0.14.1-1.2) Make the build reproducible (#828222), add docbook-xml to Build-Depends (#628813), re-add demo files (#450577), and update URL in debian/copyright (#693270).
Here is my monthly update covering what I have been doing in the free software world (previous month):
Submitted a number of pull requests to the Django web development framework:
Add a --mode=unified option to the "diffsettings" management command. (#8113)
Fix a crash in setup_test_environment() if ALLOWED_HOSTS is a tuple. (#8101)
Use Python 3 "shebangs" now that the master branch is Python 3 only. (#8105)
URL namespacing warning should consider nested namespaces. (#8102)
Created an experimental patch against the Python interpreter in order to find reproducibility-related assumptions in dict handling in arbitrary Python code. (#29431)
Filed two issues against dh-virtualenv, a tool to package Python virtualenv environments in Debian packages:
Fix "upgrage-pip" typo in usage documentation. (#195)
Missing DH_UPGRADE_SETUPTOOLS equivalent for dh_virtualenv (#196)
Reviewed and merged a pull request by @jheld for django-slack (my library to easily post messages to the Slack group-messaging utility) to support per-message backends and channels. (#63)
Created a pull request for django-two-factor-auth, a complete Two-Factor Authentication (2FA) framework for projects using the Django web development framework to drop use of the @lazy_property decorator to ensure compatibility with Django 1.11. (#195)
Filed, triaged and eventually merged a change from @evgeni to fix an autopkgtest-related issue in travis.debian.net, my hosted service for projects that host their Debian packaging on GitHub to use the Travis CI continuous integration platform to test builds on every code change) travis.debian.net. (#41)
Submitted a pull request against social-core a library to allow Python applications to authenticate against third-party web services such as Facebook, Twitter, etc. to use the more-readable X if Y else Z construction over Y and X or Z. (#44)
Filed an issue against freezegun (a tool to make it easier to write Python tests involving times) to report that dateutils was missing from requirements.txt. (#173)
Submitted a pull request against the Hypothesis "QuickCheck"-like testing framework to make the build reproducible. (#440)
Fixed an issue reported by @davidak in trydiffoscope (a web-based version of the diffoscope in-depth and content-aware diff utility) where the maximum upload size was incorrectly calculated. (#22)
Created a pull request for the Mars Simulation Project to remove some embedded timestamps from the changelog.gz and mars-sim.1.gz files in order to make the build reproducible. (#24)
Filed a bug against the cpio archiving utility to report that the testsuite fails when run in the UTC +1300 timezone. (Thread)
Submitted a pull request against the "pnmixer" system-tray volume mixer in order to make the build reproducible. (#153)
Sent a patch to Testfixtures (a collection of helpers and mock objects that are useful when writing Python unit tests or doctests) to make the build reproducible. (#56)
Whilst anyone can inspect the source code of free software for malicious flaws, most software is distributed pre-compiled to end users.
The motivation behind the Reproducible Builds effort is to permit verification that no flaws have been introduced either maliciously or accidentally during this compilation process by promising identical results are always generated from a given source, thus allowing multiple third-parties to come to a consensus on whether a build was compromised.
(I have been awarded a grant from the Core Infrastructure Initiative to fund my work in this area.)
This month I:
Issued DLA 817-1 for libphp-phpmailer, correcting a local file disclosure vulnerability where insufficient parsing of HTML messages could potentially be used by attacker to read a local file.
Issued DLA 826-1 for wireshark which fixes a denial of service vulnerability in wireshark, where a malformed NATO Ground Moving Target Indicator Format ("STANAG 4607") capture file could cause a memory exhausion/infinite loop.
Uploads
python-django (1:1.11~beta1-1) New upstream beta release.
On CVE-2016-4484, a (security)? bug in the cryptsetup initramfs integration
On November 4, I was made aware of a security vulnerability in the integration
of cryptsetup into initramfs. The vulnerability was discovered by security
researchers Hector Marco and Ismael Ripoll of CyberSecurity UPV Research
Group and got
CVE-2016-4484
assigned.
In this post I'll try to reflect a bit on
What CVE-2016-4484 is all about
Basically, the vulnerability is about two separate but related issues:
1. Initramfs rescue shell considered harmful
The main topic that Hector Marco and Ismael Ripoll address in their
publication
is that Debian exits into a rescue shell in case of failure during initramfs,
and that this can be triggered by entering a wrong password ~93 times in a
row.
Indeed the Debian initramfs implementation as provided by initramfs-tools
exits into a rescue shell (usually a busybox shell) after a defined amount of
failed attempts to make the root filesystem available. The loop in question
is in local_device_setup() at the local initramfs script
In general, this behaviour is considered as a feature: if the root device
hasn't shown up after 30 rounds, the rescue shell is spawned to provide the
local user/admin a way to debug and fix things herself.
Hector Marco and Ismael Ripoll argue
that in special environments, e.g. on public computers with password protected
BIOS/UEFI and bootloader, this opens an attack vector and needs to be regarded
as a security vulnerability:
It is common to assume that once the attacker has physical access to the
computer, the game is over. The attackers can do whatever they want. And
although this was true 30 years ago, today it is not.
There are many "levels" of physical access. [...]
In order to protect the computer in these scenarios: the BIOS/UEFI has one
or two passwords to protect the booting or the configuration menu; the GRUB
also has the possibility to use multiple passwords to protect unauthorized
operations.
And in the case of an encrypted system, the initrd shall block the maximum
number of password trials and prevent the access to the computer in that
case.
While Hector and Ismael have a valid point in that the rescue shell might
open an additional attack vector in special setups, this is not true for
the vast majority of Debian systems out there: in most cases a local attacker
can alter the boot order, replace or add boot devices, modify boot options in
the (GNU GRUB) bootloader menu or modify/replace arbitrary hardware parts.
The required scenario to make the initramfs rescue shell an additional attack
vector is indeed very special: locked down hardware, password protected
BIOS and bootloader but still local keyboard (or serial console) access are
required at least.
Hector and Ismael argue
that the default should be changed for enhanced security:
[...] But then Linux is used in more hostile environments, this helpful
(but naive) recovery services shall not be the default option.
For the reasons explained about, I tend to disagree to Hectors and Ismaels
opinion here. And after discussing this topic with several people I find my
opinion reconfirmed: the Debian Security Team disputes the security
impact of the
issue and othersagree.
But leaving the disputable opinion on a sane default aside, I don't think that
the cryptsetup package is the right place to change the default, if at all.
If you want added security by a locked down initramfs (i.e. no rescue shell
spawned), then at least the bootloader (GNU GRUB) needs to be locked down by
default as well.
To make it clear: if one wants to lock down the boot process, bootloader and
initramfs should be locked down together. And the right place to do this would
be the configurable behaviour of
grub-mkconfig.
Here, one can set a password for GRUB and the boot parameter 'panic=1' which
disables the spawning of a rescue shell in
initramfs.
But as mentioned, I don't agree that this would be sane defaults. The vast
majority of Debian systems out there don't have any security added by locked
down bootloader and initramfs and the benefit of a rescue shell for debugging
purposes clearly outrivals the minor security impact in my opinion.
For the few setups which require the added security of a locked down bootloader
and initramfs, we already have the relevant options documented in the Securing
Debian Manual:
After discussing the topic with initramfs-tools maintainers today, Guilhem and
me (the cryptsetup maintainers) finally decided to not change any defaults and
just add a 'sleep 60' after the maximum allowed attempts were reached.
2. tries=n option ignored, local brute-force slightly cheaper
Apart from the issue of a rescue shell being spawned, Hector and Ismael also
discovered a programming bug in the cryptsetup initramfs integration. This bug
in the cryptroot initramfs local-top
script
allowed endless retries of passphrase input, ignoring the tries=n option of
crypttab (and the default of 3). As a result, theoretically unlimited
attempts to unlock encrypted disks were possible when processed during
initramfs stage. The attack vector here was that local brute-force attacks are
a bit cheaper. Instead of having to reboot after max tries were reached, one
could go on trying passwords.
Even though efficient brute-force attacks are mitigated by the
PBKDF2 implementation in cryptsetup,
this clearly is a real bug.
The reason for the bug was twofold:
First, the condition in setup_mapping() responsible for making the
function fail when the maximum amount of allowed attempts is reached,
was never met:
setup_mapping()[...]# Try to get a satisfactory password $crypttries times
count=0 while[$crypttries-le 0][$count-lt $crypttries];doexport CRYPTTAB_TRIED="$count"
count=$(($count+1))[...]doneif[$crypttries-gt 0] && [$count-gt $crypttries];then
message "cryptsetup: maximum number of tries exceeded for$crypttarget"return1fi[...]
As one can see, the while loop stops when $count -lt $crypttries.
Thus the second condition $count -gt $crypttries is never met. This
can easily be fixed by decreasing $count by one in case of a successful
unlock attempt along with changing the second condition to $count -ge
$crypttries:
setup_mapping()[...]while[$crypttries-le 0][$count-lt $crypttries];do[...]# decrease $count by 1, apparently last try was successful.
count=$(($count-1))[...]doneif[$crypttries-gt 0] && [$count-ge $crypttries];then[...]fi[...]
Christian Lamparter already spotted this bug
back in October 2011 and provided a (incomplete) patch,
but back then I even managed to merge the patch in an improper way,
making it even more useless: The patch by Christian forgot to decrease
$count by one in case of a successful unlock attempt, resulting in
warnings about maximum tries exceeded even for successful attemps in
some circumstances. But instead of adding the decrease myself and
keeping the (almost correct) condition $count -eq $crypttries for
detection of exceeded maximum tries, I changed back the condition to
the wrong original $count -gt $crypttries that again was never met.
Apparently I didn't test the fix properly back then. I definitely should
do better in future!
Second, back in December 2013,
I added a cryptroot initramfs local-block script
as suggested by Goswin von Brederlow in order to fix bug #678692.
The purpose of the cryptroot initramfs local-block script is to invoke
the cryptroot initramfs local-top script again and again in a loop. This
is required to support complex block device stacks.
In fact, the numberless options of stacked block devices are one of the
biggest and most inglorious reasons that the cryptsetup initramfs
integration scripts became so complex over the years. After all we need
to support setups like rootfs on top of LVM with two separate encrypted
PVs or rootfs on top of LVM on top of dm-crypt on top of MD raid.
The problem with the local-block script is that exiting the
setup_mapping() function merely triggers a new invocation of the very
same function.
The guys who discovered the bug suggested a simple and good solution to
this bug: When maximum attempts are detected (by second condition from
above), the script sleeps for 60 seconds. This mitigates the brute-force
attack options for local attackers - even rebooting after max attempts
should be faster.
About disclosure, wording and clickbaiting
I'm happy that Hector and Ismael brought up the topic and made their argument
about the security impacts of an initramfs rescue shell, even though I have
to admit that I was rather astonished about the fact that they got a CVE
assigned.
Nevertheless I'm very happy that they informed the Security Teams of Debian and
Ubuntu prior to publishing their findings, which put me in the loop in turn.
Also Hector and Ismael were open and responsive when it came to discussing
their proposed fixes.
But unfortunately the way they advertised their finding was not very helpful.
They announced a speech about this topic at the DeepSec 2016 in Vienna with
the headline Abusing LUKS to Hack the System.
Honestly, this headline is missleading - if not wrong - in several ways:
First, the whole issue is not about LUKS, neither is it about cryptsetup
itself. It's about Debians integration of cryptsetup into the initramfs,
which is a compeletely different story.
Second, the term hack the system suggests that an exploit to break into
the system is revealed. This is not true. The device encryption is not
endangered at all.
Third - as shown above - very special prerequisites need to be met in order
to make the mere existance of a LUKS encrypted device the relevant fact
to be able to spawn a rescue shell during initramfs.
Unfortunately, the way this issue was published lead to even worse articles
in the tech news press. Topics like Major security hole found in Cryptsetup
script for LUKS disk encryption
or Linux Flaw allows Root Shell During Boot-Up for LUKS Disk-Encrypted
Systems suggest that a major security vulnerabilty
was revealed and that it compromised the protection that cryptsetup respective
LUKS offer.
If these articles/news did anything at all, then it was causing damage to the
cryptsetup project,
which is not affected by the whole issue at all.
After the cat was out of the bag, Marco and Ismael aggreed that the way the
news picked up the issue was suboptimal, but I cannot fight the feeling that
the over-exaggeration was partly intended and that clickbaiting is taking
place here. That's a bit sad.
My prior post showed my research from earlier in the year at the 2016 Linux Security Summit on kernel security flaw lifetimes. Now that CVE-2016-5195 is public, here are updated graphs and statistics. Due to their rarity, the Critical bug average has now jumped from 3.3 years to 5.2 years. There aren t many, but, as I mentioned, they still exist, whether you know about them or not. CVE-2016-5195 was sitting on everyone s machine when I gave my LSS talk, and there are still other flaws on all our Linux machines right now. (And, I should note, this problem is not unique to Linux.) Dealing with knowing that there are always going to be bugs present requires proactive kernel self-protection (to minimize the effects of possible flaws) and vendors dedicated to updating their devices regularly and quickly (to keep the exposure window minimized once a flaw is widely known).
So, here are the graphs updated for the 668 CVEs known today:
I've been doing a little bit of dynamically typed programming in Haskell,
to improve Propellor's Info type. The result is kind of
interesting in a scary way.
Info started out as a big record type, containing all the different sorts
of metadata that Propellor needed to keep track of. Host IP addresses, DNS
entries, ssh public keys, docker image configuration parameters... This got
quite out of hand. Info needed to have its hands in everything,
even types that should have been private to their module.
To fix that, recent versions of Propellor let a single
Info contain many different types of values. Look at it one way and
it contains DNS entries; look at it another way and it contains ssh public
keys, etc.
As an migr from lands where you can never know what type of value is in
a $foo until you look, this was a scary prospect at first, but I found
it's possible to have the benefits of dynamic types and the safety of
static types too.
The key to doing it is Data.Dynamic. Thanks to Joachim Breitner for
suggesting I could use it here. What I arrived at is this type (slightly
simplified):
newtype Info = Info [Dynamic]deriving(Monoid)
So Info is a monoid, and it holds of a bunch of dynamic values, which could
each be of any type at all. Eep!
So far, this is utterly scary to me. To tame it, the Info constructor is not
exported, and so the only way to create an Info is to start with mempty
and use this function:
addInfo :: (IsInfo v, Monoid v) => Info -> v -> Info
addInfo (Info l) v = Info (toDyn v : l)
The important part of that is that only allows adding values that are in
the IsInfo type class. That prevents the foot shooting associated with
dynamic types, by only allowing use of types that make sense as Info.
Otherwise arbitrary Strings etc could be passed to addInfo by accident, and
all get concated together, and that would be a total dynamic programming
mess.
Anything you can add into an Info, you can get back out:
getInfo :: (IsInfo v, Monoid v) => Info -> v
getInfo (Info l) = mconcat (mapMaybe fromDynamic (reverse l))
Only monoids can be stored in Info, so if you ask for a type that an Info
doesn't contain, you'll get back mempty.
Crucially, IsInfo is an open type class. Any module in Propellor
can make a new data type and make it an instance of IsInfo, and then that
new data type can be stored in the Info of a Property, and any Host that
uses the Property will have that added to its Info, available for later
introspection.
For example, this weekend I'm extending Propellor to have controllers:
Hosts that are responsible for running Propellor on some other hosts.
Useful if you want to run propellor once and have it update the
configuration of an entire network of hosts.
There can be whole chains of controllers controlling other controllers etc.
The problem is, what if host foo has the property controllerFor bar
and host bar has the property controllerFor foo? I want to avoid
a loop of foo running Propellor on bar, running Propellor on foo, ...
To detect such loops, each Host's Info should contain a list of the
Hosts it's controlling. Which is not hard to accomplish:
newtype Controlling = Controlled [Host]deriving(Typeable, Monoid)
isControlledBy :: Host -> Controlling ->Bool
h isControlledBy (Controlled hs) =any(== hostName h) (map hostName hs)instance IsInfo Controlling where
propigateInfo _ =True
mkControllingInfo :: Host -> Info
mkControllingInfo controlled = addInfo mempty (Controlled [controlled])
getControlledBy :: Host -> Controlling
getControlledBy = getInfo . hostInfo
isControllerLoop :: Host -> Host ->Bool
isControllerLoop controller controlled = go S.empty controlled
where
go checked h
controller isControlledBy c =True-- avoid checking loops that have been checked before
hostName h S.member checked =Falseotherwise=any(go (S.insert(hostName h) checked)) l
where
c@(Controlled l) = getControlledBy h
This is all internal to the module that needs it; the rest of
propellor doesn't need to know that the Info is using used for this.
And yet, the necessary information about Hosts is gathered as
propellor runs.
So, that's a useful technique. I do wonder if I could somehow make
addInfo combine together values in the list that have the same type;
as it is the list can get long. And, to show Info, the best I could do was
this:
instanceShow Info whereshow(Info l) ="Info "++show(map dynTypeRep l)
The resulting long list of the types of vales stored in a host's info is not
a useful as it could be. Of course, getInfo can be used to get any
particular type of value:
Hi all,
After 4 release candidates, the FusionForge community is proud to
announce the new major Fusionforge 6.0 final release.
The major changes in this version are:
Immediate system actions (0-delay for new project, new repository, new SSH key...)
Unified, concurrent SSH & HTTPS access to Git and SVN
Technology preview: new TaskBoard plugin supporting Scrum and Kanban agile methodologies
Here is a more detailed list of visible changes:
Standard features:
New install system (Inria)
Reactivity: system replication is now performed immediately (rather than waiting for cron jobs) (Inria)
SCM:
Concurrent SSH and HTTPS access, relying on Apache mod_itk (Roland Mas and Inria)
Allow projects to use several SCM engines in parallel (Roland Mas, for CEA)
Support read-only access to private projects via SSH (Inria)
Browsing support for (Git) private repositories (Roland Mas, for AdaCore)
Anonymous read-only access through xinetd and rsync (Inria)
System: users now use a common default group ("users") rather than per-user group; avoids conflicts with project groups (Inria)
Docman:
Basic Webdav write mkcol, delete, put, move support (TrivialDev)
Add move mass actions (TrivialDev)
Direct link to file details (TrivialDev)
Rewrite parser using unoconv, support more file formats (Roland Mas, for CEA)
FRS:
Enable widget "My monitored packages" (TrivialDev)
Provide new role settings (TrivialDev)
Add delete packages, releases or files mass action (TrivialDev)
Provide link to download any release as ZIP file (TrivialDev)
Web UI:
Drop tipsy plugin, use standard jQuery UI tooltip already provided (TrivialDev)
Install hooks as the requesting system user (Inria)
AuthLDAP: Support LPAP_OPT_REFERRALS option, needed by ActiveDirectory Server (TrivialDev)
Task Board: New Agile TaskBoard supporting Scrum and Kanban methodologies (Vitaliy Pylypiv and TrivialDev)
Tracker roadmap of the 6.0 release: roadmap.
Some metrics about 6.0:
14 months of development since 5.3
~ 2900 commits between 5.3 and 6.0
36 contributors
43 feature requests implemented
10 bugs fixed (in addition to those that were not in the tracker)
FusionForge 6.0 can be downloaded in source form from our
file release system.
Packages will be available in some distributions soon.
Enjoy! Your feedback to fusionforge-general@lists.fusionforge.org is welcome!
For more information on FusionForge, refer to FusionForge.org.
-- The FusionForge community
RHEL7 installation note says "The new graphical installer also generates automatic default settings where applicable. For example, if the installer detects a network connection, the user's general location is determined with GeoIP and sane suggestions are made for the default keyboard layout, language and timezone." but CentOS7 doesn't work as expected ;-)
GeoIP support in Fedora20 Installer works well and it's pretty nice. Boot from live media and it shows "Try Fedora" and "Install to Hard Drive" menu.
Then, select "Install" and...Boom! it shows in Japanese without any configuration automagically!
mk-configure is a project which tries to be autotools done right.
Instead of supporting an exceedingly large number of platforms, modern and ancient, at costs of generated unreadable
multi-kilobyte shell scripts, mk-configure aims at better support of less platforms, but those which are really in
use today. One of the main differences of this project is that it avoids code generation as much as possible.
The author of mk-configure, Aleksey Cheusov, a NetBSD hacker from Belarus, uses NetBSD make (bmake)
and shell script snippets instead of monstrous libraries written in m4 interleaved with shell scripts. As the result,
there s no need in a separate step of package configuration or bootstrapping the configure script, everything is done
by just running bmake, or a convenience wrapper for it, mkcmake, which prepends a proper library path to bmake
arguments, so you don t have to specify it yourself.
Today, mk-configure is already powerful enough to be able replace autotools for most of the projects, and what is missing
from it can be easily done by hacking the Makefile, which would otherwise be quite simple.
Try it for your project, you may really like it. I already did. And report bugs.
I'm using WebDAV on Lenny and on Squeeze now for some time for syncing my bookmarks and calendars which is working just fine. But now I want to extend my WebDAV in order to use it as an external storage. The only problem is: it doesn't workon OSX! D'oh!
Basically I followed severalHowTos on the Net, so I ended with this configuration so far:
DavLockDB /path/to/DAVLockDB/DAVLockDB
<Directory /path/to/webdav/>
DAV On
AuthType Digest
AuthName "realm"
AuthUserFile /path/tot/.htdigest
Require valid-user
Options +Indexes
AllowOverride None
Order allow,deny
Allow from all
<LimitExcept GET PUT POST OPTIONS DELETE PROPFIND PROPPATCH MKCOL COPY MOVE LOCK UNLOCK>
RewriteEngine Off
</LimitExcept>
</Directory>
I can connect to and browse the WebDAV directory, but I can't upload new files - neither with Finder on OSX nor with cp on command line in OSX. When using Finder I get the following errors:
For non-Germans: it says that the process couldn't be completed because the object is still in use.
Error -36 seems to be a generic I/O error in OSX and you can find many hits when you do a search in your favorite search engine. The Apache logs report lots of these lines:
When copying some files with cp on OSXs command line I get these kind of errors:
$ cp -r Desktop/AIDAluna_KameraArchiv_Geiranger /Volumes/ij/Files/
cp: /Volumes/ij/Files/AIDAluna_KameraArchiv_Geiranger/PRIVATE/AVCHD: Operation not permitted
cp: Desktop/AIDAluna_KameraArchiv_Geiranger/PRIVATE/AVCHD: unable to copy extended attributes to /Volumes/ij/Files/AIDAluna_KameraArchiv_Geiranger/PRIVATE/AVCHD: Operation not permitted
cp: /Volumes/ij/Files/AIDAluna_KameraArchiv_Geiranger/PRIVATE/AVCHD/.DS_Store: No such file or directory
cp: /Volumes/ij/Files/AIDAluna_KameraArchiv_Geiranger/PRIVATE/AVCHD/AVCHDTN: No such file or directory
Funny enough directories were created and some files were copying although OSX complains about "Operation not permitted":
$ du -sch /Volumes/ij/Files/AIDAluna_KameraArchiv_Geiranger/*
10M /Volumes/ij/Files/AIDAluna_KameraArchiv_Geiranger/DCIM
2,5K /Volumes/ij/Files/AIDAluna_KameraArchiv_Geiranger/MISC
2,0K /Volumes/ij/Files/AIDAluna_KameraArchiv_Geiranger/PRIVATE
10M total
Of course the directory on the webserver has sufficient permissions and copying files to it is working just fine with Windows as well as Debian Sid. But anyway, is there something I'm missing in WebDAV configuration or can I do something in OSX to make it work? Using a third party application on OSX is something I would like to avoid, but when nothing else will help, I'm open for suggestions.
For the Freaky Wall I have installed a Debian GNU/kFreeBSD system
using the installer with ZFS support announced on:
http://robertmh.wordpress.com/2010/09/06/debian-installer-with-zfs/
I used the mini.iso found on:
http://people.debian.org/~rmh/zfs/kfreebsd-amd64/monolithic/mini.iso
the 12th of October of 2010; as I had some problems and reported them to
Robert is possible that the current image solves part of them.
Installation plan
I did a standard installation on a machine with two hard disks, but only used
the first one from the installer.
The plan was to use ZFS with RAID-1, but current versions of grub do not
support booting from a ZFS + RAID file system, so I had to use the same
technique used for Linux for a long time; three partitions: a swap partition,
a small /boot partition and a big partition for /; / and /boot were
formated to use ZFS.
First reboot
After the installation the system failed to boot because of a bug when
building the /boot/grub/grub.cfg (some routes were missing a //@ prefix);
to be able to boot Iwe edited the config on the grub prompt and later fixed
the file:
I haven't tested the installer since that day, but I believe that the current
ZFS installer was fixed by Robert to deal with that problem.
Once the system was booted I had to fix a couple of things:
The keyboard configuration was wrong, but it was easy to fix the Debian Way:
dpkg-reconfigure kbdcontrol
The /boot partition was mounted on /target/boot, as that was what was
recorded on the ZFS file system; to fix it I executed the following commands:
 # zfs set mountpoint=/     dkfbf1-ad4s3
 # zfs set mountpoint=/boot dkfbf1-ad4s1
Where dkfbf1-ad4s3 is the root file system and dkfbf1-ad4s1 is the
original /boot.
I reported that to Robert also and I believe it is fixed on the ZFS
installer now.
Adjusting ZFS to do RAID-1
On the second disk I created the same partitions as the ones on the first disk
using parted; the final result was:
    # parted -l
    Model: ST3250620NS/3BKS (ide)
    Disk /dev/ad6: 250GB
    Sector size (logical/physical): 512B/512B
    Partition Table: msdos
    Number  Start   End     Size    Type     File system  Flags
     1      1049kB  256MB   255MB   primary
     2      256MB   4256MB  4000MB  primary
     3      4256MB  250GB   246GB   primary
    Model: ST3250620NS/3BKS (ide)
    Disk /dev/ad4: 250GB
    Sector size (logical/physical): 512B/512B
    Partition Table: msdos
    Number  Start   End     Size    Type     File system     Flags
      1      1049kB  256MB   255MB   primary
      2      256MB   4256MB  4000MB  primary  linux-swap(v1)
      3      4256MB  250GB   246GB   primary
To use the second partition of both disks as swap I added the following to
/etc/fstab:
To configure the mirroring for the root file system I did the following:
zpool attach dkfbf1-ad4s3 ad4s3 ad6s3
As the /boot can't work as a replica I adjusted it to make two copies of
every file:
zfs set copies=2 dkfbf1-ad4s1
Leaving the second disk copy alone, although my plan is to configure it to
hold a copy of the /boot partition synchronized with rsync each night.
After all those changes the system didn't boot, as the grub-pc generates a
buggy /boot/grub/grub.cfg; the problem is on the /etc/grub.d/10_kfreebsd
section:
    ### BEGIN /etc/grub.d/10_kfreebsd ###
    menuentry 'Debian GNU/kFreeBSD, with kFreeBSD 8.1-1-amd64' --class debian \
      --class gnu-kfreebsd --class gnu --class os
          insmod part_msdos
          insmod zfs
          set root='(hd0,1)'
          search --no-floppy --fs-uuid --set a371979bb836d1fe
          echo 'Loading kernel of FreeBSD 8.1-1-amd64 ...'
          kfreebsd /kfreebsd-8.1-1-amd64.gz
          set kFreeBSD.vfs.root.mountfrom=unknown:/dev/ad4s3
          set kFreeBSD.vfs.root.mountfrom.options=rw

    ### END /etc/grub.d/10_kfreebsd ###
To fix it there has to be a copy of the modules for ZFS on the boot partition
(in my case I moved the /lib/modules directory to /boot and created a
link on the root partition to the new directory):
    cd /boot
    mkdir lib
    mv /lib/modules lib
    cd /lib
    ln -s ../boot/lib/modules
And instead of fixing the /etc/grub.d/10_kfreebsd code I wrote a new
script (/etc/grub.d/09_zfs_kfreebsd) that creates the right config for my
current configuration on the grub.cfg file:
    #!/bin/sh
    prefix=/usr
    exec_prefix=$ prefix
    bindir=$ exec_prefix /bin
    libdir=$ exec_prefix /lib
    . $ libdir /grub/grub-mkconfig_lib
    prepare_boot_cache="$(prepare_grub_to_access_device $ GRUB_DEVICE_BOOT    sed -e "s/^/\t/")"
    kfreebsd_versions="$(ls /lib/modules/)"
    zfs_root_device="$(zfs list   awk '/\/$/   print $1  '   head -1)"
    for kversion in $kfreebsd_versions; do
      cat << EOF
    # Entry when using ZFS (we have issues with /etc/grub.d/10_kfreebsd)
    menuentry 'Debian GNU/kFreeBSD, with kFreeBSD $kversion and ZFS' --class debian --class gnu-kfreebsd --class gnu --class os
    $ prepare_boot_cache
          echo                    'Loading kernel of FreeBSD $kversion ...'
          kfreebsd                //@/kfreebsd-$kversion.gz
          kfreebsd_module_elf     //@/lib/modules/$kversion/opensolaris.ko
          kfreebsd_module_elf     //@/lib/modules/$kversion/zfs.ko
          kfreebsd_module         //@/zfs/zpool.cache type=/boot/zfs/zpool.cache
          set kFreeBSD.vfs.root.mountfrom=zfs:$zfs_root_device
          set kFreeBSD.vfs.root.mountfrom.options=rw

    EOF
    done
I solved the problem this way to have a working solution that does not break
with squeeze upgrades, assuming that a future grub-pc package will deal well
with my config and I'll be able to remove this script, but I guess I'll have
to install it from backports.
The entry generated by the script when called from update-grub will be
similar to:
    ### BEGIN /etc/grub.d/09_zfs-kfreebsd ###
    # Entry when using ZFS (we have issues with /etc/grub.d/10_kfreebsd)
    menuentry 'Debian GNU/kFreeBSD, with kFreeBSD 8.1-1-amd64 @ ITI' --class debian --class gnu-kfreebsd --class gnu --class os
          insmod part_msdos
          insmod zfs
          set root='(hd0,1)'
          search --no-floppy --fs-uuid --set a371979bb836d1fe
          echo                    'Loading kernel of FreeBSD 8.1-1-amd64 ...'
          kfreebsd                //@/kfreebsd-8.1-1-amd64.gz
          kfreebsd_module_elf     //@/lib/modules/8.1-1-amd64/opensolaris.ko
          kfreebsd_module_elf     //@/lib/modules/8.1-1-amd64/zfs.ko
          kfreebsd_module         //@/zfs/zpool.cache type=/boot/zfs/zpool.cache
          set kFreeBSD.vfs.root.mountfrom=zfs:dkfbf1-ad4s3
          set kFreeBSD.vfs.root.mountfrom.options=rw

    ### END /etc/grub.d/10_iti-kfreebsd ###
And after rebooting the machine with this new configuration the system boots
OK.
On my next post I'll continue explaining how to compile a kernel that supports
the use of the OpenBSD Packet Filter and related technologies (CARP, pflog,
etc.).
From time to time I have to boot an iso or even a floppy. Unfortunately my X200 doesn't have a CD-Rom or a Floppy. Grub isn't able to boot isos and floppy images on its own, thats the point where syslinux comes into play: from version 4.x the syslinux memdisk driver is able to boot most iso and floppy images. The syslinux wiki has some details about the supported image types.
Yesterday I had to boot an iso image and instead of editing grub.cfg by hand I decided to create a snippet for grub.d to automate things. If you drop an .iso or an .img into the IMAGES path and run update-grub2 afterwards you get a nice boot entry that boots the floppy or iso image.
The only thing you have to do is to install syslinux and copy /usr/lib/syslinux/memdisk to /boot.
And here it comes:
#!/bin/sh
set -e
IMAGES=/boot/images
. /usr/lib/grub/grub-mkconfig_lib
if test -e /boot/memdisk ; then
    MEMDISKPATH=$( make_system_path_relative_to_its_root "/boot/memdisk" )
    echo "Found memdisk: $MEMDISKPATH" >&2
    find $IMAGES -name "*.iso" -o -name '*.img'   sort
    while read image ; do
        IMAGEPATH=$( make_system_path_relative_to_its_root "$image" )
        case "$image" in
            *.iso)
                echo "Found iso image: $IMAGEPATH" >&2
                cat << EOF
menuentry "Bootable ISO Image: $(basename $IMAGEPATH   sed s/.img//)"
EOF
                prepare_grub_to_access_device $ GRUB_DEVICE_BOOT    sed -e "s/^/\t/"
                cat << EOF
    linux16 $MEMDISKPATH iso
    initrd16 $IMAGEPATH

EOF
                ;;
            *.img)
                echo "Found floppy image: $IMAGEPATH" >&2
                cat << EOF
menuentry "Bootable Floppy Image: $(basename $IMAGEPATH   sed s/.img//)"
EOF
                prepare_grub_to_access_device $ GRUB_DEVICE_BOOT    sed -e "s/^/\t/"
                cat << EOF
    linux16 $MEMDISKPATH raw
    initrd16 $IMAGEPATH

EOF
                ;;
        esac
    done
fi
P.S. I got the idea and some code snippets from several blog and wiki entries in the net and just added the iso part, so thats not all my code :)
Various people observed in a long thread on debian-devel that the grub2 package was in a bit of a mess in terms of its release-critical bug count, and Jordi and Stefano both got in touch with me directly to gently point out that I probably ought to be doing something about it as one of the co-maintainers.
Actually, I don't think grub2 was in quite as bad a state as its 18 RC bugs suggested. Of course every boot loader failure is critical to the person affected by it, not to mention that GRUB 2 offers more complex functionality than any other boot loader (e.g. LVM and RAID), and so it tends to accumulate RC bugs at rather a high rate. That said, we'd been neglecting its bug list for some time; Robert and Felix have both been taking some time off, Jordi mostly only cared about PowerPC and can't do that any more due to hardware failure, and I hadn't been able to pick up the slack.
Most of my projects at work for the next while involve GRUB in one way or another, so I decided it was a perfectly reasonable use of work time to do something about this; I was going to need fully up-to-date snapshots anyway, and practically all the Debian grub2 bugs affect Ubuntu too. Thus, with the exception of some other little things like releasing the first Maverick alpha, I've spent pretty much the last week and a half solidly trying to get the grub2 package back into shape, with four uploads so far.
The RC issues that remain are:
upgrade-from-grub-legacy problems (#547944, #550477):
I think this has just been traditionally undertested. I'm setting up a KVM image now with GRUB Legacy which I can snapshot just before and after running upgrade-from-grub-legacy, and I should be able to unpick the bugs this way.
LVM snapshots break GRUB's LVM module (#574863): Sean has been working on this and seems to be nearly there. Yay.
RAID metadata version 1.x not supported (#492897):
This became rather more of an issue recently since mdadm switched its default from the old 0.90 format which GRUB understood. Felix put together a branch implementing the hard parts of this a while back, and I've been trying to finish it off. The hard bit is dealing with device naming, especially as the new-format and rather more useful names under /dev/md/ don't show up during d-i after creating RAID volumes; I think this is because we always create them as /dev/md0 etc. It's looking tractable, though.
Another odd problem probing RAID (#548648):
Not sure about this one, and I'll need to work with Josip on it as soon as I get a chance.
Stable device naming #554790) and consequential problems due to grub-install not being properly run (#557425 and many other sub-RC bugs):
Ubuntu's been carrying a patch to rearrange device presentation in the postinst, which Robert OKed in principle ages ago and so I've been intending to merge it for a while, but there are a few known problems with it that I need to fix first. One known unfixable problem is that it will have to ask some people which devices they want GRUB to be installed on, even if they'd answered that question before: this will be one-time, and it's because it recorded the answer using unstable device names and so has in some sense forgotten. Simple cases (e.g. single-disk) can be handled without needing to ask again, though.
Alignment errors on SPARC (#560823):
I have no idea what's going on here, I'm afraid. I'll try to trace it, but may have to downgrade it at some point since after all we don't install GRUB by default on SPARC yet.
Fonts not shown in gfxmenu (#564844):
Apparently fixed upstream, but I couldn't find the responsible commit so I want to make sure I can get gfxmenu working before closing this.
Sensitivity to out-of-date device.map files (#575076 and other sub-RC bugs):
We're trying to get rid of device.map in general. It was fine in the 1990s but it's hopeless now. Unfortunately there are still a small number of problems with running entirely without one, and one of my patches to help is controversial upstream, so we probably won't get to that for squeeze. In the meantime we'll probably just need some extra sanity-checking and robustness in the event that there's an incorrect or out-of-date device.map lying around, which we may just be able to do in the maintainer scripts or something if necessary.
Seriously weird failures to load initramfs (#582342):
If anyone can produce a reproduction recipe for this, that would really help me out. There are too many reports to discount as user error, but I haven't seen this myself yet.
Build failure on sparc (unfiled):
We've been discussing this upstream, but for the time being I'm just going to stop building grub-emu on sparc as a workaround.
If we can fix that lot, or even just the ones that are reasonably well-understood, I think we'll be in reasonable shape. I'd also like to make grub-mkconfig a bit more robust in the event that the root filesystem isn't one that GRUB understands (#561855, #562672), and I'd quite like to write some more documentation.
On the upside, progress has been good. We have multiple terminal support thanks to a new upstream snapshot (#506707), update-grub runs much faster (#508834, #574088), we have DM-RAID support with a following wind (#579919), the new scheme with symlinks under /dev/mapper/ works (#550704), we have basic support for btrfs / as long as you have something GRUB understands properly on /boot (#540786), we have full info documentation covering all the user-adjustable settings in /etc/default/grub, and a host of other smaller fixes. I'm hoping we can keep this up.
If you'd like to help, contact me, especially if there's something particular that isn't being handled that you think you could work on. GRUB 2 is actually quite a pleasant codebase to work on once you get used to its layout; it's certainly much easier to fix bugs in than GRUB Legacy ever was, as far as I'm concerned. Thanks to tools like grub-probe and grub-fstest, it's very often possible to fix problems without needing to reboot for anything other than a final sanity check (although KVM certainly helps), and you can often debug very substantial bits of the boot loader - the bits that actually go wrong - using standard tools such as strace and gdb. Upstream is helpful and I've been able to get many of the problems above fixed directly there. If you have a sound knowledge of C and a decent level of understanding of the environment a boot loader needs to operate in - or for that matter specialist knowledge of interesting device types - then you should be able to find something to do.
We have started to look into kdb+ as a possible
high-performance column-store backend. Kx offers
free trials
-- and so I have played with
this for a day or two, both the general system, data loads and dumps and in particular with
the interface to R,
Based on the few files (one C source with interface
code, one R file to access the C code, one object file to link against, one header
file and a simple Makefile), it took just a couple of minutes to turn this
into a proper CRAN-style R
package.
Anyway, the reason for this post was that the R / kdb+ glue code works well
... but not for datetimes. I really like to be able to pass date/time objects
natively between systems as easily as, say, numbers or strings (and see
e.g. my Rcpp package
for doing this with R and C++) and I was a bit annoyed when the millisecond
timestamps didn't move smoothly. Turns out that the basic converter function in the
code had a number of problems: it converted to integer, only covered a
single scalar rather than vectorised mode, and erroneously reduced a
reference count. A better version, in my view, is as follows:
static SEXP from_datetime_kobject(K x)

	SEXP result;
	int i, length = x->n;
	if (scalar(x))
		result = PROTECT(allocVector(REALSXP, 1));
		REAL(result)[0] = (kF(x)[0] + 10957) * 86400;
	  else
		result = PROTECT(allocVector(REALSXP, length));
		for(i = 0; i < length; i++)
		    	REAL(result)[i] = (kF(x)[i] + 10957) * 86400;


	SEXP datetimeclass = PROTECT(allocVector(STRSXP,2));
	SET_STRING_ELT(datetimeclass, 0, mkChar("POSIXt"));
	SET_STRING_ELT(datetimeclass, 1, mkChar("POSIXct"));
	setAttrib(result, R_ClassSymbol, datetimeclass);
	UNPROTECT(2);
        return result;
This deals with vectors as well as scalars, converts Kdb's 'fractional days
since Jan 1, 2000' to the Unix standard of seconds since the epoch --
including the R extension of fractional seconds -- and as importantly, sets
the class attributes to POSIXt POSIXct as needed by R. With
that, a simple select max datetime from table does just that,
and vectors of timestamped records of trades or quotes or whatever also
come with proper POSIXct behaviour into R. Note that it needs TZ to be set to UTC, though,
or you get a timezone offset you may not want.
I have done some major work on mdadm (see PTS) in experimental,
which is now at version 2.5.2-1 (not all web pages reflect that yet).
I still have not received enough success reports to make me comfortable
enough to upload to unstable, so here's another request for testing (or
else etch will ship with 2.4.1).
I am 95% confident that it's a smooth upgrade, though it helps if you make
sure that the output of the script /usr/share/mdadm/mkconf looks okay
before you reboot. Come and find me on IRC if you need reconfirmation (see
below).
Previously, mdadm required a newer version of initramfs-tools, one
which did not exist yet. I have addressed this issue with this version,
meaning that you can install it with anyinitramfs-tools out there,
and it will just do what it can do.
Details are available in the online README, which is a little more up to
date than the included /usr/share/doc/mdadm/README.experimental.
Please test mdadm2.5.2-1! and drop me a line if it works, or if it does
not! The package is in experimental or available from my repository for
i386 or amd64.
Again, do not hesitate to bug me on IRC
(#debian-devel/irc.debian.org) if you have questions or need
assistance.
Update: Alec Berryman discovered a slight problem when mdadm2.5.2-1
is used in conjunction with initramfs-tools 0.64 or earlier. Please see
this post for details and solutions. The online README has been updated.
I don't think this warrants a new package to be uploaded to the archive, but
please correct me if I am wrong.
Update: Alec Berryman helped discover another problem when the root
filesystem is on LVM is on RAID. If this is your setup, please do not
use mdadm 2.5 at the moment. See #375879.
 As promised, on this post I m going to explain how I ve configured this blog
using
As promised, on this post I m going to explain how I ve configured this blog
using  The first install of a Gentoo kernel needs to be somewhat manual if you want to optimize the kernel for the (virtual) system it boots on.
In
The first install of a Gentoo kernel needs to be somewhat manual if you want to optimize the kernel for the (virtual) system it boots on.
In 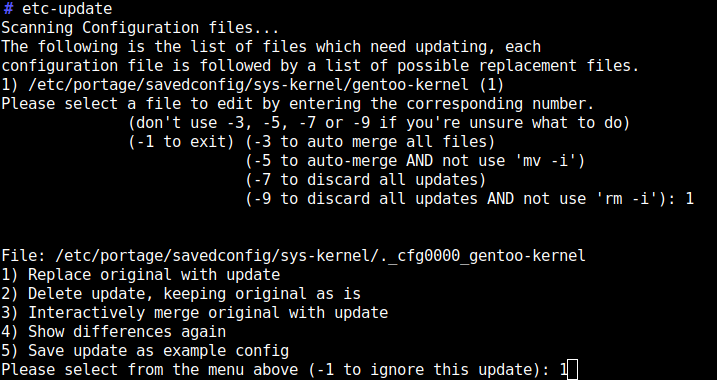 The kernel should auto-build once new versions become available via portage.
Again the
The kernel should auto-build once new versions become available via portage.
Again the 
 I have been using
  For the last years, I have been using btrfs in a completely naive way, simply creating new filesystems, mounting them, moving data over, linking the directories into my home dir, etc etc. It all became a huge mess over time. I have heard of
  All in all, a very smooth transition, and at least for some time I don t have to worry about which partition has still some space left.
Thanks btrfs and Open Source!
All in all, a very smooth transition, and at least for some time I don t have to worry about which partition has still some space left.
Thanks btrfs and Open Source!
 Here is my monthly update covering what I have been doing in the free software world (


 I've been doing a little bit of dynamically typed programming in Haskell,
to improve
I've been doing a little bit of dynamically typed programming in Haskell,
to improve  Hi all,
After 4 release candidates, the FusionForge community is proud to
announce the new major Fusionforge 6.0 final release.
The major changes in this version are:
Hi all,
After 4 release candidates, the FusionForge community is proud to
announce the new major Fusionforge 6.0 final release.
The major changes in this version are:


 Error -36 seems to be a generic I/O error in OSX and you can find many hits when you do a search in your favorite search engine. The Apache logs report lots of these lines:
 Various people observed in a
  We have started to look into