Search Results: "mez"

18 April 2024

Thomas Koch: Minimal overhead VMs with Nix and MicroVM

Posted on March 17, 2024
Joachim Breitner wrote about a Convenient sandboxed development environment and thus reminded me to blog about MicroVM. I ve toyed around with it a little but not yet seriously used it as I m currently not coding. MicroVM is a nix based project to configure and run minimal VMs. It can mount and thus reuse the hosts nix store inside the VM and thus has a very small disk footprint. I use MicroVM on a debian system using the nix package manager. The MicroVM author uses the project to host production services. Otherwise I consider it also a nice way to learn about NixOS after having started with the nix package manager and before making the big step to NixOS as my main system. The guests root filesystem is a tmpdir, so one must explicitly define folders that should be mounted from the host and thus be persistent across VM reboots. I defined the VM as a nix flake since this is how I started from the MicroVM projects example:
 
  description = "Haskell dev MicroVM";
  inputs.impermanence.url = "github:nix-community/impermanence";
  inputs.microvm.url = "github:astro/microvm.nix";
  inputs.microvm.inputs.nixpkgs.follows = "nixpkgs";
  outputs =   self, impermanence, microvm, nixpkgs  :
    let
      persistencePath = "/persistent";
      system = "x86_64-linux";
      user = "thk";
      vmname = "haskell";
      nixosConfiguration = nixpkgs.lib.nixosSystem  
          inherit system;
          modules = [
            microvm.nixosModules.microvm
            impermanence.nixosModules.impermanence
            ( pkgs, ...  :  
            environment.persistence.$ persistencePath  =  
                hideMounts = true;
                users.$ user  =  
                  directories = [
                    "git" ".stack"
                  ];
                 ;
               ;
              environment.sessionVariables =  
                TERM = "screen-256color";
               ;
              environment.systemPackages = with pkgs; [
                ghc
                git
                (haskell-language-server.override   supportedGhcVersions = [ "94" ];  )
                htop
                stack
                tmux
                tree
                vcsh
                zsh
              ];
              fileSystems.$ persistencePath .neededForBoot = nixpkgs.lib.mkForce true;
              microvm =  
                forwardPorts = [
                    from = "host"; host.port = 2222; guest.port = 22;  
                    from = "guest"; host.port = 5432; guest.port = 5432;   # postgresql
                ];
                hypervisor = "qemu";
                interfaces = [
                    type = "user"; id = "usernet"; mac = "00:00:00:00:00:02";  
                ];
                mem = 4096;
                shares = [  
                  # use "virtiofs" for MicroVMs that are started by systemd
                  proto = "9p";
                  tag = "ro-store";
                  # a host's /nix/store will be picked up so that no
                  # squashfs/erofs will be built for it.
                  source = "/nix/store";
                  mountPoint = "/nix/.ro-store";
                   
                  proto = "virtiofs";
                  tag = "persistent";
                  source = "~/.local/share/microvm/vms/$ vmname /persistent";
                  mountPoint = persistencePath;
                  socket = "/run/user/1000/microvm-$ vmname -persistent";
                 
                ];
                socket = "/run/user/1000/microvm-control.socket";
                vcpu = 3;
                volumes = [];
                writableStoreOverlay = "/nix/.rwstore";
               ;
              networking.hostName = vmname;
              nix.enable = true;
              nix.nixPath = ["nixpkgs=$ builtins.storePath <nixpkgs> "];
              nix.settings =  
                extra-experimental-features = ["nix-command" "flakes"];
                trusted-users = [user];
               ;
              security.sudo =  
                enable = true;
                wheelNeedsPassword = false;
               ;
              services.getty.autologinUser = user;
              services.openssh =  
                enable = true;
               ;
              system.stateVersion = "24.11";
              systemd.services.loadnixdb =  
                description = "import hosts nix database";
                path = [pkgs.nix];
                wantedBy = ["multi-user.target"];
                requires = ["nix-daemon.service"];
                script = "cat $ persistencePath /nix-store-db-dump nix-store --load-db";
               ;
              time.timeZone = nixpkgs.lib.mkDefault "Europe/Berlin";
              users.users.$ user  =  
                extraGroups = [ "wheel" "video" ];
                group = "user";
                isNormalUser = true;
                openssh.authorizedKeys.keys = [
                  "ssh-rsa REDACTED"
                ];
                password = "";
               ;
              users.users.root.password = "";
              users.groups.user =  ;
             )
          ];
         ;
    in  
      packages.$ system .default = nixosConfiguration.config.microvm.declaredRunner;
     ;
 
I start the microVM with a templated systemd user service:
[Unit]
Description=MicroVM for Haskell development
Requires=microvm-virtiofsd-persistent@.service
After=microvm-virtiofsd-persistent@.service
AssertFileNotEmpty=%h/.local/share/microvm/vms/%i/flake/flake.nix
[Service]
Type=forking
ExecStartPre=/usr/bin/sh -c "[ /nix/var/nix/db/db.sqlite -ot %h/.local/share/microvm/nix-store-db-dump ]   nix-store --dump-db >%h/.local/share/microvm/nix-store-db-dump"
ExecStartPre=ln -f -t %h/.local/share/microvm/vms/%i/persistent/ %h/.local/share/microvm/nix-store-db-dump
ExecStartPre=-%h/.local/state/nix/profile/bin/tmux new -s microvm -d
ExecStart=%h/.local/state/nix/profile/bin/tmux new-window -t microvm: -n "%i" "exec %h/.local/state/nix/profile/bin/nix run --impure %h/.local/share/microvm/vms/%i/flake"
The above service definition creates a dump of the hosts nix store db so that it can be imported in the guest. This is necessary so that the guest can actually use what is available in /nix/store. There is an effort for an overlayed nix store that would be preferable to this hack. Finally the microvm is started inside a tmux session named microvm . This way I can use the VM with SSH or through the console and also access the qemu console. And for completeness the virtiofsd service:
[Unit]
Description=serve host persistent folder for dev VM
AssertPathIsDirectory=%h/.local/share/microvm/vms/%i/persistent
[Service]
ExecStart=%h/.local/state/nix/profile/bin/virtiofsd \
 --socket-path=$ XDG_RUNTIME_DIR /microvm-%i-persistent \
 --shared-dir=%h/.local/share/microvm/vms/%i/persistent \
 --gid-map :995:%G:1: \
 --uid-map :1000:%U:1:

1 April 2024

Colin Watson: Free software activity in March 2024

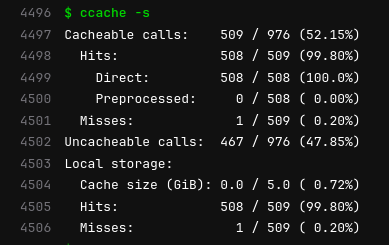
My Debian contributions this month were all sponsored by Freexian.

13 March 2024

Freexian Collaborators: Debian Contributions: Upcoming Improvements to Salsa CI, /usr-move, packaging simplemonitor, and more! (by Utkarsh Gupta)

Contributing to Debian is part of Freexian s mission. This article covers the latest achievements of Freexian and their collaborators. All of this is made possible by organizations subscribing to our Long Term Support contracts and consulting services.

/usr-move, by Helmut Grohne Much of the work was spent on handling interaction with time time64 transition and sending patches for mitigating fallout. The set of packages relevant to debootstrap is mostly converted and the patches for glibc and base-files have been refined due to feedback from the upload to Ubuntu noble. Beyond this, he sent patches for all remaining packages that cannot move their files with dh-sequence-movetousr and packages using dpkg-divert in ways that dumat would not recognize.

Upcoming improvements to Salsa CI, by Santiago Ruano Rinc n Last month, Santiago Ruano Rinc n started the work on integrating sbuild into the Salsa CI pipeline. Initially, Santiago used sbuild with the unshare chroot mode. However, after discussion with josch, jochensp and helmut (thanks to them!), it turns out that the unshare mode is not the most suitable for the pipeline, since the level of isolation it provides is not needed, and some test suites would fail (eg: krb5). Additionally, one of the requirements of the build job is the use of ccache, since it is needed by some C/C++ large projects to reduce the compilation time. In the preliminary work with unshare last month, it was not possible to make ccache to work. Finally, Santiago changed the chroot mode, and now has a couple of POC (cf: 1 and 2) that rely on the schroot and sudo, respectively. And the good news is that ccache is successfully used by sbuild with schroot! The image here comes from an example of building grep. At the end of the build, ccache -s shows the statistics of the cache that it used, and so a little more than half of the calls of that job were cacheable. The most important pieces are in place to finish the integration of sbuild into the pipeline. Other than that, Santiago also reviewed the very useful merge request !346, made by IOhannes zm lnig to autodetect the release from debian/changelog. As agreed with IOhannes, Santiago is preparing a merge request to include the release autodetection use case in the very own Salsa CI s CI.

Packaging simplemonitor, by Carles Pina i Estany Carles started using simplemonitor in 2017, opened a WNPP bug in 2022 and started packaging simplemonitor dependencies in October 2023. After packaging five direct and indirect dependencies, Carles finally uploaded simplemonitor to unstable in February. During the packaging of simplemonitor, Carles reported a few issues to upstream. Some of these were to make the simplemonitor package build and run tests reproducibly. A reproducibility issue was reprotest overriding the timezone, which broke simplemonitor s tests. There have been discussions on resolving this upstream in simplemonitor and in reprotest, too. Carles also started upgrading or improving some of simplemonitor s dependencies.

Miscellaneous contributions
  • Stefano Rivera spent some time doing admin on debian.social infrastructure. Including dealing with a spike of abuse on the Jitsi server.
  • Stefano started to prepare a new release of dh-python, including cleaning out a lot of old Python 2.x related code. Thanks to Niels Thykier (outside Freexian) for spear-heading this work.
  • DebConf 24 planning is beginning. Stefano discussed venues and finances with the local team and remotely supported a site-visit by Nattie (outside Freexian).
  • Also in the DebConf 24 context, Santiago took part in discussions and preparations related to the Content Team.
  • A JIT bug was reported against pypy3 in Debian Bookworm. Stefano bisected the upstream history to find the patch (it was already resolved upstream) and released an update to pypy3 in bookworm.
  • Enrico participated in /usr-merge discussions with Helmut.
  • Colin Watson backported a python-channels-redis fix to bookworm, rediscovered while working on debusine.
  • Colin dug into a cluster of celery build failures and tracked the hardest bit down to a Python 3.12 regression, now fixed in unstable. celery should be back in testing once the 64-bit time_t migration is out of the way.
  • Thorsten Alteholz uploaded a new upstream version of cpdb-libs. Unfortunately upstream changed the naming of their release tags, so updating the watch file was a bit demanding. Anyway this version 2.0 is a huge step towards introduction of the new Common Print Dialog Backends.
  • Helmut send patches for 48 cross build failures.
  • Helmut changed debvm to use mkfs.ext4 instead of genext2fs.
  • Helmut sent a debci MR for improving collector robustness.
  • In preparation for DebConf 25, Santiago worked on the Brest Bid.

7 February 2024

Reproducible Builds: Reproducible Builds in January 2024

Welcome to the January 2024 report from the Reproducible Builds project. In these reports we outline the most important things that we have been up to over the past month. If you are interested in contributing to the project, please visit our Contribute page on our website.

How we executed a critical supply chain attack on PyTorch John Stawinski and Adnan Khan published a lengthy blog post detailing how they executed a supply-chain attack against PyTorch, a popular machine learning platform used by titans like Google, Meta, Boeing, and Lockheed Martin :
Our exploit path resulted in the ability to upload malicious PyTorch releases to GitHub, upload releases to [Amazon Web Services], potentially add code to the main repository branch, backdoor PyTorch dependencies the list goes on. In short, it was bad. Quite bad.
The attack pivoted on PyTorch s use of self-hosted runners as well as submitting a pull request to address a trivial typo in the project s README file to gain access to repository secrets and API keys that could subsequently be used for malicious purposes.

New Arch Linux forensic filesystem tool On our mailing list this month, long-time Reproducible Builds developer kpcyrd announced a new tool designed to forensically analyse Arch Linux filesystem images. Called archlinux-userland-fs-cmp, the tool is supposed to be used from a rescue image (any Linux) with an Arch install mounted to, [for example], /mnt. Crucially, however, at no point is any file from the mounted filesystem eval d or otherwise executed. Parsers are written in a memory safe language. More information about the tool can be found on their announcement message, as well as on the tool s homepage. A GIF of the tool in action is also available.

Issues with our SOURCE_DATE_EPOCH code? Chris Lamb started a thread on our mailing list summarising some potential problems with the source code snippet the Reproducible Builds project has been using to parse the SOURCE_DATE_EPOCH environment variable:
I m not 100% sure who originally wrote this code, but it was probably sometime in the ~2015 era, and it must be in a huge number of codebases by now. Anyway, Alejandro Colomar was working on the shadow security tool and pinged me regarding some potential issues with the code. You can see this conversation here.
Chris ends his message with a request that those with intimate or low-level knowledge of time_t, C types, overflows and the various parsing libraries in the C standard library (etc.) contribute with further info.

Distribution updates In Debian this month, Roland Clobus posted another detailed update of the status of reproducible ISO images on our mailing list. In particular, Roland helpfully summarised that all major desktops build reproducibly with bullseye, bookworm, trixie and sid provided they are built for a second time within the same DAK run (i.e. [within] 6 hours) . Additionally 7 of the 8 bookworm images from the official download link build reproducibly at any later time. In addition to this, three reviews of Debian packages were added, 17 were updated and 15 were removed this month adding to our knowledge about identified issues. Elsewhere, Bernhard posted another monthly update for his work elsewhere in openSUSE.

Community updates There were made a number of improvements to our website, including Bernhard M. Wiedemann fixing a number of typos of the term nondeterministic . [ ] and Jan Zerebecki adding a substantial and highly welcome section to our page about SOURCE_DATE_EPOCH to document its interaction with distribution rebuilds. [ ].
diffoscope is our in-depth and content-aware diff utility that can locate and diagnose reproducibility issues. This month, Chris Lamb made a number of changes such as uploading versions 254 and 255 to Debian but focusing on triaging and/or merging code from other contributors. This included adding support for comparing eXtensible ARchive (.XAR/.PKG) files courtesy of Seth Michael Larson [ ][ ], as well considerable work from Vekhir in order to fix compatibility between various and subtle incompatible versions of the progressbar libraries in Python [ ][ ][ ][ ]. Thanks!

Reproducibility testing framework The Reproducible Builds project operates a comprehensive testing framework (available at tests.reproducible-builds.org) in order to check packages and other artifacts for reproducibility. In January, a number of changes were made by Holger Levsen:
  • Debian-related changes:
    • Reduce the number of arm64 architecture workers from 24 to 16. [ ]
    • Use diffoscope from the Debian release being tested again. [ ]
    • Improve the handling when killing unwanted processes [ ][ ][ ] and be more verbose about it, too [ ].
    • Don t mark a job as failed if process marked as to-be-killed is already gone. [ ]
    • Display the architecture of builds that have been running for more than 48 hours. [ ]
    • Reboot arm64 nodes when they hit an OOM (out of memory) state. [ ]
  • Package rescheduling changes:
    • Reduce IRC notifications to 1 when rescheduling due to package status changes. [ ]
    • Correctly set SUDO_USER when rescheduling packages. [ ]
    • Automatically reschedule packages regressing to FTBFS (build failure) or FTBR (build success, but unreproducible). [ ]
  • OpenWrt-related changes:
    • Install the python3-dev and python3-pyelftools packages as they are now needed for the sunxi target. [ ][ ]
    • Also install the libpam0g-dev which is needed by some OpenWrt hardware targets. [ ]
  • Misc:
    • As it s January, set the real_year variable to 2024 [ ] and bump various copyright years as well [ ].
    • Fix a large (!) number of spelling mistakes in various scripts. [ ][ ][ ]
    • Prevent Squid and Systemd processes from being killed by the kernel s OOM killer. [ ]
    • Install the iptables tool everywhere, else our custom rc.local script fails. [ ]
    • Cleanup the /srv/workspace/pbuilder directory on boot. [ ]
    • Automatically restart Squid if it fails. [ ]
    • Limit the execution of chroot-installation jobs to a maximum of 4 concurrent runs. [ ][ ]
Significant amounts of node maintenance was performed by Holger Levsen (eg. [ ][ ][ ][ ][ ][ ][ ] etc.) and Vagrant Cascadian (eg. [ ][ ][ ][ ][ ][ ][ ][ ]). Indeed, Vagrant Cascadian handled an extended power outage for the network running the Debian armhf architecture test infrastructure. This provided the incentive to replace the UPS batteries and consolidate infrastructure to reduce future UPS load. [ ] Elsewhere in our infrastructure, however, Holger Levsen also adjusted the email configuration for @reproducible-builds.org to deal with a new SMTP email attack. [ ]

Upstream patches The Reproducible Builds project tries to detects, dissects and fix as many (currently) unreproducible packages as possible. We endeavour to send all of our patches upstream where appropriate. This month, we wrote a large number of such patches, including: Separate to this, Vagrant Cascadian followed up with the relevant maintainers when reproducibility fixes were not included in newly-uploaded versions of the mm-common package in Debian this was quickly fixed, however. [ ]

If you are interested in contributing to the Reproducible Builds project, please visit our Contribute page on our website. However, you can get in touch with us via:

5 January 2024

Valhalla's Things: Random Sashiko + Crazy Quilt Pocket

Posted on January 5, 2024
Tags: madeof:atoms
A 18th century pocket in black jeans with a random pattern of pink running stitches forming squares and other shapes. The unfinished edges of the pieces of jeans can be seen, running more or less diagonally. 
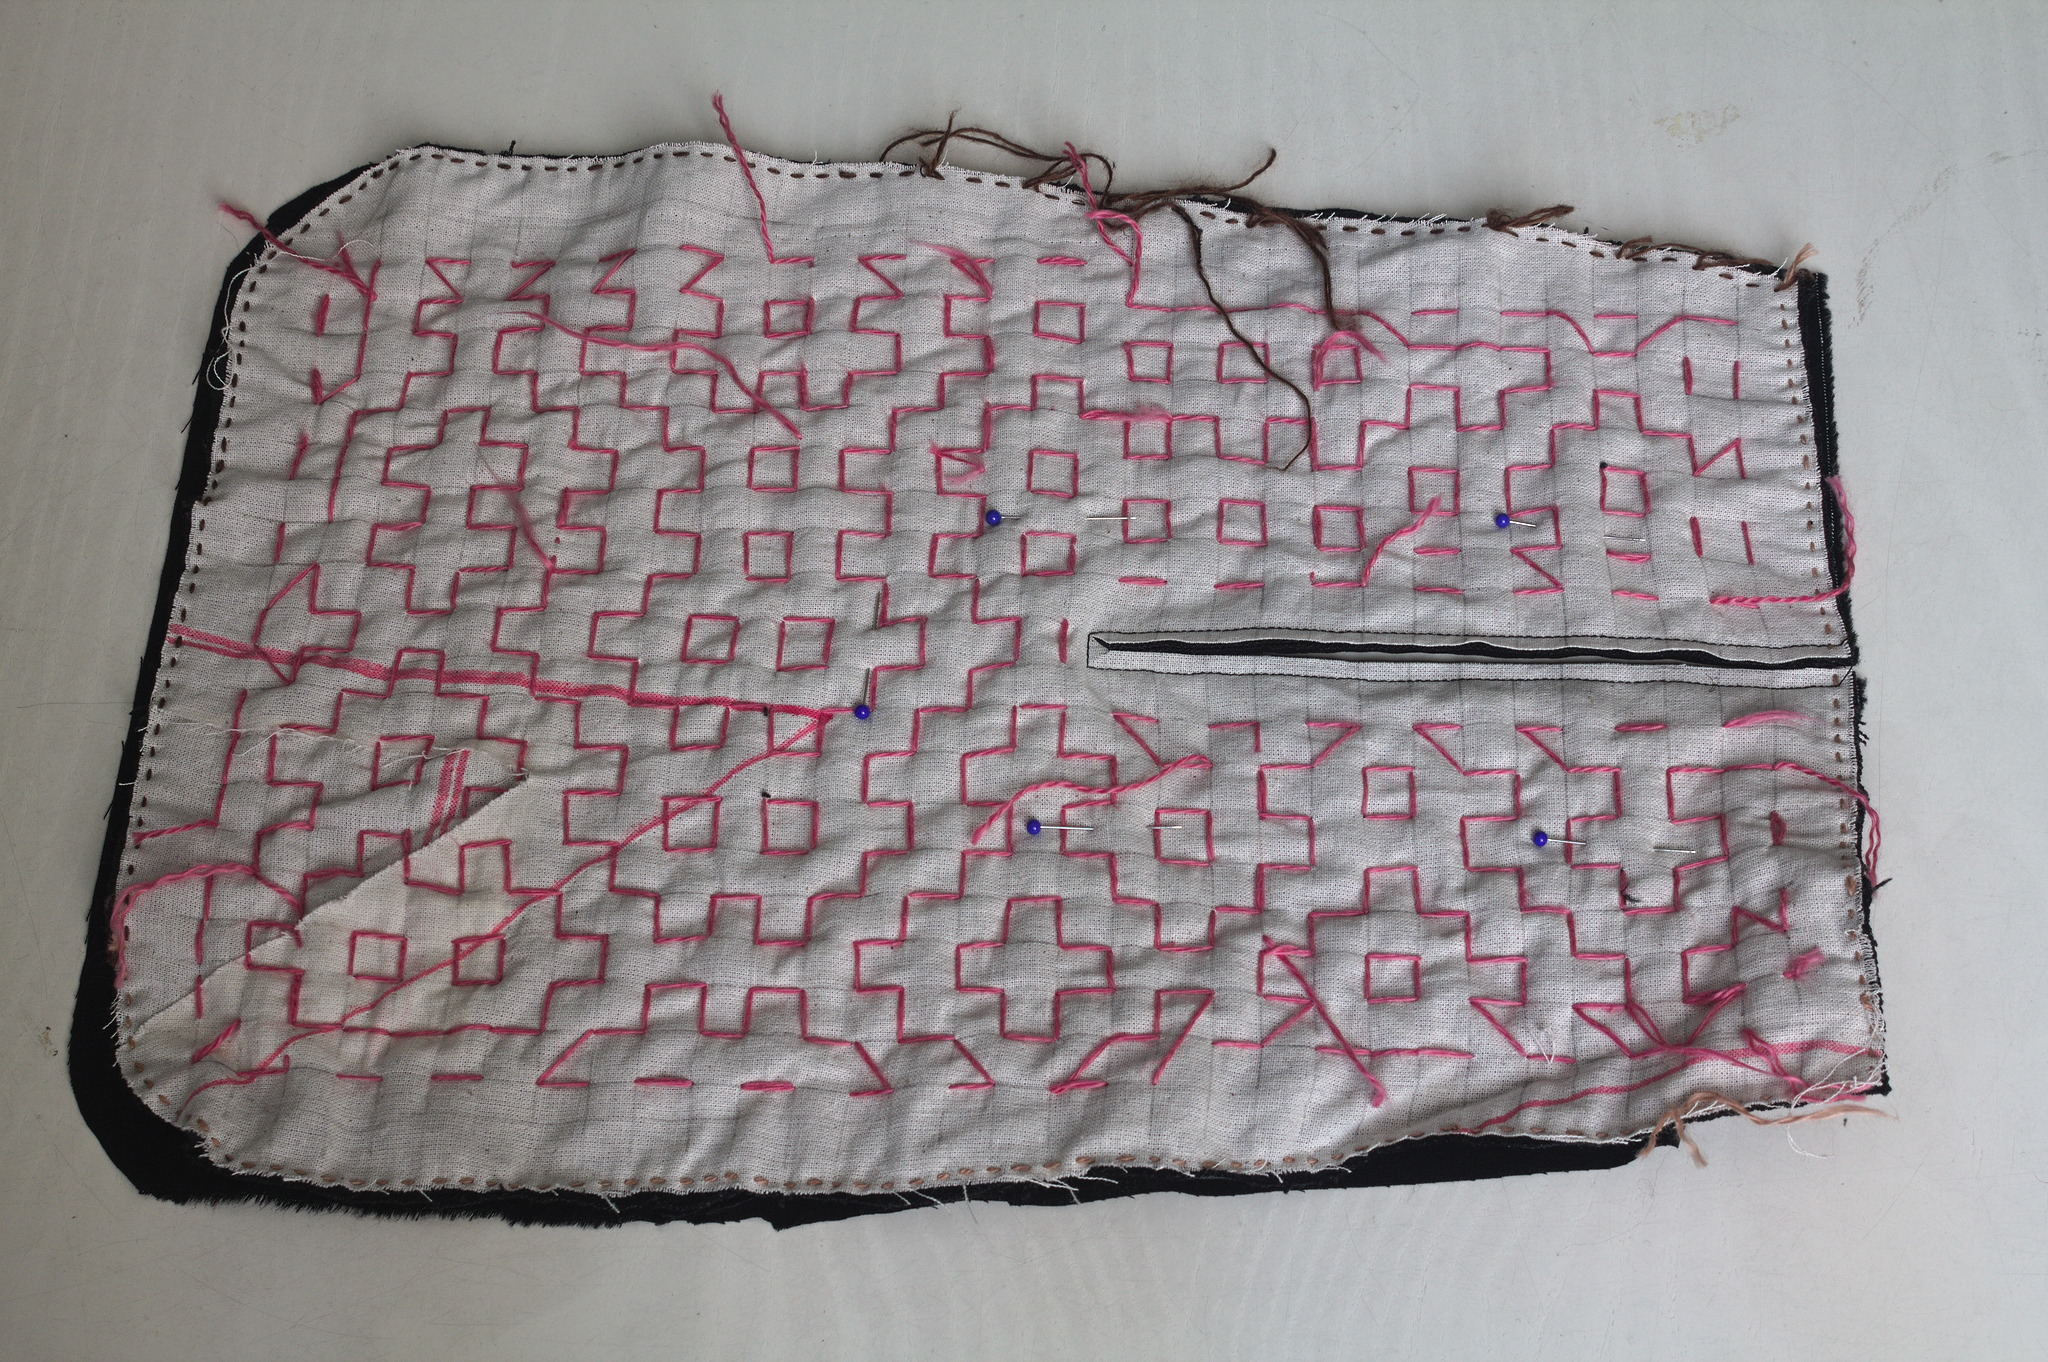
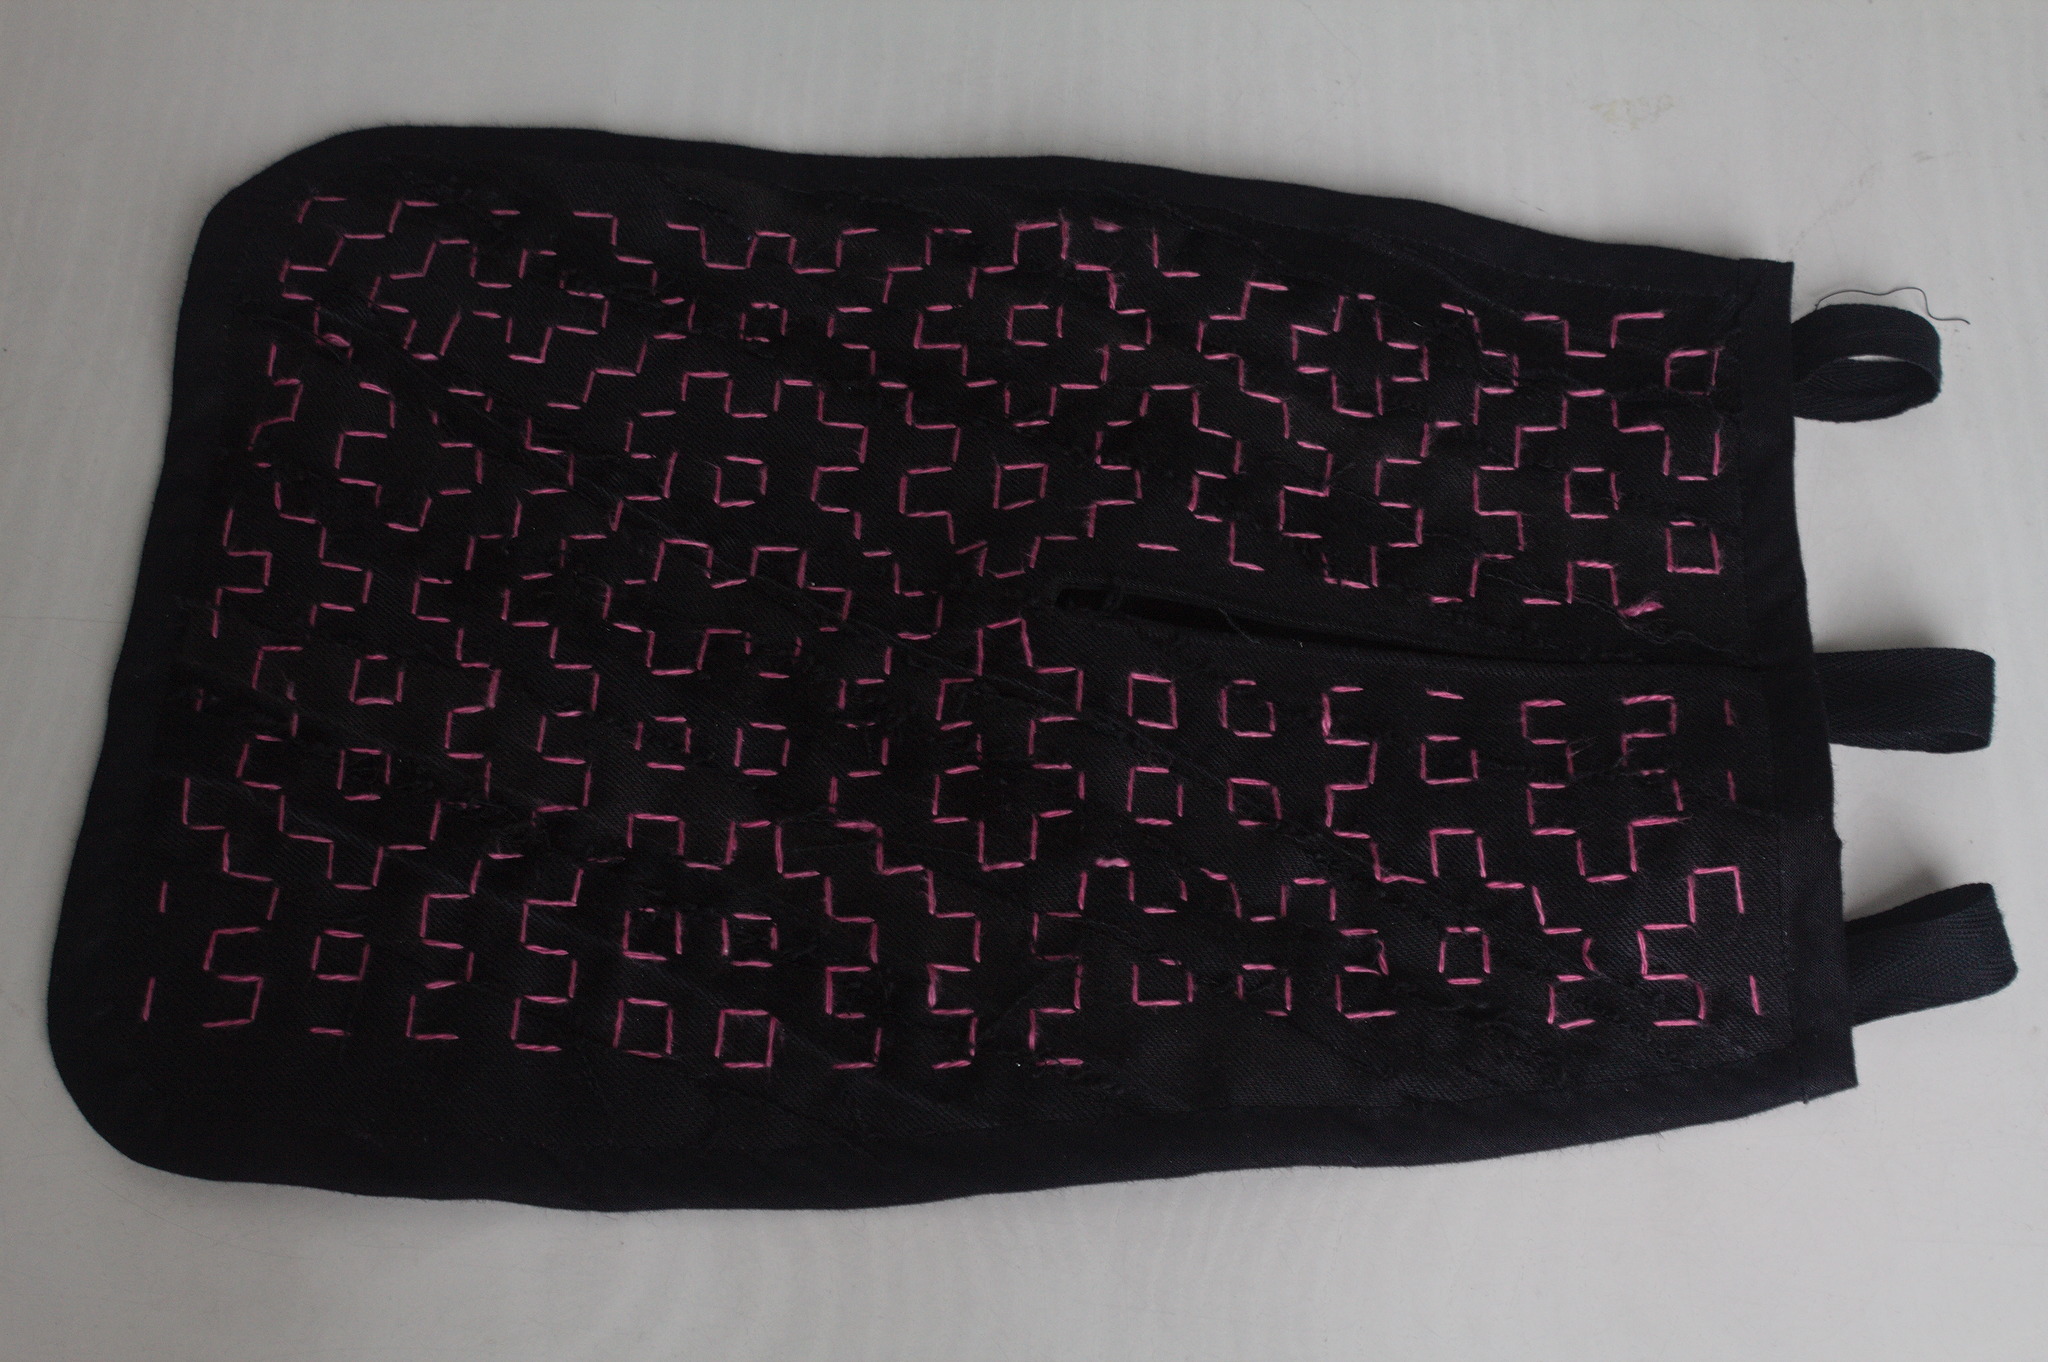
Lately I ve seen people on the internet talking about victorian crazy quilting. Years ago I had watched a
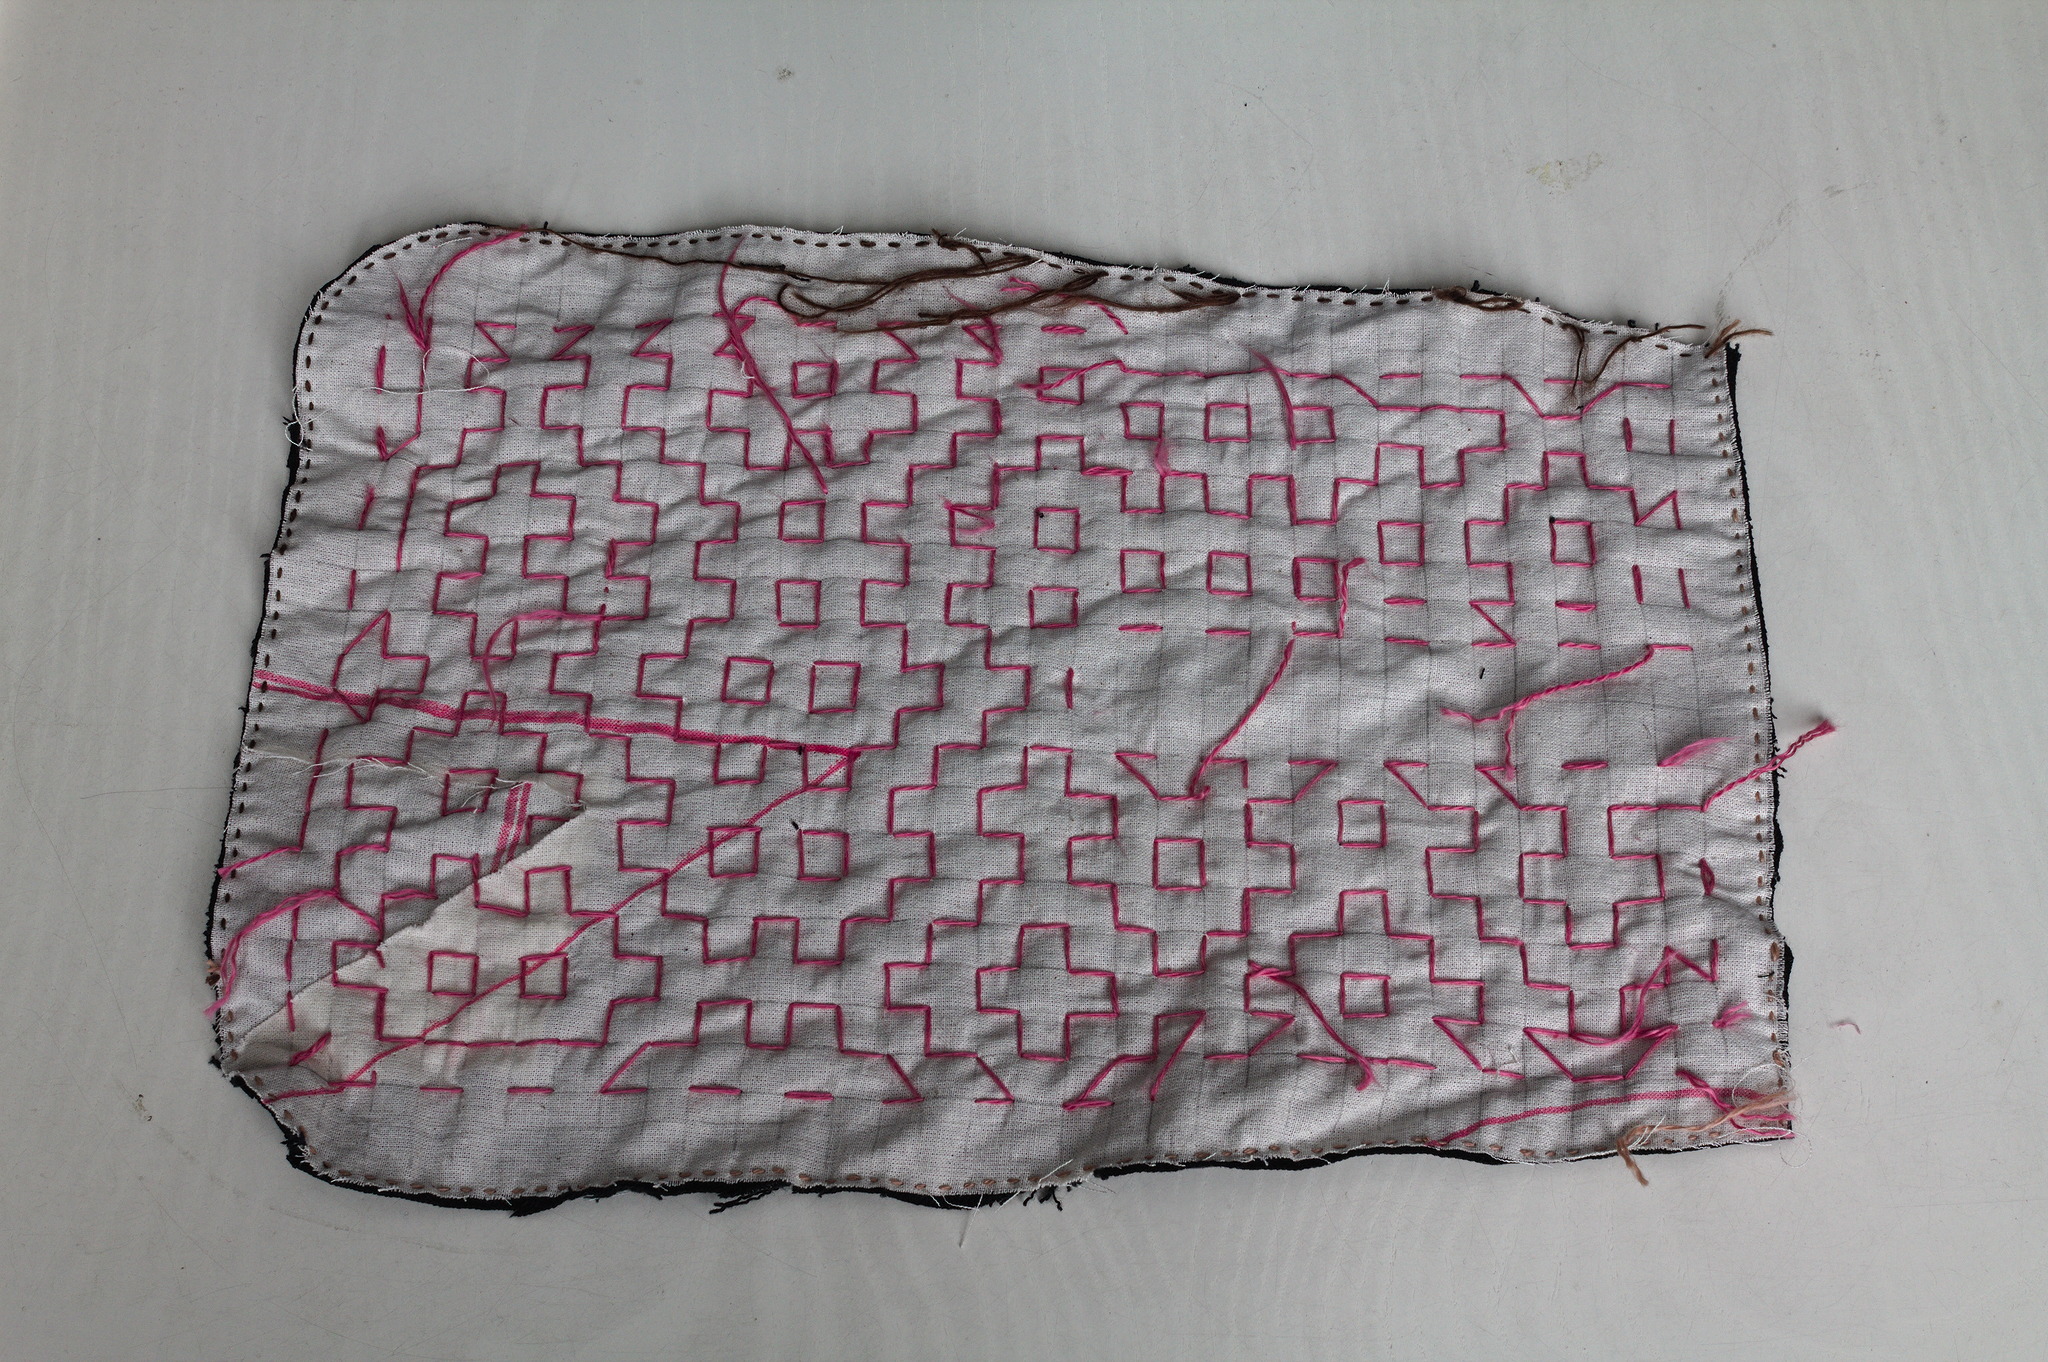
 Numberphile video about Hitomezashi Stitch Patterns based on numbers, words or randomness. Few weeks ago I had cut some fabric piece out of an old pair of jeans and I had a lot of scraps that were too small to do anything useful on their own. It easy to see where this can go, right? The wrong side of a pocket piece, showing a light coloured fabric with a grid drawn in pencil, a line of small stitches all around the edges and a mess of thread ends left hanging. I cut a pocket shape out of old garment mockups (this required some piecing), drew a square grid, arranged scraps of jeans to cover the other side, kept everything together with a lot of pins, carefully avoided basting anything, and started covering everything in sashiko / hitomezashi stitches, starting each line with a stitch on the front or the back of the work based on the result of:
import random
random.choice(["front", "back"])
The wrong side of the other pocket piece, with just three lines of stitching and a piece of paper to mark the pattern. There are bits of jeans peeking out of the sides. 
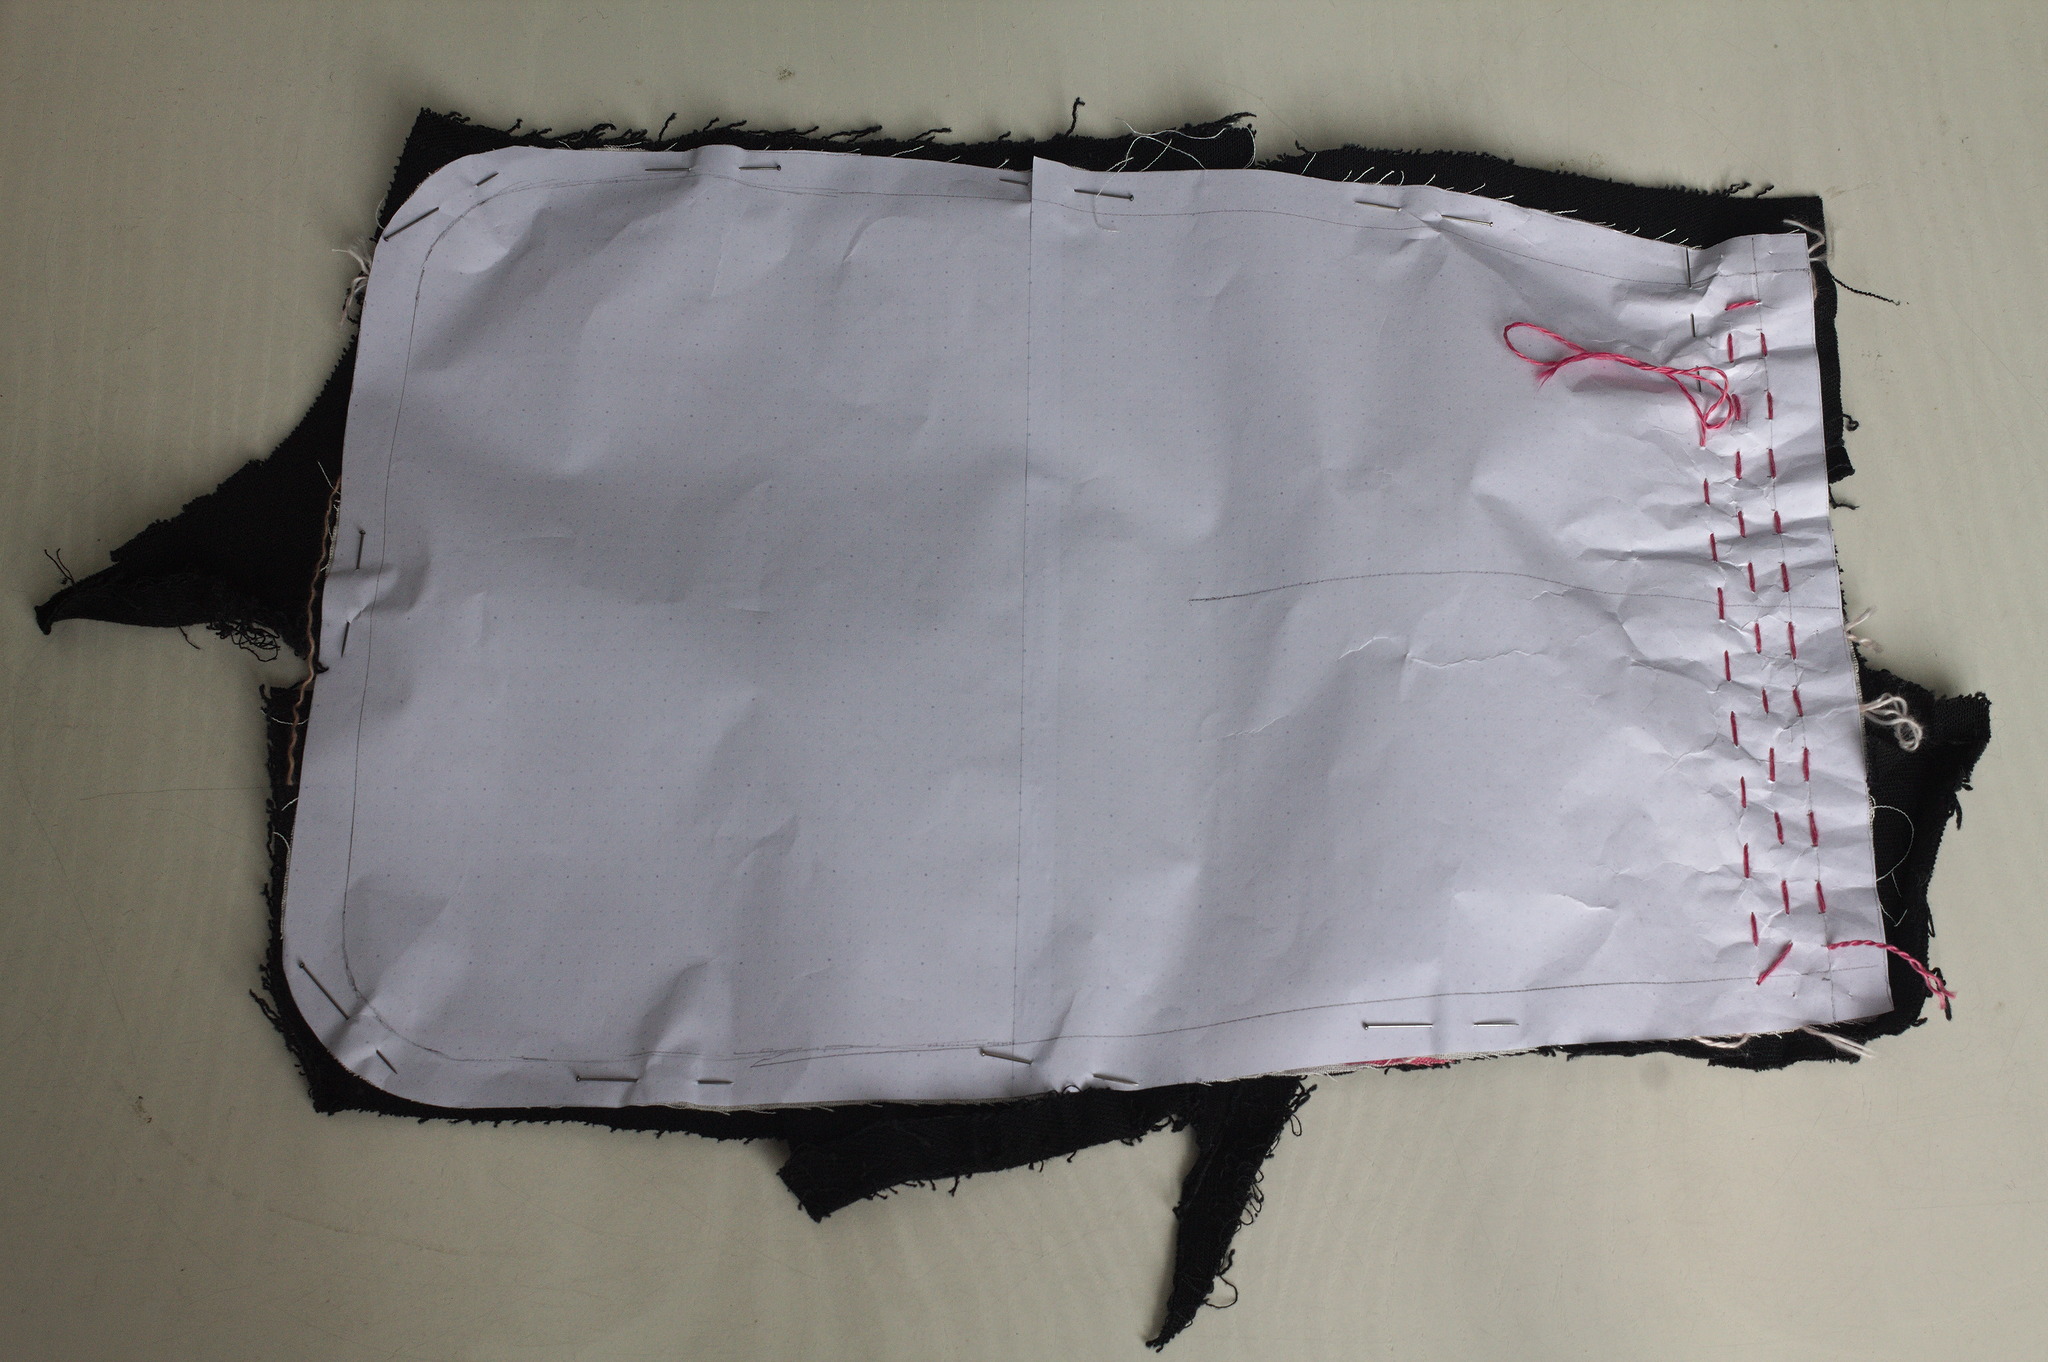
For the second piece I tried to use a piece of paper with the square grid instead of drawing it on the fabric: it worked, mostly, I would not do it again as removing the paper was more of a hassle than drawing the lines in the first place. I suspected it, but had to try it anyway. The front of the pocket seen from the wrong side, with a machine seam around the lit, whose end has been cut in a triangle so that it can be turned. Then I added a lining from some plain black cotton from the stash; for the slit I put the lining on the front right sides together, sewn at 2 mm from the marked slit, cut it, turned the lining to the back side, pressed and then topstitched as close as possible to the slit from the front. The finished pocket attached to a belt made from the waistband of a pair of jeans (with button, buttonhole and belt loops still attached) whose raw edges (left when unpicking away the jeans) have been sewn shut by hand. 
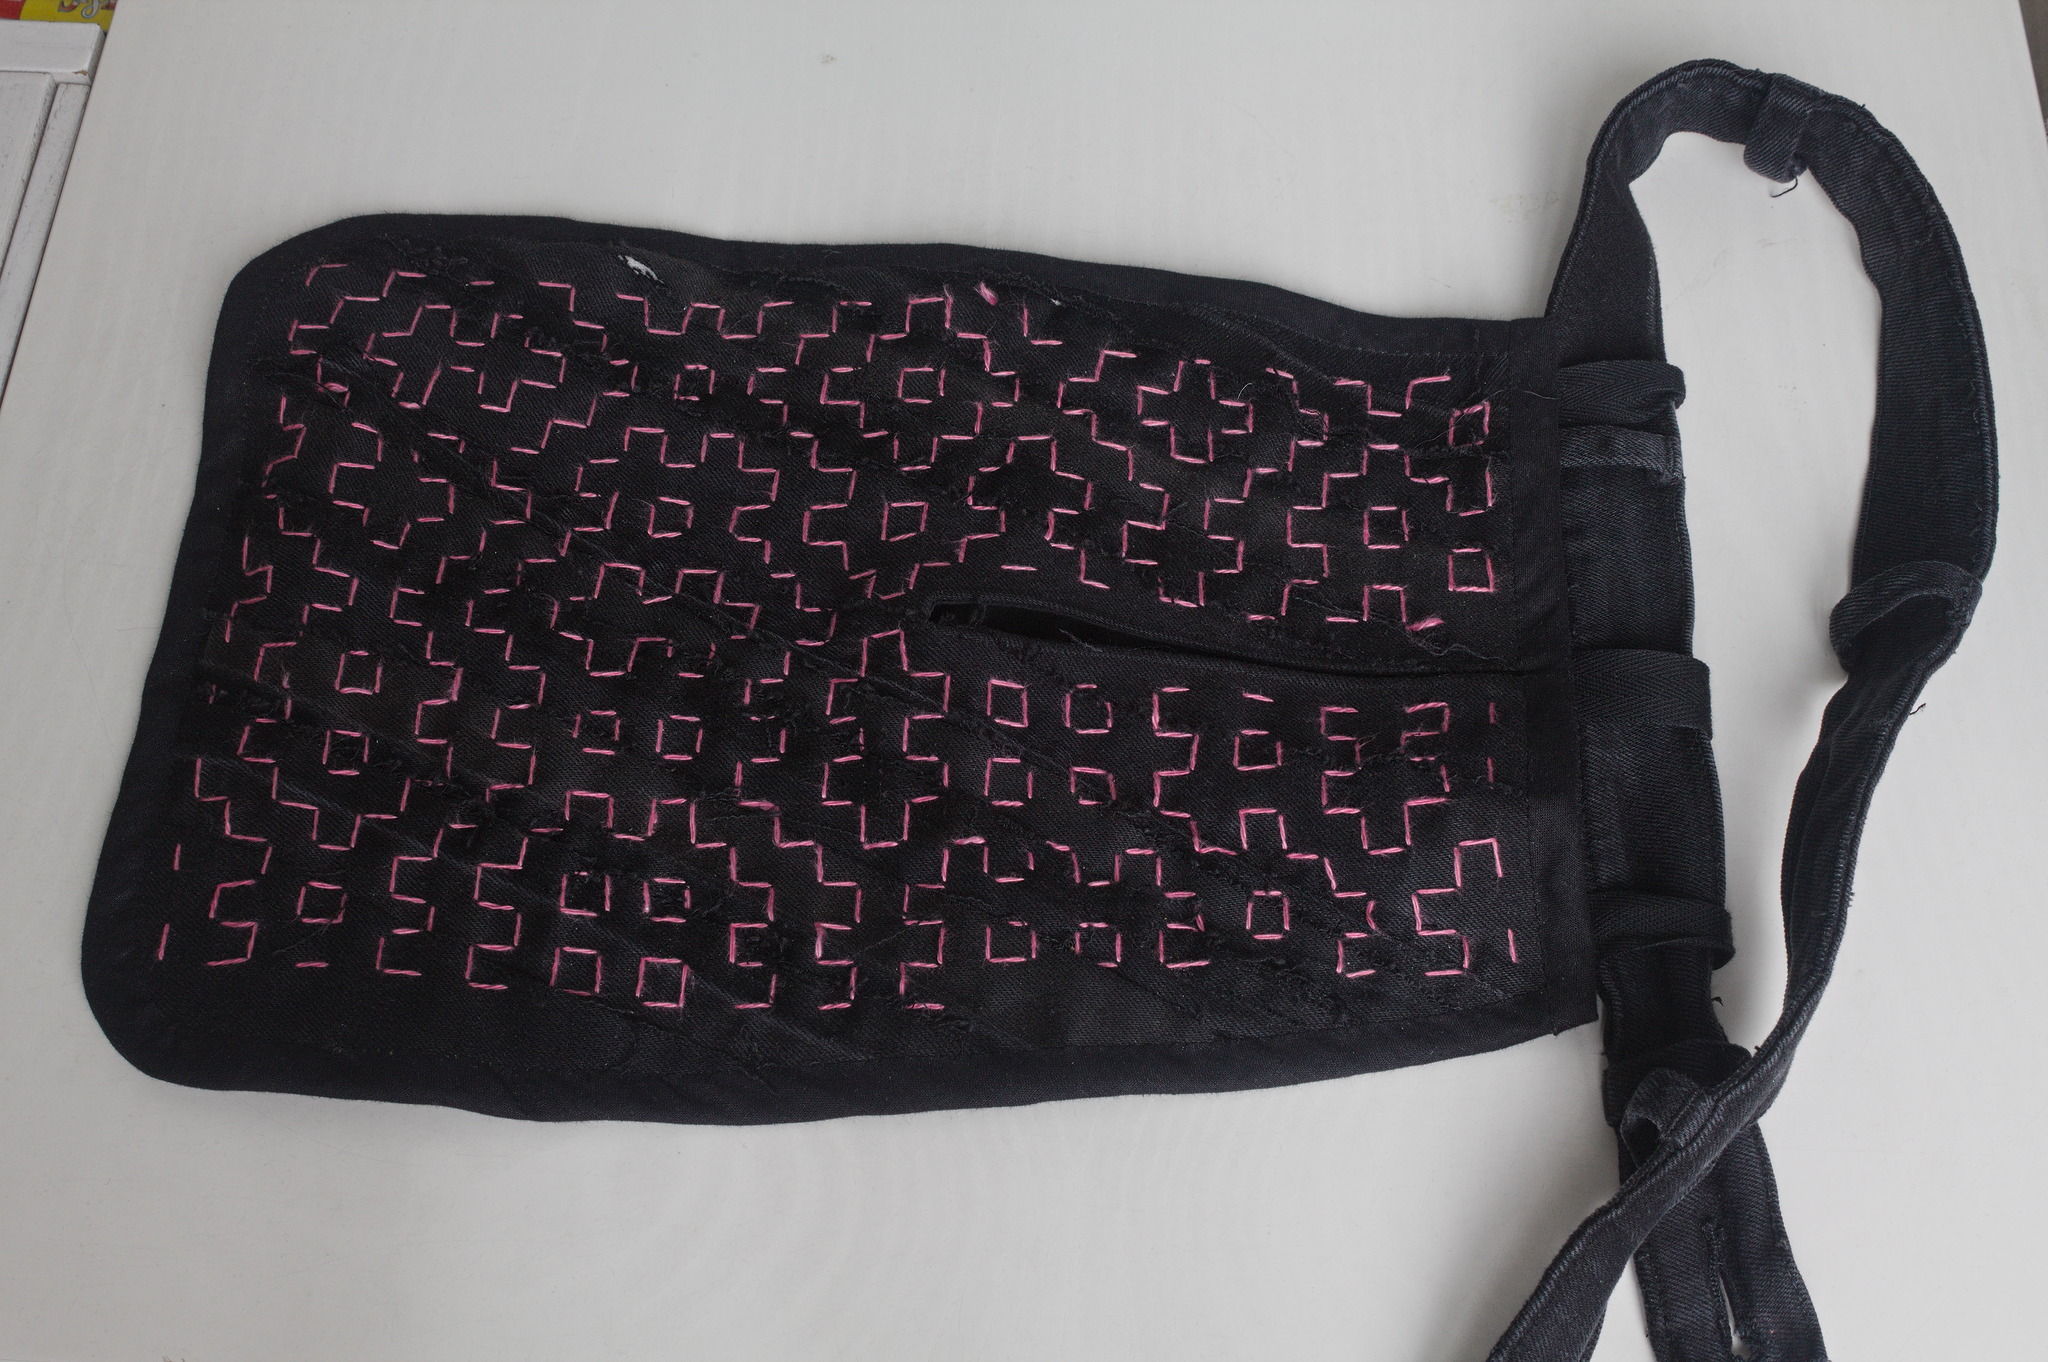
I bound everything with bias tape, adding herringbone tape loops at the top to hang it from a belt (such as one made from the waistband of one of the donor pair of jeans) and that was it. The back of the pocket, showing another random pattern in two different shades of pink for the vertical and horizontal lines of stitching. 
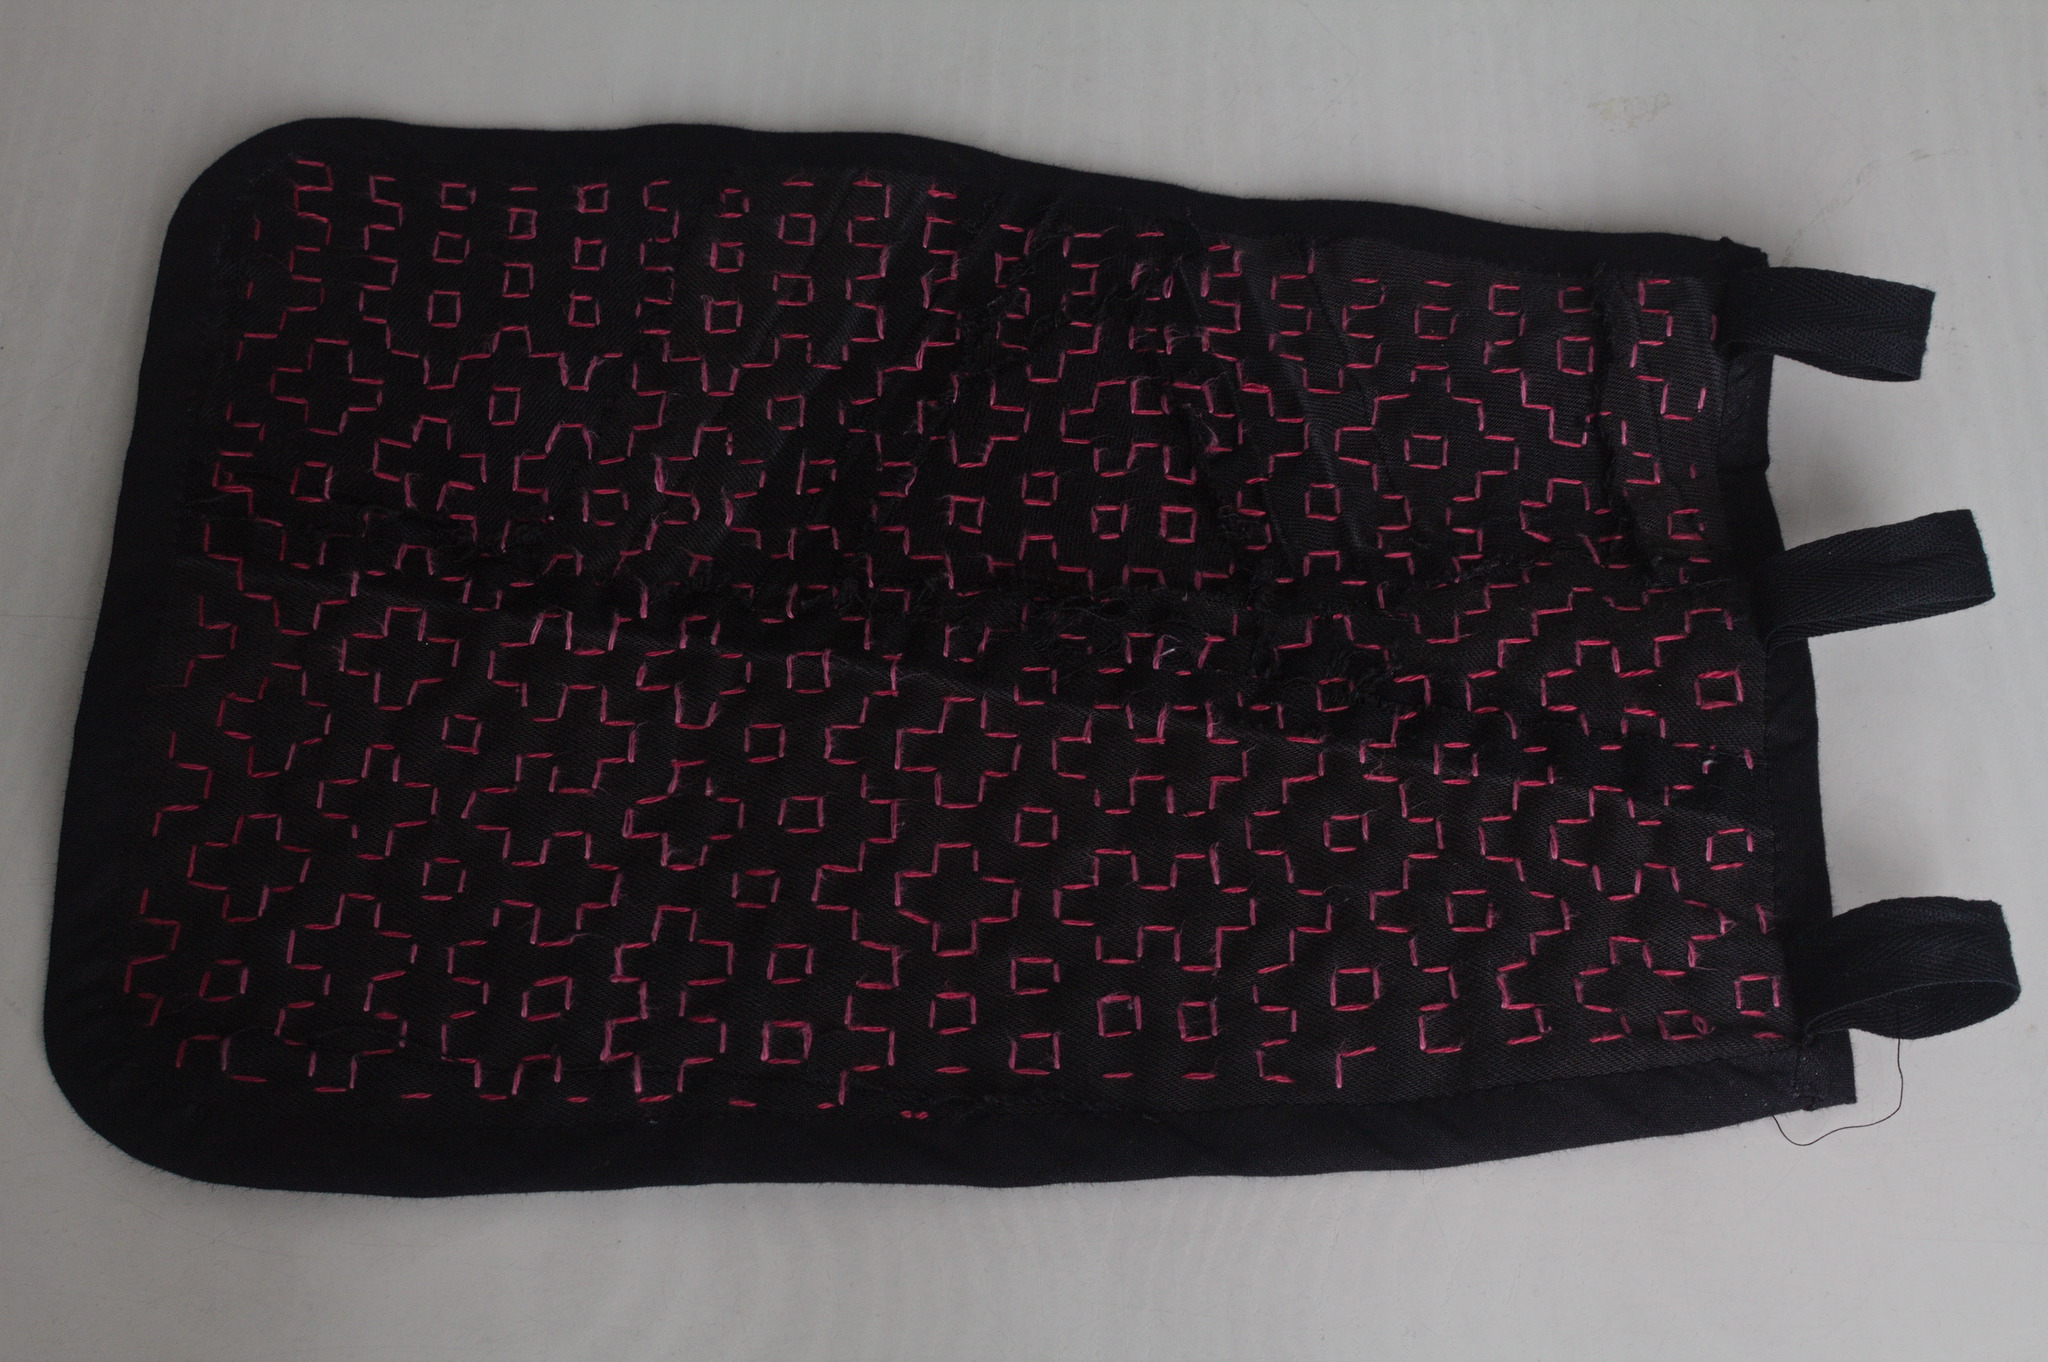
I like the way the result feels; maybe it s a bit too stiff for a pocket, but I can see it work very well for a bigger bag, and maybe even a jacket or some other outer garment.

31 December 2023

Chris Lamb: Favourites of 2023

This post should have marked the beginning of my yearly roundups of the favourite books and movies I read and watched in 2023. However, due to coming down with a nasty bout of flu recently and other sundry commitments, I wasn't able to undertake writing the necessary four or five blog posts In lieu of this, however, I will simply present my (unordered and unadorned) highlights for now. Do get in touch if this (or any of my previous posts) have spurred you into picking something up yourself

Books

Peter Watts: Blindsight (2006) Reymer Banham: Los Angeles: The Architecture of Four Ecologies (2006) Joanne McNeil: Lurking: How a Person Became a User (2020) J. L. Carr: A Month in the Country (1980) Hilary Mantel: A Memoir of My Former Self: A Life in Writing (2023) Adam Higginbotham: Midnight in Chernobyl (2019) Tony Judt: Postwar: A History of Europe Since 1945 (2005) Tony Judt: Reappraisals: Reflections on the Forgotten Twentieth Century (2008) Peter Apps: Show Me the Bodies: How We Let Grenfell Happen (2021) Joan Didion: Slouching Towards Bethlehem (1968)Erik Larson: The Devil in the White City (2003)

Films Recent releases

Unenjoyable experiences included Alejandro G mez Monteverde's Sound of Freedom (2023), Alex Garland's Men (2022) and Steven Spielberg's The Fabelmans (2022).
Older releases (Films released before 2022, and not including rewatches from previous years.) Distinctly unenjoyable watches included Ocean's Eleven (1960), El Topo (1970), L olo (1992), Hotel Mumbai (2018), Bulworth (1998) and and The Big Red One (1980).

12 December 2023

Raju Devidas: Nextcloud AIO install with docker-compose and nginx reverse proxy

Nextcloud AIO install with docker-compose and nginx reverse proxy
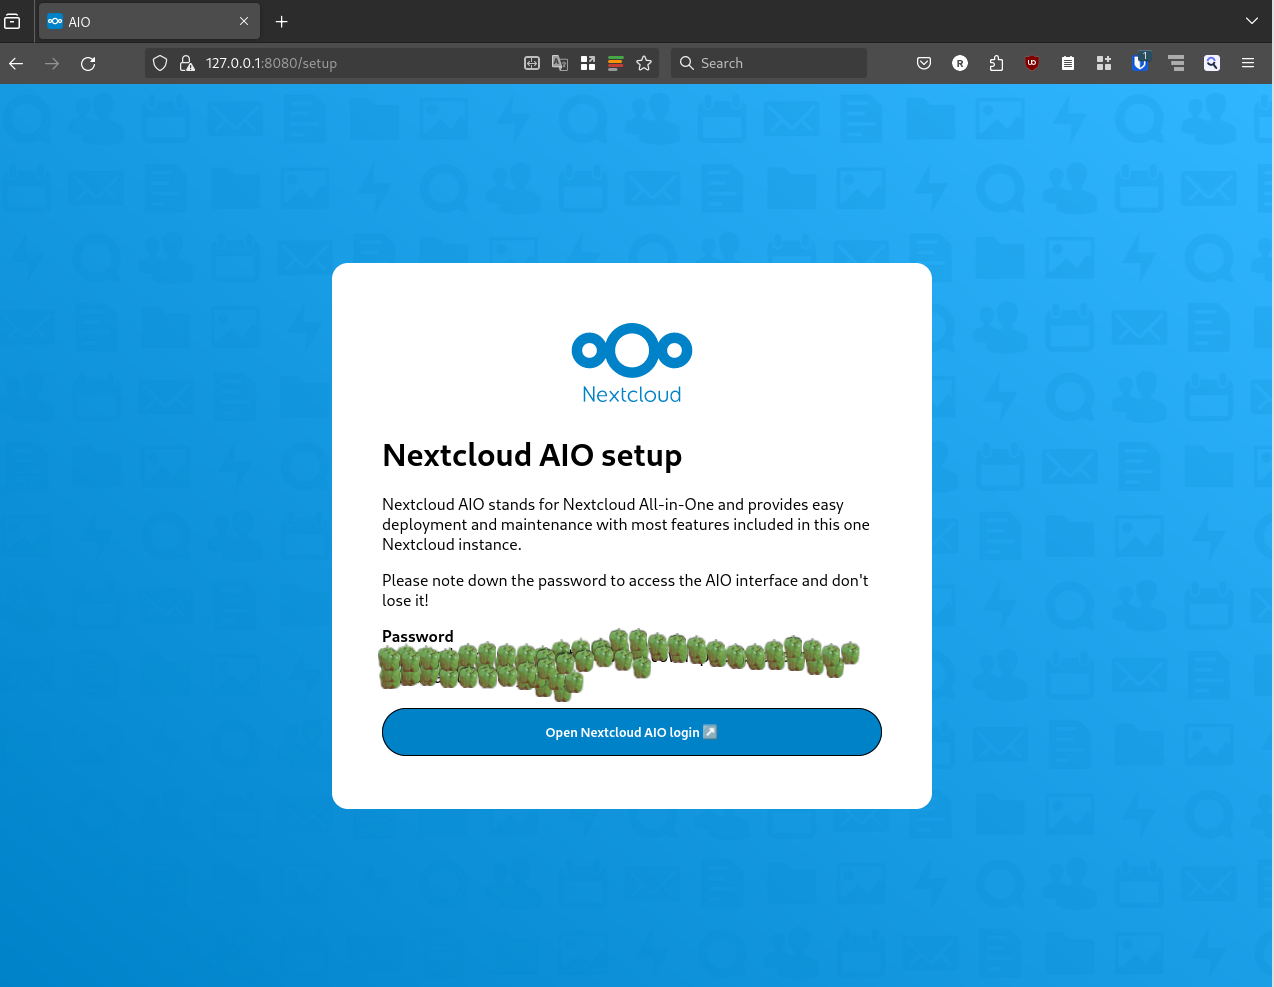
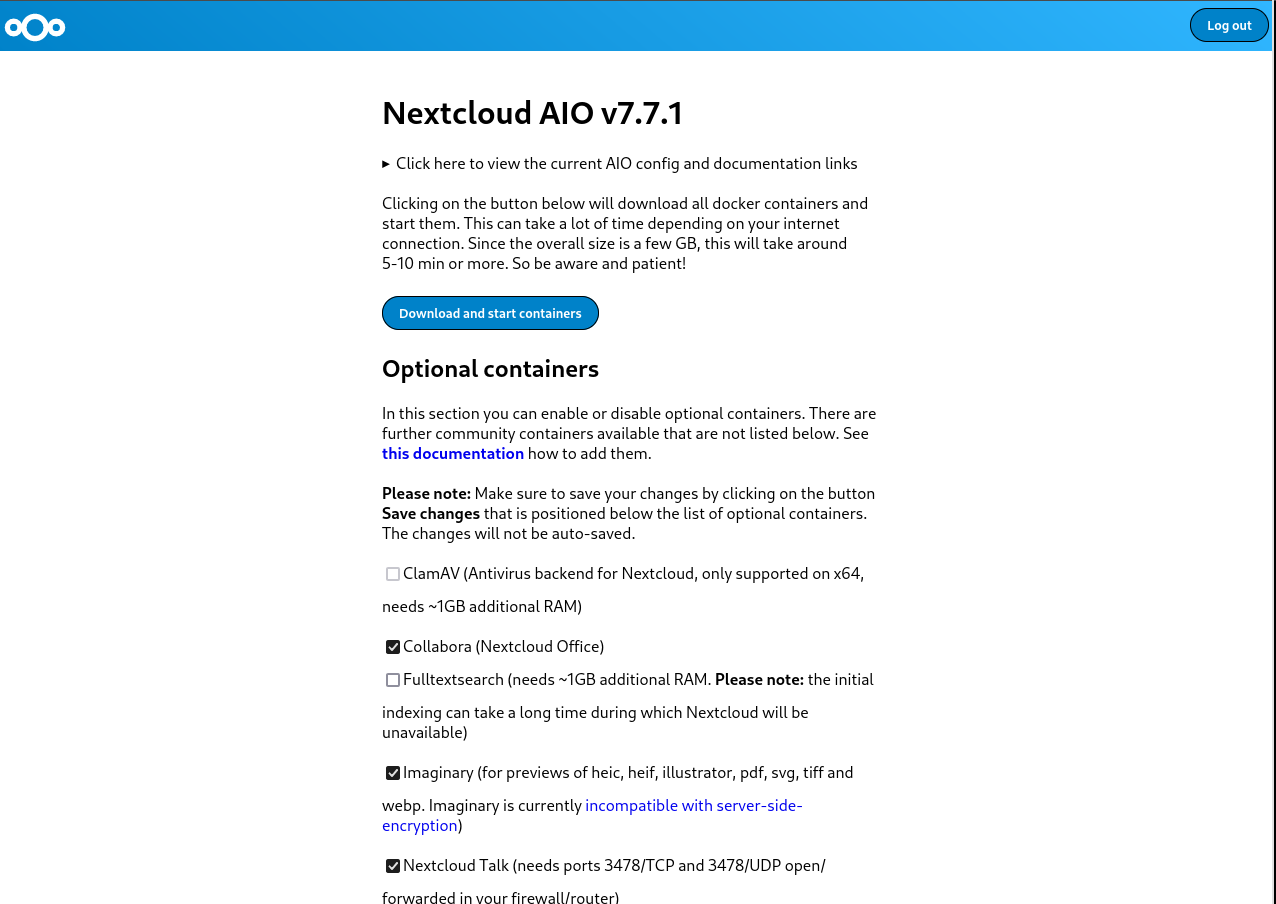
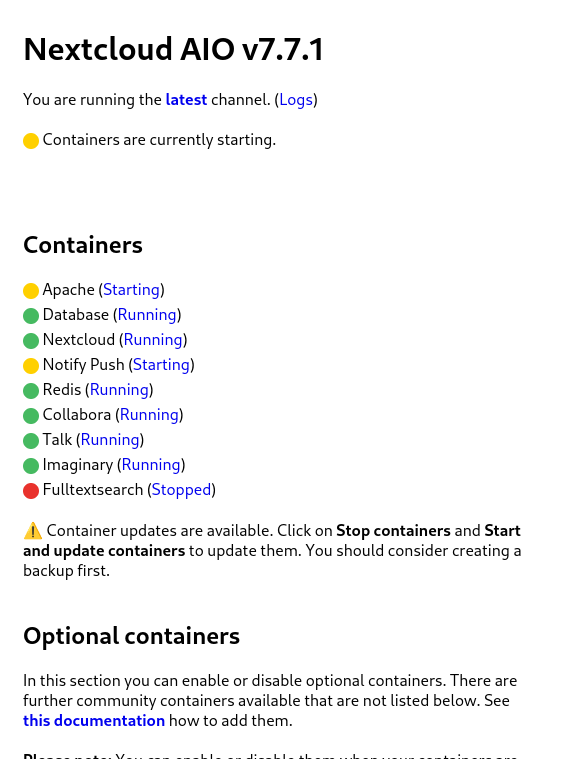
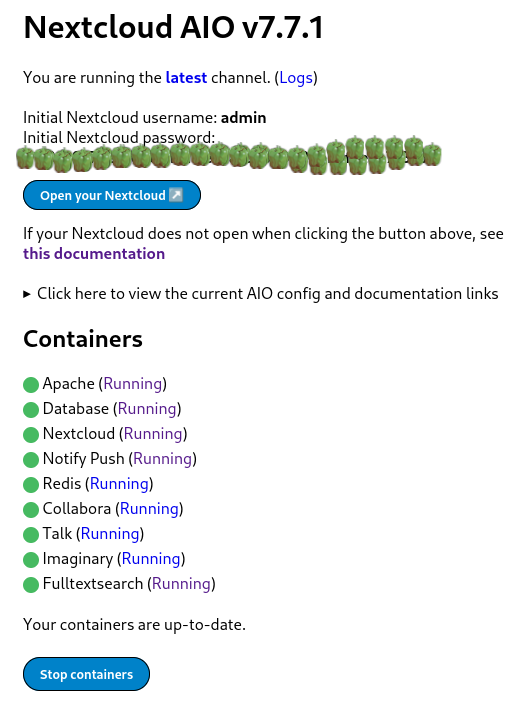
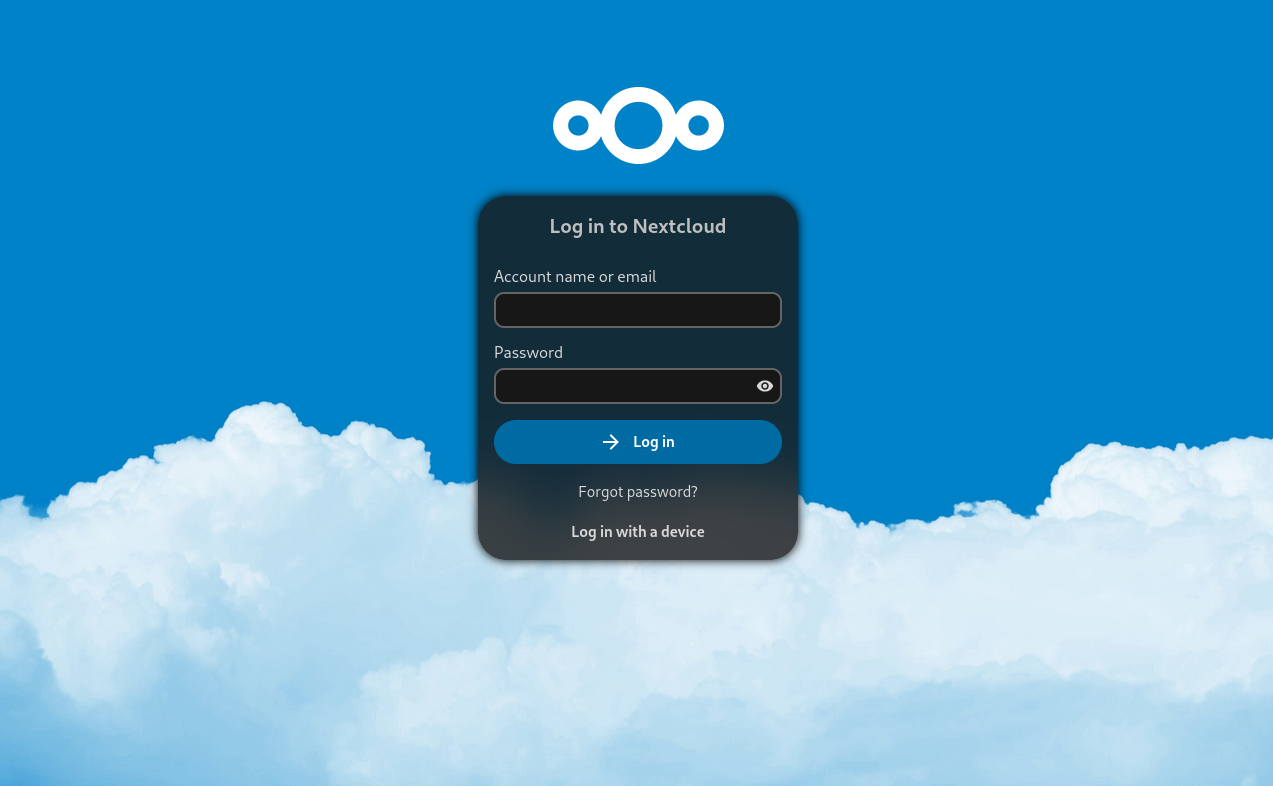
Nextcloud is a popular self-hosted solution for file sync and share as well as cloud apps such as document editing, chat and talk, calendar, photo gallery etc. This guide will walk you through setting up Nextcloud AIO using Docker Compose. This blog post would not be possible without immense help from Sahil Dhiman a.k.a. sahilisterThere are various ways in which the installation could be done, in our setup here are the pre-requisites.

Step 1 : The docker-compose file for nextcloud AIOThe original compose.yml file is present in nextcloud AIO&aposs git repo here . By taking a reference of that file, we have own compose.yml here.
services:
  nextcloud-aio-mastercontainer:
    image: nextcloud/all-in-one:latest
    init: true
    restart: always
    container_name: nextcloud-aio-mastercontainer # This line is not allowed to be changed as otherwise AIO will not work correctly
    volumes:
      - nextcloud_aio_mastercontainer:/mnt/docker-aio-config # This line is not allowed to be changed as otherwise the built-in backup solution will not work
      - /var/run/docker.sock:/var/run/docker.sock:ro # May be changed on macOS, Windows or docker rootless. See the applicable documentation. If adjusting, don&apost forget to also set &aposWATCHTOWER_DOCKER_SOCKET_PATH&apos!
    ports:
      - 8080:8080
    environment: # Is needed when using any of the options below
      # - AIO_DISABLE_BACKUP_SECTION=false # Setting this to true allows to hide the backup section in the AIO interface. See https://github.com/nextcloud/all-in-one#how-to-disable-the-backup-section
      - APACHE_PORT=32323 # Is needed when running behind a web server or reverse proxy (like Apache, Nginx, Cloudflare Tunnel and else). See https://github.com/nextcloud/all-in-one/blob/main/reverse-proxy.md
      - APACHE_IP_BINDING=127.0.0.1 # Should be set when running behind a web server or reverse proxy (like Apache, Nginx, Cloudflare Tunnel and else) that is running on the same host. See https://github.com/nextcloud/all-in-one/blob/main/reverse-proxy.md
      # - BORG_RETENTION_POLICY=--keep-within=7d --keep-weekly=4 --keep-monthly=6 # Allows to adjust borgs retention policy. See https://github.com/nextcloud/all-in-one#how-to-adjust-borgs-retention-policy
      # - COLLABORA_SECCOMP_DISABLED=false # Setting this to true allows to disable Collabora&aposs Seccomp feature. See https://github.com/nextcloud/all-in-one#how-to-disable-collaboras-seccomp-feature
      - NEXTCLOUD_DATADIR=/opt/docker/cloud.raju.dev/nextcloud # Allows to set the host directory for Nextcloud&aposs datadir.   Warning: do not set or adjust this value after the initial Nextcloud installation is done! See https://github.com/nextcloud/all-in-one#how-to-change-the-default-location-of-nextclouds-datadir
      # - NEXTCLOUD_MOUNT=/mnt/ # Allows the Nextcloud container to access the chosen directory on the host. See https://github.com/nextcloud/all-in-one#how-to-allow-the-nextcloud-container-to-access-directories-on-the-host
      # - NEXTCLOUD_UPLOAD_LIMIT=10G # Can be adjusted if you need more. See https://github.com/nextcloud/all-in-one#how-to-adjust-the-upload-limit-for-nextcloud
      # - NEXTCLOUD_MAX_TIME=3600 # Can be adjusted if you need more. See https://github.com/nextcloud/all-in-one#how-to-adjust-the-max-execution-time-for-nextcloud
      # - NEXTCLOUD_MEMORY_LIMIT=512M # Can be adjusted if you need more. See https://github.com/nextcloud/all-in-one#how-to-adjust-the-php-memory-limit-for-nextcloud
      # - NEXTCLOUD_TRUSTED_CACERTS_DIR=/path/to/my/cacerts # CA certificates in this directory will be trusted by the OS of the nexcloud container (Useful e.g. for LDAPS) See See https://github.com/nextcloud/all-in-one#how-to-trust-user-defined-certification-authorities-ca
      # - NEXTCLOUD_STARTUP_APPS=deck twofactor_totp tasks calendar contacts notes # Allows to modify the Nextcloud apps that are installed on starting AIO the first time. See https://github.com/nextcloud/all-in-one#how-to-change-the-nextcloud-apps-that-are-installed-on-the-first-startup
      # - NEXTCLOUD_ADDITIONAL_APKS=imagemagick # This allows to add additional packages to the Nextcloud container permanently. Default is imagemagick but can be overwritten by modifying this value. See https://github.com/nextcloud/all-in-one#how-to-add-os-packages-permanently-to-the-nextcloud-container
      # - NEXTCLOUD_ADDITIONAL_PHP_EXTENSIONS=imagick # This allows to add additional php extensions to the Nextcloud container permanently. Default is imagick but can be overwritten by modifying this value. See https://github.com/nextcloud/all-in-one#how-to-add-php-extensions-permanently-to-the-nextcloud-container
      # - NEXTCLOUD_ENABLE_DRI_DEVICE=true # This allows to enable the /dev/dri device in the Nextcloud container.   Warning: this only works if the &apos/dev/dri&apos device is present on the host! If it should not exist on your host, don&apost set this to true as otherwise the Nextcloud container will fail to start! See https://github.com/nextcloud/all-in-one#how-to-enable-hardware-transcoding-for-nextcloud
      # - NEXTCLOUD_KEEP_DISABLED_APPS=false # Setting this to true will keep Nextcloud apps that are disabled in the AIO interface and not uninstall them if they should be installed. See https://github.com/nextcloud/all-in-one#how-to-keep-disabled-apps
      # - TALK_PORT=3478 # This allows to adjust the port that the talk container is using. See https://github.com/nextcloud/all-in-one#how-to-adjust-the-talk-port
      # - WATCHTOWER_DOCKER_SOCKET_PATH=/var/run/docker.sock # Needs to be specified if the docker socket on the host is not located in the default &apos/var/run/docker.sock&apos. Otherwise mastercontainer updates will fail. For macos it needs to be &apos/var/run/docker.sock&apos
    # networks: # Is needed when you want to create the nextcloud-aio network with ipv6-support using this file, see the network config at the bottom of the file
      # - nextcloud-aio # Is needed when you want to create the nextcloud-aio network with ipv6-support using this file, see the network config at the bottom of the file
      # - SKIP_DOMAIN_VALIDATION=true
    # # Uncomment the following line when using SELinux
    # security_opt: ["label:disable"]
volumes: # If you want to store the data on a different drive, see https://github.com/nextcloud/all-in-one#how-to-store-the-filesinstallation-on-a-separate-drive
  nextcloud_aio_mastercontainer:
    name: nextcloud_aio_mastercontainer # This line is not allowed to be changed as otherwise the built-in backup solution will not work
I have not removed many of the commented options in the compose file, for a possibility of me using them in the future.If you want a smaller cleaner compose with the extra options, you can refer to
services:
  nextcloud-aio-mastercontainer:
    image: nextcloud/all-in-one:latest
    init: true
    restart: always
    container_name: nextcloud-aio-mastercontainer
    volumes:
      - nextcloud_aio_mastercontainer:/mnt/docker-aio-config
      - /var/run/docker.sock:/var/run/docker.sock:ro
    ports:
      - 8080:8080
    environment:
      - APACHE_PORT=32323
      - APACHE_IP_BINDING=127.0.0.1
      - NEXTCLOUD_DATADIR=/opt/docker/nextcloud
volumes:
  nextcloud_aio_mastercontainer:
    name: nextcloud_aio_mastercontainer
I am using a separate directory to store nextcloud data. As per nextcloud documentation you should be using a separate partition if you want to use this feature, however I did not have that option on my server, so I used a separate directory instead. Also we use a custom port on which nextcloud listens for operations, we have set it up as 32323 above, but you can use any in the permissible port range. The 8080 port is used the setup the AIO management interface. Both 8080 and the APACHE_PORT do not need to be open on the host machine, as we will be using reverse proxy setup with nginx to direct requests. once you have your preferred compose.yml file, you can start the containers using
$ docker-compose -f compose.yml up -d 
Creating network "clouddev_default" with the default driver
Creating volume "nextcloud_aio_mastercontainer" with default driver
Creating nextcloud-aio-mastercontainer ... done
once your container&aposs are running, we can do the nginx setup.

Step 2: Configuring nginx reverse proxy for our domain on host. A reference nginx configuration for nextcloud AIO is given in the nextcloud git repository here . You can modify the configuration file according to your needs and setup. Here is configuration that we are using

map $http_upgrade $connection_upgrade  
    default upgrade;
    &apos&apos close;
 
server  
    listen 80;
    #listen [::]:80;            # comment to disable IPv6
    if ($scheme = "http")  
        return 301 https://$host$request_uri;
     
    listen 443 ssl http2;      # for nginx versions below v1.25.1
    #listen [::]:443 ssl http2; # for nginx versions below v1.25.1 - comment to disable IPv6
    # listen 443 ssl;      # for nginx v1.25.1+
    # listen [::]:443 ssl; # for nginx v1.25.1+ - keep comment to disable IPv6
    # http2 on;                                 # uncomment to enable HTTP/2        - supported on nginx v1.25.1+
    # http3 on;                                 # uncomment to enable HTTP/3 / QUIC - supported on nginx v1.25.0+
    # quic_retry on;                            # uncomment to enable HTTP/3 / QUIC - supported on nginx v1.25.0+
    # add_header Alt-Svc &aposh3=":443"; ma=86400&apos; # uncomment to enable HTTP/3 / QUIC - supported on nginx v1.25.0+
    # listen 443 quic reuseport;       # uncomment to enable HTTP/3 / QUIC - supported on nginx v1.25.0+ - please remove "reuseport" if there is already another quic listener on port 443 with enabled reuseport
    # listen [::]:443 quic reuseport;  # uncomment to enable HTTP/3 / QUIC - supported on nginx v1.25.0+ - please remove "reuseport" if there is already another quic listener on port 443 with enabled reuseport - keep comment to disable IPv6
    server_name cloud.example.com;
    location /  
        proxy_pass http://127.0.0.1:32323$request_uri;
        proxy_set_header X-Forwarded-For $proxy_add_x_forwarded_for;
        proxy_set_header X-Forwarded-Port $server_port;
        proxy_set_header X-Forwarded-Scheme $scheme;
        proxy_set_header X-Forwarded-Proto $scheme;
        proxy_set_header X-Real-IP $remote_addr;
        proxy_set_header Accept-Encoding "";
        proxy_set_header Host $host;
    
        client_body_buffer_size 512k;
        proxy_read_timeout 86400s;
        client_max_body_size 0;
        # Websocket
        proxy_http_version 1.1;
        proxy_set_header Upgrade $http_upgrade;
        proxy_set_header Connection $connection_upgrade;
     
    ssl_certificate /etc/letsencrypt/live/cloud.example.com/fullchain.pem; # managed by Certbot
    ssl_certificate_key /etc/letsencrypt/live/cloud.example.com/privkey.pem; # managed by Certbot
    ssl_session_timeout 1d;
    ssl_session_cache shared:MozSSL:10m; # about 40000 sessions
    ssl_session_tickets off;
    ssl_protocols TLSv1.2 TLSv1.3;
    ssl_ciphers ECDHE-ECDSA-AES128-GCM-SHA256:ECDHE-RSA-AES128-GCM-SHA256:ECDHE-ECDSA-AES256-GCM-SHA384:ECDHE-RSA-AES256-GCM-SHA384:ECDHE-ECDSA-CHACHA20-POLY1305:ECDHE-RSA-CHACHA20-POLY1305:DHE-RSA-AES128-GCM-SHA256:DHE-RSA-AES256-GCM-SHA384:DHE-RSA-CHACHA20-POLY1305;
    ssl_prefer_server_ciphers on;
    # Optional settings:
    # OCSP stapling
    # ssl_stapling on;
    # ssl_stapling_verify on;
    # ssl_trusted_certificate /etc/letsencrypt/live/<your-nc-domain>/chain.pem;
    # replace with the IP address of your resolver
    # resolver 127.0.0.1; # needed for oscp stapling: e.g. use 94.140.15.15 for adguard / 1.1.1.1 for cloudflared or 8.8.8.8 for google - you can use the same nameserver as listed in your /etc/resolv.conf file
 
Please note that you need to have valid SSL certificates for your domain for this configuration to work. Steps on getting valid SSL certificates for your domain are beyond the scope of this article. You can give a web search on getting SSL certificates with letsencrypt and you will get several resources on that, or may write a blog post on it separately in the future.once your configuration for nginx is done, you can test the nginx configuration using
$ sudo nginx -t 
nginx: the configuration file /etc/nginx/nginx.conf syntax is ok
nginx: configuration file /etc/nginx/nginx.conf test is successful
and then reload nginx with
$ sudo nginx -s reload

Step 3: Setup of Nextcloud AIO from the browser.To setup nextcloud AIO, we need to access it using the web browser on URL of our domain.tld:8080, however we do not want to open the 8080 port publicly to do this, so to complete the setup, here is a neat hack from sahilister
ssh -L 8080:127.0.0.1:8080 username:<server-ip>
you can bind the 8080 port of your server to the 8080 of your localhost using Unix socket forwarding over SSH.The port forwarding only last for the duration of your SSH session, if the SSH session breaks, your port forwarding will to. So, once you have the port forwarded, you can open the nextcloud AIO instance in your web browser at 127.0.0.1:8080
Nextcloud AIO install with docker-compose and nginx reverse proxy
you will get this error because you are trying to access a page on localhost over HTTPS. You can click on advanced and then continue to proceed to the next page. Your data is encrypted over SSH for this session as we are binding the port over SSH. Depending on your choice of browser, the above page might look different.once you have proceeded, the nextcloud AIO interface will open and will look something like this.
Nextcloud AIO install with docker-compose and nginx reverse proxynextcloud AIO initial screen with capsicums as password
It will show an auto generated passphrase, you need to save this passphrase and make sure to not loose it. For the purposes of security, I have masked the passwords with capsicums. once you have noted down your password, you can proceed to the Nextcloud AIO login, enter your password and then login. After login you will be greeted with a screen like this.
Nextcloud AIO install with docker-compose and nginx reverse proxy
now you can put the domain that you want to use in the Submit domain field. Once the domain check is done, you will proceed to the next step and see another screen like this
Nextcloud AIO install with docker-compose and nginx reverse proxy
here you can select any optional containers for the features that you might want. IMPORTANT: Please make sure to also change the time zone at the bottom of the page according to the time zone you wish to operate in.
Nextcloud AIO install with docker-compose and nginx reverse proxy
The timezone setup is also important because the data base will get initialized according to the set time zone. This could result in wrong initialization of database and you ending up in a startup loop for nextcloud. I faced this issue and could only resolve it after getting help from sahilister . Once you are done changing the timezone, and selecting any additional features you want, you can click on Download and start the containersIt will take some time for this process to finish, take a break and look at the farthest object in your room and take a sip of water. Once you are done, and the process has finished you will see a page similar to the following one.
Nextcloud AIO install with docker-compose and nginx reverse proxy
wait patiently for everything to turn green.
Nextcloud AIO install with docker-compose and nginx reverse proxy
once all the containers have started properly, you can open the nextcloud login interface on your configured domain, the initial login details are auto generated as you can see from the above screenshot. Again you will see a password that you need to note down or save to enter the nextcloud interface. Capsicums will not work as passwords. I have masked the auto generated passwords using capsicums.Now you can click on Open your Nextcloud button or go to your configured domain to access the login screen.
Nextcloud AIO install with docker-compose and nginx reverse proxy
You can use the login details from the previous step to login to the administrator account of your Nextcloud instance. There you have it, your very own cloud!

Additional Notes:

How to properly reset Nextcloud setup?While following the above steps, or while following steps from some other tutorial, you may have made a mistake, and want to start everything again from scratch. The instructions for it are present in the Nextcloud documentation here . Here is the TLDR for a docker-compose setup. These steps will delete all data, do not use these steps on an existing nextcloud setup unless you know what you are doing.
  • Stop your master container.
docker-compose -f compose.yml down -v
The above command will also remove the volume associated with the master container
  • Stop all the child containers that has been started by the master container.
docker stop nextcloud-aio-apache nextcloud-aio-notify-push nextcloud-aio-nextcloud nextcloud-aio-imaginary nextcloud-aio-fulltextsearch nextcloud-aio-redis nextcloud-aio-database nextcloud-aio-talk nextcloud-aio-collabora
  • Remove all the child containers that has been started by the master container
docker rm nextcloud-aio-apache nextcloud-aio-notify-push nextcloud-aio-nextcloud nextcloud-aio-imaginary nextcloud-aio-fulltextsearch nextcloud-aio-redis nextcloud-aio-database nextcloud-aio-talk nextcloud-aio-collabora
  • If you also wish to remove all images associated with nextcloud you can do it with
docker rmi $(docker images --filter "reference=nextcloud/*" -q)
  • remove all volumes associated with child containers
docker volume rm <volume-name>
  • remove the network associated with nextcloud
docker network rm nextcloud-aio

Additional references.
  1. Nextcloud Github
  2. Nextcloud reverse proxy documentation
  3. Nextcloud Administration Guide
  4. Nextcloud User Manual
  5. Nextcloud Developer&aposs manual

7 December 2023

Daniel Kahn Gillmor: New OpenPGP certificate for dkg, December 2023

dkg's New OpenPGP certificate in December 2023 In December of 2023, I'm moving to a new OpenPGP certificate. You might know my old OpenPGP certificate, which had an fingerprint of C29F8A0C01F35E34D816AA5CE092EB3A5CA10DBA. My new OpenPGP certificate has a fingerprint of: D477040C70C2156A5C298549BB7E9101495E6BF7. Both certificates have the same set of User IDs:
  • Daniel Kahn Gillmor
  • <dkg@debian.org>
  • <dkg@fifthhorseman.net>
You can find a version of this transition statement signed by both the old and new certificates at: https://dkg.fifthhorseman.net/2023-dkg-openpgp-transition.txt The new OpenPGP certificate is:
-----BEGIN PGP PUBLIC KEY BLOCK-----
xjMEZXEJyxYJKwYBBAHaRw8BAQdA5BpbW0bpl5qCng/RiqwhQINrplDMSS5JsO/Y
O+5Zi7HCwAsEHxYKAH0FgmVxCcsDCwkHCRC7fpEBSV5r90cUAAAAAAAeACBzYWx0
QG5vdGF0aW9ucy5zZXF1b2lhLXBncC5vcmfUAgfN9tyTSxpxhmHA1r63GiI4v6NQ
mrrWVLOBRJYuhQMVCggCmwECHgEWIQTUdwQMcMIValwphUm7fpEBSV5r9wAAmaEA
/3MvYJMxQdLhIG4UDNMVd2bsovwdcTrReJhLYyFulBrwAQD/j/RS+AXQIVtkcO9b
l6zZTAO9x6yfkOZbv0g3eNyrAs0QPGRrZ0BkZWJpYW4ub3JnPsLACwQTFgoAfQWC
ZXEJywMLCQcJELt+kQFJXmv3RxQAAAAAAB4AIHNhbHRAbm90YXRpb25zLnNlcXVv
aWEtcGdwLm9yZ4l+Z3i19Uwjw3CfTNFCDjRsoufMoPOM7vM8HoOEdn/vAxUKCAKb
AQIeARYhBNR3BAxwwhVqXCmFSbt+kQFJXmv3AAALZQEAhJsgouepQVV98BHUH6Sv
WvcKrb8dQEZOvHFbZQQPNWgA/A/DHkjYKnUkCg8Zc+FonqOS/35sHhNA8CwqSQFr
tN4KzRc8ZGtnQGZpZnRoaG9yc2VtYW4ubmV0PsLACgQTFgoAfQWCZXEJywMLCQcJ
ELt+kQFJXmv3RxQAAAAAAB4AIHNhbHRAbm90YXRpb25zLnNlcXVvaWEtcGdwLm9y
ZxLvwkgnslsAuo+IoSa9rv8+nXpbBdab2Ft7n4H9S+d/AxUKCAKbAQIeARYhBNR3
BAxwwhVqXCmFSbt+kQFJXmv3AAAtFgD4wqcUfQl7nGLQOcAEHhx8V0Bg8v9ov8Gs
Y1ei1BEFwAD/cxmxmDSO0/tA+x4pd5yIvzgfGYHSTxKS0Ww3hzjuZA7NE0Rhbmll
bCBLYWhuIEdpbGxtb3LCwA4EExYKAIAFgmVxCcsDCwkHCRC7fpEBSV5r90cUAAAA
AAAeACBzYWx0QG5vdGF0aW9ucy5zZXF1b2lhLXBncC5vcmd7X4TgiINwnzh4jar0
Pf/b5hgxFPngCFxJSmtr/f0YiQMVCggCmQECmwECHgEWIQTUdwQMcMIValwphUm7
fpEBSV5r9wAAMuwBAPtMonKbhGOhOy+8miAb/knJ1cIPBjLupJbjM+NUE1WyAQD1
nyGW+XwwMrprMwc320mdJH9B0jdokJZBiN7++0NoBM4zBGVxCcsWCSsGAQQB2kcP
AQEHQI19uRatkPSFBXh8usgciEDwZxTnnRZYrhIgiFMybBDQwsC/BBgWCgExBYJl
cQnLCRC7fpEBSV5r90cUAAAAAAAeACBzYWx0QG5vdGF0aW9ucy5zZXF1b2lhLXBn
cC5vcmfCopazDnq6hZUsgVyztl5wmDCmxI169YLNu+IpDzJEtQKbAr6gBBkWCgBv
BYJlcQnLCRB3LRYeNc1LgUcUAAAAAAAeACBzYWx0QG5vdGF0aW9ucy5zZXF1b2lh
LXBncC5vcmcQglI7G7DbL9QmaDkzcEuk3QliM4NmleIRUW7VvIBHMxYhBHS8BMQ9
hghL6GcsBnctFh41zUuBAACwfwEAqDULksr8PulKRcIP6N9NI/4KoznyIcuOHi8q
Gk4qxMkBAIeV20SPEnWSw9MWAb0eKEcfupzr/C+8vDvsRMynCWsDFiEE1HcEDHDC
FWpcKYVJu36RAUlea/cAAFD1AP0YsE3Eeig1tkWaeyrvvMf5Kl1tt2LekTNWDnB+
FUG9SgD+Ka8vfPR8wuV8D3y5Y9Qq9xGO+QkEBCW0U1qNypg65QHOOARlcQnLEgor
BgEEAZdVAQUBAQdAWTLEa0WmnhUmDBdWXX0ZlYAa4g1CK/fXg0NPOQSteA4DAQgH
wsAABBgWCgByBYJlcQnLCRC7fpEBSV5r90cUAAAAAAAeACBzYWx0QG5vdGF0aW9u
cy5zZXF1b2lhLXBncC5vcmexrMBZe0QdQ+ZJOZxFkAiwCw2I7yTSF2Ox9GVFWKmA
mAKbDBYhBNR3BAxwwhVqXCmFSbt+kQFJXmv3AABcJQD/f4ltpSvLBOBEh/C2dIYa
dgSuqkCqq0B4WOhFRkWJZlcA/AxqLWG4o8UrrmwrmM42FhgxKtEXwCSHE00u8wR4
Up8G
=9Yc8
-----END PGP PUBLIC KEY BLOCK-----
When I have some reasonable number of certifications, i'll update the certificate associated with my e-mail addresses on https://keys.openpgp.org, in DANE, and in WKD. Until then, those lookups should continue to provide the old certificate.

9 August 2023

Antoine Beaupr : OpenPGP key transition

This is a short announcement to say that I have changed my main OpenPGP key. A signed statement is available with the cryptographic details but, in short, the reason is that I stopped using my old YubiKey NEO that I have worn on my keyring since 2015. I now have a YubiKey 5 which supports ED25519 which features much shorter keys and faster decryption. It allowed me to move all my secret subkeys on the key (including encryption keys) while retaining reasonable performance. I have written extensive documentation on how to do that OpenPGP key rotation and also YubiKey OpenPGP operations.

Warning on storing encryption keys on a YubiKey People wishing to move their private encryption keys to such a security token should be very careful as there are special precautions to take for disaster recovery. I am toying with the idea of writing an article specifically about disaster recovery for secrets and backups, dealing specifically with cases of death or disabilities.

Autocrypt changes One nice change is the impact on Autocrypt headers, which are considerably shorter. Before, the header didn't even fit on a single line in an email, it overflowed to five lines:
Autocrypt: addr=anarcat@torproject.org; prefer-encrypt=nopreference;
 keydata=xsFNBEogKJ4BEADHRk8dXcT3VmnEZQQdiAaNw8pmnoRG2QkoAvv42q9Ua+DRVe/yAEUd03EOXbMJl++YKWpVuzSFr7IlZ+/lJHOCqDeSsBD6LKBSx/7uH2EOIDizGwfZNF3u7X+gVBMy2V7rTClDJM1eT9QuLMfMakpZkIe2PpGE4g5zbGZixn9er+wEmzk2mt20RImMeLK3jyd6vPb1/Ph9+bTEuEXi6/WDxJ6+b5peWydKOdY1tSbkWZgdi+Bup72DLUGZATE3+Ju5+rFXtb/1/po5dZirhaSRZjZA6sQhyFM/ZhIj92mUM8JJrhkeAC0iJejn4SW8ps2NoPm0kAfVu6apgVACaNmFb4nBAb2k1KWru+UMQnV+VxDVdxhpV628Tn9+8oDg6c+dO3RCCmw+nUUPjeGU0k19S6fNIbNPRlElS31QGL4H0IazZqnE+kw6ojn4Q44h8u7iOfpeanVumtp0lJs6dE2nRw0EdAlt535iQbxHIOy2x5m9IdJ6q1wWFFQDskG+ybN2Qy7SZMQtjjOqM+CmdeAnQGVwxowSDPbHfFpYeCEb+Wzya337Jy9yJwkfa+V7e7Lkv9/OysEsV4hJrOh8YXu9a4qBWZvZHnIO7zRbz7cqVBKmdrL2iGqpEUv/x5onjNQwpjSVX5S+ZRBZTzah0w186IpXVxsU8dSk0yeQskblrwARAQABzSlBbnRvaW5lIEJlYXVwcsOpIDxhbmFyY2F0QHRvcnByb2plY3Qub3JnPsLBlAQTAQgAPgIbAwULCQgHAwUVCgkICwUWAgMBAAIeAQIXgBYhBI3JAc5kFGwEitUPu3khUlJ7dZIeBQJihnFIBQkacFLiAAoJEHkhUlJ7dZIeXNAP/RsX+27l9K5uGspEaMH6jabAFTQVWD8Ch1om9YvrBgfYtq2k/m4WlkMh9IpT89Ahmlf0eq+V1Vph4wwXBS5McK0dzoFuHXJa1WHThNMaexgHhqJOs
 S60bWyLH4QnGxNaOoQvuAXiCYV4amKl7hSuDVZEn/9etDgm/UhGn2KS3yg0XFsqI7V/3RopHiDT+k7+zpAKd3st2V74w6ht+EFp2Gj0sNTBoCdbmIkRhiLyH9S4B+0Z5dUCUEopGIKKOSbQwyD5jILXEi7VTZhN0CrwIcCuqNo7OXI6e8gJd8McymqK4JrVoCipJbLzyOLxZMxGz8Ki0b9O844/DTzwcYcg9I1qogCsGmZfgVze2XtGxY+9zwSpeCLeef6QOPQ0uxsEYSfVgS+onCesSRCgwAPmppPiva+UlGuIMun87gPpQpV2fqFg/V8zBxRvs6YTGcfcQjfMoBHmZTGb+jk1//QAgnXMO7fGG38YH7iQSSzkmodrH2s27ZKgUTHVxpBL85ptftuRqbR7MzIKXZsKdA88kjIKKXwMmez9L1VbJkM4k+1Kzc5KdVydwi+ujpNegF6ZU8KDNFiN9TbDOlRxK5R+AjwdS8ZOIa4nci77KbNF9OZuO3l/FZwiKp8IFJ1nK7uiKUjmCukL0od/6X2rJtAzJmO5Co93ZVrd5r48oqUvjklzzsBNBFmeC3oBCADEV28RKzbv3dEbOocOsJQWr1R0EHUcbS270CrQZfb9VCZWkFlQ/1ypqFFQSjmmUGbNX2CG5mivVsW6Vgm7gg8HEnVCqzL02BPY4OmylskYMFI5Bra2wRNNQBgjg39L9XU4866q3BQzJp3r0fLRVH8gHM54Jf0FVmTyHotR/Xiw5YavNy2qaQXesqqUv8HBIha0rFblbuYI/cFwOtJ47gu0QmgrU0ytDjlnmDNx4rfsNylwTIHS0Oc7Pezp7MzLmZxnTM9b5VMprAXnQr4rewXCOUKBSto+j4rD5/77DzXw96bbueNruaupb2Iy2OHXNGkB0vKFD3xHsXE2x75NBovtABEBAAHCwqwEGAEIACAWIQSNyQHOZBRsBIrVD7t5IVJSe3WSHgUCWZ4LegIbAgFACRB5IV
 JSe3WSHsB0IAQZAQgAHRYhBHsWQgTQlnI7AZY1qz6h3d2yYdl7BQJZngt6AAoJED6h3d2yYdl7CowH/Rp7GHEoPZTSUK8Ss7crwRmuAIDGBbSPkZbGmm4bOTaNs/gealc2tsVYpoMx7aYgqUW+t+84XciKHT+bjRv8uBnHescKZgDaomDuDKc2JVyx6samGFYuYPcGFReRcdmH0FOoPCn7bMW5mTPztV/wIA80LZD9kPKIXanfUyI3HLP0BPwZG4WTpKzJaalR1BNwu2oF6kEK0ymH3LfDiJ5Sr6emI2jrm4gH+/19ux/x+ST4tvm2PmH3BSQOPzgiqDiFd7RZoAIhmwr3FW4epsK9LtSxsi9gZ2vATBKO1oKtb6olW/keQT6uQCjqPSGojwzGRT2thEANH+5t6Vh0oDPZhrKUXRAAxHMBNHEaoo/M0sjZo+5OF3Ig1rMnI6XbKskLv6hu13cCymW0w/5E4XuYnyQ1cNC3pLvqDQbDx5mAPfBVHuqxJdRLQ3yDM/D2QIsxnkzQwi0FsJuni4vuJzWK/NHHDCvxMCh0YmSgbptUtgW8/niatd2Y6MbfRGxUHoctKtzqzivC8hKMTFrj4AbZhg/e9QVCsh5zSXtpWP0qFDJsxRMx0/432n9d4XUiy4U672r9Q09SsynB3QN6nTaCTWCIxGxjIb+8kJrRqTGwy/PElHX6kF0vQUWZNf2ITV1sd6LK/s/7sH+x4rzgUEHrsKr/qPvY3rUY/dQLd+owXesY83ANOu6oMWhSJnPMksbNa4tIKKbjmw3CFIOfoYHOWf3FtnydHNXoXfj4nBX8oSnkfhLILTJgf6JDFXfw6mTsv/jMzIfDs7PO1LK2oMK0+prSvSoM8bP9dmVEGIurzsTGjhTOBcb0zgyCmYVD3S48vZlTgHszAes1zwaCyt3/tOwrzU5JsRJVns+B/TUYaR/u3oIDMDygvE5ObWxXaFVnCC59r+zl0FazZ0ouyk2AYIR
 zHf+n1n98HCngRO4FRel2yzGDYO2rLPkXRm+NHCRvUA/i4zGkJs2AV0hsKK9/x8uMkBjHAdAheXhY+CsizGzsKjjfwvgqf84LwAzSDdZqLVE2yGTOwU0ESiArJwEQAJhtnC6pScWjzvvQ6rCTGAai6hrRiN6VLVVFLIMaMnlUp92EtgVSNpw6kANtRTpKXUB5fIPZVUrVdfEN06t96/6LE42tgifDAFyFTZY5FdHHri1GG/Cr39MpW2VqCDCtTTPVWHTUlU1ZG631BJ+9NB+ce58TmLr6wBTQrT+W367eRFBC54EsLNb7zQAspCn9pw1xf1XNHOGnrAQ4r9BXhOW5B8CzRd4nLRQwVgtw/c5M/bjemAOoq2WkwN+0mfJe4TSfHwFUozXuN274X+0Gr10fhp8xEDYuQM0qu6W3aDXMBBwIu0jTNudEELsTzhKUbqpsBc9WjwNMCZoCuSw/RTpFBV35mXbqQoQgbcU7uWZslLl9Wvv/C6rjXgd+GeX8SGBjTqq1ZkTv5UXLHTNQzPnbkNEExzqToi/QdSjFMIACnakeOSxc0ckfnsd9pfGv1PUyPyiwrHiqWFzBijzGIZEHxhNGFxAkXwTJR7Pd40a7RDxwbO6p/TSIIum41JtteehLHwTRDdQNMoyfLxuNLEtNYS0uR2jYI1EPQfCNWXCdT2ZK/l6GVP6jyB/olHBIOr+oVXqJh+48ki8cATPczhq3fUr7UivmguGwD67/4omZ4PCKtz1hNndnyYFS9QldEGo+AsB3AoUpVIA0XfQVkxD9IZr+Zu6aJ6nWq4M2bsoxABEBAAHCwXYEGAEIACACGwwWIQSNyQHOZBRsBIrVD7t5IVJSe3WSHgUCWPerZAAKCRB5IVJSe3WSHkIgEACTpxdn/FKrwH0/LDpZDTKWEWm4416l13RjhSt9CUhZ/Gm2GNfXcVTfoF/jKXXgjHcV1DHjfLUPmPVwMdqlf5ACOiFqIUM2ag/OEARh356w
 YG7YEobMjX0CThKe6AV2118XNzRBw/S2IO1LWnL5qaGYPZONUa9Pj0OaErdKIk/V1wge8Zoav2fQPautBcRLW5VA33PH1ggoqKQ4ES1hc9HC6SYKzTCGixu97mu/vjOa8DYgM+33TosLyNy+bCzw62zJkMf89X0tTSdaJSj5Op0SrRvfgjbC2YpJOnXxHr9qaXFbBZQhLjemZi6zRzUNeJ6A3Nzs+gIc4H7s/bYBtcd4ugPEhDeCGffdS3TppH9PnvRXfoa5zj5bsKFgjqjWolCyAmEvd15tXz5yNXtvrpgDhjF5ozPiNp/1EeWX4DxbH2i17drVu4fXwauFZ6lcsAcJxnvCA28RlQlmEQu/gFOx1axVXf6GIuXnQSjQN6qJbByUYrdc/cFCxPO2/lGuUxnufN9Tvb51Qh54laPgGLrlD2huQeSD9Sxa0MNUjNY0qLqaReT99Ygb2LPYGSLoFVx9iZz6sZNt07LqCx9qNgsJwsdmwYsNpMuFbc7nkWjtlEqzsXZHTvYN654p43S+hcAhmmOzQZcew6h71fAJLciiqsPBnCEdgCGFAWhZZdPkMA==
After the change, the entire key fits on a single line, neat!
Autocrypt: addr=anarcat@torproject.org; prefer-encrypt=nopreference;
 keydata=xjMEZHZPzhYJKwYBBAHaRw8BAQdAWdVzOFRW6FYVpeVaDo3sC4aJ2kUW4ukdEZ36UJLAHd7NKUFudG9pbmUgQmVhdXByw6kgPGFuYXJjYXRAdG9ycHJvamVjdC5vcmc+wpUEExYIAD4WIQS7ts1MmNdOE1inUqYCKTpvpOU0cwUCZHZgvwIbAwUJAeEzgAULCQgHAwUVCgkICwUWAgMBAAIeAQIXgAAKCRACKTpvpOU0c47SAPdEqfeHtFDx9UPhElZf7nSM69KyvPWXMocu9Kcu/sw1AQD5QkPzK5oxierims6/KUkIKDHdt8UcNp234V+UdD/ZB844BGR2UM4SCisGAQQBl1UBBQEBB0CYZha2IMY54WFXMG4S9/Smef54Pgon99LJ/hJ885p0ZAMBCAfCdwQYFggAIBYhBLu2zUyY104TWKdSpgIpOm+k5TRzBQJkdlDOAhsMAAoJEAIpOm+k5TRzBg0A+IbcsZhLx6FRIqBJCdfYMo7qovEo+vX0HZsUPRlq4HkBAIctCzmH3WyfOD/aUTeOF3tY+tIGUxxjQLGsNQZeGrQI
Note that I have implemented my own kind of ridiculous Autocrypt support for the Notmuch Emacs email client I use, see this elisp code. To import keys, I pipe the message into this script which is basically just:
sq autocrypt decode   gpg --import
... thanks to Sequoia best-of-class Autocrypt support.

Note on OpenPGP usage While some have claimed OpenPGP's death, I believe those are overstated. Maybe it's just me, but I still use OpenPGP for my password management, to authenticate users and messages, and it's the interface to my YubiKey for authenticating with SSH servers. I understand people feel that OpenPGP is possibly insecure, counter-intuitive and full of problems, but I think most of those problems should instead be attributed to its current flagship implementation, GnuPG. I have tried to work with GnuPG for years, and it keeps surprising me with evilness and oddities. I have high hopes that the Sequoia project can bring some sanity into this space, and I also hope that RFC4880bis can eventually get somewhere so we have a more solid specification with more robust crypto. It's kind of a shame that this has dragged on for so long, but Update: there's a separate draft called openpgp-crypto-refresh that might actually be adopted as the "OpenPGP RFC" soon! And it doesn't keep real work from happening in Sequoia and other implementations. Thunderbird rewrote their OpenPGP implementation with RNP (which was, granted, a bumpy road because it lost compatibility with GnuPG) and Sequoia now has a certificate store with trust management (but still no secret storage), preliminary OpenPGP card support and even a basic GnuPG compatibility layer. I'm also curious to try out the OpenPGP CA capabilities. So maybe it's just because I'm becoming an old fart that doesn't want to change tools, but so far I haven't seen a good incentive in switching away from OpenPGP, and haven't found a good set of tools that completely replace it. Maybe OpenSSH's keys and CA can eventually replace it, but I suspect they will end up rebuilding most of OpenPGP anyway, just more slowly. If they do, let's hope they avoid the mistakes our community has done in the past at least...

10 July 2023

Michael Ablassmeier: Java timezone sheanigans

While running CI tests for a application that is implemented in C and Java, some configuration scripts set the current timezone. The C implemented parts catch the change just nicely, but the java related parts still report the default image timezone. A simple example:
import java.util.*;
import java.text.*;
class simpleTest
 
        public static void main(String args[])
         
           Calendar cal = Calendar.getInstance();
           System.out.println("TIME ZONE :"+ cal.getTimeZone().getDisplayName());
         
 
Result:
vagrant@vm:~$ sudo timedatectl set-timezone America/Aruba 
vagrant@vm:~$ timedatectl 
[..]
                Time zone: America/Aruba (AST, -0400)
[..]
vagrant@vm:~$ java test.java
TIME ZONE :Central European Standard Time
vagrant@vm:~$ ls -alh /etc/localtime 
lrwxrwxrwx 1 root root 35 Jul 10 14:41 /etc/localtime -> ../usr/share/zoneinfo/America/Aruba
It appears the Java implementation uses /etc/timezone as source, not /etc/localtime.
vagrant@vm:~$ echo America/Aruba   sudo tee /etc/timezone 
America/Aruba
vagrant@vm:~$ java test.java
TIME ZONE :Atlantic Standard Time
dpkg-reconfigure tzdata updates this file as well, so using timedatectl only won t be enough (at least not on Debian based systems which run java based applications.)

14 June 2023

Freexian Collaborators: Monthly report about Debian Long Term Support, May 2023 (by Roberto C. S nchez)

Like each month, have a look at the work funded by Freexian s Debian LTS offering.

Debian LTS contributors In May, 18 contributors have been paid to work on Debian LTS, their reports are available:
  • Abhijith PA did 6.0h (out of 6.0h assigned and 8.0h from previous period), thus carrying over 8.0h to the next month.
  • Anton Gladky did 6.0h (out of 8.0h assigned and 7.0h from previous period), thus carrying over 9.0h to the next month.
  • Bastien Roucari s did 17.0h (out of 17.0h assigned and 3.0h from previous period), thus carrying over 3.0h to the next month.
  • Ben Hutchings did 17.0h (out of 16.0h assigned and 8.0h from previous period), thus carrying over 7.0h to the next month.
  • Chris Lamb did 18.0h (out of 18.0h assigned).
  • Daniel Leidert did 0.0h (out of 0h assigned and 12.0h from previous period), thus carrying over 12.0h to the next month.
  • Dominik George did 0.0h (out of 0h assigned and 20.34h from previous period), thus carrying over 20.34h to the next month.
  • Emilio Pozuelo Monfort did 32.0h (out of 18.5h assigned and 16.0h from previous period), thus carrying over 2.5h to the next month.
  • Guilhem Moulin did 20.0h (out of 8.5h assigned and 11.5h from previous period).
  • Holger Levsen did 0.0h (out of 0h assigned and 10.0h from previous period), thus carrying over 10.0h to the next month.
  • Lee Garrett did 0.0h (out of 0h assigned and 40.5h from previous period), thus carrying over 40.5h to the next month.
  • Markus Koschany did 34.5h (out of 34.5h assigned).
  • Roberto C. S nchez did 18.25h (out of 20.5h assigned and 11.5h from previous period), thus carrying over 13.75h to the next month.
  • Scarlett Moore did 20.0h (out of 20.0h assigned).
  • Sylvain Beucler did 34.5h (out of 29.0h assigned and 5.5h from previous period).
  • Thorsten Alteholz did 14.0h (out of 14.0h assigned).
  • Tobias Frost did 16.0h (out of 15.0h assigned and 1.0h from previous period).
  • Utkarsh Gupta did 5.5h (out of 5.0h assigned and 26.0h from previous period), thus carrying over 25.5h to the next month.

Evolution of the situation In May, we have released 34 DLAs. Several of the DLAs constituted notable security updates to LTS during the month of May. Of particular note were the linux (4.19) and linux-5.10 packages, both of which addressed a considerable number of CVEs. Additionally, the postgresql-11 package was updated by synchronizing it with the 11.20 release from upstream. Notable non-security updates were made to the distro-info-data database and the timezone database. The distro-info-data package was updated with the final expected release date of Debian 12, made aware of Debian 14 and Ubuntu 23.10, and was updated with the latest EOL dates for Ubuntu releases. The tzdata and libdatetime-timezone-perl packages were updated with the 2023c timezone database. The changes in these packages ensure that in addition to the latest security updates LTS users also have the latest information concerning Debian and Ubuntu support windows, as well as the latest timezone data for accurate worldwide timekeeping. LTS contributor Anton implemented an improvement to the Debian Security Tracker Unfixed vulnerabilities in unstable without a filed bug view, allowing for more effective management of CVEs which do not yet have a corresponding bug entry in the Debian BTS. LTS contributor Sylvain concluded an audit of obsolete packages still supported in LTS to ensure that new CVEs are properly associated. In this case, a package being obsolete means that it is no longer associated with a Debian release for which the Debian Security Team has direct responsibility. When this occurs, it is the responsibility of the LTS team to ensure that incoming CVEs are properly associated to packages which exist only in LTS. Finally, LTS contributors also contributed several updates to packages in unstable/testing/stable to fix CVEs. This helps package maintainers, addresses CVEs in current and future Debian releases, and ensures that the CVEs do not remain open for an extended period of time only for the LTS team to be required to deal with them much later in the future.

Thanks to our sponsors Sponsors that joined recently are in bold.

3 March 2023

Sven Hoexter: exfat-fuse 1.4 in experimental

I know a few people hold on to the exFAT fuse implementation due the support for timezone offsets, so here is a small update for you. Andrew released 1.4.0, which includes the timezone offset support, which was so far only part of the git master branch. It also fixes a, from my point of view very minor, security issue CVE-2022-29973. In addition to that it's the first build with fuse3 support. If you still use this driver, pick it up in experimental (we're in the bookworm freeze right now), and give it a try. I'm personally not using it anymore beyond a very basic "does it mount" test.

7 February 2023

Stephan Lachnit: Installing Debian on F2FS rootfs with deboostrap and systemd-boot

I recently got a new NVME drive. My plan was to create a fresh Debian install on an F2FS root partition with compression for maximum performance. As it turns out, this is not entirely trivil to accomplish. For one, the Debian installer does not support F2FS (here is my attempt to add it from 2021). And even if it did, grub does not support F2FS with the extra_attr flag that is required for compression support (at least as of grub 2.06). Luckily, we can install Debian anyway with all these these shiny new features when we go the manual road with debootstrap and using systemd-boot as bootloader. We can break down the process into several steps:
  1. Creating the partition table
  2. Creating and mounting the root partition
  3. Bootstrapping with debootstrap
  4. Chrooting into the system
  5. Configure the base system
  6. Define static file system information
  7. Installing the kernel and bootloader
  8. Finishing touches
Warning: Playing around with partitions can easily result in data if you mess up! Make sure to double check your commands and create a data backup if you don t feel confident about the process.

Creating the partition partble The first step is to create the GPT partition table on the new drive. There are several tools to do this, I recommend the ArchWiki page on this topic for details. For simplicity I just went with the GParted since it has an easy GUI, but feel free to use any other tool. The layout should look like this:
Type         Partition        Suggested size
 
EFI          /dev/nvme0n1p1           512MiB
Linux swap   /dev/nvme0n1p2             1GiB
Linux fs     /dev/nvme0n1p3        remainder
Notes:
  • The disk names are just an example and have to be adjusted for your system.
  • Don t set disk labels, they don t appear on the new install anyway and some UEFIs might not like it on your boot partition.
  • The size of the EFI partition can be smaller, in practive it s unlikely that you need more than 300 MiB. However some UEFIs might be buggy and if you ever want to install an additional kernel or something like memtest86+ you will be happy to have the extra space.
  • The swap partition can be omitted, it is not strictly needed. If you need more swap for some reason you can also add more using a swap file later (see ArchWiki page). If you know you want to use suspend-to-RAM, you want to increase the size to something more than the size of your memory.
  • If you used GParted, create the EFI partition as FAT32 and set the esp flag. For the root partition use ext4 or F2FS if available.

Creating and mounting the root partition To create the root partition, we need to install the f2fs-tools first:
sudo apt install f2fs-tools
Now we can create the file system with the correct flags:
mkfs.f2fs -O extra_attr,inode_checksum,sb_checksum,compression,encrypt /dev/nvme0n1p3
For details on the flags visit the ArchWiki page. Next, we need to mount the partition with the correct flags. First, create a working directory:
mkdir boostrap
cd boostrap
mkdir root
export DFS=$(pwd)/root
Then we can mount the partition:
sudo mount -o compress_algorithm=zstd:6,compress_chksum,atgc,gc_merge,lazytime /dev/nvme0n1p3 $DFS
Again, for details on the mount options visit the above mentioned ArchWiki page.

Bootstrapping with debootstrap First we need to install the debootstrap package:
sudo apt install debootstrap
Now we can do the bootstrapping:
debootstrap --arch=amd64 --components=main,contrib,non-free,non-free-firmware unstable $DFS http://deb.debian.org/debian
Notes:
  • --arch sets the CPU architecture (see Debian Wiki).
  • --components sets the archive components, if you don t want non-free pacakges you might want to remove some entries here.
  • unstable is the Debian release, you might want to change that to testing or bookworm.
  • $DFS points to the mounting point of the root partition.
  • http://deb.debian.org/debian is the Debian mirror, you might want to set that to http://ftp.de.debian.org/debian or similar if you have a fast mirror in you area.

Chrooting into the system Before we can chroot into the newly created system, we need to prepare and mount virtual kernel file systems. First create the directories:
sudo mkdir -p $DFS/dev $DFS/dev/pts $DFS/proc $DFS/sys $DFS/run $DFS/sys/firmware/efi/efivars $DFS/boot/efi
Then bind-mount the directories from your system to the mount point of the new system:
sudo mount -v -B /dev $DFS/dev
sudo mount -v -B /dev/pts $DFS/dev/pts
sudo mount -v -B /proc $DFS/proc
sudo mount -v -B /sys $DFS/sys
sudo mount -v -B /run $DFS/run
sudo mount -v -B /sys/firmware/efi/efivars $DFS/sys/firmware/efi/efivars
As a last step, we need to mount the EFI partition:
sudo mount -v -B /dev/nvme0n1p1 $DFS/boot/efi
Now we can chroot into new system:
sudo chroot $DFS /bin/bash

Configure the base system The first step in the chroot is setting the locales. We need this since we might leak the locales from our base system into the chroot and if this happens we get a lot of annoying warnings.
export LC_ALL=C.UTF-8 LANG=C.UTF-8
apt install locales console-setup
Set your locales:
dpkg-reconfigure locales
Set your keyboard layout:
dpkg-reconfigure keyboard-configuration
Set your timezone:
dpkg-reconfigure tzdata
Now you have a fully functional Debian chroot! However, it is not bootable yet, so let s fix that.

Define static file system information The first step is to make sure the system mounts all partitions on startup with the correct mount flags. This is done in /etc/fstab (see ArchWiki page). Open the file and change its content to:
# file system                               mount point   type   options                                                            dump   pass
# NVME efi partition
UUID=XXXX-XXXX                              /boot/efi     vfat   umask=0077                                                         0      0
# NVME swap
UUID=XXXXXXXX-XXXX-XXXX-XXXX-XXXXXXXXXXXX   none          swap   sw                                                                 0      0
# NVME main partition
UUID=XXXXXXXX-XXXX-XXXX-XXXX-XXXXXXXXXXXX   /             f2fs   compress_algorithm=zstd:6,compress_chksum,atgc,gc_merge,lazytime   0      1
You need to fill in the UUIDs for the partitions. You can use
ls -lAph /dev/disk/by-uuid/
to match the UUIDs to the more readable disk name under /dev.

Installing the kernel and bootloader First install the systemd-boot and efibootmgr packages:
apt install systemd-boot efibootmgr
Now we can install the bootloader:
bootctl install --path=/boot/efi
You can verify the procedure worked with
efibootmgr -v
The next step is to install the kernel, you can find a fitting image with:
apt search linux-image-*
In my case:
apt install linux-image-amd64
After the installation of the kernel, apt will add an entry for systemd-boot automatically. Neat! However, since we are in a chroot the current settings are not bootable. The first reason is the boot partition, which will likely be the one from your current system. To change that, navigate to /boot/efi/loader/entries, it should contain one config file. When you open this file, it should look something like this:
title      Debian GNU/Linux bookworm/sid
version    6.1.0-3-amd64
machine-id 2967cafb6420ce7a2b99030163e2ee6a
sort-key   debian
options    root=PARTUUID=f81d4fae-7dec-11d0-a765-00a0c91e6bf6 ro systemd.machine_id=2967cafb6420ce7a2b99030163e2ee6a
linux      /2967cafb6420ce7a2b99030163e2ee6a/6.1.0-3-amd64/linux
initrd     /2967cafb6420ce7a2b99030163e2ee6a/6.1.0-3-amd64/initrd.img-6.1.0-3-amd64
The PARTUUID needs to point to the partition equivalent to /dev/nvme0n1p3 on your system. You can use
ls -lAph /dev/disk/by-partuuid/
to match the PARTUUIDs to the more readable disk name under /dev. The second problem is the ro flag in options which tell the kernel to boot in read-only mode. The default is rw, so you can just remove the ro flag. Once this is fixed, the new system should be bootable. You can change the boot order with:
efibootmgr --bootorder
However, before we reboot we might add well add a user and install some basic software.

Finishing touches Add a user:
useradd -m -G sudo -s /usr/bin/bash -c 'Full Name' username
Debian provides a TUI to install Desktop Environment. To open it, run:
tasksel
Now you can finally reboot into your new system:
reboot

Resources for further reading https://ivanb.neocities.org/blogs/y2022/debootstrap
https://www.debian.org/releases/stable/amd64/apds03.en.html
https://www.addictivetips.com/ubuntu-linux-tips/set-up-systemd-boot-on-arch-linux/
https://p5r.uk/blog/2020/using-systemd-boot-on-debian-bullseye.html
https://www.linuxfromscratch.org/lfs/view/stable/chapter07/kernfs.html
Thanks for reading!

28 January 2023

Craig Small: Fixing iCalendar feeds

The local government here has all the schools use an iCalendar feed for things like when school terms start and stop and other school events occur. The department s website also has events like public holidays. The issue is that all of them don t make it an all-day event but one that happens at midnight, or one past midnight. The events synchronise fine, though Google s calendar is known for synchronising when it feels like it, not at any particular time you would like it to.
Screenshot of Android Calendar showing a tiny bar at midnight which is the event.
Even though a public holiday is all day, they are sent as appointments for midnight. That means on my phone all the events are these tiny bars that appear right up the top of the screen and are easily missed, especially when the focus of the calendar is during the day. On the phone, you can see the tiny purple bar at midnight. This is how the events appear. It s not the calendar s fault, as far as it knows the school events are happening at midnight. You can also see Lunar New Year and Australia Day appear in the all-day part of the calendar and don t scroll away. That s where these events should be.
Why are all the events appearing at midnight? The reason is the feed is incorrectly set up and has the time. The events are sent in an iCalendar format and a typical event looks like this:
BEGIN:VEVENT
DTSTART;TZID=Australia/Sydney:20230206T000000
DTEND;TZID=Australia/Sydney:20230206T000000
SUMMARY:School Term starts
END:VEVENT
The event starting and stopping date and time are the DTSTART and DTEND lines. Both of them have the date of 2023/02/06 or 6th February 2023 and a time of 00:00:00 or midnight. So the calendar is doing the right thing, we need to fix the feed! The Fix I wrote a quick and dirty PHP script to download the feed from the real site, change the DTSTART and DTEND lines to all-day events and leave the rest of it alone.
<?php
$site = $_GET['s'];
if ($site == 'site1')  
    $REMOTE_URL='https://site1.example.net/ical_feed';
  elseif ($site == 'site2')  
    $REMOTE_URL='https://site2.example.net/ical_feed';
  else  
    http_response_code(400);
    die();
 
$fp = fopen($REMOTE_URL, "r");
if (!$fp)  
    die("fopen");
 
header('Content-Type: text/calendar');
while (( $line = fgets($fp, 1024)) !== false)  
    $line = preg_replace(
        '/^(DTSTART DTEND);[^:]+:([0-9] 8 )T000[01]00/',
        '$ 1 ;VALUE=DATE:$ 2 ',
        $line);
    echo $line;
 
?>
It s pretty quick and nasty but gets the job done. So what is it doing? You need to save the script on your web server somewhere, possibly with an alias command. The whole point of this is to change the type from a date/time to a date-only event and only print the date part of it for the start and end of it. The resulting iCalendar event looks like this:
BEGIN:VEVENT
DTSTART;VALUE=DATE:20230206
DTEND;VALUE=DATE:20230206
SUMMARY:School Term starts
END:VEVENT
The calendar then shows it properly as an all-day event. I would check the script works before doing the next step. You can use things like curl or wget to download it. If you use a normal browser, it will probably just download the translated file. If you re not seeing the right thing then it s probably the PCRE failing. You can check it online with a regex checker such as https://regex101.com. The site has saved my PCRE and match so you got something to start with. Calendar settings The last thing to do is to change the URL in your calendar settings. Each calendar system has a different way of doing it. For Google Calendar they provide instructions and you want to follow the section titled Use a link to add a public Calendar . The URL here is not the actual site s URL (which you would have put into the REMOTE_URL variable before) but the URL of your script plus the ?s=site1 part. So if you put your script aliased to /myical.php and the site ID was site1 and your website is www.example.com the URL would be https://www.example.com/myical.php?s=site1 . You should then see the events appear as all-day events on your calendar.

12 December 2022

Vasudev Kamath: Installing Debian from GRML Live CD

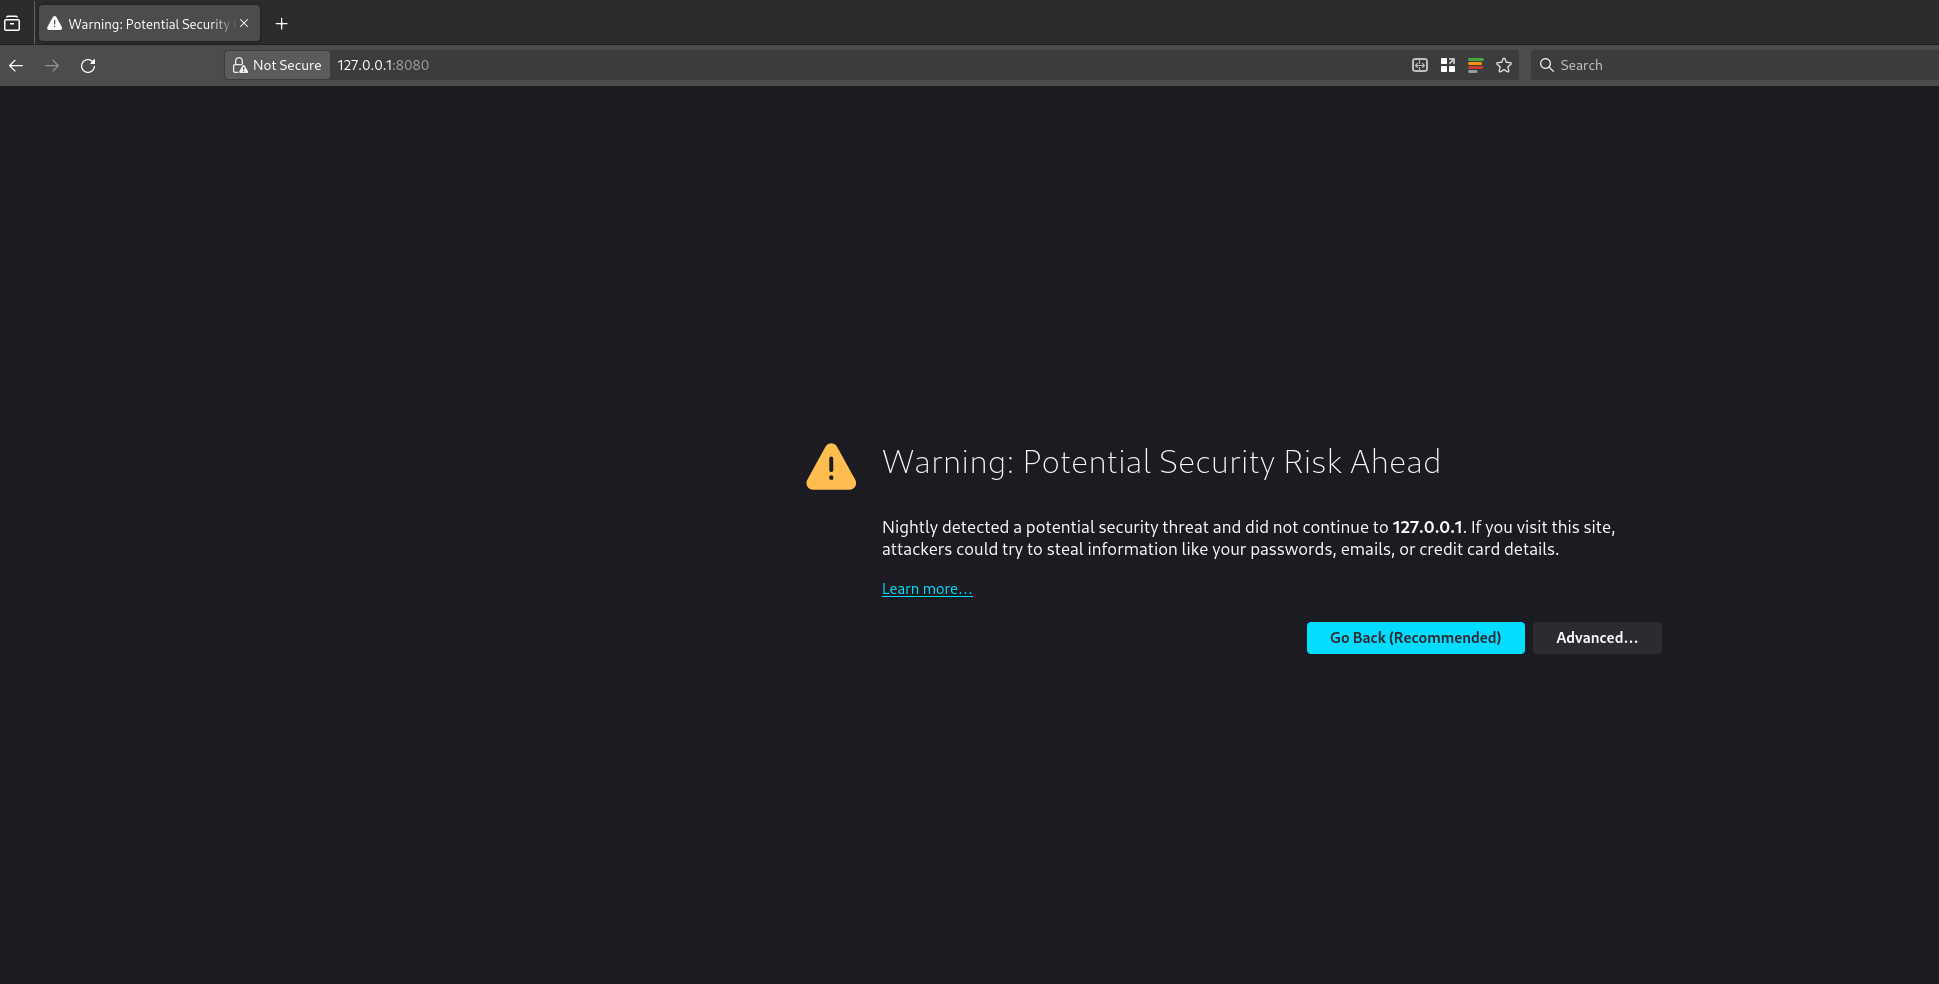
I had bought a Thinkpad E470 laptop back in 2018 which was lying unused for quite some time. Recently when I wanted to use it, I found that the keyboard is not working, especially some keys and after some time the laptop will hang in Lenovo boot screen. I came back to Bangalore almost after 2 years from my hometown (WFH due to Covid) and thought it was the right time to get my laptop back to normal working state. After getting the keyboard replaced I noticed that 1TB HDD is no longer fast enough for my taste!. I've to admit I never thought I would start disliking HDD so quickly thanks to modern SSD based work laptops. So as a second upgrade I got the HDD removed from my laptop and got a 240G SSD. Yeah I know its reduction from my original size but I intend to continue using my old HDD via USB SATA enclosure as an external HDD which can house the extra data which I need to save. So now that I've a SSD I need to install Debian Unstable again on it and this is where I tried something new. My colleague (name redacted on request) suggested to me use GRML live CD and install Debian via debootstrap. And after giving a thought I decided to try this out. Some reason for going ahead with this are listed below
  1. Debian Installer does not support a proper BTRFS based root file system. It just allows btrfs as root but no subvolume support. Also I'm not sure about the luks support with btrfs as root.
  2. I also wanted to give a try to systemd-boot as my laptop is UEFI capable and I've slowly started disliking Grub.
  3. I really hate installing task-kde-desktop (Yeah you read it right, I've switched to be a KDE user for quite some time) which will pull tons of unwanted stuff and bloat. Well it's not just task-kde-desktop but any other task-desktop package does similar and I don't want to have too much of unused stuff and services running.
Disk Preparation As a first step I went to GRML website and downloaded current pre-release. Frankly, I'm using GRML for first time and I was not sure what to expect. When I booted it up I was bit taken a back to see its console based and I did not have a wired lan just a plain wireless dongle (Jiofi device) and was wondering what it will take to connect. But surprisingly curses based UI was pretty much straight forward to allow me to connect to Wifi AP. Another thing was the rescue CD had non-free firmware as the laptop was using ath10k device and needed non-free blobs to operate. Once I got shell prompt in rescue CD first thing I did was to reconfigure console-setup to increase font size which was very very small on default boot. Once that is done I did the following to create a 1G (FAT32) partition for EFI.
parted -a optimal -s /dev/sda mklabel gpt
parted -a optimal -s /dev/sda mkpart primary vfat 0% 1G
parted -a optimal -s /dev/sda set 1 esp on
mkfs.vfat -n boot_disk -F 32 /dev/sda1
So here is what I did: created a 1G vfat type partition and set the esp flag on it. This will be mounted to /boot/efi for systemd-boot. Next I created a single partition on the rest of the available free disk which will be used as the root file system. Next I encrypted the root parition using LUKS and then created the BTRFS file system on top of it.
cryptsetup luksFormat /dev/sda2
cryptsetup luksOpen /dev/sda2 ENC
mkfs.btrfs -L root_disk /dev/mapper/ENC
Next is to create subvolumes in BTRFS. I followed suggestion by colleague and created a top-level @ as subvolume below which created @/home @/var/log @/opt . Also enabled compression with zstd and level of 1 to avoid battery drain. Finally marked the @ as default subvolume to avoid adding it to fstab entry.
mount -o compress=zstd:1 /dev/mapper/ENC /mnt
btrfs subvol create /mnt/@
cd /mnt/@
btrfs subvol create ./home
btrfs subvol create ./opt
mkdir -p var
btrfs subvol create ./var/log
btrfs suvol set-default /mnt/@
Bootstrapping Debian Now that root disk is prepared next step was to bootstrap the root file system. I used debootstrap for this job. One thing I missed here from installer was ability to preseed. I tried looking around to figure out if we can preseed debootstrap but did not find much. If you know the procedure do point it to me.
cd /mnt/
debootstrap --include=dbus,locales,tzdata unstable @/ http://deb.debian.org/debian
Well this just gets a bare minimal installation of Debian I need to install rest of the things post this step manually by chroot into target folder @/. I like the grml-chroot command for chroot purpose, it does most of the job of mounting all required directory like /dev/ /proc /sys etc. But before entering chroot I need to mount the ESP partition we created to /boot/efi so that I can finalize the installation of kernel and systemd-boot.
umount /mnt
mount -o compress=zstd:1 /dev/mapper/ENC /mnt
mkdir -p /mnt/boot/efi
mount /dev/sda1 /mnt/boot/efi
grml-chroot /mnt /bin/bash
I remounted the root subvolume @ directly to /mnt now, remember I made @ as default subvolume before. I also mounted ESP partition with FAT32 file system to /boot/efi. Finally I used grml-chroot to get into chroot of newly bootstrapped file system. Now I will install the kernel and minimal KDE desktop installation and configure locales and time zone data for the new system. I wanted to use dracut instead of default initramfs-tools for initrd. I also need to install cryptsetup and btrfs-progs so I can decrypt and really boot into my new system.
apt-get update
apt-get install linux-image-amd64 dracut openssh-client \
                        kde-plasma-desktop plasma-workspace-wayland \
                        plasma-nm cryptsetup btrfs-progs sudo
Next is setting up crypttab and fstab entries for new system. Following entry is added to fstab
LABEL="root_disk" / btrfs defaults,compress=zstd:1 0 0
And the crypttab entry
ENCRYPTED_ROOT UUID=xxxx none discard,x-initrd.attach
I've not written actual UUID above this is just for the purpose of showing the content of /etc/crypttab. Once these entries are added we need to recreate initrd. I just reconfigured the installed kernel package for retriggerring the recreation of initrd using dracut. .. Reconfiguration was locales is done by editing /etc/locales.gen to uncomment en_US.UTF-8 and writing /etc/timezone with Asia/Kolkata. I used DEBIAN_FRONTEND=noninteractive to avoid another prompt asking for locale and timezone information.
export DEBIAN_FRONTEND=noninteractive
dpkg-reconfigure locales
dpkg-reconfigure tzdata
Added my user using adduser command and also set the root password as well. Added my user to sudo group so I can use sudo to elevate privileges.
Setting up systemd-boot So now basic usable system is ready last part is enabling the systemd-boot configuration as I'm not gonna use grub. I did following to install systemd-boot. Frankly I'm not expert of this it was colleague's suggestion. Before installing the systemd-boot I had to setup kernel command line. This can be done by writing command line to /etc/kernel/cmdline with following contents.
systemd.gpt_auto=no quiet root=LABEL=root_disk
I'm disabling systemd-gpt-generator to avoid race condition between crypttab entry and auto generated entry by systemd. I faced this mainly because of my stupidity of not adding entry root=LABEL=root_disk
apt-get install -y systemd-boot
bootctl install --make-entry-directory=yes --entry-token=machine-id
dpkg-reconfigure linux-image-6.0.0-5-amd64
Finally exit from the chroot and reboot into the freshly installed system. systemd-boot already ships a hook file zz-systemd-boot under /etc/kernel so its pretty much usable without any manual intervention. Previously after kernel installation we had to manually update kernel image in efi partitions using bootctl
Conclussion Though installing from live image is not new and debian-installer also does the same only difference is more control over installation and doing things which is installer is not letting you do (or should I say is not part of default installation?). If properly automated using scripts we can leverage this to do custom installation in large scale environments. I know there is FAI but I've not explored it and felt there is too much to setup for a simple installations with specific requirements. So finally I've a system with Debian which differs from default Debian installation :-). I should thank my colleague for rekindling nerd inside me who had stopped experimenting quite a long time back.

29 October 2022

Dirk Eddelbuettel: gettz 0.0.5 on CRAN: Maintenance

A minor routine update 0.0.5 of gettz arrived on CRAN overnight. gettz provides a possible fallback in situations where Sys.timezone() fails to determine the system timezone. That happened when e.g. the file /etc/localtime somehow is not a link into the corresponding file with zoneinfo data in, say, /usr/share/zoneinfo. Since the package was written (in the fall of 2016), R added a similar extended heuristic approach itself. This release updates a function signature to satisfy the more stringent tests by clang-15, updates the GitHub Action checkout code to suppress a nag, and changes a few remaining http documentation links to https. As with the previous releses: No functional changes, no new code, or new features. Courtesy of my CRANberries, there is a comparison to the previous release. More information is on the gettz page. For questions or comments use the issue tracker off the GitHub repo. If you like this or other open-source work I do, you can now sponsor me at GitHub.

This post by Dirk Eddelbuettel originated on his Thinking inside the box blog. Please report excessive re-aggregation in third-party for-profit settings.

22 August 2022

Simon Josefsson: Static network config with Debian Cloud images

I self-host some services on virtual machines (VMs), and I m currently using Debian 11.x as the host machine relying on the libvirt infrastructure to manage QEMU/KVM machines. While everything has worked fine for years (including on Debian 10.x), there has always been one issue causing a one-minute delay every time I install a new VM: the default images run a DHCP client that never succeeds in my environment. I never found out a way to disable DHCP in the image, and none of the documented ways through cloud-init that I have tried worked. A couple of days ago, after reading the AlmaLinux wiki I found a solution that works with Debian. The following commands creates a Debian VM with static network configuration without the annoying one-minute DHCP delay. The three essential cloud-init keywords are the NoCloud meta-data parameters dsmode:local, static network-interfaces setting combined with the user-data bootcmd keyword. I m using a Raptor CS Talos II ppc64el machine, so replace the image link with a genericcloud amd64 image if you are using x86.
wget https://cloud.debian.org/images/cloud/bullseye/latest/debian-11-generic-ppc64el.qcow2
cp debian-11-generic-ppc64el.qcow2 foo.qcow2
cat>meta-data
dsmode: local
network-interfaces:  
 iface enp0s1 inet static
 address 192.168.98.14/24
 gateway 192.168.98.12
^D
cat>user-data
#cloud-config
fqdn: foo.mydomain
manage_etc_hosts: true
disable_root: false
ssh_pwauth: false
ssh_authorized_keys:
- ssh-ed25519 AAAA...
timezone: Europe/Stockholm
bootcmd:
- rm -f /run/network/interfaces.d/enp0s1
- ifup enp0s1
^D
virt-install --name foo --import --os-variant debian10 --disk foo.qcow2 --cloud-init meta-data=meta-data,user-data=user-data
Unfortunately virt-install from Debian 11 does not support the cloud-init network-config parameter, so if you want to use a version 2 network configuration with cloud-init (to specify IPv6 addresses, for example) you need to replace the final virt-install command with the following.
cat>network_config_static.cfg
version: 2
 ethernets:
  enp0s1:
   dhcp4: false
   addresses: [ 192.168.98.14/24, fc00::14/7 ]
   gateway4: 192.168.98.12
   gateway6: fc00::12
   nameservers:
    addresses: [ 192.168.98.12, fc00::12 ]
^D
cloud-localds -v -m local --network-config=network_config_static.cfg seed.iso user-data
virt-install --name foo --import --os-variant debian10 --disk foo.qcow2 --disk seed.iso,readonly=on --noreboot
virsh start foo
virsh detach-disk foo vdb --config
virsh console foo
There are still some warnings like the following, but it does not seem to cause any problem: [FAILED] Failed to start Initial cloud-init job (pre-networking). Finally, if you do not want the cloud-init tools installed in your VMs, I found the following set of additional user-data commands helpful. Cloud-init will not be enabled on first boot and a cron job will be added that purges some unwanted packages.
runcmd:
- touch /etc/cloud/cloud-init.disabled
- apt-get update && apt-get dist-upgrade -uy && apt-get autoremove --yes --purge && printf '#!/bin/sh\n  rm /etc/cloud/cloud-init.disabled /etc/cloud/cloud.cfg.d/01_debian_cloud.cfg && apt-get purge --yes cloud-init cloud-guest-utils cloud-initramfs-growroot genisoimage isc-dhcp-client && apt-get autoremove --yes --purge && rm -f /etc/cron.hourly/cloud-cleanup && shutdown --reboot +1;   2>&1   logger -t cloud-cleanup\n' > /etc/cron.hourly/cloud-cleanup && chmod +x /etc/cron.hourly/cloud-cleanup && reboot &
The production script I m using is a bit more complicated, but can be downloaded as vello-vm. Happy hacking!

2 July 2022

Fran ois Marier: Remote logging of Turris Omnia log messages using syslog-ng and rsyslog

As part of debugging an upstream connection problem I've been seeing recently, I wanted to be able to monitor the logs from my Turris Omnia router. Here's how I configured it to send its logs to a server I already had on the local network.

Server setup The first thing I did was to open up my server's rsyslog (Debian's default syslog server) to remote connections since it's going to be the destination host for the router's log messages. I added the following to /etc/rsyslog.d/router.conf:
module(load="imtcp")
input(type="imtcp" port="514")
if $fromhost-ip == '192.168.1.1' then  
    if $syslogseverity <= 5 then  
        action(type="omfile" file="/var/log/router.log")
     
    stop
 
This is using the latest rsyslog configuration method: a handy scripting language called RainerScript. Severity level 5 maps to "notice" which consists of unusual non-error conditions, and 192.168.1.1 is of course the IP address of the router on the LAN side. With this, I'm directing all router log messages to a separate file, filtering out anything less important than severity 5. In order for rsyslog to pick up this new configuration file, I restarted it:
systemctl restart rsyslog.service
and checked that it was running correctly (e.g. no syntax errors in the new config file) using:
systemctl status rsyslog.service
Since I added a new log file, I also setup log rotation for it by putting the following in /etc/logrotate.d/router:
/var/log/router.log
 
    rotate 4
    weekly
    missingok
    notifempty
    compress
    delaycompress
    sharedscripts
    postrotate
        /usr/lib/rsyslog/rsyslog-rotate
    endscript
 
In addition, since I use logcheck to monitor my server logs and email me errors, I had to add /var/log/router.log to /etc/logcheck/logcheck.logfiles. Finally I opened the rsyslog port to the router in my server's firewall by adding the following to /etc/network/iptables.up.rules:
# Allow logs from the router
-A INPUT -s 192.168.1.1 -p tcp --dport 514 -j ACCEPT
and ran iptables-apply. With all of this in place, it was time to get the router to send messages.

Router setup As suggested on the Turris forum, I ssh'ed into my router and added this in /etc/syslog-ng.d/remote.conf:
destination d_loghost  
        network("192.168.1.200" time-zone("America/Vancouver"));
 ;
source dns  
        file("/var/log/resolver");
 ;
log  
        source(src);
        source(net);
        source(kernel);
        source(dns);
        destination(d_loghost);
 ;
Setting the timezone to the same as my server was needed because the router messages were otherwise sent with UTC timestamps. To ensure that the destination host always gets the same IP address (192.168.1.200), I went to the advanced DHCP configuration page and added a static lease for the server's MAC address so that it always gets assigned 192.168.1.200. If that wasn't already the server's IP address, you'll have to restart it for this to take effect. Finally, I restarted the syslog-ng daemon on the router to pick up the new config file:
/etc/init.d/syslog-ng restart

Testing In order to test this configuration, I opened three terminal windows:
  1. tail -f /var/log/syslog on the server
  2. tail -f /var/log/router.log on the server
  3. tail -f /var/log/messages on the router
I immediately started to see messages from the router in the third window and some of these, not all because of my severity-5 filter, were flowing to the second window as well. Also important is that none of the messages make it to the first window, otherwise log messages from the router would be mixed in with the server's own logs. That's the purpose of the stop command in /etc/rsyslog.d/router.conf. To force a log messages to be emitted by the router, simply ssh into it and issue the following command:
logger Test
It should show up in the second and third windows immediately if you've got everything setup correctly

26 May 2022

Sergio Talens-Oliag: New Blog Config

As promised, on this post I m going to explain how I ve configured this blog using hugo, asciidoctor and the papermod theme, how I publish it using nginx, how I ve integrated the remark42 comment system and how I ve automated its publication using gitea and json2file-go. It is a long post, but I hope that at least parts of it can be interesting for some, feel free to ignore it if that is not your case

Hugo Configuration

Theme settingsThe site is using the PaperMod theme and as I m using asciidoctor to publish my content I ve adjusted the settings to improve how things are shown with it. The current config.yml file is the one shown below (probably some of the settings are not required nor being used right now, but I m including the current file, so this post will have always the latest version of it):
config.yml
baseURL: https://blogops.mixinet.net/
title: Mixinet BlogOps
paginate: 5
theme: PaperMod
destination: public/
enableInlineShortcodes: true
enableRobotsTXT: true
buildDrafts: false
buildFuture: false
buildExpired: false
enableEmoji: true
pygmentsUseClasses: true
minify:
  disableXML: true
  minifyOutput: true
languages:
  en:
    languageName: "English"
    description: "Mixinet BlogOps - https://blogops.mixinet.net/"
    author: "Sergio Talens-Oliag"
    weight: 1
    title: Mixinet BlogOps
    homeInfoParams:
      Title: "Sergio Talens-Oliag Technical Blog"
      Content: >
        ![Mixinet BlogOps](/images/mixinet-blogops.png)
    taxonomies:
      category: categories
      tag: tags
      series: series
    menu:
      main:
        - name: Archive
          url: archives
          weight: 5
        - name: Categories
          url: categories/
          weight: 10
        - name: Tags
          url: tags/
          weight: 10
        - name: Search
          url: search/
          weight: 15
outputs:
  home:
    - HTML
    - RSS
    - JSON
params:
  env: production
  defaultTheme: light
  disableThemeToggle: false
  ShowShareButtons: true
  ShowReadingTime: true
  disableSpecial1stPost: true
  disableHLJS: true
  displayFullLangName: true
  ShowPostNavLinks: true
  ShowBreadCrumbs: true
  ShowCodeCopyButtons: true
  ShowRssButtonInSectionTermList: true
  ShowFullTextinRSS: true
  ShowToc: true
  TocOpen: false
  comments: true
  remark42SiteID: "blogops"
  remark42Url: "/remark42"
  profileMode:
    enabled: false
    title: Sergio Talens-Oliag Technical Blog
    imageUrl: "/images/mixinet-blogops.png"
    imageTitle: Mixinet BlogOps
    buttons:
      - name: Archives
        url: archives
      - name: Categories
        url: categories
      - name: Tags
        url: tags
  socialIcons:
    - name: CV
      url: "https://www.uv.es/~sto/cv/"
    - name: Debian
      url: "https://people.debian.org/~sto/"
    - name: GitHub
      url: "https://github.com/sto/"
    - name: GitLab
      url: "https://gitlab.com/stalens/"
    - name: Linkedin
      url: "https://www.linkedin.com/in/sergio-talens-oliag/"
    - name: RSS
      url: "index.xml"
  assets:
    disableHLJS: true
    favicon: "/favicon.ico"
    favicon16x16:  "/favicon-16x16.png"
    favicon32x32:  "/favicon-32x32.png"
    apple_touch_icon:  "/apple-touch-icon.png"
    safari_pinned_tab:  "/safari-pinned-tab.svg"
  fuseOpts:
    isCaseSensitive: false
    shouldSort: true
    location: 0
    distance: 1000
    threshold: 0.4
    minMatchCharLength: 0
    keys: ["title", "permalink", "summary", "content"]
markup:
  asciidocExt:
    attributes:  
    backend: html5s
    extensions: ['asciidoctor-html5s','asciidoctor-diagram']
    failureLevel: fatal
    noHeaderOrFooter: true
    preserveTOC: false
    safeMode: unsafe
    sectionNumbers: false
    trace: false
    verbose: false
    workingFolderCurrent: true
privacy:
  vimeo:
    disabled: false
    simple: true
  twitter:
    disabled: false
    enableDNT: true
    simple: true
  instagram:
    disabled: false
    simple: true
  youtube:
    disabled: false
    privacyEnhanced: true
services:
  instagram:
    disableInlineCSS: true
  twitter:
    disableInlineCSS: true
security:
  exec:
    allow:
      - '^asciidoctor$'
      - '^dart-sass-embedded$'
      - '^go$'
      - '^npx$'
      - '^postcss$'
Some notes about the settings:
  • disableHLJS and assets.disableHLJS are set to true; we plan to use rouge on adoc and the inclusion of the hljs assets adds styles that collide with the ones used by rouge.
  • ShowToc is set to true and the TocOpen setting is set to false to make the ToC appear collapsed initially. My plan was to use the asciidoctor ToC, but after trying I believe that the theme one looks nice and I don t need to adjust styles, although it has some issues with the html5s processor (the admonition titles use <h6> and they are shown on the ToC, which is weird), to fix it I ve copied the layouts/partial/toc.html to my site repository and replaced the range of headings to end at 5 instead of 6 (in fact 5 still seems a lot, but as I don t think I ll use that heading level on the posts it doesn t really matter).
  • params.profileMode values are adjusted, but for now I ve left it disabled setting params.profileMode.enabled to false and I ve set the homeInfoParams to show more or less the same content with the latest posts under it (I ve added some styles to my custom.css style sheet to center the text and image of the first post to match the look and feel of the profile).
  • On the asciidocExt section I ve adjusted the backend to use html5s, I ve added the asciidoctor-html5s and asciidoctor-diagram extensions to asciidoctor and adjusted the workingFolderCurrent to true to make asciidoctor-diagram work right (haven t tested it yet).

Theme customisationsTo write in asciidoctor using the html5s processor I ve added some files to the assets/css/extended directory:
  1. As said before, I ve added the file assets/css/extended/custom.css to make the homeInfoParams look like the profile page and I ve also changed a little bit some theme styles to make things look better with the html5s output:
    custom.css
    /* Fix first entry alignment to make it look like the profile */
    .first-entry   text-align: center;  
    .first-entry img   display: inline;  
    /**
     * Remove margin for .post-content code and reduce padding to make it look
     * better with the asciidoctor html5s output.
     **/
    .post-content code   margin: auto 0; padding: 4px;  
  2. I ve also added the file assets/css/extended/adoc.css with some styles taken from the asciidoctor-default.css, see this blog post about the original file; mine is the same after formatting it with css-beautify and editing it to use variables for the colors to support light and dark themes:
    adoc.css
    /* AsciiDoctor*/
    table  
        border-collapse: collapse;
        border-spacing: 0
     
    .admonitionblock>table  
        border-collapse: separate;
        border: 0;
        background: none;
        width: 100%
     
    .admonitionblock>table td.icon  
        text-align: center;
        width: 80px
     
    .admonitionblock>table td.icon img  
        max-width: none
     
    .admonitionblock>table td.icon .title  
        font-weight: bold;
        font-family: "Open Sans", "DejaVu Sans", sans-serif;
        text-transform: uppercase
     
    .admonitionblock>table td.content  
        padding-left: 1.125em;
        padding-right: 1.25em;
        border-left: 1px solid #ddddd8;
        color: var(--primary)
     
    .admonitionblock>table td.content>:last-child>:last-child  
        margin-bottom: 0
     
    .admonitionblock td.icon [class^="fa icon-"]  
        font-size: 2.5em;
        text-shadow: 1px 1px 2px var(--secondary);
        cursor: default
     
    .admonitionblock td.icon .icon-note::before  
        content: "\f05a";
        color: var(--icon-note-color)
     
    .admonitionblock td.icon .icon-tip::before  
        content: "\f0eb";
        color: var(--icon-tip-color)
     
    .admonitionblock td.icon .icon-warning::before  
        content: "\f071";
        color: var(--icon-warning-color)
     
    .admonitionblock td.icon .icon-caution::before  
        content: "\f06d";
        color: var(--icon-caution-color)
     
    .admonitionblock td.icon .icon-important::before  
        content: "\f06a";
        color: var(--icon-important-color)
     
    .conum[data-value]  
        display: inline-block;
        color: #fff !important;
        background-color: rgba(100, 100, 0, .8);
        -webkit-border-radius: 100px;
        border-radius: 100px;
        text-align: center;
        font-size: .75em;
        width: 1.67em;
        height: 1.67em;
        line-height: 1.67em;
        font-family: "Open Sans", "DejaVu Sans", sans-serif;
        font-style: normal;
        font-weight: bold
     
    .conum[data-value] *  
        color: #fff !important
     
    .conum[data-value]+b  
        display: none
     
    .conum[data-value]::after  
        content: attr(data-value)
     
    pre .conum[data-value]  
        position: relative;
        top: -.125em
     
    b.conum *  
        color: inherit !important
     
    .conum:not([data-value]):empty  
        display: none
     
  3. The previous file uses variables from a partial copy of the theme-vars.css file that changes the highlighted code background color and adds the color definitions used by the admonitions:
    theme-vars.css
    :root  
        /* Solarized base2 */
        /* --hljs-bg: rgb(238, 232, 213); */
        /* Solarized base3 */
        /* --hljs-bg: rgb(253, 246, 227); */
        /* Solarized base02 */
        --hljs-bg: rgb(7, 54, 66);
        /* Solarized base03 */
        /* --hljs-bg: rgb(0, 43, 54); */
        /* Default asciidoctor theme colors */
        --icon-note-color: #19407c;
        --icon-tip-color: var(--primary);
        --icon-warning-color: #bf6900;
        --icon-caution-color: #bf3400;
        --icon-important-color: #bf0000
     
    .dark  
        --hljs-bg: rgb(7, 54, 66);
        /* Asciidoctor theme colors with tint for dark background */
        --icon-note-color: #3e7bd7;
        --icon-tip-color: var(--primary);
        --icon-warning-color: #ff8d03;
        --icon-caution-color: #ff7847;
        --icon-important-color: #ff3030
     
  4. The previous styles use font-awesome, so I ve downloaded its resources for version 4.7.0 (the one used by asciidoctor) storing the font-awesome.css into on the assets/css/extended dir (that way it is merged with the rest of .css files) and copying the fonts to the static/assets/fonts/ dir (will be served directly):
    FA_BASE_URL="https://cdnjs.cloudflare.com/ajax/libs/font-awesome/4.7.0"
    curl "$FA_BASE_URL/css/font-awesome.css" \
      > assets/css/extended/font-awesome.css
    for f in FontAwesome.otf fontawesome-webfont.eot \
      fontawesome-webfont.svg fontawesome-webfont.ttf \
      fontawesome-webfont.woff fontawesome-webfont.woff2; do
        curl "$FA_BASE_URL/fonts/$f" > "static/assets/fonts/$f"
    done
  5. As already said the default highlighter is disabled (it provided a css compatible with rouge) so we need a css to do the highlight styling; as rouge provides a way to export them, I ve created the assets/css/extended/rouge.css file with the thankful_eyes theme:
    rougify style thankful_eyes > assets/css/extended/rouge.css
  6. To support the use of the html5s backend with admonitions I ve added a variation of the example found on this blog post to assets/js/adoc-admonitions.js:
    adoc-admonitions.js
    // replace the default admonitions block with a table that uses a format
    // similar to the standard asciidoctor ... as we are using fa-icons here there
    // is no need to add the icons: font entry on the document.
    window.addEventListener('load', function ()  
      const admonitions = document.getElementsByClassName('admonition-block')
      for (let i = admonitions.length - 1; i >= 0; i--)  
        const elm = admonitions[i]
        const type = elm.classList[1]
        const title = elm.getElementsByClassName('block-title')[0];
    	const label = title.getElementsByClassName('title-label')[0]
    		.innerHTML.slice(0, -1);
        elm.removeChild(elm.getElementsByClassName('block-title')[0]);
        const text = elm.innerHTML
        const parent = elm.parentNode
        const tempDiv = document.createElement('div')
        tempDiv.innerHTML =  <div class="admonitionblock $ type ">
        <table>
          <tbody>
            <tr>
              <td class="icon">
                <i class="fa icon-$ type " title="$ label "></i>
              </td>
              <td class="content">
                $ text 
              </td>
            </tr>
          </tbody>
        </table>
      </div> 
        const input = tempDiv.childNodes[0]
        parent.replaceChild(input, elm)
       
     )
    and enabled its minified use on the layouts/partials/extend_footer.html file adding the following lines to it:
     - $admonitions := slice (resources.Get "js/adoc-admonitions.js")
        resources.Concat "assets/js/adoc-admonitions.js"   minify   fingerprint  
    <script defer crossorigin="anonymous" src="  $admonitions.RelPermalink  "
      integrity="  $admonitions.Data.Integrity  "></script>

Remark42 configurationTo integrate Remark42 with the PaperMod theme I ve created the file layouts/partials/comments.html with the following content based on the remark42 documentation, including extra code to sync the dark/light setting with the one set on the site:
comments.html
<div id="remark42"></div>
<script>
  var remark_config =  
    host:   .Site.Params.remark42Url  ,
    site_id:   .Site.Params.remark42SiteID  ,
    url:   .Permalink  ,
    locale:   .Site.Language.Lang  
   ;
  (function(c)  
    /* Adjust the theme using the local-storage pref-theme if set */
    if (localStorage.getItem("pref-theme") === "dark")  
      remark_config.theme = "dark";
      else if (localStorage.getItem("pref-theme") === "light")  
      remark_config.theme = "light";
     
    /* Add remark42 widget */
    for(var i = 0; i < c.length; i++) 
      var d = document, s = d.createElement('script');
      s.src = remark_config.host + '/web/' + c[i] +'.js';
      s.defer = true;
      (d.head   d.body).appendChild(s);
     
   )(remark_config.components   ['embed']);
</script>
In development I use it with anonymous comments enabled, but to avoid SPAM the production site uses social logins (for now I ve only enabled Github & Google, if someone requests additional services I ll check them, but those were the easy ones for me initially). To support theme switching with remark42 I ve also added the following inside the layouts/partials/extend_footer.html file:
 - if (not site.Params.disableThemeToggle)  
<script>
/* Function to change theme when the toggle button is pressed */
document.getElementById("theme-toggle").addEventListener("click", () =>  
  if (typeof window.REMARK42 != "undefined")  
    if (document.body.className.includes('dark'))  
      window.REMARK42.changeTheme('light');
      else  
      window.REMARK42.changeTheme('dark');
     
   
 );
</script>
 - end  
With this code if the theme-toggle button is pressed we change the remark42 theme before the PaperMod one (that s needed here only, on page loads the remark42 theme is synced with the main one using the code from the layouts/partials/comments.html shown earlier).

Development setupTo preview the site on my laptop I m using docker-compose with the following configuration:
docker-compose.yaml
version: "2"
services:
  hugo:
    build:
      context: ./docker/hugo-adoc
      dockerfile: ./Dockerfile
    image: sto/hugo-adoc
    container_name: hugo-adoc-blogops
    restart: always
    volumes:
      - .:/documents
    command: server --bind 0.0.0.0 -D -F
    user: $ APP_UID :$ APP_GID 
  nginx:
    image: nginx:latest
    container_name: nginx-blogops
    restart: always
    volumes:
      - ./nginx/default.conf:/etc/nginx/conf.d/default.conf
    ports:
      -  1313:1313
  remark42:
    build:
      context: ./docker/remark42
      dockerfile: ./Dockerfile
    image: sto/remark42
    container_name: remark42-blogops
    restart: always
    env_file:
      - ./.env
      - ./remark42/env.dev
    volumes:
      - ./remark42/var.dev:/srv/var
To run it properly we have to create the .env file with the current user ID and GID on the variables APP_UID and APP_GID (if we don t do it the files can end up being owned by a user that is not the same as the one running the services):
$ echo "APP_UID=$(id -u)\nAPP_GID=$(id -g)" > .env
The Dockerfile used to generate the sto/hugo-adoc is:
Dockerfile
FROM asciidoctor/docker-asciidoctor:latest
RUN gem install --no-document asciidoctor-html5s &&\
 apk update && apk add --no-cache curl libc6-compat &&\
 repo_path="gohugoio/hugo" &&\
 api_url="https://api.github.com/repos/$repo_path/releases/latest" &&\
 download_url="$(\
  curl -sL "$api_url"  \
  sed -n "s/^.*download_url\": \"\\(.*.extended.*Linux-64bit.tar.gz\)\"/\1/p"\
 )" &&\
 curl -sL "$download_url" -o /tmp/hugo.tgz &&\
 tar xf /tmp/hugo.tgz hugo &&\
 install hugo /usr/bin/ &&\
 rm -f hugo /tmp/hugo.tgz &&\
 /usr/bin/hugo version &&\
 apk del curl && rm -rf /var/cache/apk/*
# Expose port for live server
EXPOSE 1313
ENTRYPOINT ["/usr/bin/hugo"]
CMD [""]
If you review it you will see that I m using the docker-asciidoctor image as the base; the idea is that this image has all I need to work with asciidoctor and to use hugo I only need to download the binary from their latest release at github (as we are using an image based on alpine we also need to install the libc6-compat package, but once that is done things are working fine for me so far). The image does not launch the server by default because I don t want it to; in fact I use the same docker-compose.yml file to publish the site in production simply calling the container without the arguments passed on the docker-compose.yml file (see later). When running the containers with docker-compose up (or docker compose up if you have the docker-compose-plugin package installed) we also launch a nginx container and the remark42 service so we can test everything together. The Dockerfile for the remark42 image is the original one with an updated version of the init.sh script:
Dockerfile
FROM umputun/remark42:latest
COPY init.sh /init.sh
The updated init.sh is similar to the original, but allows us to use an APP_GID variable and updates the /etc/group file of the container so the files get the right user and group (with the original script the group is always 1001):
init.sh
#!/sbin/dinit /bin/sh
uid="$(id -u)"
if [ "$ uid " -eq "0" ]; then
  echo "init container"
  # set container's time zone
  cp "/usr/share/zoneinfo/$ TIME_ZONE " /etc/localtime
  echo "$ TIME_ZONE " >/etc/timezone
  echo "set timezone $ TIME_ZONE  ($(date))"
  # set UID & GID for the app
  if [ "$ APP_UID " ]   [ "$ APP_GID " ]; then
    [ "$ APP_UID " ]   APP_UID="1001"
    [ "$ APP_GID " ]   APP_GID="$ APP_UID "
    echo "set custom APP_UID=$ APP_UID  & APP_GID=$ APP_GID "
    sed -i "s/^app:x:1001:1001:/app:x:$ APP_UID :$ APP_GID :/" /etc/passwd
    sed -i "s/^app:x:1001:/app:x:$ APP_GID :/" /etc/group
  else
    echo "custom APP_UID and/or APP_GID not defined, using 1001:1001"
  fi
  chown -R app:app /srv /home/app
fi
echo "prepare environment"
# replace  % REMARK_URL %  by content of REMARK_URL variable
find /srv -regex '.*\.\(html\ js\ mjs\)$' -print \
  -exec sed -i "s % REMARK_URL % $ REMARK_URL  g"   \;
if [ -n "$ SITE_ID " ]; then
  #replace "site_id: 'remark'" by SITE_ID
  sed -i "s 'remark' '$ SITE_ID ' g" /srv/web/*.html
fi
echo "execute \"$*\""
if [ "$ uid " -eq "0" ]; then
  exec su-exec app "$@"
else
  exec "$@"
fi
The environment file used with remark42 for development is quite minimal:
env.dev
TIME_ZONE=Europe/Madrid
REMARK_URL=http://localhost:1313/remark42
SITE=blogops
SECRET=123456
ADMIN_SHARED_ID=sto
AUTH_ANON=true
EMOJI=true
And the nginx/default.conf file used to publish the service locally is simple too:
default.conf
server   
 listen 1313;
 server_name localhost;
 location /  
    proxy_pass http://hugo:1313;
    proxy_set_header Host $http_host;
    proxy_set_header X-Real-IP $remote_addr;
    proxy_set_header X-Forwarded-For $proxy_add_x_forwarded_for;
    proxy_set_header X-Forwarded-Proto $scheme;
    proxy_set_header Upgrade $http_upgrade;
    proxy_set_header Connection "upgrade";
  
 location /remark42/  
    rewrite /remark42/(.*) /$1 break;
    proxy_pass http://remark42:8080/;
    proxy_set_header Host $http_host;
    proxy_set_header X-Real-IP $remote_addr;
    proxy_set_header X-Forwarded-For $proxy_add_x_forwarded_for;
    proxy_set_header X-Forwarded-Proto $scheme;


Production setupThe VM where I m publishing the blog runs Debian GNU/Linux and uses binaries from local packages and applications packaged inside containers. To run the containers I m using docker-ce (I could have used podman instead, but I already had it installed on the machine, so I stayed with it). The binaries used on this project are included on the following packages from the main Debian repository:
  • git to clone & pull the repository,
  • jq to parse json files from shell scripts,
  • json2file-go to save the webhook messages to files,
  • inotify-tools to detect when new files are stored by json2file-go and launch scripts to process them,
  • nginx to publish the site using HTTPS and work as proxy for json2file-go and remark42 (I run it using a container),
  • task-spool to queue the scripts that update the deployment.
And I m using docker and docker compose from the debian packages on the docker repository:
  • docker-ce to run the containers,
  • docker-compose-plugin to run docker compose (it is a plugin, so no - in the name).

Repository checkoutTo manage the git repository I ve created a deploy key, added it to gitea and cloned the project on the /srv/blogops PATH (that route is owned by a regular user that has permissions to run docker, as I said before).

Compiling the site with hugoTo compile the site we are using the docker-compose.yml file seen before, to be able to run it first we build the container images and once we have them we launch hugo using docker compose run:
$ cd /srv/blogops
$ git pull
$ docker compose build
$ if [ -d "./public" ]; then rm -rf ./public; fi
$ docker compose run hugo --
The compilation leaves the static HTML on /srv/blogops/public (we remove the directory first because hugo does not clean the destination folder as jekyll does). The deploy script re-generates the site as described and moves the public directory to its final place for publishing.

Running remark42 with dockerOn the /srv/blogops/remark42 folder I have the following docker-compose.yml:
docker-compose.yml
version: "2"
services:
  remark42:
    build:
      context: ../docker/remark42
      dockerfile: ./Dockerfile
    image: sto/remark42
    env_file:
      - ../.env
      - ./env.prod
    container_name: remark42
    restart: always
    volumes:
      - ./var.prod:/srv/var
    ports:
      - 127.0.0.1:8042:8080
The ../.env file is loaded to get the APP_UID and APP_GID variables that are used by my version of the init.sh script to adjust file permissions and the env.prod file contains the rest of the settings for remark42, including the social network tokens (see the remark42 documentation for the available parameters, I don t include my configuration here because some of them are secrets).

Nginx configurationThe nginx configuration for the blogops.mixinet.net site is as simple as:
server  
  listen 443 ssl http2;
  server_name blogops.mixinet.net;
  ssl_certificate /etc/letsencrypt/live/blogops.mixinet.net/fullchain.pem;
  ssl_certificate_key /etc/letsencrypt/live/blogops.mixinet.net/privkey.pem;
  include /etc/letsencrypt/options-ssl-nginx.conf;
  ssl_dhparam /etc/letsencrypt/ssl-dhparams.pem;
  access_log /var/log/nginx/blogops.mixinet.net-443.access.log;
  error_log  /var/log/nginx/blogops.mixinet.net-443.error.log;
  root /srv/blogops/nginx/public_html;
  location /  
    try_files $uri $uri/ =404;
   
  include /srv/blogops/nginx/remark42.conf;
 
server  
  listen 80 ;
  listen [::]:80 ;
  server_name blogops.mixinet.net;
  access_log /var/log/nginx/blogops.mixinet.net-80.access.log;
  error_log  /var/log/nginx/blogops.mixinet.net-80.error.log;
  if ($host = blogops.mixinet.net)  
    return 301 https://$host$request_uri;
   
  return 404;
 
On this configuration the certificates are managed by certbot and the server root directory is on /srv/blogops/nginx/public_html and not on /srv/blogops/public; the reason for that is that I want to be able to compile without affecting the running site, the deployment script generates the site on /srv/blogops/public and if all works well we rename folders to do the switch, making the change feel almost atomic.

json2file-go configurationAs I have a working WireGuard VPN between the machine running gitea at my home and the VM where the blog is served, I m going to configure the json2file-go to listen for connections on a high port using a self signed certificate and listening on IP addresses only reachable through the VPN. To do it we create a systemd socket to run json2file-go and adjust its configuration to listen on a private IP (we use the FreeBind option on its definition to be able to launch the service even when the IP is not available, that is, when the VPN is down). The following script can be used to set up the json2file-go configuration:
setup-json2file.sh
#!/bin/sh
set -e
# ---------
# VARIABLES
# ---------
BASE_DIR="/srv/blogops/webhook"
J2F_DIR="$BASE_DIR/json2file"
TLS_DIR="$BASE_DIR/tls"
J2F_SERVICE_NAME="json2file-go"
J2F_SERVICE_DIR="/etc/systemd/system/json2file-go.service.d"
J2F_SERVICE_OVERRIDE="$J2F_SERVICE_DIR/override.conf"
J2F_SOCKET_DIR="/etc/systemd/system/json2file-go.socket.d"
J2F_SOCKET_OVERRIDE="$J2F_SOCKET_DIR/override.conf"
J2F_BASEDIR_FILE="/etc/json2file-go/basedir"
J2F_DIRLIST_FILE="/etc/json2file-go/dirlist"
J2F_CRT_FILE="/etc/json2file-go/certfile"
J2F_KEY_FILE="/etc/json2file-go/keyfile"
J2F_CRT_PATH="$TLS_DIR/crt.pem"
J2F_KEY_PATH="$TLS_DIR/key.pem"
# ----
# MAIN
# ----
# Install packages used with json2file for the blogops site
sudo apt update
sudo apt install -y json2file-go uuid
if [ -z "$(type mkcert)" ]; then
  sudo apt install -y mkcert
fi
sudo apt clean
# Configuration file values
J2F_USER="$(id -u)"
J2F_GROUP="$(id -g)"
J2F_DIRLIST="blogops:$(uuid)"
J2F_LISTEN_STREAM="172.31.31.1:4443"
# Configure json2file
[ -d "$J2F_DIR" ]   mkdir "$J2F_DIR"
sudo sh -c "echo '$J2F_DIR' >'$J2F_BASEDIR_FILE'"
[ -d "$TLS_DIR" ]   mkdir "$TLS_DIR"
if [ ! -f "$J2F_CRT_PATH" ]   [ ! -f "$J2F_KEY_PATH" ]; then
  mkcert -cert-file "$J2F_CRT_PATH" -key-file "$J2F_KEY_PATH" "$(hostname -f)"
fi
sudo sh -c "echo '$J2F_CRT_PATH' >'$J2F_CRT_FILE'"
sudo sh -c "echo '$J2F_KEY_PATH' >'$J2F_KEY_FILE'"
sudo sh -c "cat >'$J2F_DIRLIST_FILE'" <<EOF
$(echo "$J2F_DIRLIST"   tr ';' '\n')
EOF
# Service override
[ -d "$J2F_SERVICE_DIR" ]   sudo mkdir "$J2F_SERVICE_DIR"
sudo sh -c "cat >'$J2F_SERVICE_OVERRIDE'" <<EOF
[Service]
User=$J2F_USER
Group=$J2F_GROUP
EOF
# Socket override
[ -d "$J2F_SOCKET_DIR" ]   sudo mkdir "$J2F_SOCKET_DIR"
sudo sh -c "cat >'$J2F_SOCKET_OVERRIDE'" <<EOF
[Socket]
# Set FreeBind to listen on missing addresses (the VPN can be down sometimes)
FreeBind=true
# Set ListenStream to nothing to clear its value and add the new value later
ListenStream=
ListenStream=$J2F_LISTEN_STREAM
EOF
# Restart and enable service
sudo systemctl daemon-reload
sudo systemctl stop "$J2F_SERVICE_NAME"
sudo systemctl start "$J2F_SERVICE_NAME"
sudo systemctl enable "$J2F_SERVICE_NAME"
# ----
# vim: ts=2:sw=2:et:ai:sts=2
Warning: The script uses mkcert to create the temporary certificates, to install the package on bullseye the backports repository must be available.

Gitea configurationTo make gitea use our json2file-go server we go to the project and enter into the hooks/gitea/new page, once there we create a new webhook of type gitea and set the target URL to https://172.31.31.1:4443/blogops and on the secret field we put the token generated with uuid by the setup script:
sed -n -e 's/blogops://p' /etc/json2file-go/dirlist
The rest of the settings can be left as they are:
  • Trigger on: Push events
  • Branch filter: *
Warning: We are using an internal IP and a self signed certificate, that means that we have to review that the webhook section of the app.ini of our gitea server allows us to call the IP and skips the TLS verification (you can see the available options on the gitea documentation). The [webhook] section of my server looks like this:
[webhook]
ALLOWED_HOST_LIST=private
SKIP_TLS_VERIFY=true
Once we have the webhook configured we can try it and if it works our json2file server will store the file on the /srv/blogops/webhook/json2file/blogops/ folder.

The json2file spooler scriptWith the previous configuration our system is ready to receive webhook calls from gitea and store the messages on files, but we have to do something to process those files once they are saved in our machine. An option could be to use a cronjob to look for new files, but we can do better on Linux using inotify we will use the inotifywait command from inotify-tools to watch the json2file output directory and execute a script each time a new file is moved inside it or closed after writing (IN_CLOSE_WRITE and IN_MOVED_TO events). To avoid concurrency problems we are going to use task-spooler to launch the scripts that process the webhooks using a queue of length 1, so they are executed one by one in a FIFO queue. The spooler script is this:
blogops-spooler.sh
#!/bin/sh
set -e
# ---------
# VARIABLES
# ---------
BASE_DIR="/srv/blogops/webhook"
BIN_DIR="$BASE_DIR/bin"
TSP_DIR="$BASE_DIR/tsp"
WEBHOOK_COMMAND="$BIN_DIR/blogops-webhook.sh"
# ---------
# FUNCTIONS
# ---------
queue_job()  
  echo "Queuing job to process file '$1'"
  TMPDIR="$TSP_DIR" TS_SLOTS="1" TS_MAXFINISHED="10" \
    tsp -n "$WEBHOOK_COMMAND" "$1"
 
# ----
# MAIN
# ----
INPUT_DIR="$1"
if [ ! -d "$INPUT_DIR" ]; then
  echo "Input directory '$INPUT_DIR' does not exist, aborting!"
  exit 1
fi
[ -d "$TSP_DIR" ]   mkdir "$TSP_DIR"
echo "Processing existing files under '$INPUT_DIR'"
find "$INPUT_DIR" -type f   sort   while read -r _filename; do
  queue_job "$_filename"
done
# Use inotifywatch to process new files
echo "Watching for new files under '$INPUT_DIR'"
inotifywait -q -m -e close_write,moved_to --format "%w%f" -r "$INPUT_DIR"  
  while read -r _filename; do
    queue_job "$_filename"
  done
# ----
# vim: ts=2:sw=2:et:ai:sts=2
To run it as a daemon we install it as a systemd service using the following script:
setup-spooler.sh
#!/bin/sh
set -e
# ---------
# VARIABLES
# ---------
BASE_DIR="/srv/blogops/webhook"
BIN_DIR="$BASE_DIR/bin"
J2F_DIR="$BASE_DIR/json2file"
SPOOLER_COMMAND="$BIN_DIR/blogops-spooler.sh '$J2F_DIR'"
SPOOLER_SERVICE_NAME="blogops-j2f-spooler"
SPOOLER_SERVICE_FILE="/etc/systemd/system/$SPOOLER_SERVICE_NAME.service"
# Configuration file values
J2F_USER="$(id -u)"
J2F_GROUP="$(id -g)"
# ----
# MAIN
# ----
# Install packages used with the webhook processor
sudo apt update
sudo apt install -y inotify-tools jq task-spooler
sudo apt clean
# Configure process service
sudo sh -c "cat > $SPOOLER_SERVICE_FILE" <<EOF
[Install]
WantedBy=multi-user.target
[Unit]
Description=json2file processor for $J2F_USER
After=docker.service
[Service]
Type=simple
User=$J2F_USER
Group=$J2F_GROUP
ExecStart=$SPOOLER_COMMAND
EOF
# Restart and enable service
sudo systemctl daemon-reload
sudo systemctl stop "$SPOOLER_SERVICE_NAME"   true
sudo systemctl start "$SPOOLER_SERVICE_NAME"
sudo systemctl enable "$SPOOLER_SERVICE_NAME"
# ----
# vim: ts=2:sw=2:et:ai:sts=2

The gitea webhook processorFinally, the script that processes the JSON files does the following:
  1. First, it checks if the repository and branch are right,
  2. Then, it fetches and checks out the commit referenced on the JSON file,
  3. Once the files are updated, compiles the site using hugo with docker compose,
  4. If the compilation succeeds the script renames directories to swap the old version of the site by the new one.
If there is a failure the script aborts but before doing it or if the swap succeeded the system sends an email to the configured address and/or the user that pushed updates to the repository with a log of what happened. The current script is this one:
blogops-webhook.sh
#!/bin/sh
set -e
# ---------
# VARIABLES
# ---------
# Values
REPO_REF="refs/heads/main"
REPO_CLONE_URL="https://gitea.mixinet.net/mixinet/blogops.git"
MAIL_PREFIX="[BLOGOPS-WEBHOOK] "
# Address that gets all messages, leave it empty if not wanted
MAIL_TO_ADDR="blogops@mixinet.net"
# If the following variable is set to 'true' the pusher gets mail on failures
MAIL_ERRFILE="false"
# If the following variable is set to 'true' the pusher gets mail on success
MAIL_LOGFILE="false"
# gitea's conf/app.ini value of NO_REPLY_ADDRESS, it is used for email domains
# when the KeepEmailPrivate option is enabled for a user
NO_REPLY_ADDRESS="noreply.example.org"
# Directories
BASE_DIR="/srv/blogops"
PUBLIC_DIR="$BASE_DIR/public"
NGINX_BASE_DIR="$BASE_DIR/nginx"
PUBLIC_HTML_DIR="$NGINX_BASE_DIR/public_html"
WEBHOOK_BASE_DIR="$BASE_DIR/webhook"
WEBHOOK_SPOOL_DIR="$WEBHOOK_BASE_DIR/spool"
WEBHOOK_ACCEPTED="$WEBHOOK_SPOOL_DIR/accepted"
WEBHOOK_DEPLOYED="$WEBHOOK_SPOOL_DIR/deployed"
WEBHOOK_REJECTED="$WEBHOOK_SPOOL_DIR/rejected"
WEBHOOK_TROUBLED="$WEBHOOK_SPOOL_DIR/troubled"
WEBHOOK_LOG_DIR="$WEBHOOK_SPOOL_DIR/log"
# Files
TODAY="$(date +%Y%m%d)"
OUTPUT_BASENAME="$(date +%Y%m%d-%H%M%S.%N)"
WEBHOOK_LOGFILE_PATH="$WEBHOOK_LOG_DIR/$OUTPUT_BASENAME.log"
WEBHOOK_ACCEPTED_JSON="$WEBHOOK_ACCEPTED/$OUTPUT_BASENAME.json"
WEBHOOK_ACCEPTED_LOGF="$WEBHOOK_ACCEPTED/$OUTPUT_BASENAME.log"
WEBHOOK_REJECTED_TODAY="$WEBHOOK_REJECTED/$TODAY"
WEBHOOK_REJECTED_JSON="$WEBHOOK_REJECTED_TODAY/$OUTPUT_BASENAME.json"
WEBHOOK_REJECTED_LOGF="$WEBHOOK_REJECTED_TODAY/$OUTPUT_BASENAME.log"
WEBHOOK_DEPLOYED_TODAY="$WEBHOOK_DEPLOYED/$TODAY"
WEBHOOK_DEPLOYED_JSON="$WEBHOOK_DEPLOYED_TODAY/$OUTPUT_BASENAME.json"
WEBHOOK_DEPLOYED_LOGF="$WEBHOOK_DEPLOYED_TODAY/$OUTPUT_BASENAME.log"
WEBHOOK_TROUBLED_TODAY="$WEBHOOK_TROUBLED/$TODAY"
WEBHOOK_TROUBLED_JSON="$WEBHOOK_TROUBLED_TODAY/$OUTPUT_BASENAME.json"
WEBHOOK_TROUBLED_LOGF="$WEBHOOK_TROUBLED_TODAY/$OUTPUT_BASENAME.log"
# Query to get variables from a gitea webhook json
ENV_VARS_QUERY="$(
  printf "%s" \
    '(.             @sh "gt_ref=\(.ref);"),' \
    '(.             @sh "gt_after=\(.after);"),' \
    '(.repository   @sh "gt_repo_clone_url=\(.clone_url);"),' \
    '(.repository   @sh "gt_repo_name=\(.name);"),' \
    '(.pusher       @sh "gt_pusher_full_name=\(.full_name);"),' \
    '(.pusher       @sh "gt_pusher_email=\(.email);")'
)"
# ---------
# Functions
# ---------
webhook_log()  
  echo "$(date -R) $*" >>"$WEBHOOK_LOGFILE_PATH"
 
webhook_check_directories()  
  for _d in "$WEBHOOK_SPOOL_DIR" "$WEBHOOK_ACCEPTED" "$WEBHOOK_DEPLOYED" \
    "$WEBHOOK_REJECTED" "$WEBHOOK_TROUBLED" "$WEBHOOK_LOG_DIR"; do
    [ -d "$_d" ]   mkdir "$_d"
  done
 
webhook_clean_directories()  
  # Try to remove empty dirs
  for _d in "$WEBHOOK_ACCEPTED" "$WEBHOOK_DEPLOYED" "$WEBHOOK_REJECTED" \
    "$WEBHOOK_TROUBLED" "$WEBHOOK_LOG_DIR" "$WEBHOOK_SPOOL_DIR"; do
    if [ -d "$_d" ]; then
      rmdir "$_d" 2>/dev/null   true
    fi
  done
 
webhook_accept()  
  webhook_log "Accepted: $*"
  mv "$WEBHOOK_JSON_INPUT_FILE" "$WEBHOOK_ACCEPTED_JSON"
  mv "$WEBHOOK_LOGFILE_PATH" "$WEBHOOK_ACCEPTED_LOGF"
  WEBHOOK_LOGFILE_PATH="$WEBHOOK_ACCEPTED_LOGF"
 
webhook_reject()  
  [ -d "$WEBHOOK_REJECTED_TODAY" ]   mkdir "$WEBHOOK_REJECTED_TODAY"
  webhook_log "Rejected: $*"
  if [ -f "$WEBHOOK_JSON_INPUT_FILE" ]; then
    mv "$WEBHOOK_JSON_INPUT_FILE" "$WEBHOOK_REJECTED_JSON"
  fi
  mv "$WEBHOOK_LOGFILE_PATH" "$WEBHOOK_REJECTED_LOGF"
  exit 0
 
webhook_deployed()  
  [ -d "$WEBHOOK_DEPLOYED_TODAY" ]   mkdir "$WEBHOOK_DEPLOYED_TODAY"
  webhook_log "Deployed: $*"
  mv "$WEBHOOK_ACCEPTED_JSON" "$WEBHOOK_DEPLOYED_JSON"
  mv "$WEBHOOK_ACCEPTED_LOGF" "$WEBHOOK_DEPLOYED_LOGF"
  WEBHOOK_LOGFILE_PATH="$WEBHOOK_DEPLOYED_LOGF"
 
webhook_troubled()  
  [ -d "$WEBHOOK_TROUBLED_TODAY" ]   mkdir "$WEBHOOK_TROUBLED_TODAY"
  webhook_log "Troubled: $*"
  mv "$WEBHOOK_ACCEPTED_JSON" "$WEBHOOK_TROUBLED_JSON"
  mv "$WEBHOOK_ACCEPTED_LOGF" "$WEBHOOK_TROUBLED_LOGF"
  WEBHOOK_LOGFILE_PATH="$WEBHOOK_TROUBLED_LOGF"
 
print_mailto()  
  _addr="$1"
  _user_email=""
  # Add the pusher email address unless it is from the domain NO_REPLY_ADDRESS,
  # which should match the value of that variable on the gitea 'app.ini' (it
  # is the domain used for emails when the user hides it).
  # shellcheck disable=SC2154
  if [ -n "$ gt_pusher_email##*@"$ NO_REPLY_ADDRESS " " ] &&
    [ -z "$ gt_pusher_email##*@* " ]; then
    _user_email="\"$gt_pusher_full_name <$gt_pusher_email>\""
  fi
  if [ "$_addr" ] && [ "$_user_email" ]; then
    echo "$_addr,$_user_email"
  elif [ "$_user_email" ]; then
    echo "$_user_email"
  elif [ "$_addr" ]; then
    echo "$_addr"
  fi
 
mail_success()  
  to_addr="$MAIL_TO_ADDR"
  if [ "$MAIL_LOGFILE" = "true" ]; then
    to_addr="$(print_mailto "$to_addr")"
  fi
  if [ "$to_addr" ]; then
    # shellcheck disable=SC2154
    subject="OK - $gt_repo_name updated to commit '$gt_after'"
    mail -s "$ MAIL_PREFIX $ subject " "$to_addr" \
      <"$WEBHOOK_LOGFILE_PATH"
  fi
 
mail_failure()  
  to_addr="$MAIL_TO_ADDR"
  if [ "$MAIL_ERRFILE" = true ]; then
    to_addr="$(print_mailto "$to_addr")"
  fi
  if [ "$to_addr" ]; then
    # shellcheck disable=SC2154
    subject="KO - $gt_repo_name update FAILED for commit '$gt_after'"
    mail -s "$ MAIL_PREFIX $ subject " "$to_addr" \
      <"$WEBHOOK_LOGFILE_PATH"
  fi
 
# ----
# MAIN
# ----
# Check directories
webhook_check_directories
# Go to the base directory
cd "$BASE_DIR"
# Check if the file exists
WEBHOOK_JSON_INPUT_FILE="$1"
if [ ! -f "$WEBHOOK_JSON_INPUT_FILE" ]; then
  webhook_reject "Input arg '$1' is not a file, aborting"
fi
# Parse the file
webhook_log "Processing file '$WEBHOOK_JSON_INPUT_FILE'"
eval "$(jq -r "$ENV_VARS_QUERY" "$WEBHOOK_JSON_INPUT_FILE")"
# Check that the repository clone url is right
# shellcheck disable=SC2154
if [ "$gt_repo_clone_url" != "$REPO_CLONE_URL" ]; then
  webhook_reject "Wrong repository: '$gt_clone_url'"
fi
# Check that the branch is the right one
# shellcheck disable=SC2154
if [ "$gt_ref" != "$REPO_REF" ]; then
  webhook_reject "Wrong repository ref: '$gt_ref'"
fi
# Accept the file
# shellcheck disable=SC2154
webhook_accept "Processing '$gt_repo_name'"
# Update the checkout
ret="0"
git fetch >>"$WEBHOOK_LOGFILE_PATH" 2>&1   ret="$?"
if [ "$ret" -ne "0" ]; then
  webhook_troubled "Repository fetch failed"
  mail_failure
fi
# shellcheck disable=SC2154
git checkout "$gt_after" >>"$WEBHOOK_LOGFILE_PATH" 2>&1   ret="$?"
if [ "$ret" -ne "0" ]; then
  webhook_troubled "Repository checkout failed"
  mail_failure
fi
# Remove the build dir if present
if [ -d "$PUBLIC_DIR" ]; then
  rm -rf "$PUBLIC_DIR"
fi
# Build site
docker compose run hugo -- >>"$WEBHOOK_LOGFILE_PATH" 2>&1   ret="$?"
# go back to the main branch
git switch main && git pull
# Fail if public dir was missing
if [ "$ret" -ne "0" ]   [ ! -d "$PUBLIC_DIR" ]; then
  webhook_troubled "Site build failed"
  mail_failure
fi
# Remove old public_html copies
webhook_log 'Removing old site versions, if present'
find $NGINX_BASE_DIR -mindepth 1 -maxdepth 1 -name 'public_html-*' -type d \
  -exec rm -rf   \; >>"$WEBHOOK_LOGFILE_PATH" 2>&1   ret="$?"
if [ "$ret" -ne "0" ]; then
  webhook_troubled "Removal of old site versions failed"
  mail_failure
fi
# Switch site directory
TS="$(date +%Y%m%d-%H%M%S)"
if [ -d "$PUBLIC_HTML_DIR" ]; then
  webhook_log "Moving '$PUBLIC_HTML_DIR' to '$PUBLIC_HTML_DIR-$TS'"
  mv "$PUBLIC_HTML_DIR" "$PUBLIC_HTML_DIR-$TS" >>"$WEBHOOK_LOGFILE_PATH" 2>&1  
    ret="$?"
fi
if [ "$ret" -eq "0" ]; then
  webhook_log "Moving '$PUBLIC_DIR' to '$PUBLIC_HTML_DIR'"
  mv "$PUBLIC_DIR" "$PUBLIC_HTML_DIR" >>"$WEBHOOK_LOGFILE_PATH" 2>&1  
    ret="$?"
fi
if [ "$ret" -ne "0" ]; then
  webhook_troubled "Site switch failed"
  mail_failure
else
  webhook_deployed "Site deployed successfully"
  mail_success
fi
# ----
# vim: ts=2:sw=2:et:ai:sts=2

5 March 2022

Reproducible Builds: Reproducible Builds in February 2022

Welcome to the February 2022 report from the Reproducible Builds project. In these reports, we try to round-up the important things we and others have been up to over the past month. As ever, if you are interested in contributing to the project, please visit our Contribute page on our website.
Jiawen Xiong, Yong Shi, Boyuan Chen, Filipe R. Cogo and Zhen Ming Jiang have published a new paper titled Towards Build Verifiability for Java-based Systems (PDF). The abstract of the paper contains the following:
Various efforts towards build verifiability have been made to C/C++-based systems, yet the techniques for Java-based systems are not systematic and are often specific to a particular build tool (eg. Maven). In this study, we present a systematic approach towards build verifiability on Java-based systems.

GitBOM is a flexible scheme to track the source code used to generate build artifacts via Git-like unique identifiers. Although the project has been active for a while, the community around GitBOM has now started running weekly community meetings.
The paper Chris Lamb and Stefano Zacchiroli is now available in the March/April 2022 issue of IEEE Software. Titled Reproducible Builds: Increasing the Integrity of Software Supply Chains (PDF), the abstract of the paper contains the following:
We first define the problem, and then provide insight into the challenges of making real-world software build in a reproducible manner-this is, when every build generates bit-for-bit identical results. Through the experience of the Reproducible Builds project making the Debian Linux distribution reproducible, we also describe the affinity between reproducibility and quality assurance (QA).

In openSUSE, Bernhard M. Wiedemann posted his monthly reproducible builds status report.
On our mailing list this month, Thomas Schmitt started a thread around the SOURCE_DATE_EPOCH specification related to formats that cannot help embedding potentially timezone-specific timestamp. (Full thread index.)
The Yocto Project is pleased to report that it s core metadata (OpenEmbedded-Core) is now reproducible for all recipes (100% coverage) after issues with newer languages such as Golang were resolved. This was announced in their recent Year in Review publication. It is of particular interest for security updates so that systems can have specific components updated but reducing the risk of other unintended changes and making the sections of the system changing very clear for audit. The project is now also making heavy use of equivalence of build output to determine whether further items in builds need to be rebuilt or whether cached previously built items can be used. As mentioned in the article above, there are now public servers sharing this equivalence information. Reproducibility is key in making this possible and effective to reduce build times/costs/resource usage.

diffoscope diffoscope is our in-depth and content-aware diff utility. Not only can it locate and diagnose reproducibility issues, it can provide human-readable diffs from many kinds of binary formats. This month, Chris Lamb prepared and uploaded versions 203, 204, 205 and 206 to Debian unstable, as well as made the following changes to the code itself:
  • Bug fixes:
    • Fix a file(1)-related regression where Debian .changes files that contained non-ASCII text were not identified as such, therefore resulting in seemingly arbitrary packages not actually comparing the nested files themselves. The non-ASCII parts were typically in the Maintainer or in the changelog text. [ ][ ]
    • Fix a regression when comparing directories against non-directories. [ ][ ]
    • If we fail to scan using binwalk, return False from BinwalkFile.recognizes. [ ]
    • If we fail to import binwalk, don t report that we are missing the Python rpm module! [ ]
  • Testsuite improvements:
    • Add a test for recent file(1) issue regarding .changes files. [ ]
    • Use our assert_diff utility where we can within the test_directory.py set of tests. [ ]
    • Don t run our binwalk-related tests as root or fakeroot. The latest version of binwalk has some new security protection against this. [ ]
  • Codebase improvements:
    • Drop the _PATH suffix from module-level globals that are not paths. [ ]
    • Tidy some control flow in Difference._reverse_self. [ ]
    • Don t print a warning to the console regarding NT_GNU_BUILD_ID changes. [ ]
In addition, Mattia Rizzolo updated the Debian packaging to ensure that diffoscope and diffoscope-minimal packages have the same version. [ ]

Website updates There were quite a few changes to the Reproducible Builds website and documentation this month as well, including:
  • Chris Lamb:
    • Considerably rework the Who is involved? page. [ ][ ]
    • Move the contributors.sh Bash/shell script into a Python script. [ ][ ][ ]
  • Daniel Shahaf:
    • Try a different Markdown footnote content syntax to work around a rendering issue. [ ][ ][ ]
  • Holger Levsen:
    • Make a huge number of changes to the Who is involved? page, including pre-populating a large number of contributors who cannot be identified from the metadata of the website itself. [ ][ ][ ][ ][ ]
    • Improve linking to sponsors in sidebar navigation. [ ]
    • drop sponsors paragraph as the navigation is clearer now. [ ]
    • Add Mullvad VPN as a bronze-level sponsor . [ ][ ]
  • Vagrant Cascadian:

Upstream patches The Reproducible Builds project attempts to fix as many currently-unreproducible packages as possible. February s patches included the following:

Testing framework The Reproducible Builds project runs a significant testing framework at tests.reproducible-builds.org, to check packages and other artifacts for reproducibility. This month, the following changes were made:
  • Daniel Golle:
    • Update the OpenWrt configuration to not depend on the host LLVM, adding lines to the .config seed to build LLVM for eBPF from source. [ ]
    • Preserve more OpenWrt-related build artifacts. [ ]
  • Holger Levsen:
  • Temporary use a different Git tree when building OpenWrt as our tests had been broken since September 2020. This was reverted after the patch in question was accepted by Paul Spooren into the canonical openwrt.git repository the next day.
    • Various improvements to debugging OpenWrt reproducibility. [ ][ ][ ][ ][ ]
    • Ignore useradd warnings when building packages. [ ]
    • Update the script to powercycle armhf architecture nodes to add a hint to where nodes named virt-*. [ ]
    • Update the node health check to also fix failed logrotate and man-db services. [ ]
  • Mattia Rizzolo:
    • Update the website job after contributors.sh script was rewritten in Python. [ ]
    • Make sure to set the DIFFOSCOPE environment variable when available. [ ]
  • Vagrant Cascadian:
    • Various updates to the diffoscope timeouts. [ ][ ][ ]
Node maintenance was also performed by Holger Levsen [ ] and Vagrant Cascadian [ ].

Finally If you are interested in contributing to the Reproducible Builds project, please visit our Contribute page on our website. However, you can get in touch with us via:

Next.