I Just bought a LicheePi 4A RISC-V embedded computer (like a RaspberryPi but with a RISC-V CPU) for $322.68 from Aliexpress (the official site for buying LicheePi devices).
Here is the Sipheed web page about it and their other recent offerings [1]. I got the version with 16G of RAM and 128G of storage, I probably don t need that much storage (I can use NFS or USB) but 16G of RAM is good for VMs.
Here is the Wiki about this board [2].
Configuration
When you get one of these devices you should make setting up ssh server your first priority. I found the HDMI output to be very unreliable. The first monitor I tried was a Samsung 4K monitor dating from when 4K was a new thing, the LicheePi initially refused to operate at a resolution higher than 1024*768 but later on switched to 4K resolution when resuming from screen-blank for no apparent reason (and the window manager didn t support this properly). On the Dell 4K monitor I use on my main workstation it sometimes refused to talk to it and occasionally worked. I got it running at 1920*1080 without problems and then switched it to 4K and it lost video sync and never talked to that monitor again. On my Desklab portabable 4K monitor I got it to display in 4K resolution but only the top left 1/4 of the screen displayed.
The issues with HDMI monitor support greatly limit the immediate potential for using this as a workstation. It doesn t make it impossible but would be fiddly at best. It s quite likely that a future OS update will fix this. But at the moment it s best used as a server.
The LicheePi has a custom Linux distribution based on Ubuntu so you want too put something like the following in /etc/network/interfaces to make it automatically connect to the ethernet when plugged in:
auto end0
iface end0 inet dhcp
Then to get sshd to start you have to run the following commands to generate ssh host keys that aren t zero bytes long:
rm /etc/ssh/ssh_host_*
systemctl restart ssh.service
It appears to have wifi hardware but the OS doesn t recognise it. This isn t a priority for me as I mostly want to use it as a server.
Performance
For the first test of performance I created a 100MB file from /dev/urandom and then tried compressing it on various systems. With zstd -9 it took 16.893 user seconds on the LicheePi4A, 0.428s on my Thinkpad X1 Carbon Gen5 with a i5-6300U CPU (Debian/Unstable), 1.288s on my E5-2696 v3 workstation (Debian/Bookworm), 0.467s on the E5-2696 v3 running Debian/Unstable, 2.067s on a E3-1271 v3 server, and 7.179s on the E3-1271 v3 system emulating a RISC-V system via QEMU running Debian/Unstable.
It s very impressive that the QEMU emulation is fast enough that emulating a different CPU architecture is only 3.5* slower for this test (or maybe 10* slower if it was running Debian/Unstable on the AMD64 code)! The emulated RISC-V is also more than twice as fast as real RISC-V hardware and probably of comparable speed to real RISC-V hardware when running the same versions (and might be slightly slower if running the same version of zstd) which is a tribute to the quality of emulation.
One performance issue that most people don t notice is the time taken to negotiate ssh sessions. It s usually not noticed because the common CPUs have got faster at about the same rate as the algorithms for encryption and authentication have become more complex. On my i5-6300U laptop it takes 0m0.384s to run ssh -i ~/.ssh/id_ed25519 localhost id with the below server settings (taken from advice on
ssh-audit.com [3] for a secure ssh configuration). On the E3-1271 v3 server it is 0.336s, on the QMU system it is 28.022s, and on the LicheePi it is 0.592s. By this metric the LicheePi is about 80% slower than decent x86 systems and the QEMU emulation of RISC-V is 73* slower than the x86 system it runs on. Does crypto depend on instructions that are difficult to emulate?
HostKey /etc/ssh/ssh_host_ed25519_key
KexAlgorithms -ecdh-sha2-nistp256,ecdh-sha2-nistp384,ecdh-sha2-nistp521,diffie-hellman-group14-sha256
MACs -umac-64-etm@openssh.com,hmac-sha1-etm@openssh.com,umac-64@openssh.com,umac-128@openssh.com,hmac-sha2-256,hmac-sha2-512,hmac-sha1
I haven t yet tested the performance of Ethernet (what routing speed can you get through the 2 gigabit ports?), emmc storage, and USB. At the moment I ve been focused on using RISC-V as a test and development platform. My conclusion is that I m glad I don t plan to compile many kernels or anything large like LibreOffice. But that for typical development that I do it will be quite adequate.
The speed of Chromium seems adequate in basic tests, but the video output hasn t worked reliably enough to do advanced tests.
Hardware Features
Having two Gigabit Ethernet ports, 4 USB-3 ports, and Wifi on board gives some great options for using this as a router. It s disappointing that they didn t go with 2.5Gbit as everyone seems to be doing that nowadays but Gigabit is enough for most things.
Having only a single HDMI port and not supporting USB-C docks (the USB-C port appears to be power only) limits what can be done for workstation use and for controlling displays. I know of people using small ARM computers attached to the back of large TVs for advertising purposes and that isn t going to be a great option for this.
The CPU and RAM apparently uses a lot of power (which is relative the entire system draws up to 2A at 5V so the CPU would be something below 5W). To get this working a cooling fan has to be stuck to the CPU and RAM chips via a layer of thermal stuff that resembles a fine sheet of blu-tack in both color and stickyness. I am disappointed that there isn t any more solid form of construction, to mount this on a wall or ceiling some extra hardware would be needed to secure this. Also if they just had a really big copper heatsink I think that would be better. 80386 CPUs with similar TDP were able to run without a fan.
I wonder how things would work with all USB ports in use. It s expected that a USB port can supply a minimum of 2.5W which means that all the ports could require 10W if they were active. Presumably something significantly less than 5W is available for the USB ports.
Other Devices
Sipheed has a range of other devices in the works. They currently sell the LicheeCluster4A which support 7 compute modules for a cluster in a box. This has some interesting potential for testing and demonstrating cluster software but you could probably buy an AMD64 system with more compute power for less money. The Lichee Console 4A is a tiny laptop which could be useful for people who like the 7 laptop form factor, unfortunately it only has a 1280*800 display if it had the same resolution display as a typical 7 phone I would have bought one.
The next device that appeals to me is the soon to be released Lichee Pad 4A which is a 10.1 tablet with 1920*1200 display, Wifi6, Bluetooth 5.4, and 16G of RAM. It also has 1 USB-C connection, 2*USB-3 sockets, and support for an external card with 2*Gigabit ethernet. It s a tablet as a laptop without keyboard instead of the more common larger phone design model.
They are also about to release the LicheePadMax4A which is similar to the other tablet but with a 14 2240*1400 display and which ships with a keyboard to make it essentially a laptop with detachable keyboard.
Conclusion
At this time I wouldn t recommend that this device be used as a workstation or laptop, although the people who want to do such things will probably do it anyway regardless of my recommendations. I think it will be very useful as a test system for RISC-V development. I have some friends who are interested in this sort of thing and I can give them VMs.
It is a bit expensive. The Sipheed web site boasts about the LicheePi4 being faster than the RaspberryPi4, but it s not a lot faster and the RaspberryPi4 is much cheaper ($127 or $129 for one with 8G of RAM). The RaspberryPi4 has two HDMI ports but a limit of 8G of RAM while the LicheePi has up to 16G of RAM and two Gigabit Ethernet ports but only a single HDMI port. It seems that the RaspberryPi4 might win if you want a cheap low power desktop system.
At this time I think the reason for this device is testing out RISC-V as an alternative to the AMD64 and ARM64 architectures. An open CPU architecture goes well with free software, but it isn t just people who are into FOSS who are testing such things. I know some corporations are trying out RISC-V as a way of getting other options for embedded systems that don t involve paying monopolists.
The Lichee Console 4A is probably a usable tiny laptop if the resolution is sufficient for your needs. As an aside I predict that the tiny laptop or pocket computer segment will take off in the near future. There are some AMD64 systems the size of a phone but thicker that run Windows and go for reasonable prices on AliExpress. Hopefully in the near future this device will have better video drivers and be usable as a small and quiet workstation.
I won t rule out the possibility of making this my main workstation in the not too distant future, all it needs is reliable 4K display and the ability to decode 4K video. It s performance for web browsing and as an ssh client seems adequate, and that s what matters for my workstation use. But for the moment it s just for server use.
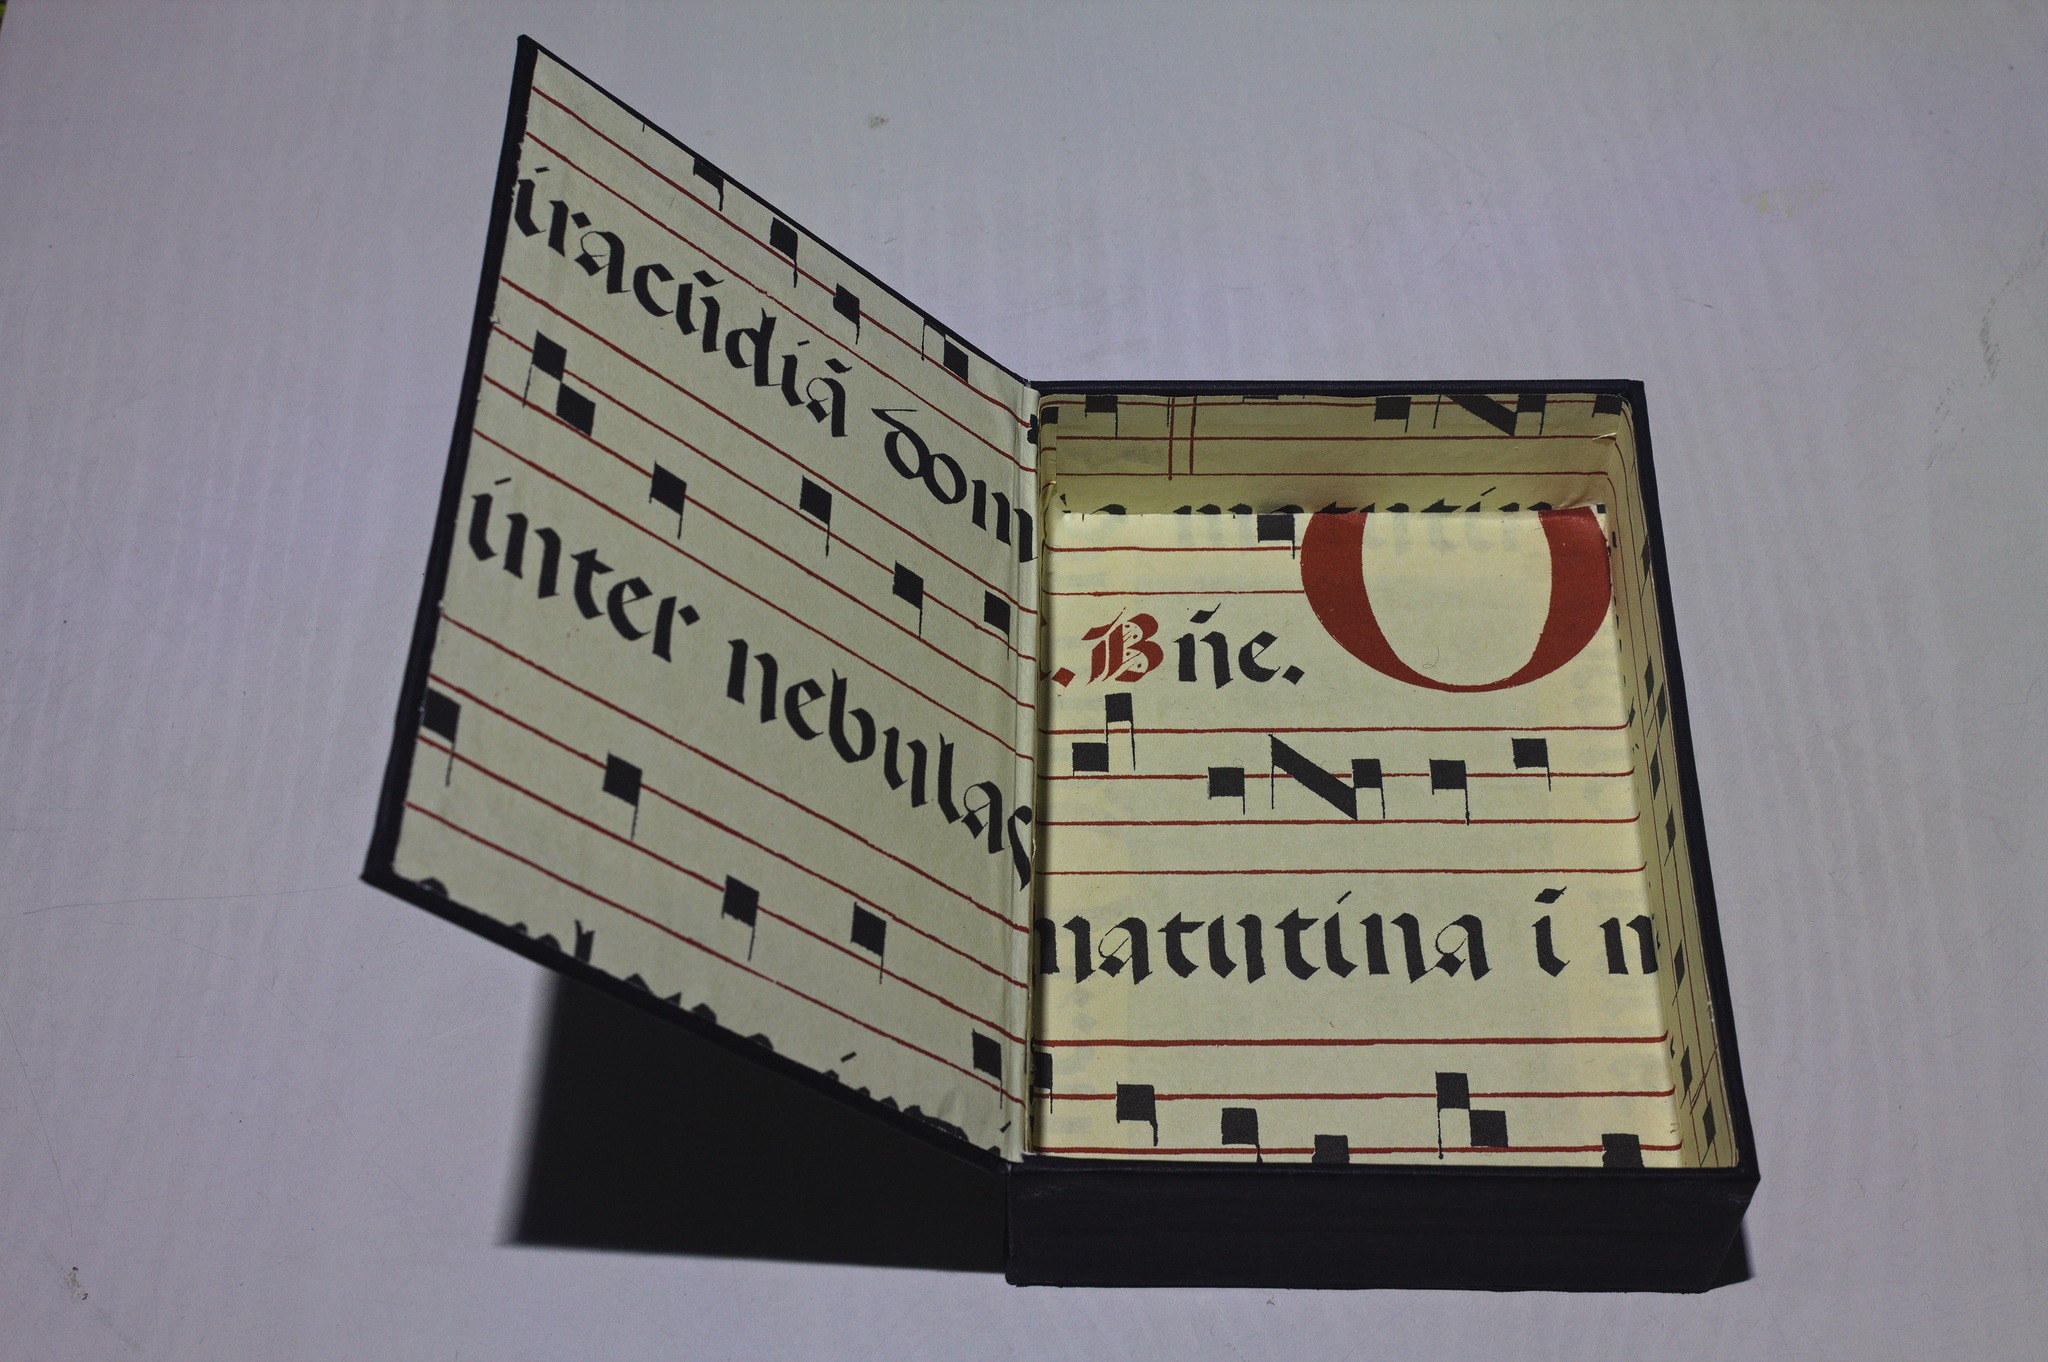 Thanks to All Saints Day, I ve just had a 5 days weekend. One of those
days I woke up and decided I absolutely needed a cartonnage box for the
cardboard and linocut piecepack I ve been working on for quite some
time.
I started drawing a plan with measures before breakfast, then decided to
change some important details, restarted from scratch, did a quick dig
through the bookbinding materials and settled on 2 mm cardboard for the
structure, black fabric-like paper for the outside and a scrap of paper
with a manuscript print for the inside.
Then we had the only day with no rain among the five, so some time was
spent doing things outside, but on the next day I quickly finished two
boxes, at two different heights.
The weather situation also meant that while I managed to take passable
pictures of the first stages of the box making in natural light, the
last few stages required some creative artificial lightning, even if it
wasn t that late in the evening. I need to build1 myself a
light box.
And then decided that since they are C6 sized, they also work well for
postcards or for other A6 pieces of paper, so I will probably need
to make another one when the piecepack set will be finally finished.
The original plan was to use a linocut of the piecepack suites as the
front cover; I don t currently have one ready, but will make it while
printing the rest of the piecepack set. One day :D
Thanks to All Saints Day, I ve just had a 5 days weekend. One of those
days I woke up and decided I absolutely needed a cartonnage box for the
cardboard and linocut piecepack I ve been working on for quite some
time.
I started drawing a plan with measures before breakfast, then decided to
change some important details, restarted from scratch, did a quick dig
through the bookbinding materials and settled on 2 mm cardboard for the
structure, black fabric-like paper for the outside and a scrap of paper
with a manuscript print for the inside.
Then we had the only day with no rain among the five, so some time was
spent doing things outside, but on the next day I quickly finished two
boxes, at two different heights.
The weather situation also meant that while I managed to take passable
pictures of the first stages of the box making in natural light, the
last few stages required some creative artificial lightning, even if it
wasn t that late in the evening. I need to build1 myself a
light box.
And then decided that since they are C6 sized, they also work well for
postcards or for other A6 pieces of paper, so I will probably need
to make another one when the piecepack set will be finally finished.
The original plan was to use a linocut of the piecepack suites as the
front cover; I don t currently have one ready, but will make it while
printing the rest of the piecepack set. One day :D
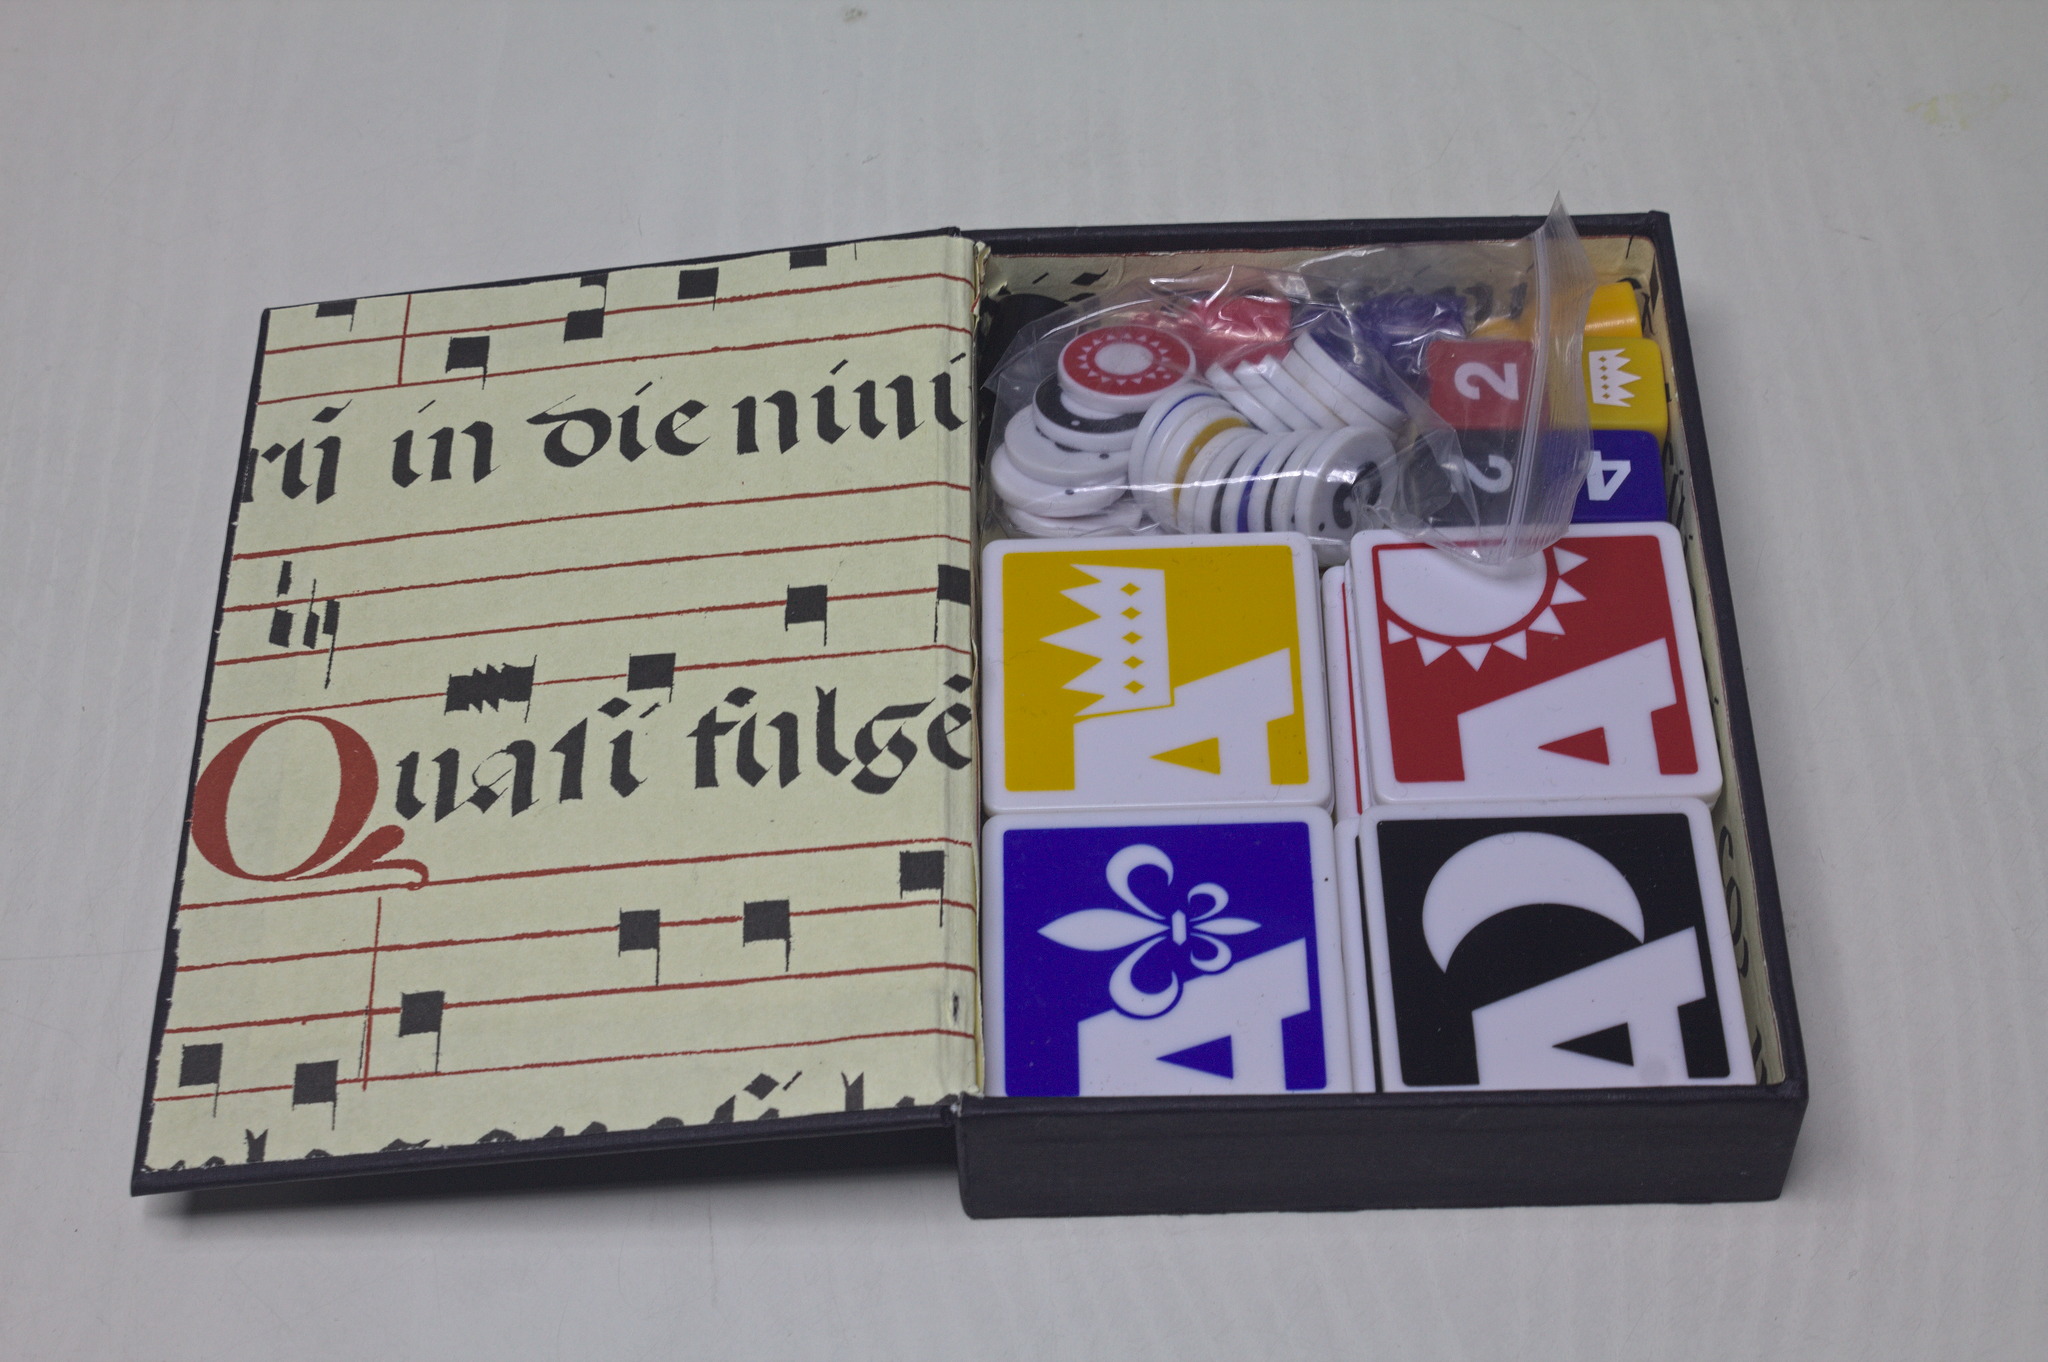 One of the boxes was temporarily used for the plastic piecepack I got
with the book, and that one works well, but since it s a set with
standard suites I think I will want to make another box, using some of
the paper with fleur-de-lis that I saw in the stash.
I ve also started to write detailed instructions: I will publish them as
soon as they are ready, and then either update this post, or they will
be mentioned in an additional post if I will have already made more
boxes in the meanwhile.
One of the boxes was temporarily used for the plastic piecepack I got
with the book, and that one works well, but since it s a set with
standard suites I think I will want to make another box, using some of
the paper with fleur-de-lis that I saw in the stash.
I ve also started to write detailed instructions: I will publish them as
soon as they are ready, and then either update this post, or they will
be mentioned in an additional post if I will have already made more
boxes in the meanwhile.
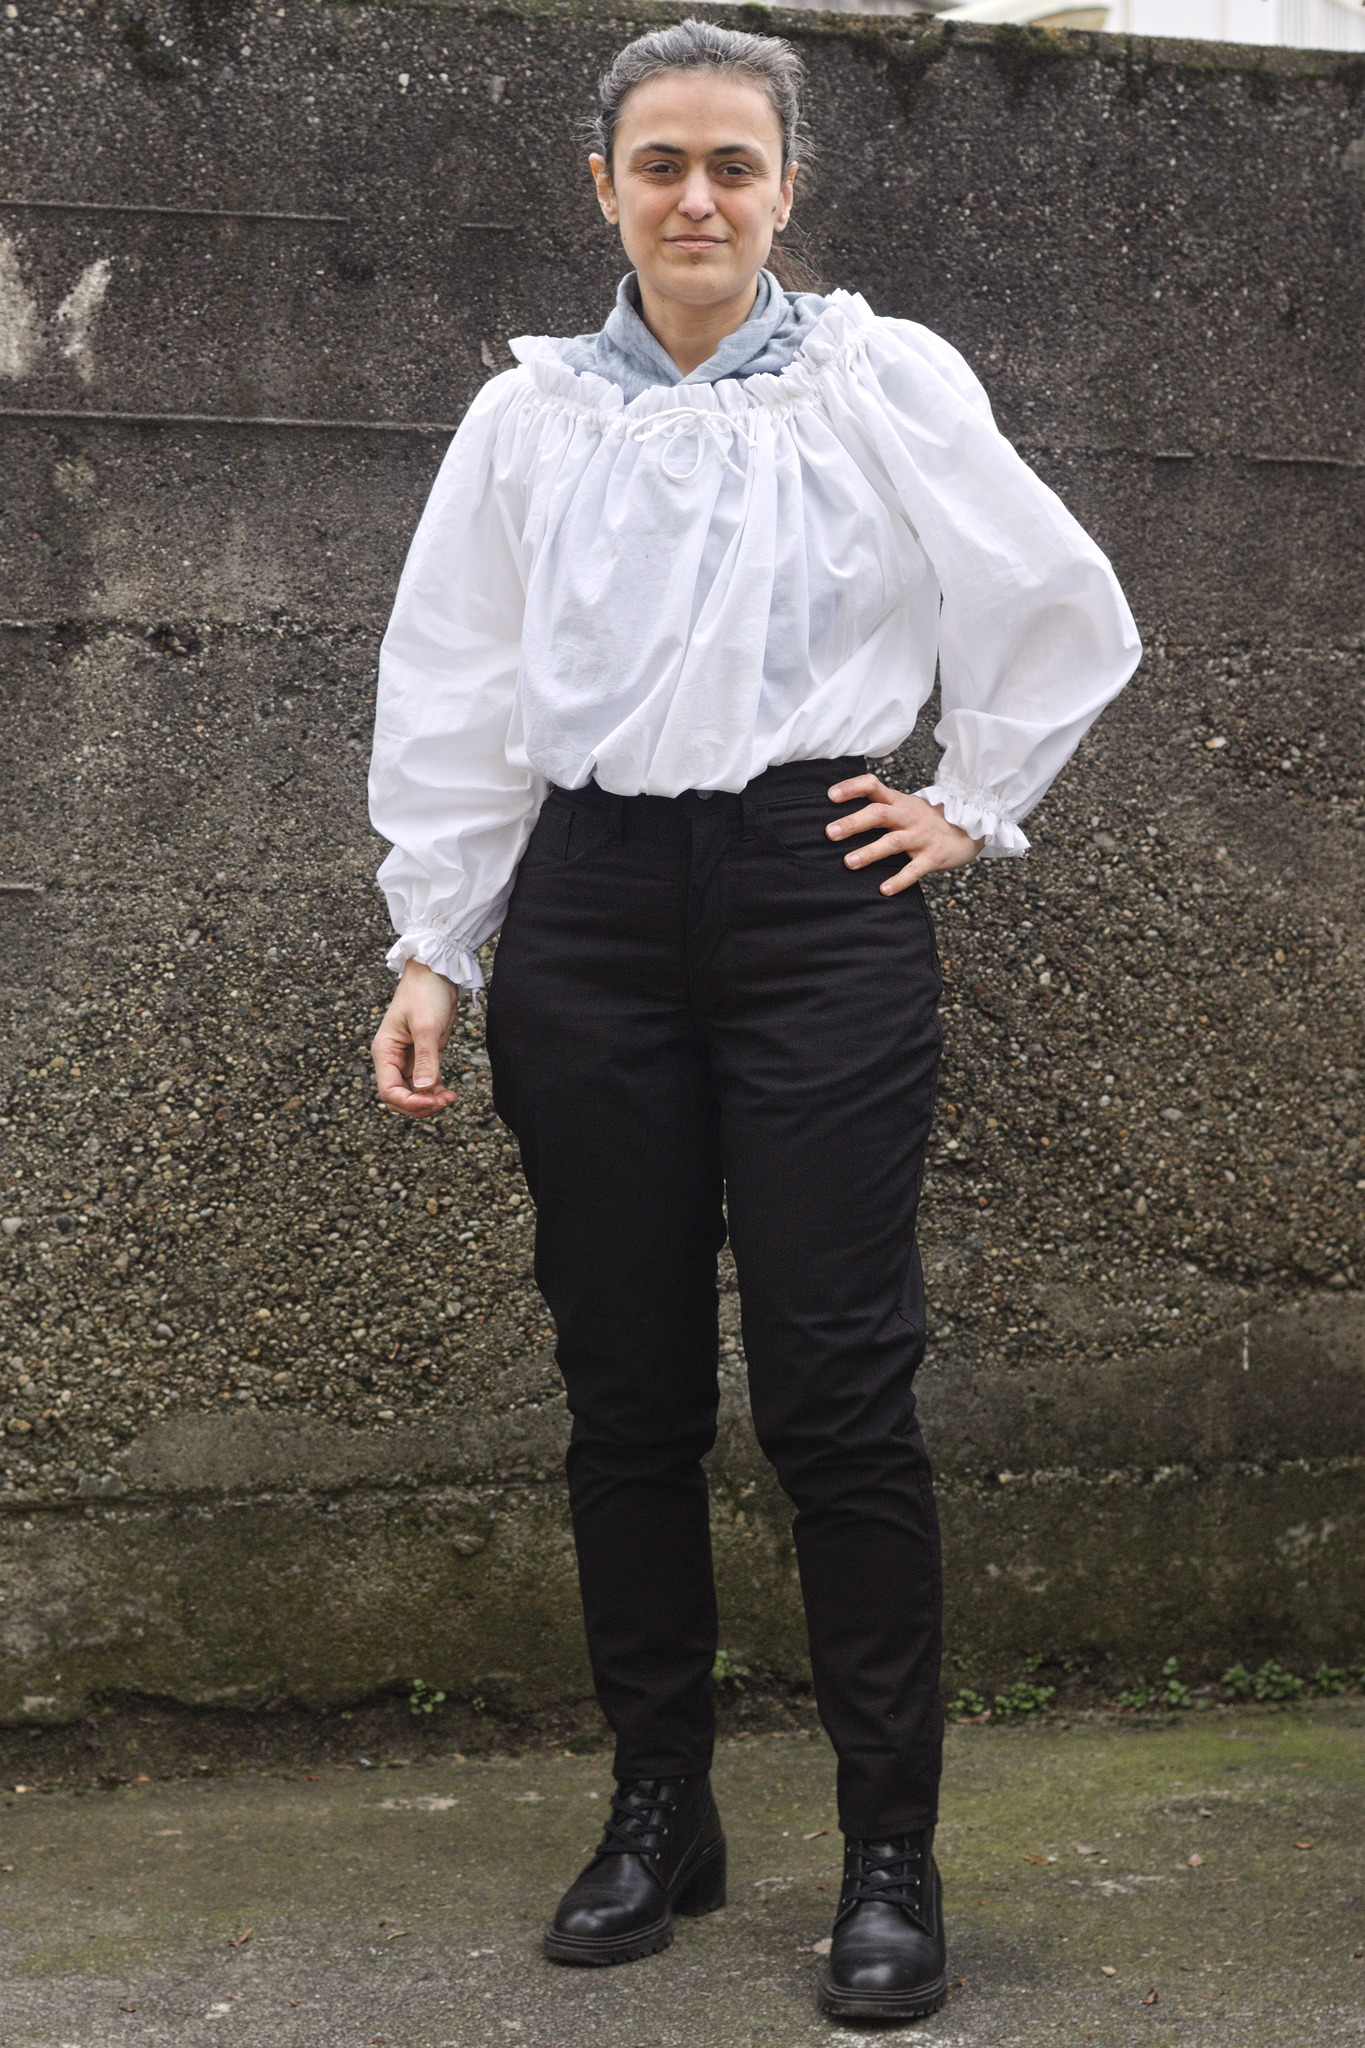 After making my
 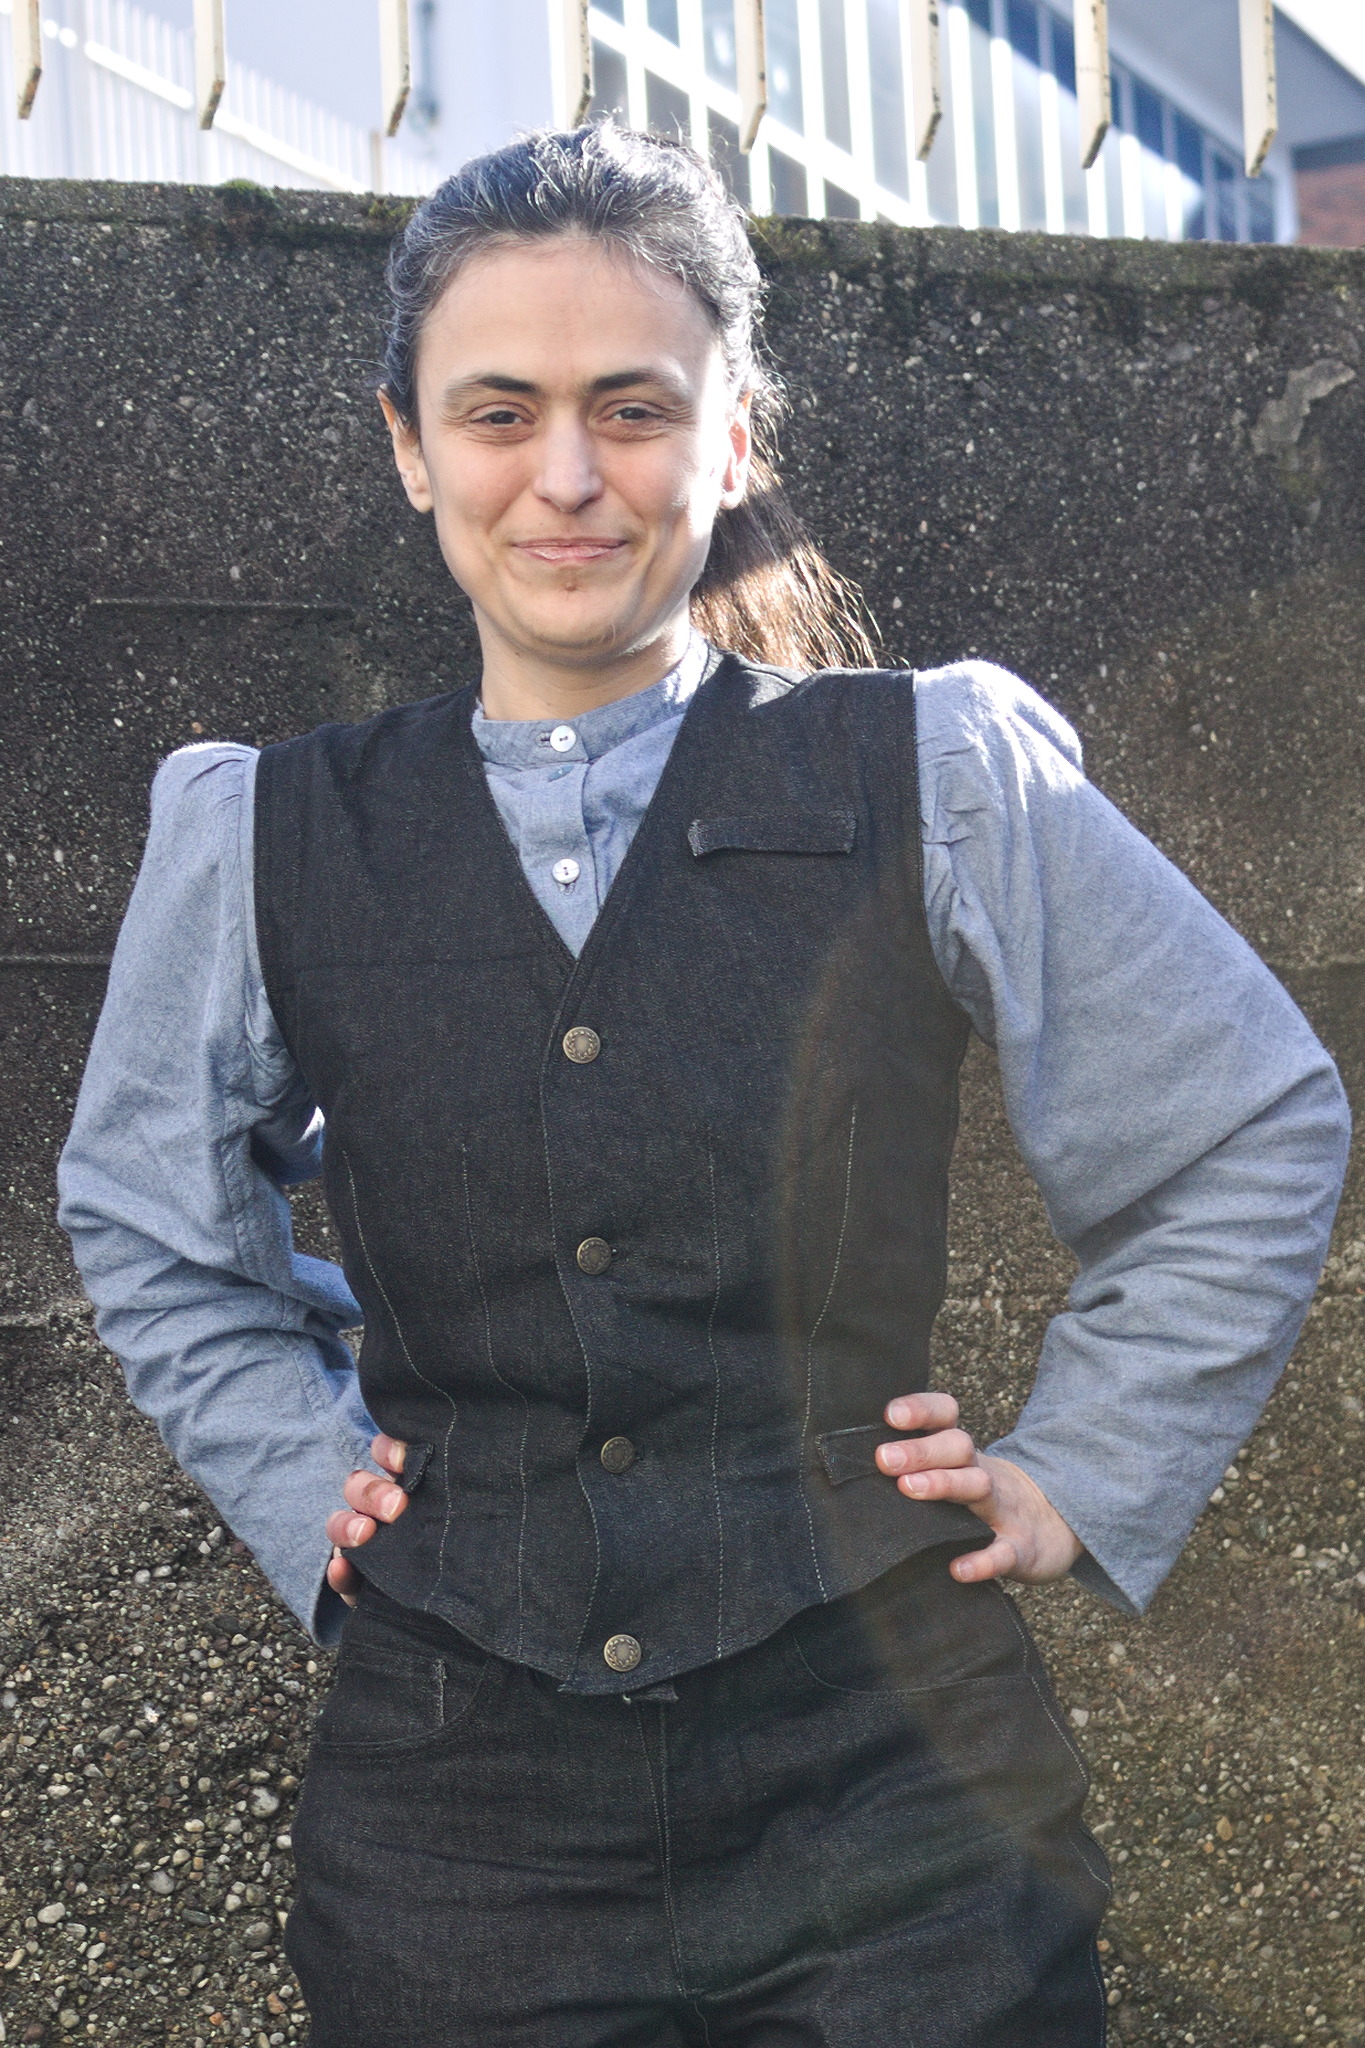 I had finished sewing my jeans, I had a scant 50 cm of elastic denim
left.
Unrelated to that, I had just finished drafting a vest with Valentina,
after
I had finished sewing my jeans, I had a scant 50 cm of elastic denim
left.
Unrelated to that, I had just finished drafting a vest with Valentina,
after 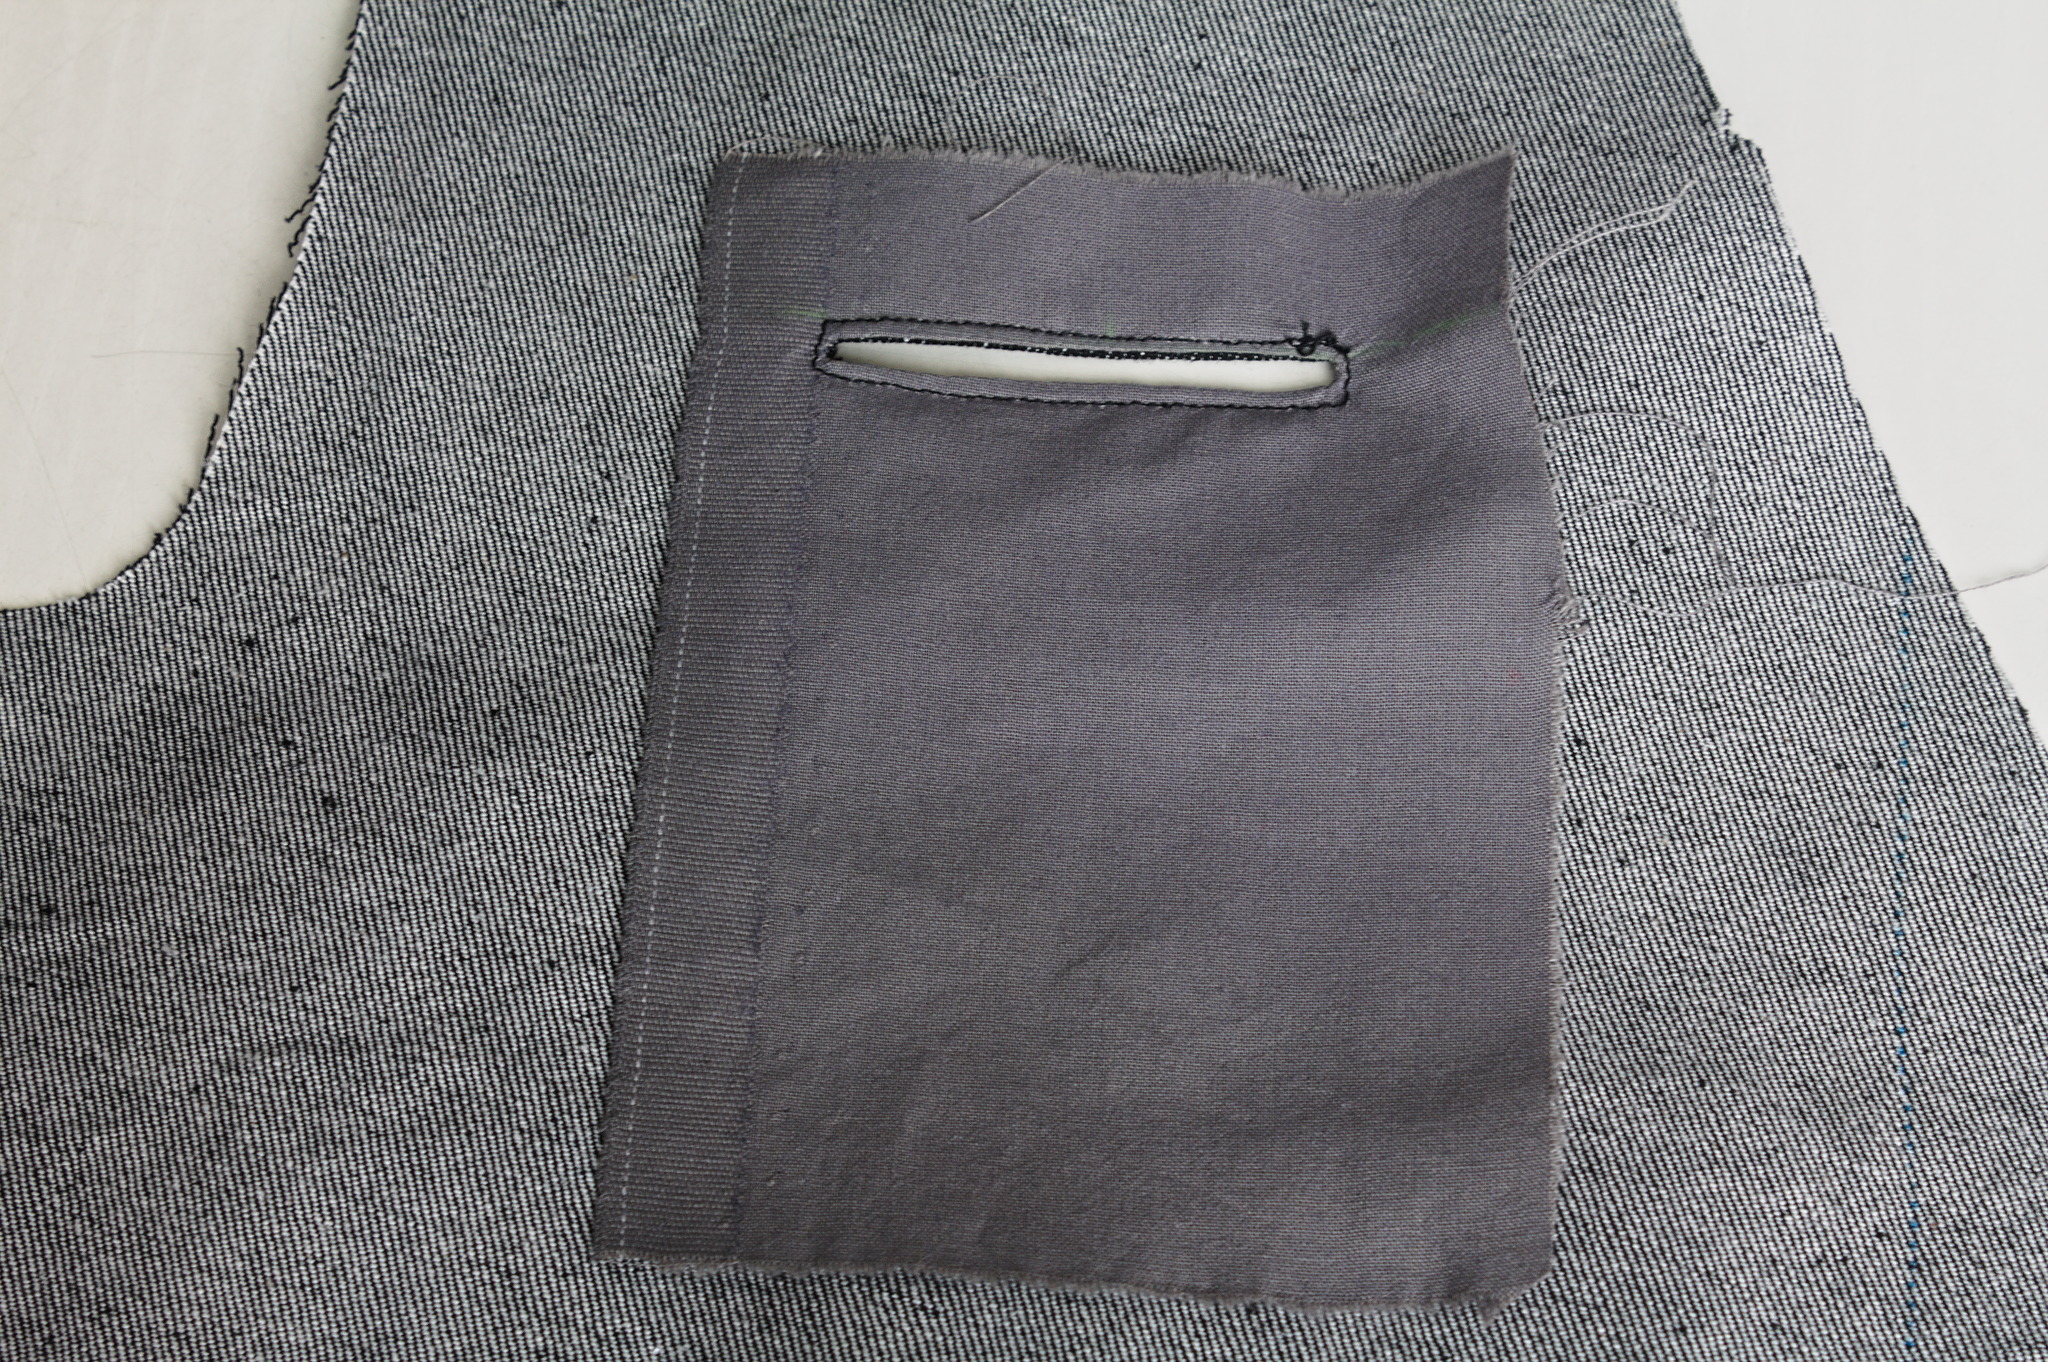
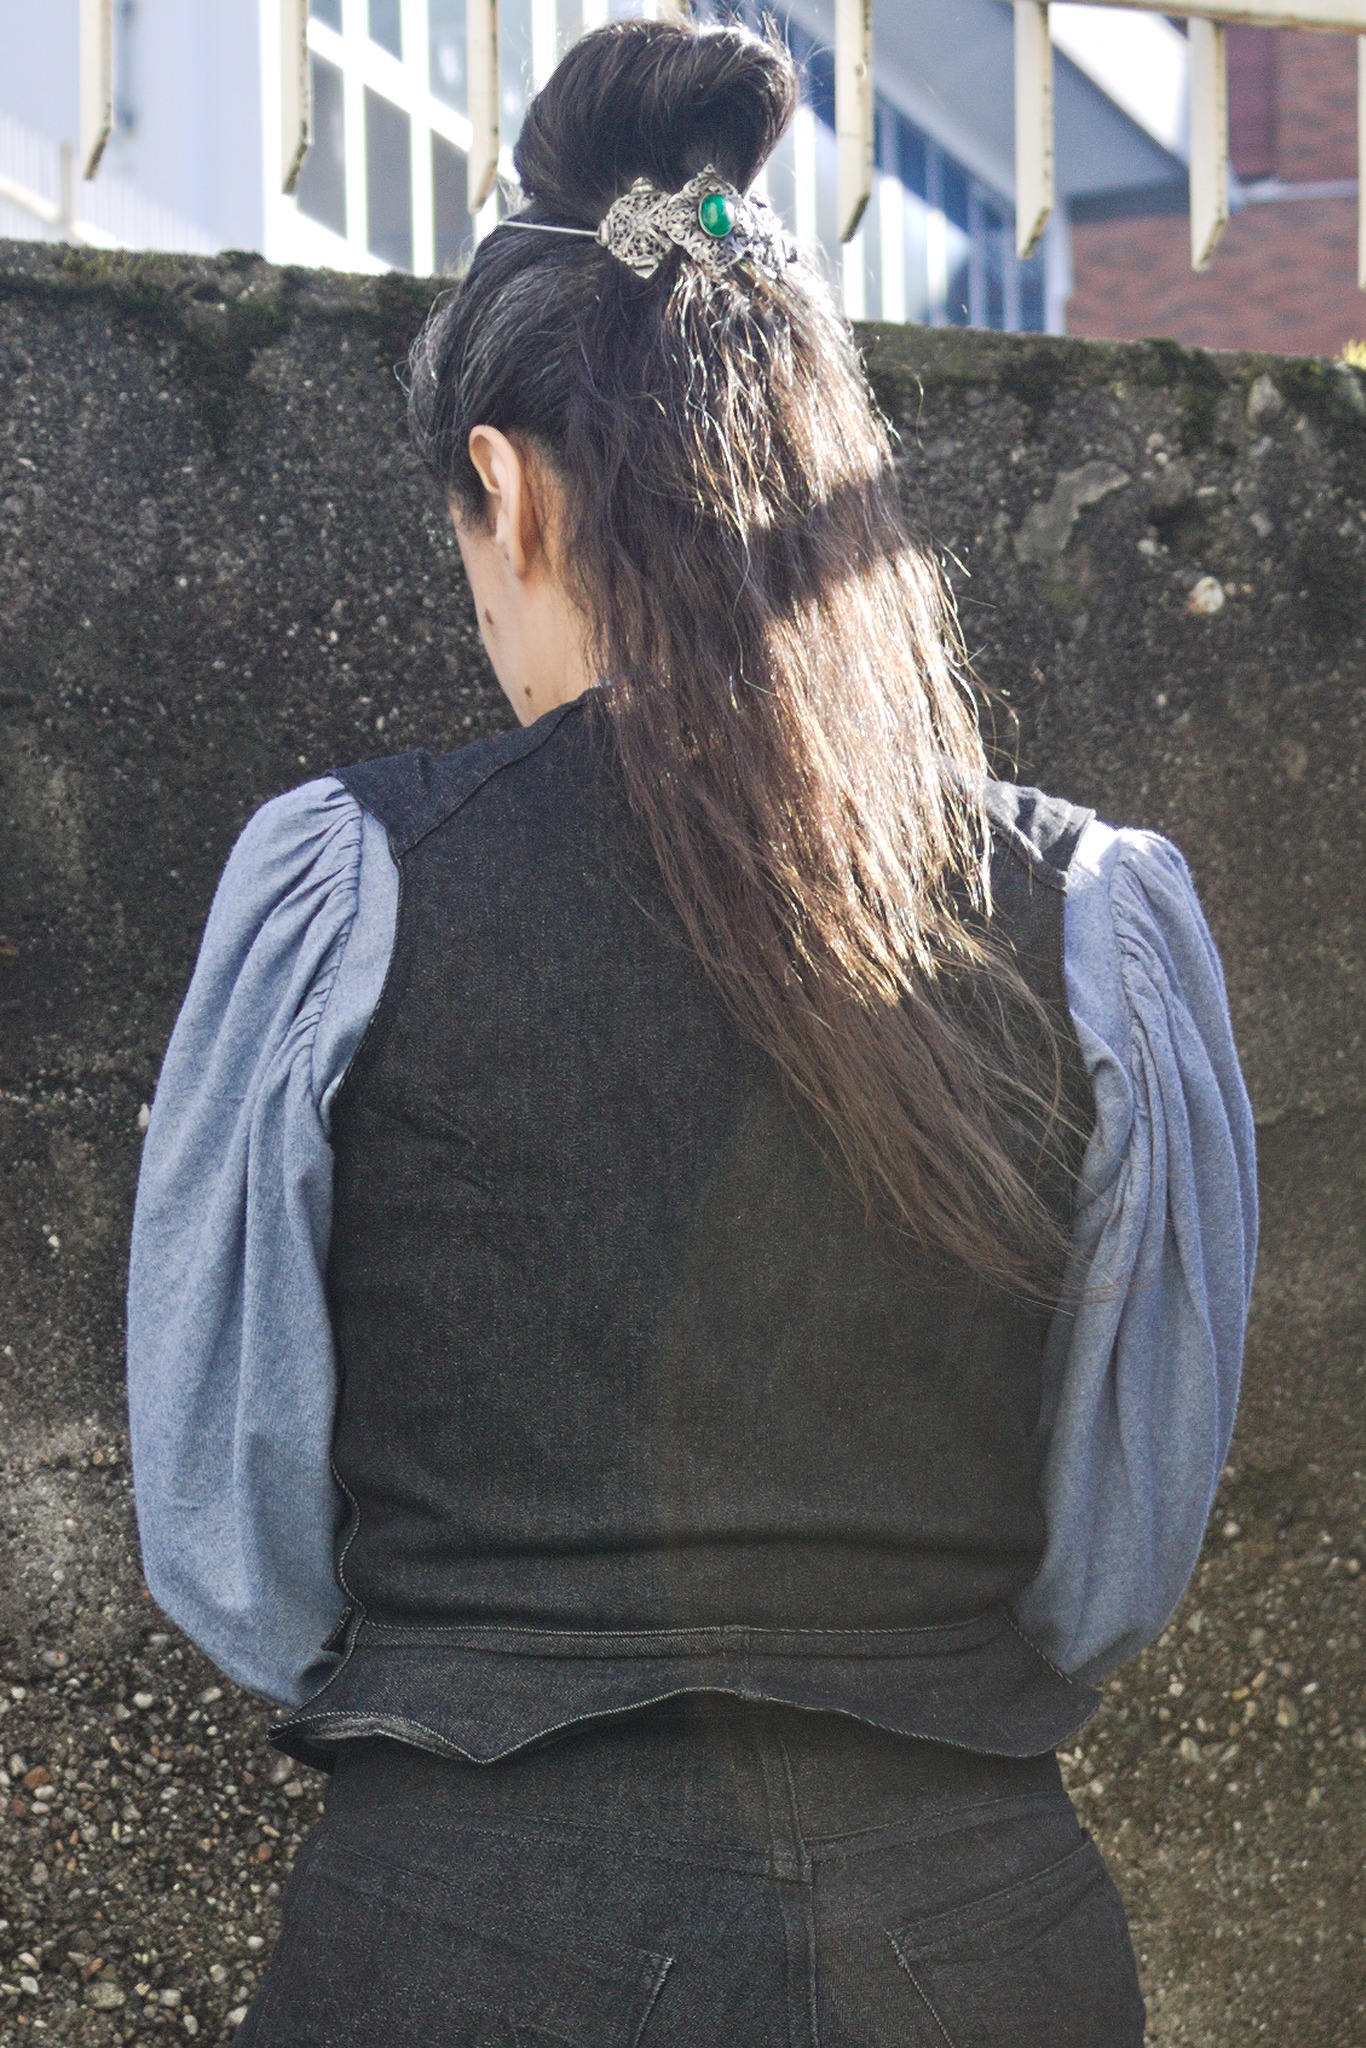 The other thing that wasn t exactly as expected is the back: the pattern
splits the bottom part of the back to give it sufficient spring over
the hips . The book is probably published in 1892, but I had already
found when drafting the foundation skirt that its idea of hips
includes a bit of structure. The enough steel to carry a book or a cup
of tea kind of structure. I should have expected a lot of spring, and
indeed that s what I got.
To fit the bottom part of the back on the limited amount of fabric I had
to piece it, and I suspect that the flat felled seam in the center is
helping it sticking out; I don t think it s exactly bad, but it is
a peculiar look.
Also, I had to cut the back on the fold, rather than having a seam in
the middle and the grain on a different angle.
Anyway, my next waistcoat project is going to have a linen-cotton lining
and silk fashion fabric, and I d say that the pattern is good enough
that I can do a few small fixes and cut it directly in the lining, using
it as a second mockup.
As for the wrinkles, there is quite a bit, but it looks something that
will be solved by a bit of lightweight boning in the side seams and in
the front; it will be seen in the second mockup and the finished
waistcoat.
As for this one, it s definitely going to get some wear as is, in casual
contexts. Except. Well, it s a denim waistcoat, right? With a very
different cut from the get a denim jacket and rip out the sleeves , but
still a denim waistcoat, right? The kind that you cover in patches,
right?
The other thing that wasn t exactly as expected is the back: the pattern
splits the bottom part of the back to give it sufficient spring over
the hips . The book is probably published in 1892, but I had already
found when drafting the foundation skirt that its idea of hips
includes a bit of structure. The enough steel to carry a book or a cup
of tea kind of structure. I should have expected a lot of spring, and
indeed that s what I got.
To fit the bottom part of the back on the limited amount of fabric I had
to piece it, and I suspect that the flat felled seam in the center is
helping it sticking out; I don t think it s exactly bad, but it is
a peculiar look.
Also, I had to cut the back on the fold, rather than having a seam in
the middle and the grain on a different angle.
Anyway, my next waistcoat project is going to have a linen-cotton lining
and silk fashion fabric, and I d say that the pattern is good enough
that I can do a few small fixes and cut it directly in the lining, using
it as a second mockup.
As for the wrinkles, there is quite a bit, but it looks something that
will be solved by a bit of lightweight boning in the side seams and in
the front; it will be seen in the second mockup and the finished
waistcoat.
As for this one, it s definitely going to get some wear as is, in casual
contexts. Except. Well, it s a denim waistcoat, right? With a very
different cut from the get a denim jacket and rip out the sleeves , but
still a denim waistcoat, right? The kind that you cover in patches,
right?
 And I may have screenprinted a home sewing is killing fashion patch
some time ago, using
And I may have screenprinted a home sewing is killing fashion patch
some time ago, using 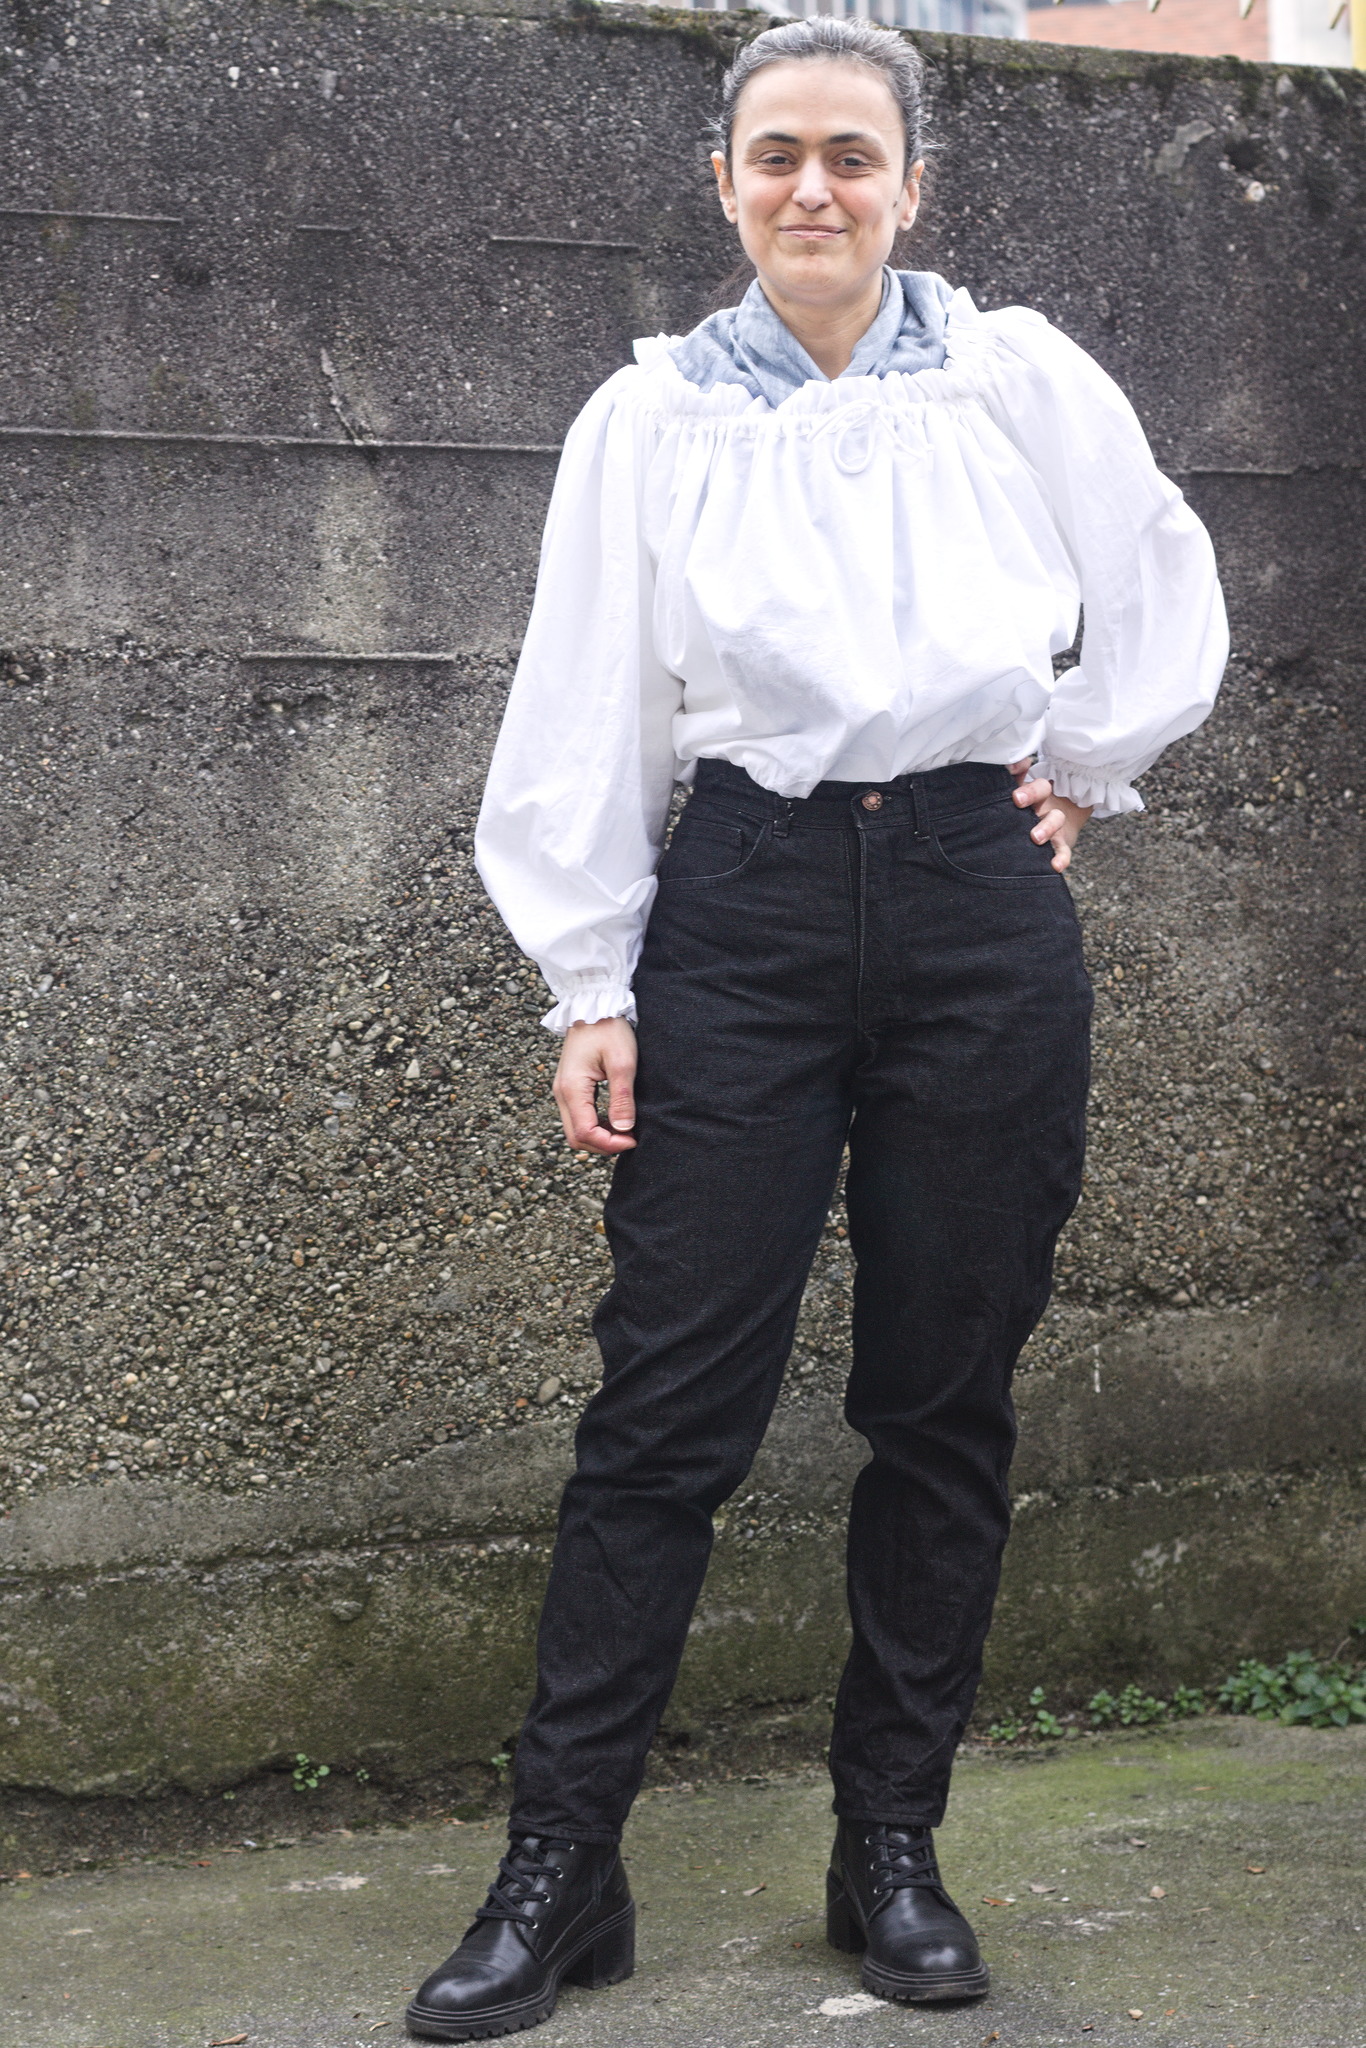 I was working on what looked like a good pattern for a pair of
jeans-shaped trousers, and I knew I wasn t happy with 200-ish g/m
cotton-linen for general use outside of deep summer, but I didn t have a
source for proper denim either (I had been low-key looking for it for a
long time).
Then one day I looked at an article I had saved about fabric shops that
sell technical fabric and while window-shopping on one I found that they
had a decent selection of denim in a decent weight.
I decided it was a sign, and decided to buy the two heaviest denim they
had: a
I was working on what looked like a good pattern for a pair of
jeans-shaped trousers, and I knew I wasn t happy with 200-ish g/m
cotton-linen for general use outside of deep summer, but I didn t have a
source for proper denim either (I had been low-key looking for it for a
long time).
Then one day I looked at an article I had saved about fabric shops that
sell technical fabric and while window-shopping on one I found that they
had a decent selection of denim in a decent weight.
I decided it was a sign, and decided to buy the two heaviest denim they
had: a 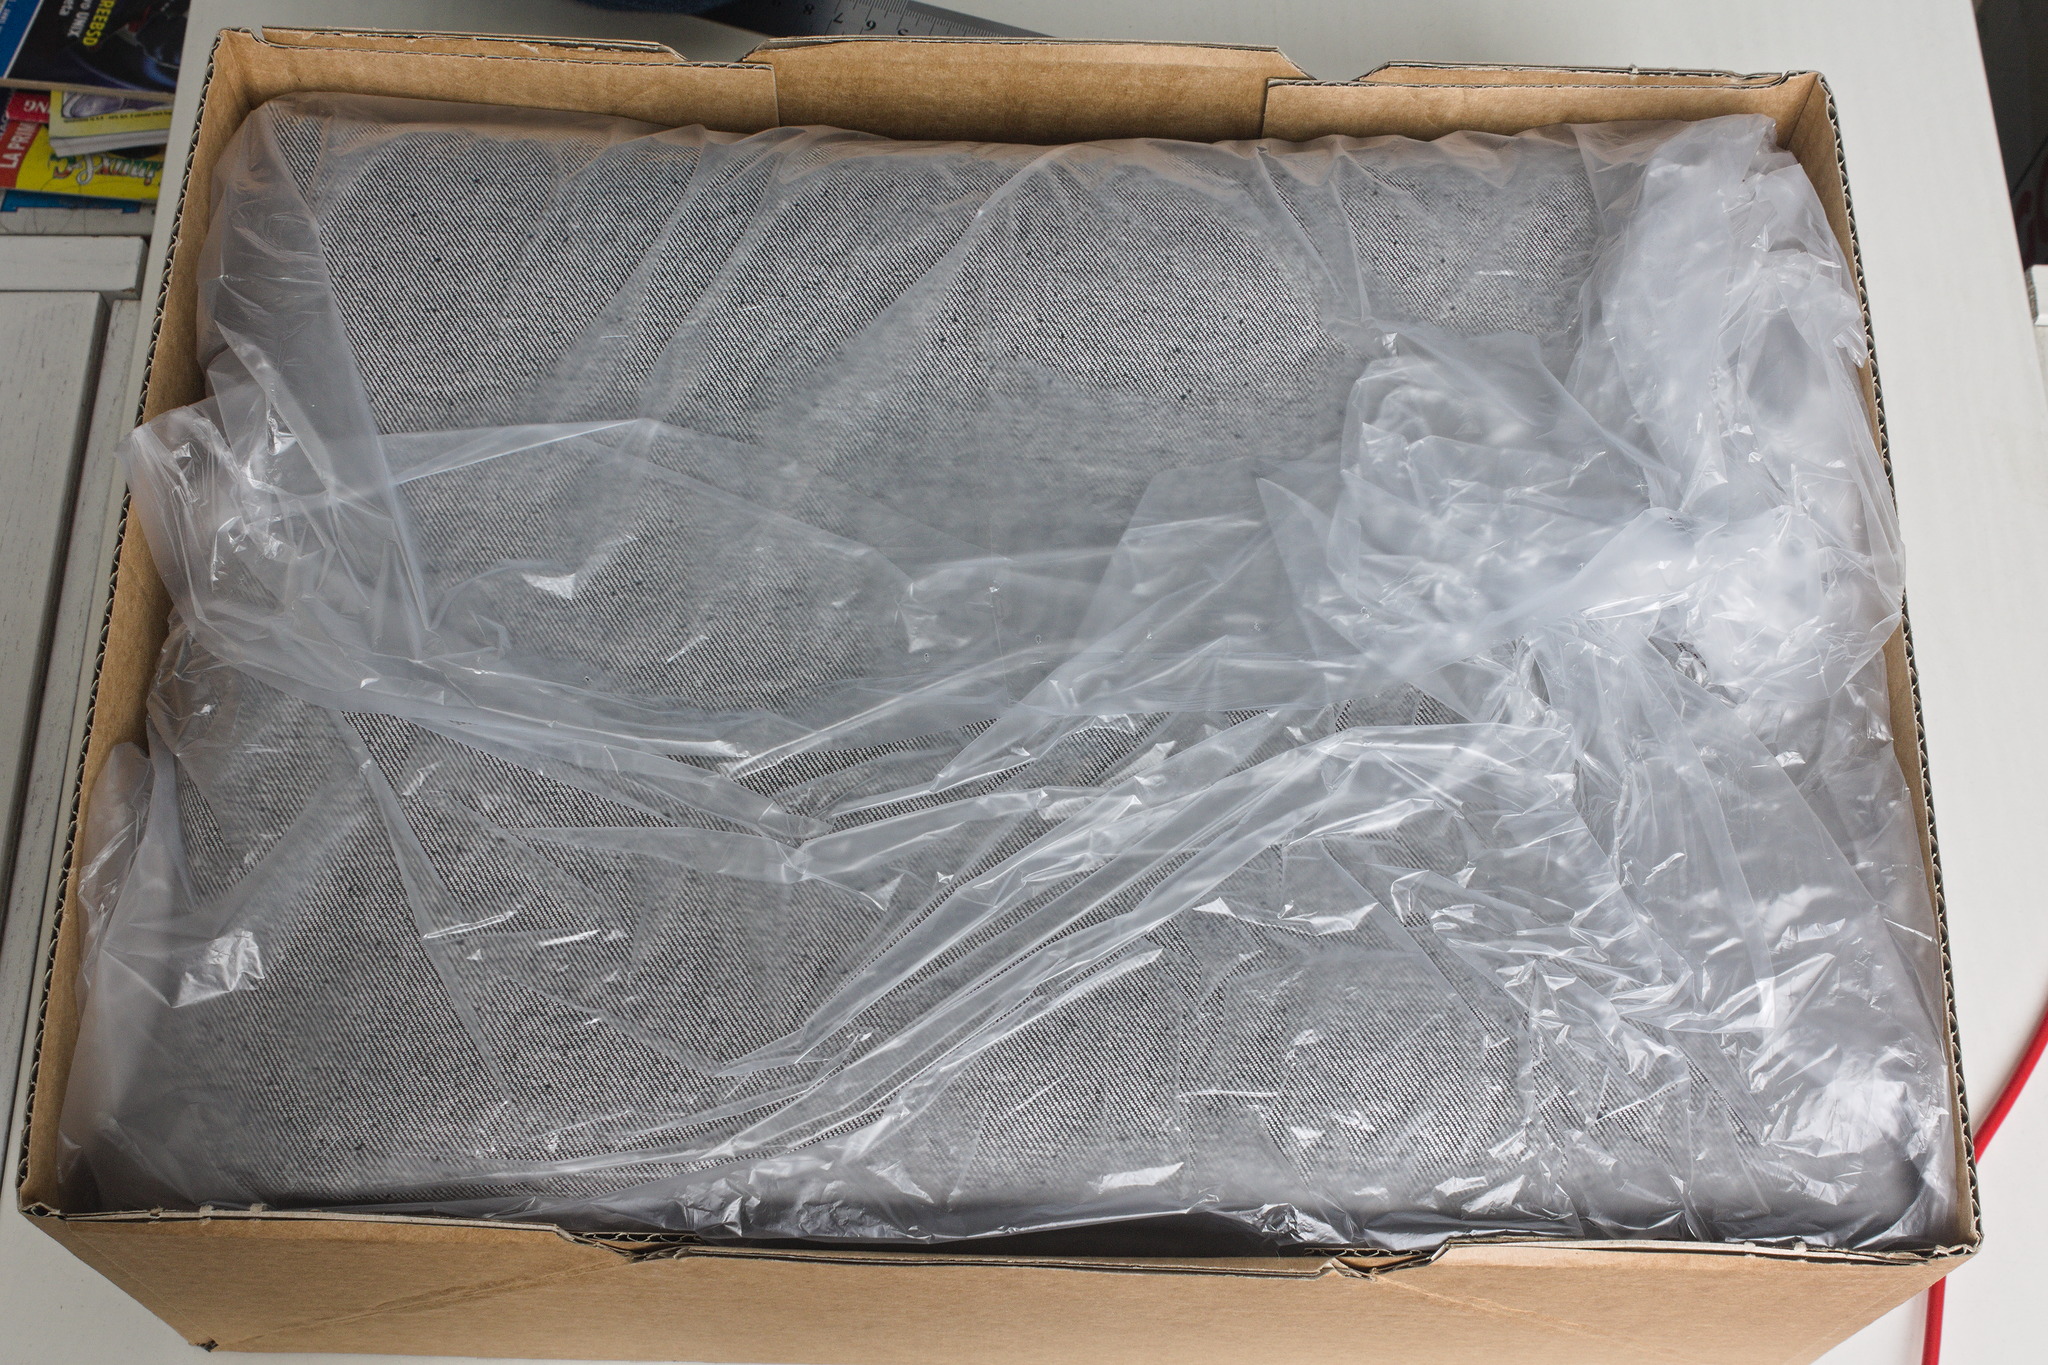 The shop sent everything very quickly, the courier took their time (oh,
well) but eventually delivered my fabric on a sunny enough day that I
could wash it and start as soon as possible on the first pair.
The pattern I did in linen was a bit too fitting, but I was afraid I had
widened it a bit too much, so I did the first pair in the 100% cotton
denim. Sewing them took me about a week of early mornings and late
afternoons, excluding the weekend, and my worries proved false: they
were mostly just fine.
The only bit that could have been a bit better is the waistband, which
is a tiny bit too wide on the back: it s designed to be so for comfort,
but the next time I should pull the elastic a bit more, so that it stays
closer to the body.
The shop sent everything very quickly, the courier took their time (oh,
well) but eventually delivered my fabric on a sunny enough day that I
could wash it and start as soon as possible on the first pair.
The pattern I did in linen was a bit too fitting, but I was afraid I had
widened it a bit too much, so I did the first pair in the 100% cotton
denim. Sewing them took me about a week of early mornings and late
afternoons, excluding the weekend, and my worries proved false: they
were mostly just fine.
The only bit that could have been a bit better is the waistband, which
is a tiny bit too wide on the back: it s designed to be so for comfort,
but the next time I should pull the elastic a bit more, so that it stays
closer to the body.
 I wore those jeans daily for the rest of the week, and confirmed that
they were indeed comfortable and the pattern was ok, so on the next
Monday I started to cut the elastic denim.
I decided to cut and sew two pairs, assembly-line style, using the
shaped waistband for one of them and the straight one for the other one.
I started working on them on a Monday, and on that week I had a couple
of days when I just couldn t, plus I completely skipped sewing on the
weekend, but on Tuesday the next week one pair was ready and could be
worn, and the other one only needed small finishes.
I wore those jeans daily for the rest of the week, and confirmed that
they were indeed comfortable and the pattern was ok, so on the next
Monday I started to cut the elastic denim.
I decided to cut and sew two pairs, assembly-line style, using the
shaped waistband for one of them and the straight one for the other one.
I started working on them on a Monday, and on that week I had a couple
of days when I just couldn t, plus I completely skipped sewing on the
weekend, but on Tuesday the next week one pair was ready and could be
worn, and the other one only needed small finishes.
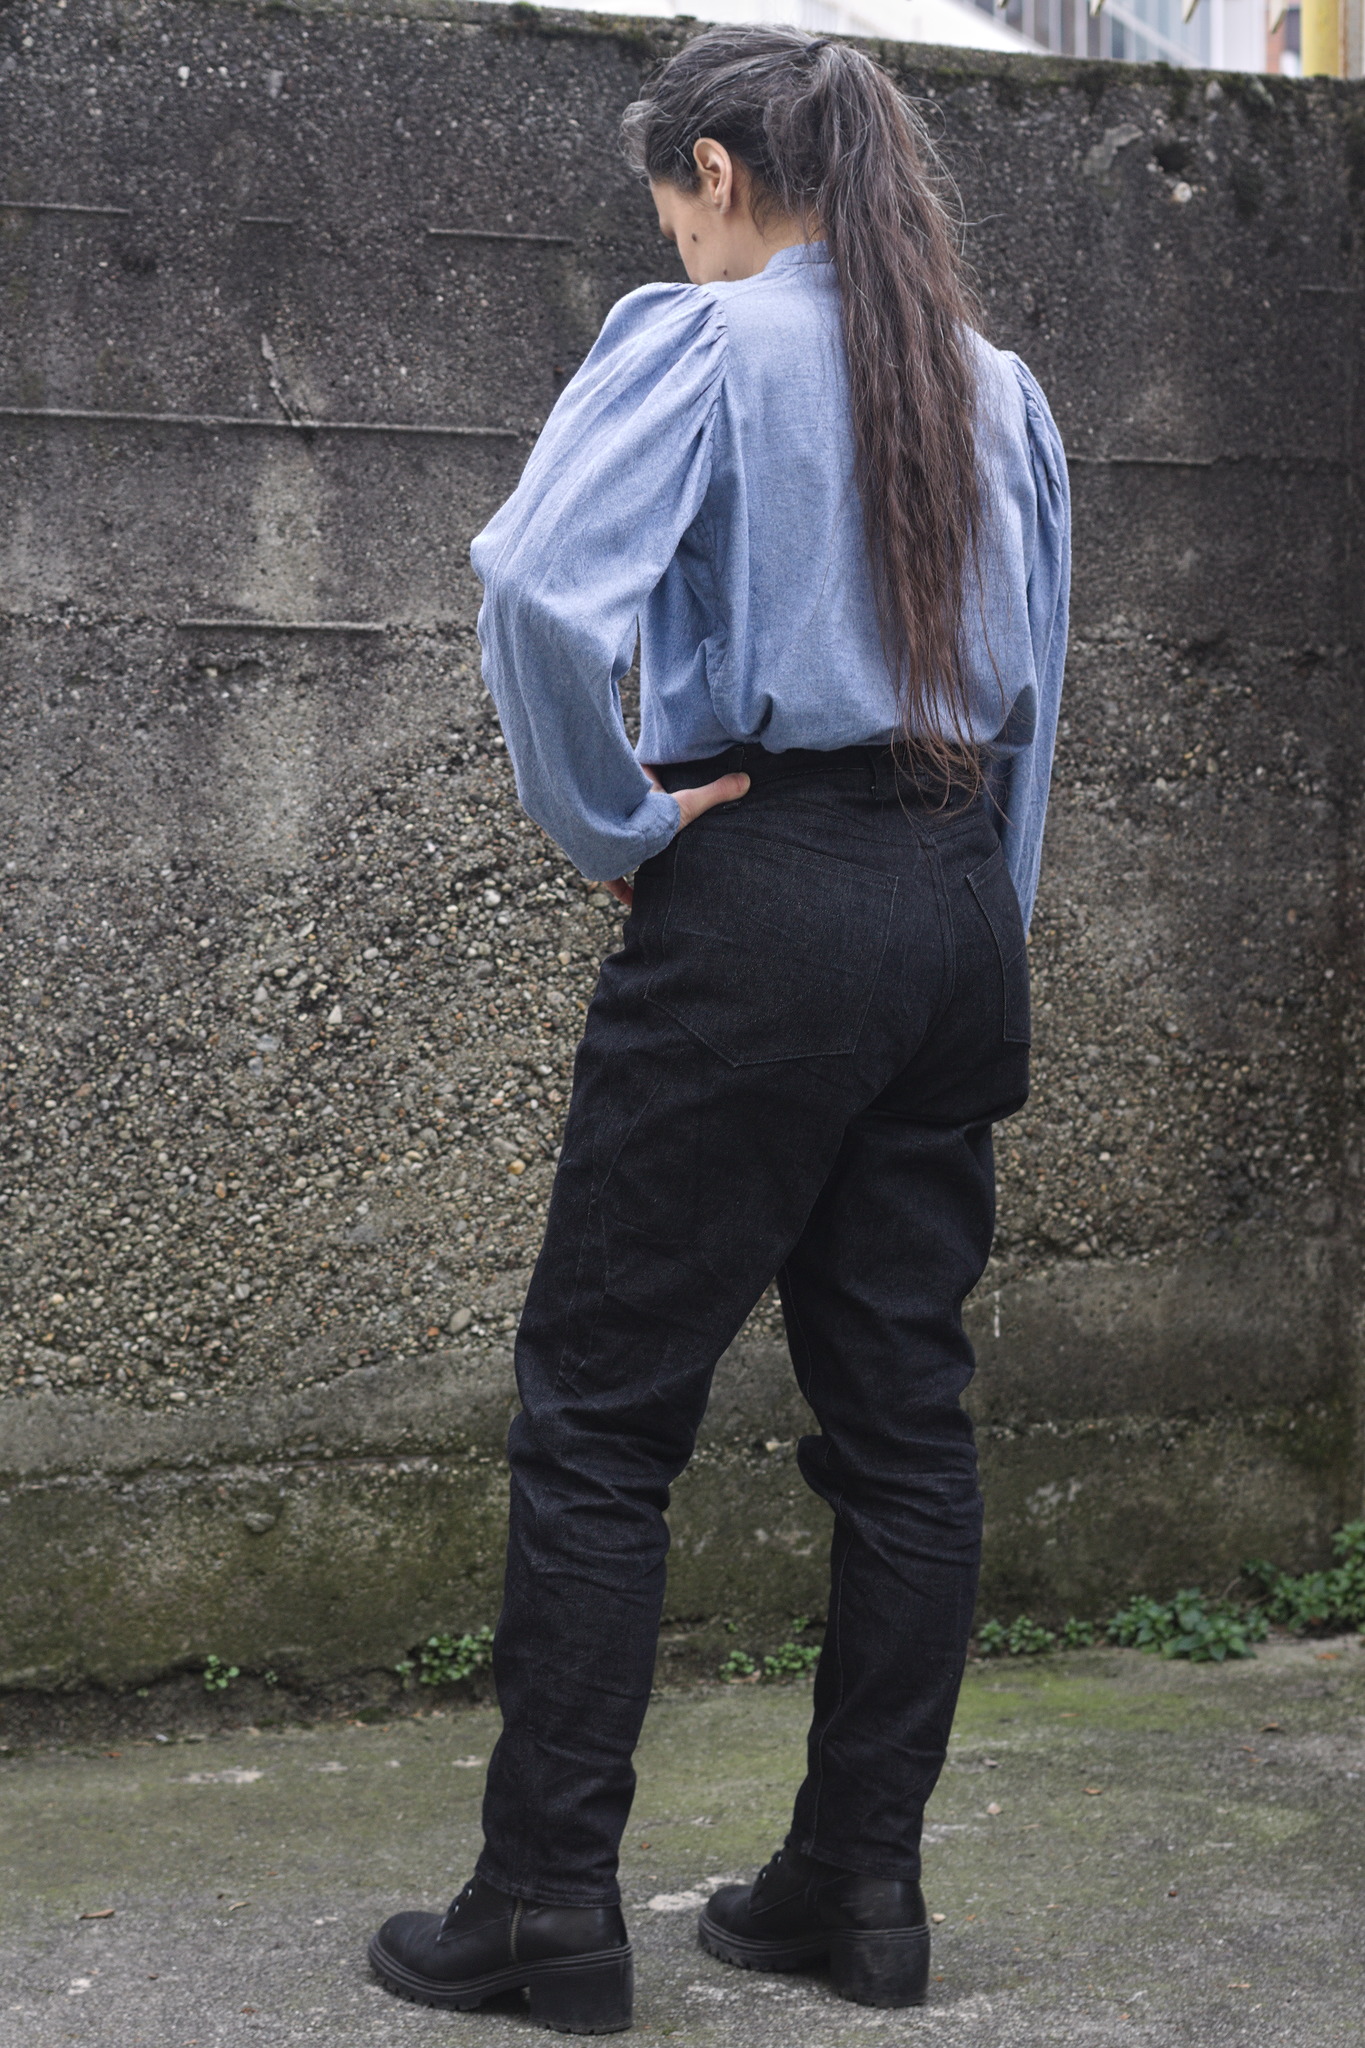 And I have to say, I m really, really happy with the ones with a shaped
waistband in elastic denim, as they fit even better than the ones with a
straight waistband gathered with elastic. Cutting it requires more
fabric, but I think it s definitely worth it.
But it will be a problem for a later time: right now three pairs of
jeans are a good number to keep in rotation, and I hope I won t have to
sew jeans for myself for quite some time.
And I have to say, I m really, really happy with the ones with a shaped
waistband in elastic denim, as they fit even better than the ones with a
straight waistband gathered with elastic. Cutting it requires more
fabric, but I think it s definitely worth it.
But it will be a problem for a later time: right now three pairs of
jeans are a good number to keep in rotation, and I hope I won t have to
sew jeans for myself for quite some time.
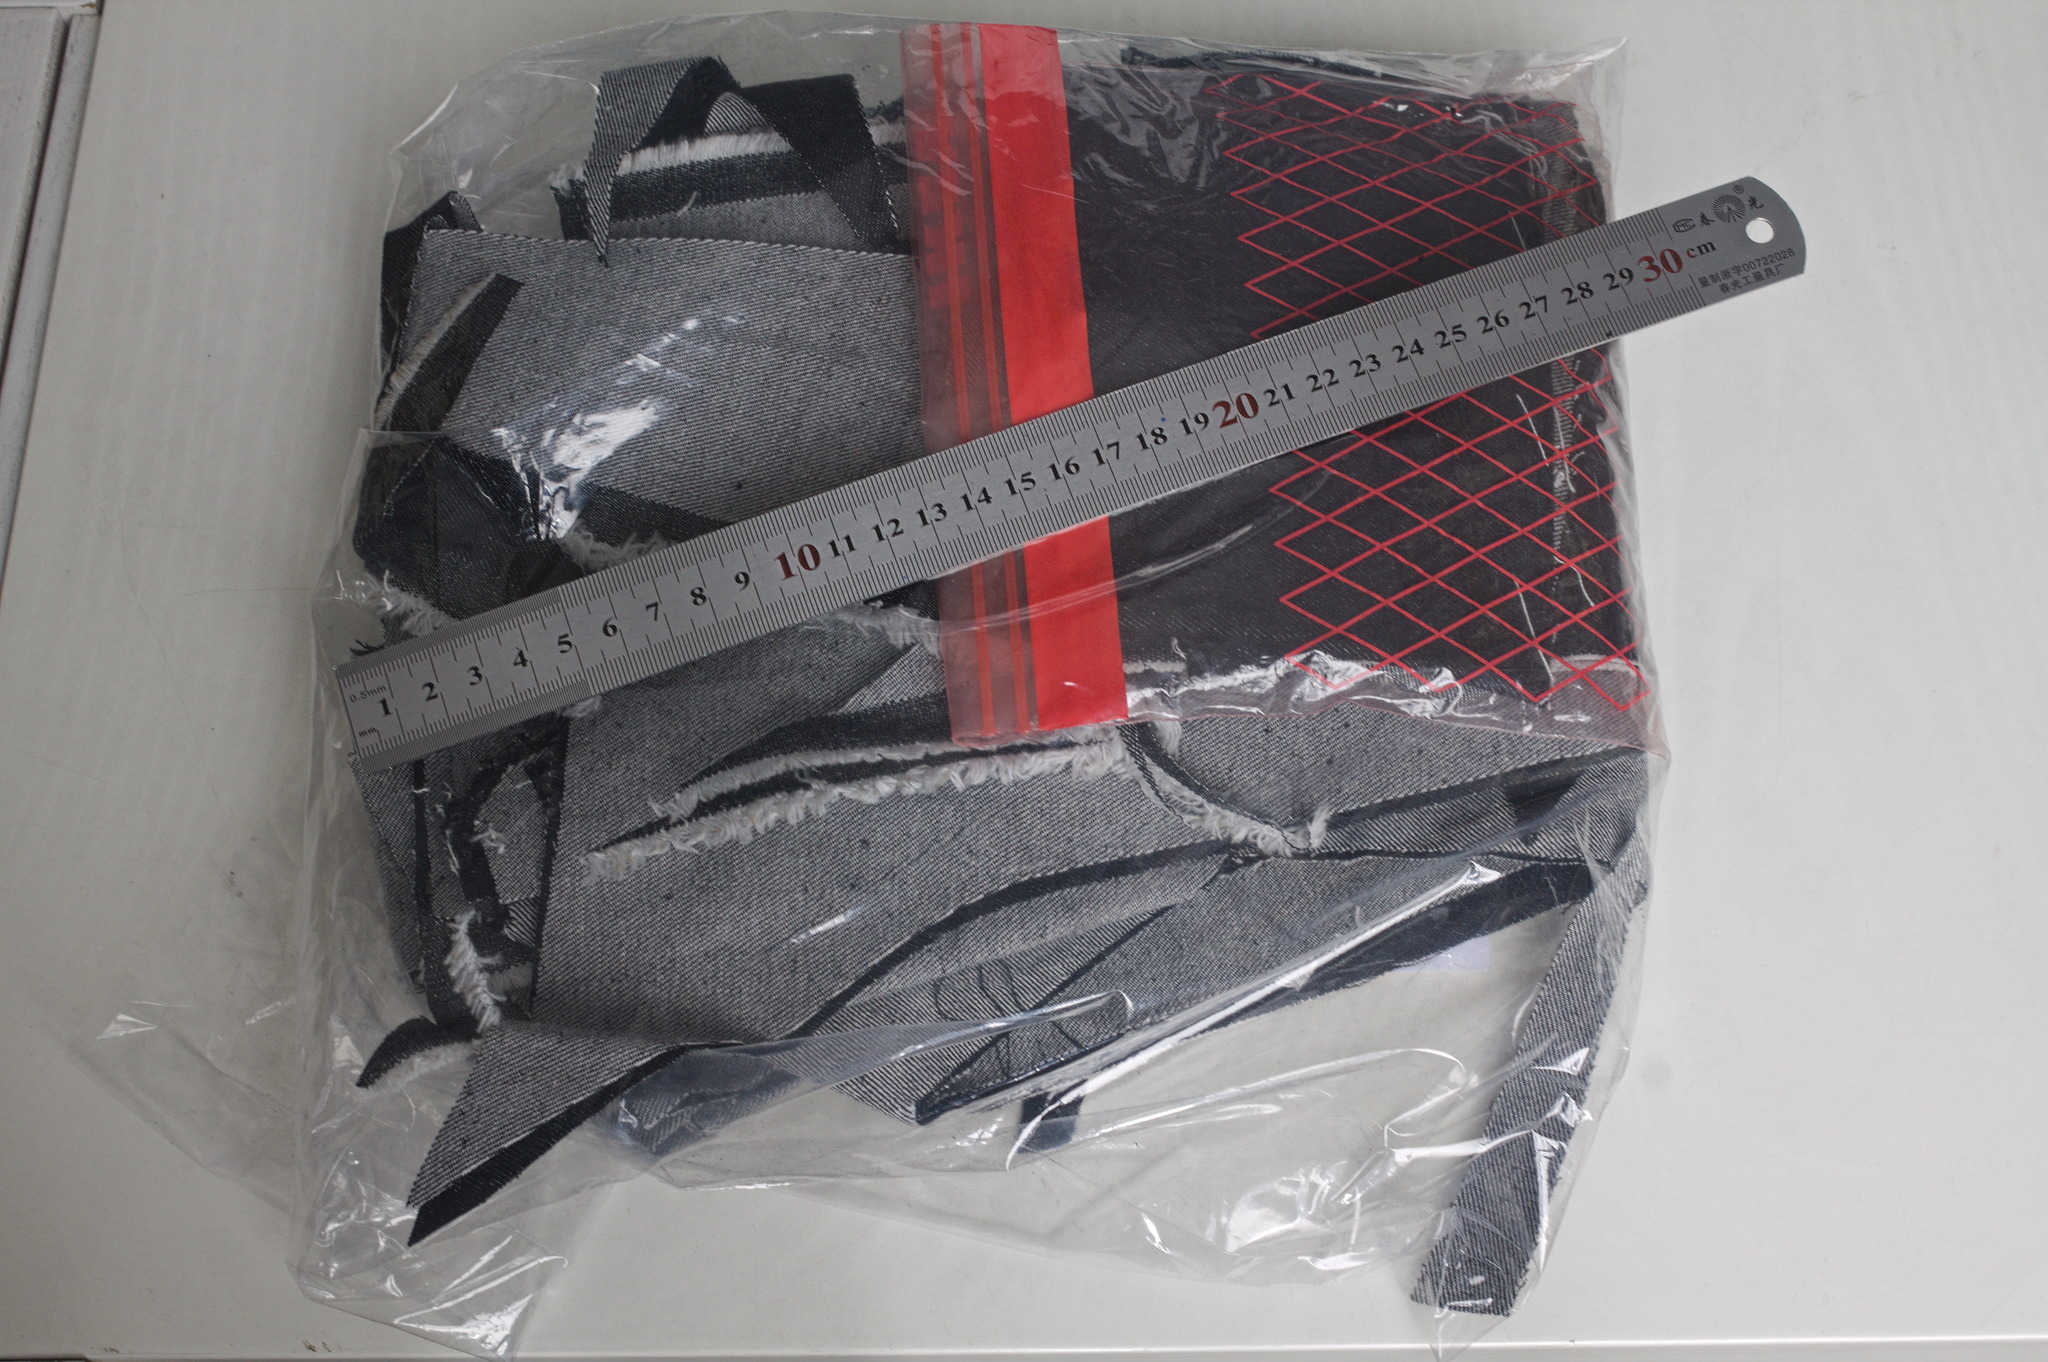 I think that the leftovers of plain denim will be used for a skirt or
something else, and as for the leftovers of elastic denim, well, there
aren t a lot left, but what else I did with them is the topic for
another post.
Thanks to the fact that they are all slightly different, I ve started to
keep track of the times when I wash each pair, and hopefully I will be
able to see whether the elastic denim is significantly less durable than
the regular, or the added weight compensates for it somewhat. I m not
sure I ll manage to remember about saving the data until they get worn,
but if I do it will be interesting to know.
Oh, and I say I ve finished working on jeans and everything, but I still
haven t sewn the belt loops to the third pair. And I m currently wearing
them. It s a sewist tradition, or something. :D
I think that the leftovers of plain denim will be used for a skirt or
something else, and as for the leftovers of elastic denim, well, there
aren t a lot left, but what else I did with them is the topic for
another post.
Thanks to the fact that they are all slightly different, I ve started to
keep track of the times when I wash each pair, and hopefully I will be
able to see whether the elastic denim is significantly less durable than
the regular, or the added weight compensates for it somewhat. I m not
sure I ll manage to remember about saving the data until they get worn,
but if I do it will be interesting to know.
Oh, and I say I ve finished working on jeans and everything, but I still
haven t sewn the belt loops to the third pair. And I m currently wearing
them. It s a sewist tradition, or something. :D
 Just like the corset, I also needed a new pair of jeans.
Back when my body size changed drastically of course my jeans no longer
fit. While I was waiting for my size to stabilize I kept wearing them
with a somewhat tight belt, but it was ugly and somewhat uncomfortable.
When I had stopped changing a lot I tried to buy new ones in the same
model, and found out that I was too thin for the menswear jeans of that
shop. I could have gone back to wearing women s jeans, but I didn t want
to have to deal with the crappy fabric and short pockets, so I basically
spent a few years wearing mostly skirts, and oversized jeans when I
really needed trousers.
Meanwhile, I had drafted a
Just like the corset, I also needed a new pair of jeans.
Back when my body size changed drastically of course my jeans no longer
fit. While I was waiting for my size to stabilize I kept wearing them
with a somewhat tight belt, but it was ugly and somewhat uncomfortable.
When I had stopped changing a lot I tried to buy new ones in the same
model, and found out that I was too thin for the menswear jeans of that
shop. I could have gone back to wearing women s jeans, but I didn t want
to have to deal with the crappy fabric and short pockets, so I basically
spent a few years wearing mostly skirts, and oversized jeans when I
really needed trousers.
Meanwhile, I had drafted a  Making also went smoothly, and the result was fitting. Very fitting. A
big too fitting, and the standard bum adjustment of the back was just
enough for what apparently still qualifies as a big bum, so I adjusted
the pattern to be able to add a custom amount of ease in a few places.
But at least I had a pair of jeans-shaped trousers that fit!
Except, at 200 g/m I can t say that fabric is the proper weight for a
pair of trousers, and I may have looked around online
Making also went smoothly, and the result was fitting. Very fitting. A
big too fitting, and the standard bum adjustment of the back was just
enough for what apparently still qualifies as a big bum, so I adjusted
the pattern to be able to add a custom amount of ease in a few places.
But at least I had a pair of jeans-shaped trousers that fit!
Except, at 200 g/m I can t say that fabric is the proper weight for a
pair of trousers, and I may have looked around online I realize it s a bit late to start publicly organizing this, but better late
than never I m happy some Debian people I have directly contacted have
already expressed interest. So, lets make this public!
I realize it s a bit late to start publicly organizing this, but better late
than never I m happy some Debian people I have directly contacted have
already expressed interest. So, lets make this public!
 For all interested people who are reasonably close to central Argentina, or can
be persuaded to come here in a month s time You are all welcome!
It seems I managed to convince my good friend Mart n Bayo (some Debian people
will remember him, as he was present in DebConf19 in Curitiba, Brazil) to get
some facilities for us to have a nice Debian get-together in Central Argentina.
For all interested people who are reasonably close to central Argentina, or can
be persuaded to come here in a month s time You are all welcome!
It seems I managed to convince my good friend Mart n Bayo (some Debian people
will remember him, as he was present in DebConf19 in Curitiba, Brazil) to get
some facilities for us to have a nice Debian get-together in Central Argentina.
 In late 2022 I prepared a batch of
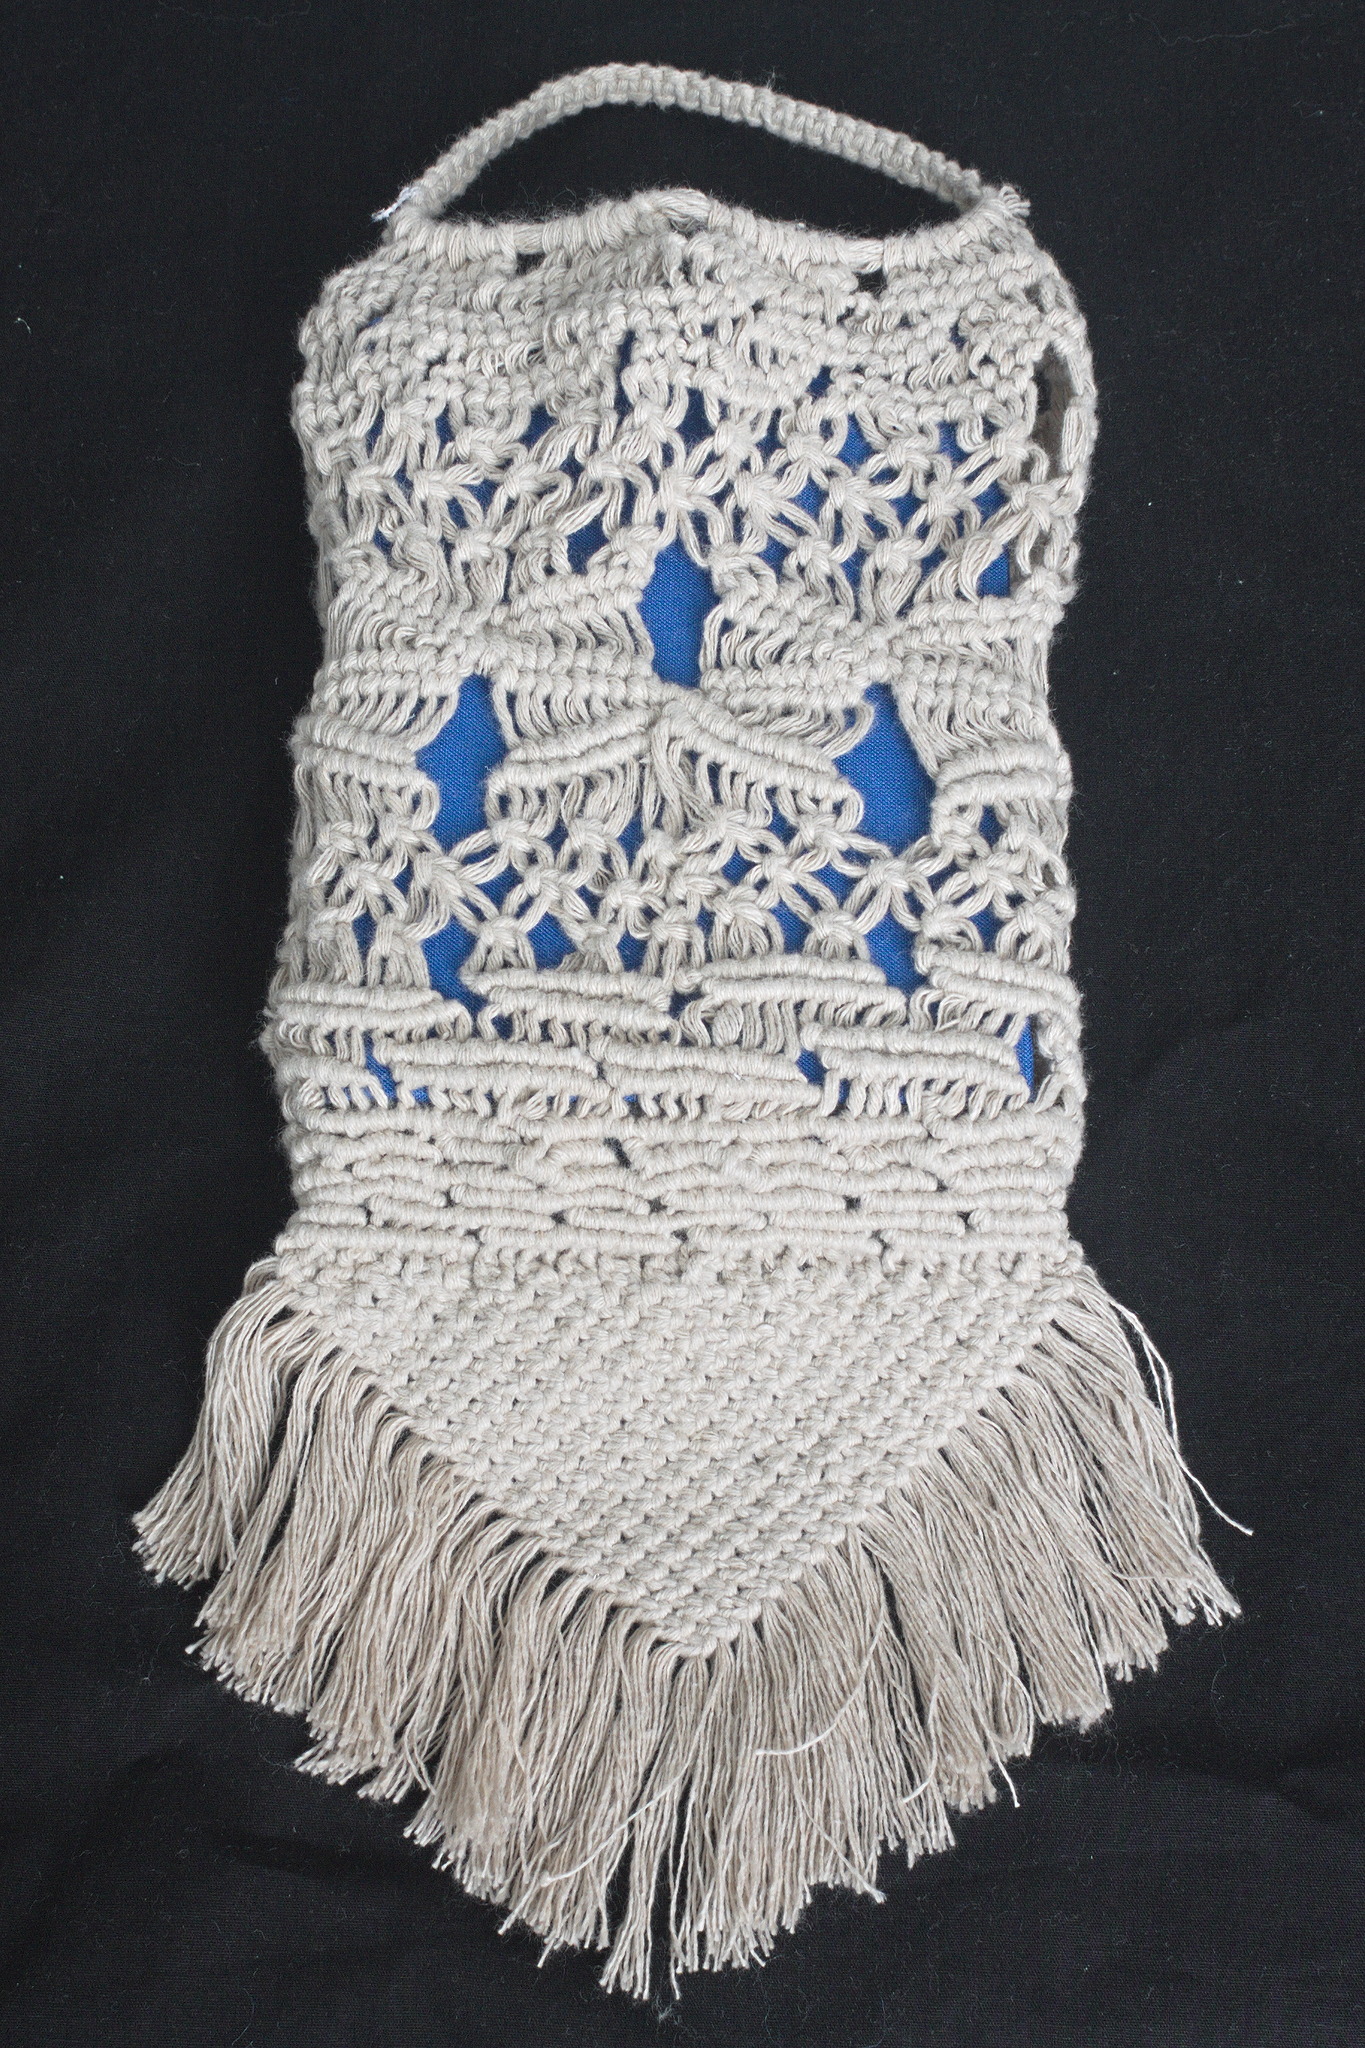
  I started by looping 5 m of cord, making iirc 2 rounds of a loop about
the right size to go around the book with a bit of ease, then used the
ends as filler cords for a handle, wrapped them around the loop and
worked square knots all over them to make a handle.
Then I cut the rest of the cord into 40 pieces, each 4 m long, because I
had no idea how much I was going to need (spoiler: I successfully got it
wrong :D )
I joined the cords to the handle with lark head knots, 20 per side, and
then I started knotting without a plan or anything, alternating between
hitches and square knots, sometimes close together and sometimes leaving
some free cord between them.
And apparently I also completely forgot to take in-progress pictures.
I kept working on this for a few months, knotting a row or two now and
then, until the bag was long enough for the book, then I closed the
bottom by taking one cord from the front and the corresponding on the
back, knotting them together (I don t remember how) and finally I made a
rigid triangle of tight square knots with all of the cords,
progressively leaving out a cord from each side, and cutting it in a
fringe.
I then measured the remaining cords, and saw that the shortest ones were
about a meter long, but the longest ones were up to 3 meters, I could
have cut them much shorter at the beginning (and maybe added a couple
more cords). The leftovers will be used, in some way.
And then I postponed taking pictures of the finished object for a few
months.
I started by looping 5 m of cord, making iirc 2 rounds of a loop about
the right size to go around the book with a bit of ease, then used the
ends as filler cords for a handle, wrapped them around the loop and
worked square knots all over them to make a handle.
Then I cut the rest of the cord into 40 pieces, each 4 m long, because I
had no idea how much I was going to need (spoiler: I successfully got it
wrong :D )
I joined the cords to the handle with lark head knots, 20 per side, and
then I started knotting without a plan or anything, alternating between
hitches and square knots, sometimes close together and sometimes leaving
some free cord between them.
And apparently I also completely forgot to take in-progress pictures.
I kept working on this for a few months, knotting a row or two now and
then, until the bag was long enough for the book, then I closed the
bottom by taking one cord from the front and the corresponding on the
back, knotting them together (I don t remember how) and finally I made a
rigid triangle of tight square knots with all of the cords,
progressively leaving out a cord from each side, and cutting it in a
fringe.
I then measured the remaining cords, and saw that the shortest ones were
about a meter long, but the longest ones were up to 3 meters, I could
have cut them much shorter at the beginning (and maybe added a couple
more cords). The leftovers will be used, in some way.
And then I postponed taking pictures of the finished object for a few
months.
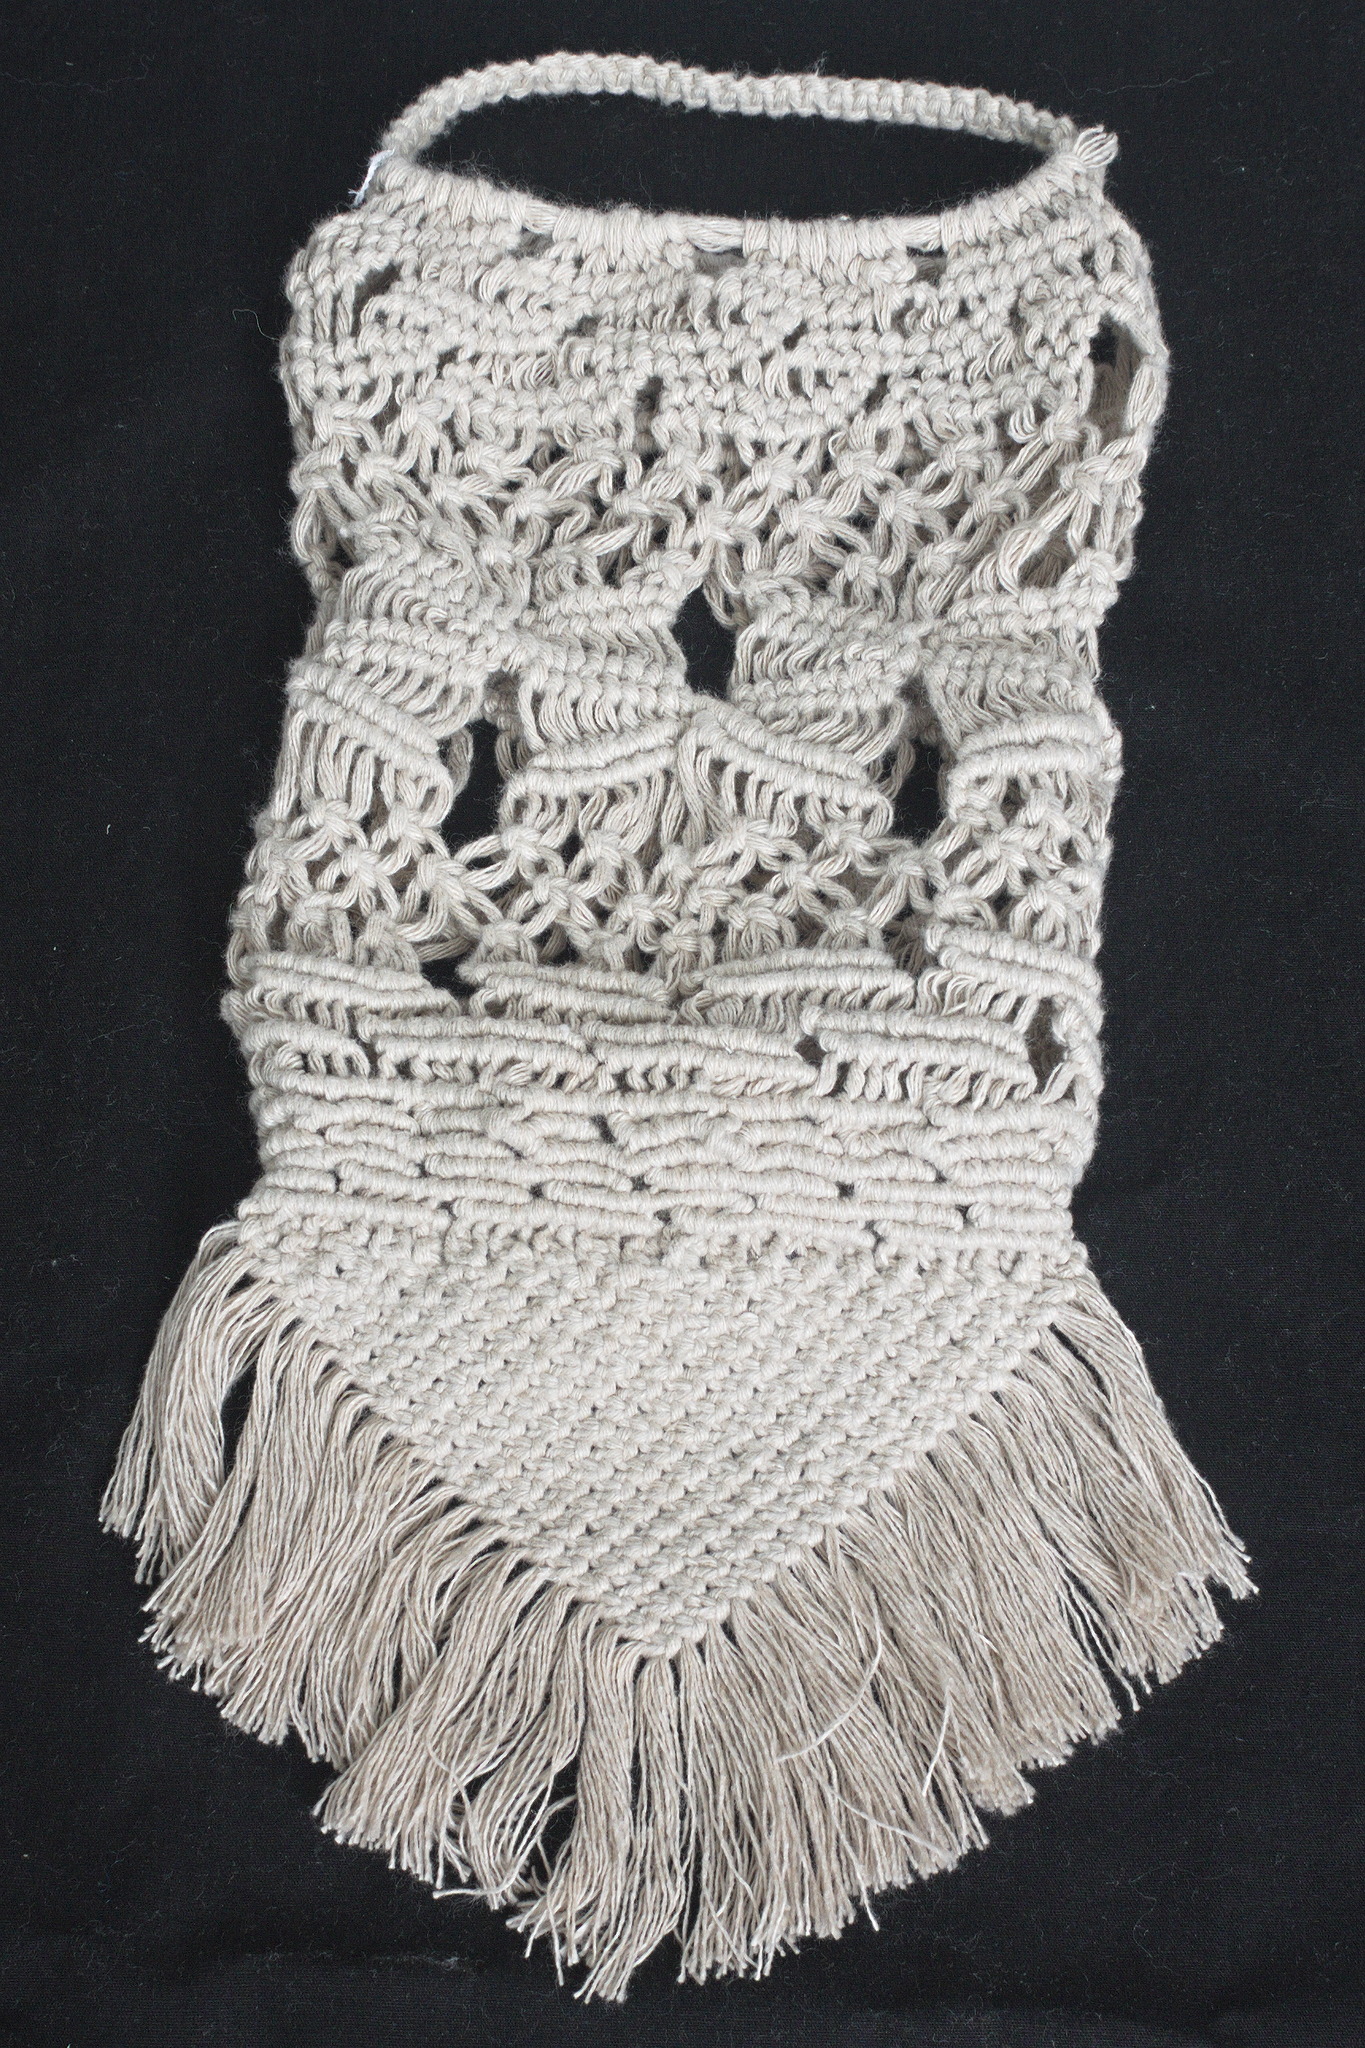 Now the result is functional, but I have to admit it is somewhat ugly:
not as much for the lack of a pattern (that I think came out quite fine)
but because of how irregular the knots are; I m not confident that the
next time I will be happy with their regularity, either, but I hope I
will improve, and that s one important thing.
And the other important thing is: I enjoyed making this, even if I kept
interrupting the work, and I think that there may be some other macrame
in my future.
Now the result is functional, but I have to admit it is somewhat ugly:
not as much for the lack of a pattern (that I think came out quite fine)
but because of how irregular the knots are; I m not confident that the
next time I will be happy with their regularity, either, but I hope I
will improve, and that s one important thing.
And the other important thing is: I enjoyed making this, even if I kept
interrupting the work, and I think that there may be some other macrame
in my future.
 In 2022 I read a post on the fediverse by somebody who mentioned that
they had bought on a whim a cute tiny book years ago, and that it
had been a companion through hard times. Right now I can t find the
post, but it was pretty aaaaawwww.
In 2022 I read a post on the fediverse by somebody who mentioned that
they had bought on a whim a cute tiny book years ago, and that it
had been a companion through hard times. Right now I can t find the
post, but it was pretty aaaaawwww.
 At the same time, I had discovered Coptic binding, and I wanted to do
some exercise to let my hands learn it, but apparently there is a limit
to the number of notebooks and sketchbooks a person needs (I m not 100%
sure I actually believe this, but I ve heard it is a thing).
At the same time, I had discovered Coptic binding, and I wanted to do
some exercise to let my hands learn it, but apparently there is a limit
to the number of notebooks and sketchbooks a person needs (I m not 100%
sure I actually believe this, but I ve heard it is a thing).
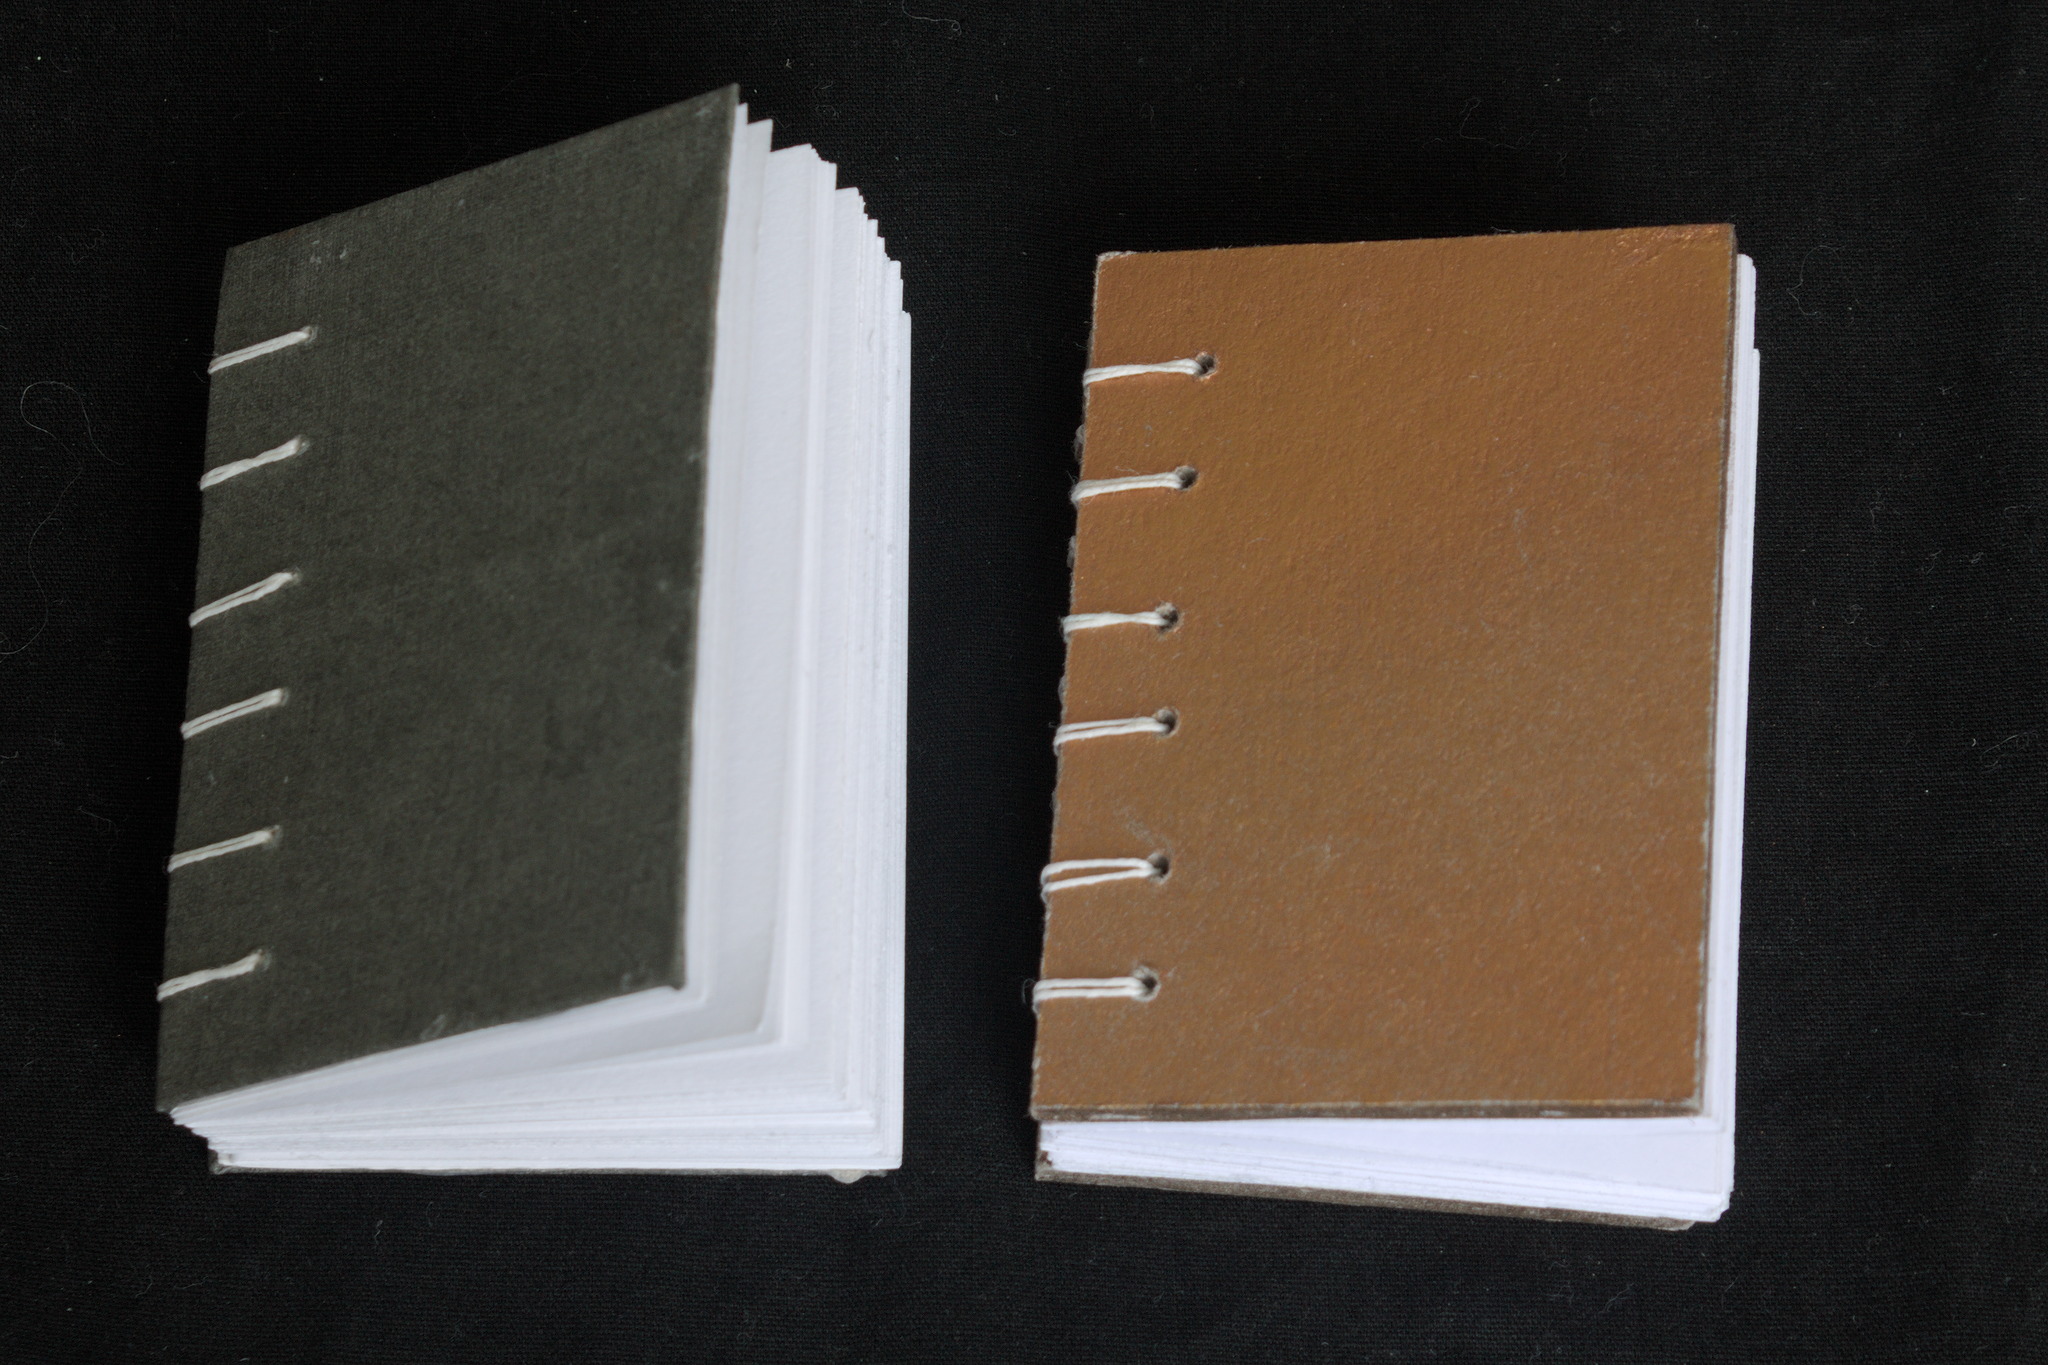
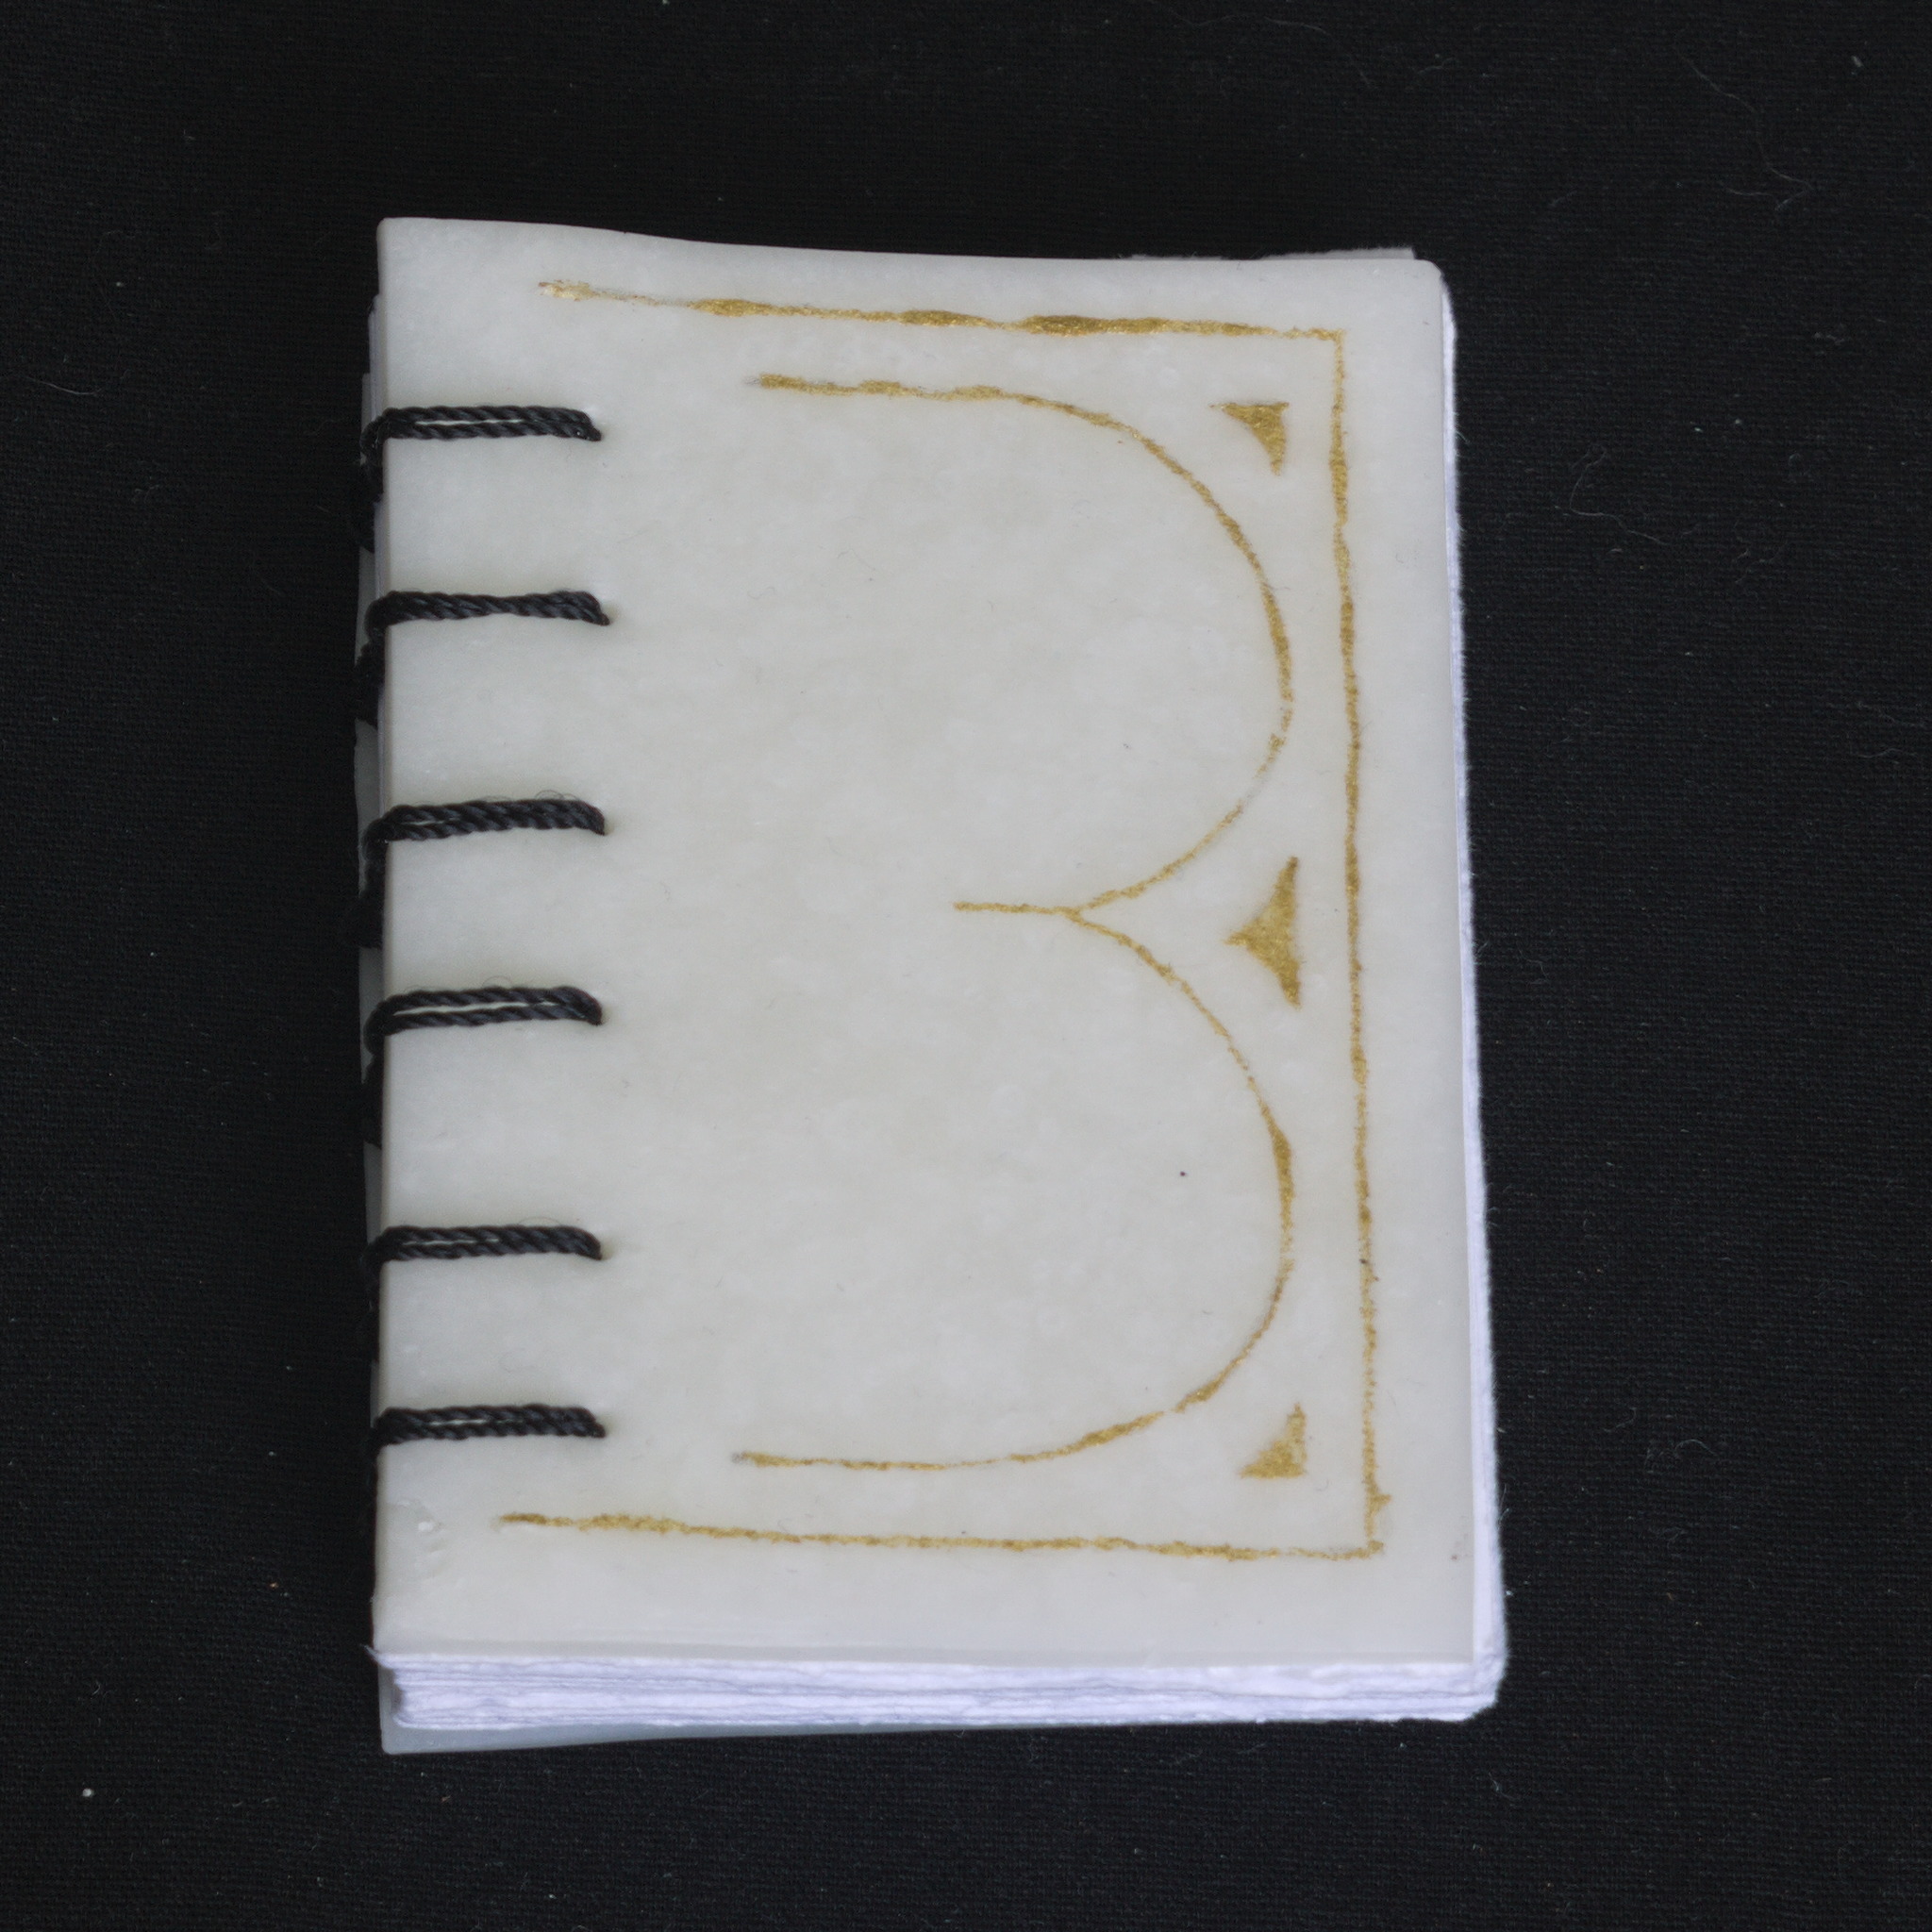 So I decided to start making minibooks with the intent to give them
away: I settled (mostly) on the A8 size, and used a combination of found
materials, leftovers from bigger projects and things I had in the Stash.
As for paper, I ve used a variety of the ones I have that are at the
very least good enough for non-problematic fountain pen inks.
So I decided to start making minibooks with the intent to give them
away: I settled (mostly) on the A8 size, and used a combination of found
materials, leftovers from bigger projects and things I had in the Stash.
As for paper, I ve used a variety of the ones I have that are at the
very least good enough for non-problematic fountain pen inks.
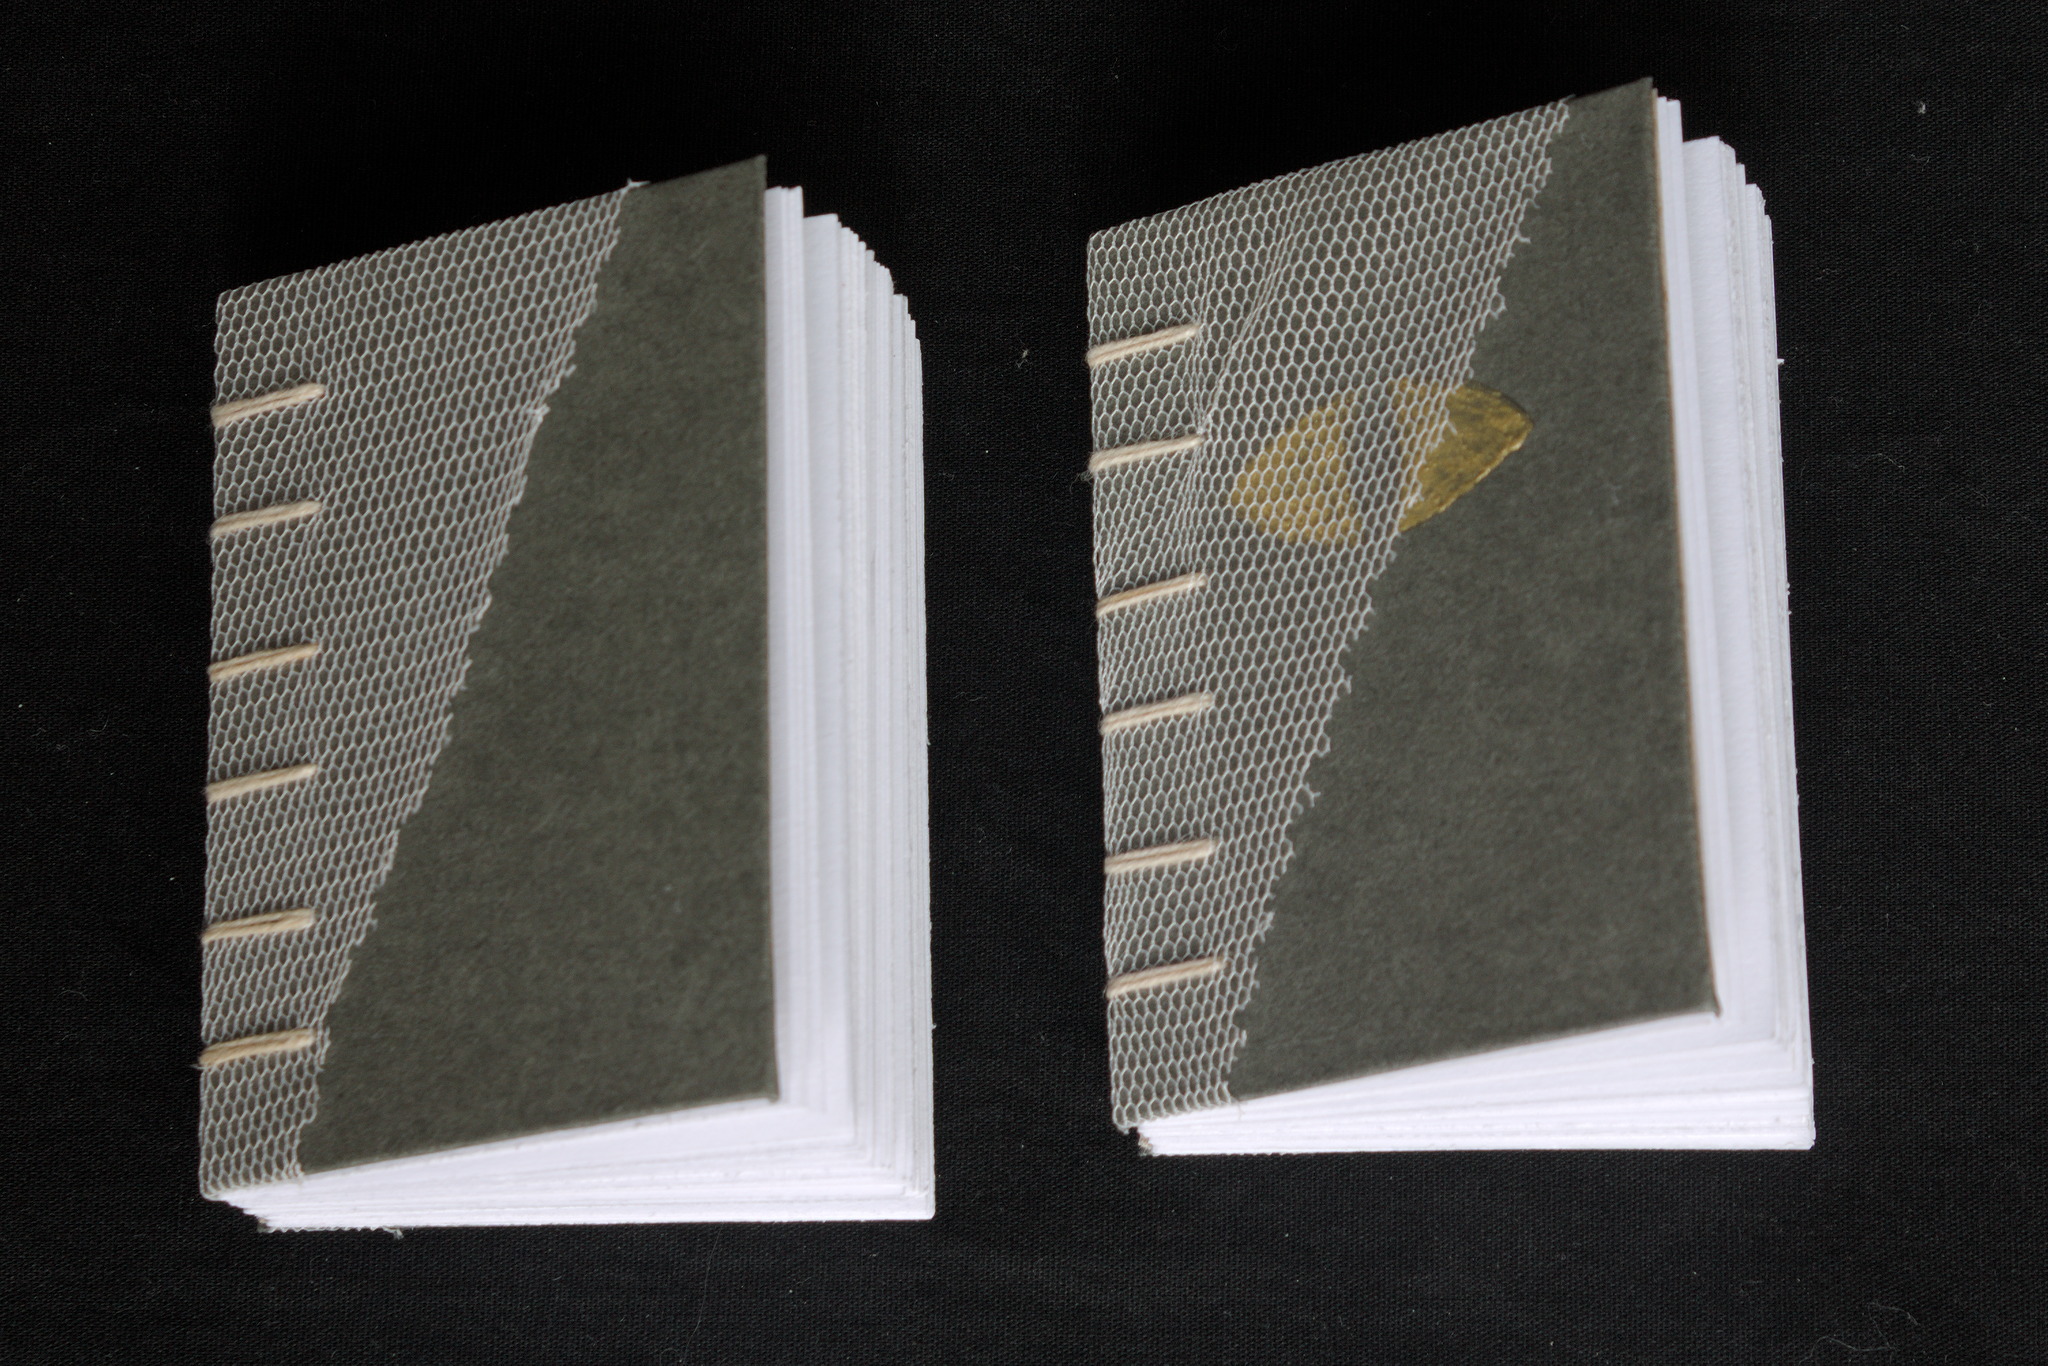
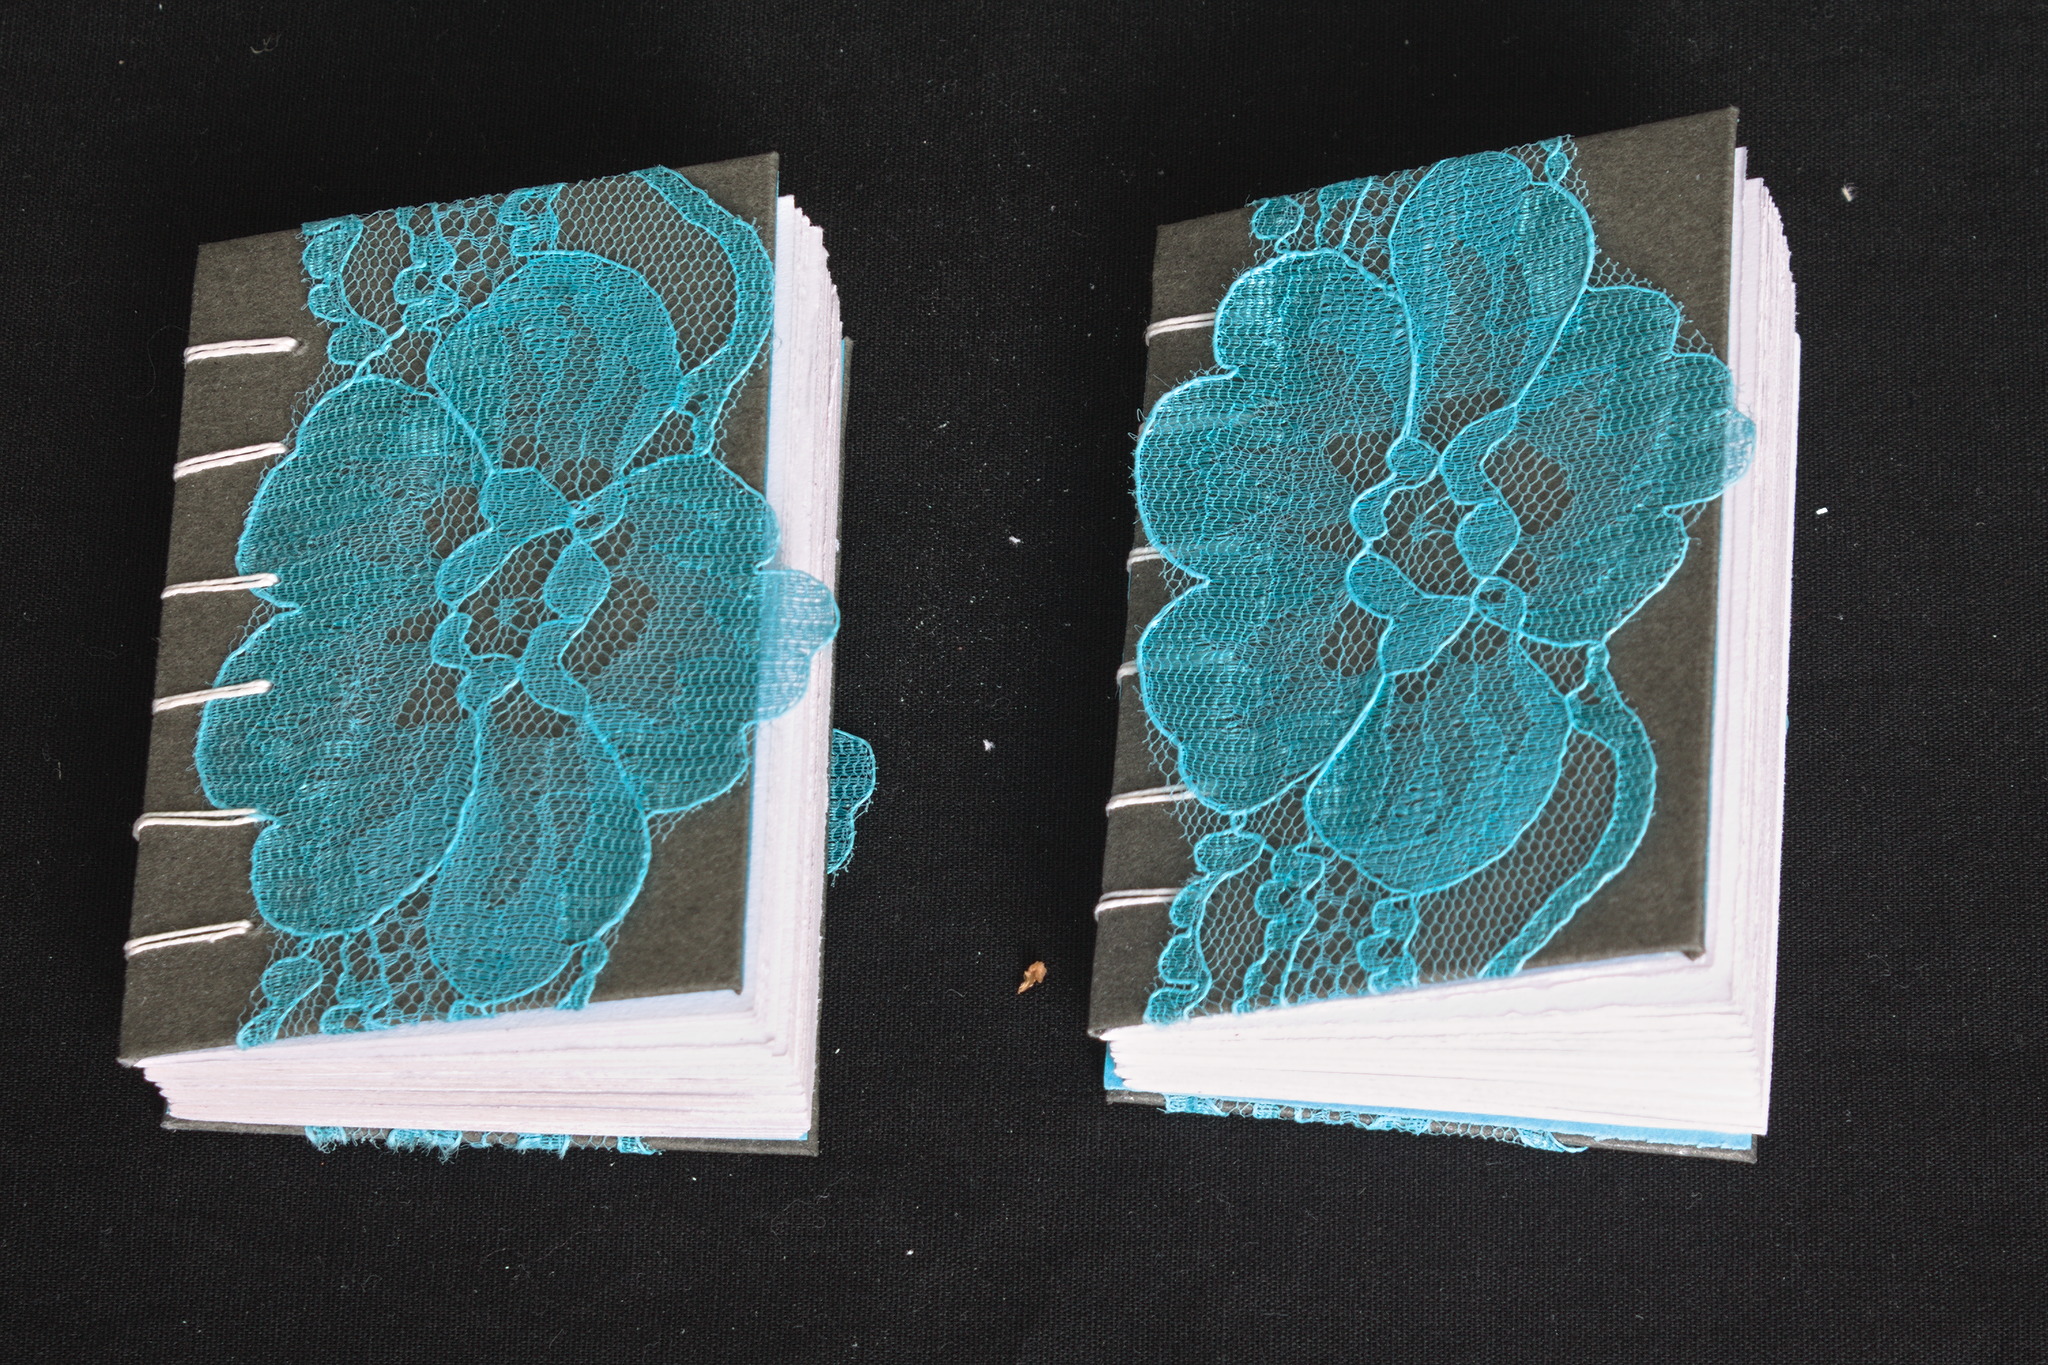 Thanks to the small size, and the way coptic binding works, I ve been
able to play around with the covers, experimenting with different styles
beyond the classic bookbinding cloth / paper covered cardboard,
including adding lace, covering food box cardboard with gesso and
decorating it with acrylic paints, embossing designs by gluing together
two layers of cardboard, one of which has holes, making covers
completely out of cernit, etc. Some of these I will probably also use in
future full-scale projects, but it s nice to find out what works and
what doesn t on a small scale.
Thanks to the small size, and the way coptic binding works, I ve been
able to play around with the covers, experimenting with different styles
beyond the classic bookbinding cloth / paper covered cardboard,
including adding lace, covering food box cardboard with gesso and
decorating it with acrylic paints, embossing designs by gluing together
two layers of cardboard, one of which has holes, making covers
completely out of cernit, etc. Some of these I will probably also use in
future full-scale projects, but it s nice to find out what works and
what doesn t on a small scale.
 Now, after a year of sporadically making these I have to say that the
making went quite well: I enjoyed the making and the creativity in
making different covers. The giving away was a bit more problematic, as
I didn t really have a lot of chances to do so, so I believe I still
have most of them. In 2024 I ll try to look for more opportunities (and
if you live nearby and want one or a few feel free to ask!)
Now, after a year of sporadically making these I have to say that the
making went quite well: I enjoyed the making and the creativity in
making different covers. The giving away was a bit more problematic, as
I didn t really have a lot of chances to do so, so I believe I still
have most of them. In 2024 I ll try to look for more opportunities (and
if you live nearby and want one or a few feel free to ask!)
 CW for body size change mentions
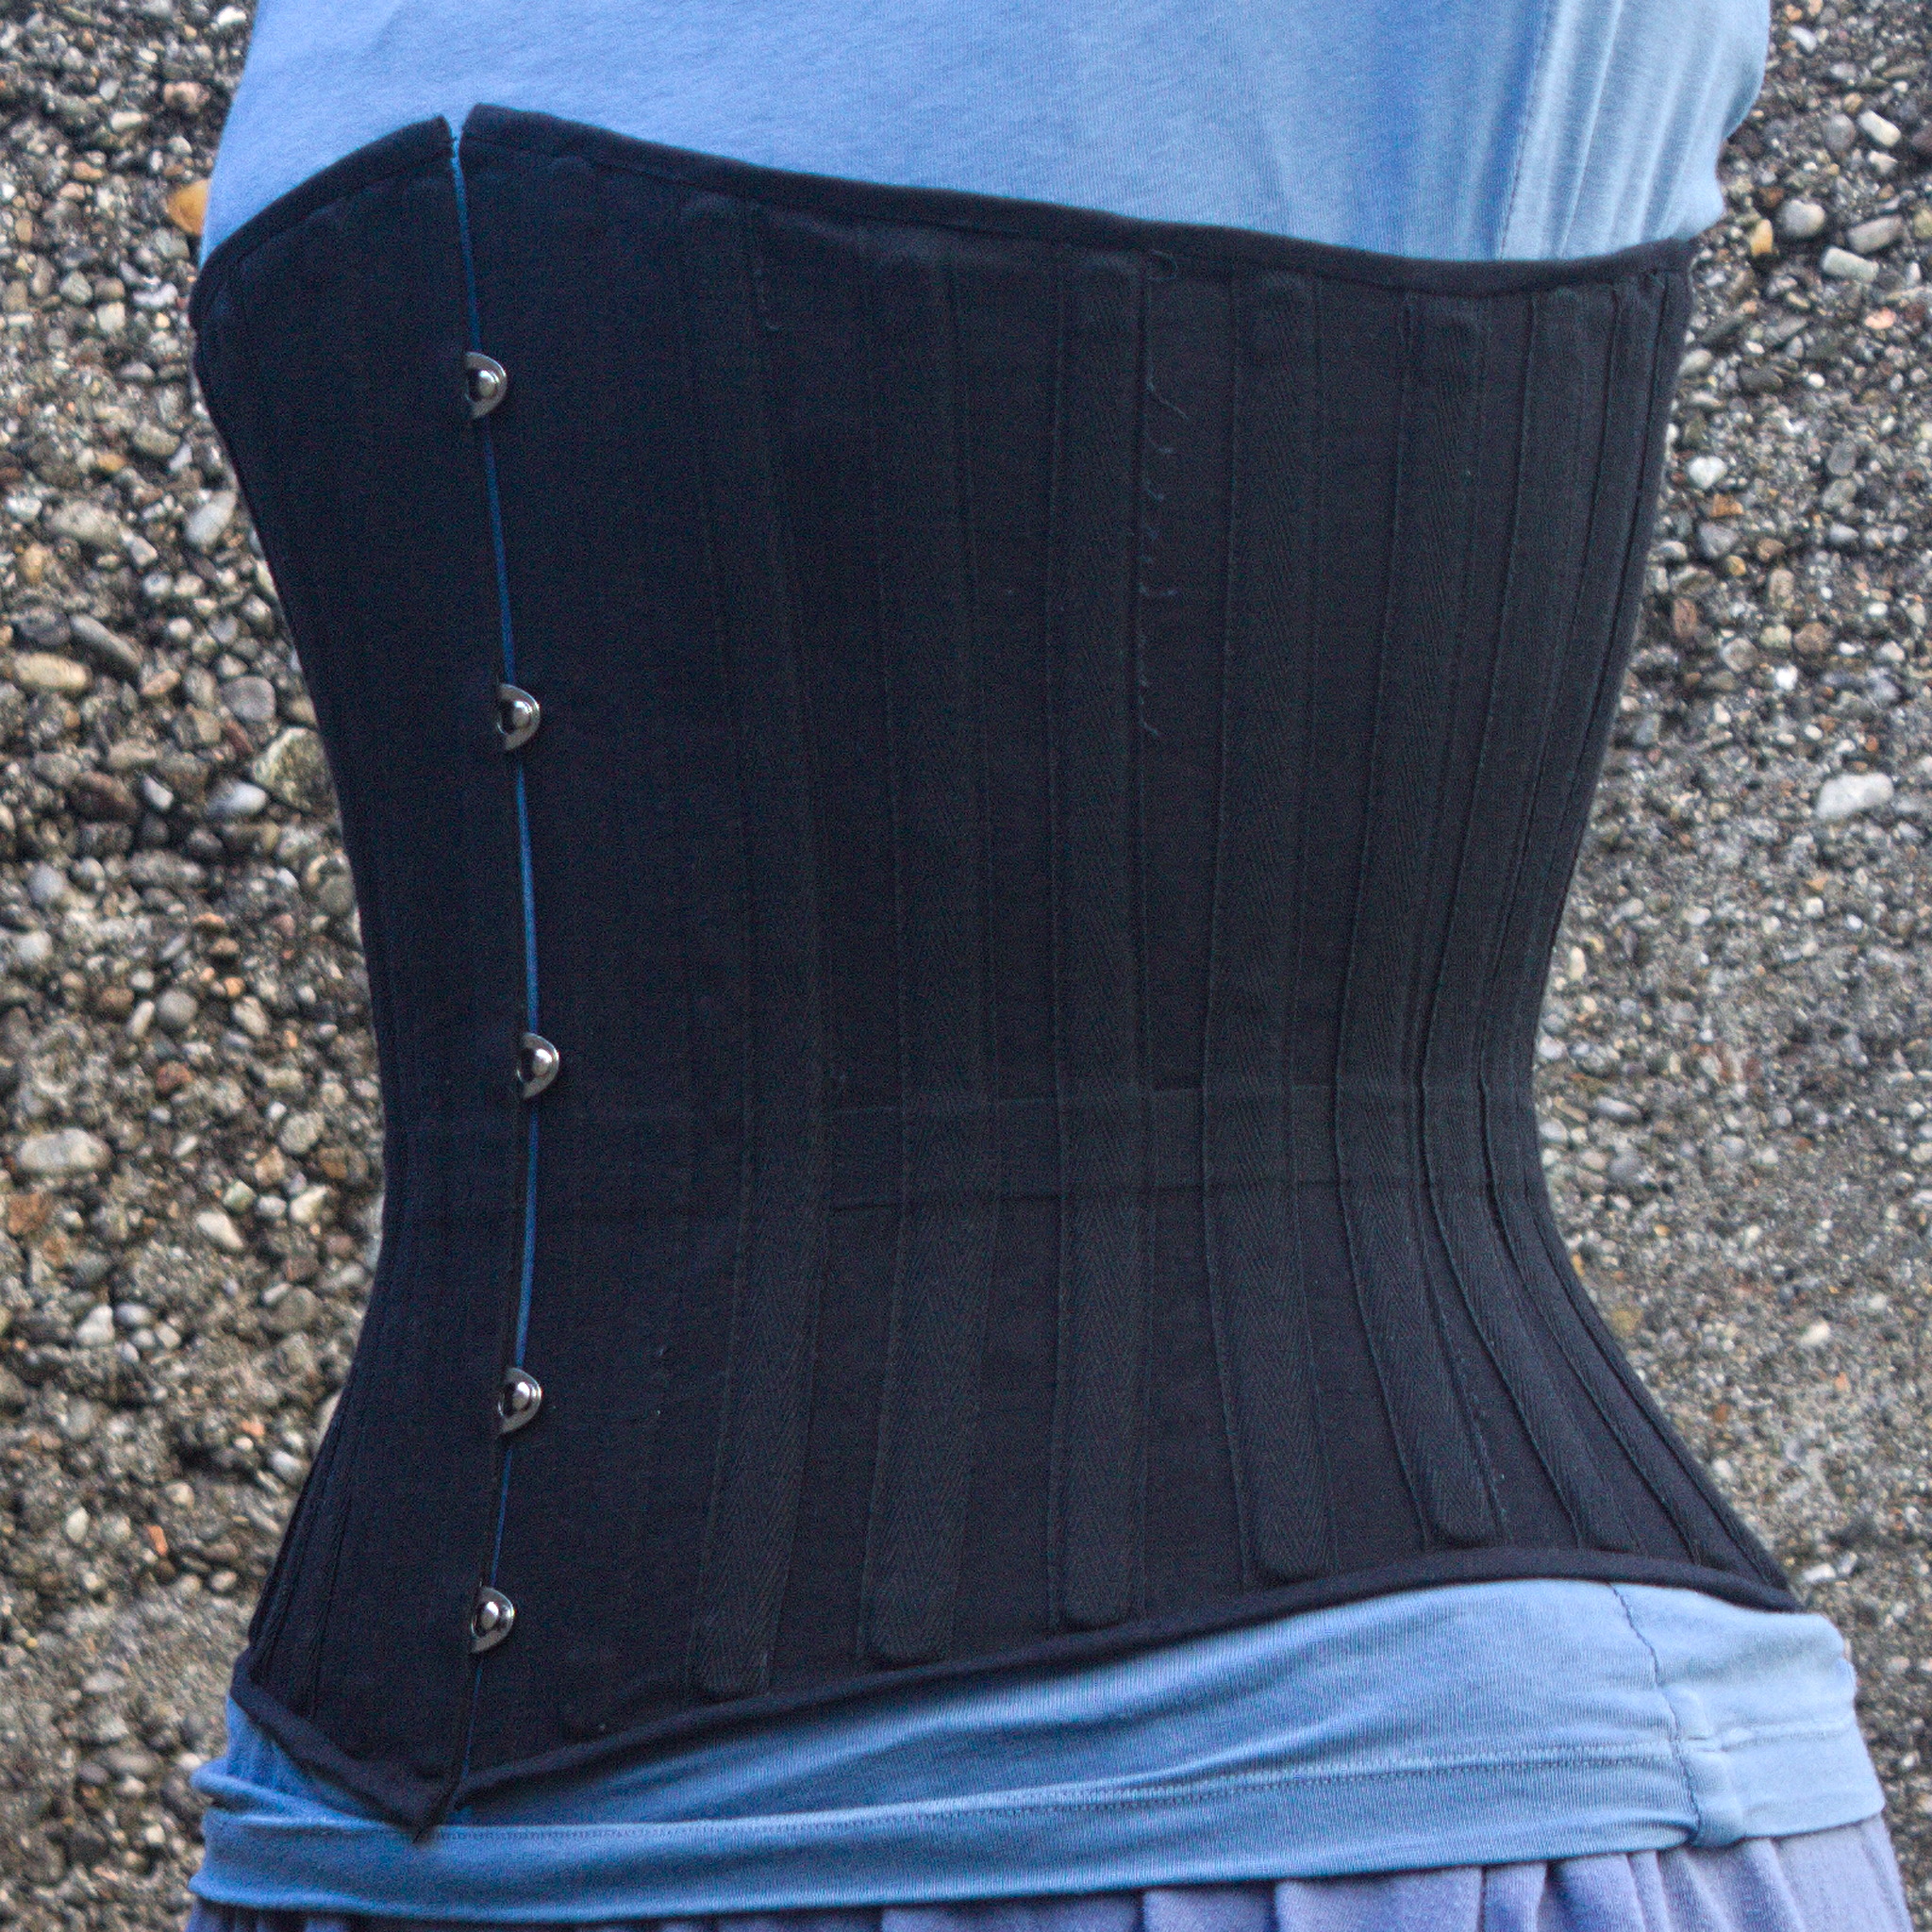
I needed a corset, badly.
Years ago I had a chance to have my measurements taken by a former
professional corset maker and then a lesson in how to draft an underbust
corset, and that lead to me learning how nice wearing a well-fitted
corset feels.
Later I tried to extend that pattern up for a midbust corset, with
success.
And then my body changed suddenly, and I was no longer able to wear
either of those, and after a while I started missing them.
Since my body was still changing (if no longer drastically so), and I
didn t want to use expensive materials for something that had a risk of
not fitting after too little time, I decided to start by making myself a
summer lightweight corset in aida cloth and plastic boning (for which I
had already bought materials). It fitted, but not as well as the first
two ones, and I ve worn it quite a bit.
I still wanted back the feeling of wearing a comfy, heavy contraption of
coutil and steel, however.
After a lot of procrastination I redrafted a new pattern, scrapped
everything, tried again, had my measurements taken by a dressmaker
[#dressmaker], put them in the draft, cut a first mock-up in cheap
cotton, fixed the position of a seam, did a second mock-up in denim
[#jeans] from an old pair of jeans, and then cut into the cheap
herringbone coutil I was planning to use.
And that s when I went to see which one of the busks in my stash would
work, and realized that I had used a wrong vertical measurement and the
front of the corset was way too long for a midbust corset.
CW for body size change mentions
I needed a corset, badly.
Years ago I had a chance to have my measurements taken by a former
professional corset maker and then a lesson in how to draft an underbust
corset, and that lead to me learning how nice wearing a well-fitted
corset feels.
Later I tried to extend that pattern up for a midbust corset, with
success.
And then my body changed suddenly, and I was no longer able to wear
either of those, and after a while I started missing them.
Since my body was still changing (if no longer drastically so), and I
didn t want to use expensive materials for something that had a risk of
not fitting after too little time, I decided to start by making myself a
summer lightweight corset in aida cloth and plastic boning (for which I
had already bought materials). It fitted, but not as well as the first
two ones, and I ve worn it quite a bit.
I still wanted back the feeling of wearing a comfy, heavy contraption of
coutil and steel, however.
After a lot of procrastination I redrafted a new pattern, scrapped
everything, tried again, had my measurements taken by a dressmaker
[#dressmaker], put them in the draft, cut a first mock-up in cheap
cotton, fixed the position of a seam, did a second mock-up in denim
[#jeans] from an old pair of jeans, and then cut into the cheap
herringbone coutil I was planning to use.
And that s when I went to see which one of the busks in my stash would
work, and realized that I had used a wrong vertical measurement and the
front of the corset was way too long for a midbust corset.
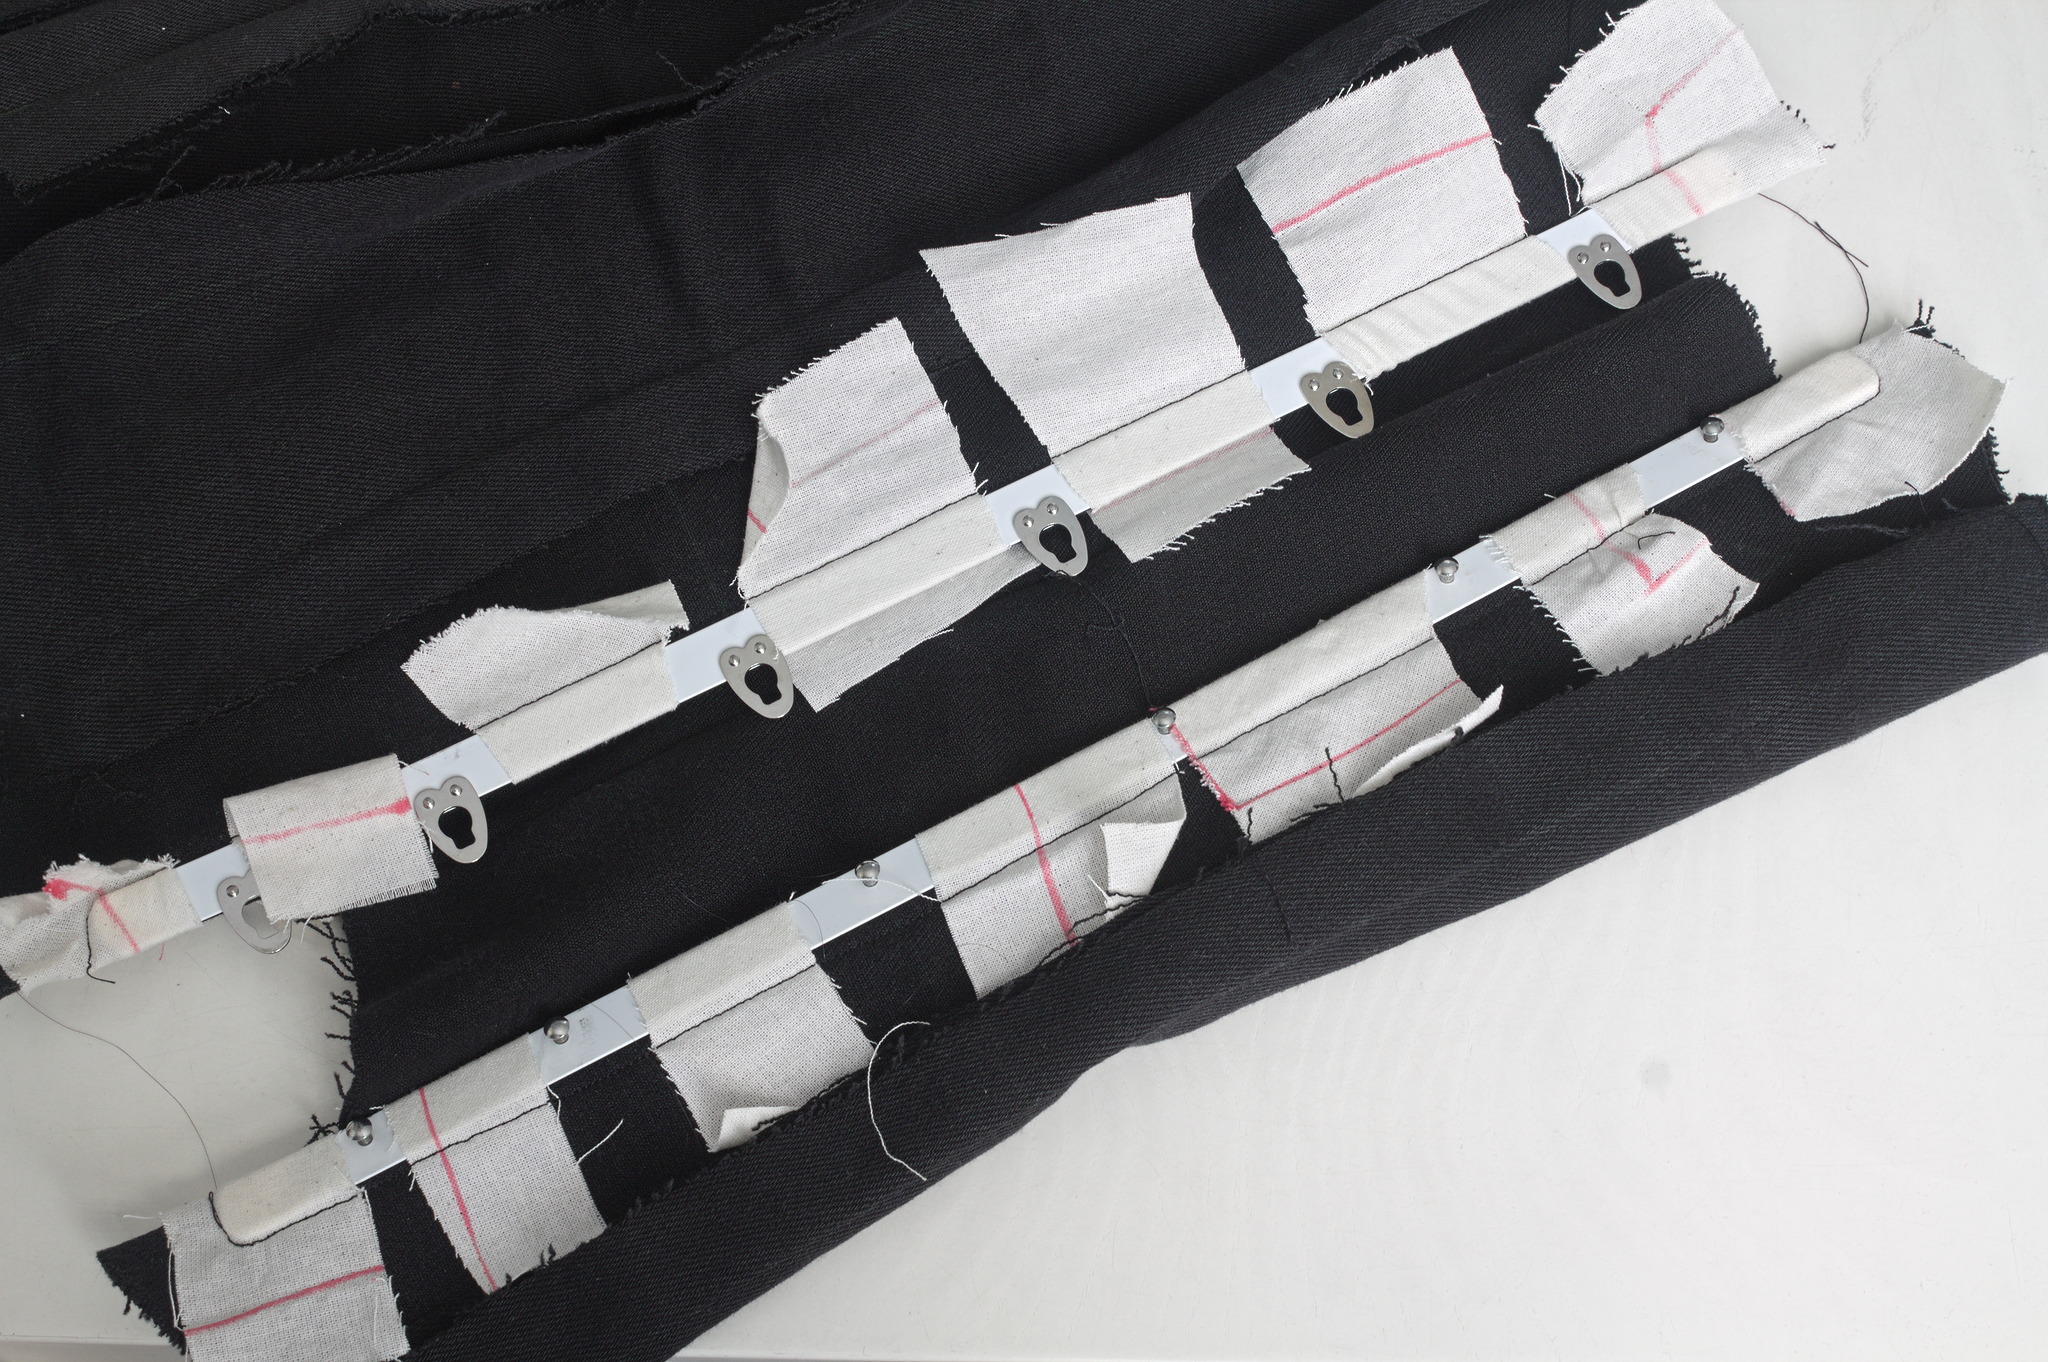 Luckily I also had a few longer busks, I basted one to the denim mock up
and tried to wear it for a few hours, to see if it was too long to be
comfortable. It was just a bit, on the bottom, which could be easily
fixed with the Power Tools
Luckily I also had a few longer busks, I basted one to the denim mock up
and tried to wear it for a few hours, to see if it was too long to be
comfortable. It was just a bit, on the bottom, which could be easily
fixed with the Power Tools I could have been a bit more precise with the binding, as it doesn t
align precisely at the front edge, but then again, it s underwear,
nobody other than me and everybody who reads this post is going to see
it and I was in a hurry to see it finished. I will be more careful with
the next one.
I could have been a bit more precise with the binding, as it doesn t
align precisely at the front edge, but then again, it s underwear,
nobody other than me and everybody who reads this post is going to see
it and I was in a hurry to see it finished. I will be more careful with
the next one.
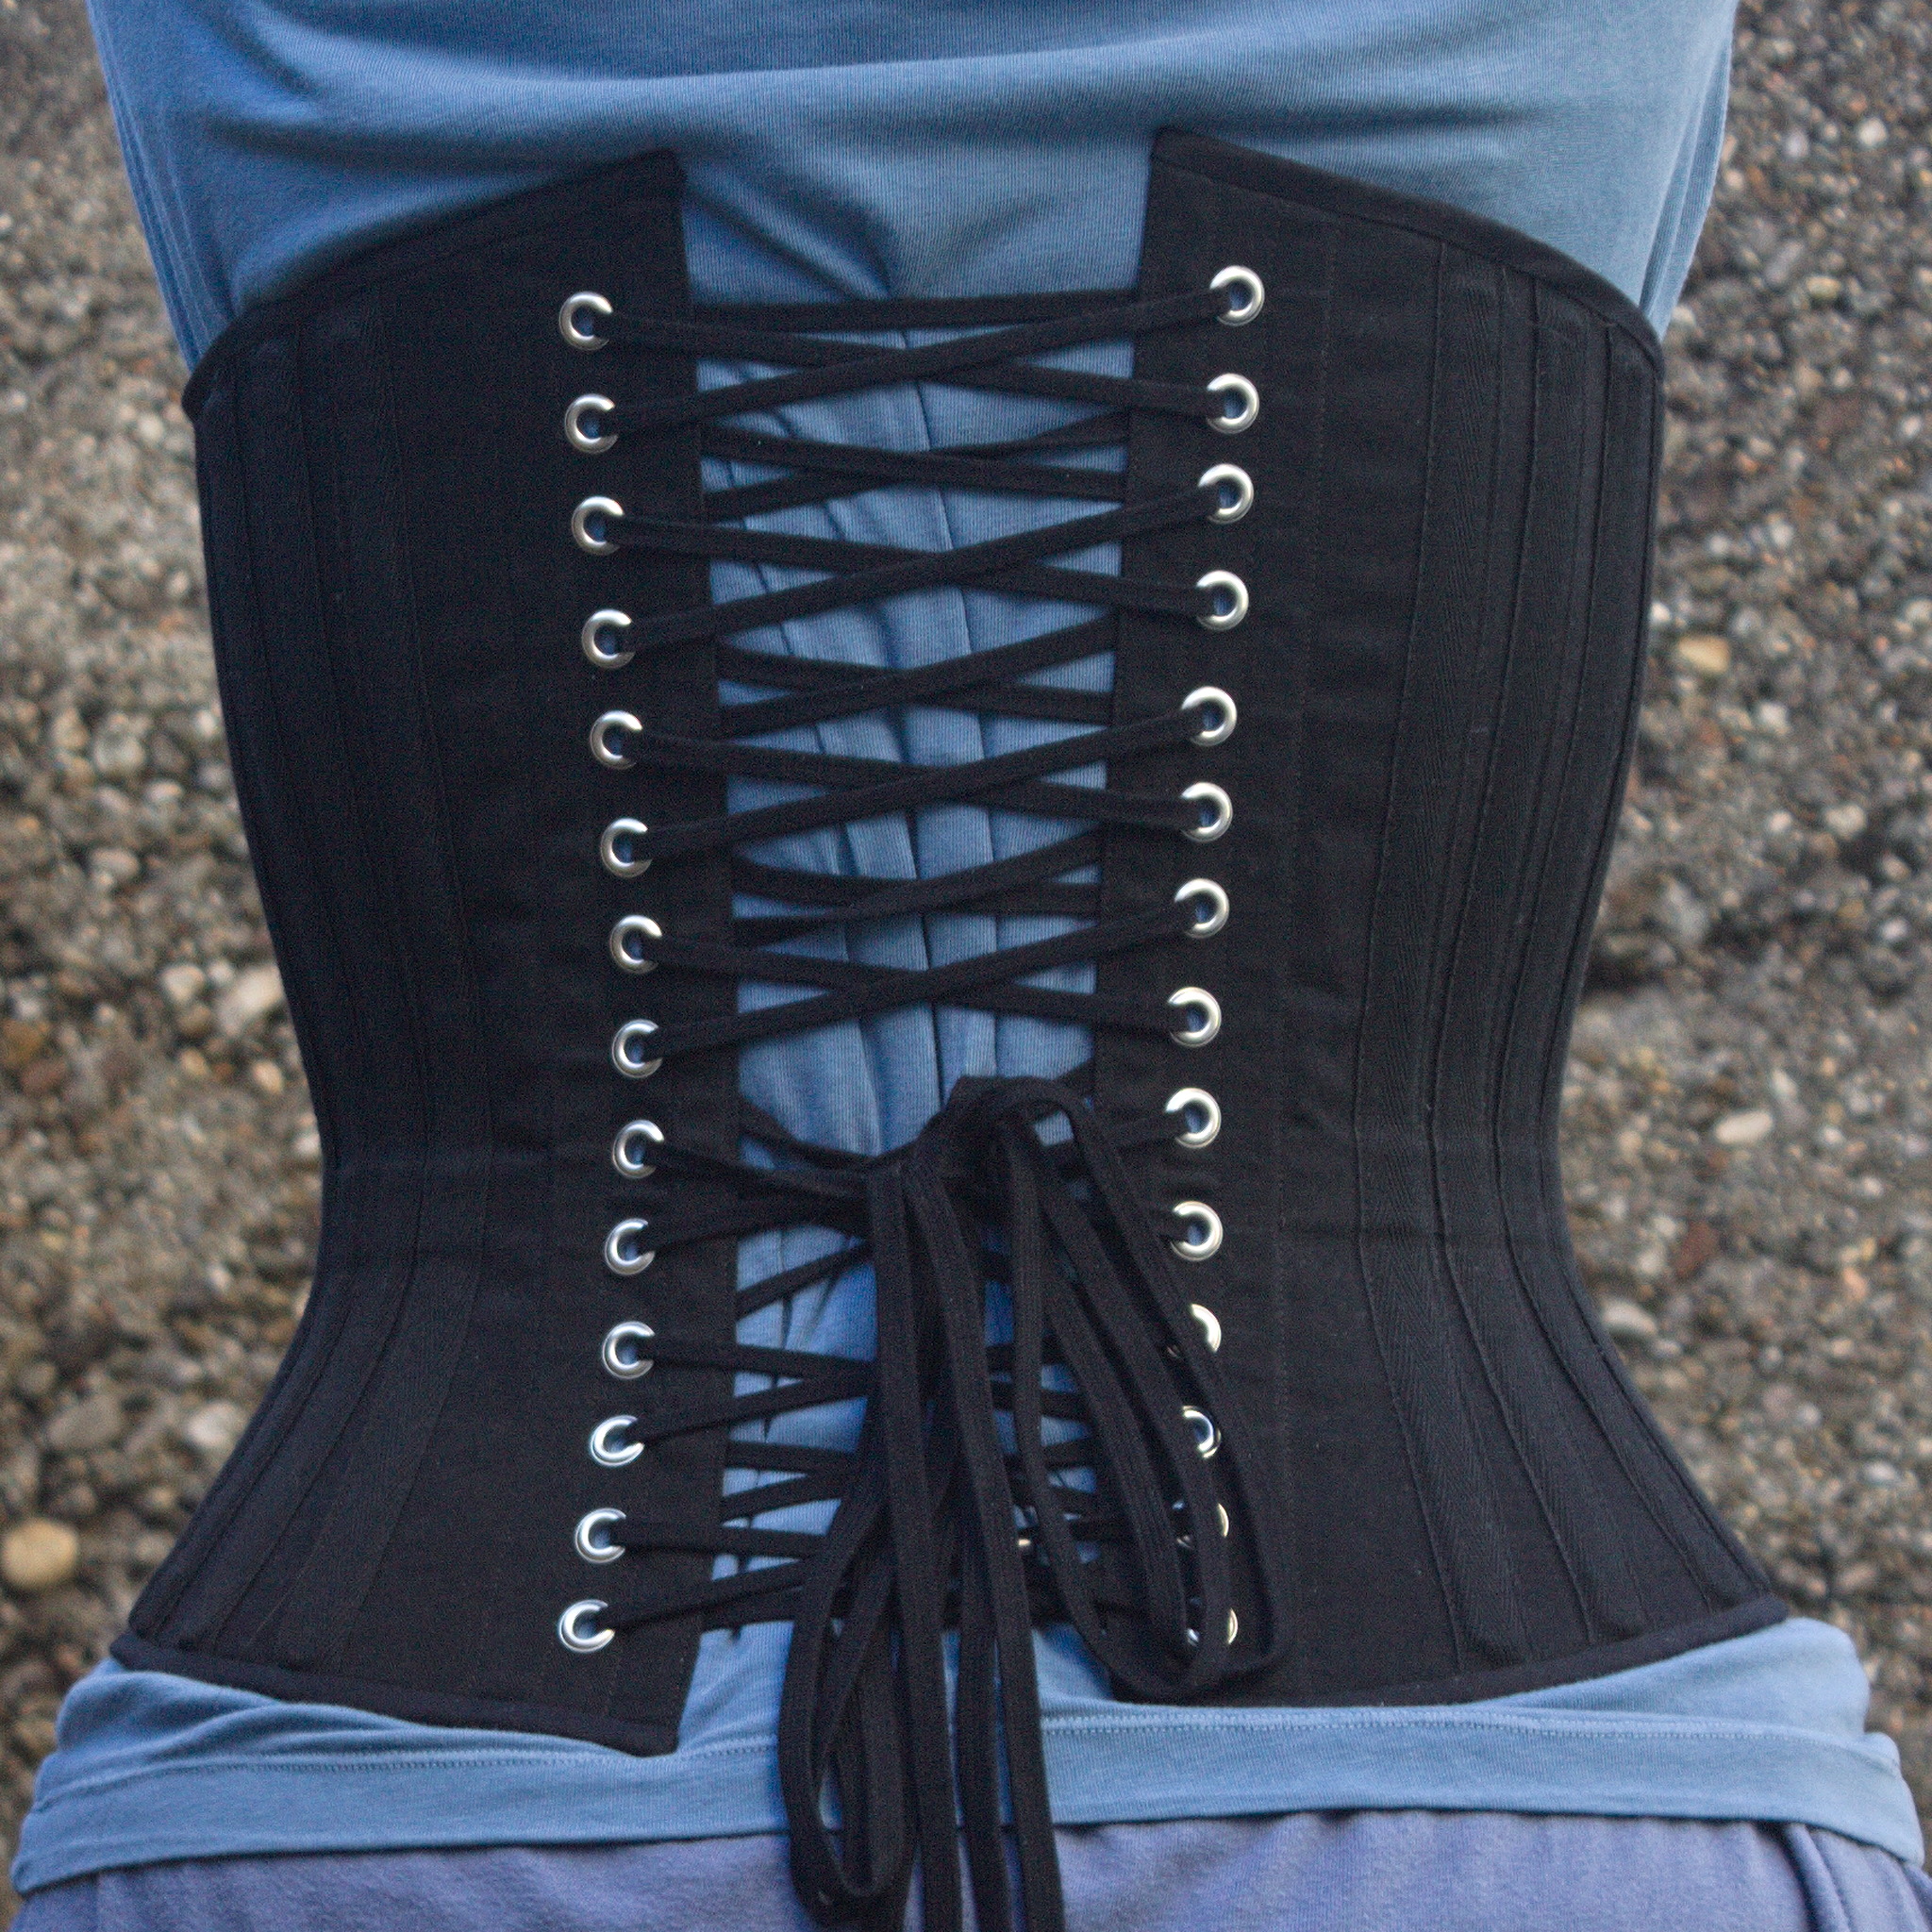 I also think that I haven t been careful enough when pressing the seams
and applying the tape, and I ve lost about a cm of width per part, so
I m using a lacing gap that is a bit wider than I planned for, but that
may change as the corset gets worn, and is still within tolerance.
Also, on the morning after I had finished the corset I woke up and
realized that I had forgotten to add garter tabs at the bottom edge.
I don t know whether I will ever use them, but I wanted the option, so
maybe I ll try to add them later on, especially if I can do it without
undoing the binding.
The next step would have been flossing, which I proceeded to postpone
until I ve worn the corset for a while: not because there is any reason
for it, but because I still don t know how I want to do it :)
What was left was finishing and uploading the
I also think that I haven t been careful enough when pressing the seams
and applying the tape, and I ve lost about a cm of width per part, so
I m using a lacing gap that is a bit wider than I planned for, but that
may change as the corset gets worn, and is still within tolerance.
Also, on the morning after I had finished the corset I woke up and
realized that I had forgotten to add garter tabs at the bottom edge.
I don t know whether I will ever use them, but I wanted the option, so
maybe I ll try to add them later on, especially if I can do it without
undoing the binding.
The next step would have been flossing, which I proceeded to postpone
until I ve worn the corset for a while: not because there is any reason
for it, but because I still don t know how I want to do it :)
What was left was finishing and uploading the 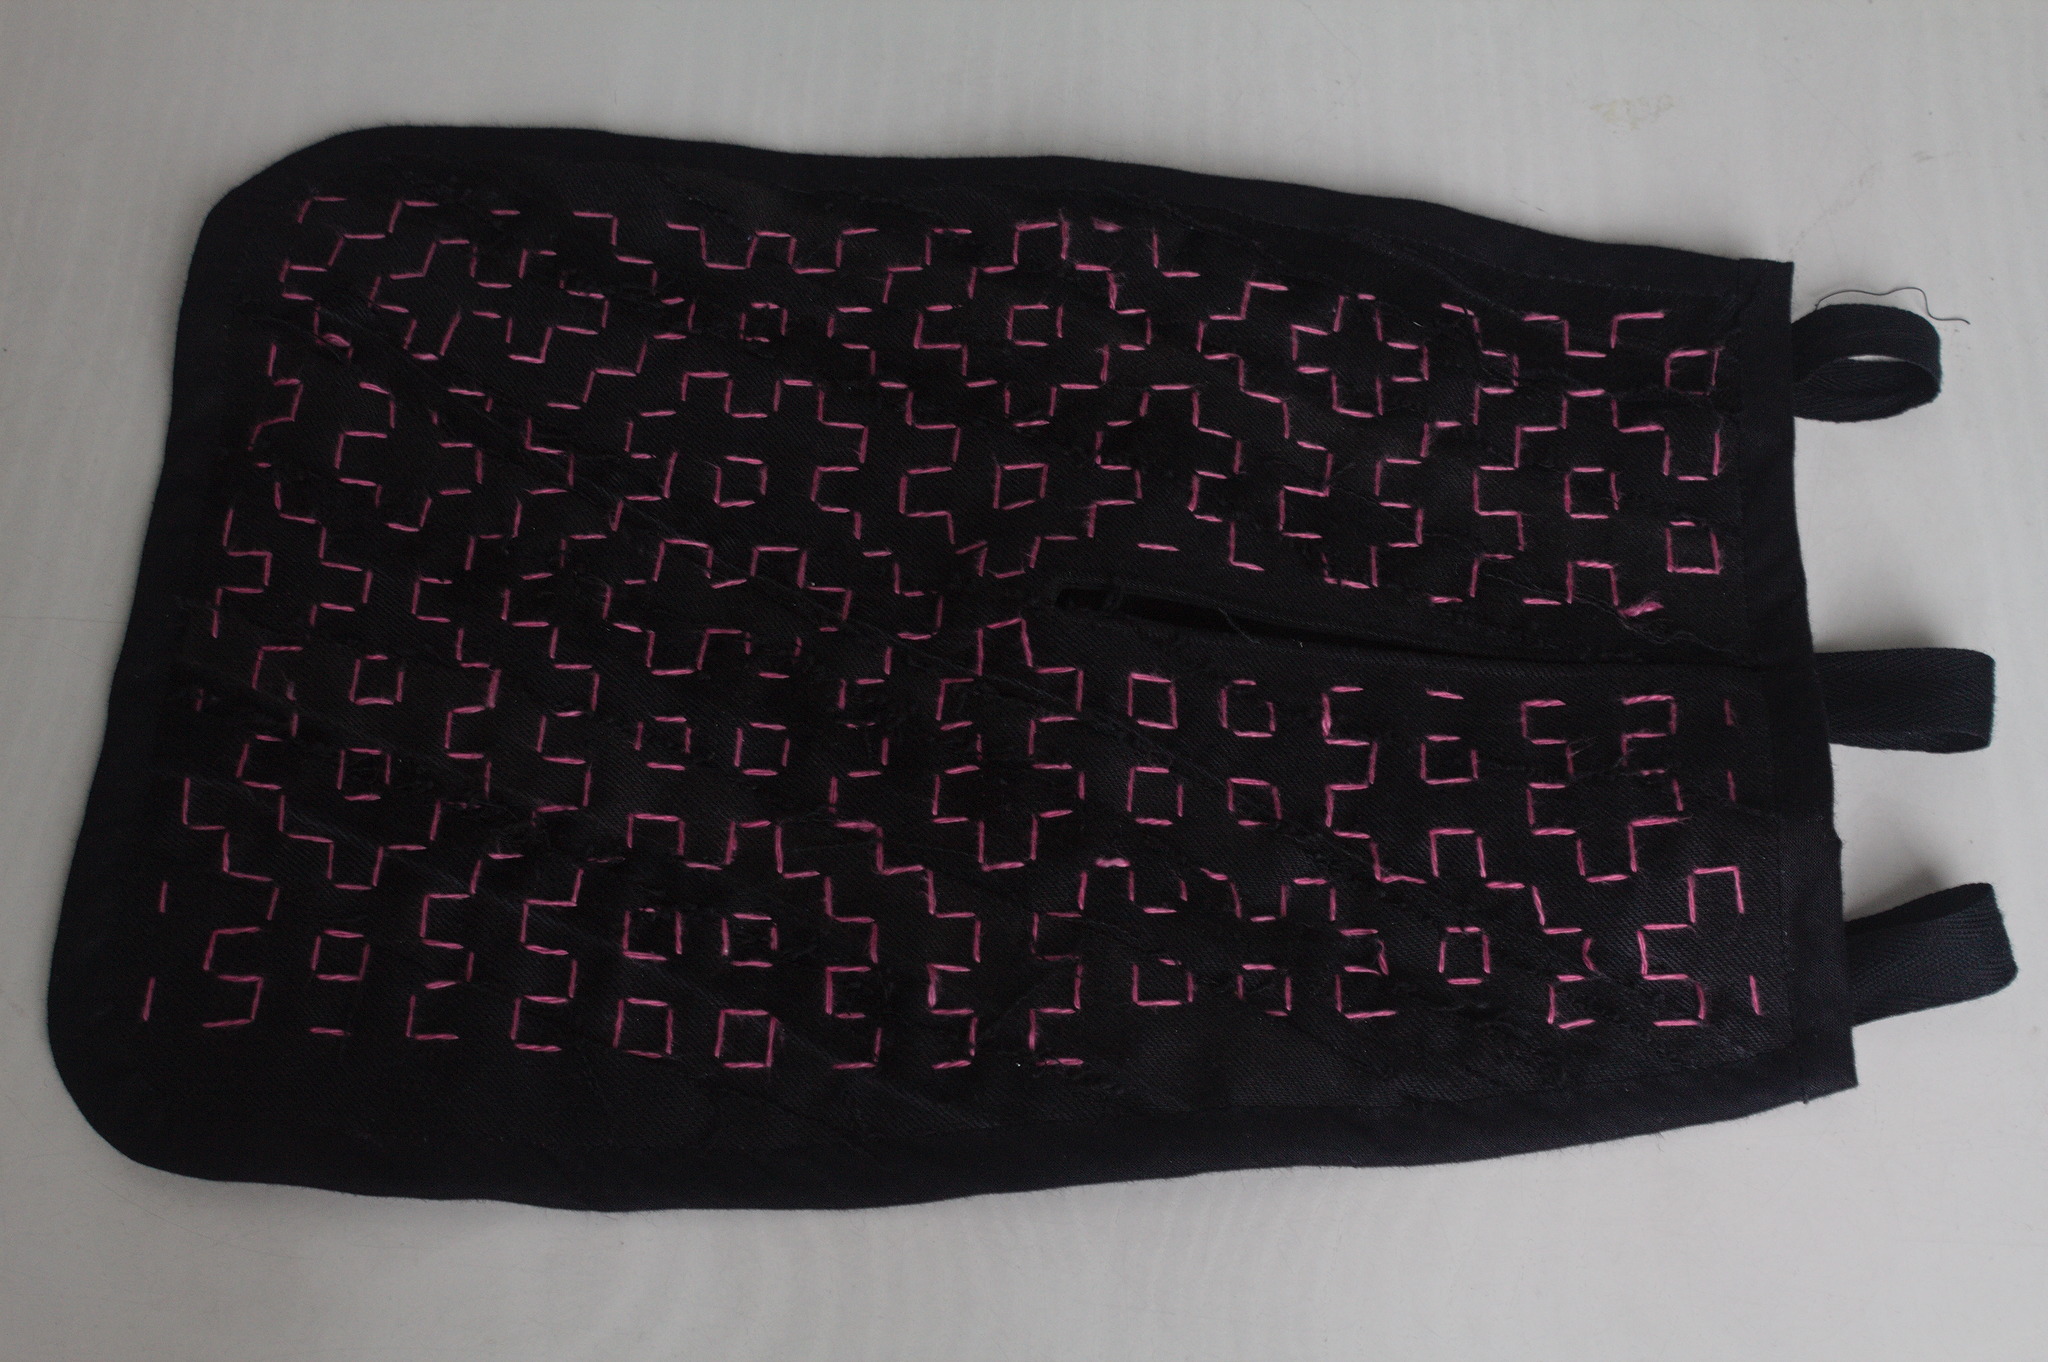 Lately I ve seen people on the internet talking about victorian crazy
quilting. Years ago I had watched a
Lately I ve seen people on the internet talking about victorian crazy
quilting. Years ago I had watched a 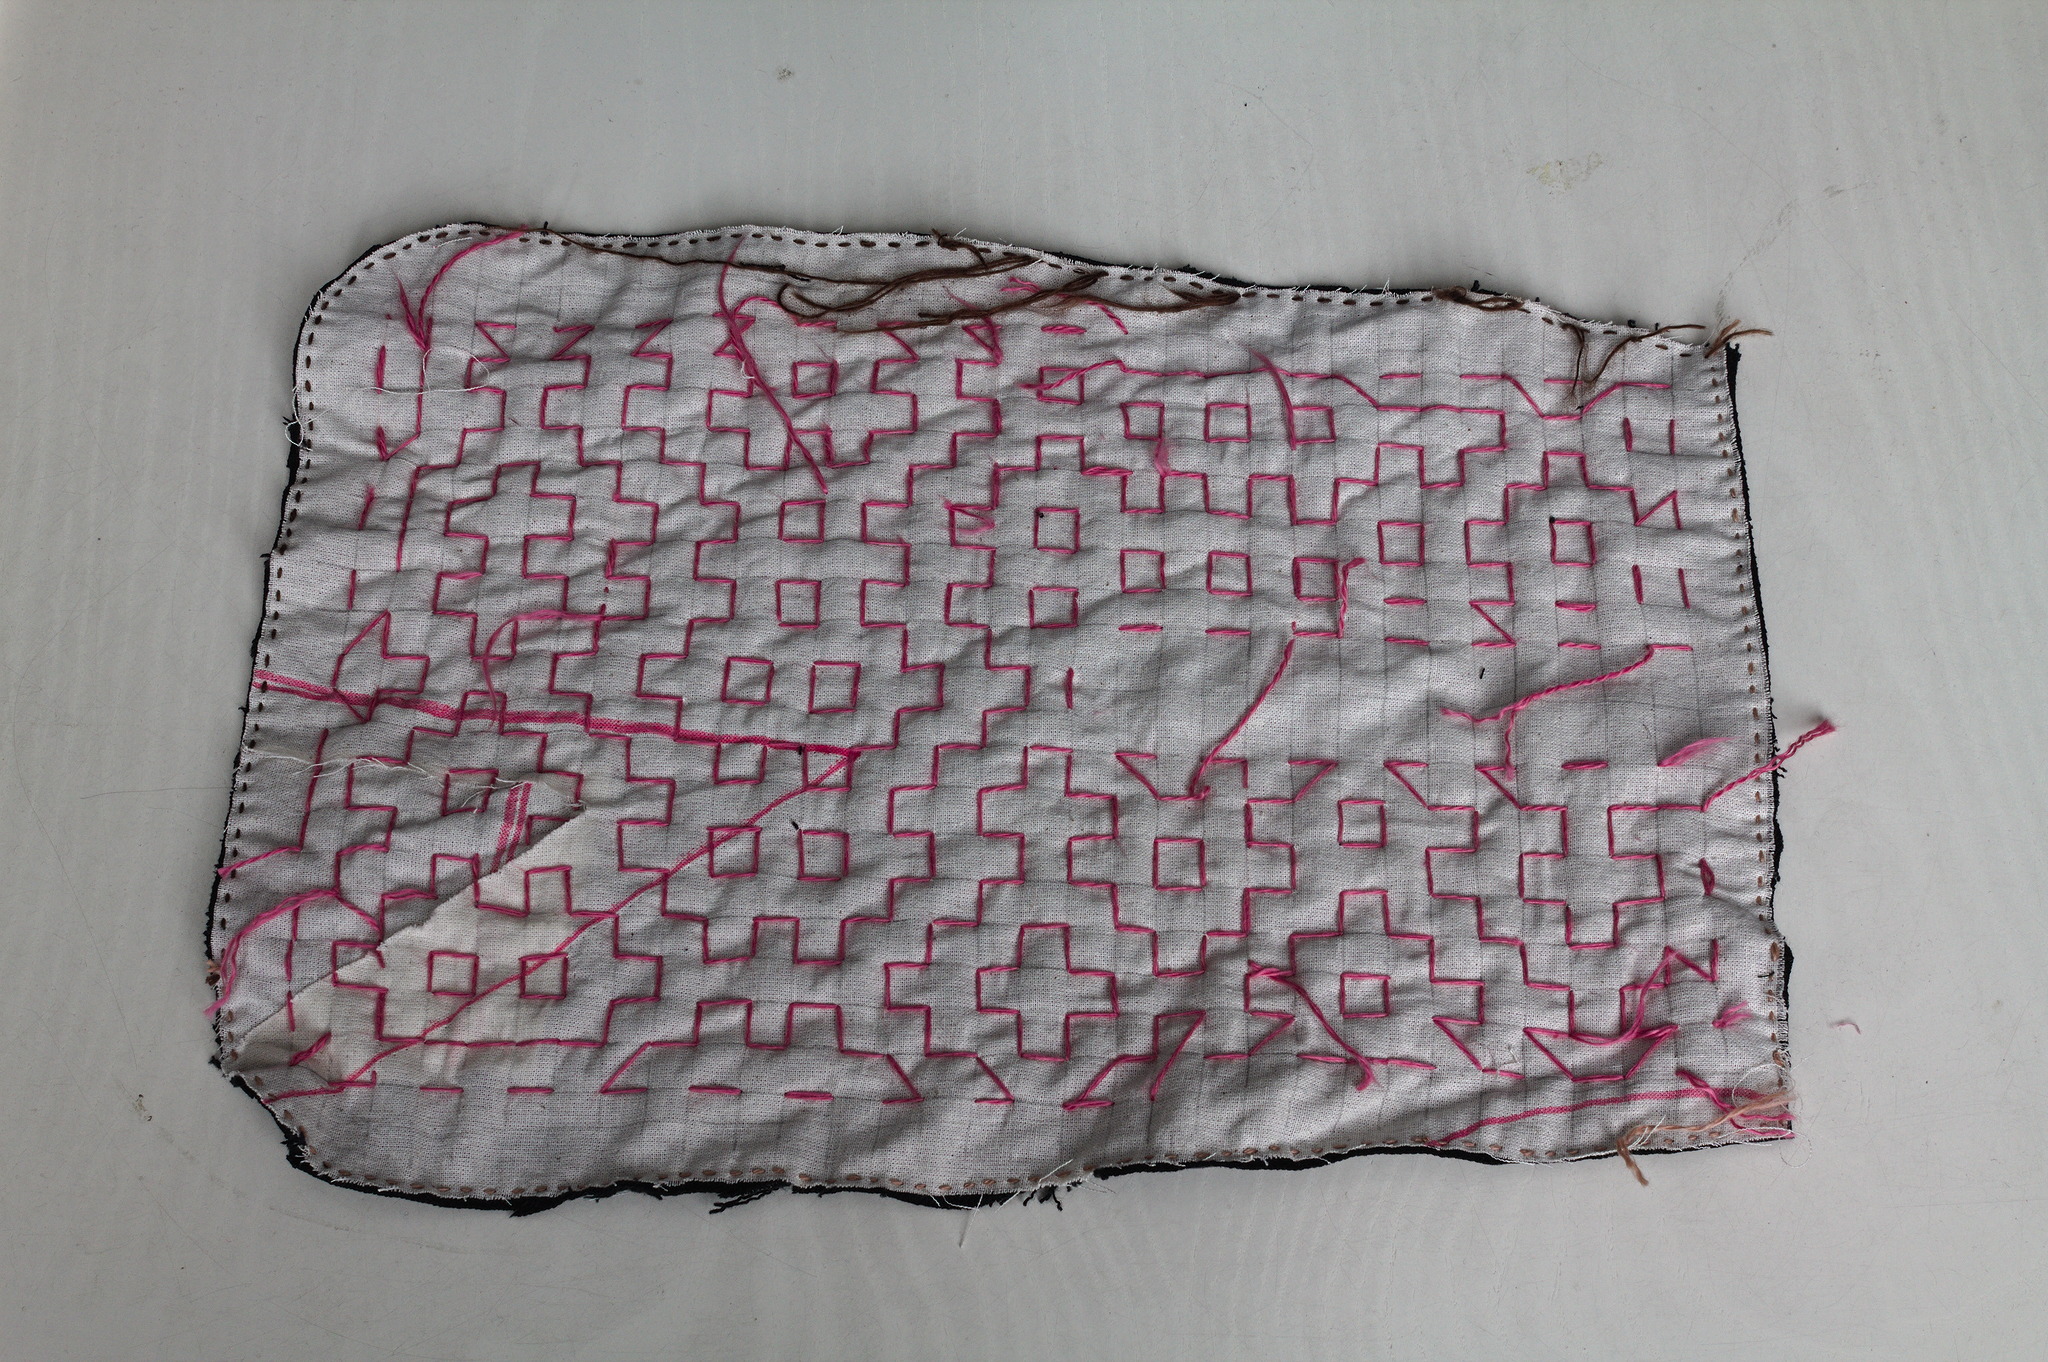 I cut a
 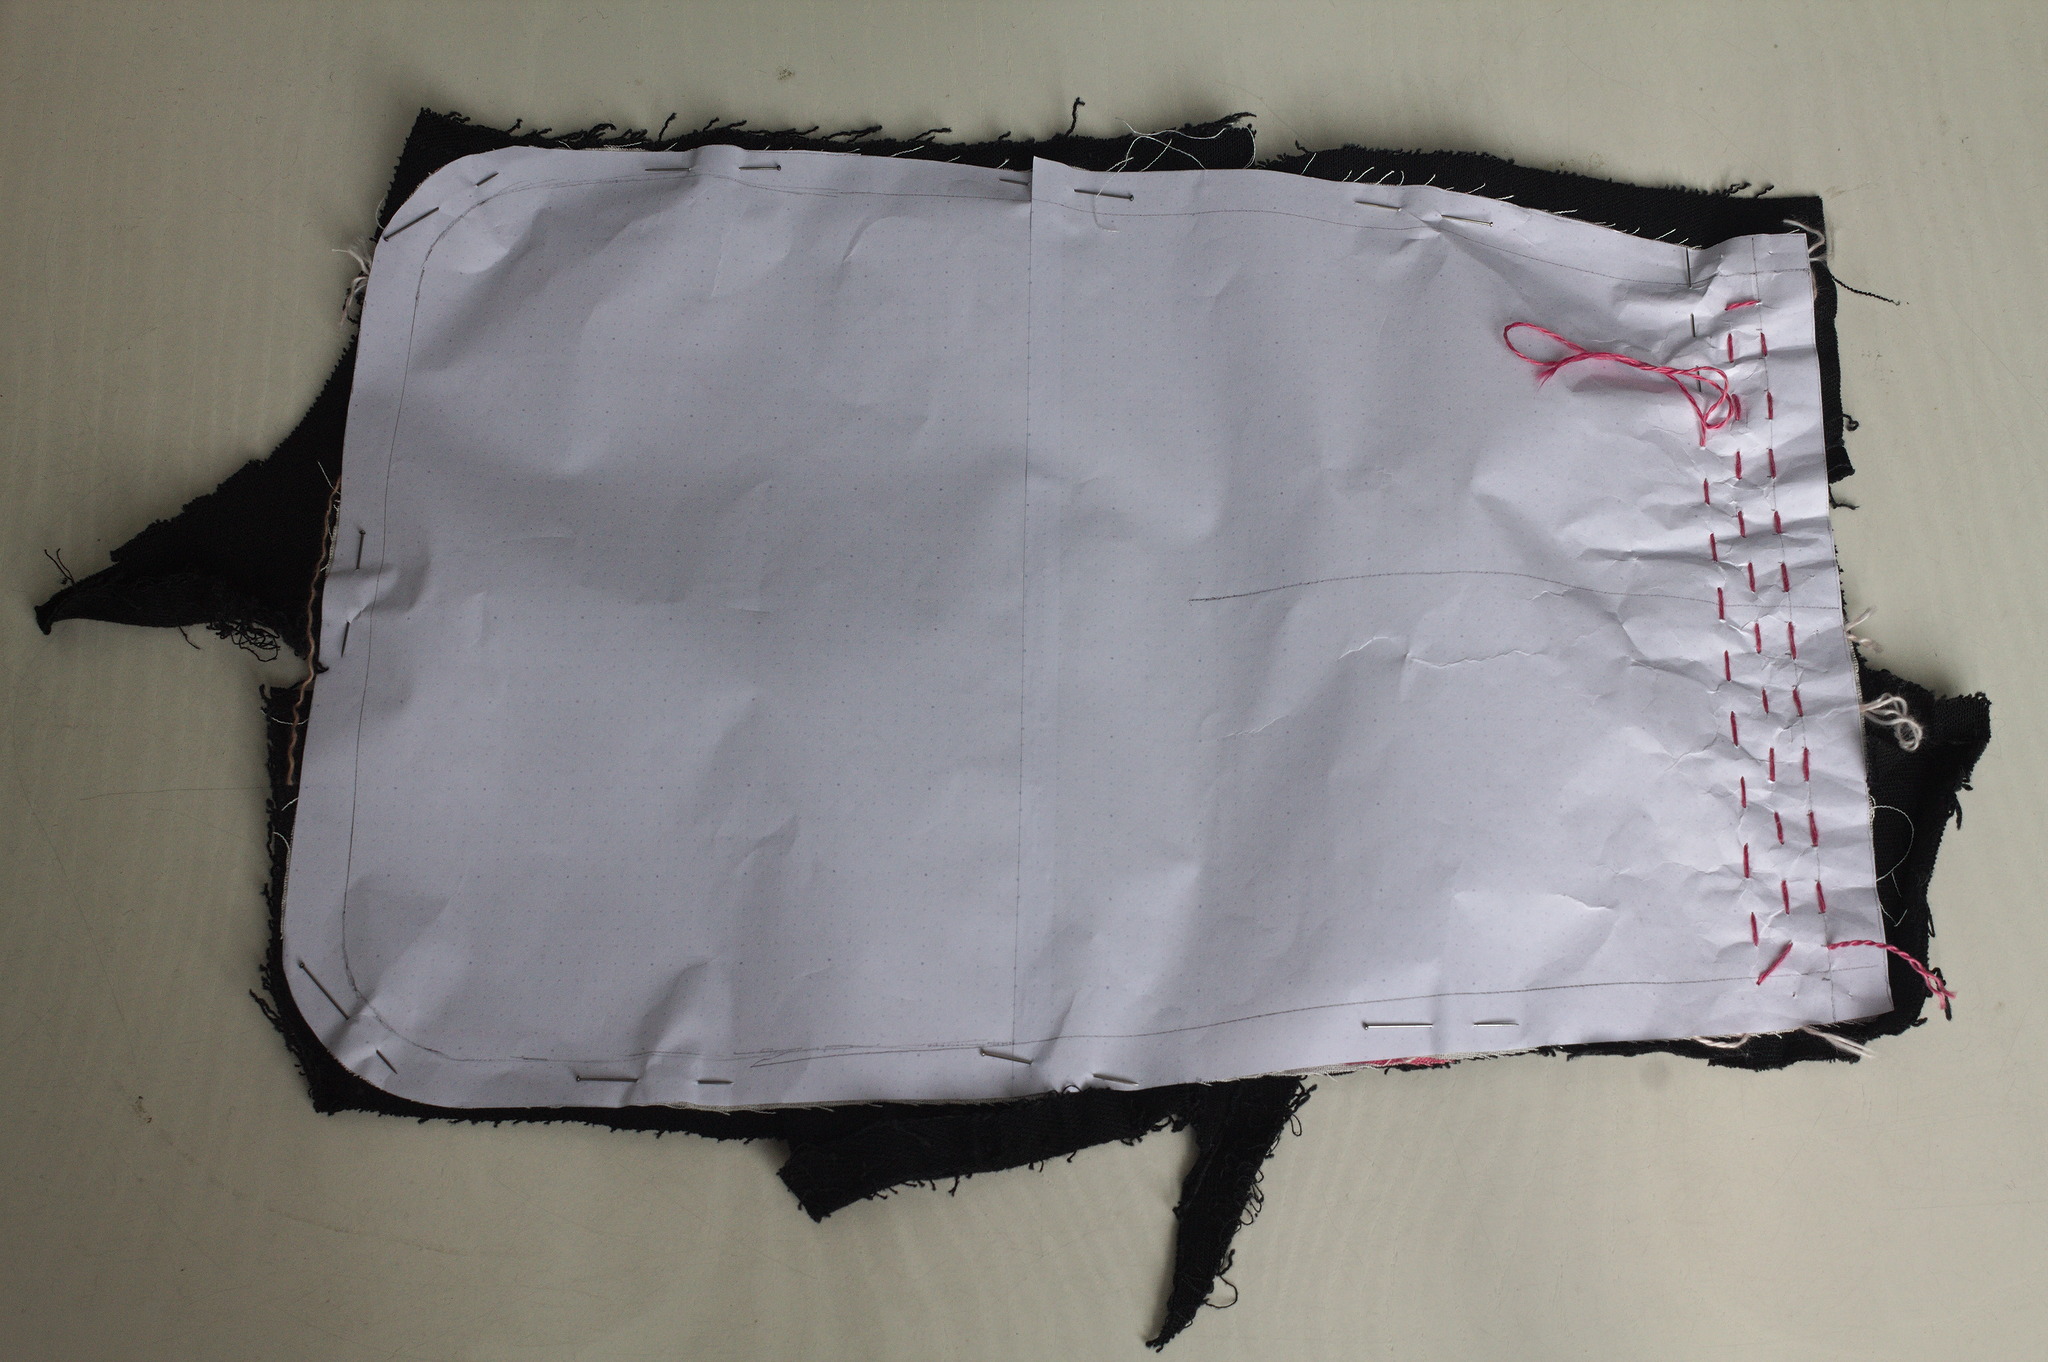 For the second piece I tried to use a piece of paper with the square
grid instead of drawing it on the fabric: it worked, mostly, I would not
do it again as removing the paper was more of a hassle than drawing the
lines in the first place. I suspected it, but had to try it anyway.
For the second piece I tried to use a piece of paper with the square
grid instead of drawing it on the fabric: it worked, mostly, I would not
do it again as removing the paper was more of a hassle than drawing the
lines in the first place. I suspected it, but had to try it anyway.
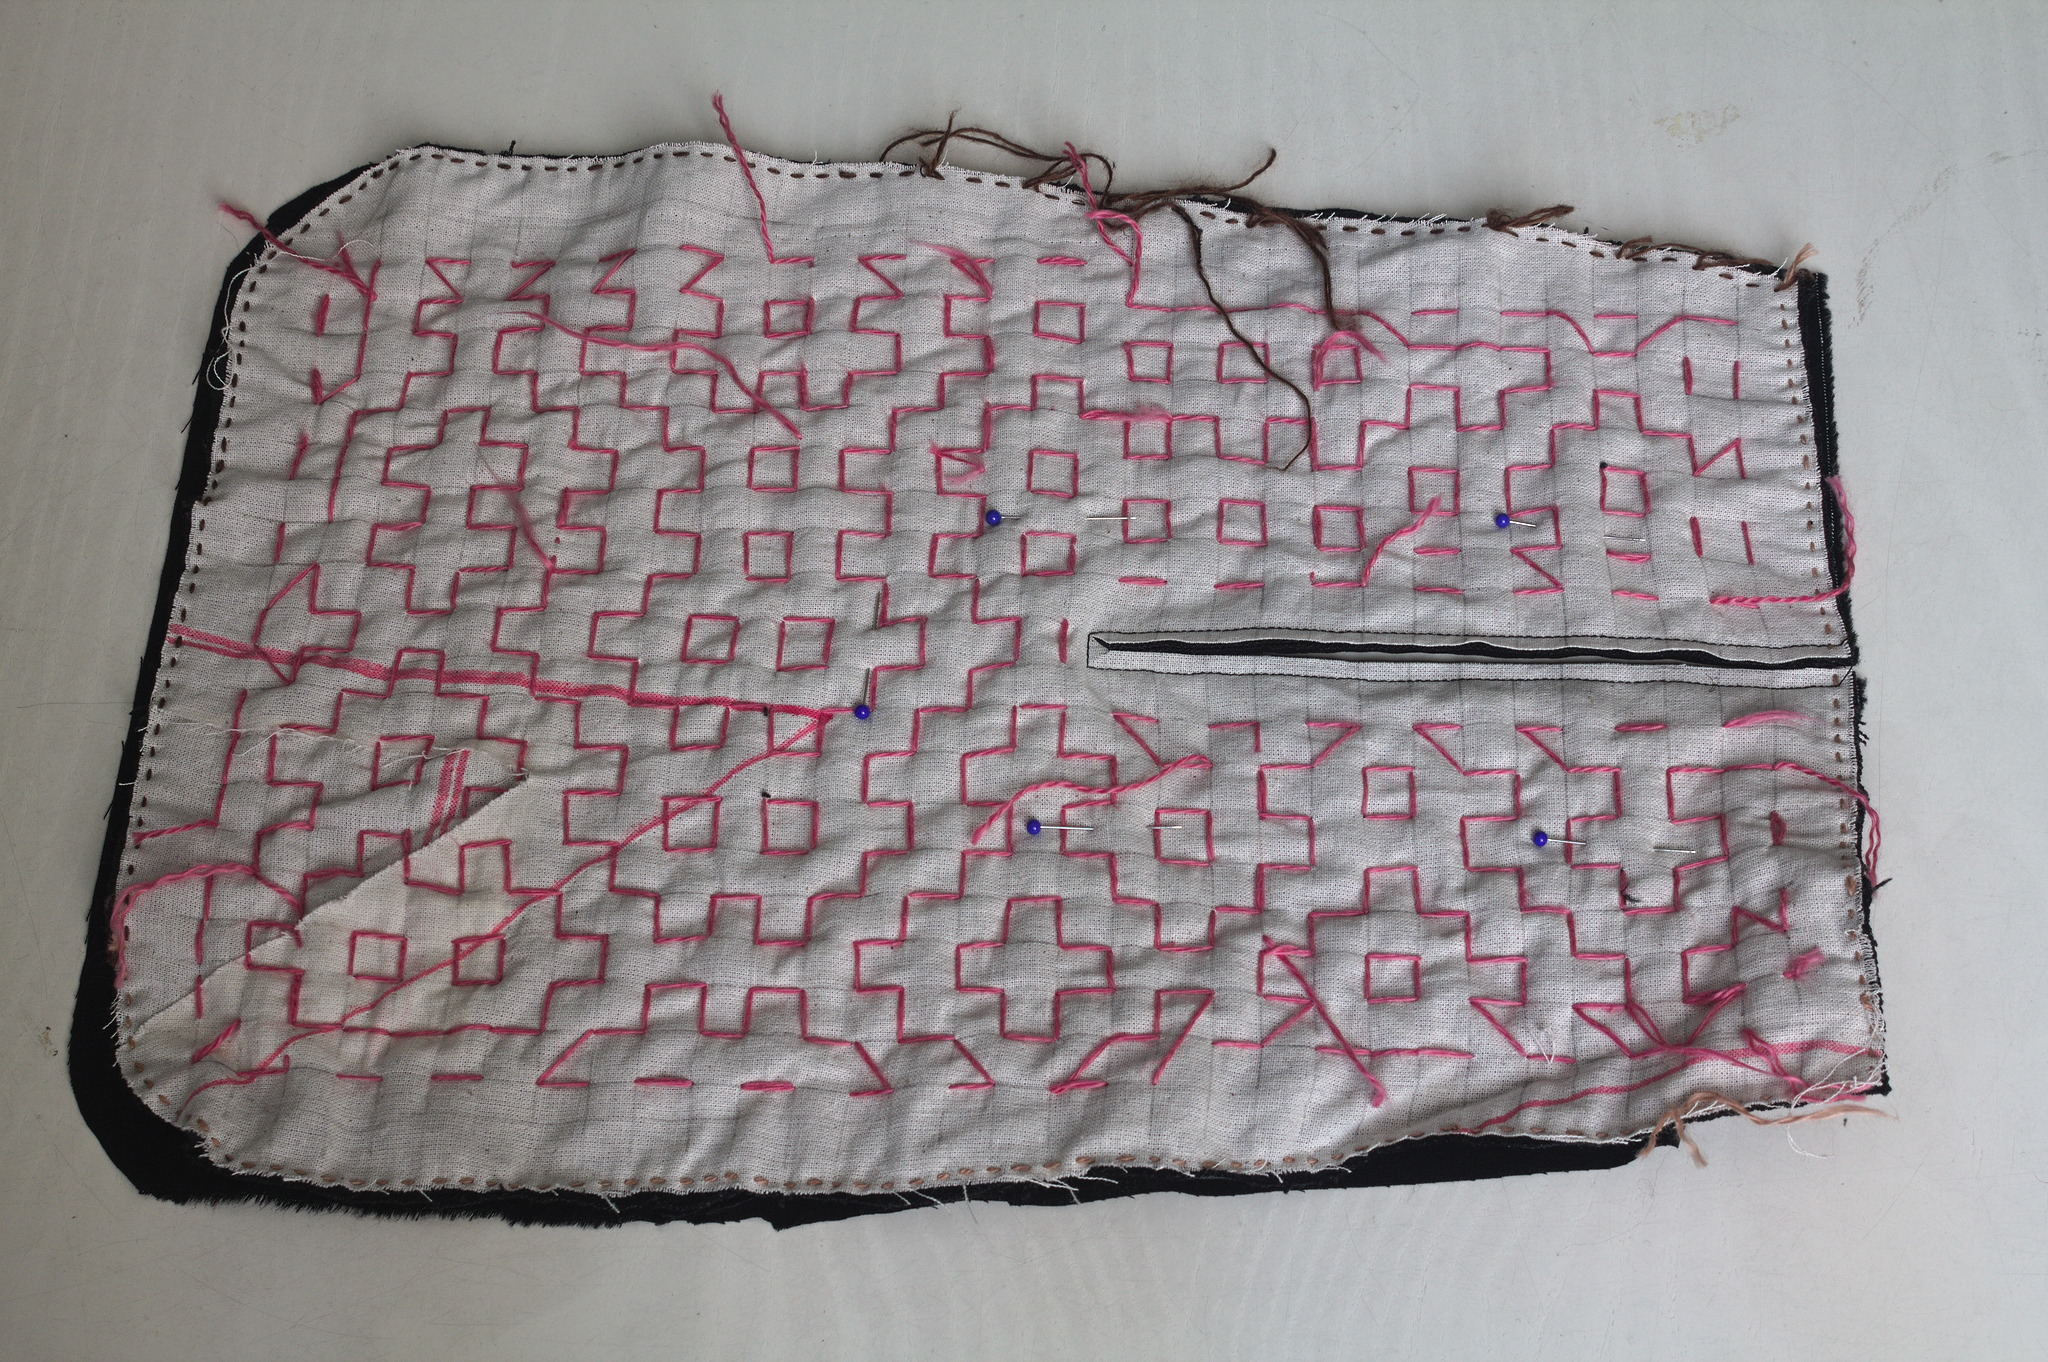 Then I added a lining from some plain black cotton from the stash; for
the slit I put the lining on the front right sides together, sewn
at 2 mm from the marked slit, cut it, turned the lining to the back
side, pressed and then topstitched as close as possible to the slit from
the front.
Then I added a lining from some plain black cotton from the stash; for
the slit I put the lining on the front right sides together, sewn
at 2 mm from the marked slit, cut it, turned the lining to the back
side, pressed and then topstitched as close as possible to the slit from
the front.
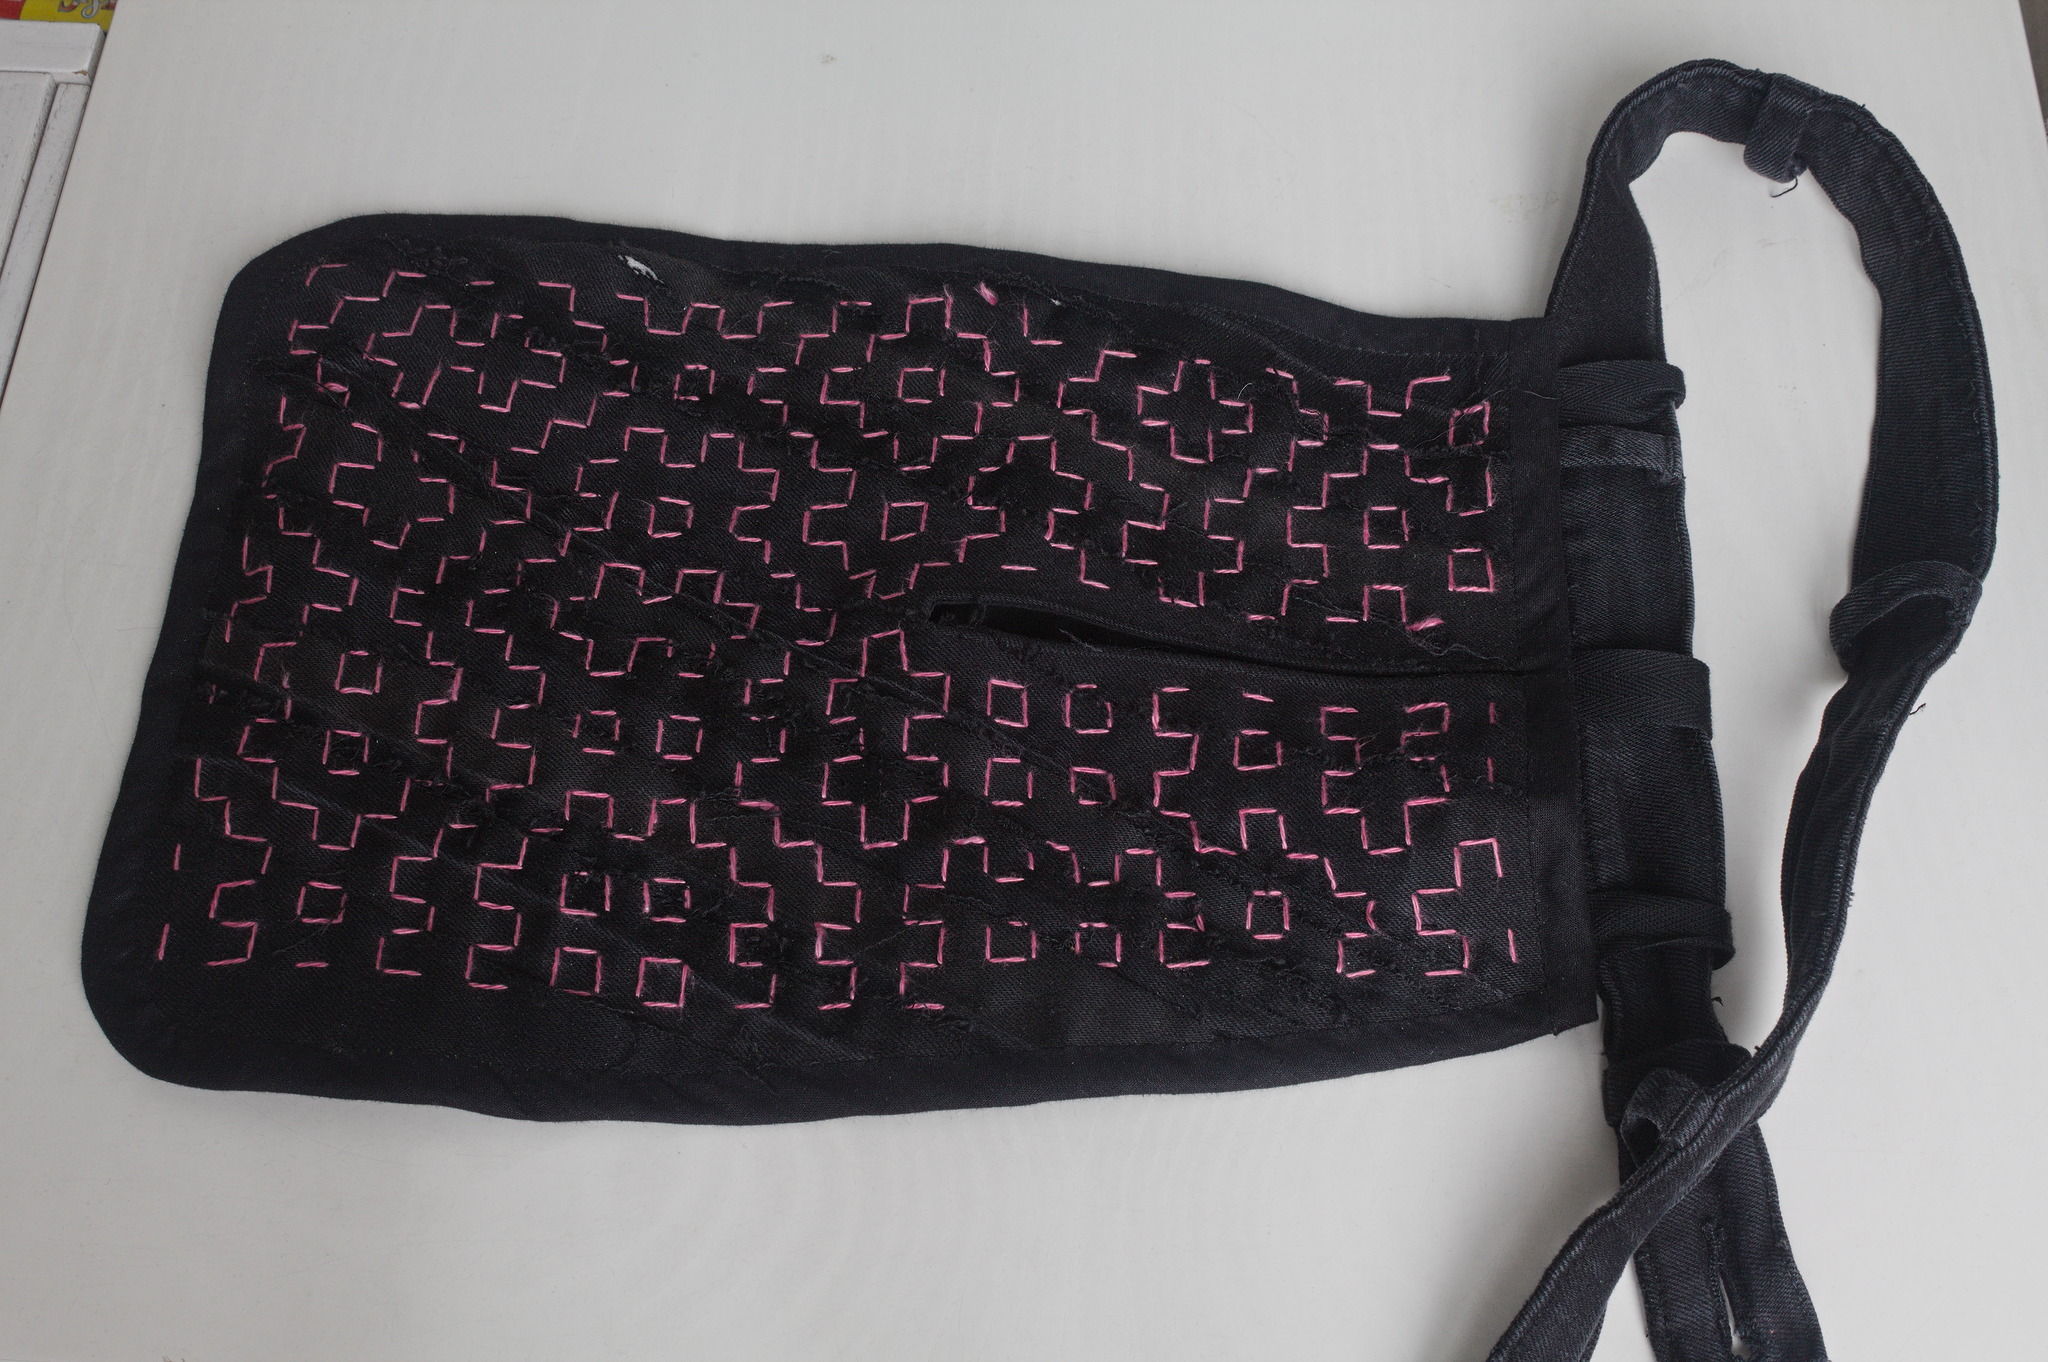 I bound everything with bias tape, adding herringbone tape loops at the
top to hang it from a belt (such as one made from the waistband of one
of the donor pair of jeans) and that was it.
I bound everything with bias tape, adding herringbone tape loops at the
top to hang it from a belt (such as one made from the waistband of one
of the donor pair of jeans) and that was it.
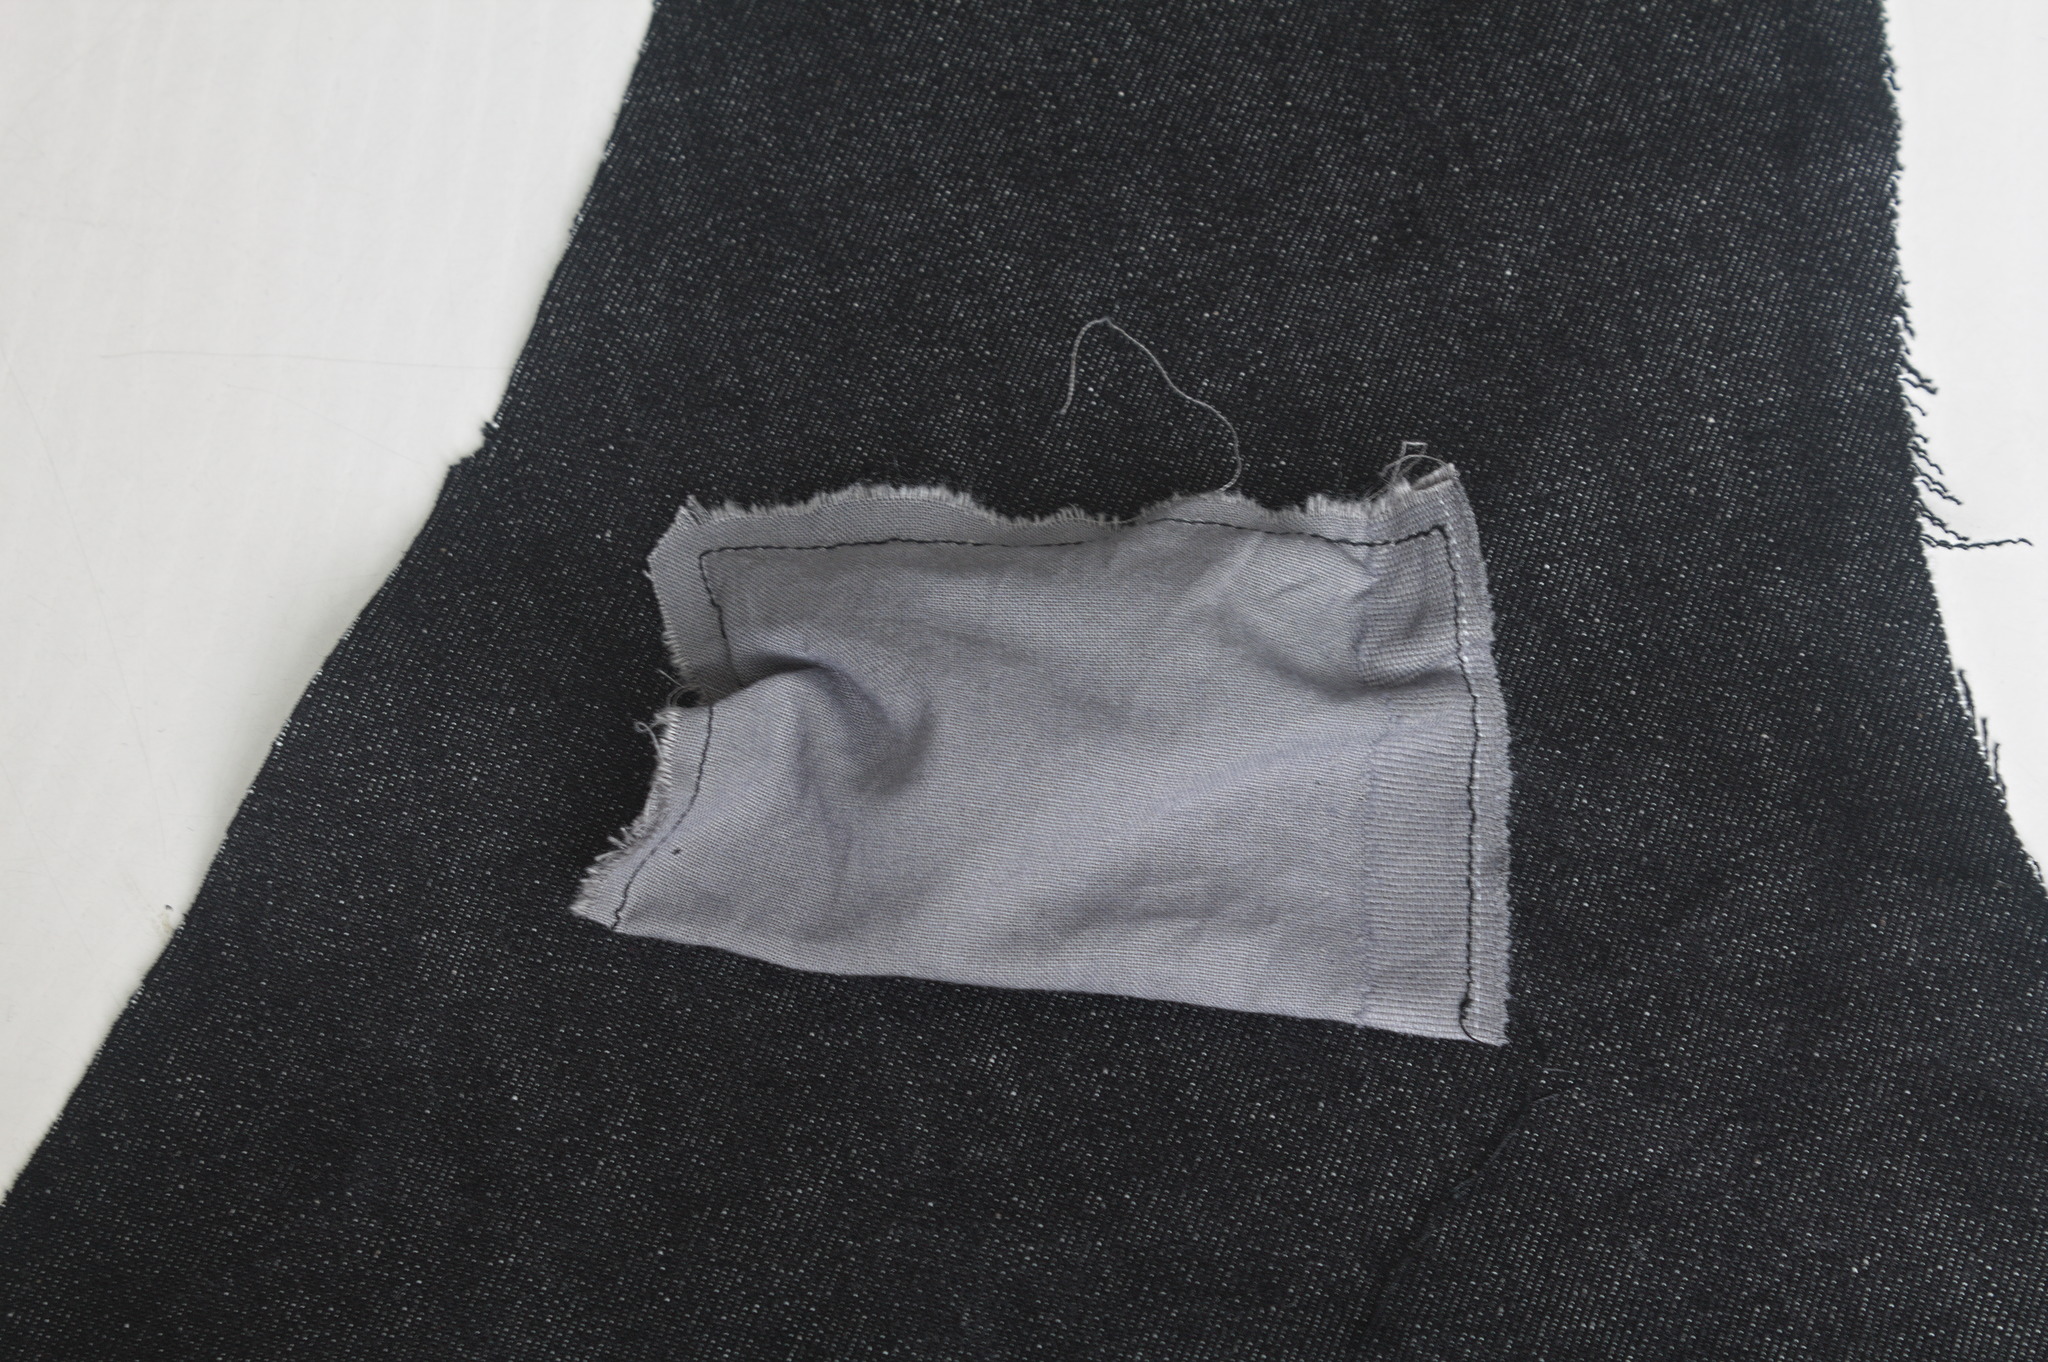
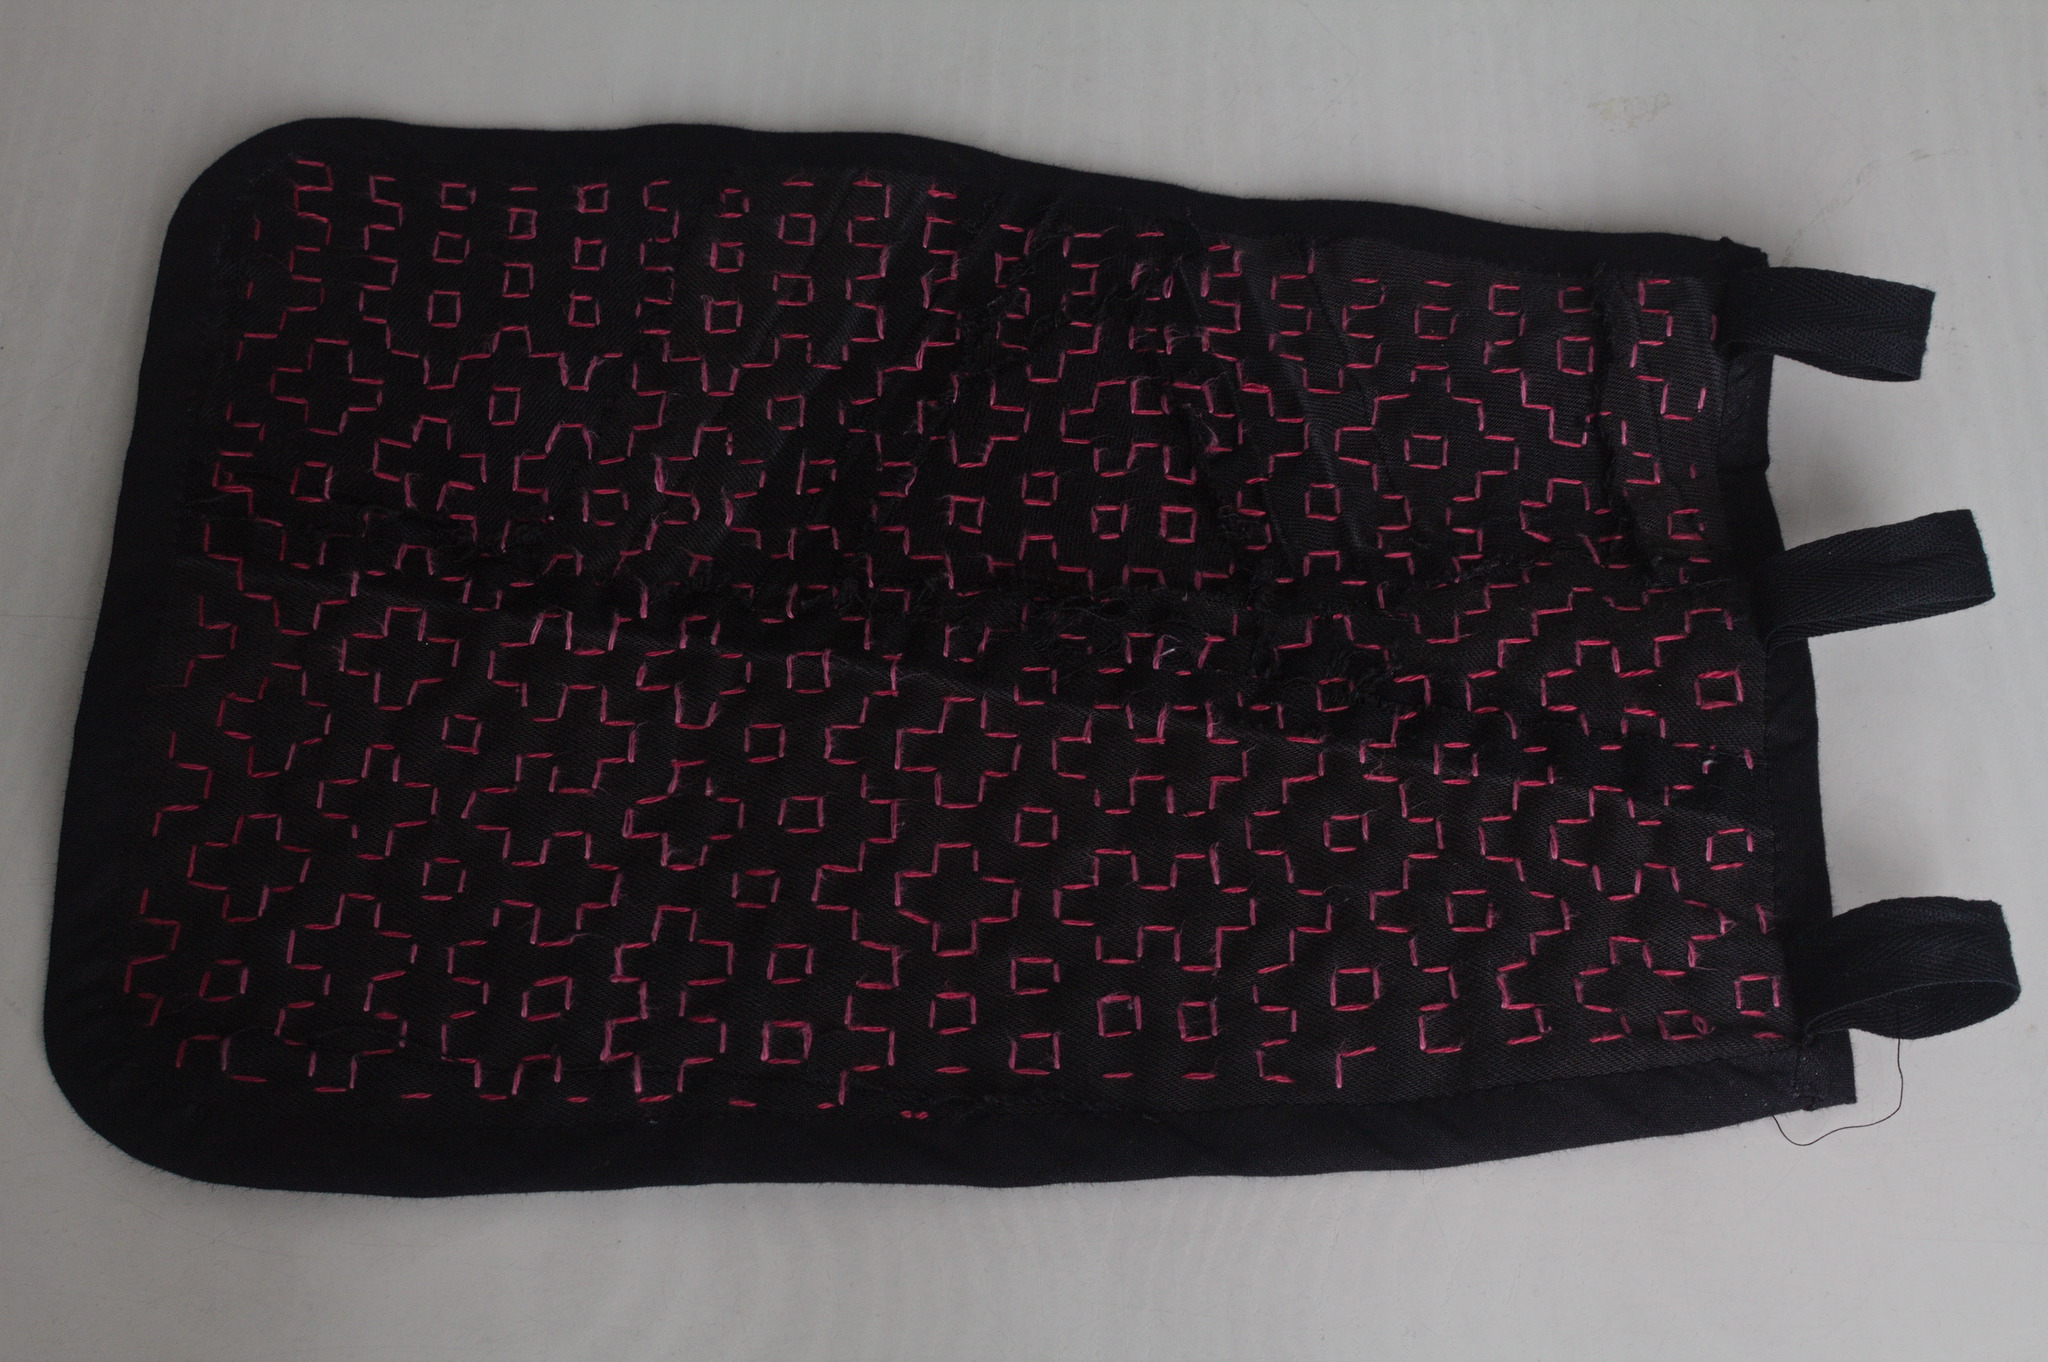 I like the way the result feels; maybe it s a bit too stiff for a
pocket, but I can see it work very well for a bigger bag, and maybe even
a jacket or some other outer garment.
I like the way the result feels; maybe it s a bit too stiff for a
pocket, but I can see it work very well for a bigger bag, and maybe even
a jacket or some other outer garment.
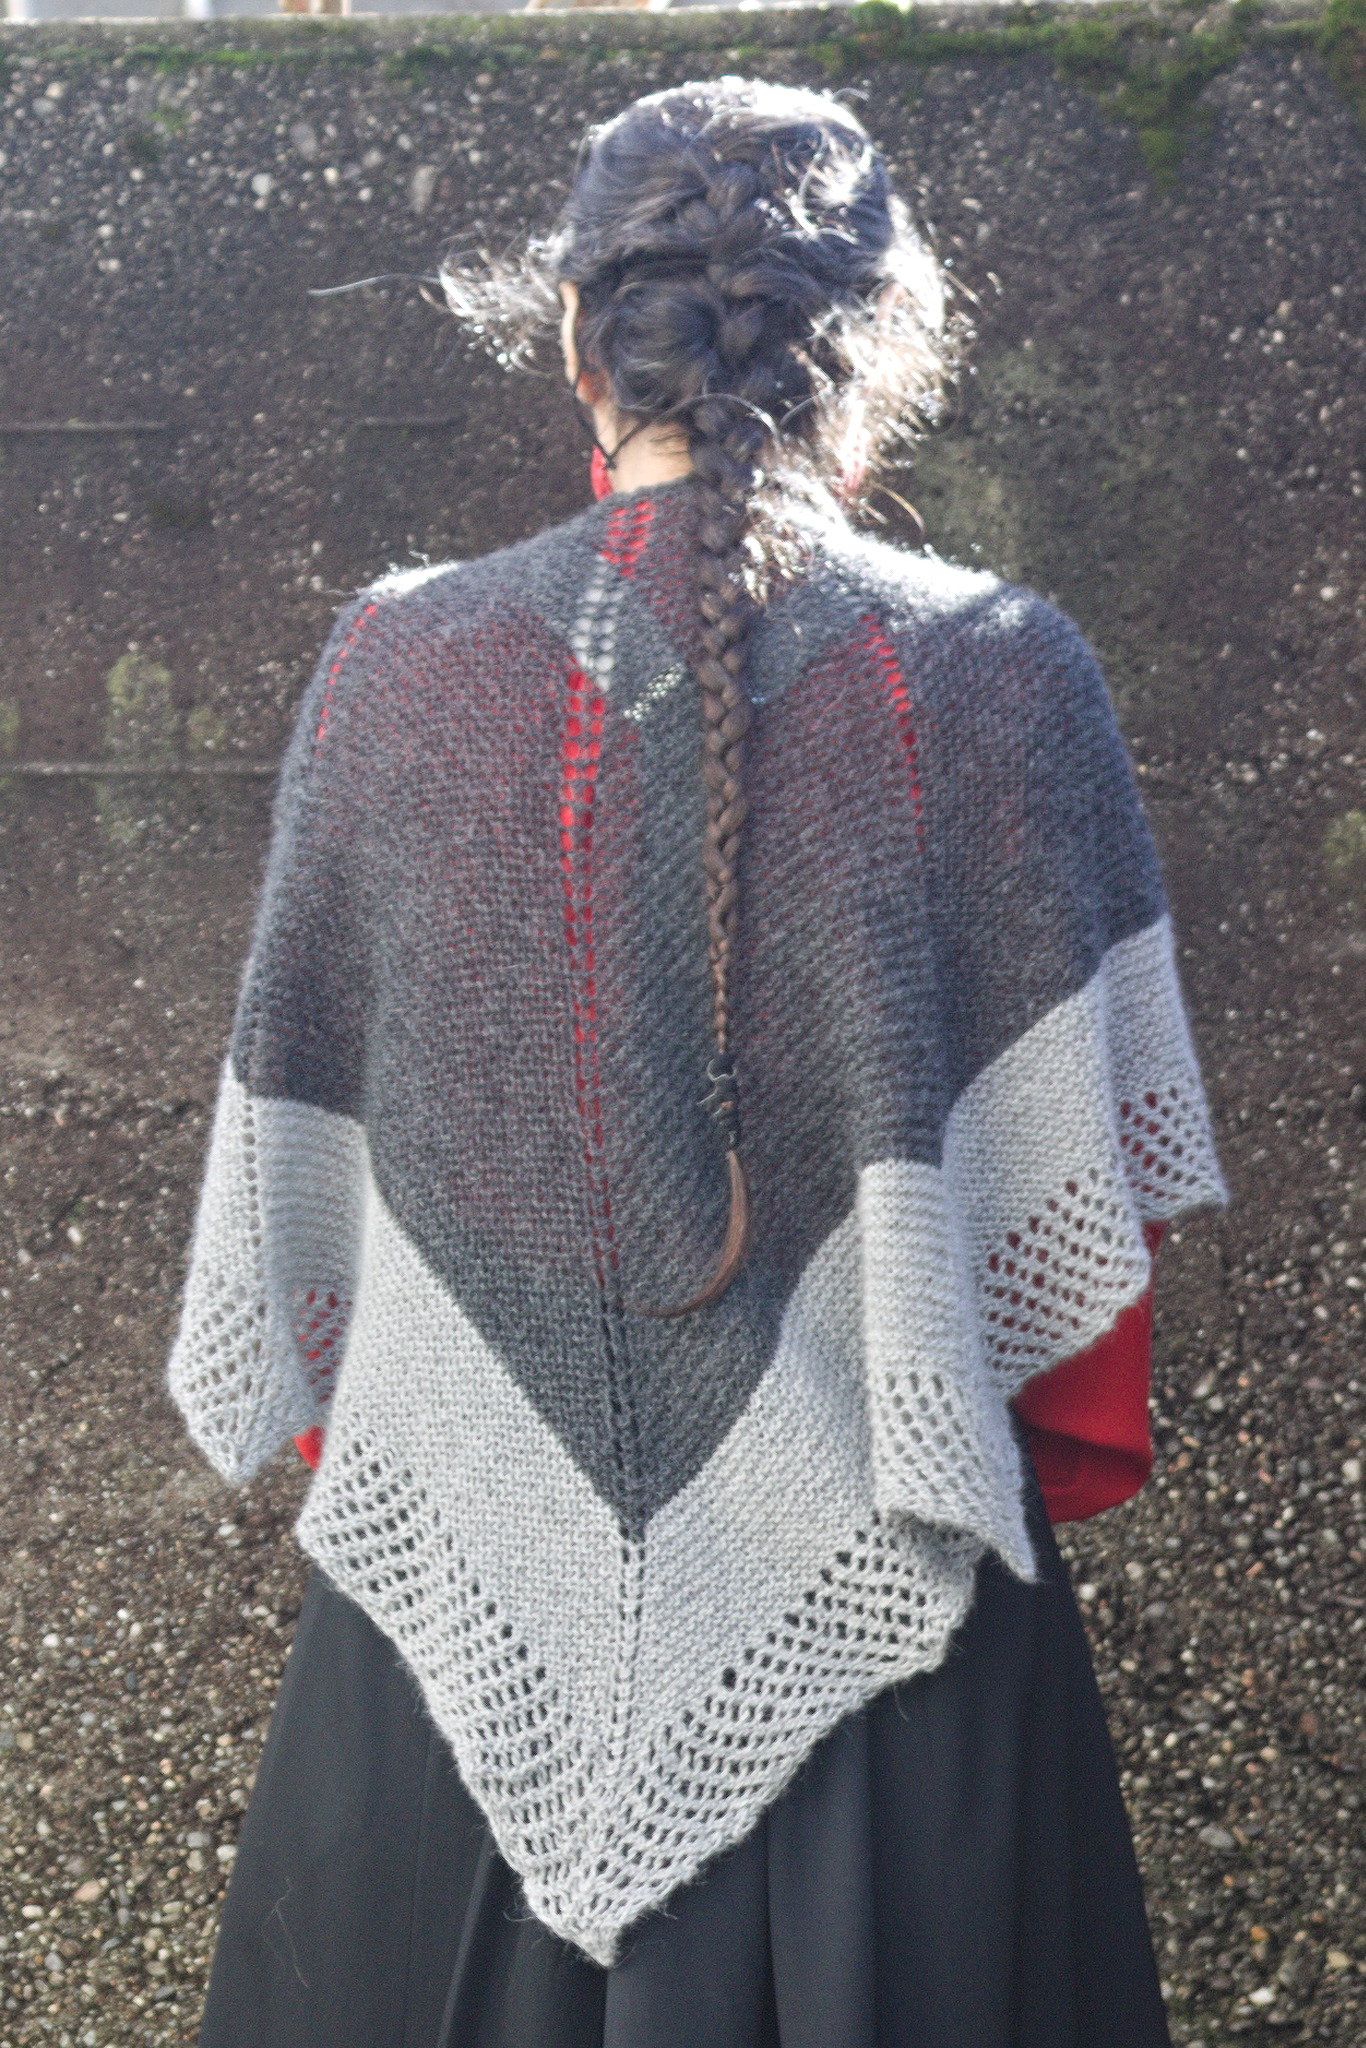 One of the knitting projects I m working on is a big bottom-up
triangular shawl in less-than-fingering weight yarn (NM 1/15): it feels
like a cloud should by all rights feel, and I have good expectations out
of it, but it s taking forever and a day.
And then one day last spring I started thinking in the general direction
of top-down shawls, and decided I couldn t wait until I had finished the
first one to see if I could design one.
For my first attempt I used an odd ball of 50% wool 50% plastic I had in
my stash and worked it on 12 mm tree trunks, and I quickly made
something between a scarf and a shawl that got some use during the
summer thunderstorms when temperatures got a bit lower, but not really
cold. I was happy with the shape, not with the exact position of the
increases, but I had ideas for improvements, so I just had to try
another time.
Digging through the stash I found four balls of Drops Alpaca in two
shades of grey: I had bought it with the intent to test its durability
in somewhat more demanding situations (such as gloves or even socks),
but then the LYS
One of the knitting projects I m working on is a big bottom-up
triangular shawl in less-than-fingering weight yarn (NM 1/15): it feels
like a cloud should by all rights feel, and I have good expectations out
of it, but it s taking forever and a day.
And then one day last spring I started thinking in the general direction
of top-down shawls, and decided I couldn t wait until I had finished the
first one to see if I could design one.
For my first attempt I used an odd ball of 50% wool 50% plastic I had in
my stash and worked it on 12 mm tree trunks, and I quickly made
something between a scarf and a shawl that got some use during the
summer thunderstorms when temperatures got a bit lower, but not really
cold. I was happy with the shape, not with the exact position of the
increases, but I had ideas for improvements, so I just had to try
another time.
Digging through the stash I found four balls of Drops Alpaca in two
shades of grey: I had bought it with the intent to test its durability
in somewhat more demanding situations (such as gloves or even socks),
but then the LYS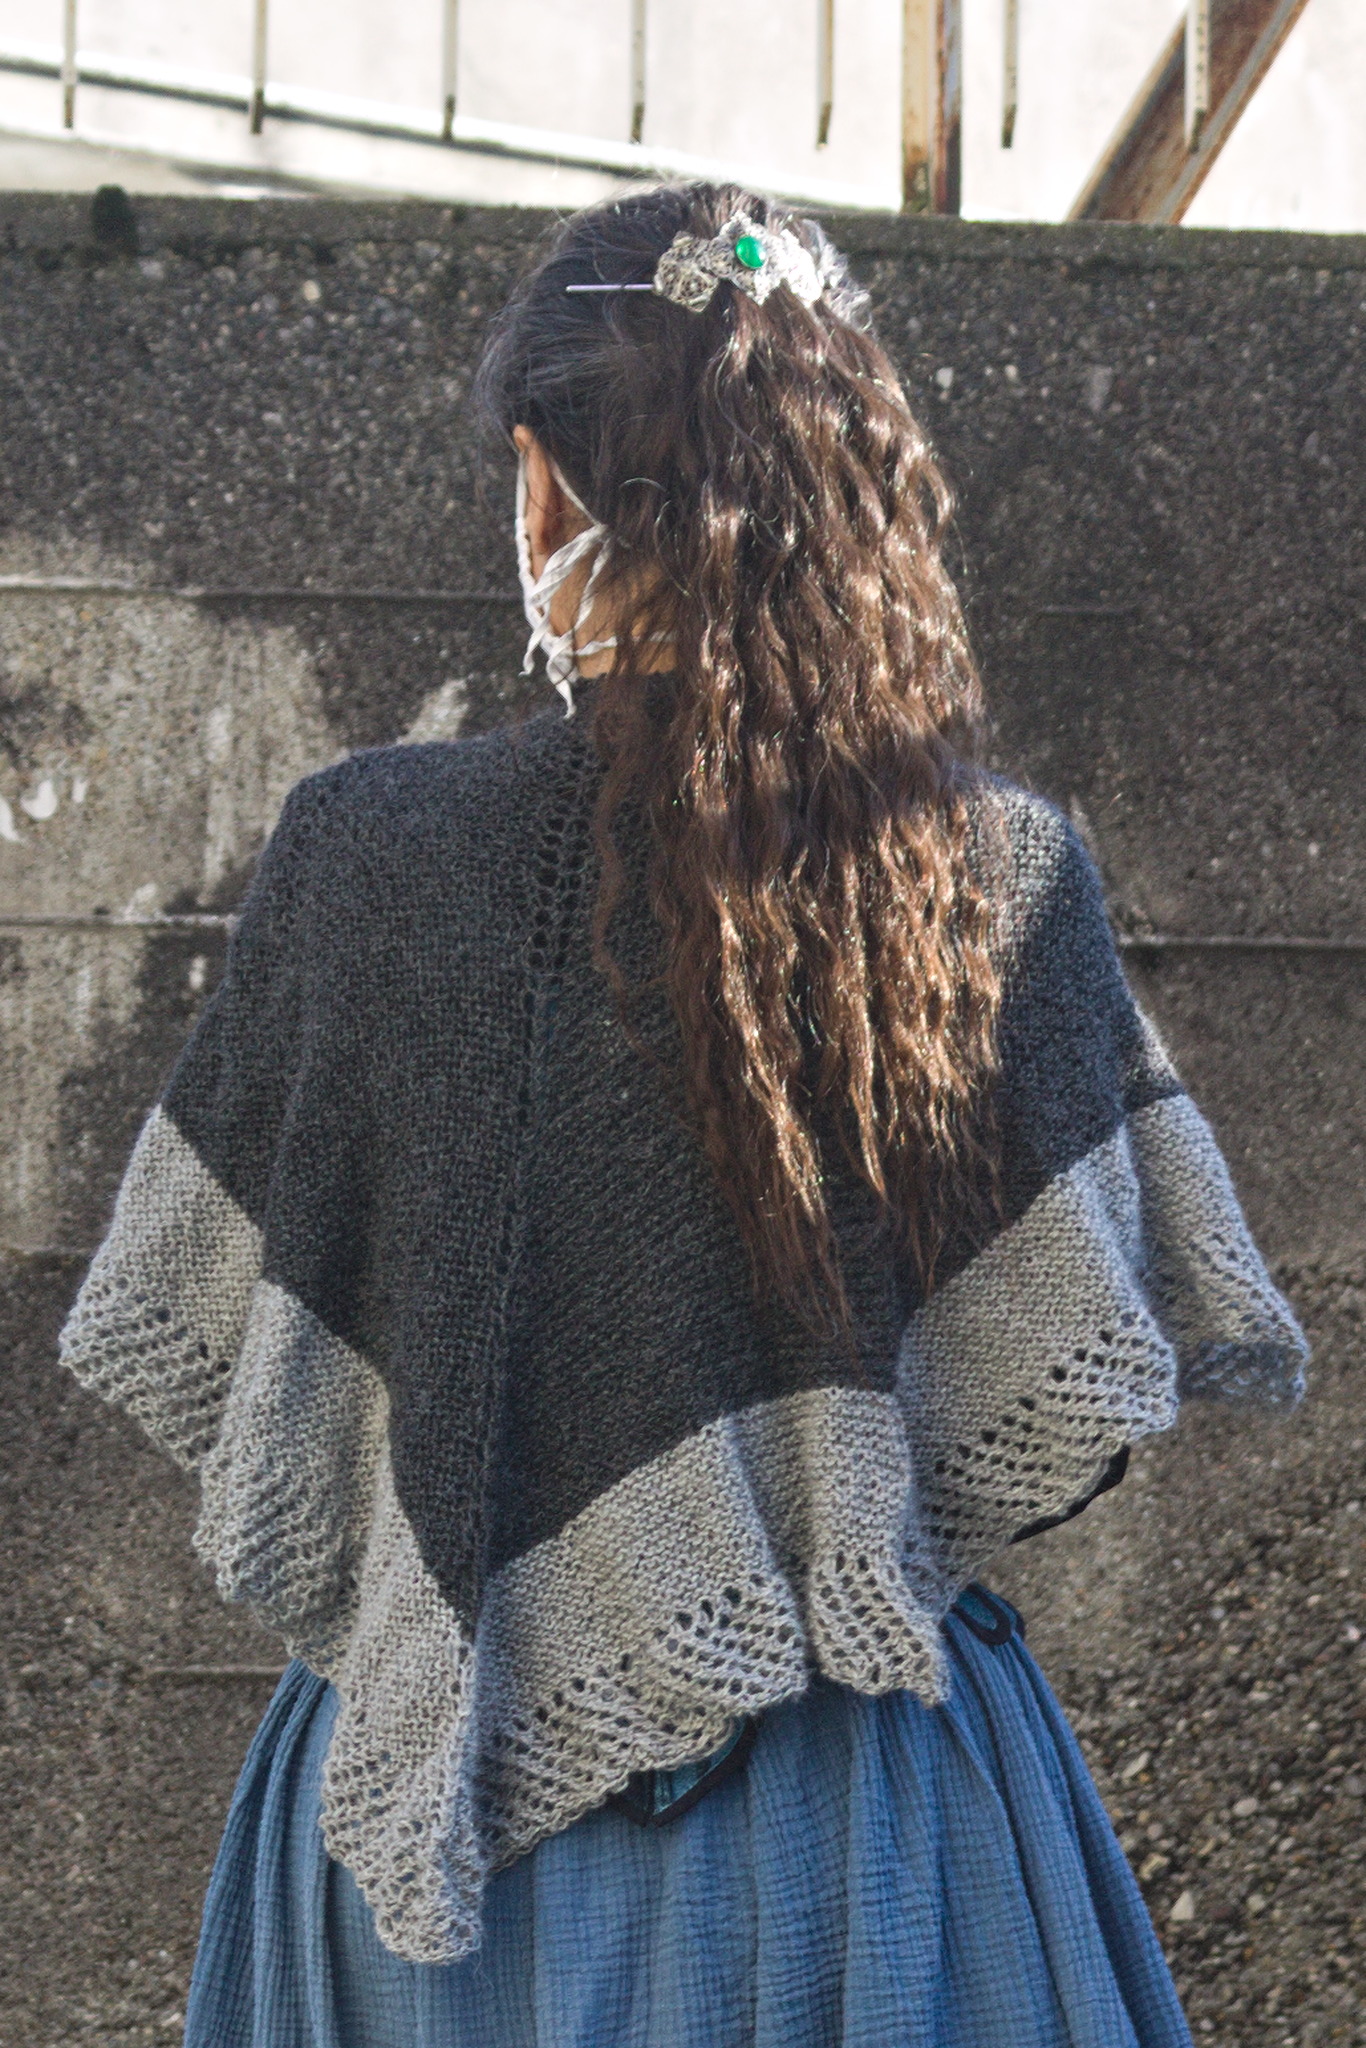
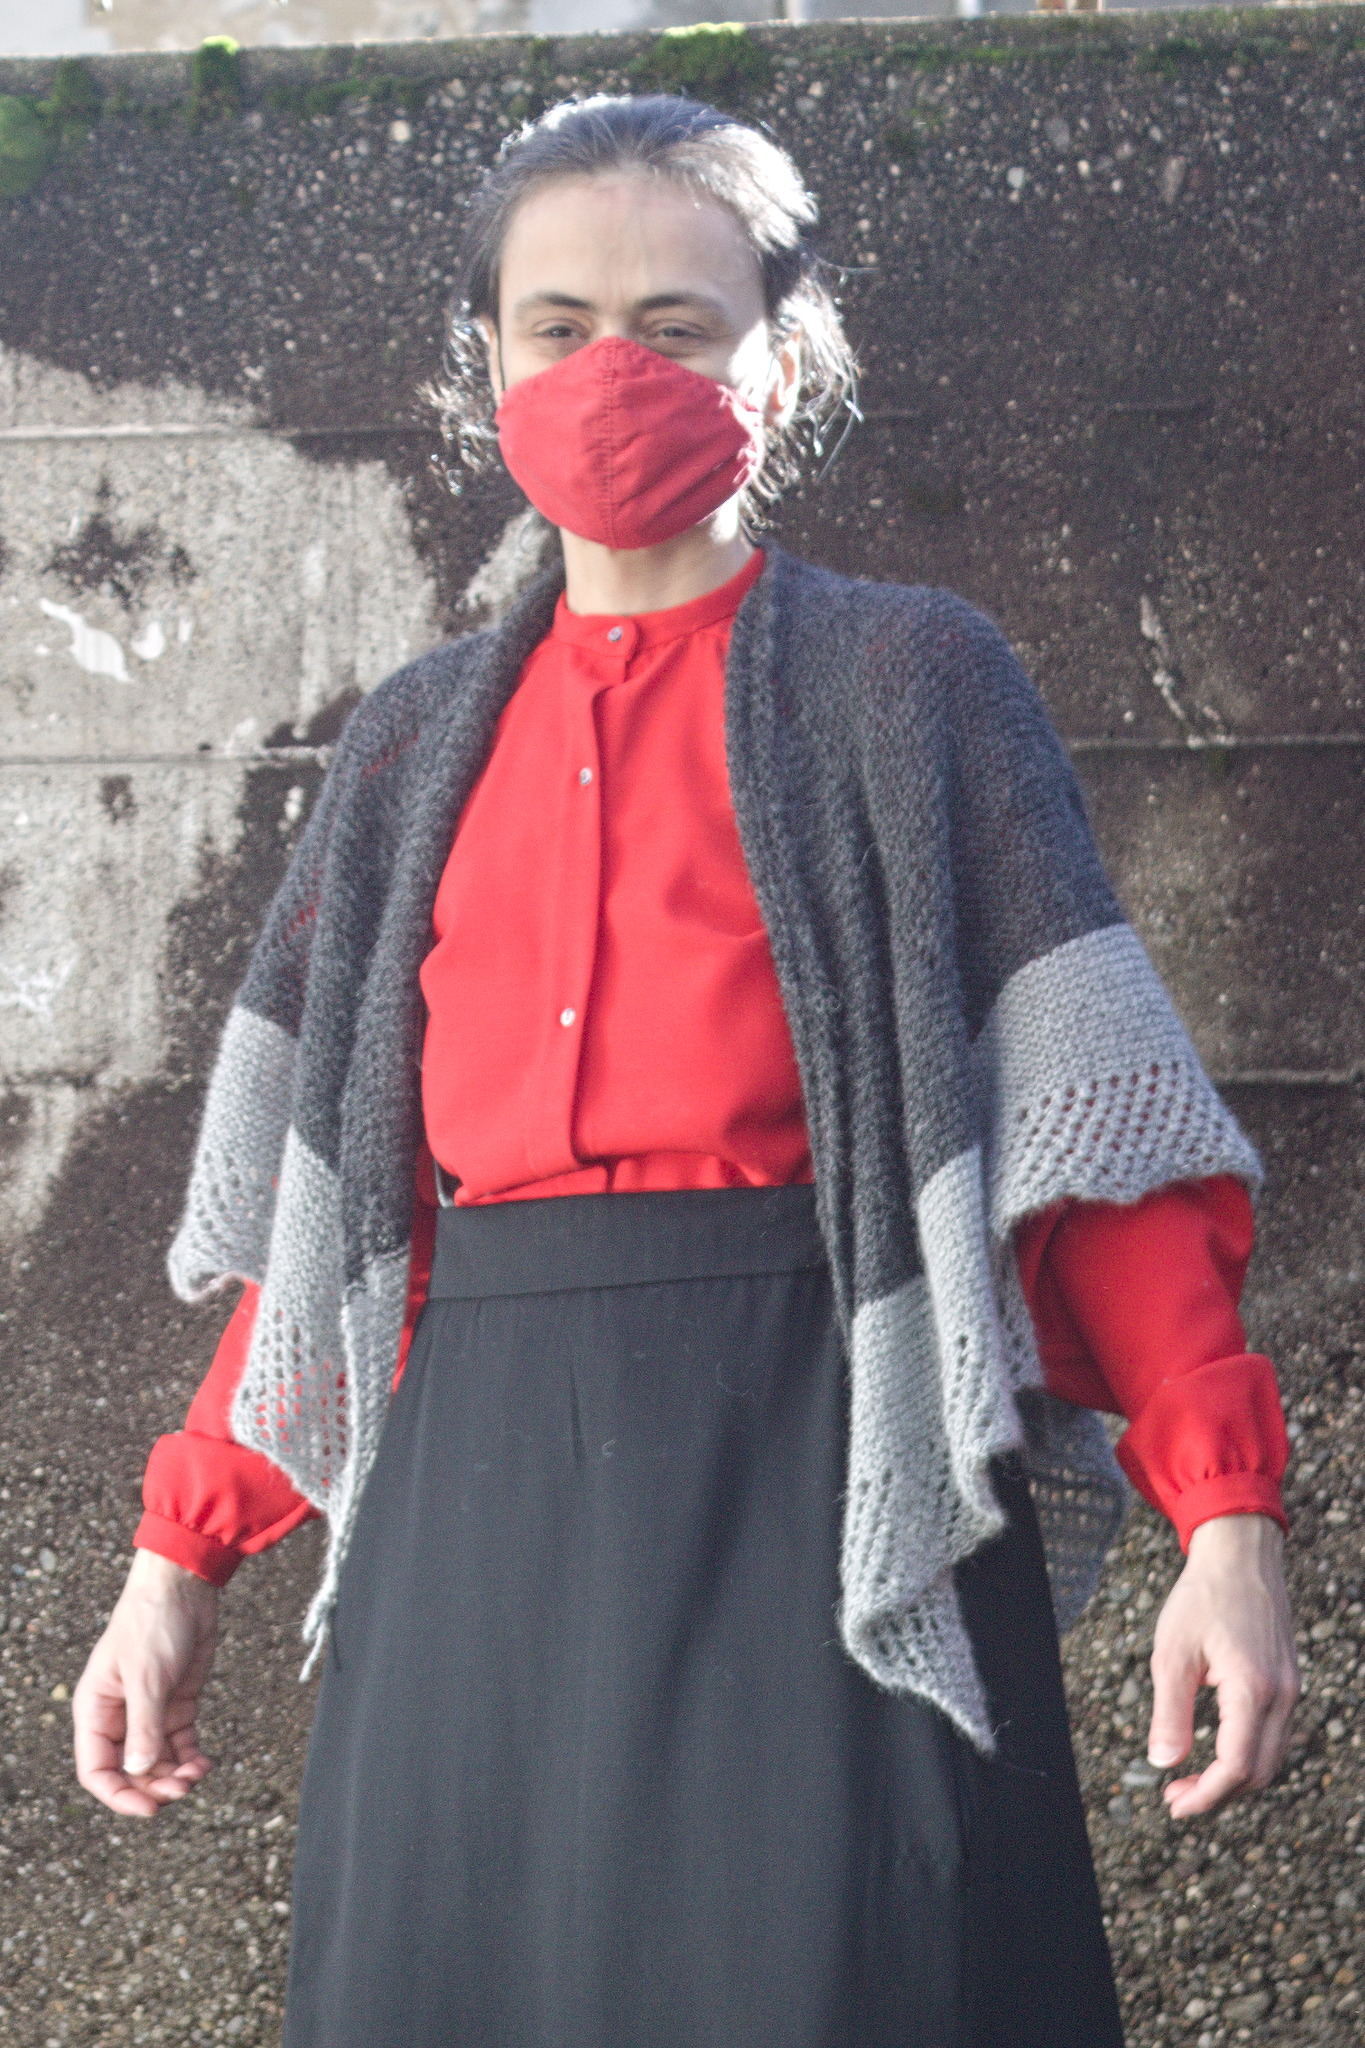 I m glad that I did it, however, as it s still soft and warm, but now
also looks nicer.
The pattern is of course online as #FreeSoftWear on
I m glad that I did it, however, as it s still soft and warm, but now
also looks nicer.
The pattern is of course online as #FreeSoftWear on 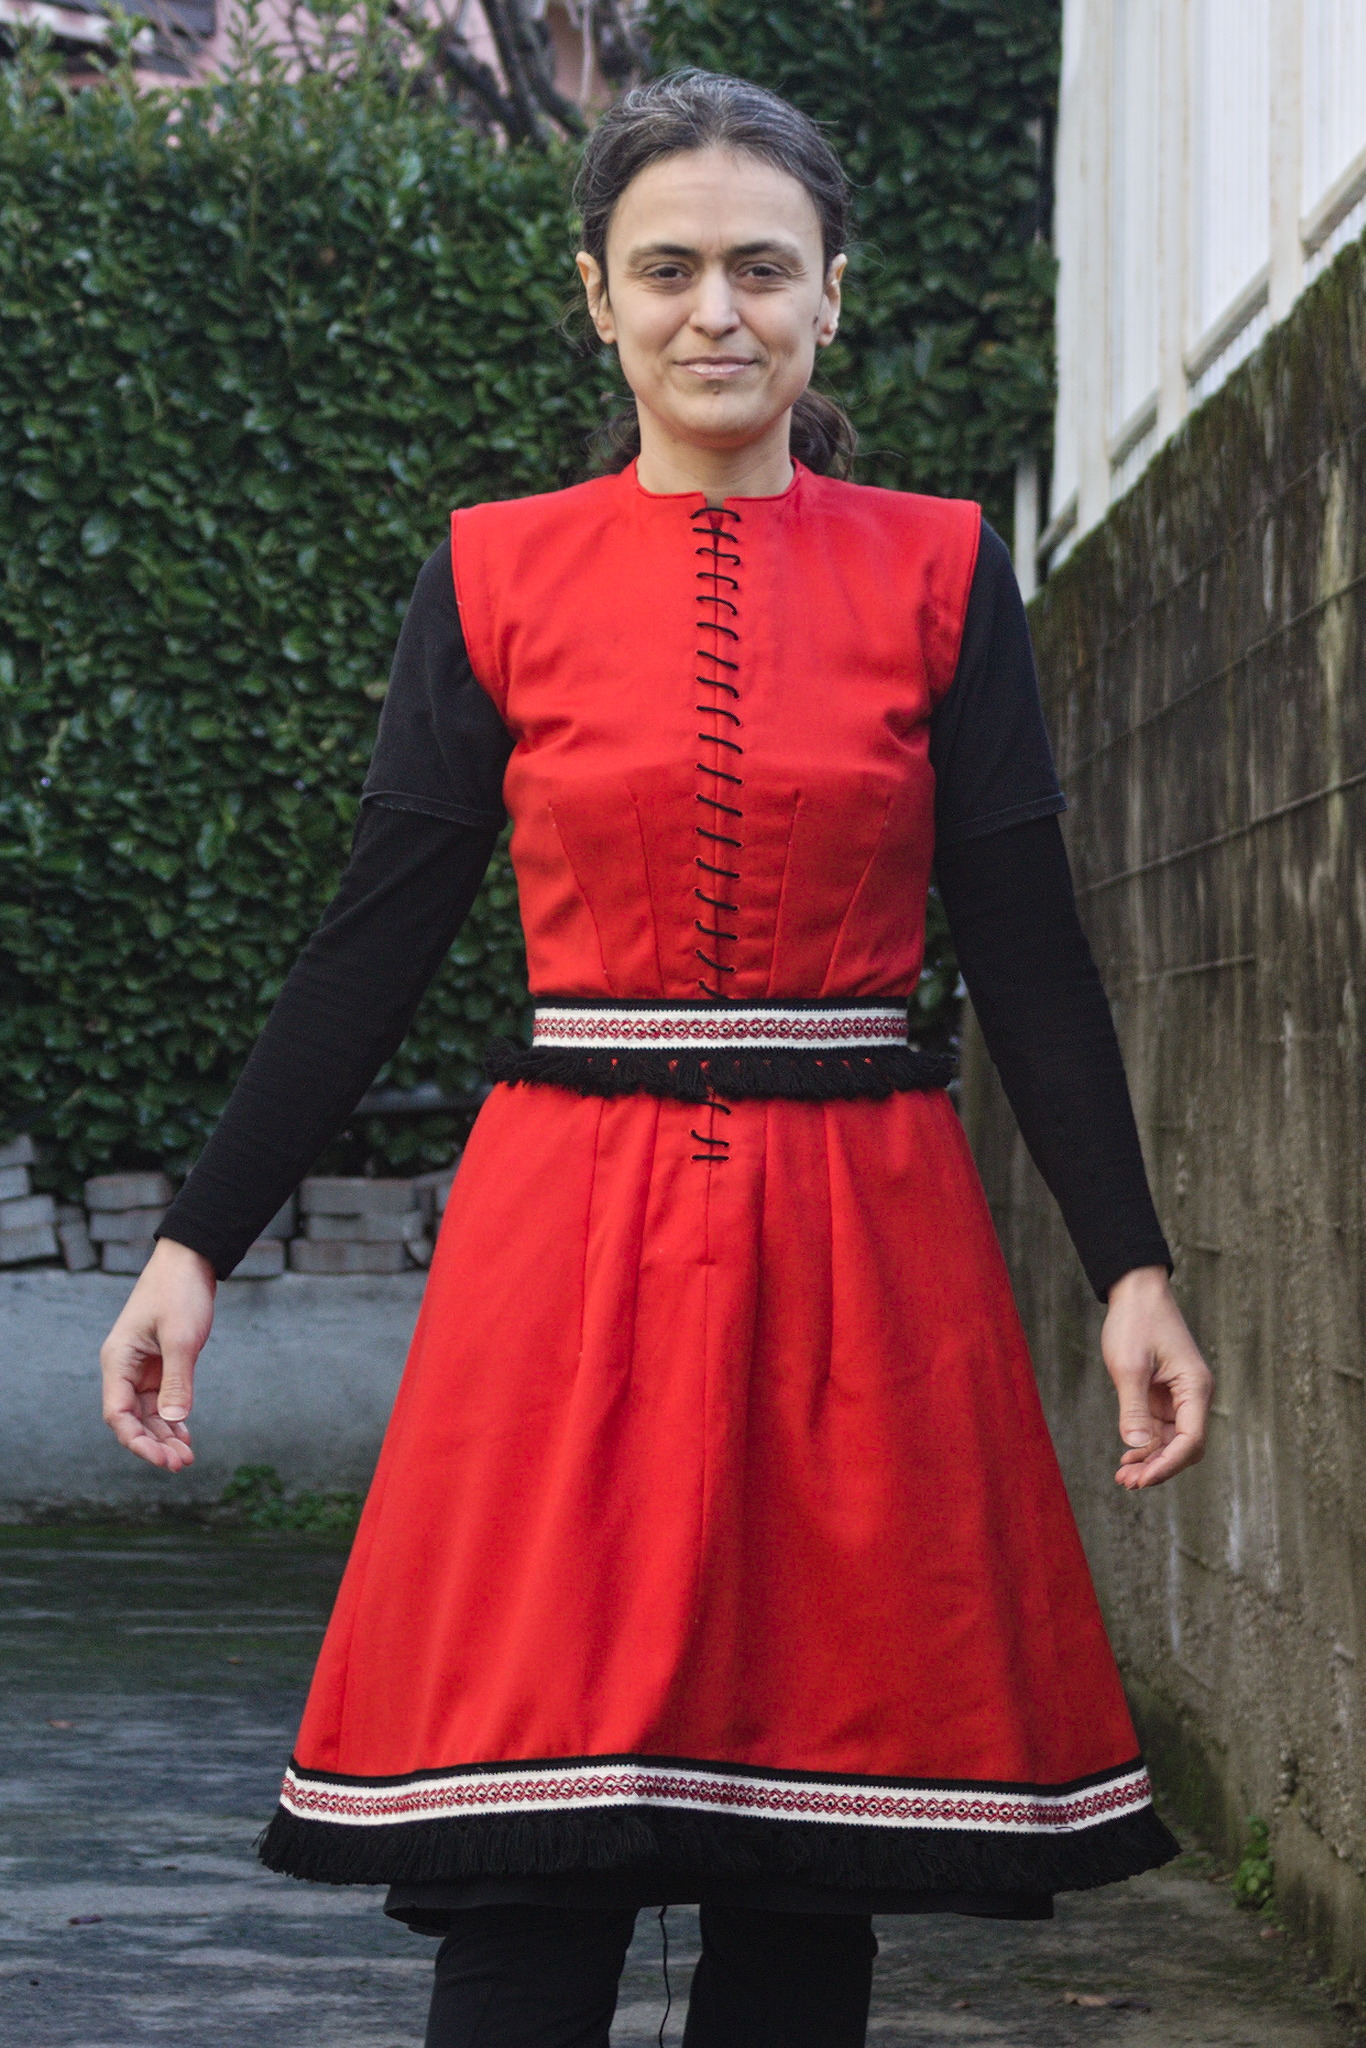 By the influencers on the famous proprietary video platform
 Anyway, my brain suddenly decided that I needed a red wool dress, fitted
enough to give some bust support. I had already made a
Anyway, my brain suddenly decided that I needed a red wool dress, fitted
enough to give some bust support. I had already made a 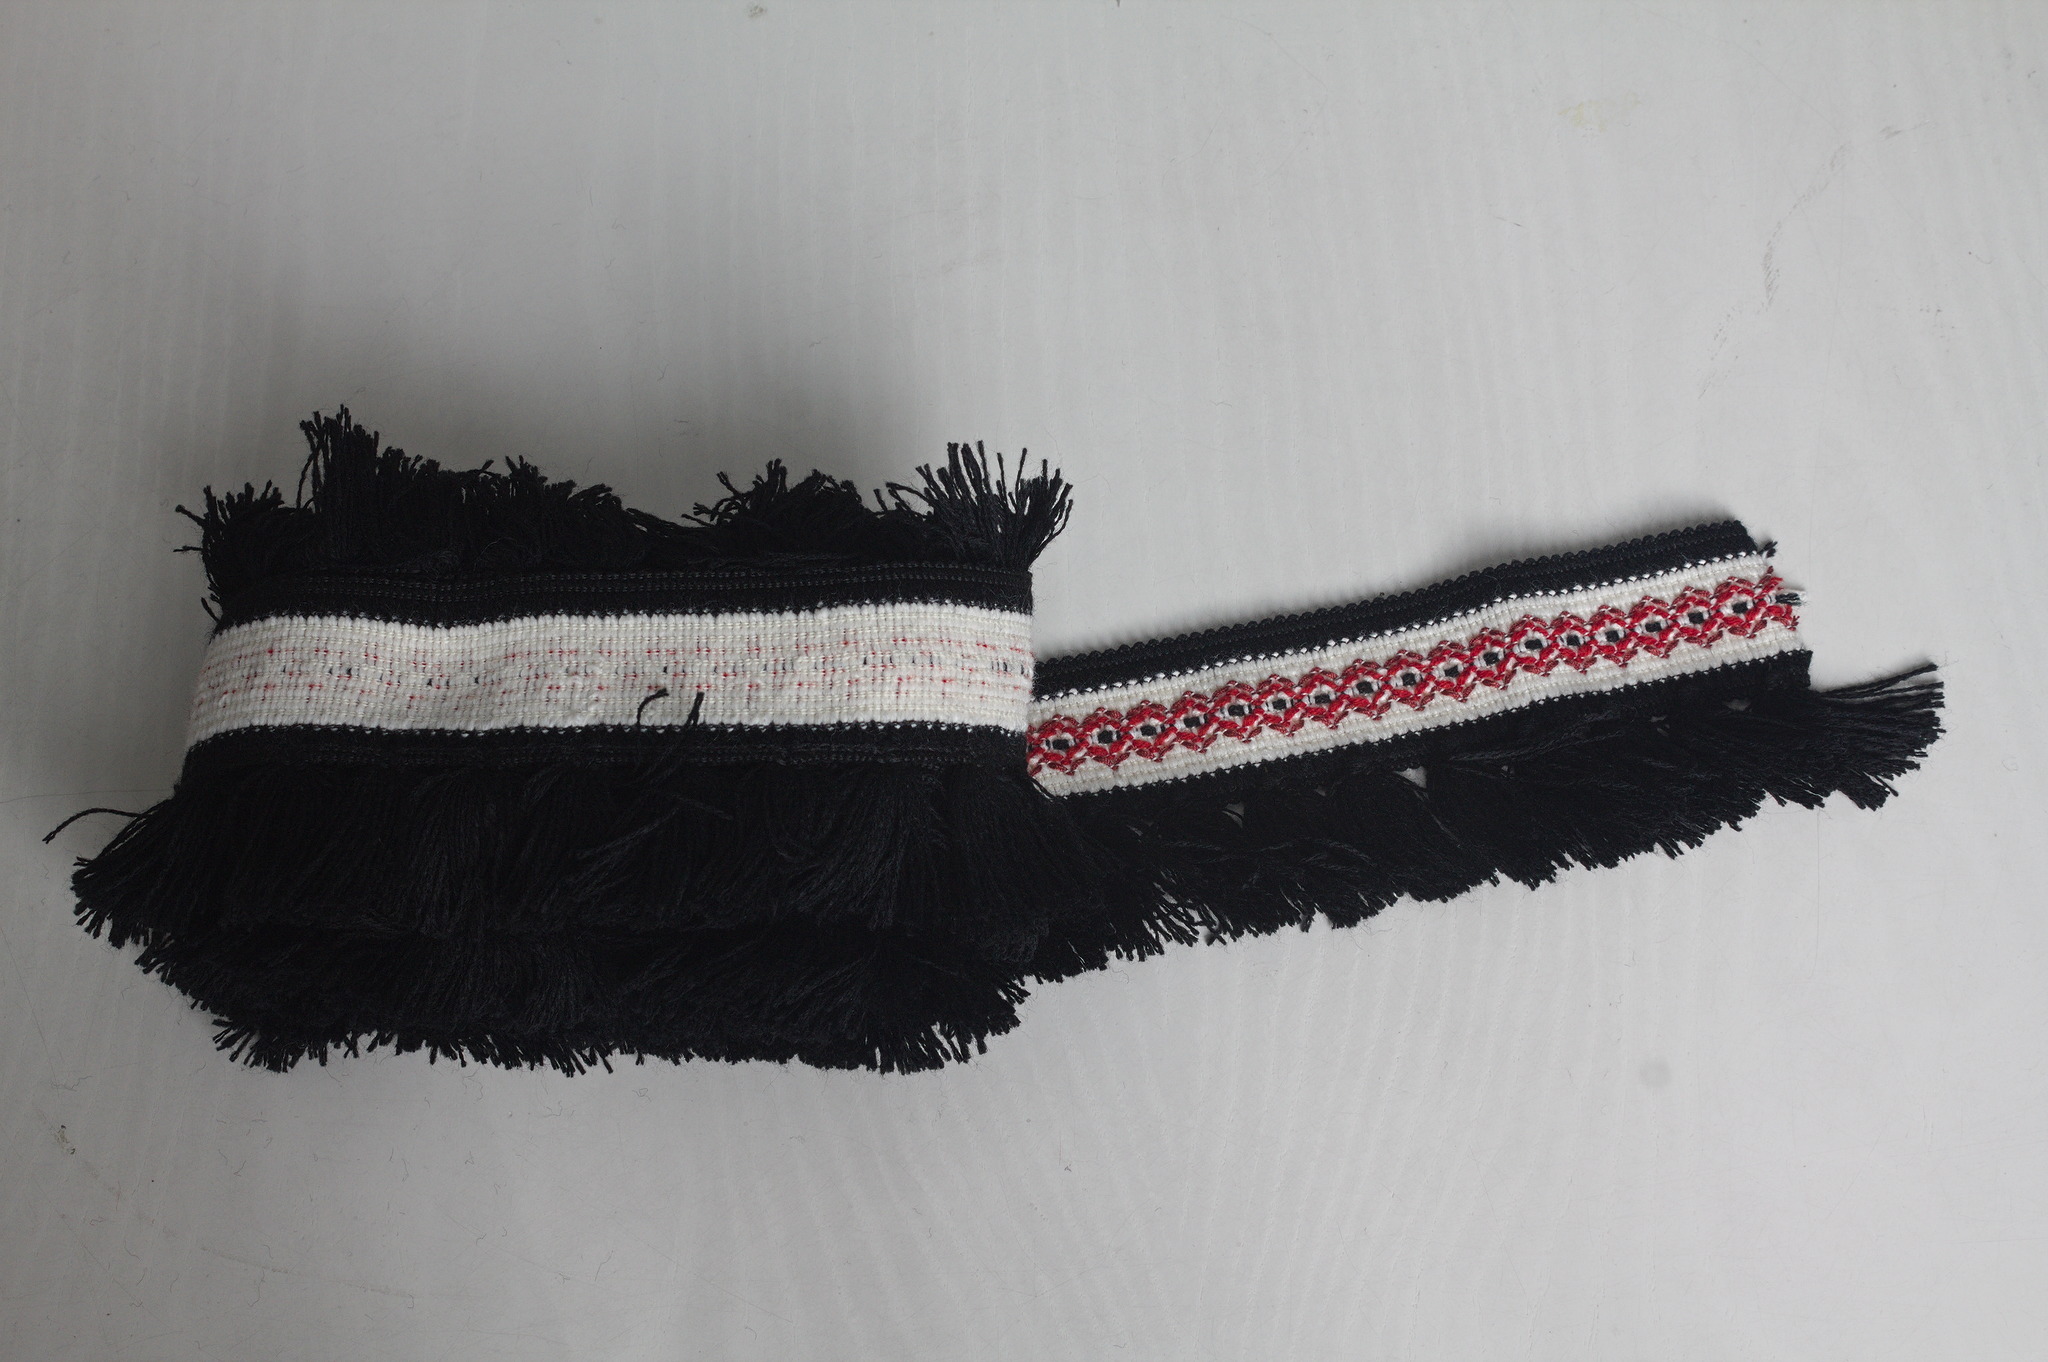 I knew that I didn t have enough fabric to add a flounce to the hem, as
in the cotton dress, but then I remembered that some time ago I fell for
a piece of fringed trim in black, white and red. I did a quick check
that the red wasn t clashing (it wasn t) and I knew I had a plan for the
hem decoration.
Then I spent a week finishing other projects, and the more I thought
about this dress, the more I was tempted to have spiral lacing at the
front rather than buttons, as a nod to the kirtle inspiration.
It may end up be a bit of a hassle, but if it is too much I can always
add a hidden zipper on a side seam, and only have to undo a bit of the
lacing around the neckhole to wear the dress.
Finally, I could start working on the dress: I cut all of the main
pieces, and since the seam lines were quite curved I marked them with
tailor s tacks, which I don t exactly enjoy doing or removing, but are
the only method that was guaranteed to survive while manipulating this
fabric (and not leave traces afterwards).
I knew that I didn t have enough fabric to add a flounce to the hem, as
in the cotton dress, but then I remembered that some time ago I fell for
a piece of fringed trim in black, white and red. I did a quick check
that the red wasn t clashing (it wasn t) and I knew I had a plan for the
hem decoration.
Then I spent a week finishing other projects, and the more I thought
about this dress, the more I was tempted to have spiral lacing at the
front rather than buttons, as a nod to the kirtle inspiration.
It may end up be a bit of a hassle, but if it is too much I can always
add a hidden zipper on a side seam, and only have to undo a bit of the
lacing around the neckhole to wear the dress.
Finally, I could start working on the dress: I cut all of the main
pieces, and since the seam lines were quite curved I marked them with
tailor s tacks, which I don t exactly enjoy doing or removing, but are
the only method that was guaranteed to survive while manipulating this
fabric (and not leave traces afterwards).
 While cutting the front pieces I accidentally cut the high neck line
instead of the one I had used on the cotton dress: I decided to go for
it also on the back pieces and decide later whether I wanted to lower
it.
Since this is a modern dress, with no historical accuracy at all, and I
have access to a serger, I decided to use some dark blue cotton voile
I ve had in my stash for quite some time, cut into bias strip, to bind
the raw edges before sewing. This works significantly better than bought
bias tape, which is a bit too stiff for this.
While cutting the front pieces I accidentally cut the high neck line
instead of the one I had used on the cotton dress: I decided to go for
it also on the back pieces and decide later whether I wanted to lower
it.
Since this is a modern dress, with no historical accuracy at all, and I
have access to a serger, I decided to use some dark blue cotton voile
I ve had in my stash for quite some time, cut into bias strip, to bind
the raw edges before sewing. This works significantly better than bought
bias tape, which is a bit too stiff for this.
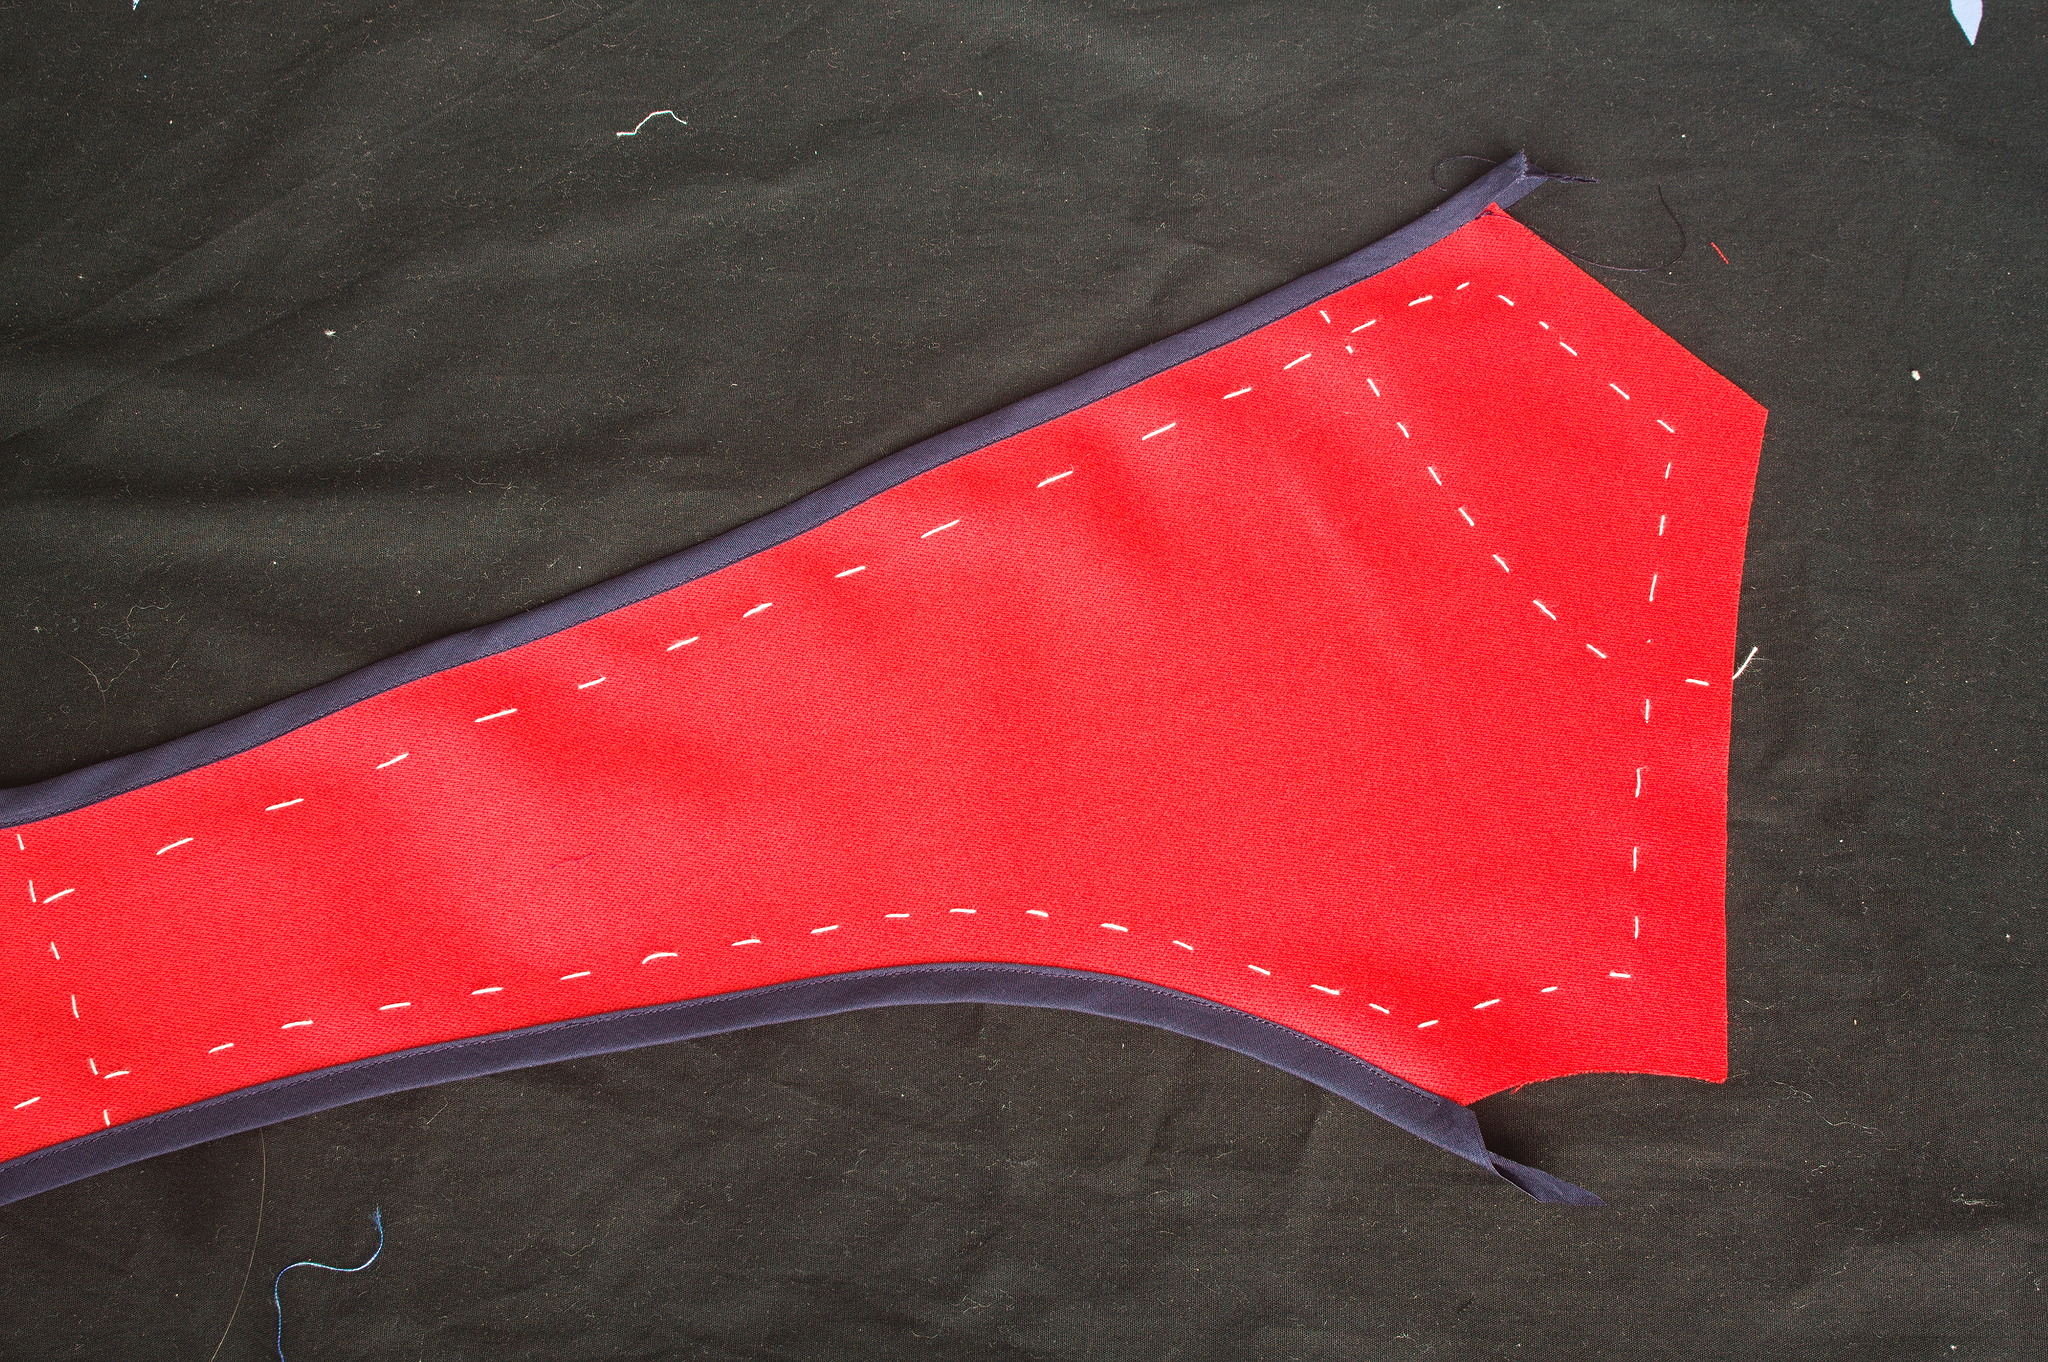
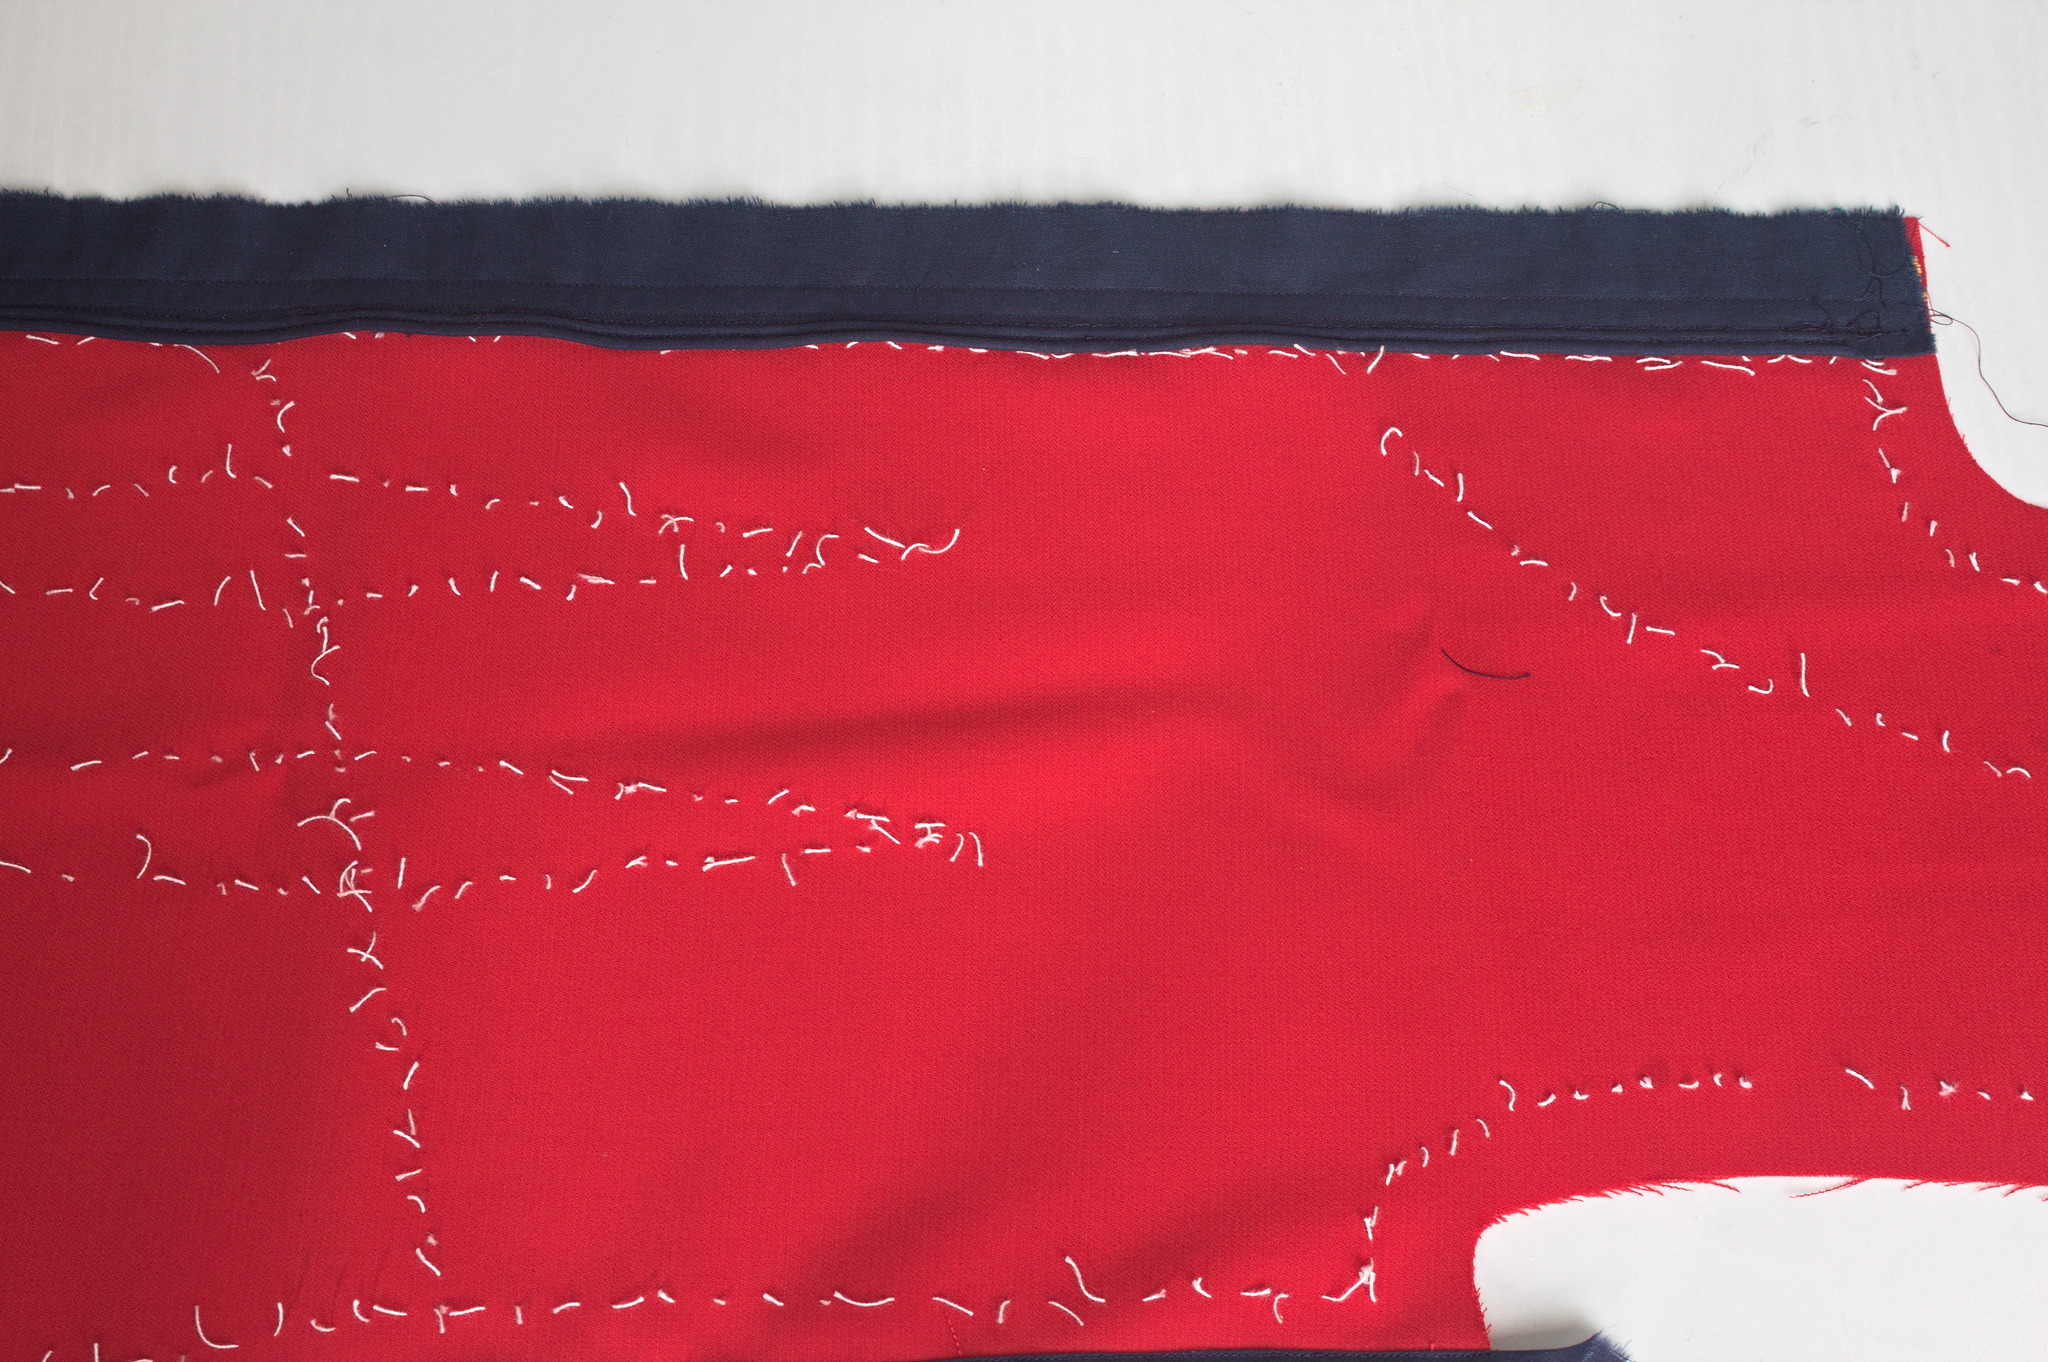 For the front opening, I ve decided to reinforce the areas where the
lacing holes will be with cotton: I ve used some other navy blue cotton,
also from the stash, and added two lines of cording to stiffen the front
edge.
So I ve cut the front in two pieces rather than on the fold, sewn the
reinforcements to the sewing allowances in such a way that the corded
edge was aligned with the center front and then sewn the bottom of the
front seam from just before the end of the reinforcements to the hem.
For the front opening, I ve decided to reinforce the areas where the
lacing holes will be with cotton: I ve used some other navy blue cotton,
also from the stash, and added two lines of cording to stiffen the front
edge.
So I ve cut the front in two pieces rather than on the fold, sewn the
reinforcements to the sewing allowances in such a way that the corded
edge was aligned with the center front and then sewn the bottom of the
front seam from just before the end of the reinforcements to the hem.
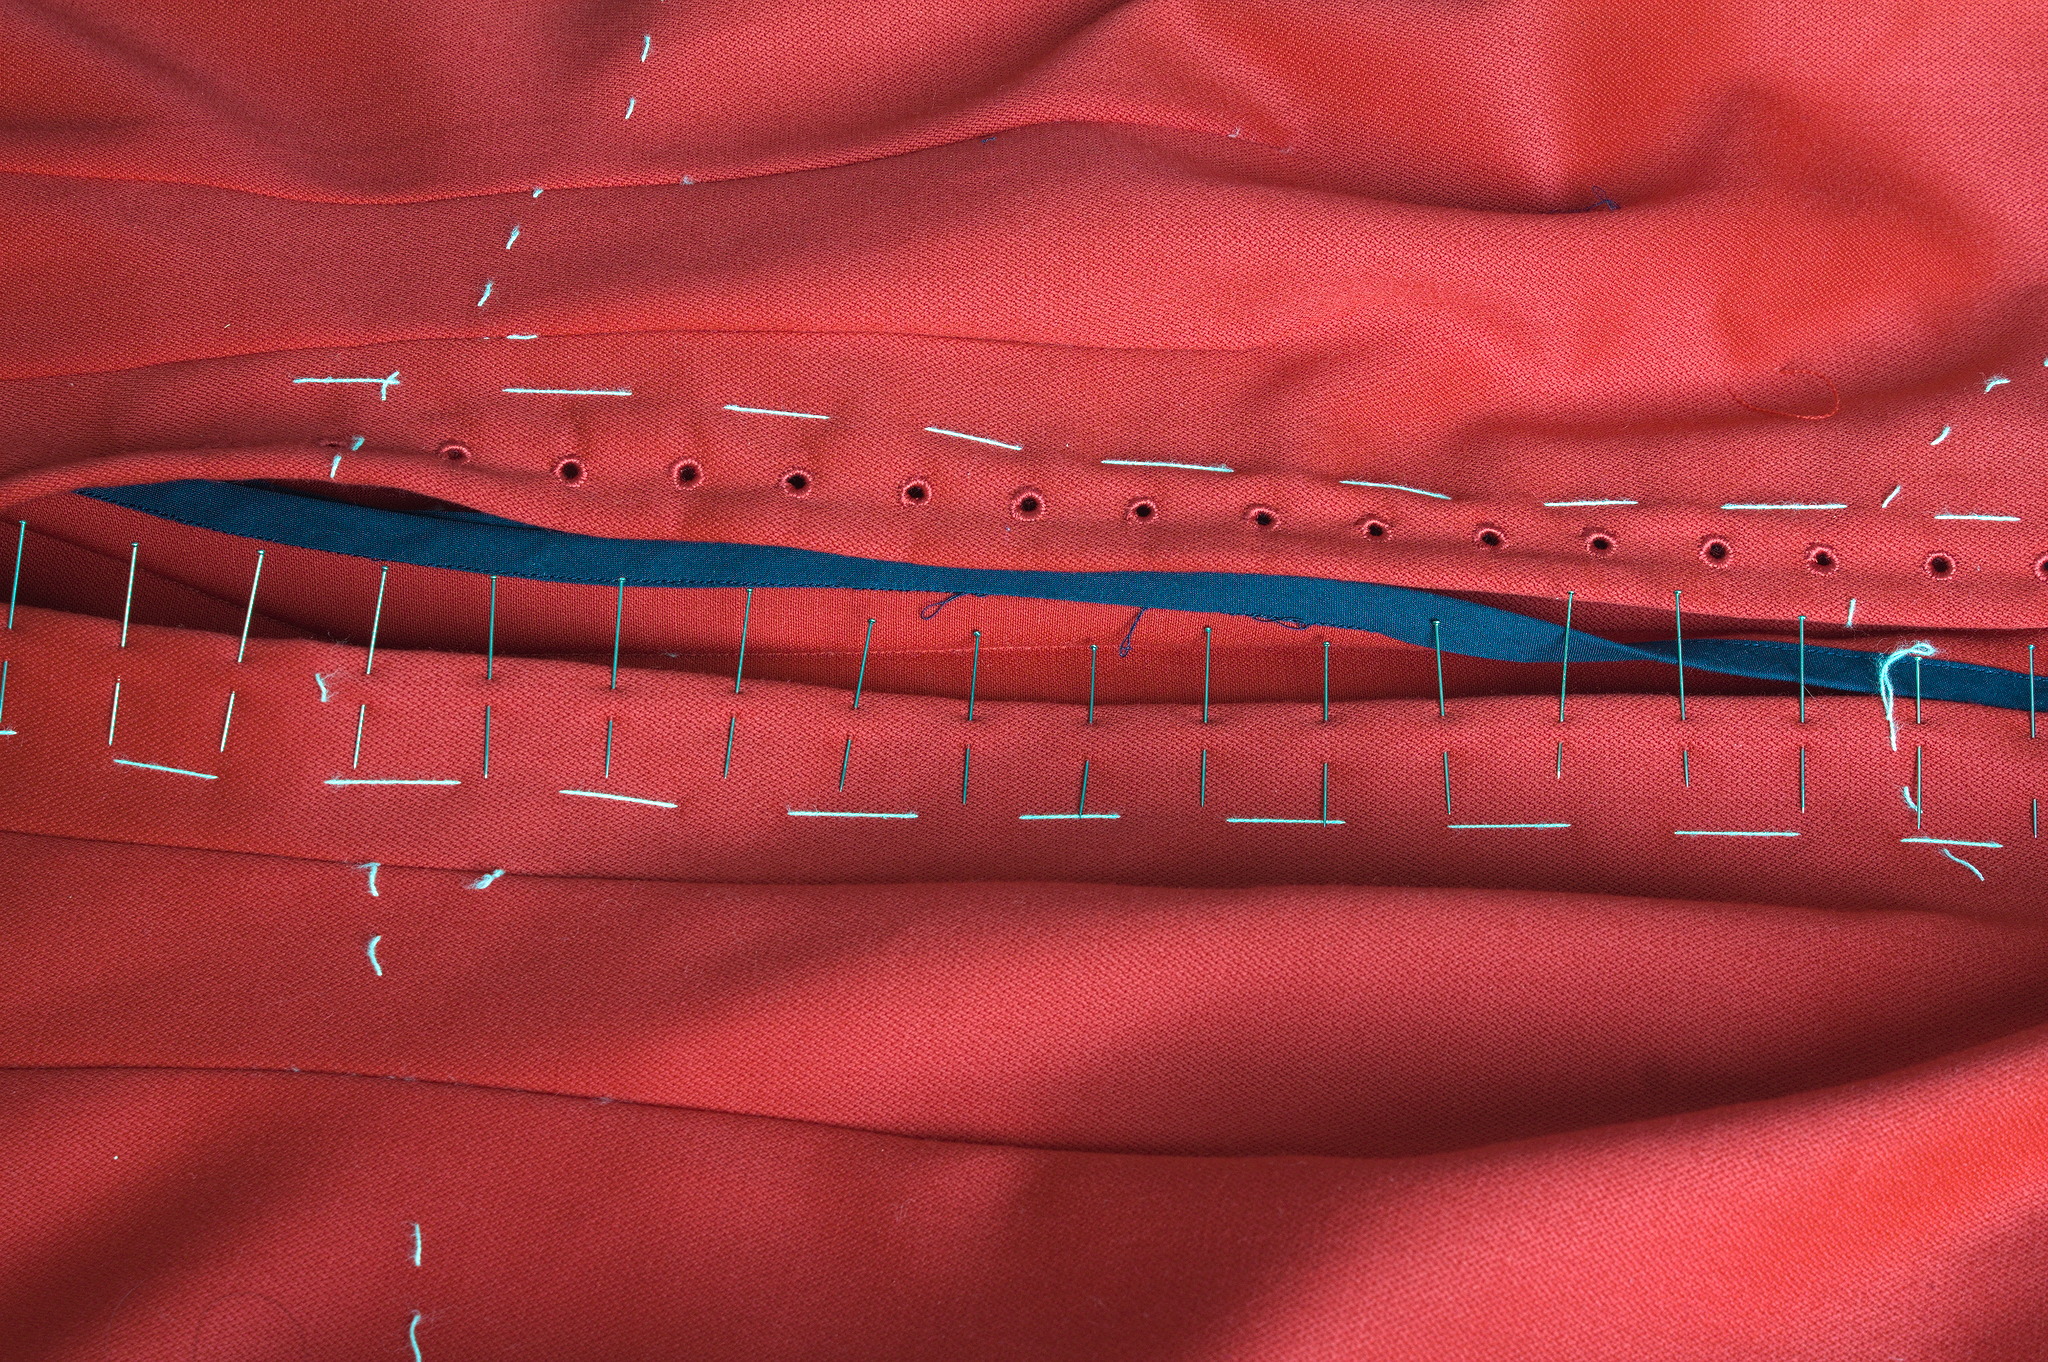 The allowances are then folded back, and then they are kept in place
by the worked lacing holes. The cotton was pinked, while for the wool I
used the selvedge of the fabric and there was no need for any finishing.
Behind the opening I ve added a modesty placket: I ve cut a strip of red
wool, a strip of cotton, folded the edge of the strip of cotton to the
center, added cording to the long sides, pressed the allowances of the
wool towards the wrong side, and then handstitched the cotton to the
wool, wrong sides facing. This was finally handstitched to one side of
the sewing allowance of the center front.
I ve also decided to add real pockets, rather than just slits, and for
some reason I decided to add them by hand after I had sewn the dress, so
I ve left opening in the side back seams, where the slits were in the
cotton dress. I ve also already worn the dress, but haven t added the
pockets yet, as I m still debating about their shape. This will be fixed
in the near future.
Another thing that will have to be fixed is the trim situation: I like
the fringe at the bottom, and I had enough to also make a belt, but this
makes the top of the dress a bit empty. I can t use the same fringe
tape, as it is too wide, but it would be nice to have something smaller
that matches the patterned part. And I think I can make something
suitable with tablet weaving, but I m not sure on which materials to
use, so it will have to be on hold for a while, until I decide on the
supplies and have the time for making it.
Another improvement I d like to add are detached sleeves, both matching
(I should still have just enough fabric) and contrasting, but first I
want to learn more about real kirtle construction, and maybe start
making sleeves that would be suitable also for a real kirtle.
Meanwhile, I ve worn it on Christmas (over my 1700s menswear shirt with
big sleeves) and may wear it again tomorrow (if I bother to dress up to
spend New Year s Eve at home :D )
The allowances are then folded back, and then they are kept in place
by the worked lacing holes. The cotton was pinked, while for the wool I
used the selvedge of the fabric and there was no need for any finishing.
Behind the opening I ve added a modesty placket: I ve cut a strip of red
wool, a strip of cotton, folded the edge of the strip of cotton to the
center, added cording to the long sides, pressed the allowances of the
wool towards the wrong side, and then handstitched the cotton to the
wool, wrong sides facing. This was finally handstitched to one side of
the sewing allowance of the center front.
I ve also decided to add real pockets, rather than just slits, and for
some reason I decided to add them by hand after I had sewn the dress, so
I ve left opening in the side back seams, where the slits were in the
cotton dress. I ve also already worn the dress, but haven t added the
pockets yet, as I m still debating about their shape. This will be fixed
in the near future.
Another thing that will have to be fixed is the trim situation: I like
the fringe at the bottom, and I had enough to also make a belt, but this
makes the top of the dress a bit empty. I can t use the same fringe
tape, as it is too wide, but it would be nice to have something smaller
that matches the patterned part. And I think I can make something
suitable with tablet weaving, but I m not sure on which materials to
use, so it will have to be on hold for a while, until I decide on the
supplies and have the time for making it.
Another improvement I d like to add are detached sleeves, both matching
(I should still have just enough fabric) and contrasting, but first I
want to learn more about real kirtle construction, and maybe start
making sleeves that would be suitable also for a real kirtle.
Meanwhile, I ve worn it on Christmas (over my 1700s menswear shirt with
big sleeves) and may wear it again tomorrow (if I bother to dress up to
spend New Year s Eve at home :D )
 This post describes how I m using


