Search Results: "bug1"

9 December 2023

Simon Josefsson: Classic McEliece goes to IETF and OpenSSH

My earlier work on Streamlined NTRU Prime has been progressing along. The IETF document on sntrup761 in SSH has passed several process points. GnuPG s libgcrypt has added support for sntrup761. The libssh support for sntrup761 is working, but the merge request is stuck mostly due to lack of time to debug why the regression test suite sporadically errors out in non-sntrup761 related parts with the patch. The foundation for lattice-based post-quantum algorithms has some uncertainty around it, and I have felt that there is more to the post-quantum story than adding sntrup761 to implementations. Classic McEliece has been mentioned to me a couple of times, and I took some time to learn it and did a cut n paste job of the proposed ISO standard and published draft-josefsson-mceliece in the IETF to make the algorithm easily available to the IETF community. A high-quality implementation of Classic McEliece has been published as libmceliece and I ve been supporting the work of Jan Moj to package libmceliece for Debian, alas it has been stuck in the ftp-master NEW queue for manual review for over two months. The pre-dependencies librandombytes and libcpucycles are available in Debian already. All that text writing and packaging work set the scene to write some code. When I added support for sntrup761 in libssh, I became familiar with the OpenSSH code base, so it was natural to return to OpenSSH to experiment with a new SSH KEX for Classic McEliece. DJB suggested to pick mceliece6688128 and combine it with the existing X25519+sntrup761 or with plain X25519. While a three-algorithm hybrid between X25519, sntrup761 and mceliece6688128 would be a simple drop-in for those that don t want to lose the benefits offered by sntrup761, I decided to start the journey on a pure combination of X25519 with mceliece6688128. The key combiner in sntrup761x25519 is a simple SHA512 call and the only good I can say about that is that it is simple to describe and implement, and doesn t raise too many questions since it is already deployed. After procrastinating coding for months, once I sat down to work it only took a couple of hours until I had a successful Classic McEliece SSH connection. I suppose my brain had sorted everything in background before I started. To reproduce it, please try the following in a Debian testing environment (I use podman to get a clean environment).
# podman run -it --rm debian:testing-slim
apt update
apt dist-upgrade -y
apt install -y wget python3 librandombytes-dev libcpucycles-dev gcc make git autoconf libz-dev libssl-dev
cd ~
wget -q -O- https://lib.mceliece.org/libmceliece-20230612.tar.gz   tar xfz -
cd libmceliece-20230612/
./configure
make install
ldconfig
cd ..
git clone https://gitlab.com/jas/openssh-portable
cd openssh-portable
git checkout jas/mceliece
autoreconf
./configure # verify 'libmceliece support: yes'
make # CC="cc -DDEBUG_KEX=1 -DDEBUG_KEXDH=1 -DDEBUG_KEXECDH=1"
You should now have a working SSH client and server that supports Classic McEliece! Verify support by running ./ssh -Q kex and it should mention mceliece6688128x25519-sha512@openssh.com. To have it print plenty of debug outputs, you may remove the # character on the final line, but don t use such a build in production. You can test it as follows:
./ssh-keygen -A # writes to /usr/local/etc/ssh_host_...
# setup public-key based login by running the following:
./ssh-keygen -t rsa -f ~/.ssh/id_rsa -P ""
cat ~/.ssh/id_rsa.pub > ~/.ssh/authorized_keys
adduser --system sshd
mkdir /var/empty
while true; do $PWD/sshd -p 2222 -f /dev/null; done &
./ssh -v -p 2222 localhost -oKexAlgorithms=mceliece6688128x25519-sha512@openssh.com date
On the client you should see output like this:
OpenSSH_9.5p1, OpenSSL 3.0.11 19 Sep 2023
...
debug1: SSH2_MSG_KEXINIT sent
debug1: SSH2_MSG_KEXINIT received
debug1: kex: algorithm: mceliece6688128x25519-sha512@openssh.com
debug1: kex: host key algorithm: ssh-ed25519
debug1: kex: server->client cipher: chacha20-poly1305@openssh.com MAC: <implicit> compression: none
debug1: kex: client->server cipher: chacha20-poly1305@openssh.com MAC: <implicit> compression: none
debug1: expecting SSH2_MSG_KEX_ECDH_REPLY
debug1: SSH2_MSG_KEX_ECDH_REPLY received
debug1: Server host key: ssh-ed25519 SHA256:YognhWY7+399J+/V8eAQWmM3UFDLT0dkmoj3pIJ0zXs
...
debug1: Host '[localhost]:2222' is known and matches the ED25519 host key.
debug1: Found key in /root/.ssh/known_hosts:1
debug1: rekey out after 134217728 blocks
debug1: SSH2_MSG_NEWKEYS sent
debug1: expecting SSH2_MSG_NEWKEYS
debug1: SSH2_MSG_NEWKEYS received
debug1: rekey in after 134217728 blocks
...
debug1: Sending command: date
debug1: pledge: fork
debug1: permanently_set_uid: 0/0
Environment:
  USER=root
  LOGNAME=root
  HOME=/root
  PATH=/usr/bin:/bin:/usr/sbin:/sbin:/usr/local/bin
  MAIL=/var/mail/root
  SHELL=/bin/bash
  SSH_CLIENT=::1 46894 2222
  SSH_CONNECTION=::1 46894 ::1 2222
debug1: client_input_channel_req: channel 0 rtype exit-status reply 0
debug1: client_input_channel_req: channel 0 rtype eow@openssh.com reply 0
Sat Dec  9 22:22:40 UTC 2023
debug1: channel 0: free: client-session, nchannels 1
Transferred: sent 1048044, received 3500 bytes, in 0.0 seconds
Bytes per second: sent 23388935.4, received 78108.6
debug1: Exit status 0
Notice the kex: algorithm: mceliece6688128x25519-sha512@openssh.com output. How about network bandwidth usage? Below is a comparison of a complete SSH client connection such as the one above that log in and print date and logs out. Plain X25519 is around 7kb, X25519 with sntrup761 is around 9kb, and mceliece6688128 with X25519 is around 1MB. Yes, Classic McEliece has large keys, but for many environments, 1MB of data for the session establishment will barely be noticeable.
./ssh -v -p 2222 localhost -oKexAlgorithms=curve25519-sha256 date 2>&1   grep ^Transferred
Transferred: sent 3028, received 3612 bytes, in 0.0 seconds
./ssh -v -p 2222 localhost -oKexAlgorithms=sntrup761x25519-sha512@openssh.com date 2>&1   grep ^Transferred
Transferred: sent 4212, received 4596 bytes, in 0.0 seconds
./ssh -v -p 2222 localhost -oKexAlgorithms=mceliece6688128x25519-sha512@openssh.com date 2>&1   grep ^Transferred
Transferred: sent 1048044, received 3764 bytes, in 0.0 seconds
So how about session establishment time?
date; i=0; while test $i -le 100; do ./ssh -v -p 2222 localhost -oKexAlgorithms=curve25519-sha256 date > /dev/null 2>&1; i= expr $i + 1 ; done; date
Sat Dec  9 22:39:19 UTC 2023
Sat Dec  9 22:39:25 UTC 2023
# 6 seconds
date; i=0; while test $i -le 100; do ./ssh -v -p 2222 localhost -oKexAlgorithms=sntrup761x25519-sha512@openssh.com date > /dev/null 2>&1; i= expr $i + 1 ; done; date
Sat Dec  9 22:39:29 UTC 2023
Sat Dec  9 22:39:38 UTC 2023
# 9 seconds
date; i=0; while test $i -le 100; do ./ssh -v -p 2222 localhost -oKexAlgorithms=mceliece6688128x25519-sha512@openssh.com date > /dev/null 2>&1; i= expr $i + 1 ; done; date
Sat Dec  9 22:39:55 UTC 2023
Sat Dec  9 22:40:07 UTC 2023
# 12 seconds
I never noticed adding sntrup761, so I m pretty sure I wouldn t notice this increase either. This is all running on my laptop that runs Trisquel so take it with a grain of salt but at least the magnitude is clear. Future work items include: Happy post-quantum SSH ing! Update: Changing the mceliece6688128_keypair call to mceliece6688128f_keypair (i.e., using the fully compatible f-variant) results in McEliece being just as fast as sntrup761 on my machine. Update 2023-12-26: An initial IETF document draft-josefsson-ssh-mceliece-00 published.

26 July 2023

Enrico Zini: Mysterious DNS issues

Uhm, salsa is not resolving:
$ git fetch
ssh: Could not resolve hostname salsa.debian.org: Name or service not known
fatal: Could not read from remote repository.
$ ping salsa.debian.org
ping: salsa.debian.org: Name or service not known
But... it is?
$ host salsa.debian.org
salsa.debian.org has address 209.87.16.44
salsa.debian.org has IPv6 address 2607:f8f0:614:1::1274:44
salsa.debian.org mail is handled by 10 mailly.debian.org.
salsa.debian.org mail is handled by 10 mitropoulos.debian.org.
salsa.debian.org mail is handled by 10 muffat.debian.org.
It really is resolving correctly at each step:
$ cat /etc/resolv.conf
# This is /run/systemd/resolve/stub-resolv.conf managed by man:systemd-resolved(8).
# Do not edit.
# [...]
# Run "resolvectl status" to see details about the uplink DNS servers
# currently in use.
# [...]
nameserver 127.0.0.53
options edns0 trust-ad
search fritz.box
$ host salsa.debian.org 127.0.0.53
Using domain server:
Name: 127.0.0.53
Address: 127.0.0.53#53
Aliases:
salsa.debian.org has address 209.87.16.44
salsa.debian.org has IPv6 address 2607:f8f0:614:1::1274:44
salsa.debian.org mail is handled by 10 mailly.debian.org.
salsa.debian.org mail is handled by 10 muffat.debian.org.
salsa.debian.org mail is handled by 10 mitropoulos.debian.org.
# resolvectl status
Global
       Protocols: +LLMNR +mDNS -DNSOverTLS DNSSEC=no/unsupported
resolv.conf mode: stub
Link 3 (wlp108s0)
    Current Scopes: DNS LLMNR/IPv4 LLMNR/IPv6
         Protocols: +DefaultRoute +LLMNR -mDNS -DNSOverTLS DNSSEC=no/unsupported
Current DNS Server: 192.168.178.1
       DNS Servers: 192.168.178.1 fd00::3e37:12ff:fe99:2301 2a01:b600:6fed:1:3e37:12ff:fe99:2301
        DNS Domain: fritz.box
Link 4 (virbr0)
Current Scopes: none
     Protocols: -DefaultRoute +LLMNR -mDNS -DNSOverTLS DNSSEC=no/unsupported
Link 9 (enxace2d39ce693)
    Current Scopes: DNS LLMNR/IPv4 LLMNR/IPv6
         Protocols: +DefaultRoute +LLMNR -mDNS -DNSOverTLS DNSSEC=no/unsupported
Current DNS Server: 192.168.178.1
       DNS Servers: 192.168.178.1 fd00::3e37:12ff:fe99:2301 2a01:b600:6fed:1:3e37:12ff:fe99:2301
        DNS Domain: fritz.box
$ host salsa.debian.org 192.168.178.1
Using domain server:
Name: 192.168.178.1
Address: 192.168.178.1#53
Aliases:
salsa.debian.org has address 209.87.16.44
salsa.debian.org has IPv6 address 2607:f8f0:614:1::1274:44
salsa.debian.org mail is handled by 10 muffat.debian.org.
salsa.debian.org mail is handled by 10 mitropoulos.debian.org.
salsa.debian.org mail is handled by 10 mailly.debian.org.
$ host salsa.debian.org fd00::3e37:12ff:fe99:2301 2a01:b600:6fed:1:3e37:12ff:fe99:2301
Using domain server:
Name: fd00::3e37:12ff:fe99:2301
Address: fd00::3e37:12ff:fe99:2301#53
Aliases:
salsa.debian.org has address 209.87.16.44
salsa.debian.org has IPv6 address 2607:f8f0:614:1::1274:44
salsa.debian.org mail is handled by 10 muffat.debian.org.
salsa.debian.org mail is handled by 10 mitropoulos.debian.org.
salsa.debian.org mail is handled by 10 mailly.debian.org.
Could it be caching?
# systemctl restart systemd-resolved
$ dpkg -s nscd
dpkg-query: package 'nscd' is not installed and no information is available
$ git fetch
ssh: Could not resolve hostname salsa.debian.org: Name or service not known
fatal: Could not read from remote repository.
Could it be something in ssh's config?
$ grep salsa ~/.ssh/config
$ ssh git@salsa.debian.org
ssh: Could not resolve hostname salsa.debian.org: Name or service not known
Something weird with ssh's control sockets?
$ strace -fo /tmp/zz ssh git@salsa.debian.org
ssh: Could not resolve hostname salsa.debian.org: Name or service not known
enrico@ploma:~/lavori/legal/legal$ grep salsa /tmp/zz
393990 execve("/usr/bin/ssh", ["ssh", "git@salsa.debian.org"], 0x7ffffcfe42d8 /* 54 vars */) = 0
393990 connect(3,  sa_family=AF_UNIX, sun_path="/home/enrico/.ssh/sock/git@salsa.debian.org:22" , 110) = -1 ENOENT (No such file or directory)
$ strace -fo /tmp/zz1 ssh -S none git@salsa.debian.org
ssh: Could not resolve hostname salsa.debian.org: Name or service not known
$ grep salsa /tmp/zz1
394069 execve("/usr/bin/ssh", ["ssh", "-S", "none", "git@salsa.debian.org"], 0x7ffd36cbfde8 /* 54 vars */) = 0
How is ssh trying to resolve salsa.debian.org?
393990 socket(AF_UNIX, SOCK_STREAM SOCK_CLOEXEC SOCK_NONBLOCK, 0) = 3
393990 connect(3,  sa_family=AF_UNIX, sun_path="/run/systemd/resolve/io.systemd.Resolve" , 42) = 0
393990 sendto(3, " \"method\":\"io.systemd.Resolve.Re"..., 99, MSG_DONTWAIT MSG_NOSIGNAL, NULL, 0) = 99
393990 mmap(NULL, 135168, PROT_READ PROT_WRITE, MAP_PRIVATE MAP_ANONYMOUS, -1, 0) = 0x7f4fc71ca000
393990 recvfrom(3, 0x7f4fc71ca010, 135152, MSG_DONTWAIT, NULL, NULL) = -1 EAGAIN (Resource temporarily unavailable)
393990 ppoll([ fd=3, events=POLLIN ], 1,  tv_sec=119, tv_nsec=999917000 , NULL, 8) = 1 ([ fd=3, revents=POLLIN ], left  tv_sec=119, tv_nsec=998915689 )
393990 recvfrom(3, " \"error\":\"io.systemd.System\",\"pa"..., 135152, MSG_DONTWAIT, NULL, NULL) = 56
393990 rt_sigprocmask(SIG_SETMASK, [], NULL, 8) = 0
393990 close(3)                         = 0
393990 munmap(0x7f4fc71ca000, 135168)   = 0
393990 getpid()                         = 393990
393990 write(2, "ssh: Could not resolve hostname "..., 77) = 77
Something weird with resolved?
$ resolvectl query salsa.debian.org
salsa.debian.org: resolve call failed: Lookup failed due to system error: Invalid argument
Let's try disrupting what ssh is trying and failing:
# mv /run/systemd/resolve/io.systemd.Resolve /run/systemd/resolve/io.systemd.Resolve.backup
$ strace -o /tmp/zz2 ssh -S none -vv git@salsa.debian.org
OpenSSH_9.2p1 Debian-2, OpenSSL 3.0.9 30 May 2023
debug1: Reading configuration data /home/enrico/.ssh/config
debug1: /home/enrico/.ssh/config line 1: Applying options for *
debug1: /home/enrico/.ssh/config line 228: Applying options for *.debian.org
debug1: Reading configuration data /etc/ssh/ssh_config
debug1: /etc/ssh/ssh_config line 19: include /etc/ssh/ssh_config.d/*.conf matched no files
debug1: /etc/ssh/ssh_config line 21: Applying options for *
debug2: resolving "salsa.debian.org" port 22
ssh: Could not resolve hostname salsa.debian.org: Name or service not known
$ tail /tmp/zz2
394748 prctl(PR_CAPBSET_READ, 0x29 /* CAP_??? */) = -1 EINVAL (Invalid argument)
394748 munmap(0x7f27af5ef000, 164622)   = 0
394748 rt_sigprocmask(SIG_BLOCK, [HUP USR1 USR2 PIPE ALRM CHLD TSTP URG VTALRM PROF WINCH IO], [], 8) = 0
394748 futex(0x7f27ae5feaec, FUTEX_WAKE_PRIVATE, 2147483647) = 0
394748 openat(AT_FDCWD, "/run/systemd/machines/salsa.debian.org", O_RDONLY O_CLOEXEC) = -1 ENOENT (No such file or directory)
394748 rt_sigprocmask(SIG_SETMASK, [], NULL, 8) = 0
394748 getpid()                         = 394748
394748 write(2, "ssh: Could not resolve hostname "..., 77) = 77
394748 exit_group(255)                  = ?
394748 +++ exited with 255 +++
$ machinectl list
No machines.
# resolvectl flush-caches
$ resolvectl query salsa.debian.org
salsa.debian.org: resolve call failed: Lookup failed due to system error: Invalid argument
# resolvectl reset-statistics
$ resolvectl query salsa.debian.org
salsa.debian.org: resolve call failed: Lookup failed due to system error: Invalid argument
# resolvectl reset-server-features
$ resolvectl query salsa.debian.org
salsa.debian.org: resolve call failed: Lookup failed due to system error: Invalid argument
# resolvectl monitor
  Q: salsa.debian.org IN A
  Q: salsa.debian.org IN AAAA
  S: EINVAL
  A: debian.org IN NS sec2.rcode0.net
  A: debian.org IN NS sec1.rcode0.net
  A: debian.org IN NS nsp.dnsnode.net
  A: salsa.debian.org IN A 209.87.16.44
  A: debian.org IN NS dns4.easydns.info
I guess I won't be using salsa today, and I wish I understood why. Update: as soon as I pushed this post to my blog (via ssh) salsa started resolving again.

27 January 2023

Matthew Garrett: Further adventures in Apple PKCS#11 land

After my previous efforts, I wrote up a PKCS#11 module of my own that had no odd restrictions about using non-RSA keys and I tested it. And things looked much better - ssh successfully obtained the key, negotiated with the server to determine that it was present in authorized_keys, and then went to actually do the key verification step. At which point things went wrong - the Sign() method in my PKCS#11 module was never called, and a strange
debug1: identity_sign: sshkey_sign: error in libcrypto
sign_and_send_pubkey: signing failed for ECDSA "testkey": error in libcrypto"

error appeared in the ssh output. Odd. libcrypto was originally part of OpenSSL, but Apple ship the LibreSSL fork. Apple don't include the LibreSSL source in their public source repo, but do include OpenSSH. I grabbed the OpenSSH source and jumped through a whole bunch of hoops to make it build (it uses the macosx.internal SDK, which isn't publicly available, so I had to cobble together a bunch of headers from various places), and also installed upstream LibreSSL with a version number matching what Apple shipped. And everything worked - I logged into the server using a hardware-backed key.

Was the difference in OpenSSH or in LibreSSL? Telling my OpenSSH to use the system libcrypto resulted in the same failure, so it seemed pretty clear this was an issue with the Apple version of the library. The way all this works is that when OpenSSH has a challenge to sign, it calls ECDSA_do_sign(). This then calls ECDSA_do_sign_ex(), which in turn follows a function pointer to the actual signature method. By default this is a software implementation that expects to have the private key available, but you can also register your own callback that will be used instead. The OpenSSH PKCS#11 code does this by calling EC_KEY_set_method(), and as a result calling ECDSA_do_sign() ends up calling back into the PKCS#11 code that then calls into the module that communicates with the hardware and everything works.

Except it doesn't under macOS. Running under a debugger and setting a breakpoint on EC_do_sign(), I saw that we went down a code path with a function called ECDSA_do_sign_new(). This doesn't appear in any of the public source code, so seems to be an Apple-specific patch. I pushed Apple's libcrypto into Ghidra and looked at ECDSA_do_sign() and found something that approximates this:
nid = EC_GROUP_get_curve_name(curve);
if (nid == NID_X9_62_prime256v1)  
  return ECDSA_do_sign_new(dgst,dgst_len,eckey);
 
return ECDSA_do_sign_ex(dgst,dgst_len,NULL,NULL,eckey);
What this means is that if you ask ECDSA_do_sign() to sign something on a Mac, and if the key in question corresponds to the NIST P256 elliptic curve type, it goes down the ECDSA_do_sign_new() path and never calls the registered callback. This is the only key type supported by the Apple Secure Enclave, so I assume it's special-cased to do something with that. Unfortunately the consequence is that it's impossible to use a PKCS#11 module that uses Secure Enclave keys with the shipped version of OpenSSH under macOS. For now I'm working around this with an SSH agent built using Go's agent module, forwarding most requests through to the default session agent but appending hardware-backed keys and implementing signing with them, which is probably what I should have done in the first place.

comment count unavailable comments

22 March 2022

Tollef Fog Heen: DNSSEC, ssh and VerifyHostKeyDNS

OpenSSH has this very nice setting, VerifyHostKeyDNS, which when enabled, will pull SSH host keys from DNS, and you no longer need to either trust on first use, or copy host keys around out of band. Naturally, trusting unsecured DNS is a bit scary, so this requires the record to be signed using DNSSEC. This has worked for a long time, but then broke, seemingly out of the blue. Running ssh -vvv gave output similar to
debug1: found 4 insecure fingerprints in DNS
debug3: verify_host_key_dns: checking SSHFP type 1 fptype 2
debug3: verify_host_key_dns: checking SSHFP type 4 fptype 2
debug1: verify_host_key_dns: matched SSHFP type 4 fptype 2
debug3: verify_host_key_dns: checking SSHFP type 4 fptype 1
debug1: verify_host_key_dns: matched SSHFP type 4 fptype 1
debug3: verify_host_key_dns: checking SSHFP type 1 fptype 1
debug1: matching host key fingerprint found in DNS
even though the zone was signed, the resolver was checking the signature and I even checked that the DNS response had the AD bit set. The fix was to add options trust-ad to /etc/resolv.conf. Without this, glibc will discard the AD bit from any upstream DNS servers. Note that you should only add this if you actually have a trusted DNS resolver. I run unbound on localhost, so if somebody can do a man-in-the-middle attack on that traffic, I have other problems.

20 September 2021

Jamie McClelland: Putty Problems

I upgraded my first servers from buster to bullseye over the weekend and it went very smoothly, so big thank you to all the debian developers who contributed your labor to the bullseye release! This morning, however, I hit a snag when the first windows users tried to login. It seems like a putty bug (see update below). First, the user received an error related to algorithm selection. I didn t record the exact error and simply suggested that the user upgrade. Once the user was running the latest version of putty (0.76), they received a new error:
Server refused public-key signature despite accepting key!
I turned up debugging on the server and recorded:
Sep 20 13:10:32 container001 sshd[1647842]: Accepted key RSA SHA256:t3DVS5wZmO7DVwqFc41AvwgS5gx1jDWnR89apGmFpf4 found at /home/XXXXXXXXX/.ssh/authorized_keys:6
Sep 20 13:10:32 container001 sshd[1647842]: debug1: restore_uid: 0/0
Sep 20 13:10:32 container001 sshd[1647842]: Postponed publickey for XXXXXXXXX from xxx.xxx.xxx.xxx port 63579 ssh2 [preauth]
Sep 20 13:10:33 container001 sshd[1647842]: debug1: userauth-request for user XXXXXXXXX service ssh-connection method publickey [preauth]
Sep 20 13:10:33 container001 sshd[1647842]: debug1: attempt 2 failures 0 [preauth]
Sep 20 13:10:33 container001 sshd[1647842]: debug1: temporarily_use_uid: 1000/1000 (e=0/0)
Sep 20 13:10:33 container001 sshd[1647842]: debug1: trying public key file /home/XXXXXXXXX/.ssh/authorized_keys
Sep 20 13:10:33 container001 sshd[1647842]: debug1: fd 5 clearing O_NONBLOCK
Sep 20 13:10:33 container001 sshd[1647842]: debug1: /home/XXXXXXXXX/.ssh/authorized_keys:6: matching key found: RSA SHA256:t3DVS5wZmO7DVwqFc41AvwgS5gx1jDWnR89apGmFpf4
Sep 20 13:10:33 container001 sshd[1647842]: debug1: /home/XXXXXXXXX/.ssh/authorized_keys:6: key options: agent-forwarding port-forwarding pty user-rc x11-forwarding
Sep 20 13:10:33 container001 sshd[1647842]: Accepted key RSA SHA256:t3DVS5wZmO7DVwqFc41AvwgS5gx1jDWnR89apGmFpf4 found at /home/XXXXXXXXX/.ssh/authorized_keys:6
Sep 20 13:10:33 container001 sshd[1647842]: debug1: restore_uid: 0/0
Sep 20 13:10:33 container001 sshd[1647842]: debug1: auth_activate_options: setting new authentication options
Sep 20 13:10:33 container001 sshd[1647842]: Failed publickey for XXXXXXXXX from xxx.xxx.xxx.xxx port 63579 ssh2: RSA SHA256:t3DVS5wZmO7DVwqFc41AvwgS5gx1jDWnR89apGmFpf4
Sep 20 13:10:39 container001 sshd[1647514]: debug1: Forked child 1648153.
Sep 20 13:10:39 container001 sshd[1648153]: debug1: Set /proc/self/oom_score_adj to 0
Sep 20 13:10:39 container001 sshd[1648153]: debug1: rexec start in 5 out 5 newsock 5 pipe 8 sock 9
Sep 20 13:10:39 container001 sshd[1648153]: debug1: inetd sockets after dupping: 4, 4
The server log seems to agree with the client returned message: first the key was accepted, then it was refused. We re-generated a new key. We turned off the windows firewall. We deleted all the putty settings via the windows registry and re-set them from scratch. Nothing seemed to work. Then, another windows user reported no problem (and that user was running putty version 0.74). So the first user downgraded to 0.74 and everything worked fine.

Update Wow, very impressed with the responsiveness of putty devs! And, who knew that putty is available in debian?? Long story short: putty version 0.76 works on linux and, from what I can tell, works for everyone except my one user. Maybe it s their provider doing some filtering? Maybe a nuance to their version of Windows?

16 June 2015

Simon Josefsson: SSH Host Certificates with YubiKey NEO

If you manage a bunch of server machines, you will undoubtedly have run into the following OpenSSH question:
The authenticity of host 'host.example.org (1.2.3.4)' can't be established.
RSA key fingerprint is 1b:9b:b8:5e:74:b1:31:19:35:48:48:ba:7d:d0:01:f5.
Are you sure you want to continue connecting (yes/no)?
If the server is a single-user machine, where you are the only person expected to login on it, answering yes once and then using the ~/.ssh/known_hosts file to record the key fingerprint will (sort-of) work and protect you against future man-in-the-middle attacks. I say sort-of, since if you want to access the server from multiple machines, you will need to sync the known_hosts file somehow. And once your organization grows larger, and you aren t the only person that needs to login, having a policy that everyone just answers yes on first connection on all their machines is bad. The risk that someone is able to successfully MITM attack you grows every time someone types yes to these prompts. Setting up one (or more) SSH Certificate Authority (CA) to create SSH Host Certificates, and have your users trust this CA, will allow you and your users to automatically trust the fingerprint of the host through the indirection of the SSH Host CA. I was surprised (but probably shouldn t have been) to find that deploying this is straightforward. Even setting this up with hardware-backed keys, stored on a YubiKey NEO, is easy. Below I will explain how to set this up for a hypothethical organization where two persons (sysadmins) are responsible for installing and configuring machines. I m going to assume that you already have a couple of hosts up and running and that they run the OpenSSH daemon, so they have a /etc/ssh/ssh_host_rsa_key* public/private keypair, and that you have one YubiKey NEO with the PIV applet and that the NEO is in CCID mode. I don t believe it matters, but I m running a combination of Debian and Ubuntu machines. The Yubico PIV tool is used to configure the YubiKey NEO, and I will be using OpenSC s PKCS#11 library to connect OpenSSH with the YubiKey NEO. Let s install some tools:
apt-get install yubikey-personalization yubico-piv-tool opensc-pkcs11 pcscd
Every person responsible for signing SSH Host Certificates in your organization needs a YubiKey NEO. For my example, there will only be two persons, but the number could be larger. Each one of them will have to go through the following process. The first step is to prepare the NEO. First mode switch it to CCID using some device configuration tool, like yubikey-personalization.
ykpersonalize -m1
Then prepare the PIV applet in the YubiKey NEO. This is covered by the YubiKey NEO PIV Introduction but I ll reproduce the commands below. Do this on a disconnected machine, saving all files generated on one or more secure media and store that in a safe.
user=simon
key= dd if=/dev/random bs=1 count=24 2>/dev/null   hexdump -v -e '/1 "%02X"' 
echo $key > ssh-$user-key.txt
pin= dd if=/dev/random bs=1 count=6 2>/dev/null   hexdump -v -e '/1 "%u"' cut -c1-6 
echo $pin > ssh-$user-pin.txt
puk= dd if=/dev/random bs=1 count=6 2>/dev/null   hexdump -v -e '/1 "%u"' cut -c1-8 
echo $puk > ssh-$user-puk.txt
yubico-piv-tool -a set-mgm-key -n $key
yubico-piv-tool -k $key -a change-pin -P 123456 -N $pin
yubico-piv-tool -k $key -a change-puk -P 12345678 -N $puk
Then generate a RSA private key for the SSH Host CA, and generate a dummy X.509 certificate for that key. The only use for the X.509 certificate is to make PIV/PKCS#11 happy they want to be able to extract the public-key from the smartcard, and do that through the X.509 certificate.
openssl genrsa -out ssh-$user-ca-key.pem 2048
openssl req -new -x509 -batch -key ssh-$user-ca-key.pem -out ssh-$user-ca-crt.pem
You import the key and certificate to the PIV applet as follows:
yubico-piv-tool -k $key -a import-key -s 9c < ssh-$user-ca-key.pem
yubico-piv-tool -k $key -a import-certificate -s 9c < ssh-$user-ca-crt.pem
You now have a SSH Host CA ready to go! The first thing you want to do is to extract the public-key for the CA, and you use OpenSSH's ssh-keygen for this, specifying OpenSC's PKCS#11 module.
ssh-keygen -D /usr/lib/x86_64-linux-gnu/opensc-pkcs11.so -e > ssh-$user-ca-key.pub
If you happen to use YubiKey NEO with OpenPGP using gpg-agent/scdaemon, you may get the following error message:
no slots
cannot read public key from pkcs11
The reason is that scdaemon exclusively locks the smartcard, so no other application can access it. You need to kill scdaemon, which can be done as follows:
gpg-connect-agent SCD KILLSCD SCD BYE /bye
The output from ssh-keygen may look like this:
ssh-rsa AAAAB3NzaC1yc2EAAAADAQABAAABAQCp+gbwBHova/OnWMj99A6HbeMAGE7eP3S9lKm4/fk86Qd9bzzNNz2TKHM7V1IMEj0GxeiagDC9FMVIcbg5OaSDkuT0wGzLAJWgY2Fn3AksgA6cjA3fYQCKw0Kq4/ySFX+Zb+A8zhJgCkMWT0ZB0ZEWi4zFbG4D/q6IvCAZBtdRKkj8nJtT5l3D3TGPXCWa2A2pptGVDgs+0FYbHX0ynD0KfB4PmtR4fVQyGJjJ0MbF7fXFzQVcWiBtui8WR/Np9tvYLUJHkAXY/FjLOZf9ye0jLgP1yE10+ihe7BCxkM79GU9BsyRgRt3oArawUuU6tLgkaMN8kZPKAdq0wxNauFtH
Now all your users in your organization needs to add a line to their ~/.ssh/known_hosts as follows:
@cert-authority *.example.com ssh-rsa AAAAB3NzaC1yc2EAAAADAQABAAABAQCp+gbwBHova/OnWMj99A6HbeMAGE7eP3S9lKm4/fk86Qd9bzzNNz2TKHM7V1IMEj0GxeiagDC9FMVIcbg5OaSDkuT0wGzLAJWgY2Fn3AksgA6cjA3fYQCKw0Kq4/ySFX+Zb+A8zhJgCkMWT0ZB0ZEWi4zFbG4D/q6IvCAZBtdRKkj8nJtT5l3D3TGPXCWa2A2pptGVDgs+0FYbHX0ynD0KfB4PmtR4fVQyGJjJ0MbF7fXFzQVcWiBtui8WR/Np9tvYLUJHkAXY/FjLOZf9ye0jLgP1yE10+ihe7BCxkM79GU9BsyRgRt3oArawUuU6tLgkaMN8kZPKAdq0wxNauFtH
Each sysadmin needs to go through this process, and each user needs to add one line for each sysadmin. While you could put the same key/certificate on multiple YubiKey NEOs, to allow users to only have to put one line into their file, dealing with revocation becomes a bit more complicated if you do that. If you have multiple CA keys in use at the same time, you can roll over to new CA keys without disturbing production. Users may also have different policies for different machines, so that not all sysadmins have the power to create host keys for all machines in your organization. The CA setup is now complete, however it isn't doing anything on its own. We need to sign some host keys using the CA, and to configure the hosts' sshd to use them. What you could do is something like this, for every host host.example.com that you want to create keys for:
h=host.example.com
scp root@$h:/etc/ssh/ssh_host_rsa_key.pub .
gpg-connect-agent "SCD KILLSCD" "SCD BYE" /bye
ssh-keygen -D /usr/lib/x86_64-linux-gnu/opensc-pkcs11.so -s ssh-$user-ca-key.pub -I $h -h -n $h -V +52w ssh_host_rsa_key.pub
scp ssh_host_rsa_key-cert.pub root@$h:/etc/ssh/
The ssh-keygen command will use OpenSC's PKCS#11 library to talk to the PIV applet on the NEO, and it will prompt you for the PIN. Enter the PIN that you set above. The output of the command would be something like this:
Enter PIN for 'PIV_II (PIV Card Holder pin)': 
Signed host key ssh_host_rsa_key-cert.pub: id "host.example.com" serial 0 for host.example.com valid from 2015-06-16T13:39:00 to 2016-06-14T13:40:58
The host now has a SSH Host Certificate installed. To use it, you must make sure that /etc/ssh/sshd_config has the following line:
HostCertificate /etc/ssh/ssh_host_rsa_key-cert.pub
You need to restart sshd to apply the configuration change. If you now try to connect to the host, you will likely still use the known_hosts fingerprint approach. So remove the fingerprint from your machine:
ssh-keygen -R $h
Now if you attempt to ssh to the host, and using the -v parameter to ssh, you will see the following:
debug1: Server host key: RSA-CERT 1b:9b:b8:5e:74:b1:31:19:35:48:48:ba:7d:d0:01:f5
debug1: Host 'host.example.com' is known and matches the RSA-CERT host certificate.
Success! One aspect that may warrant further discussion is the host keys. Here I only created host certificates for the hosts' RSA key. You could create host certificate for the DSA, ECDSA and Ed25519 keys as well. The reason I did not do that was that in this organization, we all used GnuPG's gpg-agent/scdaemon with YubiKey NEO's OpenPGP Card Applet with RSA keys for user authentication. So only the host RSA key is relevant. Revocation of a YubiKey NEO key is implemented by asking users to drop the corresponding line for one of the sysadmins, and regenerate the host certificate for the hosts that the sysadmin had created host certificates for. This is one reason users should have at least two CAs for your organization that they trust for signing host certificates, so they can migrate away from one of them to the other without interrupting operations.

23 May 2015

Eddy Petri&#537;or: HOWTO: No SSH logins SFTP only chrooted server configuration with OpenSSH

If you are in a situation where you want to set up a SFTP server in a more secure way, don't want to expose anything from the server via SFTP and do not want to enable SSH login on the account allowed to sftp, you might find the information below useful.

What do we want to achive:
To obtain all of the above we will create a dedicated account which will be chroot-ed, its home will be stored on a removable/no always mounted drive (acessing SFTP will not work when the drive is not mounted).

Mount the removable drive which will hold the SFTP area (you might need to add some entry in fstab).

Create the account to be used for SFTP access (on a Debian system this will do the trick):
# adduser --system --home /media/Store/sftp --shell /usr/sbin/nologin sftp

This will create the account sftp which has login disabled, shell is /usr/sbin/nologin and create the home directory for this user.

Unfortunately the default ownership of the home directory of this user are incompatible with chroot-ing in SFTP (which prevents access to other files on the server). A message like the one below will be generated in this kind of case:
$ sftp -v sftp@localhost
[..]
sftp@localhost's password:
debug1: Authentication succeeded (password).
Authenticated to localhost ([::1]:22).
debug1: channel 0: new [client-session]
debug1: Requesting no-more-sessions@openssh.com
debug1: Entering interactive session.
Write failed: Broken pipe
Couldn't read packet: Connection reset by peer
Also /var/log/auth.log will contain something like this:
fatal: bad ownership or modes for chroot directory "/media/Store/sftp"

The default permissions are visible using the 'namei -l' command on the sftp home directory:
# namei -l /media/Store/sftp
f: /media/Store/sftp
drwxr-xr-x root root /
drwxr-xr-x root root media
drwxr-xr-x root root Store
drwxr-xr-x sftp nogroup sftp
We change the ownership of the sftp directory and make sure there is a place for files to be uploaded in the SFTP area:
# chown root:root /media/Store/sftp
# mkdir /media/Store/sftp/upload
# chown sftp /media/Store/sftp/upload

We isolate the sftp users from other users on the system and configure a chroot-ed environment for all users accessing the SFTP server:
# addgroup sftpusers
# adduser sftp sftusers
Set a password for the sftp user so password authentication works:
# passwd sftp
Putting all pieces together, we restrict access only to the sftp user, allow it access via password authentication only to SFTP, but not SSH (and disallow tunneling and forwarding or empty passwords).

Here are the changes done in /etc/ssh/sshd_config:
PermitEmptyPasswords no
PasswordAuthentication yes
AllowUsers sftp
Subsystem sftp internal-sftp
Match Group sftpusers
ChrootDirectory %h
ForceCommand internal-sftp
X11Forwarding no
AllowTcpForwarding no
PermitTunnel no
Reload the sshd configuration (I'm using systemd):
# systemctl reload ssh.service
Check sftp user can't login via SSH:
$ ssh sftp@localhost
sftp@localhost's password:
This service allows sftp connections only.
Connection to localhost closed.
But SFTP is working and is restricted to the SFTP area:
$ sftp sftp@localhost
sftp@localhost's password:
Connected to localhost.
sftp> ls
upload
sftp> pwd
Remote working directory: /
sftp> put netbsd-nfs.bin
Uploading netbsd-nfs.bin to /netbsd-nfs.bin
remote open("/netbsd-nfs.bin"): Permission denied
sftp> cd upload
sftp> put netbsd-nfs.bin
Uploading netbsd-nfs.bin to /upload/netbsd-nfs.bin
netbsd-nfs.bin 100% 3111KB 3.0MB/s 00:00
Now your system is ready to accept sftp connections, things can be uploaded in the upload directory and whenever the external drive is unmounted, SFTP will NOT work.

Note: Since we added 'AllowUsers sftp', you can test no local user can login via SSH. If you don't want to restrict access only to the sftp user, you can whitelist other users by adding them in the AllowUsers directive, or dropping it entirely so all local users can SSH into the system.

30 March 2015

John Goerzen: ssh suddenly stops communicating with some hosts

Here s a puzzle I m having trouble figuring out. This afternoon, ssh from my workstation or laptop stopped working to any of my servers (at OVH). The servers are all running wheezy, the local machines jessie. This happens on both my DSL and when tethered to my mobile phone. They had not applied any updates since the last time ssh worked. When looking at it with ssh -v, they were all hanging after:
debug1: SSH2_MSG_KEXINIT sent
debug1: SSH2_MSG_KEXINIT received
debug1: kex: server->client aes128-ctr umac-64@openssh.com none
debug1: kex: client->server aes128-ctr umac-64@openssh.com none
debug1: sending SSH2_MSG_KEX_ECDH_INIT
debug1: expecting SSH2_MSG_KEX_ECDH_REPLY
Now, I noticed that a server on my LAN running wheezy could successfully connect. It was a little different:
debug1: kex: server->client aes128-ctr hmac-md5 none
debug1: kex: client->server aes128-ctr hmac-md5 none
debug1: sending SSH2_MSG_KEX_ECDH_INIT
debug1: expecting SSH2_MSG_KEX_ECDH_REPLY
And indeed, if I run ssh -o MACs=hmac-md5, it works fine. Now, I tried rebooting machines at multiple ends of this. No change. I tried connecting from multiple networks. No change. And then, as I was writing this blog post, all of a sudden it works normally again. Supremely weird! Any ideas what I can blame here?

2 July 2014

Mike Hommey: Firefox and Gtk+ 3

Folks from Collabora and Red Hat have been working on making Firefox on Gtk+ 3 a thing. See Emilio s blog post for some recent update. But getting Firefox to build and run locally is unfortunately not the whole story. I ve been working on getting Gtk+ 3 Firefox builds going on Mozilla build infrastructure, and I m proud to announce today that those builds are now going through Mozilla continuous integration on a project branch: Elm, and receive the same automated testing as mozilla-central. And when I said getting Firefox to build and run was unfortunately not the whole story, I meant it: if you click on the Elm link above, you ll notice that there s a lot of orange, when it should be all green. So, yes, Firefox on Gtk+ 3 is a thing, and it now has continuous integration. But there s still a whole bunch of things to fix. So if you re interested in making those builds work better, you can hop in, there are many things you can do:

13 November 2013

Andrea Veri: Configuring DNSSEC on your personal domain

Today I ll be working out how to properly configure DNSSEC on a BIND9 installation, I ll also make sure to give you all the needed instructions to properly verify if a specific domain is being correctly covered by DNSSEC itself. In addition to that a few more details will be provided about adding the relevant SSHFP s entries on your DNS zone files to be able to automatically verify the authenticity of your domain when connecting to it with SSH avoiding any possible MITM attack. First of all, let s create the Zone Signing Key (ZSK) which is the key that will be responsible to sign any other record on the zone file which is not a DNSKEY record itself:
dnssec-keygen -a RSASHA1 -b 1024 -n ZONE gnome.org


Note: the dnssec-keygen binary file should be part of bind97 (RHEL 5) or bind (RHEL6) package according to yum whatprovides: RHEL 5:
32:bind97-9.7.0-17.P2.el5_9.2.x86_64 : The Berkeley Internet Name Domain (BIND) DNS (Domain Name System) server
Repo : rhel-x86_64-server-5
Matched from:
Filename : /usr/sbin/dnssec-keygen


RHEL 6:
32:bind-9.8.2-0.17.rc1.el6.3.x86_64 : The Berkeley Internet Name Domain (BIND) DNS (Domain Name System) server
Repo : rhel-x86_64-server-6
Matched from:
Filename : /usr/sbin/dnssec-keygen


Then, create the Key Signing Key (KSK), which will be used to sign all the DNSKEY records:
dnssec-keygen -a RSASHA1 -b 2048 -n ZONE -f KSK gnome.org


Creating the above keys can take several minutes, when done copy the public keys to the zone file this way:
cat Kgnome.org*.key >> gnome.org


When done you can clean out the useless bits from the zone file and just leave the DNSKEY records (which are not commented out as you will notice) An additional and cleaner way of accomplishing the above is to use the INCLUDE rule on the zone file itself as follows:
$INCLUDE /srv/dnssec-keys/Kgnome.org+005+12345.key
$INCLUDE /srv/dnssec-keys/Kgnome.org+005+67890.key


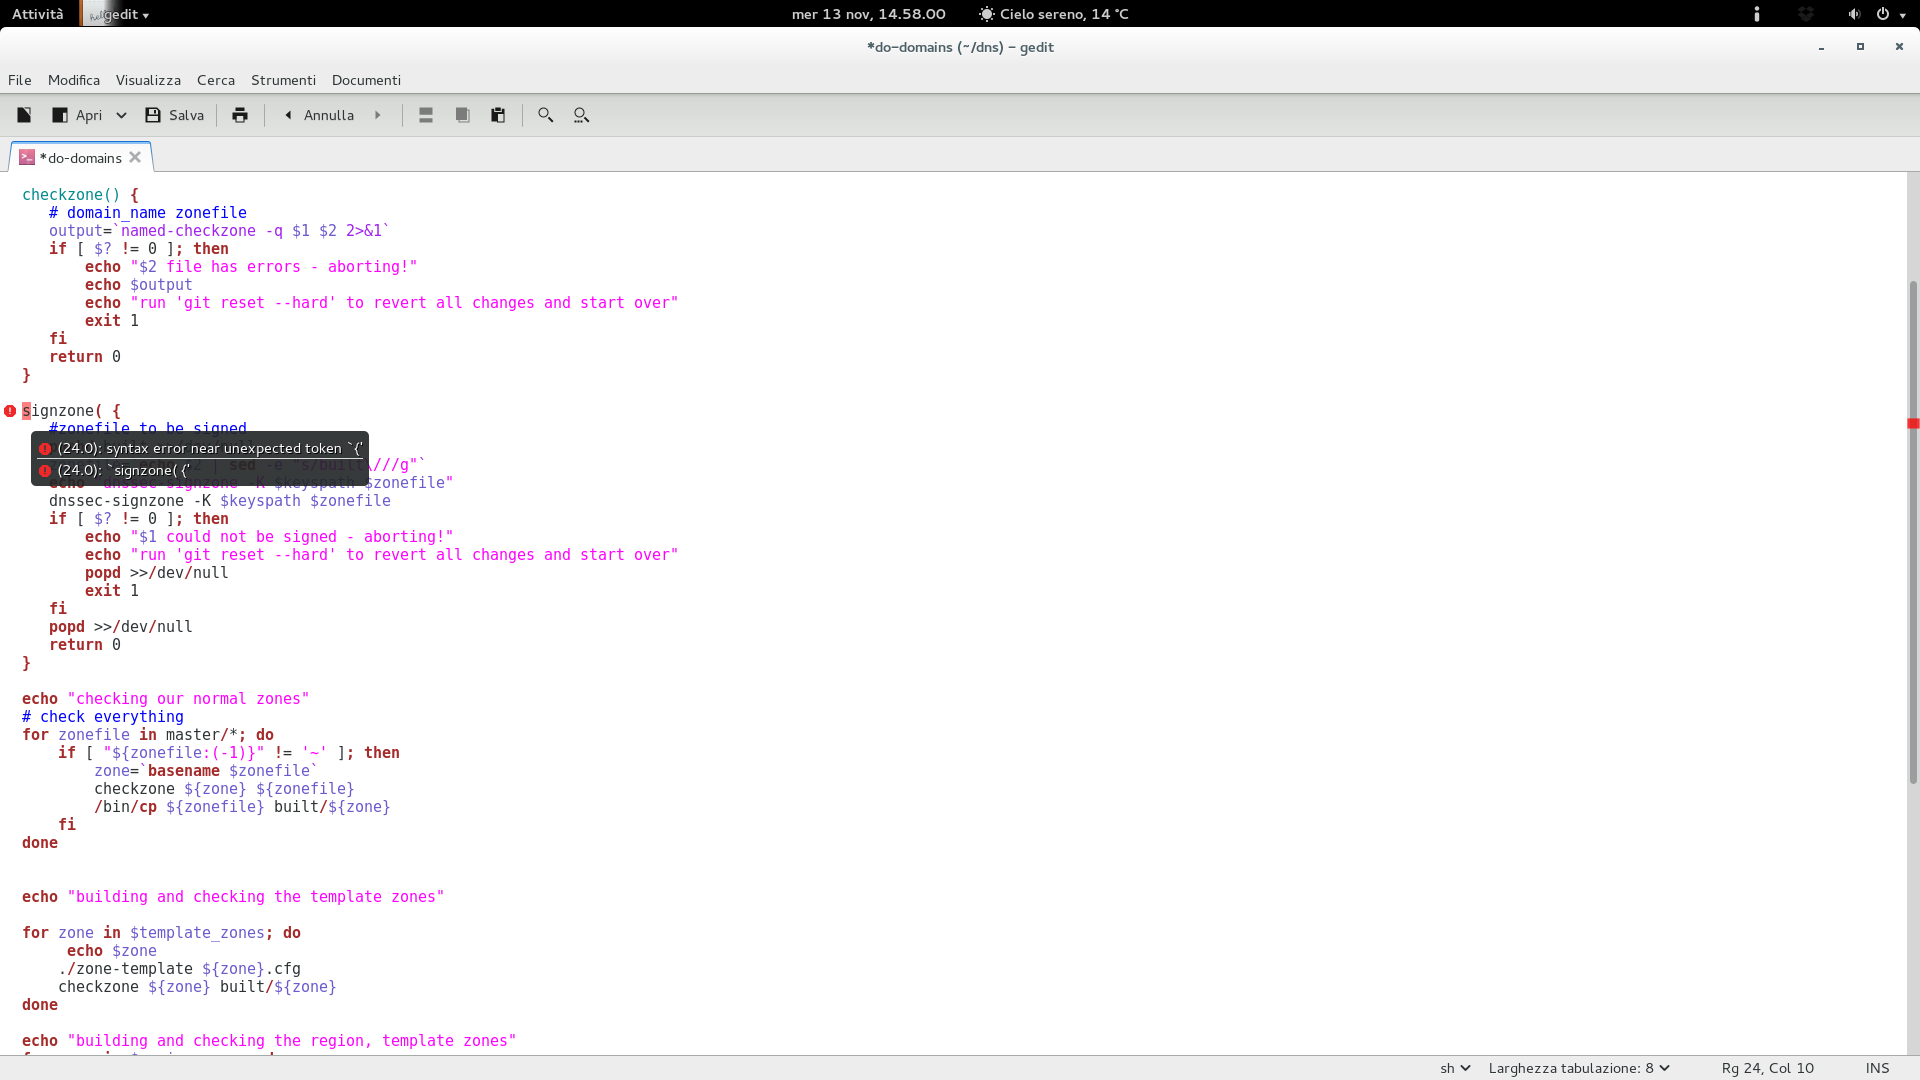
Choosing which method to use is really up to you. Once that is done you can go ahead and sign the zone file. As of myself I m making use of the do-domain script taken from the Fedora Infrastructure Team s repositories. If you are going to use it yourself, make sure to adjust all the relevant variables to match your setup, especially keyspath, region_zones, template_zone, signed_zones and AREA. The do-domain script also checks your zone file through named-checkzone before signing it.
/me while editing the do-domains script with the preview of gnome-code-assistance!

/me while editing the do-domains script with the preview of gnome-code-assistance!

If instead you don t want to use the script above, you can sign the zone file manually in the following way:
dnssec-signzone -K /path/to/your/dnssec/keys -e +3024000 -N INCREMENT gnome.org


By default, the above command will append .signed to the file name, you can modify that behaviour by appending the -f flag to the dnssec-signzone call. The -N INCREMENT will increment the serial number automatically making use of the RFC 1982 arithmetics while the -e flag will extend the zone signature end date from the default 30 days to 35. (this way we can safely run a monthly cron job that will sign the zone file automatically) You can make use of the following script to achieve the above:
#!/bin/sh
SIGNZONE="/usr/sbin/dnssec-signzone"
DNSSEC_KEYS="/srv/dnssec-keys"
NAMEDCHROOT="/var/named/chroot"
ZONEFILES="gnome.org"
cd $NAMEDCHROOT
for ZONE in $ZONEFILES; do
$SIGNZONE -K $DNSSEC_KEYS -e +3024000 -f $ZONE.signed -N INCREMENT $ZONE
done
/sbin/service named reload


Once the zone file has been signed just make sure to include it on named.conf and restart named:
zone "gnome.org"  
file "gnome.org.signed";
 ;


When you re done with that we should be moving ahead adding a DS record for our domain at our domain registrar. My example is taken from the known gandi.net registrar.
gandi

Gandi s DNSSEC interface

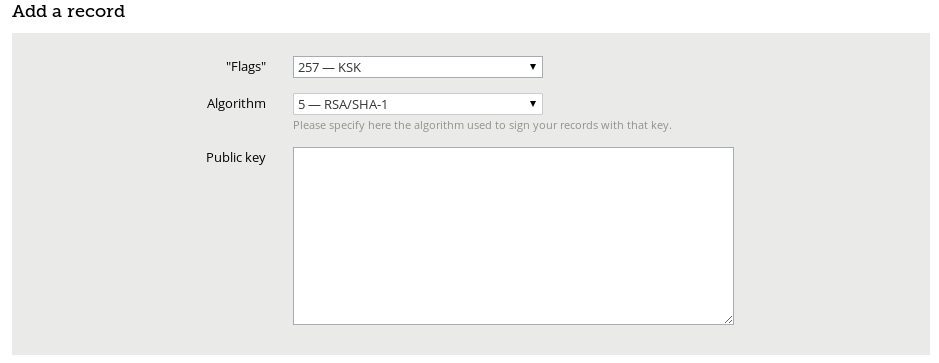
Select KSK (257) and (RSA/SHA-1) on the dropdown list and paste your public key on the box. You will find the public key you need on one of the Kgnome.org*.key files, you should look for the DNSKEY 257 entry as dig DNSKEY gnome.org shows:
;; ANSWER SECTION:
gnome.org. 888 IN DNSKEY 257 3 5 AwEAAbRD7AymDFuKc2iXta7HXZMleMkUMwjOZTsn4f75ZUp0of8TJdlU DtFtqifEBnFcGJU5r+ZVvkBKQ0qDTTjayL54Nz56XGGoIBj6XxbG8Es+ VbZCg0RsetDk5EsxLst0egrvOXga27jbsJ+7Me3D5Xp1bkBnQMrXEXQ9 C43QfO2KUWJVljo1Bii3fTfnHSLRUsbRn8Puz+orK71qxs3G9mgGR6rm n91brkpfmHKr3S9Rbxq8iDRWDPiCaWkI7qfASdFk4TLV0gSVlA3OxyW9 TCkPZStZ5r/WRW2jhUY/kjHERQd4qX5dHAuYrjJSV99P6FfCFXoJ3ty5 s3fl1RZaTo8=


Once that is done you should have a fully covered DNSSEC domain, you can verify that this way:
dig . DNSKEY   grep -Ev '^($ ;)' > root.keys
dig +sigchase +trusted-key=./root.keys gnome.org. A   cat -n


The result:
105 ;; WE HAVE MATERIAL, WE NOW DO VALIDATION
106 ;; VERIFYING DS RRset for org. with DNSKEY:59085: success
107 ;; OK We found DNSKEY (or more) to validate the RRset
108 ;; Ok, find a Trusted Key in the DNSKEY RRset: 19036
109 ;; VERIFYING DNSKEY RRset for . with DNSKEY:19036: success
110
111 ;; Ok this DNSKEY is a Trusted Key, DNSSEC validation is ok: SUCCESS

Bonus content: Adding SSHFP entries for your domain and verifying them You can retrieve the SSHFP entries for a specific host with the following command:
ssh-keygen -r $(hostname --fqdn) -f /etc/ssh/ssh_host_rsa_key.pub


When retrieved just add the SSHFP entry on the zone file for your domain and verify it:
ssh -oVerifyHostKeyDNS=yes -v subdomain.gnome.org


Or directly add the above parameter into your /etc/ssh/ssh_config file this way:
VerifyHostKeyDNS=yes


And run ssh -v subdomain.gnome.org , the result you should receive:
debug1: Server host key: RSA 00:39:fd:1a:a4:2c:6b:28:b8:2e:95:31:c2:90:72:03
debug1: found 1 secure fingerprints in DNS
debug1: matching host key fingerprint found in DNS
debug1: ssh_rsa_verify: signature correct

That s it! Enjoy!