Debian Stretch feels like an excellent release by the Debian project.
The final
stable release is about to happen in the short term.
Among the great things you can do with Debian, you could set up a VPN using
the
openvpn software.
In this blog post I will describe how I ve deployed myself an openvpn server
using Debian Stretch, my network environment and my configurations & workflow.
Before all, I would like to reference my requisites and the characteristics of
what I needed:
- a VPN server which allows internet clients to access our datacenter internal
network (intranet) securely
- strong authentications mechanisms for the users (user/password + client
certificate)
- the user/password information is stored in a LDAP server of the datacenter
- support for several (hundreds?) of clients
- only need to route certain subnets (intranet) through the VPN, not the entire
network traffic of the clients
- full IPv4 & IPv6 dual stack support, of course
- a group of system admins will perform changes to the configurations, adding
and deleting clients
I agree this is a rather complex scenario and not all the people will face
these requirements.
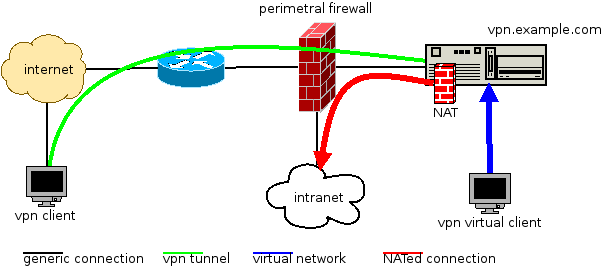
The service diagram has this shape:
 (DIA source file)
So, it works like this:
- clients connect via internet to our openvpn server, vpn.example.com
- the openvpn server validates the connection and the tunnel is established (green)
- now the client is virtually inside our network (blue)
- the client wants to access some intranet resource, the tunnel traffic is NATed (red)
Our datacenter intranet is using public IPv4 addressing, but the VPN tunnels
use private IPv4 addresses. To don t mix public and private address NAT is used.
Obviously we don t want to invest public IPv4 addresses in our internal tunnels.
We don t have this limitations in IPv6, we could use public IPv6 addresses
within the tunnels. But we prefer sticking to a hard dual stack IPv4/IPv6
approach and also use private IPv6 addresses inside the tunnels and also NAT
the IPv6 from private to public.
This way, there are no differences in how IPv4 and IPv6 network are managed.
We follow this approach for the addressing:
- client 1 tunnel: 192.168.100.11, fd00:0:1::11
- client 1 public NAT: x.x.x.11, x:x::11
- client 2 tunnel: 192.168.100.12, fd00:0:1::12
- client 2 public NAT: x.x.x.12, x:x::12
- [ ]
The NAT runs in the VPN server, since this is kind of a router. We use
nftables for this task.
As the final win, I will describe how we manage all this configuration using
the git version control system. Using git we can track which admin made which
change. A git hook will deploy the files from the git repo itself to /etc/
so the services can read them.
The VPN server networking configuration is as follows (
/etc/network/interfaces
file, adjust to your network environments):
auto lo
iface lo inet loopback
# main public IPv4 address of vpn.example.com
allow-hotplug eth0
iface eth0 inet static
        address x.x.x.4
        netmask 255.255.255.0
        gateway x.x.x.1
# main public IPv6 address of vpn.example.com
iface eth0 inet6 static
        address x:x:x:x::4
        netmask 64
        gateway x:x:x:x::1
# NAT Public IPv4 addresses (used to NAT tunnel of client 1)
auto eth0:11
iface eth0:11 inet static
        address x.x.x.11
        netmask 255.255.255.0
# NAT Public IPv6 addresses (used to NAT tunnel of client 1)
iface eth0:11 inet6 static
        address x:x:x:x::11
        netmask 64
# NAT Public IPv4 addresses (used to NAT tunnel of client 2)
auto eth0:12
iface eth0:12 inet static
        address x.x.x.12
        netmask 255.255.255.0
# NAT Public IPv6 addresses (used to NAT tunnel of client 2)
iface eth0:12 inet6 static
        address x:x:x:x::12
        netmask 64
Thanks to the amazing and tireless work of the Alberto Gonzalez Iniesta
(DD), the
openvpn package in debian is in very good shape, ready
to use.
In
vpn.example.com, install the required packages:
% sudo aptitude install openvpn openvpn-auth-ldap nftables git sudo
Two git repositories will be used, one for the openvpn configuration and
another for nftables (the nftables config is described later):
% sudo mkdir -p /srv/git/vpn.example.com-nft.git
% sudo git init --bare /srv/git/vpn.example.com-nft.git
% sudo mkdir -p /srv/git/vpn.example.com-openvpn.git
% sudo git init --bare /srv/git/vpn.example.com-openvpn.git
% sudo chown -R :git /srv/git/*
% sudo chmod -R g+rw /srv/git/*
The repositories belong to the git group, a system group we create to let
systems admins operate the server using git:
% sudo addgroup --system git
% sudo adduser admin1 git
% sudo adduser admin2 git
For the openvpn git repository, we need at least this git hook
(file
/srv/git/vpn.example.com-openvpn.git/hooks/post-receive with
execution permission):
#!/bin/bash
NAME="hooks/post-receive"
OPENVPN_ROOT="/etc/openvpn"
export GIT_WORK_TREE="$OPENVPN_ROOT"
UNAME=$(uname -n)
info()

        echo "$ UNAME  $ NAME  $1 ..."

info "checkout latest data to $GIT_WORK_TREE"
sudo git checkout -f
info "cleaning untracked files and dirs at $GIT_WORK_TREE"
sudo git clean -f -d
For this hook to work, sudo permissions are required (file
/etc/sudoers.d/openvpn-git):
User_Alias      OPERATORS = admin1, admin2
Defaults        env_keep += "GIT_WORK_TREE"

OPERATORS       ALL=(ALL) NOPASSWD:/usr/bin/git checkout -f
OPERATORS       ALL=(ALL) NOPASSWD:/usr/bin/git clean -f -d
Please review this sudoers file to match your environment and security
requirements.
The openvpn package deploys several systemd services:
% dpkg -L openvpn   grep service
/lib/systemd/system/openvpn-client@.service
/lib/systemd/system/openvpn-server@.service
/lib/systemd/system/openvpn.service
/lib/systemd/system/openvpn@.service
We don t need all of them, we can use the simple
openvpn.service:
% sudo systemctl edit --full openvpn.service
And put a content like this:
% systemctl cat openvpn.service
# /etc/systemd/system/openvpn.service
[Unit]
Description=OpenVPN server
Documentation=man:openvpn(8)
Documentation=https://community.openvpn.net/openvpn/wiki/Openvpn23ManPage
Documentation=https://community.openvpn.net/openvpn/wiki/HOWTO

[Service]
PrivateTmp=true
KillMode=mixed
Type=forking
ExecStart=/usr/sbin/openvpn --daemon ovpn --status /run/openvpn/%i.status 10 --cd /etc/openvpn --config /etc/openvpn/server.conf --writepid /run/openvpn/server.pid
PIDFile=/run/openvpn/server.pid
ExecReload=/bin/kill -HUP $MAINPID
WorkingDirectory=/etc/openvpn
ProtectSystem=yes
CapabilityBoundingSet=CAP_IPC_LOCK CAP_NET_ADMIN CAP_NET_BIND_SERVICE CAP_NET_RAW CAP_SETGID CAP_SETUID CAP_SYS_CHROOT CAP_DAC_READ_SEARCH CAP_AUDIT_WRITE
LimitNPROC=10
DeviceAllow=/dev/null rw
DeviceAllow=/dev/net/tun rw

[Install]
WantedBy=multi-user.target
We can move on now to configure nftables to perform the NATs.
First, it s good to load the NAT configuration at boot time, so you need a
service file like this (
/etc/systemd/system/nftables.service):
[Unit]
Description=nftables
Documentation=man:nft(8) http://wiki.nftables.org

[Service]
Type=oneshot
RemainAfterExit=yes
StandardInput=null
ProtectSystem=full
ProtectHome=true
WorkingDirectory=/etc/nftables.d
ExecStart=/usr/sbin/nft -f ruleset.nft
ExecReload=/usr/sbin/nft -f ruleset.nft
ExecStop=/usr/sbin/nft flush ruleset

[Install]
WantedBy=multi-user.target
The nftables git hooks are implemented as described in
nftables managed with git. We are interested in the git hooks:
(file
/srv/git/vpn.example.com-nft.git/hooks/post-receive):
#!/bin/bash
NAME="hooks/post-receive"
NFT_ROOT="/etc/nftables.d"
RULESET="$ NFT_ROOT /ruleset.nft"
export GIT_WORK_TREE="$NFT_ROOT"
UNAME=$(uname -n)
info()

        echo "$ UNAME  $ NAME  $1 ..."

info "checkout latest data to $GIT_WORK_TREE"
sudo git checkout -f
info "cleaning untracked files and dirs at $GIT_WORK_TREE"
sudo git clean -f -d
info "deploying new ruleset"
set -e
cd $NFT_ROOT && sudo nft -f $RULESET
info "new ruleset deployment was OK"
This hook moves our nftables configuration to
/etc/nftables.d and then
applies it to the kernel. So a single commit changes the runtime configuration
of the server.
You could implement some QA using the git hook
update, check
this file!
Remember, git hooks requires exec permissions to work.
Of course, you will need again a
sudo policy for these nft hooks.
Finally, we can start configuring both openvpn and nftables using git.
For the VPN you will require the configure the PKI side: server certificates,
and the CA signing your client s certificates. You can check
openvpn s own
documentation about this.
Your first commit for openvpn could be the
server.conf file:
plugin		/usr/lib/openvpn/openvpn-plugin-auth-pam.so common-auth
mode		server
user		nobody
group		nogroup
port		1194
proto		udp6
daemon
comp-lzo
persist-key
persist-tun
tls-server
cert		/etc/ssl/private/vpn.example.com_pub.crt
key		/etc/ssl/private/vpn.example.com_priv.pem
ca		/etc/ssl/cacert/clients_ca.pem
dh		/etc/ssl/certs/dh2048.pem
cipher		AES-128-CBC
dev		tun
topology	subnet
server		192.168.100.0 255.255.255.0
server-ipv6	fd00:0:1:35::/64
ccd-exclusive
client-config-dir ccd
max-clients	100
inactive	43200
keepalive	10 360
log-append	/var/log/openvpn.log
status		/var/log/openvpn-status.log
status-version	1
verb		4
mute		20
Don t forget the
ccd/ directory. This directory contains a file per user
using the VPN service. Each file is named after the CN of the client
certificate:
# private addresses for client 1
ifconfig-push		192.168.100.11 255.255.255.0
ifconfig-ipv6-push	fd00:0:1::11/64
# routes to the intranet network
push "route-ipv6 x:x:x:x::/64"
push "route x.x.3.128 255.255.255.240"
# private addresses for client 2
ifconfig-push		192.168.100.12 255.255.255.0
ifconfig-ipv6-push	fd00:0:1::12/64
# routes to the intranet network
push "route-ipv6 x:x:x:x::/64"
push "route x.x.3.128 255.255.255.240"
You end with at leats these files in the openvpn git tree:
server.conf
ccd/CN=CLIENT_1
ccd/CN=CLIENT_2
Please note that if you commit a change to
ccd/, the changes are read
at runtime by openvpn. In the other hand, changes to
server.conf require
you to restart the openvpn service by hand.
Remember, the addressing is like this:
 (DIA source file)
In the nftables git tree, you should put a ruleset like this (a single file
named
ruleset.nft is valid):
flush ruleset
table ip nat
	map mapping_ipv4_snat
		type ipv4_addr : ipv4_addr
		elements =  	192.168.100.11 : x.x.x.11,
				192.168.100.12 : x.x.x.12

	map mapping_ipv4_dnat
		type ipv4_addr : ipv4_addr
		elements =  	x.x.x.11 : 192.168.100.11,
				x.x.x.12 : 192.168.100.12

	chain prerouting
		type nat hook prerouting priority -100; policy accept;
		dnat to ip daddr map @mapping_ipv4_dnat

	chain postrouting
		type nat hook postrouting priority 100; policy accept;
		oifname "eth0" snat to ip saddr map @mapping_ipv4_snat


table ip6 nat
	map mapping_ipv6_snat
		type ipv6_addr : ipv6_addr
		elements =  	fd00:0:1::11 : x:x:x::11,
				fd00:0:1::12 : x:x:x::12

	map mapping_ipv6_dnat
		type ipv6_addr : ipv6_addr
		elements =  	x:x:x::11 : fd00:0:1::11,
				x:x:x::12 : fd00:0:1::12

	chain prerouting
		type nat hook prerouting priority -100; policy accept;
		dnat to ip6 daddr map @mapping_ipv6_dnat

	chain postrouting
		type nat hook postrouting priority 100; policy accept;
		oifname "eth0" snat to ip6 saddr map @mapping_ipv6_snat


table inet filter
	chain forward
		type filter hook forward priority 0; policy accept;
		# some forwarding filtering policy, if required, for both IPv4 and IPv6
Since the server is in fact routing packets between the tunnel and the public
network, we require forwarding enabled in sysctl:
net.ipv4.conf.all.forwarding = 1
net.ipv6.conf.all.forwarding = 1
Of course, the VPN clients will require a
client.conf file which looks
like this:
client
remote vpn.example.com 1194
dev tun
proto udp
resolv-retry infinite
comp-lzo
verb 5
nobind
persist-key
persist-tun
user nobody
group nogroup

tls-client
ca      /etc/ssl/cacert/server_ca.crt
pkcs12  /home/user/mycertificate.p12
verify-x509-name vpn.example.com name
cipher AES-128-CBC
auth-user-pass
auth-nocache
Workflow for the system admins:
- git clone the openvpn repo
- modify ccd/ and server.conf
- git commit the changes, push to the server
- if server.conf was modified, restart openvpn
- git clone the nftables repo
- modify ruleset
- git commit the changes, push to the server
Comments via email welcome!
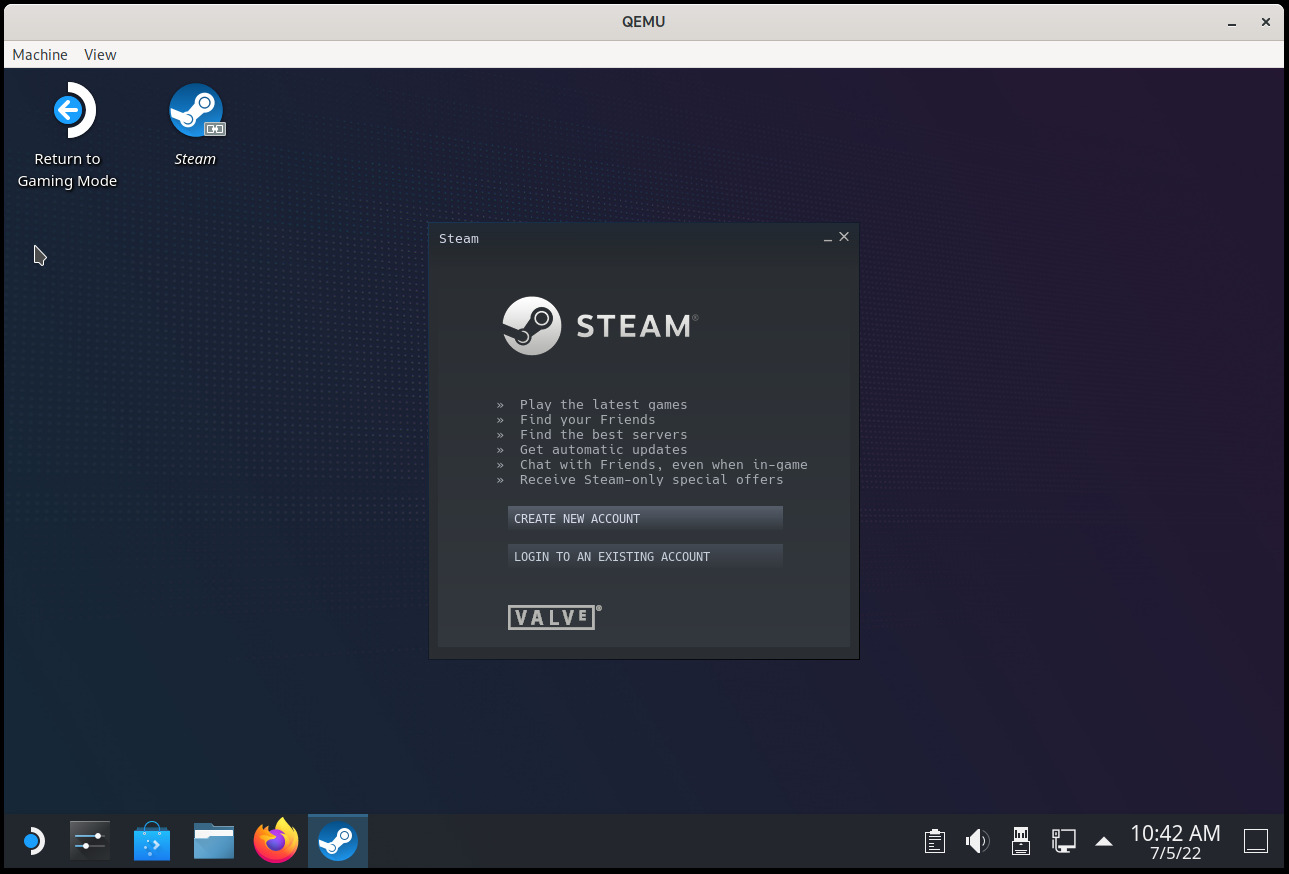
 Introduction: an immutable OS
The Steam Deck runs SteamOS, a single-user operating system based on Arch Linux. Although derived from a standard package-based distro, the OS in the Steam Deck is immutable and system updates replace the contents of the root filesystem atomically instead of using the package manager.
An immutable OS makes the system more stable and its updates less error-prone, but users cannot install additional packages to add more software. This is not a problem for most users since they are only going to run Steam and its games (which are stored in the home partition). Nevertheless, the OS also has a desktop mode which provides a standard Linux desktop experience, and here it makes sense to be able to install more software.
How to do that though? It is possible for the user to become root, make the root filesytem read-write and install additional software there, but any changes will be gone after the next OS update. Modifying the rootfs can also be dangerous if the user is not careful.
Ways to add additional software
The simplest and safest way to install additional software is with Flatpak, and that s the method recommended in the Steam Deck Desktop FAQ. Flatpak is already installed and integrated in the system via the Discover app so I won t go into more details here.
However, while Flatpak works great for desktop applications not every piece of software is currently available, and Flatpak is also not designed for other types of programs like system services or command-line tools.
Fortunately there are several ways to add software to the Steam Deck without touching the root filesystem, each one with different pros and cons. I will probably talk about some of them in the future, but in this post I m going to focus on one that is already available in the system:
Introduction: an immutable OS
The Steam Deck runs SteamOS, a single-user operating system based on Arch Linux. Although derived from a standard package-based distro, the OS in the Steam Deck is immutable and system updates replace the contents of the root filesystem atomically instead of using the package manager.
An immutable OS makes the system more stable and its updates less error-prone, but users cannot install additional packages to add more software. This is not a problem for most users since they are only going to run Steam and its games (which are stored in the home partition). Nevertheless, the OS also has a desktop mode which provides a standard Linux desktop experience, and here it makes sense to be able to install more software.
How to do that though? It is possible for the user to become root, make the root filesytem read-write and install additional software there, but any changes will be gone after the next OS update. Modifying the rootfs can also be dangerous if the user is not careful.
Ways to add additional software
The simplest and safest way to install additional software is with Flatpak, and that s the method recommended in the Steam Deck Desktop FAQ. Flatpak is already installed and integrated in the system via the Discover app so I won t go into more details here.
However, while Flatpak works great for desktop applications not every piece of software is currently available, and Flatpak is also not designed for other types of programs like system services or command-line tools.
Fortunately there are several ways to add software to the Steam Deck without touching the root filesystem, each one with different pros and cons. I will probably talk about some of them in the future, but in this post I m going to focus on one that is already available in the system: 
 Introduction
The
Introduction
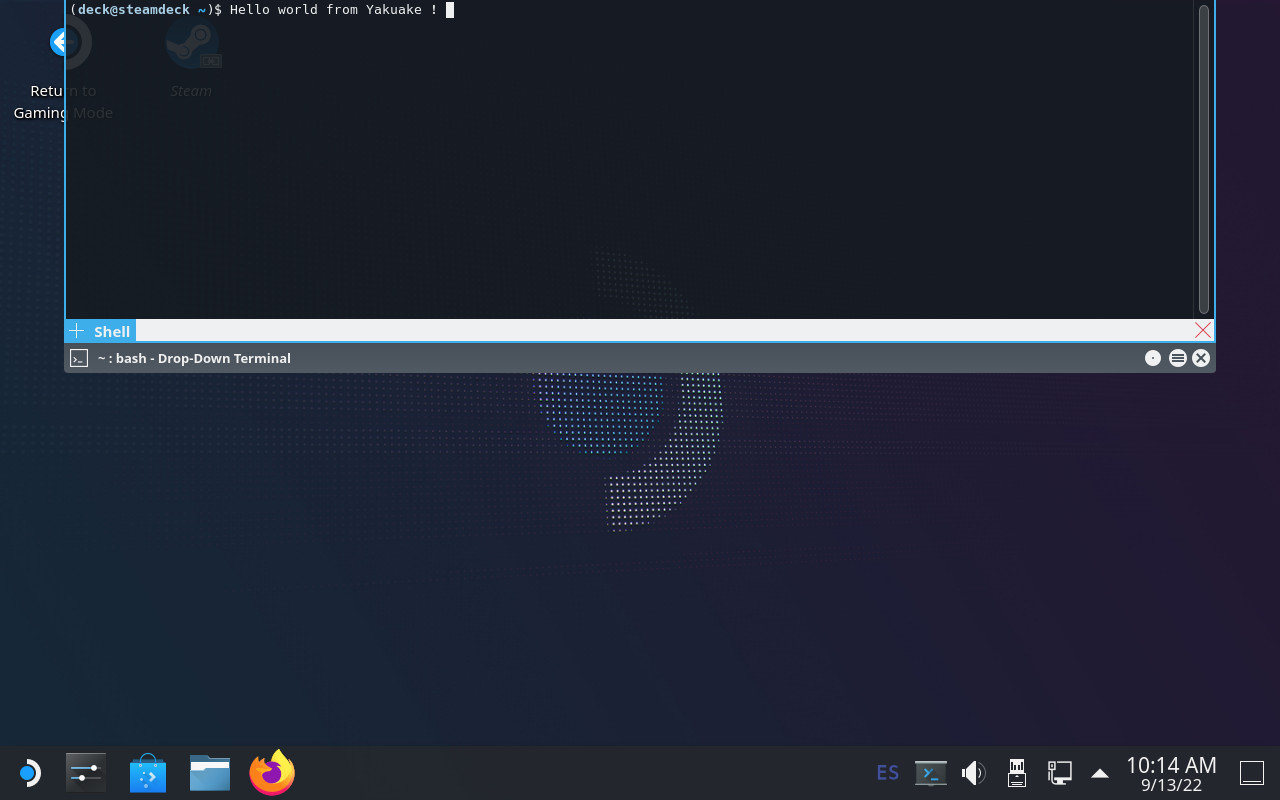
The  Once the system has booted we ll see a KDE Plasma session with a few tools on the desktop. If we select Reimage Steam Deck and click Proceed on the confirmation dialog then SteamOS will be installed on the destination drive. This process should not take a long time.
Now, once the operation finishes a new confirmation dialog will ask if we want to reboot the Steam Deck, but here we have to choose Cancel . We cannot use the new image yet because it would try to boot into the Gamescope session, which won t work, so we need to change the default desktop session.
SteamOS comes with a helper script that allows us to enter a chroot after automatically mounting all SteamOS partitions, so let s open a Konsole and make the Plasma session the default one in both partition sets:
Once the system has booted we ll see a KDE Plasma session with a few tools on the desktop. If we select Reimage Steam Deck and click Proceed on the confirmation dialog then SteamOS will be installed on the destination drive. This process should not take a long time.
Now, once the operation finishes a new confirmation dialog will ask if we want to reboot the Steam Deck, but here we have to choose Cancel . We cannot use the new image yet because it would try to boot into the Gamescope session, which won t work, so we need to change the default desktop session.
SteamOS comes with a helper script that allows us to enter a chroot after automatically mounting all SteamOS partitions, so let s open a Konsole and make the Plasma session the default one in both partition sets:
 In previous blog posts I talked about QEMU s qcow2 file format and how to make it faster.

 The following contributors got their Debian Developer accounts in the last two months:


 This is a guest post by


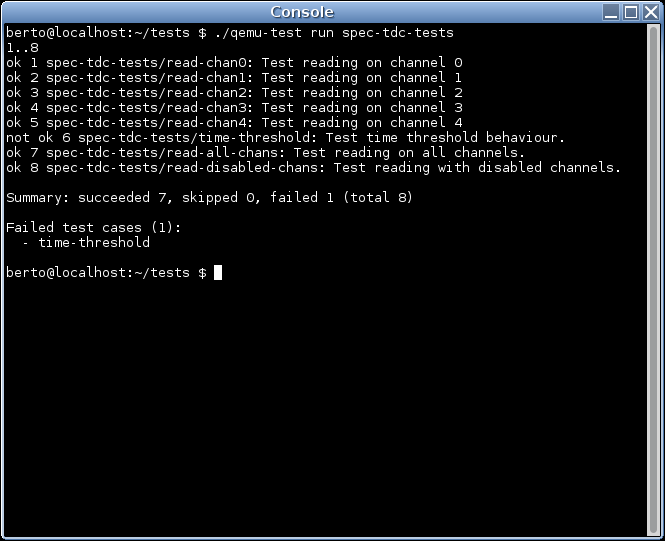
 My primary usecase is to prevent testsuites and build systems from contacting internet-based services. This, at the very least, introduces an element of non-determinism and malicious code at worst.
I use Alberto Bertogli's
My primary usecase is to prevent testsuites and build systems from contacting internet-based services. This, at the very least, introduces an element of non-determinism and malicious code at worst.
I use Alberto Bertogli's  I have just released version 1.7.4 of
  Recently I started doing a internet-wide scan for rsync servers, thinking it might be fun to write a toy search-engine/indexer.
Even the basics such as searching against the names of exported shares would be interesting, I thought.
Today I abandoned that after exploring some of the results, (created with
Recently I started doing a internet-wide scan for rsync servers, thinking it might be fun to write a toy search-engine/indexer.
Even the basics such as searching against the names of exported shares would be interesting, I thought.
Today I abandoned that after exploring some of the results, (created with