Search Results: "Arnaud Rebillout"

6 November 2025

Sahil Dhiman: Debconf25 Brest

DebConf25 was held at IMT Atlantique Brest Campus in France from 14th to 19th July 2025. As usual, it was preceded by DebCamp from 7th to 13th July. I was less motivated to write this time. So this year, more pictures, less text. Hopefully, (eventually) I may come back to fill this up.

Conference
IMT Atlantique

Main conference area

RAK restaurant, the good food place near the venue

Bits from DPL (can't really miss the tradition of a Bits picture)

Kali Linux: Delivery of a rolling distro at scale with Mirrorbits by Arnaud Rebillout

The security of Debian - An introduction to advanced users by Samuel Henrique

Salsa CI BoF by Otto Kek l inen and others

Debian.net Team BoF by debian.net team

During the conference, Subin had this crazy idea of shooting Parody of a popular clip from the American-Malayalee television series Akkarakazhchakal advertising Debian. He explained the whole story in the BTS video. The results turned out great, TBF:
You have a computer, but no freedom?
Credits - Subin Siby, licensed under CC BY SA 4.0.

BTS from "You have a computer, but no freedom?" video shoot

DebConf25 closing


DC25 network usage graphs. Click to enlarge.

Flow diagrams. Click to enlarge.

Streaming bandwidth graph. Click to enlarge.

Brest
Brest Harbor and Sea

I managed to complete The Little Prince (Le Petit Prince) during my travel from Paris to Brest

Paris
Basilica of the Sacred Heart of Montmartre


View of Paris from the Basilica of the Sacred Heart of Montmartre

Paris streets

Cats rule the world, even on Paris streetlights

Eiffel Tower
Eiffel Tower. It's massive.

Eiffel Tower
View from Eiffel Tower
Credits - Nilesh Patra, licensed under CC BY SA 4.0.

As for the next DebConf work, it has already started. It seems like it never ends. We close one and in one or two months start working on the next one. DebConf is going to Argentina this time and we have a nice little logo too now. DebConf26 logo
DebConf26 logo
Credits - Romina Molina, licensed under CC BY SA 4.0.
Overall, DebConf25 Brest was a nice conference. Many thanks to local team, PEB and everyone involved for everything. Let s see about next year. Bye! DebConf25 Group Photo
DebConf25 Group Photo. Click to enlarge.
Credits - Aigars Mahinovs
PS - Talks are available on Debian media server.

17 July 2025

Arnaud Rebillout: Acquire-By-Hash for APT packages repositories, and the lack of it in Kali Linux

This is a lenghty blog post. It features a long introduction that explains how apt update acquires various files from a package repository, what is Acquire-By-Hash, and how it all works for Kali Linux: a Debian-based distro that doesn't support Acquire-By-Hash, and which is distributed via a network of mirrors and a redirector. In a second part, I explore some "Hash Sum Mismatch" errors that we can hit with Kali Linux, errors that would not happen if only Acquire-By-Hash was supported. If anything, this blog post supports the case for adding Acquire-By-Hash support in reprepro, as requested at https://bugs.debian.org/820660. All of this could have just remained some personal notes for myself, but I got carried away and turned it into a blog post, dunno why... Hopefully others will find it interesting, but you really need to like troubleshooting stories, packed with details, and poorly written at that. You've been warned! Introducing Acquire-By-Hash Acquire-By-Hash is a feature of APT package repositories, that might or might not be supported by your favorite Debian-based distribution. A repository that supports it says so, in the Release file, by setting the field Acquire-By-Hash: yes. It's easy to check. Debian and Ubuntu both support it:
$ wget -qO- http://deb.debian.org/debian/dists/sid/Release   grep -i ^Acquire-By-Hash:
Acquire-By-Hash: yes
$ wget -qO- http://archive.ubuntu.com/ubuntu/dists/devel/Release   grep -i ^Acquire-By-Hash:
Acquire-By-Hash: yes
What about other Debian derivatives?
$ wget -qO- http://http.kali.org/kali/dists/kali-rolling/Release   grep -i ^Acquire-By-Hash:   echo not supported
not supported
$ wget -qO- https://archive.raspberrypi.com/debian/dists/trixie/Release   grep -i ^Acquire-By-Hash:   echo not supported
not supported
$ wget -qO- http://packages.linuxmint.com/dists/faye/Release   grep -i ^Acquire-By-Hash:   echo not supported
not supported
$ wget -qO- https://apt.pop-os.org/release/dists/noble/Release   grep -i ^Acquire-By-Hash:   echo not supported
not supported
Huhu, Acquire-By-Hash is not ubiquitous. But wait, what is Acquire-By-Hash to start with? To answer that, we have to take a step back and cover some basics first. The HTTP requests performed by 'apt update' What happens when one runs apt update? APT first requests the Release file from the repository(ies) configured in the APT sources. This file is a starting point, it contains a list of other files (sometimes called "Index files") that are available in the repository, along with their hashes. After fetching the Release file, APT proceeds to request those Index files. To give you an idea, there are many kinds of Index files, among which: There's an excellent Wiki page that details the structure of a Debian package repository, it's there: https://wiki.debian.org/DebianRepository/Format. Note that APT doesn't necessarily download ALL of those Index files. For simplicity, we'll limit ourselves to the minimal scenario, where apt update downloads only the Packages files. Let's try to make it more visual: here's a representation of a apt update transaction, assuming that all the components of the repository are enabled:
apt update -> Release -> Packages (main/amd64)
                      -> Packages (contrib/amd64)
                      -> Packages (non-free/amd64)
                      -> Packages (non-free-firmware/amd64)
Meaning that, in a first step, APT downloads the Release file, reads its content, and then in a second step it downloads the Index files in parallel. You can actually see that happen with a command such as apt -q -o Debug::Acquire::http=true update 2>&1 grep ^GET. For Kali Linux you'll see something pretty similar to what I described above. Try it!
$ podman run --rm kali-rolling apt -q -o Debug::Acquire::http=true update 2>&1   grep ^GET
GET /kali/dists/kali-rolling/InRelease HTTP/1.1    # <- returns a redirect, that is why the file is requested twice
GET /kali/dists/kali-rolling/InRelease HTTP/1.1
GET /kali/dists/kali-rolling/non-free/binary-amd64/Packages.gz HTTP/1.1
GET /kali/dists/kali-rolling/main/binary-amd64/Packages.gz HTTP/1.1
GET /kali/dists/kali-rolling/non-free-firmware/binary-amd64/Packages.gz HTTP/1.1
GET /kali/dists/kali-rolling/contrib/binary-amd64/Packages.gz HTTP/1.1
However, and it's now becoming interesting, for Debian or Ubuntu you won't see the same kind of URLs:
$ podman run --rm debian:sid apt -q -o Debug::Acquire::http=true update 2>&1   grep ^GET
GET /debian/dists/sid/InRelease HTTP/1.1
GET /debian/dists/sid/main/binary-amd64/by-hash/SHA256/22709f0ce67e5e0a33a6e6e64d96a83805903a3376e042c83d64886bb555a9c3 HTTP/1.1
APT doesn't download a file named Packages, instead it fetches a file named after a hash. Why? This is due to the field Acquire-By-Hash: yes that is present in the Debian's Release file. What does Acquire-By-Hash mean for 'apt update' The idea with Acquire-By-Hash is that the Index files are named after their hash on the repository, so if the MD5 sum of main/binary-amd64/Packages is 77b2c1539f816832e2d762adb20a2bb1, then the file will be stored at main/binary-amd64/by-hash/MD5Sum/77b2c1539f816832e2d762adb20a2bb1. The path main/binary-amd64/Packages still exists (it's the "Canonical Location" of this particular Index file), but APT won't use it, instead it downloads the file located in the by-hash/ directory. Why does it matter? This has to do with repository updates, and allowing the package repository to be updated atomically, without interruption of service, and without risk of failure client-side. It's important to understand that the Release file and the Index files are part of a whole, a set of files that go altogether, given that Index files are validated by their hash (as listed in the Release file) after download by APT. If those files are simply named "Release" and "Packages", it means they are not immutable: when the repository is updated, all of those files are updated "in place". And it causes problems. A typical failure mode for the client, during a repository update, is that: 1) APT requests the Release file, then 2) the repository is updated and finally 3) APT requests the Packages files, but their checksum don't match, causing apt update to fail. There are variations of this error, but you get the idea: updating a set of files "in place" is problematic. The Acquire-By-Hash mechanism was introduced exactly to solve this problem: now the Index files have a unique, immutable name. When the repository is updated, at first new Index files are added in the by-hash/ directory, and only after the Release file is updated. Old Index files in by-hash/ are retained for a while, so there's a grace period during which both the old and the new Release files are valid and working: the Index files that they refer to are available in the repo. As a result: no interruption of service, no failure client-side during repository updates. This is explained in more details at https://www.chiark.greenend.org.uk/~cjwatson/blog/no-more-hash-sum-mismatch-errors.html, which is the blog post from Colin Watson that came out at the time Acquire-By-Hash was introduced in... 2016. This is still an excellent read in 2025. So you might be wondering why I'm rambling about a problem that's been solved 10 years ago, but then as I've shown in the introduction, the problem is not solved for everyone. Support for Acquire-By-Hash server side is not for granted, and unfortunately it never landed in reprepro, as one can see at https://bugs.debian.org/820660. reprepro is a popular tool for creating APT package repositories. In particular, at Kali Linux we use reprepro, and that's why there's no Acquire-By-Hash: yes in the Kali Release file. As one can guess, it leads to subtle issues during those moments when the repository is updated. However... we're not ready to talk about that yet! There's still another topic that we need to cover: this window of time during which a repository is being updated, and during which apt update might fail. The window for Hash Sum Mismatches, and the APT trick that saves the day Pay attention! In this section, we're now talking about packages repositories that do NOT support Acquire-By-Hash, such as the Kali Linux repository. As I've said above, it's only when the repository is being updated that there is a "Hash Sum Mismatch Window", ie. a moment when apt update might fail for some unlucky clients, due to invalid Index files. Surely, it's a very very short window of time, right? I mean, it can't take that long to update files on a server, especially when you know that a repository is usually updated via rsync, and rsync goes to great length to update files the most atomically as it can (with the option --delay=updates). So if apt update fails for me, I've been very unlucky, but I can just retry in a few seconds and it should be fixed, isn't it? The answer is: it's not that simple. So far I pictured the "package repository" as a single server, for simplicity. But it's not always what it is. For Kali Linux, by default users have http.kali.org configured in their APT sources, and it is a redirector, ie. a web server that redirects requests to mirrors that are nearby the client. Some context that matters for what comes next: the Kali repository is synced with ~70 mirrors all around the world, 4 times a day. What happens if your apt update requests are redirected to 2 mirrors close-by, and one was just synced, while the other is still syncing (or even worse, failed to sync entirely)? You'll get a mix of old and new Index files. Hash Sum Mismatch! As you can see, with this setup the "Hash Sum Mismatch Window" becomes much longer than a few seconds: as long as nearby mirrors are syncing the window is opened. You could have a fast and a slow mirror next to you, and they can be out of sync with each other for several minutes every time the repository is updated, for example. For Kali Linux in particular, there's a "detail" in our network of mirrors that, as a side-effect, almost guarantees that this window lasts several minutes at least. This is because the pool of mirrors includes kali.download which is in fact the Cloudflare CDN, and from the redirector point of view, it's seen as a "super mirror" that is present in every country. So when APT fires a bunch of requests against http.kali.org, it's likely that some of them will be redirected to the Kali CDN, and others will be redirected to a mirror nearby you. So far so good, but there's another point of detail to be aware of: the Kali CDN is synced first, before the other mirrors. Another thing: usually the mirrors that are the farthest from the Tier-0 mirror are the longest to sync. Packing all of that together: if you live somewhere in Asia, it's not uncommon for your "Hash Sum Mismatch Window" to be as long as 30 minutes, between the moment the Kali CDN is synced, and the moment your nearby mirrors catch up and are finally in sync as well. Having said all of that, and assuming you're still reading (anyone here?), you might be wondering... Does that mean that apt update is broken 4 times a day, for around 30 minutes, for every Kali user out there? How can they bear with that? Answer is: no, of course not, it's not broken like that. It works despite all of that, and this is thanks to yet another detail that we didn't go into yet. This detail lies in APT itself. APT is in fact "redirector aware", in a sense. When it fetches a Release file, and if ever the request is redirected, it then fires the subsequent requests against the server where it was initially redirected. So you are guaranteed that the Release file and the Index files are retrieved from the same mirror! Which brings back our "Hash Sum Mismatch Window" to the window for a single server, ie. something like a few seconds at worst, hopefully. And that's what makes it work for Kali, literally. Without this trick, everything would fall apart. For reference, this feature was implemented in APT back in... 2016! A busy year it seems! Here's the link to the commit: use the same redirection mirror for all index files. To finish, a dump from the console. You can see this behaviour play out easily, again with APT debugging turned on. Below we can see that only the first request hits the Kali redirector:
$ podman run --rm kali-rolling apt -q -o Debug::Acquire::http=true update 2>&1   grep -e ^Answer -e ^HTTP
Answer for: http://http.kali.org/kali/dists/kali-rolling/InRelease
HTTP/1.1 302 Found
Answer for: http://mirror.freedif.org/kali/dists/kali-rolling/InRelease
HTTP/1.1 200 OK
Answer for: http://mirror.freedif.org/kali/dists/kali-rolling/non-free-firmware/binary-amd64/Packages.gz
HTTP/1.1 200 OK
Answer for: http://mirror.freedif.org/kali/dists/kali-rolling/contrib/binary-amd64/Packages.gz
HTTP/1.1 200 OK
Answer for: http://mirror.freedif.org/kali/dists/kali-rolling/main/binary-amd64/Packages.gz
HTTP/1.1 200 OK
Answer for: http://mirror.freedif.org/kali/dists/kali-rolling/non-free/binary-amd64/Packages.gz
HTTP/1.1 200 OK
Interlude Believe it or not, we're done with the introduction! At this point, we have a good understanding of what apt update does (in terms of HTTP requests), we know that Release files and Index files are part of a whole, and we know that a repository can be updated atomically thanks to the Acquire-By-Hash feature, so that users don't experience interruption of service or failures of any sort, even with a rolling repository that is updated several times a day, like Debian sid. We've also learnt that, despite the fact that Acquire-By-Hash landed almost 10 years ago, some distributions like Kali Linux are still doing without it... and yet it works! But the reason why it works is more complicated to grasp, especially when you add a network of mirrors and a redirector to the picture. Moreover, it doesn't work as flawlessly as with the Acquire-By-Hash feature: we still expect some short (seconds at worst) "Hash Sum Mismatch Windows" for those unlucky users that run apt update at the wrong moment. This was a long intro, but that really sets the stage for what comes next: the edge cases. Some situations in which we can hit some Hash Sum Mismatch errors with Kali. Error cases that I've collected and investigated over the time... If anything, it supports the case that Acquire-By-Hash is really something that should be implemented in reprepro. More on that in the conclusion, but for now, let's look at those edge cases. Edge Case 1: the caching proxy If you put a caching proxy (such as approx, my APT caching proxy of choice) between yourself and the actual packages repository, then obviously it's the caching proxy that performs the HTTP requests, and therefore APT will never know about the redirections returned by the server, if any. So the APT trick of downloading all the Index files from the same server in case of redirect doesn't work anymore. It was rather easy to confirm that by building a Kali package during a mirror sync, and watch if fail at the "Update chroot" step:
$ sudo rm /var/cache/approx/kali/dists/ -fr
$ gbp buildpackage --git-builder=sbuild
+------------------------------------------------------------------------------+
  Update chroot                                Wed, 11 Jun 2025 10:33:32 +0000  
+------------------------------------------------------------------------------+
Get:1 http://http.kali.org/kali kali-dev InRelease [41.4 kB]
Get:2 http://http.kali.org/kali kali-dev/contrib Sources [81.6 kB]
Get:3 http://http.kali.org/kali kali-dev/main Sources [17.3 MB]
Get:4 http://http.kali.org/kali kali-dev/non-free Sources [122 kB]
Get:5 http://http.kali.org/kali kali-dev/non-free-firmware Sources [8297 B]
Get:6 http://http.kali.org/kali kali-dev/non-free amd64 Packages [197 kB]
Get:7 http://http.kali.org/kali kali-dev/non-free-firmware amd64 Packages [10.6 kB]
Get:8 http://http.kali.org/kali kali-dev/contrib amd64 Packages [120 kB]
Get:9 http://http.kali.org/kali kali-dev/main amd64 Packages [21.0 MB]
Err:9 http://http.kali.org/kali kali-dev/main amd64 Packages
  File has unexpected size (20984689 != 20984861). Mirror sync in progress? [IP: ::1 9999]
  Hashes of expected file:
   - Filesize:20984861 [weak]
   - SHA256:6cbbee5838849ffb24a800bdcd1477e2f4adf5838a844f3838b8b66b7493879e
   - SHA1:a5c7e557a506013bd0cf938ab575fc084ed57dba [weak]
   - MD5Sum:1433ce57419414ffb348fca14ca1b00f [weak]
  Release file created at: Wed, 11 Jun 2025 07:15:10 +0000
Fetched 17.9 MB in 9s (1893 kB/s)
Reading package lists...
E: Failed to fetch http://http.kali.org/kali/dists/kali-dev/main/binary-amd64/Packages.gz  File has unexpected size (20984689 != 20984861). Mirror sync in progress? [IP: ::1 9999]
   Hashes of expected file:
    - Filesize:20984861 [weak]
    - SHA256:6cbbee5838849ffb24a800bdcd1477e2f4adf5838a844f3838b8b66b7493879e
    - SHA1:a5c7e557a506013bd0cf938ab575fc084ed57dba [weak]
    - MD5Sum:1433ce57419414ffb348fca14ca1b00f [weak]
   Release file created at: Wed, 11 Jun 2025 07:15:10 +0000
E: Some index files failed to download. They have been ignored, or old ones used instead.
E: apt-get update failed
The obvious workaround is to NOT use the redirector in the approx configuration. Either use a mirror close by, or the Kali CDN:
$ grep kali /etc/approx/approx.conf 
#kali http://http.kali.org/kali <- do not use the redirector!
kali  http://kali.download/kali
Edge Case 2: debootstrap struggles What if one tries to debootstrap Kali while mirrors are being synced? It can give you some ugly logs, but it might not be fatal:
$ sudo debootstrap kali-dev kali-dev http://http.kali.org/kali
[...]
I: Target architecture can be executed
I: Retrieving InRelease 
I: Checking Release signature
I: Valid Release signature (key id 827C8569F2518CC677FECA1AED65462EC8D5E4C5)
I: Retrieving Packages 
I: Validating Packages 
W: Retrying failed download of http://http.kali.org/kali/dists/kali-dev/main/binary-amd64/Packages.gz
I: Retrieving Packages 
I: Validating Packages 
W: Retrying failed download of http://http.kali.org/kali/dists/kali-dev/main/binary-amd64/Packages.gz
I: Retrieving Packages 
I: Validating Packages 
W: Retrying failed download of http://http.kali.org/kali/dists/kali-dev/main/binary-amd64/Packages.gz
I: Retrieving Packages 
I: Validating Packages 
W: Retrying failed download of http://http.kali.org/kali/dists/kali-dev/main/binary-amd64/Packages.gz
I: Retrieving Packages 
I: Validating Packages 
I: Resolving dependencies of required packages...
I: Resolving dependencies of base packages...
I: Checking component main on http://http.kali.org/kali...
I: Retrieving adduser 3.152
[...]
To understand this one, we have to go and look at the debootstrap source code. How does debootstrap fetch the Release file and the Index files? It uses wget, and it retries up to 10 times in case of failure. It's not as sophisticated as APT: it doesn't detect when the Release file is served via a redirect. As a consequence, what happens above can be explained as such:
  1. debootstrap requests the Release file, gets redirected to a mirror, and retrieves it from there
  2. then it requests the Packages file, gets redirected to another mirror that is not in sync with the first one, and retrieves it from there
  3. validation fails, since the checksum is not as expected
  4. try again and again
Since debootstrap retries up to 10 times, at some point it's lucky enough to get redirected to the same mirror as the one from where it got its Release file from, and this time it gets the right Packages file, with the expected checksum. So ultimately it succeeds. Edge Case 3: post-debootstrap failure I like this one, because it gets us to yet another detail that we didn't talk about yet. So, what happens after we successfully debootstraped Kali? We have only the main component enabled, and only the Index file for this component have been retrieved. It looks like that:
$ sudo debootstrap kali-dev kali-dev http://http.kali.org/kali
[...]
I: Base system installed successfully.
$ cat kali-dev/etc/apt/sources.list
deb http://http.kali.org/kali kali-dev main
$ ls -l kali-dev/var/lib/apt/lists/
total 80468
-rw-r--r-- 1 root root    41445 Jun 19 07:02 http.kali.org_kali_dists_kali-dev_InRelease
-rw-r--r-- 1 root root 82299122 Jun 19 07:01 http.kali.org_kali_dists_kali-dev_main_binary-amd64_Packages
-rw-r--r-- 1 root root    40562 Jun 19 11:54 http.kali.org_kali_dists_kali-dev_Release
-rw-r--r-- 1 root root      833 Jun 19 11:54 http.kali.org_kali_dists_kali-dev_Release.gpg
drwxr-xr-x 2 root root     4096 Jun 19 11:54 partial
So far so good. Next step would be to complete the sources.list with other components, then run apt update: APT will download the missing Index files. But if you're unlucky, that might fail:
$ sudo sed -i 's/main$/main contrib non-free non-free-firmware/' kali-dev/etc/apt/sources.list
$ cat kali-dev/etc/apt/sources.list
deb http://http.kali.org/kali kali-dev main contrib non-free non-free-firmware
$ sudo chroot kali-dev apt update
Hit:1 http://http.kali.org/kali kali-dev InRelease
Get:2 http://kali.download/kali kali-dev/contrib amd64 Packages [121 kB]
Get:4 http://mirror.sg.gs/kali kali-dev/non-free-firmware amd64 Packages [10.6 kB]
Get:3 http://mirror.freedif.org/kali kali-dev/non-free amd64 Packages [198 kB]
Err:3 http://mirror.freedif.org/kali kali-dev/non-free amd64 Packages
  File has unexpected size (10442 != 10584). Mirror sync in progress? [IP: 66.96.199.63 80]
  Hashes of expected file:
   - Filesize:10584 [weak]
   - SHA256:71a83d895f3488d8ebf63ccd3216923a7196f06f088461f8770cee3645376abb
   - SHA1:c4ff126b151f5150d6a8464bc6ed3c768627a197 [weak]
   - MD5Sum:a49f46a85febb275346c51ba0aa8c110 [weak]
  Release file created at: Fri, 23 May 2025 06:48:41 +0000
Fetched 336 kB in 4s (77.5 kB/s)  
Reading package lists... Done
E: Failed to fetch http://mirror.freedif.org/kali/dists/kali-dev/non-free/binary-amd64/Packages.gz  File has unexpected size (10442 != 10584). Mirror sync in progress? [IP: 66.96.199.63 80]
   Hashes of expected file:
    - Filesize:10584 [weak]
    - SHA256:71a83d895f3488d8ebf63ccd3216923a7196f06f088461f8770cee3645376abb
    - SHA1:c4ff126b151f5150d6a8464bc6ed3c768627a197 [weak]
    - MD5Sum:a49f46a85febb275346c51ba0aa8c110 [weak]
   Release file created at: Fri, 23 May 2025 06:48:41 +0000
E: Some index files failed to download. They have been ignored, or old ones used instead.
What happened here? Again, we need APT debugging options to have a hint:
$ sudo chroot kali-dev apt -q -o Debug::Acquire::http=true update 2>&1   grep -e ^Answer -e ^HTTP
Answer for: http://http.kali.org/kali/dists/kali-dev/InRelease
HTTP/1.1 304 Not Modified
Answer for: http://http.kali.org/kali/dists/kali-dev/contrib/binary-amd64/Packages.gz
HTTP/1.1 302 Found
Answer for: http://http.kali.org/kali/dists/kali-dev/non-free/binary-amd64/Packages.gz
HTTP/1.1 302 Found
Answer for: http://http.kali.org/kali/dists/kali-dev/non-free-firmware/binary-amd64/Packages.gz
HTTP/1.1 302 Found
Answer for: http://kali.download/kali/dists/kali-dev/contrib/binary-amd64/Packages.gz
HTTP/1.1 200 OK
Answer for: http://mirror.sg.gs/kali/dists/kali-dev/non-free-firmware/binary-amd64/Packages.gz
HTTP/1.1 200 OK
Answer for: http://mirror.freedif.org/kali/dists/kali-dev/non-free/binary-amd64/Packages.gz
HTTP/1.1 200 OK
As we can see above, for the Release file we get a 304 (aka. "Not Modified") from the redirector. Why is that? This is due to If-Modified-Since also known as RFC-7232. APT supports this feature when it retrieves the Release file, it basically says to the server "Give me the Release file, but only if it's newer than what I already have". If the file on the server is not newer than that, it answers with a 304, which basically says to the client "You have the latest version already". So APT doesn't get a new Release file, it uses the Release file that is already present locally in /var/lib/apt/lists/, and then it proceeeds to download the missing Index files. And as we can see above: it then hits the redirector for each requests, and might be redirected to different mirrors for each Index file. So the important bit here is: the APT "trick" of downloading all the Index files from the same mirror only works if the Release file is served via a redirect. If it's not, like in this case, then APT hits the redirector for each files it needs to download, and it's subject to the "Hash Sum Mismatch" error again. In practice, for the casual user running apt update every now and then, it's not an issue. If they have the latest Release file, no extra requests are done, because they also have the latest Index files, from a previous apt update transaction. So APT doesn't re-download those Index files. The only reason why they'd have the latest Release file, and would miss some Index files, would be that they added new components to their APT sources, like we just did above. Not so common, and then they'd need to run apt update at a unlucky moment. I don't think many users are affected in practice. Note that this issue is rather new for Kali Linux. The redirector running on http.kali.org is mirrorbits, and support for If-Modified-Since just landed in the latest release, version 0.6. This feature was added by no one else than me, a great example of the expression "shooting oneself in the foot". An obvious workaround here is to empty /var/lib/apt/lists/ in the chroot after debootstrap completed. Or we could disable support for If-Modified-Since entirely for Kali's instance of mirrorbits. Summary and Conclusion The Hash Sum Mismatch failures above are caused by a combination of things: At the same time: All in all, it seems that all those issues would go away if only Acquire-By-Hash was supported in the Kali packages repository. Now is not a bad moment to try to land this feature in reprepro. After development halted in 2019, there's now a new upstream, and patches are being merged again. But it won't be easy: reprepro is a C codebase of around 50k lines of code, and it will take time and effort for the newcomer to get acquainted with the codebase, to the point of being able to implement a significant feature like this one. As an alternative, aptly is another popular tool to manage APT package repositories. And it seems to support Acquire-By-Hash already. Another alternative: I was told that debusine has (experimental) support for package repositories, and that Acquire-By-Hash is supported as well. Options are on the table, and I hope that Kali will eventually get support for Acquire-By-Hash, one way or another. To finish, due credits: this blog post exists thanks to my employer OffSec. Thanks for reading!

24 March 2025

Arnaud Rebillout: Buid container images with buildah/podman in GitLab CI

Oh no, it broke again! Today, this .gitlab-ci.yml file no longer works in GitLab CI:
build-container-image:
  stage: build
  image: debian:testing
  before_script:
    - apt-get update
    - apt-get install -y buildah ca-certificates
  script:
    - buildah build -t $CI_REGISTRY_IMAGE .
The command buildah build ... fails with this error message:
STEP 2/3: RUN  apt-get update
internal:0:0-0: Error: Could not process rule: No such file or directory
error running container: did not get container start message from parent: EOF
Error: building at STEP "RUN apt-get update": setup network: netavark: nftables error: nft did not return successfully while applying ruleset
After some investigation, it's caused by the recent upload of netavark 1.14.0-2. In this version, netavark switched from iptables to nftables as the default firewall driver. That doesn't really fly on GitLab Saas shared runners. For the complete background, refer to https://discussion.fedoraproject.org/t/125528. Note that the issue with GitLab was reported back in November, but at this point the conversation had died out. Fortunately, it's easy to workaround, we can tell netavark to keep using iptables via the environment variables NETAVARK_FW. The .gitlab-ci.yml file above becomes:
build-container-image:
  stage: build
  image: debian:testing
  variables:
    # Cf. https://discussion.fedoraproject.org/t/125528/7
    NETAVARK_FW: iptables
  before_script:
    - apt-get update
    - apt-get install -y buildah ca-certificates
  script:
    - buildah build -t $CI_REGISTRY_IMAGE .
And everything works again! If you're interested in this issue, feel free to fork https://gitlab.com/arnaudr/gitlab-build-container-image and try it by yourself.

20 November 2024

Arnaud Rebillout: Installing an older Ansible version via pipx

Latest Ansible requires Python 3.8 on the remote hosts ... and therefore, hosts running Debian Buster are now unsupported. Monday, I updated the system on my laptop (Debian Sid), and I got the latest version of ansible-core, 2.18:
$ ansible --version   head -1
ansible [core 2.18.0]
To my surprise, Ansible started to fail with some remote hosts:
ansible-core requires a minimum of Python version 3.8. Current version: 3.7.3 (default, Mar 23 2024, 16:12:05) [GCC 8.3.0]
Yep, I do have to work with hosts running Debian Buster (aka. oldoldstable). While Buster is old, it's still out there, and it's still supported via Freexian s Extended LTS. How are we going to keep managing those machines? Obviously, we'll need an older version of Ansible. Pipx to the rescue TL;DR
pipx install --include-deps ansible==10.6.0
pipx inject ansible dnspython    # for community.general.dig
Installing Ansible via pipx Lately I discovered pipx and it's incredibly simple, so I thought I'd give it a try for this use-case. Reminder: pipx allows users to install Python applications in isolated environments. In other words, it doesn't make a mess with your system like pip does, and it doesn't require you to learn how to setup Python virtual environments by yourself. It doesn't ask for root privileges either, as it installs everything under ~/.local/. First thing to know: pipx install ansible won't cut it, it doesn't install the whole Ansible suite. Instead we need to use the --include-deps flag in order to install all the Ansible commands. The output should look something like that:
$ pipx install --include-deps ansible==10.6.0
  installed package ansible 10.6.0, installed using Python 3.12.7
  These apps are now globally available
    - ansible
    - ansible-community
    - ansible-config
    - ansible-connection
    - ansible-console
    - ansible-doc
    - ansible-galaxy
    - ansible-inventory
    - ansible-playbook
    - ansible-pull
    - ansible-test
    - ansible-vault
done!      
Note: at the moment 10.6.0 is the latest release of the 10.x branch, but make sure to check https://pypi.org/project/ansible/#history and install whatever is the latest on this branch. The 11.x branch doesn't work for us, as it's the branch that comes with ansible-core 2.18, and we don't want that. Next: do NOT run pipx ensurepath, even though pipx might suggest that. This is not needed. Instead, check your ~/.profile, it should contain these lines:
# set PATH so it includes user's private bin if it exists
if [ -d "$HOME/.local/bin" ] ; then
    PATH="$HOME/.local/bin:$PATH"
fi
Meaning: ~/.local/bin/ should already be in your path, unless it's the first time you installed a program via pipx and the directory ~/.local/bin/ was just created. If that's the case, you have to log out and log back in. Now, let's open a new terminal and check if we're good:
$ which ansible
/home/me/.local/bin/ansible
$ ansible --version   head -1
ansible [core 2.17.6]
Yep! And that's working already, I can use Ansible with Buster hosts again. What's cool is that we can run ansible to use this specific Ansible version, but we can also run /usr/bin/ansible to run the latest version that is installed via APT. Injecting Python dependencies needed by collections Quickly enough, I realized something odd, apparently the plugin community.general.dig didn't work anymore. After some research, I found a one-liner to test that:
# Works with APT-installed Ansible? Yes!
$ /usr/bin/ansible all -i localhost, -m debug -a msg="  lookup('dig', 'debian.org./A')  "
localhost   SUCCESS =>  
    "msg": "151.101.66.132,151.101.2.132,151.101.194.132,151.101.130.132"
 
# Works with pipx-installed Ansible? No!
$ ansible all -i localhost, -m debug -a msg="  lookup('dig', 'debian.org./A')  "
localhost   FAILED! =>  
  "msg": "An unhandled exception occurred while running the lookup plugin 'dig'.
  Error was a <class 'ansible.errors.AnsibleError'>, original message: The dig
  lookup requires the python 'dnspython' library and it is not installed."
 
The issue here is that we need python3-dnspython, which is installed on my system, but is not installed within the pipx virtual environment. It seems that the way to go is to inject the required dependencies in the venv, which is (again) super easy:
$ pipx inject ansible dnspython
  injected package dnspython into venv ansible
done!      
Problem fixed! Of course you'll have to iterate to install other missing dependencies, depending on which Ansible external plugins are used in your playbooks. Closing thoughts Hopefully there's nothing left to discover and I can get back to work! If there's more quirks and rough edges, drop me an email so that I can update this blog post. Let me also credit another useful blog post on the matter: https://unfriendlygrinch.info/posts/effortless-ansible-installation/

3 April 2024

Arnaud Rebillout: Firefox: Moving from the Debian package to the Flatpak app (long-term?)

First, thanks to Samuel Henrique for giving notice of recent Firefox CVEs in Debian testing/unstable. At the time I didn't want to upgrade my system (Debian Sid) due to the ongoing t64 transition transition, so I decided I could install the Firefox Flatpak app instead, and why not stick to it long-term? This blog post details all the steps, if ever others want to go the same road. Flatpak Installation Disclaimer: this section is hardly anything more than a copy/paste of the official documentation, and with time it will get outdated, so you'd better follow the official doc. First thing first, let's install Flatpak:
$ sudo apt update
$ sudo apt install flatpak
Then the next step is to add the Flathub remote repository, from where we'll get our Flatpak applications:
$ flatpak remote-add --if-not-exists flathub https://dl.flathub.org/repo/flathub.flatpakrepo
And that's all there is to it! Now come the optional steps. For GNOME and KDE users, you might want to install a plugin for the software manager specific to your desktop, so that it can support and manage Flatpak apps:
$ which -s gnome-software  && sudo apt install gnome-software-plugin-flatpak
$ which -s plasma-discover && sudo apt install plasma-discover-backend-flatpak
And here's an additional check you can do, as it's something that did bite me in the past: missing xdg-portal-* packages, that are required for Flatpak applications to communicate with the desktop environment. Just to be sure, you can check the output of apt search '^xdg-desktop-portal' to see what's available, and compare with the output of dpkg -l grep xdg-desktop-portal. As you can see, if you're a GNOME or KDE user, there's a portal backend for you, and it should be installed. For reference, this is what I have on my GNOME desktop at the moment:
$ dpkg -l   grep xdg-desktop-portal   awk ' print $2 '
xdg-desktop-portal
xdg-desktop-portal-gnome
xdg-desktop-portal-gtk
Install the Firefox Flatpak app This is trivial, but still, there's a question I've always asked myself: should I install applications system-wide (aka. flatpak --system, the default) or per-user (aka. flatpak --user)? Turns out, this questions is answered in the Flatpak documentation:
Flatpak commands are run system-wide by default. If you are installing applications for day-to-day usage, it is recommended to stick with this default behavior.
Armed with this new knowledge, let's install the Firefox app:
$ flatpak install flathub org.mozilla.firefox
And that's about it! We can give it a go already:
$ flatpak run org.mozilla.firefox
Data migration At this point, running Firefox via Flatpak gives me an "empty" Firefox. That's not what I want, instead I want my usual Firefox, with a gazillion of tabs already opened, a few extensions, bookmarks and so on. As it turns out, Mozilla provides a brief doc for data migration, and it's as simple as moving Firefox data directory around! To clarify, we'll be copying data: Make sure that all Firefox instances are closed, then proceed:
# BEWARE! Below I'm erasing data!
$ rm -fr ~/.var/app/org.mozilla.firefox/.mozilla/firefox/
$ cp -a ~/.mozilla/firefox/ ~/.var/app/org.mozilla.firefox/.mozilla/
To avoid confusing myself, it's also a good idea to rename the local data directory:
$ mv ~/.mozilla/firefox ~/.mozilla/firefox.old.$(date --iso-8601=date)
At this point, flatpak run org.mozilla.firefox takes me to my "usual" everyday Firefox, with all its tabs opened, pinned, bookmarked, etc. More integration? After following all the steps above, I must say that I'm 99% happy. So far, everything works as before, I didn't hit any issue, and I don't even notice that Firefox is running via Flatpak, it's completely transparent. So where's the 1% of unhappiness? The Run a Command dialog from GNOME, the one that shows up via the keyboard shortcut <Alt+F2>. This is how I start my GUI applications, and I usually run two Firefox instances in parallel (one for work, one for personal), using the firefox -p <profile> command. Given that I ran apt purge firefox before (to avoid confusing myself with two installations of Firefox), now the right (and only) way to start Firefox from a command-line is to type flatpak run org.mozilla.firefox -p <profile>. Typing that every time is way too cumbersome, so I need something quicker. Seems like the most straightforward is to create a wrapper script:
$ cat /usr/local/bin/firefox 
#!/bin/sh
exec flatpak run org.mozilla.firefox "$@"
And now I can just hit <Alt+F2> and type firefox -p <profile> to start Firefox with the profile I want, just as before. Neat! Looking forward: system updates I usually update my system manually every now and then, via the well-known pair of commands:
$ sudo apt update
$ sudo apt full-upgrade
The downside of introducing Flatpak, ie. introducing another package manager, is that I'll need to learn new commands to update the software that comes via this channel. Fortunately, there's really not much to learn. From flatpak-update(1):
flatpak update [OPTION...] [REF...] Updates applications and runtimes. [...] If no REF is given, everything is updated, as well as appstream info for all remotes.
Could it be that simple? Apparently yes, the Flatpak equivalent of the two apt commands above is just:
$ flatpak update
Going forward, my options are:
  1. Teach myself to run flatpak update additionally to apt update, manually, everytime I update my system.
  2. Go crazy: let something automatically update my Flatpak apps, in my back and without my consent.
I'm actually tempted to go for option 2 here, and I wonder if GNOME Software will do that for me, provided that I installed gnome-software-plugin-flatpak, and that I checked Software Updates -> Automatic in the Settings (which I did). However, I didn't find any documentation regarding what this setting really does, so I can't say if it will only download updates, or if it will also install it. I'd be happy if it automatically installs new version of Flatpak apps, but at the same time I'd be very unhappy if it automatically upgrades my Debian system... So we'll see. Enough for today, hope this blog post was useful!

18 January 2023

Arnaud Rebillout: Build container images in GitLab CI (iptables-legacy at the rescue)

It's 2023 and these days, building a container image in a CI pipeline should be straightforward. So let's try. For this blog post we'll focus on GitLab SaaS only, that is, gitlab.com, as it's what I use for work and for personal projects. To get started, we just need two files in our Git repository: Here is our Git tree:
$ ls -A
Containerfile  .git  .gitlab-ci.yml
$ cat Containerfile 
FROM debian:stable
RUN  apt-get update
CMD  echo hello world
$ cat .gitlab-ci.yml 
build-container-image:
  stage: build
  image: debian:testing
  before_script:
    - apt-get update
    - apt-get install -y buildah ca-certificates
  script:
    - buildah build -t $CI_REGISTRY_IMAGE .
    - buildah login -u $CI_REGISTRY_USER -p $CI_JOB_TOKEN $CI_REGISTRY
    - buildah push $CI_REGISTRY_IMAGE
A few remarks: Now let's push that. Does the CI pass? No, of course, otherwise I wouldn't be writing this blog post ;) The CI fails at the buildah build command, with a rather cryptic error:
$ buildah build --tag $CI_REGISTRY_IMAGE .
[...]
STEP 2/3: RUN  apt-get update
error running container: did not get container start message from parent: EOF
Error: building at STEP "RUN apt-get update": netavark: code: 4, msg: iptables v1.8.8 (nf_tables): Could not fetch rule set generation id: Invalid argument
The hint here is nf_tables... Back in July 2021, GitLab did a major update of their shared runners infrastructure, and broke nftables support in the process, as it seems. So we have to use iptables instead. Let's fix our .gitlab-ci.yml, which now looks like that:
$ cat .gitlab-ci.yml 
build-container-image:
  stage: build
  image: debian:testing
  before_script:
    - apt-get update
    - apt-get install -y buildah ca-certificates
    -  
      # Switch to iptables legacy, as GitLab CI doesn't support nftables.
      apt-get install -y --no-install-recommends iptables
      update-alternatives --set iptables /usr/sbin/iptables-legacy
  script:
    - buildah build -t $CI_REGISTRY_IMAGE .
    - buildah login -u $CI_REGISTRY_USER -p $CI_JOB_TOKEN $CI_REGISTRY
    - buildah push $CI_REGISTRY_IMAGE
And push again. Does that work? Yes! If you're interested in this issue, feel free to fork https://gitlab.com/arnaudr/gitlab-build-container-image and try it by yourself. It's been more than a year since this change, and I'm surprised that I didn't find much about it on the Internet, neither mentions of the issue, nor of a workaround. Maybe nobody builds container images in GitLab CI, or maybe they do it another way, I don't know. In any case, now it's documented in this blog, hopefully some will find it useful. Happy 2023!

26 September 2022

Bits from Debian: New Debian Developers and Maintainers (July and August 2022)

The following contributors got their Debian Developer accounts in the last two months: The following contributors were added as Debian Maintainers in the last two months: Congratulations!

24 August 2020

Arnaud Rebillout: Send emails from your terminal with msmtp

In this tutorial, we'll configure everything needed to send emails from the terminal. We'll use msmtp, a lightweight SMTP client. For the sake of the example, we'll use a GMail account, but any other email provider can do. Your OS is expected to be Debian, as usual on this blog, although it doesn't really matter. We will also see how to store the credentials for the email account in the system keyring. And finally, we'll go the extra mile, and see how to configure various command-line utilities so that they automatically use msmtp to send emails. Even better, we'll make msmtp the default email sender, to actually avoid configuring these utilities one by one. Prerequisites Strong prerequisites (if you don't recognize yourself here, you probably landed on the wrong page): Weak prerequisites (if your setup doesn't match those points exactly, that's fine, you can still read on): GMail account setup For a GMail account, there's a bit of configuration to do. For other email providers, I have no idea, maybe you can just skip this part, or maybe you will have to go through a similar procedure. If you want an external program (msmtp in this case) to talk to the GMail servers on your behalf, and send emails, you can't just use your usual GMail password. Instead, GMail requires you to generate so-called app passwords, one for each application that needs to access your GMail account. This approach has several advantages: So app passwords are a good idea, it just requires a bit of work to set it up. Let's see what it takes. First, 2-Step Verification must be enabled on your GMail account. Visit https://myaccount.google.com/security, and if that's not the case, enable it. You'll need to authorize all of your devices (computer(s), phone(s) and so on), and it can be a bit tedious, granted. But you only have to do it once in a lifetime, and after it's done, you're left with a more secure account, so it's not that bad, right? Enabling the 2-Step Verification will unlock the feature we need: App passwords. Visit https://myaccount.google.com/apppasswords, and under "Signing in to Google", click "App passwords", and generate one. An app password is a 16 characters string, something like qwertyuiopqwerty. It's supposed to be used from only one place, ie. from ONE application that is installed on ONE device. That's why it's common to give it a name of the form application@device, so in our case it could be msmtp@laptop, but really it's free form, choose whatever name suits you, as long as it makes sense to you. So let's give a name to this app password, write it down for now, and we're done with the GMail config. Send your first email Time to get started with msmtp. First thing first, installation, trivial:
sudo apt install msmtp
Let's try to send an email. At this point, we did not create any configuration file for msmtp yet, so we have to provide every details on the command line.
# Write a dummy email
cat << EOF > message.txt
From: YOUR_LOGIN@gmail.com
To: SOMEONE_ELSE@SOMEWHERE_ELSE.com
Subject: Cafe Sua Da
Iced-coffee with condensed milk
EOF
# Send it
cat message.txt   msmtp \
    --auth=on --tls=on \
    --host smtp.gmail.com \
    --port 587 \
    --user YOUR_LOGIN \
    --read-envelope-from \
    --read-recipients
# msmtp prompts you for your password:
# this is where goes the app password!
Obviously, in this example you should replace the uppercase words with the real thing, that is, your email login, and real email addresses. Also, let me insist, you must enter the app password that was generated previously, not your real GMail password. And it should work already, this email should have been sent and received by now. So let me explain quickly what happened here. In the file message.txt, we provided From: (the email address of the person sending the email) and To: (the destination email address). Then we asked msmtp to re-use those values to set the envelope of the email with --read-envelope-from and --read-recipients. What about the other parameters? For more details, you should refer to the msmtp documentation. Write a configuration file So we could send an email, that's cool already. However the command to do that was a bit long, and we don't want to juggle with all these arguments every time we send an email. So let's write down all of that into a configuration file. msmtp supports two locations: ~/.msmtprc and ~/.config/msmtp/config, at your preference. In this tutorial we'll use ~/.msmtprc for brevity:
cat << 'EOF' > ~/.msmtprc
defaults
tls on
account gmail
auth on
host smtp.gmail.com
port 587
user YOUR_LOGIN
from YOUR_LOGIN@gmail.com
account default : gmail
EOF
And for a quick explanation: All in all it's pretty simple, and it's becoming easier to send an email:
# Write a dummy email. Note that the
# header 'From:' is no longer needed,
# it's already in '~/.msmtprc'.
cat << 'EOF' > message.txt
To: SOMEONE_ELSE@SOMEWHERE_ELSE.com
Subject: Flat White
The milky way for coffee
EOF
# Send it
cat message.txt   msmtp \
    --account default \
    --read-recipients
Actually, --account default is not needed, as it's the default anyway if you don't provide a --account argument. Furthermore --read-recipients can be shortened as -t. So we can make it real short now:
msmtp -t < message.txt
At this point, life is good! Except for one thing maybe: we still have to type the password every time we send an email. Surely it must be possible to avoid that annoyance... Store your password in the system keyring For this part, we'll make use of the libsecret tool to store the password in the system keyring via the Secret Service API. It means that your desktop environment should implement the Secret Service specification, which is the case for both GNOME and KDE. Note that GNOME provides Seahorse to have a look at your secrets, KDE has the KDE Wallet. There's also KeePassXC, which I have only heard of but never used. I guess it can be your password manager of choice if you use neither GNOME nor KDE. For those running an up-to-date Debian unstable, you should have msmtp >= 1.8.11-2, and you're all good to go. For those having an older version than that however, you will have to install the package msmtp-gnome in order to have msmtp built with libsecret support. Note that this package depends on seahorse, hence it pulls in a good part of the GNOME stack when you install it. For those not running GNOME, that's unfortunate. All of this was discussed and fixed in #962689. Alright! So let's just make sure that the libsecret tools are installed:
sudo apt install libsecret-tools
And now we can store our password in the system keyring with this command:
secret-tool store --label msmtp \
    host smtp.gmail.com \
    service smtp \
    user YOUR_LOGIN
If this looks a bit too magic, and you want something more visual, you can actually fire a GUI like seahorse (for GNOME users), or kwalletmanager5 (for KDE users), and then you will see what passwords are stored in there. Here's a screenshot of Seahorse, with a msmtp password stored: seahorse with msmtp password Let's try to send an email again:
msmtp -t < message.txt
No need for a password anymore, msmtp got it from the system keyring! For more details on how msmtp handle the passwords, and to see what other methods are supported, refer to the extensive documentation. Use-cases and integration Let's go over a few use-cases, situations where you might end up sending emails from the command-line, and what configuration is required to make it work with msmtp. Git Send-Email Sending emails with git is a common workflow for some projects, like the Linux kernel. How does git send-email actually send emails? From the git-send-email manual page:
the built-in default is to search for sendmail in /usr/sbin, /usr/lib and $PATH if such program is available
It is possible to override this default though:
--smtp-server=
[...] Alternatively it can specify a full pathname of a sendmail-like program instead; the program must support the -i option.
So in order to use msmtp here, you'd add a snippet like that to your ~/.gitconfig file:
[sendemail]
    smtpserver = /usr/bin/msmtp
For a full guide, you can also refer to https://git-send-email.io. Debian developer tools Tools like bts or reportbug are also good examples of command-line tools that need to send emails. From the bts manual page:
--sendmail=SENDMAILCMD
Specify the sendmail command [...] Default is /usr/sbin/sendmail.
So if you want bts to send emails with msmtp instead of sendmail, you must use bts --sendmail='/usr/bin/msmtp -t'. Note that bts also loads settings from the file /etc/devscripts.conf and ~/.devscripts, so you could also set BTS_SENDMAIL_COMMAND='/usr/bin/msmtp -t' in one of those files. From the reportbug manual page:
--mta=MTA
Specify an alternate MTA, instead of /usr/sbin/sendmail (the default).
In order to use msmtp here, you'd write reportbug --mta=/usr/bin/msmtp. Note that reportbug reads it settings from /etc/reportbug.conf and ~/.reportbugrc, so you could as well set mta /usr/bin/msmtp in one of those files. So who is this sendmail again? By now, you probably noticed that sendmail seems to be considered the default tool for the job, the "traditional" command that has been around for ages. Rather than configuring every tool to use something else than sendmail, wouldn't it be simpler to actually replace sendmail by msmtp? Like, create a symlink that points to msmtp, something like ln -sr /usr/bin/msmtp /usr/sbin/sendmail? So that msmtp acts as a drop-in replacement for sendmail, and there's nothing else to configure? Answer is yes, kind of. Actually, the first msmtp feature that is listed on the homepage is "Sendmail compatible interface (command line options and exit codes)". Meaning that msmtp is a drop-in replacement for sendmail, that seems to be the intent. However, you should refrain from creating or modifying anything in /usr, as it's the territory of the package manager, apt. Any change in /usr might be overwritten by apt the next time you run an upgrade or install new packages. In the case of msmtp, there is actually a package named msmtp-mta that will create this symlink for you. So if you really want a definitive replacement for sendmail, there you go:
sudo apt install msmtp-mta
From this point, sendmail is now a symlink /usr/sbin/sendmail /usr/bin/msmtp, and there's no need to configure git, bts, reportbug or any other tool that would rely on sendmail. Everything should work "out of the box". Conclusion I hope that you enjoyed reading this article! If you have any comment, feel free to send me a short email, preferably from your terminal!

17 August 2020

Arnaud Rebillout: Modify Vim syntax files for your taste

In this short how-to, we'll see how to make small modifications to a Vim syntax file, in order to change how a particular file format is highlighted. We'll go for a simple use-case: modify the Markdown syntax file, so that H1 and H2 headings (titles and subtitles, if you prefer) are displayed in bold. Of course, this won't be exactly as easy as expected, but no worries, we'll succeed in the end. The calling Let's start with a screenshot: how Vim displays Markdown files for me, someone who use the GNOME terminal with the Solarized light theme. Vim - Markdown file with original highlighting 
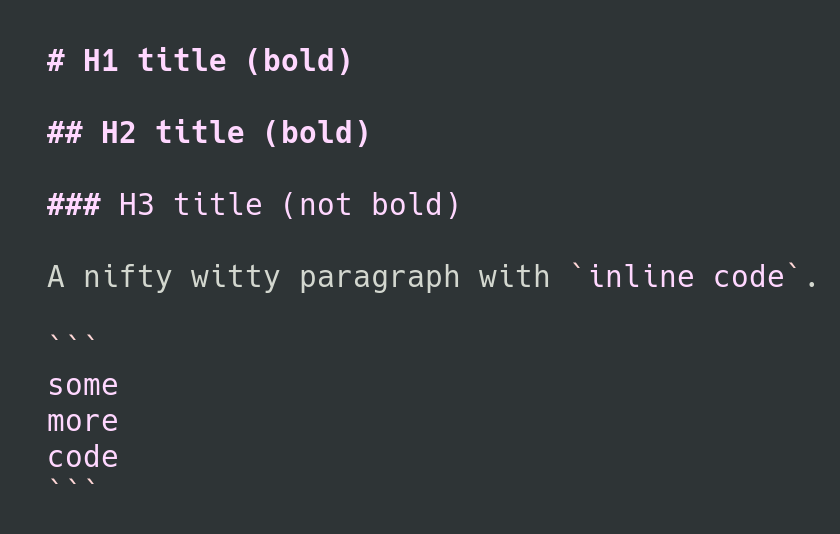
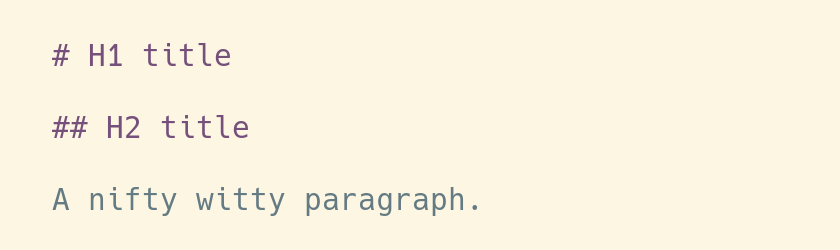
I'm mostly happy with that, except for one or two little details. I'd like to have the titles displayed in bold, for example, so that they're easier to spot when I skim through a Markdown file. It seems like a simple thing to ask, so I hope there can be a simple solution. The first steps Let's learn the basics. In Vim world, the rules to highlight files formats are defined in the directory
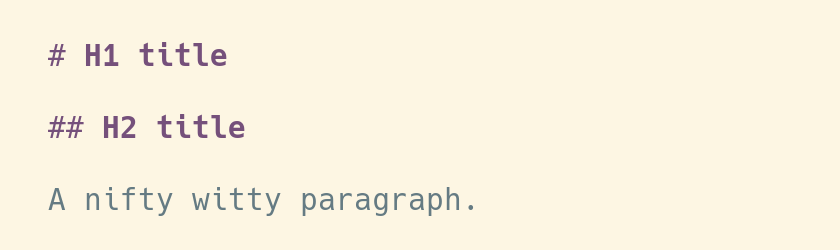
 /usr/share/vim/vim82/syntax (I bet you'll have to adjust this path depending on the version of Vim that is installed on your system). And so, for the Markdown file format, the rules are defined in the file /usr/share/vim/vim82/syntax/markdown.vim. The first thing we could do is to have a look at this file, try to make sense of it, and maybe start to make some modifications. But wait a moment. You should know that modifying a system file is not a great idea. First because your changes will be lost as soon as an update kicks in and the package manager replaces this file by a new version. Second, because you will quickly forget what files you modified, and what were your modifications, and if you do that too much, you might experience what is called "maintenance headache" in the long run. So instead, maybe you DO NOT modify this file, and instead you copy it in your personal Vim folder, more precisely in ~/.vim/syntax. Create this directory if it does not exist:
mkdir -p ~/.vim/syntax
cp /usr/share/vim/vim82/syntax/markdown.vim ~/.vim/syntax
The file in your personal folder takes precedence over the system file of the same name in /usr/share/vim/vim82/syntax/, it is a replacement for the existing syntax files. And so from now on, Vim uses the file ~/.vim/syntax/markdown.vim, and this is where we can make our modifications. (And by the way, this is explained in the Vim faq-24.12) And so, it's already nice to know all of that, but wait, there's even better. There's is another location of interest, and it is ~/.vim/after/syntax. You can drop syntax files in this directory, and these files are treated as additions to the existing syntax. So if you only want to make slight modifications, that's the way to go. (And by the way, this is explained in the Vim faq-24.11) So let's forget about a syntax replacement in ~/.vim/syntax/markdown.vim, and instead let's go for some syntax additions in ~/.vim/after/syntax/markdown.vim.
mkdir -p ~/.vim/after/syntax
touch ~/.vim/after/syntax/markdown.vim
Now, let's answer the initial question: how do we modify the highlighting rules for Markdown files, so that the titles are displayed in bold? First, we have to understand where are the rules that define the highlighting for titles. Here there are, from the file /usr/share/vim/vim82/syntax/markdown.vim:
hi def link markdownH1 htmlH1
hi def link markdownH2 htmlH2
hi def link markdownH3 htmlH3
...
You should know that H1 means Heading 1, and so on, and so we want to make H1 and H2 bold. What we can see here is that the headings in the Markdown files are highlighted like the headings in HTML files, and this is obviously defined in the file /usr/share/vim/vim82/syntax/html.vim. So let's have a look into this file:
hi def link htmlH1 Title
hi def link htmlH2 htmlH1
hi def link htmlH3 htmlH2
...
Let's keep digging a bit. Where is Title defined? For those using the default color scheme like me, this is defined straight in the Vim source code, in the file src/highlight.c.
CENT("Title term=bold ctermfg=DarkMagenta",
     "Title term=bold ctermfg=DarkMagenta gui=bold guifg=Magenta"),
And for those using custom color schemes, it might be defined in a file under /usr/share/vim/vim82/colors/. Alright, so how do we override that? We can just define this kind of rules in our syntax additions file at ~/.vim/after/syntax/markdown.vim:
hi link markdownH1 markdownHxBold
hi link markdownH2 markdownHxBold
hi markdownHxBold  term=bold ctermfg=DarkMagenta gui=bold guifg=Magenta cterm=bold
As you can see, the only addition we made, compared to what's defined in src/highlight.c, is cterm=bold. And that's already enough to achieve the initial goal, make the titles (ie. H1 and H2) bold. The result can be seen in the following screenshot: Vim - Markdown file with modified highlighting The rabbit hole So we could stop right here, and life would be easy and good. However, with this solution there's still something that is not perfect. We use the color DarkMagenta as defined in the default color scheme. What I didn't mention however, is that this is applicable for a light background. If you have a dark background though, dark magenta won't be easy to read. Actually, if you look a bit more into src/highlight.c, you will see that the default color scheme comes in two variants, one for a light background, and one for a dark background. And so the definition for Title for a dark background is as follow:
CENT("Title term=bold ctermfg=LightMagenta",
     "Title term=bold ctermfg=LightMagenta gui=bold guifg=Magenta"),
Hmmm, so how do we do that in our syntax file? How can we support both light and dark background, so that the color is right in both cases? After a bit of research, and after looking at other syntax files, it seems that the solution is to check for the value of the background option, and so our syntax file becomes:
hi link markdownH1 markdownHxBold
hi link markdownH2 markdownHxBold
if &background == "light"
  hi markdownHxBold term=bold ctermfg=DarkMagenta gui=bold guifg=Magenta cterm=bold
else
  hi markdownHxBold term=bold ctermfg=LightMagenta gui=bold guifg=Magenta cterm=bold
endif
In case you wonder, in Vim script you prefix Vim options with &, and so you get the value of the background option by writing &background. You can learn this kind of things in the Vim scripting cheatsheet. And so, it's easy enough, except for one thing: it doesn't work. The headings always show up in DarkMagenta, even for a dark background. This is why I called this paragraph "the rabbit hole", by the way. So... Well after trying a few things, I noticed that in order to make it work, I would have to reload the syntax files with :syntax on. At this point, the most likely explanation is that the background option is not set yet when the syntax files are loaded at startup, hence it needs to be reloaded manually afterward. And after muuuuuuch research, I found out that it's actually possible to set a hook for when an option is modified. Meaning, it's possible to execute a function when the background option is modified. Quite cool actually. And so, there it goes in my ~/.vimrc:
" Reload syntax when the background changes 
autocmd OptionSet background if exists("g:syntax_on")   syntax on   endif
For humans, this line reads as:
  1. when the background option is modified -- autocmd OptionSet background
  2. check if the syntax is on -- if exists("g:syntax_on")
  3. if that's the case, reload it -- syntax on
With that in place, my Markdown syntax overrides work for both dark and light background. Champagne! The happy end To finish, let me share my actual additions to the markdown.vim syntax. It makes H1 and H2 bold, along with their delimiters, and it also colors the inline code and the code blocks.
" H1 and H2 headings -> bold
hi link markdownH1 markdownHxBold
hi link markdownH2 markdownHxBold
" Heading delimiters (eg '#') and rules (eg '----', '====') -> bold
hi link markdownHeadingDelimiter markdownHxBold
hi link markdownRule markdownHxBold
" Code blocks and inline code -> highlighted
hi link markdownCode htmlH1
" The following test requires this addition to your vimrc:
" autocmd OptionSet background if exists("g:syntax_on")   syntax on   endif
if &background == "light"
  hi markdownHxBold term=bold ctermfg=DarkMagenta gui=bold guifg=Magenta cterm=bold
else
  hi markdownHxBold term=bold ctermfg=LightMagenta gui=bold guifg=Magenta cterm=bold
endif
And here's how it looks like with a light background: Vim - Markdown file with final highlighting (light) 
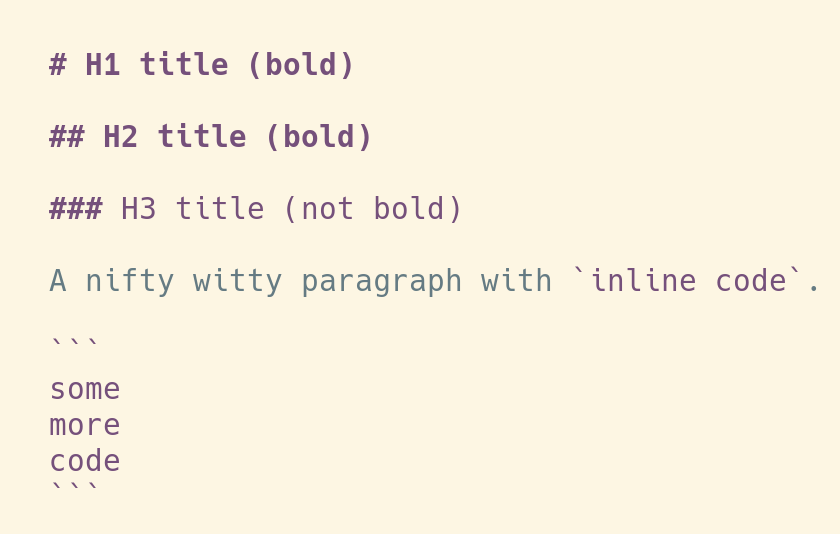
And a dark background: Vim - Markdown file with final highlighting (dark) That's all, that's very little changes compared to the highlighting from the original syntax file, and now that we understand how it's supposed to be done, it's not much effort to achieve it. It's just that finding the workaround to make it work for both light and dark background took forever, and leaves the usual, unanswered question: bug or feature?

10 August 2020

Arnaud Rebillout: GoAccess 1.4, a detailed tutorial

GoAccess v1.4 was just released a few weeks ago! Let's take this chance to write a loooong tutorial. We'll go over every steps to install and operate GoAccess. This is a tutorial aimed at those who don't play sysadmin every day, and that's why it's so long, I did my best to provide thorough explanations all along, so that it's more than just a "copy-and-paste" kind of tutorial. And for those who do play sysadmin everyday: please try not to fall asleep while reading, and don't hesitate to drop me an e-mail if you spot anything inaccurate in here. Thanks! Introduction So what's GoAccess already? GoAccess is a web log analyzer, and it allows you to visualize the traffic for your website, and get to know a bit more about your visitors: how many visitors and hits, for which pages, coming from where (geolocation, operating system, web browser...), etc... It does so by parsing the access logs from your web server, be it Apache, NGINX or whatever. GoAccess gives you different options to display the statistics, and in this tutorial we'll focus on producing a HTML report. Meaning that you can see the statistics for your website straight in your web browser, under the form of a single HTML page. For an example, you can have a look at the stats of my blog here: http://goaccess.arnaudr.io. GoAccess is written in C, it has very few dependencies, it had been around for about 10 years, and it's distributed under the MIT license. Assumptions This tutorial is about installing and configuring, so I'll assume that all the commands are run as root. I won't prefix each of them with sudo. I use the Apache web server, running on a Debian system. I don't think it matters so much for this tutorial though. If you're using NGINX it's fine, you can keep reading. Also, I will just use the name SITE for the name of the website that we want to analyze with GoAccess. Just replace that with the real name of your site. I also assume the following locations for your stuff: If you have your stuff in /srv/SITE/ log,www instead, no worries, just adjust the paths accordingly, I bet you can do it. Installation The latest version of GoAccess is v1.4, and it's not yet available in the Debian repositories. So for this part, you can follow the instructions from the official GoAccess download page. Install steps are explained in details, so there's nothing left for me to say :) When this is done, let's get started with the basics. We're talking about the latest version v1.4 here, let's make sure:
$ goaccess --version
GoAccess - 1.4.
...
Now let's try to create a HTML report. I assume that you already have a website up and running. GoAccess needs to parse the access logs. These logs are optional, they might or might not be created by your web server, depending on how it's configured. Usually, these log files are named access.log, unsurprisingly. You can check if those logs exist on your system by running this command:
find /var/log -name access.log
Another important thing to know is that these logs can be in different formats. In this tutorial we'll assume that we work with the combined log format, because it seems to be the most common default. To check what kind of access logs your web server produces, you must look at the configuration for your site. For an Apache web server, you should have such a line in the file /etc/apache2/sites-enabled/SITE.conf:
CustomLog $ APACHE_LOG_DIR /SITE/access.log combined
For NGINX, it's quite similar. The configuration file would be something like /etc/nginx/sites-enabled/SITE, and the line to enable access logs would be something like:
access_log /var/log/nginx/SITE/access.log
Note that NGINX writes the access logs in the combined format by default, that's why you don't see the word combined anywhere in the line above: it's implicit. Alright, so from now on we assume that yes, you have access log files available, and yes, they are in the combined log format. If that's the case, then you can already run GoAccess and generate a report, for example for the log file /var/log/apache2/access.log
goaccess \
    --log-format COMBINED \
    --output /tmp/report.html \
    /var/log/apache2/access.log
It's possible to give GoAccess more than one log files to process, so if you have for example the file access.log.1 around, you can use it as well:
goaccess \
    --log-format COMBINED \
    --output /tmp/report.html \
    /var/log/apache2/access.log \
    /var/log/apache2/access.log.1
If GoAccess succeeds (and it should), you're on the right track! All is left to do to complete this test is to have a look at the HTML report created. It's a single HTML page, so you can easily scp it to your machine, or just move it to the document root of your site, and then open it in your web browser. Looks good? So let's move on to more interesting things. Web server configuration This part is very short, because in terms of configuration of the web server, there's very little to do. As I said above, the only thing you want from the web server is to create access log files. Then you want to be sure that GoAccess and your web server agree on the format for these files. In the part above we used the combined log format, but GoAccess supports many other common log formats out of the box, and even allows you to parse custom log formats. For more details, refer to the option --log-format in the GoAccess manual page. Another common log format is named, well, common. It even has its own Wikipedia page. But compared to combined, the common log format contains less information, it doesn't include the referrer and user-agent values, meaning that you won't have it in the GoAccess report. So at this point you should understand that, unsurprisingly, GoAccess can only tell you about what's in the access logs, no more no less. And that's all in term of web server configuration. Configuration to run GoAccess unprivileged Now we're going to create a user and group for GoAccess, so that we don't have to run it as root. The reason is that, well, for everything running unattended on your server, the less code runs as root, the better. It's good practice and common sense. In this case, GoAccess is simply a log analyzer. So it just needs to read the logs files from your web server, and there is no need to be root for that, an unprivileged user can do the job just as well, assuming it has read permissions on /var/log/apache2 or /var/log/nginx. The log files of the web server are usually part of the adm group (though it might depend on your distro, I'm not sure). This is something you can check easily with the following command:
ls -l /var/log   grep -e apache2 -e nginx
As a result you should get something like that:
drwxr-x--- 2 root adm 20480 Jul 22 00:00 /var/log/apache2/
And as you can see, the directory apache2 belongs to the group adm. It means that you don't need to be root to read the logs, instead any unprivileged user that belongs to the group adm can do it. So, let's create the goaccess user, and add it to the adm group:
adduser --system --group --no-create-home goaccess
addgroup goaccess adm
And now, let's run GoAccess unprivileged, and verify that it can still read the log files:
setpriv \
    --reuid=goaccess --regid=goaccess \
    --init-groups --inh-caps=-all \
    -- \
    goaccess \
    --log-format COMBINED \
    --output /tmp/report2.html \
    /var/log/apache2/access.log
setpriv is the command used to drop privileges. The syntax is quite verbose, it's not super friendly for tutorials, but don't be scared and read the manual page to learn what it does. In any case, this command should work, and at this point, it means that you have a goaccess user ready, and we'll use it to run GoAccess unprivileged. Integration, option A - Run GoAccess once a day, from a logrotate hook In this part we wire things together, so that GoAccess processes the log files once a day, adds the new logs to its internal database, and generates a report from all that aggregated data. The result will be a single HTML page. Introducing logrotate In order to do that, we'll use a logrotate hook. logrotate is a little tool that should already be installed on your server, and that runs once a day, and that is in charge of rotating the log files. "Rotating the logs" means moving access.log to access.log.1 and so on. With logrotate, a new log file is created every day, and log files that are too old are deleted. That's what prevents your logs from filling up your disk basically :) You can check that logrotate is indeed installed and enabled with this command (assuming that your init system is systemd):
systemctl status logrotate.timer
What's interesting for us is that logrotate allows you to run scripts before and after the rotation is performed, so it's an ideal place from where to run GoAccess. In short, we want to run GoAccess just before the logs are rotated away, in the prerotate hook. But let's do things in order. At first, we need to write a little wrapper script that will be in charge of running GoAccess with the right arguments, and that will process all of your sites. The wrapper script This wrapper is made to process more than one site, but if you have only one site it works just as well, of course. So let me just drop it on you like that, and I'll explain afterward. Here's my wrapper script:
 1
 2
 3
 4
 5
 6
 7
 8
 9
10
11
12
13
14
15
16
17
18
19
20
21
22
23
24
25
26
27
28
29
30
31
32
33
34
35
36
37
38
39
40
41
42
43
44
45
46
47
48
49
50
#!/bin/bash
# Process log files /var/www/apache2/SITE/access.log,
# only if /var/lib/goaccess-db/SITE exists.
# Create HTML reports in $1, a directory that must exist.
set -eu
OUTDIR=
LOGDIR=/var/log/apache2
DBDIR=/var/lib/goaccess-db
fail()   echo >&2 "$@"; exit 1;  
[ $# -eq 1 ]   fail "Usage: $(basename $0) OUTPUT_DIRECTORY"
OUTDIR=$1
[ -d "$OUTDIR" ]   fail "'$OUTDIR' is not a directory"
[ -d "$LOGDIR" ]   fail "'$LOGDIR' is not a directory"
[ -d "$DBDIR"  ]   fail "'$DBDIR' is not a directory"
for d in $(find "$LOGDIR" -mindepth 1 -maxdepth 1 -type d); do
    site=$(basename "$sitedir")
    dbdir=$DBDIR/$site
    logfile=$d/access.log
    outfile=$OUTDIR/$site.html
    if [ ! -d "$dbdir" ]   [ ! -e "$logfile" ]; then
        echo "  Skipping site '$site'"
        continue
    else
        echo "  Processing site '$site'"
    fi
    setpriv \
        --reuid=goaccess --regid=goaccess \
        --init-groups --inh-caps=-all \
        -- \
    goaccess \
        --agent-list \
        --anonymize-ip \
        --persist \
        --restore \
        --config-file /etc/goaccess/goaccess.conf \
        --db-path "$dbdir" \
        --log-format "COMBINED" \
        --output "$outfile" \
        "$logfile"
done
So you'd install this script at /usr/local/bin/goaccess-wrapper for example, and make it executable:
chmod +x /usr/local/bin/goaccess-wrapper
A few things to note: As is, the script makes the assumption that the logs for your site are logged in a sub-directory /var/log/apache2/SITE/. If it's not the case, adjust that in the wrapper accordingly. The name of this sub-directory is then used to find the GoAccess database directory /var/lib/goaccess-db/SITE/. This directory is expected to exist, meaning that if you don't create it yourself, the wrapper won't process this particular site. It's a simple way to control which sites are processed by this GoAccess wrapper, and which sites are not. So if you want goaccess-wrapper to process the site SITE, just create a directory with the name of this site under /var/lib/goaccess-db:
mkdir -p /var/lib/goaccess-db/SITE
chown goaccess:goaccess /var/lib/goaccess-db/SITE
Now let's create an output directory:
mkdir /tmp/goaccess-reports
chown goaccess:goaccess /tmp/goaccess-reports
And let's give a try to the wrapper script:
goaccess-wrapper /tmp/goaccess-reports
ls /tmp/goaccess-reports
Which should give you:
SITE.html
At the same time, you can check that GoAccess populated the database with a bunch of files:
ls /var/lib/goaccess-db/SITE
Setting up the logrotate prerotate hook At this point, we have the wrapper in place. Let's now add a pre-rotate hook so that goaccess-wrapper runs once a day, just before the logs are rotated away. The logrotate config file for Apache2 is located at /etc/logrotate.d/apache2, and for NGINX it's at /etc/logrotate.d/nginx. Among the many things you'll see in this file, here's what is of interest for us: In the config file, there is also this snippet:
prerotate
    if [ -d /etc/logrotate.d/httpd-prerotate ]; then \
        run-parts /etc/logrotate.d/httpd-prerotate; \
    fi; \
endscript
It indicates that scripts in the directory /etc/logrotate.d/httpd-prerotate/ will be executed before the rotation takes place. Refer to the man page run-parts(8) for more details... Putting all of that together, it means that logs from the web server are rotated once a day, and if we want to run scripts just before the rotation, we can just drop them in the httpd-prerotate directory. Simple, right? Let's first create this directory if it doesn't exist:
mkdir -p /etc/logrotate.d/httpd-prerotate/
And let's create a tiny script at /etc/logrotate.d/httpd-prerotate/goaccess:
1
2
#!/bin/sh
exec goaccess-wrapper /tmp/goaccess-reports
Don't forget to make it executable:
chmod +x /etc/logrotate.d/httpd-prerotate/goaccess
As you can see, the only thing that this script does is to invoke the wrapper with the right argument, ie. the output directory for the HTML reports that are generated. And that's all. Now you can just come back tomorrow, check the logs, and make sure that the hook was executed and succeeded. For example, this kind of command will tell you quickly if it worked:
journalctl   grep logrotate
Integration, option B - Run GoAccess once a day, from a systemd service OK so we've just seen how to use a logrotate hook. One downside with that is that we have to drop privileges in the wrapper script, because logrotate runs as root, and we don't want to run GoAccess as root. Hence the rather convoluted syntax with setpriv. Rather than embedding this kind of thing in a wrapper script, we can instead run the wrapper script from a [systemd][] service, and define which user runs the wrapper straight in the systemd service file. Introducing systemd niceties So we can create a systemd service, along with a systemd timer that fires daily. We can then set the user and group that execute the script straight in the systemd service, and there's no need for setpriv anymore. It's a bit more streamlined. We can even go a bit further, and use systemd parameterized units (also called templates), so that we have one service per site (instead of one service that process all of our sites). That will simplify the wrapper script a lot, and it also looks nicer in the logs. With this approach however, it seems that we can't really run exactly before the logs are rotated away, like we did in the section above. But that's OK. What we'll do is that we'll run once a day, no matter the time, and we'll just make sure to process both log files access.log and access.log.1 (ie. the current logs and the logs from yesterday). This way, we're sure not to miss any line from the logs. Note that GoAccess is smart enough to only consider newer entries from the log files, and discard entries that are already in the database. In other words, it's safe to parse the same log file more than once, GoAccess will do the right thing. For more details see "INCREMENTAL LOG PROCESSING" from man goaccess. systemd]: https://freedesktop.org/wiki/Software/systemd/ Implementation And here's how it all looks like. First, a little wrapper script for GoAccess:
 1
 2
 3
 4
 5
 6
 7
 8
 9
10
11
12
13
14
15
16
17
18
19
20
21
22
23
24
25
26
27
28
29
30
31
32
#!/bin/bash
# Usage: $0 SITE DBDIR LOGDIR OUTDIR
set -eu
SITE=$1
DBDIR=$2
LOGDIR=$3
OUTDIR=$4
LOGFILES=()
for ext in log log.1; do
    logfile="$LOGDIR/access.$ext"
    [ -e "$logfile" ] && LOGFILES+=("$logfile")
done
if [ $ #LOGFILES[@]  -eq 0 ]; then
    echo "No log files in '$LOGDIR'"
    exit 0
fi
goaccess \
    --agent-list \
    --anonymize-ip \
    --persist \
    --restore \
    --config-file /etc/goaccess/goaccess.conf \
    --db-path "$DBDIR" \
    --log-format "COMBINED" \
    --output "$OUTDIR/$SITE.html" \
    "$ LOGFILES[@] "
This wrapper does very little. Actually, the only thing it does is to check for the existence of the two log files access.log and access.log.1, to be sure that we don't ask GoAccess to process a file that does not exist (GoAccess would not be happy about that). Save this file under /usr/local/bin/goaccess-wrapper, don't forget to make it executable:
chmod +x /usr/local/bin/goaccess-wrapper
Then, create a systemd parameterized unit file, so that we can run this wrapper as a systemd service. Save it under /etc/systemd/system/goaccess@.service:
[Unit]
Description=Update GoAccess report - %i
ConditionPathIsDirectory=/var/lib/goaccess-db/%i
ConditionPathIsDirectory=/var/log/apache2/%i
ConditionPathIsDirectory=/tmp/goaccess-reports
PartOf=goaccess.service
[Service]
Type=oneshot
User=goaccess
Group=goaccess
Nice=19
ExecStart=/usr/local/bin/goaccess-wrapper \
 %i \
 /var/lib/goaccess-db/%i \
 /var/log/apache2/%i \
 /tmp/goaccess-reports
So, what is a systemd parameterized unit? It's a service to which you can pass an argument when you enable it. The %i in the unit definition will be replaced by this argument. In our case, the argument will be the name of the site that we want to process. As you can see, we use the directive ConditionPathIsDirectory= extensively, so that if ever one of the required directories does not exist, the unit will just be skipped (and marked as such in the logs). It's a graceful way to fail. We run the wrapper as the user and group goaccess, thanks to User= and Group=. We also use Nice= to give a low priority to the process. At this point, it's already possible to test. Just make sure that you created a directory for the GoAccess database:
mkdir -p /var/lib/goaccess-db/SITE
chown goaccess:goaccess /var/lib/goaccess-db/SITE
Also make sure that the output directory exists:
mkdir /tmp/goaccess-reports
chown goaccess:goaccess /tmp/goaccess-reports
Then reload systemd and fire the unit to see if it works:
systemctl daemon-reload
systemctl start goaccess@SITE.service
journalctl   tail
And that should work already. As you can see, the argument, SITE, is passed in the systemctl start command. We just append it after the @, in the name of the unit. Now, let's create another GoAccess service file, which sole purpose is to group all the parameterized units together, so that we can start them all in one go. Note that we don't use a systemd target for that, because ultimately we want to run it once a day, and that would not be possible with a target. So instead we use a dummy oneshot service. So here it is, saved under /etc/systemd/system/goaccess.service:
[Unit]
Description=Update GoAccess reports
Requires= \
 goaccess@SITE1.service \
 goaccess@SITE2.service
[Service]
Type=oneshot
ExecStart=true
As you can see, we simply list the sites that we want to process in the Requires= directive. In this example we have two sites named SITE1 and SITE2. Let's ensure that everything is still good:
systemctl daemon-reload
systemctl start goaccess.service
journalctl   tail
Check the logs, both sites SITE1 and SITE2 should have been processed. And finally, let's create a timer, so that systemd runs goaccess.service once a day. Save it under /etc/systemd/system/goaccess.timer.
[Unit]
Description=Daily update of GoAccess reports
[Timer]
OnCalendar=daily
RandomizedDelaySec=1h
Persistent=true
[Install]
WantedBy=timers.target
Finally, enable the timer:
systemctl daemon-reload
systemctl enable --now goaccess.timer
At this point, everything should be OK. Just come back tomorrow and check the logs with something like:
journalctl   grep goaccess
Last word: if you have only one site to process, of course you can simplify, for example you can hardcode all the paths in the file goaccess.service instead of using a parameterized unit. Up to you. Daily operations So in this part, we assume that you have GoAccess all setup and running, once a day or so. Let's just go over a few things worth noting. Serve your report Up to now in this tutorial, we created the reports in /tmp/goaccess-reports, but that was just for the sake of the example. You will probably want to save your reports in a directory that is served by your web server, so that, well, you can actually look at it in your web browser, that was the point, right? So how to do that is a bit out of scope here, and I guess that if you want to monitor your website, you already have a website, so you will have no trouble serving the GoAccess HTML report. However there's an important detail to be aware of: GoAccess shows all the IP addresses of your visitors in the report. As long as the report is private it's OK, but if ever you make your GoAccess report public, then you should definitely invoke GoAccess with the option --anonymize-ip. Keep an eye on the logs In this tutorial, the reports we create, along with the GoAccess databases, will grow bigger every day, forever. It also means that the GoAccess processing time will grow a bit each day. So maybe the first thing to do is to keep an eye on the logs, to see how long it takes to GoAccess to do its job every day. Also, maybe you'd like to keep an eye on the size of the GoAccess database with:
du -sh /var/lib/goaccess-db/SITE
If your site has few visitors, I suspect it won't be a problem though. You could also be a bit pro-active in preventing this problem in the future, and for example you could break the reports into, say, monthly reports. Meaning that every month, you would create a new database in a new directory, and also start a new HTML report. This way you'd have monthly reports, and you make sure to limit the GoAccess processing time, by limiting the database size to a month. This can be achieved very easily, by including something like YEAR-MONTH in the database directory, and in the HTML report. You can handle that automatically in the wrapper script, for example:
sfx=$(date +'%Y-%m')
mkdir -p $DBDIR/$sfx
goaccess \
    --db-path $DBDIR/$sfx \
    --output "$OUTDIR/$SITE-$sfx.html" \
    ...
You get the idea. Further notes Migration from older versions With the --persist option, GoAccess keeps all the information from the logs in a database, so that it can re-use it later. In prior versions, GoAccess used the Tokyo Cabinet key-value store for that. However starting from v1.4, GoAccess dropped this dependency and now uses its own database format. As a result, the previous database can't be used anymore, you will have to remove it and restart from zero. At the moment there is no way to convert the data from the old database to the new one. If you're interested, this is discussed upstream at [#1783][bug-1783]. Another thing that changed with this new version is the name for some of the command-line options. For example, --load-from-disk was dropped in favor of --restore, and --keep-db-files became --persist. So you'll have to look at the documentation a bit, and update your script(s) accordingly. Other ways to use GoAccess It's also possible to do it completely differently. You could keep GoAccess running, pretty much like a daemon, with the --real-time-html option, and have it process the logs continuously, rather than calling it on a regular basis. It's also possible to see the GoAccess report straight in the terminal, thanks to libncurses, rather than creating a HTML report. And much more, GoAccess is packed with features. Conclusion I hope that this tutorial helped some of you folks. Feel free to drop an e-mail for comments.

Arnaud Rebillout: GoAccess 1.4, a detailed tutorial

GoAccess v1.4 was just released a few weeks ago! Let's take this chance to write a loooong tutorial. We'll go over every steps to install and operate GoAccess. This is a tutorial aimed at those who don't play sysadmin every day, and that's why it's so long, I did my best to provide thorough explanations all along, so that it's more than just a "copy-and-paste" kind of tutorial. And for those who do play sysadmin everyday: please try not to fall asleep while reading, and don't hesitate to drop me an e-mail if you spot anything inaccurate in here. Thanks! Introduction So what's GoAccess already? GoAccess is a web log analyzer, and it allows you to visualize the traffic for your website, and get to know a bit more about your visitors: how many visitors and hits, for which pages, coming from where (geolocation, operating system, web browser...), etc... It does so by parsing the access logs from your web server, be it Apache, NGINX or whatever. GoAccess gives you different options to display the statistics, and in this tutorial we'll focus on producing a HTML report. Meaning that you can see the statistics for your website straight in your web browser, under the form of a single HTML page. For an example, you can have a look at the stats of my blog here: https://goaccess.arnaudr.io. GoAccess is written in C, it has very few dependencies, it had been around for about 10 years, and it's distributed under the MIT license. Assumptions This tutorial is about installing and configuring, so I'll assume that all the commands are run as root. I won't prefix each of them with sudo. I use the Apache web server, running on a Debian system. I don't think it matters so much for this tutorial though. If you're using NGINX it's fine, you can keep reading. Also, I will just use the name SITE for the name of the website that we want to analyze with GoAccess. Just replace that with the real name of your site. I also assume the following locations for your stuff: If you have your stuff in /srv/SITE/ log,www instead, no worries, just adjust the paths accordingly, I bet you can do it. Installation The latest version of GoAccess is v1.4, and it's not yet available in the Debian repositories. So for this part, you can follow the instructions from the official GoAccess download page. Install steps are explained in details, so there's nothing left for me to say :) When this is done, let's get started with the basics. We're talking about the latest version v1.4 here, let's make sure:
$ goaccess --version
GoAccess - 1.4.
...
Now let's try to create a HTML report. I assume that you already have a website up and running. GoAccess needs to parse the access logs. These logs are optional, they might or might not be created by your web server, depending on how it's configured. Usually, these log files are named access.log, unsurprisingly. You can check if those logs exist on your system by running this command:
find /var/log -name access.log
Another important thing to know is that these logs can be in different formats. In this tutorial we'll assume that we work with the combined log format, because it seems to be the most common default. To check what kind of access logs your web server produces, you must look at the configuration for your site. For an Apache web server, you should have such a line in the file /etc/apache2/sites-enabled/SITE.conf:
CustomLog $ APACHE_LOG_DIR /SITE/access.log combined
For NGINX, it's quite similar. The configuration file would be something like /etc/nginx/sites-enabled/SITE, and the line to enable access logs would be something like:
access_log /var/log/nginx/SITE/access.log
Note that NGINX writes the access logs in the combined format by default, that's why you don't see the word combined anywhere in the line above: it's implicit. Alright, so from now on we assume that yes, you have access log files available, and yes, they are in the combined log format. If that's the case, then you can already run GoAccess and generate a report, for example for the log file /var/log/apache2/access.log
goaccess \
    --log-format COMBINED \
    --output /tmp/report.html \
    /var/log/apache2/access.log
It's possible to give GoAccess more than one log files to process, so if you have for example the file access.log.1 around, you can use it as well:
goaccess \
    --log-format COMBINED \
    --output /tmp/report.html \
    /var/log/apache2/access.log \
    /var/log/apache2/access.log.1
If GoAccess succeeds (and it should), you're on the right track! All is left to do to complete this test is to have a look at the HTML report created. It's a single HTML page, so you can easily scp it to your machine, or just move it to the document root of your site, and then open it in your web browser. Looks good? So let's move on to more interesting things. Web server configuration This part is very short, because in terms of configuration of the web server, there's very little to do. As I said above, the only thing you want from the web server is to create access log files. Then you want to be sure that GoAccess and your web server agree on the format for these files. In the part above we used the combined log format, but GoAccess supports many other common log formats out of the box, and even allows you to parse custom log formats. For more details, refer to the option --log-format in the GoAccess manual page. Another common log format is named, well, common. It even has its own Wikipedia page. But compared to combined, the common log format contains less information, it doesn't include the referrer and user-agent values, meaning that you won't have it in the GoAccess report. So at this point you should understand that, unsurprisingly, GoAccess can only tell you about what's in the access logs, no more no less. And that's all in term of web server configuration. Configuration to run GoAccess unprivileged Now we're going to create a user and group for GoAccess, so that we don't have to run it as root. The reason is that, well, for everything running unattended on your server, the less code runs as root, the better. It's good practice and common sense. In this case, GoAccess is simply a log analyzer. So it just needs to read the logs files from your web server, and there is no need to be root for that, an unprivileged user can do the job just as well, assuming it has read permissions on /var/log/apache2 or /var/log/nginx. The log files of the web server are usually part of the adm group (though it might depend on your distro, I'm not sure). This is something you can check easily with the following command:
ls -l /var/log   grep -e apache2 -e nginx
As a result you should get something like that:
drwxr-x--- 2 root adm 20480 Jul 22 00:00 /var/log/apache2/
And as you can see, the directory apache2 belongs to the group adm. It means that you don't need to be root to read the logs, instead any unprivileged user that belongs to the group adm can do it. So, let's create the goaccess user, and add it to the adm group:
adduser --system --group --no-create-home goaccess
addgroup goaccess adm
And now, let's run GoAccess unprivileged, and verify that it can still read the log files:
setpriv \
    --reuid=goaccess --regid=goaccess \
    --init-groups --inh-caps=-all \
    -- \
    goaccess \
    --log-format COMBINED \
    --output /tmp/report2.html \
    /var/log/apache2/access.log
setpriv is the command used to drop privileges. The syntax is quite verbose, it's not super friendly for tutorials, but don't be scared and read the manual page to learn what it does. In any case, this command should work, and at this point, it means that you have a goaccess user ready, and we'll use it to run GoAccess unprivileged. Integration, option A - Run GoAccess once a day, from a logrotate hook In this part we wire things together, so that GoAccess processes the log files once a day, adds the new logs to its internal database, and generates a report from all that aggregated data. The result will be a single HTML page. Introducing logrotate In order to do that, we'll use a logrotate hook. logrotate is a little tool that should already be installed on your server, and that runs once a day, and that is in charge of rotating the log files. "Rotating the logs" means moving access.log to access.log.1 and so on. With logrotate, a new log file is created every day, and log files that are too old are deleted. That's what prevents your logs from filling up your disk basically :) You can check that logrotate is indeed installed and enabled with this command (assuming that your init system is systemd):
systemctl status logrotate.timer
What's interesting for us is that logrotate allows you to run scripts before and after the rotation is performed, so it's an ideal place from where to run GoAccess. In short, we want to run GoAccess just before the logs are rotated away, in the prerotate hook. But let's do things in order. At first, we need to write a little wrapper script that will be in charge of running GoAccess with the right arguments, and that will process all of your sites. The wrapper script This wrapper is made to process more than one site, but if you have only one site it works just as well, of course. So let me just drop it on you like that, and I'll explain afterward. Here's my wrapper script:
 1
 2
 3
 4
 5
 6
 7
 8
 9
10
11
12
13
14
15
16
17
18
19
20
21
22
23
24
25
26
27
28
29
30
31
32
33
34
35
36
37
38
39
40
41
42
43
44
45
46
47
48
49
50
#!/bin/bash
# Process log files /var/www/apache2/SITE/access.log,
# only if /var/lib/goaccess-db/SITE exists.
# Create HTML reports in $1, a directory that must exist.
set -eu
OUTDIR=
LOGDIR=/var/log/apache2
DBDIR=/var/lib/goaccess-db
fail()   echo >&2 "$@"; exit 1;  
[ $# -eq 1 ]   fail "Usage: $(basename $0) OUTPUT_DIRECTORY"
OUTDIR=$1
[ -d "$OUTDIR" ]   fail "'$OUTDIR' is not a directory"
[ -d "$LOGDIR" ]   fail "'$LOGDIR' is not a directory"
[ -d "$DBDIR"  ]   fail "'$DBDIR' is not a directory"
for d in $(find "$LOGDIR" -mindepth 1 -maxdepth 1 -type d); do
    site=$(basename "$sitedir")
    dbdir=$DBDIR/$site
    logfile=$d/access.log
    outfile=$OUTDIR/$site.html
    if [ ! -d "$dbdir" ]   [ ! -e "$logfile" ]; then
        echo "  Skipping site '$site'"
        continue
    else
        echo "  Processing site '$site'"
    fi
    setpriv \
        --reuid=goaccess --regid=goaccess \
        --init-groups --inh-caps=-all \
        -- \
    goaccess \
        --agent-list \
        --anonymize-ip \
        --persist \
        --restore \
        --config-file /etc/goaccess/goaccess.conf \
        --db-path "$dbdir" \
        --log-format "COMBINED" \
        --output "$outfile" \
        "$logfile"
done
So you'd install this script at /usr/local/bin/goaccess-wrapper for example, and make it executable:
chmod +x /usr/local/bin/goaccess-wrapper
A few things to note: As is, the script makes the assumption that the logs for your site are logged in a sub-directory /var/log/apache2/SITE/. If it's not the case, adjust that in the wrapper accordingly. The name of this sub-directory is then used to find the GoAccess database directory /var/lib/goaccess-db/SITE/. This directory is expected to exist, meaning that if you don't create it yourself, the wrapper won't process this particular site. It's a simple way to control which sites are processed by this GoAccess wrapper, and which sites are not. So if you want goaccess-wrapper to process the site SITE, just create a directory with the name of this site under /var/lib/goaccess-db:
mkdir -p /var/lib/goaccess-db/SITE
chown goaccess:goaccess /var/lib/goaccess-db/SITE
Now let's create an output directory:
mkdir /tmp/goaccess-reports
chown goaccess:goaccess /tmp/goaccess-reports
And let's give a try to the wrapper script:
goaccess-wrapper /tmp/goaccess-reports
ls /tmp/goaccess-reports
Which should give you:
SITE.html
At the same time, you can check that GoAccess populated the database with a bunch of files:
ls /var/lib/goaccess-db/SITE
Setting up the logrotate prerotate hook At this point, we have the wrapper in place. Let's now add a pre-rotate hook so that goaccess-wrapper runs once a day, just before the logs are rotated away. The logrotate config file for Apache2 is located at /etc/logrotate.d/apache2, and for NGINX it's at /etc/logrotate.d/nginx. Among the many things you'll see in this file, here's what is of interest for us: In the config file, there is also this snippet:
prerotate
    if [ -d /etc/logrotate.d/httpd-prerotate ]; then \
        run-parts /etc/logrotate.d/httpd-prerotate; \
    fi; \
endscript
It indicates that scripts in the directory /etc/logrotate.d/httpd-prerotate/ will be executed before the rotation takes place. Refer to the man page run-parts(8) for more details... Putting all of that together, it means that logs from the web server are rotated once a day, and if we want to run scripts just before the rotation, we can just drop them in the httpd-prerotate directory. Simple, right? Let's first create this directory if it doesn't exist:
mkdir -p /etc/logrotate.d/httpd-prerotate/
And let's create a tiny script at /etc/logrotate.d/httpd-prerotate/goaccess:
1
2
#!/bin/sh
exec goaccess-wrapper /tmp/goaccess-reports
Don't forget to make it executable:
chmod +x /etc/logrotate.d/httpd-prerotate/goaccess
As you can see, the only thing that this script does is to invoke the wrapper with the right argument, ie. the output directory for the HTML reports that are generated. And that's all. Now you can just come back tomorrow, check the logs, and make sure that the hook was executed and succeeded. For example, this kind of command will tell you quickly if it worked:
journalctl   grep logrotate
Integration, option B - Run GoAccess once a day, from a systemd service OK so we've just seen how to use a logrotate hook. One downside with that is that we have to drop privileges in the wrapper script, because logrotate runs as root, and we don't want to run GoAccess as root. Hence the rather convoluted syntax with setpriv. Rather than embedding this kind of thing in a wrapper script, we can instead run the wrapper script from a [systemd][] service, and define which user runs the wrapper straight in the systemd service file. Introducing systemd niceties So we can create a systemd service, along with a systemd timer that fires daily. We can then set the user and group that execute the script straight in the systemd service, and there's no need for setpriv anymore. It's a bit more streamlined. We can even go a bit further, and use systemd parameterized units (also called templates), so that we have one service per site (instead of one service that process all of our sites). That will simplify the wrapper script a lot, and it also looks nicer in the logs. With this approach however, it seems that we can't really run exactly before the logs are rotated away, like we did in the section above. But that's OK. What we'll do is that we'll run once a day, no matter the time, and we'll just make sure to process both log files access.log and access.log.1 (ie. the current logs and the logs from yesterday). This way, we're sure not to miss any line from the logs. Note that GoAccess is smart enough to only consider newer entries from the log files, and discard entries that are already in the database. In other words, it's safe to parse the same log file more than once, GoAccess will do the right thing. For more details see "INCREMENTAL LOG PROCESSING" from man goaccess. systemd]: https://freedesktop.org/wiki/Software/systemd/ Implementation And here's how it all looks like. First, a little wrapper script for GoAccess:
 1
 2
 3
 4
 5
 6
 7
 8
 9
10
11
12
13
14
15
16
17
18
19
20
21
22
23
24
25
26
27
28
29
30
31
32
#!/bin/bash
# Usage: $0 SITE DBDIR LOGDIR OUTDIR
set -eu
SITE=$1
DBDIR=$2
LOGDIR=$3
OUTDIR=$4
LOGFILES=()
for ext in log log.1; do
    logfile="$LOGDIR/access.$ext"
    [ -e "$logfile" ] && LOGFILES+=("$logfile")
done
if [ $ #LOGFILES[@]  -eq 0 ]; then
    echo "No log files in '$LOGDIR'"
    exit 0
fi
goaccess \
    --agent-list \
    --anonymize-ip \
    --persist \
    --restore \
    --config-file /etc/goaccess/goaccess.conf \
    --db-path "$DBDIR" \
    --log-format "COMBINED" \
    --output "$OUTDIR/$SITE.html" \
    "$ LOGFILES[@] "
This wrapper does very little. Actually, the only thing it does is to check for the existence of the two log files access.log and access.log.1, to be sure that we don't ask GoAccess to process a file that does not exist (GoAccess would not be happy about that). Save this file under /usr/local/bin/goaccess-wrapper, don't forget to make it executable:
chmod +x /usr/local/bin/goaccess-wrapper
Then, create a systemd parameterized unit file, so that we can run this wrapper as a systemd service. Save it under /etc/systemd/system/goaccess@.service:
[Unit]
Description=Update GoAccess report - %i
ConditionPathIsDirectory=/var/lib/goaccess-db/%i
ConditionPathIsDirectory=/var/log/apache2/%i
ConditionPathIsDirectory=/tmp/goaccess-reports
PartOf=goaccess.service
[Service]
Type=oneshot
User=goaccess
Group=goaccess
Nice=19
ExecStart=/usr/local/bin/goaccess-wrapper \
 %i \
 /var/lib/goaccess-db/%i \
 /var/log/apache2/%i \
 /tmp/goaccess-reports
So, what is a systemd parameterized unit? It's a service to which you can pass an argument when you enable it. The %i in the unit definition will be replaced by this argument. In our case, the argument will be the name of the site that we want to process. As you can see, we use the directive ConditionPathIsDirectory= extensively, so that if ever one of the required directories does not exist, the unit will just be skipped (and marked as such in the logs). It's a graceful way to fail. We run the wrapper as the user and group goaccess, thanks to User= and Group=. We also use Nice= to give a low priority to the process. At this point, it's already possible to test. Just make sure that you created a directory for the GoAccess database:
mkdir -p /var/lib/goaccess-db/SITE
chown goaccess:goaccess /var/lib/goaccess-db/SITE
Also make sure that the output directory exists:
mkdir /tmp/goaccess-reports
chown goaccess:goaccess /tmp/goaccess-reports
Then reload systemd and fire the unit to see if it works:
systemctl daemon-reload
systemctl start goaccess@SITE.service
journalctl   tail
And that should work already. As you can see, the argument, SITE, is passed in the systemctl start command. We just append it after the @, in the name of the unit. Now, let's create another GoAccess service file, which sole purpose is to group all the parameterized units together, so that we can start them all in one go. Note that we don't use a systemd target for that, because ultimately we want to run it once a day, and that would not be possible with a target. So instead we use a dummy oneshot service. So here it is, saved under /etc/systemd/system/goaccess.service:
[Unit]
Description=Update GoAccess reports
Requires= \
 goaccess@SITE1.service \
 goaccess@SITE2.service
[Service]
Type=oneshot
ExecStart=true
As you can see, we simply list the sites that we want to process in the Requires= directive. In this example we have two sites named SITE1 and SITE2. Let's ensure that everything is still good:
systemctl daemon-reload
systemctl start goaccess.service
journalctl   tail
Check the logs, both sites SITE1 and SITE2 should have been processed. And finally, let's create a timer, so that systemd runs goaccess.service once a day. Save it under /etc/systemd/system/goaccess.timer.
[Unit]
Description=Daily update of GoAccess reports
[Timer]
OnCalendar=daily
RandomizedDelaySec=1h
Persistent=true
[Install]
WantedBy=timers.target
Finally, enable the timer:
systemctl daemon-reload
systemctl enable --now goaccess.timer
At this point, everything should be OK. Just come back tomorrow and check the logs with something like:
journalctl   grep goaccess
Last word: if you have only one site to process, of course you can simplify, for example you can hardcode all the paths in the file goaccess.service instead of using a parameterized unit. Up to you. Daily operations So in this part, we assume that you have GoAccess all setup and running, once a day or so. Let's just go over a few things worth noting. Serve your report Up to now in this tutorial, we created the reports in /tmp/goaccess-reports, but that was just for the sake of the example. You will probably want to save your reports in a directory that is served by your web server, so that, well, you can actually look at it in your web browser, that was the point, right? So how to do that is a bit out of scope here, and I guess that if you want to monitor your website, you already have a website, so you will have no trouble serving the GoAccess HTML report. However there's an important detail to be aware of: GoAccess shows all the IP addresses of your visitors in the report. As long as the report is private it's OK, but if ever you make your GoAccess report public, then you should definitely invoke GoAccess with the option --anonymize-ip. Keep an eye on the logs In this tutorial, the reports we create, along with the GoAccess databases, will grow bigger every day, forever. It also means that the GoAccess processing time will grow a bit each day. So maybe the first thing to do is to keep an eye on the logs, to see how long it takes to GoAccess to do its job every day. Also, maybe you'd like to keep an eye on the size of the GoAccess database with:
du -sh /var/lib/goaccess-db/SITE
If your site has few visitors, I suspect it won't be a problem though. You could also be a bit pro-active in preventing this problem in the future, and for example you could break the reports into, say, monthly reports. Meaning that every month, you would create a new database in a new directory, and also start a new HTML report. This way you'd have monthly reports, and you make sure to limit the GoAccess processing time, by limiting the database size to a month. This can be achieved very easily, by including something like YEAR-MONTH in the database directory, and in the HTML report. You can handle that automatically in the wrapper script, for example:
sfx=$(date +'%Y-%m')
mkdir -p $DBDIR/$sfx
goaccess \
    --db-path $DBDIR/$sfx \
    --output "$OUTDIR/$SITE-$sfx.html" \
    ...
You get the idea. Further notes Migration from older versions With the --persist option, GoAccess keeps all the information from the logs in a database, so that it can re-use it later. In prior versions, GoAccess used the Tokyo Cabinet key-value store for that. However starting from v1.4, GoAccess dropped this dependency and now uses its own database format. As a result, the previous database can't be used anymore, you will have to remove it and restart from zero. At the moment there is no way to convert the data from the old database to the new one. If you're interested, this is discussed upstream at [#1783][bug-1783]. Another thing that changed with this new version is the name for some of the command-line options. For example, --load-from-disk was dropped in favor of --restore, and --keep-db-files became --persist. So you'll have to look at the documentation a bit, and update your script(s) accordingly. Other ways to use GoAccess It's also possible to do it completely differently. You could keep GoAccess running, pretty much like a daemon, with the --real-time-html option, and have it process the logs continuously, rather than calling it on a regular basis. It's also possible to see the GoAccess report straight in the terminal, thanks to libncurses, rather than creating a HTML report. And much more, GoAccess is packed with features. Conclusion I hope that this tutorial helped some of you folks. Feel free to drop an e-mail for comments.

3 August 2020

Arnaud Rebillout: GoAccess 1.4, a detailed tutorial

GoAccess v1.4 was just released a few weeks ago! Let's take this chance to write a loooong tutorial. We'll go over every steps to install and operate GoAccess. This is a tutorial aimed at those who don't play sysadmin every day, and that's why it's so long, I did my best to provide thorough explanations all along, so that it's more than just a "copy-and-paste" kind of tutorial. And for those who do play sysadmin everyday: please try not to fall asleep while reading, and don't hesitate to drop me an e-mail if you spot anything inaccurate in here. Thanks! Introduction So what's GoAccess already? GoAccess is a web log analyzer, and it allows you to visualize the traffic for your website, and get to know a bit more about your visitors: how many visitors and hits, for which pages, coming from where (geolocation, operating system, web browser...), etc... It does so by parsing the access logs from your web server, be it Apache, NGINX or whatever. GoAccess gives you different options to display the statistics, and in this tutorial we'll focus on producing a HTML report. Meaning that you can see the statistics for your website straight in your web browser, under the form of a single HTML page. For an example, you can have a look at the stats of my blog here: http://goaccess.arnaudr.io. GoAccess is written in C, it has very few dependencies, it had been around for about 10 years, and it's distributed under the MIT license. Assumptions This tutorial is about installing and configuring, so I'll assume that all the commands are run as root. I won't prefix each of them with sudo. I use the Apache web server, running on a Debian system. I don't think it matters so much for this tutorial though. If you're using NGINX it's fine, you can keep reading. Also, I will just use the name SITE for the name of the website that we want to analyze with GoAccess. Just replace that with the real name of your site. I also assume the following locations for your stuff: If you have your stuff in /srv/SITE/ log,www instead, no worries, just adjust the paths accordingly, I bet you can do it. Installation The latest version of GoAccess is v1.4, and it's not yet available in the Debian repositories. So for this part, you can follow the instructions from the official GoAccess download page. Install steps are explained in details, so there's nothing left for me to say :) When this is done, let's get started with the basics. We're talking about the latest version v1.4 here, let's make sure:
$ goaccess --version
GoAccess - 1.4.
...
Now let's try to create a HTML report. I assume that you already have a website up and running. GoAccess needs to parse the access logs. These logs are optional, they might or might not be created by your web server, depending on how it's configured. Usually, these log files are named access.log, unsurprisingly. You can check if those logs exist on your system by running this command:
find /var/log -name access.log
Another important thing to know is that these logs can be in different formats. In this tutorial we'll assume that we work with the combined log format, because it seems to be the most common default. To check what kind of access logs your web server produces, you must look at the configuration for your site. For an Apache web server, you should have such a line in the file /etc/apache2/sites-enabled/SITE.conf:
CustomLog $ APACHE_LOG_DIR /SITE/access.log combined
For NGINX, it's quite similar. The configuration file would be something like /etc/nginx/sites-enabled/SITE, and the line to enable access logs would be something like:
access_log /var/log/nginx/SITE/access.log
Note that NGINX writes the access logs in the combined format by default, that's why you don't see the word combined anywhere in the line above: it's implicit. Alright, so from now on we assume that yes, you have access log files available, and yes, they are in the combined log format. If that's the case, then you can already run GoAccess and generate a report, for example for the log file /var/log/apache2/access.log
goaccess \
    --log-format COMBINED \
    --output /tmp/report.html \
    /var/log/apache2/access.log
It's possible to give GoAccess more than one log files to process, so if you have for example the file access.log.1 around, you can use it as well:
goaccess \
    --log-format COMBINED \
    --output /tmp/report.html \
    /var/log/apache2/access.log \
    /var/log/apache2/access.log.1
If GoAccess succeeds (and it should), you're on the right track! All is left to do to complete this test is to have a look at the HTML report created. It's a single HTML page, so you can easily scp it to your machine, or just move it to the document root of your site, and then open it in your web browser. Looks good? So let's move on to more interesting things. Web server configuration This part is very short, because in terms of configuration of the web server, there's very little to do. As I said above, the only thing you want from the web server is to create access log files. Then you want to be sure that GoAccess and your web server agree on the format for these files. In the part above we used the combined log format, but GoAccess supports many other common log formats out of the box, and even allows you to parse custom log formats. For more details, refer to the option --log-format in the GoAccess manual page. Another common log format is named, well, common. It even has its own Wikipedia page. But compared to combined, the common log format contains less information, it doesn't include the referrer and user-agent values, meaning that you won't have it in the GoAccess report. So at this point you should understand that, unsurprisingly, GoAccess can only tell you about what's in the access logs, no more no less. And that's all in term of web server configuration. Configuration to run GoAccess unprivileged Now we're going to create a user and group for GoAccess, so that we don't have to run it as root. The reason is that, well, for everything running unattended on your server, the less code runs as root, the better. It's good practice and common sense. In this case, GoAccess is simply a log analyzer. So it just needs to read the logs files from your web server, and there is no need to be root for that, an unprivileged user can do the job just as well, assuming it has read permissions on /var/log/apache2 or /var/log/nginx. The log files of the web server are usually part of the adm group (though it might depend on your distro, I'm not sure). This is something you can check easily with the following command:
ls -l /var/log   grep -e apache2 -e nginx
As a result you should get something like that:
drwxr-x--- 2 root adm 20480 Jul 22 00:00 /var/log/apache2/
And as you can see, the directory apache2 belongs to the group adm. It means that you don't need to be root to read the logs, instead any unprivileged user that belongs to the group adm can do it. So, let's create the goaccess user, and add it to the adm group:
adduser --system --group --no-create-home goaccess
addgroup goaccess adm
And now, let's run GoAccess unprivileged, and verify that it can still read the log files:
setpriv \
    --reuid=goaccess --regid=goaccess \
    --init-groups --inh-caps=-all \
    -- \
    goaccess \
    --log-format COMBINED \
    --output /tmp/report2.html \
    /var/log/apache2/access.log
setpriv is the command used to drop privileges. The syntax is quite verbose, it's not super friendly for tutorials, but don't be scared and read the manual page to learn what it does. In any case, this command should work, and at this point, it means that you have a goaccess user ready, and we'll use it to run GoAccess unprivileged. Integration, option A - Run GoAccess once a day, from a logrotate hook In this part we wire things together, so that GoAccess processes the log files once a day, adds the new logs to its internal database, and generates a report from all that aggregated data. The result will be a single HTML page. Introducing logrotate In order to do that, we'll use a logrotate hook. logrotate is a little tool that should already be installed on your server, and that runs once a day, and that is in charge of rotating the log files. "Rotating the logs" means moving access.log to access.log.1 and so on. With logrotate, a new log file is created every day, and log files that are too old are deleted. That's what prevents your logs from filling up your disk basically :) You can check that logrotate is indeed installed and enabled with this command (assuming that your init system is systemd):
systemctl status logrotate.timer
What's interesting for us is that logrotate allows you to run scripts before and after the rotation is performed, so it's an ideal place from where to run GoAccess. In short, we want to run GoAccess just before the logs are rotated away, in the prerotate hook. But let's do things in order. At first, we need to write a little wrapper script that will be in charge of running GoAccess with the right arguments, and that will process all of your sites. The wrapper script This wrapper is made to process more than one site, but if you have only one site it works just as well, of course. So let me just drop it on you like that, and I'll explain afterward. Here's my wrapper script:
 1
 2
 3
 4
 5
 6
 7
 8
 9
10
11
12
13
14
15
16
17
18
19
20
21
22
23
24
25
26
27
28
29
30
31
32
33
34
35
36
37
38
39
40
41
42
43
44
45
46
47
48
49
50
#!/bin/bash
# Process log files /var/www/apache2/SITE/access.log,
# only if /var/lib/goaccess-db/SITE exists.
# Create HTML reports in $1, a directory that must exist.
set -eu
OUTDIR=
LOGDIR=/var/log/apache2
DBDIR=/var/lib/goaccess-db
fail()   echo >&2 "$@"; exit 1;  
[ $# -eq 1 ]   fail "Usage: $(basename $0) OUTPUT_DIRECTORY"
OUTDIR=$1
[ -d "$OUTDIR" ]   fail "'$OUTDIR' is not a directory"
[ -d "$LOGDIR" ]   fail "'$LOGDIR' is not a directory"
[ -d "$DBDIR"  ]   fail "'$DBDIR' is not a directory"
for d in $(find "$LOGDIR" -mindepth 1 -maxdepth 1 -type d); do
    site=$(basename "$sitedir")
    dbdir=$DBDIR/$site
    logfile=$d/access.log
    outfile=$OUTDIR/$site.html
    if [ ! -d "$dbdir" ]   [ ! -e "$logfile" ]; then
        echo "  Skipping site '$site'"
        continue
    else
        echo "  Processing site '$site'"
    fi
    setpriv \
        --reuid=goaccess --regid=goaccess \
        --init-groups --inh-caps=-all \
        -- \
    goaccess \
        --agent-list \
        --anonymize-ip \
        --persist \
        --restore \
        --config-file /etc/goaccess/goaccess.conf \
        --db-path "$dbdir" \
        --log-format "COMBINED" \
        --output "$outfile" \
        "$logfile"
done
So you'd install this script at /usr/local/bin/goaccess-wrapper for example, and make it executable:
chmod +x /usr/local/bin/goaccess-wrapper
A few things to note: As is, the script makes the assumption that the logs for your site are logged in a sub-directory /var/log/apache2/SITE/. If it's not the case, adjust that in the wrapper accordingly. The name of this sub-directory is then used to find the GoAccess database directory /var/lib/goaccess-db/SITE/. This directory is expected to exist, meaning that if you don't create it yourself, the wrapper won't process this particular site. It's a simple way to control which sites are processed by this GoAccess wrapper, and which sites are not. So if you want goaccess-wrapper to process the site SITE, just create a directory with the name of this site under /var/lib/goaccess-db:
mkdir -p /var/lib/goaccess-db/SITE
chown goaccess:goaccess /var/lib/goaccess-db/SITE
Now let's create an output directory:
mkdir /tmp/goaccess-reports
chown goaccess:goaccess /tmp/goaccess-reports
And let's give a try to the wrapper script:
goaccess-wrapper /tmp/goaccess-reports
ls /tmp/goaccess-reports
Which should give you:
SITE.html
At the same time, you can check that GoAccess populated the database with a bunch of files:
ls /var/lib/goaccess-db/SITE
Setting up the logrotate prerotate hook At this point, we have the wrapper in place. Let's now add a pre-rotate hook so that goaccess-wrapper runs once a day, just before the logs are rotated away. The logrotate config file for Apache2 is located at /etc/logrotate.d/apache2, and for NGINX it's at /etc/logrotate.d/nginx. Among the many things you'll see in this file, here's what is of interest for us: In the config file, there is also this snippet:
prerotate
    if [ -d /etc/logrotate.d/httpd-prerotate ]; then \
        run-parts /etc/logrotate.d/httpd-prerotate; \
    fi; \
endscript
It indicates that scripts in the directory /etc/logrotate.d/httpd-prerotate/ will be executed before the rotation takes place. Refer to the man page run-parts(8) for more details... Putting all of that together, it means that logs from the web server are rotated once a day, and if we want to run scripts just before the rotation, we can just drop them in the httpd-prerotate directory. Simple, right? Let's first create this directory if it doesn't exist:
mkdir -p /etc/logrotate.d/httpd-prerotate/
And let's create a tiny script at /etc/logrotate.d/httpd-prerotate/goaccess:
1
2
#!/bin/sh
exec goaccess-wrapper /tmp/goaccess-reports
Don't forget to make it executable:
chmod +x /etc/logrotate.d/httpd-prerotate/goaccess
As you can see, the only thing that this script does is to invoke the wrapper with the right argument, ie. the output directory for the HTML reports that are generated. And that's all. Now you can just come back tomorrow, check the logs, and make sure that the hook was executed and succeeded. For example, this kind of command will tell you quickly if it worked:
journalctl   grep logrotate
Integration, option B - Run GoAccess once a day, from a systemd service OK so we've just seen how to use a logrotate hook. One downside with that is that we have to drop privileges in the wrapper script, because logrotate runs as root, and we don't want to run GoAccess as root. Hence the rather convoluted syntax with setpriv. Rather than embedding this kind of thing in a wrapper script, we can instead run the wrapper script from a [systemd][] service, and define which user runs the wrapper straight in the systemd service file. Introducing systemd niceties So we can create a systemd service, along with a systemd timer that fires daily. We can then set the user and group that execute the script straight in the systemd service, and there's no need for setpriv anymore. It's a bit more streamlined. We can even go a bit further, and use systemd parameterized units (also called templates), so that we have one service per site (instead of one service that process all of our sites). That will simplify the wrapper script a lot, and it also looks nicer in the logs. With this approach however, it seems that we can't really run exactly before the logs are rotated away, like we did in the section above. But that's OK. What we'll do is that we'll run once a day, no matter the time, and we'll just make sure to process both log files access.log and access.log.1 (ie. the current logs and the logs from yesterday). This way, we're sure not to miss any line from the logs. Note that GoAccess is smart enough to only consider newer entries from the log files, and discard entries that are already in the database. In other words, it's safe to parse the same log file more than once, GoAccess will do the right thing. For more details see "INCREMENTAL LOG PROCESSING" from man goaccess. systemd]: https://freedesktop.org/wiki/Software/systemd/ Implementation And here's how it all looks like. First, a little wrapper script for GoAccess:
 1
 2
 3
 4
 5
 6
 7
 8
 9
10
11
12
13
14
15
16
17
18
19
20
21
22
23
24
25
26
27
28
29
30
31
32
#!/bin/bash
# Usage: $0 SITE DBDIR LOGDIR OUTDIR
set -eu
SITE=$1
DBDIR=$2
LOGDIR=$3
OUTDIR=$4
LOGFILES=()
for ext in log log.1; do
    logfile="$LOGDIR/access.$ext"
    [ -e "$logfile" ] && LOGFILES+=("$logfile")
done
if [ $ #LOGFILES[@]  -eq 0 ]; then
    echo "No log files in '$LOGDIR'"
    exit 0
fi
goaccess \
    --agent-list \
    --anonymize-ip \
    --persist \
    --restore \
    --config-file /etc/goaccess/goaccess.conf \
    --db-path "$DBDIR" \
    --log-format "COMBINED" \
    --output "$OUTDIR/$SITE.html" \
    "$ LOGFILES[@] "
This wrapper does very little. Actually, the only thing it does is to check for the existence of the two log files access.log and access.log.1, to be sure that we don't ask GoAccess to process a file that does not exist (GoAccess would not be happy about that). Save this file under /usr/local/bin/goaccess-wrapper, don't forget to make it executable:
chmod +x /usr/local/bin/goaccess-wrapper
Then, create a systemd parameterized unit file, so that we can run this wrapper as a systemd service. Save it under /etc/systemd/system/goaccess@.service:
[Unit]
Description=Update GoAccess report - %i
ConditionPathIsDirectory=/var/lib/goaccess-db/%i
ConditionPathIsDirectory=/var/log/apache2/%i
ConditionPathIsDirectory=/tmp/goaccess-reports
PartOf=goaccess.service
[Service]
Type=oneshot
User=goaccess
Group=goaccess
Nice=19
ExecStart=/usr/local/bin/goaccess-wrapper \
 %i \
 /var/lib/goaccess-db/%i \
 /var/log/apache2/%i \
 /tmp/goaccess-reports
So, what is a systemd parameterized unit? It's a service to which you can pass an argument when you enable it. The %i in the unit definition will be replaced by this argument. In our case, the argument will be the name of the site that we want to process. As you can see, we use the directive ConditionPathIsDirectory= extensively, so that if ever one of the required directories does not exist, the unit will just be skipped (and marked as such in the logs). It's a graceful way to fail. We run the wrapper as the user and group goaccess, thanks to User= and Group=. We also use Nice= to give a low priority to the process. At this point, it's already possible to test. Just make sure that you created a directory for the GoAccess database:
mkdir -p /var/lib/goaccess-db/SITE
chown goaccess:goaccess /var/lib/goaccess-db/SITE
Also make sure that the output directory exists:
mkdir /tmp/goaccess-reports
chown goaccess:goaccess /tmp/goaccess-reports
Then reload systemd and fire the unit to see if it works:
systemctl daemon-reload
systemctl start goaccess@SITE.service
journalctl   tail
And that should work already. As you can see, the argument, SITE, is passed in the systemctl start command. We just append it after the @, in the name of the unit. Now, let's create another GoAccess service file, which sole purpose is to group all the parameterized units together, so that we can start them all in one go. Note that we don't use a systemd target for that, because ultimately we want to run it once a day, and that would not be possible with a target. So instead we use a dummy oneshot service. So here it is, saved under /etc/systemd/system/goaccess.service:
[Unit]
Description=Update GoAccess reports
Requires= \
 goaccess@SITE1.service \
 goaccess@SITE2.service
[Service]
Type=oneshot
ExecStart=true
As you can see, we simply list the sites that we want to process in the Requires= directive. In this example we have two sites named SITE1 and SITE2. Let's ensure that everything is still good:
systemctl daemon-reload
systemctl start goaccess.service
journalctl   tail
Check the logs, both sites SITE1 and SITE2 should have been processed. And finally, let's create a timer, so that systemd runs goaccess.service once a day. Save it under /etc/systemd/system/goaccess.timer.
[Unit]
Description=Daily update of GoAccess reports
[Timer]
OnCalendar=daily
RandomizedDelaySec=1h
Persistent=true
[Install]
WantedBy=timers.target
Finally, enable the timer:
systemctl daemon-reload
systemctl enable --now goaccess.timer
At this point, everything should be OK. Just come back tomorrow and check the logs with something like:
journalctl   grep goaccess
Last word: if you have only one site to process, of course you can simplify, for example you can hardcode all the paths in the file goaccess.service instead of using a parameterized unit. Up to you. Daily operations So in this part, we assume that you have GoAccess all setup and running, once a day or so. Let's just go over a few things worth noting. Serve your report Up to now in this tutorial, we created the reports in /tmp/goaccess-reports, but that was just for the sake of the example. You will probably want to save your reports in a directory that is served by your web server, so that, well, you can actually look at it in your web browser, that was the point, right? So how to do that is a bit out of scope here, and I guess that if you want to monitor your website, you already have a website, so you will have no trouble serving the GoAccess HTML report. However there's an important detail to be aware of: GoAccess shows all the IP addresses of your visitors in the report. As long as the report is private it's OK, but if ever you make your GoAccess report public, then you should definitely invoke GoAccess with the option --anonymize-ip. Keep an eye on the logs In this tutorial, the reports we create, along with the GoAccess databases, will grow bigger every day, forever. It also means that the GoAccess processing time will grow a bit each day. So maybe the first thing to do is to keep an eye on the logs, to see how long it takes to GoAccess to do its job every day. Also, maybe you'd like to keep an eye on the size of the GoAccess database with:
du -sh /var/lib/goaccess-db/SITE
If your site has few visitors, I suspect it won't be a problem though. You could also be a bit pro-active in preventing this problem in the future, and for example you could break the reports into, say, monthly reports. Meaning that every month, you would create a new database in a new directory, and also start a new HTML report. This way you'd have monthly reports, and you make sure to limit the GoAccess processing time, by limiting the database size to a month. This can be achieved very easily, by including something like YEAR-MONTH in the database directory, and in the HTML report. You can handle that automatically in the wrapper script, for example:
sfx=$(date +'%Y-%m')
mkdir -p $DBDIR/$sfx
goaccess \
    --db-path $DBDIR/$sfx \
    --output "$OUTDIR/$SITE-$sfx.html" \
    ...
You get the idea. Further notes Migration from older versions With the --persist option, GoAccess keeps all the information from the logs in a database, so that it can re-use it later. In prior versions, GoAccess used the Tokyo Cabinet key-value store for that. However starting from v1.4, GoAccess dropped this dependency and now uses its own database format. As a result, the previous database can't be used anymore, you will have to remove it and restart from zero. At the moment there is no way to convert the data from the old database to the new one. If you're interested, this is discussed upstream at [#1783][bug-1783]. Another thing that changed with this new version is the name for some of the command-line options. For example, --load-from-disk was dropped in favor of --restore, and --keep-db-files became --persist. So you'll have to look at the documentation a bit, and update your script(s) accordingly. Other ways to use GoAccess It's also possible to do it completely differently. You could keep GoAccess running, pretty much like a daemon, with the --real-time-html option, and have it process the logs continuously, rather than calling it on a regular basis. It's also possible to see the GoAccess report straight in the terminal, thanks to libncurses, rather than creating a HTML report. And much more, GoAccess is packed with features. Conclusion I hope that this tutorial helped some of you folks. Feel free to drop an e-mail for comments.