Anuradha Weeraman: Testing again
123
 Testing 1 2 3
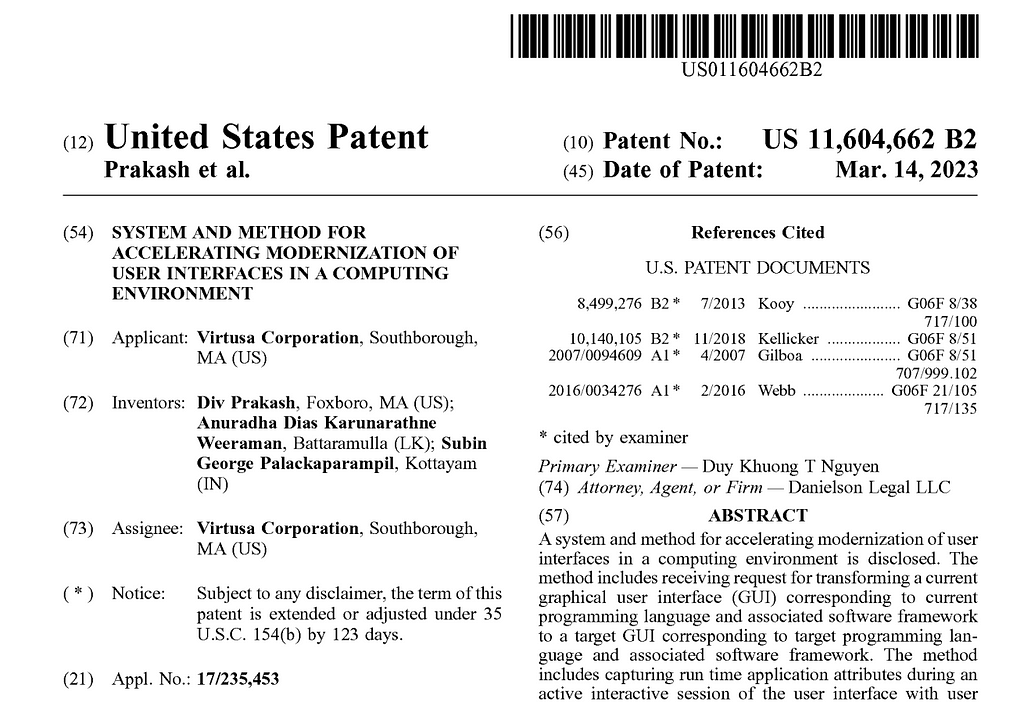 US-11604662-B2
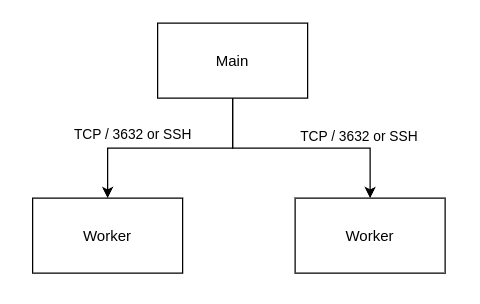
# apt install distccEdit /etc/default/distcc and set:
STARTDISTCC="true"Additionally, the JOBS and NICE variables can be tweaked to suit the compute power that you have available.Start distcc:
# Customize for your environment
ALLOWEDNETS="192.168.2.0/24"
# Specify your network device
LISTENER="192.168.2.146"
# systemctl start distccDo the same all the nodes, and if you have a firewall enabled with ufw, you will need to open up the port 3632 to the master node.
# ufw allow 3632/tcpAdditionally, if you d like to use ssh over untrusted networks so code and communication with the worker nodes happen over a secure channel, ensure that SSH is running and is opened up to the master node in the same manner as above with the key of the master node in ~/.ssh/authorized_keys of the worker nodes. Opening port 3632 in this manner is a security hole, so take precautions over untrusted networks.Back in the master node, setup a DISTCC_HOSTS environment variable that lists the worker nodes, including the master node. Note the order of the hosts, as it is important. The first host will be more heavily used, and distcc has no way of knowing the capacity and capability of the hosts, so specify the most powerful host first.
export DISTCC_HOSTS='localhost 192.168.2.107 192.168.2.91'At this point, you re ready to compile.Go to your codebase, in this case we use the Linux kernel source code for the purpose of example.
$ make tinyconfigOn another terminal, you can monitor the status of the distributed compilation with distmoncc-text or tools such as top or bpytop.Network throughput and latency will be a big factor in how much distcc will help speed up your build process. Using ssh may additionally introduce overhead, so play with the variables to see how much distcc can help speed up or optimize the build for your specific scenario. You may want to additionally consider ccache to speed up the build process.There are some aspects of the build process that are not effectively parallizable in this manner, such as the final linking step of the executable, for which you will not see any performance improvement with distcc.Give distcc a spin, and put any spare compute you have lying around in your home lab to good use.
$ time make -j$(nproc) CC=distcc bzImage
$ kubectl get pods -AThe first step would be to setup the Linkerd CLI:
NAMESPACE NAME READY STATUS RESTARTS AGE
kube-system calico-kube-controllers-59697b644f-7fsln 1/1 Running 2 (119m ago) 7d
kube-system calico-node-6ptsh 1/1 Running 2 (119m ago) 7d
kube-system calico-node-7x5j8 1/1 Running 2 (119m ago) 7d
kube-system calico-node-qlnf6 1/1 Running 2 (119m ago) 7d
kube-system coredns-565d847f94-79jlw 1/1 Running 2 (119m ago) 7d
kube-system coredns-565d847f94-fqwn4 1/1 Running 2 (119m ago) 7d
kube-system etcd-k8s-master 1/1 Running 2 (119m ago) 7d
kube-system kube-apiserver-k8s-master 1/1 Running 2 (119m ago) 7d
kube-system kube-controller-manager-k8s-master 1/1 Running 2 (119m ago) 7d
kube-system kube-proxy-4n9b7 1/1 Running 2 (119m ago) 7d
kube-system kube-proxy-k4rzv 1/1 Running 2 (119m ago) 7d
kube-system kube-proxy-lz2dd 1/1 Running 2 (119m ago) 7d
kube-system kube-scheduler-k8s-master 1/1 Running 2 (119m ago) 7d
$ curl --proto '=https' --tlsv1.2 -sSfL https://run.linkerd.io/install shOn most systems, this should be sufficient to setup the CLI. You may need to restart your terminal to load the updated paths. If you have a non-standard configuration and linkerd is not found after the installation, add the following to your PATH to be able to find the cli:
export PATH=$PATH:~/.linkerd2/bin/At this point, checking the version would give you the following:
$ linkerd versionSetting up Linkerd Control PlaneBefore installing Linkerd on the cluster, run the following step to check the cluster for pre-requisites:
Client version: stable-2.12.2
Server version: unavailable
$ linkerd check --pre
Linkerd core checks
===================
kubernetes-api
--------------
  can initialize the client
  can query the Kubernetes API
kubernetes-version
------------------
  is running the minimum Kubernetes API version
  is running the minimum kubectl version
pre-kubernetes-setup
--------------------
  control plane namespace does not already exist
  can create non-namespaced resources
  can create ServiceAccounts
  can create Services
  can create Deployments
  can create CronJobs
  can create ConfigMaps
  can create Secrets
  can read Secrets
  can read extension-apiserver-authentication configmap
  no clock skew detected
linkerd-version
---------------
  can determine the latest version
  cli is up-to-date
Status check results areAll the pre-requisites appear to be good right now, and so installation can proceed.The first step of the installation is to setup the Custom Resource Definitions (CRDs) that Linkerd requires. The linkerd cli only prints the resource YAMLs to standard output and does not create them directly in Kubernetes, so you would need to pipe the output to kubectl apply to create the resources in the cluster that you re working with.
$ linkerd install --crds   kubectl apply -f -
Rendering Linkerd CRDs...
Next, run  linkerd install   kubectl apply -f -  to install the control plane.
customresourcedefinition.apiextensions.k8s.io/authorizationpolicies.policy.linkerd.io createdNext, install the Linkerd control plane components in the same manner, this time without the crds switch:
customresourcedefinition.apiextensions.k8s.io/httproutes.policy.linkerd.io created
customresourcedefinition.apiextensions.k8s.io/meshtlsauthentications.policy.linkerd.io created
customresourcedefinition.apiextensions.k8s.io/networkauthentications.policy.linkerd.io created
customresourcedefinition.apiextensions.k8s.io/serverauthorizations.policy.linkerd.io created
customresourcedefinition.apiextensions.k8s.io/servers.policy.linkerd.io created
customresourcedefinition.apiextensions.k8s.io/serviceprofiles.linkerd.io created
$ linkerd install kubectl apply -f -Kubernetes will start spinning up the data plane components and you should see the following when you list the pods:
namespace/linkerd created
clusterrole.rbac.authorization.k8s.io/linkerd-linkerd-identity created
clusterrolebinding.rbac.authorization.k8s.io/linkerd-linkerd-identity created
serviceaccount/linkerd-identity created
clusterrole.rbac.authorization.k8s.io/linkerd-linkerd-destination created
clusterrolebinding.rbac.authorization.k8s.io/linkerd-linkerd-destination created
serviceaccount/linkerd-destination created
secret/linkerd-sp-validator-k8s-tls created
validatingwebhookconfiguration.admissionregistration.k8s.io/linkerd-sp-validator-webhook-config created
secret/linkerd-policy-validator-k8s-tls created
validatingwebhookconfiguration.admissionregistration.k8s.io/linkerd-policy-validator-webhook-config created
clusterrole.rbac.authorization.k8s.io/linkerd-policy created
clusterrolebinding.rbac.authorization.k8s.io/linkerd-destination-policy created
role.rbac.authorization.k8s.io/linkerd-heartbeat created
rolebinding.rbac.authorization.k8s.io/linkerd-heartbeat created
clusterrole.rbac.authorization.k8s.io/linkerd-heartbeat created
clusterrolebinding.rbac.authorization.k8s.io/linkerd-heartbeat created
serviceaccount/linkerd-heartbeat created
clusterrole.rbac.authorization.k8s.io/linkerd-linkerd-proxy-injector created
clusterrolebinding.rbac.authorization.k8s.io/linkerd-linkerd-proxy-injector created
serviceaccount/linkerd-proxy-injector created
secret/linkerd-proxy-injector-k8s-tls created
mutatingwebhookconfiguration.admissionregistration.k8s.io/linkerd-proxy-injector-webhook-config created
configmap/linkerd-config created
secret/linkerd-identity-issuer created
configmap/linkerd-identity-trust-roots created
service/linkerd-identity created
service/linkerd-identity-headless created
deployment.apps/linkerd-identity created
service/linkerd-dst created
service/linkerd-dst-headless created
service/linkerd-sp-validator created
service/linkerd-policy created
service/linkerd-policy-validator created
deployment.apps/linkerd-destination created
cronjob.batch/linkerd-heartbeat created
deployment.apps/linkerd-proxy-injector created
service/linkerd-proxy-injector created
secret/linkerd-config-overrides created
$ kubectl get pods -AThe components are running in the new linkerd namespace.To verify the setup, run a check:
...
linkerd linkerd-destination-67b9cc8749-xqcbx 4/4 Running 0 69s
linkerd linkerd-identity-59b46789cc-ntfcx 2/2 Running 0 69s
linkerd linkerd-proxy-injector-7fc85556bf-vnvw6 1/2 Running 0 69s
$ linkerd check
Linkerd core checks
===================
kubernetes-api
--------------
  can initialize the client
  can query the Kubernetes API
kubernetes-version
------------------
  is running the minimum Kubernetes API version
  is running the minimum kubectl version
linkerd-existence
-----------------
  'linkerd-config' config map exists
  heartbeat ServiceAccount exist
  control plane replica sets are ready
  no unschedulable pods
  control plane pods are ready
  cluster networks contains all pods
  cluster networks contains all services
linkerd-config
--------------
  control plane Namespace exists
  control plane ClusterRoles exist
  control plane ClusterRoleBindings exist
  control plane ServiceAccounts exist
  control plane CustomResourceDefinitions exist
  control plane MutatingWebhookConfigurations exist
  control plane ValidatingWebhookConfigurations exist
  proxy-init container runs as root user if docker container runtime is used
linkerd-identity
----------------
  certificate config is valid
  trust anchors are using supported crypto algorithm
  trust anchors are within their validity period
  trust anchors are valid for at least 60 days
  issuer cert is using supported crypto algorithm
  issuer cert is within its validity period
  issuer cert is valid for at least 60 days
  issuer cert is issued by the trust anchor
linkerd-webhooks-and-apisvc-tls
-------------------------------
  proxy-injector webhook has valid cert
  proxy-injector cert is valid for at least 60 days
  sp-validator webhook has valid cert
  sp-validator cert is valid for at least 60 days
  policy-validator webhook has valid cert
  policy-validator cert is valid for at least 60 days
linkerd-version
---------------
  can determine the latest version
  cli is up-to-date
control-plane-version
---------------------
  can retrieve the control plane version
  control plane is up-to-date
  control plane and cli versions match
linkerd-control-plane-proxy
---------------------------
  control plane proxies are healthy
  control plane proxies are up-to-date
  control plane proxies and cli versions match
Status check results areEverything looks good.Setting up the Viz ExtensionAt this point, the required components for the service mesh are setup, but let s also install the viz extension, which provides a good visualization capabilities that will come in handy subsequently. Once again, linkerd uses the same pattern for installing the extension.
$ linkerd viz install kubectl apply -f -A few seconds later, you should see the following in your pod list:
namespace/linkerd-viz created
clusterrole.rbac.authorization.k8s.io/linkerd-linkerd-viz-metrics-api created
clusterrolebinding.rbac.authorization.k8s.io/linkerd-linkerd-viz-metrics-api created
serviceaccount/metrics-api created
clusterrole.rbac.authorization.k8s.io/linkerd-linkerd-viz-prometheus created
clusterrolebinding.rbac.authorization.k8s.io/linkerd-linkerd-viz-prometheus created
serviceaccount/prometheus created
clusterrole.rbac.authorization.k8s.io/linkerd-linkerd-viz-tap created
clusterrole.rbac.authorization.k8s.io/linkerd-linkerd-viz-tap-admin created
clusterrolebinding.rbac.authorization.k8s.io/linkerd-linkerd-viz-tap created
clusterrolebinding.rbac.authorization.k8s.io/linkerd-linkerd-viz-tap-auth-delegator created
serviceaccount/tap created
rolebinding.rbac.authorization.k8s.io/linkerd-linkerd-viz-tap-auth-reader created
secret/tap-k8s-tls created
apiservice.apiregistration.k8s.io/v1alpha1.tap.linkerd.io created
role.rbac.authorization.k8s.io/web created
rolebinding.rbac.authorization.k8s.io/web created
clusterrole.rbac.authorization.k8s.io/linkerd-linkerd-viz-web-check created
clusterrolebinding.rbac.authorization.k8s.io/linkerd-linkerd-viz-web-check created
clusterrolebinding.rbac.authorization.k8s.io/linkerd-linkerd-viz-web-admin created
clusterrole.rbac.authorization.k8s.io/linkerd-linkerd-viz-web-api created
clusterrolebinding.rbac.authorization.k8s.io/linkerd-linkerd-viz-web-api created
serviceaccount/web created
server.policy.linkerd.io/admin created
authorizationpolicy.policy.linkerd.io/admin created
networkauthentication.policy.linkerd.io/kubelet created
server.policy.linkerd.io/proxy-admin created
authorizationpolicy.policy.linkerd.io/proxy-admin created
service/metrics-api created
deployment.apps/metrics-api created
server.policy.linkerd.io/metrics-api created
authorizationpolicy.policy.linkerd.io/metrics-api created
meshtlsauthentication.policy.linkerd.io/metrics-api-web created
configmap/prometheus-config created
service/prometheus created
deployment.apps/prometheus created
service/tap created
deployment.apps/tap created
server.policy.linkerd.io/tap-api created
authorizationpolicy.policy.linkerd.io/tap created
clusterrole.rbac.authorization.k8s.io/linkerd-tap-injector created
clusterrolebinding.rbac.authorization.k8s.io/linkerd-tap-injector created
serviceaccount/tap-injector created
secret/tap-injector-k8s-tls created
mutatingwebhookconfiguration.admissionregistration.k8s.io/linkerd-tap-injector-webhook-config created
service/tap-injector created
deployment.apps/tap-injector created
server.policy.linkerd.io/tap-injector-webhook created
authorizationpolicy.policy.linkerd.io/tap-injector created
networkauthentication.policy.linkerd.io/kube-api-server created
service/web created
deployment.apps/web created
serviceprofile.linkerd.io/metrics-api.linkerd-viz.svc.cluster.local created
serviceprofile.linkerd.io/prometheus.linkerd-viz.svc.cluster.local created
$ kubectl get pods -AThe viz components live in the linkerd-viz namespace.You can now checkout the viz dashboard:
...
linkerd-viz prometheus-b5865f776-w5ssf 1/2 Running 0 35s
linkerd-viz tap-64f5c8597b-rqgbk 2/2 Running 0 35s
linkerd-viz tap-injector-7c75cfff4c-wl9mx 2/2 Running 0 34s
linkerd-viz web-8c444745-jhzr5 2/2 Running 0 34s
$ linkerd viz dashboard
Linkerd dashboard available at:
http://localhost:50750
Grafana dashboard available at:
http://localhost:50750/grafana
Opening Linkerd dashboard in the default browser
Opening in existing browser session.
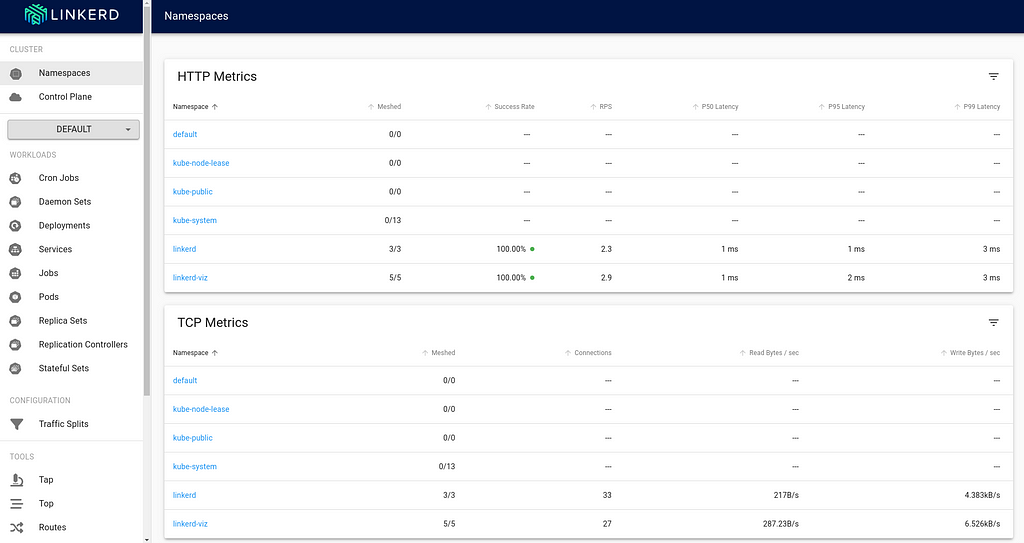
$ cat deploy.yaml
apiVersion: apps/v1
kind: Deployment
metadata:
  name: nginx-deployment
spec:
  selector:
    matchLabels:
      app: nginx
  replicas: 2
  template:
    metadata:
      labels:
        app: nginx
    spec:
      containers:
      - name: nginx
        image: nginx:latest
        ports:
        - containerPort: 80
$ kubectl apply -f deploy.yamlBack in the viz dashboard, I do see the workload deployed, but it isn t currently communicating with the Linkerd control plane, and so doesn t show any metrics, and the Meshed count is 0:
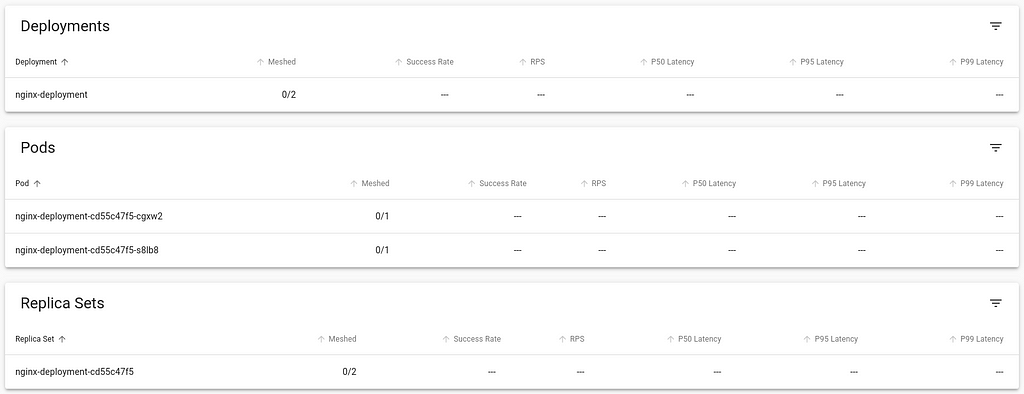
$ kubectl get pod nginx-deployment-cd55c47f5-cgxw2 -o yamlLet s directly inject the linkerd data plane into this running container. We do this by retrieving the YAML of the deployment, piping it to linkerd cli to inject the necessary components and then piping to kubectl apply the changed resources.
apiVersion: v1
kind: Pod
metadata:
annotations:
cni.projectcalico.org/containerID: aee0295dda906f7935ce5c150ae30360005f5330e98c75a550b7cc0d1532f529
cni.projectcalico.org/podIP: 172.16.36.89/32
cni.projectcalico.org/podIPs: 172.16.36.89/32
creationTimestamp: "2022-11-05T19:35:12Z"
generateName: nginx-deployment-cd55c47f5-
labels:
app: nginx
pod-template-hash: cd55c47f5
name: nginx-deployment-cd55c47f5-cgxw2
namespace: default
ownerReferences:
- apiVersion: apps/v1
blockOwnerDeletion: true
controller: true
kind: ReplicaSet
name: nginx-deployment-cd55c47f5
uid: b604f5c4-f662-4333-aaa0-bd1a2b8b08c6
resourceVersion: "22979"
uid: 8fe30214-491b-4753-9fb2-485b6341376c
spec:
containers:
- image: nginx:latest
imagePullPolicy: Always
name: nginx
ports:
- containerPort: 80
protocol: TCP
resources:
terminationMessagePath: /dev/termination-log
terminationMessagePolicy: File
volumeMounts:
- mountPath: /var/run/secrets/kubernetes.io/serviceaccount
name: kube-api-access-2bt6z
readOnly: true
dnsPolicy: ClusterFirst
enableServiceLinks: true
nodeName: k8s-node1
preemptionPolicy: PreemptLowerPriority
priority: 0
restartPolicy: Always
schedulerName: default-scheduler
securityContext:
serviceAccount: default
serviceAccountName: default
terminationGracePeriodSeconds: 30
tolerations:
- effect: NoExecute
key: node.kubernetes.io/not-ready
operator: Exists
tolerationSeconds: 300
- effect: NoExecute
key: node.kubernetes.io/unreachable
operator: Exists
tolerationSeconds: 300
volumes:
- name: kube-api-access-2bt6z
projected:
defaultMode: 420
sources:
- serviceAccountToken:
expirationSeconds: 3607
path: token
- configMap:
items:
- key: ca.crt
path: ca.crt
name: kube-root-ca.crt
- downwardAPI:
items:
- fieldRef:
apiVersion: v1
fieldPath: metadata.namespace
path: namespace
status:
conditions:
- lastProbeTime: null
lastTransitionTime: "2022-11-05T19:35:12Z"
status: "True"
type: Initialized
- lastProbeTime: null
lastTransitionTime: "2022-11-05T19:35:16Z"
status: "True"
type: Ready
- lastProbeTime: null
lastTransitionTime: "2022-11-05T19:35:16Z"
status: "True"
type: ContainersReady
- lastProbeTime: null
lastTransitionTime: "2022-11-05T19:35:13Z"
status: "True"
type: PodScheduled
containerStatuses:
- containerID: containerd://f088f200315b44cbeed16499aba9b2d1396f9f81645e53b032d4bfa44166128a
image: docker.io/library/nginx:latest
imageID: docker.io/library/nginx@sha256:943c25b4b66b332184d5ba6bb18234273551593016c0e0ae906bab111548239f
lastState:
name: nginx
ready: true
restartCount: 0
started: true
state:
running:
startedAt: "2022-11-05T19:35:15Z"
hostIP: 192.168.2.216
phase: Running
podIP: 172.16.36.89
podIPs:
- ip: 172.16.36.89
qosClass: BestEffort
startTime: "2022-11-05T19:35:12Z"
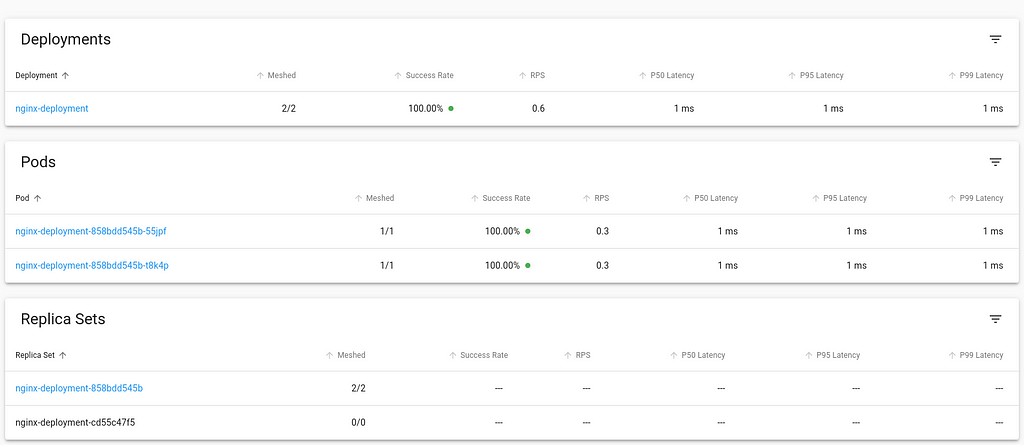
$ kubectl get deploy nginx-deployment -o yaml linkerd inject - kubectl apply -f -
deployment "nginx-deployment" injected
deployment.apps/nginx-deployment configuredBack in the viz dashboard, the workload now is integrated into Linkerd control plane.
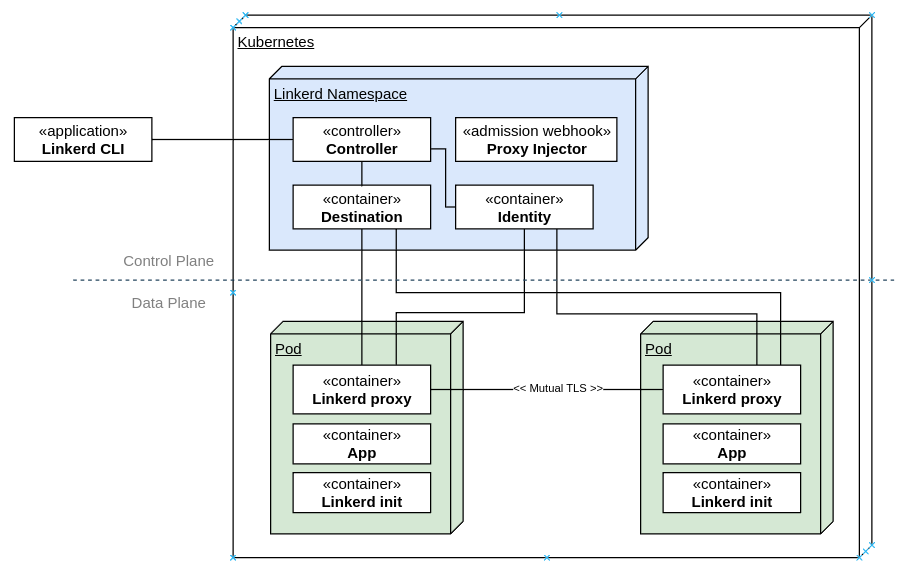
$ kubectl get pod nginx-deployment-858bdd545b-55jpf -o yamlAt this point, the necessary components are setup for you to explore Linkerd further. You can also try out the jaeger and multicluster extensions, similar to the process of installing and using the viz extension and try out their capabilities.Inject Linkerd data plane automaticallyIn this approach, we shall we how to instruct Kubernetes to automatically inject the Linkerd data plane to workloads at deployment time.We can achieve this by adding the linkerd.io/inject annotation to the deployment descriptor which causes the proxy injector admission hook to execute and inject linkerd data plane components automatically at the time of deployment.
apiVersion: v1
kind: Pod
metadata:
annotations:
cni.projectcalico.org/containerID: 1ec3d345f859be8ead0374a7e880bcfdb9ba74a121b220a6fccbd342ac4b7ea8
cni.projectcalico.org/podIP: 172.16.36.90/32
cni.projectcalico.org/podIPs: 172.16.36.90/32
linkerd.io/created-by: linkerd/proxy-injector stable-2.12.2
linkerd.io/inject: enabled
linkerd.io/proxy-version: stable-2.12.2
linkerd.io/trust-root-sha256: 354fe6f49331e8e03d8fb07808e00a3e145d2661181cbfec7777b41051dc8e22
viz.linkerd.io/tap-enabled: "true"
creationTimestamp: "2022-11-05T19:44:15Z"
generateName: nginx-deployment-858bdd545b-
labels:
app: nginx
linkerd.io/control-plane-ns: linkerd
linkerd.io/proxy-deployment: nginx-deployment
linkerd.io/workload-ns: default
pod-template-hash: 858bdd545b
name: nginx-deployment-858bdd545b-55jpf
namespace: default
ownerReferences:
- apiVersion: apps/v1
blockOwnerDeletion: true
controller: true
kind: ReplicaSet
name: nginx-deployment-858bdd545b
uid: 2e618972-aa10-4e35-a7dd-084853673a80
resourceVersion: "23820"
uid: 62f1857a-b701-4a19-8996-b5b605ff8488
spec:
containers:
- env:
- name: _pod_name
valueFrom:
fieldRef:
apiVersion: v1
fieldPath: metadata.name
- name: _pod_ns
valueFrom:
fieldRef:
apiVersion: v1
fieldPath: metadata.namespace
- name: _pod_nodeName
valueFrom:
fieldRef:
apiVersion: v1
fieldPath: spec.nodeName
- name: LINKERD2_PROXY_LOG
value: warn,linkerd=info
- name: LINKERD2_PROXY_LOG_FORMAT
value: plain
- name: LINKERD2_PROXY_DESTINATION_SVC_ADDR
value: linkerd-dst-headless.linkerd.svc.cluster.local.:8086
- name: LINKERD2_PROXY_DESTINATION_PROFILE_NETWORKS
value: 10.0.0.0/8,100.64.0.0/10,172.16.0.0/12,192.168.0.0/16
- name: LINKERD2_PROXY_POLICY_SVC_ADDR
value: linkerd-policy.linkerd.svc.cluster.local.:8090
- name: LINKERD2_PROXY_POLICY_WORKLOAD
value: $(_pod_ns):$(_pod_name)
- name: LINKERD2_PROXY_INBOUND_DEFAULT_POLICY
value: all-unauthenticated
- name: LINKERD2_PROXY_POLICY_CLUSTER_NETWORKS
value: 10.0.0.0/8,100.64.0.0/10,172.16.0.0/12,192.168.0.0/16
- name: LINKERD2_PROXY_INBOUND_CONNECT_TIMEOUT
value: 100ms
- name: LINKERD2_PROXY_OUTBOUND_CONNECT_TIMEOUT
value: 1000ms
- name: LINKERD2_PROXY_CONTROL_LISTEN_ADDR
value: 0.0.0.0:4190
- name: LINKERD2_PROXY_ADMIN_LISTEN_ADDR
value: 0.0.0.0:4191
- name: LINKERD2_PROXY_OUTBOUND_LISTEN_ADDR
value: 127.0.0.1:4140
- name: LINKERD2_PROXY_INBOUND_LISTEN_ADDR
value: 0.0.0.0:4143
- name: LINKERD2_PROXY_INBOUND_IPS
valueFrom:
fieldRef:
apiVersion: v1
fieldPath: status.podIPs
- name: LINKERD2_PROXY_INBOUND_PORTS
value: "80"
- name: LINKERD2_PROXY_DESTINATION_PROFILE_SUFFIXES
value: svc.cluster.local.
- name: LINKERD2_PROXY_INBOUND_ACCEPT_KEEPALIVE
value: 10000ms
- name: LINKERD2_PROXY_OUTBOUND_CONNECT_KEEPALIVE
value: 10000ms
- name: LINKERD2_PROXY_INBOUND_PORTS_DISABLE_PROTOCOL_DETECTION
value: 25,587,3306,4444,5432,6379,9300,11211
- name: LINKERD2_PROXY_DESTINATION_CONTEXT
value:
"ns":"$(_pod_ns)", "nodeName":"$(_pod_nodeName)"
- name: _pod_sa
valueFrom:
fieldRef:
apiVersion: v1
fieldPath: spec.serviceAccountName
- name: _l5d_ns
value: linkerd
- name: _l5d_trustdomain
value: cluster.local
- name: LINKERD2_PROXY_IDENTITY_DIR
value: /var/run/linkerd/identity/end-entity
- name: LINKERD2_PROXY_IDENTITY_TRUST_ANCHORS
value:
-----BEGIN CERTIFICATE-----
MIIBiDCCAS6gAwIBAgIBATAKBggqhkjOPQQDAjAcMRowGAYDVQQDExFpZGVudGl0
eS5saW5rZXJkLjAeFw0yMjExMDUxOTIxMDlaFw0yMzExMDUxOTIxMjlaMBwxGjAY
BgNVBAMTEWlkZW50aXR5LmxpbmtlcmQuMFkwEwYHKoZIzj0CAQYIKoZIzj0DAQcD
QgAE8AgxbWWa1qgEgN3ykFAOJ3sw9nSugUk1N5Qfvo6jXX/8/TZUW0ddko/N71+H
EcKc72kK0tlclj8jDi3pzJ4C0KNhMF8wDgYDVR0PAQH/BAQDAgEGMB0GA1UdJQQW
MBQGCCsGAQUFBwMBBggrBgEFBQcDAjAPBgNVHRMBAf8EBTADAQH/MB0GA1UdDgQW
BBThSr0yAj5joW7pj/NZPYcfIIepbzAKBggqhkjOPQQDAgNIADBFAiAomg0TVn6N
UxhOyzZdg848lAvH0Io9Ra/Ef2hxZGN0LgIhAIKjrsgDUqZA8XHiiciYYicxFnKr
Tw5yj9gBhVAgYCaB
-----END CERTIFICATE-----
- name: LINKERD2_PROXY_IDENTITY_TOKEN_FILE
value: /var/run/secrets/tokens/linkerd-identity-token
- name: LINKERD2_PROXY_IDENTITY_SVC_ADDR
value: linkerd-identity-headless.linkerd.svc.cluster.local.:8080
- name: LINKERD2_PROXY_IDENTITY_LOCAL_NAME
value: $(_pod_sa).$(_pod_ns).serviceaccount.identity.linkerd.cluster.local
- name: LINKERD2_PROXY_IDENTITY_SVC_NAME
value: linkerd-identity.linkerd.serviceaccount.identity.linkerd.cluster.local
- name: LINKERD2_PROXY_DESTINATION_SVC_NAME
value: linkerd-destination.linkerd.serviceaccount.identity.linkerd.cluster.local
- name: LINKERD2_PROXY_POLICY_SVC_NAME
value: linkerd-destination.linkerd.serviceaccount.identity.linkerd.cluster.local
- name: LINKERD2_PROXY_TAP_SVC_NAME
value: tap.linkerd-viz.serviceaccount.identity.linkerd.cluster.local
image: cr.l5d.io/linkerd/proxy:stable-2.12.2
imagePullPolicy: IfNotPresent
lifecycle:
postStart:
exec:
command:
- /usr/lib/linkerd/linkerd-await
- --timeout=2m
livenessProbe:
failureThreshold: 3
httpGet:
path: /live
port: 4191
scheme: HTTP
initialDelaySeconds: 10
periodSeconds: 10
successThreshold: 1
timeoutSeconds: 1
name: linkerd-proxy
ports:
- containerPort: 4143
name: linkerd-proxy
protocol: TCP
- containerPort: 4191
name: linkerd-admin
protocol: TCP
readinessProbe:
failureThreshold: 3
httpGet:
path: /ready
port: 4191
scheme: HTTP
initialDelaySeconds: 2
periodSeconds: 10
successThreshold: 1
timeoutSeconds: 1
resources:
securityContext:
allowPrivilegeEscalation: false
readOnlyRootFilesystem: true
runAsUser: 2102
terminationMessagePath: /dev/termination-log
terminationMessagePolicy: FallbackToLogsOnError
volumeMounts:
- mountPath: /var/run/linkerd/identity/end-entity
name: linkerd-identity-end-entity
- mountPath: /var/run/secrets/tokens
name: linkerd-identity-token
- mountPath: /var/run/secrets/kubernetes.io/serviceaccount
name: kube-api-access-9zpnn
readOnly: true
- image: nginx:latest
imagePullPolicy: Always
name: nginx
ports:
- containerPort: 80
protocol: TCP
resources:
terminationMessagePath: /dev/termination-log
terminationMessagePolicy: File
volumeMounts:
- mountPath: /var/run/secrets/kubernetes.io/serviceaccount
name: kube-api-access-9zpnn
readOnly: true
dnsPolicy: ClusterFirst
enableServiceLinks: true
initContainers:
- args:
- --incoming-proxy-port
- "4143"
- --outgoing-proxy-port
- "4140"
- --proxy-uid
- "2102"
- --inbound-ports-to-ignore
- 4190,4191,4567,4568
- --outbound-ports-to-ignore
- 4567,4568
image: cr.l5d.io/linkerd/proxy-init:v2.0.0
imagePullPolicy: IfNotPresent
name: linkerd-init
resources:
limits:
cpu: 100m
memory: 20Mi
requests:
cpu: 100m
memory: 20Mi
securityContext:
allowPrivilegeEscalation: false
capabilities:
add:
- NET_ADMIN
- NET_RAW
privileged: false
readOnlyRootFilesystem: true
runAsNonRoot: true
runAsUser: 65534
terminationMessagePath: /dev/termination-log
terminationMessagePolicy: FallbackToLogsOnError
volumeMounts:
- mountPath: /run
name: linkerd-proxy-init-xtables-lock
- mountPath: /var/run/secrets/kubernetes.io/serviceaccount
name: kube-api-access-9zpnn
readOnly: true
nodeName: k8s-node1
preemptionPolicy: PreemptLowerPriority
priority: 0
restartPolicy: Always
schedulerName: default-scheduler
securityContext:
serviceAccount: default
serviceAccountName: default
terminationGracePeriodSeconds: 30
tolerations:
- effect: NoExecute
key: node.kubernetes.io/not-ready
operator: Exists
tolerationSeconds: 300
- effect: NoExecute
key: node.kubernetes.io/unreachable
operator: Exists
tolerationSeconds: 300
volumes:
- name: kube-api-access-9zpnn
projected:
defaultMode: 420
sources:
- serviceAccountToken:
expirationSeconds: 3607
path: token
- configMap:
items:
- key: ca.crt
path: ca.crt
name: kube-root-ca.crt
- downwardAPI:
items:
- fieldRef:
apiVersion: v1
fieldPath: metadata.namespace
path: namespace
- emptyDir:
name: linkerd-proxy-init-xtables-lock
- emptyDir:
medium: Memory
name: linkerd-identity-end-entity
- name: linkerd-identity-token
projected:
defaultMode: 420
sources:
- serviceAccountToken:
audience: identity.l5d.io
expirationSeconds: 86400
path: linkerd-identity-token
status:
conditions:
- lastProbeTime: null
lastTransitionTime: "2022-11-05T19:44:16Z"
status: "True"
type: Initialized
- lastProbeTime: null
lastTransitionTime: "2022-11-05T19:44:19Z"
status: "True"
type: Ready
- lastProbeTime: null
lastTransitionTime: "2022-11-05T19:44:19Z"
status: "True"
type: ContainersReady
- lastProbeTime: null
lastTransitionTime: "2022-11-05T19:44:15Z"
status: "True"
type: PodScheduled
containerStatuses:
- containerID: containerd://62028867c48aaa726df48249a27c52cd8820cd33e8e5695ad0d322540924754e
image: cr.l5d.io/linkerd/proxy:stable-2.12.2
imageID: cr.l5d.io/linkerd/proxy@sha256:787db5055b2a46a3c4318ef3b632461261f81254c8e47bf4b9b8dab2c42575e4
lastState:
name: linkerd-proxy
ready: true
restartCount: 0
started: true
state:
running:
startedAt: "2022-11-05T19:44:16Z"
- containerID: containerd://8f8ce663c19360a7b6868ace68a4a5119f0b18cd57ffebcc2d19331274038381
image: docker.io/library/nginx:latest
imageID: docker.io/library/nginx@sha256:943c25b4b66b332184d5ba6bb18234273551593016c0e0ae906bab111548239f
lastState:
name: nginx
ready: true
restartCount: 0
started: true
state:
running:
startedAt: "2022-11-05T19:44:19Z"
hostIP: 192.168.2.216
initContainerStatuses:
- containerID: containerd://c0417ea9c8418ab296bf86077e81c5d8be06fe9b87390c138d1c5d7b73cc577c
image: cr.l5d.io/linkerd/proxy-init:v2.0.0
imageID: cr.l5d.io/linkerd/proxy-init@sha256:7d5e66b9e176b1ebbdd7f40b6385d1885e82c80a06f4c6af868247bb1dffe262
lastState:
name: linkerd-init
ready: true
restartCount: 0
state:
terminated:
containerID: containerd://c0417ea9c8418ab296bf86077e81c5d8be06fe9b87390c138d1c5d7b73cc577c
exitCode: 0
finishedAt: "2022-11-05T19:44:16Z"
reason: Completed
startedAt: "2022-11-05T19:44:15Z"
phase: Running
podIP: 172.16.36.90
podIPs:
- ip: 172.16.36.90
qosClass: Burstable
startTime: "2022-11-05T19:44:15Z"
$ cat deploy.yamlThis annotation can also be specified at the namespace level to affect all the workloads within the namespace. Note that any resources created before the annotation was added to the namespace will require a rollout restart to trigger the injection of the Linkerd components.Uninstalling LinkerdNow that we have walked through the installation and setup process of Linkerd, let s also cover how to remove it from the infrastructure and go back to the state prior to its installation.The first step would be to remove extensions, such as viz.
apiVersion: apps/v1
kind: Deployment
metadata:
name: nginx-deployment
spec:
selector:
matchLabels:
app: nginx
replicas: 2
template:
metadata:
labels:
app: nginx
annotations:
linkerd.io/inject: enabled
spec:
containers:
- name: nginx
image: nginx:latest
ports:
- containerPort: 80
$ linkerd viz uninstall kubectl delete -f -In order to uninstall the control plane, you would need to first uninject the Linkerd control plane components from any existing running pods by:
clusterrole.rbac.authorization.k8s.io "linkerd-linkerd-viz-metrics-api" deleted
clusterrole.rbac.authorization.k8s.io "linkerd-linkerd-viz-prometheus" deleted
clusterrole.rbac.authorization.k8s.io "linkerd-linkerd-viz-tap" deleted
clusterrole.rbac.authorization.k8s.io "linkerd-linkerd-viz-tap-admin" deleted
clusterrole.rbac.authorization.k8s.io "linkerd-linkerd-viz-web-api" deleted
clusterrole.rbac.authorization.k8s.io "linkerd-linkerd-viz-web-check" deleted
clusterrole.rbac.authorization.k8s.io "linkerd-tap-injector" deleted
clusterrolebinding.rbac.authorization.k8s.io "linkerd-linkerd-viz-metrics-api" deleted
clusterrolebinding.rbac.authorization.k8s.io "linkerd-linkerd-viz-prometheus" deleted
clusterrolebinding.rbac.authorization.k8s.io "linkerd-linkerd-viz-tap" deleted
clusterrolebinding.rbac.authorization.k8s.io "linkerd-linkerd-viz-tap-auth-delegator" deleted
clusterrolebinding.rbac.authorization.k8s.io "linkerd-linkerd-viz-web-admin" deleted
clusterrolebinding.rbac.authorization.k8s.io "linkerd-linkerd-viz-web-api" deleted
clusterrolebinding.rbac.authorization.k8s.io "linkerd-linkerd-viz-web-check" deleted
clusterrolebinding.rbac.authorization.k8s.io "linkerd-tap-injector" deleted
role.rbac.authorization.k8s.io "web" deleted
rolebinding.rbac.authorization.k8s.io "linkerd-linkerd-viz-tap-auth-reader" deleted
rolebinding.rbac.authorization.k8s.io "web" deleted
apiservice.apiregistration.k8s.io "v1alpha1.tap.linkerd.io" deleted
mutatingwebhookconfiguration.admissionregistration.k8s.io "linkerd-tap-injector-webhook-config" deleted
namespace "linkerd-viz" deleted
authorizationpolicy.policy.linkerd.io "admin" deleted
authorizationpolicy.policy.linkerd.io "metrics-api" deleted
authorizationpolicy.policy.linkerd.io "proxy-admin" deleted
authorizationpolicy.policy.linkerd.io "tap" deleted
authorizationpolicy.policy.linkerd.io "tap-injector" deleted
server.policy.linkerd.io "admin" deleted
server.policy.linkerd.io "metrics-api" deleted
server.policy.linkerd.io "proxy-admin" deleted
server.policy.linkerd.io "tap-api" deleted
server.policy.linkerd.io "tap-injector-webhook" deleted
$ kubectl get deployments
NAME               READY   UP-TO-DATE   AVAILABLE   AGE
nginx-deployment   2/2     2            2           10m
$ kubectl get deployment nginx-deployment -o yaml linkerd uninject - kubectl apply -f -
deployment "nginx-deployment" uninjected
deployment.apps/nginx-deployment configuredNow you can delete the control plane.
$ linkerd uninstall kubectl delete -f -At this point we re back to the original state:
clusterrole.rbac.authorization.k8s.io "linkerd-heartbeat" deleted
clusterrole.rbac.authorization.k8s.io "linkerd-linkerd-destination" deleted
clusterrole.rbac.authorization.k8s.io "linkerd-linkerd-identity" deleted
clusterrole.rbac.authorization.k8s.io "linkerd-linkerd-proxy-injector" deleted
clusterrole.rbac.authorization.k8s.io "linkerd-policy" deleted
clusterrolebinding.rbac.authorization.k8s.io "linkerd-destination-policy" deleted
clusterrolebinding.rbac.authorization.k8s.io "linkerd-heartbeat" deleted
clusterrolebinding.rbac.authorization.k8s.io "linkerd-linkerd-destination" deleted
clusterrolebinding.rbac.authorization.k8s.io "linkerd-linkerd-identity" deleted
clusterrolebinding.rbac.authorization.k8s.io "linkerd-linkerd-proxy-injector" deleted
role.rbac.authorization.k8s.io "linkerd-heartbeat" deleted
rolebinding.rbac.authorization.k8s.io "linkerd-heartbeat" deleted
customresourcedefinition.apiextensions.k8s.io "authorizationpolicies.policy.linkerd.io" deleted
customresourcedefinition.apiextensions.k8s.io "httproutes.policy.linkerd.io" deleted
customresourcedefinition.apiextensions.k8s.io "meshtlsauthentications.policy.linkerd.io" deleted
customresourcedefinition.apiextensions.k8s.io "networkauthentications.policy.linkerd.io" deleted
customresourcedefinition.apiextensions.k8s.io "serverauthorizations.policy.linkerd.io" deleted
customresourcedefinition.apiextensions.k8s.io "servers.policy.linkerd.io" deleted
customresourcedefinition.apiextensions.k8s.io "serviceprofiles.linkerd.io" deleted
mutatingwebhookconfiguration.admissionregistration.k8s.io "linkerd-proxy-injector-webhook-config" deleted
validatingwebhookconfiguration.admissionregistration.k8s.io "linkerd-policy-validator-webhook-config" deleted
validatingwebhookconfiguration.admissionregistration.k8s.io "linkerd-sp-validator-webhook-config" deleted
namespace "linkerd" deleted
$ kubectl get pods -AI hope you find this useful to get you started on your journey with Linkerd. Head on over to the docs for more information, guides and best practices.
NAMESPACE NAME READY STATUS RESTARTS AGE
default nginx-deployment-cd55c47f5-99xf2 1/1 Running 0 82s
default nginx-deployment-cd55c47f5-tt58t 1/1 Running 0 86s
kube-system calico-kube-controllers-59697b644f-7fsln 1/1 Running 2 (3h39m ago) 7d1h
kube-system calico-node-6ptsh 1/1 Running 2 (3h39m ago) 7d1h
kube-system calico-node-7x5j8 1/1 Running 2 (3h39m ago) 7d1h
kube-system calico-node-qlnf6 1/1 Running 2 (3h39m ago) 7d1h
kube-system coredns-565d847f94-79jlw 1/1 Running 2 (3h39m ago) 7d2h
kube-system coredns-565d847f94-fqwn4 1/1 Running 2 (3h39m ago) 7d2h
kube-system etcd-k8s-master 1/1 Running 2 (3h39m ago) 7d2h
kube-system kube-apiserver-k8s-master 1/1 Running 2 (3h39m ago) 7d2h
kube-system kube-controller-manager-k8s-master 1/1 Running 2 (3h39m ago) 7d2h
kube-system kube-proxy-4n9b7 1/1 Running 2 (3h39m ago) 7d2h
kube-system kube-proxy-k4rzv 1/1 Running 2 (3h39m ago) 7d2h
kube-system kube-proxy-lz2dd 1/1 Running 2 (3h39m ago) 7d2h
kube-system kube-scheduler-k8s-master 1/1 Running 2 (3h39m ago) 7d2h
 The following contributors got their Debian Developer accounts in the last two months: