Search Results: "will"

22 May 2011

Christian Perrier: See you in EDI

After my rehearsal from yesterday, I finally booked my flights to Edinburgh for Debconf 7. I'll fly from CDG terminal F on June 15th 16:15 (AF5052) and will fly back to CDG on June 24th 09:05 (AF5051). The return flight is somewhat more expensive than later flights (about 30EUR more) but much more convenient for me. See you in EDI, ladies and gentlemen...

Simon Josefsson: OpenWRT with Huawei E367 and TP-Link TL-WR1043ND

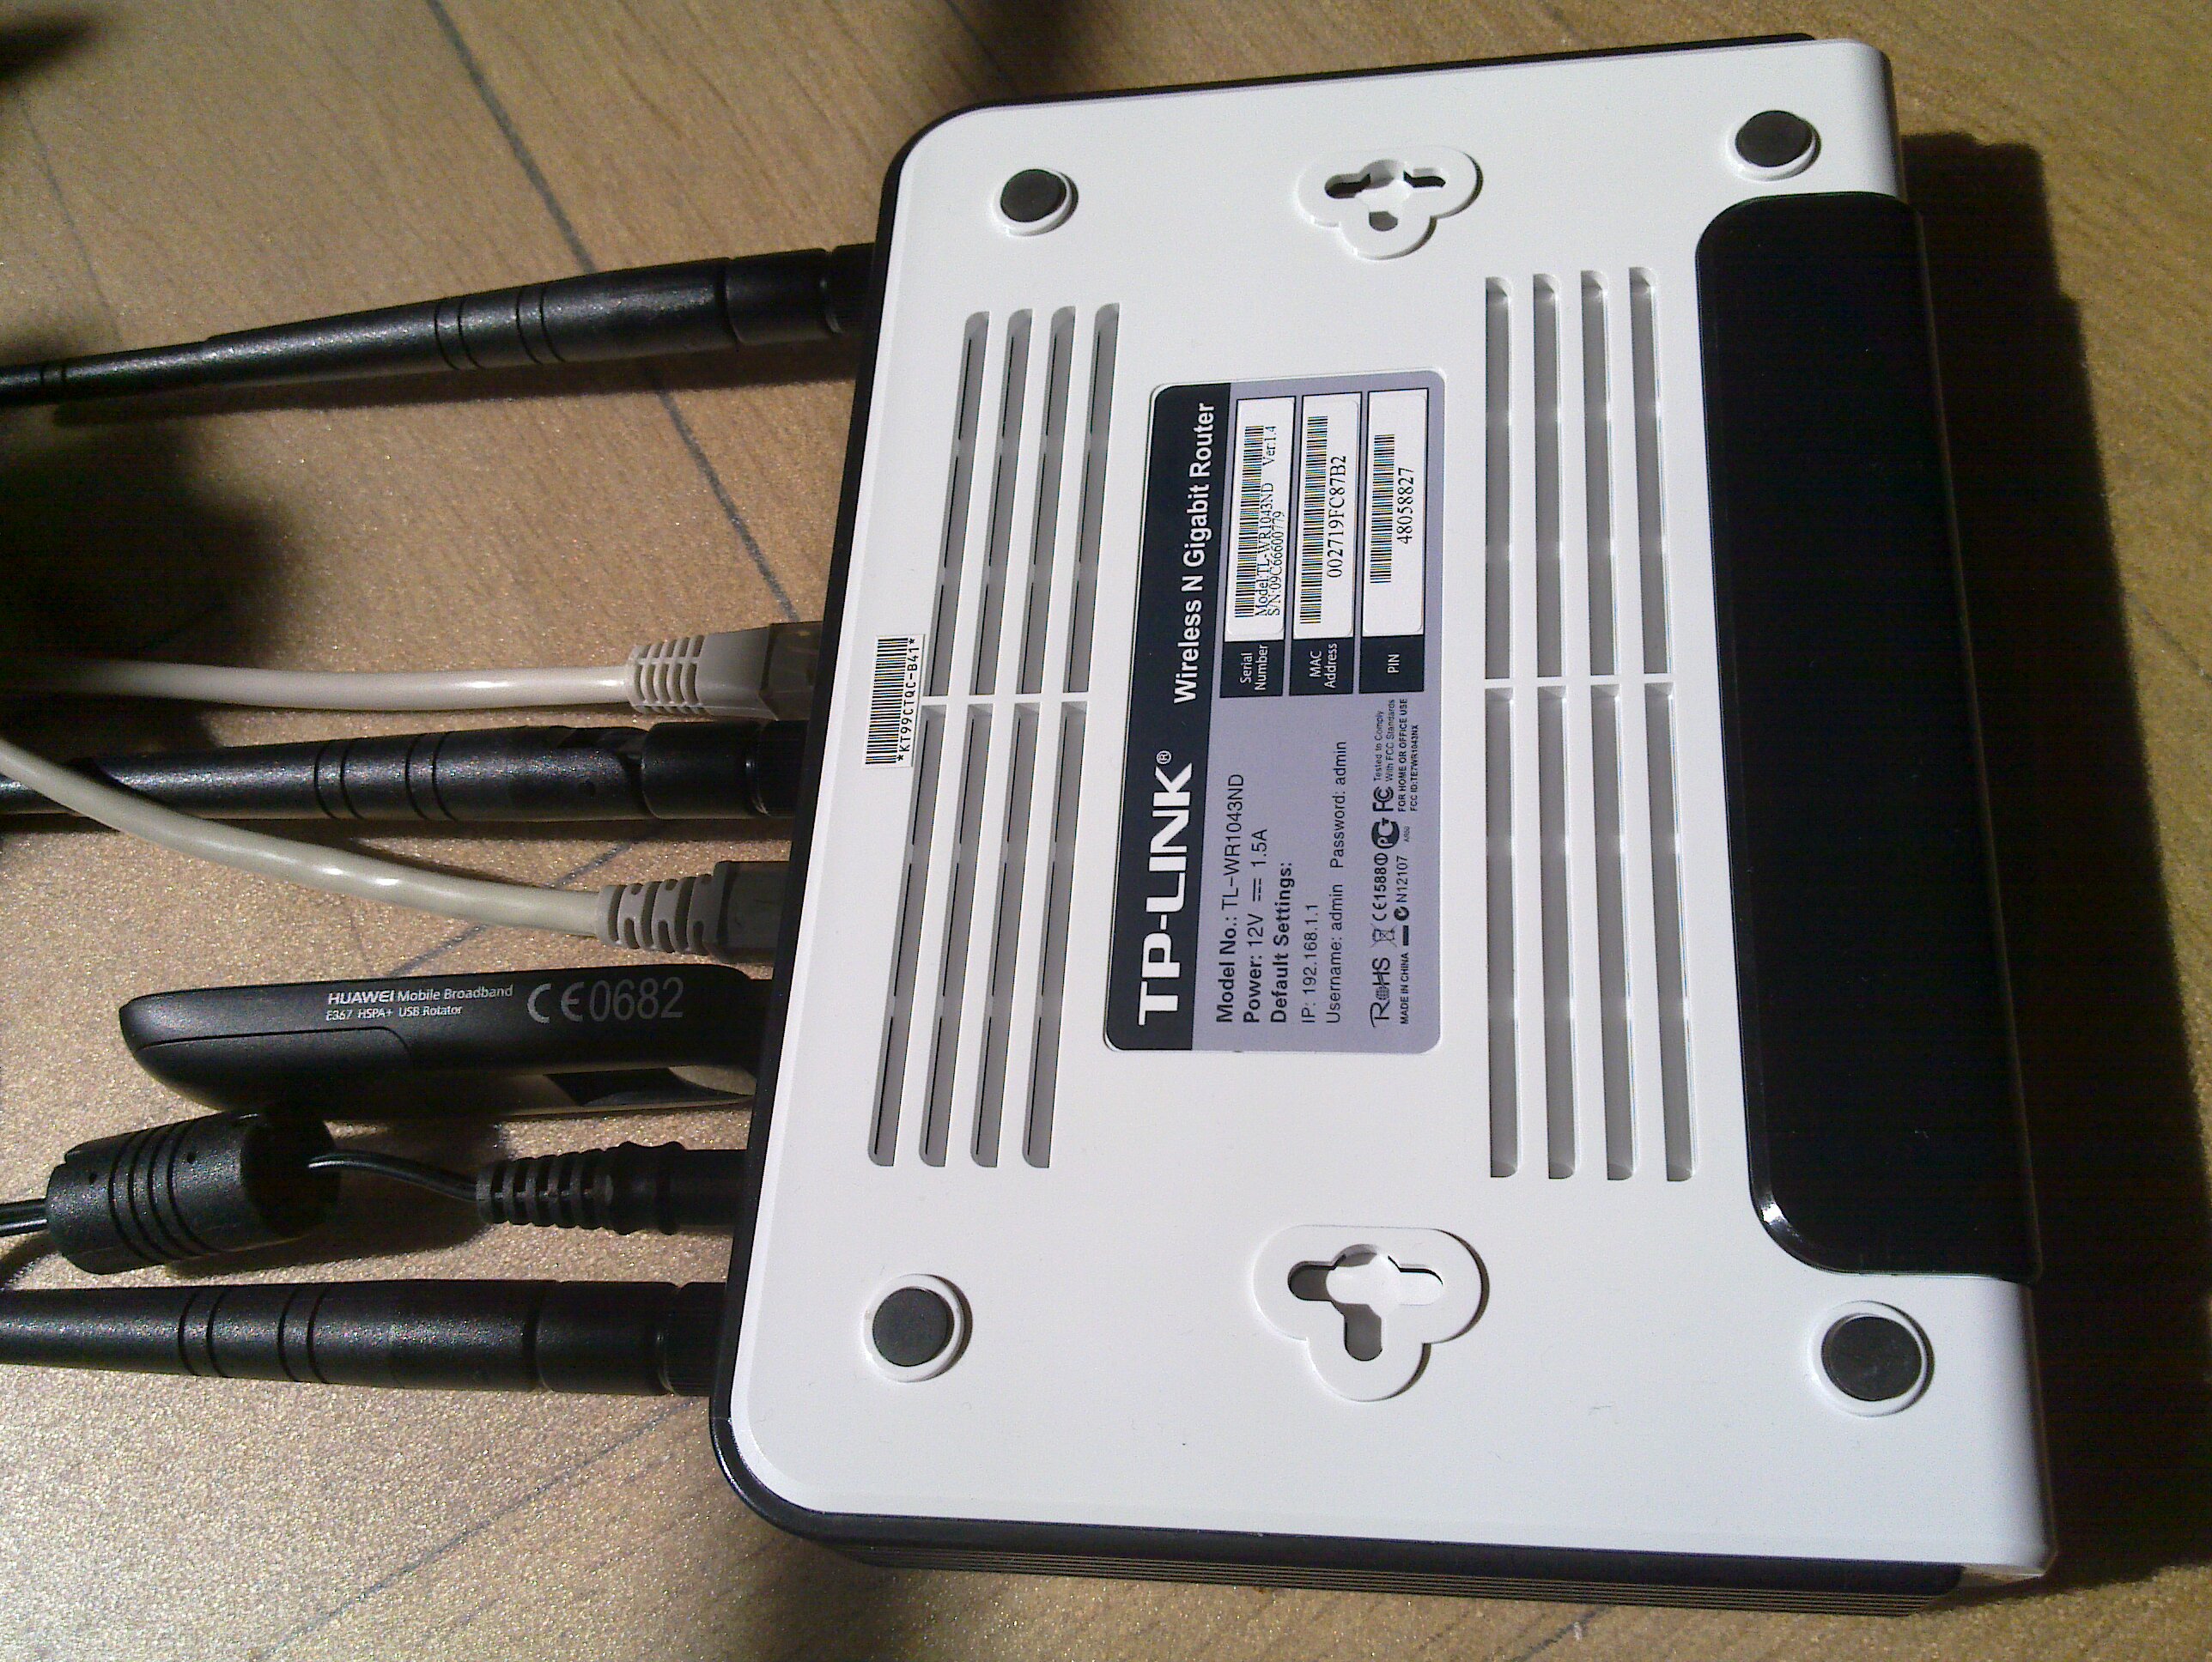
The ability to connect a 3G modem to a wireless router to form a Internet connected ad-hoc network of machines is very powerful. I ve done this many times and have written about it before (e.g., see my OpenWRT writeup page) but I recently did it with modern hardware again. Here I will use the TP-Link TL-WR1043ND wireless router (available here for around $50) together with the Huawei E367 3G UMTS/HSDPA modem. Other wireless routers and modem should work fine. The software is OpenWRT 10.03 although I hope to redo this with LibreWRT eventually. My writeup is mostly focused around what is happening around the prompt, so it is mostly a cut n'paste terminal session with a comment interlined.
TL-WR1043ND and Huawei 367

Router and modem


The first step is to flash the firmware with OpenWRT. The OpenWRT wiki page for the TL-WR1043ND covers this in detail, and for any other hardware you should find what you need in the OpenWRT wiki. If you have already installed OpenWRT on the TL-WR1043ND, and want to wipe it out and start from scratch (like I did for this writeup) here is how to do it:
root@choco:~# cd /tmp
root@choco:/tmp# wget http://downloads.openwrt.org/backfire/10.03/ar71xx/openwrt-ar71xx-tl-wr1043nd-v1-squashfs-sysupgrade.bin
Connecting to downloads.openwrt.org (78.24.191.177:80)
openwrt-ar71xx-tl-wr 100%  *******************************   2688k 00:00:00 ETA
root@choco:/tmp# md5sum openwrt-ar71xx-tl-wr1043nd-v1-squashfs-sysupgrade.bin
9927973ba5da65d0d52e255397452b87  openwrt-ar71xx-tl-wr1043nd-v1-squashfs-sysupgrade.bin
root@choco:/tmp# mtd -r write /tmp/openwrt-ar71xx-tl-wr1043nd-v1-squashfs-sysupgrade.bin firmware
Unlocking firmware ...
Writing from /tmp/openwrt-ar71xx-tl-wr1043nd-v1-squashfs-sysupgrade.bin to firmware ...
Rebooting ...
The device will reboot automatically when it is done. After say 30 seconds, try to connect to it using the default IPv4 address 192.168.1.1. I have connected the WAN port to the Internet and connect to the router over local network connected to the router s LAN1 input. Let s configure OpenWRT, I m calling the host choco and giving it the IPv4 address 192.168.1.46. I ll also set a good root password to disable telnet, and add some SSH keys to simplify remote login.
jas@latte:~$ telnet 192.168.1.1
Trying 192.168.1.1...
Connected to 192.168.1.1.
Escape character is '^]'.
 === IMPORTANT ============================
  Use 'passwd' to set your login password
  this will disable telnet and enable SSH
 ------------------------------------------
BusyBox v1.15.3 (2010-04-06 03:14:11 CEST) built-in shell (ash)
Enter 'help' for a list of built-in commands.
  _______                     ________        __
          .-----.-----.-----.          .----.    _
     -      _     -__                   _    _ 
  _______    __ _____ __ __ ________ __    ____ 
           __  W I R E L E S S   F R E E D O M
 Backfire (10.03, r20728) --------------------------
  * 1/3 shot Kahlua    In a shot glass, layer Kahlua
  * 1/3 shot Bailey's  on the bottom, then Bailey's,
  * 1/3 shot Vodka     then Vodka.
 ---------------------------------------------------
root@OpenWrt:/# passwd
Changing password for root
New password:
Retype password:
Password for root changed by root
root@OpenWrt:/# sed -i -e 's/OpenWrt/choco/' /etc/config/system
root@OpenWrt:/# sed -i -e 's/192.168.1.1/192.168.1.46/' /etc/config/network
root@OpenWrt:/# cat>/etc/dropbear/authorized_keys
ssh-rsa AAAAB3NzaC1yc2...
^D
root@OpenWrt:/# dropbearkey -y -f /etc/dropbear/dropbear_rsa_host_key
Public key portion is:
ssh-rsa AAAA... root@OpenWrt
Fingerprint: md5 45:fd:62...
root@OpenWrt:/#
You could reboot the machine here to switch from telnet to SSH, but I ll install a bunch of packages while I m at it. Run opkg update to update the package list, and then install the wireless modules for the TL-WR1043ND.
root@OpenWrt:/# opkg update
Downloading http://downloads.openwrt.org/backfire/10.03/ar71xx/packages/Packages.gz.
Inflating http://downloads.openwrt.org/backfire/10.03/ar71xx/packages/Packages.gz.
Updated list of available packages in /var/opkg-lists/packages.
root@OpenWrt:/# opkg install kmod-ath9k wpad-mini
...
Configuring iw.
Configuring kmod-crypto-core.
Configuring kmod-crypto-arc4.
Configuring kmod-crypto-aes.
Configuring wireless-tools.
Configuring kmod-cfg80211.
Configuring kmod-mac80211.
Configuring kmod-ath.
Configuring kmod-ath9k.
Configuring crda.
Configuring wpad-mini.
root@OpenWrt:/#
Next I ll install some packages that will are needed for the modem.
root@OpenWrt:/# opkg install comgt kmod-usb-serial kmod-usb2 kmod-usb-uhci kmod-usb-ohci usb-modeswitch
...
Configuring kmod-nls-base.
Configuring kmod-usb-core.
Configuring chat.
Configuring kmod-usb-ohci.
Configuring kmod-usb2.
Configuring comgt.
Configuring usb-modeswitch.
Configuring kmod-usb-serial.
Configuring kmod-usb-uhci.
root@OpenWrt:/#
Now let s reboot the machine and try to get things to really work.
root@OpenWrt:/# sync
root@OpenWrt:/# reboot
Use SSH to connect to the router, and don t forget the use its new IPv4 address! 3G modems are notoriously known for not acting as a modem directly. Instead they often simulate a CD-ROM that will install device driver software, for inferior operating systems. Fortunately the usb_modeswitch tool fixes the hardware for us. My Huawei E367 start up with the USB vendor/product IDs 0x12d1:0 1446, you normally find this out by looking in /proc/bus/usb/devices. Here is the output on my device:
root@choco:~# cat /proc/bus/usb/devices
...
T:  Bus=01 Lev=01 Prnt=01 Port=00 Cnt=01 Dev#=  2 Spd=480 MxCh= 0
D:  Ver= 2.00 Cls=00(>ifc ) Sub=00 Prot=00 MxPS=64 #Cfgs=  1
P:  Vendor=12d1 ProdID=1446 Rev= 0.00
S:  Manufacturer=Huawei Technologies
S:  Product=HUAWEI Mobile
C:* #Ifs= 2 Cfg#= 1 Atr=c0 MxPwr=500mA
I:* If#= 0 Alt= 0 #EPs= 2 Cls=08(stor.) Sub=06 Prot=50 Driver=(none)
E:  Ad=81(I) Atr=02(Bulk) MxPS= 512 Ivl=0ms
E:  Ad=01(O) Atr=02(Bulk) MxPS= 512 Ivl=0ms
I:* If#= 1 Alt= 0 #EPs= 2 Cls=08(stor.) Sub=06 Prot=50 Driver=(none)
E:  Ad=02(O) Atr=02(Bulk) MxPS= 512 Ivl=0ms
E:  Ad=82(I) Atr=02(Bulk) MxPS= 512 Ivl=0ms
root@choco:~#
This means I have to go find a usb-modeswitch configuration for this device. Fortunately, I found it on my Debian Squeeze box in /etc/usb_modeswitch.d/12d1:1446 (from the usb-modeswitch-data package). There was a slight problem with the file, it didn t specify the correct USB vendor/product ID of the device after it has been switched . My Huawei E367 switches to 12d1:1506, so I add 1506 to the TargetProductList list. Here is the final configuration:
root@choco:~# cat>/etc/usb-modeswitch.conf
EnableLogging=1
DefaultVendor= 0x12d1
DefaultProduct=0x1446
TargetVendor=  0x12d1
TargetProductList="1001,1406,140b,140c,1412,141b,14ac,1506"
CheckSuccess=20
MessageContent="55534243123456780000000000000011062000000100000000000000000000"
root@choco:~#
Now you should be able to run usb_modeswitch to perform the switch :
root@choco:~# usb_modeswitch 
Looking for target devices ...
 No devices in target mode or class found
Looking for default devices ...
 Found default devices (1)
Accessing device 002 on bus 001 ...
Using endpoints 0x01 (out) and 0x81 (in)
Inquiring device details; driver will be detached ...
Looking for active driver ...
 No driver found. Either detached before or never attached
SCSI inquiry data (for identification)
-------------------------
  Vendor String: HUAWEI
   Model String: Mass Storage
Revision String: 2.31
-------------------------
USB description data (for identification)
-------------------------
Manufacturer: Huawei Technologies
     Product: HUAWEI Mobile
  Serial No.: not provided
-------------------------
Setting up communication with interface 0 ...
Trying to send the message to endpoint 0x01 ...
 OK, message successfully sent
Checking for mode switch (max. 20 times, once per second) ...
 Waiting for original device to vanish ...
 Original device can't be accessed anymore. Good.
 Searching for target devices ...
 Searching for target devices ...
 Searching for target devices ...
 Searching for target devices ...
 Searching for target devices ...
 Found correct target device
Mode switch succeeded. Bye.
root@choco:~#
The /proc/bus/usb/devices file will now contain information about the real device:
root@choco:~# cat /proc/bus/usb/devices
...
T:  Bus=01 Lev=01 Prnt=01 Port=00 Cnt=01 Dev#=  3 Spd=480 MxCh= 0
D:  Ver= 2.00 Cls=ef(misc ) Sub=02 Prot=01 MxPS=64 #Cfgs=  1
P:  Vendor=12d1 ProdID=1506 Rev= 0.00
S:  Manufacturer=Huawei Technologies
S:  Product=HUAWEI Mobile
C:* #Ifs= 7 Cfg#= 1 Atr=c0 MxPwr=500mA
A:  FirstIf#= 1 IfCount= 2 Cls=02(comm.) Sub=00 Prot=00
I:* If#= 0 Alt= 0 #EPs= 3 Cls=ff(vend.) Sub=01 Prot=01 Driver=(none)
E:  Ad=81(I) Atr=03(Int.) MxPS=  64 Ivl=2ms
E:  Ad=82(I) Atr=02(Bulk) MxPS= 512 Ivl=0ms
E:  Ad=01(O) Atr=02(Bulk) MxPS= 512 Ivl=4ms
I:* If#= 1 Alt= 0 #EPs= 1 Cls=ff(vend.) Sub=01 Prot=09 Driver=(none)
E:  Ad=83(I) Atr=03(Int.) MxPS=  64 Ivl=2ms
I:* If#= 2 Alt= 0 #EPs= 2 Cls=ff(vend.) Sub=01 Prot=08 Driver=(none)
E:  Ad=84(I) Atr=02(Bulk) MxPS= 512 Ivl=0ms
E:  Ad=02(O) Atr=02(Bulk) MxPS= 512 Ivl=4ms
I:* If#= 3 Alt= 0 #EPs= 2 Cls=ff(vend.) Sub=01 Prot=03 Driver=(none)
E:  Ad=85(I) Atr=02(Bulk) MxPS= 512 Ivl=0ms
E:  Ad=03(O) Atr=02(Bulk) MxPS= 512 Ivl=4ms
I:* If#= 4 Alt= 0 #EPs= 2 Cls=ff(vend.) Sub=01 Prot=02 Driver=(none)
E:  Ad=86(I) Atr=02(Bulk) MxPS= 512 Ivl=0ms
E:  Ad=04(O) Atr=02(Bulk) MxPS= 512 Ivl=4ms
I:* If#= 5 Alt= 0 #EPs= 2 Cls=08(stor.) Sub=06 Prot=50 Driver=(none)
E:  Ad=87(I) Atr=02(Bulk) MxPS= 512 Ivl=0ms
E:  Ad=05(O) Atr=02(Bulk) MxPS= 512 Ivl=0ms
I:* If#= 6 Alt= 0 #EPs= 2 Cls=08(stor.) Sub=06 Prot=50 Driver=(none)
E:  Ad=06(O) Atr=02(Bulk) MxPS= 512 Ivl=0ms
E:  Ad=88(I) Atr=02(Bulk) MxPS= 512 Ivl=0ms
root@choco:~#
Let s put that command in /etc/rc.local so that it will be run on every boot.
root@choco:~# cat /etc/rc.local
# Put your custom commands here that should be executed once
# the system init finished. By default this file does nothing.
/usr/bin/usb_modeswitch
exit 0
root@choco:~#
We are not quite ready, the usbserial module needs to be told which USB vendor/product to use. The /etc/modules.d/60-usb-serial file is used during boot to set the right parameters. You can also run rmmod followed by insmod with the proper parameters to avoid a reboot. You can use the gcom info tool to find some information about the modem. Normally you use /dev/ttyUSB0 but for some reason it does not work for me and instead I had to use /dev/ttyUSB3.
root@choco:~# cat>/etc/modules.d/60-usb-serial
usbserial vendor=0x12d1 product=0x1506 maxSize=4096
root@choco:~# rmmod usbserial
root@choco:~# insmod usbserial vendor=0x12d1 product=0x1506 maxSize=4096
root@choco:~# gcom -d /dev/ttyUSB3 info
##### Wireless WAN Modem Configuration #####
Product text:
====
Manufacturer: huawei
Model: E367
Revision: 11.807.05.00.00
IMEI: 353613040739180
+GCAP: +CGSM,+DS,+ES
OK
====
Manufacturer:           huawei
IMEI and Serial Number: 353613040739180
Manufacturer's Revision:
11.807.05.00.
Hardware Revision:      NOT
Network Locked:         ERROR:
Customisation:          NOT SUPPORT
Band settings:          (NOT)
APN:                    ERROR:
##### END #####
root@choco:~#
Let s configure network and wireless. The configurations files are /etc/config/network and /etc/config/wireless. Edit them using your favorite editor, or vi. I m setting up a PSK2 encrypted WLAN and I have a WDS to connect two wireless routers. Note that you need to use the correct PIN for your SIM card (here I m using 8328) and set the APN correctly (I m using bredband.tre.se ). Reboot after making these changes.
root@choco:~# cat /etc/config/network
config 'interface' 'loopback'
       option 'ifname'   'lo'
       option 'proto'    'static'
       option 'ipaddr'   '127.0.0.1'
       option 'netmask'  '255.0.0.0'
config 'interface' 'lan'
        option 'ifname'   'eth0.1'
        option 'type'     'bridge'
        option 'proto'    'static'
        option 'ipaddr'   '192.168.1.46'
        option 'netmask'  '255.255.255.0'
#config 'interface' 'wan'
#        option 'ifname' 'eth0.2'
#        option 'proto' 'dhcp'
config 'switch'
	option 'name' 'rtl8366rb'
        option 'reset' '1'
        option 'enable_vlan' '1'
config 'switch_vlan'
        option 'device' 'rtl8366rb'
        option 'vlan' '1'
        option 'ports' '1 2 3 4 5t'
config 'switch_vlan'
        option 'device' 'rtl8366rb'
        option 'vlan' '2'
        option 'ports' '0 5t'
config interface wan
        option ifname   ppp0
        option proto    3g
        option device   /dev/ttyUSB0
        option apn      bredband.tre.se
        option pincode  8328
root@choco:~# cat /etc/config/wireless
config wifi-device  radio0
	option type     mac80211
	option channel  5
	option macaddr	00:27:19:fc:87:b2
	option hwmode	11ng
	option htmode	HT20
	list ht_capab	SHORT-GI-40
	list ht_capab	DSSS_CCK-40
config wifi-iface
	option device   radio0
	option network  lan
	option mode     ap
	option ssid     Grisslan
	option encryption psk2
	option key	  notforyoutosee
config wifi-iface
        option device     radio0
        option network    lan
        option mode       wds
        option bssid      00:1F:C6:60:D3:11
        option ssid       GrisslanWDS
        option encryption psk2
        option key        thisisalsosecret
root@choco:~# reboot
root@choco:~#
Once the machine have rebooted, you can bring up the 3G connection by using ifup wan . Look at the log by using logread and tail the log in the background by doing logread -f & .
root@choco:~# ifup wan
Trying to set PIN
PIN set successfully
root@choco:~# logread  tail -20
May 21 13:41:20 choco local2.info chat[2419]: send (ATD*99***1#^M)
May 21 13:41:20 choco local2.info chat[2419]: expect (CONNECT)
May 21 13:41:20 choco local2.info chat[2419]: ^M
May 21 13:41:20 choco local2.info chat[2419]: ATD*99***1#^M^M
May 21 13:41:20 choco local2.info chat[2419]: CONNECT
May 21 13:41:20 choco local2.info chat[2419]:  -- got it
May 21 13:41:20 choco local2.info chat[2419]: send ( ^M)
May 21 13:41:20 choco daemon.info pppd[2412]: Serial connection established.
May 21 13:41:20 choco daemon.info pppd[2412]: Using interface ppp0
May 21 13:41:20 choco daemon.notice pppd[2412]: Connect: ppp0 <--> /dev/ttyUSB0
May 21 13:41:24 choco daemon.warn pppd[2412]: Could not determine remote IP address: defaulting to 10.64.64.64
May 21 13:41:24 choco daemon.notice pppd[2412]: local  IP address 95.209.96.115
May 21 13:41:24 choco daemon.notice pppd[2412]: remote IP address 10.64.64.64
May 21 13:41:24 choco daemon.notice pppd[2412]: primary   DNS address 80.251.201.177
May 21 13:41:24 choco daemon.notice pppd[2412]: secondary DNS address 80.251.201.178
May 21 13:41:24 choco daemon.info dnsmasq[1028]: reading /tmp/resolv.conf.auto
May 21 13:41:24 choco daemon.info dnsmasq[1028]: using nameserver 80.251.201.178#53
May 21 13:41:24 choco daemon.info dnsmasq[1028]: using nameserver 80.251.201.177#53
May 21 13:41:24 choco daemon.info dnsmasq[1028]: using local addresses only for domain lan
May 21 13:41:25 choco user.notice rdate: Synced with ptbtime1.ptb.de
root@choco:~#
Hooray! Or almost so usually the first time you connect, I often get incorrect DNS servers from the server. It shows up like this in the log:
May 21 12:25:04 choco daemon.notice pppd[1157]: primary   DNS address 10.11.12.13
May 21 12:25:04 choco daemon.notice pppd[1157]: secondary DNS address 10.11.12.14
The exact reason why this happens is beyond me. There are patches floating around for pppd, but I haven t tried them. A common workaround is to hardcode static DNS servers (like Google DNS or OpenDNS). I have come up with my own workaround, based on the observation that when the problem has occurred it will not happen again if I disconnect and reconnect. Thus I have written a small script which is invoked whenever an interface is brought up (typically the WAN interface).
# Written by Simon Josefsson May 2011.
root@choco:~# cat> /etc/hotplug.d/iface/01-reconnect-if-dns-is-broken
case "$ ACTION:-ifup " in
    ifup)
	    if grep -q 10.11.12.13 /tmp/resolv.conf.auto; then
		(sleep 30 && ifdown wan && ifup wan) &
	    fi
	    ;;
esac
root@choco:~# chmod +x /etc/hotplug.d/iface/01-reconnect-if-dns-is-broken
root@choco:~#
That s it! If you found this writeup useful, please flattr it.

21 May 2011

Vincent Bernat: Network lab with User Mode Linux

To setup a virtual network lab, you get a lot of alternatives. You can for example use GNS3, Netkit, Marionnet or VNUML. Some of those tools, like GNS3, allow to add some closed source equipments like a Cisco 7200 or a Juniper router. All those tools are a great way to setup your network lab. Look at them! If you want to setup a virtual network lab for educational purpose, one of those should fit your purpose. However, none of those solution were a perfect match for me. I did not want to maintain some root filesystem. I wanted my lab to start in a few seconds. I wanted to keep all configuration files (including the ones for the virtual hosts) into one subdirectory of my home and be able to modify them while the lab was running. I also wanted to be able to plug some Cisco router using Dynamips/Dynagen. None of the listed solution above matched all those criteria. Therefore, I setup my own lab script with User Mode Linux. This is not a complete solution, but is more like a home-made solution to match one particular need. You cannot use the final result without tweaking it. Again, look at the other solutions first. We will go step by step to understand how the lab was built. If you are in a hurry, you can look at the result which is published on GitHub.

User Mode Linux User Mode Linux (or UML) is a Linux kernel running as a process instead of running on top of some processor. With Debian, you can install it using apt-get install user-mode-linux. You get a linux command that will run your Linux kernel as a simple process. No need to be root.
 1
 2
 3
 4
 5
 6
 7
 8
 9
10
11
12
13
14
15
16
17
18
19
20
21
22
23
24
25
$ linux
Core dump limits :
    soft - 0
    hard - NONE
Checking that ptrace can change system call numbers...OK
Checking syscall emulation patch for ptrace...OK
Checking advanced syscall emulation patch for ptrace...OK
Checking for tmpfs mount on /dev/shm...nothing mounted on /dev/shm
Checking PROT_EXEC mmap in /tmp/user/500/...OK
Checking for the skas3 patch in the host:
  - /proc/mm...not found: No such file or directory
  - PTRACE_FAULTINFO...not found
  - PTRACE_LDT...not found
UML running in SKAS0 mode
Adding 5632000 bytes to physical memory to account for exec-shield gap
Initializing cgroup subsys cpuset
Linux version 2.6.32 (2.6.32) (root@tito) (gcc version 4.4.5 (Debian 4.4.5-10) ) #2 Thu Jan 27 12:49:46 UTC 2011
[...]
console [mc-1] enabled
Couldn't stat "root_fs" : err = 2
Failed to initialize ubd device 0 :Couldn't determine size of device's file
registered taskstats version 1
VFS: Cannot open root device "98:0" or unknown-block(98,0)
Please append a correct "root=" boot option; here are the available partitions:
Kernel panic - not syncing: VFS: Unable to mount root fs on unknown-block(98,0)
You get a Linux kernel that will just panic because it does not find a disk to mount to run init from it. Usually, you build some root file system and give it as an argument to your UML kernel.

Basic setup However, you can also use your host filesystem as a root filesystem. We also specify /bin/sh as init instead of /sbin/init. This will be the first process to be started by our UML kernel.
 1
 2
 3
 4
 5
 6
 7
 8
 9
10
11
12
13
$ linux init=/bin/sh rootfstype=hostfs
[...]
Linux version 2.6.32 (2.6.32) (root@tito) (gcc version 4.4.5 (Debian 4.4.5-10) ) #2 Thu Jan 27 12:49:46 UTC 2011
[...]
VFS: Mounted root (hostfs filesystem) readonly on device 0:12.
IRQ 3/console-write: IRQF_DISABLED is not guaranteed on shared IRQs
IRQ 2/console: IRQF_DISABLED is not guaranteed on shared IRQs
IRQ 10/winch: IRQF_DISABLED is not guaranteed on shared IRQs
/bin/sh: can't access tty; job control turned off
# uname -a
Linux (none) 2.6.32 #2 Thu Jan 27 12:49:46 UTC 2011 x86_64 GNU/Linux
# echo $$
1
You may want to setup a bit your environment:
1
2
3
4
5
6
7
8
9
# hostname -b R1
# export TERM=xterm
# export PATH=/usr/local/bin:/usr/bin:/bin:/sbin:/usr/local/sbin:/usr/sbin
# mount -t proc proc /proc
# mount -t sysfs sysfs /sys
# mount -t tmpfs tmpfs /var/run -o rw,nosuid,nodev
# mount -t tmpfs tmpfs /var/log -o rw,nosuid,nodev
# mount -o bind /usr/lib/uml/modules /lib/modules
# mount -t hostfs hostfs /home/bernat/mylab -o /home/bernat/mylab
We setup /proc and /sys correctly. We also turn /var/run and /var/log as tmpfs filesystems. This will allow most daemons to run correctly: they will be able to write runtime data in /var/run and to write logs in /var/log. You can even launch your favorite syslog daemon. The line about /lib/modules is to ensure that our UML kernel is able to access its kernel modules. For example, we can now use modprobe tun. The line about /home allows to mount the home directory of your host inside UML. This was already the case, but it was mounted as read-only. One important thing to notice is that while you seem to be root inside UML, you did not run linux as root. Therefore, when the UML kernel tries to write a file it will still be bound by the permissions granted by your host kernel. See this example:
1
2
3
4
# mount -o remount,rw /
# touch /tmp/test1
# touch /etc/test1
touch: cannot touch  /etc/test1': Permission denied
This is a great way to ensure that your lab will not destroy your host. Do not run linux as root. What is interesting with such a setup is that you share the filesystem with your host. You can modify some configuration file on your host and your UML will see the modification right away. You can also modify a file inside UML and see the modification on your host too.

Console & job control There is a slight problem with this environment. You may be used to it if you already started your own GNU/Linux system with init=/bin/sh. The problem is that you don t have job control. Job control allows you to put tasks in background and interrupt them while they are running. It is job control that allows you to stop a program with ^C. Here, you don t have job control. See:
1
2
# cat
^C^C^C^C
You are stuck. The only way to go out is to kill the linux process on your host. Job control is a great mystery for me. I don t know how to enable it by hand. However, getty is able to enable job control for you. Just type this command:
1
# exec getty -n -l /bin/sh 38400 /dev/tty0
You get job control. We keep /bin/sh, but you may prefer /bin/bash since on most systems, /bin/sh is rather basic.

Writable root filesystem Let s get back to our root filesystem. Most daemons can run just fine with our setup. For example, we can start Nginx, a popular web server:
1
2
3
# mkdir /var/log/nginx
# /etc/init.d/nginx start
Starting nginx: nginx.
However, it will use the configuration file in /etc/nginx. You don t want to modify this directory for all your labs. The best way to handle this is to start Nginx with a custom configuration file:
1
2
# /etc/init.d/nginx stop
# nginx -c /home/bernat/mylab/nginx.conf
While keeping the configuration files related to your lab in your home is an important objective (all your lab related files are in the same place and you can modify them at will), it may be more convenient to still use /etc/init.d/nginx script to control Nginx. Moreover, some daemons do not allow to specify a configuration file. You will then need to modify your root filesystem. This is a pretty common problem with Live CD and it is solved by using an union mount. This is a special kind of mount that will merge two filesystems into one. One of the two filesystems can be read-only and all the changes will be reported to the second one. We will use AUFS. Ensure that you have aufs-tools package installed. Let s start from scratch for this example.
 1
 2
 3
 4
 5
 6
 7
 8
 9
10
$ linux init=/bin/sh rootfstype=hostfs
[...]
# mount -n -t proc proc /proc
# mount -n -t sysfs sysfs /sys
# mount -o bind /usr/lib/uml/modules /lib/modules
# mount -n -t tmpfs tmpfs /tmp -o rw,nosuid,nodev
# mkdir /tmp/ro /tmp/rw /tmp/aufs
# mount -n -t hostfs hostfs /tmp/ro -o /,ro
# mount -n -t aufs aufs /tmp/aufs -o noatime,dirs=/tmp/rw:/tmp/ro=ro
# exec chroot /tmp/aufs /bin/bash
It seems that AUFS with hostfs is rather fragile. We could have merged our root filesystem with some directory in our lab using hostfs like this:
1
2
3
4
# mount -n -t hostfs hostfs /tmp/rw -o /home/bernat/mylab/root,rw
# mount -n -t hostfs hostfs /tmp/ro -o /,ro
# mount -n -t aufs aufs /tmp/aufs -o noatime,dirs=/tmp/rw:/tmp/ro=ro
# exec chroot /tmp/aufs /bin/bash
However, the kernel panics on most operations. Therefore, /tmp/rw stays in a tmpfs filesystem. This means that any change to the root filesystem will be lost. I also was unable to issue a correct pivot_root before chroot. This is not really important here. UPDATED: It seems that there are other drawbacks to this setup. For some reason, if you have a separate /usr partition on your host system, you won t be able to write to it until you specify the noxino option to AUFS. Another issue is that AUFS does not notice most changes on the hostfs filesystem. You can fix this with option udba=inotify. However, this is incompatible with the noxino option. Therefore, you need to choose what is best for your lab. You can also mount some parts of your home with hostfs (for example, the source directory of the piece of software that you would like to test). Let s consider that Nginx configuration is in /home/bernat/lab/nginx. We simply uses a symbolic link:
1
2
# rm -rf /etc/nginx
# ln -s /home/bernat/mylab/nginx /etc/nginx
Since we lose the modifications to the root filesystem, the symbolic link should be done each time we start the lab. However, we can modify directly the configuration files in the host or in the UML.

Networking We know how to start our UML. Let s see how we can add some wires to it. UML supports several network adapters. The two most useful are TAP and VDE backend.

TAP A TAP interface is a virtual network kernel device which can be used by userland applications to inject layer 2 frames in it. If the kernel sends frames in a TAP device, they will be received by the application listening to it. This also works the other way around. A TAP interface is a regular ethernet device for the kernel. This means that you can bridge it or use tcpdump on it. The drawback of such interfaces is that you need to be root to create them. The application using them does not need to be run as root. I usually use this nifty shell function to setup TAP interfaces:
 1
 2
 3
 4
 5
 6
 7
 8
 9
10
11
12
13
14
15
16
17
18
19
20
21
22
23
__add_to_bridge()  
    # Optionally, add it to given bridge
    [ -z "$2" ]    
        [ -f /sys/class/net/$2/brforward ]    
            sudo brctl addbr $2
            sudo brctl stp $2 off
            sudo ip link set $2 up
         
        [ -f /sys/class/net/$2/brif/$1 ]    
            # We need to check if it is in another bridge
            bridge=$(echo /sys/class/net/*/brif/$1 2> /dev/null   \
                sed 's+/sys/class/net/\([^/]*\)/.*+\1+') 2> /dev/null
            [ -n "$bridge" ] && \
                sudo brctl delif $bridge $1
            sudo brctl addif $2 $1


tap()  
    sudo tunctl -b -u $(whoami) -t $1 > /dev/null
    sudo ip link set up dev $1
    __add_to_bridge $1 $2
 
It will create the interface and put it into a bridge. For example, you can create two interfaces linked together through a bridge to allow two UML to talk each other:
1
2
$ tap tap-R1 br-R1R2
$ tap tap-R2 br-R1R2
We can setup two UML which will use those interfaces. The first one is setup like this:
1
2
3
4
$ linux init=/bin/sh rootfstype=hostfs eth0=tuntap,tap-R1
[...]
# ip link set up dev eth0
# ip addr add 192.168.0.1/24 dev eth0
The second one:
1
2
3
4
5
6
7
8
9
$ linux init=/bin/sh rootfstype=hostfs eth0=tuntap,tap-R2
[...]
# ip link set up dev eth0
# ip addr add 192.168.0.2/24 dev eth0
# ping 192.168.0.1
PING 192.168.0.1 (192.168.0.1) 56(84) bytes of data.
Warning: time of day goes back (-13832us), taking countermeasures.
64 bytes from 192.168.0.1: icmp_req=20 ttl=64 time=0.633 ms
64 bytes from 192.168.0.1: icmp_req=21 ttl=64 time=0.157 ms
If you are running a firewall on your host, ensure that you let your host forward those packets. By default, bridging code forwards the frames through Netfilter.

VDE A VDE switch is a software emulation of a regular network switch. It is a userland component and does not need to be run as root. You need to install vde2 package to make use of it. You can run a switch using vde_switch command. You will get a console by pressing Enter. From this console, you can configure the switch: add ports, configure VLAN, etc. Like for TAP interfaces, let s setup two UML connected to this switch. The first one is like this:
1
2
3
4
$ linux init=/bin/sh rootfstype=hostfs eth0=vde
[...]
# ip link set up dev eth0
# ip addr add 192.168.0.1/24 dev eth0
And the second one:
1
2
3
4
5
6
7
8
9
$ linux init=/bin/sh rootfstype=hostfs eth0=vde
[...]
# ip link set up dev eth0
# ip addr add 192.168.0.2/24 dev eth0
# ping 192.168.0.1
PING 192.168.0.1 (192.168.0.1) 56(84) bytes of data.
64 bytes from 192.168.0.1: icmp_req=1 ttl=64 time=2.93 ms
Warning: time of day goes back (-8101us), taking countermeasures.
64 bytes from 192.168.0.1: icmp_req=2 ttl=64 time=0.503 ms

The lab So far, we had a look at what can be used to setup a lab. We need to put everything together into some script to setup the lab in a quick way. For each lab that I want to setup, I copy my latest script to a new location and adapt to the topology I want. I have put everything described below in GitHub. Feel free to browse and fork. Our lab will be about setting up a redundant VPN between two remote sites of the same company. This company is using OSPF as an IGP on each site and we will use BGP to let each site know the routes advertised in the other site. We will only use VDE switches for the layer 2 part. Redundant VPN lab Let s implement this lab. You should grab the sources first:
1
2
$ git clone https://github.com/vincentbernat/network-lab.git
$ cd network-lab/lab-redundant-vpn
You have a setup script which will setup the whole lab for you. You also have one directory for each UML. Those directories only contain configuration for the various daemons used inside UML. To make this lab work, ensure that you have quagga (Quagga, an Internet routing daemon supporting both OSPF and BGP) and racoon packages.

UML configuration First look at the end of script. There is something like this:
 1
 2
 3
 4
 5
 6
 7
 8
 9
10
11
12
13
14
15
16
17
18
19
20
21
22
23
24
25
26
27
case $$ in
    1)
        # Inside UML. Three states:
        [...]
        ;;
    *)
        TMP=$(mktemp -d)
        trap "rm -rf $TMP" EXIT
        check_dependencies
        setup_screen
        # Setup switches
        setup_switch site1
        setup_switch site101
        setup_switch internet
        # Start VM
        start_vm R1 eth0=vde,$TMP/switch-site1.sock
        start_vm R2 eth0=vde,$TMP/switch-site101.sock
        start_vm V1 eth0=vde,$TMP/switch-site1.sock eth1=vde,$TMP/switch-internet.sock
        start_vm V2 eth0=vde,$TMP/switch-site1.sock eth1=vde,$TMP/switch-internet.sock
        start_vm V3 eth0=vde,$TMP/switch-site101.sock eth1=vde,$TMP/switch-internet.sock
        start_vm V4 eth0=vde,$TMP/switch-site101.sock eth1=vde,$TMP/switch-internet.sock
        start_vm I1 eth0=vde,$TMP/switch-internet.sock
        display_help
        cleanup
        screen -X quit
        ;;
esac
The script will check its PID ($$). If it is 1, this means it has been invoked as init. Otherwise, it means it has been launched by the user. We will see the init part later. When called, we first check some dependencies, then we setup screen. Everything is run inside a screen session. No multiple windows. The next step is to setup the various switches needed for our lab. We take one switch for each site and one switch for Internet . The function that setups the switch just invokes vde_switch with the help of start-stop-daemon to record the PID (to shutdown the lab properly). Then, we start our various UML. For each of them, we need to specify which network adapters we need. For R1 and R2, we don t use a network adapter to connect to the internal network. We will use a dummy0 interface. To emulate Internet, we use another UML, I1. For each UML, our script will be used as init. In this case, its PID will be 1. As we have seen earlier, the script checks if it is called as init. If it is the case, it will setup the UML. During this setup, host specific configuration will be applied:
 1
 2
 3
 4
 5
 6
 7
 8
 9
10
11
12
13
14
15
16
17
18
19
20
21
22
23
24
25
26
27
28
29
30
31
32
33
34
35
36
37
38
39
40
41
42
43
44
45
46
47
48
49
50
echo "[+] Setup UML"
sysctl -w net.ipv4.ip_forward=1
case $ uts  in
    R1)
        modprobe dummy
        ip link set up dev dummy0
        ip addr add 192.168.15.1/24 dev dummy0
        ip addr add 192.168.1.10/24 dev eth0
        setup_quagga
        ;;
    R2)
        modprobe dummy
        ip link set up dev dummy0
        ip addr add 192.168.115.1/24 dev dummy0
        ip addr add 192.168.101.10/24 dev eth0
        setup_quagga
        ;;
    V1)
        ip addr add 192.168.1.11/24 dev eth0
        ip addr add 1.1.2.1/24 dev eth1
        ip route add default via 1.1.2.10
        setup_quagga
        setup_racoon 1.1.2.1 1.1.1.1 192.168.0.0/19-192.168.100.0/19
        ;;
    V2)
        ip addr add 192.168.1.12/24 dev eth0
        ip addr add 1.1.2.2/24 dev eth1
        ip route add default via 1.1.2.10
        setup_quagga
        setup_racoon 1.1.2.2 1.1.1.2 192.168.0.0/19-192.168.100.0/19
        ;;
    V3)
        ip addr add 192.168.101.13/24 dev eth0
        ip addr add 1.1.1.1/24 dev eth1
        ip route add default via 1.1.1.10
        setup_quagga
        setup_racoon 1.1.1.1 1.1.2.1 192.168.100.0/19-192.168.0.0/19
        ;;
    V4)
        ip addr add 192.168.101.14/24 dev eth0
        ip addr add 1.1.1.2/24 dev eth1
        ip route add default via 1.1.1.10
        setup_quagga
        setup_racoon 1.1.1.2 1.1.2.2 192.168.100.0/19-192.168.0.0/19
        ;;
    I1)
        ip addr add 1.1.1.10/24 dev eth0
        ip addr add 1.1.2.10/24 dev eth0
        ;;
esac
After all this, we drop to a shell to allow you to issue additional commands interactively.

Testing We need to wait one minute after the lab has been started. We can then check the routing table of various equipments. For example, here is R1 routing table (you need to type vtysh to get Quagga console):
 1
 2
 3
 4
 5
 6
 7
 8
 9
10
11
R1# show ip route
Codes: K - kernel route, C - connected, S - static, R - RIP, O - OSPF,
       I - ISIS, B - BGP, > - selected route, * - FIB route
C>* 127.0.0.0/8 is directly connected, lo
O   192.168.1.0/24 [110/10] is directly connected, eth0, 00:25:42
C>* 192.168.1.0/24 is directly connected, eth0
O   192.168.15.0/24 [110/10] is directly connected, dummy0, 00:25:42
C>* 192.168.15.0/24 is directly connected, dummy0
O>* 192.168.115.0/24 [110/20] via 192.168.1.11, eth0, 00:02:24
  *                           via 192.168.1.12, eth0, 00:02:24
We can see that if this router wants to contact R2, it has learned a multipath route with OSPF and can then sends its packets through V1 or V2, as expected. Here is the routing table of V3:
 1
 2
 3
 4
 5
 6
 7
 8
 9
10
11
12
V3# show ip route
Codes: K - kernel route, C - connected, S - static, R - RIP, O - OSPF,
       I - ISIS, B - BGP, > - selected route, * - FIB route
K>* 0.0.0.0/0 via 1.1.1.10, eth1
C>* 1.1.1.0/24 is directly connected, eth1
C>* 127.0.0.0/8 is directly connected, lo
O   192.168.15.0/24 [110/20] via 192.168.101.14, eth0, 00:04:26
B>* 192.168.15.0/24 [20/20] via 192.168.1.11 (recursive via 1.1.1.10), 00:07:16
O   192.168.101.0/24 [110/10] is directly connected, eth0, 00:07:30
C>* 192.168.101.0/24 is directly connected, eth0
O>* 192.168.115.0/24 [110/20] via 192.168.101.10, eth0, 00:07:18
We see that to contact R1, V3 knows two routes. One with BGP through the VPN. This is the one that will be used. The other one is through V4 but will not be used unless the BGP route is lost. We can ping R2 from R1:
1
2
3
4
R1# ping -I 192.168.15.1 192.168.115.1
PING 192.168.115.1 (192.168.115.1) from 192.168.15.1 : 56(84) bytes of data.
Warning: time of day goes back (-459129us), taking countermeasures.
64 bytes from 192.168.115.1: icmp_req=1 ttl=62 time=1.10 ms
Let s suppose we break the link between V1 and the Internet (using ip link set down eth1 on V1). The previous multipath route on R1 is now a single route through V2. Moreover, V3 has lost its BGP route to V1 and is now using its OSPF route through V4:
 1
 2
 3
 4
 5
 6
 7
 8
 9
10
11
V3# show ip route
Codes: K - kernel route, C - connected, S - static, R - RIP, O - OSPF,
       I - ISIS, B - BGP, > - selected route, * - FIB route
K>* 0.0.0.0/0 via 1.1.1.10, eth1
C>* 1.1.1.0/24 is directly connected, eth1
C>* 127.0.0.0/8 is directly connected, lo
O>* 192.168.15.0/24 [110/20] via 192.168.101.14, eth0, 00:10:13
O   192.168.101.0/24 [110/10] is directly connected, eth0, 00:13:17
C>* 192.168.101.0/24 is directly connected, eth0
O>* 192.168.115.0/24 [110/20] via 192.168.101.10, eth0, 00:13:05
We could enhance the resiliance of such a setup by adding a dedicated link between V1 and V2 and between V3 and V4 and running OSPF on this link (or iBGP). This would allow us to support several outages on our network.

Conclusion The script used to setup this lab can be adapted to setup other labs with little effort. Please, note that it depends on the configuration of your environment. However, the whole lab is contained in a single directory and is very small. You can email it to your friends or publish it on GitHub. It can also be extended to support Dynagen to include some Cisco equipments in your lab (for example, to experiment with VRF or MPLS).

Craig Small: JFFNMS 0.9.0 Released

After 3 release candidates jffnms is now at version 0.9.0. Both the web frontend and backend (engines) have had extensive re-work done to them to cleanup and tighten up the code. There should be a lot less warnings and errors from PHP when you set to a higher error level.

Tollef Fog Heen: Upgrading Alioth

A while ago, we got another machine for hosting Alioth and so we started thinking about how to use that machine. It's a used machine and not massively faster than the current hardware, so just moving everything over wouldn't actually get us that much of a performance upgrade. However, Alioth is using FusionForge, which is supposed to be able to run on a cluster of machines. After all, this was originally built for SourceForge.net, which certainly does not run on a single host. So, a split of services is what we'll do. This weekend, we're having a sprint in Collabora's office in Cambridge, actually implementing the split and doing a bit of general planning for the future. Last afternoon (Friday), European time, we started the migration. The first step is to move all the data off the Xen guest on wagner, where Alioth is currently hosted. This finished a few minutes ago; it turns out syncing about 8.5 million files across almost 400G of data takes a little while. The new host is called vasks and will host the database, run the main apache and be the canonical location for the various SCM repositories. We are not decomissioning wagner, but it'll be reinstalled without Xen or other virtualisation which should help performance a bit. It'll host everything that has lower performance requirements such as cron jobs, mailing lists and so on. I'll try to keep you all updated and feel free to drop by #alioth on irc.debian.org if you have any questions.

Lars Wirzenius: Obnam 0.17: second BETA release

I have just pushed out version 0.17 of Obnam, my backup application. My personal Debian repository has binaries for squeeze in i386, amd64, and armel architectures. A summary of the changes:

20 May 2011

Tanguy Ortolo: cpio > tar

Large package icon tar and cpio tar(5) and cpio(5) are two competing archive formats, that provide almost identical features. Both are streamed formats, originally designed to be used on tapes. Their major practical difference is the style of their standard command line utilities: Peace! There is a traditional opposition between these two formats and utilities and their respective supporters. To fix this, the POSIX specification deprecated both commands in 2001, replacing them by a single one called pax(1), that can be used either in cpio-like or tar-like style. This specification also defined a pax interchange format, which these vile trolls derived from tar! Now, considering the actual practice, you can notice that tar has won, and that almost nobody uses pax. Almost every free software project I know release tarballs, not cpio archives. This is probably the reason why the GNU tar utility has evolved much more than GNU cpio: tar now integrates seamlessly with compressors such as gzip, bzip2 or xz, autodetecting the compression format when needed whereas cpio has no such features as far as I know. However, cpio is notably used by the Linux kernel for its initial memory file system, aka initrd. tar and cpio drawbacks Now I come to the title of this article: I personally prefer the cpio format over tar, although I usually use tar because of the advanced features of GNU tar. In fact, tar suffers from a drawback that usually has to be worked around: it cannot store any type of file. There exist seven file types: regular files, directories, symbolic links, character devices, block devices, FIFOs and Unix sockets. Well, tar can only represent six of them, and misses the ability to store sockets. Thus, if you try to archive your entire filesystem with tar, you may get the following output:
tar: /var/spool/postfix/private/rewrite: socket ignored
tar: /var/spool/postfix/private/bsmtp: socket ignored
If you try the same with cpio, you will see that sockets get archived without any problem. Given that the tar format has a type byte, with one reserved value, I am surprised that its 2001 revision did not use it for sockets, but for some reason it did not. In practice, programs that use sockets work around this problem by creating them at startup. To be honest, I must mention that cpio also has one significant drawback: when a file has several links, it gets copied several times in the archive. Edit: It appears that archiving sockets is completely pointless, given that they must be unlinked if they exist, and then created before they are used by a program. Thus, the question becomes: why does cpio support sockets?

Russ Allbery: git-pbuilder 1.20

I've been sadly neglecting this script, but tonight I finally found some time to catch up on all the suggestions and bug reports that Guido G nther has been letting me know about (and I greatly appreciate that!). This version merges in all the good ideas people have had. This version removes the -i and -I flags passed to dpkg-source when the package format is 3.0, since with 3.0 packages, dpkg-source both already ignores Git files by default and ignores various other things that were not included in the pattern. It also offers much better configuration methods for the ignore patterns, which git-pbuilder was overriding. So that's all skipped now for 3.0 packages. git-pbuilder still passes in the ignore flags for 1.0 packages, since they don't ignore Git files by default. The environment variable BUILDER can now be set to choose the builder, which is still cowbuilder by default. The other supported option is qemubuilder, and for it git-pbuilder selects an appropriate configuration file. Additional flags for the builder can be set in the GIT_PBUILDER_OPTIONS environment variable and will be passed along. There are also a few more minor fixes: better documentation, always printing out what we're doing at the start of a run, and preserving the exit status of pdebuild and exiting with the same status. These changes are based on work by Guido G nther, Yaroslav Halchenko, and Beno t Knecht. You can get the latest version from my scripts page.

19 May 2011

Mark Brown: ASoC updates in 2.6.39

Linux 2.6.39 was released earlier today. This release includes a few updates, the main user visible one being that machine drivers can now be registered as regular devices rather than using the soc-audio device.

Tanguy Ortolo: About system host names

The host name Large address book icon On Unix systems, the host name is kept in memory by the kernel: it is set and get by the sethostname() and gethostname() functions and their command-line wrapper hostname(1). It can be used by several programs, for instance by the mail server to determine what it should use as its HELO name. In fact, the host name has two forms: the short one and the fully qualified one. For instance, a host can have muscadet as its short name muscadet and muscadet.example.com as its fully qualified one. From these two forms, a third information can be deduced: the domain name, which is the full name without its first component. The system host name can be set as either the short name or the fully qualified name. When the full name is used, the short one can be easily deduced, by keeping only its first component. When the short name is used, the full name must be determined by using a more complex heuristic that takes more time and can fail for several reasons.Determining the short and the fully qualified host name The command hostname(1) is able to give both the short and the full host name, and also the domain name that can be deduced from them:
-s, --short
Display the short host name. This is the host name cut at the first dot.
-f, --fqdn, --long
Display the FQDN (Fully Qualified Domain Name). A FQDN consists of a short host name and the DNS domain name.
-d, --domain
Display the name of the DNS domain.
Now, given that the kernel only maintains a single host name, this command and the corresponding functions are using heuristics to determine these two forms. I did not look to the code, but here is what I have deduced: The second option, when the kernel only knows the short host name, seems rather inferior, as it uses a more complex algorithm which takes more time (if it uses the DNS, it can use much more time than a fully local query) and can fail for several reasons. Setting the host name With Debian, the host name is stored in the file /etc/hostname and set at boot time by the hostname.sh init script. The local hosts table /etc/hosts also contains it, in both forms, for a loopback IPv4 address 127.0.1.1. It is asked at installation time: the most common practice is to give the short host name; you are then asked for the domain name. But you have the option to give the fully qualified domain name, which has the effect to skip the domain name question. Using a fully qualified system host name I used to define short system host names, and I switched to fully qualified ones about a year ago. I saw no drawback, but I did see benefits. Postfix, by default, uses the system host name to determine its variables myhostname and mydomain that are used for stuff like the HELO name and the mail domain name. Well, with a short system host name, it fails, and you get default myhostname = muscadet.localdomain and mydomain = localdomain, so you have to set them explicitly in its configuration file, thus duplicating information. Whereas with a fully qualified system host name, it just works, and you can rely on the default values, that will stay in sync if you have to change you host name. To sum up, it is perfectly possible to use a fully qualified name as the system host name, even though it does not seem to be a common practice. In fact, according to my experience, it is even advisable, as it eases the configuration of programs that rely on the host name, such as mail servers. Edit: As noticed by Javi, the hostname(1) manpage ends by saying without explaination that /etc/hostname should contain the short host name and not the full one. There may by some drawbacks by doing so but I was not able not identify them.

Sam Dunne: First metting today

So in a few hours I will have my first Skype meeting with my mentor. Have some ideas etc to show him and see if he thinks they re on. Will be posting some flowcharts on these later.

~Sam

MJ Ray: Top 10 Benefits of Mailing List Software

Particularly around local government, but also some not-for-profits and universities, I m trying to persuade people to stop using huge Blind Carbon Copy (BCC) lists that they keep in their address book and switch over to using mailing list manager software. Our co-op even gives some simple mailing list hosting away with web hosting. I think good mailing list software is better because:
  1. List members can help themselves they can subscribe, unsubscribe and set options by sending email to the software or visiting its website, which reduces the worker time required to manage the list. But you can still manage it directly if you prefer.
  2. Your address book is smaller because you don t need every address on the mailing list cluttering up your email software s address book any more
  3. Errors are handled automatically if an address doesn t work any more, the software will unsubscribe it, usually with some safeguards against one-off problems
  4. Privacy is safeguarded dedicated email list software will not put all the mailing list addresses in the To-line by mistake (as often happens with Address Book announcement lists)
  5. Spam is filtered rules can be set centrally and they can be different to the rest of your organisation
  6. Messages can be moderated if needed, the list managers can be asked to pre-approve the messages, or you can set rules to allow some automatically.
  7. Emails can be archived most list software can save copies of messages for you, or put them on the web
  8. You can offer digests offer members the choice between getting every message or daily or weekly batches
  9. Multiple versions can be sent some list software can send different versions of the same email (like rich and plain text, or different languages) as chosen by the user
  10. You can syndicate news some list software can also put your announcements on content management systems or social media
  11. (OK, I ve done 10 there are two more which matter to a tech worker like me which I m going to mention as free extras.) It s more efficient most list software is designed to handle hundreds or thousands of recipients and sends email with more robust settings than a typical desktop email client. It is less likely to fail after recipient 373 and ask you to resend them all.
  12. Comply with standards good list software either follows standards for things like self-service and digests automatically or can be told to do it. Some desktop email software (Outlook?) usually can t.
Do you think these are good reasons? Are there other reasons you would include above some of these? Would they persuade you to stop using your computer s address book?

18 May 2011

Sandro Tosi: I'm going to EuroPython 2011

I just got confirmation my company will sponsor me for EuroPython 2011 (thanks Register.it), so I'll be able to attend the whole week; a lot of amazing talks and the code sprints in the weekend: this is going to be a great time!

Are you coming?

Aigars Mahinovs: Travelling to Debconf11

This year Debconf is a bit off the beaten track, so there is a bit of anxiety in the participants flights to Banja Luka are quite expensive (I d guess we have packed the relevant dates pretty full already) and other options are going via Zagreb or Ljubljana, but there people do not yet have all the info on how they will be able to get from, for example, Zagreb airport to the Debconf venue in Banja Luka, if their plane lands at 22:30 and get back if the departure time is 06:30. There is hope that the organising team will provide the info on how to use the local buses and arrange a Debconf bus for people arriving late and departing early, but that has not been 100% confirmed yet. In light of all this, I really dug deep into all possible options and found an option that is far more fun and relaxing for me and almost the same price. So I will be travelling to Paris on the morning of July 16th, then staying overnight there (never been in Paris before!), then take a late morning flight to Zagreb where I ll be around noon (plenty of time to get to Banja Luka) and then on the final day of the conference I can got to Zagreb at any time, stay there overnight (never been to Zagreb too!) and around noon next day fly back home via Budapest (just a 2 hour break there). This way I will get to see two more cities, save me a lot of stress and also not bother the organizers too much. :) P.S. I must say thank you Accenture for paying for my plane tickets.

17 May 2011

Sam Dunne: DPKG, Debian and Google Summer of Code

So today is my first day of in depth research into the coming project with dpkg. It s going quiet well. I can now say I have a good understanding of dpkg-divert but am currently figuring out what all the functions do in the source code (oh so much code). Hopefully I ll update my blog on a daily basis or bi-daily. Later on I will post links to my Git repo for the project aswell as a detailed plan of how I m going to approach everything. Maybe some insights aswell, that is if I have any. Until then, ~Sam

Gerfried Fuchs: It's MY Life

Sometimes people will tell you what you should do. Sometimes they will even shout at you for simply asking a question on why they want something done because it isn't clear just from itself. And others likes to jump the boat and join in just for the fun of it... Gladly, this is MY life, and I choose how much abuse I'm willing to take, especially for a voluntary work that I didn't even enroll for but got put into. Sometimes through my dedication to getting quality into things and seeing that others simply neglect these areas, but they need to get addressed anyway, no matter how little respect is shown for people investing in these boring areas. The topic of It's MY Life is an old one and thus it is no surprise that a fair amount of songs surrounding it popped up over time. In my previous blog entry I wrote about different interpretations, some responses seem to hint that I wasn't clear enough about that I really meant different interpretations of the same lyrics, not just regular cover versions. The following set of songs is special in a different sense: It is about the same song title and thus does also cover different bands. Like always, enjoy! And think about how you interact with others. I know that I'm sometimes crossing a line myself too, no one is perfect. What though makes the difference is the willingness to learn, and especially: To excuse. But in the end: It's MY life!

/music permanent link Comments: 3 Flattr this

Vincent Bernat: Debian on Thinkpad Edge 11"

This has been several months since I didn t use much my laptop, an Asus S5N: it was crippled by a short battery life and was hit by several bugs, most of them targeting the i855GME graphic chipset thanks to the use of GEM and KMS in the latest Xorg. I did not want to invest too much in a laptop and I have found a rebate from Lenovo for Thinkpad Edge series. Voil , I have a Thinkpad Edge 11 .

Hardware Thinkpad Edge is a entry-level notebook from Lenovo. In France, it is available for around 500 , thanks to the usual parity between dollar and euro. Thinkpad Edge 11" enclosure

Hardware configuration Lenovo do not sell directly in France. Therefore, you cannot configure your laptop as you want. There is two or three configurations available. This can be a bit frustrating if you want something specific. Thinkpad Edge 11" parts Here is the configuration that I bought:
  • Intel Core i3 380UM at 1.33 GHz CPU.
  • 11.6 LED screen, with a resolution of 1366x768.
  • 4 GB RAM.
  • 320 GB hard drive.
  • Wireless network (Centrino Wireless-N) and bluetooth.
  • Broadband modem (WWAN)
It s a small laptop but it is not as light as it should be (1.5 kg or 3.3 pounds). Apart from the power supply, you don t get any extra. My Asus was shipped with a wireless mouse, a transport bag, a sleeve, an USB key and a CD burner. On one side, you get two USB ports and on the other side, one USB port, an HDMI port, a network outlet and a speaker jack. The VGA connector is placed on the rear. Thinkpad Edge 11"

BIOS First step: checking BIOS settings. WiMAX can be disabled as well as any other component that you may not need. The keyboard can be configured so that function keys are available directly instead of having to use the Fn key. There is an option called Computrace from AbsoluteSoftware which seems targeted at find back your laptop in case it gets stolen or just let the FBI know where you are. I have disabled it.

Debian installation Debian can be installed from an USB stick. This is really easy now. You grab the ISO image you want to use (I take the one for AMD64 in testing because I will run unstable) and to copy it on the USB stick:
1
# dd if=debian-testing-amd64-netinst.iso of=/dev/sdb
The previous way of making the USB stick bootable, installing a kernel, an initrd and the ISO image is deprecated (and does not work). Moreover, using testing to install Debian allows me to use a 2.6.37 kernel and circumvent some problems that may have happen with an older kernel. During the installation, I choose a guided partitioning using encrypted LVM. I choose to have several partitions but I keep /usr in the root partition since having a separate /usr is less and less supported, especially with piece of software like udev. The partitioning tool in Debian installer do not allow to resize volumes, you need to destroy them and recreate them as well as their content. However, this is still faster than writing a patch for this. When the installation is finished, the laptop boots on a 2.6.38 kernel, asks for the passphrase to decrypt the LUKS volume and display the login prompt a few seconds later.

Software configuration Most of the hardware seems to be supported. No obscure commands to run to get a working network. Therefore, I start by setting up my usual environment.

Setting up the desktop First, I change /etc/apt/sources.list to get unstable:
deb http://ftp.fr.debian.org/debian/ unstable main
deb-src http://ftp.fr.debian.org/debian/ unstable main
deb http://ftp.fr.debian.org/debian/ experimental main contrib non-free
I also want that everything that is installed from experimental to be upgraded if an update is available in experimental. This is done by creating a file /etc/apt/preferences.d/experimental:
Package: *
Pin: release experimental
Pin-Priority: 101
Then, I install the following packages:
  • zsh, my favourite shell with my hand-made maturating configuration. I should put it on GitHub one day.
  • mg, is the editor that I use to quickly edit a configuration file. I don t like vi. I have used jed for a long time but its default configuration can be cumbersome and it misses some emacs keybinding.
  • emacs, my work environment. I use it as a text editor and mail reader (with Gnus). I don t use it as a browser nor as a terminal. As for zsh, I have my configuration files ready to be copied anywhere.
  • fvwm, my window manager since quite some time. I use fvwm-crystal on top of it. My configuration is described in another post. I also use conky.
  • rxvt-unicode, a terminal. It has a very good terminal emulation and some fancy features like transparency (using compositing or not). It is light and fast and allows to search in the backbuffer. It can use a client/server system that will close all your windows when the server crashes. This almost never happens.
  • unison, a synchronisation tool that allows me to keep the same files on my different computers.
  • gdm3 is the only display manager that is able to talk correctly to ConsoleKit and get the rights set correctly without adding yourself to a lot of groups.
Nowadays, I use the kernel from Debian and I do not have to run my own configuration for it. The glory days where I had to recompile the kernel before plugging a new USB toy have passed. I remove rpcbind and nfs-common. I use ferm to setup a simple firewall. Here is my ferm.conf:
domain (ip ip6)  
  table filter  
chain INPUT  
    policy DROP;
    mod state state INVALID DROP;
    mod state state (ESTABLISHED RELATED) ACCEPT;
    interface lo ACCEPT;
    proto tcp dport ssh ACCEPT;
    
chain OUTPUT  
    policy ACCEPT;
    mod state state (ESTABLISHED RELATED) ACCEPT;
    
chain FORWARD  
    policy DROP;


unison will then sync my configuration files and my documents. After this step, my environment is ready.

Hardware configuration This is usually the most troublesome part. However, looking at the output of lspci and lsusb, everything seems pretty easy to get supported. Here is lspci output:
00:00.0 Host bridge: Intel Corporation Core Processor DRAM Controller (rev 02)
00:02.0 VGA compatible controller: Intel Corporation Core Processor Integrated Graphics Controller (rev 02)
00:16.0 Communication controller: Intel Corporation 5 Series/3400 Series Chipset HECI Controller (rev 06)
00:1a.0 USB Controller: Intel Corporation 5 Series/3400 Series Chipset USB2 Enhanced Host Controller (rev 06)
00:1b.0 Audio device: Intel Corporation 5 Series/3400 Series Chipset High Definition Audio (rev 06)
00:1c.0 PCI bridge: Intel Corporation 5 Series/3400 Series Chipset PCI Express Root Port 1 (rev 06)
00:1c.1 PCI bridge: Intel Corporation 5 Series/3400 Series Chipset PCI Express Root Port 2 (rev 06)
00:1c.5 PCI bridge: Intel Corporation 5 Series/3400 Series Chipset PCI Express Root Port 6 (rev 06)
00:1d.0 USB Controller: Intel Corporation 5 Series/3400 Series Chipset USB2 Enhanced Host Controller (rev 06)
00:1e.0 PCI bridge: Intel Corporation 82801 Mobile PCI Bridge (rev a6)
00:1f.0 ISA bridge: Intel Corporation Mobile 5 Series Chipset LPC Interface Controller (rev 06)
00:1f.2 SATA controller: Intel Corporation 5 Series/3400 Series Chipset 4 port SATA AHCI Controller (rev 06)
00:1f.3 SMBus: Intel Corporation 5 Series/3400 Series Chipset SMBus Controller (rev 06)
00:1f.6 Signal processing controller: Intel Corporation 5 Series/3400 Series Chipset Thermal Subsystem (rev 06)
03:00.0 Network controller: Intel Corporation Centrino Wireless-N 1000
09:00.0 Ethernet controller: Realtek Semiconductor Co., Ltd. RTL8111/8168B PCI Express Gigabit Ethernet controller (rev 03)
ff:00.0 Host bridge: Intel Corporation Core Processor QuickPath Architecture Generic Non-core Registers (rev 02)
ff:00.1 Host bridge: Intel Corporation Core Processor QuickPath Architecture System Address Decoder (rev 02)
ff:02.0 Host bridge: Intel Corporation Core Processor QPI Link 0 (rev 02)
ff:02.1 Host bridge: Intel Corporation Core Processor QPI Physical 0 (rev 02)
ff:02.2 Host bridge: Intel Corporation Core Processor Reserved (rev 02)
ff:02.3 Host bridge: Intel Corporation Core Processor Reserved (rev 02)
And lsusb output (I disabled the broadband modem in the BIOS and therefore, it does not appear here):
Bus 001 Device 001: ID 1d6b:0002 Linux Foundation 2.0 root hub
Bus 002 Device 001: ID 1d6b:0002 Linux Foundation 2.0 root hub
Bus 001 Device 002: ID 8087:0020 Intel Corp. Integrated Rate Matching Hub
Bus 002 Device 002: ID 8087:0020 Intel Corp. Integrated Rate Matching Hub
Bus 001 Device 003: ID 0bda:0158 Realtek Semiconductor Corp. USB 2.0 multicard reader
Bus 001 Device 004: ID 0a5c:217f Broadcom Corp. Bluetooth Controller
Bus 002 Device 003: ID 5986:01a7 Acer, Inc Lenovo Integrated Webcam
There is a dedicated page for the Thinkpad Edge 11 on ThinkWiki. This wiki is one of the best source of information when you get a Thinkpad. The kernel as shipped by Debian kernel team contains every module that you may need. One of them, thinkpad_acpi will handle most of the perks under the hood. I do not use a complete desktop like Gnome. I usually prefer to use command line tools and put them in .xsession for persistence. There is usually some graphical utility to do the same thing. There are however some configuration steps that are now far easier to do with a graphical tool. Since I use X all the time, I just rely on those tools when necessary.

BIOS upgrade From lshw output, I see that I already have the latest BIOS available. No need to update then. In case you need to update, yours, ThinkWiki has a documentation to upgrade. You can find memdisk image in syslinux package.

Graphic card The graphic card is integrated into the CPU. Intel usually ships graphic cards well supported by open source drivers. ThinkWiki tells us:
A very recent Linux distribution with kernel 2.6.33 and Intel Xorg driver 2.11 or newer is recommended. Note that XVideo (Xv) playback at certain frame sizes does not work properly unless you have at least version 2.12 of the Intel Xorg driver.
With Debian Wheezy, you get version 2.15. Therefore, configuring the graphic card is just a matter of installing xserver-xorg-video-intel and that s all. No /etc/X11/xorg.conf needed. HDMI and VGA outputs are detected without configuring anything. They can be enabled with xrandr. I did not try if it was possible to use both of them at the same time.
Screen 0: minimum 320 x 200, current 1366 x 768, maximum 8192 x 8192
LVDS1 connected 1366x768+0+0 (normal left inverted right x axis y axis) 256mm x 144mm
   1366x768       60.0*+   50.0  
   1360x768       59.8     60.0  
   1024x768       60.0  
   800x600        60.3     56.2  
   640x480        59.9  
VGA1 disconnected (normal left inverted right x axis y axis)
HDMI1 disconnected (normal left inverted right x axis y axis)
DP1 disconnected (normal left inverted right x axis y axis)
Compositing works without any problem. I use only transparency and therefore, I don t know what the speed is on a desktop with all effects turned on. Regarding video acceleration, XVideo is supported but the graphic card also features hardware decoding with i965-va-driver package. Here is the output of vainfo:
libva: libva version 0.32.0
libva: va_getDriverName() returns 0
libva: Trying to open /usr/lib/dri/i965_drv_video.so
libva: va_openDriver() returns 0
vainfo: VA API version: 0.32
vainfo: Driver version: i965 Driver 0.1
vainfo: Supported profile and entrypoints
  VAProfileMPEG2Simple            : VAEntrypointVLD
  VAProfileMPEG2Main              : VAEntrypointVLD
  VAProfileH264Baseline           : VAEntrypointVLD
  VAProfileH264Main               : VAEntrypointVLD
  VAProfileH264High               : VAEntrypointVLD
With Debian, VLC can make use of this if you put ffmpeg-hw=1 in your ~/.config/vlc/vlcrc. We are then greeted by this:
[0x2629040] avcodec decoder: Using VA API version 0.32 for hardware decoding.

Network The network card works out of the box. ThinkWiki tells us that there can be stability problems with 2.6.36 kernel. During the installation, a 2.6.37 was used without any problem. I am now running a 2.6.38 and never got a glitch. It is likely that the described problem was solved with 2.6.37.

UltraNav UltraNav is the combination of the usual touchpad and the trackpoint which is a small joystick in the center of the keyboard and is well known to Thinkpad users since most of them have one. The trackpoint is a great input device. Nowadays, all input devices are configured with the help of xinput command. Here is the output of xinput list:
  Virtual core pointer                      id=2    [master pointer  (3)]
      Virtual core XTEST pointer                id=4    [slave  pointer  (2)]
      SynPS/2 Synaptics TouchPad                id=11   [slave  pointer  (2)]
      TPPS/2 IBM TrackPoint                     id=12   [slave  pointer  (2)]
  Virtual core keyboard                     id=3    [master keyboard (2)]
  Virtual core XTEST keyboard               id=5    [slave  keyboard (3)]
  Power Button                              id=6    [slave  keyboard (3)]
  Video Bus                                 id=7    [slave  keyboard (3)]
  Power Button                              id=8    [slave  keyboard (3)]
  Integrated Camera                         id=9    [slave  keyboard (3)]
  AT Translated Set 2 keyboard              id=10   [slave  keyboard (3)]
  ThinkPad Extra Buttons                    id=13   [slave  keyboard (3)]
The command xinput list-props will give you additional information on each input device listed above. You can then configure any settings using xinput set-prop. For example, if you want to enable scrolling by using the edges of the touchpad and enable palm detection, you can use the following commands:
1
2
$ xinput set-int-prop "SynPS/2 Synaptics TouchPad" 'Synaptics Edge Scrolling' 8 1 1 0
$ xinput set-int-prop "SynPS/2 Synaptics TouchPad" 'Synaptics Palm Detection' 8 1
If you want to disable the touchpad and only use the trackpoint, use the following command:
1
$ xinput set-int-prop "SynPS/2 Synaptics TouchPad" 'Synaptics Off' 8 1
Each property has a type and a size. There is no place for guessing since every property is listed in man 4 synaptics. The same applies for the trackpoint but the correct manual page is man 4 evdev. For example, if you want to enable scrolling using the middle button, use:
1
2
$ xinput set-int-prop "TPPS/2 IBM TrackPoint" "Evdev Wheel Emulation" 8 1
$ xinput set-int-prop "TPPS/2 IBM TrackPoint" "Evdev Wheel Emulation Button" 8 2
All those commands can be tossed in ~/.xsession.

Keyboard hot keys Thinkpad laptops usually have a lot of hot keys. This is not the case of the Thinkpad Edge which only features a few of them:
  • volume control
  • brightness control
  • webcam and external screen toggle
  • wireless toggle
  • multimedia keys
All those keys trigger an event in one of the keyboard listed in xinput list. Therefore, your window manager or any other application can intercept them and act upon. You can use evtest to check which key triggers which event on which keyboard. The acpid daemon listen on those keyboards and can also trigger some actions. For example, it will run ibm-wireless.sh when you hit the wireless toggle. By default, this will enable or disable your wireless card. But you can configure the script to use a multistate toggle and disable or enable the bluetooth card as well.

Sound card As for the network card, the sound card works out of the box. I use PulseAudio because it allows per-application volume control and per-application sound card selection. It comes handy if you have some bluetooth headset. To make PulseAudio the default application for most applications, I put this in my ~/.asoundrc:
pcm.!default  
  type pulse
 
ctl.!default  
  type pulse
 

Wireless card A firmware is needed to make this card work. On Debian, you need to install firmware-iwlwifi package. Then, iwlagn module needs to be loaded. You can check with rfkill list that the wireless card has not been disabled. iw list will then give the status:
Wiphy phy0
Band 1:
    Capabilities: 0x872
        HT20/HT40
        Static SM Power Save
        RX Greenfield
        RX HT20 SGI
        RX HT40 SGI
        No RX STBC
        Max AMSDU length: 3839 bytes
        No DSSS/CCK HT40
    Maximum RX AMPDU length 65535 bytes (exponent: 0x003)
    Minimum RX AMPDU time spacing: 4 usec (0x05)
    HT RX MCS rate indexes supported: 0-15, 32
    TX unequal modulation not supported
    HT TX Max spatial streams: 1
    HT TX MCS rate indexes supported may differ
    Frequencies:
        * 2412 MHz [1] (14.0 dBm)
        * 2417 MHz [2] (14.0 dBm)
        * 2422 MHz [3] (14.0 dBm)
        * 2427 MHz [4] (14.0 dBm)
        * 2432 MHz [5] (14.0 dBm)
        * 2437 MHz [6] (14.0 dBm)
        * 2442 MHz [7] (14.0 dBm)
        * 2447 MHz [8] (14.0 dBm)
        * 2452 MHz [9] (14.0 dBm)
        * 2457 MHz [10] (14.0 dBm)
        * 2462 MHz [11] (14.0 dBm)
        * 2467 MHz [12] (14.0 dBm) (passive scanning, no IBSS)
        * 2472 MHz [13] (14.0 dBm) (passive scanning, no IBSS)
    Bitrates (non-HT):
        * 1.0 Mbps
        * 2.0 Mbps (short preamble supported)
        * 5.5 Mbps (short preamble supported)
        * 11.0 Mbps (short preamble supported)
        * 6.0 Mbps
        * 9.0 Mbps
        * 12.0 Mbps
        * 18.0 Mbps
        * 24.0 Mbps
        * 36.0 Mbps
        * 48.0 Mbps
        * 54.0 Mbps
max # scan SSIDs: 20
Supported interface modes:
     * IBSS
     * managed
     * monitor
I don t know why, but 802.11a channels have been disabled. I don t have interest in them and therefore I did not search why this happens.
iwlagn 0000:03:00.0: Detected Intel(R) Centrino(R) Wireless-N 1000 BGN, REV=0x6C
iwlagn 0000:03:00.0: device EEPROM VER=0x15d, CALIB=0x6
iwlagn 0000:03:00.0: Device SKU: 0X9
iwlagn 0000:03:00.0: Valid Tx ant: 0X1, Valid Rx ant: 0X3
iwlagn 0000:03:00.0: Tunable channels: 13 802.11bg, 0 802.11a channels
iwlagn 0000:03:00.0: irq 44 for MSI/MSI-X
iwlagn 0000:03:00.0: loaded firmware version 128.50.3.1 build 13488
Wireless is one of the thing that make me use graphical applications like Network Manager. Command line tools are too low level to quickly connect to some random wireless network. There was a large debate in debian-devel@ldo to determine if Network Manager was ready to replace ifup and ifdown commands, even for servers. It seems that this is not something impossible and therefore, I think it has become flexible enough to ensure most of the configuration tasks I need.

Bluetooth The bluetooth chipset is hosted on the USB bus. hci_usb module will take care of it. It supports AD2P and can be used to listen to music with a compatible headset. hciconfig will tell us if the chipset is working. Again, bluetooth is easier to configure with a graphical tool. BlueZ, the bluetooth stack in Linux, uses DBus to communicate with other applications. The command line tools have been deprecated and therefore, you need to fight with some DBus binding to pair your computer to your headset. gnome-bluetooth package comes with an applet which allows you to quickly pair to any device. If you install pulseaudio-module-bluetooth package, any bluetooth headset should work out of the box.

Broadband (WWAN) To configure the broadband modem, the most difficult thing to do is to grab the appropriate firmware. ThinkWiki comes with various instructions to get it. I did not keep my Windows installation and therefore, I grabbed the Qualcomm Gobi 2000 Wireless WAN driver and I unpacked it with some Windows host with msiexec as instructed (I did have to execute the installation program first, otherwise, msiexec tells that the file is invalid). I choosed the default firmware since my laptop is unlocked. ThinkWiki page explains which firmware to choose in which situation. The package gobi-loader needs to be installed. The firmware files amss.mbn, apps.mbn and UQCN.mbn should be placed in /lib/firmware/gobi. They will be loaded by udev. To avoid to reboot, I used this command:
1
# /lib/udev/gobi_loader -2000 /dev/ttyUSB0 /lib/firmware/gobi
To configure the 3G connection, I just used Network Manager. Ensure with rfkill list that your WWAN card is not blocked. I did not test the GPS part that needs to be enabled on Windows.

Webcam Nowadays, USB webcam are UVC device and there is a driver to support this class of devices. Check that the uvcvideo module is correctly loaded and you should have something like this in your dmesg:
uvcvideo: Found UVC 1.00 device Integrated Camera (5986:01a7)
cheese is a small application that can be used to check if the webcam operates as expected.

Card reader Nothing to do. This works out of the box.

Suspend to memory and disk Install the uswsusp package which will also pull pm-utils. You will get pm-suspend and pm-hibernate commands. pm-suspend will enable suspend to memory. On resume, the system takes a whole minute to become operational. I get the following message:
r8169 0000:09:00.0: eth0: unable to apply firmware patch
PM: resume of devices complete after 60786.035 msecs
PM: Finishing wakeup.
Installing firmware-realtek package solves this issue. It should also be solved by a future kernel. I also have this message when I come back from sleep:
[drm:i915_hangcheck_ring_idle] *ERROR* Hangcheck timer elapsed... render ring idle [waiting on 9297, at 9297], missed IRQ?
The X server is then slow as hell. The message can be fixed by using i915.semaphores=1 as a kernel parameter but the X server is still slow. It seems that running powertop restores the original speed. This is a known problem. On sleep, the battery loses 2% every 6 hours. This allows you to keep your laptop on sleep for several days if needed. pm-hibernate enable suspend to disk. The suspend part works well but on resume, the kernel freezes after reading back the image into memory. There are some documentation to debug this problem but I prefer to wait for 2.6.39 which may just solves this issue.

Power management Let s see on how we could enhance battery life. First, cpufrequtils package will slow down the processor when it is not used by using the ondemand governor. The frequency will drop from 1.33 GHz to 666 MHz. Several tools are then available:
  • pm-utils package comes with scripts to enable some powersaving features. Those scripts are run on ACPI events (for example, when you unplug the AC adapater). There is no way to put the laptop to sleep after two hours of inactivity for example. You need something like sleepd to handle this part. I have found nothing that could dim the screen on inactivity.
  • laptop-mode-tools is also a set of script to be run on ACPI events. It is therefore somewhat superseded by pm-utils.
  • gnome-power-manager is a daemon that makes use of upowerd. Despite its name, you can run it outside of the Gnome environment. It will put your laptop to sleep on inactivity and will dim the screen when needed. All other functionalities are handled to upowerd. This seems the way to go on today Linux desktops.
Behing the scene, upowerd will call at some point pm-powersave from pm-utils. This allows to run scripts when unplugging the AC adapter. There are some scripts shipped in /usr/lib/pm-utils/power.d. You can add your own in /etc/pm/power.d. Some scripts are configurable. For example, if you create /etc/pm/config.d/local and put SATA_ALPM_ENABLE=true in it, this will enable SATA ALPM mode on battery. You can check what needs to be done with powertop or go to a website like Less Watts to get some tips on what to configure to get a better battery life. Without adding any script, I get 5 hours of battery life with the laptop doing almost nothing. Lenovo tells that you should get 6 hours of battery life. I think that on moderate workloads, you should get 4 hours.

Conclusion This Lenovo Edge has a good value for money. It features a great keyboard for a laptop of its size. It could be lighter and thinner. Its battery life is pretty good. Almost everything works out of the box with GNU/Linux. I hope that 2.6.39 kernel will solve the remaining issues like the suspend on disk issue.

16 May 2011

Sylvestre Ledru: Status of LLVM in Debian

Here is some updates on the LLVM world into Debian.
LLVM and CLANG getting better and better after each release. After some lag, it is now time to have all these packages up-to-date into the archive. Here is an update of their status in Debian: Deprecated stuffs:

DebConf team: DebConf Newbies/Non-Regulars Funding for 2011 (Posted by Tiago Bortoletto Vaz)

As previously announced in Ganneff s blog and Debian News, a special funding for DebConf11 is available for Debian Developers and Debian Maintainers who have either never attended a DebConf before, or who have not been to a DebConf since DebConf7 (in Scotland). How to apply Email the DebConf Newbies Team (newbies@debconf.org) providing the following information: the DebConf team

John Sullivan: Send bricks to Nintendo

Brick Nintendo before they brick you! Connectivity can be a force for autonomy and freedom, or it can be used for control and subjugation. The Nintendo 3DS is an example of the latter. Okay, yeah, I just said a cute video game console is a threat to personal freedom. Hear me out. If you haven't read the highlights of Nintendo's Terms of Service for the 3DS yet, you should do that. On one hand, it's "just" a games console. On the other hand, it's a computer, marketed to children, which monitors your location (based on proximity to wifi access points), uploads your photos and messages to Nintendo's servers (giving them a license to re-use that information in various ways), and tracks your activity. Now that's entertainment. If you wanted your Nintendo computer to stop doing those things, you could try to install some 3rd-party "homebrew" software on it. Except then, according to the Terms, Nintendo would "brick" your device render it inoperable, when the modified software is detected. Would you accept Ford disabling your car because you had a mechanic friend fix a problem using some aftermarket parts? Microsoft breaking your computer hardware because you installed Firefox? The ability to stop your electronics from spying on you is an important freedom to defend, even if you don't ever plan on purchasing a Nintendo device. Such terms, and the Digital Restrictions Management software that enforces them, are a problem in all areas of digital life. It's the same fundamental strategy as Apple controlling what you can install on the iPhone or iPad, or Sony sending police officers to a programmer's house because he showed other people how to modify their own computers to make them able to run non-Sony-approved software. If we don't set a strong precedent against this behavior, it will become more prevalent. If we lose the ability to install what we like on our computers, then we lose the ability to use those computers in any way that isn't pre-approved by a corporation. We lose it not only because we ourselves can't install some software maybe we hate changing anything on our computers at all but because the people who write the software we rely on lose that freedom, which ends up impacting even the most non-technical of computer users. Companies like to portray anyone arguing for this freedom as criminals just wanting to illegally copy software. But that's obviously not true -- a person who follows all laws, even the most absurd, might still want to install something to stop Nintendo from receiving copies of her photos or reporting on her location. Companies use the threat of illegal copying to justify massive infringements on real personal freedoms. People often say, "well, just don't buy it then". I agree don't buy it. But don't think this is merely a consumer issue. Terms like Nintendo's are backed by the force of criminal law the Digital Millennium Copyright Act in the US for example which can put you in jail for helping people to modify their own computers. So this is more than a mere preference issue, it's also one of law and ethics. It's not a free market when one side has coercive state resources in play to prop up its arbitrary business model. To help send this message, I just donated to send 5 bricks to Nintendo. I hope you'll send one or five too. The campaign has a goal of sending 200 bricks by the end of today (Monday, May 16th). Nintendo clearly wants to get into the brick-making business, so surely they'll appreciate the extra inventory. (Disclosure: While I do work for the Free Software Foundation and am paid partly to run the Defective by Design campaign, I really did donate, and support this campaign personally.)

Next.

Previous.