There are many translation plugins available for WordPress, and most of them deal with translations of articles. This might be of interest for others, but not for me. If you have a blog with visitors from various language background, because you are living abroad, or writing in several languages, you might feel tempted to provide visitors with a localized environment , meaning that as much as possible is translated into the native language of the visitor, without actually translating content but allowing to.
In my case I am writing mostly in English and Japanese, but sometimes (in former times) in Italian and now and then in my mother tongue, German. Visitors from my site are from all over the world, but at least for Japanese visitors I wanted to provide a localized environment. This blog describes how to get as much as possible translated of your blog, and here I mean not the actual articles, because this is the easy part and most translation plugins handle that fine, but the things around the articles (categories, tags, headers, ).
Starting point and aims
My starting point was a blog where I already had language added as extra taxonomy, and have tagged all articles with a language. But I didn t have any other translation plugin installed or used. Furthermore, I am using a child theme of the main theme in use (that is always a good idea anyway!). And of course, the theme you are using should be prepared for translation, that is that most literal strings in the theme source code are wrapped in __( ... ) or _e( ... ) calls. And by the way, if you don t have the language taxonomy, don t worry, that will come in automatically.
One more thing: The following descriptions are not for the very beginner. I expect certain fluency with WordPress, where for example themese and plugins keep their files, as well as PHP programming experience is needed for some of the steps.
With this starting point my aims were quite clear:
allow for translation of articles
translate as much as possible of the surroundings
auto-selection of language either depending on article or on browser language of visitor
by default show all articles independent of selected language
if possible, keep database clean as far as possible
Translation plugins
There is a huge bunch of translation plugins, localization plugins, or internationalization plugins out there, and it is hard to select one. I don t say that what I propose here is the optimal solution, just one that I was pointed at by a colleague, namely utilizing the xili-language plugin.
Installation and initial setup
Not much to say here, just follow the usual procedure (search, install, activate), followed by the initial setup of xili-language. If you haven t had a language taxonomy by now, you can add languages from the preference page of xili-language, first tab. After having added some languages you should have something similar to the above screen shot. Having defined your languages, you can assign a language to your articles, but for now nothing has actually changed on the blog pages.
As I already mentioned, I assume that you are using a child theme. In this case you should consult the fourth tab of the xili-language settings page, called Managing language files, where on the right you should see / set up things in a way that translations in the child theme override the ones in the main theme, see screen shot on the right. I just mention here that there is another xili plugin, xili-dictionary, that can do a lot of things for you when it comes to translation but I couldn t figure out its operation mode, so I switched back (i.e., uninstalled that plugin) and used normal .po/.mo files as described in the next section.
Adding translations po and mo files
Translations are handled in normal (at least for the Unix world) gettext format. Matthias wrote about this in this blog. In principle you have to:
create a directory languages in your child theme folder
create there .po file named local-LL.po or local-LL_DD.po, where LL and LL_DD are the same as the values in the field ISO Names in the list of defined languages (see above)
convert the .po files to .mo files using
msgfmt local-LL.po -o local-LL.mo
The contents of the po files are described in Matthias blog, and in the following when I say add a translation, then I mean: adding a stanza
msgid "some string"
msgstr "translation of some string"
to the po file, and not forgetting to recompile it to mo file.
So let us go through a list of changes I made to translate various pieces of the blog appearance:
Translation of categories
This is the easiest part, simply throw in the names of your categories into the respective local-DD_LL.po file, and be ready. In my case I used local-ja.po which besides other categories contains stanzas like:
msgid "Travel"
msgstr " "
Translation of widget titles
In most cases the widget titles are already automatically translated, if the plugin/widget author cared for it, meaning that he called the widget_title filter on the title. If this does not happen, please report this to the widget/plugin author. I have done this for example for the simple links plugin, which I use for various elements of the side-bar. The author was extremely responsive and the fix will be in the next release is already in the latest release big thanks!
Translation of tags
This is a bit a problem, as the tags appear in various places on my blog: next to the title line and the footer of each blog, as well as in the tag cloud in the side bar.
Furthermore, I want to translate tags instead of having related tag groups as provided by xili tidy tags plugin, so we have to deal with the various appearances of tags one by one:
Tags on the main page shown by the theme
This is the easier part in my case I had already a customized content.php and content-single.php in my child theme folder. If not, you need to copy the one from the parent theme and change the appearance of it to translate tags. Since this is something that depends on the specific theme, I cannot give detailed advice, but if you see something like:
(there are for sure simpler ways ) This code loops over the tags and translates them using the __ function. Note that the second parameter must be the text domain of the parent theme.
If you have done this right and the web site is still running (I recommend testing it on a test installation I had white pages many times due to php programming errors), and of course you have actual translations available and are looking at a localized version of the web site, then the list of tags as shown by your theme should be translated.
Tag cloud widget
This one is a tricky one: The tag cloud widget comes by default with WordPress, but doesn t translate the tags. I tried a few variants (e.g. creating a new widget as extension of the original tag cloud widget, and only changing the respective functions), but that didn t work out at all. I finally resorted to a trick: Reading the code of the original widget, I saw that it applies the tag-sort-filter filter on the array of tags. That allows us to hook into the tag cloud creating and translate the tags.
You have to add the following code to your child theme s functions.php:
function translate_instead_of_sort($tags)foreach((array)$tagsas$tag)$tag->name= __($tag->name,'mistylake');return$tags;
add_action('tag_cloud_sort','translate_instead_of_sort');
(again, don t forget to change the text domain in the __(.., ..) call!) There might be some more things one could do, like changing the priority to be used after the sorting, or sort directly, but I haven t played around with that. Using the above code and translating several of the tags, the tag cloud now looks like the screenshot on the right I know, it could use some tweaking. Also, now the untranslated tags are sorted all before the translated, things one probably can address with the priority of the filter.
Having done the above things, my blog page when Japanese is selected is now mostly in Japanese, with of course the exception the actual articles, which are in a variety of languages.
Open problems
There are a few things I haven t managed till now to translate, and they are mostly related to the Jetpack plugin, but not only:
translation of the calendar it is strange that although this is a standard widget of WordPress, the translation somehow does not work out there
transalation of the meta text entries (Log in, RSS feed, ) interestingly, even adding the translation of these strings did not help get them translated
translation of simple links text fields here I haven t invested by now
translation of (Jetpack) subscribe to this blog widget
I have a few ideas how to tackle this problem: With Jetpack the biggest problem seems that all the strings are translated in a different text domain. So one should be able to add some code to the functions.php to override/add translations to the jetpack text domain. But somehow it didn t work out in my case. The same goes for things that are in the WordPress core and use the translation functions without a text domain so I guess the translation function will use the main WordPress translation files/text domain.
Conclusion
The good thing of the xili-language plugin is that it does not change the actual posts (some plugins save the translations in the the post text), and is otherwise not too intrusive IMHO. Still, it falls short of allowing to translate various parts of the blog, including the widget areas.
I am not sure whether there are better plugins for this usage scenario, I would be surprised if not, but all the plugins I have seen were doing a bit too much on the article translation side and not enough on the translation of the surroundings side.
In any case, I would like to see more separation between the functionality of localization (translating the interface) and translation (translating the content). But at the moment I don t have enough impetus to write my own plugin for this.
If you have any suggestions for improvement, please let me know!
Enjoy.
Ending an era of shipping Libav as default the Debian Multimedia Team is working out the last details of switching to FFmpeg. If you would like to read more about the reasons please read the rationale behind the change on the dedicated wiki page. If you feel so be welcome to test the new ffmpeg packages or join the discussion starting here. (Warning, the thread is loooong!)
Ok, I have to admit, I sometimes do game and recently I finished Portal. Quite old (released in 2007), but still lots of fun. I started playing it about one year ago, off and on, until I recently finished the last level. Took me about 1 year of playing to finish the actual playing time of about 10h I guess you can see how much an addict I am
I have never been a gamer, and I think there are only three set of games I played for extended periods of time:
The Myst Series Fully played: Myst, Riven, Myst III Exile, and partly Uru: Ages beyond Myst, Myst IV Revelation, never played Myst V End of Ages
Puzzle games where one explores worlds that are created by writing books. I remember jotting down loads of notes and building models to solve all the problems (before the walk-through times), only to get stuck at one of the final riddles that were color based, practically impossible for me.
The Descent Series Descent, Descent II, Descent 3 These were some of the first games playable on Linux back in the old times, distributed by Linux Game Development, now long defunct. I still remember fighting with getting my joystick supported to play D3
Hard-core board gamer who I am (I prefer playing with people real games without computer), I loved the Myst series for its crazy riddles, where solving them often needs a combination of logical thinking, recognizing patterns in images and sounds, and piecing together long list of hints. This is something a normal board game cannot provide.
From the Descent series I loved the complete freedom of movement. Normal first-person shooters are just like humans running around, a bit of jumping and crouching, but Descent gives you 6D freedom which led to some people getting sick while watching me playing.
From the Civilization series I don t know what I liked particularly, but it got you involved and allowed you to play long rounds.
After these sins of youngsters, I haven t played for long long time, until a happy coincidence (of being Debian Developer) brought Steam onto my (Linux) machine together with a bunch of games I received for free. One of the games was Portal.
Portal is in the style of Myst games one can place dual portals in various places, and by entering one of the portals, one leaves through the other. Using this one has to manage to solve loads of puzzle, evade being shot, dissolved in acid, crashed to death, etc etc, with the only aim to leave the underground station.
Besides shooting these portals there are some cubes that one can carry around and use for a variety of purposes, like putting them onto buttons, using them as stairs, protecting yourself from being shot, etc. But that s already all the tools one has. Despite of this, the levels pose increasingly difficult problems, and one is surprised how strange things one can achieve with these limited abilities and no, one cannot buy new power-ups, its not WoW. Logical thinking, tactic, and a certain level of reaction suffices.
While not as philosophical as Myst, it was still a lot of fun. The only thing I am a bit unclear is, where to go from here. There are two possible successors: The logical one would be Portal 2. But I recently found a game that reminded me even more of the Myst series, combined with Portal: The Talos Principle, with stunning graphics:
And filled with riddles again, maybe not as involved as in the Myst series (I don t know by now), but still a bit more challenging than Portal s one:
Difficult decision. If you have any other suggestions, please let me know!
Dear Debian Users,
I met last night with a friend from many years ago and a number of students of cryptography. I was disappointed to see the prevalence of black hat, anti-government hackers at the event. I was hoping that civilized humanity had come to agree that using cryptography for deception, harm to others and plausible deniability is bad, m kay? When one speaks of the government as they, nobody s going to get anywhere really quick. Let s take responsibility for the upkeep of the environment in which we find ourselves, please.
Despite what I perceived as a negative focus of the presentation, it was good to meet with peers in the Seattle area. I was very pleasantly surprised to find that better than half of the attendees were not male, that many of the socioeconomic classes of the city were represented, as were those of various ethnic backgrounds. I am really quite proud of the progress of our State University, even if I m not always in agreement with the content that they re polluting our kids brains with. I guess I should roll up my sleeves and get busy, eh?
V/R,
C.J.
I have uploaded ptex2pdf to CTAN. Changes are mainly about how files are searched and extensions are treated. ptex2pdf now follows the TeX standard, that is:
first check if the passed in filename can be found with libkpathsea
if not, try the filename with .tex appended
if that also does not fail, try the filename with .ltx appended.
Recently, I've been fighting with the never ending issue of timezones. I never
thought I would have plunged into this rabbit hole, but hacking on OpenStack
and Gnocchi I felt into that trap easily is, thanks to Python.
Why you really, really, should never ever deal with timezones
To get a glimpse of the complexity of timezones, I recommend that you watch
Tom Scott's video on the subject. It's fun and it
summarizes remarkably well the nightmare that timezones are and why you should
stop thinking that you're smart.
The importance of timezones in applications
Once you've heard what Tom says, I think it gets pretty clear that a timestamp
without any timezone attached does not give any useful information. It should
be considered irrelevant and useless. Without the necessary context given by
the timezone, you cannot infer what point in time your application is really
referring to.
That means your application should never handle timestamps with no timezone
information. It should try to guess or raises an error if no timezone is
provided in any input.
Of course, you can infer that having no timezone information means UTC. This
sounds very handy, but can also be dangerous in certain applications or
language such as Python, as we'll see.
Indeed, in certain applications, converting timestamps to UTC and losing the
timezone information is a terrible idea. Imagine that a user create a recurring
event every Wednesday at 10:00 in its local timezone, say CET. If you convert
that to UTC, the event will end up being stored as every Wednesday at 09:00.
Now imagine that the CET timezone switches from UTC+01:00 to UTC+02:00: your
application will compute that the event starts at 11:00 CET every Wednesday.
Which is wrong, because as the user told you, the event starts at 10:00 CET,
whatever the definition of CET is. Not at 11:00 CET. So CET means CET, not
necessarily UTC+1.
As for endpoints like REST API, a thing I daily deal with, all timestamps
should include a timezone information. It's nearly impossible to know what
timezone the timestamps are in otherwise: UTC? Server local? User local? No way
to know.
Python design & defect
Python comes with a timestamp object named datetime.datetime. It can store
date and time precise to the microsecond, and is qualified of timezone "aware"
or "unaware", whether it embeds a timezone information or not.
To build such an object based on the current time, one can use
datetime.datetime.utcnow() to retrieve the date and time for the UTC
timezone, and datetime.datetime.now() to retrieve the date and time for the
current timezone, whatever it is.
As you can notice, none of these results contains timezone information. Indeed,
Python datetime API always returns unaware datetime objects, which is very
unfortunate. Indeed, as soon as you get one of this object, there is no way to
know what the timezone is, therefore these objects are pretty "useless" on
their own.
Armin Ronacher proposes that an application always consider that the unaware datetime objects from Python are considered as UTC.
As we just saw, that statement cannot be considered true for objects returned
by datetime.datetime.now(), so I would not advise doing so. datetime
objects with no timezone should be considered as a "bug" in the application.
Recommendations
My recommendation list comes down to:
Always use aware datetime object, i.e. with timezone information. That
makes sure you can compare them directly (aware and unaware datetime
objects are not comparable) and will return them correctly to users.
Leverage pytz to have timezone objects.
Use ISO 8601 as input and output
string format. Use datetime.datetime.isoformat() to return timestamps as string formatted
using that format, which includes the timezone information.
If you need to parse strings containing ISO 8601 formatted timestamp, you can
rely on the iso8601, which returns
timestamps with correct timezone information. This makes timestamps directly
comparable:
If you need to store those timestamps, the same rule should apply. If you rely
on MongoDB, it assumes that all the timestamp are in UTC,
so be careful when storing them you will have to normalize the timestamp to
UTC.
For MySQL, nothing is assumed, it's up to the application
to insert them in a timezone that makes sense to it. Obviously, if you have
multiple applications accessing the same database with different data sources,
this can end up being a nightmare.
PostgreSQL has a
special data type that is recommended
called timestamp with timezone, and which can store the timezone associated,
and do all the computation for you. That's the recommended way to store them
obviously. That does not mean you should not use UTC in most cases; that just
means you are sure that the timestamp are stored in UTC since it's written in
the database, and you check if any other application inserted timestamps with
different timezone.
OpenStack status
As a side note, I've improved OpenStack situation recently by changing the
oslo.utils.timeutils
module to deprecate some useless and dangerous functions. I've also added
support for returning timezone aware objects when using the
oslo_utils.timeutils.utcnow() function. It's not possible to make it a
default unfortunately for backward compatibility reason, but it's there
nevertheless, and it's advised to use it. Thanks to my colleague
Victor for the help!
Have a nice day, whatever your timezone is!
If you manage a bunch of server machines, you will undoubtedly have run into the following OpenSSH question:
The authenticity of host 'host.example.org (1.2.3.4)' can't be established.
RSA key fingerprint is 1b:9b:b8:5e:74:b1:31:19:35:48:48:ba:7d:d0:01:f5.
Are you sure you want to continue connecting (yes/no)?
If the server is a single-user machine, where you are the only person expected to login on it, answering yes once and then using the ~/.ssh/known_hosts file to record the key fingerprint will (sort-of) work and protect you against future man-in-the-middle attacks. I say sort-of, since if you want to access the server from multiple machines, you will need to sync the known_hosts file somehow. And once your organization grows larger, and you aren t the only person that needs to login, having a policy that everyone just answers yes on first connection on all their machines is bad. The risk that someone is able to successfully MITM attack you grows every time someone types yes to these prompts.
Setting up one (or more) SSH Certificate Authority (CA) to create SSH Host Certificates, and have your users trust this CA, will allow you and your users to automatically trust the fingerprint of the host through the indirection of the SSH Host CA. I was surprised (but probably shouldn t have been) to find that deploying this is straightforward. Even setting this up with hardware-backed keys, stored on a YubiKey NEO, is easy. Below I will explain how to set this up for a hypothethical organization where two persons (sysadmins) are responsible for installing and configuring machines.
I m going to assume that you already have a couple of hosts up and running and that they run the OpenSSH daemon, so they have a /etc/ssh/ssh_host_rsa_key* public/private keypair, and that you have one YubiKey NEO with the PIV applet and that the NEO is in CCID mode. I don t believe it matters, but I m running a combination of Debian and Ubuntu machines. The Yubico PIV tool is used to configure the YubiKey NEO, and I will be using OpenSC s PKCS#11 library to connect OpenSSH with the YubiKey NEO. Let s install some tools:
Every person responsible for signing SSH Host Certificates in your organization needs a YubiKey NEO. For my example, there will only be two persons, but the number could be larger. Each one of them will have to go through the following process.
The first step is to prepare the NEO. First mode switch it to CCID using some device configuration tool, like yubikey-personalization.
ykpersonalize -m1
Then prepare the PIV applet in the YubiKey NEO. This is covered by the YubiKey NEO PIV Introduction but I ll reproduce the commands below. Do this on a disconnected machine, saving all files generated on one or more secure media and store that in a safe.
Then generate a RSA private key for the SSH Host CA, and generate a dummy X.509 certificate for that key. The only use for the X.509 certificate is to make PIV/PKCS#11 happy they want to be able to extract the public-key from the smartcard, and do that through the X.509 certificate.
You import the key and certificate to the PIV applet as follows:
yubico-piv-tool -k $key -a import-key -s 9c < ssh-$user-ca-key.pem
yubico-piv-tool -k $key -a import-certificate -s 9c < ssh-$user-ca-crt.pem
You now have a SSH Host CA ready to go! The first thing you want to do is to extract the public-key for the CA, and you use OpenSSH's ssh-keygen for this, specifying OpenSC's PKCS#11 module.
The reason is that scdaemon exclusively locks the smartcard, so no other application can access it. You need to kill scdaemon, which can be done as follows:
Each sysadmin needs to go through this process, and each user needs to add one line for each sysadmin. While you could put the same key/certificate on multiple YubiKey NEOs, to allow users to only have to put one line into their file, dealing with revocation becomes a bit more complicated if you do that. If you have multiple CA keys in use at the same time, you can roll over to new CA keys without disturbing production. Users may also have different policies for different machines, so that not all sysadmins have the power to create host keys for all machines in your organization.
The CA setup is now complete, however it isn't doing anything on its own. We need to sign some host keys using the CA, and to configure the hosts' sshd to use them. What you could do is something like this, for every host host.example.com that you want to create keys for:
The ssh-keygen command will use OpenSC's PKCS#11 library to talk to the PIV applet on the NEO, and it will prompt you for the PIN. Enter the PIN that you set above. The output of the command would be something like this:
Enter PIN for 'PIV_II (PIV Card Holder pin)':
Signed host key ssh_host_rsa_key-cert.pub: id "host.example.com" serial 0 for host.example.com valid from 2015-06-16T13:39:00 to 2016-06-14T13:40:58
The host now has a SSH Host Certificate installed. To use it, you must make sure that /etc/ssh/sshd_config has the following line:
You need to restart sshd to apply the configuration change. If you now try to connect to the host, you will likely still use the known_hosts fingerprint approach. So remove the fingerprint from your machine:
ssh-keygen -R $h
Now if you attempt to ssh to the host, and using the -v parameter to ssh, you will see the following:
debug1: Server host key: RSA-CERT 1b:9b:b8:5e:74:b1:31:19:35:48:48:ba:7d:d0:01:f5
debug1: Host 'host.example.com' is known and matches the RSA-CERT host certificate.
Success!
One aspect that may warrant further discussion is the host keys. Here I only created host certificates for the hosts' RSA key. You could create host certificate for the DSA, ECDSA and Ed25519 keys as well. The reason I did not do that was that in this organization, we all used GnuPG's gpg-agent/scdaemon with YubiKey NEO's OpenPGP Card Applet with RSA keys for user authentication. So only the host RSA key is relevant.
Revocation of a YubiKey NEO key is implemented by asking users to drop the corresponding line for one of the sysadmins, and regenerate the host certificate for the hosts that the sysadmin had created host certificates for. This is one reason users should have at least two CAs for your organization that they trust for signing host certificates, so they can migrate away from one of them to the other without interrupting operations.
Almost every new autopkgtest release brings some small improvements, but 3.14 got some reboot related changes worth pointing out.
First of all, I simplified and unified the implementation of rebooting across all runners that support it (ssh, lxc, and qemu). If you use a custom setup script for adt-virt-ssh you might have to update it: Previously, the setup script needed to respond to a reboot function to trigger a reboot, wait for the testbed to go down, and come back up. This got split into issuing the actual reboot system command directly by adt-run itself on the testbed, and the wait for go down and back up part. The latter now has a sensible default implementation: it simply waits for the ssh port to become unavailable, and then waits for ssh to respond again; most testbeds should be fine with that. You only need to provide the new wait-reboot function in your ssh setup script if you need to do anything else (such as re-enabling ssh after reboot). Please consult the manpage and the updated SKELETON for details.
The ssh runner gained a new --reboot option to indicate that the remote testbed can be rebooted. This will automatically declare the reboot testbed capability and thus you can now run rebooting tests without having to use a setup script. This is very useful for running tests on real iron.
Finally, in testbeds which support rebooting your tests will now find a new /tmp/autopkgtest-reboot-prepare command. Like /tmp/autopkgtest-reboot it takes an arbitrary marker , saves the current state, restores it after reboot and re-starts your test with the marker; however, it will not trigger the actual reboot but expects the test to do that. This is useful if you want to test a piece of software which does a reboot as part of its operation, such as a system-image upgrade. Another use case is testing kernel crashes, kexec or another nonstandard way of rebooting the testbed. README.package-tests shows an example how this looks like.
3.14 is now available in Debian unstable and Ubuntu wily. As usual, for older releases you can just grab the deb and install it, it works on all supported Debian and Ubuntu releases.
Enjoy, and let me know if you run into troubles or have questions!
Joachim Breitner uploaded ghc/7.8.4-9 which uses a hash of the command line instead of the pid when calculating a random directory name.
Lunar uploaded mozilla-devscripts/0.42 which now properly sets the timezone. Patch by Reiner Herrmann.
Dmitry Shachnev uploaded python-qt4/4.11.4+dfsg-1 which now outputs the list of imported module in a stable order. The issue has been fixed upstream. Original patch by Reiner Herrmann.
Norbert Preining uploaded tex-common/6.00 which tries to ensure reproducible builds in files generated by dh_installtex.
Daniel Kahn Gillmor's report on help2man started a discussion with Brendan O'Dea and Ximin Luo about standardizing a common environment variable that would provide a replacement for an embedded build date. After various proposals and research by Ximin about date handling in several programming languages, the best solution seems to define SOURCE_DATE_EPOCH with a value suitable for gmtime(3).
Martin Borgert wondered if Sphinx could be changed in a way that would avoid having to tweak debian/rules in packages using it to produce HTML documentation.
#788238 on kfreebsd-10 by Steven Chamberlain: fix mtimes in source tarball.
#788246 on pyepr by Juan Picca: set documentation date for Sphinx.
#788247 on grapefruit by Juan Picca: set documentation date for Sphinx.
#788249 on pastescript by Juan Picca: set documentation date for Sphinx.
#788275 on geoip-database by Reiner Herrmann: sets the embedded timestamp to the date from the latest changelog entry and normalizes the used timezone to UTC..
#788336 on irrlicht by akira: removes $datetime from the file footer.html. Now fixed upstream..
#788393 on brian by Juan Picca: set documentation date for Sphinx.
#788402 on linop by Juan Picca: set documentation date for Sphinx.
#788403 on pyevolve by Juan Picca: set documentation date for Sphinx.
#788406 on argvalidate by Juan Picca: set documentation date for Sphinx.
#788467 on astroquery by Juan Picca: set documentation date for Sphinx.
#788476 on mpi4py by Juan Picca: set documentation date for Sphinx.
#788599 on wtforms by Juan Picca: set documentation date for Sphinx.
#788618 on rumor by Holger Levsen: set TZ to UTC when building the documentation.
#788722 on thuban by Reiner Herrmann: set the date embedded in man pages to the changelog date.
reproducible.debian.net
A new variation to better notice when a package captures the environment has been introduced. (h01ger)
The test on Debian packages works by building the package twice in a short time frame. But sometimes, a mirror push can happen between the first and the second build, resulting in a package built in a different build environment. This situation is now properly detected and will run a third build automatically. (h01ger)
OpenWrt, the distribution specialized in embedded devices like small routers, is now being tested for reproducibility. The situation looks very good for their packages which seems mostly affected by timestamps in the tarball. System images will require more work on debbindiff to be better understood. (h01ger)
debbindiff development
Reiner Herrmann added support for decompling Java .class file and .ipk package files (used by OpenWrt). This is now available in version 22 released on 2015-06-14.
Documentation update
Stephen Kitt
documented
the new --insert-timestamp available since
binutils-mingw-w64 version 6.2
available to insert a ready-made date in PE binaries built with
mingw-w64.
Package reviews
195 obsolete
reviews have
been removed, 65 added and 126 updated this week.
New identified issues:
Misc.
Holger Levsen reported an issue with the locales-all package that Provides: locales but is actually missing some of the files provided by locales.
Coreboot upstream has been quick to react after the
announcement
of the tests set up the week
before. Patrick Georgi has fixed all issues in a couple of days and all
Coreboot images are now reproducible (without a payload).
SeaBIOS is one of the most frequently used payload
on PC hardware and can now be made
reproducible
too.
Paul Kocialkowski wrote to the mailing
list
asking for help on getting U-Boot tested for
reproducibility.
Lunar had a chat with maintainers of Open Build
Service to better
understand the difference between their system and what we are doing for
Debian.
It is a bit work to figure out the ownership structure of companies
in Norway. The information is publicly available, but one need to
recursively look up ownership for all owners to figure out the complete
ownership graph of a given set of companies. To save me the work in
the future, I wrote a script to do this automatically, outputting the
ownership structure using the Graphviz/dotty format. The data source
is web scraping from Proff, because
I failed to find a useful source directly from the official keepers of
the ownership data, Br nn ysundsregistrene.
To get an ownership graph for a set of companies, fetch
the code from git and run it using the organisation number. I'm
using the Norwegian newspaper Dagbladet as an example here, as its
ownership structure is very simple:
% time ./bin/eierskap-dotty 958033540 > dagbladet.dot
real    0m2.841s
user    0m0.184s
sys     0m0.036s
%
The script accept several organisation numbers on the command line,
allowing a cluster of companies to be graphed in the same image. The
resulting dot file for the example above look like this. The edges
are labeled with the ownership percentage, and the nodes uses the
organisation number as their name and the name as the label:
To view the ownership graph, run "dotty dagbladet.dot" or
convert it to a PNG using "dot -T png dagbladet.dot >
dagbladet.png". The result can be seen below:
Note that I suspect the "Aller Holding A/S" entry to be incorrect
data in the official ownership register, as that name is not
registered in the official company register for Norway. The ownership
register is sensitive to typos and there seem to be no strict checking
of the ownership links.
Let me know if you improve the script or find better data sources.
The code is licensed according to GPL 2 or newer.
Update 2015-06-15: Since the initial post I've been told that
"Aller
Holding A/S" is a Danish company, which explain why it did not
have a Norwegian organisation number. I've also been told that there
is a web
services API available from Br nn ysundsregistrene, for those
willing to accept the terms or pay the price.
It s no secret that OpenStack is becoming the de-facto standard for private cloud and a way for telecom operators to differentiate against big names such as Amazon or Google.
OpenStack has already been adopted in some specific projects, but the wide adoption in enterprises is starting now, mostly because people simply find it difficult to understand. VMWare is still something to compare to, but OpenStack and cloud is different. While cloud implies virtualization, virtualization is not cloud.
Cloud is a huge shift in your organization and will change forever your way of working in the IT projects, improving your IT dramatically and cutting down costs.
In order to get the best of OpenStack, you need to understand deeply how cloud works. Moreover, you need to understand the whole picture beyond the software itself to provide new levels of agility, flexibility, and cost savings in your business.
Giuseppe Paterno , leading European consultant and recently awarded by HP, wrote OpenStack Explained to guide you through the OpenStack technology and reveal his secret ingredient to have a successful project. You can download the ebook for a small donation to provide emergency and reconstruction aid for Nepal. Your donation is certified by ZEWO , the Swiss federal agency that ensures that funds go to a real charity project.
but hurry up, the ebook is in a limited edition and it ends on July 2015.
Donate & Download here: https://life-changer.helvetas.ch/openstack
As with all the previous versions, I have prepared a mega update for the Kobo firmware 3.16.0, including all my favorite patches and features. Please see details for 3.15.0, 3.13.1 and 3.12.1. As before, the following addons are included: Kobo Start Menu, koreader, coolreader, pbchess, ssh access, custom dictionaries, plus as a new treat, some side-loaded fonts. What I dropped this time is most of the kobohack part, as the libraries seem to get outdated. But I included the dropbear ssh server from the kobohack package.
So what are all these items:
firmware (thread): the basic software of the device, shipped by Kobo company
Kobo Start Menu (V07, update 4 thread): an menu that pops up before the reading software (nickel) starts, which allows to start alternative readers (like koreader) etc.
KOreader (koreader-nightly-20150608, thread): an alternative document reader that supports epub, azw, pdf, djvu and many more
pbchess and CoolReader (2015.5, thread): a chess program and another alternative reader, bundled together with several other games
ssh access (old post: makes a full computer from your device by allowing you to log into it via ssh
custom dictionaries (thread): in particular Japanese-English
side-loaded fonts: GentiumBasic and GentiumBookBasic, Verdana, DroidSerif, and Charter-eInk
Please see this post for details.
Here is the combined Kobo-3.16.0-combined/KoboRoot.tgz
Update procedure
First install the normal firmware as obtained from above. Then, install the KoboRoot.tgz from above.
WARNINGS
Here a a few things you need to do after you have installed the mega update:
ssh passwords and telnet disabling needs to be done! This is an important step, please see this old post and follow the steps from step 9.
The combined KoboRoot.tgz is provided without warranty. If you need to reset your device, don t blame me!
Some people are very bad at responding to e-mails. Or they don t check
their mailbox as often as I do, who knows. Anyway, sometimes I want to
ping somebody about an e-mail that I sent some time ago. Till now, I
did it by going through a list of my sent e-mails and resending
messages that were unreplied. However, that was somewhat inefficient.
As a solution, I coded a post-new hook for
notmuch that tags all unreplied
messages. The implementation is rather short and straightforward (see
GitHub repo). It marks
all replied messages with response and everything else with
noresponse. The precise definition of replied message is: a
message whose ID is mentioned in at least one In-Reply-To header in
your mailbox.
To solve my initial problem, I also tag my sent, but unreplied
messages with noack so that I can easily obtain the list of people
to ping eventually. I also have the backlog tag which groups
e-mails sent to me and which I haven t replied yet.
Feel free to use it if you find it useful.
I have previously written about the gitlab CI runners that use docker. Yesterday I made some changes to procps and pushed them to gitlab which would then start the CI. This morning I checked and it said build failed ok, so that s not terribly unusual. The output from the runner was:
gitlab-ci-multi-runner 0.3.3 (dbaf96f)
Using Docker executor with image csmall/testdebian ...
Pulling docker image csmall/testdebian ...
Build failed with Error: image csmall/testdebian: not found
Hmm, I know I have that image, it just must be the runner so, let s see what images I have:
$ docker images
REPOSITORY TAG IMAGE ID CREATED VIRTUAL SIZE
Now, I know I have images, I had about 10 or so of them, where did they go? I even looked in the /var/lib/docker directories and can see the json configs, what have you done with my images docker?
Storage Drivers
The first hint I got from stackexchange where someone lost their AUFS images and needed to load the aufs kernel module. Now I know there are two places or methods where docker stores its images. They are called aufs and devicemapper. There is some debate around which one is better and to be honest with what I do I don t much care, I just want it to work.
The version of kernel is significant. It seems the default storage container was AUFS and this requires the aufs.ko kernel module. Linux 4.0 (the version shipped with Debian) does NOT have that module, or at least I couldn t find it.
For new images, this isn t a problem. Docker will just create the new images using devicemapper and everyone is happy. The problem is where you have old aufs images, like me. I want those images.
Rescue the Images
I m not sure if this is the best or most correct way of getting your images, but for me it worked. I got the idea basically from someone who wanted to switch from aufs to devicemapper images for other reasons.
You first need to reboot and select at the grub prompt a 3.x kernel that has aufs support. Then when the system comes up, you should see all your images, like this:
$ docker images
REPOSITORY TAG IMAGE ID CREATED VIRTUAL SIZE
csmall/testdebian latest 6979033105a4 5 weeks ago 369.4 MB
gcc5.1 b063030b23b8 5 weeks ago 1.225 GB
gcc 5.1.0 b063030b23b8 5 weeks ago 1.225 GB
gcc latest b063030b23b8 5 weeks ago 1.225 GB
ruby 2.1 236bf35223e7 6 weeks ago 779.8 MB
ruby 2.1.6 236bf35223e7 6 weeks ago 779.8 MB
debian jessie 41b730702607 6 weeks ago 125.1 MB
debian latest 41b730702607 6 weeks ago 125.1 MB
debian 8 41b730702607 6 weeks ago 125.1 MB
debian 8.0 41b730702607 6 weeks ago 125.1 MB
busybox buildroot-2014.02 8c2e06607696 8 weeks ago 2.433 MB
busybox latest 8c2e06607696 8 weeks ago 2.433 MB
What a relief to see this! Work out what images you need to transfer over. In my case it was just the csmall/testdebian one. You need to save it to a tar file.
$ docker save csmall/testdebian > csmall-testdebian.tar.gz
Once you have all your images you want, reboot back to your 4.x kernel. You then need to load each image back into docker.
$ docker load csmall-testdebian.tar.gz
and then test to see its there
$ docker images
REPOSITORY TAG IMAGE ID CREATED VIRTUAL SIZE
csmall/testdebian latest 6979033105a4 5 weeks ago 368.3 MB
The size of my image was slightly different. I m not too sure why this is the case but assume it is to do with the storage types. My CI builds now run, they re failing because my test program is trying to link with the library (it shouldn t be) but at least its not a docker problem.
A new release, now at version 0.1.3, of pkgKitten arrived on CRAN this morning.
The main change is (optional) support of the excellent whoami package by Gabor which allows us to fill in the Author: and Maintainer: fields of the DESCRIPTION file with automatically discovered values. This is however only a Suggests: and not a Depends: to not force the added dependencies on everywhere. We also alter the default values of Title: and Description: so that they actually pass the current level of tests enforced by R CMD check --as-cran.
Changes in version 0.1.3 (2015-06-12)
The fields Title: and Description: in the file DESCRIPTION file are now updated such that they actually pass R CMD check on current versions of R.
If installed, the whoami package (version 1.1.0 or later) is now used to discover the username and email in the DESCRIPTION file.
For reasons that fail my, my internal SATA DVD drive is very seldom seen by the kernel at startup. My guess is that it takes very long to start, and the kernel doesn't wait that long before deciding that it had all SCSI devices, so it misses it. It's actually very annoying, since you can't use the drive at all. After digging around, I finally stumbled on the rescan-scsi-bus tool from the scsitools package. Running (as root, of course)
~ rescan-scsi-bus -w -l
(sometimes two or three times) is enough to get the device back up, with the /dev/dvd udev symlink.Hope this'll help !
I know very little about hardware.
I think I have a good understanding on many aspects of what happens inside a computer, but my knowledge is clearly firmer on what happens once an operating system is already running. And even then, my understanding of the lower parts of reality is shaky at most At least according to my self-evaluation, of course, comparing to people I'm honored to call "my peers".
During the last ~18 months, my knowledge of this part of reality, while still far from complete, has increased quite a bit Maybe mostly showing that I'm basically very cheap: As I have come across very cheap (or even free for me!) hardware, I have tried to understand and shape what happens in levels below those where I dwell.
I have been meaning to do a writeup on the MIPS Creator CI20, which was shipped to me for free (thanks++!) by Imagination Technologies; I still want to get more familiar with the board and have better knowledge before reporting on it. Just as a small advance, as this has been keeping me somewhat busy: I got this board after their offer to Debian Developers, and prompted because I'll be teaching some modules on the Embedded Linux diploma course dictated by Facultad de Ingenier a, UNAM Again, I'll blog about that later.
My post today follows Riku's, titled Dystopia of things, where he very clearly finds holes in the Internet of Things offering of one specific product and one specific company, but allows for generalizations on what we will surely see as the model. Riku says:
Today, the GPL sources for hub are available - at least the kernel and a patch for busybox. The proper GPL release is still only through written offer. The sources appeared online April this year while Hub has been sold for two years already. Even if I ordered the GPL CD, it's unlikely I could build a modified system with it - too many proprietary bits. The whole GPL was invented by someone who couldn't make a printer do what he wanted. The dystopian today where I have to rewrite the whole stack running on a Linux-based system if I'm not happy what's running there as provided by OEM.
This is not exactly the situation on the boards/products (it's a disservice to call the cute CuBox-i just a board!) I mention I'm using, but it's neither too far. Being used to the easy x86 world, I am used to bitching on specific hardware that does not get promptly recognized by the Linux kernel But even with the extra work UEFI+SecureBoot introduces, getting the kernel to boot is something we just take for granted. In the MIPS and ARM worlds, this is not so much of a given; I'm still treating the whole SPL and DeviceTree world as a black box, but that's where a lot of the work happens.
The boards I am working on try to make a point they are Open Hardware. The CI20 is quite impressive in this regard, as not only it has a much more complete set of on-board peripherials than any other, but a wealth of schematics, datasheets and specifications for the different parts of its components. And, of course, the mere availability of the MIPSfpga program to universities worldwide is noteworthy Completely outside of my skillset, but looks most interesting.
However... Despite being so much almost-Free-with-a-capital-F, all those boards fail our definitions of freedom in several ways. And yes, they lead us to a situation similar to what Riku describes, to what Stallman feared... To a situation not really better to where we stand on openly closed-source, commodity x86 hardware: Relying on binary blobs and on non-free portions of code to just use our hardware, or at least to use many of the features that would be available to us otherwise.
As an example, both the CI20 and the CuBox-i vendors provide system images able to boot what they describe as a Debian 7 system, based on a 3.0 Linux kernel (which Debian never used; IIRC the CuBox-i site said it was derived from a known-good Android kernel)... Only that it's an image resulting of somebody else installing and configuring it. Why should we trust their image to be sane? Yes, the resulting installation is quite impressive (i.e. the CI20's 3D demos are quite impressive for a system that feels otherwise sluggish, and out of my ARM experience, I'd wager it feels sluggish mostly because of a slow SSD)...
I have managed to do clean Debian installs on most of my ARM machines (the CuBox-i as described in my previous blog post; this post from Elena of Valhalla'' prompted me into trying the already well documented way of running the official Debian Installer, which worked like a charm and gave me a very nice and responsive Debian 8 install Modulo yes, the Banana's non-free video interface, which AFAICT uses the non-free Mail binary driver... And which I haven't had the time to play with yet. Of course, my CuBox is in a similar situation, where it works like a charm as a personal server, but is completely worthless as a set-top box.
So, with those beautiful, small, cheap SoC systems, we are close to where we stood twenty years ago with x86 Linux: Good support for a small set of peripherials, but a far cry from having a functional system with exclusively free software. ,
Still... Playing with these boards has taught me a lot, and has clearly taught me I'm still standing on the first steps of the n00b level. I have a lot to learn to be able to responsibly teach my part of the diploma course, and I'm very thankful for the differences in hardware (and, of course, for the hardware manufacturers, specially for the MIPS Creator CI20 and the Lemaker Banana Pi for giving me boards to work on!)
I shall keep posting on this topic.
I've now had an "Internet of Things" device for about a year. It is Logitech Harmony HUB, an universal remote controller. It comes with a traditional remote, but the interesting part is that it allows me to use my smartphone/tablet as remote over WiFi. With the android app it provides a rather nice use experience, yet I can see the inevitable end in anger. Bare minimum GPL respectToday, the GPL sources for hub are available - at least the kernel and a patch for busybox. The proper GPL release is still only through written offer. The sources appeared online April this year while Hub has been sold for two years already. Even if I ordered the GPL CD, it's unlikely I could build a modified system with it - too many proprietary bits. The whole GPL was invented by someone who couldn't make a printer do what he wanted. The dystopian today where I have to rewrite the whole stack running on a Linux-based system if I'm not happy what's running there as provided by OEM.App onlyThe smartphone app is mandatory. The app is used to set up the hub. There is no HTML5 interface or any other way to control to the hub - just the bundled remote and phone apps. Fully proprietary apps, with limited customization options. And if app store update removes a feature you have used.. well you can't get it from anywhere anymore. The dystopian today where "Internet of Things" is actually "Smartphone App of Things".Locked APIMaybe instead of modifying the official app you could write your own UI? Like one screen with only the buttons you ever use when watching TV? There *is* an API with delightful headline "Better home experiences, together". However, not together with me, the owner of the harmony hub. The official API is locked to selected partners. And the API is not to control the hub - it's to let the hub connect to other IoT devices. Of course, for talented people, locked api is usually just undocumented api. People have reverse engineered how the app talks to the hub over wifi. Curiously it is actually Jabber based with some twists like logging credentials through Logitech servers. The dystopian today where I can't write programs to remotely control the internet connected thing I own without reverse engineering protocols.Central ServerDid someone say Logitech servers? Ah yes, all configuring of the remote happens via myharmony servers, where the database of remote controllers lives. There is some irony in calling the service *my* harmony when it's clearly theirs. The communication with cloud servers leaks at minimum back to Logitech what hardware I control with my hub. At the worst, it will become an avenue of exploits. And how long will Logitech manage these servers? The moment they are gone, harmony hub becomes a semi-brick. It will still work, but I can't change any configuration anymore. The dystopian future where the Internet of Thing will stop working *when* cloud servers get sunsetWhat nowThis is not just the Harmony hub - this is a pattern that many IoT products follow - Linux based gadget, smartphone app, cloud services, monetized apis. After the gadget is bought, the vendor has little incentive to provide any updates. After all, the next chance I'll carry them money is when the current gadget gets obsolete. I can see two ways out. The easy way is to get IoT gadgets as monthly paid service. Now the gadget vendor has the right incentive - instead of trying to convince me to buy their next gadget, their incentive is to keep me happily paying the monthly bill. The polar opposite is to start making open competing IoT's, and market to people the advantage of being yourself in control. I can see markets for both options. But half-way between is just pure dystopy.
The recent AWS introduction of the Elastic File System gives you an automatic grow-and-shrink capability as an NFS mount, an exciting option that takes away the previous overhead in creating shared block file systems for EC2 instances.
However it should be noted that the same auto-management of capacity is not true in the EC2 instance s Elastic Block Store (EBS) block storage disks; sizing (and resizing) is left to the customer. With current 2015 EBS, one cannot simply increase the size of an EBS Volume as the storage becomes full; (as at June 2015) an EBS volume, once created, has fixed size. For many applications, that lack of resize function on its local EBS disks is not a problem; many server instances come into existence for a brief period, process some data and then get Terminated, so long term managment is not needed.
However for a long term data store on an instance (instead of S3, which I would recommend looking closely at from a durability and pricing fit), and where I want to harness the capacity to grow (or shrink) disk for my data, then I will need to leverage some slightly more advanced disk management. And just to make life interesting, I wish to do all this while the data is live and in-use, if possible.
Enter: Logical Volume Management, or LVM. It s been around for a long, long time: LVM 2 made a debut around 2002-2003 (2.00.09 was Mar 2004) and LVM 1 was many years before that so it s pretty mature now. It s a powerful layer that sits between your raw storage block devices (as seen by the operating system), and the partitions and file systems you would normally put on them.
In this post, I ll walk through the process of getting set up with LVM on Debian in the AWS EC2 environment, and how you d do some basic maintenance to add and remove (where possible) storage with minimal interruption.
Getting Started
First a little prep work for a new Debian instance with LVM.
As I d like to give the instance its own ability to manage its storage, I ll want to provision an IAM Role for EC2 Instances for this host. In the AWS console, visit IAM, Roles, and I ll create a new Role I ll name EC2-MyServer (or similar), and at this point I ll skip giving it any actual privileges (later we ll update this). As at this date, we can only associate an instance role/profile at instance launch time.
Now I launch a base image Debian EC2 instance launched with this IAM Role/Profile; the root file system is an EBS Volume. I am going to put data that I ll be managing on a separate disk from the root file system.
First, I need to get the LVM utilities installed. It s a simple package to install: the lvm2 package. From my EC2 instance I need to get root privileges (sudo -i) and run:
apt update && apt install lvm2
After a few moments, the package is installed. I ll choose a location that I want my data to live in, such as /opt/. I want a separate disk for this task for a number of reasons:
Root EBS volumes cannot currently be encrypted using Amazon s Encrypted EBS Volumes at this point in time. If I want to also use AWS encryption option, it ll have to be on a non-root disk. Note that instance-size restrictions also exist for EBS Encrypted Volumes.
It s possibly not worth make a snapshot of the Operating System at the same time as the user content data I am saving. The OS install (except the /etc/ folder) can almost entirely be recreated from a fresh install. so why snapshot that as well (unless that s your strategy for preserving /etc, /home, etc).
The type of EBS volume that you require may be different for different data: today (Apr 2015) there is a choice of Magnetic, General Purpose 2 (GP2) SSD, and Provisioned IO/s (PIOPS) SSD, each with different costs; and depending on our volume, we may want to select one for our root volume (operating system), and something else for our data storage.
I may want to use EBS snapshots to clone the disk to another host, without the base OS bundled in with the data I am cloning.
I will create this extra volume in the AWS console and present it to this host. I ll start by using a web browser (we ll use CLI later) with the EC2 console.
The first piece of information we need to know is where my EC2 instance is running. Specifically, the AWS Region and Availability Zone (AZ). EBS Volumes only exist within the one designated AZ. If I accidentally make the volume(s) in the wrong AZ, then I won t be able to connect them to my instance. It s not a huge issue, as I would just delete the volume and try again.
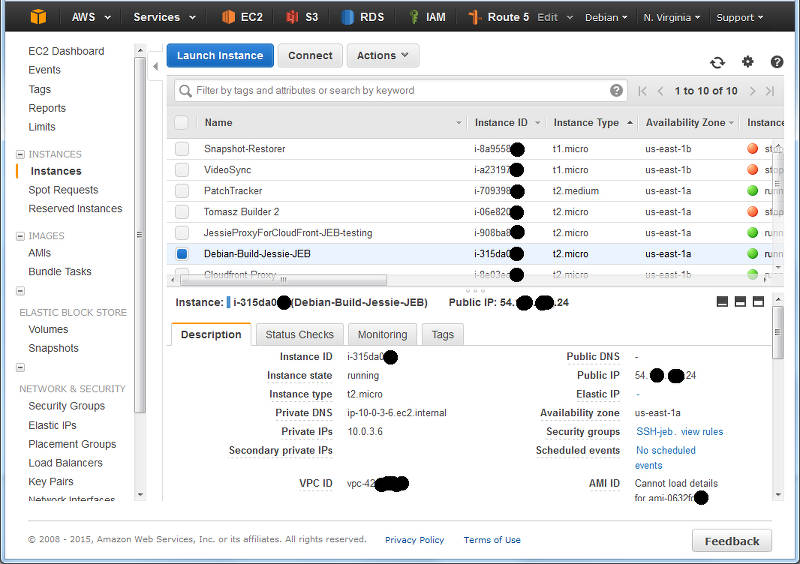
I navigate to the Instances panel of the EC2 Console, and find my instance in the list:
A (redacted) list of instance from the EC2 console.
Here I can see I have located an instance and it s running in US-East-1A: that s AZ A in Region US-East-1. I can also grab this with a wget from my running Debian instance by asking the MetaData server:
The returned text is simply: us-east-1a .
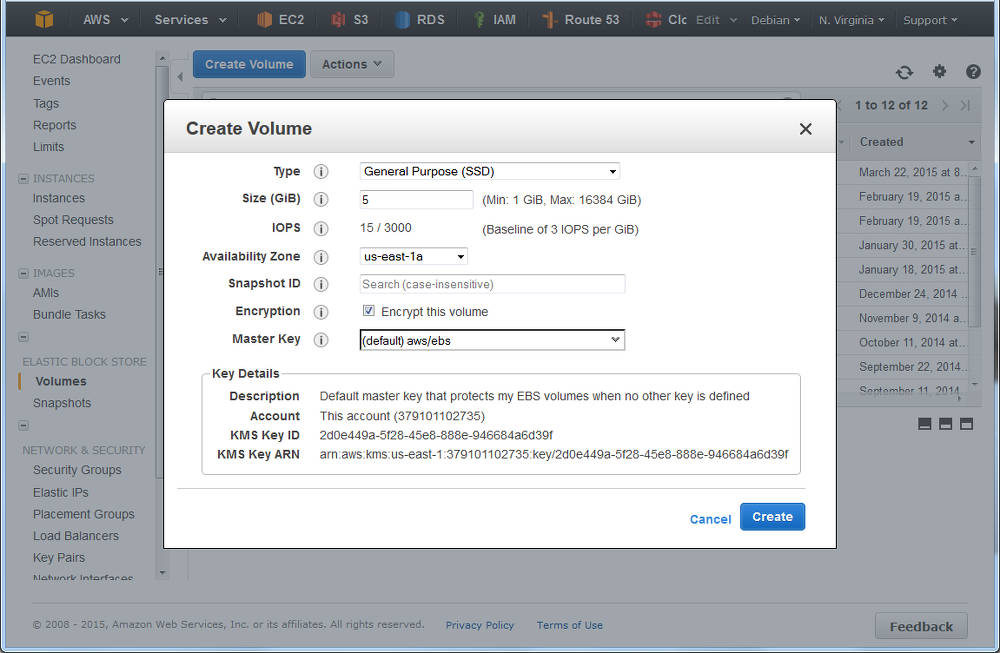
Time to navigate to Elastic Block Store , choose Volumes and click Create :
Creating a volume in AWS EC2: ensure the AZ is the same as your instance
You ll see I selected that I wanted AWS to encrypt this and as noted above, at this time that doesn t include the t2 family. However, you have an option of using encryption with LVM where the customer looks after the encryption key see LUKS.
What s nice is that I can do both have AWS Encrypted Volumes, and then use encryption on top of this, but I have to manage my own keys with LUKS, and should I lose them, then I can keep all the cyphertext!
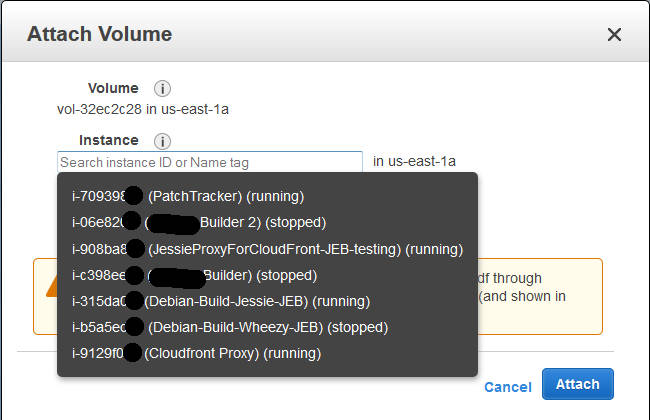
I deselected this for my example (with a t2.micro), and continue; I could see the new volume in the list as creating , and then shortly afterwards as available . Time to attach it: select the disk, and either right-click and choose Attach , or from the menu at the top of the list, chose Actions -> Attach (both do the same thing).
Attaching a volume to an instance: you ll be prompted for the compatible instances in the same AZ.
At this point in time your EC2 instance will now notice a new disk; you can confirm this with dmesg tail , and you ll see something like:
[1994151.231815] xvdg: unknown partition table
(Note the time-stamp in square brackets will be different).
Previously at this juncture you would format the entire disk with your favourite file system, mount it in the desired location, and be done. But we re adding in LVM here between this raw device, and the filesystem we are yet to make .
Marking the block device for LVM
Our first operation with LVM is to put a marker on the volume to indicate it s being use for LVM so that when we scan the block device, we know what it s for. It s a really simple command:
pvcreate /dev/xvdg
The device name above (/dev/xvdg) should correspond to the one we saw from the dmesg output above. The output of the above is rather straight forward:
Physical volume "/dev/xvdg" successfully created
Checking our EBS Volume
We can check on the EBS volume which LVM sees as a Physical Volume using the pvs command.
Here we see the entire disk is currently unused.
Creating our First Volume Group
Next step, we need to make an initial LVM Volume Group which will use our Physical volume (xvdg). The Volume Group will then contain one (or more) Logical Volumes that we ll format and use. Again, a simple command to create a volume group by giving it its first physical device that it will use:
# vgcreate  OptVG /dev/xvdg
  Volume group "OptVG" successfully created
And likewise we can check our set of Volume Groups with vgs :
The Attribute flags here indicate this is writable, resizable, and allocating extents in normal mode. Lets proceed to make our (first) Logical Volume in this Volume Group:
# lvcreate -n OptLV -L 4.9G OptVG
  Rounding up size to full physical extent 4.90 GiB
  Logical volume "OptLV" created
You ll note that I have created our Logical Volume as almost the same size as the entire Volume Group (which is currently one disk) but I left some space unused: the reason for this comes down to keeping some space available for any jobs that LVM may want to use on the disk and this will be used later when we want to move data between raw disk devices.
If I wanted to use LVM for Snapshots, then I d want to leave more space free (unallocated) again.
We can check on our Logical Volume:
The attribytes indicating that the Logical Volume is writeable, is allocating its data to the disk in inherit mode (ie, as the Volume Group is doing), and that it is active. At this stage you may also discover we have a device /dev/OptVG/OptLV, and this is what we re going to format and mount. But before we do, we should review what file system we ll use.
Filesystems
Popular Linux file systems
Name
Shrink
Grow
Journal
Max File Sz
Max Vol Sz
btrfs
Y
Y
N
16 EB
16 EB
ext3
Y off-line
Y
Y
2 TB
32 TB
ext4
Y off-line
Y
Y
16 TB
1 EB
xfs
N
Y
Y
8 EB
8 EB
zfs*
N
Y
Y
16 EB
256 ZB
For more details see Wikipedia comparison. Note that ZFS requires 3rd party kernel module of FUSE layer, so I ll discount that here. BTRFS only went stable with Linux kernel 3.10, so with Debian Jessie that s a possibility; but for tried and trusted, I ll use ext4.
The selection of ext4 also means that I ll only be able to shrink this file system off-line (unmounted).
I ll make the filesystem:
# mkfs.ext4 /dev/OptVG/OptLV
mke2fs 1.42.12 (29-Aug-2014)
Creating filesystem with 1285120 4k blocks and 321280 inodes
Filesystem UUID: 4f831d17-2b80-495f-8113-580bd74389dd
Superblock backups stored on blocks:
  32768, 98304, 163840, 229376, 294912, 819200, 884736
Allocating group tables: done
Writing inode tables: done
Creating journal (32768 blocks): done
Writing superblocks and filesystem accounting information: done
And now mount this volume and check it out:
# mount /dev/OptVG/OptLV /opt/
# df -HT /opt
Filesystem  Type  Size  Used Avail Use% Mounted on
/dev/mapper/OptVG-OptLV ext4  5.1G  11M  4.8G  1% /opt
Lastly, we want this to be mounted next time we reboot, so edit /etc/fstab and add the line:
/dev/OptVG/OptLV /opt ext4 noatime,nodiratime 0 0
With this in place, we can now start using this disk. I selected here not to update the filesystem every time I access a file or folder updates get logged as normal but access time is just ignored.
Time to expand
After some time, our 5 GB /opt/ disk is rather full, and we need to make it bigger, but we wish to do so without any downtime. Amazon EBS doesn t support resizing volumes, so our strategy is to add a new larger volume, and remove the older one that no longer suits us; LVM and ext4 s online resize ability will allow us to do this transparently.
For this example, we ll decide that we want a 10 GB volume. It can be a different type of EBS volume to our original we re going to online-migrate all our data from one to the other.
As when we created the original 5 GB EBS volume above, create a new one in the same AZ and attach it to the host (perhaps a /dev/xvdh this time). We can check the new volume is visible with dmesg again:
[1999786.341602] xvdh: unknown partition table
And now we initalise this as a Physical volume for LVM:
# pvcreate /dev/xvdh
  Physical volume "/dev/xvdh" successfully created
And then add this disk to our existing OptVG Volume Group:
# vgextend OptVG /dev/xvdh
  Volume group "OptVG" successfully extended
We can now review our Volume group with vgs, and see our physical volumes with pvs:
There are now 2 Physical Volumes we have a 4.9 GB filesystem taking up space, so 10.09 GB of unallocated space in the VG.
Now its time to stop using the /dev/xvgd volume for any new requests:
# pvchange -x n /dev/xvdg
  Physical volume "/dev/xvdg" changed
  1 physical volume changed / 0 physical volumes not changed
At this time, our existing data is on the old disk, and our new data is on the new one. Its now that I d recommend running GNU screen (or similar) so you can detach from this shell session and reconnect, as the process of migrating the existing data can take some time (hours for large volumes):
During the move, checking the Monitoring tab in the AWS EC2 Console for the two volumes should show one with a large data Read metric, and one with a large data Write metric clearly data should be flowing off the old disk, and on to the new.
A note on disk throughput
The above move was a pretty small, and empty volume. Larger disks will take longer, naturally, so getting some speed out of the process maybe key. There s a few things we can do to tweak this:
EBS Optimised: a launch-time option that reserves network throughput from certain instance types back to the EBS service within the AZ. Depending on the size of the instance this is 500 MB/sec up to 4GB/sec. Note that for the c4 family of instances, EBS Optimised is on by default.
Size of GP2 disk: the larger the disk, the longer it can sustain high IO throughput but read this for details.
Size and speed of PIOPs disk: if consistent high IO is required, then moving to Provisioned IO disk may be useful. Looking at the (2 weeks) history of Cloudwatch logs for the old volume will give me some idea of the duty cycle of the disk IO.
Back to the move
Upon completion I can see that the disk in use is the new disk and not the old one, using pvs again:
So all 5 GB is now unused (compare to above, where only 96 MB was PFree). With that disk not containing data, I can tell LVM to remove the disk from the Volume Group:
# vgreduce OptVG /dev/xvdg
  Removed "/dev/xvdg" from volume group "OptVG"
Then I cleanly wipe the labels from the volume:
# pvremove /dev/xvdg
  Labels on physical volume "/dev/xvdg" successfully wiped
If I really want to clean the disk, I could choose to use shred(1) on the disk to overwrite with random data. This can take a lng time
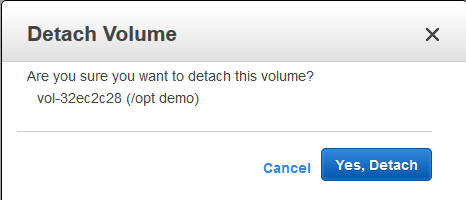
Now the disk is completely unused and disassociated from the VG, I can return to the AWS EC2 Console, and detach the disk:
Detach an EBS volume from an EC2 instance
Wait for a few seconds, and the disk is then shown as available ; I then chose to delete the disk in the EC2 console (and stop paying for it).
Back to the Logical Volume it s still 4.9 GB, so I add 4.5 GB to it:
# lvresize -L +4.5G /dev/OptVG/OptLV
  Size of logical volume OptVG/OptLV changed from 4.90 GiB (1255 extents) to 9.40 GiB (2407 extents).
  Logical volume OptLV successfully resized
We now have 0.6GB free space on the physical volume (pvs confirms this).
Finally, its time to expand out ext4 file system:
# resize2fs /dev/OptVG/OptLV
resize2fs 1.42.12 (29-Aug-2014)
Filesystem at /dev/OptVG/OptLV is mounted on /opt; on-line resizing required
old_desc_blocks = 1, new_desc_blocks = 1
The filesystem on /dev/OptVG/OptLV is now 2464768 (4k) blocks long.
And with df we can now see:
# df -HT /opt/
Filesystem  Type  Size  Used Avail Use% Mounted on
/dev/mapper/OptVG-OptLV ext4  9.9G  12M  9.4G  1% /opt
Automating this
The IAM Role I made at the beginning of this post is now going to be useful. I ll start by adding an IAM Policy to the Role to permit me to List Volumes, Create Volumes, Attach Volumes and Detach Volumes to my instance-id. Lets start with creating a volume, with a policy like this:
This policy puts some restrictions on the volumes that this instance can create: only within the given Availability Zone (matching our instance), only GP2 SSD (no PIOPs volumes), and size no more than 250 GB. I ll add another policy to permit this instance role to tag volumes in this AZ that don t yet have a tag called InstanceId:
Now that I can create (and then tag) volumes, this becomes a simple procedure as to what else I can do to this volume. Deleting and creating snapshots of this volume are two obvious options, and the corresponding policy:
Of course it would be lovely if I could use a variable inside the policy condition instead of the literal string of the instance ID, but that s not currently possible.
Clearly some of the more important actions I want to take are to attach and detach a volume to my instance:
Now with this in place, we can start to fire up the AWS CLI we spoke of. We ll let the CLI inherit its credentials form the IAM Instance Role and the polices we just defined.
and at this stage, the above manipulation of the raw block device with LVM can begin. Likewise you can then use the CLI to detach and destroy any unwanted volumes if you are migrating off old block devices.
After long time of waiting we finally released TeX Live 2015. Get some champagne, and ready to party!
Get it via downloading the net-installer, by obtaining a DVD, or downloading the iso. Besides the huge list up updates to packages and loads of bug fixes to all the programs, here are some notable news:
new LaTeX2e release which automatically includes fixltx2e
pdfTeX got improved jpeg support (exif and JFIF)
luaTeX got a new library newtokenlib
XeTeX got image handling fixes
MetaPost got a new numbersystem binary, and Japanese variants were added (upmpost and updvitomp)
MacTeX s Ghostscript packages got a facelift with better CJK support, other Unix-like distributions can do the same with my the newly included script cjk-gs-integrate (also one one my projects)
architectures: *kfreebsd was removed,and some additional platforms available as custom binaries. The DVD does not contain all platforms (due to space reasons), but all of them can be installed via the net-installer.
Regular updates of the repository will start in due course.
Thanks to all the contributors for the hard work. Let s have a party!
 There are many translation plugins available for WordPress, and most of them deal with translations of articles. This might be of interest for others, but not for me. If you have a blog with visitors from various language background, because you are living abroad, or writing in several languages, you might feel tempted to provide visitors with a localized environment , meaning that as much as possible is translated into the native language of the visitor, without actually translating content but allowing to.
 In my case I am writing mostly in English and Japanese, but sometimes (in former times) in Italian and now and then in my mother tongue, German. Visitors from my site are from all over the world, but at least for Japanese visitors I wanted to provide a localized environment. This blog describes how to get as much as possible translated of your blog, and here I mean not the actual articles, because this is the easy part and most translation plugins handle that fine, but the things around the articles (categories, tags, headers, ).
Starting point and aims
My starting point was a blog where I already had language added as extra taxonomy, and have tagged all articles with a language. But I didn t have any other translation plugin installed or used. Furthermore, I am using a child theme of the main theme in use (that is always a good idea anyway!). And of course, the theme you are using should be prepared for translation, that is that most literal strings in the theme source code are wrapped in __( ... ) or _e( ... ) calls. And by the way, if you don t have the language taxonomy, don t worry, that will come in automatically.
One more thing: The following descriptions are not for the very beginner. I expect certain fluency with WordPress, where for example themese and plugins keep their files, as well as PHP programming experience is needed for some of the steps.
With this starting point my aims were quite clear:
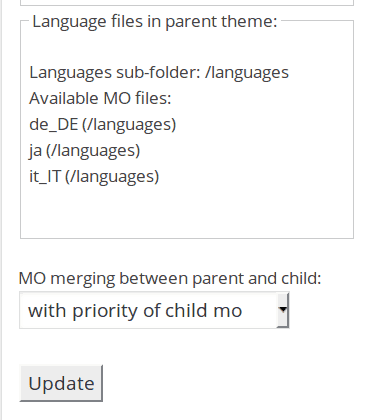 As I already mentioned, I assume that you are using a child theme. In this case you should consult the fourth tab of the xili-language settings page, called Managing language files, where on the right you should see / set up things in a way that translations in the child theme override the ones in the main theme, see screen shot on the right. I just mention here that there is another xili plugin, xili-dictionary, that can do a lot of things for you when it comes to translation but I couldn t figure out its operation mode, so I switched back (i.e., uninstalled that plugin) and used normal .po/.mo files as described in the next section.
Adding translations po and mo files
Translations are handled in normal (at least for the Unix world) gettext format. Matthias wrote about this in this blog. In principle you have to:
 (again, don t forget to change the text domain in the __(.., ..) call!) There might be some more things one could do, like changing the priority to be used after the sorting, or sort directly, but I haven t played around with that. Using the above code and translating several of the tags, the tag cloud now looks like the screenshot on the right I know, it could use some tweaking. Also, now the untranslated tags are sorted all before the translated, things one probably can address with the priority of the filter.







 Dear Debian Users,
I met last night with

 Recently, I've been fighting with the never ending issue of timezones. I never
thought I would have plunged into this rabbit hole, but hacking on OpenStack
and Gnocchi I felt into that trap easily is, thanks to Python.
Why you really, really, should never ever deal with timezones
To get a glimpse of the complexity of timezones, I recommend that you watch


 Almost every new autopkgtest release brings some small improvements, but
 What happened about the
 Note that I suspect the "Aller Holding A/S" entry to be incorrect
data in the official ownership register, as that name is not
registered in the official company register for Norway. The ownership
register is sensitive to typos and there seem to be no strict checking
of the ownership links.
Let me know if you improve the script or find better data sources.
The code is licensed according to GPL 2 or newer.
Update 2015-06-15: Since the initial post I've been told that
"
 It s no secret that OpenStack is becoming the de-facto standard for private cloud and a way for telecom operators to differentiate against big names such as Amazon or Google.


 A new release, now at version 0.1.3, of
 I know very little about hardware.
I think I have a good understanding on many aspects of what happens inside a computer, but my knowledge is clearly firmer on what happens once an operating system is already running. And even then, my understanding of the lower parts of reality is shaky at most At least according to my self-evaluation, of course, comparing to people I'm honored to call "my peers".
During the last ~18 months, my knowledge of this part of reality, while still far from complete, has increased quite a bit Maybe mostly showing that I'm basically very cheap: As I have come across very cheap (or even free for me!) hardware, I have tried to understand and shape what happens in levels below those where I dwell.
I have been meaning to do a writeup on the
 The Thing on Internet

 The recent