Search Results: "js"

26 August 2014

Daniel Pocock: GSoC talks at DebConf 14 today

This year I mentored two students doing work in support of Debian and free software (as well as those I mentored for Ganglia). Both of them are presenting details about their work at DebConf 14 today. While Juliana's work has been widely publicised already, mainly due to the fact it is accessible to every individual DD, Andrew's work is also quite significant and creates many possibilities to advance awareness of free software. The Java project that is not just about Java Andrew's project is about recursively building Java dependencies from third party repositories such as the Maven Central Repository. It matches up well with the wonderful new maven-debian-helper tool in Debian and will help us to fill out /usr/share/maven-repo on every Debian system. Firstly, this is not just about Java. On a practical level, some aspects of the project are useful for many other purposes. One of those is the aim of scanning a repository for non-free artifacts, making a Git mirror or clone containing a dfsg branch for generating repackaged upstream source and then testing to see if it still builds. Then there is the principle of software freedom. The Maven Central repository now requires that people publish a sources JAR and license metadata with each binary artifact they upload. They do not, however, demand that the sources JAR be complete or that the binary can be built by somebody else using the published sources. The license data must be specified but it does not appeared to be verified in the same way as packages inspected by Debian's legendary FTP masters. Thanks to the transitive dependency magic of Maven, it is quite possible that many Java applications that are officially promoted as free software can't trace the source code of every dependency or build plugin. Many organizations are starting to become more alarmed about the risk that they are dependent upon some rogue dependency. Maybe they will be hit with a lawsuit from a vendor stating that his plugin was only free for the first 3 months. Maybe some binary dependency JAR contains a nasty trojan for harvesting data about their corporate network. People familiar with the principles of software freedom are in the perfect position to address these concerns and Andrew's work helps us build a cleaner alternative. It obviously can't rebuild every JAR for the very reason that some of them are not really free - however, it does give the opportunity to build a heat-map of trouble spots and also create a fast track to packaging for those heirarchies of JARs that are truly free. Making WebRTC accessible to more people Juliana set out to update rtc.debian.org and this involved working on JSCommunicator, the HTML5/JavaScript softphone based on WebRTC. People attending the session today or participating remotely are advised to set up your RTC / VoIP password at db.debian.org well in advance so the server will allow you to log in and try it during the session. It can take 30 minutes or so for the passwords to be replicated to the SIP proxy and TURN server. Please also check my previous comments about what works and what doesn't and in particular, please be aware that Iceweasel / Firefox 24 on wheezy is not suitable unless you are on the same LAN as the person you are calling.

24 August 2014

Vincent Sanders: Without craftsmanship, inspiration is a mere reed shaken in the wind.

While I imagine Johannes Brahms was referring to music I think the sentiment applies to other endeavours just as well. The trap of believing an idea is worth something without an implementation occurs all too often, however this is not such an unhappy tale.

Lars original design idea
Lars Wirzenius, Steve McIntyre and myself were chatting a few weeks ago about several of the ongoing Debian discussions. As is often the case these discussions had devolved into somewhat unproductive noise and yet amongst all this was a voice of reason in Russ Allbery.

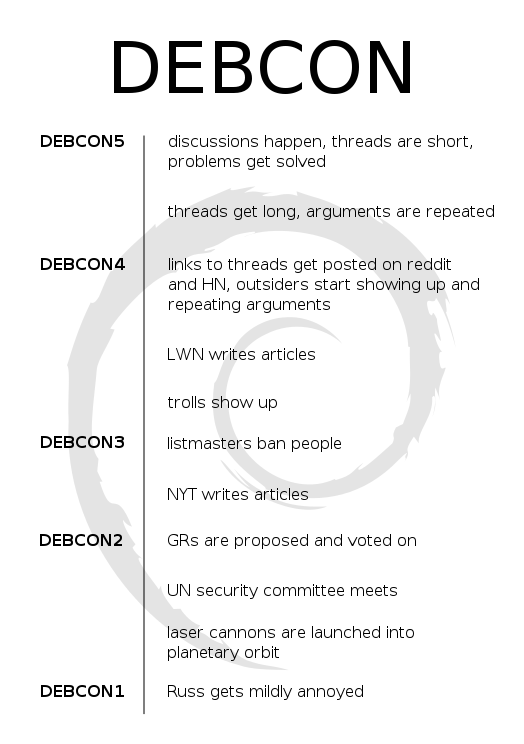
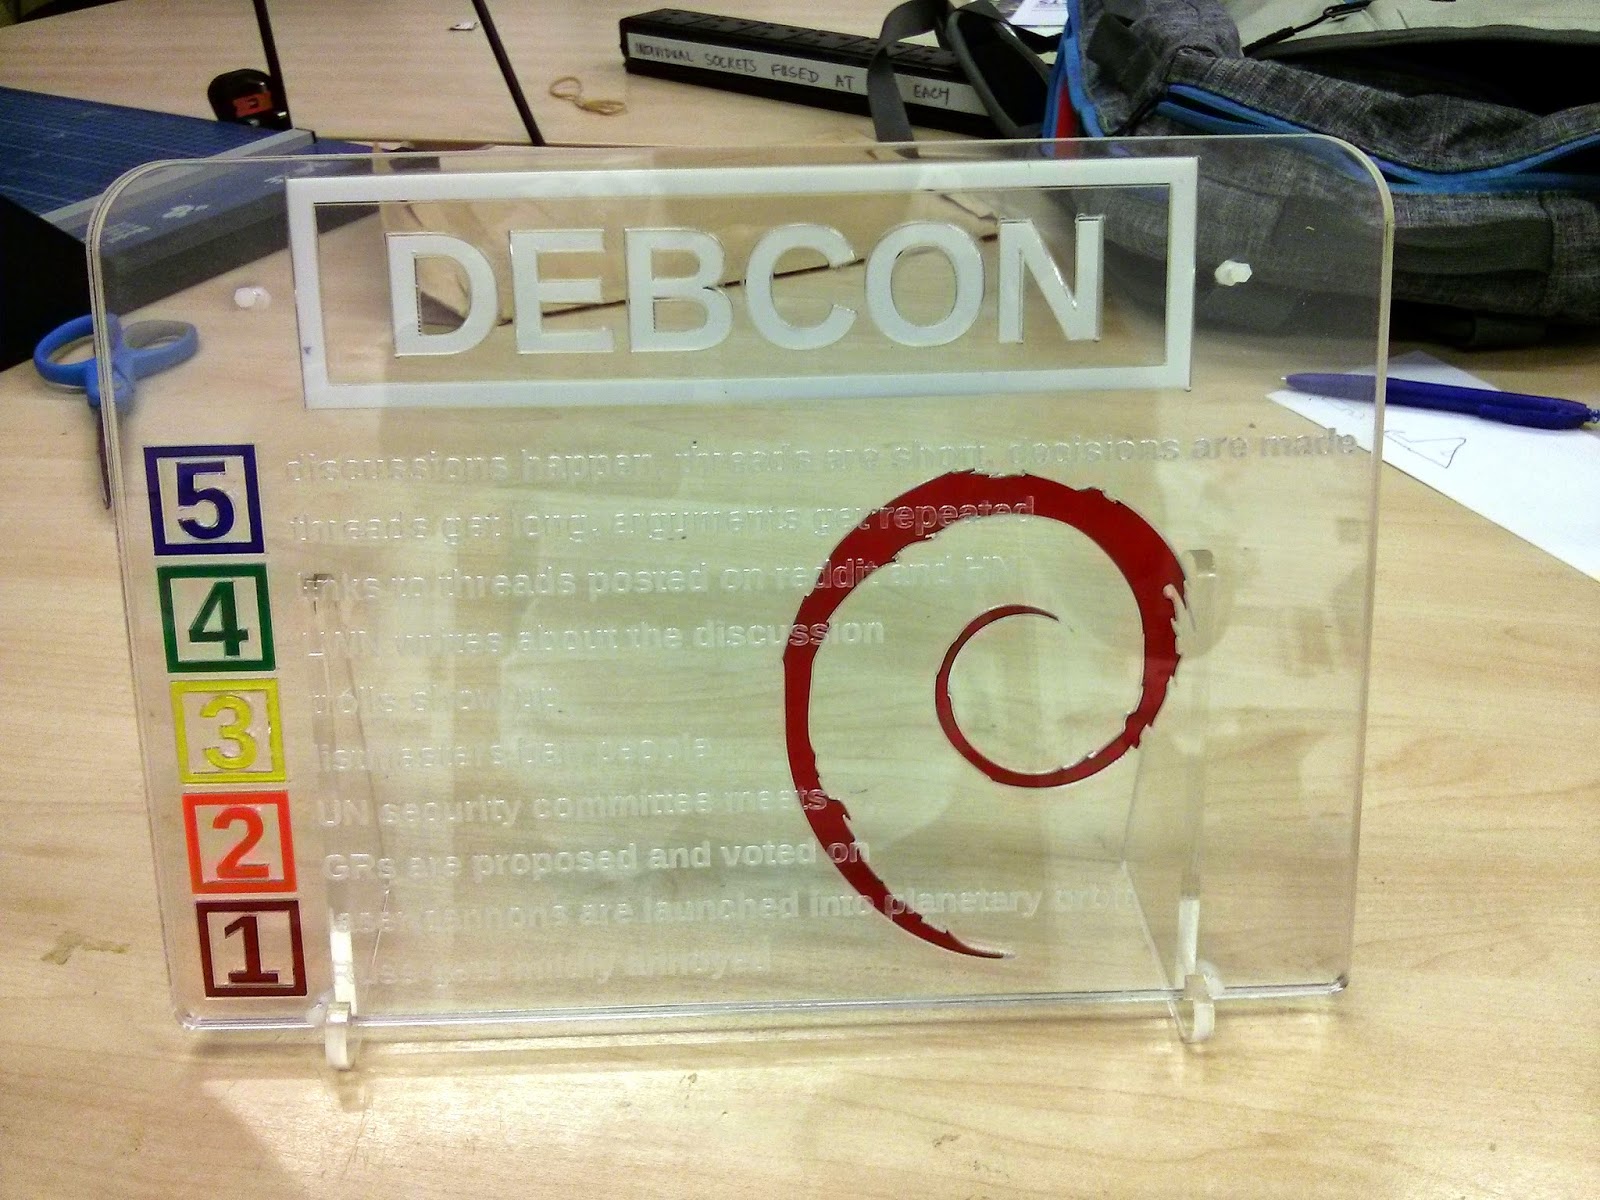
Lars decided that would take the opportunity of the upcoming opportunity of Debconf 14 to say thank you to Russ for his work. It was decided that a plaque would be a nice gift and I volunteered to do the physical manufacture. Lars came up with the idea of a DEBCON scale similar to the DEFCON scale and got some text together with an initial design idea.

CAD drawing of cut paths in clear acrylic
I took the initial design and as is often the case what is practically possible forced several changes. The prototype was a steep learning curve on using the Cambridge makespace laser cutter to create all the separate pieces.

The construction is pretty simple and consisted of three layers of transparent acrylic plastic. The base layer is a single piece of plastic with the correct outline. The next layer has the DEBCON title, the Debian swirl and level numbers. The top layer has the text engraved in its back surface giving the impression the text floats above the layer behind it.

Failed prototype DEBCON plaqueFor the prototype I attempted to glue the pieces together. This was a complete disaster and required discarding the entire piece and starting again with new materials.

The final version with stand ready to be presented
For the second version I used four small nylon bolts to hold the sandwich of layers together which worked very well.

Presentation of plaque photo by Aigars Mahinovs
Yesterday at the Debconf 14 opening Steve McIntyre presented it to Russ and I think he was pleased, certainly he was surprised (photo from Aigars Mahinovs).

The design files are available from my design git repo, though why anyone would want to reproduce it I have no idea ;-)

23 August 2014

Daniel Pocock: Want to be selected for Google Summer of Code 2015?

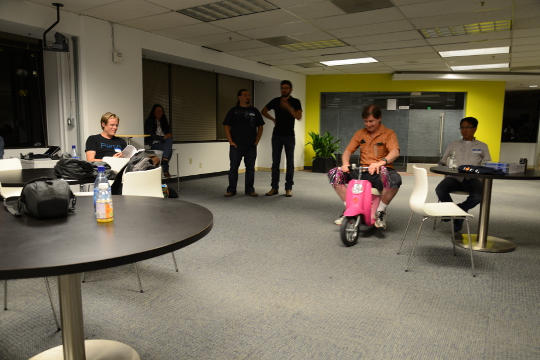
I've mentored a number of students in 2013 and 2014 for Debian and Ganglia and most of the companies I've worked with have run internships and graduate programs from time to time. GSoC 2014 has just finished and with all the excitement, many students are already asking what they can do to prepare and be selected in 2015. My own observation is that the more time the organization has to get to know the student, the more confident they can be selecting that student. Furthermore, the more time that the student has spent getting to know the free software community, the more easily they can complete GSoC. Here I present a list of things that students can do to maximize their chance of selection and career opportunities at the same time. These tips are useful for people applying for GSoC itself and related programs such as GNOME's Outreach Program for Women or graduate placements in companies. Disclaimers There is no guarantee that Google will run the program again in 2015 or any future year. There is no guarantee that any organization or mentor (including myself) will be involved until the official list of organizations is published by Google. Do not follow the advice of web sites that invite you to send pizza or anything else of value to prospective mentors. Following the steps in this page doesn't guarantee selection. That said, people who do follow these steps are much more likely to be considered and interviewed than somebody who hasn't done any of the things in this list. Understand what free software really is You may hear terms like free software and open source software used interchangeably. They don't mean exactly the same thing and many people use the term free software for the wrong things. Not all open source projects meet the definition of free software. Those that don't, usually as a result of deficiencies in their licenses, are fundamentally incompatible with the majority of software that does use genuinely free licenses. Google Summer of Code is about both writing and publishing your code and it is also about community. It is fundamental that you know the basics of licensing and how to choose a free license that empowers the community to collaborate on your code well after GSoC has finished. Please review the definition of free software early on and come back and review it from time to time. The The GNU Project / Free Software Foundation have excellent resources to help you understand what a free software license is and how it works to maximize community collaboration. Don't look for shortcuts There is no shortcut to GSoC selection and there is no shortcut to GSoC completion. The student stipend (USD $5,500 in 2014) is not paid to students unless they complete a minimum amount of valid code. This means that even if a student did find some shortcut to selection, it is unlikely they would be paid without completing meaningful work. If you are the right candidate for GSoC, you will not need a shortcut anyway. Are you the sort of person who can't leave a coding problem until you really feel it is fixed, even if you keep going all night? Have you ever woken up in the night with a dream about writing code still in your head? Do you become irritated by tedious or repetitive tasks and often think of ways to write code to eliminate such tasks? Does your family get cross with you because you take your laptop to Christmas dinner or some other significant occasion and start coding? If some of these statements summarize the way you think or feel you are probably a natural fit for GSoC. An opportunity money can't buy The GSoC stipend will not make you rich. It is intended to make sure you have enough money to survive through the summer and focus on your project. Professional developers make this much money in a week in leading business centers like New York, London and Singapore. When you get to that stage in 3-5 years, you will not even be thinking about exactly how much you made during internships. GSoC gives you an edge over other internships because it involves publicly promoting your work. Many companies still try to hide the potential of their best recruits for fear they will be poached or that they will be able to demand higher salaries. Everything you complete in GSoC is intended to be published and you get full credit for it. Imagine a young musician getting the opportunity to perform on the main stage at a rock festival. This is how the free software community works. It is a meritocracy and there is nobody to hold you back. Having a portfolio of free software that you have created or collaborated on and a wide network of professional contacts that you develop before, during and after GSoC will continue to pay you back for years to come. While other graduates are being screened through group interviews and testing days run by employers, people with a track record in a free software project often find they go straight to the final interview round. Register your domain name and make a permanent email address Free software is all about community and collaboration. Register your own domain name as this will become a focal point for your work and for people to get to know you as you become part of the community. This is sound advice for anybody working in IT, not just programmers. It gives the impression that you are confident and have a long term interest in a technology career. Choosing the provider: as a minimum, you want a provider that offers DNS management, static web site hosting, email forwarding and XMPP services all linked to your domain. You do not need to choose the provider that is linked to your internet connection at home and that is often not the best choice anyway. The XMPP foundation maintains a list of providers known to support XMPP. Create an email address within your domain name. The most basic domain hosting providers will let you forward the email address to a webmail or university email account of your choice. Configure your webmail to send replies using your personalized email address in the From header. Update your ~/.gitconfig file to use your personalized email address in your Git commits. Create a web site and blog Start writing a blog. Host it using your domain name. Some people blog every day, other people just blog once every two or three months. Create links from your web site to your other profiles, such as a Github profile page. This helps reinforce the pages/profiles that are genuinely related to you and avoid confusion with the pages of other developers. Many mentors are keen to see their students writing a weekly report on a blog during GSoC so starting a blog now gives you a head start. Mentors look at blogs during the selection process to try and gain insight into which topics a student is most suitable for. Create a profile on Github Github is one of the most widely used software development web sites. Github makes it quick and easy for you to publish your work and collaborate on the work of other people. Create an account today and get in the habbit of forking other projects, improving them, committing your changes and pushing the work back into your Github account. Github will quickly build a profile of your commits and this allows mentors to see and understand your interests and your strengths. In your Github profile, add a link to your web site/blog and make sure the email address you are using for Git commits (in the ~/.gitconfig file) is based on your personal domain. Start using PGP Pretty Good Privacy (PGP) is the industry standard in protecting your identity online. All serious free software projects use PGP to sign tags in Git, to sign official emails and to sign official release files. The most common way to start using PGP is with the GnuPG (GNU Privacy Guard) utility. It is installed by the package manager on most Linux systems. When you create your own PGP key, use the email address involving your domain name. This is the most permanent and stable solution. Print your key fingerprint using the gpg-key2ps command, it is in the signing-party package on most Linux systems. Keep copies of the fingerprint slips with you. This is what my own PGP fingerprint slip looks like. You can also print the key fingerprint on a business card for a more professional look. Using PGP, it is recommend that you sign any important messages you send but you do not have to encrypt the messages you send, especially if some of the people you send messages to (like family and friends) do not yet have the PGP software to decrypt them. If using the Thunderbird (Icedove) email client from Mozilla, you can easily send signed messages and validate the messages you receive using the Enigmail plugin. Get your PGP key signed Once you have a PGP key, you will need to find other developers to sign it. For people I mentor personally in GSoC, I'm keen to see that you try and find another Debian Developer in your area to sign your key as early as possible. Free software events Try and find all the free software events in your area in the months between now and the end of the next Google Summer of Code season. Aim to attend at least two of them before GSoC. Look closely at the schedules and find out about the individual speakers, the companies and the free software projects that are participating. For events that span more than one day, find out about the dinners, pub nights and other social parts of the event. Try and identify people who will attend the event who have been GSoC mentors or who intend to be. Contact them before the event, if you are keen to work on something in their domain they may be able to make time to discuss it with you in person. Take your PGP fingerprint slips. Even if you don't participate in a formal key-signing party at the event, you will still find some developers to sign your PGP key individually. You must take a photo ID document (such as your passport) for the other developer to check the name on your fingerprint but you do not give them a copy of the ID document. Events come in all shapes and sizes. FOSDEM is an example of one of the bigger events in Europe, linux.conf.au is a similarly large event in Australia. There are many, many more local events such as the Debian France mini-DebConf in Lyon, 2015. Many events are either free or free for students but please check carefully if there is a requirement to register before attending. On your blog, discuss which events you are attending and which sessions interest you. Write a blog during or after the event too, including photos. Quantcast generously hosted the Ganglia community meeting in San Francisco, October 2013. We had a wild time in their offices with mini-scooters, burgers, beers and the Ganglia book. That's me on the pink mini-scooter and Bernard Li, one of the other Ganglia GSoC 2014 admins is on the right. Install Linux GSoC is fundamentally about free software. Linux is to free software what a tree is to the forest. Using Linux every day on your personal computer dramatically increases your ability to interact with the free software community and increases the number of potential GSoC projects that you can participate in. This is not to say that people using Mac OS or Windows are unwelcome. I have worked with some great developers who were not Linux users. Linux gives you an edge though and the best time to gain that edge is now, while you are a student and well before you apply for GSoC. If you must run Windows for some applications used in your course, it will run just fine in a virtual machine using Virtual Box, a free software solution for desktop virtualization. Use Linux as the primary operating system. Here are links to download ISO DVD (and CD) images for some of the main Linux distributions: If you are nervous about getting started with Linux, install it on a spare PC or in a virtual machine before you install it on your main PC or laptop. Linux is much less demanding on the hardware than Windows so you can easily run it on a machine that is 5-10 years old. Having just 4GB of RAM and 20GB of hard disk is usually more than enough for a basic graphical desktop environment although having better hardware makes it faster. Your experiences installing and running Linux, especially if it requires some special effort to make it work with some of your hardware, make interesting topics for your blog. Decide which technologies you know best Personally, I have mentored students working with C, C++, Java, Python and JavaScript/HTML5. In a GSoC program, you will typically do most of your work in just one of these languages. From the outset, decide which language you will focus on and do everything you can to improve your competence with that language. For example, if you have already used Java in most of your course, plan on using Java in GSoC and make sure you read Effective Java (2nd Edition) by Joshua Bloch. Decide which themes appeal to you Find a topic that has long-term appeal for you. Maybe the topic relates to your course or maybe you already know what type of company you would like to work in. Here is a list of some topics and some of the relevant software projects:
  • System administration, servers and networking: consider projects involving monitoring, automation, packaging. Ganglia is a great community to get involved with and you will encounter the Ganglia software in many large companies and academic/research networks. Contributing to a Linux distribution like Debian or Fedora packaging is another great way to get into system administration.
  • Desktop and user interface: consider projects involving window managers and desktop tools or adding to the user interface of just about any other software.
  • Big data and data science: this can apply to just about any other theme. For example, data science techniques are frequently used now to improve system administration.
  • Business and accounting: consider accounting, CRM and ERP software.
  • Finance and trading: consider projects like R, market data software like OpenMAMA and connectivity software (Apache Camel)
  • Real-time communication (RTC), VoIP, webcam and chat: look at the JSCommunicator or the Jitsi project
  • Web (JavaScript, HTML5): look at the JSCommunicator
Before the GSoC application process begins, you should aim to learn as much as possible about the theme you prefer and also gain practical experience using the software relating to that theme. For example, if you are attracted to the business and accounting theme, install the PostBooks suite and get to know it. Maybe you know somebody who runs a small business: help them to upgrade to PostBooks and use it to prepare some reports. Make something Make some small project, less than two week's work, to demonstrate your skills. It is important to make something that somebody will use for a practical purpose, this will help you gain experience communicating with other users through Github. For an example, see the servlet Juliana Louback created for fixing phone numbers in December 2013. It has since been used as part of the Lumicall web site and Juliana was selected for a GSoC 2014 project with Debian. There is no better way to demonstrate to a prospective mentor that you are ready for GSoC than by completing and publishing some small project like this yourself. If you don't have any immediate project ideas, many developers will also be able to give you tips on small projects like this that you can attempt, just come and ask us on one of the mailing lists. Ideally, the project will be something that you would use anyway even if you do not end up participating in GSoC. Such projects are the most motivating and rewarding and usually end up becoming an example of your best work. To continue the example of somebody with a preference for business and accounting software, a small project you might create is a plugin or extension for PostBooks. Getting to know prospective mentors Many web sites provide useful information about the developers who contribute to free software projects. Some of these developers may be willing to be a GSoC mentor. For example, look through some of the following: Getting on the mentor's shortlist Once you have identified projects that are interesting to you and developers who work on those projects, it is important to get yourself on the developer's shortlist. Basically, the shortlist is a list of all students who the developer believes can complete the project. If I feel that a student is unlikely to complete a project or if I don't have enough information to judge a student's probability of success, that student will not be on my shortlist. If I don't have any student on my shortlist, then a project will not go ahead at all. If there are multiple students on the shortlist, then I will be looking more closely at each of them to try and work out who is the best match. One way to get a developer's attention is to look at bug reports they have created. Github makes it easy to see complaints or bug reports they have made about their own projects or other projects they depend on. Another way to do this is to search through their code for strings like FIXME and TODO. Projects with standalone bug trackers like the Debian bug tracker also provide an easy way to search for bug reports that a specific person has created or commented on. Once you find some relevant bug reports, email the developer. Ask if anybody else is working on those issues. Try and start with an issue that is particularly easy and where the solution is interesting for you. This will help you learn to compile and test the program before you try to fix any more complicated bugs. It may even be something you can work on as part of your academic program. Find successful projects from the previous year Contact organizations and ask them which GSoC projects were most successful. In many organizations, you can find the past students' project plans and their final reports published on the web. Read through the plans submitted by the students who were chosen. Then read through the final reports by the same students and see how they compare to the original plans. Start building your project proposal now Don't wait for the application period to begin. Start writing a project proposal now. When writing a proposal, it is important to include several things:
  • Think big: what is the goal at the end of the project? Does your work help the greater good in some way, such as increasing the market share of Linux on the desktop?
  • Details: what are specific challenges? What tools will you use?
  • Time management: what will you do each week? Are there weeks where you will not work on GSoC due to vacation or other events? These things are permitted but they must be in your plan if you know them in advance. If an accident or death in the family cut a week out of your GSoC project, which work would you skip and would your project still be useful without that? Having two weeks of flexible time in your plan makes it more resilient against interruptions.
  • Communication: are you on mailing lists, IRC and XMPP chat? Will you make a weekly report on your blog?
  • Users: who will benefit from your work?
  • Testing: who will test and validate your work throughout the project? Ideally, this should involve more than just the mentor.
If your project plan is good enough, could you put it on Kickstarter or another crowdfunding site? This is a good test of whether or not a project is going to be supported by a GSoC mentor. Learn about packaging and distributing software Packaging is a vital part of the free software lifecycle. It is very easy to upload a project to Github but it takes more effort to have it become an official package in systems like Debian, Fedora and Ubuntu. Packaging and the communities around Linux distributions help you reach out to users of your software and get valuable feedback and new contributors. This boosts the impact of your work. To start with, you may want to help the maintainer of an existing package. Debian packaging teams are existing communities that work in a team and welcome new contributors. The Debian Mentors initiative is another great starting place. In the Fedora world, the place to start may be in one of the Special Interest Groups (SIGs). Think from the mentor's perspective After the application deadline, mentors have just 2 or 3 weeks to choose the students. This is actually not a lot of time to be certain if a particular student is capable of completing a project. If the student has a published history of free software activity, the mentor feels a lot more confident about choosing the student. Some mentors have more than one good student while other mentors receive no applications from capable students. In this situation, it is very common for mentors to send each other details of students who may be suitable. Once again, if a student has a good Github profile and a blog, it is much easier for mentors to try and match that student with another project. GSoC logo generic Conclusion Getting into the world of software engineering is much like joining any other profession or even joining a new hobby or sporting activity. If you run, you probably have various types of shoe and a running watch and you may even spend a couple of nights at the track each week. If you enjoy playing a musical instrument, you probably have a collection of sheet music, accessories for your instrument and you may even aspire to build a recording studio in your garage (or you probably know somebody else who already did that). The things listed on this page will not just help you walk the walk and talk the talk of a software developer, they will put you on a track to being one of the leaders. If you look over the profiles of other software developers on the Internet, you will find they are doing most of the things on this page already. Even if you are not selected for GSoC at all or decide not to apply, working through the steps on this page will help you clarify your own ideas about your career and help you make new friends in the software engineering community.

Tim Retout: Packaging pump.io for Debian

I intend to intend to package pump.io for Debian. It's going to take a long time, but I don't know whether that's weeks or years yet. The world needs decentralized social networking. I discovered the tools that let me create this wiki summary of the progress in pump.io packaging. There are at least 35 dependencies that need uploading, so this would go a lot faster if it weren't a solo effort - if anyone else has some time, please let me know! But meanwhile I'm hoping to build some momentum. I think it's important to keep the quality of the packaging as high as possible, even while working through so many. It would cost a lot of time later if I had to go back and fix bugs in everything. I really want to be running the test suites in these builds, but it's not always easy. One of the milestones along the way might be packaging nodeunit. Nodeunit is a Nodejs unit testing framework (duh), used by node-bcrypt (and, unrelatedly, statsd, which would be pretty cool to have in Debian too). Last night I filed eight pull requests to try and fix up copyright/licensing issues in dependencies of nodeunit. Missing copyright statements are one of the few things I can't fix by myself as a packager. All I can do is wait, and package other dependencies in the meantime. Fortunately there are plenty of those. And I have not seen so many issues in direct dependencies of pump.io itself - or at least they've been fixed in git.

Tim Retout: Packaging pump.io for Debian

I intend to intend to package pump.io for Debian. It's going to take a long time, but I don't know whether that's weeks or years yet. The world needs decentralized social networking. I discovered the tools that let me create this wiki summary of the progress in pump.io packaging. There are at least 35 dependencies that need uploading, so this would go a lot faster if it weren't a solo effort - if anyone else has some time, please let me know! But meanwhile I'm hoping to build some momentum. I think it's important to keep the quality of the packaging as high as possible, even while working through so many. It would cost a lot of time later if I had to go back and fix bugs in everything. I really want to be running the test suites in these builds, but it's not always easy. One of the milestones along the way might be packaging nodeunit. Nodeunit is a Nodejs unit testing framework (duh), used by node-bcrypt (and, unrelatedly, statsd, which would be pretty cool to have in Debian too). Last night I filed eight pull requests to try and fix up copyright/licensing issues in dependencies of nodeunit. Missing copyright statements are one of the few things I can't fix by myself as a packager. All I can do is wait, and package other dependencies in the meantime. Fortunately there are plenty of those. And I have not seen so many issues in direct dependencies of pump.io itself - or at least they've been fixed in git.

21 August 2014

Steve Kemp: Updating Debian Administration

Recently I've been getting annoyed with the Debian Administration website; too often it would be slower than it should be considering the resources behind it. As a brief recap I have six nodes: The misc server is designed to display events. There is a node.js listener which receives UDP messages and stores them in a rotating buffer. The messages might contain things like "User bob logged in", "Slaughter ran", etc. It's a neat hack which gives a good feeling of what is going on cluster-wide. I need to rationalize that code - but there's a very simple predecessor posted on github for the curious. Anyway enough diversions, the database is tuned, and "small". The misc server is almost entirely irrelevent, non-public, and not explicitly advertised. So what do the web nodes run? Well they run a lot. Potentially. Each web node has four services configured: Apache runs the main site, listening on *:8080. One of the nodes will be special and will claim a virtual IP provided via ucarp. The virtual IP is actually the end-point visitors hit, meaning we have:
Master HostOther hosts
Running:
  • Apache.
  • Pound.
  • Varnish
Running:
  • Apache.
Pound is configured to listen on the virtual IP and perform SSL termination. That means that incoming requests get proxied from "vip:443 -> vip:80". Varnish listens on "vip:80" and proxies to the back-end apache instances. The end result should be high availability. In the typical case all four servers are alive, and all is well. If one server dies, and it is not the master, then it will simply be dropped as a valid back-end. If a single server dies and it is the master then a new one will appear, thanks to the magic of ucarp, and the remaining three will be used as expected. I'm sure there is a pathological case when all four hosts die, and at that point the site will be down, but that's something that should be atypical. Yes, I am prone to over-engineering. The site doesn't have any availability requirements that justify this setup, but it is good to experiment and learn things. So, with this setup in mind, with incoming requests (on average) being divided at random onto one of four hosts, why is the damn thing so slow? We'll come back to that in the next post. (Good news though; I fixed it ;)

18 August 2014

Daniel Pocock: Is WebRTC private?

With the exciting developments at rtc.debian.org, many people are starting to look more closely at browser-based real-time communications. Some have dared to ask: does it solve the privacy problems of existing solutions? Privacy is a relative term Perfect privacy and its technical manifestations are hard to define. I had a go at it in a blog on the Gold Standard for free communications technology on 5 June 2013. By pure co-incidence, a few hours later, the first Snowden leaks appeared and this particular human right was suddenly thrust into the spotlight. WebRTC and ICE privacy risk WebRTC does not give you perfect privacy. At least one astute observer at my session at Paris mini-DebConf 2014 questioned the privacy of Interactive Connectivity Establishment (ICE, RFC 5245). In its most basic form, ICE scans all the local IP addresses on your machine and NAT gateway and sends them to the person calling you so that their phone can find the optimal path to contact you. This clearly has privacy implications as a caller can work out which ISP you are connected to and some rough details of your network topology at any given moment in time. What WebRTC does bring to the table Some of this can be mitigated though: an ICE implementation can be tuned so that it only advertises the IP address of a dedicated relay host. If you can afford a little latency, your privacy is safe again. This privacy protecting initiative could be made by a browser vendor such as Mozilla or it can be done in JavaScript by a softphone such as JSCommunicator. Many individuals are now using a proprietary softphone to talk to family and friends around the world. The softphone in question has properties like a virus, siphoning away your private information. This proprietary softphone is also an insidious threat to open source and free operating systems on the desktop. WebRTC is a positive step back from the brink. It gives people a choice. WebRTC is a particularly relevant choice for business. Can you imagine going to a business and asking them to make all their email communication through hotmail? When a business starts using a particular proprietary softphone, how is it any different? WebRTC offers a solution that is actually easier for the user and can be secured back to the business network using TLS. WebRTC is based on open standards, particularly HTML5. Leading implementations, such as the SIP over WebSocket support in reSIProcate, JSCommunicator and the DruCall module for Drupal are fully open source. Not only is it great to be free, it is possible to extend and customize any of these components. What is missing There are some things that are not quite there yet and require a serious effort from the browser vendors. At the top of the list for privacy:
  • ZRTP support - browsers currently support DTLS-SRTP, which is based on X.509. ZRTP is more like PGP, a democratic and distributed peer-to-peer privacy solution without needing to trust some central certificate authority.
  • TLS with PGP - the TLS protocol used to secure the WebSocket signalling channel is also based on X.509 with the risk of a central certificate authority. There is increasing chatter about the need for TLS to use PGP instead of X.509 and WebRTC would be a big winner if this were to eventuate and be combined with ZRTP.
You may think "I'll believe it when I see it". Each of these features, including WebRTC itself, is a piece of the puzzle and even solving one piece at a time brings people further out of danger from the proprietary mess the world lives with today. To find out more about practical integration of WebRTC into free software solutions, consider coming to my talk at xTupleCon in October.

17 August 2014

Andrew Pollock: [tech] Solar follow up

Now that I've had my solar generation system for a little while, I thought I'd write a follow up post on how it's all going. Energex came out a week ago last Saturday and swapped my electricity meter over for a new digital one that measures grid consumption and excess energy exported. Prior to that point, it was quite fun to watch the old analog meter going backwards. I took a few readings after the system was installed, through to when the analog meter was disconnected, and the meter had a value 26 kWh lower than when I started. I've really liked how the excess energy generated during the day has effectively masked any relatively small overnight power consumption. Now that I have the new digital meter things are less exciting. It has a meter measuring how much power I'm buying from the grid, and how much excess power I'm exporting back to the grid. So far, I've bought 32 kWh and exported 53 kWh excess energy. Ideally I want to minimise the excess because what I get paid for it is about a third of what I have to pay to buy it from the grid. The trick is to try and shift around my consumption as much as possible to the daylight hours so that I'm using it rather than exporting it. On a good day, it seems I'm generating about 10 kWh of energy. I'm still impatiently waiting for PowerOne to release their WiFi data logger card. Then I'm hoping I can set up something automated to submit my daily production to PVOutput for added geekery.

16 August 2014

Daniel Pocock: WebRTC: what works, what doesn't

With the release of the latest rtc.debian.org portal update, there are numerous improvements but there are still some known problems too. The good news is that if you have a web browser, you can probably make successful WebRTC calls from one developer to another without any need to install or configure anything else. The bad news is that not every permutation of browser and client will work. Here I list some of the limitations so people won't waste time on them. The SIP proxy supports any SIP client Just about any SIP client can connect to the proxy server and register. This does not mean that every client will be able to call each other. Generally speaking, modern WebRTC clients will be able to call each other. Standalone softphones or deskphones will call each other. Calling from a normal softphone or deskphone to a WebRTC browser, or vice-versa, will not work though. Some softphones, like Jitsi, have implemented most of the protocols to communicate with WebRTC but they are yet to put the finishing touches on it. Chat should just work for any combination of clients The new WebRTC frontend supports SIP chat messaging. There is no presence or buddy list support yet. You can even use a tool like sipsak to accept or send SIP chats from a script. Chat works for any client new or old. Although a WebRTC user can't call a softphone user, for example, they can send chats to each other. WebRTC support in Iceweasel 24 on wheezy systems is very limited On a wheezy system, the most recent Iceweasel update is version 24.7. This version supports most of WebRTC but does not support TURN relay servers to help you out of a NAT network. If you call between two wheezy machines on the same NAT network it will work. If the call has to traverse a NAT boundary it will not work. Wheezy users need to either download a newer Firefox version or use Chromium. JsSIP doesn't handle ICE elegantly Internet Connectivity Establishment (ICE, RFC 5245) is meant to prevent calls from being answered with missing audio or video streams. ICE is a mandatory part of WebRTC. When correctly implemented, the JavaScript application will exchange ICE candidates and run the connectivity checks before alerting anybody that a call is ringing. If the checks fail (for example, with Iceweasel 24 and NAT), the caller should be told the call can't be made and the callee shouldn't be disturbed at all. JsSIP is not operating in this manner though. It alerts the callee before telling the browser to start the connectivity checks. Then it even waits for the callee to answer. Only then does it tell the browser to start checking connectivity. This is not a fault with the ICE standard or the browser, it is an implementation problem. Therefore, until this is fully fixed, people may still see some calls that appear to answer but don't have any media stream. After this is fixed, such calls really will be a thing of the past. Debian RTC testing is more than just a pipe dream Although these glitches are not ideal for end users, there is a clear roadmap to resolve them. There are also a growing collection of workarounds to minimize the inconvenience. For example, JSCommunicator has a hack to detect when somebody is using Iceweasel 24 and just refuse to make the call. See the option require_relay_candidate in the config.js settings file. This also ensures that it will refuse to make a call if the TURN server is offline. Better to give the user a clear error than a call without any audio or video stream. require_relay_candidate is enabled on freephonebox.net because it makes life easier for end users. It is not enabled on rtc.debian.org because some DDs may be willing to tolerate this issue when testing on a local LAN. To find out more about practical integration of WebRTC into free software solutions, consider coming to my talk at xTupleCon in October.

14 August 2014

Juliana Louback: JSCommunicator 2.0 (Beta) is Live!

This is the last week of Google Summer of Code 2014 - all good things must come to an end. To wrap things up, I ve merged all my work on JSCommunicator into a new version with all the added features. You can now demo the new and improved (or at least so I hope) JSCommunicator on rtc.debian.org! JSCommunicator 2.0 has an assortment of new add-ons, the most important new features are the Instant Messaging component and the internationalization support. The UI has been reorganized but we are currently not using a skin for color scheme - will be posting about that in a bit. The idea is to have a more neutral look that can be easily customized and integrated with other web apps. A chat session is automatically opened when you begin a call with someone - unless you already started a chat session with said someone. Sound alerts for new incoming messages are optional in the config file, visual alerts occur when an inactive chat tab receives a new message. Future work includes multiple user chat sessions and adapting the layout to a large amount of chat tabs. Currently it only handles 6. (Should I allow more? Who chats with more than 6 people at once? 14 year old me would, but now I just can t handle that. Anyway, I welcome advice on how to go about this. Should we do infinite tabs or if not, what s the cut-off?) About internationalization, I m uber proud to say we currently run in 6 languages! The 6 are English (default), Spanish, French, Portuguese, Hebrew and German. But one thing I must mention is that since I added new stuff to JSCommunicator, some of the new stuff doesn t have a translation. I took care of the Portuguese translation and Yehuda Korotkin quickly turned in the Hebrew translation, but we are still missing an update for Spanish, French and German. If you can contribute, please do. There are about 10 new labels to translate, you can fix the issue here. Or if you re short on time, shoot me an email with the translation for what s on the right side of the = : welcome = Welcome, call = Call chat = Chat enter_contact = Enter contact type_to_chat = type to chat start_chat = start chat me = me logout = Logout no_contact = Please enter a contact. remember_me = Remember me I ll merge it myself but I ll be sure to add you to the authors list.

Daniel Pocock: Bug tracker or trouble ticket system?

One of the issues that comes up from time to time in many organizations and projects (both community and commercial ventures) is the question of how to manage bug reports, feature requests and support requests. There are a number of open source solutions and proprietary solutions too. I've never seen a proprietary solution that offers any significant benefit over the free and open solutions, so this blog only looks at those that are free and open. Support request or bug? One common point of contention is the distinction between support requests and bugs. Users do not always know the difference. Some systems, like the Github issue tracker, gather all the requests together in a single list. Calling them "Issues" invites people to submit just about anything, such as "I forgot my password". At the other extreme, some organisations are so keen to keep support requests away from their developers that they operate two systems and a designated support team copies genuine bugs from the customer-facing trouble-ticket/CRM system to the bug tracker. This reduces the amount of spam that hits the development team but there is overhead in running multiple systems and having staff doing cut and paste. Will people use it? Another common problem is that a full bug report template is overkill for some issues. If a user is asking for help with some trivial task and if the tool asks them to answer twenty questions about their system, application version, submit log files and other requirements then they won't use it at all and may just revert to sending emails or making phone calls. Ideally, it should be possible to demand such details only when necessary. For example, if a support engineer routes a request to a queue for developers, then the system may guide the support engineer to make sure the ticket includes attributes that a ticket in the developers' queue should have. Beyond Perl Some of the most well known systems in this space are Bugzilla, Request Tracker and OTRS. All of these solutions are developed in Perl. These days, Python, JavaScript/Node.JS and Java have taken more market share and Perl is chosen less frequently for new projects. Perl skills are declining and younger developers have usually encountered Python as their main scripting language at university. My personal perspective is that this hinders the ability of Perl projects to attract new blood or leverage the benefits of new Python modules that don't exist in Perl at all. Bugzilla has fallen out of the Debian and Ubuntu distributions after squeeze due to its complexity. In contrast, Fedora carries the Bugzilla packages and also uses it as their main bug tracker. Evaluation I recently started having a look at the range of options in the Wikipedia list of bug tracking systems. Some of the trends that appear:
  • Many appear to be bug tracking systems rather than issue tracking / general-purpose support systems. How well do they accept non-development issues and keep them from spamming the developers while still providing a useful features for the subset of users who are doing development?
  • A number of them try to bundle other technologies, like wiki or FAQ systems: but how well do they work with existing wikis? This trend towards monolithic products is slightly dangerous. In my own view, a wiki embedded in some other product may not be as well supported as one of the leading purpose-built wikis.
  • Some of them also appear to offer various levels of project management. For development tasks, it is just about essential for dependencies and a roadmap to be tightly integrated with the bug/feature tracker but does it make the system more cumbersome for people dealing with support requests? Many support requests, like "I've lost my password", don't really have any relationship with project management or a project roadmap.
  • Not all appear to handle incoming requests by email. Bug tracking systems can be purely web/form-based, but email is useful for helpdesk systems.
Questions This leaves me with some of the following questions:
  • Which of these systems can be used as a general purpose help-desk / CRM / trouble-ticket system while also being a full bug and project management tool for developers?
  • For those systems that don't work well for both use cases, which combinations of trouble-ticket system + bug manager are most effective, preferably with some automated integration?
  • Which are more extendable with modern programming practices, such as Python scripting and using Git?
  • Which are more future proof, with choice of database backend, easy upgrades, packages in official distributions like Debian, Ubuntu and Fedora, scalability, IPv6 support?
  • Which of them are suitable for the public internet and which are only considered suitable for private access?

13 August 2014

Daniel Pocock: WebRTC in CRM/ERP solutions at xTupleCon 2014

In October this year I'll be visiting the US and Canada for some conferences and a wedding. The first event will be xTupleCon 2014 in Norfolk, Virginia. xTuple make the popular open source accounting and CRM suite PostBooks. The event kicks off with a keynote from Apple co-founder Steve Wozniak on the evening of October 14. On October 16 I'll be making a presentation about how JSCommunicator makes it easy to add click-to-call real-time communications (RTC) to any other web-based product without requiring any browser plugins or third party softphones. Juliana Louback has been busy extending JSCommunicator as part of her Google Summer of Code project. When finished, we hope to quickly roll out the latest version of JSCommunicator to other sites including rtc.debian.org, the WebRTC portal for the Debian Developer community. Juliana has also started working on wrapping JSCommunicator into a module for the new xTuple / PostBooks web-based CRM. Versatility is one of the main goals of the JSCommunicator project and it will be exciting to demonstrate this in action at xTupleCon. xTupleCon discounts for developers xTuple has advised that they will offer a discount to other open source developers and contributers who wish to attend any part of their event. For details, please contact xTuple directly through this form. Please note it is getting close to their deadline for registration and discounted hotel bookings. Potential WebRTC / JavaScript meet-up in Norfolk area For those who don't or can't attend xTupleCon there has been some informal discussion about a small WebRTC-hacking event at some time on 15 or 16 October. Please email me privately if you may be interested.

11 August 2014

Juliana Louback: JSCommunicator - Setup and Architecture

Preface During Google Summer of Code 2014, I got to work on the Debian WebRTC portal under the mentorship of Daniel Pocock. Now I had every intention of meticulously documenting my progress at each step of development in this blog, but I was a bit late in getting the blog up and running. I ll now be publishing a series of posts to recap all I ve done during GSoC. Better late than never. Intro JSCommunicator is a SIP communication tool developed in HTML and JavaScript. The code was designed to make integrating JSCommunicator with a website or web app as simple as possible. It s quite easy, really. However, I do think a more detailed explanation on how to set things up and a guide to the JSCommunicator architecture could be of use, particularly for those wanting to modify the code in any way. Setup To begin, please fork the JSCommunicator repo. If you are new to git, feel free to follow the steps in section Setup and Clone in this post. If you read the README file (which you always should), you ll see that JSCommunicator needs a SIP proxy that supports SIP over Websockets transport. Some options are: I didn t find a tutorial for Kamailio setup, I did find one for repro setup. And bonus, here you have a great tutorial on how to setup and configure your SIP proxy AND your TURN server. In your project s root directory, you ll see a file named config-sample.js. Make a copy of that file named config.js. The config-sample.js file has comments that are very instructive. In sum, the only thing you have to modify is the turn_servers property and the websocket property. In my case, debrtc.org was the domain registered for testing my project, so my config file has:
turn_servers: [
	  server:"turn:debrtc.org"       
],
Note that unlike the sample, I didn t set a username and password so SIP credentials will be used. Now fill in the websocket property here we use sip5060.net.
websocket:  
    servers: 'wss://ws.sip5060.net',
    connection_recovery_min_interval: 2,
    connection_recovery_max_interval: 30,
   ,
I m pretty sure you can set the connection_recovery properties to whatever you like. Everything else is optional. If you set the user property, specifically display_name and uri, that will be used to fill in the Login form and takes preference over any Remember me data. If you also set sip_auth_password, JSCommunicator will automatically log in. All the other properties are for other optional functionalities and are well explained. You ll need some third-party javascript that is not included in the JSCommunicator git repo. Namely jQuery version 1.4 or higher and ArbiterJS version 1.0. Download jQuery here and ArbiterJS here and place the .js files in your project s root directory. Do make sure that you are including the correct filename in your html file. For example, in phone-dev.shtml, a file named jquery.js is included. The file you downloaded will likely have version numbers in it s file name. So rename the downloaded file or change the content of src in your includes. This is uber trivial, but I ve made the mistake several times. You ll also need JsSIP.js which can be downloaded here. Same naming care must be taken as is the case for jQuery and ArbiterJS. The recently added Instant Messaging component and some of the new features need jQuery-UI - so far version 1.11.* is known to work. From the downloaded .zip all you need is the jquery-ui-...js file and the jquery-ui-...css file, also to be placed in the project s root directory. If you ll be using the internationalization support you ll also need jquery.i18n.properties.js. To try out JSCommunicator, deploy the website locally by copying your project directory to the apache document root directory (provided you are using apache, which is a good idea.). You ll likely have to restart your server before this works. Now the demo .shtml pages only have a header with all the necessary includes, then a Server Side Include for the body of the page, with all the JSCommunicator html. The html content is in the file jscommunicator.inc. You can enable SSI on apache, OR you can simply copy and paste the content of jscommunicator.inc into phone-dev.shmtl. Start up apache, open a browser and navigate to localhost/jscommunicator/phone-dev.shmtl and you should see: jscommunicatorRaw Actually, pending updates to JSCommunicator, you should see a brand new UI! But all the core stuff will be the same. Architecture Disclaimer: I m explaining my view of the JSCommunicator architecture, which currently may not be 100% correct. But so far it s been enough for me to make my modifications and additions to the code, so it could be of use. One I get a JSCommunicator Founding Father s stamp of approval, I ll be sure to confirm the accuracy. Now to explain how the JSCommunicator code interacts, the use of each code item is described, ignoring all the html and css which will vary according to how you choose to use JSCommunicator. I m also not going to explain jQuery which is a dependency but not specific to WebRTC. The core JSCommunicator code is the following: Each of these files will be presented in what I hope is an intuitive order. The next three files could be considered utils : These two are where the magic happens: Now for some extras: Third party code: Here s a diagram of sorts to help you visualize how the code interacts: jscommArch In sum, 1 - JSCommUI.js handles what is displayed in the UI and feeds data to JSCommManager.js; 2 - JSCommManager.js actually does stuff, feeding data to be displayed to JSCommUI.js; 3 - JSCommManager.js calls functions from the three utils , parseuri.js, webrtc-check.js and jssip-helpher.js which organizes the data from config.js; 4 - JSCommManager.js initializes a SIP User Agent based on the implementation in Arbiter.js. When making any changes to JSCommunicator, you will likely only be working with JSCommUI.js and JSCommManager.js.

Juliana Louback: JSCommunicator - Setup and Architecture

Preface During Google Summer of Code 2014, I got to work on the Debian WebRTC portal under the mentorship of Daniel Pocock. Now I had every intention of meticulously documenting my progress at each step of development in this blog, but I was a bit late in getting the blog up and running. I ll now be publishing a series of posts to recap all I ve done during GSoC. Better late than never. Intro JSCommunicator is a SIP communication tool developed in HTML and JavaScript. The code was designed to make integrating JSCommunicator with a website or web app as simple as possible. It s quite easy, really. However, I do think a more detailed explanation on how to set things up and a guide to the JSCommunicator architecture could be of use, particularly for those wanting to modify the code in any way. Setup To begin, please fork the JSCommunicator repo. If you are new to git, feel free to follow the steps in section Setup and Clone in this post. If you read the README file (which you always should), you ll see that JSCommunicator needs a SIP proxy that supports SIP over Websockets transport. Some options are: I didn t find a tutorial for Kamailio setup, I did find one for repro setup. And bonus, here you have a great tutorial on how to setup and configure your SIP proxy AND your TURN server. In your project s root directory, you ll see a file named config-sample.js. Make a copy of that file named config.js. The config-sample.js file has comments that are very instructive. In sum, the only thing you have to modify is the turn_servers property and the websocket property. In my case, debrtc.org was the domain registered for testing my project, so my config file has:
turn_servers: [
	  server:"turn:debrtc.org"       
],
Note that unlike the sample, I didn t set a username and password so SIP credentials will be used. Now fill in the websocket property here we use sip5060.net.
websocket:  
    servers: 'wss://ws.sip5060.net',
    connection_recovery_min_interval: 2,
    connection_recovery_max_interval: 30,
   ,
I m pretty sure you can set the connection_recovery properties to whatever you like. Everything else is optional. If you set the user property, specifically display_name and uri, that will be used to fill in the Login form and takes preference over any Remember me data. If you also set sip_auth_password, JSCommunicator will automatically log in. All the other properties are for other optional functionalities and are well explained. You ll need some third-party javascript that is not included in the JSCommunicator git repo. Namely jQuery version 1.4 or higher and ArbiterJS version 1.0. Download jQuery here and ArbiterJS here and place the .js files in your project s root directory. Do make sure that you are including the correct filename in your html file. For example, in phone-dev.shtml, a file named jquery.js is included. The file you downloaded will likely have version numbers in it s file name. So rename the downloaded file or change the content of src in your includes. This is uber trivial, but I ve made the mistake several times. You ll also need JsSIP.js which can be downloaded here. Same naming care must be taken as is the case for jQuery and ArbiterJS. The recently added Instant Messaging component and some of the new features need jQuery-UI - so far version 1.11.* is known to work. From the downloaded .zip all you need is the jquery-ui-...js file and the jquery-ui-...css file, also to be placed in the project s root directory. If you ll be using the internationalization support you ll also need jquery.i18n.properties.js. To try out JSCommunicator, deploy the website locally by copying your project directory to the apache document root directory (provided you are using apache, which is a good idea.). You ll likely have to restart your server before this works. Now the demo .shtml pages only have a header with all the necessary includes, then a Server Side Include for the body of the page, with all the JSCommunicator html. The html content is in the file jscommunicator.inc. You can enable SSI on apache, OR you can simply copy and paste the content of jscommunicator.inc into phone-dev.shmtl. Start up apache, open a browser and navigate to localhost/jscommunicator/phone-dev.shmtl and you should see: jscommunicatorRaw Actually, pending updates to JSCommunicator, you should see a brand new UI! But all the core stuff will be the same. Architecture Disclaimer: I m explaining my view of the JSCommunicator architecture, which currently may not be 100% correct. But so far it s been enough for me to make my modifications and additions to the code, so it could be of use. One I get a JSCommunicator Founding Father s stamp of approval, I ll be sure to confirm the accuracy. Now to explain how the JSCommunicator code interacts, the use of each code item is described, ignoring all the html and css which will vary according to how you choose to use JSCommunicator. I m also not going to explain jQuery which is a dependency but not specific to WebRTC. The core JSCommunicator code is the following: Each of these files will be presented in what I hope is an intuitive order. The next three files could be considered utils : These two are where the magic happens: Now for some extras: Third party code: Here s a diagram of sorts to help you visualize how the code interacts: jscommArch In sum, 1 - JSCommUI.js handles what is displayed in the UI and feeds data to JSCommManager.js; 2 - JSCommManager.js actually does stuff, feeding data to be displayed to JSCommUI.js; 3 - JSCommManager.js calls functions from the three utils , parseuri.js, webrtc-check.js and jssip-helpher.js which organizes the data from config.js; 4 - JSCommManager.js initializes a SIP User Agent based on the implementation in Arbiter.js. When making any changes to JSCommunicator, you will likely only be working with JSCommUI.js and JSCommManager.js.

9 August 2014

Steve Kemp: Rebooting the CMS

I run a cluster for the Debian Administration website, and the code is starting to show its age. Unfortunately the code is not so modern, and has evolved a lot of baggage. Given the relatively clean separation between the logical components I'm interested in trying something new. In brief the current codebase allows: It crossed my mind the other night that it might make sense to break this code down into a number of mini-servers - a server to handle all article-related things, a server to handle all poll-related things, etc. If we have a JSON endpoint that will allow: Then we could have a very thin shim/server on top of that whihc would present the public API. Of course the internal HTTP overhead might make this unworkable, but it is an interesting approach to the problem, and would allow the backend storage to be migrated in the future without too much difficulty. At the moment I've coded up two trivial servers, one for getting user-data (to allow login requests to succeed), and one for getting article data. There is a tiny presentation server written to use those back-end servers and it seems like an approach that might work. Of course deployment might be a pain.. It is still an experiment rather than a plan, but it could work out: http://github.com/skx/snooze/.

8 August 2014

Ian Donnelly: The Line Plug-In

Hi Everybody, As you may have noticed I wrote a new plug-in for Elektra called line . I used it for a lot of examples in my tutorial, How-To: Write a Plug-In. The line plug-in is a very simple storage plug-in for Elektra. This plug-in stores files into the Elektra Key Database creating a new Key for each line and setting the string value of the Key to the string value of the line of that file. So if we have a file called hello.txt :

Hello
World!

And we mount it to kdb like so: kdb mount ~/line.txt system/hello_line line. The output of kdb ls system/hello_line the output would be:

system/hello_line/#1
system/hello_line/#
2

With the getString values of #1 and #2 being Hello and World! respectively. If this seems like a very simple plug-in, that s because it is. Obviously, this plug-in isn t a great showcase for the robustness of Elektra, any data structure could store a file line by line relatively easy, so why did we add a line plug-in at all? The answer is that we included a line plug-in to allow any line-based file to use functions of Elektra, particularly the new Merge function. My Google Summer of Code project is to allow for automatic three-way merge of Debian conffiles during package upgrades as opposed to the current prompt and manual merging a user must do if a conffile is edited. Using Elektra and the new mergecode we can mount a conffile with the best plug-in for it, (the ini plug-in for Samba s smb.conf for instance) and that allows for a very powerful merging ability with a lot more success than a simple diff merge. However, there are a lot of conffiles that don t use any particular standard (such as ini, xml, or JSON) to store data. That is where the line plug-in comes in. We can still mount these files using the line plug-in and attempt a merge. Of course it is much more likely to have conflicts, and this type of merge is still susceptible to many of the same flaws as regular file merges (such as not being able to detect when a line has been moved), but it simple cases, the merge may succeed which would reduce the overall number of times a user would be prompted during an upgrade. Basically, I wrote a line plug-in for Elektra as a fallback for conffile merges when we can t mount the conffile in any more meaningful way. While merges using KeySets that were mounted using line are more likely to fail than other, more specialized plug-ins, there are cases that these merges will succeed and the user will not have to deal with a confusing prompt. The whole point of my Google Summer of Code project is to make upgrading packages and dealing with conffiles much smoother and easier than it is now by including a three-way mere and this line plug-in will help with this goal. Sincerely,
Ian S. Donnelly

5 August 2014

Andrew Pollock: [geek] Lifehacking with NFC, Tasker and HabitRPG

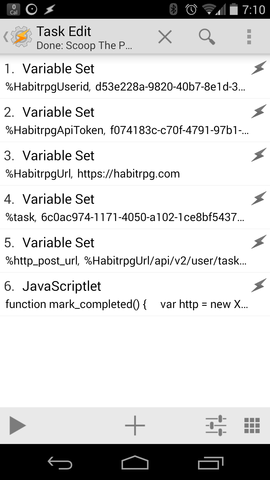
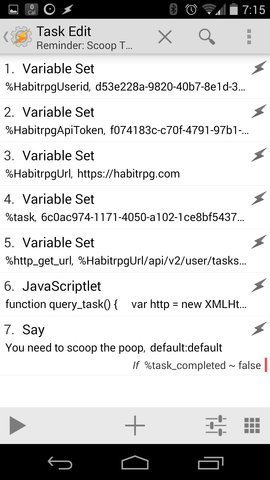
Oh man, I'm such a geek... Being a single parent has required a considerable amount of self-discipline on my behalf. I find I do best in an environment with routine to make sure stuff gets done. One of the things I did to try and make sure stuff got done was to form positive habits. To help and make this a bit more "fun", I started using HabitRPG, an online role-playing game based on habits. I've only ever used it in a half-arsed manner, and as a result, I die a lot. Often I'll do my dailies, but then forget to mark them off. Sometimes I just fall off the habit wagon altogether. And die. One of my dailies is to scoop my cat's litterboxes. For whatever reason, I find this a tad onerous, and had found myself falling out of the habit of doing it on a daily basis. My cat deserves better than this, so I wanted to get back on the habit wagon, but make it a bit more "fun" as well. I love NFC, I've been a big NFC weenie for a long time. It's a solution looking for a problem. I have a huge collection of NFC tags, and I've finally found a problem I could use them with. I wanted to make it more frictionless to mark a task as completed in HabitRPG. I didn't want to have to take out my phone, unlock it, open the HabitRPG app and check off the daily task. I just wanted to wave my phone at an NFC tag. Here's how I did it. The inimitable Paul Fenwick, who first inspired me to use HabitRPG, has a way more complicated set up to achieve something similar. The Site Reliability Engineer in me wanted the least number of moving parts and third-parties to have to get from my phone to HabitRPG. After some hunting around, I found this wiki page on integrating Tasker with HabitRPG's API, so based on that breadcrumb, I got hacking. I'd not used Tasker before. I was already using AutomateIt to do some other, reasonably dumb automation on my phone, though. Tasker is a little bit obtuse, and it took me a couple of days of casual fiddling with it to wrap my head around it's usage model. The fact that it can run arbitrary JavaScript, and that NFC Tools integrates with it is where the real awesome lies. So based off the wiki, I crafted a couple of bits of JavaScript, one to mark daily tasks as complete on HabitRPG, and one to query HabitRPG to see if they have been marked as complete. For the former, it was trivial, using NFC Tools, to write an NFC tag that then runs the Tasker task to call the HabitRPG API to mark a daily task as complete. That goal was now complete. The equally satisfying part was also having Tasker do a time-based conditional nag based on the state of the daily task in HabitRPG. So now if it gets to 4:45pm and I haven't scooped the litterboxes, my phone literally tells me I'd better go do it. I've also done the same thing with putting the dishwasher on. I've stuck an NFC tag on the dishwashing powder bottle lid, and I get a conditional reminder before bed time. It used to be an unconditional reminder with AutomateIt, and it was dumb, because I rarely forget to put the dishwasher on. Now, I can use HabitRPG to keep state on it instead. The hunk of JavaScript to update HabitRPG is very simple:
function mark_completed()   
  var http = new XMLHttpRequest();
  http.open("POST", http_post_url, false);
  http.setRequestHeader("x-api-user", global('HabitrpgUserid'));
  http.setRequestHeader("x-api-key", global('HabitrpgApiToken'));
  http.send();
  return(http.responseText); 
 
try   
  var result = mark_completed(); 
  catch(e)   
  var error = e.message; 
 
All of the interesting stuff is defined in variables preceding the JavaScript in the task definition. Here's a screenshot of the Task in Tasker that tells a thousand words: Screenshot of Tasker task that uses HabitRPG API to mark a task complete Similarly, to query HabitRPG, I'm using:
function query_task()   
  var http = new XMLHttpRequest();
  http.open("GET",http_get_url,false);
  http.setRequestHeader("x-api-user", global('HabitrpgUserid'));
  http.setRequestHeader("x-api-key", global('HabitrpgApiToken'));
  http.send();
  var p = JSON.parse(http.responseText);
  return p['completed'];
 
try   
  var task_completed = query_task(); 
  catch(e)   
  var error = e.message; 
 
It's only slightly trickier because you have to parse the JSON blob that comes back. Again, a screenshot. Screenshot of Tasker task that uses HabitRPG API to query task state Now maybe I'll stop dying so much in HabitRPG, my cat will have the clean toilet she deserves, and I'll stop getting reminded about putting the dishwasher on when I already have. Better living through automation, that's my motto.

25 July 2014

Juliana Louback: Extending an xTuple Business Object

xTuple is in my opinion incredibly well designed; the code is clean and the architecture ahderent to a standardized structure. All this makes working with xTuple software quite a breeze. I wanted to integrate JSCommunicator into the web-based xTuple version. JSCommunicator is a SIP communication tool, so my first step was to create an extension for the SIP account data. Luckily for me, the xTuple development team published an awesome tutorial for writing an xTuple extension. xTuple cleverly uses model based business objects for the various features available. This makes customizing xTuple very straightforward. I used the tutorial mentioned above for writing my extension, but soon noticed my goals were a little different. A SIP account has 3 data fields, these being the SIP URI, the account password and an optional display name. xTuple currently has a business object in the core code for a User Account and it would make a lot more sense to simply add my 3 fields to this existing business object rather than create another business object. The tutorial very clearly shows how to extend a business object with another business object, but not how to extend a business object with only new fields (not a whole new object). Now maybe I m just a whole lot slower than most people, but I had a ridiculously had time figuring this out. Mind you, this is because I m slow, because the xTuple documentation and code is understandable and as self-explanatory as it gets. I think it just takes a bit to get used to. Either way, I thought this just might be useful to others so here is how I went about it. Setup First you ll have to set up your xTuple development environment and fork the xtuple and xtuple-extesions repositories as shown in this handy tutorial. A footnote I d like to add is please verify that your version of Vagrant (and anything else you install) is the one listed in the tutorial. I think I spent like two entire days or more on a wild goose (bug) chase trying to set up my environment when the cause of all the errors was that I somehow installed an older version of Vagrant - 1.5.4 instead of 1.6.3. Please don t make the same mistake I did. Actually if for some reason you get the following error when you try using node:
<<ERROR 2014-07-10T23:52:46.948Z>> Unrecoverable exception. Cannot call method 'extend' of undefined
    at /home/vagrant/dev/xtuple/lib/backbone-x/source/model.js:37:39
    at Object.<anonymous> (/home/vagrant/dev/xtuple/lib/backbone-x/source/model.js:1364:3)
    ...
chances are, you have the wrong version. That s what happened to me. The Vagrant Virtual Development Environment automatically installs and configures everything you need, it s ready to go. So if you find yourself installing and updating and apt-gets and etc, you probably did something wrong. Coding So by now we should have the Vagrant Virtual Development Environment set up and the web app up and running and accessible at localhost:8443. So far so good. Disclaimer: You will note that much of this is similar - or rather, nearly identical - to xTuple s tutorial but there are some small but important differences and a few observations I think might be useful. Other Disclaimer: I m describing how I did it, which may or may not be up to snuff . Works for me though. Schema First let s make a schema for the table we will create with the new custom fields. Be sure to create the correct directory stucture, aka /path/to/xtuple-extensions/source/<YOUR EXTENSION NAME>/database/source or in my case /path/to/xtuple-extensions/source/sip_account/database/source, and create the file create_sa_schema.sql, sa is the name of my schema. This file will contain the following lines:
do $$
  /* Only create the schema if it hasn't been created already */
  var res, sql = "select schema_name from information_schema.schemata where schema_name = 'sa'",
  res = plv8.execute(sql);
  if (!res.length)  
    sql = "create schema sa; grant all on schema sa to group xtrole;"
    plv8.execute(sql);
   
$$ language plv8;
Of course, feel free to replace sa with your schema name of choice. All the code described here can be found in my xtuple-extensions fork, on the sip_ext branch. Table We ll create a table containing your custom fields and a link to an existing table - the table for the existing business object you want to extend. If you re wondering why make a whole new table for a few extra fields, here s a good explanation, the case in question is adding fields to the Contact business object. You need to first figure out what table you want to link to. This might not be uber easy. I think the best way to go about it is to look at the ORMs. The xTuple ORMs are a JSON mapping between the SQL tables and the object-oriented world above the database, they re .json files found at path/to/xtuple/node_modules/xtuple/enyo-client/database/orm/models for the core business objects and at path/to/xtuplenyo-client/extensions/source/<EXTENSION NAME>/database/orm/models for exension business objects. I ll give two examples. If you look at contact.json you will see that the Contact business object refers to the table cntct . Look for the type : Contact on the line above, so we know it s the Contact business object. In my case, I wanted to extend the UserAccount and UserAccountRelation business objects, so check out user_account.json. The table listed for UserAccount is xt.usrinfo and the table listed for UserAccountRelation is xt.usrlite. A closer look at the sql files for these tables (usrinfo.sql and usrlite.sql) revealed that usrinfo is in fact a view and usrlite is A light weight table of user information used to avoid punishingly heavy queries on the public usr view . I chose to refer to xt.usrlite - that or I received error messages when trying the other table names. Now I ll make the file /path/to/xtuple-extensions/source/sip_account/database/source/usrlitesip.sql, to create a table with my custom fields plus the link to the urslite table. Don t quote me on this, but I m under the impression that this is the norm for naming the sql file joining tables: the name of the table you are referring to ( usrlite in this case) and your extension s name. Content of usrlitesip.sql:
select xt.create_table('usrlitesip', 'sa');
select xt.add_column('usrlitesip','usrlitesip_id', 'serial', 'primary key', 'sa');
select xt.add_column('usrlitesip','usrlitesip_usr_username', 'text', 'references xt.usrlite (usr_username)', 'sa');
select xt.add_column('usrlitesip','usrlitesip_uri', 'text', '', 'sa');
select xt.add_column('usrlitesip','usrlitesip_name', 'text', '', 'sa');
select xt.add_column('usrlitesip','usrlitesip_password', 'text', '', 'sa');
comment on table sa.usrlitesip is 'Joins User with SIP account';
Breaking it down, line 1 creates the table named usrlitesip (no duh), line 2 is for the primary key (self-explanatory). You can then add any columns you like, just be sure to add one that references the table you want to link to. I checked usrlite.sql and saw the primary key is usr_username, be sure to use the primary key of the table you are referencing. You can check what you made by executing the .sql files like so:
$ cd /path/to/xtuple-extensions/source/sip_account/database/source
$ psql -U admin -d dev -f create_sa_schema.sql
$ psql -U admin -d dev -f usrlitesip.sql
After which you will see the table with the columns you created if you enter:
$ psql -U admin -d dev -c "select * from sa.usrlitesip;"
Now create the file /path/to/xtuple-extensions/source/sip_account/database/source/manifest.js to put the files together and in the right order. It should contain:
 
  "name": "sip_account",
  "version": "1.4.1",
  "comment": "Sip Account extension",
  "loadOrder": 999,
  "dependencies": ["crm"],
  "databaseScripts": [
    "create_sa_schema.sql",
    "usrlitesip.sql",
    "register.sql"
  ]
 
I think the name has to be the same you named your extension directory as in /path/to/xtuple-extensions/source/<YOUR EXTENSION NAME>. I think the comment can be anything you like and you want your loadOrder to be high so it s the last thing installed (as it s an add on.) So far we are doing exactly what s instructed in the xTuple tutorial. It s repetitive, but I think you can never have too many examples to compare to. In databaseScripts you will list the two .sql files you just created for the schema and the table, plus another file to be made in the same directory named register.sql. I m not sure why you have to make the register.sql or even if you indeed have to. If you leave the file empty, there will be a build error, so put a ; in the register.sql or remove the line register.sql from manifest.js as I think for now we are good without it. Now let s update the database with our new extension:
$ cd /path/to/xtuple
$ ./scripts/build_app.js -d dev -e ../xtuple-extensions/source/sip_account
$ psql -U admin -d dev -c "select * from xt.ext;"
That last command should display a table with a list of extensions; the ones already in xtuple like crm and billing and some others plus your new extension, in this case sip_account . When you run build_app.js you ll probably see a message along the lines of <Extension name> has no client code, not building client code and that s fine because yeah, we haven t worked on the client code yet. ORM Here s where things start getting different. So ORMs link your object to an SQL table. But we DON T want to make a new business object, we want to extend an existing business object, so the ORM we will make will be a little different than the xTuple tutorial. Steve Hackbarth kindly explained this new business object/existing business object ORM concept here. First we ll create the directory /path/to/xtuple-extensions/source/sip_account/database/orm/ext, according to xTuple convention. ORMs for new business objects would be put in /path/to/xtuple-extensions/source/sip_account/database/orm/models. Now we ll create the .json file /path/to/xtuple-extensions/source/sip_account/database/orm/ext/user_account.jscon for our ORM. Once again, don t quote me on this, but I think the name of the file should be the name of the business object you are extending, as is done in the turorial example extending the Contact object. In our case, UserAccount is defined in user_account.json and that s what I named my extension ORM too. Here s what you should place in it:
 1 [
 2    
 3     "context": "sip_account",
 4     "nameSpace": "XM",
 5     "type": "UserAccount",
 6     "table": "sa.usrlitesip",
 7     "isExtension": true,
 8     "isChild": false,
 9     "comment": "Extended by Sip",
10     "relations": [
11        
12         "column": "usrlitesip_usr_username",
13         "inverse": "username"
14        
15     ],
16     "properties": [
17        
18         "name": "uri",
19         "attr":  
20           "type": "String",
21           "column": "usrlitesip_uri",
22           "isNaturalKey": true
23          
24        ,
25        
26         "name": "displayName",
27         "attr":  
28           "type": "String",
29           "column": "usrlitesip_name"
30          
31        ,
32        
33         "name": "sipPassword",
34         "attr":  
35           "type": "String",
36           "column": "usrlitesip_password"
37          
38        
39     ],
40     "isSystem": true
41    ,
42    
43     "context": "sip_account",
44     "nameSpace": "XM",
45     "type": "UserAccountRelation",
46     "table": "sa.usrlitesip",
47     "isExtension": true,
48     "isChild": false,
49     "comment": "Extended by Sip",
50     "relations": [
51        
52         "column": "usrlitesip_usr_username",
53         "inverse": "username"
54        
55     ],
56     "properties": [
57        
58         "name": "uri",
59         "attr":  
60           "type": "String",
61           "column": "usrlitesip_uri",
62           "isNaturalKey": true
63          
64        ,
65        
66         "name": "displayName",
67         "attr":  
68           "type": "String",
69           "column": "usrlitesip_name"
70          
71        ,
72        
73         "name": "sipPassword",
74         "attr":  
75           "type": "String",
76           "column": "usrlitesip_password"
77          
78        
79     ],
80     "isSystem": true
81    
82 ]
Note the context is my extension name, because the context + nameSpace + type combo has to be unique. We already have a UserAccount and UserAccountRelation object in the XM namespace in the xtuple context in the original user_account.json, now we will have a UserAccount and UserAccountRelation object in the XM namespace in the sip_account conext. What else is important? Note that isExtension is true on lines 7 and 47 and the relations item contains the column of the foreign key we referenced. This is something you might want to verify: column (lines 12 and 52) is the name of the attribute on your table. When we made a reference to the primary key usr_usrname from the xt.usrlite table we named that column usrlitesip_usr_usrname. But the inverse is the attribute name associated with the original sql column in the original ORM. Did I lose you? I had a lot of trouble with this silly thing. In the original ORM that created a new UserAccount business object, the primary key attribute is named username , as can be seen here. That is what should be used for the inverse value. Not the sql column name (usr_username) but the object attribute name (username). I m emphasizing this because I made that mistake and if I can spare you the pain I will. If we rebuild our extension everything should come along nicely, but you won t see any changes just yet in the web app because we haven t created the client code. Client Create the directory /path/to/xtuple-extensions/source/sip_account/client which is where we ll keep all the client code. Extend Workspace View I want the fields I added to show up on the form to create a new User Account, so I need to extend the view for the User Account workspace. I ll start by creating a directory /path/to/xtuple-extensions/source/sip_account/client/views and in it creating a file named workspace.js containing this code:
XT.extensions.sip_account.initWorkspace = function ()  
	var extensions = [
  	 kind: "onyx.GroupboxHeader", container: "mainGroup", content: "_sipAccount".loc() ,
  	 kind: "XV.InputWidget", container: "mainGroup", attr: "uri"  ,
  	 kind: "XV.InputWidget", container: "mainGroup", attr: "displayName"  ,
  	 kind: "XV.InputWidget", container: "mainGroup", type:"password", attr: "sipPassword"  
	];
	XV.appendExtension("XV.UserAccountWorkspace", extensions);
 ;
So I m initializing my workspace and creating an array of items to add (append) to view XV.UserAccountWorkspace. The first item is this onyx.GroupboxHeader which is a pretty divider for my new form fields, the kind you find in the web app at Setup > User Accounts, like Overview . I have no idea what other options there are for container other than mainGroup , so let s stick to that. I ll explain content: _sipAccount .loc() in a bit. Next I created three input fields of the XV.InputWidget kind. This also confused me a bit as there are different kinds of input to be used, like dropdowns and checkboxes. The only advice I can give is snoop around the webapp, find an input you like and look up the corresponding workspace.js file to see what was used. What we just did is (should be) enough for the new fields to show up on the User Account form. But before we see things change, we have to package the client. Create the file /path/to/xtuple-extensions/source/sip_account/client/views/package.js. This file is needed to package groups of files and indicates the order the files should be loaded (for more on that, see this). For now, all the file will contain is:
enyo.depends(
"workspace.js"
);
You also need to package the views directory containing workspace.js, so create the file Create the file /path/to/xtuple-extensions/source/sip_account/client/package.js and in it show that the directory views and its contents must be part of the higher level package:
enyo.depends(
"views"
);
I like to think of it as a box full of smaller boxes. This will sound terrible, but apparently you also need to create the file /path/to/xtuple-extensions/source/sip_account/client/core.js containing this line:
XT.extensions.icecream =  ;
I don t know why. As soon as I find out I ll be sure to inform you. As we ve added a file to the client directory, be sure to update /path/to/xtuple-extensions/source/sip_account/client/package.js so it included the new file:
enyo.depends(
"core.js",
"views"
);
Translations Remember _sipAccount .loc() in our workspace.js file? xTuple has great internationalization support and it s easy to use. Just create the directory and file /path/to/xtuple-extensions/source/sip_account/client/en/strings.js and in it put key-value pairs for labels and their translation, like this:
(function ()  
  "use strict";
  var lang = XT.stringsFor("en_US",  
    "_sipAccount": "Sip Account",
    "_uri": "Sip URI",
    "_displayName": "Display Name",
    "_sipPassword": "Password"
   );
  if (typeof exports !== 'undefined')  
    exports.language = lang;
   
 ());
So far I included all the labels I used in my Sip Account form. If you write the wrong label (key) or forget to include a corresponding key-value pair in strings.js, xTuple will simply name your lable _lableName , underscore and all. Now build your extension and start up the server:
$ cd /path/to/xtuple 
$ ./scripts/build_app.js -d dev -e ../xtuple-extensions/source/sip_account
$ node node-datasource/main.js
If the server is already running, just stop it and restart it to reflect your changes. Now if you go to Setup > User Accounts and click the + button, you should see a nice little addition to the form with a Sip Account divider and three new fields. Nice, eh? Extend Parameters Currently you can search your User Accounts list using any of the User Account fields. It would be nice to be able to search with the Sip account fields we added as well. To do that, let s create the directory /path/to/xtuple-extensions/source/sip_account/client/widgets and there create the file parameter.js to extend XV.UserAccountListParameters. One again, you ll have to look this up. In the xTuple code you ll find the application s parameter.js in /path/to/xtuple/enyo-client/application/source/widgets. Search for the business object you are extending (for example, XV.UserAccount) and look for some combination of the business object name and Parameters . If there s more than one, try different ones. Not a very refined method, but it worked for me. Here s the content of our parameter.js:
XT.extensions.sip_account.initParameterWidget = function ()  
  var extensions = [
     kind: "onyx.GroupboxHeader", content: "_sipAccount".loc() ,
     name: "uri", label: "_uri".loc(), attr: "uri", defaultKind: "XV.InputWidget" ,
     name: "displayName", label: "_displayName".loc(), attr: "displayName", defaultKind: "XV.InputWidget" 
  ];
  XV.appendExtension("XV.UserAccountListParameters", extensions);
 ;
Node that I didn t include a search field for the password attribute for obvious reasons. Now once again, we package this new code addition by creating a /path/to/xtuple-extensions/source/sip_account/client/widgets/package.js file:
enyo.depends(
"parameter.js"
);
We also have to update /path/to/xtuple-extensions/source/sip_account/client/package.js:
enyo.depends(
"core.js",
"widgets"
"views"
);
Rebuild the extension (and restart the server) and go to Setup > User Accounts. Press the magnifying glass button on the upper left side of the screen and you ll see many options for filtering the User Accounts, among them the SIP Uri and Display Name. Extend List View You might want your new fields to show up on the list of User Accounts. There s a bit of an issue here because unlike what we did in workspace.js and parameter.js, we can t append new things to the list of UserAccounts with the funciton XV.appendExtension(args). First I tried overwriting the original UserAccountList, which works but it s far from ideal as this could result in a loss of data from the core implementation. After some discussion with the xTuple dev community, now there s a better alternative: Create the file /path/to/xtuple-extensions/source/sip_account/client/views/list.js and add the following:
1 var oldUserAccountListCreate = XV.UserAccountList.prototype.create;
2 
3 XV.UserAccountList.prototype.create = function ()  
4   oldUserAccountListCreate.apply(this, arguments);
5   this.createComponent(
6    kind: "XV.ListColumn", container: this.$.listItem, components: [
7         kind: "XV.ListAttr", attr: "uri" 
8    ] )
9  ;
To understand what I m doing, check out the XV.UserAccountList implementation in /path/to/xtuple/enyo-client/application/source/views/list.js the entire highlighted part. What we are doing is extending XV.UserAccountList through prototype-chaining ; this is how inheritance works with Enyo. In line 1 we create a prototype and in line 4 we inherit the features including original components array which the list is based on. We then create an additional component immitating the setup shown in XV.UserAccountList: An XV.ListColumn containing an XV.ListAttr, which should be placed in the XV.ListItem components array as is done with the existing columns (refer to implementation). Components can or should (?) have names which are used to access said components. You d refer to a specific component by the this.$.componentName hash. The components in XV.UserAccountList don t have names, so Enyo automatically names them (apparently) based on the kind name, for example something of the kind ListItem is named listItem. I found this at random after a lot of trial and error and it s not a bullet proof solution. Can be bettered. It s strange because if you encapsulate that code with
XT.extensions.sip_account.initList = function ()  
 //Code here
 ;
as is done with parameter.js and workspace.js (and in the xTuple tutorial you are supposed to do that with a new business object), it doesn t work. I have no idea why. This might be wrong or against xTuple coding norms; I will find out and update this post ASAP. But it does work this way. * shrugs * That said, as we ve created the list.js file, we need to ad it to our package by editing /path/to/xtuple-extensions/source/sip_account/client/views/package.js:
enyo.depends(
"list.js",
"workspace.js"
);
That s all. Rebuild the app and restart your server and when you select Setup > User Accounts in the web app you should see the Sip URI displayed on the User Accounts that have the Sip Account data. Add a new User Account to try this out.

Tim Retout: London.pm's July 2014 tech meeting

Last night, I went to the London.pm tech meeting, along with a couple of colleagues from CV-Library. The talks, combined with the unusually hot weather we're having in the UK at the moment, combined with my holiday all last week, make it feel like I'm at a software conference. :) The highlight for me was Thomas Klausner's talk about OX (and AngularJS). We bought him a drink at the pub later to pump him for information about using Bread::Board, with some success. It was worth the long, late commute back to Southampton. All very enjoyable, and I hope they have more technical meetings soon. I'm planning to attend the London Perl Workshop later in the year.

23 July 2014

Russ Allbery: WebAuth 4.6.1

This is a bug-fix release of the WebAuth site-wide web authentication system. As is typical, I accumulated a variety of minor bug fixes and improvements that I wanted to get into a release before starting larger work (in this case, adding JSON support for the user information service protocol). The most severe bug fix is something that only folks at Stanford would notice: support for AuthType StanfordAuth was broken in the 4.6.0 release. This is for legacy compatibility with WebAuth 2.5. It has been fixed in this release. In other, more minor bug fixes, build issues when remctl support is disabled have been fixed, expiring password warnings are shown in WebLogin after any POST-based authentication, the confirmation page is forced if authorization identity switching is available, the username field is verified before multifactor authentication to avoid subsequent warnings, newlines and tabs are allowed in the XML sent from the WebKDC for user messages, empty RT and ST parameters are correctly diagnosed, and there are some documentation improvements. The main new feature in this release is support for using FAST armor during password authentication in mod_webkdc. A new WebKdcFastArmorCache directive can be set to point at a Kerberos ticket cache to use for FAST armor. If set, FAST is required, so the KDC must support it as well. This provides better wire security for the initial password authentication to protect against brute-force dictionary attacks against the password by a passive eavesdropper. This release also adds a couple of new factor types, mp (mobile push) and v (voice), that Stanford will use as part of its Duo Security integration. Note that, for the FAST armor feature, there is also an SONAME bump in the shared library in this release. Normally, I wouldn't bump the SONAME in a minor release, but in this case the feature was fairly minor and most people will not notice the change, so it didn't feel like it warranted a major release. I'm still of two minds about that, but oh well, it's done and built now. (At least I noticed that the SONAME bump was required prior to the release.) You can get the latest release from the official WebAuth distribution site or from my WebAuth distribution pages.

Next.

Previous.