Search Results: "ag"

18 December 2015

Carl Chenet: My Free activities in November 2015

Personal projects: Debian : Others: That s all folks! See you next month!

Joachim Breitner: A multitude of early Christmas presents

Today was a nice day with a surprising number of early Christmas presents:

Martin Pitt: What s new in autopkgtest: LXD, MaaS, apt pinning, and more

The last two major autopkgtest releases (3.18 from November, and 3.19 fresh from yesterday) bring some new features that are worth spreading. New LXD virtualization backend 3.19 debuts the new adt-virt-lxd virtualization backend. In case you missed it, LXD is an API/CLI layer on top of LXC which introduces proper image management, seamlessly use images and containers on remote locations, intelligently caching them locally, automatically configure performant storage backends like zfs or btrfs, and just generally feels really clean and much simpler to use than the classic LXC. Setting it up is not complicated at all. Install the lxd package (possibly from the backports PPA if you are on 14.04 LTS), and add your user to the lxd group. Then you can add the standard LXD image server with
  lxc remote add lco https://images.linuxcontainers.org:8443
and use the image to run e. g. the libpng test from the archive:
  adt-run libpng --- lxd lco:ubuntu/trusty/i386
  adt-run libpng --- lxd lco:debian/sid/amd64
The adt-virt-lxd.1 manpage explains this in more detail, also how to use this to run tests in a container on a remote host (how cool is that!), and how to build local images with the usual autopkgtest customizations/optimizations using adt-build-lxd. I have btrfs running on my laptop, and LXD/autopkgtest automatically use that, so the performance really rocks. Kudos to St phane, Serge, Tycho, and the other LXD authors! The motivation for writing this was to make it possible to move our armhf testing into the cloud (which for $REASONS requires remote containers), but I now have a feeling that soon this will completely replace the existing adt-virt-lxc virt backend, as its much nicer to use. It is covered by the same regression tests as the LXC runner, and from the perspective of package tests that you run in it it should behave very similar to LXC. The one problem I m aware of is that autopkgtest-reboot-prepare is broken, but hardly anything is using that yet. This is a bit complicated to fix, but I expect it will be in the next few weeks. MaaS setup script While most tests are not particularly sensitive about which kind of hardware/platform they run on, low-level software like the Linux kernel, GL libraries, X.org drivers, or Mir very much are. There is a plan for extending our automatic tests to real hardware for these packages, and being able to run autopkgtests on real iron is one important piece of that puzzle. MaaS (Metal as a Service) provides just that it manages a set of machines and provides an API for installing, talking to, and releasing them. The new maas autopkgtest ssh setup script (for the adt-virt-ssh backend) brings together autopkgtest and real hardware. Once you have a MaaS setup, get your API key from the web UI, then you can run a test like this:
  adt-run libpng --- ssh -s maas -- \
     --acquire "arch=amd64 tags=touchscreen" -r wily \
     http://my.maas.server/MAAS 123DEADBEEF:APIkey
The required arguments are the MaaS URL and the API key. Without any further options you will get any available machine installed with the default release. But usually you want to select a particular one by architecture and/or tags, and install a particular distro release, which you can do with the -r/--release and --acquire options. Note that this is not wired into Ubuntu s production CI environment, but it will be. Selectively using packages from -proposed Up until a few weeks ago, autopkgtest runs in the CI environment were always seeing/using the entirety of -proposed. This often led to lockups where an application foo and one of its dependencies libbar got a new version in -proposed at the same time, and on test regressions it was not clear at all whose fault it was. This often led to perfectly good packages being stuck in -proposed for a long time, and a lot of manual investigation about root causes. . These days we are using a more fine-grained approach: A test run is now specific for a trigger , that is, the new package in -proposed (e. g. a new version of libbar) that caused the test (e. g. for foo ) to run. autopkgtest sets up apt pinning so that only the binary packages for the trigger come from -proposed, the rest from -release. This provides much better isolation between the mush of often hundreds of packages that get synced or uploaded every day. This new behaviour is controlled by an extension of the --apt-pocket option. So you can say
  adt-run --apt-pocket=proposed=src:foo,libbar1,libbar-data ...
and then only the binaries from the foo source, libbar1, and libbar-data will come from -proposed, everything else from -release. Caveat:Unfortunately apt s pinning is rather limited. As soon as any of the explicitly listed packages depends on a package or version that is only available in -proposed, apt falls over and refuses the installation instead of taking the required dependencies from -proposed as well. In that case, adt-run falls back to the previous behaviour of using no pinning at all. (This unfortunately got worse with apt 1.1, bug report to be done). But it s still helpful in many cases that don t involve library transitions or other package sets that need to land in lockstep. Unified testbed setup script There is a number of changes that need to be made to testbeds so that tests can run with maximum performance (like running dpkg through eatmydata, disabling apt translations, or automatically using the host s apt-cacher-ng), reliable apt sources, and in a minimal environment (to detect missing dependencies and avoid interference from unrelated services these days the standard cloud images have a lot of unnecessary fat). There is also a choice whether to apply these only once (every day) to an autopkgtest specific base image, or on the fly to the current ephemeral testbed for every test run (via --setup-commands). Over time this led to quite a lot of code duplication between adt-setup-vm, adt-build-lxc, the new adt-build-lxd, cloud-vm-setup, and create-nova-image-new-release. I now cleaned this up, and there is now just a single setup-commands/setup-testbed script which works for all kinds of testbeds (LXC, LXD, QEMU images, cloud instances) and both for preparing an image with adt-buildvm-ubuntu-cloud, adt-build-lx[cd] or nova, and with preparing just the current ephemeral testbed via --setup-commands. While this is mostly an internal refactorization, it does impact users who previously used the adt-setup-vm script for e. g. building Debian images with vmdebootstrap. This script is now gone, and the generic setup-testbed entirely replaces it. Misc Aside from the above, every new version has a handful of bug fixes and minor improvements, see the git log for details. As always, if you are interested in helping out or contributing a new feature, don t hesitate to contact me or file a bug report.

17 December 2015

Iain R. Learmonth: YubiKey NEO as an OpenPGP token

I was first interested in the idea of using a smartcard to store OpenPGP subkeys when I joined the Free Software Foundation Europe as a Fellow and recieved my FSFE Fellowship Card. By performing all cryptographic operations on the smartcard it would remove almost all the routes by which the secret key material could be compromised as the host operating system never has access to that secret material. I decided that this was something I wanted to try out and I purchased two Cherry G83-6644 keyboards. One of the nice things I noticed about this product was that it was both FIPS 201 approved and GOST R approved. If both the Americans and the Russians could agree it was a good keyboard, it had a good chance of being a good keyboard. A little udev magic to handle permissions and the card worked great, but there was a problem. This was not the most friendly form-factor and a USB keyboard was a bit big to be carrying around to use the smartcard with my laptop. I intended to get a smaller reader for my laptop but never did and the Fellowship card fell into disuse. Later, I came across the YubiKey NEO. The YubiKey NEO is capable of emulating an OpenPGP smartcard, just like the Fellowship card, but in the form-factor of a USB stick. This improved form factor was enough to make me give it a go. Since August 2015 I've been using a YubiKey NEO to store my OpenPGP subkeys and, excluding some occasional udev mishaps, it's been working great. When you first get the YubiKey NEO, it does not have the OpenPGP applet enabled. You'll need to enable it yourself using the ykpersonalize tool:

sudo apt install yubikey-personalization  
sudo ykpersonalize -m 82  
Once you've enabled the OpenPGP module, the USB product ID will change, and you can now add a udev rule that will allow you to interact with the device when it's plugged in as your normal user.
/etc/udev/rules.d/99-yubikeys.rules:
------------------------------------
SUBSYSTEMS=="usb", ATTRS idVendor =="1050",ATTRS idProduct =="0111", OWNER="irl"  
This is not the correct way to do this. I've set it so that any YubiKey with the OpenPGP module inserted is set to be owned by my username (irl) when the correct way to do this would be to have it set to the current console user. I do not know enough udev magic to know how to do that. UPDATE: I recieved a lot of good feedback on this, which you can find here. Of course, for my key 0xE9846C49, this key started life as an ordinary key just stored on my laptop, so seperating subkeys onto the YubiKey has not massively increased security as an attacker that has stolen the secret key material can generate new subkeys. I would hopefully notice these new rogue subkeys (I do monitor keyservers for changes to my key regularly), but I would prefer to make the possibility of the key being compromised as low as possible. For this reason I am performing a key transition to a new key, F540ABCD, where the master key is stored offline. In my next post, hopefully within a day or so, I'll explain how I used Tails to generate a key offline and load the subkeys into the YubiKey.

Alberto Garc a: Improving disk I/O performance in QEMU 2.5 with the qcow2 L2 cache

QEMU 2.5 has just been released, with a lot of new features. As with the previous release, we have also created a video changelog. I plan to write a few blog posts explaining some of the things I have been working on. In this one I m going to talk about how to control the size of the qcow2 L2 cache. But first, let s see why that cache is useful. The qcow2 file format qcow2 is the main format for disk images used by QEMU. One of the features of this format is that its size grows on demand, and the disk space is only allocated when it is actually needed by the virtual machine. A qcow2 file is organized in units of constant size called clusters. The virtual disk seen by the guest is also divided into guest clusters of the same size. QEMU defaults to 64KB clusters, but a different value can be specified when creating a new image: qemu-img create -f qcow2 -o cluster_size=128K hd.qcow2 4G In order to map the virtual disk as seen by the guest to the qcow2 image in the host, the qcow2 image contains a set of tables organized in a two-level structure. These are called the L1 and L2 tables. There is one single L1 table per disk image. This table is small and is always kept in memory. There can be many L2 tables, depending on how much space has been allocated in the image. Each table is one cluster in size. In order to read or write data to the virtual disk, QEMU needs to read its corresponding L2 table to find out where that data is located. Since reading the table for each I/O operation can be expensive, QEMU keeps a cache of L2 tables in memory to speed up disk access.
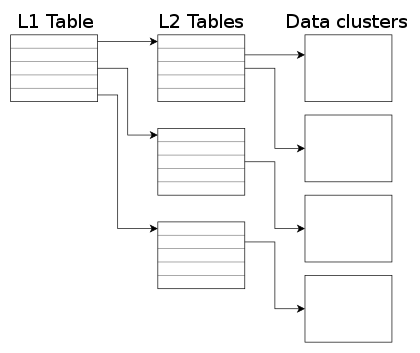
The L2 cache can have a dramatic impact on performance. As an example, here s the number of I/O operations per second that I get with random read requests in a fully populated 20GB disk image:
L2 cache size Average IOPS
1 MB 5100
1,5 MB 7300
2 MB 12700
2,5 MB 63600
If you re using an older version of QEMU you might have trouble getting the most out of the qcow2 cache because of this bug, so either upgrade to at least QEMU 2.3 or apply this patch. (in addition to the L2 cache, QEMU also keeps a refcount cache. This is used for cluster allocation and internal snapshots, but I m not covering it in this post. Please refer to the qcow2 documentation if you want to know more about refcount tables) Understanding how to choose the right cache size In order to choose the cache size we need to know how it relates to the amount of allocated space. The amount of virtual disk that can be mapped by the L2 cache (in bytes) is: disk_size = l2_cache_size * cluster_size / 8 With the default values for cluster_size (64KB) that is disk_size = l2_cache_size * 8192 So in order to have a cache that can cover n GB of disk space with the default cluster size we need l2_cache_size = disk_size_GB * 131072 QEMU has a default L2 cache of 1MB (1048576 bytes) so using the formulas we ve just seen we have 1048576 / 131072 = 8 GB of virtual disk covered by that cache. This means that if the size of your virtual disk is larger than 8 GB you can speed up disk access by increasing the size of the L2 cache. Otherwise you ll be fine with the defaults. How to configure the cache size Cache sizes can be configured using the -drive option in the command-line, or the blockdev-add QMP command. There are three options available, and all of them take bytes: There are two things that need to be taken into account:
  1. Both the L2 and refcount block caches must have a size that is a multiple of the cluster size.
  2. If you only set one of the options above, QEMU will automatically adjust the others so that the L2 cache is 4 times bigger than the refcount cache.
This means that these three options are equivalent: -drive file=hd.qcow2,l2-cache-size=2097152
-drive file=hd.qcow2,refcount-cache-size=524288
-drive file=hd.qcow2,cache-size=2621440
Although I m not covering the refcount cache here, it s worth noting that it s used much less often than the L2 cache, so it s perfectly reasonable to keep it small: -drive file=hd.qcow2,l2-cache-size=4194304,refcount-cache-size=262144 Reducing the memory usage The problem with a large cache size is that it obviously needs more memory. QEMU has a separate L2 cache for each qcow2 file, so if you re using many big images you might need a considerable amount of memory if you want to have a reasonably sized cache for each one. The problem gets worse if you add backing files and snapshots to the mix. Consider this scenario:
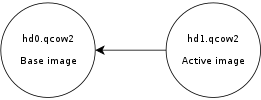
Here, hd0 is a fully populated disk image, and hd1 a freshly created image as a result of a snapshot operation. Reading data from this virtual disk will fill up the L2 cache of hd0, because that s where the actual data is read from. However hd0 itself is read-only, and if you write data to the virtual disk it will go to the active image, hd1, filling up its L2 cache as a result. At some point you ll have in memory cache entries from hd0 that you won t need anymore because all the data from those clusters is now retrieved from hd1. Let s now create a new live snapshot:
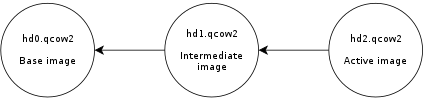
Now we have the same problem again. If we write data to the virtual disk it will go to hd2 and its L2 cache will start to fill up. At some point a significant amount of the data from the virtual disk will be in hd2, however the L2 caches of hd0 and hd1 will be full as a result of the previous operations, even if they re no longer needed. Imagine now a scenario with several virtual disks and a long chain of qcow2 images for each one of them. See the problem? I wanted to improve this a bit so I was working on a new setting that allows the user to reduce the memory usage by cleaning unused cache entries when they are not being used. This new setting is available in QEMU 2.5, and is called cache-clean-interval . It defines an interval (in seconds) after which all cache entries that haven t been accessed are removed from memory. This example removes all unused cache entries every 15 minutes: -drive file=hd.qcow2,cache-clean-interval=900 If unset, the default value for this parameter is 0 and it disables this feature. Further information In this post I only intended to give a brief summary of the qcow2 L2 cache and how to tune it in order to increase the I/O performance, but it is by no means an exhaustive description of the disk format. If you want to know more about the qcow2 format here s a few links: Acknowledgments My work in QEMU is sponsored by Outscale and has been made possible by Igalia and the invaluable help of the QEMU development team.
Enjoy QEMU 2.5!

Simon Josefsson: Let s Encrypt Clients

As many others, I have been following the launch of Let s Encrypt. Let s Encrypt is a new zero-cost X.509 Certificate Authority that supports the Automated Certificate Management Environment (ACME) protocol. ACME allow you to automate creation and retrieval of HTTPS server certificates. As anyone who has maintained a number of HTTPS servers can attest, this process has unfortunately been manual, error-prone and differ between CAs. On some of my personal domains, such as this blog.josefsson.org, I have been using the CACert authority to sign the HTTPS server certificate. The problem with CACert is that the CACert trust anchors aren t shipped with sufficient many operating systems and web browsers. The user experience is similar to reaching a self-signed server certificate. For organization-internal servers that you don t want to trust external parties for, I continue to believe that running your own CA and distributing it to your users is better than using a public CA (compare my XMPP server certificate setup). But for public servers, availability without prior configuration is more important. Therefor I decided that my public HTTPS servers should use a CA/Browser Forum-approved CA with support for ACME, and as long as Let s Encrypt is trustworthy and zero-cost, they are a good choice. I was in need of a free software ACME client, and set out to research what s out there. Unfortunately, I did not find any web pages that listed the available options and compared them. The Let s Encrypt CA points to the official Let s Encrypt client, written by Jakub Warmuz, James Kasten, Peter Eckersley and several others. The manual contain pointers to two other clients in a seamingly unrelated section. Those clients are letsencrypt-nosudo by Daniel Roesler et al, and simp_le by (again!) Jakub Warmuz. From the letsencrypt.org s client-dev mailing list I also found letsencrypt.sh by Gerhard Heift and LetsEncryptShell by Jan Moj . Is anyone aware of other ACME clients? By comparing these clients, I learned what I did not like in them. I wanted something small so that I can audit it. I want something that doesn t require root access. Preferably, it should be able to run on my laptop, since I wasn t ready to run something on the servers. Generally, it has to be Secure, which implies something about how it approaches private key handling. The letsencrypt official client can do everything, and has plugin for various server software to automate the ACME negotiation. All the cryptographic operations appear to be hidden inside the client, which usually means it is not flexible. I really did not like how it was designed, it looks like your typical monolithic proof-of-concept design. The simp_le client looked much cleaner, and gave me a good feeling. The letsencrypt.sh client is simple and written in /bin/sh shell script, but it appeared a bit too simplistic. The LetsEncryptShell looked decent, but I wanted something more automated. What all of these clients did not have, and that letsencrypt-nosudo client had, was the ability to let me do the private-key operations. All the operations are done interactively on the command-line using OpenSSL. This would allow me to put the ACME user private key, and the HTTPS private key, on a YubiKey, using its PIV applet and techniques similar to what I used to create my SSH host CA. While the HTTPS private key has to be available on the HTTPS server (used to setup TLS connections), I wouldn t want the ACME user private key to be available there. Similarily, I wouldn t want to have the ACME or the HTTPS private key on my laptop. The letsencrypt-nosudo tool is otherwise more rough around the edges than the more cleaner simp_le client. However the private key handling aspect was the deciding matter for me. After fixing some hard-coded limitations on RSA key sizes, getting the cert was as simple as following the letsencrypt-nosudo instructions. I ll follow up with a later post describing how to put the ACME user private key and the HTTPS server certificate private key on a YubiKey and how to use that with letsencrypt-nosudo. So you can now enjoy browsing my blog over HTTPS! Thank you Let s Encrypt!

Dirk Eddelbuettel: RcppArmadillo 0.6.400.2.2

armadillo image And yet another updated of Armadillo by Conrad bringing us to 6.400.2. I folded that yesterday into RcppArmadillo 0.6.400.2.2; and this is now on CRAN and Debian. There was even an interim-CRAN-only release 0.6.300.2.2 with a refinement for tests of imcompleye LAPACK libraries---which we encounter whenver R is build with its own (partial) copy of LAPACK as on Windows, and on bigger computers whenver this was chosen over the default of system LAPACK. Armadillo is a powerful and expressive C++ template library for linear algebra aiming towards a good balance between speed and ease of use with a syntax deliberately close to a Matlab. This release brings the following changes:
Changes in RcppArmadillo version 0.6.400.2.0 (2015-12-15)
  • Upgraded to Armadillo 6.400.2 ("Flying Spaghetti Monster Deluxe")
    • expanded each_col(), each_row() and each_slice() to handle C++11 lambda functions
    • added ind2sub() and sub2ind()
    • fixes for corner cases in gmm_diag class
Changes in RcppArmadillo version 0.6.300.2.2 (2015-12-12)
  • Upgraded to Armadillo 6.300.3-test ("Flying Spaghetti Monster")
    • Additional test in auxlib_meat.hpp for limited LAPACK
  • Updated test and #define for limited LAPACK version R might be built with on Unix-alike systems
Courtesy of CRANberries, there is also a diffstat report for the most recent CRAN release. As always, more detailed information is on the RcppArmadillo page. Questions, comments etc should go to the rcpp-devel mailing list off the R-Forge page.

This post by Dirk Eddelbuettel originated on his Thinking inside the box blog. Please report excessive re-aggregation in third-party for-profit settings.

Steinar H. Gunderson: sRGB weirdness: Doing the right thing causes a worse result

A while back, I wrote about how you should always do image calculations in linear light, not gamma space; since then, Tom Forsythe has come out with a much better metaphor than I could cough up myself, namely that you should look at sRGB value as compressed values, not integers. So naturally, when I needed a deinterlacing filter for Movit, my GPU filter library, I wanted to do it in linear light. (In fact, all pixel processing in Movit is in linear light, except in the cases where it's 100% equivalent to do it on the gamma-encoded values and the conversion can be skipped for speed.) After some deliberations, I made an implementation of Martin Weston's three-field deinterlacing filter, known in ffmpeg as w3fdif. I won't discuss deinterlacing in detail here since it's really hard, but I'll note that w3fdif works by way of applying two filters; low-frequency components are estimated from the current field, and high-frequency from the previous and next fields. (This makes intuitive sense; you cannot get the HF information from the current field since you don't have the lines you need for that, but you can hope it hasn't changed too much.) Aha! A filter. Brilliant, that's exactly when linear light means the most, too. But when implementing it, I found that it sometimes looked weird -- and ffmpeg's implementation (which works directly on the sRGB values, which we already established is wrong) didn't. After lots of tweaking back and forth, I decided to set up a synthetic test to settle this once and for all; I took a static test picture (eliminating everything related to video capture, codecs, frame rates, etc.) and compared to ffmpeg. Of course, deinterlacing is all about movement, but this would do to try to nail things down. So after lots of fruitless debugging, I did a last-ditch: What if I turned off the gamma conversions? This gave me a huge surprise; indeed it looked better! I'll provide some upscaled versions; left is the original image, middle is deinterlaced in sRGB space and right is deinterlaced in linear light: Original picture Deinterlaced in sRGB space Deinterlaced in linear light If that's not dramatic enough for you (trust me, you'll notice it when it's animated as you flicker through the two different fields), here's an even more high-contrast example (same ordering): Original picture Deinterlaced in sRGB space Deinterlaced in linear light I guess it's obvious in retrospect what happens; the HF filter picks up residue from its outer edges, and even if the coefficient is just 0.031 (well, times two; it adds that value from both the previous and next field), 3% the photons of a fully lit pixel (which is what you get when working in linear light) is actually quite a bit, whereas a 3% gray is only pixel value 8 or so, which is barely visible. So what am I to make of this? I'm honestly not sure. Maybe it's somehow related to that these filter values were chosen in 1988, where they were relatively unlikely to do this in linear light (although if they did it with analog circuitry, perhaps they could?) and it was tweaked to look good despite doing the wrong thing. Or maybe I need to change my approach here entirely. It always sucks when your fundamental assumptions are challenged, but I think it shows once again that if you notice something funny in your output, you really ought to investigate, because you never know how deep the rabbit hole goes. :-/

16 December 2015

Thomas Goirand: Django upgrades area always a pain

It s been a few years that I maintain some python-django-* packages, as part of the maintenance of the OpenStack dashboard, Horizon. Currently, this consist of: python-django-appconf, python-django-babel, python-django-bootstrap-form, python-django-compressor, python-django-discover-runner, python-django-formtools, python-django-openstack-auth, python-django-overextends, python-django-pyscss. By far, Django has been one of the biggest pain point. It moves too fast, deprecating its own API from one minor version to the next, at the rate of one minor release every 6 months. As Django 1.9 was uploaded to Sid, a bunch of problems appeared. The Django 1.9 release notes explains it all: a large chunk of its API gets removed (look for Freatures removed in that page). I had to fix a few issues: the last one I fixed was #807346 (in django-openstack-auth), which needed 2 patches. Amusingly, the patch I wrote looks the same as what is currently under review, by one of the upstream authors. Though still have #807355 to fix, and that one is more complex. To fix it, I have to package the latest commit of django-compressor, and: Even after doing all of this, django-compressor still doesn t build (unit test failures) with lots of errors ending with this: File some-path/build-area/python-django-compressor-1.6+2015.12.15.git.66feba0db5/compressor/management/commands/compress.py , line 162, in compress
followlinks=options.get( followlinks , False)):
File /usr/lib/python2.7/os.py , line 278, in walk
names = listdir(top)
TypeError: coercing to Unicode: need string or buffer, Origin found I tried fixing this last one, but failed so far. (if anyone can help, please do ) This was just the upgrade from 1.8 to 1.9, and it doesn t include some of the issues fixed earlier (when Django 1.9 was only in Experimental and easy fixes were written). All this to say: Django upgrades are always painful. As I always say: the Linux kernel is so much more complex than this kind of Python modules, and yet, they don t allow themselves break the userland API. Why most Python developers believe that it s OK to do so? It isn t possible to separate private and public API clearly in python (like it is with the kernel). So it isn t uncommon that library users start using non-public functions, classes or methods. For that, it is understandable that there are breakages (when someone uses something that isn t made to be used by the library users). But that s the only case where it is, and there s no excuse to break known used public API. Django upstream authors, if you read me, please stop breaking the world every 6 months! And no, your deprecation messages are not an excuse. If you did a design mistake in the past, that s no excuse. Too bad you ll have to live with it until the end of times and find a work-around.

Benjamin Mako Hill: TheSetup ChangeLog

Several years ago, I did a long interview with TheSetup a fantastic website that posts of interviews with nerdy people that ask the same four questions:
  1. Who are you, and what do you do?
  2. What hardware are you using?
  3. And what software?
  4. What would be your dream setup?
Because I have a very carefully considered but admittedly quite idiosyncratic setup, I spent a lot of time preparing my answers. Many people have told me that they found my write-up useful. I recently spoke with several students who said it had been assigned in one of their classes! Of course, my setup has changed since 2012. Although the vast majority is still the same, there is a growing list of modifications and additions. To address this, I ve been keeping a changelog on my wiki where I detail every major change and addition I ve made to the setup that I described in the original interview.

15 December 2015

Chris Lamb: Peake Nationalism

Timothy Peake boarded the International Space Station a few hours ago becoming the United Kingdom's first official astronaut. It has become headline news, dominating the day's news cycle. But whilst Peake left our pale blue dot with only the humble honorific "Mister", he has subsequently been awarded the dubious appellation of "British Astronaut". Now, I'm no open-borders pan-nationalist and nor do I in any wish to detract or denigrate Peake's accomplishments indeed, it is only out of a genuine respect of "our Tim's" achievements that I pen this in the first place but are we still clinging to the idea that an extraordinary effort by a co-member of our species requires a nationalistic qualifier? How much do we really have in common with our "fellow countrymen"? This is, after all, the International Space Station, to which Peake was elevated from Kazakhstan on the back of a Russian rocket, in order that he may peacefully collaborate with an American, a Ukrainian, etc. I encountered the rebuttal that support of this nature is inspirational and incentive to others, but is it really motivating to know that if you toil to achieve greatness in this life then your accomplishments will be cheaply co-opted by mediocrities who only share the same colour passport as you? In this sense, isn't national pride really a form of national insecurity? A "Briton" in space: if space travel can teach us anything, it's that broadcasting the specific patch of ground you were born in is an outdated, tribalistic contrivance and should be assigned to the dustbin of history.

Thomas Goirand: OpenStack: Mitaka beta 1 packages available, Liberty uploaded to Jessie Backports

OpenStack Mitaka beta 1 Debian packages available I didn t find the time to announce it until today, though I have finished last Friday to package Mitaka Beta 1. It is available, as usual, on the Jenkins server Debian repository: deb http://mitaka-jessie.pkgs.mirantis.com/debian jessie-mitaka-backports main
deb-src http://mitaka-jessie.pkgs.mirantis.com/debian jessie-mitaka-backports main
deb http://mitaka-jessie.pkgs.mirantis.com/debian jessie-mitaka-backports-nochange main
deb-src http://mitaka-jessie.pkgs.mirantis.com/debian jessie-mitaka-backports-nochange main Not all of the updated packages avialable above has been uploaded to Debian Experimental, mostly those needing to pass the FTP master NEW queue did. I will upload the rest as I find enough time to do so, which unfortunately may not happen before Mitaka b2 (which will be in the middle of January). OpenStack Liberty uploaded to jessie-backports Also, as python-repoze.who 2.x finally could migrate to Debian testing (after filed to be removed dependencies got removed by the FTP masters), python-pysaml2 3.0, and then Keystone also did. So this week-end, all of OpenStack Liberty reached testing. So today, I could finally upload all of OpenStack liberty in the official jessie-backports repository. This is 165 packages that I uploaded, out of which 135 are going through the backports NEW queue. I m sorry to give that much work to the FTP masters, but most OpenStack users do want to use the latest release of OpenStack on top of the latest stable distributions. So this upload really is what OpenStack Debian user will prefer (until we have PPA^Wbikesheds for Debian).

Vasudev Kamath: Persisting resource control options for systemd-nspawn containers

In my previous post on systemd-nspawn I mentioned, I was unclear on how to persist resource control options for a container. Today I accidentally discovered how can the property be persisted across boot without modifying service file or writing custom service file for container. It is done using systemctl set-property To set CPUAccounting and CPUShares for a container we need to run following command.
systemctl set-property systemd-nspawn@container.service  CPUACCounting=1 CPUShares=200
This actually persists these settings at location, /etc/systemd/systemd-nspawn@container.service.d/ folder. So in our case there will be 2 files created under above location by name 50-CPUAccounting.conf and 50-CPUShares.conf with following contents.
# 50-CPUAccounting.conf
[Service]
CPUAccounting=yes
# 50-CPUShares.conf
[Service]
CPUShares=200
Today when I discovered this folder and saw the file contents, I became curious and started to wonder who created this folder. The look at systemctl man page made showed me this.
set-property NAME ASSIGNMENT...

Set the specified unit properties at runtime where this is supported. This allows changing configuration parameter properties such as resource control settings at runtime. Not all properties may be changed at runtime, but many resource control settings (primarily those in systemd.resource-control(5)) may. The changes are applied instantly, and stored on disk for future boots, unless --runtime is passed, in which case the settings only apply until the next reboot. The syntax of the property assignment follows closely the syntax of assignments in unit files. Example: systemctl set-property foobar.service CPUShares=777

Note that this command allows changing multiple properties at the same time, which is preferable over setting them individually. Like unit file configuration settings, assigning the empty list to list parameters will reset the list.

I did remember doing this for my container and hence it became clear these files are actually written by systemctl set-property. In case you don't want to persist the properties across boot you can simply pass --runtime switch. Basically this is not just for container, resource control can be thus applied to any running service on the system. This is actually cool.

Zlatan Todori : Just read LWN or make your news

So it has been always a pain but lately going and (yes, my mistake) reading Phoronix news is just horrible (the best word I could choose, other were much more nasty). So instead writing thousand of words I just choose to make a picture. moronix I think it's pretty much clear what it is. Instead of that people should read LWN or I should start making news because it is not hard to be waaaay much better then Phoronix guy but also news that I didn't write I will not just link to it (many times not even that) and then say how I wrote article! You know, it is fine not to understand everything and ask people questions.

Sven Hoexter: Some helpful commands from the CentOS yum and rpm world

Today I learned from my coworkers about a few helpful sub commands of yum and some other things from the rpm world. Just jotting them down here so I don't forget about them. Oh and why did we've to do it? Well CentOS 6 got a grep update from 2.6 to 2.20. That upgrade lost the --mmap option and some very old stuff started to fall apart because of the now unknown option. Update: There are some interesting issues related to this update in the RedHat Bugzilla. #1287074 #1256756 I added #1291714 just for the sake of completeness.
# yum history
ID       Login user                 Date and time      Action(s)        Altered
-------------------------------------------------------------------------------
124   xxx                        2015-12-15 11:51   Downgrade           1
123   yyy                        2015-12-15 11:02   E, O, U           244 EE
122   zzz                        2015-12-15 10:57   I, O, U           255 **
Provides an overview of the last actions done with yum. On CentOS 7 (this one is from CentOS 6) the output seems to have changed slighty and it provides the commandline instead of the username.
# yum list installed   grep epel
bash-completion.noarch             1:1.3-7.el6                      @epel-Mirror
eventlog.x86_64                    0.2.13-1.el6                     @epel-Mirror
libnet.x86_64                      1.1.6-7.el6                      @epel-Mirror
pylint.noarch                      1.3.1-1.el6                      @epel-Mirror
python-astroid.noarch              1.2.1-2.el6                      @epel-Mirror
python-logilab-common.noarch       0.62.1-2.el6                     @epel-Mirror
python-unittest2.noarch            0.5.1-3.el6                      @epel-Mirror
Helps you to find out from which repository you installed which package.
# repoquery -i grep
Name        : grep
Version     : 2.20
Release     : 3.el6_7.1
Architecture: x86_64
Size        : 1197808
Packager    : CentOS BuildSystem <http://bugs.centos.org>
Group       : Applications/Text
URL         : http://www.gnu.org/software/grep/
Repository  : update
Summary     : Pattern matching utilities
Source      : grep-2.20-3.el6_7.1.src.rpm
Description : [ ... ]
Kind of the rpm -q ... stuff on a repository level instead of the local rpm database. Update: T.P. provided a small shell snippet to show updates. Thanks.

Bartosz Fe&#324;ski: Once again two full-time days to work on Debian

Thanks to my employer I had opportunity to spent two days just working on my packages.
I know it s kinda sad that I have to wait for these two special days to do my (volunteer but still) job. Anyway. I was able to dig through all changes in our policy and standards and update some of my packages. Changes include: potrace (1.13-1) unstable; urgency=low * The Akamai Technologies paid volunteer days release.
* New upstream version.
* Bumped Standards-Version (no changes needed) Bartosz Fenski Thu, 10 Dec 2015 10:37:54 +0100 ipcalc (0.41-5) unstable; urgency=low * The Akamai Technologies paid volunteer days release.
* Updating to the newest standards of basically everything.
Very cool experience
* CGI script is now optional and put into examples (Closes: #763032) Bartosz Fenski Thu, 10 Dec 2015 13:51:12 +0100 dibbler (1.0.1-1) unstable; urgency=low * The Akamai Technologies paid volunteer days release.
* New upstream release (Closes: #780232, #795493)
fixes segfaults in TClntCfgMgr::validateConfig (Closes: #732697)
* Includes debugging packages (Closes: #732707)
* Bumped Standards-Version (no changes needed) Bartosz Fenski Thu, 10 Dec 2015 13:33:56 +0100 calcurse (4.0.0-1) unstable; urgency=low * The Akamai Technologies paid volunteer days release.
* New upstream version.
* Properly handles apts file with new line sign (Closes: #749282)
* Explicitly uses autotools-dev dependency.
* Bumped Standards-Version. (no changes needed) Bartosz Fenski Mon, 14 Dec 2015 10:55:30 +0100 libstatgrab (0.91-1) unstable; urgency=low * The Akamai Technologies paid volunteer days release.
* New upstream version (Closes: #804480)
* ACK NMUs, thanks Manuel!
* Bumped Standards-Version (no changes needed) Bartosz Fenski Mon, 14 Dec 2015 14:27:37 +0100 httpie (0.9.2-1) unstable; urgency=low * The Akamai Technologies paid volunteer days release.
* ACK previous NMU, thanks a lot Vincent!
* Bumped required python-requests version (Closes: #802540) Bartosz Fenski Mon, 14 Dec 2015 15:39:37 +0100 These uploads fixed 7 bugs and 9 lintian warnings/errors. Except that I reviewed mydumper package update and I uploaded it for Mateusz Kijowski who tries to became NM. Thanks Akamai!

Antoine Beaupr : Using a Yubikey NEO for SSH and OpenPGP on Debian jessie

I recently ordered two Yubikey devices from Yubico, partly because of a special offer from Github. I ordered both a Yubikey NEO and a Yubikey 4, although I am not sure I remember why I ordered two - you can see their Yubikey product comparison if you want to figure that out, but basically, the main difference is that the NEO has support for NFC while the "4" has support for larger RSA key sizes (4096). This article details my experiment on the matter. It is partly based on first hand experience, but also links to various other tutorials that helped me along the way. Especially thanks to folks on various IRC channels that really helped me out in understanding this. My objective in getting a hardware security token like this was three-fold:
  1. use 2FA on important websites like Github, to improve the security of critical infrastructure (like my Borg backup software)
  2. login to remote SSH servers without exposing my password or my private key material on third party computers
  3. store OpenPGP key material on the key securely, so that the private key material can never be compromised
To make a long story short: this article documents step 2 and implicitly step 3 (because I use OpenPGP to login to SSH servers). However it is not possible to use the key on arbitrary third party computers, given how much setup was necessary to make the thing work at all. 2FA on the Github site completely failed, but could be used on other sites, although this is not covered by this article. I have also not experimented in details the other ways the Yubikey can also be used (sorry for the acronym flood) as: Update: OATH works! It is easy to configure and i added a section below.

Not recommended After experimenting with the device and doing a little more research, I am not sure it was the right decision to buy a Yubikey. I would not recommend buying Yubikey devices because they don't allow changing the firmware, making the device basically proprietary, even in the face of an embarrassing security vulnerability on the Yubikey NEO that came out in 2015. A security device, obviously, should be as open as the protocols it uses, otherwise it's basically impossible to trust that the crypto hasn't been backdoored or compromised, or, in this case, is vulnerable to the simplest drive-by attacks. Furthermore, it turns out that the primary use case that Github was promoting is actually not working as advertised: to use the Yubikey on Github, you actually first need to configure 2FA with another tool, either with your phone's text messages (SMS) or with something like Google Authenticator. After contacting Github support, they explained that the Yubikey is seen as a "backup device", which seems really odd to me, especially considering the promotion and the fact that I don't have a "smart" (aka "Google", it seems these days) phone or the desire to share my personal phone number with Github. Finally, as I mentioned before, the fact that those devices are fairly new and the configuration necessary to make them work at all is completely obtuse, non-standardized or at least not available by default on arbitrary computers makes them basically impossible to use on other computers than your own specially crafted gems.

Plugging it in The Yubikey, when inserted into a USB port, seems to be detected properly. It shows up both as a USB keyboard and a generic device.
d c 14 17:23:26 angela kernel: input: Yubico Yubikey NEO OTP+U2F as /devices/pci0000:00/0000:00:12.0/usb3/3-2/3-2:1.0/0003:1050:0114.0016/input/input127
d c 14 17:23:26 angela kernel: hid-generic 0003:1050:0114.0016: input,hidraw3: USB HID v1.10 Keyboard [Yubico Yubikey NEO OTP+U2F] on usb-0000:00:12.0-2/input0
d c 14 17:23:26 angela kernel: hid-generic 0003:1050:0114.0017: hiddev0,hidraw4: USB HID v1.10 Device [Yubico Yubikey NEO OTP+U2F] on usb-0000:00:12.0-2/input1
We'll be changing this now - we want to to support OTP, U2F and CCID. Don't worry about those acronyms now, but U2F is for the web, CCID is for GPG/SSH, and OTP is for the One Time Passwords stuff mentionned earlier. I am using the Yubikey Personalization tool from stretch because the jessie one is too old, according to Gorzen. Indeed, I found out that the jessie version doesn't ship with the proper udev rules. Also, note that we need to run as sudo otherwise we get a permission denied:
$ sudo apt install yubikey-personalization/stretch
$ sudo ykpersonalize -m86
Firmware version 3.4.3 Touch level 1541 Program sequence 1
The USB mode will be set to: 0x86
Commit? (y/n) [n]: y
To understand better what the above does, see the NEO composite device documentation. The next step is to reconnect the key, for the udev rules to kick in. If you were like me, you enthusiastically plugged in the device before installing the yubikey-personalization package, and the udev rules were not present then.

Configuring a PIN Various operations will require you to enter a PIN when talking to the key. The default PIN is 123456 and the default admin PIN is 12345678. You will want to change that, otherwise someone that gets a hold of your key could do any operation without your consent. For this, you need to use:
$ gpg --card-edit
> passwd
> admin
> passwd
Be sure to remember those passwords! Of course, the key material on the Yubikey can be revoked when you loose the key, but only if you still have control of the master key, or if you have a OpenPGP revocation certification (which you should have).

Configuring GPG To do OpenPGP operations (like decryption, signatures and so on), or SSH operations (like authentication on a remote server), you need to talk with GPG. Yes, OpenPGP keys are RSA keys that can be used to authenticate with SSH servers, that's not new and I have already been doing this with Monkeysphere for a while. Now the challenge is how to make GPG talk with the Yubikey. So the next step is to see if gpg can see the key alright, as described in the Yubikey importing keys howto - you will need first to install scdaemon and pcscd (according to this howto) for gpg-agent to be able to talk with the key:
$ sudo apt install scdaemon gnupg-agent pcscd
$ gpg-connect-agent --hex "scd apdu 00 f1 00 00" /bye
ERR 100663404 Card error <SCD>
Well that failed. At this point, touching the key types a bunch of seemingly random characters wherever my cursor is sitting - fun but totally useless still. That was because I failed to reconnect the key: make sure the udev rules are in place and reconnect the key, the above should work:
$ gpg-connect-agent --hex "scd apdu 00 f1 00 00" /bye
D[0000]  01 00 10 90 00                                     .....
OK
This shows it is running the firmware 1.10, which is not vulnerable to the infamous security issue. (Note: I also happened to install opensc and gpgsm because of this suggestion but I am not sure they are required at all.)

Using SSH To make GPG work with SSH, you need somehow to start gpg-agent with ssh support, for example with:
gpg-agent --daemon --enable-ssh-support bash
Of course, this will work better if it's started with your Xsession. Such an agent should already be started, so you just need to add the ssh emulation to its configuration file and restart your X session.
echo 'enable-ssh-support' >> .gnupg/gpg-agent.conf
In Debian Jessie, the ssh-agent wrapper will not start if it detects that you have already one running (for example from gpg-agent) but if that fails, you can try commenting out use-ssh-agent from /etc/X11/Xsession.options to keep it from starting up in your session. (Thanks to stackexchange for that reference.) Here I assume you have already created an authentication subkey on your PGP key. If you haven't, I suggest trying out simply monkeysphere gen-subkey, which will generate an authentication subkey for you. You can also do it by hand by following one of the OpenPGP/SSH tutorials from Yubikey, especially the more complete one. If you are going to generate a completely new OpenPGP key, you may want to follow this simpler tutorial here. Then you need to move your authentication subkey to the Yubikey. For this, you need to edit the key and use the keytocard command:
$ gpg2 --edit-key anarcat@debian.org
> toggle
> key 2
> keytocard
> save
Here, we use toggle to show the OpenPGP private key material. You should see a key marked with A for Authentication. Mine was the second one so I selected it with key 2 which put a star next to it. The keytocard command moved it to the key and save ensure the key was removed from the local keyring. Obviously, backups are essential before doing this, because it's perfectly possible to loose that key in the process, for example if you destroy or lose the key or forget the password. It's probably better to create a completely different authentication subkey for just this purpose, but that may require reconfiguring all remote SSH hosts, and you may not want to do that. Then SSH should magically talk with the GPG agent and ask you for the PIN! That's pretty much all there is to it - if it doesn't, it means that gpg-agent is not your SSH agent, and obviously things will fail... Also, you should be able to see the key being loaded in the agent when it is:
$ ssh-add -l
2048 23:f3:be:bf:1e:da:e8:ad:4b:c7:f6:60:5e:03:c2:a6 cardno:000603647189 (RSA)
.. that's about it! I have yet to cover 2FA and OpenPGP support, but that got me going for a while and I'll stop geeking around with that thing for now. It was fun, for sure, but not sure it's worth it for now.

Using OATH This is pretty neat: it allows you to add two factor authentication to a lot of things. For example, PAM has such a module, which I will configure here to allow myself to login to my server from untrusted machines. While I will expose my main password to keyloggers, the OTP password will prevent that from being reused. This is a simplified version of this OATH tutorial. We install the PAM module with:
sudo apt install libpam-oath
Then, we can hook it into any PAM consumer, for example with sshd:
--- a/pam.d/sshd
+++ b/pam.d/sshd
@@ -1,5 +1,8 @@
 # PAM configuration for the Secure Shell service
+# for the yubikey
+auth required pam_oath.so usersfile=/etc/users.oath window=5 digits=8
+
 # Standard Un*x authentication.
 @include common-auth
We also needed to allow OTP passwords in sshd explicitely, with:
ChallengeResponseAuthentication yes
This will force the user to enter a valid oath token on the server. Unfortunately, this will affect all users, regardless of whether they are present in the users.oath file. I filed bug #807990 regarding this, with a patch. Also, it means the main password is still exposed on the client machine - you can use the sufficient keyword instead of required to workaround that, but then it means anyone with your key can login to your machine, which is something to keep in mind. The /etc/users.oath file needs to be created with something like:
#type   username        pin     start seed
HOTP    anarcat -   00
00 is obviously a fake, and insecure string. Generate a proper one with:
dd if=/dev/random bs=1k count=1   sha1sum # create a random secret
Then the shared secret needs to be added to the Yubikey:
ykpersonalize -1 -o oath-hotp -o oath-hotp8 -o append-cr -a
You simply paste the random secret you created above, when prompted, and that shared secret will be saved in a Yubikey slot for future use. Next time you login to the SSH server, you will be prompted for a OATH password, you just touch the button on the key and it will be pasted there:
$ ssh -o PubkeyAuthentication=no anarc.at
One-time password (OATH) for  anarcat':
Password:
[... logged in!]
Final note: the centralized file approach makes it hard, if not impossible, for users to update their own secret token.. It would be nice if there would be a user-accessible token file, maybe ~/.oath? Filed feature request #807992 about this as well.

14 December 2015

Alessio Treglia: Big Data: ask the right questions

The Big Data phenomenon has reached a reality that is often baffling to the amount of information to be managed, and what for us today is called Big it will not be anymore in 5 years, from where it will be necessary to coin other terminologies and corresponding analysis technologies . bigdata1.jpg

The scientific and technological world is thus in ferment in a general rush towards finding the most appropriate tools to get the answers to these extensive masses of data. Big Data represents a paradigm shift: from the Society of network and connection the approach is increasingly leaning towards information and database .

<Read more >

Vasudev Kamath: Ordering mount points in Jessie (systemd < 220)

In the previous post I had mentioned that I didn't figure out how to add dependency on mount points so as to achieve correct ordering of mount points. After a lot of search today I finally figured it out thanks to the bug report and the patch which adds x-systemd.requires and other option to systemd. So basically you can add additional ordering information to the .mount files generated by systemd-fstab-generator by adding a ordering.conf file to path /etc/systemd/system/usr-local-bin.mount.d/ path with following contents.
[Unit]
After=home.mount
And that is it, now usr-local-bin.mount will be mounted after home.mount is activated. I couldn't find this information directly in related manpages like systemd.mount or systemd.automount. Also this information is not directly available in search results!.

Rapha&#235;l Hertzog: Freexian s report about Debian Long Term Support, November 2015

A Debian LTS logoLike each month, here comes a report about the work of paid contributors to Debian LTS. Individual reports In November, 114.50 work hours have been dispatched among 8 paid contributors. Their reports are available: Evolution of the situation We lost one hour of funding for December due to a sponsor not renewing, and we don t have any new sponsor lined up right now. There s another sponsor who will reduce his sponsorship starting with 2016. While the situation is relatively healthy right now, we should continue the efforts to find new sponsors, both to ensure we can cover more software in wheezy and to better share the costs: having many small sponsors is more resilient than relying on a few big ones. And we still haven t reached our second goal of funding the equivalent of a full-time position. In terms of security updates waiting to be handled, the situation is close to last month: the dla-needed.txt file lists 19 packages awaiting an update (2 less than last month), the list of open vulnerabilities in Squeeze shows about 22 affected packages in total (1 less than last month). Thanks to our sponsors The new sponsors are in bold.

No comment Liked this article? Click here. My blog is Flattr-enabled.

Next.

Previous.