Search Results: "ag"

24 January 2016

Lunar: Reproducible builds: week 39 in Stretch cycle

What happened in the reproducible builds effort between January 17th and January 23rd:

Toolchain fixes James McCoy uploaded subversion/1.9.3-2 which removes -Wdate-time from CPPFLAGS passed to swig enabling several packages to build again. The switch made in binutils/2.25-6 to use deterministic archives by default had the unfortunate effect of breaking a seldom used feature of make. Manoj Srivastava asked on debian-devel the best way to communicate the changes to Debian users. Lunar quickly came up with a patch that displays a warning when Make encounters deterministic archives. Manoj made it available in make/4.1-2 together with a NEWS file advertising the change. Following Guillem Jover's comment on the latest patch to make mtimes of packaged files deterministic, Daniel Kahn Gillmor updated and extended the patch adding the --clamp-mtime option to GNU Tar. Mattia Rizzolo updated texlive-bin in the reproducible experimental repository.

Packages fixed The following packages became reproducible after getting fixed: Some uploads fixed some reproducibility issues, but not all of them: Patches submitted which have not made their way to the archive yet:

reproducible.debian.net Transition from reproducible.debian.net to the more general tests.reproducible-builds.org has started. More visual changes are coming. (h01ger) A plan on how to run tests for F-Droid has been worked out. (hc, mvdan, h01ger) A first step has been made by adding a Jenkins job to setup an F-Droid build environment. (h01ger)

diffoscope development diffoscope 46 has been released on January 19th, followed-up by version 47 made available on January 23rd. Try it online at try.diffoscope.org! The biggest visible change is the improvement to ELF file handling. Comparisons are now done section by section, using the most appropriate tool and options to get meaningful results, thanks to Dhole's work and Mike Hommey's suggestions. Also suggested by Mike, symbols for IP-relative ops are now filtered out to remove clutter. Understanding differences in ELF files belonging to Debian packages should also be much easier as diffoscope will now try to extract debug information from the matching dbgsym package. This means objdump disassembler should output line numbers for packages built with recent debhelper as long as the associated debug package is in the same directory. As diff tends to consume huge amount of memory on large inputs, diffoscope has a limit in place to prevent crashes. diffoscope used to display a difference every time the limit was hit. Because this was confusing in case there were actually no differences, a hash is now internally computed to only report a difference when one exists. Files in archives and other container members are now compared in the original order. This should not matter in most case but overall give more predictable results. Debian .buildinfo files are now supported. Amongst other minor fixes and improvements, diffoscope will now properly compare symlinks in directories. Thanks Tuomas Tynkkynen for reporting the problem.

Package reviews 70 reviews have been removed, 125 added and 33 updated in the previous week, gcc-5 amongst others. 25 FTBFS issues have been filled by Chris Lamb, Daniel Stender, Martin Michlmayr.

Misc. The 16th FOSDEM will happen in Brussels, Belgium on January 30-31st. Several talks will be about reproducible builds: h01ger about the general ecosystem, Fabian Keil about the security oriented ElectroBSD, Baptiste Daroussin about FreeBSD packages, Ludovic Court s about Guix.

Niels Thykier: Lintian 2.5.40 now with less output

You have probably tried to run lintian (-EIL +pedantic) on your packages only to watch lintian drown your terminal. If you have, you would certainly not be the first. A concrete example with lintian 2.5.40.2:
$ lintian -EIL +pedantic 389-ds-base_1.3.4.5-2_amd64.deb   wc -l
85
Notably, at least 45 of these appeared in 2.5.40 (the hardening-no-bindnow tag):
$ lintian -EIL +pedantic 389-ds-base_1.3.4.5-2_amd64.deb \
  --tags hardening-no-bindnow   wc -l
45
In a single release, we have over doubled the number of tags in the given package. I very much doubt this is the first time such a thing happened. Therefore, we have implemented a per package tag filter in 2.5.40. The filter is applied automatically when stdout is a tty and restricts lintian to emitting no more than 3 concrete instances of a given tag per package. If a fourth tag would have been emitted, the filter replaces it with a how to see all instances message and suppresses further instances in that package. Accordingly, lintian only emits 25 lines (instead of 85) for the example package. It looks something like this:
$ lintian -EIL +pedantic 389-ds-base_1.3.4.5-2_amd64.deb 
I: 389-ds-base: spelling-error-in-binary usr/bin/dbscan-bin conents contents
X: 389-ds-base: hardening-no-bindnow usr/bin/dbscan-bin
X: 389-ds-base: hardening-no-bindnow usr/bin/dsktune-bin
X: 389-ds-base: hardening-no-bindnow usr/bin/infadd-bin
X: 389-ds-base: hardening-no-bindnow ... use --no-tag-display-limit to see all (or pipe to a file/program)
I: 389-ds-base: spelling-error-in-binary usr/lib/x86_64-linux-gnu/dirsrv/libns-dshttpd.so.0.0.0 occured occurred
[...]
With this very simple filter in place, the entire lintian output for that single binary now fits on my screen. I am pretty sure the filter could do with additional smarts, but I believe it is a good start.
Filed under: Debian, Lintian

Wouter Verhelst: Playing with Letsencrypt

While I'm not convinced that encrypting everything by default is necessarily a good idea, it is certainly true that encryption has its uses. Unfortunately, for the longest time getting an SSL certificate from a CA was quite a hassle -- and then I'm not even mentioning the fact that it would cost money, too. In that light, the letsencrypt project is a useful alternative: rather than having to dabble with emails or webforms, letsencrypt does everything by way of a few scripts. Also, the letsencrypt CA is free to use, in contrast to many other certificate authorities. Of course, once you start scripting, it's easy to overdo it. When you go to the letsencrypt website and try to install their stuff, they point you to a "letsencrypt-auto" thing, which starts installing a python virtualenv and loads of other crap, just so we can talk to a server and get a certificate properly signed. I'm sure that makes sense for some people, and I'm also sure it makes some things significantly easier, but honestly, I think it's a bit overkill. Luckily, there is also a regular letsencrypt script that doesn't do all the virtualenv stuff, and which is already packaged for Debian, so installing that gets us rid of the overkill bits. It's not in stable, but it is an arch:all package. Unfortunately, not all dependencies are available in Jessie, but backporting it turned out to be not too complicated. Once the client is installed, you need to get it to obtain a certificate, and you need to have the certificate be activated for your webserver. By default, the letsencrypt client will update your server configuration for you, and run a temporary webserver, and do a whole lot of other things that I would rather not see it do. The good news, though, is that you can switch all that off. If you're willing to let it write a few files to your DocumentRoot, it can do the whole thing without any change to your system:
letsencrypt certonly -m <your mailaddress> --accept-tos --webroot -w \
    /path/to/DocumentRoot -d example.com -d www.example.com
In that command, the -m option (with mail address) and the --accept-tos option are only required the first time you ever run letsencrypt. Doing so creates an account for you at letsencrypt.org, without which you cannot get any certificates. The --accept-tos option specifies that you accept their terms of service, which you might want to read first before blindly accepting. If all goes well, letsencrypt will tell you that it wrote your account information and some certificates somewhere under /etc/letsencrypt. All that's left is to update your webserver configuration so that the certificates are actually used. No, I won't tell you how that's done -- if you need that information, it's probably better if you just use the apache or nginx plugin of letsencrypt, which updates your webserver's configuration automatically. But if you already know how to do so, and prefer to maintain your configuration by yourself, then it's good to know that it is at least possible. Since we specified two -d parameters, the certificate you get from the letsencrypt CA will have subjectAlternativeName fields, allowing you to use them for more than one domain name. I specified example.com and www.example.com as the valid names, but there is nothing in letsencrypt requiring that the domain names you specify share a suffix; so yes, it is certainly possible to have multiple domains on a single certificate, if you want that. Finally, you need to ensure that your certificates are renewed before they expire. The easiest way to do that is to add a cronjob, which runs letsencrypt again; only this time, you'll need slightly different options:
letsencrypt certonly --renew-by-default --webroot -w \
    /path/to/DocumentRoot -d domain.name.tld -d www.domain.name.tld
The --renew-by-default option tells letsencrypt that you want to renew your certificates, not create new ones. If you specify this, the old certificate will be revoked, and a new one will be generated, again with three months validity. The symlinks under /etc/letsencrypt/live will be updated, so if your webserver's configuration uses those as the path to your certificates, you don't need to update any configuration files (although you may need to restart your webserver). You'll also notice that the -m and --accept-tos options are not specified this time around; this is because those are only required when you want to create an account -- once that step has been taken, letsencrypt will read the necessary information from its configuration files (and creating a new account for every renewal is just silly). With that, you now have a working, browser-trusted, certificate. Update: fix mistake about installing on Jessie. It's possible (I've done so), but it's been a while and I forgot that I had to recompile several of letsencrypt's dependencies in order for it to be installable.

Petter Reinholdtsen: Creepy, visualise geotagged social media information - nice free software

Most people seem not to realise that every time they walk around with the computerised radio beacon known as a mobile phone their position is tracked by the phone company and often stored for a long time (like every time a SMS is received or sent). And if their computerised radio beacon is capable of running programs (often called mobile apps) downloaded from the Internet, these programs are often also capable of tracking their location (if the app requested access during installation). And when these programs send out information to central collection points, the location is often included, unless extra care is taken to not send the location. The provided information is used by several entities, for good and bad (what is good and bad, depend on your point of view). What is certain, is that the private sphere and the right to free movement is challenged and perhaps even eradicated for those announcing their location this way, when they share their whereabouts with private and public entities.

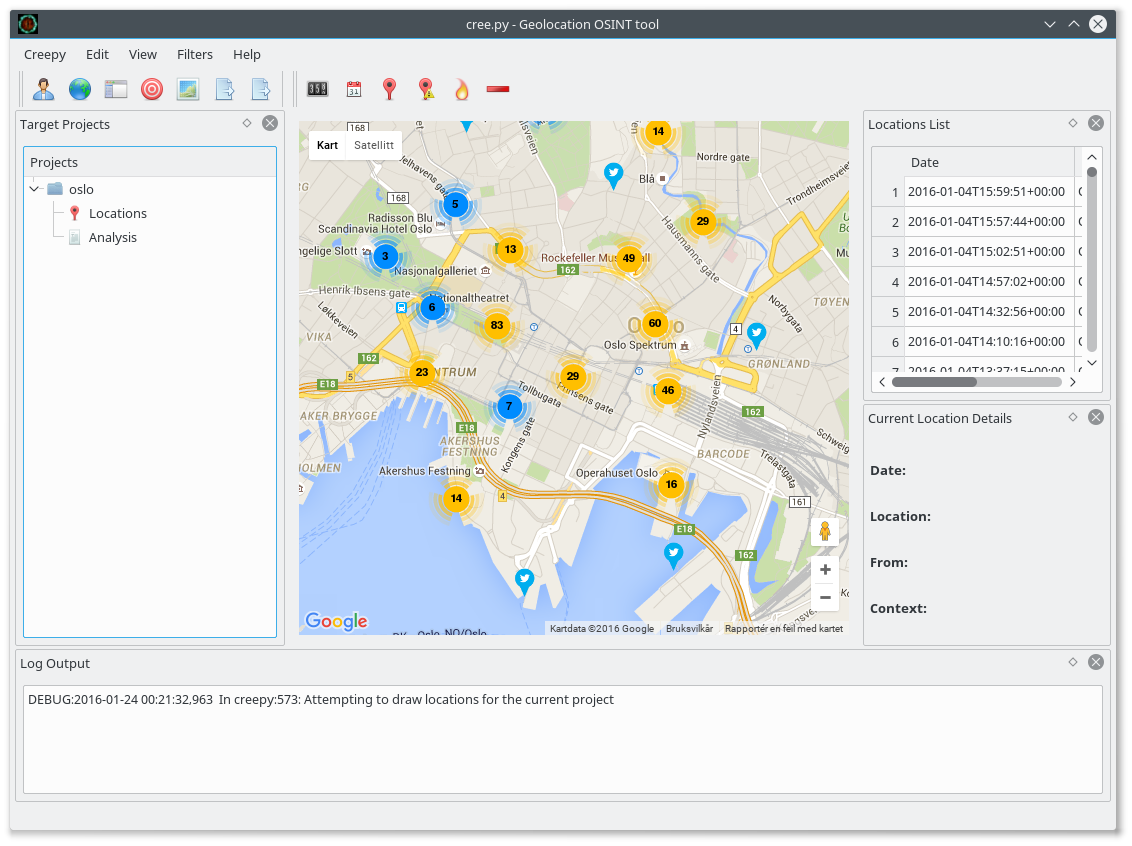
The phone company logs provide a register of locations to check out when one want to figure out what the tracked person was doing. It is unavailable for most of us, but provided to selected government officials, company staff, those illegally buying information from unfaithful servants and crackers stealing the information. But the public information can be collected and analysed, and a free software tool to do so is called Creepy or Cree.py. I discovered it when I read an article about Creepy in the Norwegian newspaper Aftenposten i November 2014, and decided to check if it was available in Debian. The python program was in Debian, but the version in Debian was completely broken and practically unmaintained. I uploaded a new version which did not work quite right, but did not have time to fix it then. This Christmas I decided to finally try to get Creepy operational in Debian. Now a fixed version is available in Debian unstable and testing, and almost all Debian specific patches are now included upstream. The Creepy program visualises geolocation information fetched from Twitter, Instagram, Flickr and Google+, and allow one to get a complete picture of every social media message posted recently in a given area, or track the movement of a given individual across all these services. Earlier it was possible to use the search API of at least some of these services without identifying oneself, but these days it is impossible. This mean that to use Creepy, you need to configure it to log in as yourself on these services, and provide information to them about your search interests. This should be taken into account when using Creepy, as it will also share information about yourself with the services. The picture above show the twitter messages sent from (or at least geotagged with a position from) the city centre of Oslo, the capital of Norway. One useful way to use Creepy is to first look at information tagged with an area of interest, and next look at all the information provided by one or more individuals who was in the area. I tested it by checking out which celebrity provide their location in twitter messages by checkout out who sent twitter messages near a Norwegian TV station, and next could track their position over time, making it possible to locate their home and work place, among other things. A similar technique have been used to locate Russian soldiers in Ukraine, and it is both a powerful tool to discover lying governments, and a useful tool to help people understand the value of the private information they provide to the public. The package is not trivial to backport to Debian Stable/Jessie, as it depend on several python modules currently missing in Jessie (at least python-instagram, python-flickrapi and python-requests-toolbelt). (I have uploaded the image to screenshots.debian.net and licensed it under the same terms as the Creepy program in Debian.)

Martin Michlmayr: QNAP TS-x09 installer available again

Debian 8.3 came out today. As part of this update, Debian installer images for QNAP TS-109, TS-209 and TS-409 are available again. These devices are pretty old but there are still some users. We dropped installer support several years ago because the installer ramdisk was too large to fit in flash. Since then, users had to install Debian 6.0 (squeeze) and upgrade from there. When squeeze was removed from the Debian mirrors recently, I received mail from a number of users. I investigated a bit and found out that we can bring back the installer thanks to XZ compression and some other changes. The installer is available for jessie and stretch.

Russ Allbery: git-pbuilder 1.40

(Yeah, yeah, I still haven't rewritten this in Python so that it can be properly merged with the git-buildpackage distribution.) Simon Fowler found that using git-pbuilder create with a user-supplied --basepath option fails because git-pbuilder always creates a --basepath option and passes it in. The solution, for which he provided a patch, is to just use the supplied --basepath if one is already present. This is fixed in the latest release, along with a minor coding style fix. You can get the latest release from my scripts distribution page.

23 January 2016

Dirk Eddelbuettel: RcppEigen 0.3.2.7.0

A new minor release of RcppEigen is now on CRAN and in Debian. It primarily upgrades to the recent 3.2.7 release of Eigen -- thanks once again to fine work by Yixuan Qiu. We also have one additonal PR by Alexey Stukalow who ensured that the fastLm() example will work fine with when the Intel MKL is used. The NEWS file entry follows.
Changes in RcppEigen version 0.3.2.7.0 (2016-01-18)
  • Updated to version 3.2.7 of Eigen
  • The fastLm example will not include the Lapack header if MKL is defined (thanks to PR #25 by Alexey Stukalow)
Courtesy of CRANberries, there is also a diffstat report for the most recent release.

This post by Dirk Eddelbuettel originated on his Thinking inside the box blog. Please report excessive re-aggregation in third-party for-profit settings.

Dirk Eddelbuettel: RcppCCTZ 0.0.3

Bradley White from the upstream CCTZ team prepared some more changes in CCTZ itself -- so a new RcppCCTZ version got to CRAN the other day catching up with these changes. CCTZ is a C++ library for translating between absolute and civil times using the rules of a time zone. It requires only a proper C++11 compiler and the standard IANA time zone data base which standard Unix, Linux, OS X, ... computers tend to have in /usr/share/zoneinfo. RcppCCTZ connects this library to R by relying on Rcpp. Changes in this version are summarized here:
Changes in version 0.0.3 (2016-01-17)
  • Synchronized with CCTZ upstream.
We also have a diff to the previous version thanks to CRANberries. More details, issue tickets etc at the GitHub repository.

This post by Dirk Eddelbuettel originated on his Thinking inside the box blog. Please report excessive re-aggregation in third-party for-profit settings.

21 January 2016

Tanguy Ortolo: Removing sam2p from Debian

Issues with sam2p and removal I have been maintaining the Debian package of sam2p for some time. Unfortunately, the upstream development of that program is no longer active, and it is using an old custom build chain that no longer works with recent version of GCC. This package is currently failing to build from source, and while I have been able to patch some issues in the past, and it may still be possible to fix it again, this is not really sustainable. I am therefore considering to remove sam2p from Debian, unless someone has a very good reason to keep it and is able and willing to maintain it.Alternative sam2p is a raster image conversion tool that can convert PNG and JPEG to EPS and PDF while keeping their compression, which is mostly useful to use them in documents compiled with LaTeX. Fortunately, the same can be done with ImageMagick. If you want to convert to EPS, you have to specify that you want EPS 2 or 3, otherwise it would produce EPS level 1 which does not provide native raster compression:
% convert debian-openlogo-raster100.png \
          eps3:debian-openlogo-raster100.eps
% convert debian-openlogo-raster100.png \
          debian-openlogo-raster100.pdf
% ls -lh
1.7K debian-openlogo-raster100.png
6.0K debian-openlogo-raster100.eps
8.8K debian-openlogo-raster100.pdf
% convert photograph.jpg eps3:photograph.eps
% convert photograph.jpg photograph.pdf
% ls -lh
657K photograph.jpg
662K photograph.eps
664K photograph.pdf
% convert scanned-document.png eps3:scanned-document.eps
% convert scanned-document.png scanned-document.pdf
140K scanned-document.png
145K scanned-document.eps
150K scanned-document.pdf
This is a bit less efficient than sam2p, as convert seems to add some fixed overhead, but it does keep the appropriate compression algorithm. See this documentation page from ImageMagick for more information. Using appropriate formats As a reminder, when writing LaTeX documents, depending on your build chain, you can use:
photographs
JPEG or EPS (converted from JPEG with ImageMagick);
raster drawings, screenshots
PNG or EPS (converted from PNG with ImageMagick);
vector graphics
PDF or EPS (convertes from SVG with Inkscape).

Jonathan Dowland: Network Attached Storage

little and large little and large
I've just upgraded my home Network Storage box. Until now, it was very discreet, about the size of a car radio. It lived on one of my bookcases and I was very happy with it but it could only take 2.5" sized hard drives and I've outgrown what you can fit on them. I've ended up moving to 2x4T 3.5" drives, a Coolermaster Elite 110 case and re-using the mainboard/CPU and RAM. This is hopefully enough capacity that I don't need to look at another upgrade for a few years, and the case could take more drives if I need it to. The Elite 110 is - by Mini-ITX case terms - pretty small, but still 6 times larger in volume than the old case. In the consumer NAS market, there are plenty of appliances that takes two 3.5" drives and are much smaller than that (such as the WD MyBook Duo, or Synology DS214). Unfortunately I could not find any cases that were of this size for a DIY build. Did I miss anything obvious? (As to why I choose DIY, that could be the subject for a future post.) The full boring details of the build are on the NAS system page.

Jan Wagner: Using nginx as reverse proxy (for containered Ghost)

In some cases it might be a good idea to use a reverse proxy in front of a web application. Nginx is a very common solution for this scenario these days. As I started with containers for some of my playgrounds, I decided to go this route.

Container security When looking around to implement a nginx in front of a Docker web application, in most cases nginx itself is also a Docker container.

In my eyes Docker containers have a huge disadvantage. To get updated software (at least security related) into production, you have to hope that your container image is well maintained or you have to care about it yourself. If this not the case, you might worry.
As long as you don't have container solutions deployed in large scale (and make use of automatically rebuilding and deploying your container images) I would recommend to keep the footprint of your containered applications as small as possible from security point of view. So I decided to run my nginx on the same system where the Docker web applications are living, but you can also have it placed on a system in front of your container systems. Updates are supplied via usual Distribution security updates.

Installing nginx
# aptitude install nginx
I don't will advise you on the usual steps about setting up nginx, but will focus on things required to proxy into your container web application.

Configuration of nginx As our Docker container for Ghost exposes port 2368, we need to define our upstream server. I've done that in conf.d/docker-ghost.conf.
upstream docker-ghost    
  server localhost:2368;
 
The vHost configuration can be taken into /etc/nginx/nginx.conf but I would recommend to use a config file in /etc/nginx/sites-available/ instead.
server    
  listen 80;
  server_name log.cyconet.org;
  include /etc/nginx/snippets/ghost_vhost.conf;
  location /  
    proxy_pass                          http://docker-ghost;
    proxy_set_header  Host              $http_host;   # required for docker client's sake
    proxy_set_header  X-Real-IP         $remote_addr; # pass on real client's IP
    proxy_set_header  X-Forwarded-For   $proxy_add_x_forwarded_for;
    proxy_set_header  X-Forwarded-Proto $scheme;
    proxy_read_timeout                  900;
   
 
Let's enable the configuration and reload nginx:
# ln -s ../sites-available/ghost.conf /etc/nginx/sites-enabled/ghost.conf && \
 service nginx configtest && service nginx reload

Going further This is a very basic configuration. You might think about delivering static content (like images) directly from your Docker data volume, caching and maybe encryption.

Jonas Smedegaard: IT@school

Siri and I are on a journey through India and Nepal, with the aim of learning about needs of Debian derivatives, to improve Debian and encourage closer integration.

Distribution IT@school is a distribution originally based on Debian, later rebased on Ubuntu. Next release will possibly again be a direct derivative of Debian, or maybe even - time will tell - a Debian pure blend.

Aim is education As its name indicates, IT@school is targeted at schools: The system is used in 8th - 10th grades of most (or all?) public primary schools in Kerala, Together with KEK members Anto and Fayad, Siri and I met with former and current key participants in the project where we learned about its history and current status, and discussed some differences between Ubuntu and Debian. IT@school has a strong emphasis on the educational aspect, arguably setting it apart from Skolelinux/DebianEdu which emphasizes the technical aspect of relieving teachers from admin tasks. In the early years of deployment the project faced many hardware issues - e.g. in getting sound cards to work. This was seen not as problems but as beneficial learning for the teachers facing those issues. Kerala public school system has set the standard for other states in India, but sadly political support within the state has been weak in recent years. It is hoped that next election - this April - will bring a positive change.

School book IT@school is accompagnied by a school book written specifically for use of the included tools. No explicit license is applied to the book (which means it defaults to classic copyright). Possibly it will get Creative Commons licensed. If the school book gets a DFSG-free license, several collaboration opportunities emerge: Currently the book is drafted in LibreOffice but then - due to state procedures - finalized with PageMaker. Would be interesting to setup an alternate process using only Free tools - either with Scribus or XeLaTeX. An important detail here is to ensure that the process supports malayalam script.

Curriculum Work is in progress mapping FLOSS tools to the state curriculum. I recommended to share that work publicly with a Free license, to encourage comparisons across countries, and invite collaboration e.g. with Skolelunux/DebianEdu.

Blend for SBCs Some Kerala higher education schools (sorry, don't remember which) have bought some thousands of RaspberryPi2. I suggested to create a Debian Blend for SBCs (Single Board Computers) - we will see what comes of that idea

Blend for education I also suggested to make a Debian blend around IT@school distribution itself, with its strong focus on educational content - i.e. not just as addon to technical tools but the primary purpose pulling in tools as needed.

Russell Coker: Finding Storage Performance Problems

Here are some basic things to do when debugging storage performance problems on Linux. It s deliberately not an advanced guide, I might write about more advanced things in a later post. Disk Errors When a hard drive is failing it often has to read sectors several times to get the right data, this can dramatically reduce performance. As most hard drives aren t monitored properly (email or SMS alerts on errors) it s quite common for the first notification about an impending failure to be user complaints about performance. View your kernel message log with the dmesg command and look in /var/log/kern.log (or wherever your system is configured to store kernel logs) for messages about disk read errors, bus resetting, and anything else unusual related to the drives. If you use an advanced filesystem like BTRFS or ZFS there are system commands to get filesystem information about errors. For BTRFS you can run btrfs device stats MOUNTPOINT and for ZFS you can run zpool status . Most performance problems aren t caused by failing drives, but it s a good idea to eliminate that possibility before you continue your investigation. One other thing to look out for is a RAID array where one disk is noticeably slower than the others. For example if you have a RAID-5 or RAID-6 array every drive should have almost the same number of reads and writes, if one disk in the array is at 99% performance capacity and the other disks are at 5% then it s an indication of a failing disk. This can happen even if SMART etc don t report errors. Monitoring IO The iostat program in the Debian sysstat package tells you how much IO is going to each disk. If you have physical hard drives sda, sdb, and sdc you could run the command iostat -x 10 sda sdb sdc to tell you how much IO is going to each disk over 10 second periods. You can choose various durations but I find that 10 seconds is long enough to give results that are useful. By default iostat will give stats on all block devices including LVM volumes, but that usually gives too much data to analyse easily. The most useful things that iostat tells you are the %util (the percentage utilisation anything over 90% is a serious problem), the reads per second r/s , and the writes per second w/s . The parameters to iostat for block devices can be hard drives, partitions, LVM volumes, encrypted devices, or any other type of block device. After you have discovered which block devices are nearing their maximum load you can discover which of the partitions, RAID arrays, or swap devices on that disk are causing the load in question. The iotop program in Debian (package iotop) gives a display that s similar to that of top but for disk io. It generally isn t essential (you can run ps ax grep D to get most of that information), but it is handy. It will tell you which programs are causing IO on a busy filesystem. This can be good when you have a busy system and don t know why. It isn t very useful if you have a system that is used for one task, EG a database server that is known to be busy doing database stuff. It s generally a good idea to have sysstat and iotop installed on all systems. If a system is experiencing severe performance problems you might not want to wait for new packages to be installed. In Debian the sysstat package includes the sar utility which can give historical information on system load. One benefit of using sar for diagnosing performance problems is that it shows you the time of day that has the most load which is the easiest time to diagnose performance problems. Swap Use Swap use sometimes confuses people. In many cases swap use decreases overall disk use, this is the design of the Linux paging algorithms. So if you have a server that accesses a lot of data it might swap out some unused programs to make more space for cache. When you have multiple virtual machines on one system sharing the same disks it can be difficult to determine the best allocation for RAM. If one VM has some applications allocating a lot of RAM but not using it much then it might be best to give it less RAM and force those applications into swap so that another VM can cache all the data it accesses a lot. The important thing is not the amount of swap that is allocated but the amount of IO that goes to the swap partition. Any significant amount of disk IO going to a swap device is a serious problem that can be solved by adding more RAM. Reads vs Writes The ratio of reads to writes depends on the applications and the amount of RAM. Some applications can have most of their reads satisfied from cache. For example an ideal configuration of a mail server will have writes significantly outnumber reads (I ve seen ratios of 5:1 for writes to reads on real mail servers). Ideally a mail server will cache all new mail for at least an hour and as the most prolific users check their mail more frequently than that most mail will be downloaded before it leaves the cache. If you have a mail server with reads outnumbering writes then it needs more RAM. RAM is cheap nowadays so if you don t want to compete with Gmail it should be cheap to buy enough RAM to cache all recent mail. The ratio of reads to writes is important because it s one way of quickly determining if you have enough RAM and adding RAM is often the cheapest way of improving performance. Unbalanced IO One common performance problem on systems with multiple disks is having more load going to some disks than to others. This might not be a problem (EG having cron jobs run on disks that are under heavy load while the web server accesses data from lightly loaded disks). But you need to consider whether it s desirable to have some disks under more load than others. The simplest solution to this problem is to just have a single RAID array for all data storage. This is also the solution that gives you the maximum available disk space if you use RAID-5 or RAID-6. A more complex option is to use some SSDs for things that require performance and disks for things that don t. This can be done with the ZIL and L2ARC features of ZFS or by just creating a filesystem on SSD for the data that is most frequently accessed. What Did I Miss? I m sure that I missed something, please let me know of any other basic things to do or suggestions for a post on more advanced things.

Holger Levsen: 20160121-farewell-reproducible.debian.net

Bye bye reproducible.debian.net After an amazing 15 months I've just "pulled the plug" on reproducible.debian.net - well, not really (at all), instead now we have https://tests.reproducible-builds.org! :-) It's still a bit rough and not really yet where I want it to be (more on that soon), but hopefully it will be there, rather soon! And hopefully our patches for dpkg will soon be merged too. At least some, right now I'm slightly puzzled there are seven now, I thought we had 3 or 4 my point here is: while Debian as a whole will freeze late 2016, the core toolchain for Stretch should be ready much sooner. So pretty please

20 January 2016

Matthew Garrett: Linux Foundation quietly drops community representation

The Linux Foundation is an industry organisation dedicated to promoting, protecting and standardising Linux and open source software[1]. The majority of its board is chosen by the member companies - 10 by platinum members (platinum membership costs $500,000 a year), 3 by gold members (gold membership costs $100,000 a year) and 1 by silver members (silver membership costs between $5,000 and $20,000 a year, depending on company size). Up until recently individual members ($99 a year) could also elect two board members, allowing for community perspectives to be represented at the board level.

As of last Friday, this is no longer true. The by-laws were amended to drop the clause that permitted individual members to elect any directors. Section 3.3(a) now says that no affiliate members may be involved in the election of directors, and section 5.3(d) still permits at-large directors but does not require them[2]. The old version of the bylaws are here - the only non-whitespace differences are in sections 3.3(a) and 5.3(d).

These changes all happened shortly after Karen Sandler announced that she planned to stand for the Linux Foundation board during a presentation last September. A short time later, the "Individual membership" program was quietly renamed to the "Individual supporter" program and the promised benefit of being allowed to stand for and participate in board elections was dropped (compare the old page to the new one). Karen is the executive director of the Software Freedom Conservancy, an organisation involved in the vitally important work of GPL enforcement. The Linux Foundation has historically been less than enthusiastic about GPL enforcement, and the SFC is funding a lawsuit against one of the Foundation's members for violating the terms of the GPL. The timing may be coincidental, but it certainly looks like the Linux Foundation was willing to throw out any semblance of community representation just to ensure that there was no risk of someone in favour of GPL enforcement ending up on their board.

Much of the code in Linux is written by employees paid to do this work, but significant parts of both Linux and the huge range of software that it depends on are written by community members who now have no representation in the Linux Foundation. Ignoring them makes it look like the Linux Foundation is interested only in promoting, protecting and standardising Linux and open source software if doing so benefits their corporate membership rather than the community as a whole. This isn't a positive step.

[1] Article II of the bylaws
[2] Other than in the case of the TAB representative, an individual chosen by a board elected via in-person voting at a conference

comment count unavailable comments

Scott Kitterman: Python Packaging Build-Depends

As a follow-up to my last post where I discussed common Python packaging related errors, I thought it would be worth to have a separate post on how to decide on build-depends for Python (and Python3) packages. The python ecosystem has a lot of packages built around supporting multiple versions of python (really python3 now) in parallel. I m going to limit this post to packages you might need to build-depend on directly.

Python (2) Since Jessie (Debian 8), python2.7 has been the only supported python version. For development of Stretch and backports to Jessie there is no need to worry about multiple python versions. As a result, several all packages are (and will continue to be) equivalent to their non- all counterparts. We well continue to provide the all packages for backward compatibility, but they aren t really needed any more. python (or python-all) This is the package to build-depend on if your package is pure Python (no C extensions) and does not for some other reason need access to the Python header files (there are a handful of packages this latter caveat applies to, if you don t know if it applies to your package, it almost certainly doesn t). You should also build-depend on dh-python. It was originally shipped as part of the python package (and there is still an old version provided), but to get the most current code with new bug fixes and features, build-depend on dh-python. python-dev (or python-all-dev) If your package contains compiled C or C++ extensions, this package either provides or depends on the packages that provide all the header files you need. Do not also build-depend on python. python-dev depends on it and it is just an unneeded redundancy. python-dbg (or python-all-dbg) Add this if you build a -dbg package (not needed for -dbgsym). Other python packages There is not, AFAICT, any reason to build-dep on any of the other packages provided (e.g. libpython-dev). It is common to see things like python-all, python, python-dev, libpython-dev in build-depends. This could be simplified just to python-all-dev since it will pull the rest in.

Python3 Build-depends selection for Python 3 is generally similar, except that we continue to want to be able to support multiple python3 versions (as we currently support python3.4 and python3.5). There are a few differences: All or not -all Python3 transitions are much easier when C extensions are compiled for all supported versions. In many cases all that s needed if you use pybuild is to build-depend on python3-all-dev. While this is preferred, in many cases this would be technically challenging and not worth the trouble. This is mostly true for python3 based applications. Python3-all is mostly useful for running test suites against all supported python3 versions. Transitions As mentioned in the python section above, build-depends on python3- all- dev is generally only needed for compiled C extensions. For python3 these are also the packages that need to be rebuilt for a transition. Please avoid -dev build-depends whenever possible for non-compiled packages. Please keep your packages that do need rebuilding binNMU safe. Transitions happen in three stages:
  1. A new python3 version is added to supported python3 versions and packages that need rebuilding due to compiled code and that support multiple versions are binNMUed to add support for the new version.
  2. The default python3 is changed to be the new version and packages that only support a single python3 version are rebuilt.
  3. The old python3 version is dropped from supported versions and packages will multiple-version support are binNMUed to remove support for the dropped version.
This may seem complex (OK, it is a bit), but it enables a seamless transition for packages with multi-version support since they always support the default version. For packages that only support a single version there is an inevitable period when they go uninstallable once the default version has changed and until they can be rebuilt with the new default. Specific version requirements Please don t build-depend against specific python3 versions. Those don t show up in the transition tracker. Use X-Python3-Version (see python policy for details) to specify the version you need.

Summary Please check your packages and only build-depend on the -dev packages when you need it. Check for redundancy and remove it. Try and build for all python3 versions. Don t build-depend on specific python3 versions.

Steve Kemp: So life in Finland goes on

So after living here in Finland for 6 months I've now bought a flat. We have a few days to sort out mortgage paperwork, and assuming there are no problems we'll be moving into the new place on/around the 1st of March. Finally I'll be living in Finland, with a sauna of my very own. Interesting times. In more developer-friendly news I made a new release of Lumail with the integrated support for IMAP. Let us hope people like it.

Craig Sanders: lm-sensors configs for Asus Sabertooth 990FX and M5A97 R2.0

I had to replace a motherboard and CPU a few days ago (bought an Asus M5A97 R2.0), and wanted to get lm-sensors working properly on it. Got it working eventually, which was harder than it should have been because the lm-sensors site is MIA, seems to have been rm -rf -ed. For anyone else with this motherboard, the config is included below. This inspired me to fix the config for my Asus Sabertooth 990FX motherboard. Also included below. To install, copy-paste to a file under /etc/sensors.d/ and run sensors -s to make sensors evaluate all of the set statemnents.
# Asus M5A97 R2.0
# based on Asus M5A97 PRO from http://blog.felipe.lessa.nom.br/?p=93
chip "k10temp-pci-00c3"
     label temp1 "CPU Temp (rel)"
chip "it8721-*"
     label  in0 "+12V"
     label  in1 "+5V"
     label  in2 "Vcore"
     label  in2 "+3.3V"
     ignore in4
     ignore in5
     ignore in6
     ignore in7
     ignore fan3
     compute in0  @ * (515/120), @ / (515/120)
     compute in1  @ * (215/120), @ / (215/120)
     label temp1 "CPU Temp"
     label temp2 "M/B Temp"
     set temp1_min 30
     set temp1_max 70
     set temp2_min 30
     set temp2_max 60
     label fan1 "CPU Fan"
     label fan2 "Chassis Fan"
     label fan3 "Power Fan"
     ignore temp3
     set in0_min  12 * 0.95
     set in0_max  12 * 1.05
     set in1_min  5 * 0.95
     set in1_max  5 * 1.05
     set in3_min  3.3 * 0.95
     set in3_max  3.3 * 1.05
     ignore intrusion0
#Asus Sabertooth 990FX
# modified from the version at http://www.spinics.net/lists/lm-sensors/msg43352.html
chip "it8721-isa-0290"
# Temperatures
    label temp1  "CPU Temp"
    label temp2  "M/B Temp"
    label temp3  "VCORE-1"
    label temp4  "VCORE-2"
    label temp5  "Northbridge"         # I put all these here as a reference since the
    label temp6  "DRAM"                # Asus Thermal Radar tool on my Windows box displays
    label temp7  "USB3.0-1"            # all of them.
    label temp8  "USB3.0-2"            # lm-sensors ignores all but the CPU and M/B temps.
    label temp9  "PCIE-1"              # If that is really what they are.
    label temp10 "PCIE-2"
    set temp1_min 0
    set temp1_max 70
    set temp2_min 0
    set temp2_max 60
    ignore temp3
# Fans
    label fan1 "CPU Fan"
    label fan2 "Chassis Fan 1"
    label fan3 "Chassis Fan 2"
    label fan4 "Chassis Fan 3"
#    label fan5 "Chassis Fan 4"      # lm-sensor complains about this
    ignore fan2
    ignore fan3
    set fan1_min 600
    set fan2_min 600
    set fan3_min 600
# Voltages
    label in0 "+12V"
    label in1 "+5V"
    label in2 "Vcore"
    label in3 "+3.3V"
    label in5 "VDDA"
    compute  in0  @ * (50/12), @ / (50/12)
    compute  in1  @ * (205/120), @ / (205/120)
    set in0_min  12 * 0.95
    set in0_max  12 * 1.05
    set in1_min  5 * 0.95
    set in1_max  5 * 1.05
    set in2_min  0.80
    set in2_max  1.6
    set in3_min  3.20
    set in3_max  3.6
    set in5_min  2.2
    set in5_max  2.8
    ignore in4
    ignore in6
    ignore in7
    ignore intrusion0
chip "k10temp-pci-00c3"
     label temp1 "CPU Temp"
lm-sensors configs for Asus Sabertooth 990FX and M5A97 R2.0 is a post from: Errata

19 January 2016

Joey Hess: git-annex v6

Version 6 of git-annex, released last week, adds a major new feature; support for unlocked large files that can be edited as usual and committed using regular git commands. For example:
git init
git annex init --version=6
mv ~/foo.iso .
git add foo.iso
git commit -m "added hundreds of megabytes to git annex (not git)"
git remote add origin ssh://sever/dir
git annex sync origin --content # uploads foo.iso
Compare that with how git-annex has worked from the beginning, where git annex add is used to add a file, and then the file is locked, preventing further modifications of it. That is still a very useful way to use git-annex for many kinds of files, and is still supported of course. Indeed, you can easily switch files back and forth between being locked and unlocked. This new unlocked file mode uses git's smudge/clean filters, and I was busy developing it all through December. It started out playing catch-up with git-lfs somewhat, but has significantly surpassed it now in several ways. So, if you had tried git-annex before, but found it didn't meet your needs, you may want to give it another look now.
Now a few thoughts on git-annex vs git-lfs, and different tradeoffs made by them. After trying it out, my feeling is that git-lfs brings an admirable simplicity to using git with large files. File contents are automatically uploaded to the server when a git branch is pushed, and downloaded when a branch is merged, and after setting it up, the user may not need to change their git workflow at all to use git-lfs. But there are some serious costs to that simplicity. git-lfs is a centralized system. This is especially problimatic when dealing with large files. Being a decentralized system, git-annex has a lot more flexability, like transferring large file contents peer-to-peer over a LAN, and being able to choose where large quantities of data are stored (maybe in S3, maybe on a local archive disk, etc). The price git-annex pays for this flexability is you have to configure it, and run some additional commands. And, it has to keep track of what content is located where, since it can't assume the answer is "in the central server". The simplicity of git-lfs also means that the user doesn't have much control over what files are present in their checkout of a repository. git-lfs downloads all the files in the work tree. It doesn't have facilities for dropping the content of some files to free up space, or for configuring a repository to only want to get a subset of files in the first place. On the other hand, git-annex has excellent support for all those things, and this comes largely for free from its decentralized design. If git has showed us anything, it's perhaps that a little added complexity to support a fully distributed system won't prevent people using it. Even if many of them end up using it in a mostly centralized way. And that being decentralized can have benefits beyond the obvious ones.
Oh yeah, one other advantage of git-annex over git-lfs. It can use half as much disk space! A clone of a git-lfs repository contains one copy of each file in the work tree. Since the user can edit that file at any time, or checking out a different branch can delete the file, it also stashes a copy inside .git/lfs/objects/. One of the main reasons git-annex used locked files, from the very beginning, was to avoid that second copy. A second local copy of a large file can be too expensive to put up with. When I added unlocked files in git-annex v6, I found it needed a second copy of them, same as git-lfs does. That's the default behavior. But, I decided to complicate git-annex with a config setting:
git config annex.thin true
git annex fix
Run those two commands, and now only one copy is needed for unlocked files! How's it work? Well, it comes down to hard links. But there is a tradeoff here, which is why this is not the default: When you edit a file, no local backup is preserved of its old content. So you have to make sure to let git-annex upload files to another repository before editing them or the old version could get lost. So it's a tradeoff, and maybe it could be improved. (Only thin out a file after a copy has been uploaded?) This adds a small amount of complexity to git-annex, but I feel it's well worth it to let unlocked files use half the disk space. If the git-lfs developers are reading this, that would probably be my first suggestion for a feature to consider adding to git-lfs. I hope for more opportunities to catch-up to git-lfs in turn.

Jan Wagner: Trying icinga2 and icingaweb2 with Docker

In case you ever wanted to look at Icinga2, even into distributed features, without messing with installing whole server setups, this might interesting for you. At first, you need to have a running Docker on your system. For more information, have a look into my previous post!

Initiating Docker images
$ git clone https://github.com/joshuacox/docker-icinga2.git && \
  cd docker-icinga2
$ make temp
[...]
$ make grab
[...]
$ make prod
[...]

Setting IcingaWeb2 password (Or using the default one)
$ make enter
docker exec -i -t  cat cid  /bin/bash  
root@ce705e592611:/# openssl passwd -1 f00b4r  
$1$jgAqBcIm$aQxyTPIniE1hx4VtIsWvt/
root@ce705e592611:/# mysql -h mysql icingaweb2 -p -e \  
  "UPDATE icingaweb_user SET password_hash='$1$jgAqBcIm$aQxyTPIniE1hx4VtIsWvt/' WHERE name='icingaadmin';"
Enter password:  
root@ce705e592611:/# exit  

Setting Icinga Classic UI password
$ make enter
docker exec -i -t  cat cid  /bin/bash  
root@ce705e592611:/# htpasswd /etc/icinga2-classicui/htpasswd.users icingaadmin  
New password:  
Re-type new password:  
Adding password for user icingaadmin  
root@ce705e592611:/# exit  

Cleaning things up and making permanent
$ docker stop icinga2 && docker stop icinga2-mysql
icinga2  
icinga2-mysql  
$ cp -a /tmp/datadir ~/docker-icinga2.datadir
$ echo "~/docker-icinga2.datadir" > ./DATADIR
$ docker start icinga2-mysql && rm cid && docker rm icinga2 && \
  make runprod
icinga2-mysql  
icinga2  
chmod 777 /tmp/tmp.08c34zjRMpDOCKERTMP  
d34d56258d50957492560f481093525795d547a1c8fc985e178b2a29b313d47a  
Now you should be able to access the IcingaWeb2 web interface on http://localhost:4080/icingaweb2 and the Icinga Classic UI web interface at http://localhost:4080/icinga2-classicui. For further information about this Docker setup please consult the documentation written by Joshua Cox who has worked on this project. For information about Icinga2 itself, please have a look into the Icinga2 Documentation.

Next.

Previous.