Search Results: "ed"

14 August 2016

Reproducible builds folks: Reproducible Builds: week 68 in Stretch cycle

What happened in the Reproducible Builds effort between Sunday August 7 and Saturday August 13 2016: GSoC and Outreachy updates Reproducible work in other projects Thomas Schmitt scdbackup@gmx.net implemented a new -as mkisofs option:
--set_all_file_dates timestring
Set mtime, atime, and ctime of all files and directories to  the
given time.
Valid  timestring  formats  are:  'Nov  8  14:51:13  CET  2007',
110814512007.13, 2007110814511300. See also --modification-date=
and man xorriso, Examples of input timestrings.
This  action  stays  delayed until mkisofs emulation ends. Up to
then it  can  be  revoked  by  --set_all_file_dates  with  empty
timestring.   In  any  case  files  which get into the ISO after
mkisofs emulation ended will not  be  affected,  unless  another
mkisofs emulation applies --set_all_file_date again.
LEDE developer Jonas Gorski submitted a patch to fix build times in their kernel:
kernel: allow reproducable builds
Similar how we fix the file times in the filesystems, fix the build time
of the kernel, and make the build number static. This should allow the
kernel build to be reproducable when combined with setting the
KERNEL\_BUILD\_USER and \_DOMAIN in case of different machines.
The reproducability only applies to non-initramfs kernels, those still
require additional changes.
Signed-off-by: Jonas Gorski <jonas.gorski@gmail.com>
Packages reviewed and fixed, and bugs filed Patches have been submitted by: Package reviews 28 reviews have been added, 4 have been updated and 7 have been removed in this week, adding to our knowledge about identified issues. Issue types have been added/updated: Weekly QA work FTBFS bugs have been reported by: diffoscope development strip-nondeterminism development tests.reproducible-builds.org Misc. Chris started to ping old bugs with patches and no maintainer reaction so far. This week's edition was written by Chris Lamb and Holger Levsen and reviewed by a bunch of Reproducible Builds folks on IRC.

Steinar H. Gunderson: Linear interpolation, source alignment, and Debian's embedding policy

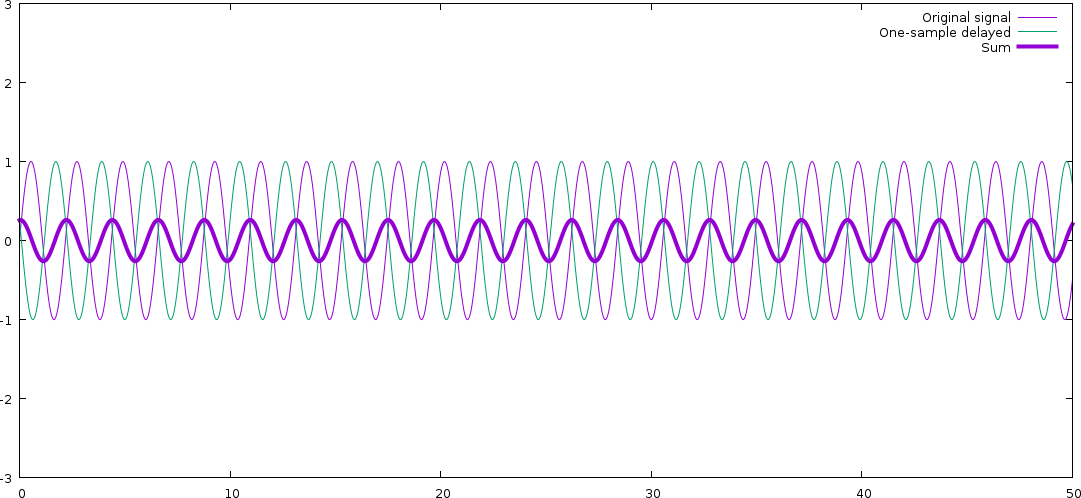
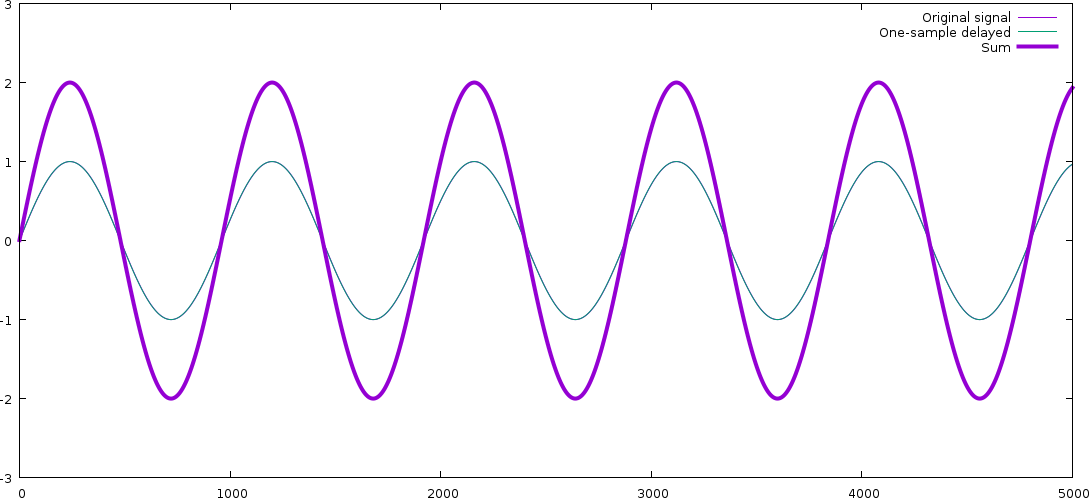
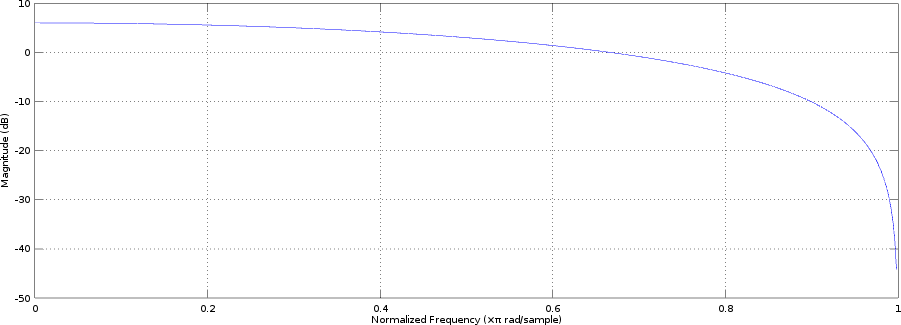
At some point back when the dinosaurs roamed the Earth and I was in high school, I borrowed my first digital signal processing book from a friend. I later went on to an engineering education and master's thesis about DSP, but the very basics of DSP never stop to fascinate me. Today, I wanted to write something about one of them and how it affects audio processing in Nageru (and finally, how Debian's policies put me in a bit of a bind on this issue). DSP texts tend to obscure profound truths with large amounts of maths, so I'll try to present a somewhat less general result that doesn't require going into the mathematical details. That rule is: Adding a signal to weighted, delayed copies of itself is a filtering operation. (It's simple, but ignoring it will have sinister effects, as we'll see later.) Let's see exactly what that means with a motivating example. Let's say that I have a signal where I want to get rid of (or rather, reduce) high frequencies. The simplest way I can think of is to add every neighboring sample; that is, set yn = xn + xn-1. For each sample, we add the previous sample, ie., the signal as it was one sample ago. (We ignore what happens at the edges; the common convention is to assume signals extend out to infinity with zeros.) What effect will this have? We can figure it out with some trigonometry, but let's just demonstrate it by plotting instead: We assume 48 kHz sample rate (which means that our one-sample delay is 20.83 s) and a 22 kHz note (definitely treble!), and plot the signal with one-sample delay (the x axis is sample number): Filtered 22 kHz As you can see, the resulting signal is a new signal of the same frequency (which is always true; linear filtering can never create new frequencies, just boost or dampen existing ones), but with much lower amplitude. The signal and the delayed version of it end up cancelling each other mostly out. Also note that there signal has changed phase; the resulting signal has been a bit delayed compared to the original. Now let's look at a 50 Hz signal (turn on your bass face). We need to zoom out a bit to see full 50 Hz cycles: Filtered 50 Hz The original signal and the delayed one overlap almost exactly! For a lower frequency, the one-sample delay means almost nothing (since the waveform is varying so slowly), and thus, in this case, the resulting signal is amplified, not dampened. (The signal has changed phase here, too actually exactly as much in terms of real time but we don't really see it, because we've zoomed out.) Real signals are not pure sines, but they can be seen as sums of many sines (another fundamental DSP result), and since filtering is a linear operation, it affects those sines independently. In other words, we now have a very simple filter that will amplify low frequencies and dampen high frequencies (and delay the entire signal a little bit). We can do this for all frequencies from 0 to 24000 Hz; let's ask Octave to do it for us: Frequency plot for simple filter (Of course, in a real filter, we'd probably multiply the result with 0.5 to leave the bass untouched instead of boosting it, but it doesn't really change anything. A real filter would have a lot more coefficients, though, and they wouldn't all be the same!) Let's now turn to a problem that will at first seem different: Combining audio from multiple different time sources. For instance, when mixing video, you could have input from two different cameras or sounds card and would want to combine them (say, a source playing music and then some audience sound from a camera). However, unless you are lucky enough to have a professional-grade setup where everything runs off the same clock (and separate clock source cables run to every device), they won't be in sync; sample clocks are good, but they are not perfect, and they have e.g. some temperature variance. Say we have really good clocks and they only differ by 0.01%; this means that after an hour of streaming, we have 360 ms delay, completely ruining lip sync! This means we'll need to resample at least one of the sources to match the other; that is, play one of them faster or slower than it came in originally. There are two problems here: How do you determine how much to resample the signals, and how do we resample them? The former is a difficult problem in its own right; about every algorithm not backed in solid control theory is doomed to fail in one way or another, and when they fail, it's extremely annoying to listen to. Nageru follows a 2012 paper by Fons Adriaensen; GStreamer does well, something else. It fails pretty badly in a number of cases; see e.g. this 2015 master's thesis that tries to patch it up. However, let's ignore this part of the problem for now and focus on the resampling. So let's look at the case where we've determined we have a signal and need to play it 0.01% faster (or slower); in a real situation, this number would vary a bit (clocks are not even consistently wrong). This means that at some point, we want to output sample number 3000 and that corresponds to input sample number 3000.3, ie., we need to figure out what's between two input samples. As with so many other things, there's a way to do this that's simple, obvious and wrong, namely linear interpolation. The basis of linear interpolation is to look at the two neighboring samples and weigh them according to the position we want. If we need sample 3000.3, we calculate y = 0.7 x3000 + 0.3 x3001 (don't switch the two coefficients!), or, if we want to save one multiplication and get better numerical behavior, we can use the equivalent y = x3000 + 0.3 (x3001 - x3000). And if we need sample 5000.5, we take y = 0.5 x5000 + 0.5 x5001. And after a while, we'll be back on integer samples; output sample 10001 corresponds to x10000 exactly. By now, I guess it should be obvious what's going on: We're creating a filter! Linear interpolation will inevitably result in high frequencies being dampened; and even worse, we are creating a time-varying filter, which means that the amount of dampening will vary over time. This manifests itself as a kind of high-frequency flutter , where the amount of flutter depends on the relative resampling frequencies. There's also cubic resampling (which can mean any of several different algorithms), but it only really reduces the problem, it doesn't really solve it. The proper way of interpolating depends a lot on exactly what you want (e.g., whether you intend to change the rate quickly or not); this paper lays out a bunch of them, and was the paper that originally made me understand why linear interpolation is so bad. Nageru outsources this problem to zita-resampler, again by Fons Adriaensen; it yields extremely high-quality resampling under controlled delay, through a relatively common technique known as polyphase filters. Unfortunately, doing this kind of calculations takes CPU. Not a lot of CPU, but Nageru runs in rather CPU-challenged environments (ultraportable laptops where the GPU wants most of the TDP, and the CPU has to go down to the lowest frequency), and it is moving in a direction where it needs to resample many more channels (more on the later), so every bit of CPU helps. So I coded up an SSE optimization of the inner loop for a particular common case (stereo signals) and sent it in for upstream inclusion. (It made the code 2.7 times as fast without any structural changes or reducing precision, which is pretty much what you can expect from SSE.) Unfortunately, after a productive discussion, suddenly upstream went silent. I tried pinging, pinging again, and after half a year pinging again, but to no avail. I filed the patch in Debian's BTS, but the maintainer understandably is reluctant to carry a delta against upstream. I also can't embed a copy; Debian policy would dictate that I build against the system's zita-resampler. I could work around it by rewriting zita-resampler until it looks nothing like the original, which might be a good idea anyway if I wanted to squeeze out the last drops of speed; there are AVX optimizations to be had in addition to SSE, and the structure as-is isn't ideal for SSE optimizations (although some of the changes I have in mind would have to be offset against increased L1 cache footprint, so careful benchmarking would be needed). But in a sense, it feels like just working around a policy that's there for good reason. So like I said, I'm in a bit of a bind. Maybe I should just buy a faster laptop. Oh, and how does GStreamer solve this? Well, it doesn't use linear interpolation. It does something even worse it uses nearest neighbor. Gah. Update: I was asked to clarify that this is about the audio resampling done by the GStreamer audio sink to sync signals, not in the audioresample element, which solves a related but different problem (static sample rate conversion). The audioresample element supports a number of different resampling methods; I haven't evaluated them.
Chris Lamb: try.diffoscope.org CLI client

One criminally-unknown new UNIX tool is diffoscope, a diff "on steroids" that will not only recursively unpack archives but will transform binary formats into human-readable forms in order to compare them instead of simply showing the raw difference in hexadecimal. In an attempt to remedy its underuse, in December 2015 I created the try.diffoscope.org service so that I and hopefully others could use diffoscope without necessarily installing the multitude of third-party tools that using it can require. It also enables trivial sharing of the HTML reports in bugs or on IRC. To make this even easier, I've now introduced a command-line client to the web service:
 $ apt-get install trydiffoscope
 [..]
 Setting up trydiffoscope (57) ...
 $ trydiffoscope /etc/hosts.allow /etc/hosts.deny
 --- a/hosts.allow
 +++ b/hosts.deny
  @@ -1,10 +1,17 @@
  -# /etc/hosts.allow: list of hosts that are allowed to access the system.
  -#                   See the manual pages hosts_access(5) and hosts_options(5).
  +# /etc/hosts.deny: list of hosts that are _not_ allowed to access the system.
  +#                  See the manual pages hosts_access(5) and hosts_options(5).
You can also install it from PyPI with:
$ pip install trydiffoscope

Mirroring the original diffoscope command, you can save the output locally in an even more-readable HTML report format by appending "--html output.html". In addition, if you specify the --webbrowser (or -w) argument:
$ trydiffoscope -w /etc/hosts.allow /etc/hosts.deny
https://try.diffoscope.org/gaauupyapzkb
... this will automatically open your default browser to view the results.

Dirk Eddelbuettel: rfoaas 1.0.0

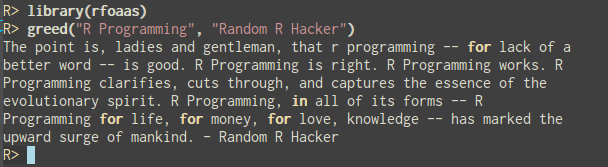
rfoaas greed example The big 1.0.0 is here! Following the unsurpassed lead of the FOAAS project, we have arrived at a milestone: Release 1.0.0 is now on CRAN. The rfoaas package provides an interface for R to the most excellent FOAAS service--which itself provides a modern, scalable and RESTful web service for the frequent need to tell someone to f$#@ off. Release 1.0.0 brings fourteen (!!) new access points: back(), bm(), gfy(), think(), keep(), single_(), look(), looking(), no(), give(), zero(), pulp(), sake(), and anyway(). All with documentation and testing. Even more neatly, thanks to a very pull request by Tyler Hunt, we can now issue random FOs via the getRandomFO() function! As usual, CRANberries provides a diff to the previous CRAN release. Questions, comments etc should go to the GitHub issue tracker. More background information is on the project page as well as on the github repo

This post by Dirk Eddelbuettel originated on his Thinking inside the box blog. Please report excessive re-aggregation in third-party for-profit settings.

Sven Hoexter: handling html mails with mutt and convincing Icedove to open http/https links in Firefox

... or the day I fixed my mail clients running on Debian/stretch. First of all mutt failed to open html mails or the html multipart stuff in Firefox. I found some interesting hints in a recent thread on debian-user. So now my "~/.mailcap" looks like this:
text/html; /usr/bin/firefox --new-tab %s;
text/html; /usr/bin/elinks -force-html -dump %s; copiousoutput
and I added the proposed "~/.muttrc" addition verbatim:
bind  attach  <return>  view-mailcap
alternative_order text/plain text/html
unauto_view *
auto_view text/html
For work related mails, where the use of html crap mails is a sad reality I can not avoid, I stick to Icedove. But beside of the many crashes everyone encountered recently it also crashes when I try to reach "Preferences -> Advanced -> Config Editor". So no chance to adjust the handling of http/https links in the UI. Luckily that configuration is still text, well XML, in a file called mimeTypes.rdf in in the profile directory. So I manually replaced "/usr/bin/iceweasel" with "/usr/bin/firefox" and a restart later clicking on http and https links works again. Yay.

David Moreno: Ruby and libv8: Exactly my feelings

Thanks to my coworker Dan for making a whole bunch of these based on our day job adventures :)

David Moreno: Deploying a Dancer app on Heroku

There s a few different posts out there on how to run Perl apps, such as Mojolicious-based, on Heroku, but I d like to show how to deploy a Perl Dancer application on Heroku. The startup script of a Dancer application (bin/app.pl) can be used as a PSGI file. With that in mind, I was able to take the good work of Miyagawa s Heroku buildpack for general PSGI apps and hack it a little bit to use Dancer s, specifically. What I like about Miyagawa s approach is that uses the fantastic cpanm and makes it available within your application, instead of the monotonous cpan, to solve dependencies. Let s make a simple Dancer app to show how to make this happen:
/tmp $ dancer -a heroku
+ heroku
+ heroku/bin
+ heroku/bin/app.pl
+ heroku/config.yml
+ heroku/environments
+ heroku/environments/development.yml
+ heroku/environments/production.yml
+ heroku/views
+ heroku/views/index.tt
+ heroku/views/layouts
+ heroku/views/layouts/main.tt
+ heroku/MANIFEST.SKIP
+ heroku/lib
heroku/lib/
+ heroku/lib/heroku.pm
+ heroku/public
+ heroku/public/css
+ heroku/public/css/style.css
+ heroku/public/css/error.css
+ heroku/public/images
+ heroku/public/500.html
+ heroku/public/404.html
+ heroku/public/dispatch.fcgi
+ heroku/public/dispatch.cgi
+ heroku/public/javascripts
+ heroku/public/javascripts/jquery.js
+ heroku/t
+ heroku/t/002_index_route.t
+ heroku/t/001_base.t
+ heroku/Makefile.PL
Now, you already know that by firing perl bin/app.pl you can get your development server up and running. So I ll just proceed to show how to make this work on Heroku, you should already have your development environment configured for it:
/tmp $ cd heroku/
/tmp/heroku $ git init
Initialized empty Git repository in /private/tmp/heroku/.git/
/tmp/heroku :master $ git add .
/tmp/heroku :master $ git commit -a -m 'Dancer on Heroku'
[master (root-commit) 6c0c55a] Dancer on Heroku
22 files changed, 809 insertions(+), 0 deletions(-)
create mode 100644 MANIFEST
create mode 100644 MANIFEST.SKIP
create mode 100644 Makefile.PL
create mode 100755 bin/app.pl
create mode 100644 config.yml
create mode 100644 environments/development.yml
create mode 100644 environments/production.yml
create mode 100644 lib/heroku.pm
create mode 100644 public/404.html
create mode 100644 public/500.html
create mode 100644 public/css/error.css
create mode 100644 public/css/style.css
create mode 100755 public/dispatch.cgi
create mode 100755 public/dispatch.fcgi
create mode 100644 public/favicon.ico
create mode 100644 public/images/perldancer-bg.jpg
create mode 100644 public/images/perldancer.jpg
create mode 100644 public/javascripts/jquery.js
create mode 100644 t/001_base.t
create mode 100644 t/002_index_route.t
create mode 100644 views/index.tt
create mode 100644 views/layouts/main.tt
/tmp/heroku :master $
And now, run heroku create, please note the buildpack URL, http://github.com/damog/heroku-buildpack-perl.git:
/tmp/heroku :master $ heroku create --stack cedar --buildpack http://github.com/damog/heroku-buildpack-perl.git
Creating blazing-beach-7280... done, stack is cedar
http://blazing-beach-7280.herokuapp.com/   git@heroku.com:blazing-beach-7280.git
Git remote heroku added
/tmp/heroku :master $
And just push:
/tmp/heroku :master $ git push heroku master
Counting objects: 34, done.
Delta compression using up to 4 threads.
Compressing objects: 100% (30/30), done.
Writing objects: 100% (34/34), 40.60 KiB, done.
Total 34 (delta 3), reused 0 (delta 0)
-----> Heroku receiving push
-----> Fetching custom buildpack... done
-----> Perl/PSGI Dancer! app detected
-----> Bootstrapping cpanm
Successfully installed JSON-PP-2.27200
Successfully installed CPAN-Meta-YAML-0.008
Successfully installed Parse-CPAN-Meta-1.4404 (upgraded from 1.39)
Successfully installed version-0.99 (upgraded from 0.77)
Successfully installed Module-Metadata-1.000009
Successfully installed CPAN-Meta-Requirements-2.122
Successfully installed CPAN-Meta-2.120921
Successfully installed Perl-OSType-1.002
Successfully installed ExtUtils-CBuilder-0.280205 (upgraded from 0.2602)
Successfully installed ExtUtils-ParseXS-3.15 (upgraded from 2.2002)
Successfully installed Module-Build-0.4001 (upgraded from 0.340201)
Successfully installed App-cpanminus-1.5015
12 distributions installed
-----> Installing dependencies
Successfully installed ExtUtils-MakeMaker-6.62 (upgraded from 6.55_02)
Successfully installed YAML-0.84
Successfully installed Test-Simple-0.98 (upgraded from 0.92)
Successfully installed Try-Tiny-0.11
Successfully installed HTTP-Server-Simple-0.44
Successfully installed HTTP-Server-Simple-PSGI-0.14
Successfully installed URI-1.60
Successfully installed Test-Tester-0.108
Successfully installed Test-NoWarnings-1.04
Successfully installed Test-Deep-0.110
Successfully installed LWP-MediaTypes-6.02
Successfully installed Encode-Locale-1.03
Successfully installed HTTP-Date-6.02
Successfully installed HTML-Tagset-3.20
Successfully installed HTML-Parser-3.69
Successfully installed Compress-Raw-Bzip2-2.052 (upgraded from 2.020)
Successfully installed Compress-Raw-Zlib-2.054 (upgraded from 2.020)
Successfully installed IO-Compress-2.052 (upgraded from 2.020)
Successfully installed HTTP-Message-6.03
Successfully installed HTTP-Body-1.15
Successfully installed MIME-Types-1.35
Successfully installed HTTP-Negotiate-6.01
Successfully installed File-Listing-6.04
Successfully installed HTTP-Daemon-6.01
Successfully installed Net-HTTP-6.03
Successfully installed HTTP-Cookies-6.01
Successfully installed WWW-RobotRules-6.02
Successfully installed libwww-perl-6.04
Successfully installed Dancer-1.3097
29 distributions installed
-----> Installing Starman
Successfully installed Test-Requires-0.06
Successfully installed Hash-MultiValue-0.12
Successfully installed Devel-StackTrace-1.27
Successfully installed Test-SharedFork-0.20
Successfully installed Test-TCP-1.16
Successfully installed Class-Inspector-1.27
Successfully installed File-ShareDir-1.03
Successfully installed Filesys-Notify-Simple-0.08
Successfully installed Devel-StackTrace-AsHTML-0.11
Successfully installed Plack-0.9989
Successfully installed Net-Server-2.006
Successfully installed HTTP-Parser-XS-0.14
Successfully installed Data-Dump-1.21
Successfully installed Starman-0.3001
14 distributions installed
-----> Discovering process types
Procfile declares types -&amp;gt; (none)
Default types for Perl/PSGI Dancer! -&amp;gt; web
-----> Compiled slug size is 2.7MB
-----> Launching... done, v4
http://blazing-beach-7280.herokuapp.com deployed to Heroku
To git@heroku.com:blazing-beach-7280.git
* [new branch] master -&amp;gt; master
/tmp/heroku :master $
And you can confirm it works: Please note that the environment it runs on is deployment . The backend server it uses is the great Starman, also by the great Miyagawa. Now, if you add or change dependencies on Makefile.PL, next time you push, those will get updated. Very cool, right? :)

David Moreno: I quit

I just recently quit my job at the startup company I had been working in for almost five years. In startup terms, such long time might be a whole lifetime, but in my case, I grew liking it more and more as the years came, I had evolved from being just another engineer, to lead a team of seven great developers, with decision-making tasks and strategy planning for our technical infrastructure. It s been such a great long teaching journey that I m nothing but pleased with my own performance, learned lessons and skills and all I provided and was provided by the project. Leaving a city like New York is not an easy task. You have it all there, you start making a life and suddenly, before you know it, you already have a bunch of ties to the place, people, leases, important dates, all kinds of shit. Seriously, all kinds of crazy ass shit start to fill up your baggage. You wake up everyday to get into the subway and commute surrounded by all of this people that are just like you: so similar yet so immensely different. No, leaving the city is not an easy task, it s not something to take lightly. You know how people just say my cycle has ended in this place as an euphemism not to end in bad terms with anyone? Well, ending a cycle is indeed a reality, I got to a point where I felt like I needed to head into a different direction, take on new challenges and overall, peace out and hope the best to everyone, specially to myself. This was me, on my last day at work, last Friday of June: (Some) people seem to be anxious to know what I m doing next, and my answer is, go mind your own fucking business. However, life is short and I would love to do any of the following: Decisions, decisions For the time being, I m chilling with my people, friends and family in beautiful Mexico City. I ve been doing so for the entire month of July and I couldn t be more content. August will see my 28th birthday and as I approach thirty, I believe I need to continue moving forward. This stupid world is a tiny place and our lives are short, I for one, will definitively try to take the bull by the horns. Thanks for reading, more updates soon. Peace.

Jaminy Prabaharan: GSoC-2016 Journey (In brief)

Three months of coding is about to end.It has officially begun on May 23rd and we are getting near to the final submission deadline on August 15th.

You can checkout my Debian wiki page to know more about myself.

I have worked on improving voice, video and chat communication (Real Time Communication) with free software, one of the RTC project for Debian.

My mentors are Iain.R.Learmonth and Daniel Pocock.Both of them were dedicative and I could learn many new things from them within these three months.I have contacted my mentors through personal mail, Debian outreach mailing lists and IRC(#debian-data and #debian-soc). They were very responsive to my queries. Thank you Iain and Daniel for improving and enlightening me.

My initial task is e-mail mining. I have to allow the client to login to the mail using IMAP, extracts the To , From and CC headers of every email message in the folder and then scan for the phone numbers, SIP addresses, XMPP addresses in the body of the message.These extracted details should be written in the CSV file also.The extracted phone numbers, SIP addresses, XMPP addresses and ham call signs should be made into a click able link using Flask.

I have also attended DebConf-16 (conference of Debian developers, contributors and users) in Cape Town in the middle of three months (Form July 2nd to July 9th).I gave a talk on my progressing GSoC project.I have learnt many new things about Debian, their projects and their packages apart form my GSoC project.I have met Debian developers, contribuors and some of the fellow GSoC students.

I have written previous blog posts related to GSoC-2016 in the following links.

GSoC-Journey till Mid term

Weekly Report for GSoC16-week 1 and week2

Weekly Report for GSoC16-Community bonding period

Weekly reports sent to Debian-outreach list.

Email-Mining is the repository I have created on GitHub to work on my project.

I have divided the tasks and coded individually to combine together.Snippet folder in the file contains the code for each tasks.

Following are the commits I have made in the repository.

https://github.com/Jaminy/Email-Mining/commits/master My tasks have been extended to add a gravatar on the page listing details for each email address, maintain a counter for each hour of the day in the scraper for each mail, show a list of other people that have been involved in email conversations and make the contact information on the detail pages machine readable. https://github.com/Jaminy/Email-Mining/issues

My mentor suggested me to work on at least three issues before final submission.I have worked on each of them individually in the snippet folder except the last one.I will be working on it after GSoC.

Mailmine.py script contains the final code which combines all snippets into one.

Three pull requests are to be merged after the confirmation from my mentor.

These are the abstract about what I have done within these three months.

It was an amazing and thrilling coding ride.

Stay tuned for the elaborated blog posts with DebConf experience and many more.

David Moreno: One year

A year ago today, I started working for Booking.com. I wish I could say that the time has flown by, but it really hasn t. It has been one hell of a ride on all fronts: work, learning experiences, friends, but specially at home, since working for this company didn t come without a complete life change. So far so good, and for that I m grateful :)

David Moreno: Twitter feed for Planet Perl Iron Man

I like to read Planet Perl Iron Man, but since I m less and less of a user of Google Reader these days, I prefer to follow interesting feeds on Twitter instead: I don t have to digest all of the content on my timeline, only when I m in the mood to see what s going on out there. So, if you wanna follow the account, find it as @perlironman. If interested, you can also follow me. That is all.

David Moreno: Feedbag released under MIT license

I was contacted by Pivotal Labs regarding licensing of Feedbag. I guess releasing open source software as GPL only makes sense if you continue to live under a rock. I ve bumped the version to 0.9 and released it under MIT license. Feedbag 1.0, which I plan to work on during the following days will bring in a brand new shiny backend powered by Nokogiri, instead of Hpricot (I mean, give me a break, I m trying to catch up with the Ruby community, after all I m primarily a Perl guy :D) and hopefully I will be able to recreate most of the feed auto-discovery test suite that Mark Pilgrim retired (410 Gone) when he committed infosuicide. Have a good weekend!

David Moreno: RVM + Rake tasks on Cron jobs

RVM hates my guts. And it doesn t matter, because I hate RVM back even more. Since I was technologically raised by aging wolfs, I have strong reasons to believe that you just shouldn t have mixed versions of software on your production systems, specially, if a lot of things are poorly tested, like most of Ruby libraries, aren t backward compatible. I was raised on a world where everything worked greatly because the good folks at projects like Debian or Perl have some of the greatest QA processes of all time, hands down. So, when someone introduces a thing like RVM which not only promotes having hundreds of different versions of the same software, both on development, testing and production environments, but also encourages poor quality looking back and looking forward, there isn t anything else but to lose faith in humanity. But enough for ranting. I had to deliver this side project that works with the Twitter API and the only requirement pretty much was that it had to be both run from the shell but also loaded as a class within a Ruby script. And so I did everything locally with my great local installation of Ruby 1.8.7. When it came the time to load on the testing/production server I found myself on a situation where pathetic RVM was installed. After spending hours trying to accommodate my changes to run properly with Ruby 1.9.2, I set up a cron job using crontab to run my shit every now and then. And the shit wasn t even running properly. Basically, my crontab line looked something like this:
*/30 * * * * cd /home/david/myproject && rake awesome_task
And that was failing, crontab was returning some crazy shit like Ruby and/or RubyGems cannot find the rake gem . Seriously? Then I thought, well, maybe my environment needs to be loaded and whatever, so I made a bash script with something like this:
#!/bin/bash
cd /home/david/myproject
/full/path/to/rvm/bin/rake -f Rakefile awesome_task
And that was still failing with the same error. So after trying to find out how cron jobs and crontab load Bash source files, I took a look at how Debian starts its shell upon login. And while that didn t tell me that much that I didn t know, I went to look at the system-wide /etc/profile and found a gem, a wonderful directory /etc/profile.d/ where a single shitty file was sitting, smiling back at me, like waiting for me to find it out and swear on all problems in life: rvm.sh. /etc/profile is not being loaded when I just run /bin/bash by my crappy script, only when I log in, I should ve known this. Doesn t RVM solve the issue of having system-wide installations so the user doesn t have to deal with, you know, anything outside of his own /home ? So I had to go ahead and do:
#!/bin/bash
source /etc/profile
cd /home/david/myproject
/full/path/to/rvm/bin/rake -f Rakefile awesome_task
And hours later I was able to continue with work. Maybe this will help some poor bastard like myself on similar situation on the future. Of course one can argue that I could ve installed my own RVM and its Ruby versions, but why, oh why, if it was, apparently, already there. Why would I have to fiddle with the Ruby installations if all I want is get my shit done and head to City Bakery where I can spend that money I just earned on chocolate cookies? My work is pretty simple to run with pretty much any ancient version of Ruby, nothing fancy (unless you call MongoMapper fancy). RVM is a great project that doesn t solve an issue, but just hides some really fucked up shit on the Ruby community.

Jamie McClelland: Noam use Gnome

I don't quite remember when I read John Goerzen's post about teaching a 4 year old to use the linux command line with audio on planet Debian. According to the byline it was published nearly 2 years before Noam was born, but I seem to remember reading it in the weeks after his birth when I was both thrilled at the prospect of teaching my kid to use the command line and, in my sleepless stupor, not entirely convinced he would ever be old enough. Well, the time came this morning. He found an old USB key board and discovered that a green light came on when he plugged it in. He was happily hitting the keys when Meredith suggested we turn on the monitor and open a program so he could see the letters appear on the screen and try to spell his name. After 10 minutes in Libre Office I remembered John's blog and was inspired to start writing a bash script in my head (I would have to stop the fun with Libre Office to write it so the pressure was on...). In the end it was only a few minutes and I came up with:
#!/bin/bash
while [ 1 ]; do
  read -p "What shall I say? "
  espeak "$REPLY"
done
It was a hit. He said what he wanted to hear and hit the keys, my job was to spell for him. Noam uses Gnome Terminal to talk Oh, also: he discovered key combinations that did things that were unsurprising to me (like taking the screen grab above) and also things that I'm still scratching my head about (like causing a prompt on the screen that said: "Downloading shockwave plugin." No thanks. And, how did he do that?

13 August 2016

Russ Allbery: git-pbuilder 1.42

A minor update to my glue script for building software with pdebuild and git-buildpackage. (Yes, still needs to get rewritten in Python.) This release stops using the old backport location for oldstable builds since oldstable is now wheezy, which merged the backports archive into the regular archive location. The old location is still there for squeeze just in case anyone needs it. It also adds a new environment variable, GIT_PBUILDER_PDEBUILDOPTIONS, that can be used to pass options directly to pdebuild. Previously, there was only a way to pass options to the builder, via pdebuild, but not to configure pdebuild itself. There are some times when that's useful, such as to pass --use-pdebuild-internal. This was based on a patch from Rafa D ugo cki. You can get the latest version of git-pbuilder from my scripts page.

Dariusz Dwornikowski: Automatic PostgreSQL config with Ansible

If for some reasons you can t use dedicated DBaaS for your PostgreSQL (like AWS RDS) then you need to run your database server on a cloud instance. In these kind of setup, when you scale up or down your instance size, you need to adjust PostgreSQL parameters according to the changing RAM size. There are several parameters in PostgreSQL that highly depend on RAM size. An example is shared_buffers for which a rule of thumb says that is should be set to 0.25*RAM. In DBaaS, when you scale the DB instance up or down, parameters are adjusted for you by the cloud provider, e.g. AWS RDS uses parameter groups for that reason, where particular parameters are defined depending on the size of the RAM of the RDS instance. So what can you when you do not have RDS or any other DBaaS? You can always keep several configuration files on your instance, each for a different memory size, you can rewrite you config every time you change the size of the instance or you can use Ansible role for that. Our Ansible role will be very simple, we will have two tasks. One will change the PostgreSQL config, the second one will just restart the database server:
---
- name: Update PostgreSQL config
  template: src=postgresql.conf.j2 dest=/etc/postgresql/9.5/main/postgresql.conf
  register: pgconf
- name: Restart postgresql
  service: name=postgresql state=restarted
  when: pgconf.changed
Now we need the template, where are the calculations take place. RAM size will be taken from the Ansible s fact called ansible_memtotal_mb. Since it returns RAM size in MBs, we will stick to MBs. We will define the following parameters, you can adjust them to your needs: For max_connections we will define a default role variable of 100 but we will allow to specify it at a runtime. The relevant parts of the postgresql.conf.j2 are below:
 max_connections =   max_connections        
 shared_buffers =   (((ansible_memtotal_mb/1024.0) round int)*0.25) int*1024  MB
 work_mem =   ((((ansible_memtotal_mb/1024.0) round int)*0.25)/max_connections*1024) round int  MB
 maintenance_work_mem =   ((ansible_memtotal_mb/1024.0) round int)*64  MB
 effective_cache_size =   (((ansible_memtotal_mb/1024.0) round int)*0.75) int*1024  MB
You can now run the role every time you change the instance size, and the config will be changed accordingly to the RAM size. You can extend the role and maybe add other constraints and change max_connections to you specific needs. An example playbook could look like:
---
hosts: my_postgres
roles:
  - postgres-config 
vars:
  - max_connection: 300
And run it:
$ ansible-playbook playbook.yml
The complete role can be found in my github repo.

Russell Coker: SSD and M.2

The Need for Speed One of my clients has an important server running ZFS. They need to have a filesystem that detects corruption, while regular RAID is good for the case where a disk gives read errors it doesn t cover the case where a disk returns bad data and claims it to be good (which I ve witnessed in BTRFS and ZFS systems). BTRFS is good for the case of a single disk or a RAID-1 array but I believe that the RAID-5 code for BTRFS is not sufficiently tested for business use. ZFS doesn t perform very well due to the checksums on data and metadata requiring multiple writes for a single change which also causes more fragmentation. This isn t a criticism of ZFS, it s just an engineering trade-off for the data integrity features. ZFS supports read-caching on a SSD (the L2ARC) and write-back caching (ZIL). To get the best benefit of L2ARC and ZIL you need fast SSD storage. So now with my client investigating 10 gigabit Ethernet I have to investigate SSD. For some time SSDs have been in the same price range as hard drives, starting at prices well below $100. Now there are some SSDs on sale for as little as $50. One issue with SATA for server use is that SATA 3.0 (which was released in 2009 and is most commonly used nowadays) is limited to 600MB/s. That isn t nearly adequate if you want to serve files over 10 gigabit Ethernet. SATA 3.2 was released in 2013 and supports 1969MB/s but I doubt that there s much hardware supporting that. See the SATA Wikipedia page for more information. Another problem with SATA is getting the devices physically installed. My client has a new Dell server that has plenty of spare PCIe slots but no spare SATA connectors or SATA power connectors. I could have removed the DVD drive (as I did for some tests before deploying the server) but that s ugly and only gives 1 device while you need 2 devices in a RAID-1 configuration for ZIL. M.2 M.2 is a new standard for expansion cards, it supports SATA and PCIe interfaces (and USB but that isn t useful at this time). The wikipedia page for M.2 is interesting to read for background knowledge but isn t helpful if you are about to buy hardware. The first M.2 card I bought had a SATA interface, then I was unable to find a local company that could sell a SATA M.2 host adapter. So I bought a M.2 to SATA adapter which made it work like a regular 2.5 SATA device. That s working well in one of my home PCs but isn t what I wanted. Apparently systems that have a M.2 socket on the motherboard will usually take either SATA or NVMe devices. The most important thing I learned is to buy the SSD storage device and the host adapter from the same place then you are entitled to a refund if they don t work together. The alternative to the SATA (AHCI) interface on an M.2 device is known as NVMe (Non-Volatile Memory Express), see the Wikipedia page for NVMe for details. NVMe not only gives a higher throughput but it gives more command queues and more commands per queue which should give significant performance benefits for a device with multiple banks of NVRAM. This is what you want for server use. Eventually I got a M.2 NVMe device and a PCIe card for it. A quick test showed sustained transfer speeds of around 1500MB/s which should permit saturating a 10 gigabit Ethernet link in some situations. One annoyance is that the M.2 devices have a different naming convention to regular hard drives. I have devices /dev/nvme0n1 and /dev/nvme1n1, apparently that is to support multiple storage devices on one NVMe interface. Partitions have device names like /dev/nvme0n1p1 and /dev/nvme0n1p2. Power Use I recently upgraded my Thinkpad T420 from a 320G hard drive to a 500G SSD which made it faster but also surprisingly quieter you never realise how noisy hard drives are until they go away. My laptop seemed to feel cooler, but that might be my imagination. The i5-2520M CPU in my Thinkpad has a TDP of 35W but uses a lot less than that as I almost never have 4 cores in use. The z7k320 320G hard drive is listed as having 0.8W low power idle and 1.8W for read-write, maybe Linux wasn t putting it in the low power idle mode. The Samsung 500G 850 EVO SSD is listed as taking 0.4W when idle and up to 3.5W when active (which would not be sustained for long on a laptop). If my CPU is taking an average of 10W then replacing the hard drive with a SSD might have reduced the power use of the non-screen part by 10%, but I doubt that I could notice such a small difference. I ve read some articles about power use on the net which can be summarised as SSDs can draw more power than laptop hard drives but if you do the same amount of work then the SSD will be idle most of the time and not use much power . I wonder if the SSD being slightly thicker than the HDD it replaced has affected the airflow inside my Thinkpad. From reading some of the reviews it seems that there are M.2 storage devices drawing over 7W! That s going to create some cooling issues on desktop PCs but should be OK in a server. For laptop use they will hopefully release M.2 devices designed for low power consumption. The Future M.2 is an ideal format for laptops due to being much smaller and lighter than 2.5 SSDs. Spinning media doesn t belong in a modern laptop and using a SATA SSD is an ugly hack when compared to M.2 support on the motherboard. Intel has released the X99 chipset with M.2 support (see the Wikipedia page for Intel X99) so it should be commonly available on desktops in the near future. For most desktop systems an M.2 device would provide all the storage that is needed (or 2*M.2 in a RAID-1 configuration for a workstation). That would give all the benefits of reduced noise and increased performance that regular SSDs provide, but with better performance and fewer cables inside the PC. For a corporate desktop PC I think the ideal design would have only M.2 internal storage and no support for 3.5 disks or a DVD drive. That would allow a design that is much smaller than a current SFF PC.

David Moreno: Perl 5.12's each function

With Perl 5.12 released earlier this summer, the each function got a nice little addition that I d like to talk about: It now has the ability to work on arrays, not only key-value pair hashes, but not exactly as you d expect it (not like Ruby s each method). The traditional way to work with each, using a hash:
my %h = (
    a => 1,
    b => 2,
    c => 3,
);
while(my($key, $value) = each %h)  
    say "index: $key => value: $value";
 
And the output. Of course, hashes being unordered lists, you won t get the nice little order of an array.
index: c => value: 3
index: a => value: 1
index: b => value: 2
Now, when you use an array, each will return the next pair on the list consisting on the index of that element s position and the position itself. Since it returns the next pair, you can iterate through it on the same fashion as when using a hash:
my @arr = ('a'..'z');
while(my($index, $value) = each @arr)  
    say "index: $index => value: $value";
 
This is particularly useful to access direct named variables, both the index and the element, while looping through an array.
index: 0 => value: a
index: 1 => value: b
index: 2 => value: c
index: 3 => value: d
index: 4 => value: e
index: 5 => value: f
index: 6 => value: g
index: 7 => value: h
index: 8 => value: i
index: 9 => value: j
index: 10 => value: k
index: 11 => value: l
index: 12 => value: m
index: 13 => value: n
index: 14 => value: o
index: 15 => value: p
index: 16 => value: q
index: 17 => value: r
index: 18 => value: s
index: 19 => value: t
index: 20 => value: u
index: 21 => value: v
index: 22 => value: w
index: 23 => value: x
index: 24 => value: y
index: 25 => value: z

David Moreno: Disable Nginx logging

This is something that is specified clearly on the Nginx manual, but it s nice to have it as a quick reference. The access_log and error_log directives on Nginx are on separate modules (HTTP Log and Core modules respectively) and they don t behave the same way when all you want is to disable all logging on your server (in our case, we serve a gazillion static files and perform a lot of reverse proxying and we re not interested on tracking that). It s a common misconception that you can set error_log to off, because that s how you disable access_log (if you do that, the server will still log to the file $nginx_path/off). Instead, you have to set error_log to log to the always mighty black hole /dev/null using the highest level for logging (which triggers the fewest events), crit:
http  
  server  
    # ...
    access_log off;
    error_log /dev/null crit;
    # ...
   
  #...
 
If you re the possessor of the blingest of bling-bling, you can disable all logging (not only for a server block), by putting error_log on the root of the configuration and access_log within your http block and make sure you don t override that on any of the inner blocks. And you re good to go.

David Moreno: Geo::PostalCode::NoDB 0.01

Geo::PostalCode is a great Perl module. It lets you find surrounding postal areas (zip codes) around a given an amount of miles (radius), calculate distance between them, among other nice features. Sadly, I couldn t get it to work with updated data and because the file its Berkely DB installer was producing was not being recognized by its parser, which bases off on DB_File. Since I was able to find working data for the source of zip codes, I ended up hacking the module and producing a version with no Berkeley DB support. So basically, and taken from the POD:
RATIONALE BEHIND NO BERKELEY DB
On a busy day at work, I couldn t get Geo::PostalCode to work with newer data (the data source TJMATHER points to is no longer available), so the tests shipped with his module pass, but trying to use real data no longer seems to work. DB_File marked the Geo::PostalCode::InstallDB output file as invalid type or format. If you don t run into that issue by not wanting to use this module, please drop me a note! I would love to learn how other people made it work.

So, in order to get my shit done, I decided to create this module. Loading the whole data into memory from the class constructor has been proven to be enough for massive usage (citation needed) on a Dancer application where this module is instantiated only once.
$ sudo cpanm Geo::PostalCode::NoDB now!

Next.

Previous.