The first Armadillo release of the 7.* series is out: a new version 7.100.3. We uploaded RcppArmadillo 0.7.100.3.0 to CRAN and Debian. This followed the usual thorough reverse-dependecy checking of by now 230 packages using it.
This release now requires a recent enough compiler. As g++ is so common, we explicitly test for version 4.6 or newer. So if you happen to be on an older RHEL or CentOS release, you may need to get yourself a more modern compiler. R on Windows is now at 4.9.3 which is decent (yet stable) choice; the 4.8 series of g++ will also do. For reference, the current LTS of Ubuntu is at 5.3.1, and we have g++ 6.1 available in Debian testing.
This new upstream release adds a few new helper functions (which are particularly useful in statistics, but were of course already available to us via Rcpp), more slicing of Cube data structures and a brand new sparse matrix decomposition module courtesy of Yixuan Qiu -- whom R users know as the author of the RSpectra package (which replaces his older rArpack package) and of course all the most excellent work he provided to RcppEigen.
Armadillo is a powerful and expressive C++ template library for linear algebra aiming towards a good balance between speed and ease of use with a syntax deliberately close to a Matlab.
Changes in this release are as follows:
Changes in RcppArmadillo version 0.7.100.3.0 (2016-05-25)Courtesy of CRANberries, there is also a diffstat report for this release. As always, more detailed information is on the RcppArmadillo page. Questions, comments etc should go to the rcpp-devel mailing list off the R-Forge page.
- Upgraded to Armadillo test release 7.100.3
- added
erf(),erfc(),lgamma()- added
.head_slices()and.tail_slices()to subcube viewsspsolve()now requires SuperLU 5.2eigs_sym(),eigs_gen()andsvds()now use a built-in reimplementation of ARPACK for real (non-complex) matrices (code contributed by Yixuan Qiu)- The
configurecode now checks against oldg++version which are no longer sufficient to build the package.
This post by Dirk Eddelbuettel originated on his Thinking inside the box blog. Please report excessive re-aggregation in third-party for-profit settings.
So in the end it was a very successful first week, because I
Time for new release! We just updated rfoaas on CRAN, and it now corresponds to version 0.1.9 of the FOAAS API.
The rfoaas package provides an interface for R to the most excellent FOAAS service--which provides a modern, scalable and RESTful web service for the frequent need to tell someone to f$#@ off.
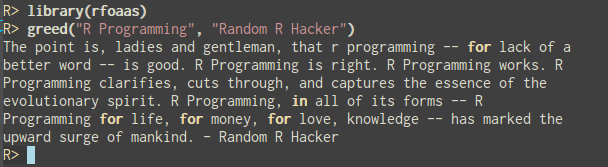
Release 0.1.9 brings three new access point functions: greed(), me() and morning(). It also adds an S3 print method for the returned object. A demo of first of these additions in shown in the image in this post.
As usual, CRANberries provides a diff to the previous CRAN release. Questions, comments etc should go to the GitHub issue tracker.
This post by Dirk Eddelbuettel originated on his Thinking inside the box blog. Please report excessive re-aggregation in third-party for-profit settings.
So far the only missing submodule in Debian's Qt5 stack is QtWebEngine. None of us the current Qt maintainers have the time/will to do the necessary stuff to have it properly packaged.
How to manage your photos? That is probably the biggest question for anyone doing anything with a photo camera. As resolutions of cameras grow, the data we have to manage is growing ever. In my case I am talking about more than 50000 photos and videos measuring up to about 200Gb of disk space, constantly growing. There are several photo management softwares out there, I guess the most commonly used ones are Shotwell for the Gnome desktop, digiKam for the KDE world, and FotoXX. I have not used Shotwell and digiKam for quite some time, and collect here my experiences of strength and weaknesses of the two programs. FotoXX seems to be very powerful, too, but I haven t tested it till now.
There is no clear winner here, unfortunately. Both have their strength and their weaknesses. And as a consequence I am using both in parallel.
Before I start a clear declaration: I have been using Shotwell for many years, and have myself contributed considerable code to Shotwell, in particular the whole comment system (comments for photos and events), as well as improved the Piwigo upload features. I started using digiKam some month ago when I started to look for offloading parts of my photo library to external devices. Since then I have used both in parallel.
Let us start with what these programs say about themselves:
Shotwell is declared as a Photo Manager for Gnome 3, with the following features:
Shotwell is Gnome 3 that means get rid of functionality. digiKam is KDE that means provide as much functionality as possible.Now before you run after me with a knife because you do not agree with me on the above, either read on, or stop reading. I am not interested in flame wars over Gnome versus KDE philosophy. I have been using Gnome since many years, and tried to convince myself to G3 for more than a year until I threw out all of it but selected programs but their number is going down. Let us look at those aspects I am using: organization, offline, sharing, editing. Organization In Shotwell, your photos are organized into events, independent from their location on disk. These events can have title and comment and collect a set of related photos. In my case I often have photos from two or more cameras (my camera and mobile, photos of friends), which I keep in separate directories within a main directory for the event. For example I have a folder 2016/05.21-22.Climbing.Tanigakadake with two sub-folders Norbert (for my photos) and Friend (for my friends photos). In Shotwell all the photos are in the same event, which is shown with title 05.21-22 Tanigakawadake Climbing within the 2016 year and May month.
So in short Shotwell distinguishes between disk layout and album/event names.
In digiKam there is a strict connection between disk layout and album names 1:1. Albums are directories. One can adjust the viewer to show all photos of sub-albums in the main album, and by this one can achieve the same effect of merging all photos of my friend and myself. The good thing in this approach is that one can easily have sub-albums: Imagine a trip to three different islands of Hawaii during one trip. This is something easy to achieve in digiKam, but hard in Shotwell.
Other organization methods
Both Shotwell and digiKam support tags, including hierarchical tags and rating (0-5 stars). Shotwell has in addition a quick flag action that I used quite often for initial selecting photos, as well as accepted and rejected. digiKam also has so called picks (no pick, reject, pending, accepted), and colors (not used by now). Both programs have some face detection support, but also this I haven t used.
So in the organization respect there is no clear winner. I like the Event idea of Shotwell, or better, the separation of events from the disk structure. But on the other hand, Shotwell does not allow for sub-albums, which is also a pain.
No clear winner draw
Offline storage
That is simple: Shotwell: forget it, not reasonably possible. One can move parts to an external HD, then unplug it, and Shotwell will tell you that all the photos are missings. And when you plug the external HD in, it will redetect them. But this is not proper support, just a consequence of hash sum storage. Also separation into several libraries (online and offline) is not supported.
On the other hand, digiKam supports multiple libraries, partly offline, without a hinch. I would love to have this feature in Shotwell, because I need to free disk space, urgently!!!
Clear winner: digiKam
Sharing
Again here my testing is very restricted I am using my own Piwigo installation exclusively. Here Shotwell is excellent in providing support for various features: upload to existing category, create new category, resize, optionally remove tags, add comments to albums and photos, etc. (partly implemented by me 
On the other hand digiKam has a very barebone interface to Piwigo you can upload photos to an existing album and resize them, but that is already everything. One also needs to say that the list of supported services in digiKam is by far longer than the one in Shotwell, but the main services (usual suspects) are supported in both.
Clear winner: Shotwell (but I haven t tested other upload services).
Editing
The editing capabilities of Shotwell are again very restricted: red eyes, resize, levels, .
Clear winner: digiKam
Conclusions
While I am still working with both, I actually would love to move completely to digiKam. I simply cannot stand the Gnome 3 philosophy of reducing functionality to a minimal for dummy users. There is a market for that, sure, but I am not one of it. Unfortunately, the missing Event support, and much more the completely minimal support for Piwigo sharing in digiKam is a big show stopper at the moment. Even after testing the upcoming digiKam 5.0 version for some time, I didn t see any improvement wrt to sharing.
That leaves me with the only option to continue working with both programs, and hope to get a new bigger SSD before the current one runs out of space. Of course I could start hacking into the digiKam source maybe I do this when I have a bit more time to add proper Piwigo support.
The hardware mappings come from several places. The preferred way is for packages to announce their hardware support using the cross distribution appstream system. See previous blog posts about isenkram to learn how to do that.% isenkram-lookup bluez cheese fprintd fprintd-demo gkrellm-thinkbat hdapsd libpam-fprintd pidgin-blinklight thinkfan tleds tp-smapi-dkms tp-smapi-source tpb %p
or Twitter
The new version 0.6 offers the support of tweets with an image. How cool is that?
db2twitter also has cool options like;
or Twitter
The new version 0.6 offers the support of tweets with an image. How cool is that?
db2twitter also has cool options like;
QEMU 2.6 was released a few days ago. One new feature that I have been working on is the new way to configure I/O limits in disk drives to allow bursts and increase the responsiveness of the virtual machine. In this post I ll try to explain how it works.
The basic settings
First I will summarize the basic settings that were already available in earlier versions of QEMU.
Two aspects of the disk I/O can be limited: the number of bytes per second and the number of operations per second (IOPS). For each one of them the user can set a global limit or separate limits for read and write operations. This gives us a total of six different parameters.
I/O limits can be set using the throttling.* parameters of -drive, or using the QMP block_set_io_throttle command. These are the names of the parameters for both cases:
| -drive | block_set_io_throttle |
|---|---|
| throttling.iops-total | iops |
| throttling.iops-read | iops_rd |
| throttling.iops-write | iops_wr |
| throttling.bps-total | bps |
| throttling.bps-read | bps_rd |
| throttling.bps-write | bps_wr |
-drive file=hd0.qcow2,throttling.iops-total=100We can do the same using QMP. In this case all these parameters are mandatory, so we must set to 0 the ones that we don t want to limit:
"execute": "block_set_io_throttle",
"arguments":
"device": "virtio0",
"iops": 100,
"iops_rd": 0,
"iops_wr": 0,
"bps": 0,
"bps_rd": 0,
"bps_wr": 0
I/O bursts
While the settings that we have just seen are enough to prevent the virtual machine from performing too much I/O, it can be useful to allow the user to exceed those limits occasionally. This way we can have a more responsive VM that is able to cope better with peaks of activity while keeping the average limits lower the rest of the time.
Starting from QEMU 2.6, it is possible to allow the user to do bursts of I/O for a configurable amount of time. A burst is an amount of I/O that can exceed the basic limit, and there are two parameters that control them: their length and the maximum amount of I/O they allow. These two can be configured separately for each one of the six basic parameters described in the previous section, but here we ll use iops-total as an example.
The I/O limit during bursts is set using iops-total-max , and the maximum length (in seconds) is set with iops-total-max-length . So if we want to configure a drive with a basic limit of 100 IOPS and allow bursts of 2000 IOPS for 60 seconds, we would do it like this (the line is split for clarity):
-drive file=hd0.qcow2,
throttling.iops-total=100,
throttling.iops-total-max=2000,
throttling.iops-total-max-length=60
Or with QMP:
"execute": "block_set_io_throttle",
"arguments":
"device": "virtio0",
"iops": 100,
"iops_rd": 0,
"iops_wr": 0,
"bps": 0,
"bps_rd": 0,
"bps_wr": 0,
"iops_max": 2000,
"iops_max_length": 60,
With this, the user can perform I/O on hd0.qcow2 at a rate of 2000 IOPS for 1 minute before it s throttled down to 100 IOPS.
The user will be able to do bursts again if there s a sufficiently long period of time with unused I/O (see below for details).
The default value for iops-total-max is 0 and it means that bursts are not allowed. iops-total-max-length can only be set if iops-total-max is set as well, and its default value is 1 second.
Controlling the size of I/O operations
When applying IOPS limits all I/O operations are treated equally regardless of their size. This means that the user can take advantage of this in order to circumvent the limits and submit one huge I/O request instead of several smaller ones.
QEMU provides a setting called throttling.iops-size to prevent this from happening. This setting specifies the size (in bytes) of an I/O request for accounting purposes. Larger requests will be counted proportionally to this size.
For example, if iops-size is set to 4096 then an 8KB request will be counted as two, and a 6KB request will be counted as one and a half. This only applies to requests larger than iops-size: smaller requests will be always counted as one, no matter their size.
The default value of iops-size is 0 and it means that the size of the requests is never taken into account when applying IOPS limits.
Applying I/O limits to groups of disks
In all the examples so far we have seen how to apply limits to the I/O performed on individual drives, but QEMU allows grouping drives so they all share the same limits.
This feature is available since QEMU 2.4. Please refer to the post I wrote when it was published for more details.
The Leaky Bucket algorithm
I/O limits in QEMU are implemented using the leaky bucket algorithm (specifically the Leaky bucket as a meter variant).
This algorithm uses the analogy of a bucket that leaks water constantly. The water that gets into the bucket represents the I/O that has been performed, and no more I/O is allowed once the bucket is full.
To see the way this corresponds to the throttling parameters in QEMU, consider the following values:
iops-total=100 iops-total-max=2000 iops-total-max-length=60
The bucket is initially empty, therefore water can be added until it s full at a rate of 2000 IOPS (the burst rate). Once the bucket is full we can only add as much water as it leaks, therefore the I/O rate is reduced to 100 IOPS. If we add less water than it leaks then the bucket will start to empty, allowing for bursts again.
Note that since water is leaking from the bucket even during bursts, it will take a bit more than 60 seconds at 2000 IOPS to fill it up. After those 60 seconds the bucket will have leaked 60 x 100 = 6000, allowing for 3 more seconds of I/O at 2000 IOPS.
Also, due to the way the algorithm works, longer burst can be done at a lower I/O rate, e.g. 1000 IOPS during 120 seconds.
Acknowledgments
As usual, my work in QEMU is sponsored by Outscale and has been made possible by Igalia and the help of the QEMU development team.
Enjoy QEMU 2.6!
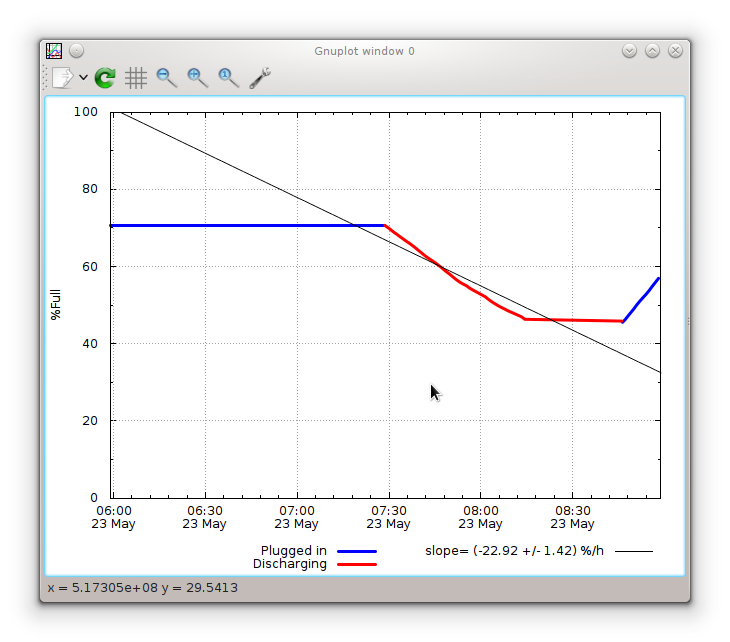
The other graph show the entire history of the collected battery
statistics, comparing it to the design capacity of the battery to
visualise how the battery life time get shorter over time. The red
line in this graph is what the previous graph considers 100 percent:
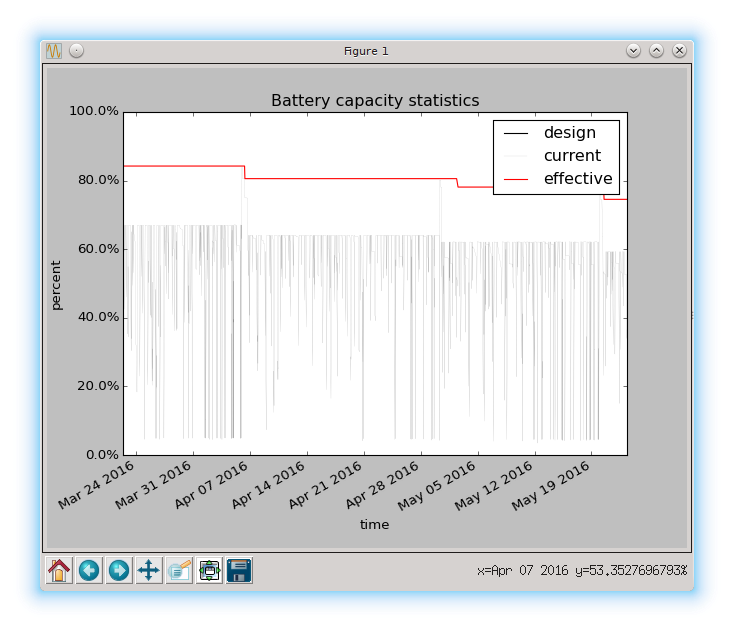
In this graph you can see that I only charge the battery to 80
percent of last full capacity, and how the capacity of the battery is
shrinking. :(
The last new feature is in the collector, which now will handle
more hardware models. On some hardware, Linux power supply
information is stored in /sys/class/power_supply/ACAD/, while the
collector previously only looked in /sys/class/power_supply/AC/. Now
both are checked to figure if there is power connected to the
machine.
If you are interested in how your laptop battery is doing, please
check out the
battery-stats
in Debian unstable, or rebuild it on Jessie to get it working on
Debian stable. :) The upstream source is available from github.
Patches are very welcome.
As usual, if you use Bitcoin and want to show your support of my
activities, please send Bitcoin donations to my address
15oWEoG9dUPovwmUL9KWAnYRtNJEkP1u1b.
Next.