Search Results: "sto"

1 May 2025

Guido G nther: Free Software Activities April 2025

Another short status update of what happened on my side last month. Notable might be the Cell Broadcast support for Qualcomm SoCs, the rest is smaller fixes and QoL improvements. phosh phoc phosh-mobile-settings pfs feedbackd feedbackd-device-themes gmobile Debian git-buildpackage wlroots ModemManager Libqmi gnome-clocks gnome-calls qmi-parse-kernel-dump xwayland-run osmo-cbc phosh-nightly Blog posts Bugs Reviews This is not code by me but reviews on other peoples code. The list is (as usual) slightly incomplete. Thanks for the contributions! Help Development If you want to support my work see donations. Comments? Join the Fediverse thread

Russ Allbery: Review: Beyond Pain

Review: Beyond Pain, by Kit Rocha
Series: Beyond #3
Publisher: Kit Rocha
Copyright: December 2013
ASIN: B00GIA4GN8
Format: Kindle
Pages: 328
Beyond Pain is a science fiction dystopian erotic romance novel and a direct sequel to Beyond Control. Following the romance series convention, each book features new protagonists who were supporting characters in the previous book. You could probably start here if you wanted, but there are significant spoilers here for earlier books in the series. I read this book as part of the Beyond Series Bundle (Books 1-3), which is what the sidebar information is for. Six has had a brutally hard life. She was rescued from an awful situation in a previous book and is now lurking around the edges of the Sector Four gang, oddly fascinated (as are we all) with their constant sexuality and trying to decide if she wants to, and can, be part of their world. Bren is one of the few people she lets get close: a huge bruiser who likes cage fights and pain but treats Six with a protective, careful respect that she finds comforting. This book is the story of Six and Bren getting to the bottom of each other's psychological hangups while the O'Kanes start taking over Six's former sector. Yes, as threatened, I read another entry in the dystopian erotica series because I keep wondering how these people will fuck their way into a revolution. This is not happening very quickly, but it seems obvious that is the direction the series is going. It's been a while since I've reviewed one of these, so here's another variation of the massive disclaimer: I think erotica is harder to review than any other genre because what people like is so intensely personal and individual. This is not even an attempt at an erotica review. I'm both wholly unqualified and also less interested in that part of the book, which should lead you to question my reading choices since that's a good half of the book. Rather, I'm reading these somewhat for the plot and mostly for the vibes. This is not the most competent collection of individuals, and to the extent that they are, it's mostly because the men (who are, as a rule, charismatic but rather dim) are willing to listen to the women. What they are good at is communication, or rather, they're good about banging their heads (and other parts) against communication barriers until they figure out a way around them. Part of this is an obsession with consent that goes quite a bit deeper than the normal simplistic treatment. When you spend this much time trying to understand what other people want, you have to spend a lot of time communicating about sex, and in these books that means spending a lot of time communicating about everything else as well. They are also obsessively loyal and understand the merits of both collective action and in making space for people to do the things that they are the best at, while still insisting that people contribute when they can. On the surface, the O'Kanes are a dictatorship, but they're run more like a high-functioning collaboration. Dallas leads because Dallas is good at playing the role of leader (and listening to Lex), which is refreshingly contrary to how things work in the real world right now. I want to be clear that not only is this erotica, this is not the sort of erotica where there's a stand-alone plot that is periodically interrupted by vaguely-motivated sex scenes that you can skim past. These people use sex to communicate, and therefore most of the important exchanges in the book are in the middle of a sex scene. This is going to make this novel, and this series, very much not to the taste of a lot of people, and I cannot be emphatic enough about that warning. But, also, this is such a fascinating inversion. It's common in media for the surface plot of the story to be full of sexual tension, sometimes to the extent that the story is just a metaphor for the sex that the characters want to have. This is the exact opposite of that: The sex is a metaphor for everything else that's going on in the story. These people quite literally fuck their way out of their communication problems, and not in an obvious or cringy way. It's weirdly fascinating? It's also possible that my reaction to this series is so unusual as to not be shared by a single other reader. Anyway, the setup in this story is that Six has major trust issues and Bren is slowly and carefully trying to win her trust. It's a classic hurt/comfort setup, and if that had played out in the way that this story often does, Bren would have taken the role of the gentle hero and Six the role of the person he rescued. That is not at all where this story goes. Six doesn't need comfort; Six needs self-confidence and the ability to demand what she wants, and although the way Beyond Pain gets her there is a little ham-handed, it mostly worked for me. As with Beyond Shame, I felt like the moral of the story is that the O'Kane men are just bright enough to stop doing stupid things at the last possible moment. I think Beyond Pain worked a bit better than the previous book because Bren is not quite as dim as Dallas, so the reader doesn't have to suffer through quite as many stupid decisions. The erotica continues to mostly (although not entirely) follow traditional gender roles, with dangerous men and women who like attention. Presumably most people are reading these books for the sex, which I am wholly unqualified to review. For whatever it's worth, the physical descriptions are too mechanical for me, too obsessed with the precise structural assemblage of parts in novel configurations. I am not recommending (or disrecommending) these books, for a whole host of reasons. But I think the authors deserve to be rewarded for understanding that sex can be communication and that good communication about difficult topics is inherently interesting in a way that (at least for me) transcends the erotica. I bet I'm going to pick up another one of these about a year from now because I'm still thinking about these people and am still curious about how they are going to succeed. Followed by Beyond Temptation, an interstitial novella. The next novel is Beyond Jealousy. Rating: 6 out of 10

30 April 2025

Simon Josefsson: Building Debian in a GitLab Pipeline

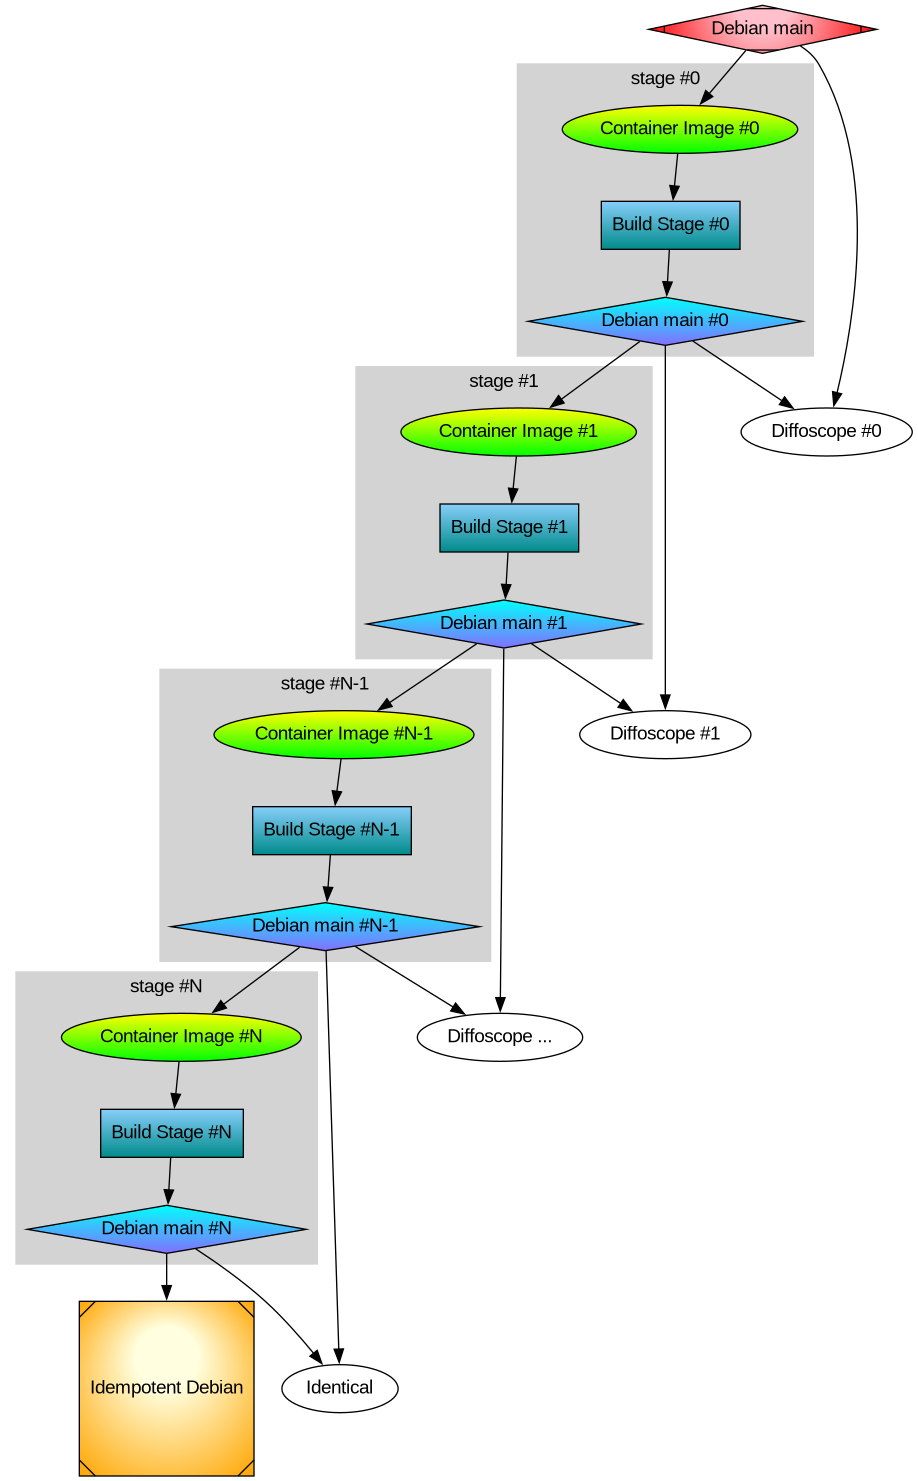
After thinking about multi-stage Debian rebuilds I wanted to implement the idea. Recall my illustration:
Earlier I rebuilt all packages that make up the difference between Ubuntu and Trisquel. It turned out to be a 42% bit-by-bit identical similarity. To check the generality of my approach, I rebuilt the difference between Debian and Devuan too. That was the debdistreproduce project. It only had to orchestrate building up to around 500 packages for each distribution and per architecture. Differential reproducible rebuilds doesn t give you the full picture: it ignore the shared package between the distribution, which make up over 90% of the packages. So I felt a desire to do full archive rebuilds. The motivation is that in order to trust Trisquel binary packages, I need to trust Ubuntu binary packages (because that make up 90% of the Trisquel packages), and many of those Ubuntu binaries are derived from Debian source packages. How to approach all of this? Last year I created the debdistrebuild project, and did top-50 popcon package rebuilds of Debian bullseye, bookworm, trixie, and Ubuntu noble and jammy, on a mix of amd64 and arm64. The amount of reproducibility was lower. Primarily the differences were caused by using different build inputs. Last year I spent (too much) time creating a mirror of snapshot.debian.org, to be able to have older packages available for use as build inputs. I have two copies hosted at different datacentres for reliability and archival safety. At the time, snapshot.d.o had serious rate-limiting making it pretty unusable for massive rebuild usage or even basic downloads. Watching the multi-month download complete last year had a meditating effect. The completion of my snapshot download co-incided with me realizing something about the nature of rebuilding packages. Let me below give a recap of the idempotent rebuilds idea, because it motivate my work to build all of Debian from a GitLab pipeline. One purpose for my effort is to be able to trust the binaries that I use on my laptop. I believe that without building binaries from source code, there is no practically feasible way to trust binaries. To trust any binary you receive, you can de-assemble the bits and audit the assembler instructions for the CPU you will execute it on. Doing that on a OS-wide level this is unpractical. A more practical approach is to audit the source code, and then confirm that the binary is 100% bit-by-bit identical to one that you can build yourself (from the same source) on your own trusted toolchain. This is similar to a reproducible build. My initial goal with debdistrebuild was to get to 100% bit-by-bit identical rebuilds, and then I would have trustworthy binaries. Or so I thought. This also appears to be the goal of reproduce.debian.net. They want to reproduce the official Debian binaries. That is a worthy and important goal. They achieve this by building packages using the build inputs that were used to build the binaries. The build inputs are earlier versions of Debian packages (not necessarily from any public Debian release), archived at snapshot.debian.org. I realized that these rebuilds would be not be sufficient for me: it doesn t solve the problem of how to trust the toolchain. Let s assume the reproduce.debian.net effort succeeds and is able to 100% bit-by-bit identically reproduce the official Debian binaries. Which appears to be within reach. To have trusted binaries we would only have to audit the source code for the latest version of the packages AND audit the tool chain used. There is no escaping from auditing all the source code that s what I think we all would prefer to focus on, to be able to improve upstream source code. The trouble is about auditing the tool chain. With the Reproduce.debian.net approach, that is a recursive problem back to really ancient Debian packages, some of them which may no longer build or work, or even be legally distributable. Auditing all those old packages is a LARGER effort than auditing all current packages! Doing auditing of old packages is of less use to making contributions: those releases are old, and chances are any improvements have already been implemented and released. Or that improvements are no longer applicable because the projects evolved since the earlier version. See where this is going now? I reached the conclusion that reproducing official binaries using the same build inputs is not what I m interested in. I want to be able to build the binaries that I use from source using a toolchain that I can also build from source. And preferably that all of this is using latest version of all packages, so that I can contribute and send patches for them, to improve matters. The toolchain that Reproduce.Debian.Net is using is not trustworthy unless all those ancient packages are audited or rebuilt bit-by-bit identically, and I don t see any practical way forward to achieve that goal. Nor have I seen anyone working on that problem. It is possible to do, though, but I think there are simpler ways to achieve the same goal. My approach to reach trusted binaries on my laptop appears to be a three-step effort: How to go about achieving this? Today s Debian build architecture is something that lack transparency and end-user control. The build environment and signing keys are managed by, or influenced by, unidentified people following undocumented (or at least not public) security procedures, under unknown legal jurisdictions. I always wondered why none of the Debian-derivates have adopted a modern GitDevOps-style approach as a method to improve binary build transparency, maybe I missed some project? If you want to contribute to some GitHub or GitLab project, you click the Fork button and get a CI/CD pipeline running which rebuild artifacts for the project. This makes it easy for people to contribute, and you get good QA control because the entire chain up until its artifact release are produced and tested. At least in theory. Many projects are behind on this, but it seems like this is a useful goal for all projects. This is also liberating: all users are able to reproduce artifacts. There is no longer any magic involved in preparing release artifacts. As we ve seen with many software supply-chain security incidents for the past years, where the magic is involved is a good place to introduce malicious code. To allow me to continue with my experiment, I thought the simplest way forward was to setup a GitDevOps-centric and user-controllable way to build the entire Debian archive. Let me introduce the debdistbuild project. Debdistbuild is a re-usable GitLab CI/CD pipeline, similar to the Salsa CI pipeline. It provide one build job definition and one deploy job definition. The pipeline can run on GitLab.org Shared Runners or you can set up your own runners, like my GitLab riscv64 runner setup. I have concerns about relying on GitLab (both as software and as a service), but my ideas are easy to transfer to some other GitDevSecOps setup such as Codeberg.org. Self-hosting GitLab, including self-hosted runners, is common today, and Debian rely increasingly on Salsa for this. All of the build infrastructure could be hosted on Salsa eventually. The build job is simple. From within an official Debian container image build packages using dpkg-buildpackage essentially by invoking the following commands.
sed -i 's/ deb$/ deb deb-src/' /etc/apt/sources.list.d/*.sources
apt-get -o Acquire::Check-Valid-Until=false update
apt-get dist-upgrade -q -y
apt-get install -q -y --no-install-recommends build-essential fakeroot
env DEBIAN_FRONTEND=noninteractive \
    apt-get build-dep -y --only-source $PACKAGE=$VERSION
useradd -m build
DDB_BUILDDIR=/build/reproducible-path
chgrp build $DDB_BUILDDIR
chmod g+w $DDB_BUILDDIR
su build -c "apt-get source --only-source $PACKAGE=$VERSION" > ../$PACKAGE_$VERSION.build
cd $DDB_BUILDDIR
su build -c "dpkg-buildpackage"
cd ..
mkdir out
mv -v $(find $DDB_BUILDDIR -maxdepth 1 -type f) out/
The deploy job is also simple. It commit artifacts to a Git project using Git-LFS to handle large objects, essentially something like this:
if ! grep -q '^pool/**' .gitattributes; then
    git lfs track 'pool/**'
    git add .gitattributes
    git commit -m"Track pool/* with Git-LFS." .gitattributes
fi
POOLDIR=$(if test "$(echo "$PACKAGE"   cut -c1-3)" = "lib"; then C=4; else C=1; fi; echo "$DDB_PACKAGE"   cut -c1-$C)
mkdir -pv pool/main/$POOLDIR/
rm -rfv pool/main/$POOLDIR/$PACKAGE
mv -v out pool/main/$POOLDIR/$PACKAGE
git add pool
git commit -m"Add $PACKAGE." -m "$CI_JOB_URL" -m "$VERSION" -a
if test "$ DDB_GIT_TOKEN:- " = ""; then
    echo "SKIP: Skipping git push due to missing DDB_GIT_TOKEN (see README)."
else
    git push -o ci.skip
fi
That s it! The actual implementation is a bit longer, but the major difference is for log and error handling. You may review the source code of the base Debdistbuild pipeline definition, the base Debdistbuild script and the rc.d/-style scripts implementing the build.d/ process and the deploy.d/ commands. There was one complication related to artifact size. GitLab.org job artifacts are limited to 1GB. Several packages in Debian produce artifacts larger than this. What to do? GitLab supports up to 5GB for files stored in its package registry, but this limit is too close for my comfort, having seen some multi-GB artifacts already. I made the build job optionally upload artifacts to a S3 bucket using SHA256 hashed file hierarchy. I m using Hetzner Object Storage but there are many S3 providers around, including self-hosting options. This hierarchy is compatible with the Git-LFS .git/lfs/object/ hierarchy, and it is easy to setup a separate Git-LFS object URL to allow Git-LFS object downloads from the S3 bucket. In this mode, only Git-LFS stubs are pushed to the git repository. It should have no trouble handling the large number of files, since I have earlier experience with Apt mirrors in Git-LFS. To speed up job execution, and to guarantee a stable build environment, instead of installing build-essential packages on every build job execution, I prepare some build container images. The project responsible for this is tentatively called stage-N-containers. Right now it create containers suitable for rolling builds of trixie on amd64, arm64, and riscv64, and a container intended for as use the stage-0 based on the 20250407 docker images of bookworm on amd64 and arm64 using the snapshot.d.o 20250407 archive. Or actually, I m using snapshot-cloudflare.d.o because of download speed and reliability. I would have prefered to use my own snapshot mirror with Hetzner bandwidth, alas the Debian snapshot team have concerns about me publishing the list of (SHA1 hash) filenames publicly and I haven t been bothered to set up non-public access. Debdistbuild has built around 2.500 packages for bookworm on amd64 and bookworm on arm64. To confirm the generality of my approach, it also build trixie on amd64, trixie on arm64 and trixie on riscv64. The riscv64 builds are all on my own hosted runners. For amd64 and arm64 my own runners are only used for large packages where the GitLab.com shared runners run into the 3 hour time limit. What s next in this venture? Some ideas include: What do you think?

29 April 2025

Daniel Lange: Weird times ... or how the New York DEC decided the US presidential elections

November 2024 will be known as the time when killing peanut, a pet squirrel, by the New York State DEC swung the US presidential elections and shaped history forever. The hundreds of millions of dollars spent on each side, the tireless campaigning by the candidates, the celebrity endorsements ... all made for an open race for months. Investments evened each other out. But an OnlyFans producer showing people an overreaching, bureaucracy driven State raiding his home to confiscate a pet squirrel and kill it ... swung enough voters to decide the elections. That is what we need to understand in times of instant worldwide publication and a mostly attention driven economy: Human fates, elections, economic cycles and wars can be decided by people killing squirrels. RIP, peanut. P.S.: Trump Media & Technology Group Corp. (DJT) stock is up 30% pre-market. *[DEC]: Department of Environmental Conservation

Freexian Collaborators: Freexian partners with Invisible Things Lab to extend security support for Xen hypervisor

Freexian is pleased to announce a partnership with Invisible Things Lab to extend the security support of the Xen type-1 hypervisor version 4.17. Three years after its initial release, Xen 4.17, the version available in Debian 12 bookworm , will reach end-of-security-support status upstream on December 2025. The aim of our partnership with Invisible Things is to extend the security support until, at least, July 2027. We may also explore a possibility of extending the support until June 2028, to coincide with the end of Debian 12 LTS support-period. The security support of Xen in Debian, since Debian 8 jessie until Debian 11 bullseye , reached its end before the end of the life cycle of the release. We aim then to significantly improve the situation of Xen in Debian 12. As with similar efforts, we would like to mention that this is an experiment and that we will do our best to make it a success. We are aiming to try and to extend the security support for Xen versions included in future Debian releases, including Debian 13 trixie . In the long term, we hope that this effort will ultimately allow the Xen Project to increase the official security support period for Xen releases from the current three years to at least five years, with the extra work being funded by the community of companies benefiting from the longer support period. If your company relies on Xen and wants to help sustain LTS versions of Xen, please reach out to us. For companies using Debian, the simplest way is to subscribe to Freexian s Debian LTS offer at a gold level (or above) and let us know that you want to contribute to Xen LTS when you send in your subscription form. For others, please reach out to us at sales@freexian.com and we will figure out a way to help you contribute. In the mean time, this initiative has been made possible thanks to the current LTS sponsors and ELTS customers. We hope the entire community of Debian and Xen users will benefit from this initiative. For any queries you might have, please don t hesitate to contact us at sales@freexian.com.

About Invisible Things Lab Invisible Things Lab (ITL) offers low-level security consulting auditing services for x86 virtualization technologies; C, C++, and assembly codebases; Intel SGX; binary exploitation and mitigations; and more. ITL also specializes in Qubes OS and Gramine consulting, including deployment, debugging, and feature development.

28 April 2025

Scarlett Gately Moore: KDE Snaps and life. Spirits are up, but I need a little help please

I was just released from the hospital after a 3 day stay for my ( hopefully ) last surgery. There was concern with massive blood loss and low heart rate. I have stabilized and have come home. Unfortunately, they had to prescribe many medications this round and they are extremely expensive and used up all my funds. I need gas money to get to my post-op doctors appointments, and food would be cool. I would appreciate any help, even just a dollar! I am already back to work, and continued work on the crashy KDE snaps in a non KDE env. ( Also affects anyone using kde-neon extensions such as FreeCAD) I hope to have a fix in the next day or so. Fixed kate bug https://bugs.kde.org/show_bug.cgi?id=503285 Thanks for stopping by.

Sergio Talens-Oliag: ArgoCD Autopilot

For a long time I ve been wanting to try GitOps tools, but I haven t had the chance to try them for real on the projects I was working on. As now I have some spare time I ve decided I m going to play a little with Argo CD, Flux and Kluctl to test them and be able to use one of them in a real project in the future if it looks appropriate. On this post I will use Argo-CD Autopilot to install argocd on a k3d local cluster installed using OpenTofu to test the autopilot approach of managing argocd and test the tool (as it manages argocd using a git repository it can be used to test argocd as well).

Installing tools locally with arkadeRecently I ve been using the arkade tool to install kubernetes related applications on Linux servers and containers, I usually get the applications with it and install them on the /usr/local/bin folder. For this post I ve created a simple script that checks if the tools I ll be using are available and installs them on the $HOME/.arkade/bin folder if missing (I m assuming that docker is already available, as it is not installable with arkade):
#!/bin/sh
# TOOLS LIST
ARKADE_APPS="argocd argocd-autopilot k3d kubectl sops tofu"
# Add the arkade binary directory to the path if missing
case ":$ PATH :" in
  *:"$ HOME /.arkade/bin":*) ;;
  *) export PATH="$ PATH :$ HOME /.arkade/bin" ;;
esac
# Install or update arkade
if command -v arkade >/dev/null; then
  echo "Trying to update the arkade application"
  sudo arkade update
else
  echo "Installing the arkade application"
  curl -sLS https://get.arkade.dev   sudo sh
fi
echo ""
echo "Installing tools with arkade"
echo ""
for app in $ARKADE_APPS; do
  app_path="$(command -v $app)"   true
  if [ "$app_path" ]; then
    echo "The application '$app' already available on '$app_path'"
  else
    arkade get "$app"
  fi
done
cat <<EOF
Add the ~/.arkade/bin directory to your PATH if tools have been installed there
EOF
The rest of scripts will add the binary directory to the PATH if missing to make sure things work if something was installed there.

Creating a k3d cluster with opentofuAlthough using k3d directly will be a good choice for the creation of the cluster, I m using tofu to do it because that will probably be the tool used to do it if we were working with Cloud Platforms like AWS or Google. The main.tf file is as follows:
terraform  
  required_providers  
    k3d =  
      source  = "moio/k3d"
      version = "0.0.12"
     
    sops =  
      source = "carlpett/sops"
      version = "1.2.0"


data "sops_file" "secrets"  
    source_file = "secrets.yaml"
 
resource "k3d_cluster" "argocd_cluster"  
  name    = "argocd"
  servers = 1
  agents  = 2
  image   = "rancher/k3s:v1.31.5-k3s1"
  network = "argocd"
  token   = data.sops_file.secrets.data["token"]
  port  
    host_port      = 8443
    container_port = 443
    node_filters = [
      "loadbalancer",
    ]
   
  k3d  
    disable_load_balancer     = false
    disable_image_volume      = false
   
  kubeconfig  
    update_default_kubeconfig = true
    switch_current_context    = true
   
  runtime  
    gpu_request = "all"
   
 
The k3d configuration is quite simple, as I plan to use the default traefik ingress controller with TLS I publish the 443 port on the hosts 8443 port, I ll explain how I add a valid certificate on the next step. I ve prepared the following script to initialize and apply the changes:
#!/bin/sh
set -e
# VARIABLES
# Default token for the argocd cluster
K3D_CLUSTER_TOKEN="argocdToken"
# Relative PATH to install the k3d cluster using terr-iaform
K3D_TF_RELPATH="k3d-tf"
# Secrets yaml file
SECRETS_YAML="secrets.yaml"
# Relative PATH to the workdir from the script directory
WORK_DIR_RELPATH=".."
# Compute WORKDIR
SCRIPT="$(readlink -f "$0")"
SCRIPT_DIR="$(dirname "$SCRIPT")"
WORK_DIR="$(readlink -f "$SCRIPT_DIR/$WORK_DIR_RELPATH")"
# Update the PATH to add the arkade bin directory
# Add the arkade binary directory to the path if missing
case ":$ PATH :" in
  *:"$ HOME /.arkade/bin":*) ;;
  *) export PATH="$ PATH :$ HOME /.arkade/bin" ;;
esac
# Go to the k3d-tf dir
cd "$WORK_DIR/$K3D_TF_RELPATH"   exit 1
# Create secrets.yaml file and encode it with sops if missing
if [ ! -f "$SECRETS_YAML" ]; then
  echo "token: $K3D_CLUSTER_TOKEN" >"$SECRETS_YAML"
  sops encrypt -i "$SECRETS_YAML"
fi
# Initialize terraform
tofu init
# Apply the configuration
tofu apply

Adding a wildcard certificate to the k3d ingressAs an optional step, after creating the k3d cluster I m going to add a default wildcard certificate for the traefik ingress server to be able to use everything with HTTPS without certificate issues. As I manage my own DNS domain I ve created the lo.mixinet.net and *.lo.mixinet.net DNS entries on my public and private DNS servers (both return 127.0.0.1 and ::1) and I ve created a TLS certificate for both entries using Let s Encrypt with Certbot. The certificate is updated automatically on one of my servers and when I need it I copy the contents of the fullchain.pem and privkey.pem files from the /etc/letsencrypt/live/lo.mixinet.net server directory to the local files lo.mixinet.net.crt and lo.mixinet.net.key. After copying the files I run the following file to install or update the certificate and configure it as the default for traefik:
#!/bin/sh
# Script to update the
secret="lo-mixinet-net-ingress-cert"
cert="$ 1:-lo.mixinet.net.crt "
key="$ 2:-lo.mixinet.net.key "
if [ -f "$cert" ] && [ -f "$key" ]; then
  kubectl -n kube-system create secret tls $secret \
    --key=$key \
    --cert=$cert \
    --dry-run=client --save-config -o yaml    kubectl apply -f -
  kubectl apply -f - << EOF
apiVersion: traefik.containo.us/v1alpha1
kind: TLSStore
metadata:
  name: default
  namespace: kube-system
spec:
  defaultCertificate:
    secretName: $secret
EOF
else
  cat <<EOF
To add or update the traefik TLS certificate the following files are needed:
- cert: '$cert'
- key: '$key'
Note: you can pass the paths as arguments to this script.
EOF
fi
Once it is installed if I connect to https://foo.lo.mixinet.net:8443/ I get a 404 but the certificate is valid.

Installing argocd with argocd-autopilot

Creating a repository and a token for autopilotI ll be using a project on my forgejo instance to manage argocd, the repository I ve created is on the URL https://forgejo.mixinet.net/blogops/argocd and I ve created a private user named argocd that only has write access to that repository. Logging as the argocd user on forgejo I ve created a token with permission to read and write repositories that I ve saved on my pass password store on the mixinet.net/argocd@forgejo/repository-write entry.

Bootstrapping the installationTo bootstrap the installation I ve used the following script (it uses the previous GIT_REPO and GIT_TOKEN values):
#!/bin/sh
set -e
# VARIABLES
# Relative PATH to the workdir from the script directory
WORK_DIR_RELPATH=".."
# Compute WORKDIR
SCRIPT="$(readlink -f "$0")"
SCRIPT_DIR="$(dirname "$SCRIPT")"
WORK_DIR="$(readlink -f "$SCRIPT_DIR/$WORK_DIR_RELPATH")"
# Update the PATH to add the arkade bin directory
# Add the arkade binary directory to the path if missing
case ":$ PATH :" in
  *:"$ HOME /.arkade/bin":*) ;;
  *) export PATH="$ PATH :$ HOME /.arkade/bin" ;;
esac
# Go to the working directory
cd "$WORK_DIR"   exit 1
# Set GIT variables
if [ -z "$GIT_REPO" ]; then
  export GIT_REPO="https://forgejo.mixinet.net/blogops/argocd.git"
fi
if [ -z "$GIT_TOKEN" ]; then
  GIT_TOKEN="$(pass mixinet.net/argocd@forgejo/repository-write)"
  export GIT_TOKEN
fi
argocd-autopilot repo bootstrap --provider gitea
The output of the execution is as follows:
  bin/argocd-bootstrap.sh
INFO cloning repo: https://forgejo.mixinet.net/blogops/argocd.git
INFO empty repository, initializing a new one with specified remote
INFO using revision: "", installation path: ""
INFO using context: "k3d-argocd", namespace: "argocd"
INFO applying bootstrap manifests to cluster...
namespace/argocd created
customresourcedefinition.apiextensions.k8s.io/applications.argoproj.io created
customresourcedefinition.apiextensions.k8s.io/applicationsets.argoproj.io created
customresourcedefinition.apiextensions.k8s.io/appprojects.argoproj.io created
serviceaccount/argocd-application-controller created
serviceaccount/argocd-applicationset-controller created
serviceaccount/argocd-dex-server created
serviceaccount/argocd-notifications-controller created
serviceaccount/argocd-redis created
serviceaccount/argocd-repo-server created
serviceaccount/argocd-server created
role.rbac.authorization.k8s.io/argocd-application-controller created
role.rbac.authorization.k8s.io/argocd-applicationset-controller created
role.rbac.authorization.k8s.io/argocd-dex-server created
role.rbac.authorization.k8s.io/argocd-notifications-controller created
role.rbac.authorization.k8s.io/argocd-redis created
role.rbac.authorization.k8s.io/argocd-server created
clusterrole.rbac.authorization.k8s.io/argocd-application-controller created
clusterrole.rbac.authorization.k8s.io/argocd-applicationset-controller created
clusterrole.rbac.authorization.k8s.io/argocd-server created
rolebinding.rbac.authorization.k8s.io/argocd-application-controller created
rolebinding.rbac.authorization.k8s.io/argocd-applicationset-controller created
rolebinding.rbac.authorization.k8s.io/argocd-dex-server created
rolebinding.rbac.authorization.k8s.io/argocd-notifications-controller created
rolebinding.rbac.authorization.k8s.io/argocd-redis created
rolebinding.rbac.authorization.k8s.io/argocd-server created
clusterrolebinding.rbac.authorization.k8s.io/argocd-application-controller created
clusterrolebinding.rbac.authorization.k8s.io/argocd-applicationset-controller created
clusterrolebinding.rbac.authorization.k8s.io/argocd-server created
configmap/argocd-cm created
configmap/argocd-cmd-params-cm created
configmap/argocd-gpg-keys-cm created
configmap/argocd-notifications-cm created
configmap/argocd-rbac-cm created
configmap/argocd-ssh-known-hosts-cm created
configmap/argocd-tls-certs-cm created
secret/argocd-notifications-secret created
secret/argocd-secret created
service/argocd-applicationset-controller created
service/argocd-dex-server created
service/argocd-metrics created
service/argocd-notifications-controller-metrics created
service/argocd-redis created
service/argocd-repo-server created
service/argocd-server created
service/argocd-server-metrics created
deployment.apps/argocd-applicationset-controller created
deployment.apps/argocd-dex-server created
deployment.apps/argocd-notifications-controller created
deployment.apps/argocd-redis created
deployment.apps/argocd-repo-server created
deployment.apps/argocd-server created
statefulset.apps/argocd-application-controller created
networkpolicy.networking.k8s.io/argocd-application-controller-network-policy created
networkpolicy.networking.k8s.io/argocd-applicationset-controller-network-policy created
networkpolicy.networking.k8s.io/argocd-dex-server-network-policy created
networkpolicy.networking.k8s.io/argocd-notifications-controller-network-policy created
networkpolicy.networking.k8s.io/argocd-redis-network-policy created
networkpolicy.networking.k8s.io/argocd-repo-server-network-policy created
networkpolicy.networking.k8s.io/argocd-server-network-policy created
secret/autopilot-secret created
INFO pushing bootstrap manifests to repo
INFO applying argo-cd bootstrap application
INFO pushing bootstrap manifests to repo
INFO applying argo-cd bootstrap application
application.argoproj.io/autopilot-bootstrap created
INFO running argocd login to initialize argocd config
Context 'autopilot' updated
INFO argocd initialized. password: XXXXXXX-XXXXXXXX
INFO run:
    kubectl port-forward -n argocd svc/argocd-server 8080:80
Now we have the argocd installed and running, it can be checked using the port-forward and connecting to https://localhost:8080/ (the certificate will be wrong, we are going to fix that in the next step).

Updating the argocd installation in gitNow that we have the application deployed we can clone the argocd repository and edit the deployment to disable TLS for the argocd server (we are going to use TLS termination with traefik and that needs the server running as insecure, see the Argo CD documentation)
  ssh clone ssh://git@forgejo.mixinet.net/blogops/argocd.git
  cd argocd
  edit bootstrap/argo-cd/kustomization.yaml
  git commit -m 'Disable TLS for the argocd-server'
The changes made to the kustomization.yaml file are the following:
--- a/bootstrap/argo-cd/kustomization.yaml
+++ b/bootstrap/argo-cd/kustomization.yaml
@@ -11,6 +11,11 @@ configMapGenerator:
         key: git_username
         name: autopilot-secret
   name: argocd-cm
+  # Disable TLS for the Argo Server (see https://argo-cd.readthedocs.io/en/stable/operator-manual/ingress/#traefik-v30)
+- behavior: merge
+  literals:
+  - "server.insecure=true"
+  name: argocd-cmd-params-cm
 kind: Kustomization
 namespace: argocd
 resources:
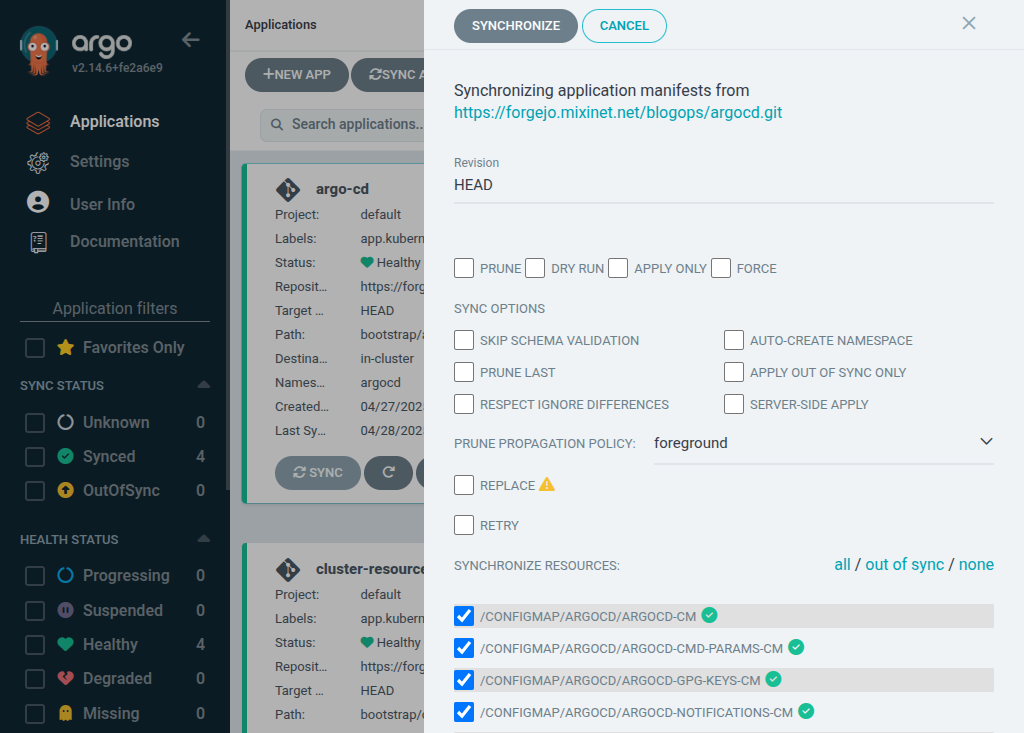
Once the changes are pushed we sync the argo-cd application manually to make sure they are applied:
argo cd sync
As a test we can download the argocd-cmd-params-cm ConfigMap to make sure everything is OK:
apiVersion: v1
data:
  server.insecure: "true"
kind: ConfigMap
metadata:
  annotations:
    kubectl.kubernetes.io/last-applied-configuration:  
       "apiVersion":"v1","data": "server.insecure":"true" ,"kind":"ConfigMap","metadata": "annotations": ,"labels": "app.kubernetes.io/instance":"argo-cd","app.kubernetes.io/name":"argocd-cmd-params-cm","app.kubernetes.io/part-of":"argocd" ,"name":"argocd-cmd-params-cm","namespace":"argocd" 
  creationTimestamp: "2025-04-27T17:31:54Z"
  labels:
    app.kubernetes.io/instance: argo-cd
    app.kubernetes.io/name: argocd-cmd-params-cm
    app.kubernetes.io/part-of: argocd
  name: argocd-cmd-params-cm
  namespace: argocd
  resourceVersion: "16731"
  uid: a460638f-1d82-47f6-982c-3017699d5f14
As this simply changes the ConfigMap we have to restart the argocd-server to read it again, to do it we delete the server pods so they are re-created using the updated resource:
  kubectl delete pods -n argocd -l app.kubernetes.io/name=argocd-server
After doing this the port-forward command is killed automatically, if we run it again the connection to get to the argocd-server has to be done using HTTP instead of HTTPS. Instead of testing that we are going to add an ingress definition to be able to connect to the server using HTTPS and GRPC against the address argocd.lo.mixinet.net using the wildcard TLS certificate we installed earlier. To do it we to edit the bootstrap/argo-cd/kustomization.yaml file to add the ingress_route.yaml file to the deployment:
--- a/bootstrap/argo-cd/kustomization.yaml
+++ b/bootstrap/argo-cd/kustomization.yaml
@@ -20,3 +20,4 @@ kind: Kustomization
 namespace: argocd
 resources:
 - github.com/argoproj-labs/argocd-autopilot/manifests/base?ref=v0.4.19
+- ingress_route.yaml
The ingress_route.yaml file contents are the following:
apiVersion: traefik.io/v1alpha1
kind: IngressRoute
metadata:
  name: argocd-server
  namespace: argocd
spec:
  entryPoints:
    - websecure
  routes:
    - kind: Rule
      match: Host( argocd.lo.mixinet.net )
      priority: 10
      services:
        - name: argocd-server
          port: 80
    - kind: Rule
      match: Host( argocd.lo.mixinet.net ) && Header( Content-Type ,  application/grpc )
      priority: 11
      services:
        - name: argocd-server
          port: 80
          scheme: h2c
  tls:
    certResolver: default
After pushing the changes and waiting a little bit the change is applied and we can access the server using HTTPS and GRPC, the first way can be tested from a browser and the GRPC using the command line interface:
  argocd --grpc-web login argocd.lo.mixinet.net:8443
Username: admin
Password:
'admin:login' logged in successfully
Context 'argocd.lo.mixinet.net:8443' updated
  argocd app list -o name
argocd/argo-cd
argocd/autopilot-bootstrap
argocd/cluster-resources-in-cluster
argocd/root
So things are working fine and that is all on this post, folks!

27 April 2025

Marco d'Itri: On the use of SaaS in systems engineering

We want to use an hyperscaler cloud because it is cheaper to delegate operating a scalable and redundant database to an hyperscaler is something that can be debated from business and technical points of view. We want to use an hyperscaler cloud because our developers do not want to operate a scalable and redundant database just means that you need to hire competent developers and/or system administrators. We must stop normalizing the idea that the people whose only skill is gluing together a few dozens of AWS services can continue calling themselves developers. We should also find a sufficiently demeaning name to refer to them...

26 April 2025

John Goerzen: Memoirs of the Early Internet

The Internet is an amazing place, and occasionally you can find things on the web that have somehow lingered online for decades longer than you might expect. Today I ll take you on a tour of some parts of the early Internet. The Internet, of course, is a network of networks and part of its early (and continuing) promise was to provide a common protocol that all sorts of networks can use to interoperate with each other. In the early days, UUCP was one of the main ways universities linked with each other, and eventually UUCP and the Internet sort of merged (but that s a long story). Let s start with some Usenet maps, which were an early way to document the UUCP modem links between universities. Start with this PDF. The first page is a Usenet map (which at the time mostly flowed over UUCP) from April of 1981. Notice that ucbvax, a VAX system at Berkeley, was central to the map. ucbvax continued to be a central node for UUCP for more than a decade; on page 5 of that PDF, you ll see that it asks for a Path from a major node (eg, ucbvax, devcax, harpo, duke) . Pre-Internet email addresses used a path; eg, mark@ucbvax was duke!decvax!ucbvax!mark to someone. You had to specify the route from your system to the recipient on your email To line. If you gave out your email address on a business card, you would start it from a major node like ucbvax, and the assumption was that everyone would know how to get from their system to the major node. On August 19, 1994, ucbvax was finally turned off. TCP/IP had driven UUCP into more obscurity; by then, it was mostly used by people without a dedicated Internet connection to get on the Internet, rather than an entire communication network of its own. A few days later, Cliff Frost posted a memoir of ucbvax; an obscurbe bit of Internet lore that is fun to read. UUCP was ad-hoc, and by 1984 there was an effort to make a machine-parsable map to help automate routing on UUCP. This was called the pathalias project, and there was a paper about it. The Linux network administration guide even includes a section on pathalias. Because UUCP mainly flowed over phone lines, long distance fees made it quite expensive. In 1985, the Stargate Project was formed, with the idea of distributing Usenet by satellite. The satellite link was short-lived, but the effort eventually morphed into UUNET. It was initially a non-profit, but eventually became a commercial backbone provider, and later ISP. Over a long series of acquisitions, UUNET is now part of Verizon. An article in ;login: is another description of this history. IAPS has an Internet in 1990 article, which includes both pathalias data and an interesting map of domain names to UUCP paths. As I was pondering what interesting things a person could do with NNCPNET Internet email, I stumbled across a page on getting FTP files via e-mail. Yes, that used to be a thing! I remember ftpmail@decwrl.dec.com. It turns out that page is from a copy of EFF s (Extended) Guide to the Internet from 1994. Wow, what a treasure! It has entries such as A Slice of Life in my Virtual Community, libraries with telnet access, Gopher, A Statement of Principle by Bruce Sterling, and I could go on. You can also get it as a PDF from Internet Archive. UUCP is still included with modern Linux and BSD distributions. It was part of how I experienced the PC and Internet revolution in rural America. It lacks modern security, but NNCP is to UUCP what ssh is to telnet.

25 April 2025

Simon Josefsson: GitLab Runner with Rootless Privilege-less Capability-less Podman on riscv64

I host my own GitLab CI/CD runners, and find that having coverage on the riscv64 CPU architecture is useful for testing things. The HiFive Premier P550 seems to be a common hardware choice. The P550 is possible to purchase online. You also need a (mini-)ATX chassi, power supply (~500W is more than sufficient), PCI-to-M2 converter and a NVMe storage device. Total cost per machine was around $8k/ 8k for me. Assembly was simple: bolt everything, connect ATX power, connect cables for the front-panel, USB and and Audio. Be sure to toggle the physical power switch on the P550 before you close the box. Front-panel power button will start your machine. There is a P550 user manual available. Below I will guide you to install the GitLab Runner on the pre-installed Ubuntu 24.04 that ships with the P550, and configure it to use Podman in root-less mode and without the --privileged flag, without any additional capabilities like SYS_ADMIN. Presumably you want to migrate to some other OS instead; hey Trisquel 13 riscv64 I m waiting for you! I wouldn t recommend using this machine for anything sensitive, there is an awful lot of non-free and/or vendor-specific software installed, and the hardware itself is young. I am not aware of any riscv64 hardware that can run a libre OS, all of them appear to require non-free blobs and usually a non-mainline kernel.
apt-get install minicom
minicom -o -D /dev/ttyUSB3
#cmd: ifconfig
inet 192.168.0.2 netmask: 255.255.240.0
gatway 192.168.0.1
SOM_Mac0: 8c:00:00:00:00:00
SOM_Mac1: 8c:00:00:00:00:00
MCU_Mac: 8c:00:00:00:00:00
#cmd: setmac 0 CA:FE:42:17:23:00
The MAC setting will be valid after rebooting the carrier board!!!
MAC[0] addr set to CA:FE:42:17:23:00(ca:fe:42:17:23:0)
#cmd: setmac 1 CA:FE:42:17:23:01
The MAC setting will be valid after rebooting the carrier board!!!
MAC[1] addr set to CA:FE:42:17:23:01(ca:fe:42:17:23:1)
#cmd: setmac 2 CA:FE:42:17:23:02
The MAC setting will be valid after rebooting the carrier board!!!
MAC[2] addr set to CA:FE:42:17:23:02(ca:fe:42:17:23:2)
#cmd:
apt-get install openocd
wget https://raw.githubusercontent.com/sifiveinc/hifive-premier-p550-tools/refs/heads/master/mcu-firmware/stm32_openocd.cfg
echo 'acc115d283ff8533d6ae5226565478d0128923c8a479a768d806487378c5f6c3 stm32_openocd.cfg' sha256sum -c
openocd -f stm32_openocd.cfg &
telnet localhost 4444
...
echo 'ssh-ed25519 AAA...' > ~/.ssh/authorized_keys
sed -i 's;^#PasswordAuthentication.*;PasswordAuthentication no;' /etc/ssh/sshd_config
service ssh restart
parted /dev/nvme0n1 print
blkdiscard /dev/nvme0n1
parted /dev/nvme0n1 mklabel gpt
parted /dev/nvme0n1 mkpart jas-p550-nvm-02 ext2 1MiB 100% align-check optimal 1
parted /dev/nvme0n1 set 1 lvm on
partprobe /dev/nvme0n1
pvcreate /dev/nvme0n1p1
vgcreate vg0 /dev/nvme0n1p1
lvcreate -L 400G -n glr vg0
mkfs.ext4 -L glr /dev/mapper/vg0-glr
Now with a reasonable setup ready, let s install the GitLab Runner. The following is adapted from gitlab-runner s official installation instructions documentation. The normal installation flow doesn t work because they don t publish riscv64 apt repositories, so you will have to perform upgrades manually.
# wget https://s3.dualstack.us-east-1.amazonaws.com/gitlab-runner-downloads/latest/deb/gitlab-runner_riscv64.deb
# wget https://s3.dualstack.us-east-1.amazonaws.com/gitlab-runner-downloads/latest/deb/gitlab-runner-helper-images.deb
wget https://gitlab-runner-downloads.s3.amazonaws.com/v17.11.0/deb/gitlab-runner_riscv64.deb
wget https://gitlab-runner-downloads.s3.amazonaws.com/v17.11.0/deb/gitlab-runner-helper-images.deb
echo '68a4c2a4b5988a5a5bae019c8b82b6e340376c1b2190228df657164c534bc3c3 gitlab-runner-helper-images.deb' sha256sum -c
echo 'ee37dc76d3c5b52e4ba35cf8703813f54f536f75cfc208387f5aa1686add7a8c gitlab-runner_riscv64.deb' sha256sum -c
dpkg -i gitlab-runner-helper-images.deb gitlab-runner_riscv64.deb
Remember the NVMe device? Let s not forget to use it, to avoid wear and tear of the internal MMC root disk. Do this now before any files in /home/gitlab-runner appears, or you have to move them manually.
gitlab-runner stop
echo 'LABEL=glr /home/gitlab-runner ext4 defaults,noatime 0 1' >> /etc/fstab
systemctl daemon-reload
mount /home/gitlab-runner
Next install gitlab-runner and configure it. Replace token glrt-REPLACEME below with the registration token you get from your GitLab project s Settings -> CI/CD -> Runners -> New project runner. I used the tags riscv64 and a runner description of the hostname.
gitlab-runner register --non-interactive --url https://gitlab.com --token glrt-REPLACEME --name $(hostname) --executor docker --docker-image debian:stable
We install and configure gitlab-runner to use podman, and to use non-root user.
apt-get install podman
gitlab-runner stop
usermod --add-subuids 100000-165535 --add-subgids 100000-165535 gitlab-runner
You need to run some commands as the gitlab-runner user, but unfortunately some interaction between sudo/su and pam_systemd makes this harder than it should be. So you have to setup SSH for the user and login via SSH to run the commands. Does anyone know of a better way to do this?
# on the p550:
cp -a /root/.ssh/ /home/gitlab-runner/
chown -R gitlab-runner:gitlab-runner /home/gitlab-runner/.ssh/
# on your laptop:
ssh gitlab-runner@jas-p550-01
systemctl --user --now enable podman.socket
systemctl --user --now start podman.socket
loginctl enable-linger gitlab-runner gitlab-runner
systemctl status --user podman.socket
We modify /etc/gitlab-runner/config.toml as follows, replace 997 with the user id shown by systemctl status above. See feature flags documentation for more documentation.
...
[[runners]]
environment = ["FF_NETWORK_PER_BUILD=1", "FF_USE_FASTZIP=1"]
...
[runners.docker]
host = "unix:///run/user/997/podman/podman.sock"
Note that unlike the documentation I do not add the privileged = true parameter here. I will come back to this later. Restart the system to confirm that pushing a .gitlab-ci.yml with a job that uses the riscv64 tag like the following works properly.
dump-env-details-riscv64:
stage: build
image: riscv64/debian:testing
tags: [ riscv64 ]
script:
- set
Your gitlab-runner should now be receiving jobs and running them in rootless podman. You may view the log using journalctl as follows:
journalctl --follow _SYSTEMD_UNIT=gitlab-runner.service
To stop the graphical environment and disable some unnecessary services, you can use:
systemctl set-default multi-user.target
systemctl disable openvpn cups cups-browsed sssd colord
At this point, things were working fine and I was running many successful builds. Now starts the fun part with operational aspects! I had a problem when running buildah to build a new container from within a job, and noticed that aardvark-dns was crashing. You can use the Debian aardvark-dns binary instead.
wget http://ftp.de.debian.org/debian/pool/main/a/aardvark-dns/aardvark-dns_1.14.0-3_riscv64.deb
echo 'df33117b6069ac84d3e97dba2c59ba53775207dbaa1b123c3f87b3f312d2f87a aardvark-dns_1.14.0-3_riscv64.deb' sha256sum -c
mkdir t
cd t
dpkg -x ../aardvark-dns_1.14.0-3_riscv64.deb .
mv /usr/lib/podman/aardvark-dns /usr/lib/podman/aardvark-dns.ubuntu
mv usr/lib/podman/aardvark-dns /usr/lib/podman/aardvark-dns.debian
My setup uses podman in rootless mode without passing the privileged parameter or any add-cap parameters to add non-default capabilities. This is sufficient for most builds. However if you try to create container using buildah from within a job, you may see errors like this:
Writing manifest to image destination
Error: mounting new container: mounting build container "8bf1ec03d967eae87095906d8544f51309363ddf28c60462d16d73a0a7279ce1": creating overlay mount to /var/lib/containers/storage/overlay/23785e20a8bac468dbf028bf524274c91fbd70dae195a6cdb10241c345346e6f/merged, mount_data="lowerdir=/var/lib/containers/storage/overlay/l/I3TWYVYTRZ4KVYCT6FJKHR3WHW,upperdir=/var/lib/containers/storage/overlay/23785e20a8bac468dbf028bf524274c91fbd70dae195a6cdb10241c345346e6f/diff,workdir=/var/lib/containers/storage/overlay/23785e20a8bac468dbf028bf524274c91fbd70dae195a6cdb10241c345346e6f/work,volatile": using mount program /usr/bin/fuse-overlayfs: unknown argument ignored: lazytime
fuse: device not found, try 'modprobe fuse' first
fuse-overlayfs: cannot mount: No such file or directory
: exit status 1
According to GitLab runner security considerations, you should not enable the privileged = true parameter, and the alternative appears to run Podman as root with privileged=false. Indeed setting privileged=true as in the following example solves the problem, and I suppose running podman as root would too.
[[runners]]
[runners.docker]
privileged = true
Can we do better? After some experimentation, and reading open issues with suggested capabilities and configuration snippets, I ended up with the following configuration. It runs podman in rootless mode (as the gitlab-runner user) without --privileged, but add the CAP_SYS_ADMIN capability and exposes the /dev/fuse device. Still, this is running as non-root user on the machine, so I think it is an improvement compared to using --privileged and also compared to running podman as root.
[[runners]]
[runners.docker]
privileged = false
cap_add = ["SYS_ADMIN"]
devices = ["/dev/fuse"]
Still I worry about the security properties of such a setup, so I only enable these settings for a separately configured runner instance that I use when I need this docker-in-docker (oh, I meant buildah-in-podman) functionality. I found one article discussing Rootless Podman without the privileged flag that suggest isolation=chroot but I have yet to make this work. Suggestions for improvement are welcome. Happy Riscv64 Building! Update 2025-05-05: I was able to make it work without the SYS_ADMIN capability too, with a GitLab /etc/gitlab-runner/config.toml like the following:
[[runners]]
  [runners.docker]
    privileged = false
    devices = ["/dev/fuse"]
And passing --isolation chroot to Buildah like this:
buildah build --isolation chroot -t $CI_REGISTRY_IMAGE:name image/
I ve updated the blog title to add the word capability-less as well. I ve confirmed that the same recipe works on podman on a ppc64el platform too. Remaining loop-holes are escaping from the chroot into the non-root gitlab-runner user, and escalating that privilege to root. The /dev/fuse and sub-uid/gid may be privilege escalation vectors here, otherwise I believe you ve found a serious software security issue rather than a configuration mistake.

24 April 2025

Jonathan McDowell: Local Voice Assistant Step 1: An ATOM Echo voice satellite

Back when I setup my home automation I ended up with one piece that used an external service: Amazon Alexa. I d rather not have done this, but voice control is extremely convenient, both for us, and guests. Since then Home Assistant has done a lot of work in developing the capability of a local voice assistant - 2023 was their Year of Voice. I ve had brief looks at this in the past, but never quite had the time to dig into setting it up, and was put off by the fact a lot of the setup instructions were just Download our prebuilt components . While I admire the efforts to get Home Assistant fully packaged for Debian I accept that s a tricky proposition, and settle for running it in a venv on a Debian stable container. Voice requires a lot more binary components, and I want to have voice satellites in more than one location, so I set about trying to understand a bit better what I was deploying, and actually building the binary bits myself. This is the start of a write-up of that. I ll break it into a bunch of posts, trying to cover one bit in each, because otherwise this will get massive. Let s start with some requirements: My house server is an AMD Ryzen 7 5700G, so my expectation was that I d have enough local processing power to be able to do this. That turned out to be a valid assumption - speech to text really has come a long way in recent years. I m still running Home Assistant 2024.3.3 - the last one that supports (but complains about) Python 3.11. Trixie has started the freeze process, so once it releases I ll look at updating the HA install. For now what I have has turned out to be Good Enough, but I know there have been improvements upstream I m missing. Finally, before I get into the details, I should point out that if you just want to get started with a voice assistant on Home Assistant and don t care about what s under the hood, there are a bunch of more user friendly details on Home Assistant s site itself, and they have pre-built images you can just deploy. My first step was sorting out a voice satellite . This is the device that actually has a microphone and speaker and communicates with the main Home Assistant setup. I d seen the post about a $13 voice assistant, and as a result had an ATOM Echo sitting on my desk I hadn t got around to setting up. Here, we ignore a bit about delving into exactly what s going on under the hood, even if we re compiling locally. This is a constrained embedded device and while I m familiar with the ESP32 IDF build system I just accepted that using ESPHome and letting it do it s thing was the quickest way to get up and running. It is possible to do this all via the web with a pre-built image, but I wanted to change the wake word to Hey Jarvis rather than the default Okay Nabu , and that was a good reason to bother doing a local build. We ll get into actually building a voice satellite on Debian in later posts. I started with the default upstream assistant config and tweaked it a little for my setup:

diff of my configuration tweaks
$ diff -u m5stack-atom-echo.yaml assistant.yaml
--- m5stack-atom-echo.yaml    2025-04-18 13:41:21.812766112 +0100
+++ assistant.yaml  2025-01-20 17:33:24.918585244 +0000
@@ -1,7 +1,7 @@
 substitutions:
-  name: m5stack-atom-echo
+  name: study-atom-echo
   friendly_name: M5Stack Atom Echo
-  micro_wake_word_model: okay_nabu  # alexa, hey_jarvis, hey_mycroft are also supported
+  micro_wake_word_model: hey_jarvis  # alexa, hey_jarvis, hey_mycroft are also supported
 
 esphome:
   name: $ name 
@@ -16,15 +16,26 @@
     version: 4.4.8
     platform_version: 5.4.0
 
+# Enable logging
 logger:
+
+# Enable Home Assistant API
 api:
+  encryption:
+    key: "TGlrZVRoaXNJc1JlYWxseUl0Rm9vbGlzaFBlb3BsZSE="
 
 ota:
   - platform: esphome
-    id: ota_esphome
+    password: "itsnotarealthing"
 
 wifi:
+  ssid: "My Wifi Goes Here"
+  password: "AndThePasswordGoesHere"
+
+  # Enable fallback hotspot (captive portal) in case wifi connection fails
   ap:
+    ssid: "Study-Atom-Echo Fallback Hotspot"
+    password: "ThisIsRandom"
 
 captive_portal:

(I note that the current upstream config has moved on a bit since I first did this, but I double checked the above instructions still work at the time of writing. I end up pinning ESPHome to the right version below due to that.) It turns out to be fairly easy to setup ESPHome in a venv and get it to build + flash the image for you:
Instructions for building + flashing ESPHome to ATOM Echo
noodles@sevai:~$ python3 -m venv esphome-atom-echo
noodles@sevai:~$ . esphome-atom-echo/bin/activate
(esphome-atom-echo) noodles@sevai:~$ cd esphome-atom-echo/
(esphome-atom-echo) noodles@sevai:~/esphome-atom-echo$  pip install esphome==2024.12.4
Collecting esphome==2024.12.4
  Using cached esphome-2024.12.4-py3-none-any.whl (4.1 MB)
 
Successfully installed FontTools-4.57.0 PyYAML-6.0.2 appdirs-1.4.4 attrs-25.3.0 bottle-0.13.2 defcon-0.12.1 esphome-2024.12.4 esphome-dashboard-20241217.1 freetype-py-2.5.1 fs-2.4.16 gflanguages-0.7.3 glyphsLib-6.10.1 glyphsets-1.0.0 openstep-plist-0.5.0 pillow-10.4.0 platformio-6.1.16 protobuf-3.20.3 puremagic-1.27 ufoLib2-0.17.1 unicodedata2-16.0.0
(esphome-atom-echo) noodles@sevai:~/esphome-atom-echo$ esphome compile assistant.yaml 
INFO ESPHome 2024.12.4
INFO Reading configuration assistant.yaml...
INFO Updating https://github.com/esphome/esphome.git@pull/5230/head
INFO Updating https://github.com/jesserockz/esphome-components.git@None
 
Linking .pioenvs/study-atom-echo/firmware.elf
/home/noodles/.platformio/packages/toolchain-xtensa-esp32@8.4.0+2021r2-patch5/bin/../lib/gcc/xtensa-esp32-elf/8.4.0/../../../../xtensa-esp32-elf/bin/ld: missing --end-group; added as last command line option
RAM:   [=         ]  10.6% (used 34632 bytes from 327680 bytes)
Flash: [========  ]  79.8% (used 1463813 bytes from 1835008 bytes)
Building .pioenvs/study-atom-echo/firmware.bin
Creating esp32 image...
Successfully created esp32 image.
esp32_create_combined_bin([".pioenvs/study-atom-echo/firmware.bin"], [".pioenvs/study-atom-echo/firmware.elf"])
Wrote 0x176fb0 bytes to file /home/noodles/esphome-atom-echo/.esphome/build/study-atom-echo/.pioenvs/study-atom-echo/firmware.factory.bin, ready to flash to offset 0x0
esp32_copy_ota_bin([".pioenvs/study-atom-echo/firmware.bin"], [".pioenvs/study-atom-echo/firmware.elf"])
==================================================================================== [SUCCESS] Took 130.57 seconds ====================================================================================
INFO Successfully compiled program.
(esphome-atom-echo) noodles@sevai:~/esphome-atom-echo$ esphome upload --device /dev/serial/by-id/usb-Hades2001_M5stack_9552AF8367-if00-port0 assistant.yaml 
INFO ESPHome 2024.12.4
INFO Reading configuration assistant.yaml...
INFO Updating https://github.com/esphome/esphome.git@pull/5230/head
INFO Updating https://github.com/jesserockz/esphome-components.git@None
 
INFO Upload with baud rate 460800 failed. Trying again with baud rate 115200.
esptool.py v4.7.0
Serial port /dev/serial/by-id/usb-Hades2001_M5stack_9552AF8367-if00-port0
Connecting....
Chip is ESP32-PICO-D4 (revision v1.1)
Features: WiFi, BT, Dual Core, 240MHz, Embedded Flash, VRef calibration in efuse, Coding Scheme None
Crystal is 40MHz
MAC: 64:b7:08:8a:1b:c0
Uploading stub...
Running stub...
Stub running...
Configuring flash size...
Auto-detected Flash size: 4MB
Flash will be erased from 0x00010000 to 0x00176fff...
Flash will be erased from 0x00001000 to 0x00007fff...
Flash will be erased from 0x00008000 to 0x00008fff...
Flash will be erased from 0x00009000 to 0x0000afff...
Compressed 1470384 bytes to 914252...
Wrote 1470384 bytes (914252 compressed) at 0x00010000 in 82.0 seconds (effective 143.5 kbit/s)...
Hash of data verified.
Compressed 25632 bytes to 16088...
Wrote 25632 bytes (16088 compressed) at 0x00001000 in 1.8 seconds (effective 113.1 kbit/s)...
Hash of data verified.
Compressed 3072 bytes to 134...
Wrote 3072 bytes (134 compressed) at 0x00008000 in 0.1 seconds (effective 383.7 kbit/s)...
Hash of data verified.
Compressed 8192 bytes to 31...
Wrote 8192 bytes (31 compressed) at 0x00009000 in 0.1 seconds (effective 813.5 kbit/s)...
Hash of data verified.
Leaving...
Hard resetting via RTS pin...
INFO Successfully uploaded program.

And then you can watch it boot (this is mine already configured up in Home Assistant):
Watching the ATOM Echo boot
$ picocom --quiet --imap lfcrlf --baud 115200 /dev/serial/by-id/usb-Hades2001_M5stack_9552AF8367-if00-port0
I (29) boot: ESP-IDF 4.4.8 2nd stage bootloader
I (29) boot: compile time 17:31:08
I (29) boot: Multicore bootloader
I (32) boot: chip revision: v1.1
I (36) boot.esp32: SPI Speed      : 40MHz
I (40) boot.esp32: SPI Mode       : DIO
I (45) boot.esp32: SPI Flash Size : 4MB
I (49) boot: Enabling RNG early entropy source...
I (55) boot: Partition Table:
I (58) boot: ## Label            Usage          Type ST Offset   Length
I (66) boot:  0 otadata          OTA data         01 00 00009000 00002000
I (73) boot:  1 phy_init         RF data          01 01 0000b000 00001000
I (81) boot:  2 app0             OTA app          00 10 00010000 001c0000
I (88) boot:  3 app1             OTA app          00 11 001d0000 001c0000
I (96) boot:  4 nvs              WiFi data        01 02 00390000 0006d000
I (103) boot: End of partition table
I (107) esp_image: segment 0: paddr=00010020 vaddr=3f400020 size=58974h (362868) map
I (247) esp_image: segment 1: paddr=0006899c vaddr=3ffb0000 size=03400h ( 13312) load
I (253) esp_image: segment 2: paddr=0006bda4 vaddr=40080000 size=04274h ( 17012) load
I (260) esp_image: segment 3: paddr=00070020 vaddr=400d0020 size=f5cb8h (1006776) map
I (626) esp_image: segment 4: paddr=00165ce0 vaddr=40084274 size=112ach ( 70316) load
I (665) boot: Loaded app from partition at offset 0x10000
I (665) boot: Disabling RNG early entropy source...
I (677) cpu_start: Multicore app
I (677) cpu_start: Pro cpu up.
I (677) cpu_start: Starting app cpu, entry point is 0x400825c8
I (0) cpu_start: App cpu up.
I (695) cpu_start: Pro cpu start user code
I (695) cpu_start: cpu freq: 160000000
I (695) cpu_start: Application information:
I (700) cpu_start: Project name:     study-atom-echo
I (705) cpu_start: App version:      2024.12.4
I (710) cpu_start: Compile time:     Apr 18 2025 17:29:39
I (716) cpu_start: ELF file SHA256:  1db4989a56c6c930...
I (722) cpu_start: ESP-IDF:          4.4.8
I (727) cpu_start: Min chip rev:     v0.0
I (732) cpu_start: Max chip rev:     v3.99 
I (737) cpu_start: Chip rev:         v1.1
I (742) heap_init: Initializing. RAM available for dynamic allocation:
I (749) heap_init: At 3FFAE6E0 len 00001920 (6 KiB): DRAM
I (755) heap_init: At 3FFB8748 len 000278B8 (158 KiB): DRAM
I (761) heap_init: At 3FFE0440 len 00003AE0 (14 KiB): D/IRAM
I (767) heap_init: At 3FFE4350 len 0001BCB0 (111 KiB): D/IRAM
I (774) heap_init: At 40095520 len 0000AAE0 (42 KiB): IRAM
I (781) spi_flash: detected chip: gd
I (784) spi_flash: flash io: dio
I (790) cpu_start: Starting scheduler on PRO CPU.
I (0) cpu_start: Starting scheduler on APP CPU.
[I][logger:171]: Log initialized
[C][safe_mode:079]: There have been 0 suspected unsuccessful boot attempts
[D][esp32.preferences:114]: Saving 1 preferences to flash...
[D][esp32.preferences:143]: Saving 1 preferences to flash: 0 cached, 1 written, 0 failed
[I][app:029]: Running through setup()...
[C][esp32_rmt_led_strip:021]: Setting up ESP32 LED Strip...
[D][template.select:014]: Setting up Template Select
[D][template.select:023]: State from initial (could not load stored index): On device
[D][select:015]: 'Wake word engine location': Sending state On device (index 1)
[D][esp-idf:000]: I (100) gpio: GPIO[39]  InputEn: 1  OutputEn: 0  OpenDrain: 0  Pullup: 0  Pulldown: 0  Intr:0 
[D][binary_sensor:034]: 'Button': Sending initial state OFF
[C][light:021]: Setting up light 'M5Stack Atom Echo 8a1bc0'...
[D][light:036]: 'M5Stack Atom Echo 8a1bc0' Setting:
[D][light:041]:   Color mode: RGB
[D][template.switch:046]:   Restored state ON
[D][switch:012]: 'Use listen light' Turning ON.
[D][switch:055]: 'Use listen light': Sending state ON
[D][light:036]: 'M5Stack Atom Echo 8a1bc0' Setting:
[D][light:047]:   State: ON
[D][light:051]:   Brightness: 60%
[D][light:059]:   Red: 100%, Green: 89%, Blue: 71%
[D][template.switch:046]:   Restored state OFF
[D][switch:016]: 'timer_ringing' Turning OFF.
[D][switch:055]: 'timer_ringing': Sending state OFF
[C][i2s_audio:028]: Setting up I2S Audio...
[C][i2s_audio.microphone:018]: Setting up I2S Audio Microphone...
[C][i2s_audio.speaker:096]: Setting up I2S Audio Speaker...
[C][wifi:048]: Setting up WiFi...
[D][esp-idf:000]: I (206) wifi:
[D][esp-idf:000]: wifi driver task: 3ffc8544, prio:23, stack:6656, core=0
[D][esp-idf:000]: 
[D][esp-idf:000][wifi]: I (1238) system_api: Base MAC address is not set
[D][esp-idf:000][wifi]: I (1239) system_api: read default base MAC address from EFUSE
[D][esp-idf:000][wifi]: I (1274) wifi:
[D][esp-idf:000][wifi]: wifi firmware version: ff661c3
[D][esp-idf:000][wifi]: 
[D][esp-idf:000][wifi]: I (1274) wifi:
[D][esp-idf:000][wifi]: wifi certification version: v7.0
[D][esp-idf:000][wifi]: 
[D][esp-idf:000][wifi]: I (1286) wifi:
[D][esp-idf:000][wifi]: config NVS flash: enabled
[D][esp-idf:000][wifi]: 
[D][esp-idf:000][wifi]: I (1297) wifi:
[D][esp-idf:000][wifi]: config nano formating: disabled
[D][esp-idf:000][wifi]: 
[D][esp-idf:000][wifi]: I (1317) wifi:
[D][esp-idf:000][wifi]: Init data frame dynamic rx buffer num: 32
[D][esp-idf:000][wifi]: 
[D][esp-idf:000][wifi]: I (1338) wifi:
[D][esp-idf:000][wifi]: Init static rx mgmt buffer num: 5
[D][esp-idf:000][wifi]: 
[D][esp-idf:000][wifi]: I (1348) wifi:
[D][esp-idf:000][wifi]: Init management short buffer num: 32
[D][esp-idf:000][wifi]: 
[D][esp-idf:000][wifi]: I (1368) wifi:
[D][esp-idf:000][wifi]: Init dynamic tx buffer num: 32
[D][esp-idf:000][wifi]: 
[D][esp-idf:000][wifi]: I (1389) wifi:
[D][esp-idf:000][wifi]: Init static rx buffer size: 1600
[D][esp-idf:000][wifi]: 
[D][esp-idf:000][wifi]: I (1399) wifi:
[D][esp-idf:000][wifi]: Init static rx buffer num: 10
[D][esp-idf:000][wifi]: 
[D][esp-idf:000][wifi]: I (1419) wifi:
[D][esp-idf:000][wifi]: Init dynamic rx buffer num: 32
[D][esp-idf:000][wifi]: 
[D][esp-idf:000]: I (1441) wifi_init: rx ba win: 6
[D][esp-idf:000]: I (1441) wifi_init: tcpip mbox: 32
[D][esp-idf:000]: I (1450) wifi_init: udp mbox: 6
[D][esp-idf:000]: I (1450) wifi_init: tcp mbox: 6
[D][esp-idf:000]: I (1460) wifi_init: tcp tx win: 5760
[D][esp-idf:000]: I (1471) wifi_init: tcp rx win: 5760
[D][esp-idf:000]: I (1481) wifi_init: tcp mss: 1440
[D][esp-idf:000]: I (1481) wifi_init: WiFi IRAM OP enabled
[D][esp-idf:000]: I (1491) wifi_init: WiFi RX IRAM OP enabled
[C][wifi:061]: Starting WiFi...
[C][wifi:062]:   Local MAC: 64:B7:08:8A:1B:C0
[D][esp-idf:000][wifi]: I (1513) phy_init: phy_version 4791,2c4672b,Dec 20 2023,16:06:06
[D][esp-idf:000][wifi]: I (1599) wifi:
[D][esp-idf:000][wifi]: mode : sta (64:b7:08:8a:1b:c0)
[D][esp-idf:000][wifi]: 
[D][esp-idf:000][wifi]: I (1600) wifi:
[D][esp-idf:000][wifi]: enable tsf
[D][esp-idf:000][wifi]: 
[D][esp-idf:000][wifi]: I (1605) wifi:
[D][esp-idf:000][wifi]: Set ps type: 1
[D][esp-idf:000][wifi]: 
[D][wifi:482]: Starting scan...
[D][esp32.preferences:114]: Saving 1 preferences to flash...
[D][esp32.preferences:143]: Saving 1 preferences to flash: 1 cached, 0 written, 0 failed
[W][micro_wake_word:151]: Wake word detection can't start as the component hasn't been setup yet
[D][esp-idf:000][wifi]: I (1646) wifi:
[D][esp-idf:000][wifi]: Set ps type: 1
[D][esp-idf:000][wifi]: 
[W][component:157]: Component wifi set Warning flag: scanning for networks
 
[I][wifi:617]: WiFi Connected!
 
[D][wifi:626]: Disabling AP...
[C][api:026]: Setting up Home Assistant API server...
[C][micro_wake_word:062]: Setting up microWakeWord...
[C][micro_wake_word:069]: Micro Wake Word initialized
[I][app:062]: setup() finished successfully!
[W][component:170]: Component wifi cleared Warning flag
[W][component:157]: Component api set Warning flag: unspecified
[I][app:100]: ESPHome version 2024.12.4 compiled on Apr 18 2025, 17:29:39
 
[C][logger:185]: Logger:
[C][logger:186]:   Level: DEBUG
[C][logger:188]:   Log Baud Rate: 115200
[C][logger:189]:   Hardware UART: UART0
[C][esp32_rmt_led_strip:187]: ESP32 RMT LED Strip:
[C][esp32_rmt_led_strip:188]:   Pin: 27
[C][esp32_rmt_led_strip:189]:   Channel: 0
[C][esp32_rmt_led_strip:214]:   RGB Order: GRB
[C][esp32_rmt_led_strip:215]:   Max refresh rate: 0
[C][esp32_rmt_led_strip:216]:   Number of LEDs: 1
[C][template.select:065]: Template Select 'Wake word engine location'
[C][template.select:066]:   Update Interval: 60.0s
[C][template.select:069]:   Optimistic: YES
[C][template.select:070]:   Initial Option: On device
[C][template.select:071]:   Restore Value: YES
[C][gpio.binary_sensor:015]: GPIO Binary Sensor 'Button'
[C][gpio.binary_sensor:016]:   Pin: GPIO39
[C][light:092]: Light 'M5Stack Atom Echo 8a1bc0'
[C][light:094]:   Default Transition Length: 0.0s
[C][light:095]:   Gamma Correct: 2.80
[C][template.switch:068]: Template Switch 'Use listen light'
[C][template.switch:091]:   Restore Mode: restore defaults to ON
[C][template.switch:057]:   Optimistic: YES
[C][template.switch:068]: Template Switch 'timer_ringing'
[C][template.switch:091]:   Restore Mode: always OFF
[C][template.switch:057]:   Optimistic: YES
[C][factory_reset.button:011]: Factory Reset Button 'Factory reset'
[C][factory_reset.button:011]:   Icon: 'mdi:restart-alert'
[C][captive_portal:089]: Captive Portal:
[C][mdns:116]: mDNS:
[C][mdns:117]:   Hostname: study-atom-echo-8a1bc0
[C][esphome.ota:073]: Over-The-Air updates:
[C][esphome.ota:074]:   Address: study-atom-echo.local:3232
[C][esphome.ota:075]:   Version: 2
[C][esphome.ota:078]:   Password configured
[C][safe_mode:018]: Safe Mode:
[C][safe_mode:020]:   Boot considered successful after 60 seconds
[C][safe_mode:021]:   Invoke after 10 boot attempts
[C][safe_mode:023]:   Remain in safe mode for 300 seconds
[C][api:140]: API Server:
[C][api:141]:   Address: study-atom-echo.local:6053
[C][api:143]:   Using noise encryption: YES
[C][micro_wake_word:051]: microWakeWord:
[C][micro_wake_word:052]:   models:
[C][micro_wake_word:015]:     - Wake Word: Hey Jarvis
[C][micro_wake_word:016]:       Probability cutoff: 0.970
[C][micro_wake_word:017]:       Sliding window size: 5
[C][micro_wake_word:021]:     - VAD Model
[C][micro_wake_word:022]:       Probability cutoff: 0.500
[C][micro_wake_word:023]:       Sliding window size: 5
[D][api:103]: Accepted 192.168.39.6
[W][component:170]: Component api cleared Warning flag
[W][component:237]: Component api took a long time for an operation (58 ms).
[W][component:238]: Components should block for at most 30 ms.
[D][api.connection:1446]: Home Assistant 2024.3.3 (192.168.39.6): Connected successfully
[D][ring_buffer:034]: Created ring buffer with size 2048
[D][micro_wake_word:399]: Resetting buffers and probabilities
[D][micro_wake_word:195]: State changed from IDLE to START_MICROPHONE
[D][micro_wake_word:107]: Starting Microphone
[D][micro_wake_word:195]: State changed from START_MICROPHONE to STARTING_MICROPHONE
[D][esp-idf:000]: I (11279) I2S: DMA Malloc info, datalen=blocksize=1024, dma_buf_count=4
[D][micro_wake_word:195]: State changed from STARTING_MICROPHONE to DETECTING_WAKE_WORD

That s enough to get a voice satellite that can be configured up in Home Assistant; you ll need the ESPHome Integration added, then for the noise_psk key you use the same string as I have under api/encryption/key in my diff above (obviously do your own, I used dd if=/dev/urandom bs=32 count=1 base64 to generate mine). If you re like me and a compulsive VLANer and firewaller even within your own network then you need to allow Home Assistant to connect on TCP port 6053 to the ATOM Echo, and also allow access to/from UDP port 6055 on the Echo (it ll send audio from that port to Home Assistant, then receive back audio to the same port). At this point you can now shout Hey Jarvis, what time is it? at the Echo, and the white light will turn flashing blue (indicating it s heard the wake word). Which means we re ready to teach Home Assistant how to do something with the incoming audio.

23 April 2025

Thomas Lange: FAI 6.4 and new ISO images available

The new FAI release 6.4 comes with some nice new features. It now supports installing the Xfce edition of Linux Mint 22.1 'Xia'. There's now an additional Linux Mint ISO [1] which does an unattended Linux Mint installation via FAI and does not need a network connection because all packages are available on the ISO. The package_config configurations now support arbitrary boolean expressions with FAI classes like this:
PACKAGES install UBUNTU && XORG && ! MINT
If you use the command ifclass in customization scripts you can now also use these expressions. The tool fai-kvm for starting a KVM virtual machine now uses UEFI variables if the VM is started with an UEFI environment, so boot settings are saved during a reboot. For the installation of Rocky Linux and Almalinux in an UEFI environment some configuration files were added. New ISO images [2] are available but it may take some time until the FAIme service [3] will supports customized Linux Mint images.

22 April 2025

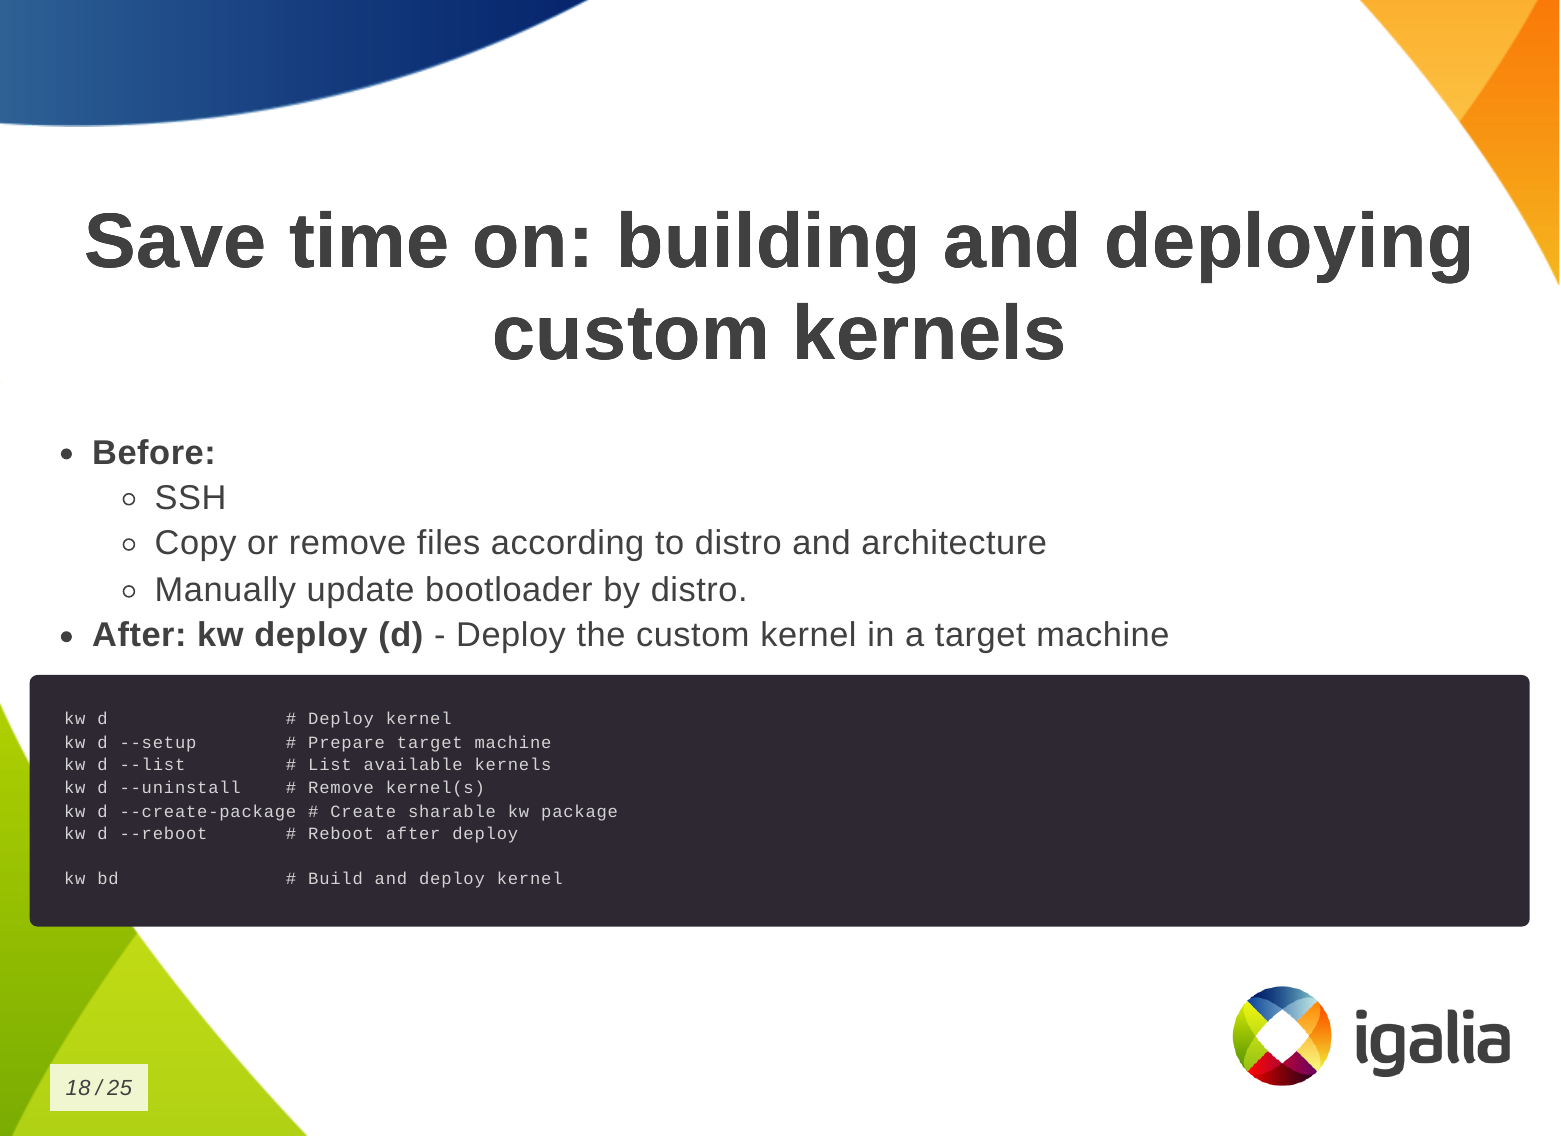
Melissa Wen: 2025 FOSDEM: Don't let your motivation go, save time with kworkflow

2025 was my first year at FOSDEM, and I can say it was an incredible experience where I met many colleagues from Igalia who live around the world, and also many friends from the Linux display stack who are part of my daily work and contributions to DRM/KMS. In addition, I met new faces and recognized others with whom I had interacted on some online forums and we had good and long conversations. During FOSDEM 2025 I had the opportunity to present about kworkflow in the kernel devroom. Kworkflow is a set of tools that help kernel developers with their routine tasks and it is the tool I use for my development tasks. In short, every contribution I make to the Linux kernel is assisted by kworkflow. The goal of my presentation was to spread the word about kworkflow. I aimed to show how the suite consolidates good practices and recommendations of the kernel workflow in short commands. These commands are easily configurable and memorized for your current work setup, or for your multiple setups. For me, Kworkflow is a tool that accommodates the needs of different agents in the Linux kernel community. Active developers and maintainers are the main target audience for kworkflow, but it is also inviting for users and user-space developers who just want to report a problem and validate a solution without needing to know every detail of the kernel development workflow. Something I didn t emphasize during the presentation but would like to correct this flaw here is that the main author and developer of kworkflow is my colleague at Igalia, Rodrigo Siqueira. Being honest, my contributions are mostly on requesting and validating new features, fixing bugs, and sharing scripts to increase feature coverage. So, the video and slide deck of my FOSDEM presentation are available for download here. And, as usual, you will find in this blog post the script of this presentation and more detailed explanation of the demo presented there.

Kworkflow at FOSDEM 2025: Speaker Notes and Demo Hi, I m Melissa, a GPU kernel driver developer at Igalia and today I ll be giving a very inclusive talk to not let your motivation go by saving time with kworkflow. So, you re a kernel developer, or you want to be a kernel developer, or you don t want to be a kernel developer. But you re all united by a single need: you need to validate a custom kernel with just one change, and you need to verify that it fixes or improves something in the kernel. And that s a given change for a given distribution, or for a given device, or for a given subsystem Look to this diagram and try to figure out the number of subsystems and related work trees you can handle in the kernel. So, whether you are a kernel developer or not, at some point you may come across this type of situation: There is a userspace developer who wants to report a kernel issue and says:

  • Oh, there is a problem in your driver that can only be reproduced by running this specific distribution. And the kernel developer asks:
  • Oh, have you checked if this issue is still present in the latest kernel version of this branch?
But the userspace developer has never compiled and installed a custom kernel before. So they have to read a lot of tutorials and kernel documentation to create a kernel compilation and deployment script. Finally, the reporter managed to compile and deploy a custom kernel and reports:
  • Sorry for the delay, this is the first time I have installed a custom kernel. I am not sure if I did it right, but the issue is still present in the kernel of the branch you pointed out.
And then, the kernel developer needs to reproduce this issue on their side, but they have never worked with this distribution, so they just created a new script, but the same script created by the reporter. What s the problem of this situation? The problem is that you keep creating new scripts! Every time you change distribution, change architecture, change hardware, change project - even in the same company - the development setup may change when you switch to a different project, you create another script for your new kernel development workflow! You know, you have a lot of babies, you have a collection of my precious scripts , like Sm agol (Lord of the Rings) with the precious ring. Instead of creating and accumulating scripts, save yourself time with kworkflow. Here is a typical script that many of you may have. This is a Raspberry Pi 4 script and contains everything you need to memorize to compile and deploy a kernel on your Raspberry Pi 4. With kworkflow, you only need to memorize two commands, and those commands are not specific to Raspberry Pi. They are the same commands to different architecture, kernel configuration, target device.
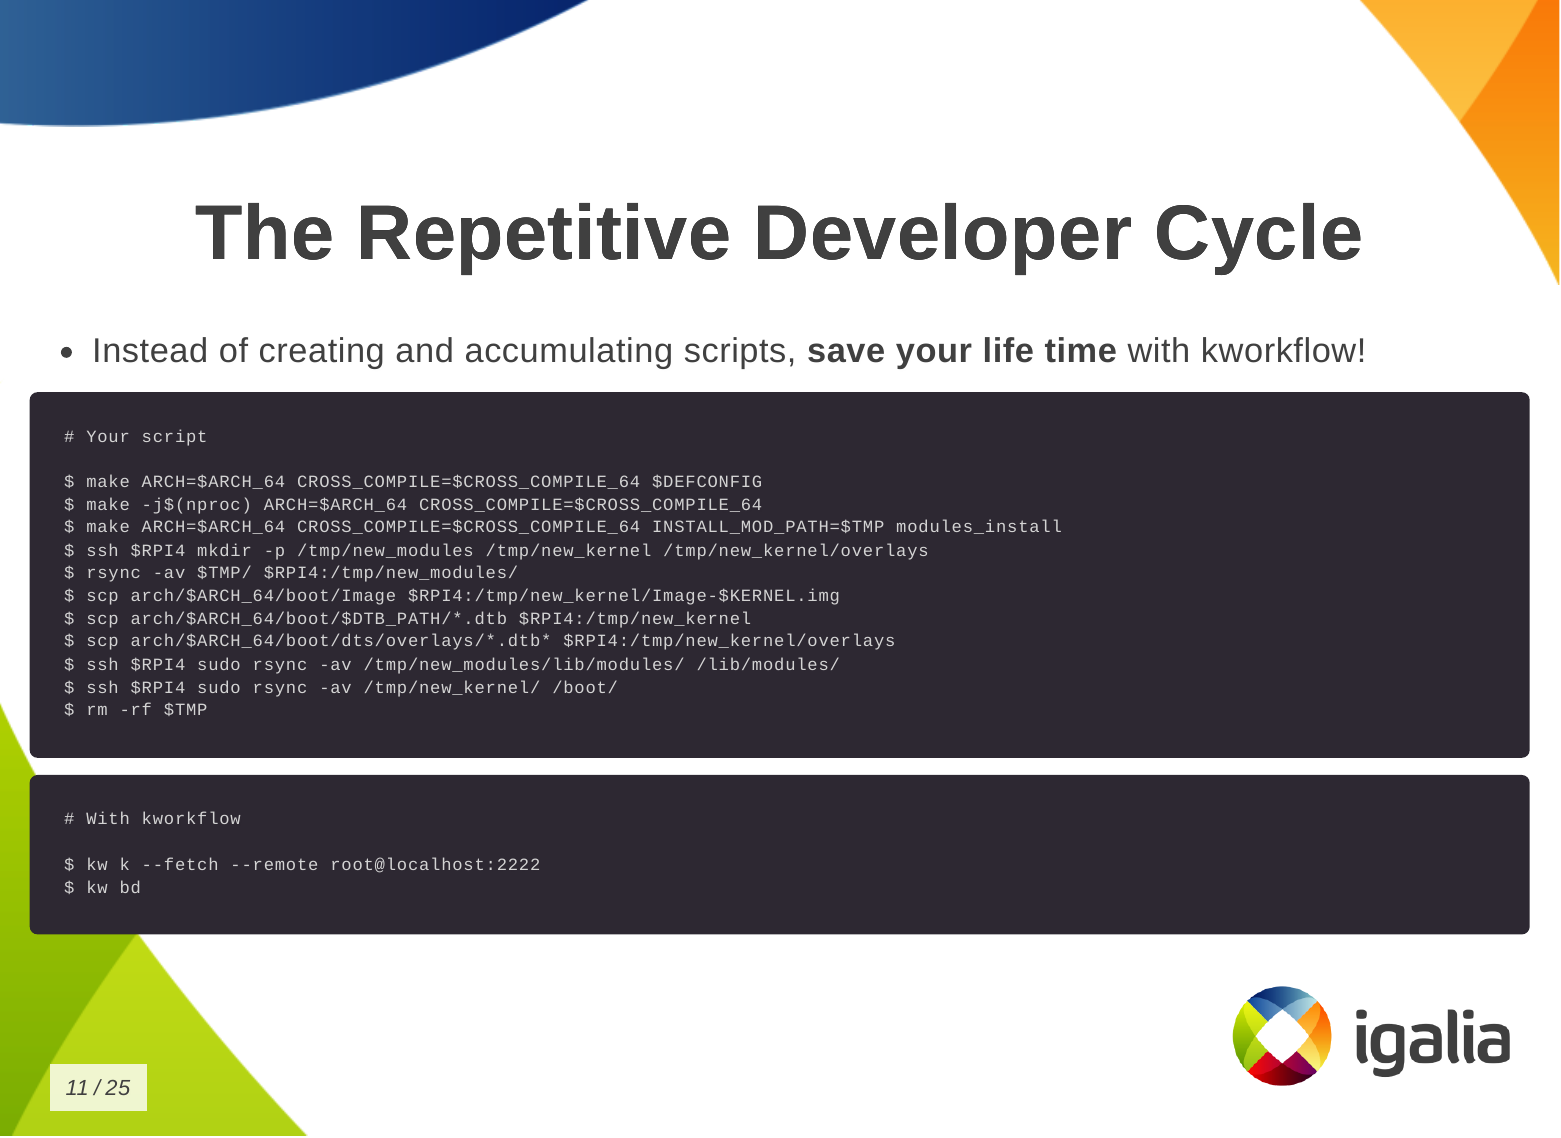

What is kworkflow? Kworkflow is a collection of tools and software combined to:
  • Optimize Linux kernel development workflow.
  • Reduce time spent on repetitive tasks, since we are spending our lives compiling kernels.
  • Standardize best practices.
  • Ensure reliable data exchange across kernel workflow. For example: two people describe the same setup, but they are not seeing the same thing, kworkflow can ensure both are actually with the same kernel, modules and options enabled.
I don t know if you will get this analogy, but kworkflow is for me a megazord of scripts. You are combining all of your scripts to create a very powerful tool.
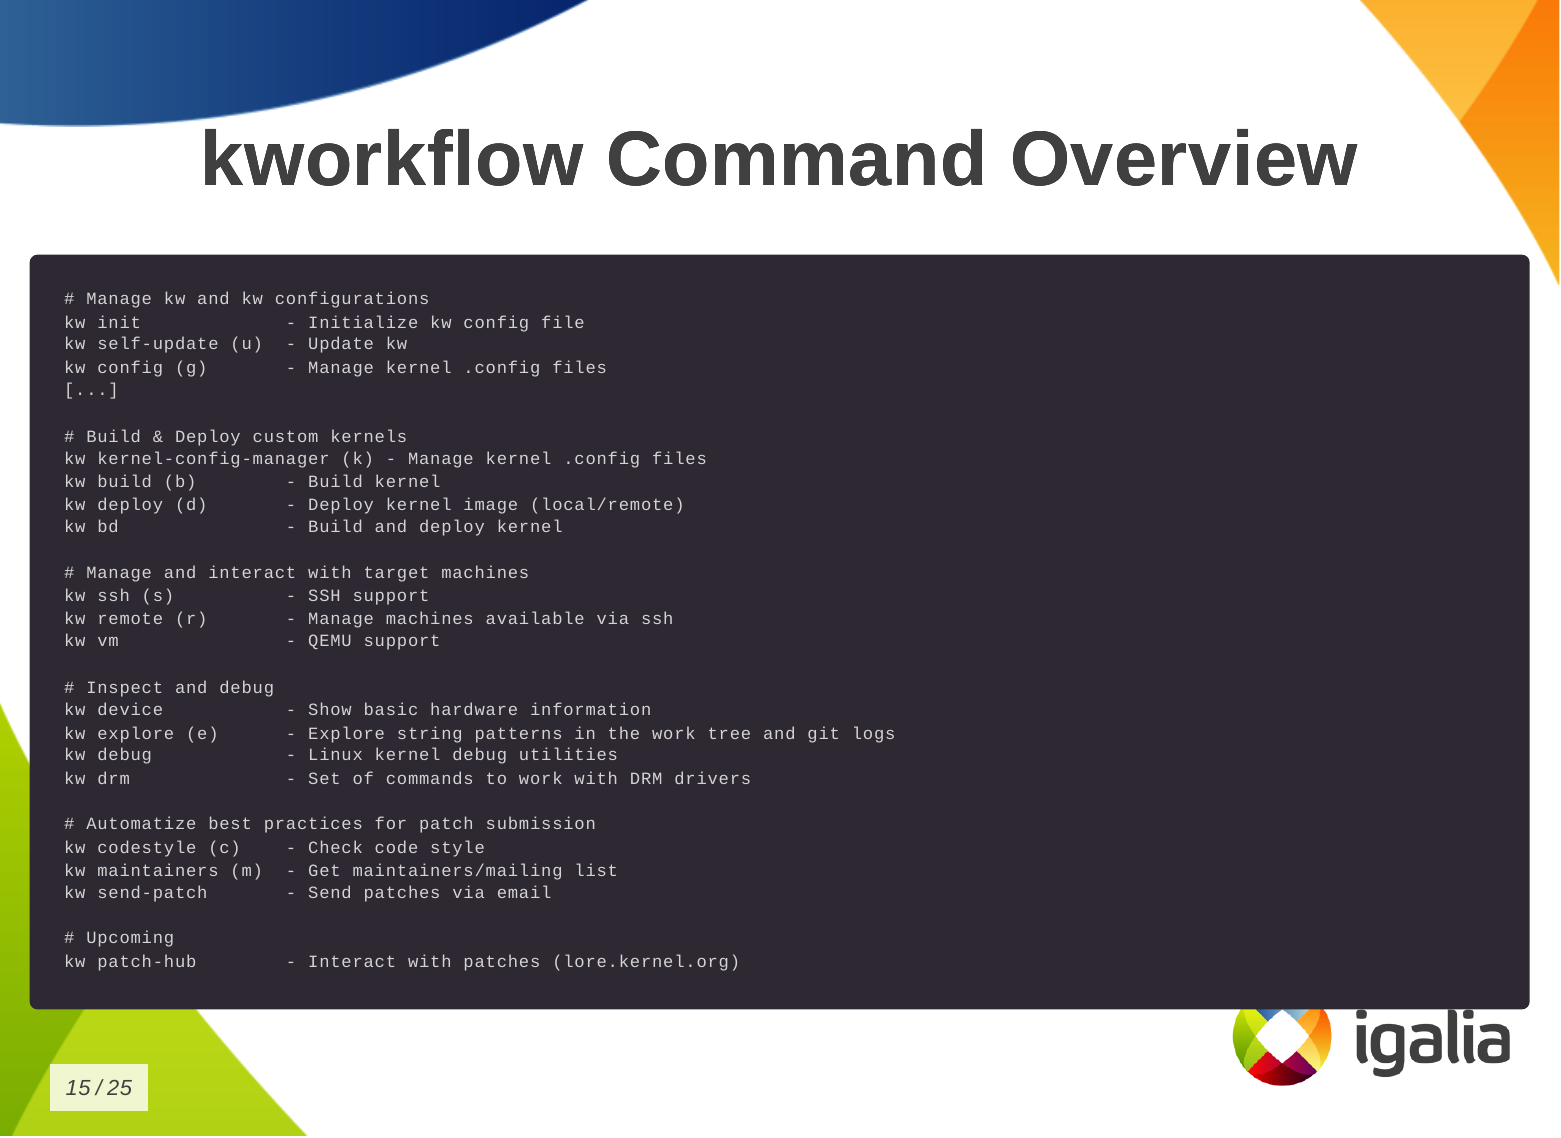
What is the main feature of kworflow? There are many, but these are the most important for me:
  • Build & deploy custom kernels across devices & distros.
  • Handle cross-compilation seamlessly.
  • Manage multiple architecture, settings and target devices in the same work tree.
  • Organize kernel configuration files.
  • Facilitate remote debugging & code inspection.
  • Standardize Linux kernel patch submission guidelines. You don t need to double check documentantion neither Greg needs to tell you that you are not following Linux kernel guidelines.
  • Upcoming: Interface to bookmark, apply and reviewed-by patches from mailing lists (lore.kernel.org).
This is the list of commands you can run with kworkflow. The first subset is to configure your tool for various situations you may face in your daily tasks.
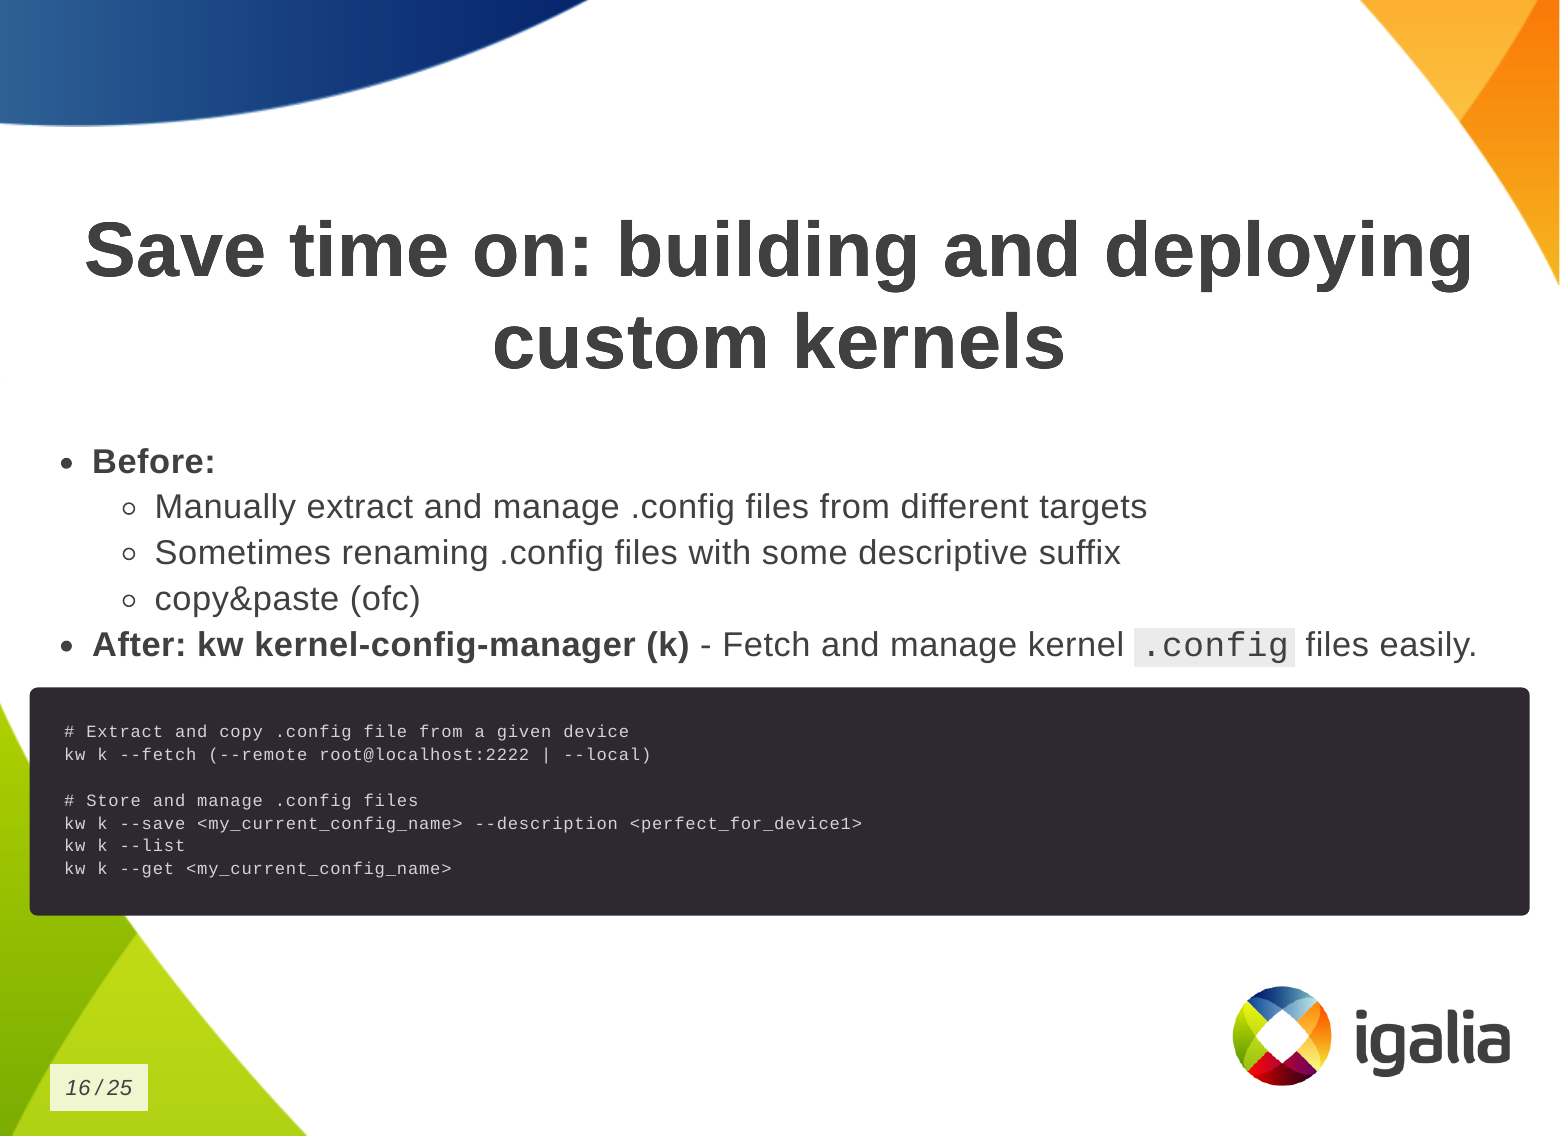
# Manage kw and kw configurations
kw init             - Initialize kw config file
kw self-update (u)  - Update kw
kw config (g)       - Manage kernel .config files
The second subset is to build and deploy custom kernels.
# Build & Deploy custom kernels
kw kernel-config-manager (k) - Manage kernel .config files
kw build (b)        - Build kernel
kw deploy (d)       - Deploy kernel image (local/remote)
kw bd               - Build and deploy kernel
We have some tools to manage and interact with target machines.
# Manage and interact with target machines
kw ssh (s)          - SSH support
kw remote (r)       - Manage machines available via ssh
kw vm               - QEMU support
To inspect and debug a kernel.
# Inspect and debug
kw device           - Show basic hardware information
kw explore (e)      - Explore string patterns in the work tree and git logs
kw debug            - Linux kernel debug utilities
kw drm              - Set of commands to work with DRM drivers
To automatize best practices for patch submission like codestyle, maintainers and the correct list of recipients and mailing lists of this change, to ensure we are sending the patch to who is interested in it.
# Automatize best practices for patch submission
kw codestyle (c)    - Check code style
kw maintainers (m)  - Get maintainers/mailing list
kw send-patch       - Send patches via email
And the last one, the upcoming patch hub.
# Upcoming
kw patch-hub        - Interact with patches (lore.kernel.org)

How can you save time with Kworkflow? So how can you save time building and deploying a custom kernel? First, you need a .config file.
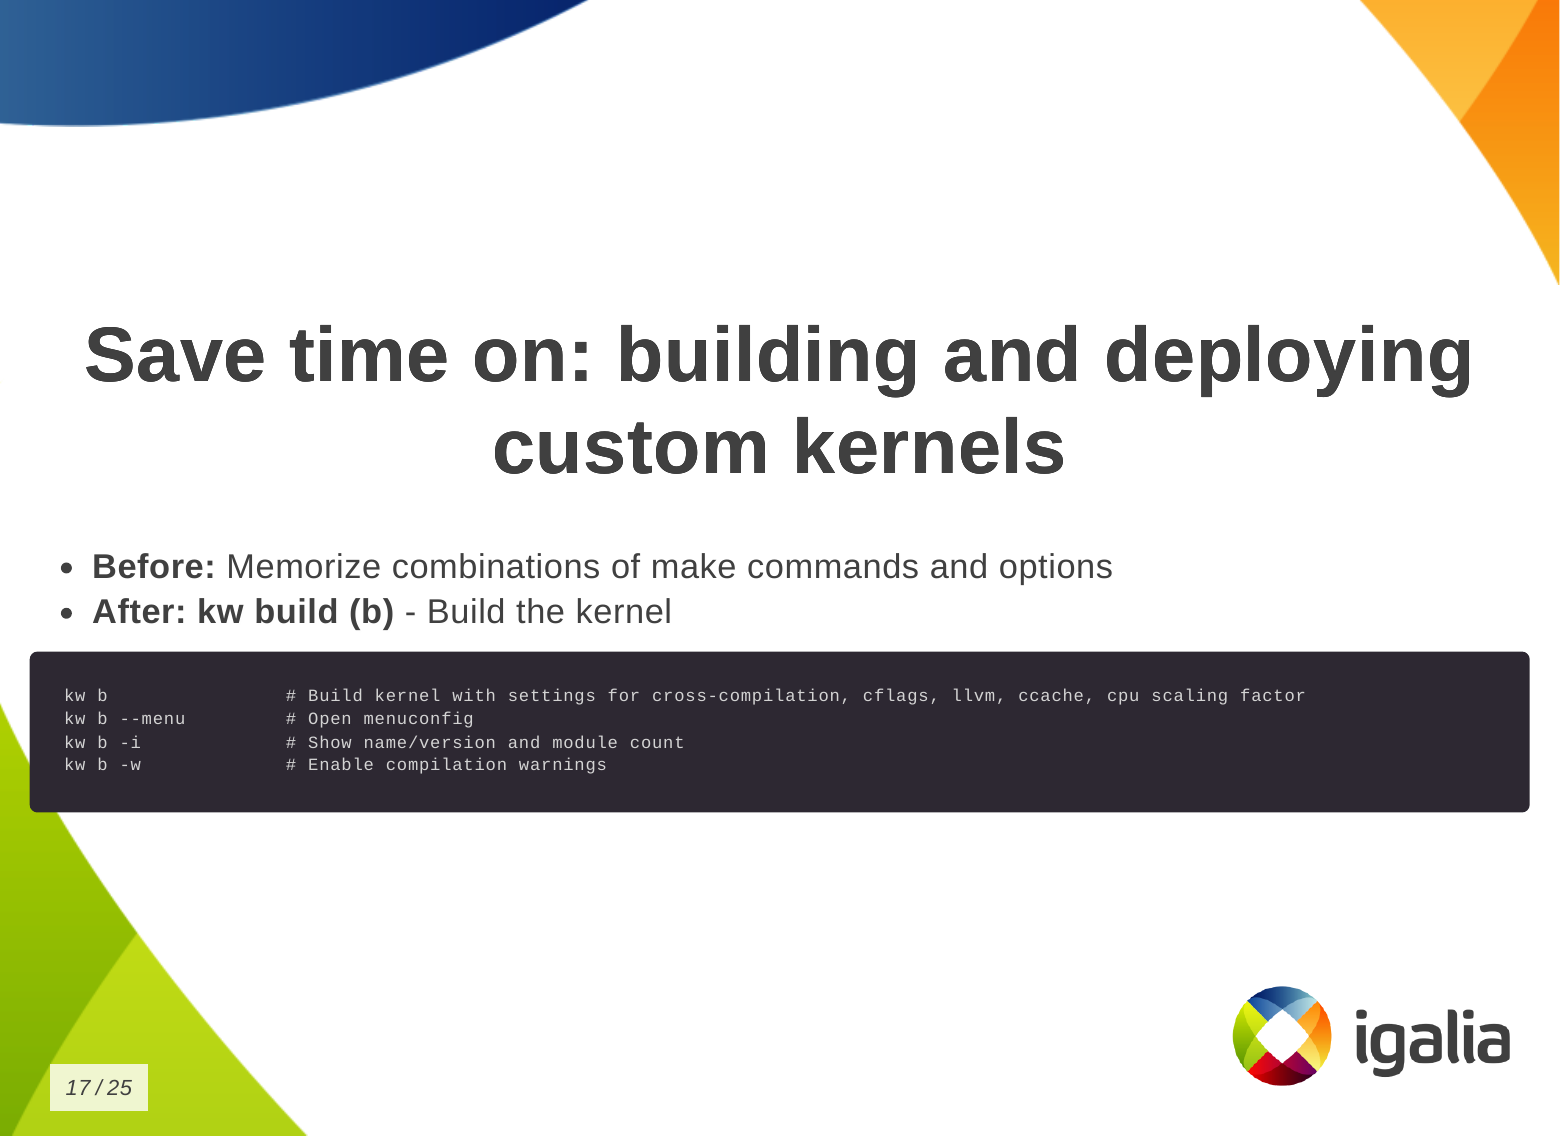
  • Without kworkflow: You may be manually extracting and managing .config files from different targets and saving them with different suffixes to link the kernel to the target device or distribution, or any descriptive suffix to help identify which is which. Or even copying and pasting from somewhere.
  • With kworkflow: you can use the kernel-config-manager command, or simply kw k, to store, describe and retrieve a specific .config file very easily, according to your current needs.
Then you want to build the kernel:
  • Without kworkflow: You are probably now memorizing a combination of commands and options.
  • With kworkflow: you just need kw b (kw build) to build the kernel with the correct settings for cross-compilation, compilation warnings, cflags, etc. It also shows some information about the kernel, like number of modules.
Finally, to deploy the kernel in a target machine.
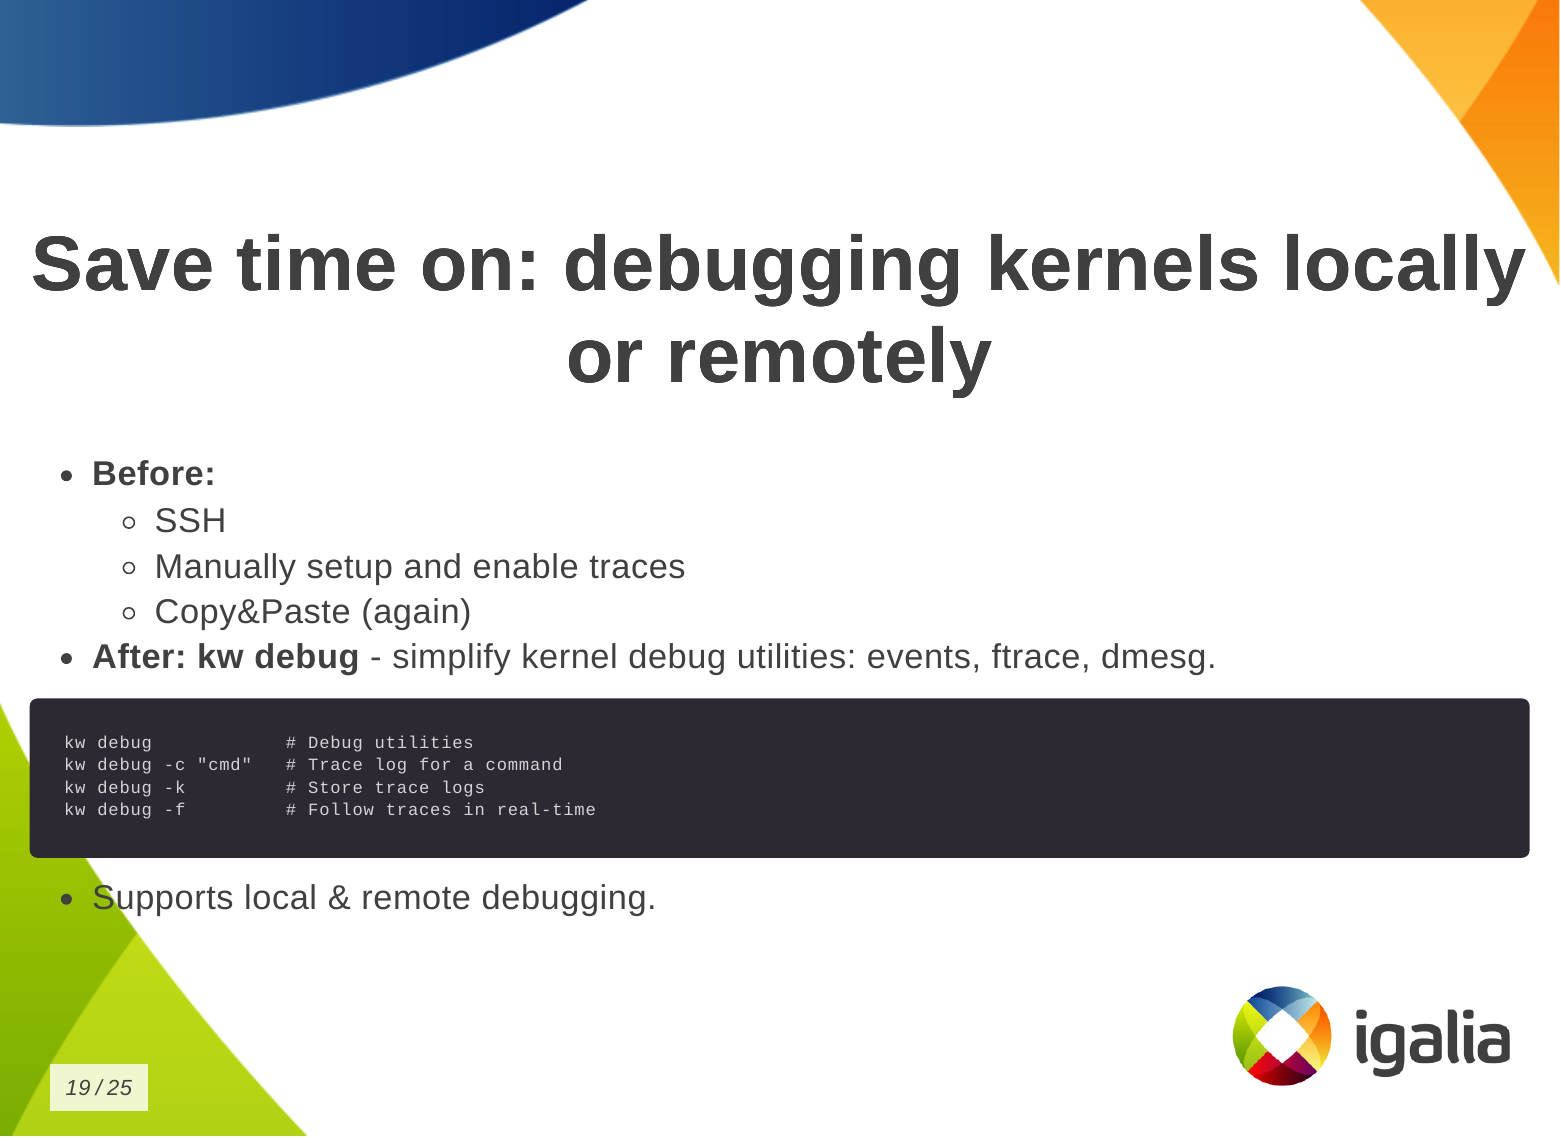
  • Without kworkflow: You might be doing things like: SSH connecting to the remote machine, copying and removing files according to distributions and architecture, and manually updating the bootloader for the target distribution.
  • With kworkflow: you just need kw d which does a lot of things for you, like: deploying the kernel, preparing the target machine for the new installation, listing available kernels and uninstall them, creating a tarball, rebooting the machine after deploying the kernel, etc.
You can also save time on debugging kernels locally or remotely.
  • Without kworkflow: you do: ssh, manual setup and traces enablement, copy&paste logs.
  • With kworkflow: more straighforward access to debug utilities: events, trace, dmesg.
You can save time on managing multiple kernel images in the same work tree.
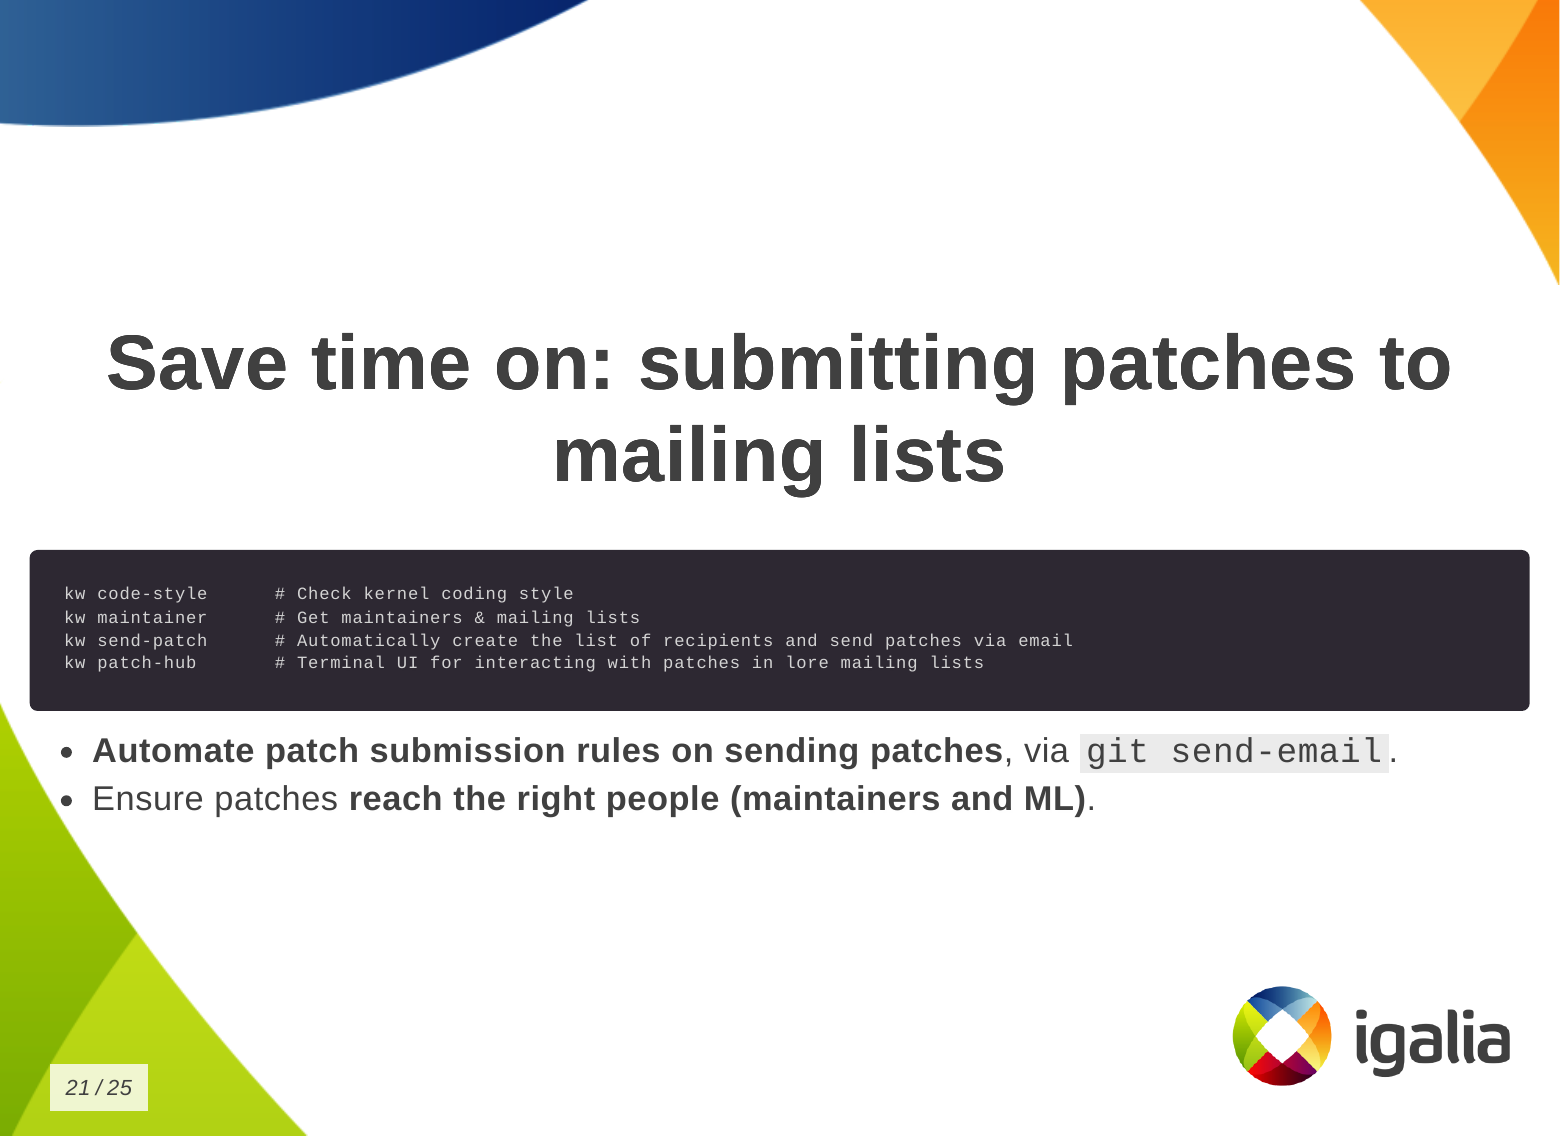
  • Without kworkflow: now you can be cloning multiple times the same repository so you don t lose compiled files when changing kernel configuration or compilation options and manually managing build and deployment scripts.
  • With kworkflow: you can use kw env to isolate multiple contexts in the same worktree as environments, so you can keep different configurations in the same worktree and switch between them easily without losing anything from the last time you worked in a specific context.
Finally, you can save time when submitting kernel patches. In kworkflow, you can find everything you need to wrap your changes in patch format and submit them to the right list of recipients, those who can review, comment on, and accept your changes. This is a demo that the lead developer of the kw patch-hub feature sent me. With this feature, you will be able to check out a series on a specific mailing list, bookmark those patches in the kernel for validation, and when you are satisfied with the proposed changes, you can automatically submit a reviewed-by for that whole series to the mailing list.
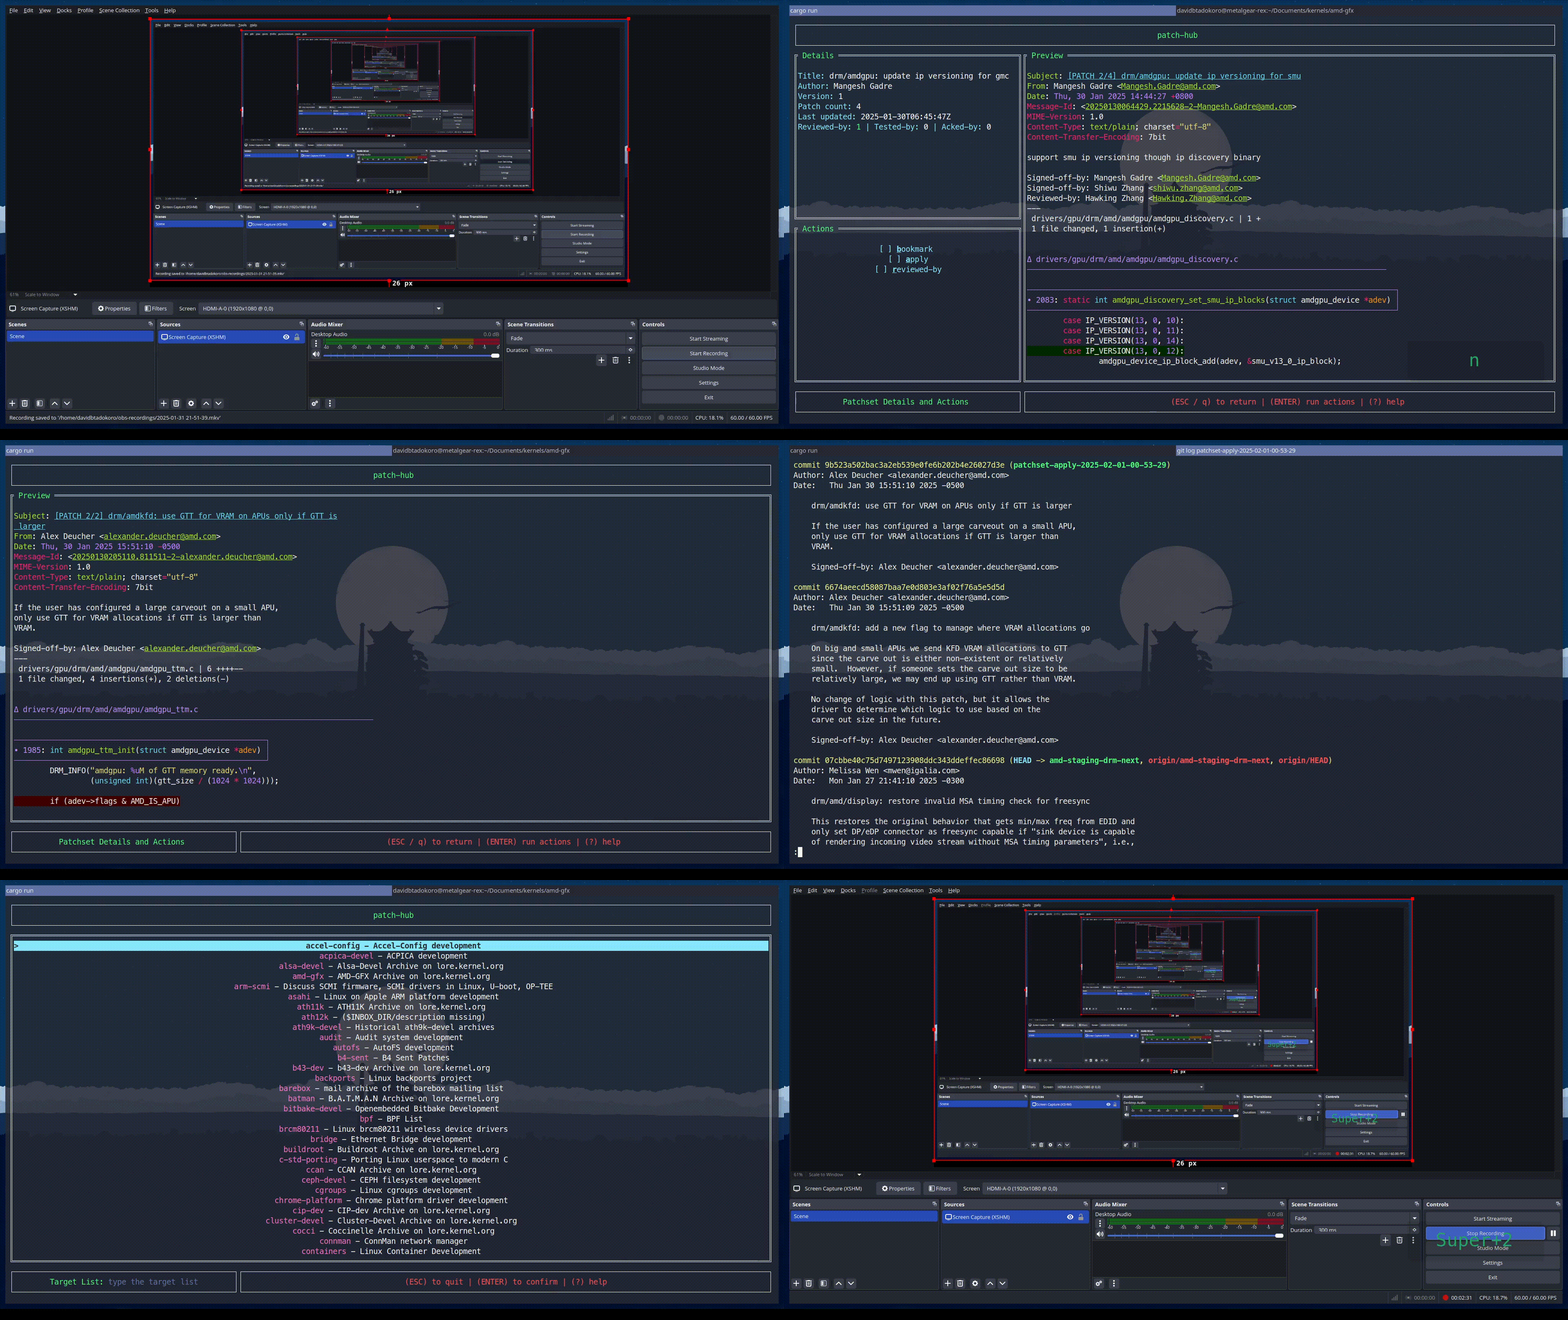

Demo Now a demo of how to use kw environment to deal with different devices, architectures and distributions in the same work tree without losing compiled files, build and deploy settings, .config file, remote access configuration and other settings specific for those three devices that I have.

Setup
  • Three devices:
    • laptop (debian x86 intel local)
    • SteamDeck (steamos x86 amd remote)
    • RaspberryPi 4 (raspbian arm64 broadcomm remote)
  • Goal: To validate a change on DRM/VKMS using a single kernel tree.
  • Kworkflow commands:
    • kw env
    • kw d
    • kw bd
    • kw device
    • kw debug
    • kw drm

Demo script In the same terminal and worktree.

First target device: Laptop (debian x86 intel local)
$ kw env --list # list environments available in this work tree
$ kw env --use LOCAL # select the environment of local machine (laptop) to use: loading pre-compiled files, kernel and kworkflow settings.
$ kw device # show device information
$ sudo modinfo vkms # show VKMS module information before applying kernel changes.
$ <open VKMS file and change module info>
$ kw bd # compile and install kernel with the given change
$ sudo modinfo vkms # show VKMS module information after kernel changes.
$ git checkout -- drivers
Second target device: RaspberryPi 4 (raspbian arm64 broadcomm remote)
$ kw env --use RPI_64 # move to the environment for a different target device.
$ kw device # show device information and kernel image name
$ kw drm --gui-off-after-reboot # set the system to not load graphical layer after reboot
$ kw b # build the kernel with the VKMS change
$ kw d --reboot # deploy the custom kernel in a Raspberry Pi 4 with Raspbian 64, and reboot
$ kw s # connect with the target machine via ssh and check the kernel image name
$ exit
Third target device: SteamDeck (steamos x86 amd remote)
$ kw env --use STEAMDECK # move to the environment for a different target device
$ kw device # show device information
$ kw debug --dmesg --follow --history --cmd="modprobe vkms" # run a command and show the related dmesg output
$ kw debug --dmesg --follow --history --cmd="modprobe -r vkms" # run a command and show the related dmesg output
$ <add a printk with a random msg to appear on dmesg log>
$ kw bd # deploy and install custom kernel to the target device
$ kw debug --dmesg --follow --history --cmd="modprobe vkms" # run a command and show the related dmesg output after build and deploy the kernel change

Q&A Most of the questions raised at the end of the presentation were actually suggestions and additions of new features to kworkflow. The first participant, that is also a kernel maintainer, asked about two features: (1) automatize getting patches from patchwork (or lore) and triggering the process of building, deploying and validating them using the existing workflow, (2) bisecting support. They are both very interesting features. The first one fits well the patch-hub subproject, that is under-development, and I ve actually made a similar request a couple of weeks before the talk. The second is an already existing request in kworkflow github project. Another request was to use kexec and avoid rebooting the kernel for testing. Reviewing my presentation I realized I wasn t very clear that kworkflow doesn t support kexec. As I replied, what it does is to install the modules and you can load/unload them for validations, but for built-in parts, you need to reboot the kernel. Another two questions: one about Android Debug Bridge (ADB) support instead of SSH and another about support to alternative ways of booting when the custom kernel ended up broken but you only have one kernel image there. Kworkflow doesn t manage it yet, but I agree this is a very useful feature for embedded devices. On Raspberry Pi 4, kworkflow mitigates this issue by preserving the distro kernel image and using config.txt file to set a custom kernel for booting. For ADB, there is no support too, and as I don t see currently users of KW working with Android, I don t think we will have this support any time soon, except if we find new volunteers and increase the pool of contributors. The last two questions were regarding the status of b4 integration, that is under development, and other debugging features that the tool doesn t support yet. Finally, when Andrea and I were changing turn on the stage, he suggested to add support for virtme-ng to kworkflow. So I opened an issue for tracking this feature request in the project github. With all these questions and requests, I could see the general need for a tool that integrates the variety of kernel developer workflows, as proposed by kworflow. Also, there are still many cases to be covered by kworkflow. Despite the high demand, this is a completely voluntary project and it is unlikely that we will be able to meet these needs given the limited resources. We will keep trying our best in the hope we can increase the pool of users and contributors too.

Joey Hess: offgrid electric car

Eight months ago I came up my rocky driveway in an electric car, with the back full of solar panel mounting rails. I didn't know how I'd manage to keep it charged. I got the car earlier than planned, with my offgrid solar upgrade only beginning. There's no nearby EV charger, and winter was coming, less solar power every day. Still, it was the right time to take a leap to offgid EV life. My existing 1 kilowatt solar array could charge the car only 5 miles on a good day. Here's my first try at charging the car offgrid:
first feeble charging offgrid
It was not worth charging the car that way, the house battery tended to get drained while doing that, and adding cycles to that battery is not desirable. So that was only a proof of concept, I knew I'd need to upgrade. My goal with the upgrade was to charge the car directly from the sun, even when it was cloudy, using the house battery only to skate over brief darker periods (like a thunderstorm). By mid October, I had enough solar installed to do that (5 kilowatts).
me standing in front of solar fence
first charging from solar fence
Using this, in 2 days I charged the car up from 57% to 82%, and took off on a celebratory road trip to Niagra Falls, where I charged the car from hydro power from a dam my grandfather had engineered. When I got home, it was November. Days were getting ever shorter. My solar upgrade was only 1/3rd complete and could charge the car 30-some miles per day, but only on a good day, and weather was getting worse. I came back with a low state of charge (both car and me), and needed to get back to full in time for my Thanksgiving trip at the end of the month. I decided to limit my trips to town.
charging up gradually through the month of November
This kind of medium term planning about car travel was new to me. But not too unusual for offgrid living. You look at the weather forecast and make some rough plans, and get to feel connected to the natural world a bit more. December is the real test for offgrid solar, and honestly this was a bit rough, with a road trip planned for the end of the month. I did the usual holiday stuff but otherwise holed up at home a bit more than I usually would. Charging was limited and the cold made it charge less efficiently.
bleak December charging
Still, I was busy installing more solar panels, and by winter solstice, was back to charging 30 miles on a good day. Of course, from there out things improved. In January and February I was able to charge up easily enough for my usual trips despite the cold. By March the car was often getting full before I needed to go anywhere, and I was doing long round trips without bothering to fast charge along the way, coming home low, knowing even cloudy days would let it charge up enough. That brings me up to today. The car is 80% full and heading up toward 100% for a long trip on Friday. Despite the sky being milky white today with no visible sun, there's plenty of power to absorb, and the car charger turned on at 11 am with the house battery already full. My solar upgrade is only 2/3rds complete, and also I have not yet installed my inverter upgrade, so the car can only currenly charge at 9 amps despite much more solar power often being available. So I'm looking forward to how next December goes with my full planned solar array and faster charging. But first, a summer where I expect the car will mostly be charged up and ready to go at all times, and the only car expense will be fast charging on road trips!
By the way, the code I've written to automate offgrid charging that runs only when there's enough solar power is here. And here are the charging graphs for the other months. All told, it's charged 475 kwh offgrid, enough to drive more than 1500 miles.
January
February
March
April

20 April 2025

Russ Allbery: Review: Up the Down Staircase

Review: Up the Down Staircase, by Bel Kaufman
Publisher: Vintage Books
Copyright: 1964, 1991, 2019
Printing: 2019
ISBN: 0-525-56566-3
Format: Kindle
Pages: 360
Up the Down Staircase is a novel (in an unconventional format, which I'll describe in a moment) about the experiences of a new teacher in a fictional New York City high school. It was a massive best-seller in the 1960s, including a 1967 movie, but seems to have dropped out of the public discussion. I read it from the library sometime in the late 1980s or early 1990s and have thought about it periodically ever since. It was Bel Kaufman's first novel. Sylvia Barrett is a new graduate with a master's degree in English, where she specialized in Chaucer. As Up the Down Staircase opens, it is her first day as an English teacher in Calvin Coolidge High School. As she says in a letter to a college friend:
What I really had in mind was to do a little teaching. "And gladly wolde he lerne, and gladly teche" like Chaucer's Clerke of Oxenford. I had come eager to share all I know and feel; to imbue the young with a love for their language and literature; to instruct and to inspire. What happened in real life (when I had asked why they were taking English, a boy said: "To help us in real life") was something else again, and even if I could describe it, you would think I am exaggerating.
She instead encounters chaos and bureaucracy, broken windows and mindless regulations, a librarian who is so protective of her books that she doesn't let any students touch them, a school guidance counselor who thinks she's Freud, and a principal whose sole interaction with the school is to occasionally float through on a cushion of cliches, dispensing utterly useless wisdom only to vanish again.
I want to take this opportunity to extend a warm welcome to all faculty and staff, and the sincere hope that you have returned from a healthful and fruitful summer vacation with renewed vim and vigor, ready to gird your loins and tackle the many important and vital tasks that lie ahead undaunted. Thank you for your help and cooperation in the past and future. Maxwell E. Clarke
Principal
In practice, the school is run by James J. McHare, Clarke's administrative assistant, who signs his messages JJ McH, Adm. Asst. and who Sylvia immediately starts calling Admiral Ass. McHare is a micro-managing control freak who spends the book desperately attempting to impose order over school procedures, the teachers, and the students, with very little success. The title of the book comes from one of his detention slips:
Please admit bearer to class Detained by me for going Up the Down staircase and subsequent insolence. JJ McH
The conceit of this book is that, except for the first and last chapters, it consists only of memos, letters, notes, circulars, and other paper detritus, often said to come from Sylvia's wastepaper basket. Sylvia serves as the first-person narrator through her long letters to her college friend, and through shorter but more frequent exchanges via intraschool memo with Beatrice Schachter, another English teacher at the same school, but much of the book lies outside her narration. The reader has to piece together what's happening from the discarded paper of a dysfunctional institution. Amid the bureaucratic and personal communications, there are frequent chapters with notes from the students, usually from the suggestion box that Sylvia establishes early in the book. These start as chaotic glimpses of often-misspelled wariness or open hostility, but over the course of Up the Down Staircase, some of the students become characters with fragmentary but still visible story arcs. This remains confusing throughout the novel there are too many students to keep them entirely straight, and several of them use pseudonyms for the suggestion box but it's the sort of confusion that feels like an intentional authorial choice. It mirrors the difficulty a teacher has in piecing together and remembering the stories of individual students in overstuffed classrooms, even if (like Sylvia and unlike several of her colleagues) the teacher is trying to pay attention. At the start, Up the Down Staircase reads as mostly-disconnected humor. There is a strong "kids say the darnedest things" vibe, which didn't entirely work for me, but the send-up of chaotic bureaucracy is both more sophisticated and more entertaining. It has the "laugh so that you don't cry" absurdity of a system with insufficient resources, entirely absent management, and colleagues who have let their quirks take over their personalities. Sylvia alternates between incredulity and stubbornness, and I think this book is at its best when it shows the small acts of practical defiance that one uses to carve out space and coherence from mismanaged bureaucracy. But this book is not just a collection of humorous anecdotes about teaching high school. Sylvia is sincere in her desire to teach, which crystallizes around, but is not limited to, a quixotic attempt to reach one delinquent that everyone else in the school has written off. She slowly finds her footing, she has a few breakthroughs in reaching her students, and the book slowly turns into an earnest portrayal of an attempt to make the system work despite its obvious unfitness for purpose. This part of the book is hard to review. Parts of it worked brilliantly; I could feel myself both adjusting my expectations alongside Sylvia to something less idealistic and also celebrating the rare breakthrough with her. Parts of it were weirdly uncomfortable in ways that I'm not sure I enjoyed. That includes Sylvia's climactic conversation with the boy she's been trying to reach, which was weirdly charged and ambiguous in a way that felt like the author's reach exceeding their grasp. One thing that didn't help my enjoyment is Sylvia's relationship with Paul Barringer, another of the English teachers and a frustrated novelist and poet. Everyone who works at the school has found their own way to cope with the stress and chaos, and many of the ways that seem humorous turn out to have a deeper logic and even heroism. Paul's, however, is to retreat into indifference and alcohol. He is a believable character who works with Kaufman's themes, but he's also entirely unlikable. I never understood why Sylvia tolerated that creepy asshole, let alone kept having lunch with him. It is clear from the plot of the book that Kaufman at least partially understands Paul's deficiencies, but that did not help me enjoy reading about him. This is a great example of a book that tried to do something unusual and risky and didn't entirely pull it off. I like books that take a risk, and sometimes Up the Down Staircase is very funny or suddenly insightful in a way that I'm not sure Kaufman could have reached with a more traditional novel. It takes a hard look at what it means to try to make a system work when it's clearly broken and you can't change it, and the way all of the characters arrive at different answers that are much deeper than their initial impressions was subtle and effective. It's the sort of book that sticks in your head, as shown by the fact I bought it on a whim to re-read some 35 years after I first read it. But it's not consistently great. Some parts of it drag, the characters are frustratingly hard to keep track of, and the emotional climax points are odd and unsatisfying, at least to me. I'm not sure whether to recommend it or not, but it's certainly unusual. I'm glad I read it again, but I probably won't re-read it for another 35 years, at least. If you are considering getting this book, be aware that it has a lot of drawings and several hand-written letters. The publisher of the edition I read did a reasonably good job formatting this for an ebook, but some of the pages, particularly the hand-written letters, were extremely hard to read on a Kindle. Consider paper, or at least reading on a tablet or computer screen, if you don't want to have to puzzle over low-resolution images. The 1991 trade paperback had a new introduction by the author, reproduced in the edition I read as an afterward (which is a better choice than an introduction). It is a long and fascinating essay from Kaufman about her experience with the reaction to this book, culminating in a passionate plea for supporting public schools and public school teachers. Kaufman's personal account adds a lot of depth to the story; I highly recommend it. Content note: Self-harm, plus several scenes that are closely adjacent to student-teacher relationships. Kaufman deals frankly with the problems of mostly-poor high school kids, including sexuality, so be warned that this is not the humorous romp that it might appear on first glance. A couple of the scenes made me uncomfortable; there isn't anything explicit, but the emotional overtones can be pretty disturbing. Rating: 7 out of 10

18 April 2025

Sven Hoexter: Trixie Upgrade and X11 Clipboard Manager Madness

Due to my own laziness and a few functionality issues my "for work laptop" is still using a 15+ year old setup with X11 and awesome. Since trixie is now starting its freeze, it's time to update that odd machine as well and look at the fallout. Good news: It's mostly my own resistance to change which required some kick in the back to move on. Clipboard Manager Madness For the past decade or so I used parcellite which served me well. Now that is no longer available in trixie and I started to look into one of the dead end streets of X11 related tooling, searching for an alternative. Parcellite Seems upstream is doing sporadic fixes, but holds GTK2 tight. The Debian package was patched to be GTK3 compatible, but has unfixed ftbfs issues with GCC 14. clipit Next I checked for a parcellite fork named clipit, and that's when it started to get funky. It's packaged in Debian, QA maintained, and recently received at least two uploads to keep it working. Installed it and found it's greeting me with a nag screen that I should migrate to diodon. The real clipit tool is still shipped as a binary named clipit.real, so if you know it you can still use it. To achieve the nag screen it depends on zenity and to ease the migration it depends on diodon. Two things I do not really need. Also the package description prominently mentions that you should not use the package. diodon The nag screen of clipit made me look at diodon. It claims it was written for the Ubuntu Unity desktop, something where I've no idea how alive and relevant it still is. While there is still something on launchpad, it seems to receive sporadic commits on github. Not sure if it's dead or just feature complete. Interim Solution: clipit Settled with clipit for now, but decided to fork the Debian package to remove the nag screen and the dependency on diodon and zenity (package build). My hope is to convert this last X11 setup to wayland within the lifetime of trixie. I also contacted the last uploader regarding a removal of the nag screen, who then brought in the last maintainer who added the nag screen. While I first thought clipit is somewhat maintained upstream, Andrej quickly pointed out that this is not really the case. Still that leaves us in trixie with a rather odd situation. We ship now for the second stable release a package that recommends to move to a different tool while still shipping the original tool. Plus it's getting patched by some of its users who refuse to migrate to the alternative envisioned by the former maintainer. VirtualBox and moving to libvirt I always liked the GUI of VirtualBox, and it really made desktop virtualization easy. But with Linux 6.12, which enables KVM by default, it seems to get even more painful to get it up and running. In the past I just took the latest release from unstable and rebuild that one on the current stable. Currently the last release in unstable is 7.0.20, while the Linux 6.12 fixes only started to appear in VirtualBox 7.1.4 and later. The good thing is with virt-manager and the whole libvirt ecosystem there is a good enough replacement available, and it works fine with related tooling like vagrant. There are instructions available on how to set it up. I can only add that it makes sense to export VAGRANT_DEFAULT_PROVIDER=libvirt in your .bashrc to make that provider change permanent.

17 April 2025

Simon Josefsson: Verified Reproducible Tarballs

Remember the XZ Utils backdoor? One factor that enabled the attack was poor auditing of the release tarballs for differences compared to the Git version controlled source code. This proved to be a useful place to distribute malicious data. The differences between release tarballs and upstream Git sources is typically vendored and generated files. Lots of them. Auditing all source tarballs in a distribution for similar issues is hard and boring work for humans. Wouldn t it be better if that human auditing time could be spent auditing the actual source code stored in upstream version control instead? That s where auditing time would help the most. Are there better ways to address the concern about differences between version control sources and tarball artifacts? Let s consider some approaches: While I like the properties of the first solution, and have made effort to support that approach, I don t think normal source tarballs are going away any time soon. I am concerned that it may not even be a desirable complete solution to this problem. We may need tarballs with pre-generated content in them for various reasons that aren t entirely clear to us today. So let s consider the second approach. It could help while waiting for more experience with the first approach, to see if there are any fundamental problems with it. How do you know that the XZ release tarballs was actually derived from its version control sources? The same for Gzip? Coreutils? Tar? Sed? Bash? GCC? We don t know this! I am not aware of any automated or collaborative effort to perform this independent confirmation. Nor am I aware of anyone attempting to do this on a regular basis. We would want to be able to do this in the year 2042 too. I think the best way to reach that is to do the verification continuously in a pipeline, fixing bugs as time passes. The current state of the art seems to be that people audit the differences manually and hope to find something. I suspect many package maintainers ignore the problem and take the release source tarballs and trust upstream about this. We can do better. I have launched a project to setup a GitLab pipeline that invokes per-release scripts to rebuild that release artifact from git sources. Currently it only contain recipes for projects that I released myself. Releases which where done in a controlled way with considerable care to make reproducing the tarballs possible. The project homepage is here: https://gitlab.com/debdistutils/verify-reproducible-releases The project is able to reproduce the release tarballs for Libtasn1 v4.20.0, InetUtils v2.6, Libidn2 v2.3.8, Libidn v1.43, and GNU SASL v2.2.2. You can see this in a recent successful pipeline. All of those releases were prepared using Guix, and I m hoping the Guix time-machine will make it possible to keep re-generating these tarballs for many years to come. I spent some time trying to reproduce the current XZ release tarball for version 5.8.1. That would have been a nice example, wouldn t it? First I had to somehow mimic upstream s build environment. The XZ release tarball contains GNU Libtool files that are identified with version 2.5.4.1-baa1-dirty. I initially assumed this was due to the maintainer having installed libtool from git locally (after making some modifications) and made the XZ release using it. Later I learned that it may actually be coming from ArchLinux which ship with this particular libtool version. It seems weird for a distribution to use libtool built from a non-release tag, and furthermore applying patches to it, but things are what they are. I made some effort to setup an ArchLinux build environment, however the now-current Gettext version in ArchLinux seems to be more recent than the one that were used to prepare the XZ release. I don t know enough ArchLinux to setup an environment corresponding to an earlier version of ArchLinux, which would be required to finish this. I gave up, maybe the XZ release wasn t prepared on ArchLinux after all. Actually XZ became a good example for this writeup anyway: while you would think this should be trivial, the fact is that it isn t! (There is another aspect here: fingerprinting the versions used to prepare release tarballs allows you to infer what kind of OS maintainers are using to make releases on, which is interesting on its own.) I made some small attempts to reproduce the tarball for GNU Shepherd version 1.0.4 too, but I still haven t managed to complete it. Do you want a supply-chain challenge for the Easter weekend? Pick some well-known software and try to re-create the official release tarballs from the corresponding Git checkout. Is anyone able to reproduce anything these days? Bonus points for wrapping it up as a merge request to my project. Happy Supply-Chain Security Hacking!

15 April 2025

Russell Coker: Storage Trends 2025

It s been almost 15 months since I blogged about Storage Trends 2024 [1]. There hasn t been much change in this time (in Australia at least I m not tracking prices in other countries). The change was so small I had to check how the Australian dollar has performed against other currencies to see if changes to currencies had countered changes to storage prices, but there has been little overall change when compared to the Chinese Yuan and the Australian dollar is only about 11% worse against the US dollar when compared to a year ago. Generally there s a trend of computer parts decreasing in price by significantly more than 11% per annum. Small Storage The cheapest storage device from MSY now is a Patriot P210 128G SATA SSD for $19, cheaper than the $24 last year and the same price as the year before. So over the last 2 years there has been no change to the cheapest storage device on sale. It would almost never make sense to buy that as a 256G SATA SSD (also Patriot P210) is $25 and has twice the lifetime (120TBW vs 60TBW). There are also 256G NVMe devices for $29 and $30 which would be better options if the system has a NVMe socket built in. The cheapest 500G devices are $42.50 for a 512G SATA SSD and $45 for a 500G NVMe. Last year the prices were $33 for SATA and $36 for NVMe in that size so there s been a significant increase in price there. The difference is enough that if someone was on a tight budget they might reasonably decide to use smaller storage than they might have used last year! 2TB hard drives are still $89 the same price as last year! Last year a 2TB SATA SSD was $118 and a 2TB NVMe was $145, now a 2TB SATA SSD is $157 and a 2TB NVMe is $127. So NVMe has become cheaper than SATA in that segment but overall prices are higher than last year. Again for business use 2TB seems a sensible minimum for most systems if you are paying MSY rates (or similar rates from Amazon etc). Medium Storage Last year 4TB HDDs were $135, now they are $148. Last year the cheapest 4TB SSD was $299, now the cheapest is a $309 NVMe. While the prices have all gone up the price difference between hard drives and SSD has decreased in that size range. So for a small server (a lot of home servers and small business servers) 4TB of RAID-1 storage is all that s needed and for that SSDs are the best option. The price difference between $296 for 4TB of RAID-1 HDDs and $618 for RAID-1 NVMe is small enough to be justified by the benefits of speed and being quiet for most small server uses. In 2023 a 8TB hard drive cost $179 and a 8TB SSD cost $739. Last year a 8TB hard drive cost $239 and a 8TB SATA SSD cost, $899. Now a 8TB HDD costs $229 and MSY doesn t sell 8TB SSDs but for comparison Amazon has a Samsung 8TB SATA SSD for $919. So for storing 8TB+ there are benefits of hard drives as SSDs are difficult to get in that size range and more expensive than they were before. It seems that 8TB SSDs aren t used by enough people to have a large market in the home and small office space, so those of us who want the larger storage sizes will have to get second hand enterprise gear. It will probably be another few years before 8TB enterprise SSDs start appearing on the second hand market. Serious Storage Last year I wrote about the affordability of U.2 devices. I regret not buying some then as there are fewer on sale now and prices are higher. For hard drives they still aren t a good choice for most users because most users don t have more than 4TB of data. For large quantities of data hard drives are still a good option, a 22TB disk costs $899. For companies this is a good option for many situations. For home users there is the additional problem that determining whether a drive is Shingled Magnetic Recording which has some serious performance issues for some use and it s very difficult to determine which drives use it. Conclusion For corporate purchases the options for serious storage are probably decent. But for small companies and home users things definitely don t seem to have improved as much as we expect from the computer industry, I had expected 8TB SSDs to go for $450 by now and SSDs less than 500G to not even be sold new any more. The prices on 8TB SSDs have gone up more in the last 2 yeas than the ASX 200 (index of 200 biggest companies in the Australian stock market). I would never recommend using SSDs as an investment, but in retrospect 8TB SSDs could have been a good one. $20 seems to be about the minimum cost that SSDs approach while hard drives have a higher minimum price of a bit under $100 because they are larger, heavier, and more fragile. It seems that the market is likely to move to most SSDs being close to $20, if they can make 2TB SSDs cheaply enough to sell for about that price then that would cover the majority of the market. I ve created a table of the prices, I should have done this before but I initially didn t plan an ongoing series of posts on this topic.
Jun 2020 Apr 2021 Apr 2023 Jan 2024 Apr 2025
128G SSD $49 $19 $24 $19
500G SSD $97 $73 $32 $33 $42.50
2TB HDD $95 $72 $75 $89 $89
2TB SSD $335 $245 $149
4TB HDD $115 $135 $148
4TB SSD $895 $349 $299 $309
8TB HDD $179 $239 $229
8TB SSD $949 $739 $899 $919
10TB HDD $549 $395

13 April 2025

Keith Packard: sanitizer-fun

Fun with -fsanitize=undefined and Picolibc Both GCC and Clang support the -fsanitize=undefined flag which instruments the generated code to detect places where the program wanders into parts of the C language specification which are either undefined or implementation defined. Many of these are also common programming errors. It would be great if there were sanitizers for other easily detected bugs, but for now, at least the undefined sanitizer does catch several useful problems. Supporting the sanitizer The sanitizer can be built to either trap on any error or call handlers. In both modes, the same problems are identified, but when trap mode is enabled, the compiler inserts a trap instruction and doesn't expect the program to continue running. When handlers are in use, each identified issue is tagged with a bunch of useful data and then a specific sanitizer handling function is called. The specific functions are not all that well documented, nor are the parameters they receive. Maybe this is because both compilers provide an implementation of all of the functions they use and don't really expect external implementations to exist? However, to make these useful in an embedded environment, picolibc needs to provide a complete set of handlers that support all versions both gcc and clang as the compiler-provided versions depend upon specific C (and C++) libraries. Of course, programs can be built in trap-on-error mode, but that makes it much more difficult to figure out what went wrong. Fixing Sanitizer Issues Once the sanitizer handlers were implemented, picolibc could be built with them enabled and all of the picolibc tests run to uncover issues within the library. As with the static analyzer adventure from last year, the vast bulk of sanitizer complaints came from invoking undefined or implementation-defined behavior in harmless ways: Signed integer shifts This is one area where the C language spec is just wrong. For left shift, before C99, it worked on signed integers as a bit-wise operator, equivalent to the operator on unsigned integers. After that, left shift of negative integers became undefined. Fortunately, it's straightforward (if tedious) to work around this issue by just casting the operand to unsigned, performing the shift and casting it back to the original type. Picolibc now has an internal macro, lsl, which does this:
    #define lsl(__x,__s) ((sizeof(__x) == sizeof(char)) ?                   \
                          (__typeof(__x)) ((unsigned char) (__x) << (__s)) :  \
                          (sizeof(__x) == sizeof(short)) ?                  \
                          (__typeof(__x)) ((unsigned short) (__x) << (__s)) : \
                          (sizeof(__x) == sizeof(int)) ?                    \
                          (__typeof(__x)) ((unsigned int) (__x) << (__s)) :   \
                          (sizeof(__x) == sizeof(long)) ?                   \
                          (__typeof(__x)) ((unsigned long) (__x) << (__s)) :  \
                          (sizeof(__x) == sizeof(long long)) ?              \
                          (__typeof(__x)) ((unsigned long long) (__x) << (__s)) : \
                          __undefined_shift_size(__x, __s))
Right shift is significantly more complicated to implement. What we want is an arithmetic shift with the sign bit being replicated as the value is shifted rightwards. C defines no such operator. Instead, right shift of negative integers is implementation defined. Fortunately, both gcc and clang define the >> operator on signed integers as arithmetic shift. Also fortunately, C hasn't made this undefined, so the program itself doesn't end up undefined. The trouble with arithmetic right shift is that it is not equivalent to right shift of unsigned values. Here's what Per Vognsen came up with using standard C operators:
    int
    __asr_int(int x, int s)  
        return x < 0 ? ~(~x >> s) : x >> s;
     
When the value is negative, we invert all of the bits (making it positive), shift right, then flip all of the bits back. Both GCC and Clang seem to compile this to a single asr instruction. This function is replicated for each of the five standard integer types and then the set of them wrapped in another sizeof-selecting macro:
    #define asr(__x,__s) ((sizeof(__x) == sizeof(char)) ?           \
                          (__typeof(__x))__asr_char(__x, __s) :       \
                          (sizeof(__x) == sizeof(short)) ?          \
                          (__typeof(__x))__asr_short(__x, __s) :      \
                          (sizeof(__x) == sizeof(int)) ?            \
                          (__typeof(__x))__asr_int(__x, __s) :        \
                          (sizeof(__x) == sizeof(long)) ?           \
                          (__typeof(__x))__asr_long(__x, __s) :       \
                          (sizeof(__x) == sizeof(long long)) ?      \
                          (__typeof(__x))__asr_long_long(__x, __s):   \
                          __undefined_shift_size(__x, __s))
The lsl and asr macros use sizeof instead of the type-generic mechanism to remain compatible with compilers that lack type-generic support. Once these macros were written, they needed to be applied where required. To preserve the benefits of detecting programming errors, they were only applied where required, not blindly across the whole codebase. There are a couple of common patterns in the math code using shift operators. One is when computing the exponent value for subnormal numbers.
for (ix = -1022, i = hx << 11; i > 0; i <<= 1)
    ix -= 1;
This code computes the exponent by shifting the significand left by 11 bits (the width of the exponent field) and then incrementally shifting it one bit at a time until the sign flips, which indicates that the most-significant bit is set. Use of the pre-C99 definition of the left shift operator is intentional here; so both shifts are replaced with our lsl operator. In the implementation of pow, the final exponent is computed as the sum of the two exponents, both of which are in the allowed range. The resulting sum is then tested to see if it is zero or negative to see if the final value is sub-normal:
hx += n << 20;
if (hx >> 20 <= 0)
    /* do sub-normal things */
In this case, the exponent adjustment, n, is a signed value and so that shift is replaced with the lsl macro. The test value needs to compute the correct the sign bit, so we replace this with the asr macro. Because the right shift operation is not undefined, we only use our fancy macro above when the undefined behavior sanitizer is enabled. On the other hand, the lsl macro should have zero cost and covers undefined behavior, so it is always used. Actual Bugs Found! The goal of this little adventure was both to make using the undefined behavior sanitizer with picolibc possible as well as to use the sanitizer to identify bugs in the library code. I fully expected that most of the effort would be spent masking harmless undefined behavior instances, but was hopeful that the effort would also uncover real bugs in the code. I was not disappointed. Through this work, I found (and fixed) eight bugs in the code:
  1. setlocale/newlocale didn't check for NULL locale names
  2. qsort was using uintptr_t to swap data around. On MSP430 in 'large' mode, that's a 20-bit type inside a 32-bit representation.
  3. random() was returning values in int range rather than long.
  4. m68k assembly for memcpy was broken for sizes > 64kB.
  5. freopen returned NULL, even on success
  6. The optimized version of memrchr was always performing unaligned accesses.
  7. String to float conversion had a table missing four values. This caused an array access overflow which resulted in imprecise values in some cases.
  8. vfwscanf mis-parsed floating point values by assuming that wchar_t was unsigned.
Sanitizer Wishes While it's great to have a way to detect places in your C code which evoke undefined and implementation defined behaviors, it seems like this tooling could easily be extended to detect other common programming mistakes, even where the code is well defined according to the language spec. An obvious example is in unsigned arithmetic. How many bugs come from this seemingly innocuous line of code?
    p = malloc(sizeof(*p) * c);
Because sizeof returns an unsigned value, the resulting computation never results in undefined behavior, even when the multiplication wraps around, so even with the undefined behavior sanitizer enabled, this bug will not be caught. Clang seems to have an unsigned integer overflow sanitizer which should do this, but I couldn't find anything like this in gcc. Summary The undefined behavior sanitizers present in clang and gcc both provide useful diagnostics which uncover some common programming errors. In most cases, replacing undefined behavior with defined behavior is straightforward, although the lack of an arithmetic right shift operator in standard C is irksome. I recommend anyone using C to give it a try.

Michael Prokop: OpenSSH penalty behavior in Debian/trixie #newintrixie

This topic came up at a customer of mine in September 2024, when working on Debian/trixie support. Since then I wanted to blog about it to make people aware of this new OpenSSH feature and behavior. I finally found some spare minutes at Debian s BSP in Vienna, so here we are. :) Some of our Q/A jobs failed to run against Debian/trixie, in the debug logs we found:
debug1: kex_exchange_identification: banner line 0: Not allowed at this time
This Not allowed at this time pointed to a new OpenSSH feature. OpenSSH introduced options to penalize undesirable behavior with version 9.8p1, see OpenSSH Release Notes, and also sshd source code. FTR, on the SSH server side, you ll see messages like that:
Apr 13 08:57:11 grml sshd-session[2135]: error: maximum authentication attempts exceeded for root from 10.100.15.42 port 55792 ssh2 [preauth]
Apr 13 08:57:11 grml sshd-session[2135]: Disconnecting authenticating user root 10.100.15.42 port 55792: Too many authentication failures [preauth]
Apr 13 08:57:12 grml sshd-session[2137]: error: maximum authentication attempts exceeded for root from 10.100.15.42 port 55800 ssh2 [preauth]
Apr 13 08:57:12 grml sshd-session[2137]: Disconnecting authenticating user root 10.100.15.42 port 55800: Too many authentication failures [preauth]
Apr 13 08:57:13 grml sshd-session[2139]: error: maximum authentication attempts exceeded for root from 10.100.15.42 port 55804 ssh2 [preauth]
Apr 13 08:57:13 grml sshd-session[2139]: Disconnecting authenticating user root 10.100.15.42 port 55804: Too many authentication failures [preauth]
Apr 13 08:57:13 grml sshd-session[2141]: error: maximum authentication attempts exceeded for root from 10.100.15.42 port 55810 ssh2 [preauth]
Apr 13 08:57:13 grml sshd-session[2141]: Disconnecting authenticating user root 10.100.15.42 port 55810: Too many authentication failures [preauth]
Apr 13 08:57:13 grml sshd[1417]: drop connection #0 from [10.100.15.42]:55818 on [10.100.15.230]:22 penalty: failed authentication
Apr 13 08:57:14 grml sshd[1417]: drop connection #0 from [10.100.15.42]:55824 on [10.100.15.230]:22 penalty: failed authentication
Apr 13 08:57:14 grml sshd[1417]: drop connection #0 from [10.100.15.42]:55838 on [10.100.15.230]:22 penalty: failed authentication
Apr 13 08:57:14 grml sshd[1417]: drop connection #0 from [10.100.15.42]:55854 on [10.100.15.230]:22 penalty: failed authentication
This feature certainly is useful and has its use cases. But if you f.e. run automated checks to ensure that specific logins aren t working, be careful: you might hit the penalty feature, lock yourself out but also consecutive checks then don t behave as expected. Your login checks might fail, but only because the penalty behavior kicks in. The login you re verifying still might be working underneath, but you don t actually check for it exactly. Furthermore legitimate traffic from systems which accept connections from many users or behind shared IP addresses, like NAT and proxies could be denied. To disable this new behavior, you can set PerSourcePenalties no in your sshd_config, but there are also further configuration options available, see PerSourcePenalties and PerSourcePenaltyExemptList settings in sshd_config(5) for further details.

Next.

Previous.