Search Results: "tach"

22 April 2014

Bits from Debian: Debian welcomes its 2014 GSoC students!

We're excited to announce that 19 students have been selected to work with Debian during the Google Summer of Code this year! Here is the list of accepted students and projects: As always, you will be able to follow their progress on the SoC coordination mailing-list Congratulations to all the students and let's make sure we all have an amazing summer!

21 April 2014

Russell Coker: Sociological Images 2014

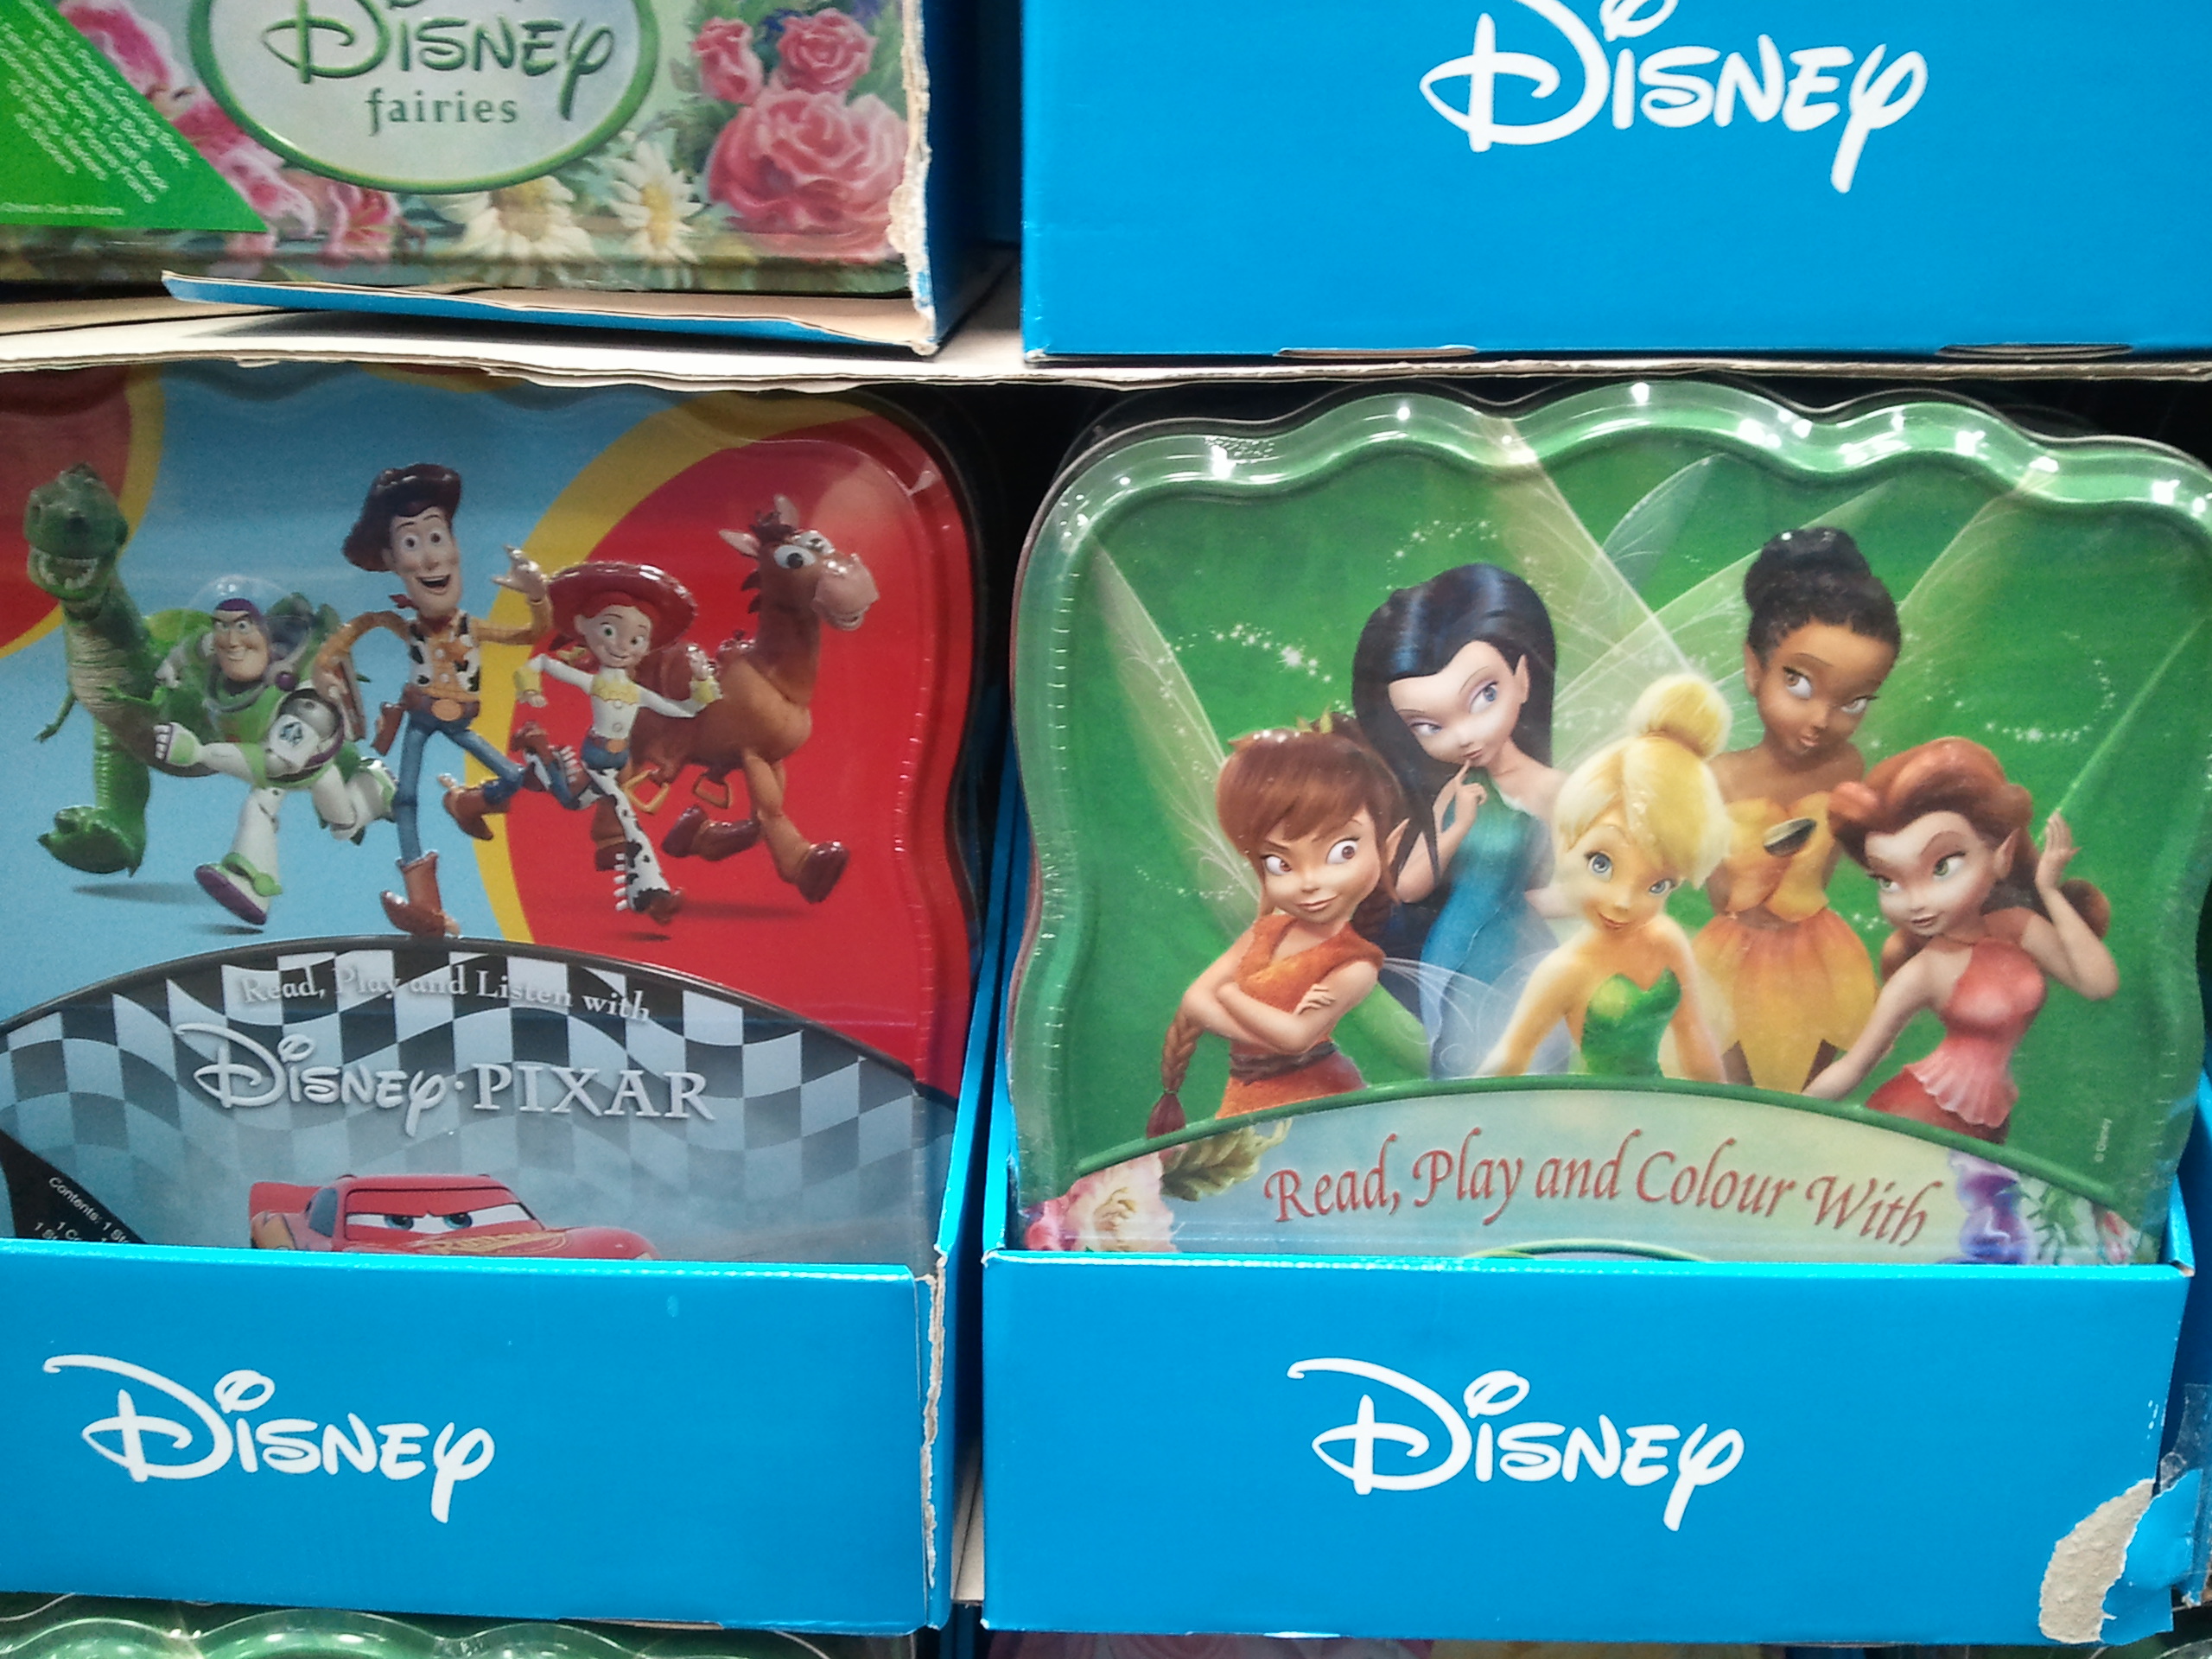
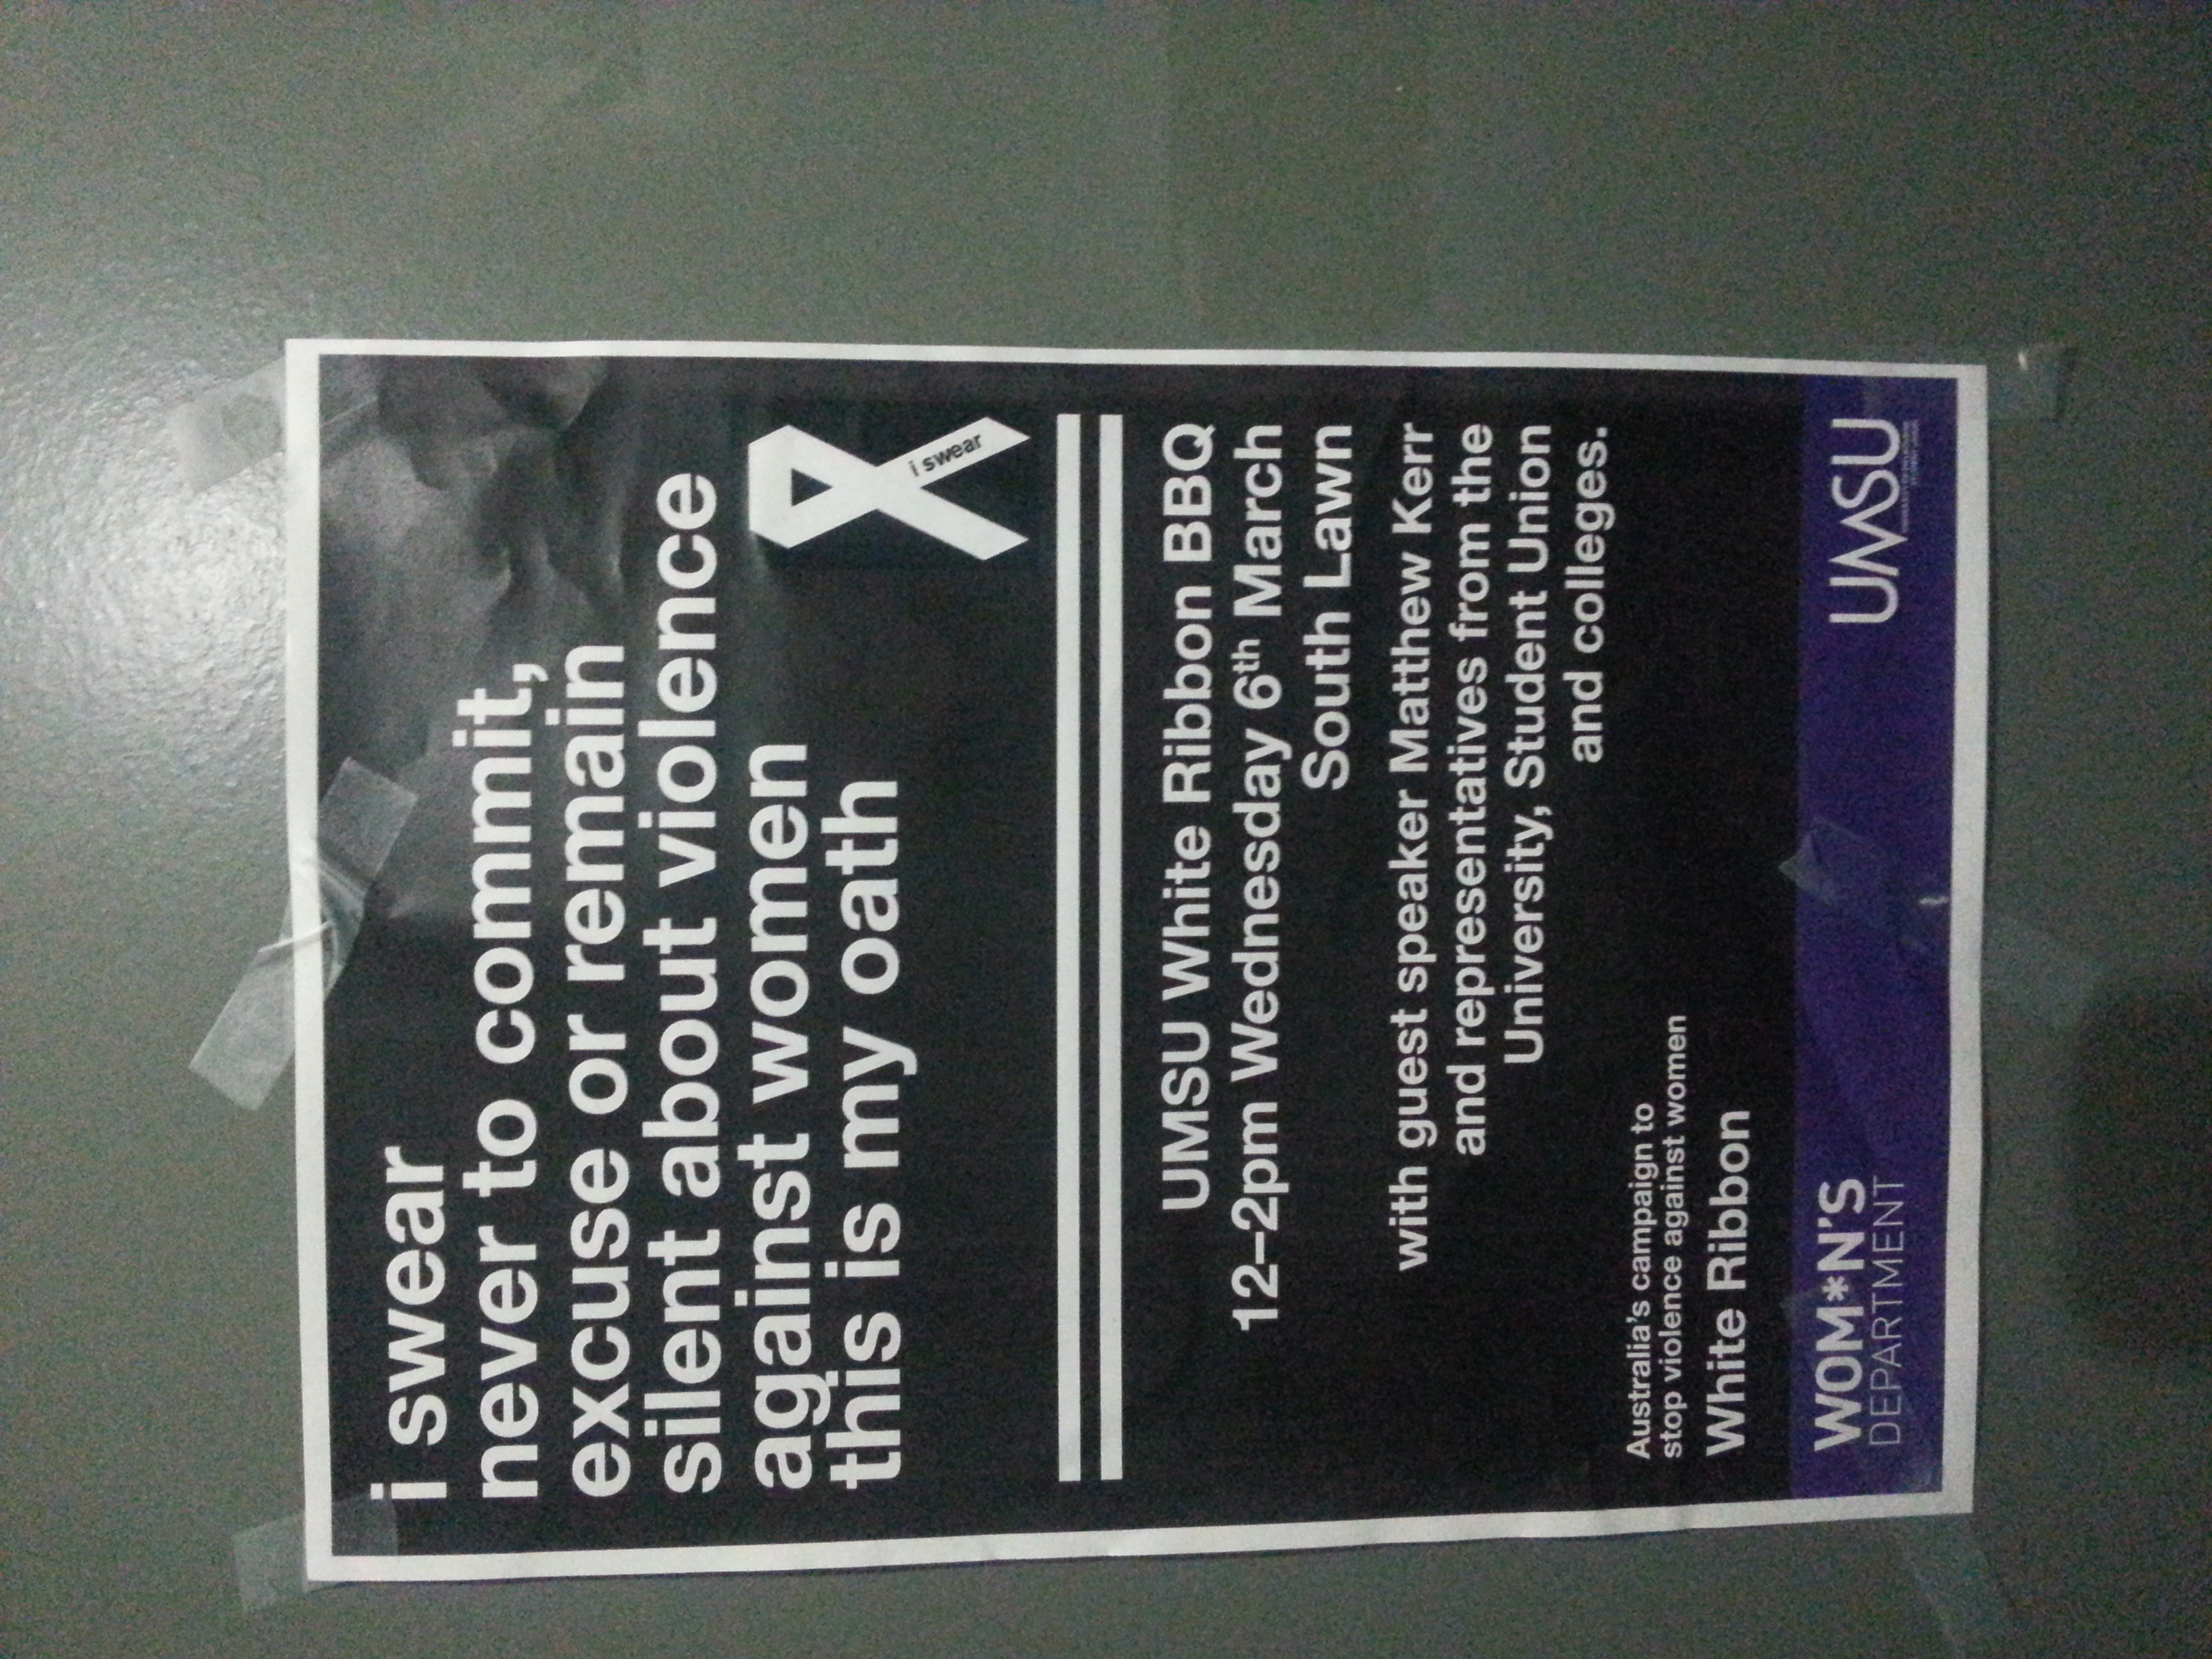
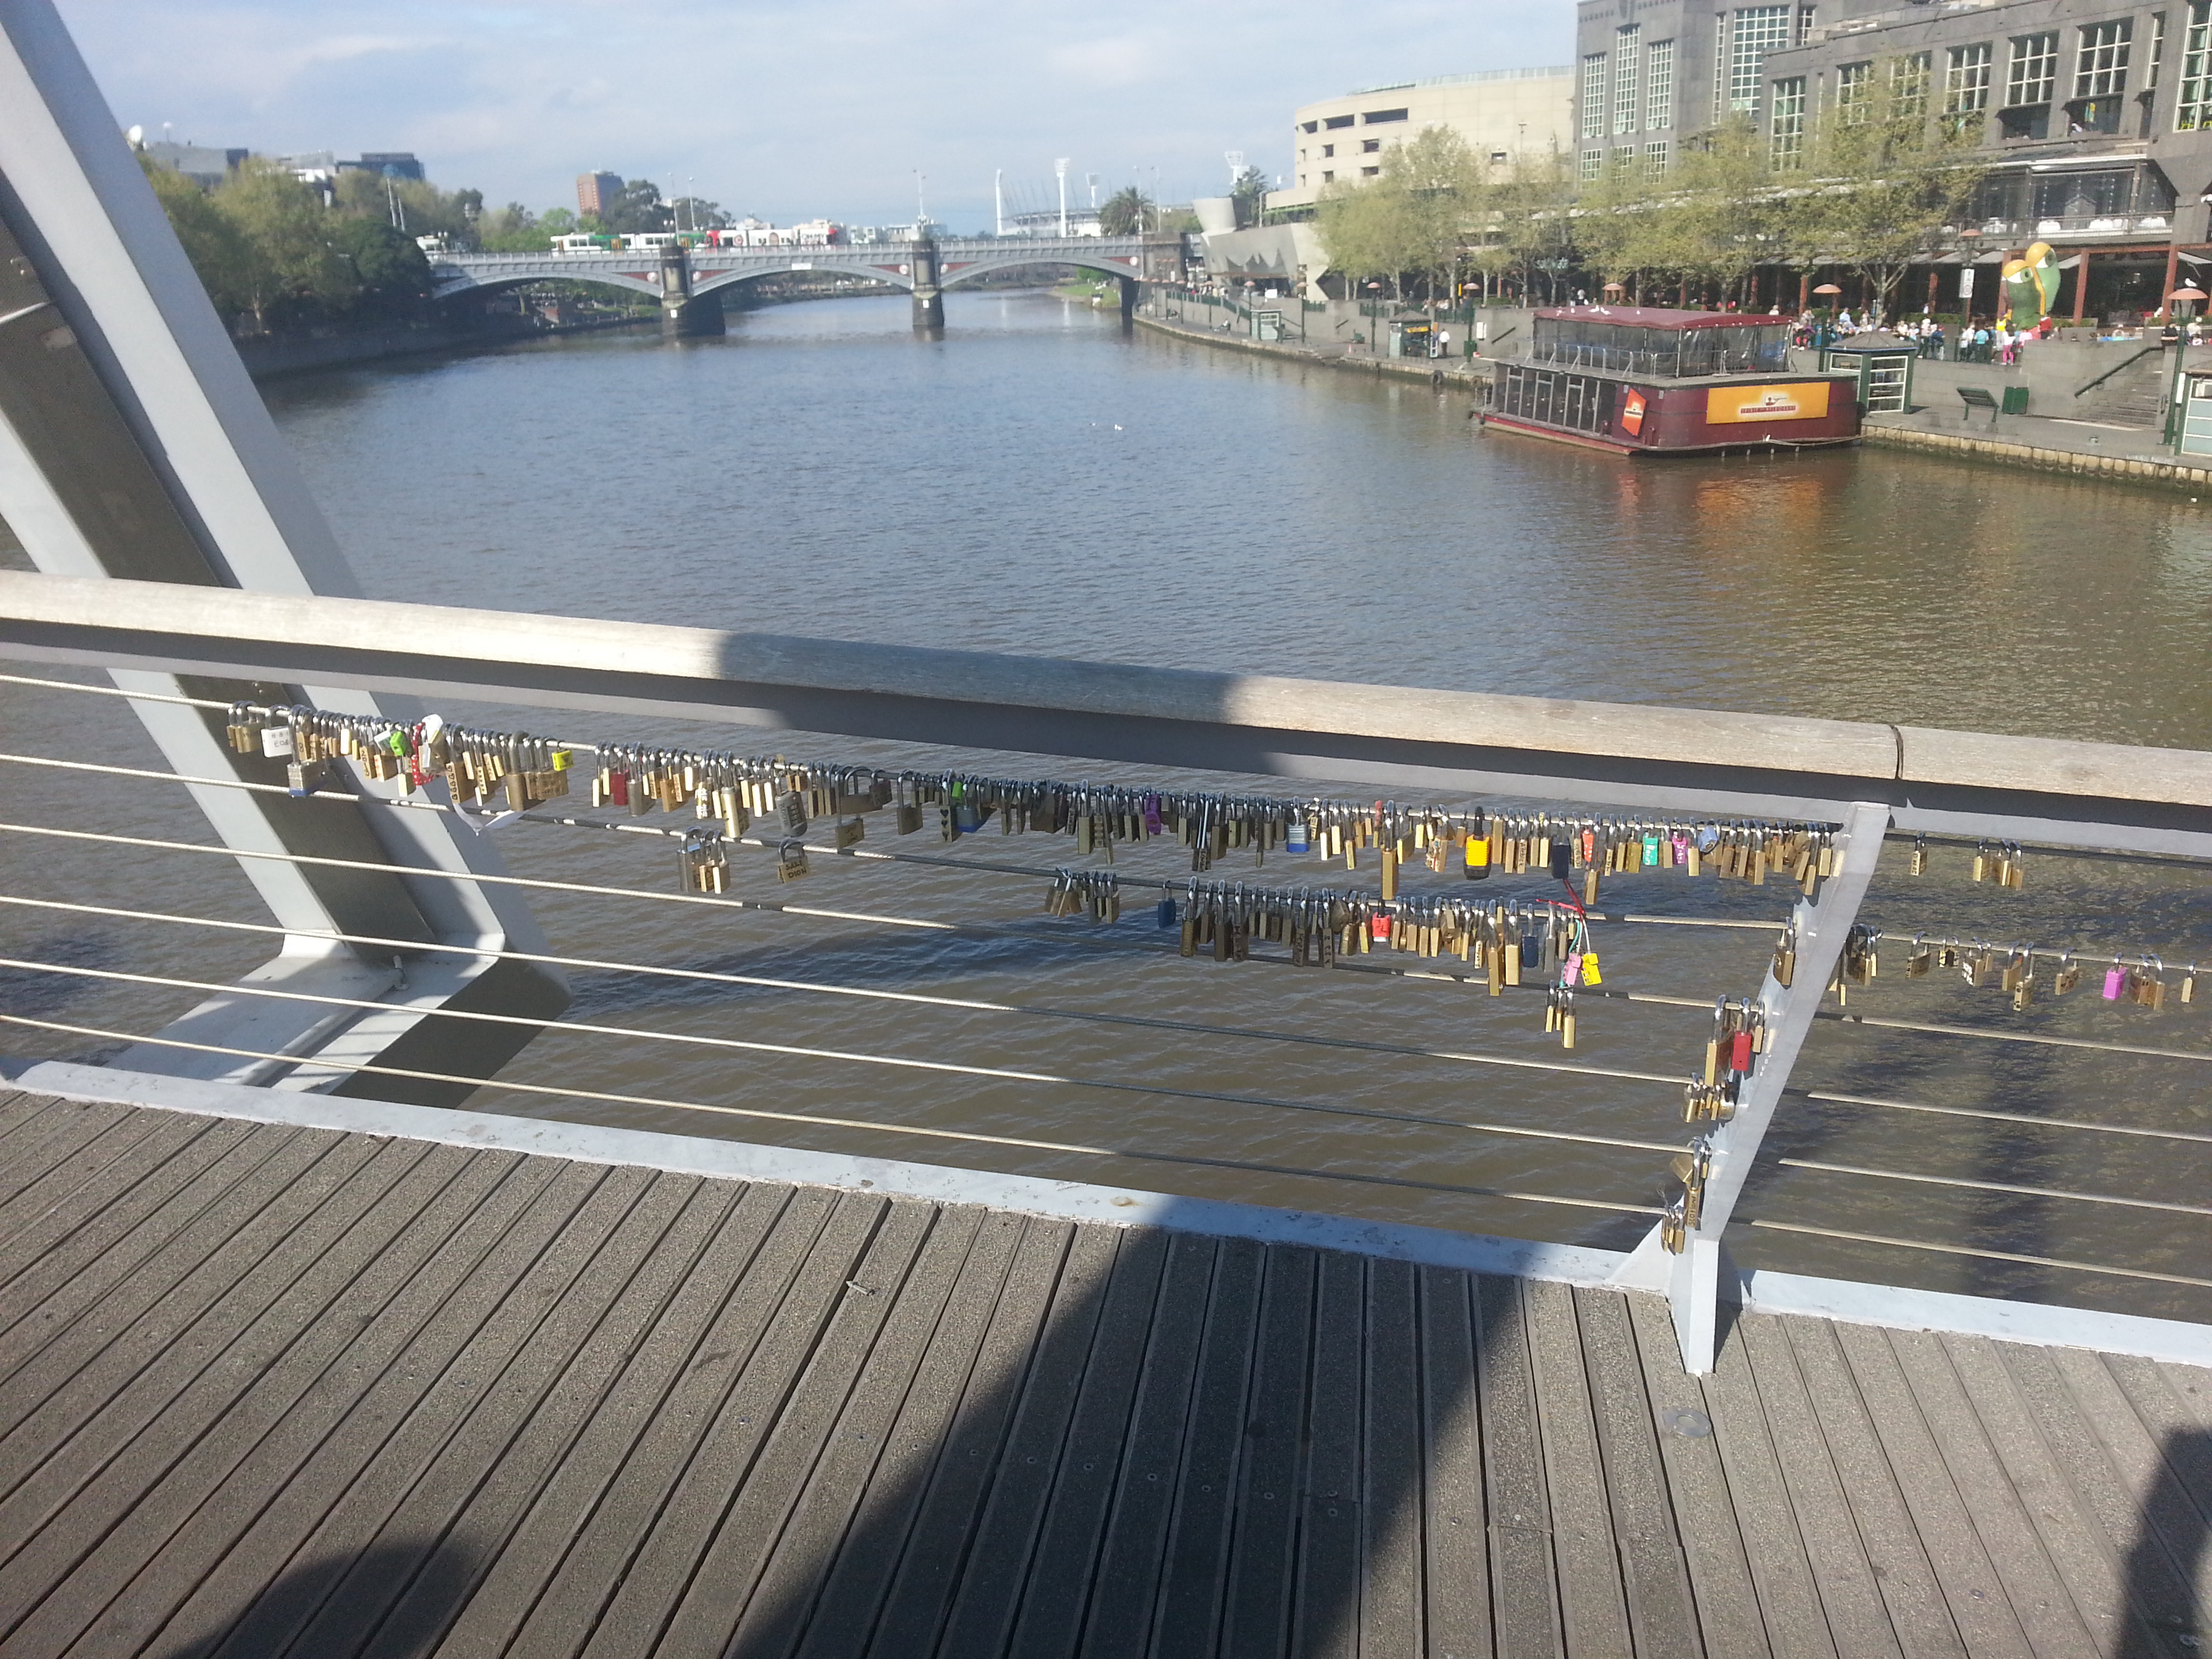
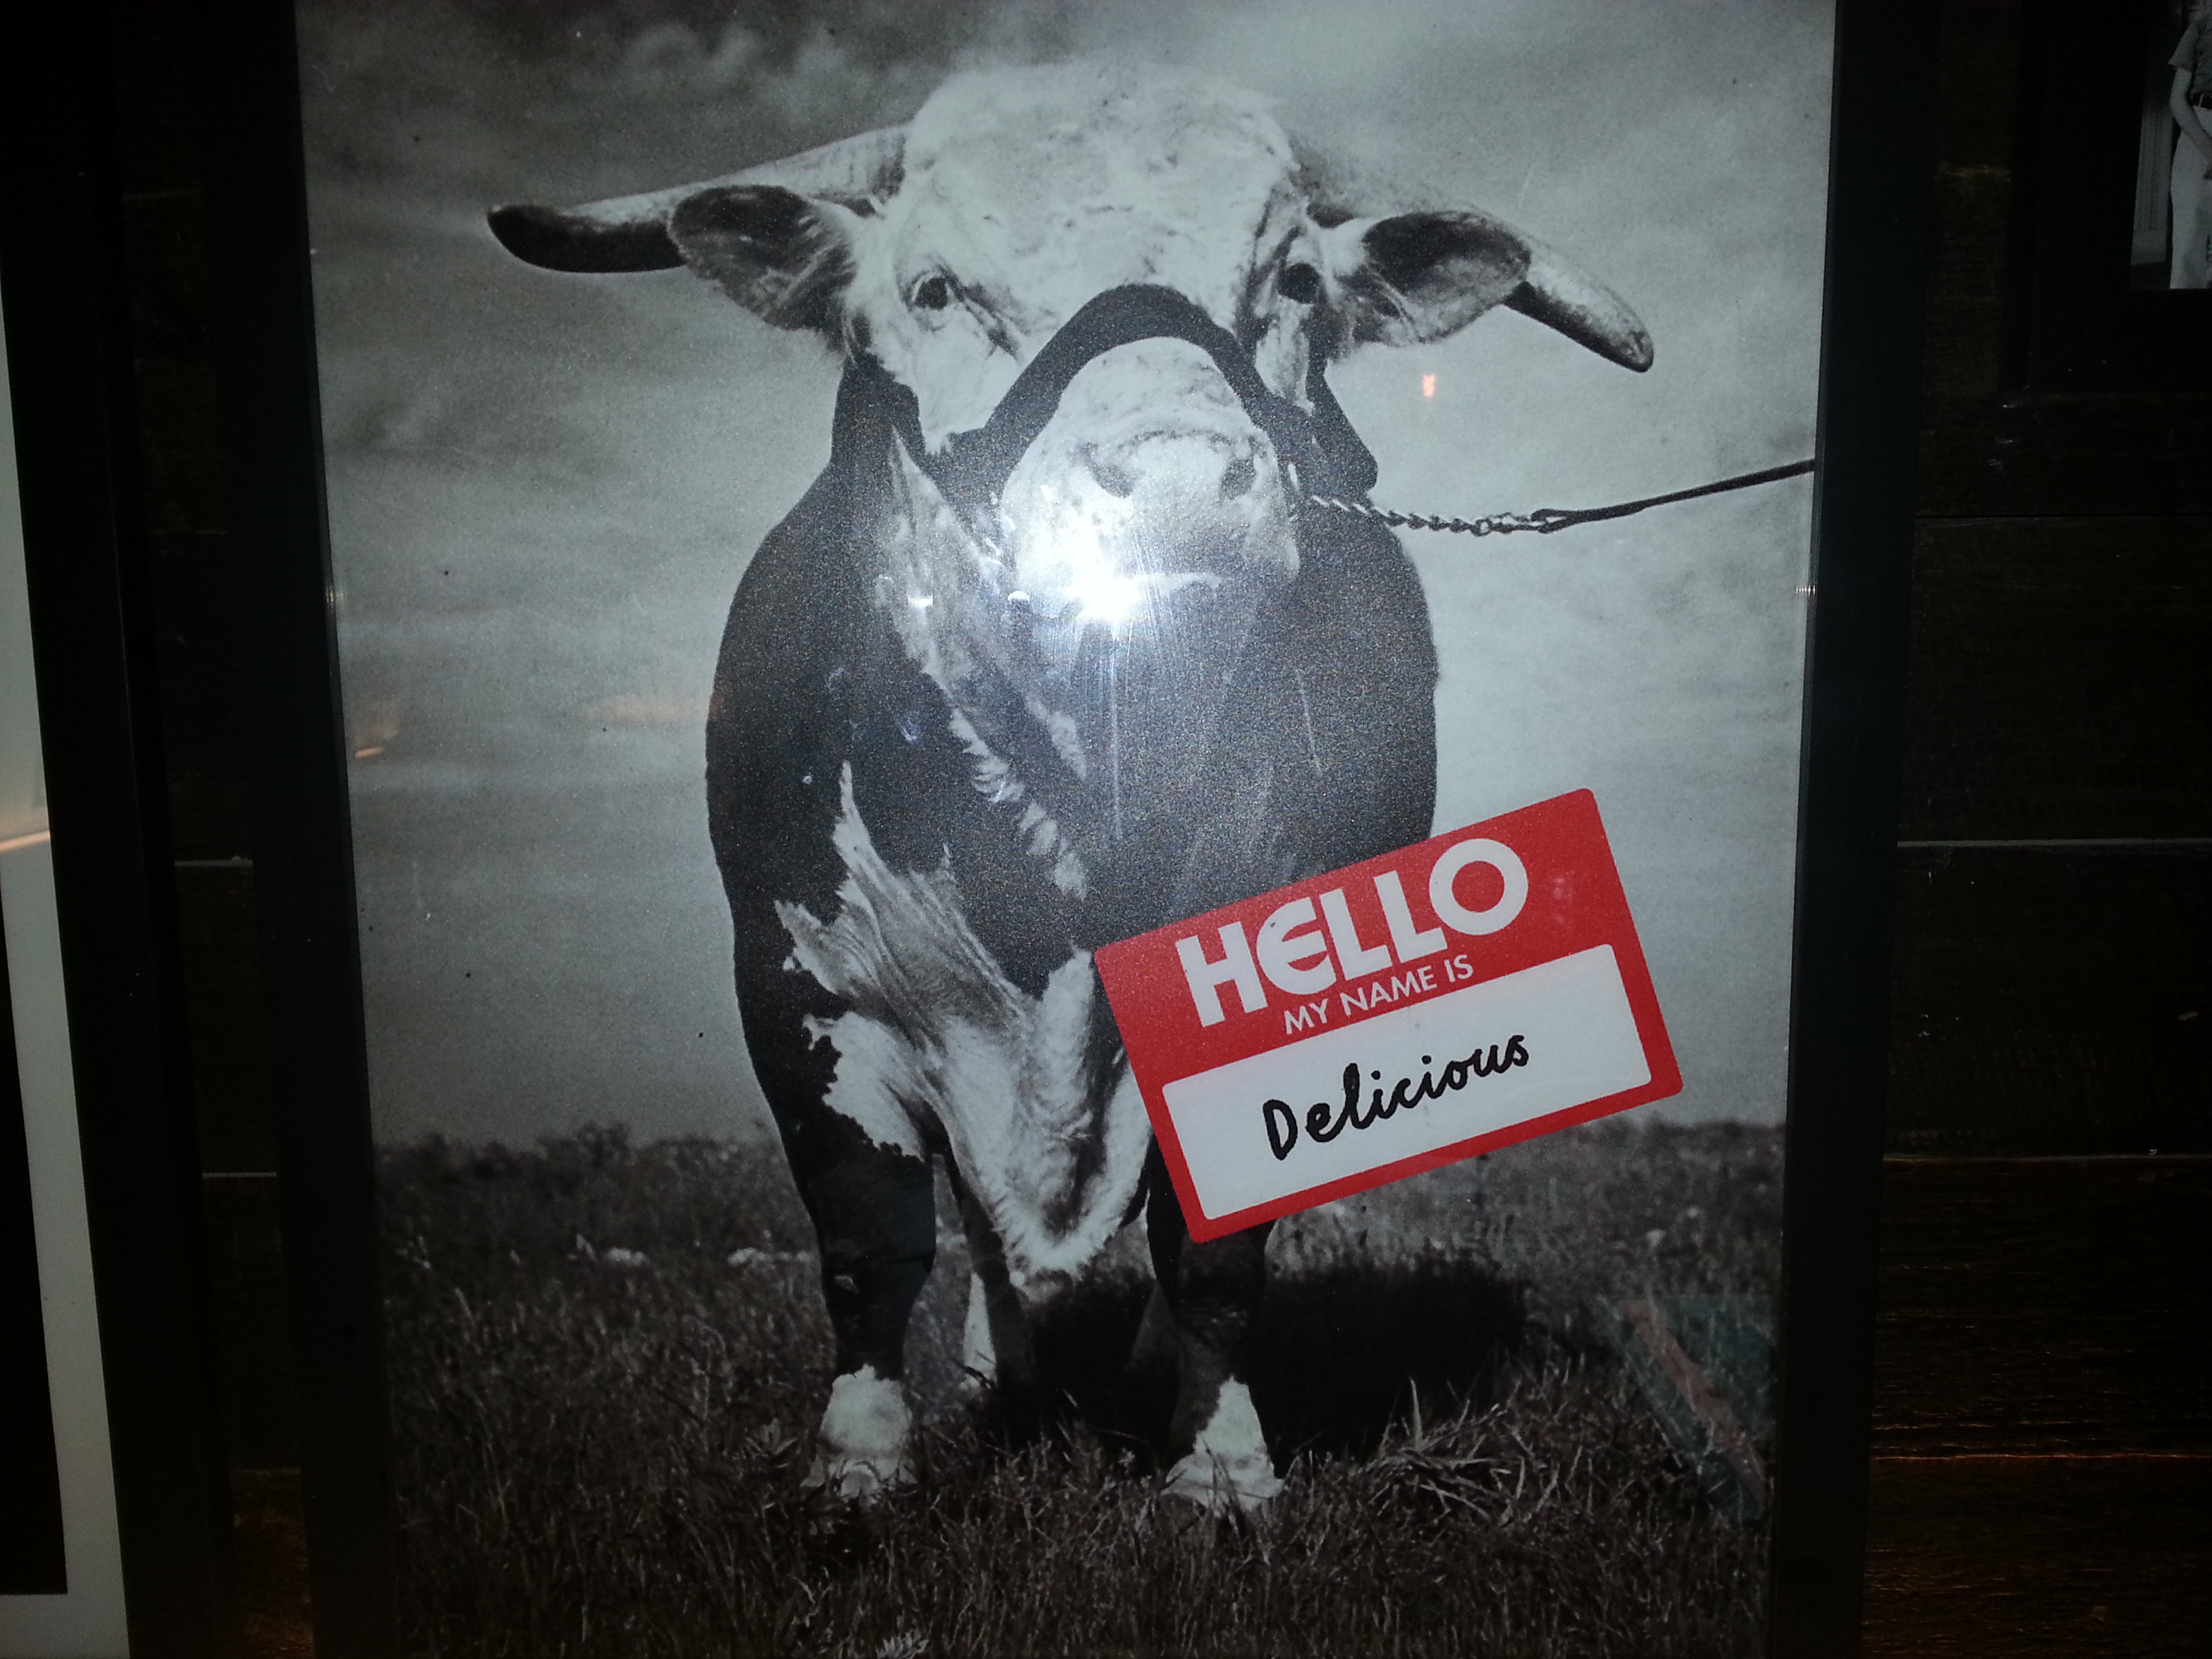
White Trash The above poster was on a bridge pylon in Flinders St in 2012. It s interesting to see what the Fringe Festival people consider to be associated with white trash . They claim homophobia is a white trash thing however lower class people have little political power and the fact that we still don t have marriage equality in Australia is clear evidence that homophobia is prevalent among powerful people. Toys vs Fairies Fairies look pretty while boys toys do things I took the above photo at Costco in 2012. I think it s worth noting the way that the Disney Fairies (all female and marketed to a female audience) are standing around looking pretty while the Toy Story characters (mostly male and marketed to a male audience) are running out to do things. Having those items side by side on the shelf was a clear example of a trend in toys towards girls being encouraged to be passive while boys are doing things. The Toy Story pack has one female character, so it could be interpreted as being aimed at both boys and girls. But even that interpretation doesn t remove the clear gender difference. It seems ironic to me that the descriptions on the boxes are Read, Play, and Listen for the Toy Story pack and Read, Play, and Colour on the Fairies pack. Colouring is more active than listening so the pictures don t match the contents. Make Up vs Tools Girls chocolate is make-up and boys chocolate is tools I took the above photo in an Aldi store in early 2013, today I was in Aldi and noticed that the same chocolate is still on sale. A clear and pointless gender difference. Rumor has it that some of the gender difference in kids clothing is so that a child can t wear the clothes of an older sibling of different gender, but chocolate only gets eaten once so there is no reason for this. Oath The above poster was inside the male toilet at Melbourne University in 2013. It would probably be good to have something like that on display all the time instead of just for one event. Locks Locks with inscriptions on a bridge on the Yarra River in Melbourne I took the above picture early this year, it shows hundreds of padlocks attached to a bridge across the Yarra River in Melbourne. Each padlock has a message written or inscribed in it, mostly declarations of love. I first noticed this last year, I m not sure how long it s been up. There was nothing formal about this (no signs about it), people just see it and decide that they want to add to it. I guess that the council cuts some of them off periodically as the number of locks doesn t seem to be increasing much in recent times. It would be interesting to do some research into how many locks are needed to start one of these. It would also be interesting to discover whether the nature of the inscriptions determines the speed at which it takes off, would a bunch of padlocks with messages like I Love Linux inspire others as well as messages declaring love for random people? All that is required is some old locks and an engraving tool. I wonder what the social norm might be regarding messing with those locks. If I was to use those padlocks to practice the sport of lock-picking (which I learned when in Amsterdam) I wonder whether random bystanders would try to discourage me. It seems likely that picking the locks and taking them away would get a negative reaction but I wonder whether picking them one at a time and replacing them (or maybe moving them to another wire) would get a reaction. Blackface for Schoolkids teachers choice blackface and yellowface masks A craft shop at the Highpoint shopping center in Melbourne is selling Teacher s Choice brand Multicultural Face Masks . Multicultural is a well regarded term in education, teaching children about other cultures is a good concept but can be implemented really badly. When I was in high school the subject Social Studies seemed to have an approach of look how weird people are in other places instead of teaching the kids anything useful. Sociological Images has an informative article on the Australian Hey Hey it s Saturday blackface incident in 2009 [1]. The idea of these masks seems to involve students dressing up as caricatures of other races. The mask which looks like someone s idea of a Geisha is an even bigger WTF, mixing what the package calls culture (really race) with sex work. When I visited Tokyo I got the impression that French maids fill a similar niche to Geisha for younger Japanese men and the maid cafe thing is really popular there. I think it s interesting to consider the way that a French maid costume is regarded differently to a Geisha costume. I expect that Teacher s Choice doesn t sell French maid costumes. Delicious Cow picture of a bovine named Delicious Usually meat is advertised in a way that minimises the connection to living animals. Often adverts just show cuts of meat and don t make any mention of animals and when animals are shown they are in the distance. The above picture was on the wall at a Grill d burger restaurant in Point Cook. It shows a bovine (looks like a bull even though I believe that cows are the ones that are usually eaten) with a name-tag identifying it as Delicious . The name tag personalises the animal which is an uncommon thing to do when parts of an animal are going to be eaten. Of the animals that are commonly eaten it seems that the general trend is to only show fish as complete live animals, presumably because people can identify with mammals such as cattle in a way that they can t identify with fish. Fish are also the only complete animals that are shown dead, adverts for fish that are sold as parts (EG salmon and tuna) often show complete dead fish. But I ve never seen a meat advert that shows a complete dead cow or sheep.

4 April 2014

Gunnar Wolf: Mozilla: So our communitary echobox *does* resound with social issues

I woke up to the news that, after a very short tenure, Brendan Eich steps down as the Mozilla CEO. Why? Because of the community outcry. Because some years ago, Eich pubilcly supported (and donated funds) the ban of any kind of marriages in California that were not between a man and a woman. The world has advanced enormously in this regard in the last years/decades, and so many individuals and organizations opposed and announced they would boycott Mozilla that either him or Mozilla could not stand the pressure anymore. So, of course, it's sad the person had to resign. Many people talked about freedom of speech, freedom of harbouring his own personal opinion But when it comes to the rights of minorities, particularly of minorities that have suffered such hard prejudice and abuse as the gay, lesbian and all the other non-orthodox sexual- and gender- orientations, righting a wrong is much more important than preserving an individual's freedom of opinion. Besides, it's not just thinking or talking about something The concrete proposition Eich supported (and eventually made him resign) is about bringing the life of thousands of people to a hellish state of uncertainty, and going back to not having a way for the society to legally recognize their way of being, their love, their lifes. But anyway What prompts me into writing this is that, once again, the Free Software (and related denominations) community has shown that a set of core values, seemingly shared by a very large amount of our own people with no coordination or correlation with what conforms us as a community (and thus, being emergent traits), are strong enough to create a critical mass, to achieve cohesion. And that ours is not just a technical community of people writing software at all layers of the stack, but first and foremost is a group of social activists, committed to making the world better. I will quote from Matthew Garrett's post on this topic, clearly more contundent and thorough that what I'm trying to come up with:
The Mozilla Manifesto discusses individual liberty in the context of use of the internet, not in a wider social context. Brendan's appointment was very much in line with the explicit aims of both the Foundation and the Corporation - whatever his views on marriage equality, nobody has seriously argued about his commitment to improving internet freedom. So, from that perspective, he should have been a fine choice. But that ignores the effect on the wider community. People don't attach themselves to communities merely because of explicitly stated goals - they do so because they feel that the community is aligned with their overall aims. The Mozilla community is one of the most diverse in free software, at least in part because Mozilla's stated goals and behaviour are fairly inspirational. People who identify themselves with other movements backing individual liberties are likely to identify with Mozilla. So, unsurprisingly, there's a large number of socially progressive individuals (LGBT or otherwise) in the Mozilla community, both inside and outside the Corporation. A CEO who's donated money to strip rights from a set of humans will not be trusted by many who believe that all humans should have those rights. It's not just limited to individuals directly affected by his actions - if someone's shown that they're willing to strip rights from another minority for political or religious reasons, what's to stop them attempting to do the same to you? Even if you personally feel safe, do you trust someone who's willing to do that to your friends? In a community that's made up of many who are either LGBT or identify themselves as allies, that loss of trust is inevitably going to cause community discomfort.

3 April 2014

Matthew Garrett: Mozilla and leadership

A post I wrote back in 2012 got linked from a couple of the discussions relating to Brendan Eich being appointed Mozilla CEO. The tldr version is "If members of your community doesn't trust their leader socially, the leader's technical competence is irrelevant". That seems to have played out here.

In terms of background[1]: in 2008, Brendan donated money to the campaign for Proposition 8, a Californian constitutional amendment that expressly defined marriage as being between one man and one woman[2]. Both before and after that he had donated money to a variety of politicians who shared many political positions, including the definition of marriage as being between one man and one woman[3].

Mozilla is an interesting organisation. It consists of the for-profit Mozilla Corporation, which is wholly owned by the non-profit Mozilla Foundation. The Corporation's bylaws require it to work to further the Foundation's goals, and any profit is reinvested in Mozilla. Mozilla developers are employed by the Corporation rather than the Foundation, and as such the CEO is responsible for ensuring that those developers are able to achieve those goals.

The Mozilla Manifesto discusses individual liberty in the context of use of the internet, not in a wider social context. Brendan's appointment was very much in line with the explicit aims of both the Foundation and the Corporation - whatever his views on marriage equality, nobody has seriously argued about his commitment to improving internet freedom. So, from that perspective, he should have been a fine choice.

But that ignores the effect on the wider community. People don't attach themselves to communities merely because of explicitly stated goals - they do so because they feel that the community is aligned with their overall aims. The Mozilla community is one of the most diverse in free software, at least in part because Mozilla's stated goals and behaviour are fairly inspirational. People who identify themselves with other movements backing individual liberties are likely to identify with Mozilla. So, unsurprisingly, there's a large number of socially progressive individuals (LGBT or otherwise) in the Mozilla community, both inside and outside the Corporation.

A CEO who's donated money to strip rights[4] from a set of humans will not be trusted by many who believe that all humans should have those rights. It's not just limited to individuals directly affected by his actions - if someone's shown that they're willing to strip rights from another minority for political or religious reasons, what's to stop them attempting to do the same to you? Even if you personally feel safe, do you trust someone who's willing to do that to your friends? In a community that's made up of many who are either LGBT or identify themselves as allies, that loss of trust is inevitably going to cause community discomfort.

The first role of a leader should be to manage that. Instead, in the first few days of Brendan's leadership, we heard nothing of substance - at best, an apology for pain being caused rather than an apology for the act that caused the pain. And then there was an interview which demonstrated remarkable tone deafness. He made no attempt to alleviate the concerns of the community. There were repeated non-sequiturs about Indonesia. It sounded like he had no idea at all why the community that he was now leading was unhappy.

And, today, he resigned. It's easy to get into hypotheticals - could he have compromised his principles for the sake of Mozilla? Would an initial discussion of the distinction between the goals of members of the Mozilla community and the goals of Mozilla itself have made this more palatable? If the board had known this would happen, would they have made the same choice - and if they didn't know, why not?

But that's not the real point. The point is that the community didn't trust Brendan, and Brendan chose to leave rather than do further harm to the community. Trustworthy leadership is important. Communities should reflect on whether their leadership reflects not only their beliefs, but the beliefs of those that they would like to join the community. Fail to do so and you'll drive them away instead.

[1] For people who've been living under a rock
[2] Proposition 8 itself was a response to an ongoing court case that, at the point of Proposition 8 being proposed, appeared likely to support the overturning of Proposition 22, an earlier Californian ballot measure that legally (rather than constitutionally) defined marriage as being between one man and one woman. Proposition 22 was overturned, and for a few months before Proposition 8 passed, gay marriage was legal in California.
[3] http://www.theguardian.com/technology/2014/apr/02/controversial-mozilla-ceo-made-donations-right-wing-candidates-brendan-eich
[4] Brendan made a donation on October 25th, 2008. This postdates the overturning of Proposition 22, and as such gay marriage was legal in California at the time of this donation. Donating to Proposition 8 at that point was not about supporting the status quo, it was about changing the constitution to forbid something that courts had found was protected by the state constitution.

comment count unavailable comments

Gunnar Wolf: DrupalCamp Mexico City: April 23-25

We are organizing a DrupalCamp in Mexico City! DrupalCamp Mexico City logo As a Drupal user, I have so far attended two DrupalCamps (one in Guadalajara, Mexico, and one in Guatemala, Guatemala). They are as Free Software conferences usually are great, informal settings where many like-minded users and developers meet and exchange all kinds of contacts, information, and have a good time. Torre de Ingenier a Torre de Ingenier a, UNAM This year, I am a (minor) part of the organizing team. DrupalCamp will be held in Torre de Ingenier a, UNAM Just by Facultad de Ingenier a, where I teach. A modern, beautiful building in Ciudad Universitaria. Talks, tracks So, who is this for? You can go look at the accepted sessions, you will find there is a lot of ground. Starting from the very introduction to how Drupal is structured and some tips on how to work with it (delivered by yours truly), through workflows for specific needs, to strong development-oriented talks. The talks are structured along four tracks: "Training", "Theming", "Development", "Business" and "SymfonyDay". "SymfonyDay"? Yes. Drupal is a fast-evolving Free Software project. Most users are currently using versions 6 and 7, which are as different between each other as day and night... But the upcoming Drupal 8 brings even greater changes. One of the most interesting changes I can see is that Drupal will now be based on a full MVC framework, Symfony. One of the days of our DrupalCamp will be devoted to Symfony (dubbed the Symfony Day). ...And... Again, just look at the list of talks. You will find a great amount of speakers interested in coming here. Not just from Mexico City. Not just from Mexico. Not just from Latin America. I must say I am personally impressed. Sponsors! Of course, as with any volunteer-run conferences: We are still looking for sponsors. We believe being a DrupalCamp sponsor will greatly increase your brand visibility in the community you want to work with. There are still a lot of expenses to cover to make this into all that we want. And surely, you want to be a part of this great project. There are many sponsor levels Surely you can be part of it!
AttachmentSize
drupalcampmx.png57.81 KB
torre_ing.jpg90.22 KB
torre_ing_mini.jpg21.64 KB

2 April 2014

Tassia Camoes Araujo: Mini-Debconf Barcelona videos now available

Hello world!!! For those who were impatiently waiting for the Mini-Debconf Barcelona videos, there you go, enjoy it! We ll probably have subtitles and some late slides soon, so come back after a while. Thank you very much for all those who make this adventure possible! If you also want to thank the videoteam, the orgateam, Debian Women, or the Universe, for converging and bringing us together in Barcleona, please do it! Just for the records, it was a great success in terms of women participation. As we didn t collect gender information at the registration, it is hard to make a clear comparison with previous Debconfs. Since 2007, the rate of non-male participants ranged from 13% to 17%. For this Mini-Debconf, the orga team did the gender identification per name and found a non-male rate of 36%. Again, since the methods were not the same we cannot safely compare, but still, I think it s worth it to make this info public ;-) The most important thing to save from this experience is that we were around 160 human beings together, sharing common goals, in a lovely and warm place, with kids around, baby trollers on the stage, painting table in the patio yes it was fun!
BCN group photo - first try

BCN group photo first try

BCN group photo - second try

BCN group photo second try

Last but not least, now we need to gather information for a final report, so if you can help, please speak up! Hope to see you all soon!

27 March 2014

Diego Escalante Urrelo: Setting up Apache + PHP + MySQL on OSX with Homebrew

Recently I ve been doing some hacking for Chamilo LMS, a Free Software E-Learning system. For various reasons I had to do this on OSX, which meant setting up a web development environment. This lead me to MAMP, an OSX bundle with Apache + MySQL + PHP. However MAMP had many weird quirks that forced me to maintain a local set of patches just to get things working. I finally had the time to look into a saner option, take some notes in the process, and write a blog post.
Important advice. This post enables it.

Important life advice. This post enables it.

A popular alternative was using OSX s installed Apache with a newer PHP version from Homebrew. This sounded dangerous because you can t just apt-get install --reinstall apache if you break something. I preferred a pure Homebrew installation also because: I couldn t find a simple and straightforward resource for this specific setup, so I present you with my tutorial/recipe to get Apache + MySQL + PHP, via Homebrew, running on OSX. I took these notes on OSX 10.7.5 while building Apache/2.2.26 (Unix) with PHP 5.5.10 and MySQL 5.6.16. #1- A healthy Homebrew install First of all you need to install Homebrew. Head over to Homebrew s homepage for instructions. Even if you already have it, I recommend a health check and an update+upgrade: $ brew doctor
$ brew update && brew upgrade
Pay attention to whatever that says and follow the instructions if there s any. You also want to add Homebrew binary paths to your $PATH, even if the directories don t exist yet. Add this to .bash_profile or whatever your shell uses:
PATH=/usr/local/opt/php55/bin/:/usr/local/sbin:/usr/local/bin:$PATH #2- PHP and all its additional recipes The PHP recipes are maintained in a different repo, but don t worry, this is not a duct taped chaos, it s properly maintained: $ brew tap jgonzales/php
$ brew install php55 --with-intl
You might want to add --with-pgsql if you want to work with PostgreSQL. MySQL, Apache and CLI support is built by default. After the installation there are two quick things to do. First, timezone configuration:
(editing /usr/local/etc/php/5.5/php.ini)
date.timezone = America/Lima (or whatever works for you)
And second, PEAR permissions:
$ chmod -R ug+w /usr/local/Cellar/php55/5.5.10/lib/php #3- Setting up boring MySQL Now let s brew MySQL:
$ brew install mysql With that done, go ahead and start the server so we can initialize the basic tables, and secure the installation defaults:
$ unset TMPDIR
$ mysql_install_db --verbose --user= whoami --basedir="$(brew --prefix mysql)" --datadir=/usr/local/var/mysql --tmpdir=/tmp
$ mysql.server start
$ mysql_secure_installation

Remember: You shouldn t use sudo, so be careful with your muscle memory!
Clint Eastwood... Yeah.

Mr. Eastwood acknowledges the warning.

#4- Brewing Apache (httpd) And finally, it s time to brew Apache. You can do so with:
$ brew install httpd When that s done burning your lap, you can start configuring Apache. I chose to keep httpd.conf as pristine as possible and do everything in a VirtualHost. Remember you need to run this on something other than port 80 because you won t run httpd as root: Note that I m enabling virtual hosts and using my own paths. If you want to configure Apache differently, you probably know what you are doing. So, get off my lawn you damn kid. #5- Brownie points: PHPMyAdmin In my virtual hosts configuration I included some lines for PHPMyAdmin. That s because I m old school and I love PHPMyAdmin. You can follow into my wrinkled foot steps with:
$ brew install phpmyadmin #6- Profit You can check everything is fine by creating an index.php with a call to phpinfo() inside your configured root from httpd-vhosts.conf. Make sure OSX s Apache is not running and start (or restart) the servers:
$ apachectl start/stop/graceful(restart)
$ mysql.server start/stop/restart
Now open go to http://localhost:8000/ and http://localhost:8000/phpmyadmin. Enjoy your success. Maybe do a victory dance:
This might seem like a lot of work, but it s fairly quick with this cheat sheet. It s also very safe and easy to keep updated with brew update && upgrade. A final note: All the suggestions and instructions that are printed after installing each package can be read again with brew info <recipe>. No need to write them down. Happy hacking!

16 March 2014

Benjamin Mako Hill: Community Data Science Workshops in Seattle

Photo from the Boston Python Workshop   a similar workshop run in Boston that has inspired and provided a template for the CDSW.

Photo from the Boston Python Workshop a similar workshop run in Boston that has inspired and provided a template for the CDSW.

On three Saturdays in April and May, I will be helping run three day-long project-based workshops at the University of Washington in Seattle. The workshops are for anyone interested in learning how to use programming and data science tools to ask and answer questions about online communities like Wikipedia, Twitter, free and open source software, and civic media. The workshops are for people with no previous programming experience and the goal is to bring together researchers as well as participants and leaders in online communities. The workshops will all be free of charge and open to the public given availability of space. Our goal is that, after the three workshops, participants will be able to use data to produce numbers, hypothesis tests, tables, and graphical visualizations to answer questions like: If you are interested in participating, fill out our registration form here. The deadline to register is Wednesday March 26th. We will let participants know if we have room for them by Saturday March 29th. Space is limited and will depend on how many mentors we can recruit for the sessions. If you already have experience with Python, please consider helping out at the sessions as a mentor. Being a mentor will involve working with participants and talking them through the challenges they encounter in programming. No special preparation is required. If you re interested, send me an email.

8 March 2014

Andrew Shadura: Process isolation support in start-stop-daemon

Yesterday I played with LXC a bit, and I liked it, as LXC provides a very lightweight isolation of processes, much like enchanced chroot. However, I realised, I don t always need the chroot-like part of LXC, sometimes what I need is just to make sure the process is unable to see the other processes and talk to them in any other way except the filesystem, but I don t want a whole separate root file system for that. LXC provides a simple utility, lxc-unshare, which uses Linux-specific clone(2) call to run a process with new PID, IPC and other namespaces. However, this utility can t be used for running forking daemons, as the container is destroyed when its PID 1 exits. That s why I decided to add the support for process isolation to start-stop-daemon. I was careful enough to introduce minimal changes to it to make sure they can be merged back to the version as shipped with dpkg, and at the same time be buildable separately from the rest of it. Speaking of building, by the way, this version of start-stop-daemon uses mk-configure, a light-weight autotools replacement, as its build system. What I added, from a user s perspective, is a single --isolate option. When run with this option, start-stop-daemon calls clone(2) just before configuring the environment of a process it s going to run. The cloned process runs in a new namespace, and immediately remounts /proc, /dev/shm and /dev/mqueue. Then it forks, and a forked process executes the daemon. The parent process, which is PID 1 in the new PID namespace, uses waitpid(2) to monitor its child processes. As soon as its very first child exits, it talks via a pipe to the process outside of the container, so that it knows the container has a forked daemon and it needs to detach. In any case, the container s PID 1 does waitpid(2) in a loop, checking the process list every time a child terminates. As soon as it s left alone or a SIGTERM is received, it exits. The code is published at Bitbucket.

1 March 2014

Michael Prokop: Jenkins on-demand slave selection through labels

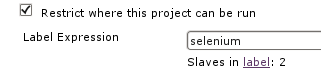
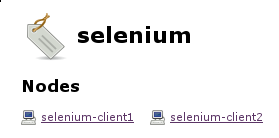
Problem description: One of my customers had a problem with their Selenium tests in the Jenkins continuous integration system. While Perl s Test::WebDriver still worked just fine the Selenium tests using Ruby s selenium-webdriver suddenly reported failures. The problem was caused by Debian wheezy s upgrade of the Iceweasel web browser. Debian originally shipped Iceweasel version 17.0.10esr-1~deb7u1 in wheezy, but during a security-update version 24.3.0esr-1~deb7u1 was brought in through the wheezy-security channel. Because the selenium tests are used in an automated fashion in a quite large and long-running build pipeline we immediately rolled back to Iceweasel version 17.0.10esr-1~deb7u1 so everything can continue as expected. Of course we wanted to get the new Iceweasel version up and running, but we didn t want to break the existing workflow while working on it. This is where on-demand slave selection through labels comes in. Basics: As soon as you re using Jenkins slaves you can instruct Jenkins to run a specific project on a particular (slave) node. By attaching labels to your slaves you can also use a label instead of a specific node name, providing more flexibility and scalability (to e.g. avoid problems if a specific node is down or you want to scale to more systems). Then Jenkins decides which of the nodes providing the according label should be considered for job execution. In the following screenshot a job uses the selenium label to restrict its execution to the slaves providing selenium and currently there are two nodes available providing this label: TIP 1: Visiting $JENKINS_SERVER/label/$label/ provides a list of slaves that provide that given $label (as well as list of projects that use $label in their configuration), like:

TIP 2: Execute the following script on $JENKINS_SERVER/script to get a list of available labels of your Jenkins system:
import hudson.model.*
labels = Hudson.instance.getLabels()
labels.each  label -> println label.name  
Solution: In the according customer setup we re using the swarm plugin (with automated Debian deployment through Grml s netscript boot option, grml-debootstrap + Puppet) to automatically connect our Jenkins slaves to Jenkins master without any manual intervention. The swarm plugin allows you to define the labels through the -labels command line option. By using the NodeLabel Parameter plugin we can configure additional parameters in Jenkins jobs: node and label . The label parameter allows us to execute the jobs on the nodes providing the requested label: This is what we can use to gradually upgrade from the old Iceweasel version to the new one by keeping a given set of slaves at the old Iceweasel version while we re upgrading other nodes to the new Iceweasel version (same for the selenium-server version which we want to also control). We can include the version number of the Iceweasel and selenium-server packages inside the labels we announce through the swarm slaves, with something like:
if [ -r /etc/init.d/selenium-server ] ; then
  FLAGS="selenium"
  ICEWEASEL_VERSION="$(dpkg-query --show --showformat='$ Version ' iceweasel)"
  if [ -n "$ICEWEASEL_VERSION" ] ; then
    ICEWEASEL_FLAG="iceweasel-$ ICEWEASEL_VERSION%%.* "
    EXTRA_FLAGS="$EXTRA_FLAGS $ICEWEASEL_FLAG"
  fi
  SELENIUM_VERSION="$(dpkg-query --show --showformat='$ Version ' selenium-server)"
  if [ -n "$SELENIUM_VERSION" ] ; then
    SELENIUM_FLAG="selenium-$ SELENIUM_VERSION%-* "
    EXTRA_FLAGS="$EXTRA_FLAGS $SELENIUM_FLAG"
  fi
fi
Then by using -labels $FLAGS EXTRA_FLAGS in the swarm invocation script we end up with labels like selenium iceweasel-24 selenium-2.40.0 for the slaves providing the Iceweasel v24 and selenium v2.40.0 Debian packages and selenium iceweasel-17 selenium-2.40.0 for the slaves providing Iceweasel v17 and selenium v2.40.0. This is perfect for our needs, because instead of using the selenium label (which is still there) we can configure the selenium jobs that should continue to work as usual to default to the slaves with the iceweasel-17 label now. The development related jobs though can use label iceweasel-24 and fail as often as needed without interrupting the build pipeline used for production. To illustrate this here we have slave selenium-client2 providing Iceweasel v17 with selenium-server v2.40. When triggering the production selenium job it will get executed on selenium-client2, because that s the slave providing the requested labels: Whereas the development selenium job can point to the slaves providing Iceweasel v24, so it will be executed on slave selenium-client1 here: This setup allowed us to work on the selenium Ruby tests while not conflicting with any production build pipeline. By the time I m writing about this setup we ve already finished the migration to support Iceweasel v24 and the infrastructure is ready for further Iceweasel and selenium-server upgrades.

27 February 2014

Simon Josefsson: Replicant 4.2 on Samsung S3

Since November 2013 I have been using Replicant on my Samsung S3 as an alternative OS. The experience has been good for everyday use. The limits (due to non-free software components) compared to a normal S3 (running vendor ROM or CyanogenMod) is lack of GPS/wifi/bluetooth/NFC/frontcamera functionality although it is easy to get some of that working again, including GPS, which is nice for my geocaching hobby. The Replicant software is stable for being an Android platform; better than my Nexus 7 (2nd generation) tablet which I got around the same time that runs an unmodified version of Android. The S3 has crashed around ten times in these four months. I ve lost track of the number of N7 crashes, especially after the upgrade to Android 4.4. I use the N7 significantly less than the S3, reinforcing my impression that Replicant is a stable Android. I have not had any other problem that I couldn t explain, and have rarely had to reboot the device. The Replicant project recently released version 4.2 and while I don t expect the release to resolve any problem for me, I decided it was time to upgrade and learn something new. I initially tried the official ROM images, and later migrated to using my own build of the software (for no particular reason other than that I could). Before the installation, I wanted to have a full backup of the phone to avoid losing data. I use SMS Backup+ to keep a backup of my call log, SMS and MMS on my own IMAP server. I use oandbackup to take a backup of all software and settings on the phone. I use DAVDroid for my contacts and calendar (using a Radicale server), and reluctantly still use aCal in order to access my Google Calendar (because Google does not implement RFC 5397 properly so it doesn t work with DAVDroid). Alas all that software is not sufficient for backup purposes, for example photos are still not copied elsewhere. In order to have a complete backup of the phone, I m using rsync over the android debug bridge (adb). More precisely, I connect the phone using a USB cable, push a rsyncd configuration file, start the rsync daemon on the phone, forward the TCP/IP port, and then launch rsync locally. The following commands are used: jas@latte:~$ cat rsyncd.conf
address 127.0.0.1
uid = root
gid = root
[root]
path = /
jas@latte:~$ adb push rsyncd.conf /extSdCard/rsyncd.conf
* daemon not running. starting it now on port 5037 *
* daemon started successfully *
0 KB/s (57 bytes in 0.059s)
jas@latte:~$ adb root
jas@latte:~$ adb shell rsync --daemon --no-detach --config=/extSdCard/rsyncd.conf &
jas@latte:~$ adb forward tcp:6010 tcp:873
jas@latte:~$ sudo rsync -av --delete --exclude /dev --exclude /acct --exclude /sys --exclude /proc rsync://localhost:6010/root/ /root/s3-bup/
...
Now feeling safe that I would not lose any data, I remove the SIM card from my phone (to avoid having calls, SMS or cell data interrupt during the installation) and follow the Replicant Samsung S3 installation documentation. Installation was straightforward. I booted up the newly installed ROM and familiarized myself with it. My first reaction was that the graphics felt a bit slower compared to Replicant 4.0, but it is hard to tell for certain. After installation, I took a quick rsync backup of the freshly installed phone, to have a starting point for future backups. Since my IMAP and CardDav/CalDav servers use certificates signed by CACert I first had to install the CACert trust anchors, to get SMS Backup+ and DAVDroid to connect. For some reason it was not sufficient to add only the root CACert certificate, so I had to add the intermediate CA cert as well. To load the certs, I invoke the following commands, selecting Install from SD Card when the menu is invoked (twice). adb push root.crt /sdcard/
adb shell am start -n "com.android.settings/.Settings\"\$\"SecuritySettingsActivity"
adb push class3.crt /sdcard/
adb shell am start -n "com.android.settings/.Settings\"\$\"SecuritySettingsActivity"
I restore apps with oandbackup, and I select a set of important apps that I want restored with settings preserved, including aCal, K9, Xabber, c:geo, OsmAnd~, NewsBlur, Google Authenticator. I install SMS Backup+ from FDroid separately and configure it, SMS Backup+ doesn t seem to want to restore anything if the app was restored with settings using oandbackup. I install and configure the DAVdroid account with the server URL, and watch it populate my address book and calendar with information. After organizing the icons on the launcher screen, and changing the wallpaper, I m up and running with Replicant 4.2. This upgrade effort took me around two evenings to complete, with around half of the time consumed by exploring different ways to do the rsync backup before I settled on the rsync daemon approach. Compared to the last time, when I spent almost two weeks researching various options and preparing for the install, this felt like a swift process.
I spent some time researching how to get the various non-free components running. This is of course sub-optimal, and the Replicant project does not endorse non-free software. Alas there aren t any devices out there that meets my requirements and use only free software. Personally, I feel using a free core OS like Replicant and then adding some non-free components back is a better approach than using CyanogenMod directly, or (horror) the stock ROM. Even better is of course to not add these components back, but you have to decide for yourselves which trade-offs you want to make. The Replicant wiki has a somewhat outdated page on Samsung S3 firmware. Below are my notes for each component, which applies to Replicant 4.2 0001. You need to first prepare your device a bit using these commands, and it is a good idea to reboot the device after installing the files. adb root
adb shell mount -o rw,remount /system
adb shell mkdir /system/vendor/firmware
adb shell chmod 755 /system/vendor/firmware
GPS: The required files are the same as for Replicant 4.0, and using the files from CyanogenMod 10.1.3 works fine. The following commands load them onto the device. Note that this will load code that will execute on your main CPU which is particularly bothersome. There seems to exist a number of different versions of these files, CyanogenMod have the same gpsd and gps.exynos4.so in version 10.1.3 and 10.2 but the libsecril-client.so differs between 10.1.3 and 10.2. All files differ from the files I got with my stock Samsung ROM on this device (MD5 checksums in my previous blog). I have not investigated how these versions differs or which of them should be recommended. I use the files from CyanogenMod 10.1.3 because it matches the Android version and because the files are easily available. adb push cm-10.1.3-i9300/system/bin/gpsd /system/bin/gpsd
adb shell chmod 755 /system/bin/gpsd
adb push cm-10.1.3-i9300/system/lib/hw/gps.exynos4.so /system/lib/hw/gps.exynos4.so
adb push cm-10.1.3-i9300/system/lib/libsecril-client.so /system/lib/libsecril-client.so
adb shell chmod 644 /system/lib/hw/gps.exynos4.so /system/lib/libsecril-client.so
Bluetooth: Only one file has to be installed, apparently firmware loaded onto the Bluetooth chip. Cyanogenmod 10.1.3 and 10.2 contains identical files, which has a string in it BCM4334B0 37.4MHz Class1.5 Samsung D2 . The file I got with my stock ROM has a string in it BCM4334B0 37.4MHz Class1.5 Samsung M0 . I don t know the difference, although I have seen that D2 sometimes refers to the US version of a Samsung device. My device is the international version, but it seems to work anyway. adb push cm-10.1.3-i9300/system/bin/bcm4334.hcd /system/vendor/firmware/bcm4334.hcd
adb shell chmod 644 /system/vendor/firmware/bcm4334.hcd
Front Camera: Two files has to be installed, apparently firmware loaded onto the Camera chip. CyanogenMod 10.1.3 and 10.2 contains identical files, which has a string in it [E4412 520-2012/08/30 17:35:56]OABH30 . The file I got with my stock ROM has a string in it [E4412 533-2012/10/06 14:38:46]OABJ06 . I don t know the difference. adb push cm-10.1.3-i9300/system/vendor/firmware/fimc_is_fw.bin /system/vendor/firmware/fimc_is_fw.bin
adb push cm-10.1.3-i9300/system/vendor/firmware/setfile.bin /system/vendor/firmware/setfile.bin
adb shell chmod 644 /system/vendor/firmware/fimc_is_fw.bin /system/vendor/firmware/setfile.bin
NFC: I m happy that I got NFC to work, this was one of my main issues with Replicant 4.0 (see my earlier blog post). Only one file is needed, however CyanogenMod does not seem to distribute it so you have to get it from your stock ROM or elsewhere. The md5 of the file I have is b9364ba59de1947d4588f588229bae20 (and no I will not send it to you). I have tested it with the YubiKey NEO and the Yubico Authenticator app. adb push clockworkmod/blobs/ee6/7188ca465cf01dd355a92685a42361e113f886ef44e96d371fdaebf57acae /system/vendor/firmware/libpn544_fw.so
adb shell chmod 644 /system/vendor/firmware/libpn544_fw.so
Wifi: I haven t gotten wifi to work, although I have not tried very hard. Loading the CyanogenMod firmwares makes my device find wireless networks, but when I try to authenticate (WPA-PSK2), I get failures. Possibly some other files has to be loaded as well. Update: This blog post has been updated since initial posting to use rsync over adb instead of USB tethering, and to mention that I got the ROM building to work. flattr this!

21 February 2014

Vasudev Kamath: Kontalk FLOSS alternative for Whatsapp and Co.

So Whatsapp has been acquired by Facebook and this news is still hot and people are discussing it all over the twitterverse. So I took this opportunity to stop using Whatsapp and removed it from my phone. Possibly I could have deleted my account but who cares. Anyway I've been searching for a secure and FLOSS alternative for Whatsapp for quite some time now, few days ago I found about Telegram but after reading post by Tincho on planet Debian, I decided not to use it. Recently while going through the talk list for fossmeet.in I found link for Kontalk in a privacy awareness talk proposal by Praveen and thought I should give it a try. So below is my first feelings about Kontalk.
Installation and Activation Kontalk can be installed from playstore for verification purpose it requests your phone number and country code and request for verification. This should send a SMS with a code which should be entered in the text box given and app is ready to use. There is also a possibility to use pre-existing verification code (if you got one from developer directly, read below for details). I did see some glitches like I never got the SMS delivered to my phone after 2 attempts and a days wait. Then I went ahead and reported a bug and the main developer was quick to respond. After a discussion it was noticed that SMS was blocked by spam filters. He also mentioned its tough to get SMS delivered to India. He was kind enough to provide me with a verification code and I used the Use existing code option to enter it and get Kontalk activated. The SMS delivery inconsistency is still present for India (and may be other nations too) some people get code immidiately others may be after couple of days and some might not. Upstream is already working on a possible workaround.
User Experience Now coming to usage part, the UI is neat and clean, I won't say super polished as Whatsapp or other popular apps but its really neat and easy to use. Some points which I like are
  • Ability to hide presence, so others won't know you are online or offline. (unlike Whatsapp which advertises last seen)
  • Encrypted messages and ability to optin or optout.
  • Encrypted status messages! Only user with your phone number can see your status. (Cool isn't it).
  • Manually requesting to find contacts who already uses kontalk!. Right it doesn't read your contact list without your permission you need to refresh to check who in your contacts is using Kontalk.
  • Attach and smiley options in the top right corner of Chat window which allows easy accessing unlike keyboard - smiley switching of Whatsapp.
  • No automatic download of media contents which is shared. Yes by default it doesn't download any picture or video automatically if you want to see something click on it and select download.
  • Running your own server for Kontalk! Now thats something which is interesting for people who doesn't want to host their data on some other peoples infrastructure. Code for server is available at xmppserver repo.
But there are some rough edges also but I'm sure this can be improved. But some points which I noticed are
  • Contact name disappears and only number is displayed. This is something which happened with one of my contact so I'm not really sure its a bug.
  • My friend noticed all his existing contacts suddenly vanished when he refreshed contacts list. Again this is possible bugs and we are considering reporting it upstream.
  • No group chats yet. I don't see a option to do that yet.
  • Attachment at the moment is restricted only to pictures (and video? never tried) and uploading takes quite sometime and sometime hangs forever.
So I'm considering forwarding these to upstream and help them by providing enough data so these can be fixed.
Technical Side All code for client server and protocol specs are available under GPL-v3 at the Kontalk project site. Server software is written in Python and I guess uses XMPP (but I've not cross verified). Server also uses MySQL as database. These can be hosted on our own servers but possibly needs more than that like SMS sending options etc.
Conclusion In my views Kontalk can become a great alternative for Whatsapp and co from Free Software world and I encourage every one to give it a try which will be the first step to help improving it.
Disclaimer: I'm not a privacy or security expert so whatever I shared above are what I noticed and experts may see something different than this. In any case I welcome comments and suggestions.

Guido G nther: Truncating git history

When starting to work on a new project I start from an empty git repository right away so I can try out different ideas, revert easily, can diff against old versions (to check if I missed something) and have a commit history to record fixmes and todos. However when making the repo public these things are not of much interest anymore so I truncate the history. To be on the save side I want to keep that history locally though. Assuming the repo is on master, I do:
# 1.) Move the old master out of the way
git branch -m branch master oldmaster
# 2.) Get the current tree at HEAD
tree=$(git rev-parse HEAD^ tree )
# 3.) Create a new commit without ancestry
commit=$(git commit-tree -m "Initial commit" $tree)
# 4.) Make this the new master
git branch master $commit
# 5.) Switch to the new branch
git checkout master
Done. One can now add a remote and push the master branch. The old history is still there locally on the completely detached commit history ending at oldmaster:
$ git log --pretty=short --graph --decorate master oldmster
* commit d5cf3371eaefbaa8efac10c0fb9e7597da17b423 (HEAD, master)
  Author: Guido G nther <agx@sigxcpu.org>
      Initial commit
* commit 64103ff72bde13d7ec4cf0489ad2a80f3ac249d3 (oldmster)
  Author: Guido G nther <agx@sigxcpu.org>
 
      Another uninteresting commit message
 
* commit bd7332a79380bb217eca09cbd7f6ff0e5174deb8
  Author: Guido G nther <agx@sigxcpu.org>
 
      Uninteresting commit message
 
... <more old history>
Update: Uli Heller pointed out that this is the same as using git checkout's --orphan option.

17 February 2014

Paul Wise: Join the Process Identifier Preservation Society today!

Process Identifiers (PIDs) are a scarce resource. On Linux they are only 15 bits by default. The Process Identifier Preservation Society (PIPS) aims to reduce abuse and wastage of the PID space. To join the society please read the following advice.

Common issues Several languages generally allow you to run all your code in one process. Some of the code that you might want to incorporate or use is not available in the form of ELF libraries or language specific libraries but only in the form of ELF binaries or interpreted scripts. As a result using additional PID space is sometimes unavoidable. Many languages have multiple methods of starting external processes and usually some of them waste PID space by running commands in a shell. You can avoid those methods or use the exec builtin to preserve the shell PID. It might be tempting to explicitly use shell in languages that don't allow implicit shell use but that just wastes extra PIDs. Several languages allow you to fork one process into two, this uses an extra PID and is to be avoided unless necessary.

Shell Programs written in the shell languages use a lot of PIDs. Even shells that have a lot of shell builtins (like busybox sh) appear to use the PID space by forking a child process. To join PIPS you should just stop writing programs in shell or use as many builtins as possible and use exec to preserve PIDs.

Init Several init systems are written in or use shell extensively and thus eat huge bowls of PIDs for breakfast. To join the PIPS you should switch away from sysvinit, openrc, init=/bin/sh etc.

C/C++ The common issues section applies to the C/C++ language. To join PIPS you should rewrite your code to use fork()+exec(), g_spawn*() or libpipeline instead of the g_spawn_command_line*(), system() and popen() functions.

Perl The common issues section applies to the Perl language. To join PIPS you should rewrite your code to avoid backticks and only pass arrays to the system(), open(), open2(), open3() functions.

PHP The common issues section applies to the PHP language. To join PIPS you should rewrite your code to use pcntl_exec() instead of backticks, exec(), system(), passthru(), shell_exec(), popen() and proc_open(). Apparently pcntl_exec() is disabled by default on Debian and pcntl_* are often unavailable so you should just not spawn processes. You could also just drop PHP already.

Python The common issues section applies to the Python language. To join PIPS you should rewrite your code to use the subprocess module and avoid passing shell=True to the subprocess.Popen() function. The os.system(), os.popen() functions and the commands module all run their commands in a shell, wasting PID space. The popen2 module requires passing arrays instead of strings in order to avoid the command being run in a shell.

Java The common issues section applies to the Java language. To join PIPS you should rewrite your code to use ProcessBuilder or only pass arrays of strings to Runtime.getRuntime().exec().

Haskell The common issues section applies to the Haskell language. To join PIPS you should only ever pass a RawCommand to createProcess and never use the shell, system, runCommand or runInteractiveCommand functions from the System.Process and System.Cmd libraries.

OCaml The common issues section applies to the OCaml language. To join PIPS you should rewrite your code to use fork+exec or the create_process* wrappers instead of system, open_process, open_process_in, open_process_out and open_process_full.

Go Go allows running external processes but doesn't allow you to waste PID space by running commands in shell. Avoid explicitly running the shell though.

Rust Rust allows running external processes but doesn't allow you to waste PID space by running commands in shell. Avoid explicitly running the shell though.

Erlang The common issues section applies to the Erlang language. To join PIPS you should rewrite your code to use erlang:open_port( spawn_executable, ... , ...) instead of os:cmd or the other options to erlang:open_port.

Node.js The common issues section applies to the Node.js language. To join PIPS you should rewrite your code to use the child_process.execFile() function (or other child_process functions) instead of child_process.exec().

Julia Julia allows running external processes but doesn't allow you to waste PID space by running commands in shell. It emulates a lot of shell features instead. Avoid explicitly running the shell though.

Dart The common issues section applies to the Dart language. To join PIPS simply do not enable the runInShell parameter of the Process object.

PS Let me know if I missed something in one of these languages. You should also do most of the above to avoid shell metacharacter injection attacks that usually allow arbitrary code execution. Dear language authors, don't allow running external processes in shell, kthxbye!

9 February 2014

Neil Williams: Debian ARMMP in LAVA using iMX53

The home lab is my LAVA development environment and I ve recently got two iMX53 Quick Start Boards working with a typical LAVA master image based on a Linaro build of Linux 3.1.0 for mx5 with a Ubuntu Oneiric Ocelot 11.10 rootfs:
 3.1.0-1002-linaro-lt-mx5 (buildd@hubbard) (gcc version 4.6.1 (Ubuntu/Linaro 4.6.1-9ubuntu3) ) #13-Ubuntu PREEMPT Fri Dec 16 01:21:07 UTC 2011
As part of my Debian work, it was clearly time to look at a current, Debian, kernel and rootfs and as I m developing and testing on Debian unstable, this would necessarily mean testing the Debian ARMMP (multi-platform) kernel which replaces the mx5 build used in Wheezy.
Linux version 3.12-1-armmp (debian-kernel@lists.debian.org) (gcc version 4.8.2 (Debian 4.8.2-10) ) #1 SMP Debian 3.12.9-1 (2014-02-01)
I will be scripting the creation of a suitable image for these tests and there are other changes planned in LAVA to make it easier to build suitable images, but it is useful to document just how I worked out how to build the first image. Manual build steps First, I ve already discovered that the u-boot on the iMX53 doesn t like ext4, so the first step was to prepare an ext3 filesystem for the image. With a SATA drive attached, it was also much better to use that than the SD card, at least for generating the image. I m also doing this natively, so I am working inside the booted master image. This is fine as the master is designed to manipulate test images, so the only package I needed to install on the LAVA master image was debootstrap. I had an empty SATA drive to play with for these tests, so first prepare an ext3 filesystem:
# mkfs.ext3 /dev/sda1
# mkdir /mnt/sata
# mount /dev/sda1 /mnt/sata
# mkdir /mnt/sata/chroots/
Start the debootstrap:
# apt-get update
# apt-get install debootstrap
# debootstrap --arch=armhf --include=linux-image-armmp \
 --verbose unstable \
 /mnt/sata/chroots/unstable-armhf http://ftp.uk.debian.org/debian
Various actions in this chroot will need proc, so mount it here:
# chroot /mnt/sata/chroots/unstable-armhf
# mount proc -t proc /proc
# mount devpts -t devpts /dev/pts
# exit
You may also have to edit the apt sources the LAVA master image doesn t have editors installed, so either use echo or download an edited file. I m using:
deb http://ftp.uk.debian.org/debian sid main
flash-kernel needs changes For the initial tests, I ve got to get this image to boot directly from u-boot, so flash-kernel is going to be needed inside the chroot and to get the iMX53 to work with the ARMMP kernel and Device Tree, flash-kernel will need an update which will mean a patch:
# chroot /mnt/sata/chroots/unstable-armhf
# apt-get update
# apt-get install patch flash-kernel
# cp /usr/share/flash-kernel/db/all.db /home
# cd /home
# patch -p2
The patch itself goes through a couple of iterations. Initially, it is enough to use:
 Machine: Freescale MX53 LOCO Board
-Kernel-Flavors: mx5
+Kernel-Flavors: armmp
+DTB-Id: imx53-qsb.dtb
+DTB-Append: yes
Later, once the device has booted with the ARMMP kernel, the Machine Id can be updated to distinguish it from the mx5 flavour (from /proc/cpuinfo) and use the model name from the Device Tree (/proc/device-tree/model):
diff --git a/db/all.db b/db/all.db
index fab3407..41f6c78 100644
--- a/db/all.db
+++ b/db/all.db
@@ -62,6 +62,18 @@ U-Boot-Initrd-Address: 0x00800000
 Required-Packages: u-boot-tools
 Bootloader-Sets-Incorrect-Root: yes
 
+Machine: Freescale i.MX53 Quick Start Board
+Kernel-Flavors: armmp
+DTB-Id: imx53-qsb.dtb
+DTB-Append-From: 3.12
+Boot-DTB-Path: /boot/dtb
+U-Boot-Kernel-Address: 0x70008000
+U-Boot-Initrd-Address: 0x0
+Boot-Kernel-Path: /boot/uImage
+Boot-Initrd-Path: /boot/uInitrd
+Required-Packages: u-boot-tools
+Bootloader-Sets-Incorrect-Root: no
+
 Machine: Freescale MX53 LOCO Board
 Kernel-Flavors: mx5
 U-Boot-Kernel-Address: 0x70008000
(I will be filing this patch in a bug report against flash-kernel soon.) With that patched, update and run flash-kernel:
# mv all.db /usr/share/flash-kernel/db/all.db
# flash-kernel
flash-kernel: installing version 3.12-1-armmp
Generating kernel u-boot image... done.
Taking backup of uImage.
Installing new uImage.
Generating initramfs u-boot image... done.
Taking backup of uInitrd.
Installing new uInitrd.
Installing new dtb.
# exit
LAVA overlays This will be a LAVA test image and it needs an overlay if you want a vanilla image, set up a passwd inside the chroot instead.
# cd /mnt/sata/chroots/unstable-armhf/
# wget --no-check-certificate https://launchpad.net/~linaro-maintainers/+archive/overlay/+files/linaro-overlay-minimal_1112.2_all.deb
# wget --no-check-certificate https://launchpad.net/~linaro-maintainers/+archive/overlay/+files/linaro-overlay_1112.2_all.deb
# chroot /mnt/sata/chroots/unstable-armhf/
# dpkg -i linaro-overlay-minimal_1112.2_all.deb linaro-overlay_1112.2_all.deb
# rm linaro-overlay-minimal_1112.2_all.deb linaro-overlay_1112.2_all.deb
# exit
Changes to allow the chroot to boot Now the chroot needs setting up as a boot image:
# chroot /mnt/sata/chroots/unstable-armhf/
# echo T0:23:respawn:/sbin/getty -L ttymxc0 115200 vt102 >> ./etc/inittab
# echo auto lo eth0 > ./etc/network/interfaces.d/mx53loco
# echo iface lo inet loopback >> ./etc/network/interfaces.d/mx53loco
# echo iface eth0 inet dhcp >> ./etc/network/interfaces.d/mx53loco
# apt-get clean
# umount /dev/pts
# umount /proc
# exit
Partitioning as a LAVA test image This would be enough as a single partition test image but, currently, LAVA expects a much more hard-wired image. Depending on the history of the device and the need for LAVA to be able to put fresh kernel builds together with a known rootfs, LAVA has used a separate /boot and / partition in the test image for nearly all boards. Standard LAVA test images for many boards (like the iMX53) also have a small unallocated space at the start of the SD card, so until I can get LAVA upstream to handle test images of arbitrary design, I m adapting the image to suit the expectations inside LAVA. Yes, I know but it s better to get something working before spending time fixing things to make it work better. It will be fixed, in time. So I needed to separate out the /boot contents from the rest of the rootfs whilst keeping the chroot itself in a state which I can easily update and use to create other images.
# cd /mnt/sata/chroots/unstable-armhf/boot/
# tar -czf ../../boot.tar.gz ./*
# cd ..
# tar -czf ../root.tar.gz ./*
Now the test image file and its partitions:
# dd if=/dev/zero of=/mnt/sata/images/empty/debian.img bs=1M count=1024
# cp /mnt/sata/images/empty/debian.img /mnt/sata/images/debian-unstable-armhf-armmp.img
# losetup /dev/loop0 /mnt/sata/images/debian-unstable-armhf-armmp.img
# parted /dev/loop0 -s unit mb mktable msdos
# parted /dev/loop0 -s unit mb mkpart primary 1 10
# parted /dev/loop0 -s unit mb mkpart primary 11 110
# parted /dev/loop0 -s unit mb mkpart primary 111 1024
I did make the mistake of using kpartx at this stage but there are many areas of confusion when translating the kpartx output to offsets for mount when parted is easier:
# parted /dev/loop0 unit B -s print
Model:  (file)
Disk /dev/loop0: 1073741824B
Sector size (logical/physical): 512B/512B
Partition Table: msdos
Number  Start       End          Size        Type     File system  Flags
 1      1048576B    10485759B    9437184B    primary
 2      10485760B   110100479B   99614720B   primary
 3      110100480B  1024458751B  914358272B  primary
Use the Start numbers and use losetup to create the loop devices for each
partition
# losetup -o 10485760 /dev/loop1 /dev/loop0
# losetup -o 110100480 /dev/loop2 /dev/loop0
# mkfs.vfat /dev/loop1
# mkfs.ext3 /dev/loop2
Now clean up the loop mountpoints:
# losetup -d /dev/loop2
# losetup -d /dev/loop1
# losetup -d /dev/loop0
# losetup -a
losetup -a should return nothing. If it doesn t, investigate the contents of /dev/mapper and use dmsetup remove until losetup -a does report empty. Otherwise the subsequent stages will fail. Now deploy the /boot contents into the empty image:
# mount -oloop,offset=10485760 /mnt/sata/images/debian-unstable-armhf-armmp.img /mnt/boot/
# pushd /mnt/boot/
# tar -xzf /mnt/sata/chroots/boot.tar.gz
# popd
# sync
# umount /mnt/boot/
and the / contents (removing the duplicate ./boot contents)
# mount -oloop,offset=110100480 /mnt/sata/images/debian-unstable-armhf-armmp.img /mnt/root/
# pushd /mnt/root
# tar -xzf /mnt/sata/chroots/root.tar.gz
# rm ./boot/*
# popd
# sync
# umount /mnt/root
Check the image
# mount -oloop,offset=10485760 debian-unstable-armhf-armmp.img /mnt/boot
# ls /mnt/boot
config-3.12-1-armmp  initrd.img-3.12-1-armmp  System.map-3.12-1-armmp  uImage  uInitrd  vmlinuz-3.12-1-armmp
# umount /mnt/boot
# mount -oloop,offset=110100480 debian-unstable-armhf-armmp.img /mnt/root
# ls /mnt/root
bin  boot  dev  etc  home  initrd.img  lib  lost+found  media  mnt  opt  proc  root  run  sbin  srv  sys  tmp  usr  var  vmlinuz
# ls /mnt/root/bin/auto-serial-console
/mnt/root/bin/auto-serial-console
# umount /mnt/root
# md5sum debian-unstable-armhf-armmp.img
Downloads Yes, I have put that file online, if you are interested. Do read the readme first though. Getting the image off the device
# ip a
# python -m SimpleHTTPServer 80 2>/dev/null
then wget (just http://, IP address / and the filename), md5sum , finish with Ctrl-C. Depending on setup, it may be quicker to transfer the uncompressed
file over a LAN than to let the device compress it. Your main machine
will do the compression much faster, even with a larger download. (It also helps to not compress the image on the device, you can
test the mount offsets more easily and do check that the image
can be mounted with the offsets from parted.) Results
# cat /proc/cpuinfo
processor	: 0
model name	: ARMv7 Processor rev 5 (v7l)
Features	: swp half thumb fastmult vfp edsp thumbee neon vfpv3 tls vfpd32 
CPU implementer	: 0x41
CPU architecture: 7
CPU variant	: 0x2
CPU part	: 0xc08
CPU revision	: 5
Hardware	: Freescale i.MX53 (Device Tree Support)
Revision	: 0000
Serial		: 0000000000000000
# uname -a
Linux imx53-02 3.12-1-armmp #1 SMP Debian 3.12.9-1 (2014-02-01) armv7l GNU/Linux
# lsb_release -a
No LSB modules are available.
Distributor ID:	Debian
Description:	Debian GNU/Linux unstable (sid)
Release:	unstable
Codename:	sid
Next! Yes, there is a lot to do from here on. Then there is the whole issue of actually making this multi-platform. After all, it is far from ideal that a multi-platform kernel package has to have platform-specific operations using flash-kernel at each update. So Grub on ARM is going to be on the list of things to investigate .

4 February 2014

Diego Escalante Urrelo: Booting Fedora 20 from USB on a black MacBook3,1 (2007)

Here s a trick that is so obvious, I m still hitting my head against the desk. Let s say you want to install an EFI-friendly distribution on your MacBook. However, your MacBook does not detect bootable USB drives on startup (known bug on old Apple hardware). I found a blog post that had success rebuilding the ISO without EFI support and installing in BIOS mode, but I had a clear memory of getting this to work a few months ago without doing that. I just couldn t remember how. Well, turns out that OSX can boot from USB drives as long as you tell it to do so in advance. You can do this in the Boot disk/Startup disk panel in System Settings:
Startup disks panel in OSX
You don t see me complaining that everything on the web is in English, do you?
You only need to select the drive and close the panel, or reboot directly using that handy Reboot button. So considerate of Apple. Important: After you install, or try, your EFI friendly live USB you have to go back to the panel and select your OSX drive again, otherwise your MacBook will keep waiting for the (now gone) USB drive for about 30 seconds on startup. For Debian, the last few times I have just booted with a CD in BIOS mode without problems. After the installation you can configure Debian for EFI boot following this instructions. I haven t tried any other distribution on this machine.

3 February 2014

Petter Reinholdtsen: Testing sysvinit from experimental in Debian Hurd

A few days ago I decided to try to help the Hurd people to get their changes into sysvinit, to allow them to use the normal sysvinit boot system instead of their old one. This follow up on the great Google Summer of Code work done last summer by Justus Winter to get Debian on Hurd working more like Debian on Linux. To get started, I downloaded a prebuilt hard disk image from http://ftp.debian-ports.org/debian-cd/hurd-i386/current/debian-hurd.img.tar.gz, and started it using virt-manager. The first think I had to do after logging in (root without any password) was to get the network operational. I followed the instructions on the Debian GNU/Hurd ports page and ran these commands as root to get the machine to accept a IP address from the kvm internal DHCP server:
settrans -fgap /dev/netdde /hurd/netdde 
kill $(ps -ef awk '/[p]finet/   print $2 ')
kill $(ps -ef awk '/[d]evnode/   print $2 ')
dhclient /dev/eth0
After this, the machine had internet connectivity, and I could upgrade it and install the sysvinit packages from experimental and enable it as the default boot system in Hurd. But before I did that, I set a password on the root user, as ssh is running on the machine it for ssh login to work a password need to be set. Also, note that a bug somewhere in openssh on Hurd block compression from working. Remember to turn that off on the client side. Run these commands as root to upgrade and test the new sysvinit stuff:
cat > /etc/apt/sources.list.d/experimental.list <<EOF
deb http://http.debian.net/debian/ experimental main
EOF
apt-get update
apt-get dist-upgrade
apt-get install -t experimental initscripts sysv-rc sysvinit \
    sysvinit-core sysvinit-utils 
update-alternatives --config runsystem
To reboot after switching boot system, you have to use reboot-hurd instead of just reboot, as there is not yet a sysvinit process able to receive the signals from the normal 'reboot' command. After switching to sysvinit as the boot system, upgrading every package and rebooting, the network come up with DHCP after boot as it should, and the settrans/pkill hack mentioned at the start is no longer needed. But for some strange reason, there are no longer any login prompt in the virtual console, so I logged in using ssh instead. Note that there are some race conditions in Hurd making the boot fail some times. No idea what the cause is, but hope the Hurd porters figure it out. At least Justus said on IRC (#debian-hurd on irc.debian.org) that they are aware of the problem. A way to reduce the impact is to upgrade to the Hurd packages built by Justus by adding this repository to the machine:
cat > /etc/apt/sources.list.d/hurd-ci.list <<EOF
deb http://darnassus.sceen.net/~teythoon/hurd-ci/ sid main
EOF
At the moment the prebuilt virtual machine get some packages from http://ftp.debian-ports.org/debian, because some of the packages in unstable do not yet include the required patches that are lingering in BTS. This is the completely list of "unofficial" packages installed:
# aptitude search '?narrow(?version(CURRENT),?origin(Debian Ports))'
i   emacs                   - GNU Emacs editor (metapackage)
i   gdb                     - GNU Debugger
i   hurd-recommended        - Miscellaneous translators
i   isc-dhcp-client         - ISC DHCP client
i   isc-dhcp-common         - common files used by all the isc-dhcp* packages
i   libc-bin                - Embedded GNU C Library: Binaries
i   libc-dev-bin            - Embedded GNU C Library: Development binaries
i   libc0.3                 - Embedded GNU C Library: Shared libraries
i A libc0.3-dbg             - Embedded GNU C Library: detached debugging symbols
i   libc0.3-dev             - Embedded GNU C Library: Development Libraries and Hea
i   multiarch-support       - Transitional package to ensure multiarch compatibilit
i A x11-common              - X Window System (X.Org) infrastructure
i   xorg                    - X.Org X Window System
i A xserver-xorg            - X.Org X server
i A xserver-xorg-input-all  - X.Org X server -- input driver metapackage
#
All in all, testing hurd has been an interesting experience. :) X.org did not work out of the box and I never took the time to follow the porters instructions to fix it. This time I was interested in the command line stuff.

Craig Small: jffnms 0.9.4

JFFNMS version 0.9.4 was released today, this version fixes some bugs that have recently appeared in previous versions.
Alarmed Interfaces and Events

Alarmed Interfaces and Events

The triggers rules editor had a problem where some of the rules clicked off the triggers would not appear or could not be edited correctly. Most of the Admin screens have the ability to sort the rows. This, unfortunately, didn t sort but the functionality has been restored. Most users are probably unaware of this, but the database schema is first created for MySQL and is then converted for PostgreSQL. The conversi0n process is far from ideal and hasn t worked until this release. More testing is required for PostgreSQL support but it should be a lot better.

2 February 2014

Gunnar Wolf: CuBox-i4Pro

CuBox-i4Pro
Somewhere back in August or September, I pre-ordered a CuBox-i A nicely finished, completely hackable, and reasonably powerful ARM system, nicely packaged and meant to be used to hack on. A sweet deal! There are four models (you can see the different models' specs here) I went for the top one, and bought a CuBox-i4Pro. That means, I have a US$130 nice little box, with 4 ARM7 cores, 2GB RAM, WiFi, and... well, all of its basic goodies and features. For some more details, look at the CuBox-i block diagram. I got it delivered by early January, and (with no real ARM experience on my side) I finally got to a point where I can, I believe, contribute something to its adoption/usage: How to get a basic Debian system installed and running in it. The ARM world is quite different to the x86 one: Compatibility is much harder, the computing platform does not self-describe properly, and a kernel must first understand how a specific subarchitecture is before being able to boot on it. Somewhere in the CuBox forums (or was it the IRC channel?) I learnt that the upstream Linux kernel does not yet boot on the i.MX6 chip (although support is rumored to be merged for the 3.14 release), so I am using both a kernel and an uBoot bootloader not built for (or by) Debian people. Besides that, the result I will describe is a kosher Debian install. Yes, I know that my orthodox friends and family will say that 99% kosher is taref... But remember I'm never ever that dogmatic. (yeah, right!) Note that there is a prebuilt image you can run if you are so inclined: In the CuBox-i forums and wiki, you will find links to a pre-installed Debian image you can use... But I cannot advise to do so. First, it is IMO quite bloated (you need a 4GB card for a very basic Debian install? Seriously?) Second, it has a whole desktop environment (LXDE, if I recall correctly) and a whole set of packages I will probably not use in this little box. Third, there is a preinstalled user, and that's a no-no (user: debian, password: debian). But, most importantly, fourth: It is a nightly build of the Testing (Jessie) suite... Built back in December. So no, as a Debian Developer, it's not something we should recommend our users to run! So, in the end and after quite a bit of frustration due to my lack of knowledge, here goes the list of steps I followed:
Using the CuBox
On the i2 and i4 models, you can use it either with a USB keyboard and a HDMI monitor, or by a serial consoles (smaller models do not have a serial console). I don't have a HDMI monitor handy (only a projector), so I prefer to use the serial terminal. Important details to avoid frustration: The USB keyboard has to be connected to the lower USB port, or it will be ignored during the boot process. And make sure your serial terminal is configured not to use hardware flow control. Minicom is configured by default to use hardware flow control, so it was not sending any characters to the CuBox. ^A-O gets you to the Minicom configuration, select Serial port setup, and disable it.
Set up the SD card
I created a 2GB partition, but much less can suffice; I'd leave it at least to 1GB to do the base install, although it can be less once the system is set up (more on this later). Partition and format using your usual tools (fdisk+mke2fs, or gparted, or whatever suits your style).
Install the bootloader
I followed up the instructions on this CuBox-i forums thread to get the SPL and uBoot bootloader running. In short, from this Google Drive folder, download the SPL-U-Boot.img.xz file, uncompress it (xz --decompress SPL-U-Boot.img.xz), and write it to the SD card just after the partition map: As root,
# dd if=SPL-U-Boot.img of=/dev/mmcblk0 bs=1024 seek=1.
Actually, to be honest: As I wanted something basic to be able to debug from, I downloaded (from the same Google Drive) the busybox.img.gz file. That's a bit easier to install from: xz --decompress busybox.img.xz, and just dump it into the SD from the beginning (as it does already include a partition table):
# dd if=busybox.img of=/dev/mmcblk0
This card is already bootable and minimal, and allows to debug some bits from the CuBox-i itself (as we will see shortly).
After this step, I created a second partition, as I said earlier. So, my mmcblk0p1 partition holds Busybox, and the second will hold Debian. We are still working from the x86 system, so we mount the SD card in /media/mmcblk0p2
Installing the base system
Without debian-installer to do the heavy lifting, I went for debootstrap. As I ran it from my PC, debootstrap's role will be for this first stage only to download and do a very initial pre-unpacking of the files: Bootstrapping a foreign architecture implies, right, using the --foreign switch:
debootstrap --foreign --arch=armhf wheezy /media/mmcblk0p2 http://http.debian.net/debian
You can add some packages you often use by specifying --include=foo,bar,baz
So, take note notes: This board is capable of running the armhf architecture (HF for Hardware Float). It can also run armel, but I understand it is way slower.
First boot (with busybox)
So, once debootstrap finishes, you are good to go to the real hardware! Unmount the SD card, put it in the little guy, plug your favorite console in (I'm using the serial port), and plug the power in! You should immediately see something like:
  1. U-Boot SPL 2013.10-rc4-gd05c5c7-dirty (Jan 12 2014 - 02:18:28)
  2. Boot Device: SD1
  3. reading u-boot.img
  4. Load image from RAW...
  5. U-Boot 2013.10-rc4-gd05c5c7-dirty (Jan 12 2014 - 02:18:28)
  6. CPU: Freescale i.MX6Q rev1.2 at 792 MHz
  7. Reset cause: POR
  8. Board: MX6-CuBox-i
  9. DRAM: 2 GiB
  10. MMC: FSL_SDHC: 0
  11. In: serial
  12. Out: vga
  13. Err: vga
  14. Net: phydev = 0x0
  15. Phy not found
  16. PHY reset timed out
  17. FEC
  18. (Re)start USB...
  19. USB0: USB EHCI 1.00
  20. scanning bus 0 for devices... 1 USB Device(s) found
  21. scanning usb for storage devices... 0 Storage Device(s) found
  22. scanning usb for ethernet devices... 0 Ethernet Device(s) found
  23. Hit any key to stop autoboot: 3

Let it boot (that means, don't stop autoboot), and you will soon see a familiar #, showing you are root in the busybox environment. Great! Now, mount the Debian partition:
# mount /dev/mmcblk0p2 /mnt
Finishing debootstrap's task
With everything in place, it's time for debootstrap to work. Chroot into the Debian partition:
# chroot /mnt
And ask Debootstrap to finish what it started:
# debootstrap --second-stage
Be patient, as this step takes quite a bit to be finished.
Some extra touches...
After this is done, your Debian system is almost ready to be booted into. Why almost? Because it still does not have any users, does not know its own name nor knows I want to use it via a serial terminal. Three very simple tasks to fix. First two:
  1. # passwd
  2. Enter new UNIX password:
  3. Retype new UNIX password:
  4. passwd: password updated successfully
  5. # echo cubox-i.gwolf.org > /etc/hostname

For the second one, add a line to /etc/inittab specifying the details of the serial console. You can just do this:
# echo 'T0:23:respawn:/sbin/getty -L ttymxc0 115200 vt100' >> /etc/inittab
Boot into Debian!
So, ready to boot Debian? Ok, first exit the chroot shell, to go back to the Busybox shell, unmount the Debian partition, and set the root partition read-only:
  1. # exit
  2. # umount /mnt
  3. # mount / -o remount,ro

Disconnect and connect power, and now, do interrupt the boot process when you see the Hit any key to stop automount prompt. To see the configuration of uboot, you can type printenv We will only modify the parameters given to the kernel:
  1. CuBox-i U-Boot > setenv root /dev/mmcblk0p2 rootfstype=ext3 ro rootwait
  2. CuBox-i U-Boot > boot

So, the kernel will load, and a minimal Debian system will be initialized. In my case, I get the following output:
  1. ** File not found /boot/busyEnv.txt **
  2. 4703740 bytes read in 390 ms (11.5 MiB/s)
  3. ## Booting kernel from Legacy Image at 10000000 ...
  4. Image Name: Linux-3.0.35-8
  5. Image Type: ARM Linux Kernel Image (uncompressed)
  6. Data Size: 4703676 Bytes = 4.5 MiB
  7. Load Address: 10008000
  8. Entry Point: 10008000
  9. Verifying Checksum ... OK
  10. Loading Kernel Image ... OK
  11. Starting kernel ...
  12. Unable to get enet.0 clock
  13. pwm-backlight pwm-backlight.0: unable to request PWM for backlight
  14. pwm-backlight pwm-backlight.1: unable to request PWM for backlight
  15. _regulator_get: get() with no identifier
  16. mxc_sdc_fb mxc_sdc_fb.2: NO mxc display driver found!
  17. INIT: version 2.88 booting
  18. [info] Using makefile-style concurrent boot in runlevel S.
  19. [....] Starting the hotplug events dispatcher: udevd. ok
  20. [....] Synthesizing the initial hotplug events...done.
  21. [....] Waiting for /dev to be fully populated...done.
  22. [....] Activating swap...done.
  23. [....] Cleaning up temporary files... /tmp. ok
  24. [....] Activating lvm and md swap...done.
  25. [....] Checking file systems...fsck from util-linux 2.20.1
  26. done.
  27. [....] Mounting local filesystems...done.
  28. [....] Activating swapfile swap...done.
  29. [....] Cleaning up temporary files.... ok
  30. [....] Setting kernel variables ...done.
  31. [....] Configuring network interfaces...done.
  32. [....] Cleaning up temporary files.... ok
  33. [....] Setting up X socket directories... /tmp/.X11-unix /tmp/.ICE-unix. ok
  34. INIT: Entering runlevel: 2
  35. [info] Using makefile-style concurrent boot in runlevel 2.
  36. [....] Starting enhanced syslogd: rsyslogd. ok
  37. [....] Starting periodic command scheduler: cron. ok
  38. Debian GNU/Linux 7 cubox-i.gwolf.org ttymxc0
  39. cubox-i login:

And that's it, the system is live and ready for my commands!
So, how big is this minimal Debian installed system? I cheated a bit on this, as I had already added emacs and screen to the system, so yours will be a small bit smaller. But anyway Lets clear our cache of downloaded packages, and see the disk usage information:
  1. root@cubox-i:~# apt-get clean
  2. root@cubox-i:~# df -h
  3. Filesystem Size Used Avail Use% Mounted on
  4. rootfs 1008M 347M 611M 37% /
  5. /dev/root 1008M 347M 611M 37% /
  6. devtmpfs 881M 0 881M 0% /dev
  7. tmpfs 177M 132K 177M 1% /run
  8. tmpfs 5.0M 0 5.0M 0% /run/lock
  9. tmpfs 353M 0 353M 0% /run/shm

So, instead of a 4GB install, we have a 350MB one. Great improvement! Now, lets get it to do something useful, in a most Debianic way!

26 January 2014

Neil Williams: Home server rack

The uses of this particular rack I ll cover in future entries this is about how I made the rack itself, with help from friends (Steve McIntyre & Andy Simpkins). A common theme is making allowances for using dev kit boards ready-to-rack ARM servers are not here yet. My aim was to have 4, possibly 6 ARM dev kit boards running services from home, so there was no need for a standard 42U rack, a 9U rack is enough. Hence:
Wall Mounted 9U 450mm deep 19 inch rack enclosure glass door To run various other services around the house (firewall, file server etc.), a microserver was also necessary:
HP 704941-421 ProLiant Micro Server (AMD Turion II Neo N54L 2.2GHz, 2GB RAM, 250GB HDD, 2 Core, 7th Generation) I chose to mount that on a bookcase beneath the wall mounted rack as it kept all the cables at the bottom of the rack itself. The microserver needed a second gigabit network card fitted to cope with being a firewall as well, if you do the same, ensure you find a suitable card with a low profile bracket. Some are described as being low profile but do not package the low profile bracket, only a low profile card and a full height bracket.
Intel EXPI9301CTBLK PRO1000 Network Card note the low profile bracket in the pack. The first of the dev kit requirements is the lack of boards which can be racked, so shelves are going to be needed, leading on to something to stop the boards wandering across the shelf when the cables are adjusted velcro pads in my case. Second requirement is that dev kit boards are notorious for not rebooting cleanly. Nothing to do with the image being run, the board just doesn t cut power or doesn t come back after cutting power. Sometimes this is down to early revisions of the board, sometimes the board pulls enough power through the USB serial converter to remain alive, whatever the cause, it won t reboot without user involvement. So a PDU becomes necessary remotely controllable. New units tend to be expensive and/or only suitable for larger racks, I managed to find an older 8 port APC unit, something like: (Don t be surprised if that becomes a dead link search for APC Smart Slot Master Switch Power Distribution Unit). Talking of power, I m looking to use SATA drives with these boards and the boards themselves come with a variety of wall wart plugs or USB cables, so a number of IEC sockets are needed not the usual plugs:
Power cable IEC C14 plug 13A socket 25 cm or, for devices which genuinely need 2A to boot (use the 1A for attached SATA or leave empty):

Black Universal 3.1A 15W 5V Dual USB Rapid Mains Charger Plug Check the power output rating of the USB plugs used to connect to the mains as well many are 1A or less. Keep the right plug for the right board.
Power is going to also be a problem if, like me, you want to run SATA drives off boards which support SATA. The lack of a standard case means that ATX power is awkward, so check out some cheap SATA enclosures to get a SATA connector with USB power. I am using these enclosures (prices seem to have risen since I obtained them):

Startech 2.5 inch eSATA USB External Hard Drive Enclosure for SATA HDD Along with these:
eSATA to SATA Serial External Shielded Cable 1m because the iMx53 boards have SATA connectors but the enclosure exports eSATA. Whilst this might seem awkward, the merit of having both eSATA and simple USB power on one enclosure is not to be under-estimated. (Avoid the stiffer black cables space will get tight inside the rack.) Naturally, a 2.5 inch SATA drive is going to be needed for each enclosure, I m using HDD but SSD is also an option. Also, consider simple 2 or 3 way fused adaptors so that the board and the SATA drive can be powered from a single PDU port, this makes rebooting much simpler if the board needs a power supply with integrated plug instead of over USB. Now to the networking (2 x 8 port was cheaper than 1 x 16):
Netgear GS108 8-port Gigabit Ethernet Unmanaged Switch Don t forget the cat5 cables too you ll want lots of short cables, 1m or shorter inside the rack and a few longer ones going to the microserver and wall socket. I used 8x1m. Naturally, on the floor below your rack you are going to put a UPS, so the PDU power then needs to be converted to draw from the UPS via IEC plugs instead of standard mains. I decided to use a 6 gang extension 1m cable with an IEC plug it was the only bit of wiring I had to do and even those are available ready-made if you want to do it that way. Depending on the board, you may need your own serial to USB converters, you ll certainly need some powered USB hubs. I m using a wall mounted 9U rack, so I also needed a masonry drill and 4 heavy duty masonry M8 bolts. The rack comes with a mounting plate which needs to be bolted to the wall but nothing else is included. This step is much easier with someone else to take the weight of the rack as it is guided into the brackets on the mounting plate the bracket may need a little persuasion to allow for the bolt heads to not get in the way during mounting. Once mounted, the holes in the back of the rack allow for plenty of room, it s just getting to that point. The rack has side panels which latch out easily, providing easy maintenance. The glass door can be easily reversed to open from the opposite side. However, the key in the glass door is largely useless. The expectation is that the units in the rack are attached at the front but the dev boards on shelves are not going to be protected by a key in the front door. The key therefore ends up being little more than a handle for the glass door. OK. If you ve got this far, it s a case of putting things together:
Economy Cage Nut Tool 19 inch racking for cagenut extraction Yes, you really do want one. Fine, do without the premium one, but the economy one will save you a lot of (physical) pain. At this stage, it becomes clear that the normal 19 inch server rack shelves don t leave a lot of room at the back of the rack for the cables and there are a lot of cables. Each board has power, USB serial connection and network. The SATA has power too. The PDU has a power lead and you ll need network switches too. The network switches need power and an uplink cable. I positioned the supports in the rack as far forward as possible and attached the shelves to give enough room for the PDU on the base of the rack, the network switches resting on top and the extension bar (with the heavier, stiffer cables) at the back. (I need to bring my shelves another 1 or 2 positions further forward as there is barely enough room for one cable between the shelf and the back of the rack and that makes moving boards around harder than it needs to be.) The PDU defaults to enabling all ports at startup, so connect to it over telnet and turn off the ports before connecting things and sorting out the network interface to what the rest of the lab needs. (I m using a 10. range and the PDU was originally set to use 192.168.1.) That s about it as far as the hardware setup is concerned. Just time to label up each board, note down which PDU port does which device, which serial to USB converter is on which device on the microserver and check the power my initial problem with one board was traced to the inability of the board to power SATA off the on-board USB port even when using the provided 2A power supply. That meant adding a standard mains adaptor to feed both the SATA power and the board power off the one PDU port there is little point powering off the board but not the SATA, or vice versa. I haven t totalled up the expenditure but the biggest expenses were the microserver and the wall mounted rack but don t underestimate how much it will cost to buy 6 IEC plugs, various USB serial converters and how much you may spend on peripheral items. There is quite a lot of room on the 2 shelves for more boards, what will limit the deployment in this rack is space for the cables, especially power. The shorter the power cables, the easier it will be to maintain the devices in the rack. It might be worth looking at a 12U rack, if only to give plenty of space for cables. Once I ve got the software working, I ll describe what this rack will be doing it s got something to do with Debian, ARM, Linux and tests but you ve probably already guessed that much

Next.

Previous.