Search Results: "ag"

14 June 2017

Mike Gabriel: Ayatana Indicators

In the near future various upstream projects related to the Ubuntu desktop experience as we have known it so far may become only sporadically maintained or even fully unmaintained. Ubuntu will switch to the Gnome desktop environment with 18.04 LTS as its default desktop, maybe even earlier. The Application Indicators [1] brought into being by Canonical Ltd. will not be needed in Gnome (AFAIK) any more. We can expect the Application Indicator related projects become unmaintained upstream. (In fact I have recently been offered continuation of upstream maintenance of libdbusmenu). Historical Background This all started at Ubuntu Developer Summit 2012 when Canonical Ltd. announced Ubuntu to become the successor of Windows XP in business offices. The Unity Greeter received an Remote Login Service enhancement: since then it supports Remote Login to Windows Terminal Servers. The question came up, why Remote Login to Linux servers--maybe even Ubuntu machines--is not on the agenda. It turned out, that it wasn't even a discussable topic. At that time, I started looking into the Unity Greeter code, adding support for X2Go Logon into Unity Greeter. I never really stopped looking at the greeter code from time to time. Since then, it turned into some sort of a hobby... While looking into the Unity Greeter code over the past years and actually forking Unity Greeter as Arctica Greeter [2] in September 2015, I also started looking into the Application Indicators concept just recently. And I must say, the more I have been looking into it, the more I have started liking the concept behind Application Indicators. The basic idea is awesome. However, lately all indicators became more and more Ubuntu-centric and IMHO too polluted by code related to the just declared dead Ubuntu phablet project. Forking Application Indicators Saying all this, I recently forked Application Indicators as Ayatana Indicators. At the moment I represent upstream and Debian package maintainer in one person. Ideally, this is only temporary and more people join in. (I heard some Unity 7 maintainers think about switching to Ayatana Indicators for the now community maintained Unity 7). The goal is to provide Ayatana Indicators to all desktop environments generically, all that want to use them, either as default or optionally. Release-wise, the idea is to strictly differentiate between upstream and Debian downstream in the release cycles of the various related components. I hope, noone is too concerned about the choice of name, as the "Ayatana" word actually was first used for upstream efforts inside Ubuntu [3]. Using the Ayatana term for the indicator forks is meant as honouring the previously undertaken efforts. I have seen very good work, so far, while going through the indicators' code. The upstream code must not be distro-specific, but, of course, can be distro-aware. Contributions Welcome The Ayatana Indicators upstream project components are currently hosted on Github under the umbrella of the Arctica Project. Regarding Debian, first uploads have recently been accepted to Debian experimental. The Debian packages are maintained under the umbrella of the revived Ayatana Packagers team [4]. Meet you at the Ayatana Indicators BoF at DebConf 17 (hopefully) For DebConf 17 (yeah, I am going there, if all plans work out well!!!!) I have submitted a BoF on this topic (let's hope, it gets accepted...). I'd like to give a quick overview on the current status of above named efforts and reasonings behind my commitment to the work. Most of the time during that BoF I would like to get into discussion with desktop maintainers, possibly upstream developers, Ubuntu developers, etc. Anyone who sees an asset in the Indicators approach is welcome to share and contribute. References

Dirk Eddelbuettel: #7: C++14, R and Travis -- A useful hack

Welcome to the seventh post in the rarely relevant R ramblings series, or R4 for short. We took a short break as several conferences and other events interfered during the month of May, keeping us busy and away from this series. But we are back now with a short and useful hack I came up with this weekend. The topic is C++14, i.e. the newest formally approved language standard for C++, and its support in R and on Travis CI. With release R 3.4.0 of a few weeks ago, R now formally supports C++14. Which is great. But there be devils. A little known fact is that R hangs on to its configuration settings from its own compile time. That matters in cases such as the one we are looking at here: Travis CI. Travis is a tremendously useful and widely-deployed service, most commonly connected to GitHub driving "continuous integration" (the 'CI') testing after each commit. But Travis CI, for as useful as it is, is also maddingly conservative still forcing everybody to live and die by [Ubuntu 14.04]http://releases.ubuntu.com/14.04/). So while we all benefit from the fine work by Michael who faithfully provides Ubuntu binaries for distribution via CRAN (based on the Debian builds provided by yours truly), we are stuck with Ubuntu 14.04. Which means that while Michael can provide us with current R 3.4.0 it will be built on ancient Ubuntu 14.04. Why does this matter, you ask? Well, if you just try to turn the very C++14 support added to R 3.4.0 on in the binary running on Travis, you get this error:
** libs
Error in .shlib_internal(args) : 
  C++14 standard requested but CXX14 is not defined
And you get it whether or not you define CXX14 in the session. So R (in version 3.4.0) may want to use C++14 (because a package we submitted requests it), but having been built on the dreaded Ubuntu 14.04, it just can't oblige. Even when we supply a newer compiler. Because R hangs on to its compile-time settings rather than current environment variables. And that means no C++14 as its compile-time compiler was too ancient. Trust me, I tried: adding not only g++-6 (from a suitable repo) but also adding C++14 as the value for CXX_STD. Alas, no mas. The trick to overcome this is twofold, and fairly straightforward. First off, we just rely on the fact that g++ version 6 defaults to C++14. So by supplying g++-6, we are in the green. We have C++14 by default without requiring extra options. Sweet. The remainder is to tell R to not try to enable C++14 even though we are using it. How? By removing CXX_STD=C++14 on the fly and just for Travis. And this can be done easily with a small script configure which conditions on being on Travis by checking two environment variables:
#!/bin/bash
## Travis can let us run R 3.4.0 (from CRAN and the PPAs) but this R version
## does not know about C++14.  Even though we can select CXX_STD = C++14, R
## will fail as the version we use there was built in too old an environment,
## namely Ubuntu "trusty" 14.04.
##
## So we install g++-6 from another repo and rely on the fact that is
## defaults to C++14.  Sadly, we need R to not fail and hence, just on
## Travis, remove the C++14 instruction
if [[ "$ CI " == "true" ]]; then
    if [[ "$ TRAVIS " == "true" ]]; then 
        echo "** Overriding src/Makevars and removing C++14 on Travis only"
        sed -i 's CXX_STD = CXX14 ' src/Makevars
    fi
fi
I have deployed this now for two sets of builds in two distinct repositories for two "under-development" packages not yet on CRAN, and it just works. In case you turn on C++14 via SystemRequirements: in the file DESCRIPTION, you need to modify it here. So to sum up, there it is: C++14 with R 3.4.0 on Travis. Only takes a quick Travis-only modification.

13 June 2017

Reproducible builds folks: Reproducible Builds: week 111 in Stretch cycle

Here's what happened in the Reproducible Builds effort between Sunday June 4 and Saturday June 10 2017: Past and upcoming events On June 10th, Chris Lamb presented at the Hong Kong Open Source Conference 2017 on reproducible builds. Patches and bugs filed Reviews of unreproducible packages 7 package reviews have been added, 10 have been updated and 14 have been removed in this week, adding to our knowledge about identified issues. Weekly QA work During our reproducibility testing, FTBFS bugs have been detected and reported by: Two FTBFS issues of LEDE (exposed in our setup) were found and were fixed: diffoscope development tests.reproducible-builds.org: Alexander 'lynxis' Couzens made some changes for testing LEDE and OpenWrt: Hans-Christoph Steiner, for testing F-Droid: Daniel Shahaf, for testing Debian: Holger 'h01ger' Levsen, for testing Debian: Misc. This week's edition was written by Ximin Luo, Chris Lamb and Holger Levsen & reviewed by a bunch of Reproducible Builds folks on IRC & the mailing lists.

Jonathan Wiltshire: What to expect on Debian release day

Nearly two years ago I wrote about what to expect on Jessie release day. Shockingly enough, the process for Stretch to be released should be almost identical.

Raphaël Hertzog: Freexian s report about Debian Long Term Support, May 2017

A Debian LTS logoLike each month, here comes a report about the work of paid contributors to Debian LTS. Individual reports In May, about 182 work hours have been dispatched among 11 paid contributors. Their reports are available: Evolution of the situation The number of sponsored hours did not change and we are thus still a little behind our objective. The security tracker currently lists 44 packages with a known CVE and the dla-needed.txt file 42. The number of open issues is close to last month. Thanks to our sponsors New sponsors are in bold (none this month unfortunately).

No comment Liked this article? Click here. My blog is Flattr-enabled.

Gunnar Wolf: Reporting progress on the translation infrastructure

Some days ago, I blogged asking for pointers to get started with the translation of Made with Creative Commons. Thank you all for your pointers and ideas! To the people that answered via private mail, via IRC, via comments on the blog. We have made quite a bit of progress so far; I want to test some things before actually sending a call for help. What do we have?
Git repository set up
I had already set up a repository at GitLab; right now, the contents are far from useful, they merely document what I have done so far. I have started talking with my Costa Rican friend Leo Arias, who is also interested in putting some muscle behind this translation, and we are both the admins to this project.
Talked with the authors
Sarah is quite enthusiastic about us making this! I asked her to hold a little bit before officially announcing there is work ongoing... I want to get bits of infrastructure ironed out first. Important Talking with her, she discussed the tools they used for authoring the book. It made me less of a purist :) Instead of starting from something "pristine", our master source will be the PDF export of the Google Docs document.
Markdown conversion
Given that translation tools work over the bits of plaintext, we want to work with the "plainest" rendition of the document, which is Markdown. I found that Pandoc does a very good approximation to what we need (that is, introduces very little "ugly" markup elements). Converting the ODT into Markdown is as easy as:
$ pandoc -f odt MadewithCreativeCommonsmostup-to-dateversion.odt -t markdown > MadewithCreativeCommonsmostup-to-dateversion.md
Of course, I want to fine-tune this as much as possible.
Producing a translatable .po file
I have used Gettext to translate user interfaces; it is a tool very well crafted for that task. Translating a book is quite different: How and where does it break and join? How are paragraphs "strung" together into chapters, parts, a book? That's a task for PO 4 Anything (po4a). As simple as this:
po4a-gettextize -f text -m MadewithCreativeCommonsmostup-to-dateversion.md -p MadewithCreativeCommonsmostup-to-dateversion.po -M utf-8
I tested the resulting file with my good ol' trusty poedit, and it works... Very nicely!
What is left to do?

Dirk Eddelbuettel: RcppMsgPack 0.1.1

A new package! Or at least new on CRAN as the very initial version 0.1.0 had been available via the ghrr drat for over a year. But now we have version 0.1.1 to announce as a CRAN package. RcppMspPack provides R with MessagePack header files for use via C++ (or C, if you must) packages such as RcppRedis. MessagePack itself is an efficient binary serialization format. It lets you exchange data among multiple languages like JSON. But it is faster and smaller. Small integers are encoded into a single byte, and typical short strings require only one extra byte in addition to the strings themselves. MessagePack is used by Redis and many other projects, and has bindings to just about any language. To use this package, simply add it to the LinkingTo: field in the DESCRIPTION field of your R package---and the R package infrastructure tools will then know how to set include flags correctly on all architectures supported by R. More information may be on the RcppMsgPack page. Issues and bugreports should go to the GitHub issue tracker.

This post by Dirk Eddelbuettel originated on his Thinking inside the box blog. Please report excessive re-aggregation in third-party for-profit settings.

12 June 2017

Sven Hoexter: UEFI PXE preseeded Debian installation on HPE DL120

We bought a bunch of very cheap low end HPE DL120 server. Enough to warrant a completely automated installation setup. Shouldn't be that much of a deal, right? Get dnsmasq up and running, feed it a preseed.cfg and be done with it. In practise it took us more hours then we expected. Setting up the hardware Our hosts are equipped with an additional 10G dual port NIC and we'd like to use this NIC for PXE booting. That's possible, but it requires you to switch to UEFI boot. Actually it enables you to boot from any available NIC. Setting up dnsmasq We decided to just use the packaged debian-installer from jessie and do some ugly things like overwritting files in /usr/lib via ansible later on. So first of all install debian-installer-8-netboot-amd64 and dnsmasq, then enroll our additional config for dnsmasq, ours looks like this:
domain=int.foobar.example
dhcp-range=192.168.0.240,192.168.0.242,255.255.255.0,1h
dhcp-boot=bootnetx64.efi
pxe-service=X86-64_EFI, "Boot UEFI PXE-64", bootnetx64.efi
enable-tftp
tftp-root=/usr/lib/debian-installer/images/8/amd64/text
dhcp-option=3,192.168.0.1
dhcp-host=00:c0:ff:ee:00:01,192.168.0.123,foobar-01
Now you've to link /usr/lib/debian-installer/images/8/amd64/text/bootnetx64.efi to /usr/lib/debian-installer/images/8/amd64/text/debian-installer/amd64/bootnetx64.efi. That got us of the ground and we had a working UEFI PXE boot that got us into debian-installer. Feeding d-i the preseed file Next we added some grub.cfg settings and parameterized some basic stuff to be handed over to d-i via the kernel command line. You'll find the correct grub.cfg in /usr/lib/debian-installer/images/8/amd64/text/debian-installer/amd64/grub/grub.cfg. We added the following two lines to automate the start of the installer:
set default="0"
set timeout=5
and our kernel command line looks like this:
 linux    /debian-installer/amd64/linux vga=788 --- auto=true interface=eth1 netcfg/dhcp_timeout=60 netcfg/choose_interface=eth1 priority=critical preseed/url=tftp://192.168.0.2/preseed.cfg quiet
Important points: preseeed.cfg, GPT and ESP One of the most painful points was the fight to find out the correct preseed values to install with GPT to create a ESP (EFI system partition) and use LVM for /. Relevant settings are:
# auto method must be lvm
d-i partman-auto/method string lvm
d-i partman-lvm/device_remove_lvm boolean true
d-i partman-md/device_remove_md boolean true
d-i partman-lvm/confirm boolean true
d-i partman-lvm/confirm_nooverwrite boolean true
d-i partman-basicfilesystems/no_swap boolean false
# Keep that one set to true so we end up with a UEFI enabled
# system. If set to false, /var/lib/partman/uefi_ignore will be touched
d-i partman-efi/non_efi_system boolean true
# enforce usage of GPT - a must have to use EFI!
d-i partman-basicfilesystems/choose_label string gpt
d-i partman-basicfilesystems/default_label string gpt
d-i partman-partitioning/choose_label string gpt
d-i partman-partitioning/default_label string gpt
d-i partman/choose_label string gpt
d-i partman/default_label string gpt
d-i partman-auto/choose_recipe select boot-root-all
d-i partman-auto/expert_recipe string \
boot-root-all :: \
538 538 1075 free \
$iflabel  gpt   \
$reusemethod    \
method  efi   \
format    \
. \
128 512 256 ext2 \
$defaultignore    \
method  format   format    \
use_filesystem    filesystem  ext2   \
mountpoint  /boot   \
. \
1024 4096 15360 ext4 \
$lvmok    \
method  format   format    \
use_filesystem    filesystem  ext4   \
mountpoint  /   \
. \
1024 4096 15360 ext4 \
$lvmok    \
method  format   format    \
use_filesystem    filesystem  ext4   \
mountpoint  /var   \
. \
1024 1024 -1 ext4 \
$lvmok    \
method  format   format    \
use_filesystem    filesystem  ext4   \
mountpoint  /var/lib   \
.
# This makes partman automatically partition without confirmation, provided
# that you told it what to do using one of the methods above.
d-i partman-partitioning/confirm_write_new_label boolean true
d-i partman/choose_partition select finish
d-i partman-md/confirm boolean true
d-i partman/confirm boolean true
d-i partman/confirm_nooverwrite boolean true
# This is fairly safe to set, it makes grub install automatically to the MBR
# if no other operating system is detected on the machine.
d-i grub-installer/only_debian boolean true
d-i grub-installer/with_other_os boolean true
d-i grub-installer/bootdev  string /dev/sda
I hope that helps to ease the processes to setup automated UEFI PXE installations for some other people out there still dealing with bare metal systems. Some settings took us some time to figure out, for example d-i partman-efi/non_efi_system boolean true required some searching on codesearch.d.n (amazing ressource if you're writing preseed files and need to find the correct templates) and reading scripts on git.d.o where you'll find the source for partman-* and grub-installer. Kudos Thanks especially to P.P. and M.K. to figure out all those details.

Petter Reinholdtsen: Updated sales number for my Free Culture paper editions

It is pleasing to see that the work we put down in publishing new editions of the classic Free Culture book by the founder of the Creative Commons movement, Lawrence Lessig, is still being appreciated. I had a look at the latest sales numbers for the paper edition today. Not too impressive, but happy to see some buyers still exist. All the revenue from the books is sent to the Creative Commons Corporation, and they receive the largest cut if you buy directly from Lulu. Most books are sold via Amazon, with Ingram second and only a small fraction directly from Lulu. The ebook edition is available for free from Github.
Title / languageQuantity
2016 jan-jun2016 jul-dec2017 jan-may
Culture Libre / French 3 6 15
Fri kultur / Norwegian 7 1 0
Free Culture / English 14 27 16
Total 24 34 31
A bit sad to see the low sales number on the Norwegian edition, and a bit surprising the English edition still selling so well. If you would like to translate and publish the book in your native language, I would be happy to help make it happen. Please get in touch.

Craig Small: psmisc 23.0

I had to go check but it has been over 3 years since the last psmisc release back in February 2014. I really didn t think it had been that long ago. Anyhow, with no further delay, psmisc version 23.0 has been released today! Update: 23.1 is out now, removed some debug line out of killall and shipped two missing documents. This release is just a few feature update and minor bug fixes. The changelog lists them all, but these are the highlights. killall namespace filtering killall was not aware of namespaces, which meant if you wanted to kill all specified processes in the root namespace, it did that, but also all the child namespaces. So now it will only by default kill processes in its current PID namespace, and there is a new -n flag to specify 0 for all or a PID to use the namespace of. killall command name parsing This is similar to the bug sudo had where it didn t parse process names properly. A crafted process name meant killall missed it, even if you specified the username or tty. While I checked for procps having this problem (it didn t) I didn t check psmisc. Now killall and sudo use a similar parsing method as procps. New program: pslog Wanted to know what logs a process is writing to? pslog can help you here. It will report on what files in /var/log are opened by the specified process ID.
pslog 26475
Pid no 26475:
Log path: /opt/observium/logs/error_log
Log path: /var/log/apache2/other_vhosts_access.log
Log path: /opt/observium/logs/access_log
Finding psmisc psmisc will be available in your usual distributions shortly. The Debian packages are about to be uploaded and will be in the sid distribution soon. Other distributions I imagine will follow. For the source code, look in the GitLab repository or the Sourceforge file location.

Eriberto Mota: Debian Developers living in South America

Well, I made this map using data from http://db.debian.org. As an example, currently, there are 27 Brazilian DDs. However, there are 23 DDs living in Brazil.

11 June 2017

Bastian Blank: New blog featuring Pelican

For years I used a working blog setup using Zope, Plone and Quills. Quills was neglected for a long time and made me stuck at the aging Plone 4.2. There seems to be some work done in the last year, but I did not really care. Also this whole setup was just a bit too heavy for what I actually use it for. Well, static page generators are the new shit, so there we are. So here is it, some new blog, nice and shiny, which I hope to stop neglecting. The blog is managed in a Git repository. This repository is hosted on a private GitLab instance. It uses Pelican to generate shiny pages and is run via the GitLab CI. The finished pages are served by a, currently not highly available, instance of GitLab Pages (yes, this is one of the parts they copied from Github first). So let's see if this setup makes me more comfortable.

Benjamin Mako Hill: The Wikipedia Adventure

I recently finished a paper that presents a novel social computing system called the Wikipedia Adventure. The system was a gamified tutorial for new Wikipedia editors. Working with the tutorial creators, we conducted both a survey of its users and a randomized field experiment testing its effectiveness in encouraging subsequent contributions. We found that although users loved it, it did not affect subsequent participation rates.
Start screen for the Wikipedia Adventure.
A major concern that many online communities face is how to attract and retain new contributors. Despite it s success, Wikipedia is no different. In fact, researchers have shown that after experiencing a massive initial surge in activity, the number of active editors on Wikipedia has been in slow decline since 2007.
The number of active, registered editors ( 5 edits per month) to Wikipedia over time. From Halfaker, Geiger, and Morgan 2012.
Research has attributed a large part of this decline to the hostile environment that newcomers experience when begin contributing. New editors often attempt to make contributions which are subsequently reverted by more experienced editors for not following Wikipedia s increasingly long list of rules and guidelines for effective participation. This problem has led many researchers and Wikipedians to wonder how to more effectively onboard newcomers to the community. How do you ensure that new editors Wikipedia quickly gain the knowledge they need in order to make contributions that are in line with community norms? To this end, Jake Orlowitz and Jonathan Morgan from the Wikimedia Foundation worked with a team of Wikipedians to create a structured, interactive tutorial called The Wikipedia Adventure. The idea behind this system was that new editors would be invited to use it shortly after creating a new account on Wikipedia, and it would provide a step-by-step overview of the basics of editing.

The Wikipedia Adventure was designed to address issues that new editors frequently encountered while learning how to contribute to Wikipedia. It is structured into different missions that guide users through various aspects of participation on Wikipedia, including how to communicate with other editors, how to cite sources, and how to ensure that edits present a neutral point of view. The sequence of the missions gives newbies an overview of what they need to know instead of having to figure everything out themselves. Additionally, the theme and tone of the tutorial sought to engage new users, rather than just redirecting them to the troves of policy pages. Those who play the tutorial receive automated badges on their user page for every mission they complete. This signals to veteran editors that the user is acting in good-faith by attempting to learn the norms of Wikipedia.

An example of a badge that a user receives after demonstrating the skills to communicate with other users on Wikipedia.
Once the system was built, we were interested in knowing whether people enjoyed using it and found it helpful. So we conducted a survey asking editors who played the Wikipedia Adventure a number of questions about its design and educational effectiveness. Overall, we found that users had a very favorable opinion of the system and found it useful.
Survey responses about how users felt about TWA.
Survey responses about what users learned through TWA.
We were heartened by these results. We d sought to build an orientation system that was engaging and educational, and our survey responses suggested that we succeeded on that front. This led us to ask the question could an intervention like the Wikipedia Adventure help reverse the trend of a declining editor base on Wikipedia? In particular, would exposing new editors to the Wikipedia Adventure lead them to make more contributions to the community? To find out, we conducted a field experiment on a population of new editors on Wikipedia. We identified 1,967 newly created accounts that passed a basic test of making good-faith edits. We then randomly invited 1,751 of these users via their talk page to play the Wikipedia Adventure. The rest were sent no invitation. Out of those who were invited, 386 completed at least some portion of the tutorial. We were interested in knowing whether those we invited to play the tutorial (our treatment group) and those we didn t (our control group) contributed differently in the first six months after they created accounts on Wikipedia. Specifically, we wanted to know whether there was a difference in the total number of edits they made to Wikipedia, the number of edits they made to talk pages, and the average quality of their edits as measured by content persistence. We conducted two kinds of analyses on our dataset. First, we estimated the effect of inviting users to play the Wikipedia Adventure on our three outcomes of interest. Second, we estimated the effect of playing the Wikipedia Adventure, conditional on having been invited to do so, on those same outcomes. To our surprise, we found that in both cases there were no significant effects on any of the outcomes of interest. Being invited to play the Wikipedia Adventure therefore had no effect on new users volume of participation either on Wikipedia in general, or on talk pages specifically, nor did it have any effect on the average quality of edits made by the users in our study. Despite the very positive feedback that the system received in the survey evaluation stage, it did not produce a significant change in newcomer contribution behavior. We concluded that the system by itself could not reverse the trend of newcomer attrition on Wikipedia. Why would a system that was received so positively ultimately produce no aggregate effect on newcomer participation? We ve identified a few possible reasons. One is that perhaps a tutorial by itself would not be sufficient to counter hostile behavior that newcomers might experience from experienced editors. Indeed, the friendly, welcoming tone of the Wikipedia Adventure might contrast with strongly worded messages that new editors receive from veteran editors or bots. Another explanation might be that users enjoyed playing the Wikipedia Adventure, but did not enjoy editing Wikipedia. After all, the two activities draw on different kinds of motivations. Finally, the system required new users to choose to play the tutorial. Maybe people who chose to play would have gone on to edit in similar ways without the tutorial. Ultimately, this work shows us the importance of testing systems outside of lab studies. The Wikipedia Adventure was built by community members to address known gaps in the onboarding process, and our survey showed that users responded well to its design. While it would have been easy to declare victory at that stage, the field deployment study painted a different picture. Systems like the Wikipedia Adventure may inform the design of future orientation systems. That said, more profound changes to the interface or modes of interaction between editors might also be needed to increase contributions from newcomers.

This blog post, and the open access paper that it describes, is a collaborative project with Sneha Narayan, Jake Orlowitz, Jonathan Morgan, and Aaron Shaw. Financial support came from the US National Science Foundation (grants IIS-1617129 and IIS-1617468), Northwestern University, and the University of Washington. We also published all the data and code necessary to reproduce our analysis in a repository in the Harvard Dataverse. Sneha posted the material in this blog post over on the Community Data Science Collective Blog.

Francois Marier: Mysterious 400 Bad Request in Django debug mode

While upgrading Libravatar to a more recent version of Django, I ran into a mysterious 400 error. In debug mode, my site was working fine, but with DEBUG = False, I would only a page containing this error:
Bad Request (400)
with no extra details in the web server logs.

Turning on extra error logging To see the full error message, I configured logging to a file by adding this to settings.py:
LOGGING =  
    'version': 1,
    'disable_existing_loggers': False,
    'handlers':  
        'file':  
            'level': 'DEBUG',
            'class': 'logging.FileHandler',
            'filename': '/tmp/debug.log',
         ,
     ,
    'loggers':  
        'django':  
            'handlers': ['file'],
            'level': 'DEBUG',
            'propagate': True,
         ,
     ,
 
Then I got the following error message:
Invalid HTTP_HOST header: 'www.example.com'. You may need to add u'www.example.com' to ALLOWED_HOSTS.

Temporary hack Sure enough, putting this in settings.py would make it work outside of debug mode:
ALLOWED_HOSTS = ['*']
which means that there's a mismatch between the HTTP_HOST from Apache and the one that Django expects.

Root cause The underlying problem was that the Libravatar config file was missing the square brackets around the ALLOWED_HOSTS setting. I had this:
ALLOWED_HOSTS = 'www.example.com'
instead of:
ALLOWED_HOSTS = ['www.example.com']

9 June 2017

Petter Reinholdtsen: Release 0.1.1 of free software archive system Nikita announced

I am very happy to report that the Nikita Noark 5 core project tagged its second release today. The free software solution is an implementation of the Norwegian archive standard Noark 5 used by government offices in Norway. These were the changes in version 0.1.1 since version 0.1.0 (from NEWS.md): If this sound interesting to you, please contact us on IRC (#nikita on irc.freenode.net) or email (nikita-noark mailing list).

John Goerzen: Fixing the Problems with Docker Images

I recently wrote about the challenges in securing Docker container contents, and in particular with keeping up-to-date with security patches from all over the Internet. Today I want to fix that. Besides security, there is a second problem: the common way of running things in Docker pretends to provide a traditional POSIX API and environment, but really doesn t. This is a big deal. Before diving into that, I want to explain something: I have often heard it said the Docker provides single-process containers. This is unambiguously false in almost every case. Any time you have a shell script inside Docker that calls cp or even ls, you are running a second process. Web servers from Apache to whatever else use processes or threads of various types to service multiple connections at once. Many Docker containers are single-application, but a process is a core part of the POSIX API, and very little software would work if it was limited to a single process. So this is my little plea for more precise language. OK, soapbox mode off. Now then, in a traditional Linux environment, besides your application, there are other key components of the system. These are usually missing in Docker containers. So today, I will fix this also. In my docker-debian-base images, I have prepared a system that still has only 11MB RAM overhead, makes minimal changes on top of Debian, and yet provides a very complete environment and API. Here s what you get: The above goes into my minimal image. Additional images add layers on top of it, and here are some of the features they add: All of the above, including the optional features, has an 11MB overhead on start. Not bad for so much, right? From here, you can layer on top all your usual Dockery things. You can still run one application per container. But you can now make sure your disk doesn t fill up from logs, run your database vacuuming commands at will, have your blog download its RSS feeds every few minutes, etc all from within the container, as it should be. Furthermore, you don t have to reinvent the wheel, because Debian already ships with things to take care of a lot of this out of the box and now those tools will just work. There is some popular work done in this area already by phusion s baseimage-docker. However, I made my own for these reasons: Finally a word on the choice to use sysvinit. It would have been simpler to use systemd here, since it is the default in Debian these days. Unfortunately, systemd requires you to poke some holes in the Docker security model, as well as mount a cgroups filesystem from the host. I didn t consider this acceptable, and sysvinit ran without these workarounds, so I went with it. With all this, Docker becomes a viable replacement for KVM for various services on my internal networks. I ll be writing about that later.

Jonathan Dowland: Western Digital Hard Drive head parking

I stumbled across some information about pathological behaviour of Western Digital Green (and some Red) hard drives relating to drive-head parking when the device is idle. In some circumstances, a particular pattern of drive activity can result in the drive head being repeatedly parked and un-parked in short intervals, possibly* resulting in excess wear on the drive. Apparently* the drive head parking is recorded in the S.M.A.R.T. "Load Cycle Count" attribute. I have two WD Red drives in my NAS, one for live data and one for backup. The latter drive is basically unused most of the day until scheduled backup jobs kick in and those jobs are all clustered together. I already unmount the backup filesystems when the jobs are not active (I wrote about this in mount-on-demand backups). Inspecting the S.M.A.R.T. attributes was surprising:
drive power on hours load cycle count
regular 12143 348
backup 12191 13043
It certainly looks like my backup drive has a much higher load cycle count than you might expect for a mostly-idle drive. I checked the attributes again 24 hours later and the regular drive had incremented by a single cycle, whilst the backup drive went up by 56. There are some official tools from Western Digital that makes an adjustment to the idle timeouts for head parking on the drives. There's also an unofficial tool idle3tcl to do the same, which is packaged in Debian. The unofficial tool let you set and fetch a particular value from the drive firmware. I don't know for sure* that the official tool does exactly the same thing, and nothing else. One advantage of the unofficial tool is it lets you read the value as well as write it. I tried the unofficial tool to get the drive's default value, which was 0x8a, and bump it to the maximum of 0xff. I then tried the official tool then fetched the value again: interestingly the official tool had reset the value back to 0x8a. I haven't managed to assess the impact of these changes on the attrition rate yet because I need to perform a cold boot for the change to take effect and that isn't convenient just now. My plan is to try and disable the feature completely via the unofficial tool. If that rectifies the issue I will then investigate changing the power management settings by hand at backup start/end time, perhaps via hdparm. ( The problem with these kind of issues is there is precious little in the way of reliable documentation as to the real issue, real drive behaviour, etc. I've marked a few sections of this blog post with * asterisks to indicate where we are having to make informed guesses. )

Norbert Preining: Calibre 3 beta for Debian

I have updated my Calibre Debian repository to include packages of the upcoming version 3, currently version 2.99.10. As with the previous packages, I kept RAR support in to allow me to read comic books.
The repository location hasn t changed, see below. Please report your experiences to the Calibre beta support channel at MobileRead.
deb http://www.preining.info/debian/ calibre main
deb-src http://www.preining.info/debian/ calibre main
The releases are signed with my Debian key 0x6CACA448860CDC13 Enjoy

8 June 2017

Norbert Preining: Running in the Kanazawa hills

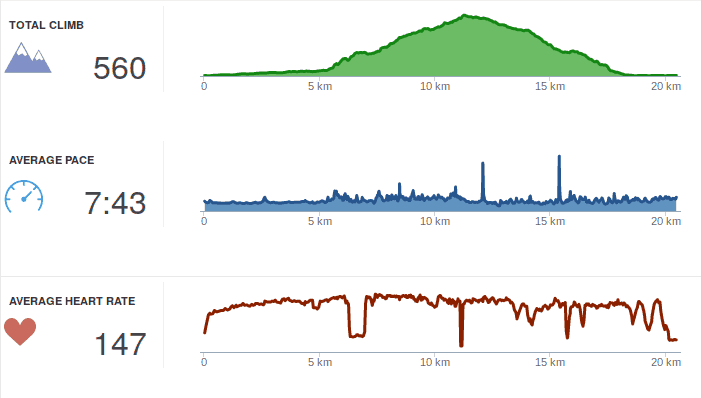
Sometimes I needed a short break from work, and usually I go a bit running. Normally I run between five and ten km, just around our flat. But yesterday I somehow thought it might be a good idea to run through the hills near by. I usually drive up there to a climbing spot or a cafe, so it will for sure not be that long. Well, my estimation was wrong
Turned out to be 20km and quite a trip up and down, in fact 560mH running up wasn t what I could actually do, so I walked the steeper parts. Due to the permanent rain the views weren t that great, but one gets a feeling how far it is back to town. I used my new fenix 5x for the run (was helpful with the built-in map, report later), so I got very detailed data from Garmin Connect. Not that I really understand what it is all for, but Garmin told me that I am overtraining and that I am not a good runner (due to vertical oscillation etc). I guess there is a whole lot to learn and improve. Anyway, I made it back alive, and the first thing I needed was loads of water to drink
Eriberto Mota: OpenVAS 9 from Kali Linux 2017.1 to Debian 9

The OpenVAS OpenVAS is a framework of several services and tools offering a comprehensive and powerful vulnerability scanning and vulnerability management solution. The framework is part of Greenbone Networks' commercial vulnerability management solution from which developments are contributed to the Open Source community since 2009. OpenVAS is composed of some elements, as OpenVAS-Cli, Greenbone Security Assistant, OpenVAS Scanner and OpenVAS Manager. The official OpenVAS homepage is http://www.openvas.org. From Kali Linux 2017.1 to Debian 9 Ok, this is a temporary solution. Now (June 2017), Debian 9 wasn't released yet and OpenVAS 9 is not available in Debian in good conditions (it is in Experimental but a bit problematic). I think that we will have OpenVAS in backports soon. The OpenVAS 9 from Kali is working perfect for Debian 9. So, to take advantage of this, adopt the following procedures:

1. Add a line to end of /etc/apt/sources.list file:

deb http://http.kali.org/kali kali-rolling main

2. Run:

# apt-get update
# apt-get install -t kali-rolling openvas

(if you want to simulate before install, add a -s option before -t)

3. Rermove or comment the previous line added to /etc/apt/sources.list file to avoid future problems in your Debian.

4. Run the following command to configure the OpenVAS and to download the initial database:

# openvas-setup

This step may take some time. Note that the initial password for user admin will be created and shown.

5. Finally, open a web browser and access the address https://127.0.0.1:9392 (use https!!!). Alternatively, you can call http://127.0.0.1 to be automagically redirected to https://127.0.0.1:9392.

The default user is admin and the password was shown in the last step. You will can change this password inside OpenVAS (menu Administration > Users > Edit User, which is an blue icon).

If your password was lost, you will be able to create a new administrative user via shell command. See the section "Some tips" below.

6. To see the packages installed from Kali Linux, use the command:

$ dpkg -l   grep kali
Some tips To create a new administrative user called test:
# openvasmd --create-user test --role Admin
To update the database (NVTs):
# openvasmd --update
# openvasmd --rebuild
# service openvas-scanner restart
To solve the message "Login failed. Waiting for OMP service to become available":
# openvas-start
To make OpenVAS listen all network interfaces, allowing one to call the service in a remote web browser (http://remote-server, port 80 only), edit the /lib/systemd/system/greenbone-security-assistant.service and change:
ExecStart=/usr/sbin/gsad --foreground --listen=127.0.0.1 --port=9392 --mlisten=127.0.0.1 --mport=9390

to

ExecStart=/usr/sbin/gsad --foreground --listen=0.0.0.0 --port=9392 --mlisten=127.0.0.1 --mport=9390
After the change, reload the configuration and restart the service:
# systemctl daemon-reload
# systemctl restart greenbone-security-assistant
Quick start for beginners If OpenVAS isn't familiar for you, I have a suggestion for a quick test. Firstly, download Ubuntu Server 8.04 from this page and install it inside a virtual machine, selecting all services as LAMP, SSH etc. I used the i386 version and VirtualBox. After this, use OpenVAS to scan the Ubuntu (menu Scans > Tasks > a pink icon with a magic wand in the upper left corner). After the scan, click over the blue bar where we will can see the word "Done". Enjoy!

Next.

Previous.