Search Results: "ron"

23 September 2011

Matthew Garrett: UEFI secure booting (part 2)

Microsoft have responded to suggestions that Windows 8 may make it difficult to boot alternative operating systems. What's interesting is that at no point do they contradict anything I've said. As things stand, Windows 8 certified systems will make it either more difficult or impossible to install alternative operating systems. But let's have some more background.

We became aware of this issue in early August. Since then, we at Red Hat have been discussing the problem with other Linux vendors, hardware vendors and BIOS vendors. We've been making sure that we understood the ramifications of the policy in order to avoid saying anything that wasn't backed up by facts. These are the facts:
Microsoft have a dominant position in the desktop operating system market. Despite Apple's huge comeback over the past decade, their worldwide share of the desktop market is below 5%. Linux is far below that. Microsoft own well over 90% of the market. Competition in that market is tough, and vendors will take every break they can get. That includes the Windows logo program, in which Microsoft give incentives to vendors to sell hardware that meets their certification requirements. Vendors who choose not to follow the certification requirements will be at a disadvantage in the marketplace. So while it's up to vendors to choose whether or not to follow the certification requirements, Microsoft's dominant position means that they'd be losing sales by doing so.

Why is this a problem? Because there's no central certification authority for UEFI signing keys. Microsoft can require that hardware vendors include their keys. Their competition can't. A system that ships with Microsoft's signing keys and no others will be unable to perform secure boot of any operating system other than Microsoft's. No other vendor has the same position of power over the hardware vendors. Red Hat is unable to ensure that every OEM carries their signing key. Nor is Canonical. Nor is Nvidia, or AMD or any other PC component manufacturer. Microsoft's influence here is greater than even Intel's.

What does this mean for the end user? Microsoft claim that the customer is in control of their PC. That's true, if by "customer" they mean "hardware manufacturer". The end user is not guaranteed the ability to install extra signing keys in order to securely boot the operating system of their choice. The end user is not guaranteed the ability to disable this functionality. The end user is not guaranteed that their system will include the signing keys that would be required for them to swap their graphics card for one from another vendor, or replace their network card and still be able to netboot, or install a newer SATA controller and have it recognise their hard drive in the firmware. The end user is no longer in control of their PC.

If Microsoft were serious about giving the end user control, they'd be mandating that systems ship without any keys installed. The user would then have the ability to make an informed and conscious decision to limit the flexibility of their system and install the keys. The user would be told what they'd be gaining and what they'd be giving up.

The final irony? If the user has no control over the installed keys, the user has no way to indicate that they don't trust Microsoft products. They can prevent their system booting malware. They can prevent their system booting Red Hat, Ubuntu, FreeBSD, OS X or any other operating system. But they can't prevent their system from running Windows 8.

Microsoft's rebuttal is entirely factually accurate. But it's also misleading. The truth is that Microsoft's move removes control from the end user and places it in the hands of Microsoft and the hardware vendors. The truth is that it makes it more difficult to run anything other than Windows. The truth is that UEFI secure boot is a valuable and worthwhile feature that Microsoft are misusing to gain tighter control over the market. And the truth is that Microsoft haven't even attempted to argue otherwise.

comment count unavailable comments

21 September 2011

Ian Wienand: Exploring $ORIGIN

Anyone who works with building something with a few libraries will quickly become familiar with rpath's; that is the ability to store a path inside a binary for finding dependencies at runtime. Slightly less well known is that the dynamic linker provides some options for this path specification; one in particular is a path with the special variable $ORIGIN. ld.so man page has the following to say about the an $ORIGIN appearing in the rpath:
  ld.so understands the string $ORIGIN (or equivalently $ ORIGIN )
  in  an  rpath specification to mean the directory containing the
  application  executable.  Thus,  an   application   located   in
  somedir/app   could   be  compiled  with  gcc  -Wl,-rpath,'$ORI 
  GIN/../lib' so that it finds an  associated  shared  library  in
  somedir/lib  no matter where somedir is located in the directory
  hierarchy.
  
As a way of a small example, consider the following:
$ cat Makefile
main: main.c lib/libfoo.so
	gcc -g -Wall -o main -Wl,-rpath='$$ORIGIN/lib' -L ./lib -lfoo main.c
lib/libfoo.so: lib/foo.c
	gcc -g -Wall -fPIC -shared -o lib/libfoo.so lib/foo.c
$ cat main.c
void function(void);
int main(void)
 
   function();
   return 0;
 
$ cat lib/foo.c
#include <stdio.h>
void function(void)
 
   printf("called!\n");
 
$ make
gcc -g -Wall -fPIC -shared -o lib/libfoo.so lib/foo.c
gcc -g -Wall -o main -Wl,-rpath='$ORIGIN/lib' -L ./lib -lfoo main.c
$ ./main
called!
Now, wherever you should choose to locate main, as long as the library is in the right relative location it will be found correctly. If you are wondering how this works, examining the back-trace from the linker function that expands it is helpful:
$ gdb ./main
(gdb) break _dl_get_origin
Function "_dl_get_origin" not defined.
Make breakpoint pending on future shared library load? (y or [n]) y
Breakpoint 1 (_dl_get_origin) pending.
(gdb) r
Starting program: /tmp/test-origin/main 
Breakpoint 1, _dl_get_origin () at ../sysdeps/unix/sysv/linux/dl-origin.c:37
37	../sysdeps/unix/sysv/linux/dl-origin.c: No such file or directory.
	in ../sysdeps/unix/sysv/linux/dl-origin.c
(gdb) bt
#0  _dl_get_origin () at ../sysdeps/unix/sysv/linux/dl-origin.c:37
#1  0x00007ffff7de61f4 in expand_dynamic_string_token (l=0x7ffff7ffe128, 
    s=<value optimized out>) at dl-load.c:331
#2  0x00007ffff7de62ea in decompose_rpath (sps=0x7ffff7ffe440, 
    rpath=0xffffffc0 <Address 0xffffffc0 out of bounds>, l=0x0, 
    what=0x7ffff7df780a "RPATH") at dl-load.c:554
#3  0x00007ffff7de7051 in _dl_init_paths (llp=0x0) at dl-load.c:722
#4  0x00007ffff7de2124 in dl_main (phdr=0x7ffff7ffe6b8, 
    phnum=<value optimized out>, user_entry=0x7ffff7ffeb28) at rtld.c:1391
#5  0x00007ffff7df3647 in _dl_sysdep_start (
    start_argptr=<value optimized out>, dl_main=0x7ffff7de14e0 <dl_main>)
    at ../elf/dl-sysdep.c:243
#6  0x00007ffff7de0423 in _dl_start_final (arg=0x7fffffffe7c0) at rtld.c:338
#7  _dl_start (arg=0x7fffffffe7c0) at rtld.c:564
#8  0x00007ffff7ddfaf8 in _start () from /lib64/ld-linux-x86-64.so.2
Just from a first look we can divine that this has found the RPATH header in the dynamic section and has decided to expand the string $ORIGIN.
$ readelf --dynamic ./main
Dynamic section at offset 0x7d8 contains 23 entries:
  Tag        Type                         Name/Value
 0x0000000000000001 (NEEDED)             Shared library: [libfoo.so]
 0x0000000000000001 (NEEDED)             Shared library: [libc.so.6]
 0x000000000000000f (RPATH)              Library rpath: [$ORIGIN/lib]
 0x000000000000000c (INIT)               0x4004d8
 0x000000000000000d (FINI)               0x4006f8
At this point it proceeds to do a readlink on /proc/self/exe to get the path to the currently running binary, effectively does a basename on it and replaces the value of $ORIGIN. Interestingly, if this should fail, it will fall back on the environment variable LD_ORIGIN_PATH for unknown reasons. This might be useful if you were in a bad situation where /proc was not mounted and you still had to run your binary, although you could probably achieve the same thing via the use of LD_LIBRARY_PATH just as well. This feature should be used with some caution to avoid turning your application in a mess that can't be packaged in any standard manner. One common example of use is probably your java virtual machine to find its implementation libraries.
$ readelf --dynamic /usr/lib/jvm/java-6-sun/bin/java
Dynamic section at offset 0x9a28 contains 25 entries:
  Tag        Type                         Name/Value
 0x0000000000000001 (NEEDED)             Shared library: [libpthread.so.0]
 0x0000000000000001 (NEEDED)             Shared library: [libjli.so]
 0x0000000000000001 (NEEDED)             Shared library: [libdl.so.2]
 0x0000000000000001 (NEEDED)             Shared library: [libc.so.6]
 0x000000000000000e (SONAME)             Library soname: [lib.so]
 0x000000000000000f (RPATH)              Library rpath: [$ORIGIN/../lib/amd64/jli:$ORIGIN/../jre/lib/amd64/jli]
 ...
There is a small but interesting security issue. If an attacker can hardlink to your binary that is using $ORIGIN then any path expansion is now relative to the attackers directory. Hence it is possible to make the linker read in arbitrary libraries and hence run arbitrary code. Clearly if your program is running setuid as someone else, such as root, you've just given up the keys to the house! Luckily, the dynamic linker will not let you shoot yourself in the foot like this, and prevents expansion of the $ORIGIN field if the program is running setuid.
$ sudo chown root ./main
$ sudo chmod +s ./main
$ ./main
./main: error while loading shared libraries: libfoo.so: cannot open shared object file: No such file or directory
However, this is a good example of why you might want to keep users home and temp directories on separate file systems away from where binaries live. There is also a similar variable $PLATFORM, which describes the current running system. This is gained via the auxiliary vector, which I have written about here and here. Setting LD_SHOW_AUXV=1 will allow you to examine this value.
$ LD_SHOW_AUXV=1 ls
...
AT_PLATFORM:     x86_64
...

20 September 2011

Matthew Garrett: UEFI secure booting

Since there are probably going to be some questions about this in the near future:

The UEFI secure boot protocol is part of recent UEFI specification releases. It permits one or more signing keys to be installed into a system firmware. Once enabled, secure boot prevents executables or drivers from being loaded unless they're signed by one of these keys. Another set of keys (Pkek) permits communication between an OS and the firmware. An OS with a Pkek matching that installed in the firmware may add additional keys to the whitelist. Alternatively, it may add keys to a blacklist. Binaries signed with a blacklisted key will not load.

There is no centralised signing authority for these UEFI keys. If a vendor key is installed on a machine, the only way to get code signed with that key is to get the vendor to perform the signing. A machine may have several keys installed, but if you are unable to get any of them to sign your binary then it won't be installable.

This impacts both software and hardware vendors. An OS vendor cannot boot their software on a system unless it's signed with a key that's included in the system firmware. A hardware vendor cannot run their hardware inside the EFI environment unless their drivers are signed with a key that's included in the system firmware. If you install a new graphics card that either has unsigned drivers, or drivers that are signed with a key that's not in your system firmware, you'll get no graphics support in the firmware.

Microsoft requires that machines conforming to the Windows 8 logo program and running a client version of Windows 8 ship with secure boot enabled. The two alternatives here are for Windows to be signed with a Microsoft key and for the public part of that key to be included with all systems, or alternatively for each OEM to include their own key and sign the pre-installed versions of Windows. The second approach would make it impossible to run boxed copies of Windows on Windows logo hardware, and also impossible to install new versions of Windows unless your OEM provided a new signed copy. The former seems more likely.

A system that ships with only OEM and Microsoft keys will not boot a generic copy of Linux.

Now, obviously, we could provide signed versions of Linux. This poses several problems. Firstly, we'd need a non-GPL bootloader. Grub 2 is released under the GPLv3, which explicitly requires that we provide the signing keys. Grub is under GPLv2 which lacks the explicit requirement for keys, but it could be argued that the requirement for the scripts used to control compilation includes that. It's a grey area, and exploiting it would be a pretty good show of bad faith. Secondly, in the near future the design of the kernel will mean that the kernel itself is part of the bootloader. This means that kernels will also have to be signed. Making it impossible for users or developers to build their own kernels is not practical. Finally, if we self-sign, it's still necessary to get our keys included by ever OEM.

There's no indication that Microsoft will prevent vendors from providing firmware support for disabling this feature and running unsigned code. However, experience indicates that many firmware vendors and OEMs are interested in providing only the minimum of firmware functionality required for their market. It's almost certainly the case that some systems will ship with the option of disabling this. Equally, it's almost certainly the case that some systems won't.

It's probably not worth panicking yet. But it is worth being concerned.

comment count unavailable comments

Kai Wasserb ch: TNEF or how to lock-up your e-mails

As the administrator for several MTAs I've received my fair share of support requests for "unreadable" e-mails. They generally have an attachment called winmail.dat. This is what all (for exceptions see the rest of this blog post) non-Outlook MUAs can display, when they receive an e-mail with the application/ms-tnef (or application/vnd.ms-tnef) MIME type. TNEF is a propietary format cooked up in Redmond. When chosen, the e-mail in question isn't sent as text/plain or at least text/html, but the entire e-mail is put into an TNEF-encoded attachment, most often called winmail.dat, in which you (most commonly) find the content of the e-mail in RTF, possible attachments are also put into the winmail.dat. The easieast solution for all involved parties is to convince the sender, that her Outlook and/or Exchange setup needs fixing (disabling TNEF in Outlook and Exchange 2003). Sadly this won't work all the time. The other solutions are to either filter the e-mails on your e-mail server and run them through something like ytnef_smtpd.py (please note, that this might be legally problematic for you as a service provider, opening an e-mail, even automatically, is a violation of communication privacy rights in many jurisdictions). Or, if the legal problem is too big or can't be solved through an local server installation (e.g. because there is no server running 24/7), you're left with either using Outlook (probably what Microsoft intended) or you can use a plug-in/add-on for your client. I've tested the LookOut add-on for icedove and it seems to work well. There are of course plug-ins for many other clients, but I can't honestly tell whether they work or not. [UPDATE 2011-09-20]: Fellow Debian Developer Josselin Mouette wrote me, that Evolution is capable of reading TNEF-encoded e-mails out of the box, but he also said that [TNEF e-mails should] be banned by all means.[/UPDATE 2011-09-20] Now, before I close, please always try to convince the sender/postmaster to fix their setup. It has only advantages: text/plain e-mails are smaller, they're less likely to contain malicious code (i.e. no parts hidden away from the virus scanner on the mail server (amavis can read TNEF e-mails, if libconvert-tnef-perl is installed)) and all recipients can open the e-mails with the client of their choice.

19 September 2011

Sylvain Beucler: Building Android NDK samples

I searched forever for a way to just build the examples in the Android NDK, preferably from the command line. Here's how. First step: build the C++ code:
cd /usr/src/android-ndk-r6/samples/san-angeles/
/usr/src/android-ndk-r6/ndk-build
Simple enough. Second step:
You will then need to generate your final .apk through the usual means. -- Android NDK Dev Guide
Thanks a ****ing lot! In addition the documentation is very much Eclipse-centered - and I can't be bothered to install and configure all the Eclipse stack for a mere Java wrapper for the above-generated .so file XD We first need to use the 'android' wrapper and download the "SDK Platform Android 2.2, API 8, revision 3" - aka "android-8", the first environment to support OpenGL ES 2.
/usr/src/android-sdk-linux_x86/tools/android
It appears we first need to "manage the project", more precisely import from an existing project: http://developer.android.com/guide/developing/projects/projects-cmdline.html So we create a project by importing the sources from the current directory:
/usr/src/android-sdk-linux_x86/tools/android update project \
  --name san-angeles --path . --target "android-8"
Then we use ant to build the thing: http://developer.android.com/guide/developing/building/building-cmdline.html
apt-get install ant openjdk-6-jdk
ant debug  # avoid messing with signing
We now have a bin/san-angeles-debug.apk and we can run it in the emulator. Create a new "Virtual device" using the "android-8" platform we downloaded above, and launch it. Given the time needed to boot the OS, I suggest enabling snapshots. Scaling to display resulted in a very tiny, dark and slow display, in a first step I suggest using a non-scaled one.
/usr/src/android-sdk-linux_x86/tools/android
At last we can run it! Install it in the emulator:
/usr/src/android-sdk-linux_x86/platform-tools/adb install -r bin/san-angeles-debug.apk
You'll find a DemoActivity in your apps directory :)
Note: I tried to compile the "hello-gl2", showcasing OpenGL ES 2.0, but sadly it crashes:
Sorry! The application GL2JNI (process com.android.gl2jni) has stopped unexpectedly. Please try again.
The emulator apparently doesn't advertise EGL_OPENGL_ES2_BIT (checked in in GL2JNIView.java). If you try to by-pass it, you'll get loads of:
E/libEGL ( 333): called unimplemented OpenGL ES API
It's worth noting the OpenGLES20 sample from the "API Demos" application uses a fall-back OpenGL ES 1 renderer if v2 is not available - it made me mistakenly believe that OpenGL ES 2 was supported only from Java >( OpenGL ES 2 is not supported in the emulator as of 2011-09-17 - period.

Keith Packard: MacBook-Air-2

Fixing the Sandbrige MacBook Air display initialization We left our hero with Debian installed on the MacBook Air, but with the display getting scrambled as soon as the i915 driver loaded. As was reported to Matthew, the problem is as simple as a lack of the right mode for the eDP panel in the machine. This mode is supposed to come from the panel EDID data, but for some reason the driver wasn t able to query the EDID data, and so it decided to try some random panel timings it dug out of the VBT tables, which are generally supposed to be used by LVDS panels. Apple helpfully stuck valid data there, but for some other panel one that is 1280x800 pixels instead of the 1366x768 pixel panel in the MacBook Air. I heard rumors that some machines would get a black screen when the i915 driver loaded. I was fortunate my machine simply displayed a 1366x768 subset of the programmed 1280x800 mode. A bit of garbage on the right side, and a few scanlines missing at the bottom. Quite workable, especially after I ran fbset -yres 768 to keep the console in the visible portion of the screen. DDC failure Looking through the kernel logs, the Intel driver tries to access the EDID data and times out, as if DDC is just completely broken. This is rather unexpected; the eDP spec says that the panel is required to support DDC and provide EDID. Now, we ve seen a lot of panels which don t quite live up to the rigorous eDP specifications, but it s a bit surprising from Apple, who generally do VESA stuff pretty well. We ve heard reports about panels reporting invalid EDID data, or EDID data which didn t actually match the panel (causing us to prefer the VBT data on LVDS machines). But I ve not heard of an eDP panel which didn t have anything hanging off of the DDC channel. But X works fine? During early debugging, I happened to start X up. Much to my surprise, X came up at the native 1366x768 mode. Digging through the kernel logs after that, I discovered that EDID was successfully fetched from the eDP panel while X started up. At this point, I knew it was all downhill the EDID data was present, it just wasn t getting picked up during the early part of the driver initialization when the console mode is initialized. eDP power management The CPU is given complete control over the power management of the eDP panel; sequencing through various power states and waiting appropriate amounts of time when things change. Given the goal of keeping power usage as low as possible, this makes a huge amount of sense. The eDP spec is quite clear though, without power, the panel will not respond to anything over the aux channel, and that includes EDID data. The eDP panel power hardware in the Sandybridge chip has a special mode for dealing with this requirement. If the panel is not displaying data, you can supply power for the aux channel stuff by setting a magic bit in the panel power registers. When initializing the frame buffer, the kernel driver turns off the panel completely so that it has all of the hardware in a known state (yeah, this is not optimal, but that s another bug). When X started, the panel was already running with the console mode. Given the difference between these two states EDID querying with the panel off failed, while EDID querying with the panel on worked, it seemed pretty clear that the panel power wasn t getting managed correctly. So, it seemed pretty clear that the magic power the panel bit wasn t getting turned on at the right times. Getting the power turned on. I stuck a check inside all of the aux channel communication functions to see where things were broken. This pointed out several places missing the panel power calls. This wasn t quite sufficient to get EDID data flowing. The remaining problem was that the code wasn t waiting long enough after turning the panel power on before starting the aux channel communication. A few msleep calls and huzzah! EDID at boot time and the console had the right mode. Making it faster However, it turns out that the driver does this a lot, and the msleeps required were fairly long the eDP panel wants a 500ms delay from turning the panel power off before you can turn it back on. I fix this by simply delaying the panel power off until things were idle for a long time. Now mode setting goes zipping through, and a few seconds later, the bit to force panel power on gets turned off. Getting these bits for yourself I ve pushed out the code to my (temporary) kernel repository git://people.freedesktop.org/~keithp/linux in the fix-edp-vdd-power branch. I d love to hear if you ve tried this on either a MacBook Air or any other eDP machine from Ironlake onwards.

18 September 2011

Keith Packard: MacBook-Air

Installing Linux on Sandybridge MacBook Air Matthew Garrett got a report from someone who bought a brand new Sandybridge MacBook Air and was trying to install Fedora on it. The screen went black as soon as the i915 driver tried to set the initial mode. I bought one to try and help out. Just getting Linux installed turned out to be a minor adventure and I thought I d write a few notes for the next person who comes along and tries to do this. The obvious method I downloaded a collection of Debian ISO images, live images, netboot images from testing and CD-1 of squeeze. I downloaded a Fedora 16 alpha XFCE live image. I burned all of these to actual CDs, and then stuck them in a CD drive and held the c key while booting the machine. Nothing worked. The CD would spin up, the screen would switch from white to a black text mode with a blinking cursor at the upper left and then then CD would stop. rEFIt attempts rEFIt provides a boot selection menu and various configuration bits to provide for a multi-boot environment. This is necessary to leave the OS-X install on the disk and also install Linux. It also lets you boot from removable media, or at least that was the story. rEFIt would list removable USB flash storage devices, but it would not list CD drives, even after the CD drive spun up and did stuff for a while. This makes me wonder if the c key technique wasn t actually trying to boot from the CD. However, rEFIt wouldn t boot from a grub2-enabled USB key. ISO on USB flash key What rEFIt will boot is a Fedora or Debian ISO image copied directly to the USB flash device. The Ubuntu 11.04 live image and it did not work. Fedora F16 Alpha The live image came up and started X in frame buffer mode. However, when I went to install the image to the hard disk, it got stuck trying to discover devices. I waited about 20 minutes and it never finished, although it did chew up a lot of CPU time. Debian Squeeze I copied CD-1 of the 32-bit Squeeze distribution to my flash key. That booted up to text mode and went through the install. Nothing really unusual until it came to installing grub. I let it install grub to /dev/sda4, the new partition I had created for Linux. I figured installing grub to /dev/sda would be a bad idea (I think it would have actually worked just fine in retrospect). A slight out-of-sync diversion here I couldn t get the 32-bit kernel to talk to any keyboard or USB networking device, so I eventually installed a 64-bit kernel and that works just fine. You can run a 32-bit user space with a 64-bit kernel without any trouble. Making EFI boot Naturally, I couldn t get the machine to boot to Linux after this. rEFIt, the multi-boot tool for Mac OS X appears only interested in booting EFI images, or at least was not interested in booting my BIOS-based Grub2 installation on /dev/sda4. I used the rescue mode on the USB flash drive to get back to my installed Linux image and installed grub-efi-amd64. The OS X EFI version does not support 32-bit EFI code, which seems entirely reasonable to me. What took a while was figuring out that all of the grub files need to be readable through EFI, and that the Mac EFI code can only read FAT (and HFS?) partitions. So, the trick appears to be to stick the grub files on the Mac OS X efi partition (/dev/sda1). I created a directory over there, /EFI/grub and then mounted that as /efi and made a symlink from /boot/grub to /efi/EFI/grub. Now, grub-install sticks the files in the right place, and update-grub will even place grub.cfg in the directory where it needs to go. At this point, rEFIt will happily find the core.efi and grub.efi files and show them in the list of possible operating systems to boot. I don t know why there are both core.efi and grub.efi files; I ve only ever picked grub.efi and that has worked nicely. Broadcom WiFi I haven t gotten that working yet; the b43 supported chip list says it works in kernel 3.1. I m busy building a 3.1-rc4 kernel as I type this, so perhaps that will just work when I boot that. i915 KMS The whole reason for doing the install is to fix problems with the eDP EDID discovery which is currently preventing the machine from running X. I ll be working on that next; a quick kludge to just read the current mode from the device should get something on the screen (we already do that for LVDS panels). Beyond that, I ll be trying to figure out whether I can make EDID actually work, or whether it s just not available in this machine. Somehow the kernel frame buffer ended up as 1280x800, which was quite annoying. As a temporary kludge, I ran fbset -yres 768 to at least avoid having text disappear off the bottom of the screen. Once the panel size is discovered correctly, that should be fixed. Status This is sure not like installing Linux on a regular PC. However, I m reasonably hopeful that the devices in the machine will be working pretty well under Debian within the next few days.

Paul Wise: Revisiting personal software freedom

Since it was Software Freedom Day again, I figured I should revisit my personal software freedom and see what has changed since my post two years ago. There hasn't been a vrms meme again this year so I don't have anyone else to compare with. A small survey on IRC indicates folks still need non-free nVidia drivers, embedded software, GNU documentation, Java and more. Since then I have switched my laptop from the Dell Inspiron 6400 to the Thinkpad X201 Tablet. Nothing really changed with my laptop, GNU documentation is still non-free and the new Intel WiFi chip on my new laptop still uses non-free embedded software. To remind myself of the non-free bits embedded in the hardware (CPU microcode, BIOS, EC etc), I have installed intel-microcode and microcode.ctl. Since then I didn't get any new phone, still the same OpenMoko FreeRunner. I'm now using QtMoko on a 4GB microSD card and Debian and SHR on other cards for testing. QtMoko is based on Debian and is the latest incarnation of Qtopia. It is probably free but I haven't done any audit of it. One interesting thing that changed with the FreeRunner in the past two years is that Harald Welte and friends started OsmocomBB, a project to create free software for the GSM modem built into the FreeRunner and many old feature-phones. I haven't tried it yet due to lack of time. While at the Chaos Communication Camp 2011 I learnt about the blackbox that SIM cards are (video), which hopefully OsmocomBB has a chance to protect against. AFAIK nothing else has changed to improve software freedom on the FreeRunner, the WiFi, GPS and other parts still contain non-free software with no chance of a replacement in sight. Since then I am still using the same wireless router and ADSL modem and I wasn't brave enough to try replacing their software. I still use gmail out of intertia, but I at least have started using offlineimap to prepare for the day when I will move away from it. I still use Google Maps, mainly for searching for public transport routes. With my recent travels in Europe I encountered many places where OpenStreetMap has much better coverage than Google. One nice thing about Google Maps adding public transport information is that public transport organisations have been publishing public data feeds for Google to consume. Apparently there is also a realtime variant. I also found one website using a JSON API for Google street view. The combination of these gives me hope for better support for spatial data in free software. The data (aerial and streets) will obviously remain a much longer term freeness issue though. For flash video on the web get-flash-videos appeared and made it even easier to ignore flash, especially since I got a few patches added to it. In addition Swfdec died but Gnash improved enough to replace it. Lightspark was also created but has so far been pretty buggy and unstable. Free RAR v3 format support appeared in the form of TheUnarchiver. The Voxware audio codec and DigiTrakker MDL files are still not supported by Rhythmbox. Unicode has been updated and so now Debian doesn't support every script fully. I still manage to avoid Skype. The nouveau drivers have matured enough to provide 3D support, multi-monitor support and general stability for the one nVidia card I used in the past two years. Overall, I'm reasonably happy with my level of software freedom. My main strategy for preventing regressions in my software freedom remains to just avoid doing things that require non-free software. The most problematic FLOSS issues for me are embedded software, spatial data support and Flash support. Please feel free to contact me with any comments or questions. Happy Software Freedom Day everyone!

17 September 2011

Joey Hess: destructive impulse

I used to know guys who would take old computer hardware out in the desert and shoot it up. I never went, and I've never gratuitously destroyed a computer in 2 decades of working with the things. Until yesterday when I picked one up by the monitor and introduced it to the floor. My regret isn't that I violently destroyed a computer, but that it was my Mom's computer, and I did it right in front of her, and without even a story-worthy reason, just out of garden variety frustration. And perhaps there's some regret that I was actually unsucessful in destroying anything other than the monitor and some speakers. The computer was salvaged, and my mom has a new monitor and a working system again. Sorry Mom & Maggie. To make up for it, I'll humiliate myself with this recording of "broke mom's computer blues", which will only be available for a very limited time: click to listen (warning: contains harmonica). Anyway, don't worry; any remaining frustration will be taken out the usual way: Splitting firewood.

Andrew Pollock: [life/americania] Whirlwind visit to the Windy City

Our friend Susan was going to be in Chicago for a conference, and as we hadn't seen Chicago yet, and it was on the list of cities we wanted to visit, we made the semi-spur of the moment decision to have a three day weekend there last weekend. We got the Virgin America red-eye flight from SFO, which left on Friday at around 5pm, and got into Chicago at around 11:30pm, local time. Zoe didn't do as well as she has previously, and didn't sleep very well on the flight over, despite us getting lucky and scoring an empty seat between us on an otherwise fairly full flight. I think she's getting too big to comfortably sleep in the Ergo baby carrier (or isn't keen on sleeping vertically any more). We stayed at the Swissotel, because that was where Susan was staying (and was where her conference was) and nearby hotels seemed to be around the same price range. When we checked in, we let them talk us into an upgrade to a larger room, which had fantastic views of Lake Michigan and the Chicago River. Lake Michigan is just mind-bogglingly big. It's an inland sea. What can I say? I was totally in love with Chicago. The weather while we were there was unbelievable. Clear skies. High 20's (Celsius). It was more humid than the Bay Area, but less humid than Brisbane. The first thing we did on Saturday was go visit a friend of Sarah's who lived in Bryn Mawr. We took the "L" there. The elevated train was an interesting affair, and turned out to be less accessible than we'd been led to believe from some light research in advance. In fact, I found Chicago in general to be fairly wheelchair (and by extension, stroller) unfriendly. We had to lug Zoe's stroller up and down stairs quite a bit to get from the river level to where the hotel was. Zoe seemed to find it amusing, at least. Aside from that problem, the city seemed pretty flat. I'm really glad that we got out of the city and into Bryn Mawr, because it was really great to see that aspect of Chicago life as well. Lovely, quiet, tree-lined streets with wide sidewalks. Beautiful buildings. Sarah's friend was fostering 8 kittens, so Zoe got to have a play with all of them, which she thought was pretty cool. After we returned to the city, Sarah and I kicked back in Millennium Park while Zoe napped in the stroller. Saturday, being 9/10/11 in US date format, seemed to be particularly popular for weddings, and there were a lot of couples getting wedding photos taken in the park. That night, we tried to have some deep dish pizza at Uno, the home of deep dish pizza, but the line was ridiculous. We subsequently learned about Due, and went there the following night. The pizza was good, and I found the crust to be slightly different from what we'd get at Patxi's. We checked out the Navy Pier on both Sunday and Monday, taking Zoe to the Chicago Children's Museum both days (we got free entry thanks to our membership at the Children's Discovery Museum of San Jose). We had grand plans of checking out the Shedd Aquarium, but it turned out that Monday was a "free for all Illinois residents" day, and the line at 11am was ridiculous, so we gave it a miss and took at water taxi back to Navy Pier. It was Zoe's first boat ride, and she enjoyed it. I got some unbelievably good photos of the city skyline from the boat. Our flight out was at 7pm, so we took the train to Midway. I was very impressed that we could get all the way to the airport by train for the standard price. I love flat-rate fares. I really love a city with good mass public transit. The only thing that detracted from this in Chicago was the accessibility issues. We explicitly went to the Orange Line Clarke/Lake station to go to Midway because it was listed as being wheelchair accessible, and we had a stroller and a suitcase. We ended up going up to the wrong platform, and getting across to the other side was a bit of a mission. We'd entered the station from the street level, took the elevator up, and then realised we were on the wrong side. We had to go back down the elevator to the level below the street, cross the street from underneath it, and then go back up the elevator on the other side. Aside from these sorts of shenanigans, the whole elevated train thing was pretty cool (but I wouldn't have wanted to have an apartment with the train line right outside my window). If only the cars had glass roofs, the Loop would have been a lot more scenic. Overall, it'd be hard to say whether I liked Chicago or New York City better. I liked the clean, flat nature of Chicago, the architecture and the lower density of buildings, but I also really love New York just because it's New York, and has an awesome (probably equally stroller-unfriendly) subway system. Photos from the trip are here.

Dirk Eddelbuettel: littler 0.1.5

Brown-bag release time for littler. One of the <emph>minor cleanups</emph> in the 0.1.4 release from Thursday actually introduced a nasty little bug as you can't call Rf_KillAllDevices() when you do not have any graphics device. Doh. So with apologies for the lower quality release, and the two hour malfuntioning window for CRANberries that it cause, a repaired version is now out there. The very brief (upstream) ChangeLog is as follows:
2011-09-17  Dirk Eddelbuettel  <edd>
        * configure.in: Mark as release 0.1.5
        * littler.c (littler_CleanUp): Remove call to Rf_KillAllDevices() 
littler provides r (pronounced littler), a shebang / scripting / quick eval / pipelining front-end to the the R language and data analysis environment. As usual, our code is available via our svn archive or from tarballs off my littler page and the local directory here. A fresh package is in Debian's incoming queue and will hit mirrors shortly.

Patrick Schoenfeld: Struggling with Advanced Format during a LVM to RAID migration

Recently I decided to invest in another harddisk for my atom system. That system, I built up almost two years ago, has become the central system in my home network, serving as a fileserver to host my personal data, some git repositories etc., streaming server and since I switched to a cable internet connection it also serves as a router/firewall.
Originally, I bought that disk to backup some data, of the systems in the network, but I realized that all data on this system were hosted on a single 320GB 2,5" disk and it became clear to me, that, in absense of a proper backup strategy, I at least should provide some redundancy.


So I decided, once the disk was in place, that the whole system should move to a RAID1 over the two disks. Basically this is not that hard as it may seem at a first glance, but I had some problems due to a new sector size in some recent harddisks, which is called Advanced Format.


But lets begin from the start. The basic idea of such a migration is:
  1. Install mdadm with apt-get. Make sure to answer 'all' to the question which devices need to be activated in order to boot the system.
  2. Partition the new disk (almost) identical.
    Because the new drive is somewhat bigger that wouldn't make sense, but at least the two partitions which should be mirrored on the second disk, need to be identical.
    Usually this is achieved easily by using
    sfdisk -d /dev/sda sfdisk /dev/second/sdb

    In this case, it wasn't that easy. But I will come to that in a minute.
  3. Change the type of the partitions to 'FD' (Linux RAID autodetect) with fdisk
  4. Erase evidence of an eventual old RAID from the partitions, which is probably pointless on a brand-new disk, but we want to be sure:
    mdadm --zero-superblock /dev/sdb1
    mdadm --zero-superblock /dev/sdb2
  5. Create two DEGRADED raid1 arrays from the partitions:
    mdadm --create /dev/md0 --level=1 --raid-devices=2 /dev/sdb1 missing
    mdadm --create /dev/md1 --level=1 --raid-devices=2 /dev/sdb2 missing
  6. Create filesystem on the first raid device, which will become /boot.
  7. Mount that filesystem somewhere temporary and move the contents of /boot to it:
    mount /dev/md0 /mnt/somewhere
  8. Unmount /boot, edit fstab to mount /boot from /dev/md0 and re-mount /boot (from md0)
  9. Create mdadm configuration with mdadm and append it to /etc/mdadm/mdadm.conf:
    mdadm --examine --scan >> /etc/mdadm/mdadm.conf
  10. Update the initramfs and grub (no manual modification needed with grub2 on my system)
    and install grub into the MBR of the second disk.

    update-initramfs -u
    update-grub
    grub-install /dev/sdb
  11. The first point to pray: Reboot the system to verify it can boot from the new /boot.
  12. Create a physical volume on /dev/md1:
    pvcreate /dev/md1
  13. Extend the volume group to contain that device:
    vgextend <volgroup_name> /dev/md1
  14. Move the whole volume group physically from the first disk to the degraded RAID:
    vgmove <volgroup_name> /dev/md1

    (Wait for it to complete... takes some time ;)
  15. Reduce first disk from the VG:
    vgreduce <volgroup_name> /dev/sda2
  16. Prepare it for addition to the RAID (see step 3 and 4) and add it:
    mdadm --add /dev/md0 /dev/sda1
    mdadm --add /dev/md1 /dev/sda2
  17. Hooray! Watch into /proc/mdstat. You should see that the RAID is recovering.
  18. When recovery is finished pray another time and hope that system is still booting with it running from the RAID entirely. If it does: Finished :-)

Now to the problem with the advanced format:
There is some action taking place with the hardware vendors to move to a new sector size. Physically my new device has a size of 4096 bytes per sector. Somewhat different to the 512 bytes disks used to have the last decade.


Logically it still has 512 bytes per sector. As far as I understand this is achieved by placing 8 logical sectors into one physical sector, so when partitioning a new disk the alignment of the disk has to be so that partitions start in a sector which is a multiple of 8.

That, obviously, wasn't the case with the old partitioning on my first disk. So I had to manually create partitions by specifying start points manually and making sure they are dividable by 8.

Otherwise fdisk would complain about the layout on the disk.
This does not work with cfdisk, because it does not accept manual alignment parameters and unfortunately the partitions it creates do have a wrong alignment. So good old fdisk and some calculations how many sectors are needed and where to start, to the rescue.

So the layout is now:
Device Boot Start End Blocks Id System
/dev/sdb1 2048 291154 144553+ fd Linux raid autodetect
/dev/sdb2 291160 625139334 312424087+ fd Linux raid autodetect


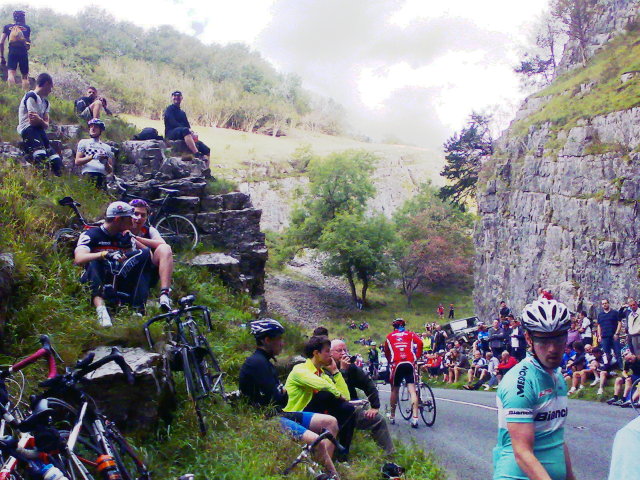
MJ Ray: Tour of Britain: Cheddar Gorge-ous

Photo of Fans in the Gorge

Fans in the Gorge

So tired, but so happy. Well worth it as a day out. Yesterday I went to the Tour of Britain as it passed through Cheddar Gorge. It was a fairly social trip, riding along with two from Bristol on the way in (hope they got back OK one bike broke crossing the orchard at Sandford, but I showed them Cheddar Cycle Store) and one from Milton on the way back. When I got there, I rode up the Gorge until I had to stop (or else fall off) and it was still packed with fans. It was a good half-hour before the race would pass by, but already almost every flattish piece of land by the road had either a spectator or a bicycle on it. I watched twitter for race news, posted an update @mjray, then put the phone away as the green-fronted police bikes came through just ahead of the racers. I tried videoing the race, but it s only the second outing for the handlebarcam and I seem to have deleted the recording before hooking it up to the laptop. Thankfully, the itv4 coverage (repeated 13:00) is pretty good. (My back is on TV! Ahem.) Now, today (Saturday) I will be mostly doing the work scheduled for Friday, but it was still worth it. Go along if you get the chance: Suffolk and Norfolk today, Westminster tomorrow. I suggested it to @enterprisehub s #coopsweekend because the Rabobank team are doing well.

16 September 2011

Rapha&#235;l Hertzog: How to triage bugs in the Debian bug tracking system

Triaging bugs is one of the easiest way to start contributing to Debian. I ll teach you the basics in this article. 1. Prerequisites All interactions with the Debian Bug Tracking System (BTS) happen through email so you need to have an email account with an address that you re willing to make public. All the mail that you send to the BTS will be archived and publicly available through its web-interface. This also means that you should have some spam filters in place because it will inevitably be harvested by spammers. :-( To ensure that this email address is consistently used by the various tools that we re going to use, it s a good idea to put this email address in the DEBEMAIL environment variable. You can also specify your full name in DEBFULLNAME (in case you don t want to use the name associated with your Unix account). You usually do this by modifying ~/.bashrc (if you use bash as login shell):
export DEBEMAIL="hertzog@debian.org"
export DEBFULLNAME="Rapha l Hertzog"
You should also install the devscripts package, it provides the bts command that we re going to use. 2. Find a package or a team with too many bugs You can literally pick any popular software that s in Debian, they almost always get more bug reports than the maintainers can handle. Instead of picking a package, you can also select a packaging team and concentrate your efforts on the set of packages managed by the team. In any case, it s important to receive the bug traffic for the packages that you re going to work on. If you went for a specific package, you should subscribe to the package via the Package Tracking System (there s a subscribe box on the bottom left corner once you selected the source package of interest). If you decided to help a team, there s usually a dedicated mailing list receiving all bug traffic. You can browse a list of packages with the most bugs if you have troubles finding a package to work on. A stack of bug reports to triage 3. Triage bugs! Bug triaging is all about making sure that bugs are correctly classified so that when a developer looks at the bug list, he can quickly find bugs with all the information required to be able to fix them! 3.1 Adding information to bug Adding supplementary information is easily done just by sending a mail to XXXX@bugs.debian.org (replace XXXX with the bug number). But often you want to reply to a message in the bug history, in that case bts --mbox show XXXX is for you. It will grab the corresponding mailbox and open a mailer (mutt by default) on it. Now you can directly reply in your favorite mailer. 3.2 Classifying bugs The Debian BTS uses tags (click the link and read the doc!) to classify bugs. bts tag XXXX + foo will add the foo tag (replace the + with a to remove a tag). If you want to explain why you re adding a tag, you should instead reply in the bug log as explained above, put control@bugs.debian.org in Bcc (Blind Carbon Copy) and start the body of your message with your tag command:
tag XXXX + foo
thanks
But what tag should you add? When a bug is submitted, you should try to reproduce the bug. If you can reproduce it, then tag the bug confirmed (example in #641710). If you can t, you should request more information (ex: a sample document triggering the bug, a configuration file, the output of some relevant command, etc.) until you can reproduce it or conclude that it was a user mistake. When you request supplementary information due to this, you should tag the bug unreproducible moreinfo (example in #526774). moreinfo should be later dropped when the requested information are provided, and unreproducible should be dropped if those information were enough to actually help reproduce the bug (example in #526774). During that initial evaluation, it s also worth differentiating packaging bugs (which are specific to Debian) from upstream bugs (which are relevant also for non-Debian users). The latter should be tagged upstream (and forwarded upstream if the bug is reproducible or contains enough information for the upstream developers, example in #635112). If you saw a (viable) patch in the bug log, the bug should be tagged patch . This is usually done by the patch submitter but sometimes it s forgotten (example in #632460). Take care though to not reinstate the patch tag if it was initially set but then dropped by the package maintainer after a review of the patch. If the title of the bug report is not descriptive enough, you can change it with a retitle XXXX new-title command (example in #170850). You can also change the severity of the bug report depending on the impact of the problem (with a command severity XXXX new-severity , what a surprise!). Request for new features are wishlist , most documentation problems are minor . On the other side of the scale, you can use important for bugs that are very annoying but that should not block a release. serious , grave and critical are used for release critical bugs, check the official definitions of the severities (examples in 502738 or #506498). 3.3 Closing non-bugs and bugs that are already fixed If your analysis of the bug report is that it s not really a bug but a user mistake, then you should close it by sending a mail to XXXX-done@bugs.debian.org with some explanations of the user s mistake so that he can get past his problem (example in #592853). If the problem was a real bug, but one that is apparently already fixed, you should try to quickly find the version that fixed the bug. If you can t find it in the changelog (there s a link to it in the PTS, or you can use /usr/share/doc/package/changelog.Debian.gz), you ll make the safe assumption that the upstream version you re currently using is the first one where this is fixed. Then you send a mail to XXXX-done@bugs.debian.org but you start your mail with Version: version-that-fixed-the-bug and continue with a small explanation of why you believe the bug to be fixed by this version (example in #122948). 3.4 Reassigning misfiled bug reports Bug reports are not always filed against the proper package. Users file bugs against applications where they experience the bugs, but the real bug might be in an underlying library or application. When that happens, you should use the reassign XXXX correct-package version command to get it filed against the correct package. The version parameter is optional but should be provided if possible, it should be the oldest version that we know to have the problem (example in #626232). 3.5 Forwarding bugs Forwarding bugs means opening bug reports in the upstream bug tracker for issues that have been reported in Debian but that applies to the upstream (unmodified) source code. Be sure to include all the relevant information and a link to the corresponding Debian bug. Depending on the upstream bug tracker, you might have to open an account to be able to file new bug reports. On the Debian side, you must record that a bug has been forwarded with bts forwarded XXXX upstream-bug-url . upstream-bug-url is the URL corresponding to the upstream bug report you created (ex: http://projects.ciarang.com/p/feed2omb/issues/21/ recorded in #609345 ). If the upstream authors fix the bug you reported, you can tag the Debian bug with fixed-upstream so that it s easier to find bugs to close when the next upstream release comes out (example in #637275). 3.6 Updating version information The Debian BTS uses version tracking to know which package versions are affected by a given bug. It s particularly important to have correct version information for release critical bugs since it might affect the migration of packages to testing. You can learn more on this topic here: http://wiki.debian.org/HowtoUseBTS. 4. More advice Colin Watson wrote a constructive rant explaining some mistakes that bug triagers are often doing. While it refers mainly to Ubuntu s launchpad, the advice apply equally as well to Debian. Check it out to become a better bug triager! Note that you can refer to this article with this shorter URL: http://raphaelhertzog.com/go/bugtriaging/

Do you want to read more tutorials like this one? Click here to subscribe to my free newsletter, you can opt to receive future articles by email.

One comment Liked this article? Click here. My blog is Flattr-enabled.

Peter Eisentraut: ccache and clang, part 2

There's more funny business when using ccache in combination with clang. Last time I suggested that you use the invocation
./configure CC='ccache clang -Qunused-arguments -fcolor-diagnostics'
to get rid of the "argument unused during compilation" warnings.But you still might get loads of warnings that you wouldn't normally get without ccache, such as this example (from the PostgreSQL source code):

extension.c:382:35: warning: equality comparison with extraneous parentheses [-Wparentheses]
if (( (((control->directory)[0]) == '/') ))
~~~~~~~~~~~~~~~~~~~~~~~~~~^~~~~~
extension.c:382:35: note: use '=' to turn this equality comparison into an assignment
(This is the opposite of the warning that tells you to put two pairs of parentheses around an assignment used as a truth value.)Or:

path.c:727:7: warning: explicitly assigning a variable of type 'char *' to itself [-Wself-assign]
path = (path);
~~~~ ^ ~~~~
The problem is, these come from macro expansions, so wouldn't normally see them, because (I guess) the compiler driver is smart enough not to warn about such things when they come from macro expansions.The way ccache works is approximately
  1. preprocess the input file
  2. look for it in the cache
  3. if not found, compile the preprocessed file
What would be better in this situation is
  1. preprocess the input file
  2. look for it in the cache
  3. if not found, compile the original file
And indeed you can turn on that second behavior by setting the obscure environment variable CCACHE_CPP2 (as in, run cpp twice):
export CCACHE_CPP2=yes
Then all these extra warnings disappear.(The ccache man page is worth a read. There are a few interesting settings to play with.)I'm currently playing around with a shell script ccache-clang that looks like this:
CCACHE_CPP2=yes exec ccache clang -Qunused-arguments  test -t 2 && echo -fcolor-diagnostics  "$@"

15 September 2011

Dirk Eddelbuettel: littler 0.1.4

Matthias Klose, the tireless force behind the Debian / Ubuntu gcc, python, and what have you packages, sent me a minimal patch to let littler build when the ld linker uses the --as-needed option (as Ubuntu builds now do): all it took was a little reordering of arguments. With that, I did a little cleanup as it has been a while since version 0.1.3. The brief (upstream) ChangeLog is as follows:
2011-09-15  Dirk Eddelbuettel  <edd>
        * configure.in: Mark as release 0.1.4
        * Makefile.am: Applied patch by Mathias Klose to prevent FTBFS with
          'ld --as-needed', cf LP bug 770980.
        * littler.c: A few small tweaks suggested by 'gcc -Wall'
        * examples/install2.r: Added a second R package installer example
        * examples/update.r: Switch to '/usr/bin/r -t' as shebang line
        * examples/fsizes.r: Dito
        * littler.c: Update copyrights to 2011
        * README: Idem
littler provides r (pronounced littler), a shebang / scripting / quick eval / pipelining front-end to the the R language and data analysis environment. As usual, our code is available via our svn archive or from tarballs off my littler page and the local directory here. A fresh package is in Debian's incoming queue and will hit mirrors shortly.

14 September 2011

Mike Hommey: Building a custom kernel for the Nexus S

There are several reasons why someone would want to build a custom kernel for their Android phone. In my case, this is because I wanted performance counters (those used by the perf tool that comes with the kernel source). In Julian Seward s case, he wanted swap support to overcome the limited memory amount on these devices in order to run valgrind. In both cases, the usual suspects (AOSP, CyanogenMod) don t provide the wanted features in prebuilt ROMs. There are also several reasons why someone would NOT want to build a complete ROM for their Android phone. In my case, the Nexus S is what I use to work on Firefox Mobile, but it is also my actual mobile phone. It s a quite painful and long process to create a custom ROM, and another long (but arguably less painful thanks to ROM manager) process to backup the phone data, install the ROM, restore the phone data. And if you happen to like or use the proprietary Google Apps that don t come with the AOSP sources, you need to add more steps. There are however tricks that allow to build a custom kernel for the Nexus S and use it with the system already on the phone. Please note that the following procedure has only been tested on two Nexus S with a 2.6.35.7-something kernel (one with a stock ROM, but unlocked, and another one with an AOSP build). Also please note that there are various ways to achieve many of the steps in this procedure, but I ll only mention one (or two in a few cases). Finally, please note some steps rely on your device being rooted. There may be ways to do without, but I m pretty sure it requires an unlocked device at the very least. This post doesn t cover neither rooting nor unlocking. Preparing a build environment To build an Android kernel, you need a cross-compiling toolchain. Theoretically, any will do, provided it targets ARM. I just used the one coming in the Android NDK:
$ wget http://dl.google.com/android/ndk/android-ndk-r6b-linux-x86.tar.bz2
$ tar -jxf android-ndk-r6b-linux-x86.tar.bz2
$ export ARCH=arm
$ export CROSS_COMPILE=$(pwd)/android-ndk-r6b/toolchains/arm-linux-androideabi-4.4.3/prebuilt/linux-x86/bin/arm-linux-androideabi-
For the latter, you need to use a directory path containing prefixed versions (such as arm-eabi-gcc or arm-linux-androideabi-gcc), and include the prefix, but not gcc . You will also need the adb tool coming from the Android SDK. You can install it this way:
$ wget http://dl.google.com/android/android-sdk_r12-linux_x86.tgz
$ tar -zxf android-sdk_r12-linux_x86.tgz
$ android-sdk-linux_x86/tools/android update sdk -u -t platform-tool
$ export PATH=$PATH:$(pwd)/android-sdk-linux_x86/platform-tools
Building the kernel For the Nexus S, one needs to use the Samsung Android kernel tree, which happens to be unavailable at the moment of writing due to the kernel.org outage. Fortunately, there is a clone used for the B2G project, which also happens to contain the necessary cherry-picked patch to add support for the PMU registers on the Nexus S CPU that are needed for the performance counters.
$ git clone -b devrom-2.6.35 https://github.com/cgjones/samsung-android-kernel
$ cd samsung-android-kernel
You can then either start from the default kernel configuration:
$ make herring_defconfig
or use the one from the B2G project, which enables interesting features such as oprofile:
$ wget -O .config https://raw.github.com/cgjones/B2G/master/config/kernel-nexuss4g
From then, you can use the make menuconfig or similar commands to further configure your kernel. One of the problems you d first encounter when booting such a custom kernel image is that the bcm4329 driver module that is shipped in the system partition (and not in the boot image) won t match the kernel, and won t be loaded. The unfortunate consequence is the lack of WiFi support. One way to overcome this problem is to overwrite the kernel module in the system partition, but I didn t want to have to deal with switching modules when switching kernels. There is however a trick allowing the existing module to be loaded by the kernel: compile a kernel with the same version string as the one already on the phone. Please note this only really works if the kernel is really about the same. If there are differences in the binary interface between the kernel and the modules, it will fail in possibly dangerous ways. To use that trick, you first need to know what kernel version is running on your device. Settings > About phone > Kernel version will give you that information on the device itself. You can also retrieve that information with the following command:
$ adb shell cat /proc/version
With my stock ROM, this looks like the following:
Linux version 2.6.35.7-ge382d80 (android-build@apa28.mtv.corp.google.com) (gcc version 4.4.3 (GCC) ) #1 PREEMPT Thu Mar 31 21:11:55 PDT 2011
In the About phone information, it looks like:
2.6.35.7-ge382d80
android-build@apa28
The important part above is -ge382d80, and that is what we will be using in our kernel build. Make sure the part preceding -ge382d80 does match the output of the following command:
$ make kernelversion
The trick is to write that -ge382d80 in a .scmversion file in the kernel source tree (obviously, you need to replace -ge382d80 with whatever your device has):
$ echo -ge382d80 > .scmversion
The kernel can now be built:
$ make -j$(($(grep -c processor /proc/cpuinfo) * 3 / 2))
The -j part is the general rule I use when choosing the number of parallel processes make can use at the same time. You can pick whatever suits you better. Before going further, we need to get back to the main directory:
$ cd ..
Getting the current boot image The Android boot image living in the device doesn t contain only a kernel. It also contains a ramdisk containing a few scripts and binaries, that starts the system initialization. As we will be using the ramdisk coming with the existing kernel, we need to get that ramdisk from the device flash memory:
$ adb shell cat /proc/mtd awk -F'[:"]' '$3 == "boot" print $1 '
The above command will print the mtd device name corresponding to the boot partition. On the Nexus S, this should be mtd2.
$ adb shell
$ su
# dd if=/dev/mtd/mtd2 of=/sdcard/boot.img bs=4096
2048+0 records in
2048+0 records out
8388608 bytes transferred in x.xxx secs (xxxxxxxx bytes/sec)
# exit
$ exit
In the above command sequence, replace mtd2 with whatever the previous command did output for you. Now, you can retrieve the boot image:
$ adb pull /sdcard/boot.img
Creating the new boot image We first want to extract the ramdisk from that boot image. There are various tools to do so, but for convenience, I took unbootimg, on github, and modified it slightly to seemlessly support the page size on the Nexus S. For convenience as well, we ll use mkbootimg even if fastboot is able to create boot images. Building unbootimg, as well as the other tools rely on the Android build system, but since I didn t want to go through setting it up, I figured a minimalistic way to build the tools:
$ git clone https://github.com/glandium/unbootimg.git
$ git clone git://git.linaro.org/android/platform/system/core.git
The latter is a clone of git://android.git.kernel.org/platform/system/core.git, which is down at the moment.
$ gcc -o unbootimg/unbootimg unbootimg/unbootimg.c core/libmincrypt/sha.c -Icore/include -Icore/mkbootimg
$ gcc -o mkbootimg core/mkbootimg/mkbootimg.c core/libmincrypt/sha.c -Icore/include
$ gcc -o fastboot core/fastboot/ protocol,engine,bootimg,fastboot,usb_linux,util_linux .c core/libzipfile/ centraldir,zipfile .c -Icore/mkbootimg -Icore/include -lz
Once the tools are built, we can extract the various data from the boot image:
$ unbootimg/unbootimg boot.img
section sizes incorrect
kernel 1000 2b1b84
ramdisk 2b3000 22d55
second 2d6000 0
total 2d6000 800000
...but we can still continue
Don t worry about the error messages about incorrect section sizes if it tells you we can still continue . The unbootimg program creates three files: All that is left to do is to generate the new boot image:
$ eval ./mkbootimg $(sed s,boot.img-kernel,samsung-android-kernel/arch/arm/boot/zImage, boot.img-mk)
Booting the image There are two ways you can use the resulting boot image: one-time boot or flash. If you want to go for the latter, it is best to actually do both, starting with the one-time boot, to be sure you won t be leaving your phone useless (though recovery is there to the rescue, but is not covered here). First, you need to get your device in the fastboot mode, a.k.a. boot-loader:
$ adb reboot bootloader
Alternatively, you can power it off, and power it back on while pressing the volume up button. Once you see the boot-loader screen, you can test the boot image with a one-time boot:
$ ./fastboot boot boot.img
downloading 'boot.img'...
OKAY [ 0.xxxs]
booting...
OKAY [ 0.xxxs]
finished. total time: 0.xxxs
As a side note, if fastboot sits waiting for device , it either means your device is not in fastboot mode (or is not connected), or that you have permissions issues on the corresponding USB device in /dev. Your device should now be starting up, and eventually be usable under your brand new kernel (and WiFi should be working, too). Congratulations. If you want to use that kernel permanently, you can now flash it after going back in the bootloader:
$ adb reboot bootloader
$ ./fastboot flash boot boot.img
sending 'boot' (2904 KB)...
OKAY [ 0.xxxs]
writing 'boot'...
OKAY [ 0.xxxs]
finished. total time: 0.xxxs
$ ./fastboot reboot
Voil .

John Goerzen: Mexico Part 4: Street Scenes and Architecture

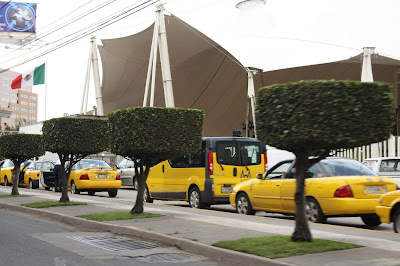
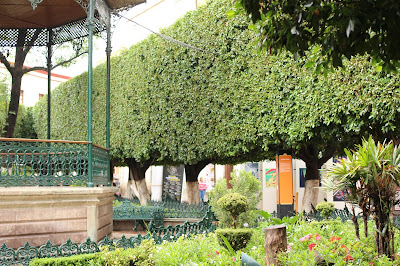
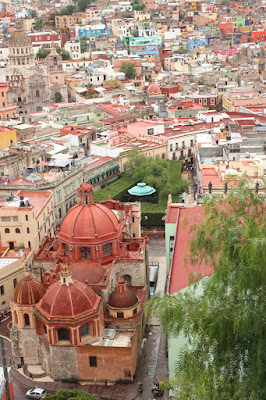
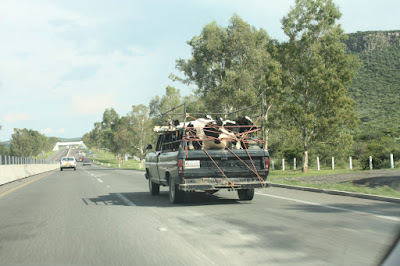
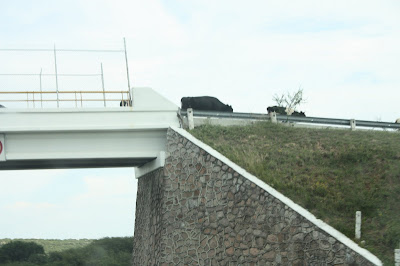
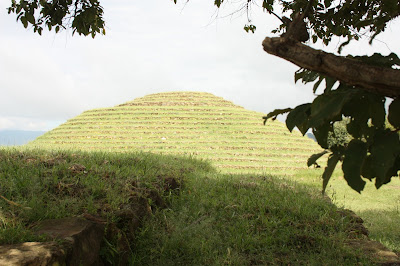
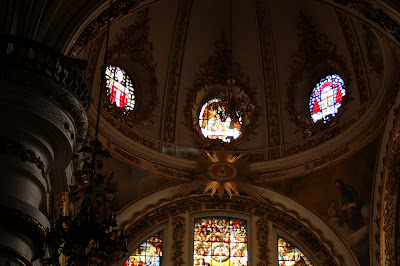
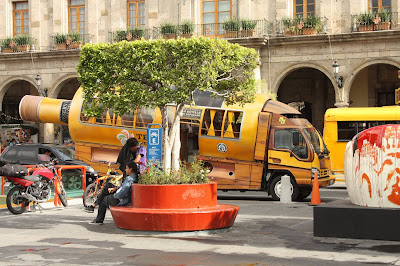
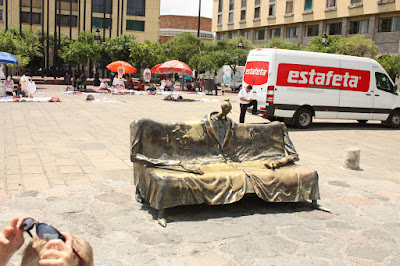
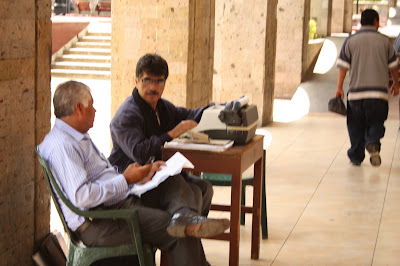
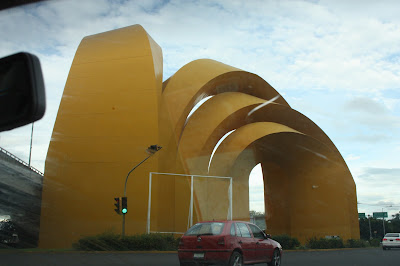
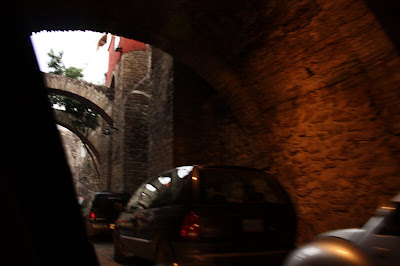
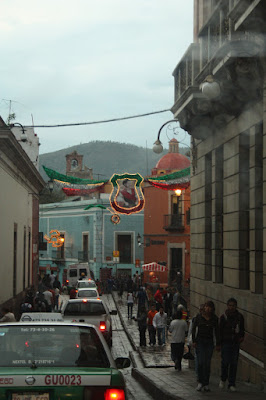
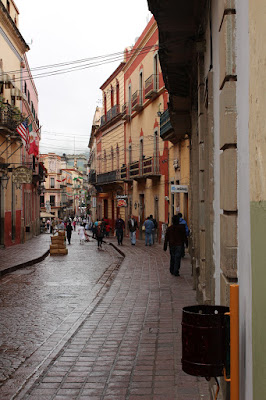
The fourth in a series; see also parts 1, 2, and 3. This post is going to be more a photolog than a narrative, and I apologize in advance for it being a bit disjointed. I ve already touched on these themes a bit in the other post, but now it s time to focus on them. Immediately after leaving the airport, it s quite clear that things are a little different. Trees are square. People ride around in the backs of pickups sometimes on top of piles of debris. Left turns are made in front of other lanes of traffic going the same way. But those are just the things obvious from the road. It s a lot of fun to enjoy the differences. First, the ubiquitous square trees. They look pretty, and are found all over. I also found carefully-manicured trees in cone shapes, more cylindrical shapes, etc. It seems that tree care is taken seriously in Mexico. It was also not uncommon to see the bottom few feet of a tree painted white. A park in Guanajuato had a whole bunch of trees carefully trimmed. And from up on the mountain, it still looked impressive (the green area behind the dome). Driving in Mexico was interesting for a lot of reasons. The highways there aren t quite as limited access as the freeways in the USA. It was quite common to see bicyclists, walkers, a mule, or some cattle ambling along the side of the road. Roadside taco stands don t require taking an exit. You just pull off the road because it s right there. Some sights were a bit surprising. Cattle in a pickup, with rope, for instance. Or cattle crossing the highway on the overpass. Street vendors were everywhere. Stop at a red light and someone might spring from the side of the road and suddenly start washing your windshield (expecting a tip); try to sell you flowers, juice, or bug zappers; or even throw business card-sized advertisements for adult websites into any open windows they can find. One night we saw an incredible fire juggler. I would have tipped him well but he was too far away to do so before the light turned green. Mexico s history stretches back into prehistoric times, and we saw the Teuchitlan ruins at Guachimontones one day. It was truly a remarkable feeling to be able to walk down the middle of the ancient ball court, or to climb up one pyramid and see the other from it. It s not exactly architecture, but Jacob and Oliver sure enjoyed visiting the hot springs at Bosque de la Primavera. Jacob still remembers that where the steam is, the water is 200 degrees, and we CAN T TOUCH IT THERE! Back in Guadalajara, here s a photo from the inside of the grand old cathedral. Compared to the cathedrals we saw in Europe, this was of a similar general size and design, and perhaps only slightly newer. But one big difference: worshipers outnumbered tourists at every Mexican cathedral I saw, whether in the center of Guadalajara or at a rainy intersection in Guanajuato or a plaza in Tlaquepaque. It made them feel more alive, and perhaps more sacred as well. One surprise was seeing people sitting on the steps of the cathedral in downtown Guadalajara selling trinkets such as beads. I think the only other place I had seen something like that was in New Orleans. All of Guadalajara s Centro was beautiful. Much of it survives from colonial days; I think a person could spend days exploring its museums and buildings. Way too many of my 900 photos were taken in Centro to post on the blog, but just for flavor, here s one of the less than historic scenes. Yes, that is a bus shaped like a tequila bottle. Fountains were beautiful and common across Mexico. A few of them were easily reachable by boys, and ours sure loved those. There was a lot of public art, including this interesting chair/skeleton/I m not sure what it is: And, just for good measure while walking around Centro, they tossed in an apparent Redundant Array of Inexpensive Typewriters. I don t know what they were doing, but there were about a dozen guys sitting out in the sun typing on their manual typewriters on their identical tables. And who can leave Guadalajara without seeing one of North America s most impressive traffic circles. I ve got to hand it to the Mexicans for making something that is normally really boring into an interesting work of art. Over in Guanajuato, a lot of driving takes place in the city s vast underground tunnel system. Here s a scene emerging from one of them. Guanajuato was already getting decorated for Mexican independence day festivities (Sept. 15-16) while we were there. Here s a typical Guanajuato street scene. Many of the streets were closed to traffic and perhaps not wide enough to handle vehicles anyway. Those streets had a wonderful peaceful and slow feel to them. I feel that I ve barely done the trip justice with this post. The feelings of walking down a beautiful Guanajuato street, or stepping into a Spanish cathedral, or even seeing a bunch of guys with typewriters, just can t be replicated. It s brimming with history and character, and shouldn t be missed.

13 September 2011

Vincent Sanders: Electricity is really just organized lightning.

I have recently been working on a project that requires a 12V supply. Ordinarily this is no problem my selection of bench supplies are generally more than a match for anything I throw at them.

My TS3022S Bench SupplyThis project however needed a little more "oomph" than usual, specifically 200W more. Funnily enough a precision variable output bench supply capable of supplying 20A are rare and *very* expensive beasties.

So we turn to a fixed output supply, after all I will want to run my project without hogging my bench supplies anyway. These can be bought from various electronics suppliers like Farnell from around the 50 mark and Chinese imports from Ebay sellers start around the 20 mark.

All very well and good but that is money I was not planning on spending and possibly a month of waiting for an already badly delayed project. So I decided to Convert an old ATX PSU into a 12V source. This is not a new idea and a quick search revealed many suitable guides online. I had a quick skim, decided I did understand the general idea and ploughed ahead.

Wikipedia has a very useful page on the ATX standard complete with pinout diagrams and colour codes. The pile of grey box ATX supplies available on my shelf was examined and one was helpfully labelled with a sticker proclaiming 22A@12V and we had a winner.

Opening the case of the donor 450W CIT branded supply revealed a mostly empty enclosure with the usual basic switching arrangement. I removed most of the wire loom aside from two of each output voltage (3.3V, 5V and 12V i figured the other voltages might be useful in future) and three commons, the 3.3V and 5V sense lines were also kept. Each of these pairs were cut to length and leads were wired to 4mm sockets.

The "PWR_EN" line was wired via a toggle switch to ground so the output can be switched on and off easily. The 5V standby and a 5V output line were wired to a green/red bi-colour LED (via 270 current limit resistors) to give indication that mains is present and when the output is on.

Holes were drilled for four 4mm sockets an indicator LED and a switch. The connectors and switches were all mounted in the PSU casework. I plugged it all in, put an 8.2 load resistor on the 5V line with an ammeter in line and a voltmeter across the 12V rail.

ATX bench power supply I turned the mains on and the LED lit up green (5V standby worked) and when I flicked the output switch the LED turned orange, the 12V line went to 12V and the expected 0.6A flowed through the load resistor.

Basically, Success!

I have since loaded the supply up to the 200W operating load and nothing unexpected has happened so I am happy. Seems converting an ATX PSU is a perfectly good way of getting a 200W 12V supply and I can recommend it for anyone as cheap as me willing to put an hour or so into such a project.

Kai Wasserb ch: Time-critical: Sign the petition against a new data retention law

If you're a German citizen and haven't signed the petition against a new data retention law, then sign it immediately, please. There are approximately [UPDATE]five twenty-five*[/UPDATE] hours left (after that you can still sign the petition until 2011-10-06, but it won't help in the endeavour to cause a public meeting of the petition committee). If you know somebody, who hasn't signed, get the word to them. [UPDATE]* According to netzpolitik.org the deadline for triggering a public meeting of the petition committee was moved to 2011-09-14 23:59 (CEST), which gives you another 24 hours to sign the petition in time (or get others to sign it). Please use that time![/UPDATE] [UPDATE2 (2011-09-14)]netzpolitik.org moved the entry about the deadline change to a new blog post, thus I've updated the link above. If you need instructions for the signing process, you can watch Endspurt: Petition gegen die Vorratsdatenspeicherung .[/UPDATE2 (2011-09-14)] [UPDATE3 (2011-09-14)]We did it! Keep it up![/UPDATE3 (2011-09-14)]

Next.

Previous.