Search Results: "tach"

1 June 2015

Sven Hoexter: Out of the comfort zone: CentOS 5 mock chroot and /etc/filesystems vs net-snmp

It turned out that my adventure in backporting net-snmp from CentOS 7 to CentOS 5 has a regression issue with disk stats. The logs provided us with the following error message
2015-05-29T10:27:14+02:00 foobar snmpd[2200]: Cannot statfs
but only on CentOS 5. CentOS 6, build on the same CentOS 7 VM also with mock, worked like a charm. When I attached strace to the snmpd process I could see that the calls to statfs() were executed with an empty string, so no path was supplied. A bit of source code grep'ing already pointed in the direction of #define ETC_MNTTAB but at that point I didn't believe that the chroot could be the culprit. So it took some discussions with the colleagues until I did a test build, the old way with a "./configure --prefix=$HOME/snmpd && make && make install", on a real system. To my surprise that worked. Since I did not fold in all the patches from the CentOS 7 rpm I expected that one of the patches broke something along the way for old Linux releases. So I went on, disabled nearly all patches in the spec file, build again in a chroot and the resulting binary still did not work. Somehow the chroot was at fault. Looking closer at the configure magic linked above you'll see it iterates through a list of various files that contain the list of mounted disks on various of *nix systems. For some unknown reason my CentOS 5 chroot is not populated with a proper /etc/mtab linked to the systems /proc/self/mounts while the one for CentOS 6 is. With /etc/mtab missing the configure script happily picks up /etc/filesystems which is, you might or might not know this, the /etc/fstab pendant on AIX. But on a CentOS system that just contains a list of filesystems. That indeed could not work out and explains why the build itself succeeded but parsing a filesystem path out of that file did not. Luckily we can override that stuff easily with the '--with-mnttab="/etc/mtab"' configure option of net-snmp, but the "/etc/filesystems" file on CentOS was something I did not expect and never noticed before. Hint: for the function of /etc/filesystems take a look at man 8 mount and the section about the "-t" parameter.

29 May 2015

Roland Mas: FusionForge 6.0 final release available

Hi all, After 4 release candidates, the FusionForge community is proud to announce the new major Fusionforge 6.0 final release. The major changes in this version are: Here is a more detailed list of visible changes: Standard features: Tracker roadmap of the 6.0 release: roadmap. Some metrics about 6.0: FusionForge 6.0 can be downloaded in source form from our file release system. Packages will be available in some distributions soon. Enjoy! Your feedback to fusionforge-general@lists.fusionforge.org is welcome! For more information on FusionForge, refer to FusionForge.org. -- The FusionForge community

27 May 2015

Vincent Bernat: Live patching QEMU for VENOM mitigation

CVE-2015-3456, also known as VENOM, is a security vulnerability in QEMU virtual floppy controller:
The Floppy Disk Controller (FDC) in QEMU, as used in Xen [ ] and KVM, allows local guest users to cause a denial of service (out-of-bounds write and guest crash) or possibly execute arbitrary code via the FD_CMD_READ_ID, FD_CMD_DRIVE_SPECIFICATION_COMMAND, or other unspecified commands.
Even when QEMU has been configured with no floppy drive, the floppy controller code is still active. The vulnerability is easy to test1:
#define FDC_IOPORT 0x3f5
#define FD_CMD_READ_ID 0x0a
int main()  
    ioperm(FDC_IOPORT, 1, 1);
    outb(FD_CMD_READ_ID, FDC_IOPORT);
    for (size_t i = 0;; i++)
        outb(0x42, FDC_IOPORT);
    return 0;
 
Once the fix installed, all processes still have to be restarted for the upgrade to be effective. It is possible to minimize the downtime by leveraging virsh save. Another possibility would be to patch the running processes. The Linux kernel attracted a lot of interest in this area, with solutions like Ksplice (mostly killed by Oracle), kGraft (by Red Hat) and kpatch (by Suse) and the inclusion of a common framework in the kernel. The userspace has far less out-of-the-box solutions2. I present here a simple and self-contained way to patch a running QEMU to remove the vulnerability without requiring any sensible downtime. Here is a short demonstration:

Proof of concept First, let s find a workaround that would be simple to implement through live patching: while modifying running code text is possible, it is easier to modify a single variable.

Concept Looking at the code of the floppy controller and the patch, we can avoid the vulnerability by not accepting any command on the FIFO port. Each request would be answered by Invalid command (0x80) and a user won t be able to push more bytes to the FIFO until the answer is read and the FIFO queue reset. Of course, the floppy controller would be rendered useless in this state. But who cares? The list of commands accepted by the controller on the FIFO port is contained in the handlers[] array:
static const struct  
    uint8_t value;
    uint8_t mask;
    const char* name;
    int parameters;
    void (*handler)(FDCtrl *fdctrl, int direction);
    int direction;
  handlers[] =  
      FD_CMD_READ, 0x1f, "READ", 8, fdctrl_start_transfer, FD_DIR_READ  ,
      FD_CMD_WRITE, 0x3f, "WRITE", 8, fdctrl_start_transfer, FD_DIR_WRITE  ,
    /* [...] */
      0, 0, "unknown", 0, fdctrl_unimplemented  , /* default handler */
 ;
To avoid browsing the array each time a command is received, another array is used to map each command to the appropriate handler:
/* Associate command to an index in the 'handlers' array */
static uint8_t command_to_handler[256];
static void fdctrl_realize_common(FDCtrl *fdctrl, Error **errp)
 
    int i, j;
    static int command_tables_inited = 0;
    /* Fill 'command_to_handler' lookup table */
    if (!command_tables_inited)  
        command_tables_inited = 1;
        for (i = ARRAY_SIZE(handlers) - 1; i >= 0; i--)  
            for (j = 0; j < sizeof(command_to_handler); j++)  
                if ((j & handlers[i].mask) == handlers[i].value)  
                    command_to_handler[j] = i;


    /* [...] */
 
Our workaround is to modify the command_to_handler[] array to map all commands to the fdctrl_unimplemented() handler (the last one in the handlers[] array).

Testing with gdb To check if the workaround works as expected, we test it with gdb. Unless you have compiled QEMU yourself, you need to install a package with debug symbols. Unfortunately, on Debian, they are not available, yet3. On Ubuntu, you can install the qemu-system-x86-dbgsym package after enabling the appropriate repositories. The following function for gdb maps every command to the unimplemented handler:
define patch
  set $handler = sizeof(handlers)/sizeof(*handlers)-1
  set $i = 0
  while ($i < 256)
   set variable command_to_handler[$i++] = $handler
  end
  printf "Done!\n"
end
Attach to the vulnerable process (with attach), call the function (with patch) and detach of the process (with detach). You can check that the exploit is not working anymore. This could be easily automated.

Limitations Using gdb has two main limitations:
  1. It needs to be installed on each host to be patched.
  2. The debug packages need to be installed as well. Moreover, it can be difficult to fetch previous versions of those packages.

Writing a custom patcher To overcome those limitations, we can write a customer patcher using the ptrace() system call without relying on debug symbols being present.

Finding the right memory spot Before being able to modify the command_to_handler[] array, we need to know its location. The first clue is given by the symbol table. To query it, use readelf -s:
$ readelf -s /usr/lib/debug/.build-id/09/95121eb46e2a4c13747ac2bad982829365c694.debug   \
>   sed -n -e 1,3p -e /command_to_handler/p
Symbol table '.symtab' contains 27066 entries:
   Num:    Value          Size Type    Bind   Vis      Ndx Name
  8485: 00000000009f9d00   256 OBJECT  LOCAL  DEFAULT   26 command_to_handler
This table is usually stripped out of the executable to save space, like shown below:
$ file -b /usr/bin/qemu-system-x86_64   tr , \\n
ELF 64-bit LSB shared object
 x86-64
 version 1 (SYSV)
 dynamically linked
 interpreter /lib64/ld-linux-x86-64.so.2
 for GNU/Linux 2.6.32
 BuildID[sha1]=0995121eb46e2a4c13747ac2bad982829365c694
 stripped
If your distribution provides a debug package, the debug symbols are installed in /usr/lib/debug. Most modern distributions are now relying on the build ID4 to map an executable to its debugging symbols, like the example above. Without a debug package, you need to recompile the existing package without stripping debug symbols in a clean environment5. On Debian, this can be done by setting the DEB_BUILD_OPTIONS environment variable to nostrip. We have now two possible cases:
  • the easy one, and
  • the hard one.

The easy case On x86, here is the standard layout of a regular Linux process in memory6: Memory layout of a regular process on x86 The random gaps (ASLR) are here to prevent an attacker from reliably jumping to a particular exploited function in memory. On x86-64, the layout is quite similar. The important point is that the base address of the executable is fixed. The memory mapping of a process is also available through /proc/PID/maps. Here is a shortened and annotated example on x86-64:
$ cat /proc/3609/maps
00400000-00401000         r-xp 00000000 fd:04 483  not-qemu [text segment]
00601000-00602000         r--p 00001000 fd:04 483  not-qemu [data segment]
00602000-00603000         rw-p 00002000 fd:04 483  not-qemu [BSS segment]
[random gap]
02419000-0293d000         rw-p 00000000 00:00 0    [heap]
[random gap]
7f0835543000-7f08356e2000 r-xp 00000000 fd:01 9319 /lib/x86_64-linux-gnu/libc-2.19.so
7f08356e2000-7f08358e2000 ---p 0019f000 fd:01 9319 /lib/x86_64-linux-gnu/libc-2.19.so
7f08358e2000-7f08358e6000 r--p 0019f000 fd:01 9319 /lib/x86_64-linux-gnu/libc-2.19.so
7f08358e6000-7f08358e8000 rw-p 001a3000 fd:01 9319 /lib/x86_64-linux-gnu/libc-2.19.so
7f08358e8000-7f08358ec000 rw-p 00000000 00:00 0
7f08358ec000-7f083590c000 r-xp 00000000 fd:01 5138 /lib/x86_64-linux-gnu/ld-2.19.so
7f0835aca000-7f0835acd000 rw-p 00000000 00:00 0
7f0835b08000-7f0835b0c000 rw-p 00000000 00:00 0
7f0835b0c000-7f0835b0d000 r--p 00020000 fd:01 5138 /lib/x86_64-linux-gnu/ld-2.19.so
7f0835b0d000-7f0835b0e000 rw-p 00021000 fd:01 5138 /lib/x86_64-linux-gnu/ld-2.19.so
7f0835b0e000-7f0835b0f000 rw-p 00000000 00:00 0
[random gap]
7ffdb0f85000-7ffdb0fa6000 rw-p 00000000 00:00 0    [stack]
With a regular executable, the value given in the symbol table is an absolute memory address:
$ readelf -s not-qemu   \
>   sed -n -e 1,3p -e /command_to_handler/p
Symbol table '.dynsym' contains 9 entries:
   Num:    Value          Size Type    Bind   Vis      Ndx Name
    47: 0000000000602080   256 OBJECT  LOCAL  DEFAULT   25 command_to_handler
So, the address of command_to_handler[], in the above example, is just 0x602080.

The hard case To enhance security, it is possible to load some executables at a random base address, just like a library. Such an executable is called a Position Independent Executable (PIE). An attacker won t be able to rely on a fixed address to find some helpful function. Here is the new memory layout: Memory layout of a PIE process on x86 With a PIE process, the value in the symbol table is now an offset from the base address.
$ readelf -s not-qemu-pie   sed -n -e 1,3p -e /command_to_handler/p
Symbol table '.dynsym' contains 17 entries:
   Num:    Value          Size Type    Bind   Vis      Ndx Name
    47: 0000000000202080   256 OBJECT  LOCAL  DEFAULT   25 command_to_handler
If we look at /proc/PID/maps, we can figure out where the array is located in memory:
$ cat /proc/12593/maps
7f6c13565000-7f6c13704000 r-xp 00000000 fd:01 9319  /lib/x86_64-linux-gnu/libc-2.19.so
7f6c13704000-7f6c13904000 ---p 0019f000 fd:01 9319  /lib/x86_64-linux-gnu/libc-2.19.so
7f6c13904000-7f6c13908000 r--p 0019f000 fd:01 9319  /lib/x86_64-linux-gnu/libc-2.19.so
7f6c13908000-7f6c1390a000 rw-p 001a3000 fd:01 9319  /lib/x86_64-linux-gnu/libc-2.19.so
7f6c1390a000-7f6c1390e000 rw-p 00000000 00:00 0
7f6c1390e000-7f6c1392e000 r-xp 00000000 fd:01 5138  /lib/x86_64-linux-gnu/ld-2.19.so
7f6c13b2e000-7f6c13b2f000 r--p 00020000 fd:01 5138  /lib/x86_64-linux-gnu/ld-2.19.so
7f6c13b2f000-7f6c13b30000 rw-p 00021000 fd:01 5138  /lib/x86_64-linux-gnu/ld-2.19.so
7f6c13b30000-7f6c13b31000 rw-p 00000000 00:00 0
7f6c13b31000-7f6c13b33000 r-xp 00000000 fd:04 4594  not-qemu-pie [text segment]
7f6c13cf0000-7f6c13cf3000 rw-p 00000000 00:00 0
7f6c13d2e000-7f6c13d32000 rw-p 00000000 00:00 0
7f6c13d32000-7f6c13d33000 r--p 00001000 fd:04 4594  not-qemu-pie [data segment]
7f6c13d33000-7f6c13d34000 rw-p 00002000 fd:04 4594  not-qemu-pie [BSS segment]
[random gap]
7f6c15c46000-7f6c15c67000 rw-p 00000000 00:00 0     [heap]
[random gap]
7ffe823b0000-7ffe823d1000 rw-p 00000000 00:00 0     [stack]
The base address is 0x7f6c13b31000, the offset is 0x202080 and therefore, the location of the array is 0x7f6c13d33080. We can check with gdb:
$ print &command_to_handler
$1 = (uint8_t (*)[256]) 0x7f6c13d33080 <command_to_handler>

Patching a memory spot Once we know the location of the command_to_handler[] array in memory, patching it is quite straightforward. First, we start tracing the target process:
/* Attach to the running process */
static int
patch_attach(pid_t pid)
 
    int status;
    printf("[.] Attaching to PID %d...\n", pid);
    if (ptrace(PTRACE_ATTACH, pid, NULL, NULL) == -1)  
        fprintf(stderr, "[!] Unable to attach to PID %d: %m\n", pid);
        return -1;
     
    if (waitpid(pid, &status, 0) == -1)  
        fprintf(stderr, "[!] Error while attaching to PID %d: %m\n", pid);
        return -1;
     
    assert(WIFSTOPPED(status)); /* Tracee may have died */
    if (ptrace(PTRACE_GETSIGINFO, pid, NULL, &si) == -1)  
        fprintf(stderr, "[!] Unable to read siginfo for PID %d: %m\n", pid);
        return -1;
     
    assert(si.si_signo == SIGSTOP); /* Other signals may have been received */
    printf("[*] Successfully attached to PID %d\n", pid);
    return 0;
 
Then, we retrieve the command_to_handler[] array, modify it and put it back in memory7.
static int
patch_doit(pid_t pid, unsigned char *target)
 
    int ret = -1;
    unsigned char *command_to_handler = NULL;
    size_t i;
    /* Get the table */
    printf("[.] Retrieving command_to_handler table...\n");
    command_to_handler = ptrace_read(pid,
                                     target,
                                     QEMU_COMMAND_TO_HANDLER_SIZE);
    if (command_to_handler == NULL)  
        fprintf(stderr, "[!] Unable to read command_to_handler table: %m\n");
        goto out;
     
    /* Check if the table has already been patched. */
    /* [...] */
    /* Patch it */
    printf("[.] Patching QEMU...\n");
    for (i = 0; i < QEMU_COMMAND_TO_HANDLER_SIZE; i++)  
        command_to_handler[i] = QEMU_NOT_IMPLEMENTED_HANDLER;
     
    if (ptrace_write(pid, target, command_to_handler,
           QEMU_COMMAND_TO_HANDLER_SIZE) == -1)  
        fprintf(stderr, "[!] Unable to patch command_to_handler table: %m\n");
        goto out;
     
    printf("[*] QEMU successfully patched!\n");
    ret = 0;
out:
    free(command_to_handler);
    return ret;
 
Since ptrace() only allows to read or write a word at a time, ptrace_read() and ptrace_write() are wrappers to read or write arbitrary large chunks of memory8. Here is the code for ptrace_read():
/* Read memory of the given process */
static void *
ptrace_read(pid_t pid, void *address, size_t size)
 
    /* Allocate the buffer */
    uword_t *buffer = malloc((size/sizeof(uword_t) + 1)*sizeof(uword_t));
    if (!buffer) return NULL;
    /* Read word by word */
    size_t readsz = 0;
    do  
        errno = 0;
        if ((buffer[readsz/sizeof(uword_t)] =
                ptrace(PTRACE_PEEKTEXT, pid,
                       (unsigned char*)address + readsz,
                       0)) && errno)  
            fprintf(stderr, "[!] Unable to peek one word at address %p: %m\n",
                    (unsigned char *)address + readsz);
            free(buffer);
            return NULL;
         
        readsz += sizeof(uword_t);
      while (readsz < size);
    return (unsigned char *)buffer;
 

Putting the pieces together The patcher is provided with the following information:
  • the PID of the process to be patched,
  • the command_to_handler[] offset from the symbol table, and
  • the build ID of the executable file used to get this offset (as a safety measure).
The main steps are:
  1. Attach to the process with ptrace().
  2. Get the executable name from /proc/PID/exe.
  3. Parse /proc/PID/maps to find the address of the text segment (it s the first one).
  4. Do some sanity checks:
    • check there is a ELF header at this location (4-byte magic number),
    • check the executable type (ET_EXEC for regular executables, ET_DYN for PIE), and
    • get the build ID and compare with the expected one.
  5. From the base address and the provided offset, compute the location of the command_to_handler[] array.
  6. Patch it.
You can find the complete patcher on GitHub.
$ ./patch --build-id 0995121eb46e2a4c13747ac2bad982829365c694 \
>         --offset 9f9d00 \
>         --pid 16833
[.] Attaching to PID 16833...
[*] Successfully attached to PID 16833
[*] Executable name is /usr/bin/qemu-system-x86_64
[*] Base address is 0x7f7eea912000
[*] Both build IDs match
[.] Retrieving command_to_handler table...
[.] Patching QEMU...
[*] QEMU successfully patched!

  1. The complete code for this test is on GitHub.
  2. An interesting project seems to be Katana. But there are also some insightful hacking papers on the subject.
  3. Some packages come with a -dbg package with debug symbols, some others don t. Fortunately, a proposal to automatically produce debugging symbols for everything is near completion.
  4. The Fedora Wiki contains the rationale behind the build ID.
  5. If the build is incorrectly reproduced, the build ID won t match. The information provided by the debug symbols may or may not be correct. Debian currently has a reproducible builds effort to ensure that each package can be reproduced.
  6. Anatomy of a program in memory is a great blog post explaining in more details how a program lives in memory.
  7. Being an uninitialized static variable, the variable is in the BSS section. This section is mapped to a writable memory segment. If it wasn t the case, with Linux, the ptrace() system call is still allowed to write. Linux will copy the page and mark it as private.
  8. With Linux 3.2 or later, process_vm_readv() and process_vm_writev() can be used to transfer data from/to a remote process without using ptrace() at all. However, ptrace() would still be needed to reliably stop the main thread.

23 May 2015

Eddy Petri&#537;or: Linksys NSLU2 adventures into the NetBSD land passed through JTAG highlands - part 1

About 2 months ago I set a goal to run some kind of BSD on the spare Linksys NSLU2 I had. This was driven mostly by curiosity, after listening to a few BSDNow episodes and becoming a regular listener, but it was a really interesting experience (it was also somewhat frustrating, mostly due to lacking documentation or proprietary code).

Looking for documentation on how to install any BSD flavour on the Linksys NSLU2, I have found what appears to be some too-incomplete-to-be-useful-for-a-BSD-newbie information about installing FreeBSD, no information about OpenBSD and some very detailed information about NetBSD on the Linksys NSLU2.

I was very impressed by the NetBSD build.sh script which can be used to cross-compile the entire NetBSD system - to do that, it also builds the appropriate toolchain - NetBSD kernel and the base system, even when ran on a Linux host. Having some experience with cross compilation for GNU/Linux embedded systems I can honestly say this is immensely impressive, well done NetBSD!

Gone were a few failed attempts to properly follow the instruction and lots of hours of (re)building, but then I had the kernel and the sets (the NetBSD system is split into several parts which are grouped by functionality, these are the sets), so I was in the position to have to set things up to be able to net boot - kernel loading via TFTP and rootfs on NFS.

But it wouldn't be challenging if the instructions were followed to the letter, so the first thing I wanted to change was that I didn't want to run dhcpd just to pass the DHCP boot configuration to the NSLU2, that seemed like a waste of resources since I already had dnsmasq running.

After some effort and struggling with missing documentation, I managed to use dnsmasq to pass DHCP boot parameters to the slug, but also use it as TFTP server - after some time I documented this for future reference on my blog and expect to refer to it in the future.

Setting up NFS wasn't a problem, but, when trying to boot, I found that I managed to misread at least 3 or 4 times some of the NSLU2 related information on the NetBSD wiki. To be able to debug what was happening I concluded the slug should have a serial console attached to it, which helped a lot.

Still the result was that I wasn't able to boot the trunk version of the NetBSD code on my NSLU2.

Long story short, with the help of some people from the #netbsd IRC channel on Freenode and from the port-arm NetBSD mailing list I found out that I might have a better chance with specific older versions. In practice what really worked was the code from the netbsd_6_1 branch.

Discussions on the port-arm mailing list, some digging into the (recently found) PR (problem reports), and a successful execution of the trunk kernel (at the time, version 7.99.4) together with 6.1.5 userspace lead me to the conclusion the NetBSD userspace for armbe was broken in the trunk branch.

And since I concluded this would be a good occasion to learn a few details about NetBSD, I set out to git bisect through the trunk history to identify when this happened. But that meant being able to easily load kernels and run them from TFTP, which was not how the RedBoot bootloader flashed into the slug behaves by default.

Be default, the RedBoot bootloader flashed into the NSLU2 waits for 2 seconds for a manual interaction (it waits for a ^C) on the serial console or on the telnet RedBoot prompt, then, if no such event happens, it copies the Linux image it has in flash starting with adress 0x50060000 into RAM at address 0x01d00000 (after stripping the Sercomm header) and then executes the copied code from RAM.

Of course, this is not a very handy way to try to boot things from TFTP, so my first idea to overcome this limitation was to use a second stage bootloader which would do the loading via TFTP of the NetBSD kernel, then execute it from RAM. Flashing this second stage bootloader instead of the Linux kernel at 0x50060000 would make sure that no manual intervention except power on would be necessary when a new kernel+userspace pair is ready to be tested.

Another advantage was that I would not risk bricking the NSLU2 since I would not be changing RedBoot, the original bootloader.

I knew Apex was used as the second stage bootloader in Debian, so I started configuring my own version of the APEX bootloader to make it work for the netbsd-nfs.bin image to be loaded via TFTP.

My first disappointment was that Apex was did not support receiving the boot parameters via DHCP, but only via RARP (it was clear it was less tested with BOOTP or DHCP) and TFTP was documented in the code as being problematic. That meant that I would have to hard code the boot configuration or configure RARP, but that wasn't too bad.

Later I found out that I wasted time on that avenue because the network driver in Apex was some Intel code (NPE Access Library) which can't be freely distributed, but could have been downloaded from Intel's site back in 2008-2009. The bad news was that current versions did not work at all with the old patch work that was done in Apex to allow for the driver made for Linux to compile in a world of its own so it could be incorporated in Apex.

I was stuck and the only options I were:
  1. Fight with the available Intel code and make it compile in Apex
  2. Incorporate the NPE driver from NetBSD into a rump kernel which will be included in Apex, since I knew the NetBSD driver only needed a very easily obtainable binary blob, instead of the entire driver as was in Apex before
  3. Hack together an Apex version that simulates the typing of the necessary commands to load the netbsd-nfs.bin image inside RedBoot, or in other words, call from Apex the RedBoot functions necessary to load from TFTP and execute NetBSD.
Option 1 did not look that appealing after looking into the horrible Intel build system and its endless dependencies into a specific Linux kernel version.

Option 2 was more appealing, but since I didn't knew NetBSD and only tried once to build and run a NetBSD rump kernel, it seemed like a doable project only for an experienced NetBSD developer or at least an experienced NetBSD user, which I was not.

So I was left with option 3, which meant I had to do some reverse engineering of the code, because, although RedBoot is GPL, Linksys did not publish the source from which the running RedBoot was built from.


(continues here)

Eddy Petri&#537;or: Linksys NSLU2 adventures into the NetBSD land passed through JTAG highlands - part 2 - RedBoot reverse engineering and APEX hacking

(continuation of Linksys NSLU2 adventures into the NetBSD land passed through JTAG highlands - part 1; meanwhile, my article was mentioned briefly in BSDNow Episode 89 - Exclusive Disjunction around minute 36:25)

Choosing to call RedBoot from a hacked Apex
As I was saying in my previous post, in order to be able to automate the booting of the NetBSD image via TFTP, I opted for using a 2nd stage bootloader (planning to flash it in the NSLU2 instead of a Linux kernel), and since Debian was already using Apex, I chose Apex, too.

The first problem I found was that the networking support in Apex was relying on an old version of the Intel NPE library which I couldn't find on Intel's site. The new version was incompatible/not building with the old build wrapper in Apex, so I was faced with 3 options:
  1. Fight with the availabel Intel code and try to force it to compile in Apex
  2. Incorporate the NPE driver from NetBSD into a rump kernel to be included in Apex instead of the original Intel code, since the NetBSD driver only needed an easily compilable binary blob
  3. Hack together an Apex version that simulates the typing necessary RedBoot commands to load via TFTP the netbsd image and execute it.
After taking a look at the NPE driver buildsystem, I concluded there were very few options less attractive that option 1, among which was hammering nails through my forehead as a improvement measure against the severe brain damage which I would probably be likely to be inflicted with after dealing with the NPE "build system".

Option 2 looked like the best option I could have, given the situation, but my NetBSD foo was too close to 0 to even dream to endeavor on such a task. In my opinion, this still remains the technically superior solution to the problem since is very portable and a flexible way to ensure networking works in spite of the proprietary NPE code.

But, in practice, the best option I could implement at the time was option 3. I initially planned to pre-fill from Apex my desired commands into the RedBoot buffer that stored the keyboard strokes typed by the user:

load -r -b 0x200000 -h 192.168.0.2 netbsd-nfs.bin
g
Since this was the first time ever for me I was going to do less than trivial reverse engineering in order to find the addresses and signatures of interesting functions in the RedBoot code, it wasn't bad at all that I had a version of the RedBoot source code.

When stuck with reverse engineering, apply JTAG
The bad thing was that the code Linksys published as the source of the RedBoot running inside the NSLU2 was, in fact, a different code which had some significant changes around the code pieces I was mostly interested in. That in spite of the GPL terms.

But I thought that I could manage. After all, how hard could it be to identify the 2-3 functions I was interested in and 1 buffer? Even if I only had the disassembled code from the slug, it shouldn't be that hard.

I struggled with this for about 2-3 weeks on the few occasions I had during that time, but the excitement of leaning something new kept me going. Until I got stuck somewhere between the misalignment between the published RedBoot code and the disassembled code, the state of the system at the time of dumping the contents from RAM (for purposes of disassemby), the assembly code generated by GCC for some specific C code I didn't have at all, and the particularities of ARM assembly.

What was most likely to unblock me was to actually see the code in action, so I decided attaching a JTAG dongle to the slug and do a session of in-circuit-debugging was in order.

Luckily, the pinout of the JTAG interface was already identified in the NSLU2 Linux project, so I only had to solder some wires to the specified places and a 2x20 header to be able to connect through JTAG to the board.


JTAG connections on Kinder (the NSLU2 targeting NetBSD)

After this was done I tried immediately to see if when using a JTAG debugger I could break the execution of the code on the system. The answer was sadly, no.

The chip was identified, but breaking the execution was not happening. I tried this in OpenOCD and in another proprietary debugger application I had access to, and the result was the same, breaking was not happening.
$ openocd -f interface/ftdi/olimex-arm-usb-ocd.cfg -f board/linksys_nslu2.cfg
Open On-Chip Debugger 0.8.0 (2015-04-14-09:12)
Licensed under GNU GPL v2
For bug reports, read
http://openocd.sourceforge.net/doc/doxygen/bugs.html
Info : only one transport option; autoselect 'jtag'
adapter speed: 300 kHz
Info : ixp42x.cpu: hardware has 2 breakpoints and 2 watchpoints
0
Info : clock speed 300 kHz
Info : JTAG tap: ixp42x.cpu tap/device found: 0x29277013 (mfg: 0x009,
part: 0x9277, ver: 0x2)
[..]

$ telnet localhost 4444
Trying ::1...
Trying 127.0.0.1...
Connected to localhost.
Escape character is '^]'.
Open On-Chip Debugger
> halt
target was in unknown state when halt was requested
in procedure 'halt'
> poll
background polling: on
TAP: ixp42x.cpu (enabled)
target state: unknown
Looking into the documentation I found a bit of information on the XScale processors[X] which suggested that XScale processors might necessarily need the (otherwise optional) SRST signal on the JTAG interface to be able to single step the chip.

This confused me a lot since I was sure other people had already used JTAG on the NSLU2.

The options I saw at the time were:
  1. my NSLU2 did have a fully working JTAG interface (either due to the missing SRST signal on the interface or maybe due to a JTAG lock on later generation NSLU-s, as was my second slug)
  2. nobody ever single stepped the slug using OpenOCD or other JTAG debugger, they only reflashed, and I was on totally new ground
I even contacted Rod Whitby, the project leader of the NSLU2 project to try to confirm single stepping was done before. Rod told me he never did that and he only reflashed the device.

This confused me even further because, from what I encountered on other platforms, in order to flash some device, the code responsible for programming the flash is loaded in the RAM of the target microcontroller and that code is executed on the target after a RAM buffer with the to be flashed data is preloaded via JTAG, then the operation is repeated for all flash blocks to be reprogrammed.

I was aware it was possible to program a flash chip situated on the board, outside the chip, by only playing with the chip's pads, strictly via JTAG, but I was still hoping single stepping the execution of the code in RedBoot was possible.

Guided by that hope and the possibility the newer versions of the device to be locked, I decided to add a JTAG interface to my older NSLU2, too. But this time I decided I would also add the TRST and SRST signals to the JTAG interface, just in case single stepping would work.

This mod involved even more extensive changes than the ones done on the other NSLU, but I was so frustrated by the fact I was stuck that I didn't mind poking a few holes through the case and the prospect of a connector always sticking out from the other NSLU2, which was doing some small, yet useful work in my home LAN.

It turns out NOBODY single stepped the NSLU2 After biting the bullet and soldering JTAG interface with also the TRST and the SRST signals connected as the pinout page from the NSLU2 Linux wiki suggested, I was disappointed to observe that I was not able to single step the older NSLU2 either, in spite of the presence of the extra signals.

I even tinkered with the reset configurations of OpenOCD, but had not success. After obtaining the same result on the proprietary debugger, digging through a presentation made by Rod back in the hay day of the project and the conversations on the NSLU2 Linux Yahoo mailing list, I finally concluded:
Actually nobody single stepped the NSLU2, no matter the version of the NSLU2 or connections available on the JTAG interface!
So I was back to square 1, I had to either struggle with disassembly, reevaluate my initial options, find another option or even drop entirely the idea. At that point I was already committed to the project, so dropping entirely the idea didn't seem like the reasonable thing to do.

Since I was feeling I was really close to finish on the route I had chosen a while ago, I was not any significantly more knowledgeable in the NetBSD code, and looking at the NPE code made me feel like washing my hands, the only option which seemed reasonable was to go on.

Digging a lot more through the internet, I was finally able to find another version of the RedBoot source which was modified for Intel ixp42x systems. A few checks here and there revealed this newly found code was actually almost identical to the code I had disassembled from the slug I was aiming to run NetBSD on. This was a huge step forward.

Long story short, a couple of days later I had a hacked Apex that could go through the RedBoot data structures, search for available commands in RedBoot and successfully call any of the built-in RedBoot commands!

Testing with loading this modified Apex by hand in RAM via TFTP then jumping into it to see if things woked as expected revealed a few small issues which I corrected right away.

Flashing a modified RedBoot?! But why? Wasn't Apex supposed to avoid exactly that risky operation?
Since the tests when executing from RAM were successful, my custom second stage Apex bootloader for NetBSD net booting was ready to be flashed into the NSLU2.

I added two more targets in the Makefile in the code on the dedicated netbsd branch of my Apex repository to generate the images ready for flashing into the NSLU2 flash (RedBoot needs to find a Sercomm header in flash, otherwise it will crash) and the exact commands to be executed in RedBoot are also print out after generation. This way, if the command is copy-pasted, there is no risk the NSLU2 is bricked by mistake.

After some flashing and reflashing of the apex_nslu2.flash image into the NSLU2 flash, some manual testing, tweaking and modifying the default built in APEX commands, checking that the sequence of commands 'move', 'go 0x01d00000' would jump into Apex, which, in turn, would call RedBoot to transfer the netbsd-nfs.bin image from a TFTP to RAM and then execute it successfully, it was high time to check NetBSD would boot automatically after the NSLU was powered on.

It didn't. Contrary to my previous tests, no call made from Apex to the RedBoot code would return back to Apex, not even the execution of a basic command such as the 'version' command.

It turns out the default commands hardcoded into RedBoot were 'boot; exec 0x01d00000', but I had tested 'boot; go 0x01d0000', which is not the same thing.

While 'go' does a plain jump at the specified address, the 'exec' command also does some preparations so it allows a jump into the Linux kernel and those preparations break some environment the RedBoot commands expect. I don't know which those are and didn't had the mood or motivation to find out.

So the easiest solution was to change the RedBoot's built-in command and turn that 'exec' into a 'go'. But that meant this time I was actually risking to brick the NSLU, unless I
was able to reflash via JTAG the NSLU2.


(to be continued - next, changing RedBoot and bisecting through the NetBSD history)

[X] Linksys NSLU2 has an XScale IXP420 processor which is compatible at ASM level with the ARMv5TEJ instruction set

30 April 2015

Eddy Petri&#537;or: Linksys NSLU2 JTAG help requested

Some time ago I have embarked on a jurney to install NetBSD on one of my two NSLU2-s. I have ran into all sorts of hurdles and problems which I finally managed to overcome, except one:

The NSLU I am using has a standard 20 pin ARM JTAG connector attached to it (as per this page http://www.nslu2-linux.org/wiki/Info/PinoutOfJTAGPort, only TDI, TDO, TMS, TCK, Vref and GND signals), but, although the chip is identified, I am unable to halt the CPU:
    $ openocd -f interface/ftdi/olimex-arm-usb-ocd.cfg -f board/linksys_nslu2.cfg
    Open On-Chip Debugger 0.8.0 (2015-04-14-09:12)
    Licensed under GNU GPL v2
    For bug reports, read
    http://openocd.sourceforge.net/doc/doxygen/bugs.html
    Info : only one transport option; autoselect 'jtag'
    adapter speed: 300 kHz
    Info : ixp42x.cpu: hardware has 2 breakpoints and 2 watchpoints
    0
    Info : clock speed 300 kHz
    Info : JTAG tap: ixp42x.cpu tap/device found: 0x29277013 (mfg: 0x009,
    part: 0x9277, ver: 0x2)
    [..]
    $ telnet localhost 4444
    Trying ::1...
    Trying 127.0.0.1...
    Connected to localhost.
    Escape character is '^]'.
    Open On-Chip Debugger
    > halt
    target was in unknown state when halt was requested
    in procedure 'halt'
    > poll
    background polling: on
    TAP: ixp42x.cpu (enabled)
    target state: unknown
My main goal is to make sure I can flash the device via JTAG, in case I break it, but it would be ideal if I could use the JTAG to single step through the code.

I have found that other people have managed to flash the device via JTAG without the other signals, and some have even changed the bootloader (and had JTAG confirmed as backup solution), so I am stuck.

So if anyone can give some insights into ixp42x / Xscale / NSLU2 specific JTAG issues or hints regarding this issue on OpenOCD or other such tool, I would be really grateful.


Note: I have made a hacked second stage Apex bootloader to laod the NetBSD image via TFTP, but the default RedBoot sequence 'boot; exec 0x01d00000' should be 'boot; go 0x01d00000' for NetBSD to work, so I am considering changing the RedBoot partition to alter that command. The gory details can be summed as my Apex is calling RedBoot functions to be network enabled (because Intel's NPE current code is not working on Apex) and I have tested this to work with go, but not with exec.

26 April 2015

Joachim Breitner: Fifth place in Godingame World Cup

Last evening, Codingame held a Programming World Cup titled There is no Spoon . The format is that within four hours, you get to write a program that solves a given task. Submissions are first rated by completeness (there are 13 test inputs that you can check your code again, and further hidden tests that will only be checked after submission) and then by time of submission. You can only submit your code once. What I like about Codingame is that they support a great number of programming languages in their Web- IDE , including Haskell. I had nothing better to do yesterday, so I joined. I was aiming for a good position in the Haskell-specific ranking. After nearly two hours my code completed all the visible test cases and I submitted. I figured that this was a reasonable time to do so, as it was half-time and there are supposed to be two challenges. I turned out that the first, quite small task, which felt like a warm-up or qualification puzzle, was the first of those two, and that therefore I was done, and indeed the 5th fastest to complete a 100% solution! With only less than 5 minutes difference to the 3rd, money-winning place if I had known I had such a chance, I had started on time... Having submitted the highest ranked Haskell code, I will get a T-Shirt. I also defended Haskell s reputation as an efficient programming language, ranked third in the contest, after C++ (rank 1) and Java (rank 2), but before PHP (9), C# (10) and Python (11), listing only those that had a 100% solution. The task, solving a Bridges puzzle, did not feel like a great fit for Haskell at first. I was juggling Data.Maps around where otherwise I d simple attach attributes to object, and a recursive function simulated nothing but a plain loop. But it played off the moment I had to implement guessing parts of the solution, trying what happens and backtracking when it did not work: With all state in parameters and pure code it was very simple to get a complete solution. My code is of course not very polished, and having the main loop live in the IO monad just to be able to print diagnostic commands is a bit ugly. The next, Lord of the Ring-themed world cup will be on June 27th. Maybe we will see more than 18 Haskell entries then?

15 April 2015

Rapha&#235;l Hertzog: Looking back at the Debian Long Term Support project

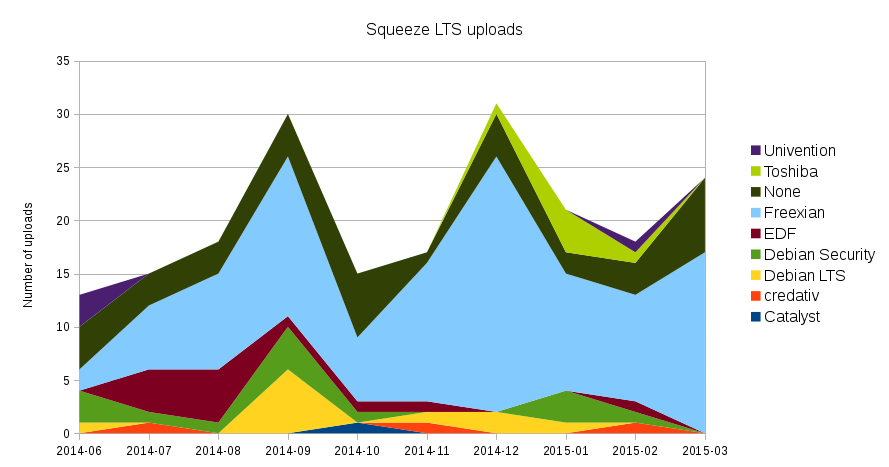
On Sunday I gave a talk about Debian LTS during the Mini-DebConf in Lyon. Obviously I presented the project and the way it s organized, but I also took the opportunity to compute some statistics. You can watch the presentation (thanks to the video team!) or have a look at the slides to learn more. Here are some extracts of the statistics I collected: The number of the uploads per affiliation (known affiliations are recorded in the LTS/Team wiki page) is displayed on the graph below. None corresponds to packages maintainers taking care of their own packages, Debian Security corresponds to members of the security team who also contributed to LTS, Debian LTS corresponds to individual members of the LTS team without any explicit affiliation. Freexian represents in fact 29 financial sponsors (see detail here). Debian LTS uploads over time Top 12 contributors (in number of uploads): The talk also contains explanations about the current funding setup. Hopefully this clears things up for people who were still wondering how the LTS project is working.

One comment Liked this article? Click here. My blog is Flattr-enabled.

14 April 2015

Neil Williams: Extending an existing ARMMP initramfs

The actual use of this extension is still in development and the log files are not currently publicly visible, but it may still be useful for people to know the what and why The Debian ARMMP kernel can be used for multiple devices, just changing the DTB. I ve already done tests with this for Cubietruck and Beaglebone-Black, iMX.53 was one of the original test devices too. Whilst these tests can deploy a full image (there are examples of building such images in the vmdebootstrap package), it is a lot quicker to do simple tests of a kernel using a ramdisk. The default Debian initramfs has a focused objective but still forms a useful base for extension. In particular, I want to be able to test one initramfs on multiple boards (so multiple dtbs) with the same kernel image. I then want to be able, on selected boards, to mount a SATA drive or write an image to eMMC or a USB stick or whatever. LAVA (via the ongoing refactoring, not necessarily in the current dispatcher code) can automate such tests, e.g. to allow me to boot a Cubietruck into a standard Debian ARMMP armhf install on the SATA drive but using a modified (or updated) ARMMP kernel over TFTP without needing to install it on the device itself. That same kernel image can then be tested on multiple boards to see if the changes have benefitted one board at the expense of another. Automating all of that could be of a lot of benefit to the ARM kernel developers in Debian and outside Debian. So, the start point. Install Debian onto a Cubietruck in my case, with a SATA drive attached. All well and good so far, standard Debian Jessie ARMMP. (Cubietruck uses the LPAE kernel flavour but that won t matter for the initramfs.) Rather than building the initramfs manually, this provides a shortcut at some point I may investigate how to do this in QEMU but for now, it s just as quick to SSH onto the Cubietruck and update. I ve already written a little script to download the relevant linux-image package for ARMMP, unpack it and pull out the vmlinuz, the dtbs and a selected list of modules. The list is selective because TFTP has a 32Mb download limit and there are more modules than that. So I borrowed a snippet from the Xen folks (already shown previously here). The script is in a support repository for LAVA but can be used anywhere. (You ll need to edit the package name in the script to choose between ARMMP and ARMMP LPAE. Steps

  1. Get a working initramfs from an installed device running Debian ARMMP and copy some files for use later. Note: use the name of the symlink in the copy so that the file in /tmp/ is the actual file, using the name of the symlink as the filename. This is important later as it saves a step of having to make the (unnecessary) symlink inside the initramfs. Also, mkinitramfs, which built this initrd.img file in the first place, uses the same shared libraries as the main system, so copying these into the initramfs still works. (This is really useful when you get your ramdisk to support the attached secondary storage, allowing you to simply mount the original Debian install and fixup the initramfs by copying files off the main Debian install.) The relevant files are to support DNS lookup inside the initramfs which then allows a test to download a new image to put onto the attached media before rebooting into it.
    cp /boot/initrd.img-3.16.0-4-armmp-lpae /tmp/
    cp /lib/arm-linux-gnueabihf/libresolv.so.2 /tmp/
    cp /mnt/lib/arm-linux-gnueabihf/libnss_dns.so.2 /tmp/
    
    Copy these off the device for local adjustment:
    scp IP_ADDR:/tmp/FILE .
    
  2. Decompress the initrd.img:
    cp initrd.img-3.16.0-4-armmp-lpae initrd.img-3.16.0-4-armmp-lpae.gzip
    gunzip initrd.img-3.16.0-4-armmp-lpae.gzip
    
  3. Make a new empty directory
    mkdir initramfs
    cd initramfs
    
  4. Unpack:
    sudo cpio -id < initrd.img-3.16.0-4-armmp-lpae
    
  5. Remove the old modules (LAVA can add these later, allowing tests to use an updated build with updated modules):
    sudo rm -rf ./lib/modules/*
    
  6. Start to customise - need a script for udhcpc and two of the libraries from the installed system to allow the initramfs to do DNS lookups successfully.
    cp ../libresolv.so.2 ./lib/arm-linux-gnueabihf/
    cp ../libnss_dns.so.2 ./lib/arm-linux-gnueabihf/
    
  7. Copy the udhcpc default script into place:
    mkdir ./etc/udhcpc/
    sudo cp ../udhcpc.d ./etc/udhcpc/default.script
    sudo chmod 0755 ./etc/udhcpc/default.script
    
  8. Rebuild the cpio archive:
    find .   cpio -H newc -o > ../initrd.img-armmp.cpio
    
  9. Recompress:
    cd ..
    gzip initrd.img-armmp.cpio
    
  10. If using u-boot, add the UBoot header:
    mkimage -A arm -T ramdisk -C none -d initrd.img-armmp.cpio.gz initrd.img-armmp.cpio.gz.u-boot
    
  11. Checksum the final file so that you can check that against the LAVA logs.
    md5sum initrd.img-armmp.cpio.gz.u-boot
    
Each type of device will need a set of modules modprobed before tests can start. With the refactoring code, I can use an inline YAML and use dmesg -n 5 to reduce the kernel message noise. The actual module names here are just those for the Cubietruck but by having these only in the job submission, it makes it easier to test particular combinations and requirements.
- dmesg -n 5
- lava-test-case udevadm --shell udevadm hwdb --update
- lava-test-case depmod --shell depmod -a
- lava-test-case sata-mod --shell modprobe -a stmmac ahci_sunxi sd_mod sg ext4
- lava-test-case ifconfig --shell ifconfig eth0 up
- lava-test-case udhcpc --shell udhcpc
- dmesg -n 7
In due course, this will be added to the main LAVA documentation to allow others to keep the initramfs up to date and to support further test development.

8 April 2015

Ben Hutchings: Call for testing: linux 3.16.7-ckt9-1

As it is nearly time to release Debian 8 (codename jessie), I've uploaded a new version of the Linux kernel to unstable which I hope will be the version to go into the initial release (8.0). The changes from the current version in testing are mostly bug fixes: Please test this new version (which should be on mirrors within the next 24 hours) and report any regressions you spot. It's now too late to add new hardware support for Debian 8.0, but we'll probably be able to improve it in subsequent point releases. So, please also report driver changes that should be backported from later kernel versions to improve hardware support, with severity of 'important'. If you can provide precise information about which upstream commits are needed, that makes things easier for us, and you should add the 'patch' tag.

7 April 2015

Carl Chenet: Backup Checker, the ServerSpec for your backups

Follow me on Identi.ca or Twitter or Diaspora*diaspora-banner Sysadmins usually know ServerSpec, a tool allowing to check if your servers are correctly configured. The use of automated deployment tools makes deployments easier and easier, but lot of unexpected situations can come up using this tool, especially when more and more servers are implied. ServerSpec allows to verify that the result of your deployments are what you were expecting for and that no exception or unexpected event goes undetected. serverspec Backup Checker (Github stars appreciated :)) offers the same kind of controls, but for your backups. Once you have backups, you don t know if they contain what you are expecting for. And this is especially important because having broken backups mean losing your data after a major outage! Moreover if you think you are well protected with backups but they are eventually broken (corrupted archives, archives being filled with empty files, saving useless files ), you will perform your server or database upgrades without being really protected, leading to terrible situations.
github-logo

Backup Checker on github

Backup Checker offers lots of controls over backups: Use Backup Checker with Backup-Manager or Rsnapshot Starting from Backup Checker 1.7,if you use a backup tool like Backup-Manager or Rsnapshot, you ll be glad to know that Backup Checker perfectly works with them. The documentation is available on the Backup Checker Community page with the howtos to install and configure Backup Checker with Backup-Manager or with Rsnapshot. weneedyou What about you? Let us know in the comments what you think of Backup Checker and its features to connect with other backup tools. We would be happy to get your feedbacks about how you use Backup Checker or what you expect from a backup checking solution.

6 April 2015

Daniel Leidert: Correct keyboard layout (QWERTZ) with Logitech K400 attached to an Android HDMI stick

I've bought an HDMI stick with Android 4.4.2 to connect a TV to the local network (stream, DLNA) and the internet (Video portals etc.). The stick comes with no input device whatsoever. So I decided for a wireless Logitech K400r keyboard. Unfortunately the keyboard layout used by Android seems to be American (QWERTY) although the language and location settings are set to German. So I neither get Umlauts nor special signs correct nor do the media keys of the K400 work. But there is an easy way to make all this work. I've recently seen some people suggesting to install an app called External Keyboard Helper to fix things, which comes in a demo and a pro version, the latter with costs. Fortunately I didn't need any of these for the Logitech keyboard plus I got all media keys of this keyboard to work in just three steps without any cost :) Step 1First I went to the Google Play Store and installed the Logitech Keyboard Plus app by Logitech Europe S.A. (See? No external stuff and without costs. Ignore anything that's written in its description about Bluetooth.)App Logitech Keyboard Plus shown at Google Play Store Step 2Then I opened the settings section and went for Settings > Language and Input (Einstellungen > Sprache und Eingabe). Under KEYBOARD & INPUT METHOD (TASTATUR & EINGABEMETHODEN) I activated the entry called Logitech keyboard (Logitech Tastatur) as shown below.Activate the entry &quote;Logitech keyboard&quote; under Settings > Language and Input Step 3Now a click on the field above that is called Default (Standard) and (here) defaults to Deutsch - Android-Tastatur (AOSP) ...Click on the field &quote;Default&quote;... opened a popup called Choose input method and there I've chosen Logitech keyboard (Logitech Tastatur) as shown below and confirmed it.Activate the Logitech keyboard on the popup called &quote;Choose input method&quote;The default now is the Logitech keyboard:The default keyboard now is the Logitech keyboard Finally ...... it's done. The keyboard now behaves as expected and also the media/function keys do work. It is however not possible to adjust or configure anything, because this presumes a confirmed Bluetooth pairing between the keyboard and the android device and the K400 is not a Bluetooth device. It would probably be a good idea for Logitech to make this app usable for all available Logitech keyboards, even USB and Unifying(TM) ones. Update: As of now it is possible to cancel the Bluetooth pairing attempt without leaving the application. So this app in fact can be used for USB and Unifying(TM)-based Logitech keyboards.

2 April 2015

Rudy Godoy: No SSH for you how to fix OpenRG routers

I find interesting when faced a taken-for-granted situation, in particular in the tech world. This time s history is about an Internet ADSL connection that allows all traffic but SSH. Yes, you read it correctly. It was very bizarre confirming such event was a real-life situation. I don t claim to be a networking expert but at least I want to think I m well educated. After few minutes I ve focused my efforts on dealing with the ADSL router/modem s networking configuration. The device is provided by Movistar (formerly Telefonica) and it runs OpenRG. I ve discovered that other people have experienced the same issue and what Movistar did was basically replacing the device. Of course the problem is gone after that. So, this post is dedicated to those who don t give up. Following the steps below will allow SSH outbound traffic for a OpenRG-based device. OpenRG device specs
Software Version: 6.0.18.1.110.1.52 Upgrade
Release Date: Oct 7 2014
Diagnostic When you do the command below, it shows nothing but timeout. Even when you SSH the router it doesn t establish connection to it.
ssh -vv host.somewhere.com
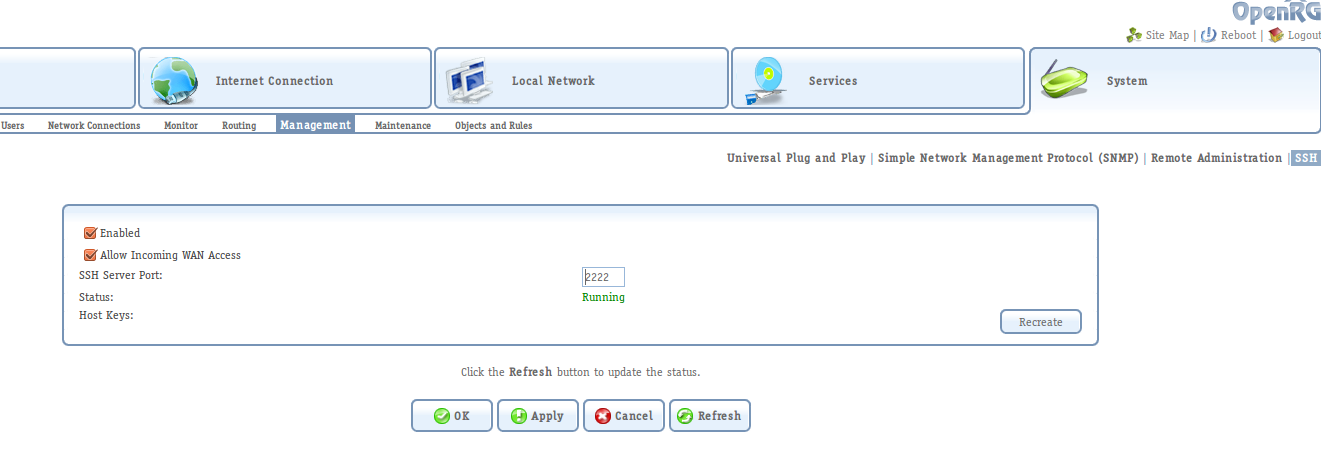
Solution Change router s SSH service port. This step will allow you to access the console-based configuration for the router (since I haven t found any way to do the steps described below from the web management interface). To do so, go to System > Management > SSH. Update the service port to something else than 22, for instance 2222.
OpenRG SSH service configuration

OpenRG SSH service configuration

Connect to the SSH interface Once you have changed the SSH service port, you can access it from a SSH client.
ssh -p 2222 admin@192.168.1.1
admin@192.168.1.1's password: 
OpenRG>
Once you have the console prompt, issue the following commands to allow SSH outbound traffic coming from the LAN and Wifi networks. After the last command, which saves and updates the device s configuration, you should be able to do SSH from any computer in your network to the Internet (thanks to tips from inkhorn).
OpenRG> conf set fw/policy/0/chain/fw_br0_in/rule/0/enabled 0
Returned 0
OpenRG> conf set fw/policy/0/chain/fw_br1_in/rule/0/enabled 0
Returned 0
OpenRG> conf reconf 1
Returned 0

1 April 2015

Benjamin Mako Hill: RomancR: The Future of the Sharing-Your-Bed Economy

romancer_logo Today, Aaron Shaw and I are pleased to announce a new startup. The startup is based around an app we are building called RomancR that will bring the sharing economy directly into your bedrooms and romantic lives. When launched, RomancR will bring the kind of market-driven convenience and efficiency that Uber has brought to ride sharing, and that AirBnB has brought to room sharing, directly into the most frustrating and inefficient domain of our personal lives. RomancR is Uber for romance and sex. Here s how it will work: Of course, there are many existing applications like Tinder and Grindr that help facilitate romance, dating, and hookups. Unfortunately, each of these still relies on old-fashion intrinsic ways of motivating people to participate in romantic endeavors. The sharing economy has shown us that systems that rely on these non-monetary motivations are ineffective and limiting! For example, many altruistic and socially-driven ride-sharing systems existed on platforms like Craigslist or Ridejoy before Uber. Similarly, volunteer-based communities like Couchsurfing and Hospitality Club existed for many years before AirBnB. None of those older systems took off in the way that their sharing economy counterparts were able to! The reason that Uber and AirBnB exploded where previous efforts stalled is that this new generation of sharing economy startups brings the power of markets to bear on the problems they are trying to solve. Money both encourages more people to participate in providing a service and also makes it socially easier for people to take that service up without feeling like they are socially in debt to the person providing the service for free. The result has been more reliable and effective systems for proving rides and rooms! The reason that the sharing economy works, fundamentally, is that it has nothing to do with sharing at all! Systems that rely on people s social desire to share without money projects like Couchsurfing are relics of the previous century. RomancR, which we plan to launch later this year, will bring the power and efficiency of markets to our romantic lives. You will leave your pitiful dating life where it belongs in the dustbin of history! Go beyond antiquated non-market systems for finding lovers. Why should we rely on people s fickle sense of taste and attractiveness, their complicated ideas of interpersonal compatibility, or their sense of altruism, when we can rely on the power of prices? With RomancR, we won t have to! Note: Thanks to Yochai Benkler whose example of how leaving a $100 bill on the bedside table of a person with whom you spent the night can change the nature of the a romantic interaction inspired the idea for this startup.

Benjamin Mako Hill: RomancR: The Future of the Sharing-Your-Bed Economy

romancer_logo Today, Aaron Shaw and I are pleased to announce a new startup. The startup is based around an app we are building called RomancR that will bring the sharing economy directly into your bedrooms and romantic lives. When launched, RomancR will bring the kind of market-driven convenience and efficiency that Uber has brought to ride sharing, and that AirBnB has brought to room sharing, directly into the most frustrating and inefficient domain of our personal lives. RomancR is Uber for romance and sex. Here s how it will work: Of course, there are many existing applications like Tinder and Grindr that help facilitate romance, dating, and hookups. Unfortunately, each of these still relies on old-fashion intrinsic ways of motivating people to participate in romantic endeavors. The sharing economy has shown us that systems that rely on these non-monetary motivations are ineffective and limiting! For example, many altruistic and socially-driven ride-sharing systems existed on platforms like Craigslist or Ridejoy before Uber. Similarly, volunteer-based communities like Couchsurfing and Hospitality Club existed for many years before AirBnB. None of those older systems took off in the way that their sharing economy counterparts were able to! The reason that Uber and AirBnB exploded where previous efforts stalled is that this new generation of sharing economy startups brings the power of markets to bear on the problems they are trying to solve. Money both encourages more people to participate in providing a service and also makes it socially easier for people to take that service up without feeling like they are socially in debt to the person providing the service for free. The result has been more reliable and effective systems for proving rides and rooms! The reason that the sharing economy works, fundamentally, is that it has nothing to do with sharing at all! Systems that rely on people s social desire to share without money projects like Couchsurfing are relics of the previous century. RomancR, which we plan to launch later this year, will bring the power and efficiency of markets to our romantic lives. You will leave your pitiful dating life where it belongs in the dustbin of history! Go beyond antiquated non-market systems for finding lovers. Why should we rely on people s fickle sense of taste and attractiveness, their complicated ideas of interpersonal compatibility, or their sense of altruism, when we can rely on the power of prices? With RomancR, we won t have to! Note: Thanks to Yochai Benkler whose example of how leaving a $100 bill on the bedside table of a person with whom you spent the night can change the nature of the a romantic interaction inspired the idea for this startup.

Benjamin Mako Hill: More Community Data Science Workshops

Pictures from the CDSW sessions in Spring 2014Pictures from the CDSW sessions in Spring 2014
After two successful rounds in 2014, I m helping put on another round of the Community Data Science Workshops. Last year, our 40+ volunteer mentorss taught more than 150 absolute beginners the basics of programming in Python, data collection from web APIs, and tools for data analysis and visualization and we re still in the process of improving our curriculum and scaling up. Once again, the workshops will be totally free of charge and open to anybody. Once again, they will be possible through the generous participation of a small army of volunteer mentors. We ll be meeting for four sessions over three weekends: If you re interested in attending, or interested in volunteering as mentor, you can go to the information and registration page for the current round of workshops and sign up before April 3rd.

25 March 2015

Yves-Alexis Perez: LXCs upgrade to Jessie

So I started migrating some of my LXCs to Jessie, to test the migration in advance. The upgrade itself was easy (the LXC is mostly empty and only runs radicale), but after the upgrade I couldn't login anymore (using lxc-console since I don't have lxc-attach, the host is on Wheezy). So this is mostly a note to self. auth.log was showing:
Mar 25 22:10:13 lxc-sync login[1033]: pam_loginuid(login:session): Cannot open /proc/self/loginuid: Read-only file system
Mar 25 22:10:13 lxc-sync login[1033]: pam_loginuid(login:session): set_loginuid failed
Mar 25 22:10:13 lxc-sync login[1033]: pam_unix(login:session): session opened for user root by LOGIN(uid=0)
Mar 25 22:10:13 lxc-sync login[1033]: Cannot make/remove an entry for the specified session
The last message isn't too useful, but the first one gave the answer. Since LXC isn't really ready for security stuff, I have some hardening on top of that, and one measure is to not have rw access to /proc. I don't really need pam_loginuid there, so I just disabled that. I just need to remember to do that after each LXC upgrade. Other than that, I have to boot using SystemV init, since apparently systemd doesn't cope too well with the various restrictions I enforce on my LXCs:
lxc-start -n sync
Failed to mount sysfs at /sys: Operation not permitted
(which is expected, since I drop CAP_SYS_ADMIN from my LXCs). I didn't yet investigate how to stop systemd doing that, so for now I'm falling back to SystemV init until I find the correct customization:
lxc-start -n sync /lib/sysvinit/init   
INIT: version 2.88 booting
[info] Using makefile-style concurrent boot in runlevel S.
hostname: you must be root to change the host name
mount: permission denied
[FAIL] udev requires a mounted sysfs, not started ... failed!
 failed!
mount: permission denied
[info] Setting the system clock.
hwclock: Cannot access the Hardware Clock via any known method.
hwclock: Use the --debug option to see the details of our search for an access method.
[warn] Unable to set System Clock to: Wed Mar 25 21:21:43 UTC 2015 ... (warning).
[ ok ] Activating swap...done.
mount: permission denied
[ ok ] Activating lvm and md swap...done.
[....] Checking file systems...fsck from util-linux 2.25.2
done.
[ ok ] Cleaning up temporary files... /tmp.
[ ok ] Mounting local filesystems...done.
[ ok ] Activating swapfile swap...done.
mount: permission denied
[ ok ] Cleaning up temporary files....
[ ok ] Setting kernel variables ...done.
[....] Configuring network interfaces...RTNETLINK answers: Operation not permitted
Failed to bring up lo.
done.
[ ok ] Cleaning up temporary files....
[FAIL] startpar: service(s) returned failure: hostname.sh udev ... failed!
INIT: Entering runlevel: 2
[info] Using makefile-style concurrent boot in runlevel 2.
dmesg: read kernel buffer failed: Operation not permitted
[ ok ] Starting Radicale CalDAV server : radicale.
Yes, there are a lot of errors, but they seem to be handled just fine.

23 March 2015

Carl Chenet: Unverified backups are useless. Automatize the controls!

Follow me on Identi.ca or Twitter or Diaspora*diaspora-banner Unverified backups are useless, every sysadmins know that. But manually verifying a backup means wasting time and resources. Moreover it s boring. You should automatize it!
charlot

Charlie Chaplin Modern Times

Backup Checker is a command line software developed in Python 3.4 on GitHub (stars appreciated :) ) allowing users to verify the integrity of archives (tar, gz, bz2, lzma, zip, tree of files) and the state of the files inside an archive in order to find corruptions or intentional of accidental changes of states or removal of files inside an archive.
github-logo

Backup Checker on github

The new feature of the latest version 1.4 is the control of outdated archives with the new outdated parameter. Lots of data are outdated quite fast, because they are dependent of other data, or because they are only useful in a specific context.
Hey, this database dump is 6 months old, it s useless today!
Backup Checker now controls the expiration duration and triggers a warning if the given duration starting from the last modification of the archive (mtime) is expired. Short examples of the warning: WARNING:root:/backups/backups-12022015.tar.gz is outdated. Was good until 01/03/15 00:00:00 now 22/03/15 21:38:20 You won t be surprized any more by outdated useless data in your backups. Backup Checker also offers lots of other controls. Check the features list! Installing Backup Checker Backup Checker is available from PyPI using the following command:
# pip3.4 install backupchecker
It s also available for your Debian Squeeze or Debian Wheezy. Check how to get it for your specific distributions. weneedyou What about you? How and what for do you use Backup Checker? We would be happy to get your feedbacks. The project cares about our users and the outdated feature was a awesome idea in a feature request by one of the Backup Checker user, thanks Laurent!

22 March 2015

Rhonda D'Vine: Yasmo

Friday the 13th was my day. In so many different ways. I received a package which was addressed to Rhonda D'Vine with a special hoodie in it. The person at the post office desk asked me whether it was for my partner, my response was a (cowardly) "no, it's my pseudonym" but that settled any further questions and I got my package. Later I received an email which made me hyper happy (but which I can't share right now, potentially later). In the evening there was the WortMacht FemSlam (WordMight FemSlam) poetry slam to which the host asked me to attend just the day before. I was hyper nervous about it. The room was fully packed, there were even quite some people who didn't have a place to sit and were standing at the side. I presented Mermaids because I wasn't able to write anything new on the topic. One would think I am attached enough to the poem by now to not be nervous about it, but it was the environment that made my legs shake like hell while presenting. Gladly I hope it wasn't possible to see it enough under my skirt, but given that it was the first time that I presented it in my home town instead of the "anonymous" internet made me extra anxious. In the end I ended up in place 5 of 7 attendees, which I consider a success given that it was the only text presented in English and not in typical poetry slam style.
(Small addition to the last part: I've been yesterday to the Free Hugs Vienna event at the Schloss Sch nbrunn, and one of the people I hugged told me I know you, I've seen you at the FemSlam!. That was extra sweet. :)) I'm happy that I was notified about the FemSlam on such short notice, it was a great experience. So today's entry goes out to the host of that event. This is about Yasmo. One can just be envious about what she already accomplished in her still young life. And she is definitely someone to watch out for in the years to come. I have to excuse to my readers who don't understand German yet again, but I'll get back to something English next time, I promise. :) Like always, enjoy!

/music permanent link Comments: 0 Flattr this

Robert Edmonds: Bad Google repository signatures

Update: I was able to get in touch with the Googlers responsible for the dl.google.com service, and the root cause for the mismatched signature problem described below has been found and fixed. I now consistently receive from Google's servers Release and Release.gpg files that pass apt's signature validation on my home connection. Google publishes Linux software repositories for several of their products, including Google Chrome, which is available from the following apt source:
deb http://dl.google.com/linux/chrome/deb/ stable main
These repositories are signed with an 8 year old 1024-bit DSA key:
pub   1024D/7FAC5991 2007-03-08
      Key fingerprint = 4CCA 1EAF 950C EE4A B839  76DC A040 830F 7FAC 5991
uid                  Google, Inc. Linux Package Signing Key <linux-packages-keymaster@google.com>
sub   2048g/C07CB649 2007-03-08
Asymmetric 1024-bit keys are not considered strong enough and were, for instance, aggressively retired from Google's SSL frontends almost two years ago. Such short keys should not be used to protect the integrity of software package repositories. Note that this key has a longer 2048-bit ElGamal subkey, which is not actually used to produce signatures, but only for encryption. In fact, only a signing key is needed to sign the files in a secure apt repository, and, for instance, the archive keys used to sign official debian.org repositories do not contain an encryption subkey. Since years, many users have reported an error message like the following when running apt-get update:
W: GPG error: http://dl.google.com stable Release: The following signatures were
invalid: BADSIG A040830F7FAC5991 Google, Inc. Linux Package Signing Key
<linux-packages-keymaster@google.com>
This error might resolve itself if apt-get update is run again. Apparently, this is due to "bad pushes" occurring in the Google infrastructure. An example of this can be seen in the following curl output:
$ curl -v http://dl.google.com/linux/chrome/deb/dists/stable/Release \
        http://dl.google.com/linux/chrome/deb/dists/stable/Release.gpg
* Hostname was NOT found in DNS cache
*   Trying 74.125.196.136...
* Connected to dl.google.com (74.125.196.136) port 80 (#0)
> GET /linux/chrome/deb/dists/stable/Release HTTP/1.1
> User-Agent: curl/7.38.0
> Host: dl.google.com
> Accept: */*
> 
< HTTP/1.1 200 OK
< Accept-Ranges: bytes
< Content-Length: 1347
< Content-Type: application/octet-stream
< Etag: "518b8"
< Expires: Sun, 22 Mar 2015 18:55:19 PDT
< Last-Modified: Fri, 20 Mar 2015 04:22:00 GMT
* Server downloads is not blacklisted
< Server: downloads
< X-Content-Type-Options: nosniff
< X-Frame-Options: SAMEORIGIN
< X-Xss-Protection: 1; mode=block
< Date: Sun, 22 Mar 2015 01:55:19 GMT
< Alternate-Protocol: 80:quic,p=0.5
< 
Origin: Google, Inc.
Label: Google
Suite: stable
Codename: stable
Version: 1.0
Date: Thu, 19 Mar 2015 22:55:29 +0000
Architectures: amd64 i386
Components: main
Description: Google chrome-linux repository.
MD5Sum:
 53375c7a2d182d85aef6218c179040ed 144 main/binary-i386/Release
 c556daf52ac818e4b11b84cb5943f6e0 4076 main/binary-i386/Packages
 867ba456bd6537e51bd344df212f4662 960 main/binary-i386/Packages.gz
 2b766b2639b57d5282a154cf6a00b172 1176 main/binary-i386/Packages.bz2
 89704f9af9e6ccd87c192de11ba4c511 145 main/binary-amd64/Release
 fa88101278271922ec9b14b030fd2423 4082 main/binary-amd64/Packages
 1ba717117027f36ff4aea9c3ea60de9e 962 main/binary-amd64/Packages.gz
 19af18f376c986d317cadb3394c60ac5 1193 main/binary-amd64/Packages.bz2
SHA1:
 59414c4175f2cc22e67ba6c30687b00c72a7eafc 144 main/binary-i386/Release
 1764c5418478b1077ada54c73eb501165ba79170 4076 main/binary-i386/Packages
 db24eafac51d3e63fd41343028fb3243f96cbed6 960 main/binary-i386/Packages.gz
 ad8be07425e88b2fdf2f6d143989cde1341a8c51 1176 main/binary-i386/Packages.bz2
 153199d8f866350b7853365a4adc95ee687603dd 145 main/binary-amd64/Release
 7ce66535b35d5fc267fe23af9947f9d27e88508b 4082 main/binary-amd64/Packages
 a72b5e46c3be8ad403df54e4cdcd6e58b2ede65a 962 main/binary-amd64/Packages.gz
 dbc7fddd28cc742ef8f0fb8c6e096455e18c35f8 1193 main/binary-amd64/Packages.bz2
* Connection #0 to host dl.google.com left intact
* Found bundle for host dl.google.com: 0x7f24e68d06a0
* Re-using existing connection! (#0) with host dl.google.com
* Connected to dl.google.com (74.125.196.136) port 80 (#0)
> GET /linux/chrome/deb/dists/stable/Release.gpg HTTP/1.1
> User-Agent: curl/7.38.0
> Host: dl.google.com
> Accept: */*
> 
< HTTP/1.1 200 OK
< Accept-Ranges: bytes
< Content-Length: 198
< Content-Type: application/octet-stream
< Etag: "518f4"
< Expires: Sun, 22 Mar 2015 18:55:19 PDT
< Last-Modified: Fri, 20 Mar 2015 04:05:00 GMT
* Server downloads is not blacklisted
< Server: downloads
< X-Content-Type-Options: nosniff
< X-Frame-Options: SAMEORIGIN
< X-Xss-Protection: 1; mode=block
< Date: Sun, 22 Mar 2015 01:55:19 GMT
< Alternate-Protocol: 80:quic,p=0.5
< 
-----BEGIN PGP SIGNATURE-----
Version: GnuPG v1.4.10 (GNU/Linux)
iEYEABECAAYFAlULm7YACgkQoECDD3+sWZFyxACeNPuK/zQ0v+3Py1n2s09Wk/Ti
DckAni8V/gy++xIinu8OdUXv7c777V9H
=5vT6
-----END PGP SIGNATURE-----
* Connection #0 to host dl.google.com left intact
Note that both the Release and Release.gpg files were fetched with the same HTTP connection, so the two files must have come from the same web frontend. (Though, it is possible they were served by different backends.) However, the detached signature in Release.gpg does not match the content in Release:
gpgv: Signature made Fri 20 Mar 2015 12:01:58 AM EDT using DSA key ID 7FAC5991
gpgv: BAD signature from "Google, Inc. Linux Package Signing Key <linux-packages-keymaster@google.com>"
Performing the same pair of fetches again, the same Release.gpg file is returned, but the Release file is slightly different:
$ curl -v http://dl.google.com/linux/chrome/deb/dists/stable/Release \
        http://dl.google.com/linux/chrome/deb/dists/stable/Release.gpg
* Hostname was NOT found in DNS cache
*   Trying 74.125.196.136...
* Connected to dl.google.com (74.125.196.136) port 80 (#0)
> GET /linux/chrome/deb/dists/stable/Release HTTP/1.1
> User-Agent: curl/7.38.0
> Host: dl.google.com
> Accept: */*
> 
< HTTP/1.1 200 OK
< Accept-Ranges: bytes
< Content-Length: 1347
< Content-Type: application/octet-stream
< Etag: "518f3"
< Expires: Sun, 22 Mar 2015 18:55:04 PDT
< Last-Modified: Fri, 20 Mar 2015 04:05:00 GMT
* Server downloads is not blacklisted
< Server: downloads
< X-Content-Type-Options: nosniff
< X-Frame-Options: SAMEORIGIN
< X-Xss-Protection: 1; mode=block
< Date: Sun, 22 Mar 2015 01:55:04 GMT
< Alternate-Protocol: 80:quic,p=0.5
< 
Origin: Google, Inc.
Label: Google
Suite: stable
Codename: stable
Version: 1.0
Date: Fri, 20 Mar 2015 04:02:02 +0000
Architectures: amd64 i386
Components: main
Description: Google chrome-linux repository.
MD5Sum:
 89704f9af9e6ccd87c192de11ba4c511 145 main/binary-amd64/Release
 fa88101278271922ec9b14b030fd2423 4082 main/binary-amd64/Packages
 1ba717117027f36ff4aea9c3ea60de9e 962 main/binary-amd64/Packages.gz
 19af18f376c986d317cadb3394c60ac5 1193 main/binary-amd64/Packages.bz2
 53375c7a2d182d85aef6218c179040ed 144 main/binary-i386/Release
 c556daf52ac818e4b11b84cb5943f6e0 4076 main/binary-i386/Packages
 867ba456bd6537e51bd344df212f4662 960 main/binary-i386/Packages.gz
 2b766b2639b57d5282a154cf6a00b172 1176 main/binary-i386/Packages.bz2
SHA1:
 153199d8f866350b7853365a4adc95ee687603dd 145 main/binary-amd64/Release
 7ce66535b35d5fc267fe23af9947f9d27e88508b 4082 main/binary-amd64/Packages
 a72b5e46c3be8ad403df54e4cdcd6e58b2ede65a 962 main/binary-amd64/Packages.gz
 dbc7fddd28cc742ef8f0fb8c6e096455e18c35f8 1193 main/binary-amd64/Packages.bz2
 59414c4175f2cc22e67ba6c30687b00c72a7eafc 144 main/binary-i386/Release
 1764c5418478b1077ada54c73eb501165ba79170 4076 main/binary-i386/Packages
 db24eafac51d3e63fd41343028fb3243f96cbed6 960 main/binary-i386/Packages.gz
 ad8be07425e88b2fdf2f6d143989cde1341a8c51 1176 main/binary-i386/Packages.bz2
* Connection #0 to host dl.google.com left intact
* Found bundle for host dl.google.com: 0x7ffa33d8b6a0
* Re-using existing connection! (#0) with host dl.google.com
* Connected to dl.google.com (74.125.196.136) port 80 (#0)
> GET /linux/chrome/deb/dists/stable/Release.gpg HTTP/1.1
> User-Agent: curl/7.38.0
> Host: dl.google.com
> Accept: */*
> 
< HTTP/1.1 200 OK
< Accept-Ranges: bytes
< Content-Length: 198
< Content-Type: application/octet-stream
< Etag: "518f4"
< Expires: Sun, 22 Mar 2015 18:55:05 PDT
< Last-Modified: Fri, 20 Mar 2015 04:05:00 GMT
* Server downloads is not blacklisted
< Server: downloads
< X-Content-Type-Options: nosniff
< X-Frame-Options: SAMEORIGIN
< X-Xss-Protection: 1; mode=block
< Date: Sun, 22 Mar 2015 01:55:05 GMT
< Alternate-Protocol: 80:quic,p=0.5
< 
-----BEGIN PGP SIGNATURE-----
Version: GnuPG v1.4.10 (GNU/Linux)
iEYEABECAAYFAlULm7YACgkQoECDD3+sWZFyxACeNPuK/zQ0v+3Py1n2s09Wk/Ti
DckAni8V/gy++xIinu8OdUXv7c777V9H
=5vT6
-----END PGP SIGNATURE-----
* Connection #0 to host dl.google.com left intact
Note that the Date line in the Release file is different:
@@ -6 +6 @@
-Date: Thu, 19 Mar 2015 22:55:29 +0000
+Date: Fri, 20 Mar 2015 04:02:02 +0000
The file hashes listed in the Release file are in a different order, as well, though the actual hash values are the same. This Release file does have a valid signature:
gpgv: Signature made Fri 20 Mar 2015 12:01:58 AM EDT using DSA key ID 7FAC5991
gpgv: Good signature from "Google, Inc. Linux Package Signing Key <linux-packages-keymaster@google.com>"
Note that the Release.gpg files in the good and bad cases are the same, and the same signature cannot cover two files with different content. Also note that the same mis-signed content is available via HTTPS, so it is probably not caused by a MITM attack. The possibility of skew between the Release and Release.gpg files is precisely why inline signed Release files were introduced, but Google's repositories use only the older format with a detached signature. It would be nice if Google could fix the underlying bug in their infrastructure that results in mis-signed repositories being published frequently, because it trains users to ignore cryptographic failures.

Next.

Previous.