Search Results: "tar"

12 August 2015

Tiago Bortoletto Vaz: c3video for debconf #3

This is a follow-up to my previous post related the DebConf videoteam using a new software stack for the next conferences: http://acaia.ca/~tiago/posts/c3video-for-dc-take-2/. An outdated documentation for current subject is available at https://wiki.fem.tu-ilmenau.de/streaming/projekte/c3/28c3/crs/pipeline. Although the system may work differently nowadays, the basic idea remains the same. A newer, but incomplete documentation can be found in https://repository.fem.tu-ilmenau.de/trac/c3tt/wiki. Btw, CCC people from #voc at hackint.eu have been very kind and supportive. I've set an instance of C3TT for DebConf15 in http://c3tt.acaia.ca/. If you want to play with it just ping me in #debconf-video at oftc. As you can see, we can keep a single external C3TT server for all Debian events, without much work left to the local side, doesn't it sound amazing?
Setting a new conference Go to Projects, then Create. In the project area we'll need to import the Tickets. Tickets will come from the schedule file, which is a XML as generated from frab. With a minor hack we've been able to make the schedule XML from DebConf Summit quite compatible to it (kudos cate!):
/images/import_tickets.png

Importing tickets

By importing the schedule from https://summit.debconf.org/debconf15.xml we'll be asked from which rooms we want to import the events. Usually those that have video coverage will be selected:
/images/chosing_rooms.png

Choosing rooms

Then, we may want to exclude some talks that we won't provide video:
/images/chosing_talks.png

Choosing talks

We're also required to adjust some Properties for a given conference. An example with some explanation of these properties is availabe at https://c3voc.de/wiki/c3tracker. For my initial tests the ones below seem to be enough:
/images/c3tt_properties.png

Setting properties

The backend: basic understand The screen UI mentioned above will run a set of scripts in background which will automate most of the tasks, preparing videos for cutting to deploying them in different online services. Tab 0: A-recording-scheduler Each 30 seconds it will check if there's any ticket in the state scheduled or recording. It's based in the start/end datetime of the talk, so the ticket will be kept as scheduled (current < talk start), or marked as recording (start => current =< end) or recorded (current > end). Tab 1: B-mount4cut Each 30 seconds it will check if there's any ticket in the state recorded. That means the talk is already finished, and the raw video file is available in the path which has previously been set as a property (Path.Capture) in the web interface. For each ticket marked as recorded it will try to find the related video file in the capture path. The file format should be <room>-YYYY-MM-DD_HH-MM-SS.<extension>. The script will then use fuse-vdv to create a custom filesystem with some needed files for human interaction (fancy stuff!). Here's an example of talks in a room called Heidelberg, after being recorded and auto-mounted by the B-mount4cut script:
/images/c3tt_fuse.png

Mounting custom fuse FS

The human interaction is just a short review process using Kdenlive. The reviewers will access these files via a glusterFS network share. There's even a Debian Virtualbox image provided for that, including all the necessary tools. I'm going into this right now and will report what I get in the next hours. Hopefully the following scripts will also be covered, very soon-ish :) Tab 2: C-cut-postprocessor Tab 3: D-encoding Tab 4: E-postencoding (auphonic) Tab 5: F-postprocessing(upload) DebCamp is fun.

Elena 'valhalla' Grandi: Printing a 2965 lines text file

Printing a 2965 lines text file

Let us image I have a reason https://people.debian.org/~anibal/ksp-dc15/ksp-dc15.html to print a text file that is 2965 lines long, is encoded in utf-8 (so a2ps and enscript don't work) and I don't want to destroy a whole forest for it.

I've started by using xelatex to get a nicely typeset A5 page with my file in a monospaced font: partecipants.tex

\documentclass[a5paper] article
\usepackage fontspec
\usepackage[left=1cm,right=1cm,top=0.8cm,bottom=1cm,foot=0.2cm] geometry
\usepackage listings

\lstset %
basicstyle=\ttfamily\scriptsize,
frame=none,
keepspaces=true,


\begin document
\lstinputlisting ksp-dc15.txt
\end document


This gets compiled into partecipants.pdf with


$ xelatex partecipants.tex


And resulted in 44 pages, 4 less than the 48 needed by a2ps, and printable on just 11 A4 sheets.

I wanted it to be easily manageable while walking around, taking notes into it while standing, so I decided to arrange it in booklet form:


$ pdfbook partecipants.pdf


The result, partecipants-book.pdf was printed (two sided, of course) folded and stitched in the middle.

I could have arranged it into signatures, but this would have required an additional sheet to bring the number of pages to a multiple of 16.

I know that there are electronic alternatives around, and I've also considered just carrying around the file and adding notes (to a copy?) with vim, but I'd trust a paper copy more.

Daniel Pocock: Recording live events like a pro (part 2: video)

In the first blog in this series, we looked at how to capture audio effectively for a range of different events. While recording audio appears less complicated than video, it remains fundamental to a good recording. For some types of event, like a speech or a debate, you can have quite a bad video with poor lighting and other defects but people will still be able to watch it if the audio is good. Therefore, if you haven't already looked at the previous blog, please do so now. As mentioned in the earlier blog, many people now have high quality equipment for recording both audio and video and a wide range of opportunities to use it, whether it is a talk at a conference, a wedding or making a Kickstarter video. The right camera for video recording The fundamental piece of equipment is the camera itself. You may have a DSLR camera that can record video or maybe you have a proper handheld video camera. The leading DSLR cameras, combined with a good lens, make higher quality recordings than many handheld video cameras. Unfortunately, although you pay good money to buy a very well engineered DSLR that could easily record many hours of video, most DSLRs are crippled to record a maximum of 30 minutes in one recording. This issue and some workarounds are discussed later in this blog. If you don't have any camera at all you need to think carefully about which type to buy. If you are only going to use it once you may want to consider renting or borrowing or asking for other people attending the event to bring whatever cameras they have to help make multiple recordings (the crowdsourcing solution). If you are a very keen photographer then you will probably have a preference for a DSLR. Accessories Don't just look at the cost of your camera and conclude that is all the budget you need. For professional quality video recording, you will almost certainly need some accessories. You may find they are overpriced at the retail store where you bought your camera, but you still need some of them, so have a look online.
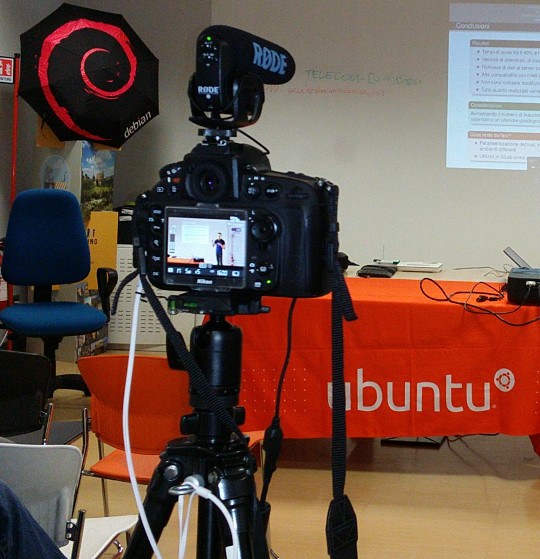
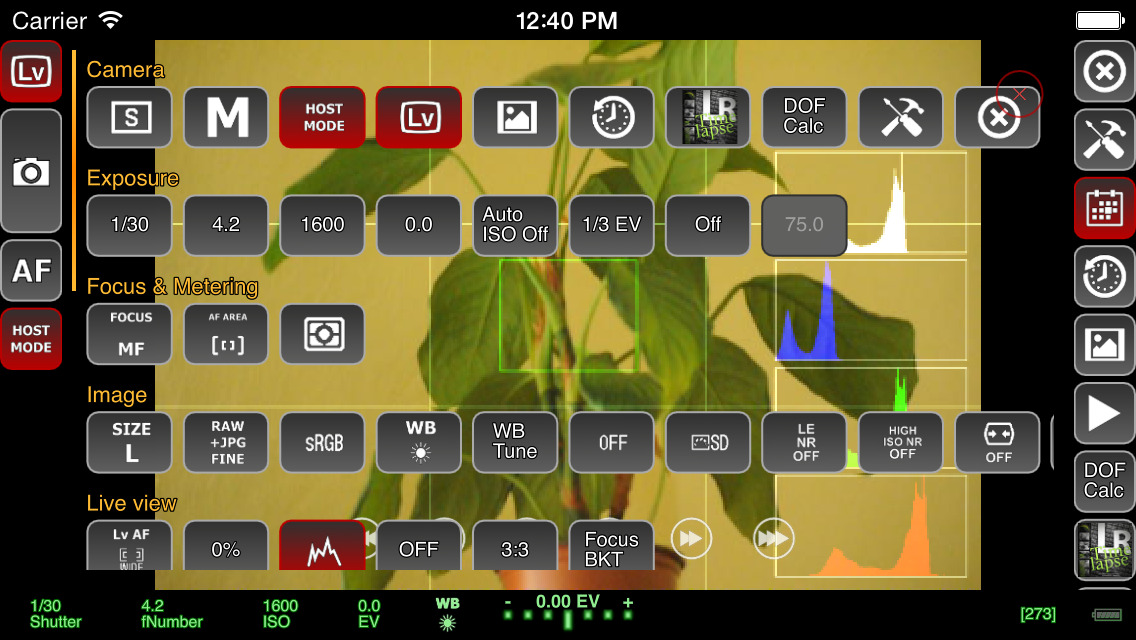
Recording a talk at a free software event with a Nikon D800 on a very basic tripod with Rode VideoMic Pro, headphones (white cable) and external power (black cable) If you want to capture audio with the camera and record it in the video file (discussed in more detail below), you will need to purchase a microphone that mounts on the camera. The built-in microphones on cameras are often quite bad, even on the most expensive cameras. If you are just using the built-in microphone for reference audio (to help with time synchronization when you combine different audio files with the video later) then the built-in microphone may be acceptable. Camera audio is discussed in more detail below. If your camera has a headphone socket, get some headphones for listening to the audio. Make sure you have multiple memory cards. Look carefully at the speed of the memory cards, slow ones are cheaper but they can't keep up with the speed of writing 1080p video. At a minimum, you should aim to buy memory cards that can handle one or two days worth of data for whatever it is you do. A tripod is essential for most types of video. If you use a particularly heavy camera or lens or if you are outdoors and it may be windy you will need a heavier tripod for stability. For video, it is very useful to have a tripod with a handle for panning left and right but if the camera will be stationary for the whole recording then the handle is not essential. Carrying at least one spare battery is another smart move. On one visit to the Inca Trail in Peru, we observed another member of our group hiking up and down the Andes with a brand new DSLR that they couldn't use because the battery was flat. For extended periods of recording, batteries will not be sufficient and you will need to purchase a mains power supply (PSU). These are available for most types of DSLR and video camera. The camera vendors typically design cameras with unusual power sockets so that you can only use a very specific and heavily overpriced PSU from the same company. Don't forget a surge protector too. There are various smartphone apps that allow you to remotely control the camera from the screen of your phone, such as the qDslrDashboard app. These often give a better preview than the screen built-in to the camera and may even allow you to use the touch screen to focus more quickly on a specific part of the picture. A regular USB cable is not suitable for this type of app, you need to buy a USB On-The-Go (OTG) cable.
Screenshot of qDslrDashboard app on a smartphone, controlling a DSLR camera If you plan to copy the video from the camera to a computer at the event, you will need to make sure you have a fast memory card reader. The memory card readers in some laptops are quite slow and others can be quite fast so you may not need to buy an extra card reader. Camera audio Most cameras, including DSLRs, have a built-in microphone and a socket for connecting an external microphone. The built-in microphones obtain very poor quality sound. For many events, it is much better to have independent microphones, such as a lapel microphone attached to a smartphone or wireless transmitter. Those solutions are described in part one of this blog series. Nonetheless, there are still some benefits of capturing audio in the camera. The biggest benefit is the time synchronization: if you have audio recordings in other devices, you will need to align them with the video using post-production software. If the camera recorded an audio stream too, even if the quality is not very good, you can visualize the waveform on screen and use it to align the other audio recordings much more easily and precisely. If the camera will be very close to the people speaking then it may be acceptable to use a microphone mounted on the camera. This will be convenient for post-production because the audio will be synchronized with the video. It may still not be as good as a lapel microphone though, but the quality of these camera-mounted microphones is still far higher than the built-in microphones. I've been trying the Rode VideoMic Pro, it is definitely better than recording with the built-in microphone on the camera and also better than the built-in microphone on my phone. One problem that most people encounter is the sound of the lens autofocus mechanism being detected by the microphone. This occurs with both the built-in microphone and any other microphone you mount on the camera. A microphone mounted on top of the camera doesn't detect this noise with the same intensity as the built-in microphone but it is still present in the recordings. If using a camera-mounted microphone to detect the audio from an audience, you may need to have an omnidirectional microphone. Many camera-mounted microphones are directional and will not detect very much sound from the sides or behind the camera. When using any type of external microphone with the camera, it is recommend to disable automatic gain control (AGC) in the camera settings and then manually adjust the microphone sensitivity/volume level. Use headphones A final word on audio - most good cameras have an audio output socket. Connect headphones and wear them, to make sure you are always capturing audio. Otherwise, if the microphone's battery goes flat or if a wireless microphone goes out of range you may not notice. Choosing a lens The more light you get, the better. Bigger and more expensive lenses allow more light into the camera. Many of the normal lenses sold with a DSLR camera are acceptable but if it is a special occasion you may want to rent a more expensive lens for the day. If you already have a lens, it is a very good idea to test it in conditions similar to those you expect for the event you want to record. Recording duration limits Most DSLR cameras with video capability impose a 30 minute maximum recording duration This is basically the result of a friendly arrangement between movie studios and politicians to charge an extra tax on video recording technology and potentially make the movie studio bosses richer, supposedly justified by the fact that a tiny but exaggerated number of people use their cameras to record movies at the cinema. As a consequence, most DSLR manufacturers limit the duration of video recording so their product won't be subject to the tax, ensuring the retail price is lower and more attractive. On top of this, many DSLR cameras also have a 4GB file size limit if they use the FAT filesystem. Recording 1080p video at a high frame rate may hit the file size limit in 10 minutes, well before you encounter the 30 minute maximum recording duration. To deal with the file size issue, you can record at 720p instead of 1080p and use the frame rate 24fps. For events longer than 30 minutes or where you really want 1080p or a higher frame rate, there are some other options you can consider:
  • Buy or rent a proper video camera instead of using a DSLR camera
  • Using multiple cameras that can stop and be restarted at different times.
  • Manually stopping and restarting the camera if there are breaks in the event where it is safe to do so.
  • Use an app to control the camera and program it to immediately restart the recording each time it stops
  • Extract the raw output from the camera's HDMI socket and record into some other device or computer. There are several purpose-built devices
    that can be used this way with an embedded SSD for storage.
  • There are also some people distributing unofficial/alternative firmware images that remove the artificial 30 minute recording limit.
Camera settings There are many online tutorials and demonstration videos on YouTube that will help you optimize the camera settings for video. You may have already made recordings using the automatic mode. Adjusting some or all of the settings manually may help you create a more optimal recording. You will need to spend some time familiarizing yourself with the settings first. The first thing to check is white balance. This tells the camera the type of lighting in the location. If you set this incorrectly then the colours will be distorted. Many cameras have the ability to automatically set the white balance. For video, you may be able to change one or more settings that control the recording quality. These settings control the file compression ratio and image size. Typical image size settings are 720p and 1080p. Compression ratio may be controlled by a high/medium/low quality setting. Choosing the highest quality and biggest picture requires more space on the memory card and also means you reach the 4GB file size limit more quickly. A higher quality setting also implies a faster memory card is required, because the rate of megabytes per second written to the memory card is higher. Next you need to think about the frame rate. Events that involve fast moving subjects, such as sports, typically benefit from a higher frame rate. For other events it is quite acceptable to use 24 frames per second (fps). Higher frame rates also imply bigger file size and a requirement for a faster memory card. Once you have decided on the frame rate, the next thing to do is set the shutter speed. Use a shutter speed that is double the frame rate. For example, if using 24fps or 25fps, use a 1/50 shutter speed. The final two settings you need to adjust are the ISO and aperture. Set these based on the lighting conditions and extent to which the subjects are moving. For example, if the setting is dark or if you are trying to record fast moving subjects like athletes, vehicles or animals, use an ISO value of 800 or higher. Once you have chosen ISO, adjust the aperture to ensure the picture is sufficiently illuminated. Aperture also has a significant impact on the depth of field. Operating the camera: zoom and focus Many people use zoom lenses. It is not always necessary to change the zoom while recording a video, you can use software to zoom in and out on individual parts of the picture when editing it in post-production. If you do change the zoom while recording, it may be more difficult to maintain focus. Almost all lenses support manual focus (turning the focus ring by hand) and many support automatic focus. When shooting photographs with a DSLR, the mirror is down and the camera can use dedicated sensors for focus and light sensing. When shooting video, the mirror is up and the camera can not use the same focus sensors that are used in photography. Video recording uses a digital focussing algorithm based on contrast in the picture. If you take a lot of photos you are probably quite accustomed to the fast and precise autofocus for photography and you will notice that keeping a video in focus is more challenging. As mentioned already, one of the first things you can do to keep focus simple is to avoid zooming while recording. Record in a higher resolution than you require and then zoom with software later. Some people record using 4k resolution even when they only want to produce a 720p video, as they can digitally zoom in to different parts of the 4k recording without losing detail. If the subject is very stationary (people sitting at a desk for an interview is a typical example), you may be able to set the camera to manual focus and not change it at all while recording. If you choose to enable autofocus while recording, any built-in camera microphone or microphone mounted on the camera is likely to detect sounds from the motorized focus system. Ultimately, the autofocus mechanism is not accurate for all subjects and you may be unable to stop them moving around so you will need to change the focus manually while recording. It requires some practice to be able to do this quickly without overshooting the right focus. To make life more tricky, Nikon and Canon focus rings rotate in the opposite direction, so if you are proficient using one brand you may feel awkward if you ever have to use the other. A good way to practice this skill is to practice while in the car or on the train, pointing at different subjects outside the window and trying to stay in focus as you move from one subject to the next. Make a trial run Many events, from weddings right up to the Olympic Games opening ceremony, have a trial run the day before. One reason for that is to test the locations and settings of all the recording and broadcasting equipment. If a trial run isn't possible for your event, you may find some similar event to practice recording and test your equipment. For example, if you are planning to record a wedding, you could try and record a Sunday mass in the same church. Backup and duplicate the recordings before leaving the event If you only have one copy of the recordings and the equipment is stolen or damaged you may be very disappointed. Before your event, make a plan to duplicate the raw audio and video recordings so that several people can take copies away with them. Decide in advance who will be responsible for this, ensure there will be several portable hard disks and estimate how much time it will take to prepare the copies and factor this into the schedule. Conclusion All the products described can be easily purchased from online retailers. You may not need every accessory that is mentioned as it depends on the type of event you record. The total cost of buying or renting the necessary accessories may be as much as the cost of the camera itself so if you are new to this you may need to think carefully about making a budget with a spreadsheet to do it correctly. Becoming familiar with the camera controls and practicing the techniques for manual focus and zoom can take weeks or months. If you enjoy photography this can be time well spent but if you don't enjoy it then you may not want to commit the time necessary to make good quality video. Don't rule out options like renting equipment instead of buying it or crowdsourcing, asking several participants or friends to help make recordings with their own equipment. For many events, audio is far more indispensable than video and as emphasizing at the beginning of this article, it is recommended that you should be one hundred percent confident in your strategy for recording audio before you start planning to record video.

11 August 2015

Tiago Bortoletto Vaz: c3video for debconf #2

This is a follow-up to my previous post related the DebConf videoteam using a new software stack for the next conferences: http://acaia.ca/~tiago/posts/c3video-for-dc-take-1/.
Installing C3TT scripts There's a video (in German) which gives an idea about how the C3TT works: https://www.youtube.com/watch?v=K-KHbAcTo9I It basically gives the volunteers a web interface to cut and review the recordings, wich communicates with a set of scripts running in background which will automate some tasks. "Installing" the set of scripts is just a matter of placing them in a common directory and installing some Perl dependencies, mostly which are already packaged for Debian. First check it out from the svn repository (fun fact: the web interface is coded in php in a git repository, the scripts are mostly written in perl with a little of bash, in a subversion repository. Both the conference and media system is are in ruby :)
$ svn co https://subversion.fem.tu-ilmenau.de/repository/cccongress
$ mkdir /opt/crs; mv cccongress/trunk/tools /opt/crs/
A few libraries required:
$ apt-get install libboolean-perl libmath-round-perl libdatetime-perl libwww-curl-perl libconfig-inifiles-perl libxml-simple-perl
$ perl -MCPAN -e 'install XML::RPC::Fast'
In the web tracker create a project, go to all projects => workers and create a worker (I'll try to explain it later). Go edit the worker and we'll see the token and secret that should be used in the scripts to talk to the interface.
cd  /opt/crs/tools/tracker3.0
Create a file tracker-profile.sh with the follow lines (using our correct values):
export CRS_TRACKER=http://localhost/rpc
export CRS_TOKEN=2q24M7LW4Rk31YNW4tWKv8koNvyM3V4s
export CRS_SECRET=5j8SyCS35W2SBk2XIM4IWeDUqF9agG1x
We also need to build and install the fuse-vdv package from trunk/tools (if working with dv files, otherwise fuse-ts package). Next step is run the scripts. Fortunatelly a nice UI has been done using screen with multiple tabs, which can be alternated using a <Ctrl+a> <number> combination.
cd  /opt/crs/tools/tracker3.0 && /start-screenrc-dv.sh
We'll get the following:
/images/screen-c3tt-dv.png

Screen tabs from C3TT

In a next post I'll try to explain a bit of how the web system work together with the scripts and how to do a basic setup for a real conference. I hope to get there soon!

Jonathan McDowell: Programming the FST-01 (gnuk) with a Bus Pirate + OpenOCD

Last year at DebConf14 Lucas authorized the purchase of a handful of gnuk devices, one of which I obtained. At the time it only supported 2048 bit RSA keys. I took a look at what might be involved in adding 4096 bit support during DebConf and managed to brick my device several times in doing so. Thankfully gniibe was on hand with his STLinkV2 to help me recover. However subsequently I was loathe to experiment further at home until I had a suitable programmer. As it is this year has been busy and the 1.1.x release train is supposed to have 4K RSA (as well as ECC) support. DebConf15 is coming up and I felt I should finally sort out playing with the device properly. I still didn t have a suitable programmer. Or did I? Could my trusty Bus Pirate help? The FST-01 has an STM32F103TB on it. There is an exposed SWD port. I found a few projects that claimed to do SWD with a Bus Pirate - Will Donnelly has a much cloned Python project, the MC HCK project have a programmer in Ruby and there s LibSWD though that s targeted to smarter programmers. None of them worked for me; I could get the Python bits as far as correctly doing the ID of the device, but not reading the option bytes or successfully flashing (though I did manage an erase). Enter the old favourite, OpenOCD. This already has SWD support and there s an outstanding commit request to add Bus Pirate support. NodoNogard has a post on using the ST-Link/V2 with OpenOCD and the FST-01 which provided some useful pointers. I grabbed the patch from Gerrit, applied it to OpenOCD git and built an openocd.cfg that contained:
source [find interface/buspirate.cfg]
buspirate_port /dev/ttyUSB0
buspirate_vreg 1
buspirate_mode normal
transport select swd
source [find target/stm32f1x.cfg]
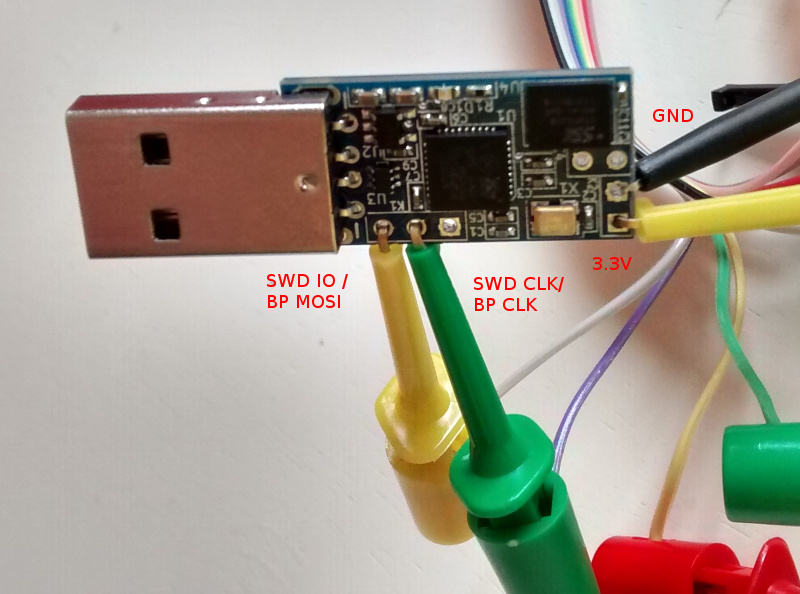
My BP has the Seeed Studio probe cable, so my hookups look like this: Bus Pirate + FST-01 SWD connection That s BP MOSI (grey) to SWD IO, BP CLK (purple) to SWD CLK, BP 3.3V (red) to FST-01 PWR and BP GND (brown) to FST-01 GND. Once that was done I fired up OpenOCD in one terminal and did the following in another:
$ telnet localhost 4444
Trying ::1...
Trying 127.0.0.1...
Connected to localhost.
Escape character is '^]'.
Open On-Chip Debugger
> reset halt
target state: halted
target halted due to debug-request, current mode: Thread
xPSR: 0x01000000 pc: 0xfffffffe msp: 0xfffffffc
Info : device id = 0x20036410
Info : SWD IDCODE 0x1ba01477
Error: Failed to read memory at 0x1ffff7e2
Warn : STM32 flash size failed, probe inaccurate - assuming 128k flash
Info : flash size = 128kbytes
> stm32f1x unlock 0
Device Security Bit Set
stm32x unlocked.
INFO: a reset or power cycle is required for the new settings to take effect.
> reset halt
target state: halted
target halted due to debug-request, current mode: Thread
xPSR: 0x01000000 pc: 0xfffffffe msp: 0xfffffffc
> flash write_image erase /home/noodles/checkouts/gnuk/src/build/gnuk.elf
auto erase enabled
wrote 109568 bytes from file /home/noodles/checkouts/gnuk/src/build/gnuk.elf in 95.055603s (1.126 KiB/s)
> stm32f1x lock 0
stm32x locked
> reset halt
target state: halted
target halted due to debug-request, current mode: Thread 
xPSR: 0x01000000 pc: 0x08000280 msp: 0x20005000
Then it was a matter of disconnecting the gnuk from the BP, plugging it into my USB port and seeing it come up successfully:
usb 1-2: new full-speed USB device number 11 using xhci_hcd
usb 1-2: New USB device found, idVendor=234b, idProduct=0000
usb 1-2: New USB device strings: Mfr=1, Product=2, SerialNumber=3
usb 1-2: Product: Gnuk Token
usb 1-2: Manufacturer: Free Software Initiative of Japan
usb 1-2: SerialNumber: FSIJ-1.1.7-87063020
usb 1-2: ep 0x82 - rounding interval to 1024 microframes, ep desc says 2040 microframes
More once I actually have a 4K key loaded on it.

10 August 2015

Carl Chenet: Retweet, a simple bot to retweet tweets from a user

Follow me on Identi.ca or Twitter or Diaspora*diaspora-banner For a small project related to the french-speaking Hacker News-style website le Journal du hacker, I needed to retweet every tweets from a Twitter account to another one. So here it is : Retweet I wanted to keep it simple, stupid, and coded in Python if I needed to extend it myself for the projet Le Journal du hacker. logo-journal-du-hacker It was quite easy to reach these goals, but the project is also well documented and should be quite simple to install, configure and use. What about you? Do you also have this kind of needs? Don t hesitate to fork the project, report bugs, ask for feature requests and let us know in the comments of this post ;)

Daniel Pocock: Going 4K

I recently started using a 4K monitor. I've generally had a positive experience and thought I would share some comments about it. What can you do with 4K resolution?
  • View the entire London Underground map or Swiss railway map without having to zoom or scroll
  • Run a mail client like Thunderbird/Icedove and an IRC client side-by-side
  • Run Eclipse and the Android emulator side-by-side
  • Run Eclipse and some other program you are debugging side-by-side
  • When reading a PDF, show a whole page at a time but only using half the screen
Are there hardware issues? Originally the hardware was expensive and people would have to do things like using multiple cables to join their video card to their 4K screen. The latest generation of video cards and monitors don't have this problem. I chose to use NVIDIA's entry-level Quadro K420 card, the smallest and least expensive Quadro supporting 4K. The PC is a HP Z800 workstation. HP suggests they only certify the K420 with their latest workstations (e.g. Z840) but I have observed no problem using it in a Z800. The monitor is a 32" BenQ display. After reading comments from other 4K users, I felt that any monitor less than 30" would not help me get the most from the world of 4K. The monitor connects to the video card using a DisplayPort 1.2 cable that was in the box with the monitor. I've been able to get sound through the monitor but I found the volume is always a bit low and at one point sound stopped completely. What about software issues? Everything just appeared to work although the fonts are a bit smaller than what I'm used to. This appears to be related to DPI issues. DPI is not automatically detected and several applications have their own way of handling non-standard DPI. Discussion about this started on the debian-devel mailing list, given that non-standard DPI will be an issue with many newer monitors, handheld devices and more exotic displays such as televisions. Some web sites just don't look so good when the browser window is maximized to 4K resolution while others use the extra space really well. For example, using the AirBNB search, the maps show more detail but using another hotel booking site I found that it was still trying to render a map within a constant size region using less than ten percent of the page.

Steve Kemp: A brief look at the weed file store

Now that I've got a citizen-ID, a pair of Finnish bank accounts, and have enrolled in a Finnish language-course (due to start next month) I guess I can go back to looking at object stores, and replicated filesystems. To recap my current favourite, despite the lack of documentation, is the Camlistore project which is written in Go. Looking around there are lots of interesting projects being written in Go, and so is my next one the seaweedfs, which despite its name is not a filesystem at all, but a store which is accessed via HTTP. Installation is simple, if you have a working go-lang environment:

go get github.com/chrislusf/seaweedfs/go/weed
Once that completes you'll find you have the executable bin/weed placed beneath your $GOPATH. This single binary is used for everything though it is worth noting that there are distinct roles: In our demo we'll have three hosts one, the master, two and three which are storage nodes. First of all we start the master:
root@one:~# mkdir /node.info
root@one:~# weed master -mdir /node.info -defaultReplication=001
Then on the storage nodes we start them up:
root@two:~# mkdir /data;
root@two:~# weed volume -dir=/data -max=1  -mserver=one.our.domain:9333
Then the second storage-node:
root@three:~# mkdir /data;
root@three:~# weed volume -dir=/data -max=1 -mserver=one.our.domain:9333
At this point we have a master to which we'll talk (on port :9333), and a pair of storage-nodes which will accept commands over :8080. We've configured replication such that all uploads will go to both volumes. (The -max=1 configuration ensures that each volume-store will only create one volume each. This is in the interest of simplicity.) Uploading content works in two phases: We'll do that like so:
laptop ~ $ curl -X POST http://one.our.domain:9333/dir/assign
 "fid":"1,06c3add5c3","url":"192.168.1.100:8080","publicUrl":"192.168.1.101:8080","count":1 
client ~ $ curl -X PUT -F file=@/etc/passwd  http://192.168.1.101:8080/1,06c3add5c3
 "name":"passwd","size":2137 
In the first command we call /dir/assign, and receive a JSON response which contains the IPs/ports of the storage-nodes, along with a "file ID", or fid. In the second command we pick one of the hosts at random (which are the IPs of our storage nodes) and make the upload using the given ID. If the upload succeeds it will be written to both volumes, which we can see directly by running strings on the files beneath /data on the two nodes. The next part is retrieving a file by ID, and we can do that by asking the master server where that ID lives:
client ~ $ curl http://one.our.domain:9333/dir/lookup?volumeId=1,06c3add5c3
 "volumeId":"1","locations":[
  "url":"192.168.1.100:8080","publicUrl":"192.168.1.100:8080" ,
  "url":"192.168.1.101:8080","publicUrl":"192.168.1.101:8080" 
] 
Or, if we prefer we could just fetch via the master - it will issue a redirect to one of the volumes that contains the file:
client ~$ curl http://one.our.domain:9333/1,06c3add5c3
<a href="http://192.168.1.100:8080/1,06c3add5c3">Moved Permanently</a>
If you follow redirections then it'll download, as you'd expect:
client ~ $ curl -L http://one.our.domain:9333/1,06c3add5c3
root:x:0:0:root:/root:/bin/bash
..
That's about all you need to know to decide if this is for you - in short uploads require two requests, one to claim an identifier, and one to use it. Downloads require that your storage-volumes be publicly accessible, and will probably require a proxy of some kind to make them visible on :80, or :443. A single "weed volume .." process, which runs as a volume-server can support multiple volumes, which are created on-demand, but I've explicitly preferred to limit them here. I'm not 100% sure yet whether it's a good idea to allow creation of multiple volumes or not. There are space implications, and you need to read about replication before you go too far down the rabbit-hole. There is the notion of "data centres", and "racks", such that you can pretend different IPs are different locations and ensure that data is replicated across them, or only within-them, but these choices will depend on your needs. Writing a thin middleware/shim to allow uploads to be atomic seems simple enough, and there are options to allow exporting the data from the volumes as .tar files, so I have no undue worries about data-storage. This system seems reliable, and it seems well designed, but people keep saying "I'm not using it in production because .. nobody else is" which is an unfortunate problem to have. Anyway, I like it. The biggest omission is really authentication. All files are public if you know their IDs, but at least they're not sequential ..

Mirco Bauer: Smuxi 1.0 "Finally" Release

And here we go again! We're proud to announce the new version of Smuxi, release 1.0 "Finally". During the development, 20 bug reports and 10 feature requests in 285 commits were worked on.

Finally 1.0 Smuxi is celebrating its 10th anniversary! 10 years ago, Mirco Bauer made the first commit to the Smuxi source code repository and is still very committed to it. He started the Gnosmirc project in 2005 when the only way a 24/7 "always-on" experience with IRC meant you had to use a console based IRC client like bitchx, irssi or epic combined with screen and SSH. This looks very practical at first and is a powerful Unix-ish way of accomplishing that job, but it has the big downside that it doesn't integrate with a desktop environment like GNOME. A bit later the Gnosmirc project was renamed to Smuxi when the new code architecture allowed other frontend implementations besides the GNOME one. The ncurses/STFL based text frontend was later implemented and is considered stable and useful enough for day to day use, but still has some rough edges. WinForms and WPF frontends also exist but need more work to reach a usable state. At this point Smuxi 1.0 contains all features that we could have imagined and even goes beyond with very advanced features like message patterns or language agnostic scripting.

Changes since Smuxi 0.11

Message Persistence One of the biggest drawbacks of the IRC protocol ever was that messages can't be retrieved from the IRC server because the IRC server is simply relaying messages to the connected clients. So, if an IRC client is freshly started and connects it starts to receive new messages, but all message you had received before are no longer available. This always made IRC in a way "volatile" unlike other communication systems like email where messages are relayed and stored on the client side. One common approach for IRC clients is to store log files in a text file. This is a simple feature and gives the user the possibility to read older conversations. Smuxi also supports text file logging like other IRC clients but it has a big user experience drawback as you need to open the file from the disk outside of the IRC client. In Smuxi 1.0 messages sent and received are now stored on the disk in a way they can automatically be retrieved/loaded when you restart Smuxi. It is like you have never closed Smuxi! This feature was already available in Smuxi for some time as a technical preview and it used the Db4o object database, but we were never happy about the performance neither with the stability so it always stayed an optional feature you need to enable. This year we tried a new message buffer backend using the famous SQLite database and it works much faster and stable as a rock. So finally we can enable this feature by default because it just works and enhanced your experience. We hope you enjoy it. Documentation of how you can change Smuxi message buffer backend and behavior can be found here. For instructions how to convert your existing db4o history to SQLite can be found in the "smuxi-message-buffer tool" section.

User Interface Enhancements
  • Synced message markers: the position of of the seen/unseen messages marker is pushed to the smuxi-server and remembered when the frontend reconnects. (Sebastian Poeplau)
  • Persistent message markers: the message marker position is also remembered across Smuxi(-server) restarts.
  • Message Counter: in addition to the highlight counter next to a chat new/unseen messages are also counted. This makes it easy to identify chats with much traffic.
  • Single application instance support. If you start Smuxi again from the menu it will bring the existing instance into the foreground. This makes the Ubuntu Messaging Menu much nicer.
  • The command/message entry is alignment with the messages. (Lex Berezhny)

Text Frontend Enhancements
  • The console background color can now be configured using: /config set STFL/Interface/TerminalBackgroundColor = #000000 (Ond ej Ho ek)
  • The text color contrast if nicks with the background is now ensured (Ond ej Ho ek) #1033
  • Messages containing images will not be skipped but their alternative text is shown instead (Ond ej Ho ek) #1035

New smuxi-message-buffer tool This is a new commandline tool that allows you to convert and export the message history of Smuxi message buffer files. This can be used to convert your existing Db4o history to SQLite like this for example:
for DB_DB4O in $HOME/.local/share/smuxi/buffers/*/*/*/*.db4o; do
    DB_SQLITE=$ DB_DB4O/.db4o/.sqlite3 
    smuxi-message-buffer convert $DB_DB4O $DB_SQLITE
done
Smuxi shouldn't be running when using this tool.

Scripting Enhancements

New Hook Points Smuxi 1.0 supports with the following new hook points:
  • engine/protocol-manager/on-presence-status-changed/ This hook point is raised when the presence status of a protocol manager changes. This happens for example when an IRC connection toggles the away state.
  • engine/session/on-event-message/ This hook point raises event messages that usually begin with "-!-". This can be useful to track state changes that are shown as a message without having a dedicated hook point for it.
  • engine/session/command-$cmd/ This hook point is raised on the engine side for commands, e.g. /some_command that isn't handled by the frontend or engine built-in commands. This is useful for commands that should be available for all frontends and isn't specific to the frontend environment.

New Plugins The following new plugins are supported by Smuxi 1.0:
  • topic-diff: Shows the word differences of the topic after topic changes. (meebey)
  • away-nick: Automatically appends and removes $AWAY_SUFFIX to/from the nick name when you go away using the /away command or by disconnecting all frontends from the smuxi-server. (meebey)
  • system-info: Shows system info. Includes system kernel version, distro name, and CPU vendor information. (AK0)
  • now-playing: This plugin is not new but was rewritten in Python to get rid of the spaghetti code monster which was written in Bash. (jamesaxl)

IRC Enhancements
  • NICKSERV support Notices from Nick/ChanServ are no longer shown on all channels as they like to send greeting messages and other spam which is annoying to see on all channels. #868
  • Automatic rejoin of channels protected with a key works as expected again
  • Connecting to irc.gitter.im is now supported. Gitter's IRCd implementation has a bug in the IRC protocol which is now tolerated.

Twitter Enhancements
  • The /search command shows tweets as live stream
  • Added /delete, /favorite and /unfavorite commands

Behind the Scenes
  • Re-licensed smuxi-common from GPLv2 to MIT/X11

Contributors Contributors to this release are the following people:
  • Mirco Bauer (199 commits)
  • Carlos Mart n Nieto (15 commits)
  • Andr s G. Aragoneses (14 commits)
  • Piotr Dr g (12 commits)
  • Ond ej Ho ek (11 commits)
  • Oliver Schneider (5 commits)
  • Calvin B (4 commits)
  • Victor Seva (3 commits)
  • Will Johansson (2 commits)
  • Sebastian Poeplau (2 commits)
  • Julian Taylor (2 commits)
  • James Axl (2 commits)
  • Daniel Mustieles (2 commits)
  • Christopher James Halse Rogers (2 commits)
  • . Uzun (1 commit)
  • Lex Berezhny (1 commit)
  • Kalle Kaitala (1 commit)
  • Jordi Mas (1 commit)
  • Joe Hansen (1 commit)
  • Jimmie Elvenmark (1 commit)
  • Dimitris Spingos (1 commit)
  • Dean Lee (1 commit)
  • Cl ment Bourgeois (1 commit)
  • Carlos Hernandez (1 commit)
Thank you very much for your contributions to Smuxi! Want this? Go here and grab it right now!

Posted Sun Aug 9 17:48:18 2015

Norbert Preining: Debian/TeX Live 2015.20150810-1

For those who are starving for some updates while the big gcc5 transitions brings the rest of Debian/sid to a halt, here is some fresh meat, a new TeX Live checkout. Nothing spectacular new here, just the usual big bunch of updates of and several new packages. Maybe worthwhile mentioning is that luasseq has been reincorporated into the TeX Live packages. Thanks to the maintainer for his work till now! Debian - TeX Live 2015 From the long list of changes let me pick one update and one new package: pgf has been updated to 3.0.1, which is just a small change in number, but incorporates 1.5 years of fixes, and the list of fixes is long. And a very interesting newcomer is pdfpagediff by C. V. Rad hakr ish nan. It allows visual comparison of two pdf files by overlaying them in a transparent way, making even slight changes in the layout immediately visible. Of course, these are not the only updates and newcomers, see the list below. Updated packages academicons, addlines, algorithms, archaic, babel, babel-estonian, biber, biblatex-source-division, bidi, bxjscls, chronology, cjk-ko, conteq, csplain, csquotes, curve2e, datatool, doclicense, dvips, eledmac, enotez, esami, eso-pic, etex-pkg, etoolbox, exsheets, fandol, fithesis, fontawesome, fontspec, forest, glossaries, greek-inputenc, jslectureplanner, kotex-oblivoir, kotex-utf, l3build, l3experimental, l3kernel, l3packages, latex, leadsheets, ledmac, lshort-english, luamplib, luasseq, luatexko, maths-symbols, media9, memoir, metrix, mhchem, minitoc, moderncv, modiagram, morefloats, mptopdf, msu-thesis, nameauth, ndsu-thesis, newpx, newtx, newtxsf, newtxtt, notes, ocgx2, pageslts, pdfpages, pdftex, pgf, phonrule, plain, polyglossia, pstricks, ptex, pxchfon, reflectgraphics, rsfso, sectionbox, siunitx, skrapport, standalone, tcolorbox, tetex, tex4ht, texfot, texinfo, texlive-scripts, todonotes, translations, tudscr, ucbthesis, unicode-math, xcharter, xgreek. New packages alertmessage, bewerbung, bidihl, bxpdfver, cloze, comicneue, copyedit, fcavtex, gradstudentresume, make4ht, mcf2graph, multiaudience, nmbib, pdfpagediff, quran, reledmac, roundrect, screenplay-pkg, shapes, tex4ebook. Enjoy.

9 August 2015

Thorsten Alteholz: My Debian Activities in July 2015

FTP assistant This month I marked 485 packages for accept, rejected 87 of them and had to send 18 emails to maintainers. The NEW-queue is below 100 again, but you hardworking fellows don t make a break, but start the GCC5 transition. This is so much fun :-) . Squeeze LTS This was my thirteens month that I did some work for the Squeeze LTS initiative, started by Raphael Hertzog at Freexian. This month I got assigned a workload of 15h and I spent again most of it to work on a new upload of php5. I finally prepared the patches for the CVEs and realized only then that the number of failed tests drastically increased. So return to beginning and checking why everything is broken now :-( . The patch for [DLA 269-1] was prepared by Mats Erik Andersson. This month I also had another term of doing frontdesk work. So I answered questions on the IRC channel and looked for CVEs that are important for Squeeze LTS or could be ignored. Other stuff This month I could finally finish the harminv transition and all affected packages migrated to testing meanwhile. I also uploaded a new version for pipexec. Donations Again, thanks alot to all donors. I really appreciate this and hope that everybody is pleased with my commitment. Don t hesitate to make suggestions for improvements.

Yves-Alexis Perez: WPS and Network Manager

So, everybody knows that WPS (Wi-Fi Protected Setup) is broken. But sometimes, you don't own the access point, and you'd just want the wireless to work. That happens for example when you're a guest in some place using an Orange Livebox and you don't have the WPA passphrase (usually because it's written somewhere you don't have access too, or because someone forgot to tell you). Liveboxes WPS is the press button thing: you press a button on the front for one second, then any device can connect in the next two minutes. That works fine with Android devices, for example, but it didn't work with my laptop and NetworkManager, which doesn't support WPS at all. Fortunately, the underlying piece of software (wpa_supplicant) does support WPS, and even the push button style. And you can nicely ask it to reveal the passphrase to you with the following trick.
  1. Disconnect NetworkManager from the network, disable the wireless link, stop it; just make sure wpa_supplicant is not running;
  2. Put a stub wpa_supplicant.conf file with only the following content:
    update_config=1
    
  3. Start wpa_supplicant in the foreground with your stub config file:
    wpa_supplicant -iwlan0 -c wpa_supplicant.conf
    
  4. Start wpa_cli
Inside wpa_cli:
  1. Scan the network:
    scan
    
  2. Get the results:
    scan_results
    
    and identity the bssid of the Livebox
  3. Press the WPS button on the Livebox
  4. Run
    wps_pbc <bssid>
    ; some text should appear in the wpa_cli window, and it should eventually connect successfully (at that point you can even run a dhclient on wlan0)
  5. Run
    save_config
    
The last command will update your stub configuration file, adding a new network block with the passphrase in the clear. You can then use that passphrase inside Network Manager if it's more convenient for you. There might be something easier, but at least it worked just fine for me during the holidays.

Hideki Yamane: xz multithreaded compression

$ dpkg -s liblzma5
Package: liblzma5
Status: install ok installed
(snip)
Version: 5.1.1alpha+20120614-2.1
$ time sudo cowbuilder --build fonts-horai-umefont_530-1.dsc
real 1m8.378s
user 1m0.084s
sys 0m3.244s
real 1m9.842s
user 1m0.964s
sys 0m3.856s
real 1m9.355s
user 1m0.824s
sys 0m3.380s

xz 5.2 supports multithread, with local build (remove --disable-thread option in debian/rules)

$ dpkg -s liblzma5
Package: liblzma5
Status: install ok installed
(snip)
Version: 5.2.1-0.1
real 1m7.946s
user 0m59.628s
sys 0m3.228s
real 1m8.794s
user 1m0.072s
sys 0m3.556s
real 1m7.580s
user 0m59.152s
sys 0m3.368s

Umm, not affected.

$ time xz -T 0 fonts-horai-umefont_530.orig.tar
real 0m15.488s
user 0m47.044s
sys 0m0.252s
$ time xz -T 1 fonts-horai-umefont_530.orig.tar
real 0m40.988s
user 0m40.804s
sys 0m0.124s
multithread itself is enabled.

Craig Small: procps 3.3.11

I have updated NEWS, bumped the API and tagged in git; procps version 3.3.11 is now released! This release we have fixed many bugs and made procps more robust for those odd corner cases. See the NEWS file for details. The most significant new feature in this release is the support for LXC containers in both ps and top. The source files can be found at both sourceforge and gitlab at: My thanks to the procps co-maintainers, bug reporters and merge/patch authors. What s Next? There has been a large amount of work on the library API. This is not visible to this release as it is on a different git branch called newlib. The library is getting a complete overhaul and will look completely different to the old libproc/libprocps set. A decision hasn t been made when newlib branch will merge into master, but we will do it once we re happy the library and its API have settled. This change will be the largest change to procps library in its 20-odd year history but will mean the library will use common modern practices for libraries.

Simon Kainz: DUCK challenge: week 5

Slighthly delayed, but here are the stats for week 5 of the DUCK challenge: So we had 10 packages fixed and uploaded by 10 different uploaders. A big "Thank You" to you!! Since the start of this challenge, a total of 59 packages, were fixed. Here is a quick overview:
Week 1 Week 2 Week 3 Week 4 Week 5 Week 6 Week 7
# Packages 10 15 10 14 10 - -
Total 10 25 35 49 59 - -
The list of the fixed and updated packages is availabe here. I will try to update this ~daily. If I missed one of your uploads, please drop me a line. Only 2 more weeks to DebConf15 so please get involved: The DUCK Challenge is running until end of DebConf15! Pevious articles are here: Week 1, Week 2, Week 3, Week 4.

8 August 2015

Dirk Eddelbuettel: drat 0.1.0: Even more repository support

drat and double drat A new version 0.1.0 of the drat package arrived on CRAN today. Its name stands for drat R Archive Template, and it helps with easy-to-create and easy-to-use repositories for R packages, and is finding increasing by other projects. This version 0.1.0 builds on the previous releases and now adds complete support for binaries for both Windows and OS X. This builds on what had been added in the previous release 0.0.4. This and other new features are listed below: Also of note: The rOpenSci project now uses drat to distribute their code, and Carl Boettiger has written a nice blog post about it. Courtesy of CRANberries, there is a comparison to the previous release. More detailed information is on the drat page.

This post by Dirk Eddelbuettel originated on his Thinking inside the box blog. Please report excessive re-aggregation in third-party for-profit settings.

Craig Small: Be careful with errno

I m getting close to releasing version 3.3.11 of procps. When it gets near that time, I generally browse again the Debian Bug Tracker for procps bugs. Bug number #733758 caught my eye. With the free command if you used the s option before the c option, the s option failed, seconds argument N failed where N was the number you typed in. The error should be for you trying to type letters for number of seconds. Seemed reasonably simple to test and simple to fix. Take me to the code The relevant code looks like this:
   case 's':
            flags  = FREE_REPEAT;
            args.repeat_interval = (1000000 * strtof(optarg, &amp;endptr));
            if (errno   optarg == endptr   (endptr &amp;&amp; *endptr))
                xerrx(EXIT_FAILURE, _("seconds argument  %s' failed"), optarg);
Seems pretty stock-standard sort of function. Use strtof() to convert the string into the float. You need to check both errno AND optarg == endptr because: At first I thought the logic was wrong, but tracing through it was fine. I then compiled free using the upstream git source, the program worked fine with s flag with no c flag. Doing a diff between the upstream HEAD and Debian s 3.3.10 source showed nothing obvious. I then shifted the upstream git to 3.3.10 too and re-compiled. The Debian source failed, the upstream parsed the s flag fine. I ran diff, no change. I ran md5sum, the hashes matched; what is going on here? I ll set when I want The man page says in the case of under/overflow ERANGE is stored in errno . What this means is if there isn t and under/overflow then errno is NOT set to 0, but its just not set at all. This is quite useful when you have a chain of functions and you just want to know something failed, but don t care what. Most of the time, you generally would have a Have I failed? test and then check errno for why. A typical example is socket calls where anything less than 0 means failure. You check the return value first and then errno. strtof() is one of those funny ones where most people check errno directly; its simpler than checking for +/- HUGE_VAL. You can see though that there are traps. What s the difference? OK, so a simple errno=0 above the call fixes it, but why would the Debian source tree have this failure and the upstream not? Even with the same code? The difference is how they are compiled. The upstream compiles free like this:
gcc -std=gnu99 -DHAVE_CONFIG_H -I. -include ./config.h -I./include -DLOCALEDIR=\"/usr/local/share/locale\" -Iproc -g -O2 -MT free.o -MD -MP -MF .deps/free.Tpo -c -o free.o free.c
mv -f .deps/free.Tpo .deps/free.Po
/bin/bash ./libtool --tag=CC --mode=link gcc -std=gnu99 -Iproc -g -O2 ./proc/libprocps.la -o free free.o strutils.o fileutils.o -ldl
libtool: link: gcc -std=gnu99 -Iproc -g -O2 -o .libs/free free.o strutils.o fileutils.o ./proc/.libs/libprocps.so -ldl
While Debian has some hardening flags:
gcc -std=gnu99 -DHAVE_CONFIG_H -I. -include ./config.h -I./include -DLOCALEDIR=\"/usr/share/locale\" -D_FORTIFY_SOURCE=2 -Iproc -g -O2 -fstack-protector-strong -Wformat -Werror=format-security -MT free.o -MD -MP -MF .deps/free.Tpo -c -o free.o free.c
mv -f .deps/free.Tpo .deps/free.Po
/bin/bash ./libtool --tag=CC --mode=link gcc -std=gnu99 -Iproc -g -O2 -fstack-protector-strong -Wformat -Werror=format-security ./proc/libprocps.la -Wl,-z,relro -o free free.o strutils.o fileutils.o -ldl
libtool: link: gcc -std=gnu99 -Iproc -g -O2 -fstack-protector-strong -Wformat -Werror=format-security -Wl,-z -Wl,relro -o .libs/free free.o strutils.o fileutils.o ./proc/.libs/libprocps.so -ldl
It s not the compiling of free itself that is doing it, but the library. Most likely something that is called before the strtof() is setting errno which this code then falls into. In fact if you run the upstream free linked to the Debian procps library it fails. Moral of the story is to set errno before the function is called if you are going to depend on it for checking if the function succeeded.

Wouter Verhelst: Backing up with tar

The tape archiver, better known as tar, is one of the older backup programs in existence. It's not very good at automated incremental backups (for which bacula is a good choice), but it can be useful for "let's take a quick snapshot of the current system" type of situations. As I'm preparing to head off to debconf tomorrow, I'm taking a backup of my n-1 laptop (which still contains some data that I don't want to lose) so it can be reinstalled and used by the Debconf video team. While I could use a "proper" backup system, running tar to a large hard disk is much easier. By default, however, tar won't preserve everything, so it is usually a good idea to add some extra options. This is what I' mrunning currently:
sudo tar cvpaSf player.local:carillon.tgz --rmt-command=/usr/sbin/rmt --one-file-system /
which breaks down to create tar archive, verbose output, preserve permissions, automatically determine compression based on file extension, handle Sparse files efficiently, write to a file on a remote host using /usr/sbin/rmt as the rmt program, don't descend into a separate filesystem (since I don't want /proc and /sys etc to be backed up), and back up my root partition. Since I don't believe there's any value to separate file systems on a laptop, this will back up the entire contents of my n-1 laptop to the carillon.tgz in my home directory on player.local.

7 August 2015

Norbert Preining: Japanese-English dictionary for Kobo

Since ever the Kobo firmwares also allowed downloading of a bunch of dictionaries, most of which I don t need. As I am fluent in most languages I read and write, the only real dictionary I would like to see is a Japanese-English (I don t dare asking for a Japanese-German). Unfortunately, Kobo never shipped one. OTOH, starting with firmware 3.16.10 they ships two different English-Japanese dictionaries, one excellent Japanese-Japanese dictionary, but not one Japanese-English. So I took the liberty to write a script that allows everyone to enrich the shipped Japanese-Japanese dictionary with English definitions. Kobo Logo Till now I have used Tshering s excellent Japanese dictionary which was enriched with English definitions. It was based on the older Japanese-Japanese dictionary shipped with firmwares before 3.16.10. I didn t want to loose the more complete dictionary from the new firmware, so here is a script that updates the dictionary for you Prerequisites The script is neither fool-proof nor does everything by itself. Furthermore, it requires a set of programs. In details: Supported dictionaries At the moment the program can use the following two dictionaries as sources: Edict2 and Japanese3. Edict2 The Edict dictionary is a free dictionary which is the base of most other dictionaries. Created by the JMdict/EDICT Project it provides a very complete Japanese-English dictionary. To use the dict with the current program, one need to download the edict2.gz file and unpack it with gunzip edict2.gz. If you put it into the same directory as the Perl script, nothing else needs to be done, otherwise one can use the command line option --edict PATH-TO-EDICT to specify the location of the edict2 file. Japanese3 The Japanese3 is a dictionary application for iOS which provides another very complete Japanese-English dictionary. My feeling is that it is 90% and more based on Edict, so adding it will not buy you much, but still a bit (see below for how much!). If you have purchased this dictionary/application, and you manage to get access to your iOS device (via jailbreaking or some other tools), then you need to get the file Japanese3.db from the application folder, and then generate a file via sqlite3 as follows:
$ sqlite3 Japanese3.db
.output japanese3-data
select Entry, Furigana, Summary from entries;
If you save the generated file japanese3-data into the same directory as the Perl script, nothing else needs to be done, otherwise one can use the command line option --japanese3 PATH-TO-J3-DATA to specify the location of the Japanese3 data file. Command line options The program supports the following command line options: Note that in case you pass in the option --unpacked, the files should be properly named (encodings are a problem!). Furthermore, note that the unpacked directory contains lots of .gif and .html files that are actually gzip-compressed files, but lacking the .gz extension. If you want to unpack the dictionary, by advised that the file names in the Zip directory are already encoded in UTF-8, but normal programs (unzip, 7z) assume that they are encoded in some other encoding. Thus, if your are using UTF-8 locale, it is necessary to set LC_CTYPE to C to make sure that the encoding is used, as in
LC_CTYPE=C 7z x ...
Typical run In the following example we use both dict2 and Japanese3 dictionaries, and prefer Edict2:
$ perl enhance-dictionary.pl --dicts edict2 --dicts japanese3
Using the following dictionaries as source for translations: edict2 japanese3
loading edict2 ... done
loading Japanese3 data ... done
unpacking original dictionary ... done
loading dict files ... done
searching for words and updating ... done
total words 805521, matches: 130563 (edict: 123388, japanese3: 7175)
creating output html ... done
creating update dictionary in dicthtml-jaxxdjs-201508072201.zip ... done
$
Installing the dictionary After having created the enhanced dictionary, one can install the generated file as KOBO/.kobo/dicts/dicthtml-jaxxdjs.zip (where KOBO is the mount point of the eReader). The dictionary should be picked up automatically. And the next lookup should give you something like the following:
kobo-glohd-enhanced-ja-dict There is only one caveat: Syncing with Kobo will re-download the original dictionary and overwrite the enhanced one. There is at least one solution here, which I am employing, see this post on MobileRead. Download and development place I am using the github repository kobo-ja-dict-enhance to develop the program. Please report bugs, and feature requests there. The file for the last released version can be downloaded from here: enhance-dictionary.pl Future plans I am planning to get rid of the 7z dependency and use Archive::Zip for all the unpacking and packing. This would also allow to do everything in memory and thus make it faster. There is a branch on github with ongoing work on this matter. I also think about including translations for Hiragana words by providing the translations of all possible Kanji readings. Conclusions Even if Kobo does not provide us with a decent Japanese-English dictionary, adding at least a huge amount of translations to the current dictionary is now easily possible. For serious students of Japanese who are reading or starting to read Japanese eBooks, this will be of great help. Enjoy, and don t forget to give feedback, suggestions, and improvements either here or better via the Github page.

Christoph Egger: Systemd pitfalls

logind hangs If you just updated systemd and ssh to that host seems to hang, that's just a known Bug (Debian Bug). Don't panic. Wait for the logind timeout and restart logind. restart and stop;start One thing that confused me several times and still confuses people is systemctl restart doing more than systemctl stop ; systemctl start. You will notice the difference once you have a failed service. A restart will try to start the service again. Both stop and start however will just ignore it. Rumors have it this has changed post jessie however. sysvinit-wrapped services and stop While there are certainly bugs with sysvinit services in general (I found myself several times without a local resolver as unbound failed to be started, haven't managed to debug further), the stop behavior of wrapped services is just broken. systemctl stop will block until the sysv initscript finished. It will even note the result of the action in its state. However systemctl will return with exitcode 0 and not output anything on stdout/stderr. This has been reported as Debian Bug. zsh helper I found the following zshrc snipped quite helpful in dealing with non-reported systemctl failures. On root shells it will display a list of failed services as part of the prompt. This will give proper feedback whether your systemctl stop failed, it will give feedback if you still have type=simple services and if the sysv-init script or wrapper is broken.
precmd ()  
    if [[ $UID == 0 && $+commands[systemctl] != 0 ]]
    then
      use_systemd=true
      systemd_failed=" systemctl --state=failed   grep failed   cut -d \  -f 2   tr '\n' ' ' "
    fi
 
if [[ $UID == 0 && $+commands[systemctl] != 0 ]]
then
  PROMPT=$'% $fg[red]>>  $systemd_failed$reset_color% \n'
else
  PROMPT=""
fi
PROMPT+=whateveryourpromptis
zsh completion Speaking of zsh, there's one problem that bothers me a lot and I don't have any solution for. Tab-completing the service name for service is blazing fast. Tab-completing the service name for systemctl restart takes ages. People traced down to truckloads of dbus communication for the completion but no further fix is known (to me). type=simple services As described in length by Lucas Nussbaum type=simple services are actively harmful. Proper type=forking daemons are strictly superior (they provide feedback of finished initialization and success thereof) and type=notify services are so simple there's no excuse for not using them even for private one-off hacks. Even if you're language doesn't provide libsystemd-daemon bindings:
(defun sd-notify (event-string)
  (let ((socket (make-instance 'sb-bsd-sockets:local-socket :type :datagram))
        (name (posix-getenv "NOTIFY_SOCKET"))
        (bufferlen (length event-string)))
    (when name
      (sb-bsd-sockets:socket-connect socket name)
      (sb-bsd-sockets:socket-send socket event-string bufferlen))))
This is a stable API guaranteed to not break in the future and implemented in less than ten lines of code with just basic socket functions. And if your language has support it becomes actually trivial:
    try:
        import systemd
        systemd.daemon.notify("READY=1")
    except ImportError:
        pass
Note that in both cases there is no drawback at all on systemd-free setups. It has the overhead of checking the process' environment for NOTIFY_SOCKET or for the systemd package and behaves like a simple service otherwise. Actually the idea of separating the technical aspect (daemonizing) from the semantic aspect of signalizing "initialization finished, everything's fine" is a pretty good idea and hopefully has the potential to reduce the number of services signalizing the "everything's fine" too early. It could even be ported to non-systemd init systems easily given the API.

Next.

Previous.