In December 2024, I went on a trip through four countries - Singapore, Malaysia, Brunei, and Vietnam - with my friend Badri. This post covers our experiences in Singapore.
I took an IndiGo flight from Delhi to Singapore, with a layover in Chennai. At the Chennai airport, I was joined by Badri. We had an early morning flight from Chennai that would land in Singapore in the afternoon. Within 48 hours of our scheduled arrival in Singapore, we submitted an arrival card online. At immigration, we simply needed to scan our passports at the gates, which opened automatically to let us through, and then give our address to an official nearby. The process was quick and smooth, but it unfortunately meant that we didn t get our passports stamped by Singapore.
Before I left the airport, I wanted to visit the nature-themed park with a fountain I saw in pictures online. It is called Jewel Changi, and it took quite some walking to get there. After reaching the park, we saw a fountain that could be seen from all the levels. We roamed around for a couple of hours, then proceeded to the airport metro station to get to our hotel.
A shot of Jewel Changi. Photo by Ravi Dwivedi. Released under the CC-BY-SA 4.0.
There were four ATMs on the way to the metro station, but none of them provided us with any cash. This was the first country (outside India, of course!) where my card didn t work at ATMs.
To use the metro, one can tap the EZ-Link card or bank cards at the AFC gates to get in. You cannot buy tickets using cash. Before boarding the metro, I used my credit card to get Badri an EZ-Link card from a vending machine. It was 10 Singapore dollars ( 630) - 5 for the card, and 5 for the balance. I had planned to use my Visa credit card to pay for my own fare. I was relieved to see that my card worked, and I passed through the AFC gates.
We had booked our stay at a hostel named Campbell s Inn, which was the cheapest we could find in Singapore. It was 1500 per night for dorm beds. The hostel was located in Little India. While Little India has an eponymous metro station, the one closest to our hostel was Rochor.
On the way to the hostel, we found out that our booking had been canceled.
We had booked from the Hostelworld website, opting to pay the deposit in advance and to pay the balance amount in person upon reaching. However, Hostelworld still tried to charge Badri s card again before our arrival. When the unauthorized charge failed, they sent an automatic message saying we tried to charge and to contact them soon to avoid cancellation, which we couldn t do as we were in the plane.
Despite this, we went to the hostel to check the status of our booking.
The trip from the airport to Rochor required a couple of transfers. It was 2 Singapore dollars (approx. 130) and took approximately an hour.
Upon reaching the hostel, we were informed that our booking had indeed been canceled, and were not given any reason for the cancelation. Furthermore, no beds were available at the hostel for us to book on the spot.
We decided to roam around and look for accommodation at other hostels in the area. Soon, we found a hostel by the name of Snooze Inn, which had two beds available. It was 36 Singapore dollars per person (around 2300) for a dormitory bed. Snooze Inn advertised supporting RuPay cards and UPI. Some other places in that area did the same. We paid using my card. We checked in and slept for a couple of hours after taking a shower.
By the time we woke up, it was dark. We met Praveen s friend Sabeel to get my FLX1 phone. We also went to Mustafa Center nearby to exchange Indian rupees for Singapore dollars. Mustafa Center also had a shopping center with shops selling electronic items and souvenirs, among other things. When we were dropping off Sabeel at a bus stop, we discovered that the bus stops in Singapore had a digital board mentioning the bus routes for the stop and the number of minutes each bus was going to take.
In addition to an organized bus system, Singapore had good pedestrian infrastructure. There were traffic lights and zebra crossings for pedestrians to cross the roads. Unlike in Indian cities, rules were being followed. Cars would stop for pedestrians at unmanaged zebra crossings; pedestrians would in turn wait for their crossing signal to turn green before attempting to walk across. Therefore, walking in Singapore was easy.
Traffic rules were taken so seriously in Singapore I (as a pedestrian) was afraid of unintentionally breaking them, which could get me in trouble, as breaking rules is dealt with heavy fines in the country. For example, crossing roads without using a marked crossing (while being within 50 meters of it) - also known as jaywalking - is an offence in Singapore.
Moreover, the streets were litter-free, and cleanliness seemed like an obsession.
After exploring Mustafa Center, we went to a nearby 7-Eleven to top up Badri s EZ-Link card. He gave 20 Singapore dollars for the recharge, which credited the card by 19.40 Singapore dollars (0.6 dollars being the recharge fee).
When I was planning this trip, I discovered that the World Chess Championship match was being held in Singapore. I seized the opportunity and bought a ticket in advance. The next day - the 5th of December - I went to watch the 9th game between Gukesh Dommaraju of India and Ding Liren of China. The venue was a hotel on Sentosa Island, and the ticket was 70 Singapore dollars, which was around 4000 at the time.
We checked out from our hostel in the morning, as we were planning to stay with Badri s aunt that night. We had breakfast at a place in Little India. Then we took a couple of buses, followed by a walk to Sentosa Island. Paying the fare for the buses was similar to the metro - I tapped my credit card in the bus, while Badri tapped his EZ-Link card. We also had to tap it while getting off.
If you are tapping your credit card to use public transport in Singapore, keep in mind that the total amount of all the trips taken on a day is deducted at the end. This makes it hard to determine the cost of individual trips. For example, I could take a bus and get off after tapping my card, but I would have no way to determine how much this journey cost.
When you tap in, the maximum fare amount gets deducted. When you tap out, the balance amount gets refunded (if it s a shorter journey than the maximum fare one). So, there is incentive for passengers not to get off without tapping out. Going by your card statement, it looks like all that happens virtually, and only one statement comes in at the end. Maybe this combining only happens for international cards.
We got off the bus a kilometer away from Sentosa Island and walked the rest of the way. We went on the Sentosa Boardwalk, which is itself a tourist attraction. I was using Organic Maps to navigate to the hotel Resorts World Sentosa, but Organic Maps route led us through an amusement park. I tried asking the locals (people working in shops) for directions, but it was a Chinese-speaking region, and they didn t understand English. Fortunately, we managed to find a local who helped us with the directions.
A shot of Sentosa Boardwalk. Photo by Ravi Dwivedi. Released under the CC-BY-SA 4.0.
Following the directions, we somehow ended up having to walk on a road which did not have pedestrian paths. Singapore is a country with strict laws, so we did not want to walk on that road. Avoiding that road led us to the Michael Hotel. There was a person standing at the entrance, and I asked him for directions to Resorts World Sentosa. The person told me that the bus (which was standing at the entrance) would drop me there! The bus was a free service for getting to Resorts World Sentosa. Here I parted ways with Badri, who went to his aunt s place.
I got to the Resorts Sentosa and showed my ticket to get in. There were two zones inside - the first was a room with a glass wall separating the audience and the players. This was the room to watch the game physically, and resembled a zoo or an aquarium. :) The room was also a silent room, which means talking or making noise was prohibited. Audiences were only allowed to have mobile phones for the first 30 minutes of the game - since I arrived late, I could not bring my phone inside that room.
The other zone was outside this room. It had a big TV on which the game was being broadcast along with commentary by David Howell and Jovanka Houska - the official FIDE commentators for the event. If you don t already know, FIDE is the authoritative international chess body.
I spent most of the time outside that silent room, giving me an opportunity to socialize. A lot of people were from Singapore. I saw there were many Indians there as well. Moreover, I had a good time with Vasudevan, a journalist from Tamil Nadu who was covering the match. He also asked questions to Gukesh during the post-match conference. His questions were in Tamil to lift Gukesh s spirits, as Gukesh is a Tamil speaker.
Tea and coffee were free for the audience. I also bought a T-shirt from their stall as a souvenir.
After the game, I took a shuttle bus from Resorts World Sentosa to a metro station, then travelled to Pasir Ris by metro, where Badri was staying with his aunt. I thought of getting something to eat, but could not find any caf s or restaurants while I was walking from the Pasir Ris metro station to my destination, and was positively starving when I got there.
Badri s aunt s place was an apartment in a gated community. On the gate was a security guard who asked me the address of the apartment. Upon entering, there were many buildings. To enter the building, you need to dial the number of the apartment you want to go to and speak to them. I had seen that in the TV show Seinfeld, where Jerry s friends used to dial Jerry to get into his building.
I was afraid they might not have anything to eat because I told them I was planning to get something on the way. This was fortunately not the case, and I was relieved to not have to sleep with an empty stomach.
Badri s uncle gave us an idea of how safe Singapore is. He said that even if you forget your laptop in a public space, you can go back the next day to find it right there in the same spot. I also learned that owning cars was discouraged in Singapore - the government imposes a high registration fee on them, while also making public transport easy to use and affordable. I also found out that 7-Eleven was not that popular among residents in Singapore, unlike in Malaysia or Thailand.
The next day was our third and final day in Singapore. We had a bus in the evening to Johor Bahru in Malaysia. We got up early, had breakfast, and checked out from Badri s aunt s home. A store by the name of Cat Socrates was our first stop for the day, as Badri wanted to buy some stationery. The plan was to take the metro, followed by the bus. So we got to Pasir Ris metro station. Next to the metro station was a mall. In the mall, Badri found an ATM where our cards worked, and we got some Singapore dollars.
It was noon when we reached the stationery shop mentioned above. We had to walk a kilometer from the place where the bus dropped us. It was a hot, sunny day in Singapore, so walking was not comfortable. We had to go through residential areas in Singapore. We saw some non-touristy parts of Singapore.
After we were done with the stationery shop, we went to a hawker center to get lunch. Hawker centers are unique to Singapore. They have a lot of shops that sell local food at cheap prices. It is similar to a food court. However, unlike the food courts in malls, hawker centers are open-air and can get quite hot.
This is the hawker center we went to. Photo by Ravi Dwivedi. Released under the CC-BY-SA 4.0.
To have something, you just need to buy it from one of the shops and find a table. After you are done, you need to put your tray in the tray-collecting spots. I had a kaya toast with chai, since there weren t many vegetarian options. I also bought a persimmon from a nearby fruit vendor. On the other hand, Badri sampled some local non-vegetarian dishes.
Table littering at the hawker center was prohibited by law. Photo by Ravi Dwivedi. Released under the CC-BY-SA 4.0.
Next, we took a metro to Raffles Place, as we wanted to visit Merlion, the icon of Singapore. It is a statue having the head of a lion and the body of a fish. While getting through the AFC gates, my card was declined. Therefore, I had to buy an EZ-Link card, which I had been avoiding because the card itself costs 5 Singapore dollars.
From the Raffles Place metro station, we walked to Merlion. The place also gave a nice view of Marina Bay Sands. It was filled with tourists clicking pictures, and we also did the same.
Merlion from behind, giving a good view of Marina Bay Sands. Photo by Ravi Dwivedi. Released under the CC-BY-SA 4.0.
After this, we went to the bus stop to catch our bus to the border city of Johor Bahru, Malaysia. The bus was more than an hour late, and we worried that we had missed the bus. I asked an Indian woman at the stop who also planned to take the same bus, and she told us that the bus was late. Finally, our bus arrived, and we set off for Johor Bahru.
Before I finish, let me give you an idea of my expenditure. Singapore is an expensive country, and I realized that expenses could go up pretty quickly. Overall, my stay in Singapore for 3 days and 2 nights was approx. 5500 rupees. That too, when we stayed one night at Badri s aunt s place (so we didn t have to pay for accomodation for one of the nights) and didn t have to pay for a couple of meals. This amount doesn t include the ticket for the chess game, but includes the costs of getting there. If you are in Singapore, it is likely you will pay a visit to Sentosa Island anyway.
Stay tuned for our experiences in Malaysia!
Credits: Thanks to Dione, Sahil, Badri and Contrapunctus for reviewing the draft. Thanks to Bhe for spotting a duplicate sentence.
If you're still using Vagrant (I am) and try to boot a box that uses UEFI (like boxen/debian-13),
a simple vagrant init boxen/debian-13 and vagrant up will entertain you with a nice traceback:
% vagrantup
Bringing machine 'default' up with 'libvirt' provider...==> default: Checking if box 'boxen/debian-13' version '2025.08.20.12' is up to date...==> default: Creating image (snapshot of base box volume).==> default: Creating domain with the following settings...==> default: -- Name: tmp.JV8X48n30U_default==> default: -- Description: Source: /tmp/tmp.JV8X48n30U/Vagrantfile==> default: -- Domain type: kvm==> default: -- Cpus: 1==> default: -- Feature: acpi==> default: -- Feature: apic==> default: -- Feature: pae==> default: -- Clock offset: utc==> default: -- Memory: 2048M==> default: -- Loader: /home/evgeni/.vagrant.d/boxes/boxen-VAGRANTSLASH-debian-13/2025.08.20.12/libvirt/OVMF_CODE.fd==> default: -- Nvram: /home/evgeni/.vagrant.d/boxes/boxen-VAGRANTSLASH-debian-13/2025.08.20.12/libvirt/efivars.fd==> default: -- Base box: boxen/debian-13==> default: -- Storage pool: default==> default: -- Image(vda): /home/evgeni/.local/share/libvirt/images/tmp.JV8X48n30U_default.img, virtio, 20G==> default: -- Disk driver opts: cache='default'==> default: -- Graphics Type: vnc==> default: -- Video Type: cirrus==> default: -- Video VRAM: 16384==> default: -- Video 3D accel: false==> default: -- Keymap: en-us==> default: -- TPM Backend: passthrough==> default: -- INPUT: type=mouse, bus=ps2==> default: -- CHANNEL: type=unix, mode===> default: -- CHANNEL: target_type=virtio, target_name=org.qemu.guest_agent.0==> default: Creating shared folders metadata...==> default: Starting domain.==> default: Removing domain...==> default: Deleting the machine folder/usr/share/gems/gems/fog-libvirt-0.13.1/lib/fog/libvirt/requests/compute/vm_action.rb:7:in 'Libvirt::Domain#create': Call to virDomainCreate failed: internal error: process exited while connecting to monitor: 2025-09-22T10:07:55.081081Z qemu-system-x86_64: -blockdev "driver":"file","filename":"/home/evgeni/.vagrant.d/boxes/boxen-VAGRANTSLASH-debian-13/2025.08.20.12/libvirt/OVMF_CODE.fd","node-name":"libvirt-pflash0-storage","auto-read-only":true,"discard":"unmap" : Could not open '/home/evgeni/.vagrant.d/boxes/boxen-VAGRANTSLASH-debian-13/2025.08.20.12/libvirt/OVMF_CODE.fd': Permission denied (Libvirt::Error) from /usr/share/gems/gems/fog-libvirt-0.13.1/lib/fog/libvirt/requests/compute/vm_action.rb:7:in 'Fog::Libvirt::Compute::Shared#vm_action' from /usr/share/gems/gems/fog-libvirt-0.13.1/lib/fog/libvirt/models/compute/server.rb:81:in 'Fog::Libvirt::Compute::Server#start' from /usr/share/vagrant/gems/gems/vagrant-libvirt-0.11.2/lib/vagrant-libvirt/action/start_domain.rb:546:in 'VagrantPlugins::ProviderLibvirt::Action::StartDomain#call' from /usr/share/vagrant/gems/gems/vagrant-2.3.4/lib/vagrant/action/warden.rb:48:in 'Vagrant::Action::Warden#call' from /usr/share/vagrant/gems/gems/vagrant-libvirt-0.11.2/lib/vagrant-libvirt/action/set_boot_order.rb:22:in 'VagrantPlugins::ProviderLibvirt::Action::SetBootOrder#call' from /usr/share/vagrant/gems/gems/vagrant-2.3.4/lib/vagrant/action/warden.rb:48:in 'Vagrant::Action::Warden#call' from /usr/share/vagrant/gems/gems/vagrant-libvirt-0.11.2/lib/vagrant-libvirt/action/share_folders.rb:22:in 'VagrantPlugins::ProviderLibvirt::Action::ShareFolders#call' from /usr/share/vagrant/gems/gems/vagrant-2.3.4/lib/vagrant/action/warden.rb:48:in 'Vagrant::Action::Warden#call' from /usr/share/vagrant/gems/gems/vagrant-libvirt-0.11.2/lib/vagrant-libvirt/action/prepare_nfs_settings.rb:21:in 'VagrantPlugins::ProviderLibvirt::Action::PrepareNFSSettings#call' from /usr/share/vagrant/gems/gems/vagrant-2.3.4/lib/vagrant/action/warden.rb:48:in 'Vagrant::Action::Warden#call' from /usr/share/vagrant/gems/gems/vagrant-2.3.4/lib/vagrant/action/builtin/synced_folders.rb:87:in 'Vagrant::Action::Builtin::SyncedFolders#call' from /usr/share/vagrant/gems/gems/vagrant-2.3.4/lib/vagrant/action/warden.rb:48:in 'Vagrant::Action::Warden#call' from /usr/share/vagrant/gems/gems/vagrant-2.3.4/lib/vagrant/action/builtin/delayed.rb:19:in 'Vagrant::Action::Builtin::Delayed#call' from /usr/share/vagrant/gems/gems/vagrant-2.3.4/lib/vagrant/action/warden.rb:48:in 'Vagrant::Action::Warden#call' from /usr/share/vagrant/gems/gems/vagrant-2.3.4/lib/vagrant/action/builtin/synced_folder_cleanup.rb:28:in 'Vagrant::Action::Builtin::SyncedFolderCleanup#call' from /usr/share/vagrant/gems/gems/vagrant-2.3.4/lib/vagrant/action/warden.rb:48:in 'Vagrant::Action::Warden#call' from /usr/share/vagrant/gems/gems/vagrant-2.3.4/plugins/synced_folders/nfs/action_cleanup.rb:25:in 'VagrantPlugins::SyncedFolderNFS::ActionCleanup#call' from /usr/share/vagrant/gems/gems/vagrant-2.3.4/lib/vagrant/action/warden.rb:48:in 'Vagrant::Action::Warden#call' from /usr/share/vagrant/gems/gems/vagrant-libvirt-0.11.2/lib/vagrant-libvirt/action/prepare_nfs_valid_ids.rb:14:in 'VagrantPlugins::ProviderLibvirt::Action::PrepareNFSValidIds#call' from /usr/share/vagrant/gems/gems/vagrant-2.3.4/lib/vagrant/action/warden.rb:48:in 'Vagrant::Action::Warden#call' from /usr/share/vagrant/gems/gems/vagrant-2.3.4/lib/vagrant/action/warden.rb:127:in 'block in Vagrant::Action::Warden#finalize_action' from /usr/share/vagrant/gems/gems/vagrant-2.3.4/lib/vagrant/action/warden.rb:48:in 'Vagrant::Action::Warden#call' from /usr/share/vagrant/gems/gems/vagrant-2.3.4/lib/vagrant/action/builder.rb:180:in 'Vagrant::Action::Builder#call' from /usr/share/vagrant/gems/gems/vagrant-2.3.4/lib/vagrant/action/runner.rb:101:in 'block in Vagrant::Action::Runner#run' from /usr/share/vagrant/gems/gems/vagrant-2.3.4/lib/vagrant/util/busy.rb:19:in 'Vagrant::Util::Busy.busy' from /usr/share/vagrant/gems/gems/vagrant-2.3.4/lib/vagrant/action/runner.rb:101:in 'Vagrant::Action::Runner#run' from /usr/share/vagrant/gems/gems/vagrant-2.3.4/lib/vagrant/action/builtin/call.rb:53:in 'Vagrant::Action::Builtin::Call#call' from /usr/share/vagrant/gems/gems/vagrant-2.3.4/lib/vagrant/action/warden.rb:48:in 'Vagrant::Action::Warden#call' from /usr/share/vagrant/gems/gems/vagrant-2.3.4/lib/vagrant/action/warden.rb:127:in 'block in Vagrant::Action::Warden#finalize_action' from /usr/share/vagrant/gems/gems/vagrant-2.3.4/lib/vagrant/action/warden.rb:48:in 'Vagrant::Action::Warden#call' from /usr/share/vagrant/gems/gems/vagrant-2.3.4/lib/vagrant/action/builder.rb:180:in 'Vagrant::Action::Builder#call' from /usr/share/vagrant/gems/gems/vagrant-2.3.4/lib/vagrant/action/runner.rb:101:in 'block in Vagrant::Action::Runner#run' from /usr/share/vagrant/gems/gems/vagrant-2.3.4/lib/vagrant/util/busy.rb:19:in 'Vagrant::Util::Busy.busy' from /usr/share/vagrant/gems/gems/vagrant-2.3.4/lib/vagrant/action/runner.rb:101:in 'Vagrant::Action::Runner#run' from /usr/share/vagrant/gems/gems/vagrant-2.3.4/lib/vagrant/action/builtin/call.rb:53:in 'Vagrant::Action::Builtin::Call#call' from /usr/share/vagrant/gems/gems/vagrant-2.3.4/lib/vagrant/action/warden.rb:48:in 'Vagrant::Action::Warden#call' from /usr/share/vagrant/gems/gems/vagrant-libvirt-0.11.2/lib/vagrant-libvirt/action/create_network_interfaces.rb:197:in 'VagrantPlugins::ProviderLibvirt::Action::CreateNetworkInterfaces#call' from /usr/share/vagrant/gems/gems/vagrant-2.3.4/lib/vagrant/action/warden.rb:48:in 'Vagrant::Action::Warden#call' from /usr/share/vagrant/gems/gems/vagrant-libvirt-0.11.2/lib/vagrant-libvirt/action/create_networks.rb:40:in 'VagrantPlugins::ProviderLibvirt::Action::CreateNetworks#call' from /usr/share/vagrant/gems/gems/vagrant-2.3.4/lib/vagrant/action/warden.rb:48:in 'Vagrant::Action::Warden#call' from /usr/share/vagrant/gems/gems/vagrant-libvirt-0.11.2/lib/vagrant-libvirt/action/create_domain.rb:452:in 'VagrantPlugins::ProviderLibvirt::Action::CreateDomain#call' from /usr/share/vagrant/gems/gems/vagrant-2.3.4/lib/vagrant/action/warden.rb:48:in 'Vagrant::Action::Warden#call' from /usr/share/vagrant/gems/gems/vagrant-libvirt-0.11.2/lib/vagrant-libvirt/action/resolve_disk_settings.rb:143:in 'VagrantPlugins::ProviderLibvirt::Action::ResolveDiskSettings#call' from /usr/share/vagrant/gems/gems/vagrant-2.3.4/lib/vagrant/action/warden.rb:48:in 'Vagrant::Action::Warden#call' from /usr/share/vagrant/gems/gems/vagrant-libvirt-0.11.2/lib/vagrant-libvirt/action/create_domain_volume.rb:97:in 'VagrantPlugins::ProviderLibvirt::Action::CreateDomainVolume#call' from /usr/share/vagrant/gems/gems/vagrant-2.3.4/lib/vagrant/action/warden.rb:48:in 'Vagrant::Action::Warden#call' from /usr/share/vagrant/gems/gems/vagrant-libvirt-0.11.2/lib/vagrant-libvirt/action/handle_box_image.rb:127:in 'VagrantPlugins::ProviderLibvirt::Action::HandleBoxImage#call' from /usr/share/vagrant/gems/gems/vagrant-2.3.4/lib/vagrant/action/warden.rb:48:in 'Vagrant::Action::Warden#call' from /usr/share/vagrant/gems/gems/vagrant-2.3.4/lib/vagrant/action/builtin/handle_box.rb:56:in 'Vagrant::Action::Builtin::HandleBox#call' from /usr/share/vagrant/gems/gems/vagrant-2.3.4/lib/vagrant/action/warden.rb:48:in 'Vagrant::Action::Warden#call' from /usr/share/vagrant/gems/gems/vagrant-libvirt-0.11.2/lib/vagrant-libvirt/action/handle_storage_pool.rb:63:in 'VagrantPlugins::ProviderLibvirt::Action::HandleStoragePool#call' from /usr/share/vagrant/gems/gems/vagrant-2.3.4/lib/vagrant/action/warden.rb:48:in 'Vagrant::Action::Warden#call' from /usr/share/vagrant/gems/gems/vagrant-libvirt-0.11.2/lib/vagrant-libvirt/action/set_name_of_domain.rb:34:in 'VagrantPlugins::ProviderLibvirt::Action::SetNameOfDomain#call' from /usr/share/vagrant/gems/gems/vagrant-2.3.4/lib/vagrant/action/warden.rb:48:in 'Vagrant::Action::Warden#call' from /usr/share/vagrant/gems/gems/vagrant-2.3.4/lib/vagrant/action/builtin/provision.rb:80:in 'Vagrant::Action::Builtin::Provision#call' from /usr/share/vagrant/gems/gems/vagrant-2.3.4/lib/vagrant/action/warden.rb:48:in 'Vagrant::Action::Warden#call' from /usr/share/vagrant/gems/gems/vagrant-libvirt-0.11.2/lib/vagrant-libvirt/action/cleanup_on_failure.rb:21:in 'VagrantPlugins::ProviderLibvirt::Action::CleanupOnFailure#call' from /usr/share/vagrant/gems/gems/vagrant-2.3.4/lib/vagrant/action/warden.rb:48:in 'Vagrant::Action::Warden#call' from /usr/share/vagrant/gems/gems/vagrant-2.3.4/lib/vagrant/action/warden.rb:127:in 'block in Vagrant::Action::Warden#finalize_action' from /usr/share/vagrant/gems/gems/vagrant-2.3.4/lib/vagrant/action/warden.rb:48:in 'Vagrant::Action::Warden#call' from /usr/share/vagrant/gems/gems/vagrant-2.3.4/lib/vagrant/action/builder.rb:180:in 'Vagrant::Action::Builder#call' from /usr/share/vagrant/gems/gems/vagrant-2.3.4/lib/vagrant/action/runner.rb:101:in 'block in Vagrant::Action::Runner#run' from /usr/share/vagrant/gems/gems/vagrant-2.3.4/lib/vagrant/util/busy.rb:19:in 'Vagrant::Util::Busy.busy' from /usr/share/vagrant/gems/gems/vagrant-2.3.4/lib/vagrant/action/runner.rb:101:in 'Vagrant::Action::Runner#run' from /usr/share/vagrant/gems/gems/vagrant-2.3.4/lib/vagrant/action/builtin/call.rb:53:in 'Vagrant::Action::Builtin::Call#call' from /usr/share/vagrant/gems/gems/vagrant-2.3.4/lib/vagrant/action/warden.rb:48:in 'Vagrant::Action::Warden#call' from /usr/share/vagrant/gems/gems/vagrant-2.3.4/lib/vagrant/action/builtin/box_check_outdated.rb:93:in 'Vagrant::Action::Builtin::BoxCheckOutdated#call' from /usr/share/vagrant/gems/gems/vagrant-2.3.4/lib/vagrant/action/warden.rb:48:in 'Vagrant::Action::Warden#call' from /usr/share/vagrant/gems/gems/vagrant-2.3.4/lib/vagrant/action/builtin/config_validate.rb:25:in 'Vagrant::Action::Builtin::ConfigValidate#call' from /usr/share/vagrant/gems/gems/vagrant-2.3.4/lib/vagrant/action/warden.rb:48:in 'Vagrant::Action::Warden#call' from /usr/share/vagrant/gems/gems/vagrant-2.3.4/lib/vagrant/action/builder.rb:180:in 'Vagrant::Action::Builder#call' from /usr/share/vagrant/gems/gems/vagrant-2.3.4/lib/vagrant/action/runner.rb:101:in 'block in Vagrant::Action::Runner#run' from /usr/share/vagrant/gems/gems/vagrant-2.3.4/lib/vagrant/util/busy.rb:19:in 'Vagrant::Util::Busy.busy' from /usr/share/vagrant/gems/gems/vagrant-2.3.4/lib/vagrant/action/runner.rb:101:in 'Vagrant::Action::Runner#run' from /usr/share/vagrant/gems/gems/vagrant-2.3.4/lib/vagrant/machine.rb:248:in 'Vagrant::Machine#action_raw' from /usr/share/vagrant/gems/gems/vagrant-2.3.4/lib/vagrant/machine.rb:217:in 'block in Vagrant::Machine#action' from /usr/share/vagrant/gems/gems/vagrant-2.3.4/lib/vagrant/environment.rb:631:in 'Vagrant::Environment#lock' from /usr/share/vagrant/gems/gems/vagrant-2.3.4/lib/vagrant/machine.rb:203:in 'Method#call' from /usr/share/vagrant/gems/gems/vagrant-2.3.4/lib/vagrant/machine.rb:203:in 'Vagrant::Machine#action' from /usr/share/vagrant/gems/gems/vagrant-2.3.4/lib/vagrant/batch_action.rb:86:in 'block (2 levels) in Vagrant::BatchAction#run'
The important part here is
Call to virDomainCreate failed: internal error: process exited while connecting to monitor:
2025-09-22T10:07:55.081081Z qemu-system-x86_64: -blockdev  "driver":"file","filename":"/home/evgeni/.vagrant.d/boxes/boxen-VAGRANTSLASH-debian-13/2025.08.20.12/libvirt/OVMF_CODE.fd","node-name":"libvirt-pflash0-storage","auto-read-only":true,"discard":"unmap" :
Could not open '/home/evgeni/.vagrant.d/boxes/boxen-VAGRANTSLASH-debian-13/2025.08.20.12/libvirt/OVMF_CODE.fd': Permission denied (Libvirt::Error)
Of course we checked that the file permissions on this file are correct (I'll save you the ls output), so what's next?
Yes, of course, SELinux!
A process in the svirt_t domain tries to access something in the user_home_t domain and is denied by the kernel.
So far, SELinux is both working as designed and preventing us from doing our work, nice.
For "normal" (non-UEFI) boxes, Vagrant uploads the image to libvirt, which stores it in ~/.local/share/libvirt/images/ and boots fine from there.
For UEFI boxen, one also needs loader and nvram files, which Vagrant keeps in ~/.vagrant.d/boxes/<box_name> and that's what explodes in our face here.
As ~/.local/share/libvirt/images/ works well, and is labeled svirt_home_t let's see what other folders use that label:
# semanagefcontext-lgrepsvirt_home_t
/home/[^/]+/\.cache/libvirt/qemu(/.*)? all files unconfined_u:object_r:svirt_home_t:s0/home/[^/]+/\.config/libvirt/qemu(/.*)? all files unconfined_u:object_r:svirt_home_t:s0/home/[^/]+/\.libvirt/qemu(/.*)? all files unconfined_u:object_r:svirt_home_t:s0/home/[^/]+/\.local/share/gnome-boxes/images(/.*)? all files unconfined_u:object_r:svirt_home_t:s0/home/[^/]+/\.local/share/libvirt/boot(/.*)? all files unconfined_u:object_r:svirt_home_t:s0/home/[^/]+/\.local/share/libvirt/images(/.*)? all files unconfined_u:object_r:svirt_home_t:s0
Okay, that all makes sense, and it's just missing the Vagrant-specific folders!
% restorecon-rv~/.vagrant.d/boxes/boxen-VAGRANTSLASH-debian-13
Relabeled /home/evgeni/.vagrant.d/boxes/boxen-VAGRANTSLASH-debian-13 from unconfined_u:object_r:user_home_t:s0 to unconfined_u:object_r:svirt_home_t:s0Relabeled /home/evgeni/.vagrant.d/boxes/boxen-VAGRANTSLASH-debian-13/metadata_url from unconfined_u:object_r:user_home_t:s0 to unconfined_u:object_r:svirt_home_t:s0Relabeled /home/evgeni/.vagrant.d/boxes/boxen-VAGRANTSLASH-debian-13/2025.08.20.12 from unconfined_u:object_r:user_home_t:s0 to unconfined_u:object_r:svirt_home_t:s0Relabeled /home/evgeni/.vagrant.d/boxes/boxen-VAGRANTSLASH-debian-13/2025.08.20.12/libvirt from unconfined_u:object_r:user_home_t:s0 to unconfined_u:object_r:svirt_home_t:s0Relabeled /home/evgeni/.vagrant.d/boxes/boxen-VAGRANTSLASH-debian-13/2025.08.20.12/libvirt/box_0.img from unconfined_u:object_r:user_home_t:s0 to unconfined_u:object_r:svirt_home_t:s0Relabeled /home/evgeni/.vagrant.d/boxes/boxen-VAGRANTSLASH-debian-13/2025.08.20.12/libvirt/metadata.json from unconfined_u:object_r:user_home_t:s0 to unconfined_u:object_r:svirt_home_t:s0Relabeled /home/evgeni/.vagrant.d/boxes/boxen-VAGRANTSLASH-debian-13/2025.08.20.12/libvirt/Vagrantfile from unconfined_u:object_r:user_home_t:s0 to unconfined_u:object_r:svirt_home_t:s0Relabeled /home/evgeni/.vagrant.d/boxes/boxen-VAGRANTSLASH-debian-13/2025.08.20.12/libvirt/OVMF_CODE.fd from unconfined_u:object_r:user_home_t:s0 to unconfined_u:object_r:svirt_home_t:s0Relabeled /home/evgeni/.vagrant.d/boxes/boxen-VAGRANTSLASH-debian-13/2025.08.20.12/libvirt/OVMF_VARS.fd from unconfined_u:object_r:user_home_t:s0 to unconfined_u:object_r:svirt_home_t:s0Relabeled /home/evgeni/.vagrant.d/boxes/boxen-VAGRANTSLASH-debian-13/2025.08.20.12/libvirt/box_update_check from unconfined_u:object_r:user_home_t:s0 to unconfined_u:object_r:svirt_home_t:s0Relabeled /home/evgeni/.vagrant.d/boxes/boxen-VAGRANTSLASH-debian-13/2025.08.20.12/libvirt/efivars.fd from unconfined_u:object_r:user_home_t:s0 to unconfined_u:object_r:svirt_home_t:s0
And it works!
% vagrantup
Bringing machine 'default' up with 'libvirt' provider...==> default: Checking if box 'boxen/debian-13' version '2025.08.20.12' is up to date...==> default: Creating image (snapshot of base box volume).==> default: Creating domain with the following settings...==> default: -- Name: tmp.JV8X48n30U_default==> default: -- Description: Source: /tmp/tmp.JV8X48n30U/Vagrantfile==> default: -- Domain type: kvm==> default: -- Cpus: 1==> default: -- Feature: acpi==> default: -- Feature: apic==> default: -- Feature: pae==> default: -- Clock offset: utc==> default: -- Memory: 2048M==> default: -- Loader: /home/evgeni/.vagrant.d/boxes/boxen-VAGRANTSLASH-debian-13/2025.08.20.12/libvirt/OVMF_CODE.fd==> default: -- Nvram: /home/evgeni/.vagrant.d/boxes/boxen-VAGRANTSLASH-debian-13/2025.08.20.12/libvirt/efivars.fd==> default: -- Base box: boxen/debian-13==> default: -- Storage pool: default==> default: -- Image(vda): /home/evgeni/.local/share/libvirt/images/tmp.JV8X48n30U_default.img, virtio, 20G==> default: -- Disk driver opts: cache='default'==> default: -- Graphics Type: vnc==> default: -- Video Type: cirrus==> default: -- Video VRAM: 16384==> default: -- Video 3D accel: false==> default: -- Keymap: en-us==> default: -- TPM Backend: passthrough==> default: -- INPUT: type=mouse, bus=ps2==> default: -- CHANNEL: type=unix, mode===> default: -- CHANNEL: target_type=virtio, target_name=org.qemu.guest_agent.0==> default: Creating shared folders metadata...==> default: Starting domain.==> default: Domain launching with graphics connection settings...==> default: -- Graphics Port: 5900==> default: -- Graphics IP: 127.0.0.1==> default: -- Graphics Password: Not defined==> default: -- Graphics Websocket: 5700==> default: Waiting for domain to get an IP address...==> default: Waiting for machine to boot. This may take a few minutes... default: SSH address: 192.168.124.157:22 default: SSH username: vagrant default: SSH auth method: private key default: default: Vagrant insecure key detected. Vagrant will automatically replace default: this with a newly generated keypair for better security. default: default: Inserting generated public key within guest... default: Removing insecure key from the guest if it's present... default: Key inserted! Disconnecting and reconnecting using new SSH key...==> default: Machine booted and ready!
Akvorado 2.0 was released today! Akvorado collects network flows with
IPFIX and sFlow. It enriches flows and stores them in a ClickHouse database.
Users can browse the data through a web console. This release introduces an
important architectural change and other smaller improvements. Let s dive in!
New outlet service
The major change in Akvorado 2.0 is splitting the inlet service into two
parts: the inlet and the outlet. Previously, the inlet handled all flow
processing: receiving, decoding, and enrichment. Flows were then sent to Kafka
for storage in ClickHouse:
Akvorado flow processing before the introduction of the outlet service
Network flows reach the inlet service using UDP, an unreliable protocol. The
inlet must process them fast enough to avoid losing packets. To handle a
high number of flows, the inlet spawns several sets of workers to receive flows,
fetch metadata, and assemble enriched flows for Kafka. Many configuration
options existed for scaling, which increased complexity for users. The code
needed to avoid blocking at any cost, making the processing pipeline complex
and sometimes unreliable, particularly the BMP receiver.1 Adding new
features became difficult without making the problem worse.2
In Akvorado 2.0, the inlet receives flows and pushes them to Kafka without
decoding them. The new outlet service handles the remaining tasks:
Akvorado flow processing after the introduction of the outlet service
This change goes beyond a simple split:3 the outlet now reads flows from
Kafka and pushes them to ClickHouse, two tasks that Akvorado did not handle
before. Flows are heavily batched to increase efficiency and reduce the load
on ClickHouse using ch-go, a low-level Go client for ClickHouse. When
batches are too small, asynchronous inserts are used (e20645). The number of
outlet workers scales dynamically (e5a625) based on the target batch
size and latency (50,000 flows and 5 seconds by default).
This new architecture also allows us to simplify and optimize the code. The
outlet fetches metadata synchronously (e20645). The BMP component becomes
simpler by removing cooperative multitasking (3b9486). Reusing the same
RawFlow object to decode protobuf-encoded flows from Kafka reduces pressure on
the garbage collector (8b580f).
The effect on Akvorado s overall performance was somewhat uncertain, but a
user reported 35% lower CPU usage after migrating from the previous
version, plus resolution of the long-standing BMP component issue.
Other changes
This new version includes many miscellaneous changes, such as completion for
source and destination ports (f92d2e), and automatic restart of the
orchestrator service (0f72ff) when configuration changes to avoid a common
pitfall for newcomers.
Let s focus on some key areas for this release: observability,
documentation, CI,
Docker, Go, and JavaScript.
Observability
Akvorado exposes metrics to provide visibility into the processing pipeline and
help troubleshoot issues. These are available through Prometheus HTTP metrics
endpoints, such as /api/v0/inlet/metrics. With the introduction
of the outlet, many metrics moved. Some were also renamed (4c0b15) to match
Prometheus best practices. Kafka consumer lag was added as a new metric
(e3a778).
If you do not have your own observability stack, the Docker Compose setup
shipped with Akvorado provides one. You can enable it by activating the profiles
introduced for this purpose (529a8f).
The prometheus profile ships Prometheus to store metrics and Alloy
to collect them (2b3c46, f81299, and 8eb7cd). Redis and Kafka
metrics are collected through the exporter bundled with Alloy (560113).
Other metrics are exposed using Prometheus metrics endpoints and are
automatically fetched by Alloy with the help of some Docker labels, similar to
what is done to configure Traefik. cAdvisor was also added (83d855) to
provide some container-related metrics.
The loki profile ships Loki to store logs (45c684). While Alloy
can collect and ship logs to Loki, its parsing abilities are limited: I could
not find a way to preserve all metadata associated with structured logs produced
by many applications, including Akvorado. Vector replaces Alloy (95e201)
and features a domain-specific language, VRL, to transform logs. Annoyingly,
Vector currently cannot retrieve Docker logs from before it was
started.
Finally, the grafana profile ships Grafana, but the shipped dashboards are
broken. This is planned for a future version.
Documentation
The Docker Compose setup provided by Akvorado makes it easy to get the web
interface up and running quickly. However, Akvorado requires a few mandatory
steps to be functional. It ships with comprehensive documentation, including
a chapter about troubleshooting problems. I hoped this documentation would
reduce the support burden. It is difficult to know if it works. Happy users
rarely report their success, while some users open discussions asking for help
without reading much of the documentation.
In this release, the documentation was significantly improved.
The documentation was updated (fc1028) to match Akvorado s new architecture.
The troubleshooting section was rewritten (17a272). Instructions on how to
improve ClickHouse performance when upgrading from versions earlier than 1.10.0
was added (5f1e9a). An LLM proofread the entire content (06e3f3).
Developer-focused documentation was also improved (548bbb, e41bae, and
871fc5).
From a usability perspective, table of content sections are now collapsable
(c142e5). Admonitions help draw user attention to important points
(8ac894).
Example of use of admonitions in Akvorado's documentation
Continuous integration
This release includes efforts to speed up continuous integration on GitHub.
Coverage and race tests run in parallel (6af216 and fa9e48). The Docker
image builds during the tests but gets tagged only after they succeed
(8b0dce).
GitHub workflow to test and build Akvorado
End-to-end tests (883e19) ensure the shipped Docker Compose setup works as
expected. Hurl runs tests on various HTTP endpoints, particularly to verify
metrics (42679b and 169fa9). For example:
## Test inlet has received NetFlow flowsGEThttp://127.0.0.1:8080/prometheus/api/v1/query[Query]query:sum(akvorado_inlet_flow_input_udp_packets_total job="akvorado-inlet",listener=":2055" )
HTTP200[Captures]inlet_receivedflows:jsonpath "$.data.result[0].value[1]" toInt
[Asserts]variable"inlet_receivedflows">10## Test inlet has sent them to KafkaGEThttp://127.0.0.1:8080/prometheus/api/v1/query[Query]query:sum(akvorado_inlet_kafka_sent_messages_total job="akvorado-inlet" )
HTTP200[Captures]inlet_sentflows:jsonpath "$.data.result[0].value[1]" toInt
[Asserts]variable"inlet_sentflows">=inlet_receivedflows
Docker
Akvorado ships with a comprehensive Docker Compose setup to help users get
started quickly. It ensures a consistent deployment, eliminating many
configuration-related issues. It also serves as a living documentation of the
complete architecture.
This release brings some small enhancements around Docker:
Previously, many Docker images were pulled from the Bitnami Containers
library. However, VMWare acquired Bitnami in 2019 and Broadcom acquired
VMWare in 2023. As a result, Bitnami images were deprecated in less than a
month. This was not really a surprise4. Previous versions of Akvorado
had already started moving away from them. In this release, the Apache project s
Kafka image replaces the Bitnami one (1eb382). Thanks to the switch to KRaft
mode, Zookeeper is no longer needed (0a2ea1, 8a49ca, and f65d20).
Akvorado s Docker images were previously compiled with Nix. However, building
AArch64 images on x86-64 is slow because it relies on QEMU userland emulation.
The updated Dockerfile uses multi-stage and multi-platform builds: one
stage builds the JavaScript part on the host platform, one stage builds the Go
part cross-compiled on the host platform, and the final stage assembles the
image on top of a slim distroless image (268e95 and d526ca).
# This is a simplified versionFROM--platform=$BUILDPLATFORMnode:20-alpineASbuild-js
RUNapkadd--no-cachemake
WORKDIR/buildCOPYconsole/frontendconsole/frontend
COPYMakefile.
RUNmakeconsole/data/frontend
FROM--platform=$BUILDPLATFORMgolang:alpineASbuild-go
RUNapkadd--no-cachemakecurlzip
WORKDIR/buildCOPY..
COPY--from=build-js/build/console/data/frontendconsole/data/frontend
RUNgomoddownload
RUNmakeall-indep
ARGTARGETOSTARGETARCHTARGETVARIANTVERSION
RUNmake
FROMgcr.io/distroless/static:latestCOPY--from=build-go/build/bin/akvorado/usr/local/bin/akvorado
ENTRYPOINT["/usr/local/bin/akvorado"]
When building for multiple platforms with --platform
linux/amd64,linux/arm64,linux/arm/v7, the build steps until the highlighted
line execute only once for all platforms. This significantly speeds up the
build.
Akvorado now ships Docker images for these platforms: linux/amd64,
linux/amd64/v3, linux/arm64, and linux/arm/v7. When requesting
ghcr.io/akvorado/akvorado, Docker selects the best image for the current CPU.
On x86-64, there are two choices. If your CPU is recent enough, Docker
downloads linux/amd64/v3. This version contains additional optimizations and
should run faster than the linux/amd64 version. It would be interesting to
ship an image for linux/arm64/v8.2, but Docker does not support the same
mechanism for AArch64 yet (792808).
Go
This release includes many changes related to Go but not visible to the users.
Toolchain
In the past, Akvorado supported the two latest Go versions, preventing immediate
use of the latest enhancements. The goal was to allow users of stable
distributions to use Go versions shipped with their distribution to compile
Akvorado. However, this became frustrating when interesting features, like go
tool, were released. Akvorado 2.0 requires Go 1.25 (77306d) but can be
compiled with older toolchains by automatically downloading a newer one
(94fb1c).5 Users can still override GOTOOLCHAIN to revert this
decision. The recommended toolchain updates weekly through CI to ensure we get
the latest minor release (5b11ec). This change also simplifies updates to
newer versions: only go.mod needs updating.
Thanks to this change, Akvorado now uses wg.Go() (77306d) and I have
started converting some unit tests to the new test/synctest package
(bd787e, 7016d8, and 159085).
Testing
When testing equality, I use a helper function Diff() to display the
differences when it fails:
This function uses kylelemons/godebug. This package is
no longer maintained and has some shortcomings: for example, by default, it does
not compare struct private fields, which may cause unexpectedly successful
tests. I replaced it with google/go-cmp, which is stricter
and has better output (e2f1df).
Another package for Kafka
Another change is the switch from Sarama to franz-go to interact with
Kafka (756e4a and 2d26c5). The main motivation for this change is to
get a better concurrency model. Sarama heavily relies on channels and it is
difficult to understand the lifecycle of an object handed to this package.
franz-go uses a more modern approach with callbacks6 that is both more
performant and easier to understand. It also ships with a package to spawn fake
Kafka broker clusters, which is more convenient than the mocking functions
provided by Sarama.
Improved routing table for BMP
To store its routing table, the BMP component used
kentik/patricia, an implementation of a patricia tree
focused on reducing garbage collection pressure.
gaissmai/bart is a more recent alternative using an
adaptation of [Donald Knuth s ART algorithm][] that promises better
performance and delivers it: 90% faster lookups and 27% faster
insertions (92ee2e and fdb65c).
Unlike kentik/patricia, gaissmai/bart does not help efficiently store values
attached to each prefix. I adapted the same approach as kentik/patricia to
store route lists for each prefix: store a 32-bit index for each prefix, and use
it to build a 64-bit index for looking up routes in a map. This leverages Go s
efficient map structure.
gaissmai/bart also supports a lockless routing table version, but this is not
simple because we would need to extend this to the map storing the routes and to
the interning mechanism. I also attempted to use Go s new unique package to
replace the intern package included in Akvorado, but performance was
worse.7
Miscellaneous
Previous versions of Akvorado were using a custom Protobuf encoder for
performance and flexibility. With the introduction of the outlet service,
Akvorado only needs a simple static schema, so this code was removed. However,
it is possible to enhance performance with
planetscale/vtprotobuf (e49a74, and 8b580f).
Moreover, the dependency on protoc, a C++ program, was somewhat annoying.
Therefore, Akvorado now uses buf, written in Go, to convert a Protobuf
schema into Go code (f4c879).
Another small optimization to reduce the size of the Akvorado binary by
10 MB was to compress the static assets embedded in Akvorado in a ZIP file. It
includes the ASN database, as well as the SVG images for the documentation. A
small layer of code makes this change transparent (b1d638 and e69b91).
JavaScript
Recently, two large supply-chain attacks hit the JavaScript ecosystem: one
affecting the popular packages chalk and debug and another
impacting the popular package @ctrl/tinycolor. These attacks also
exist in other ecosystems, but JavaScript is a prime target due to heavy use of
small third-party dependencies. The previous version of Akvorado relied on 653
dependencies.
npm-run-all was removed (3424e8, 132 dependencies). patch-package was
removed (625805 and e85ff0, 69 dependencies) by moving missing
TypeScript definitions to env.d.ts. eslint was replaced with oxlint, a
linter written in Rust (97fd8c, 125 dependencies, including the plugins).
I switched from npm to Pnpm, an alternative package manager (fce383).
Pnpm does not run install scripts by default8 and prevents installing
packages that are too recent. It is also significantly faster.9 Node.js
does not ship Pnpm but it ships Corepack, which allows us to use Pnpm
without installing it. Pnpm can also list licenses used by each dependency,
removing the need for license-compliance (a35ca8, 42 dependencies).
For additional speed improvements, beyond switching to Pnpm and Oxlint, Vite
was replaced with its faster Rolldown version (463827).
After these changes, Akvorado only pulls 225 dependencies.
Next steps
I would like to land three features in the next version of Akvorado:
Add Grafana dashboards to complete the observability stack. See issue
#1906 for details.
Integrate OVH s Grafana plugin by providing a stable API for such
integrations. Akvorado s web console would still be useful for browsing
results, but if you want to build and share dashboards, you should switch to
Grafana. See issue #1895.
Move some work currently done in ClickHouse (custom dictionaries, GeoIP and IP
enrichment) back into the outlet service. This should give more flexibility
for adding features like the one requested in issue #1030. See issue #2006.
I started working on splitting the inlet into two parts more than one year ago.
I found more motivation in recent months, partly thanks to Claude Code,
which I used as a rubber duck. Almost none of the produced code was
kept:10 it is like an intern who does not learn.
Many attempts were made to make the BMP component both performant and
not blocking. See for example PR #254, PR #255, and PR #278.
Despite these efforts, this component remained problematic for most users.
See issue #1461 as an example.
Some features have been pushed to ClickHouse to avoid the
processing cost in the inlet. See for example PR #1059.
Broadcom is known for its user-hostile moves. Look at what happened
with VMWare.
As a Debian developer, I dislike these mechanisms that circumvent
the distribution package manager. The final straw came when Go 1.25 spent one month in the Debian NEW queue, an arbitrary mechanism I
don t like at all.
In the early years of Go, channels were heavily promoted. Sarama
was designed during this period. A few years later, a more nuanced approach
emerged. See notably Go channels are bad and you should feel bad.
This should be investigated further, but my theory is that the
intern package uses 32-bit integers, while unique uses 64-bit pointers.
See commit 74e5ac.
This is also possible with npm. See commit dab2f7.
An even faster alternative is Bun, but it is less available.
The exceptions are part of the code for the admonition blocks,
the code for collapsing the table of content, and part of the documentation.
When this book was presented as available for review, I jumped on it. After
all, who doesn t love reading a nice bit of computing history, as told by a
well-known author (affectionaly known as Uncle Bob ), one who has been
immersed in computing since forever? What s not to like there?
Reading on, the book does not disappoint. Much to the contrary, it digs
into details absent in most computer history books that, being an operating
systems and computer architecture geek, I absolutely enjoyed. But let me
first address the book s organization.
The book is split into four parts. Part 1, Setting the Stage, is a short
introduction, answering the question Who are we? ( we being the
programmers, of course). It describes the fascination many of us felt when
we realized that the computer was there to obey us, to do our bidding, and
we could absolutely control it.
Part 2 talks about the giants of the computing world, on whose shoulders
we stand. It digs in with a level of detail I have never seen before,
discussing their personal lives and technical contributions (as well as the
hoops they had to jump through to get their work done). Nine chapters cover
these giants, ranging chronologically from Charles Babbage and Ada Lovelace
to Ken Thompson, Dennis Richie, and Brian Kernighan (understandably, giants
who worked together are grouped in the same chapter). This is the part with
the most historically overlooked technical details. For example, what was
the word size in the first computers, before even the concept of a byte
had been brought into regular use? What was the register structure of early
central processing units (CPUs), and why did it lead to requiring
self-modifying code to be able to execute loops?
Then, just as Unix and C get invented, Part 3 skips to computer history as
seen through the eyes of Uncle Bob. I must admit, while the change of
rhythm initially startled me, it ends up working quite well. The focus is
no longer on the giants of the field, but on one particular person (who
casts a very long shadow). The narrative follows the author s life: a boy
with access to electronics due to his father s line of work; a computing
industry leader, in the early 2000s, with extreme programming; one of the
first producers of training materials in video format a role that today
might be recognized as an influencer. This first-person narrative reaches
year 2023.
But the book is not just a historical overview of the computing world, of
course. Uncle Bob includes a final section with his thoughts on the future
of computing. As this is a book for programmers, it is fitting to start
with the changes in programming languages that we should expect to see and
where such changes are likely to take place. The unavoidable topic of
artificial intelligence is presented next: What is it and what does it
spell for computing, and in particular for programming? Interesting (and
sometimes surprising) questions follow: What does the future of hardware
development look like? What is prone to be the evolution of the World Wide
Web? What is the future of programming and programmers?
At just under 500 pages, the book is a volume to be taken seriously. But
space is very well used with this text. The material is easy to read, often
funny and always informative. If you enjoy computer history and
understanding the little details in the implementations, it might very well
be the book you want.
The solar fence and some other ground and pole mount solar panels, seen through leaves.
Solar fencing manufacturers have some good simple designs, but it's hard
to buy for a small installation. They are selling to utility scale solar
mostly. And those are installed by driving metal beams into the ground,
which requires heavy machinery.
Since I have experience with Ironridge rails for roof mount solar, I
decided to adapt that system for a vertical mount. Which is something it
was not designed for. I combined the Ironridge hardware with regular parts
from the hardware store.
The cost of mounting solar panels nowadays is often higher than the cost of
the panels. I hoped to match the cost, and I nearly did. The solar panels cost
$100 each, and the fence cost $110 per solar panel. This fence was
significantly cheaper than conventional ground mount arrays that I
considered as alternatives, and made a better use of a difficult hillside
location.
I used 7 foot long Ironridge XR-10 rails, which fit 2 solar panels per rail.
(Longer rails would need a center post anyway, and the 7 foot long rails
have cheaper shipping, since they do not need to be shipped freight.)
For the fence posts, I used regular 4x4" treated posts. 12 foot long, set
in 3 foot deep post holes, with 3x 50 lb bags of concrete per hole and 6
inches of gravel on the bottom.
detail of how the rails are mounted to the posts, and the panels to the rails
To connect the Ironridge rails to the fence posts, I used the Ironridge
LFT-03-M1 slotted L-foot bracket. Screwed into the post with a 5/8 x 3
inch hot-dipped galvanized lag screw. Since a treated post can react badly
with an aluminum bracket, there needs to be some flashing between the post
and bracket. I used Shurtape PW-100 tape for that. I see no sign of
corrosion after 1 year.
The rest of the Ironridge system is a T-bolt that connects the rail to the
L-foot (part BHW-SQ-02-A1), and Ironridge solar panel fasteners
(UFO-CL-01-A1 and UFO-STP-40MM-M1). Also XR-10 end caps and wire clips.
Since the Ironridge hardware is not designed to hold a solar panel at a 90
degree angle, I was concerned that the panels might slide downward over
time. To help prevent that, I added some additional support brackets under
the bottom of the panels. So far, that does not seem to have been a problem
though.
I installed Aptos 370 watt solar panels on the fence. They are bifacial,
and while the posts block the back partially, there is still bifacial
gain on cloudy days. I left enough space under the solar panels to be able
to run a push mower under them.
Me standing in front of the solar fence at end of construction
I put pairs of posts next to one-another, so each 7 foot segment of fence
had its own 2 posts. This is the least elegant part of this design, but
fitting 2 brackets next to one-another on a single post isn't feasible.
I bolted the pairs of posts together with some spacers. A side benefit of
doing it this way is that treated lumber can warp as it dries, and this
prevented much twisting of the posts.
Using separate posts for each segment also means that the fence can
traverse a hill easily. And it does not need to be perfectly straight. In
fact, my fence has a 30 degree bend in the middle. This means it has both
south facing and south-west facing panels, so can catch the light for
longer during the day.
After building the fence, I noticed there was a slight bit of sway at the
top, since 9 feet of wooden post is not entirely rigid. My worry was that a
gusty wind could rattle the solar panels. While I did not actually observe
that happening, I added some diagonal back bracing for peace of mind.
view of rear upper corner of solar fence, showing back bracing connection
Inspecting the fence today, I find no problems after the first year. I hope
it will last 30 years, with the lifespan of the treated lumber
being the likely determining factor.
As part of my larger (and still ongoing) ground mount solar install, the
solar fence has consistently provided great power. The vertical orientation
works well at latitude 36. It also turned out that the back of the fence was
useful to hang conduit and wiring and solar equipment, and so it turned into
the electrical backbone of my whole solar field. But that's another story..
solar fence parts list
DebConf26 is already in the air in Argentina. Organizing DebConf26 give us the
opportunity to talk about Debian in our country again. This is not the first
time that Debian has come here, previously Argentina has hosted DebConf 8 in Mar
del Plata.
In August, Nattie Mayer-Hutchings and Stefano Rivera from DebConf Committee
visited the venue where the next DebConf will take place. They came to Argentina
in order to see what it is like to travel from Buenos Aires to Santa Fe (the
venue of the next DebConf). In addition, they were able to observe the layout
and size of the classrooms and halls, as well as the infrastructure available at
the venue, which will be useful for the Video Team.
But before going to Santa Fe, on the August 27th, we organized a meetup in
Buenos Aires at GCoop, where we hosted some talks:
Qu es Debian? - Pablo Gonzalez (sultanovich) / Emmanuel Arias
On August 28th, we had the opportunity to get to know the Venue. We walked around
the city and, obviously, sampled some of the beers from Santa Fe.
On August 29th we met with representatives of the University and local government
who were all very supportive. We are very grateful to them for opening
their doors to DebConf.
In the afternoon we met some of the local free software community at an event we
held in ATE Santa Fe. The event included several talks:
Qu es Debian? - Pablo (sultanovich) / Emmanuel Arias
Ciberrestauradores: Gestores de basura electr nica - Programa RAEES Acutis
Debian and DebConf (Stefano Rivera/Nattie Mayer-Hutchings)
Thanks to Debian Argentina, and all the people who will make DebConf26
possible.
Thanks to Nattie Mayer-Hutchings and Stefano Rivera for reviewing an earlier
version of this article.
tl;dr: https://osbpo.debian.net/deb-status is now real-time updated and much better than it used to, helping the OpenStack packaging team be a way more efficient.
How it used to be
For years, the Debian OpenStack team has relied on automated tools to track the status of OpenStack packages across Debian releases. Our goal has always been simple: transparency, efficiency, accuracy.
We used to use a tool called os-version-checker, written by Michal Arbet, which generated a static status page at https://osbpo.debian.net/deb-status. It was functional and served us well but it had limitations:
It ran on a cron job, not on demand
It processed all OpenStack releases at once, making it slow
The rsync from Jenkins hosts to osbpo.debian.net was also cron-driven
No immediate feedback after a package build
This meant that when a developer pushed a new package to salsa (the Debian GitLab instance) in the team s repository, the following would happen:
Jenkins would build the backport
Store it in a local repository
Wait up to 30 minutes (or more) for the cron job to run rsync + status update
Only then would the status page reflect the new version
For maintainers actively working on a new release, this delay was frustrating. You d fix a bug, push, build and still see your package marked as missing or out of date for minutes. You had no real-time feedback. This was also an annoyance for testing, because when fixing a bug, I often had to trigger the rsync manually in order to not wait for it, so I could do my tests. Now, osbpo is always up-to-date a few seconds after the build of the package.
The New Way: Event-Driven, Real-Time Updates
We ve rebuilt the system from the ground up to be fast, responsive, and event-driven. Now, the workflow is:
Developer git push triggers Jenkins
Jenkins builds the package publishes to local repo
Jenkins immediately triggers a webhook on osbpo.debian.net
The webhook on osbpo does:
rsyncs the new package to the central Debian repo
Pulls the latest OpenStack releases from git and use its YAML data (instead of parsing the release HTML pages)
Regenerates the status page, comparing what upstream released and what s in Debian
No more cron. No more waiting
How it works
The central osbpo.debian.net server runs:
webhook to receive secure, HMAC-verified triggers that it processes in an async way
Apache to serve the status pages and the Debian OpenStack repositories
Custom scripts to rsync packages, validate, and generate reports
Jenkins instances are configured to curl the webhook on successful build. The status page is generated by openstack-debian-release-manager, a new tool I ve packaged and deployed. The dashboard uses AJAX to load content dynamically (like when browsing from one release to another), with sorting, metadata, and real-time auto-refresh every 10 seconds.
openstack-debian-release-manager is easy to deploy and configure, and will do most (if not all) of the needed configuration. Uploading it to Debian is probably not needed, and a bit over-kill, so I believe I ll just keep it in Salsa for the moment, unless there s a way to make it more generic so it can help someone else (another team?) in Debian.
Room for improvement
There s still things I want to add. Namely:
Add status for Debian stable (ie: without the osbpo.debian.net add-on repository), which we used to have with os-version-checker.
Add a per-release config file option to be able to mask not packaged project on a per OpenStack release granularity
Special thanks to Michal Arbet for the original os-version-checker that served me for years, helping me to never forget a missing OpenStack package release.
Here, in classic Goerzen deep dive fashion, is more information than you knew you wanted about a topic you ve probably never thought of. I found it pretty interesting, because it took me down a rabbit hole of subsystems I ve never worked with much and a mishmash of 1980s and 2020s tech.
I had previously tried and failed to get an actual 80x25 Linux console, but I ve since figured it out!
This post is about the Linux text console not X or Wayland. We re going to get the console right without using those systems. These instructions are for Debian trixie, but should be broadly applicable elsewhere also. The end result can look like this:
(That s a Wifi Retromodem that I got at VCFMW last year in the Hayes modem case)
What s a pixel?
How would you define a pixel these days? Probably something like a uniquely-addressable square dot in a two-dimensional grid .
In the world of VGA and CRTs, that was just a logical abstraction. We got an API centered around that because it was convenient. But, down the VGA cable and on the device, that s not what a pixel was.
A pixel, back then, was a time interval. On a multisync monitor, which were common except in the very early days of VGA, the timings could be adjusted which produced logical pixels of different sizes. Those screens often had a maximum resolution but not necessarily a native resolution in the sense that an LCD panel does. Different timings produced different-sized pixels with equal clarity (or, on cheaper monitors, equal fuzziness).
A side effect of this was that pixels need not be square. And, in fact, in the standard DOS VGA 80x25 text mode, they weren t.
You might be seeing why DVI, DisplayPort, and HDMI replaced VGA for LCD monitors: with a VGA cable, you did a pixel-to-analog-timings conversion, then the display did a timings-to-pixels conversion, and this process could be a bit lossy. (Hence why you sometimes needed to fill the screen with an image and push the center button on those older LCD screens)
(Note to the pedantically-inclined: yes I am aware that I have simplified several things here; for instance, a color LCD pixel is made up of approximately 3 sub-dots of varying colors, and that things like color eInk displays have two pixel grids with different sizes of pixels layered atop each other, and printers are another confusing thing altogether, and and and . MOST PEOPLE THINK OF A PIXEL AS A DOT THESE DAYS, OK?)
What was DOS text mode?
We think of this as the standard display: 80 columns wide and 25 rows tall. 80x25. By the time Linux came along, the standard Linux console was VGA text mode something like the 4th incarnation of text modes on PCs (after CGA, MDA, and EGA). VGA also supported certain other sizes of characters giving certain other text dimensions, but if I cover all of those, this will explode into a ridiculously more massive page than it already is.
So to display text on an 80x25 DOS VGA system, ultimately characters and attributes were written into the text buffer in memory. The VGA system then rendered it to the display as a 720x400 image (at 70Hz) with non-square pixels such that the result was approximately a 4:3 aspect ratio.
The font used for this rendering was a bitmapped one using 8x16 cells. You might do some math here and point out that 8 * 80 is only 640, and you d be correct. The fonts were 8x16 but the rendered cells were 9x16. The extra pixel was normally used for spacing between characters. However, in line graphics mode, characters 0xC0 through 0xDF repeated the 8th column in the position of the 9th, allowing the continuous line-drawing characters we re used to from TUIs.
Problems rendering DOS fonts on modern systems
By now, you re probably seeing some of the issues we have rendering DOS screens on more modern systems. These aren t new at all; I remember some of these from back in the days when I ran OS/2, and I think also saw them on various terminals and consoles in OS/2 and Windows.
Some issues you d encounter would be:
Incorrect aspect ratio caused by using the original font and rendering it using 1:1 square pixels (resulting in a squashed appearance)
Incorrect aspect ratio for ANOTHER reason, caused by failing to render column 9, resulting in text that is overall too narrow
Characters appearing to be touching each other when they shouldn t (failing to render column 9; looking at you, dosbox)
Gaps between line drawing characters that should be continuous, caused by rendering column 9 as empty space in all cases
Character set issues
DOS was around long before Unicode was. In the DOS world, there were codepages that selected the glyphs for roughly the high half of the 256 possible characters. CP437 was the standard for the USA; others existed for other locations that needed different characters. On Unix, the USA pre-Unicode standard was Latin-1. Same concept, but with different character mappings.
Nowadays, just about everything is based on UTF-8. So, we need some way to map our CP437 glyphs into Unicode space. If we are displaying DOS-based content, we ll also need a way to map CP437 characters to Unicode for display later, and we need these maps to match so that everything comes out right. Whew.
So, let s get on with setting this up!
Selecting the proper video mode
As explained in my previous post, proper hardware support for DOS text mode is limited to x86 machines that do not use UEFI. Non-x86 machines, or x86 machines with UEFI, simply do not contain the necessary support for it. As these are now standard, most of the time, the text console you see on Linux is actually the kernel driving the video hardware in graphics mode, and doing the text rendering in software.
That s all well and good, but it makes it quite difficult to actually get an 80x25 console.
First, we need to be running at 720x400. This is where I ran into difficulty last time. I realized that my laptop s LCD didn t advertise any video modes other than its own native resolution. However, almost all external monitors will, and 720x400@70 is a standard VGA mode from way back, so it should be well-supported.
You need to find the Linux device name for your device. You can look at the possible devices with ls -l /sys/class/drm. If you also have a GUI, xrandr may help too. But in any case, each directory under /sys/class/drm has a file named modes, and if you cat them all, you will eventually come across one with a bunch of modes defined. Drop the leading card0 or whatever from the directory name, and that s your device. (Verify that 720x400 is in modes while you re at it.)
Now, you re going to edit /etc/default/grub and add something like this to GRUB_CMDLINE_LINUX_DEFAULT:
video=DP-1:720x400@70
Of course, replace DP-1 with whatever your device is.
Now you can run update-grub and reboot. You should have a 720x400 display.
At first, I thought I had succeeded by using Linux s built-in VGA font with that mode. But it looked too tall. After noticing that repeated 0s were touching, I got suspicious about the missing 9th column in the cells. stty -a showed that my screen was 90x25, which is exactly what it would show if I was using 8x16 instead of 9x16 cells. Sooo . I need to prepare a 9x16 font.
Building it yourself
First, install some necessary software: apt-get install fontforge bdf2psf
Start by going to the Oldschool PC Font Pack Download page. Download oldschool_pc_font_pack_v2.2_FULL.zip and unpack it.
The file we re interested in is otb - Bm (linux bitmap)/Bm437_IBM_VGA_9x16.otb. Open it in fontforge by running fontforge BmPlus_IBM_VGA_9x16.otb. When it asks if you will load the bitmap fonts, hit select all, then yes. Go to File -> generate fonts. Save in a BDF, no need for outlines, and use guess for resolution.
Now you have a file such as Bm437_IBM_VGA_9x16-16.bdf. Excellent.
Now we need to generate a Unicode map file. We will make sure this matches the system s by enumerating every character from 0x00 to 0xFF, converting it from CP437 to Unicode, and writing the appropriate map.
Here s a Python script to do that:
By convention, we normally store these files gzipped, so gzip CP437-VGA.psf.
You can test it on the console with setfont CP437-VGA.psf.gz.
Now copy this file into /usr/local/etc.
Activating the font
Now, edit /etc/default/console-setup. It should look like this:
# CONFIGURATION FILE FOR SETUPCON

# Consult the console-setup(5) manual page.

ACTIVE_CONSOLES="/dev/tty[1-6]"

CHARMAP="UTF-8"

CODESET="Lat15"
FONTFACE="VGA"
FONTSIZE="8x16"
FONT=/usr/local/etc/CP437-VGA.psf.gz

VIDEOMODE=

# The following is an example how to use a braille font
# FONT='lat9w-08.psf.gz brl-8x8.psf'
At this point, you should be able to reboot. You should have a proper 80x25 display! Log in and run stty -a to verify it is indeed 80x25.
Using and testing CP437
Part of the point of CP437 is to be able to access BBSs, ANSI art, and similar.
Now, remember, the Linux console is still in UTF-8 mode, so we have to translate CP437 to UTF-8, then let our font map translate it back to CP437. A weird trip, but it works.
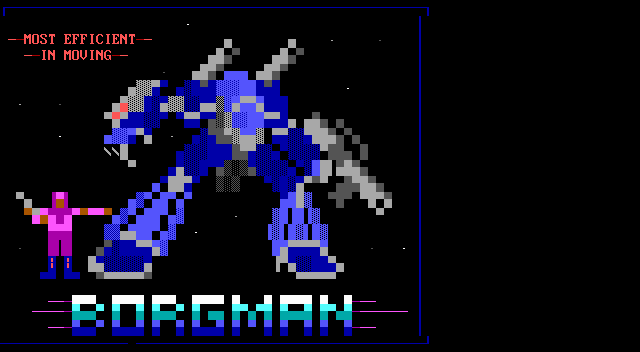
Let s test it using the Textfiles ANSI art collection. In the artworks section, I randomly grabbed a file near the top: borgman.ans. Download that, and display with:
clear; iconv -f CP437 -t UTF-8 < borgman.ans
You should see something similar to but actually more accurate than the textfiles PNG rendering of it, which you ll note has an incorrect aspect ratio and some rendering issues. I spot-checked with a few others and they seemed to look good. belinda.ans in particular tries quite a few characters and should give you a good sense if it is working.
Use with interactive programs
That s all well and good, but you re probably going to want to actually use this with some interactive program that expects CP437. Maybe Minicom, Kermit, or even just telnet?
For this, you ll want to apt-get install luit. luit maps CP437 (or any other encoding) to UTF-8 for display, and then of course the Linux console maps UTF-8 back to the CP437 font.
Here s a way you can repeat the earlier experiment using luit to run the cat program:
clear; luit -encoding CP437 cat borgman.ans
You can run any command under luit. You can even run luit -encoding CP437 bash if you like. If you do this, it is probably a good idea to follow my instructions on generating locales on my post on serial terminals, and then within luit, set LANG=en_us.IBM437. But note especially that you can run programs like minicom and others for accessing BBSs under luit.
Final words
This gave you a nice DOS-type console. Although it doesn t have glyphs for many codepoints, it does run in UTF-8 mode and therefore is compatible with modern software.
You can achieve greater compatibility with more UTF-8 codepoints with the DOS font, at the expense of accuracy of character rendering (especially for the double-line drawing characters) by using /usr/share/bdf2psf/standard.equivalents instead of /dev/null in the bdf2psf command.
Or you could go for another challenge, such as using the DEC vt-series fonts for coverage of ISO-8859-1. But just using fonts extracted from DEC ROM won t work properly, because DEC terminals had even more strangeness going on than DOS fonts.
Six years ago, I was inspired to buy a DEC serial terminal. Since then, my collection has grown to include several DEC models, an IBM 3151, a Wyse WY-55, a Televideo 990, and a few others.
When you are running a terminal program on Linux or MacOS, what you are really running is a terminal emulator. In almost all cases, the terminal emulator is emulating one of the DEC terminals in the vt100 through vt520 line, which themselves use a command set based on an ANSI standard.
In short, you spend all day using a program designed to pretend to be the exact kind of physical machine I m using for this experiment!
I have long used my terminals connected to a Raspberry Pi 4, but due to the difficulty of entering a root filesystem encryption password using a serial console on a Raspberry Pi, I am switching to an x86 Mini PC (with a N100 CPU).
While I have used a terminal with the Pi, I ve never before used it as a serial console all the way from early boot, and I have never installed Debian using the terminal to run the installer. A serial terminal gives you a login prompt. A serial console gives you access to kernel messages, the initrd environment, and sometimes even the bootloader.
This might be fun, I thought.
I selected one of my vt510 terminals for this. It is one of my newer ones, having been built in 1993. But it has a key feature: I can remap Ctrl to be at the caps lock position, something I do on every other system I use anyhow. I could have easily selected an older one from the 1980s.
Kernel configuration
To enable a serial console for Linux, you need to pass a parameter on the kernel command line. See the kernel documentaiton for more. I very frequently see instructions that are incomplete; they particularly omit flow control, which is most definitely needed for these real serial terminals.
I run my terminal at 57600 bps, so the parameter I need is console=ttyS0,57600n8r. The r means to use hardware flow control (ttyS0 corresponds to the first serial port on the system; use ttyS1 or something else as appropriate for your situation). While booting the Debian installer, according to Debian s instructions, it may be useful to also add TERM=vt102 (the installer doesn t support the vt510 terminal type directly). The TERM parameter should not be specified on a running system after instlalation.
Booting the Debian installer
When you start the Debian installer, to get it into serial mode, you have a couple of options:
You can use a traditional display and keyboard just long enough to input the kernel parameters described above
You can edit the bootloader configuration on the installer s filesystem prior to booting from it
Option 1 is pretty easy. Option 2 is hard mode, but not that bad.
On x86, the Debian installer boots in at least two different ways: it uses GRUB if you re booting under UEFI (which is most systems these days), or ISOLINUX if you are booting from the BIOS.
If using GRUB, the file to edit on the installer image is boot/grub/grub.cfg.
Near the top, add these lines:
serial --unit=0 --speed=57600 --word=8 --parity=no --stop=1
terminal_input console serial
terminal_output console serial
Unit 0 corresponds to ttyS0 as above.
GRUB s serial command does not support flow control. If your terminal gets corrupted during the GRUB stage, you may need to configure it to a slower speed.
Then, find the linux line under the Install menuentry. Edit it to insert console=ttyS0,57600n8r TERM=vt102 right after the vga=788.
Save, unmount, and boot. You should see the GRUB screen displayed on your serial terminal. Select the Install option and the installer begins.
If you are using BIOS boot, I m sure you can do something similar with the files in the isolinux directory, but haven t researched it.
Now, you can install Debian like usual!
Configuring the System
I was pleasantly surprised to find that Debian s installer took care of many, but not all, of the things I want to do in order to make the system work nicely with a serial terminal. You can perform these steps from a chroot under the installer environment before a reboot, or later in the running system.
First, while Debian does set up a getty (the program that displays the login prompt) on the serial console by default, it doesn t enable hardware flow control. So let s do that.
Configuring the System: agetty with systemd
Run systemctl edit serial-getty@ttyS0.service. This opens an editor that lets you customize the systemd configuration for a given service without having to edit the file directly. All you really need to do is modify the agetty command, so we just override it. At the top, in the designated area, write:
The empty ExecStart= line is necessary to tell systemd to remove the existing ExecStart command (otherwise, it will logically contain two ExecStart lines, which is an error).
These arguments say:
wait-cr means to wait for the user to press Return at the terminal before attempting to display the login prompt
-8 tells it to assume 8-bit mode on the serial line
-h enables hardware flow control
-L=always enables local line mode, disabling monitoring of modem control lines
%I substitutes the name of the port from systemd
57600 gives the desired speed, and vt510 gives the desired setting for the TERM environment variable
The systemd documentation refers to this page about serial consoles, which gives more background. However, I think it is better to use the systemctl edit method described here, rather than just copying the config file, since this lets things like new configurations with new Debian versions take effect.
Configuring the System: Kernel and GRUB
Your next stop is the /etc/default/grub file. Debian s installer automatically makes some changes here. There are three lines you want to change. First, near the top, edit GRUB_CMDLINE_LINUX_DEFAULT and add console=tty0 console=ttyS0,57600n8r. By specifying console twice, you allow output to go both to the standard display and to the serial console. By specifying the serial console last, you make it be the preferred one for things like entering the root filesystem password.
Next, towards the bottom, make sure these two lines look like this:
Finally, near the top, you may want to raise the GRUB_TIMEOUT to somewhere around 10 to 20 seconds since things may be a bit slower than you re used to.
Save the file and run update-grub.
Now, GRUB will display on both your standard display and the serial console. You can edit the boot command from either. If you have a VGA or HDMI monitor attached, for instance, and need to not use the serial console, you can just edit the Linux command line in GRUB and remove the reference to ttyS0 for one boot. Easy!
That s it. You now have a system that is fully operational from a serial terminal.
My original article from 2019 has some additional hints, including on how to convert from UTF-8 for these terminals.
Update 2025-09-17: It is also useful to set up proper locales. To do this, first edit /etc/locale.gen. Make sure to add, or uncomment:
Then run locale-gen. Normally, your LANG will be set to en_us.UTF-8, which will select the appropriate encoding. Plain en_US will select ISO-8859-1, which you need for the vt510. Then, add something like this to your ~/.bashrc:
if [  tty  = "/dev/ttyS0" -o "$TERM" = "vt510" ]; then
        stty -iutf8
        # might add ixon ixoff
        export LANG=en_US
        export MANOPT="-E ascii"
        stty rows 25
fi
if [ "$TERM" = "screen" -o "$TERM" = "vt100" ]; then
    export LANG=en_US.utf8
fi
Finally, in my ~/.screenrc, I have this. It lets screen convert between UTF-8 and ISO-8859-1:
Update 2025-09-18: I figured out how to do this, at least for many non-laptop screens. This post still contains a lot of good background detail, however.
Somehow along the way, a feature that I ve had across DOS, OS/2, FreeBSD, and Linux and has been present on PCs for more than 40 years is gone.
That feature, of course, is the 80 25 text console.
Linux has, for awhile now, rendered its text console using graphic modes. You can read all about it here. This has been necessary because only PCs really had the 80 25 text mode (Raspberry Pis, for instance, never did), and even they don t have it when booted with UEFI.
I ve lately been annoyed that:
The console is a different size on every screen both in terms of size of letters and the dimensions of it
If a given machine has more than one display, one or both of them will have parts of the console chopped off
My system seems to run with three different resolutions or fonts at different points of the boot process. One during the initrd, and two different ones during the remaining boot.
And, I wanted to run some software on the console that was designed with 80 25 in mind. And I d like to be able to plug in an old VGA monitor and have it just work if I want to do that.
That shouldn t be so hard, right? Well, the old vga= option that you are used to doesn t work when you booted from UEFI or on non-x86 platforms. Most of the tricks you see online for changing resolutions, etc., are no longer relevant. And things like setting a resolution with GRUB are useless for systems that don t use GRUB (including ARM).
VGA text mode uses 8 16 glyphs in 9 16 cells, where the pixels are non-square, giving a native resolution of 720 400 (which historically ran at 70Hz), which should have streched pixels to make a 4:3 image.
While it is possible to select a console font, and 8 16 fonts are present and supported in Linux, it appears to be impossible to have a standard way to set 720 400 so that they present in a reasonable size, at the correct aspect ratio, with 80 25.
Tricks like nomodeset no longer work on UEFI or ARM systems. It s possible that kmscon or something like it may help, but I m not even certain of that (video=eDP1:720 400 produced an error saying that 720 400 wasn t a supported mode, so I m unsure kmscon would be any better.) Not that it matters; all the kmscon options to select a font or zoom are broken, and it doesn t offer mode selection anyhow.
I think I m going to have to track down an old machine.
Sigh.
If you use HaProxy to e.g. terminate TLS on the frontend and connect via
TLS to a backend, one has to take care of sending the SNI (server name
indication) extension in the TLS handshake sort of manually.
Even if you use host names to address the backend server, e.g.
server foobar foobar.example:2342 ssl verify required ca-file /etc/haproxy/ca/foo.crt
HaProxy will
try to establish the connection without SNI. You manually have to enforce
SNI here, e.g.
server foobar foobar.example:2342 ssl verify required ca-file /etc/haproxy/ca/foo.crt sni str(foobar.example)
The surprising thing here was that it requires an expression, so you can not just write sni foobar.example, you've to wrap it in an expression. The simplest one is making sure it's a string.
Update: Might be noteworthy that you've to configure SNI for the health check separately, and
in that case it's a string not an expression. E.g.
If someone hands you an IP:Port of a Google Cloud load balancer, and tells you to
connect there with TLS, but all you receive in return is an F (and a few other
bytes with none printable characters) on running openssl s_client -connect ...,
you might be missing SNI (server name indication). Sadly the other side
was not transparent enough to explain in detail which exact type of Google Cloud
load balancer they used, but the conversation got more detailed and up to a working
TLS connection when the missing -servername foobar.host.name was added. I could not
find any sort of official documentation on the responses of the GFE (the frontend part)
when TLS parameters do not match the expectations. Also you won't have anything in the
logs, because logging at Google Cloud is a backend function, and as long as your requests
do not reach the backend, there are no logs. That makes it rather unpleasant to debug such cases,
when one end says "I do not see anything in the logs", and the other one says "you reject
my connection and just reply F".
Introduction and some stats
We announced tag2upload s open beta in mid-July. That was in the middle of the the freeze for trixie, so usage was fairly light until the forky floodgates opened.
Since then the service has successfully performed 637 uploads, of which 420 were in the last 32 days. That s an average of about 13 per day. For comparison, during the first half of September up to today there have been 2475 uploads to unstable. That s about 176/day.
So, tag2upload is already handling around 7.5% of uploads. This is very gratifying for a service which is advertised as still being in beta!
Sean and I are very pleased both with the uptake, and with the way the system has been performing.
Recent UI/UX improvements
During this open beta period we have been hard at work. We have made many improvements to the user experience.
Current git-debpush in forky, or trixie-backports, is much better at detecting various problems ahead of time.
When uploads do fail on the service the emailed error reports are now more informative. For example, anomalies involving orig tarballs, which by definition can t be detected locally (since one point of tag2upload is not to have tarballs locally) now generally result in failure reports containing a diffstat, and instructions for a local repro.
Why we are still in beta
There are a few outstanding work items that we currently want to complete before we declare the end of the beta.
Retrying on Salsa-side failures
The biggest of these is that the service should be able to retry when Salsa fails. Sadly, Salsa isn t wholly reliable, and right now if it breaks when the service is trying to handle your tag, your upload can fail.
We think most of these failures could be avoided. Implementing retries is a fairly substantial task, but doesn t pose any fundamental difficulties. We re working on this right now.
Other notable ongoing work
We want to support pristine-tar, so that pristine-tar users can do a new upstream release. Andrea Pappacoda is working on that with us. See #1106071. (Note that we would generally recommend against use of pristine-tar within Debian. But we want to support it.)
We have been having conversations with Debusine folks about what integration between tag2upload and Debusine would look like. We re making some progress there, but a lot is still up in the air.
We are considering how best to provide tag2upload pre-checks as part of Salsa CI. There are several problems detected by the tag2upload service that could be detected by Salsa CI too, but which can t be detected by git-debpush.
Common problems
We ve been monitoring the service and until very recently we have investigated every service-side failure, to understand the root causes. This has given us insight into the kinds of things our users want, and the kinds of packaging and git practices that are common. We ve been able to improve the system s handling of various anomalies and also improved the documentation.
Right now our failure rate is still rather high, at around 7%. Partly this is because people are trying out the system on packages that haven t ever seen git tooling with such a level of rigour.
There are two classes of problem that are responsible for the vast majority of the failures that we re still seeing:
Reuse of version numbers, and attempts to re-tag
tag2upload, like git (and like dgit), hates it when you reuse a version number, or try to pretend that a (perhaps busted) release never happened.
git tags aren t namespaced, and tend to spread about promiscuously. So replacing a signed git tag, with a different tag of the same name, is a bad idea. More generally, reusing the same version number for a different (signed!) package is poor practice. Likewise, it s usually a bad idea to remove changelog entries for versions which were actually released, just because they were later deemed improper.
We understand that many Debian contributors have gotten used to this kind of thing. Indeed, tools like dcut encourage it. It does allow you to make things neat-looking, even if you ve made mistakes - but really it does so by covering up those mistakes!
The bottom line is that tag2upload can t support such history-rewriting. If you discover a mistake after you ve signed the tag, please just burn the version number and add a new changelog stanza.
One bonus of tag2upload s approach is that it will discover if you are accidentally overwriting an NMU, and report that as an error.
Discrepancies between git and orig tarballs
tag2upload promises that the source package that it generates corresponds precisely to the git tree you tag and sign.
Orig tarballs make this complicated. They aren t present on your laptop when you git-debpush. When you re not uploading a new upstream version, the tag2upload service reuses existing orig tarballs from the archive. If your git and the archive s orig don t agree, the tag2upload service will report an error, rather than upload a package with contents that differ from your git tag.
With the most common Debian workflows, everything is fine:
If you base everything on upstream git, and make your orig tarballs with git archive (or git deborig), your orig tarballs are the same as the git, by construction. We recommend usually ignoring upstream tarballs: most upstreams work in git, and their tarballs can contain weirdness that we don t want. (At worst, the tarball can contain an attack that isn t visible in git, as with xz!)
Alternatively, if you use gbp import-orig, the differences (including an attack like Jia Tan s) are imported into git for you. Then, once again, your git and the orig tarball will correspond.
But there are other workflows where this correspondence may not hold. Those workflows are hazardous, because the thing you re probably working with locally for your routine development is the git view. Then, when you upload, your work is transplanted onto the orig tarball, which might be quite different - so what you upload isn t what you ve been working on!
This situation is detected by tag2upload, precisely because tag2upload checks that it s keeping its promise: the source package is identical to the git view. (dgit push makes the same promise.)
Get involved
Of course the easiest way to get involved is to start using tag2upload.
We would love to have more contributors. There are some easy tasks to get started with, in bugs we ve tagged newcomer mostly UX improvements such as detecting certain problems earlier, in git-debpush.
More substantially, we are looking for help with sbuild: we d like it to be able to work directly from git, rather than needing to build source packages: #868527.
Locking down database access is probably the single most important thing for a system administrator or software developer to prevent their application from leaking its data. As MariaDB 11.8 is the first long-term supported version with a few new key security features, let s recap what the most important things are every DBA should know about MariaDB in 2025.
Back in the old days, MySQL administrators had a habit of running the clumsy mysql-secure-installation script, but it has long been obsolete. A modern MariaDB database server is already secure by default and locked down out of the box, and no such extra scripts are needed. On the contrary, the database administrator is expected to open up access to MariaDB according to the specific needs of each server. Therefore, it is important that the DBA can understand and correctly configure three things:
Separate application-specific users with granular permissions allowing only necessary access and no more.
Distributing and storing passwords and credentials securely
Ensuring all remote connections are properly encrypted
For holistic security, one should also consider proper auditing, logging, backups, regular security updates and more, but in this post we will focus only on the above aspects related to securing database access.
How encrypting database connections with TLS differs from web server HTTP(S)
Even though MariaDB (and other databases) use the same SSL/TLS protocol for encrypting remote connections as web servers and HTTPS, the way it is implemented is significantly different, and the different security assumptions are important for a database administrator to grasp.
Firstly, most HTTP requests to a web server are unauthenticated, meaning the web server serves public web pages and does not require users to log in. Traditionally, when a user logs in over a HTTP connection, the username and password were transmitted in plaintext as a HTTP POST request. Modern TLS, which was previously called SSL, does not change how HTTP works but simply encapsulates it. When using HTTPS, a web browser and a web server will start an encrypted TLS connection as the very first thing, and only once established, do they send HTTP requests and responses inside it. There are no passwords or other shared secrets needed to form the TLS connection. Instead, the web server relies on a trusted third party, a Certificate Authority (CA), to vet that the TLS certificate offered by the web server can be trusted by the web browser.
For a database server like MariaDB, the situation is quite different. All users need to first authenticate and log in to the server before getting being allowed to run any SQL and getting any data out of the server. The database server and client programs have built-in authentication methods, and passwords are not, and have never been, sent in plaintext. Over the years, MySQL and its successor, MariaDB, have had multiple password authentication methods: the original SHA-1-based hashing, later double SHA-1-based mysql_native_password, followed by sha256_password and caching_sha256_password in MySQL and ed25519 in MariaDB. The MariaDB.org blog post by Sergei Golubchik recaps the history of these well.
Even though most modern MariaDB installations should be using TLS to encrypt all remote connections in 2025, having the authentication method be as secure as possible still matters, because authentication is done before the TLS connection is fully established.
To further harden the authentication agains man-in-the-middle attacks, a new password the authentication method PARSEC was introduced in MariaDB 11.8, which builds upon the previous ed25519 public-key-based verification (similar to how modern SSH does), and also combines key derivation with PBKDF2 with hash functions (SHA512,SHA256) and a high iteration count.
At first it may seem like a disadvantage to not wrap all connections in a TLS tunnel like HTTPS does, but actually not having the authentication done in a MitM resistant way regardless of the connection encryption status allows a clever extra capability that is now available in MariaDB: as the database server and client already have a shared secret that is being used by the server to authenticate the user, it can also be used by the client to validate the server s TLS certificate and no third parties like CAs or root certificates are needed. MariaDB 11.8 was the first LTS version to ship with this capability for zero-configuration TLS.
Note that the zero-configuration TLS also works on older password authentication methods and does not require users to have PARSEC enabled. As PARSEC is not yet the default authentication method in MariaDB, it is recommended to enable it in installations that use zero-configuration TLS encryption to maximize the security of the TLS certificate validation.
Why the root user in MariaDB has no password and how it makes the database more secure
Relying on passwords for security is problematic, as there is always a risk that they could leak, and a malicious user could access the system using the leaked password. It is unfortunately far too common for database passwords to be stored in plaintext in configuration files that are accidentally committed into version control and published on GitHub and similar platforms. Every application or administrative password that exists should be tracked to ensure only people who need it know it, and rotated at regular intervals to ensure old employees etc won t be able to use old passwords. This password management is complex and error-prone.
Replacing passwords with other authentication methods is always advisable when possible. On a database server, whoever installed the database by running e.g. apt install mariadb-server, and configured it with e.g. nano /etc/mysql/mariadb.cnf, already has full root access to the operating system, and asking them for a password to access the MariaDB database shell is moot, since they could circumvent any checks by directly accessing the files on the system anyway. Therefore, MariaDB, since version 10.4 stopped requiring the root user to enter a password when connecting locally, and instead checks using socket authentication whether the user is the operating-system root user or equivalent (e.g. running sudo). This is an elegant way to get rid of a password that was actually unnecessary to begin with. As there is no root password anymore, the risk of an external user accessing the database as root with a leaked password is fully eliminated.
Note that socket authentication only works for local connections on the same server. If you want to access a MariaDB server remotely as the root user, you would need to configure a password for it first. This is not generally recommended, as explained in the next section.
Create separate database users for normal use and keep root for administrative use only
Out of the box a MariaDB installation is already secure by default, and only the local root user can connect to it. This account is intended for administrative use only, and for regular daily use you should create separate database users with access limited to the databases they need and the permissions required.
The most typical commands needed to create a new database for an app and a user the app can use to connect to the database would be the following:
sqlCREATE DATABASE app_db;
CREATE USER 'app_user'@'%' IDENTIFIED BY 'your_secure_password';
GRANT ALL PRIVILEGES ON app_db.* TO 'app_user'@'%';
FLUSH PRIVILEGES;
Alternatively, if you want to use the parsec authentication method, run this to create the user:
sqlCREATE OR REPLACE USER 'app_user'@'%'
IDENTIFIED VIA parsec
USING PASSWORD('your_secure_password');
CREATEORREPLACEUSER'app_user'@'%' IDENTIFIED VIA parsec
USING PASSWORD('your_secure_password');
Note that the plugin auth_parsec is not enabled by default. If you see the error message ERROR 1524 (HY000): Plugin 'parsec' is not loaded fix this by running INSTALL SONAME 'auth_parsec';.
In the CREATE USER statements, the @'%' means that the user is allowed to connect from any host. This needs to be defined, as MariaDB always checks permissions based on both the username and the remote IP address or hostname of the user, combined with the authentication method. Note that it is possible to have multiple user@remote combinations, and they can have different authentication methods. A user could, for example, be allowed to log in locally using the socket authentication and over the network using a password.
If you are running a custom application and you know exactly what permissions are sufficient for the database users, replace the ALL PRIVILEGES with a subset of privileges listed in the MariaDB documentation.
For new permissions to take effect, restart the database or run FLUSH PRIVILEGES.
Allow MariaDB to accept remote connections and enforce TLS
Using the above 'app_user'@'%' is not enough on its own to allow remote connections to MariaDB. The MariaDB server also needs to be configured to listen on a network interface to accept remote connections. As MariaDB is secure by default, it only accepts connections from localhost until the administrator updates its configuration. On a typical Debian/Ubuntu system, the recommended way is to drop a new custom config in e.g. /etc/mysql/mariadb.conf.d/99-server-customizations.cnf, with the contents:
[mariadbd]
# Listen for connections from anywhere
bind-address = 0.0.0.0
# Only allow TLS encrypted connections
require-secure-transport = on
[mariadbd]
# Listen for connections from anywhere
bind-address = 0.0.0.0
# Only allow TLS encrypted connections
require-secure-transport = on
For settings to take effect, restart the server with systemctl restart mariadb. After this, the server will accept connections on any network interface. If the system is using a firewall, the port 3306 would additionally need to be allow-listed.
To confirm that the settings took effect, run e.g. mariadb -e "SHOW VARIABLES LIKE 'bind_address';" , which should now show 0.0.0.0.
When allowing remote connections, it is important to also always define require-secure-transport = on to enforce that only TLS-encrypted connections are allowed. If the server is running MariaDB 11.8 and the clients are also MariaDB 11.8 or newer, no additional configuration is needed thanks to MariaDB automatically providing TLS certificates and appropriate certificate validation in recent versions.
On older long-term-supported versions of the MariaDB server one would have had to manually create the certificates and configure the ssl_key, ssl_cert and ssl_ca values on the server, and distribute the certificate to the clients as well, which was cumbersome, so good it is not required anymore. In MariaDB 11.8 the only additional related config that might still be worth setting is tls_version = TLSv1.3 to ensure only the latest TLS protocol version is used.
Finally, test connections to ensure they work and to confirm that TLS is used by running e.g.:
--------------
mariadb from 11.8.3-MariaDB, client 15.2 for debian-linux-gnu (x86_64)
...
Current user: app_user@192.168.1.66
SSL: Cipher in use is TLS_AES_256_GCM_SHA384, cert is OK
...
--------------
mariadb from 11.8.3-MariaDB, client 15.2 for debian-linux-gnu (x86_64)
...
Current user: app_user@192.168.1.66
SSL: Cipher in use is TLS_AES_256_GCM_SHA384, cert is OK
...
If running a Debian/Ubuntu system, see the bundled README with zcat /usr/share/doc/mariadb-server/README.Debian.gz to read more configuration tips.
Should TLS encryption be used also on internal networks?
If a database server and app are running on the same private network, the chances that the connection gets eavesdropped on or man-in-the-middle attacked by a malicious user are low. However, it is not zero, and if it happens, it can be difficult to detect or prove that it didn t happen. The benefit of using end-to-end encryption is that both the database server and the client can validate the certificates and keys used, log it, and later have logs audited to prove that connections were indeed encrypted and show how they were encrypted.
If all the computers on an internal network already have centralized user account management and centralized log collection that includes all database sessions, reusing existing SSH connections, SOCKS proxies, dedicated HTTPS tunnels, point-to-point VPNs, or similar solutions might also be a practical option. Note that the zero-configuration TLS only works with password validation methods. This means that systems configured to use PAM or Kerberos/GSSAPI can t use it, but again those systems are typically part of a centrally configured network anyway and are likely to have certificate authorities and key distribution or network encryption facilities already set up.
In a typical software app stac however, the simplest solution is often the best and I recommend DBAs use the end-to-end TLS encryption in MariaDB 11.8 in most cases.
Hopefully with these tips you can enjoy having your MariaDB deployments both simpler and more secure than before!
It's been a while since the last performance check of Transparent Data Encryption (TDE) in Cybertec's PGEE distribution - that was in 2016. Of course, the question is still interesting, so I did some benchmarks.
Since the difference is really small between running without any extras, with data checksums turned on, and with both encryption and checksums turned on, we need to pick a configuration that will stress-test these features the most. So in the spirit of making PostgreSQL deliberately run slow, I went with only 1MB of shared_buffers with a pgbench workload of scale factor 50. The 770MB of database size will easily fit into RAM. However, having such a small buffer cache setting will cause a lot of cache misses with pages re-read from the OS disk cache, checksums checked, and the page decrypted again. To further increase the effect, I ran pgbench --skip-some-updates so the smaller, in-cache-anyway pgbench tables are not touched. Overall, this yields a pretty consistent buffer cache hit rate of only 82.8%.
Here are the PGEE 17.6 tps (transactions per second) numbers averaged over a few 1-minute 3-client pgbench runs for different combinations of data checksums on/off, TDE off, and the various supported key bit lengths:
no checksums
data checksums
no TDE
2455,6
100,00 %
2449,7
99,76 %
128 bits
2440,9
99,40 %
2443,3
99,50 %
192 bits
2439,6
99,35 %
2446,1
99,61 %
256 bits
2450,3
99,78 %
2443,1
99,49 %
There is a lot of noise in the individual runtimes before averaging, so the numbers must be viewed with some care (192-bit TDE is certainly not faster with checksums than without), but if we dare to interpret these tiny differences, we can conclude the following:
The cost of enabling data checksums on this bad-cache-ratio workload is about 0.25 %.
The cost of enabling both TDE encryption and data checksums on this workload is about 0.5%.
Debusine is a tool designed
for Debian developers and Operating System developers in general. This posts
describes our approach to the use of JavaScript, and some practical designs we
came up with to integrate it with Django with minimal effort.
Debusine web UI and JavaScript
Debusine currently has 3 user interfaces: a client on the command line, a
RESTful API, and a Django-based Web UI.
Debusine s web UI is a tool to interact with the system, and we want to spend
most of our efforts in creating a system that works and works well, rather than
chasing the latest and hippest of the frontend frameworks for the web.
Also, Debian as a community has an aversion to having parts of the JavaScript
ecosystem in the critical path of its core infrastructure, and in our
professional experience this aversion is not at all unreasonable.
This leads to having some interesting requirements for the web UI, that (rather
surprisingly, one would think) one doesn t usually find advertised in many
projects:
Straightforward to create and maintain.
Well integrated with Django.
Easy to package in Debian, with as little vendoring as possible, which helps mitigate supply chain attacks
Usable without JavaScript whenever possible, for progressive
enhancement rather
than core functionality.
The idea is to avoid growing the technical complexity and requirements of the
web UI, both server-side and client-side, for functionality that is not needed
for this kind of project, with tools that do not fit well in our ecosystem.
Also, to limit the complexity of the JavaScript portions that we do develop, we
choose to limit our JavaScript browser supports to the main browser versions
packaged in Debian Stable, plus recent oldstable.
This makes JavaScript easier to write and maintain, and it also makes it less
needed, as modern HTML plus modern CSS interfaces can go a long way with less
scripting interventions.
We recently
encoded JavaScript practices and tradeoffs in a
JavaScript Practices
chapter of Debusine s documentation.
How we use JavaScript
From the start we built the UI using Bootstrap,
which helps in having responsive layouts that can also work on mobile devices.
When we started having large select fields, we introduced
Select2 to make interaction more efficient, and which
degrades gracefully to working HTML.
Both Bootstrap and Select2 are packaged in Debian.
Form validation is done server-side by Django, and we do not reimplement it
client-side in JavaScript, as we prefer the extra round trip through a form
submission to the risk of mismatches between the two validations.
In those cases where a UI task is not at all possible without JavaScript, we
can make its support mandatory as long as the same goal can be otherwise
achieved using the debusine client command.
Django messages as Bootstrap toasts
Django has a Messages framework
that allows different parts of a view to push messages to the user, and it is
useful to signal things like a successful form submission, or warnings on
unexpected conditions.
Django messages integrate well with Bootstrap
toasts, which use a
recognisable notification language, are nicely dismissible and do not invade
the rest of the page layout.
Since toasts require JavaScript to work, we added graceful degradation.
to Bootstrap alerts
Doing so was surprisingly simple: we handle the toasts as usual, and also render the
plain alerts inside a <noscript> tag.
This is precisely the intended usage of the <noscript> tag, and it works
perfectly: toasts are displayed by JavaScript when it s available, or rendered
as alerts when not.
The resulting Django template is something like this:
JavaScript incremental improvement of formsets
Debusine is built around
workspaces,
which are, among other things, containers for resources.
Workspaces can inherit from other workspaces, which act as fallback lookups for
resources. This allows, for example, to maintain an experimental package to be
built on Debian Unstable, without the need to copy the whole Debian Unstable
workspace. A workspace can inherit from multiple others, which are looked up in
order.
When adding UI to configure workspace
inheritance, we
faced the issue that plain HTML forms do not have a convenient way to perform
data entry of an ordered list.
We initially built the data entry around Django formsets, which support
ordering
using an extra integer input field to enter the ordering position. This works,
and it s good as a fallback, but we wanted something more appropriate, like
dragging and dropping items to reorder them, as the main method of interaction.
Our final approach
renders the plain formset inside a <noscript> tag, and the JavaScript widget
inside a display: none element, which is later shown by JavaScript code.
As the workspace inheritance is edited, JavaScript serializes its state into
<form type='hidden'> fields that match the structure used by the formset, so
that when the form is submitted, the view performs validation and updates the
server state as usual without any extra maintenance burden.
Serializing state as hidden form fields looks a bit vintage, but it is an
effective way of preserving the established data entry protocol between the
server and the browser, allowing us to do incremental improvement of the UI
while minimizing the maintenance effort.
More to come
Debusine is now gaining significant adoption and is still under active
development, with new features like personal archives coming soon.
This will likely mean more user stories for the UI, so this is a design space
that we are going to explore again and again in the coming future.
Meanwhile, you can try out Debusine on
debusine.debian.net, and follow its development
on salsa.debian.org!
Please consider supporting my work in Debian and elsewhere through Liberapay.
Debian stable updates work through three main channels: point releases, security repositories, and the updates repository. Understanding these ensures your system stays secure and current.
A note about suite names
Every Debian release, or suite, has a codename the most recent major release was trixie, or Debian 13. The codename uniquely identifies that suite.
We also use changeable aliases to add meaning to the suite s lifecycle. For example, trixie currently has the alias stable, but when forky becomes stable instead, trixie will become known as oldstable.
This post uses either codenames or aliases depending on context. In source lists, codenames are generally preferred since that avoids surprise major upgrades right after a release is made.
The stable suites (point releases)
stable and oldstable (currently trixie and bookworm) are only updated during a point release. This is a minor update released to a major version. For example, 13.1 is the first minor update to trixie. It s not possible to install older minor versions of a suite except via the snapshots mechanism (not covered here). It s possible to view past versions via snapshot.debian.org, which preserves historical Debian archives.
There are also the testing and unstable aliases for the development suites. However, these are not relevant for users who want to run officially released versions.
Almost every stable installation of Debian will be opted into a stable or oldstable base suite. An example APT source might look like:
Type: deb
URIs: http://deb.debian.org/debian
Suites: trixie
Components: main
Signed-By: /usr/share/keyrings/debian-archive-keyring.pgp
Or, in legacy sources.list style:
deb https://deb.debian.org/debian trixie main
The security suites (DSAs explained)
For urgent security-related updates, the Security Team maintains a counterpart suite for each stable suite. These are called stable-security and oldstable-security when maintained by Debian s security team, and oldstable-security, oldoldstable-security, etc when maintained by the LTS team.
Example APT source:
Type: deb
URIs: https://deb.debian.org/debian-security
Suites: trixie-security
Components: main
Signed-By: /usr/share/keyrings/debian-archive-keyring.pgp
Or, in legacy sources.list style:
deb https://deb.debian.org/debian-security trixie-security main
The updates suites (SUAs and maintenance)
For urgent non-security updates, the final recommended suites are stable-updates and oldstable-updates. This is where updates staged for a point release, but needed sooner, are published. Examples include virus database updates, timezone changes, urgent bug fixes for specific problems and corrections to errors in the release process itself.
Example APT source:
Type: deb
URIs: https://deb.debian.org/debian
Suites: trixie-updates
Components: main
Signed-By: /usr/share/keyrings/debian-archive-keyring.pgp
Or, in legacy sources.list style:
deb https://deb.debian.org/debian trixie-updates main
Debian enables the updates suites by default. Stable Update Announcements (SUAs) are published to debian-stable-announce@lists.debian.org. This is also where announcements of forthcoming point releases are published.
Summary
These are the recommended suites for all production Debian systems:
Suite
Example codename
Purpose
Announcements
stable
trixie
Base suite containing all the available software for a release. Point releases every 2 4 months including lower-severity security fixes that do not require immediate release.
After a release moves from oldstable to unsupported status, Long Term Support (LTS) takes over for several more years. LTS provides urgent security updates for selected architectures. For details, see wiki.debian.org/LTS.
If you d like to stay informed, the official Debian announcement lists and release.debian.org share the latest schedules and updates.
Photo by Brian Wangenheim on Unsplash
In my post yesterday, ARM is great, ARM is terrible (and so is RISC-V), I described my desire to find ARM hardware with AES instructions to support full-disk encryption, and the poor state of the OS ecosystem around the newer ARM boards.
I was anticipating buying either a newer ARM SBC or an x86 mini PC of some sort.
More-efficient AES alternatives
Always one to think, what if I didn t have to actually buy something , I decided to research whether it was possible to use encryption algorithms that are more performant on the Raspberry Pi 4 I already have.
The answer was yes. From cryptsetup benchmark:
root@mccoy:~# cryptsetup benchmark --cipher=xchacha12,aes-adiantum-plain64
# Tests are approximate using memory only (no storage IO).
#            Algorithm         Key        Encryption        Decryption
xchacha12,aes-adiantum        256b       159.7 MiB/s       160.0 MiB/s
xchacha20,aes-adiantum        256b       116.7 MiB/s       169.1 MiB/s
    aes-xts                   256b        52.5 MiB/s        52.6 MiB/s
With best-case reads from my SD card at 45MB/s (with dd if=/dev/mmcblk0 of=/dev/null bs=1048576 status=progress), either of the ChaCha-based algorithms will be fast enough. Great, I thought. Now I can just solve this problem without spending a dollar.
But not so fast.
Serial terminals vs. serial consoles
My primary use case for this device is to drive my actual old DEC vt510 terminal. I have long been able to do that by running a getty for my FTDI-based USB-to-serial converter on /dev/ttyUSB0. This gets me a login prompt, and I can do whatever I need from there.
This does not get me a serial console, however. The serial console would show kernel messages and could be used to interact with the pre-multiuser stages of the system that is, everything before the loging prompt. You can use it to access an emergency shell for repair, etc.
Although I have long booted that kernel with console=tty0 console=ttyUSB0,57600, the serial console has never worked but I d never bothered investigating because the text terminal was sufficient.
You might be seeing where this is going: to have root on an encrypted LUKS volume, you have to enter the decryption password in the pre-multiuser environment (which happens to be on the initramfs).
So I started looking. First, I extracted the initrd with cpio and noticed that the ftdi_sio and usbserial modules weren t present. Added them to /etc/initramfs-tools/modules and rebooted; no better.
So I found the kernel s serial console guide, which explicitly notes To use a serial port as console you need to compile the support into your kernel . Well, I have no desire to custom-build a kernel on a Raspberry Pi with MicroSD storage every time a new kernel comes out.
I thought well I don t stricly need the kernel to know about the console on /dev/ttyUSB0 for this; I just need the password prompt which comes from userspace to know about it.
So I looked at the initramfs code, and wouldn t you know it, it uses /dev/console. Looking at /proc/consoles on that system, indeed it doesn t show ttyUSB0. So even though it is possible to load the USB serial driver in the initramfs, there is no way to make the initramfs use it, because it only uses whatever the kernel recognizes as a console, and the kernel won t recognize this. So there is no way to use a USB-to-serial adapter to enter a password for an encrypted root filesystem.
Drat.
The on-board UARTs?
I can hear you know: The Pi already has on-board serial support! Why not use that?
Ah yes, the reason I don t want to use that is because it is difficult to use that, particularly if you want to have RTS/CTS hardware flow control (or DTR/DSR on these old terminals, but that s another story, and I built a custom cable to map it to RTS/CTS anyhow).
Since you asked, I ll take you down this unpleasant path.
The GPIO typically has only 2 pins for serial communication: 8 and 10, for TX and RX, respectively.
But dive in and you get into a confusing maze of UARTs. The mini UART , the one we are mostly familiar with on the Pi, does not support hardware flow control. The PL011 does. So the natural question is: how do we switch to the PL011, and what pins does it use? Great questions, and the answer is undocumented, at least for the Pi 4.
According to that page, for the Pi 4, the primary UART is UART1, UART1 is the mini UART, the secondary UART is not normally present on the GPIO connector and might be used by Bluetooth anyway, and there is no documented pin for RTS/CTS anyhow. (Let alone some of the other lines modems use) There are supposed to be /dev/ttyAMA* devices, but I don t have those. There s an enable_uart kernel parameter, which does things like stop the mini UART from changing baud rates every time the VPU changes clock frequency (I am not making this up!), but doesn t seem to control the PL011 UART selection. This page has a program to do it, and map some GPIO pins to RTS/CTS, in theory.
Even if you get all that working, you still have the problem that the Pi UARTs (all of them of every type) is 3.3V and RS-232 is 5V, so unless you get a converter, you will fry your Pi the moment you connect it to something useful. So, you re probably looking at some soldering and such just to build a cable that will work with an iffy stack.
So, I could probably make it work given enough time, but I don t have that time to spare working with weird Pi serial problems, so I have always used USB converters when I need serial from a Pi.
Conclusion
I bought a fanless x86 micro PC with a N100 chip and all the ports I might want: a couple of DB-9 serial ports, some Ethernet ports, HDMI and VGA ports, and built-in wifi. Done.
My trip to pgday.at started Wednesday at the airport in D sseldorf. I was there on time, and the plane started with an estimated flight time of about 90 minutes. About half an hour into the flight, the captain announced that we would be landing in 30 minutes - in D sseldorf, because of some unspecified technical problems. Three hours after the original departure time, the plane made another attempt, and we made it to Vienna.
On the plane I had already met Dirk Krautschick who had the great honor of bringing Slonik (in the form of a big extra bag) to the conference, and we took a taxi to the hotel. On the taxi, the next surprise happened: Hans-J rgen Sch nig unfortunately couldn't make it to the conference, and his talks had to be replaced. I had submitted a talk to the conference, but it was not accepted, and neither queued on the reserve list. But two speakers on the reserve list had cancelled, and another was already giving a talk in parallel to the slot that had to be filled, so Pavlo messaged me if I could hold the talk - well of course I could. Before, I didn't have any specific plans for the evening yet, but suddenly I was a speaker, so I joined the folks going to the speakers dinner at the Wiener Grill Haus two corners from the hotel. It was a very nice evening, chatting with a lot of folks from the PostgreSQL community that I had not seen for a while.
Thursday was the conference day. The hotel was a short walk from the venue, the Apothekertrakt in Vienna's Schloss Sch nbrunn. The courtyard was already filled with visitors registering for the conference. Since I originally didn't have a talk scheduled, I had signed up to volunteer for a shift as room host. We got our badge and swag bag, and I changed into the "crew" T-shirt.
The opening and sponsor keynotes took place in the main room, the Orangerie. We were over 100 people in the room, but apparently still not enough to really fill it, so the acoustics with some echo made it a bit difficult to understand everything. I hope that part can be improved for next time (which is planned to happen!).
I was host for the Maximilian room, where the sponsor sessions were scheduled in the morning. The first talk was by our Peter Hofer, also replacing the absent Hans. He had only joined the company at the beginning of the same week, and was already tasked to give Hans' talk on PostgreSQL as Open Source. Of course he did well.
Next was Tanmay Sinha from Readyset. They are building a system that caches expensive SQL queries and selectively invalidates the cache whenever any data used by these queries changes. Whenever actually fixing the application isn't feasible, that system looks like an interesting alternative to manually maintaining materialized views, or perhaps using pg_ivm.
After lunch, I went to Federico Campoli's Mastering Index Performance, but really spent the time polishing the slides for my talk. I had given the original version at pgconf.de in Berlin in May, and the slides were still in German, so I had to do some translating. Luckily, most slides are just git commit messages, so the effort was manageable.
The next slot was mine, talking about Modern VACUUM. I started with a recap of MVCC, vacuum and freezing in PostgreSQL, and then showed how over the past years, the system was updated to be more focused (the PostgreSQL 8.4 visibility map tells vacuum which pages to visit), faster (12 made autovacuum run 10 times faster by default), less scary (14 has an emergency mode where freezing switches to maximum speed if it runs out of time; 16 makes freezing create much less WAL) and more performant (17 makes vacuum use much less memory). In summary, there is still room for the DBA to tune some knobs (for example, the default autovacuum_max_workers=3 isn't much), but the vacuum default settings are pretty much okay these days for average workloads. Specific workloads still have a whopping 31 postgresql.conf settings at their disposal just for vacuum.
Right after my talk, there was another vacuum talk: When Autovacuum Met FinOps by Mayuresh Bagayatkar. He added practical advice on tuning the performance in cloud environments. Luckily, our contents did not overlap.
After the coffee break, I was again room host, now for Floor Drees and Contributing to Postgres beyond code. She presented the various ways in which PostgreSQL is more than just the code in the Git repository: translators, web site, system administration, conference organizers, speakers, bloggers, advocates. As a member of the PostgreSQL Contributors Committee, I could only approve and we should closer cooperate in the future to make people's contributions to PostgreSQL more visible and give them the recognition they deserve.
That was already the end of the main talks and everyone rushed to the Orangerie for the lightning talks. My highlight was the Sheldrick Wildlife Trust. Tickets for the conference had included the option to donate for the elephants in Kenya, and the talk presented the trust's work in the elephant orphanage there.
After the conference had officially closed, there was a bonus track: the Celebrity DB Deathmatch, aptly presented by Boriss Mejias. PostgreSQL, MongoDB, CloudDB and Oracle were competing for the grace of a developer. MongoDB couldn't stand the JSON workload, CloudDB was dismissed for handing out new invoices all the time, and Oracle had even brought a lawyer to the stage, but then lost control over a literally 10 meter long contract with too much fine print. In the end, PostgreSQL (played by Floor) won the love of the developer (played by our Svitlana Lytvynenko).
The day closed with a gathering at the Brandauer Schlossbr u - just at the other end of the castle ground, but still a 15min walk away. We enjoyed good beer and Kaiserschmarrn. I went back to the hotel a bit before midnight, but some extended that time quite some bit more.
On Friday, my flight back was only in the afternoon, so I spent some time in morning in the Technikmuseum just next to the hotel, enjoying some old steam engines and a live demonstration of Tesla coils. This time, the flight actually went to the destination, and I was back in D sseldorf in the late afternoon.
In summary, pgday.at was a very nice event in a classy location. Thanks to the organizers for putting in all the work - and next year, Hans will hopefully be present in person!
The post A Trip To Vienna With Surprises appeared first on CYBERTEC PostgreSQL Services & Support.
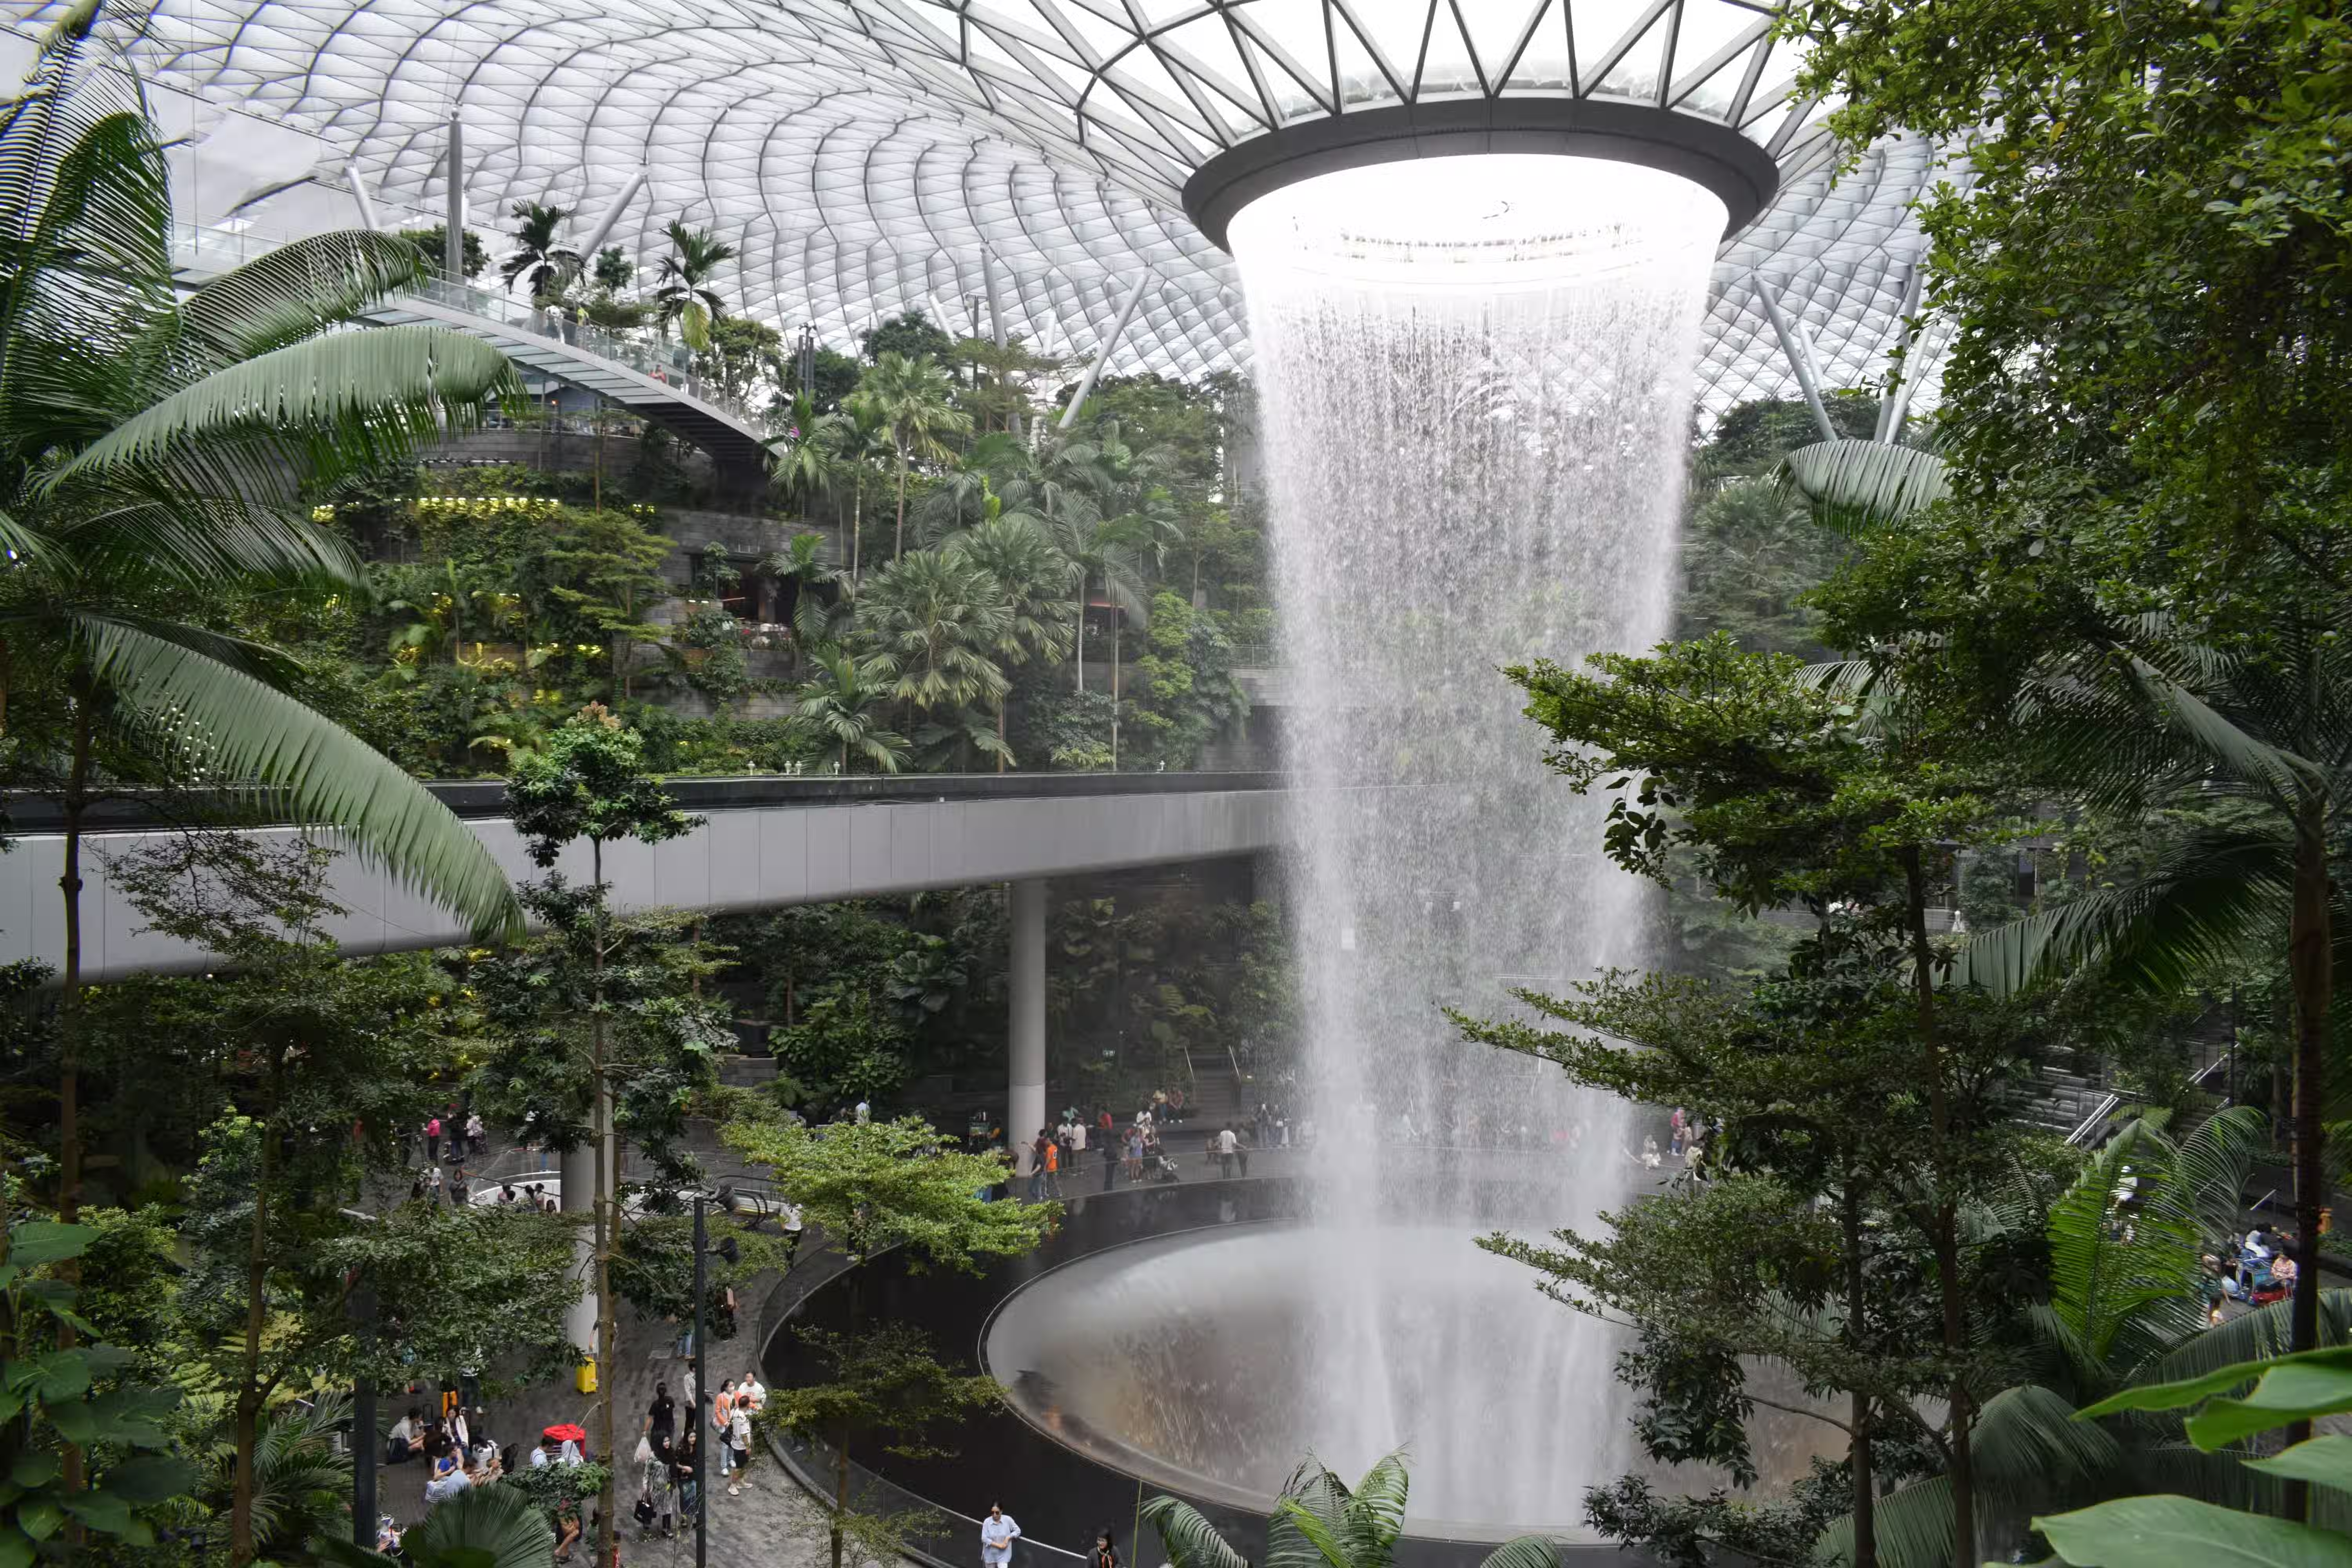 A shot of Jewel Changi. Photo by Ravi Dwivedi. Released under the CC-BY-SA 4.0.
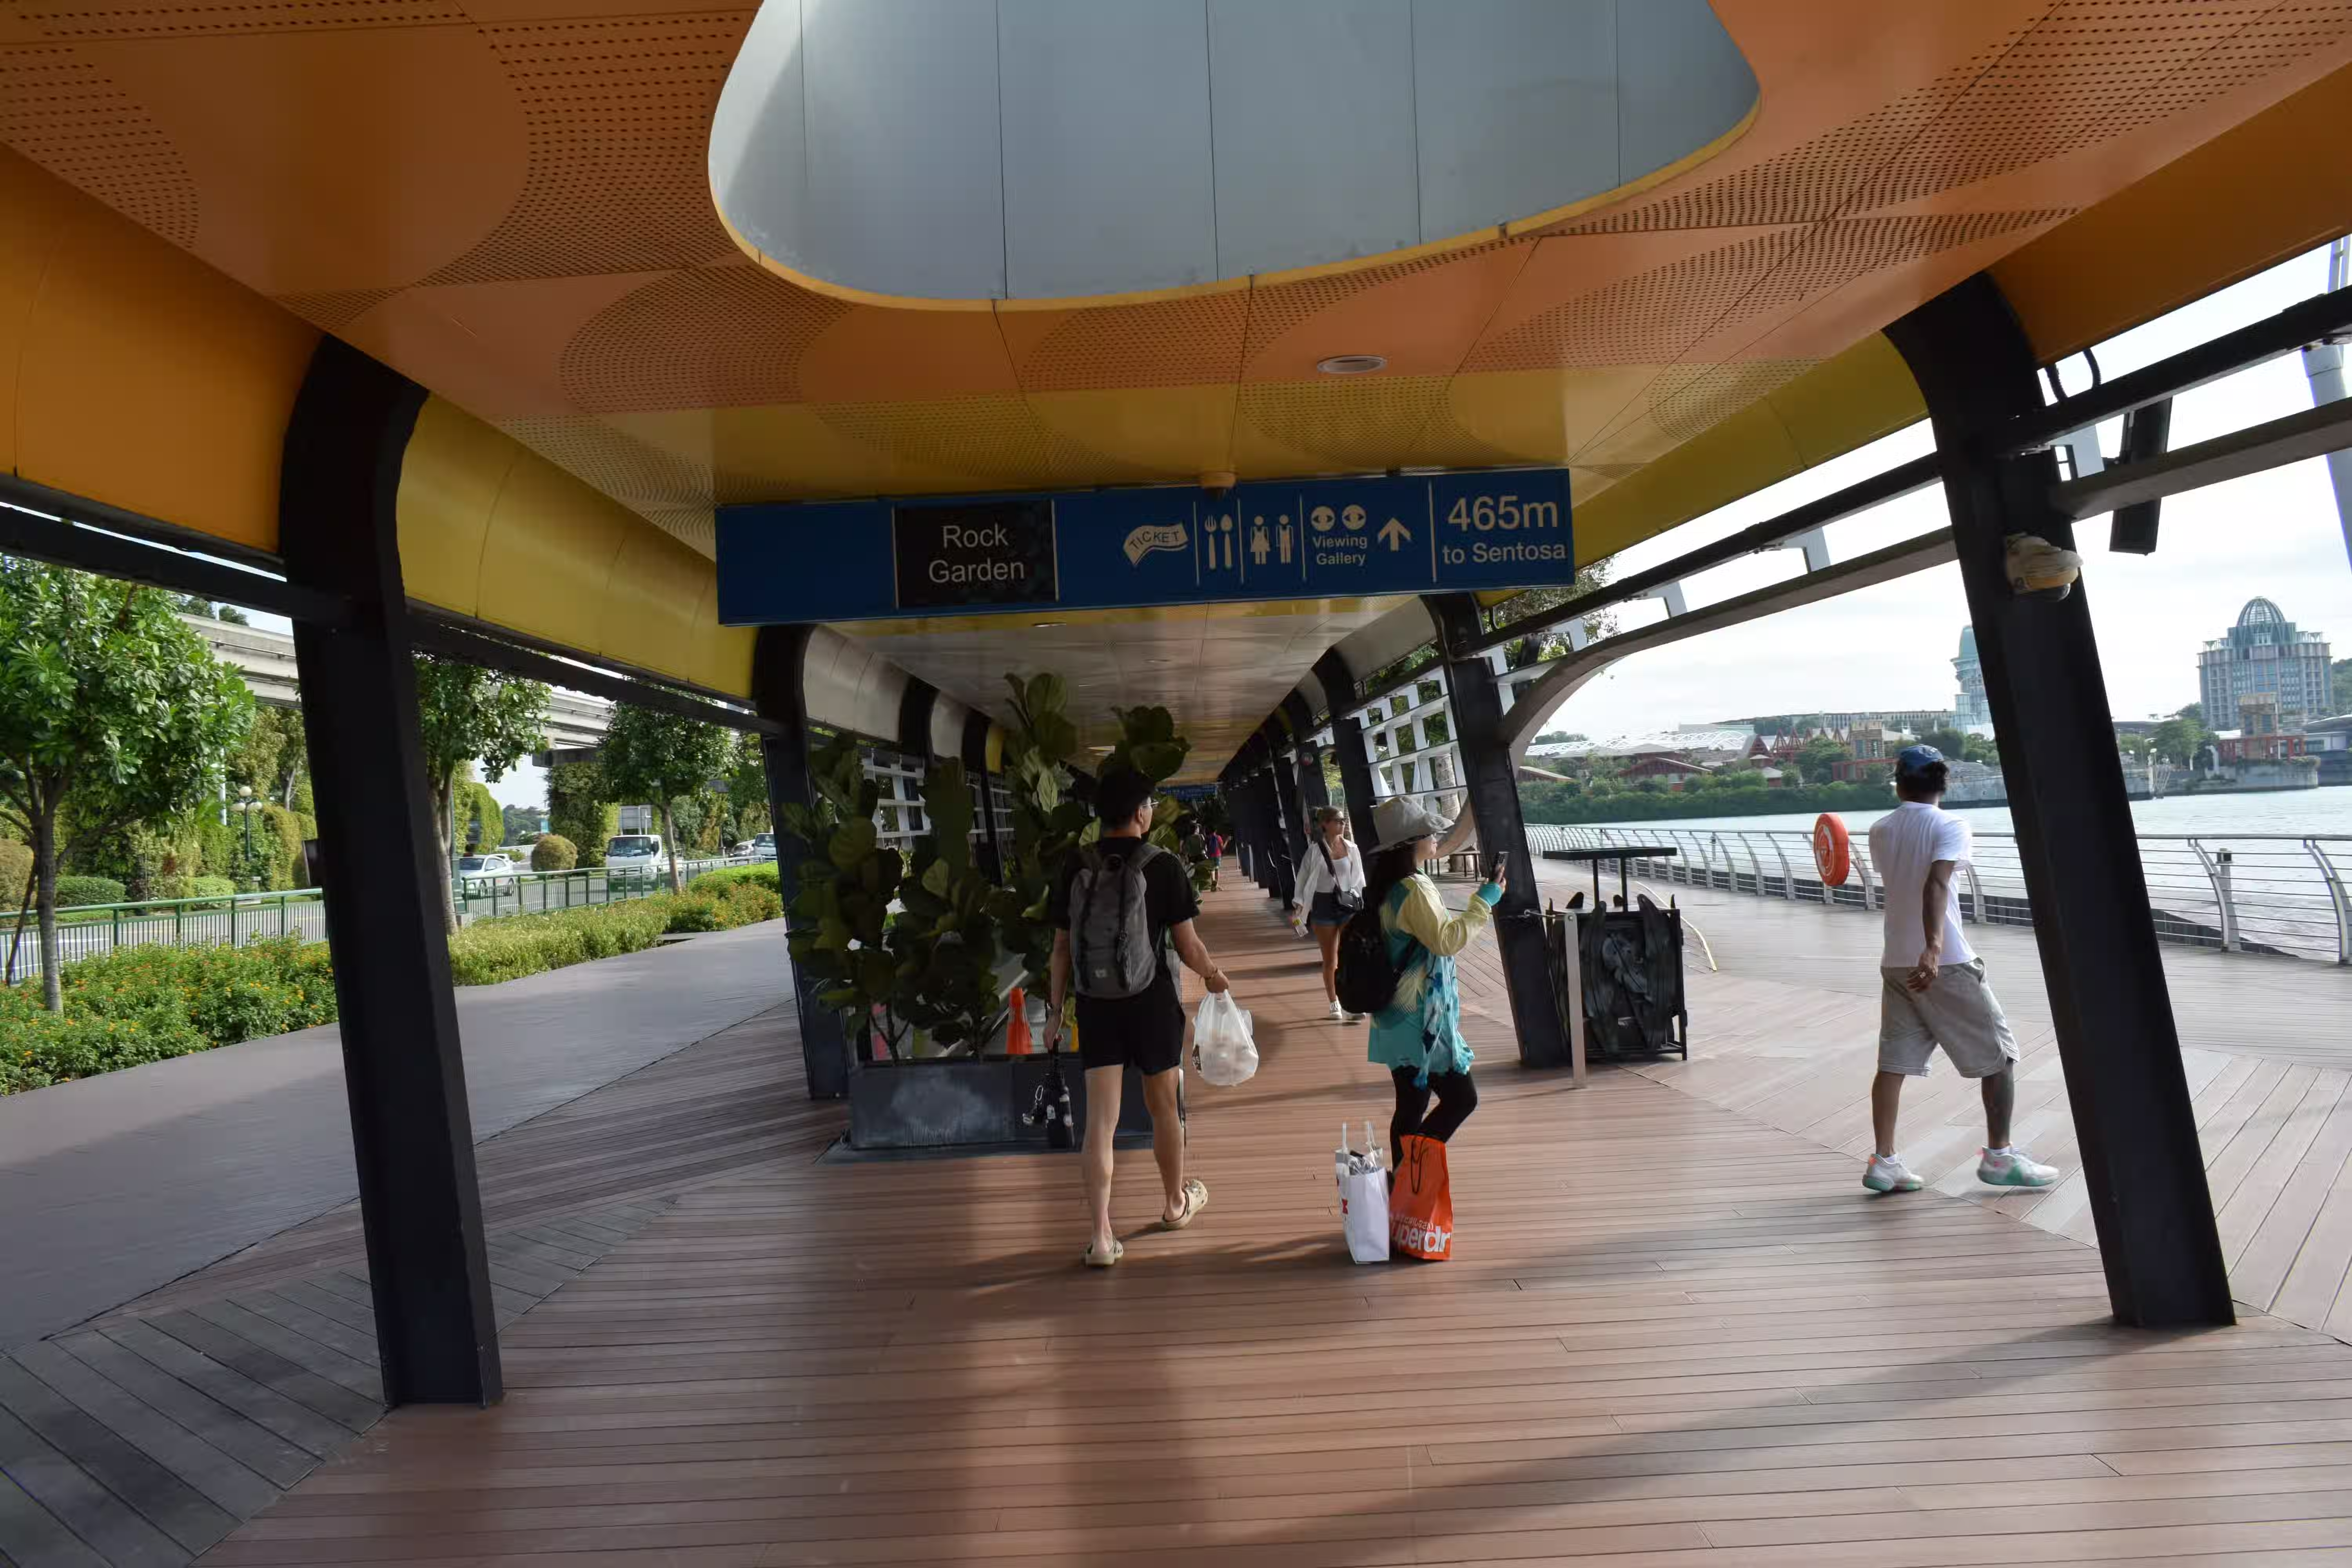 A shot of Sentosa Boardwalk. Photo by Ravi Dwivedi. Released under the CC-BY-SA 4.0.
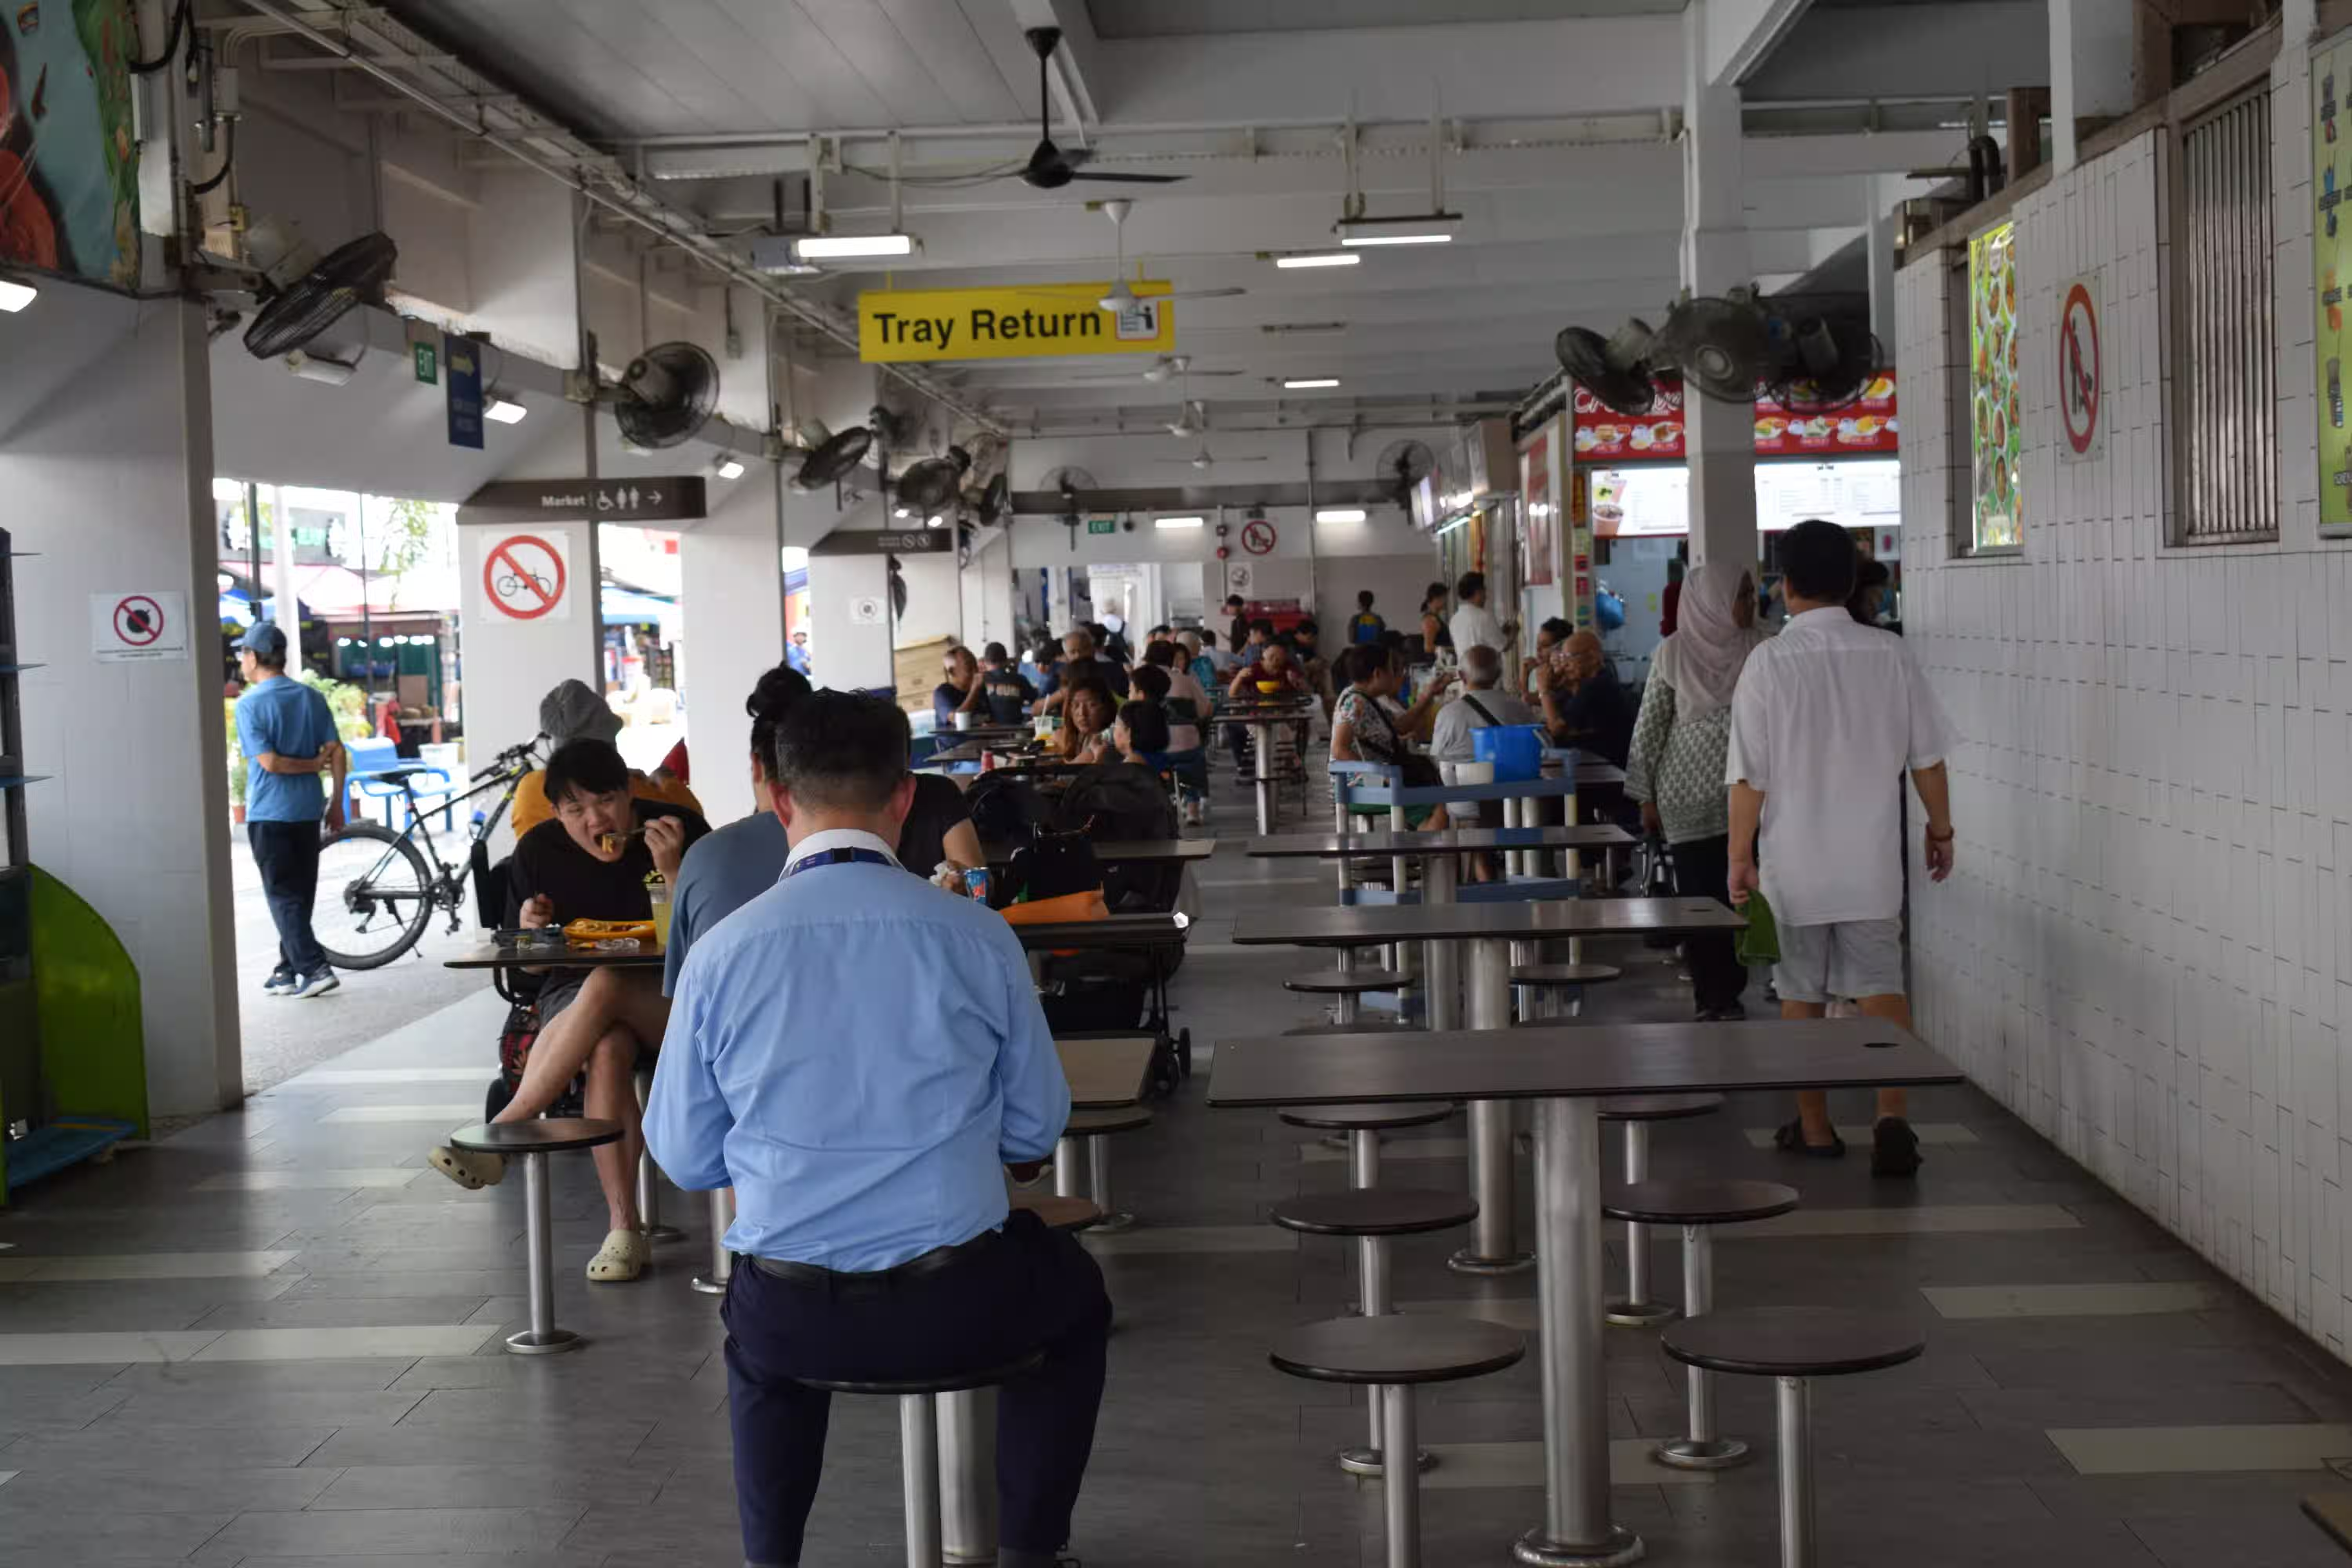 This is the hawker center we went to. Photo by Ravi Dwivedi. Released under the CC-BY-SA 4.0.
 Table littering at the hawker center was prohibited by law. Photo by Ravi Dwivedi. Released under the CC-BY-SA 4.0.
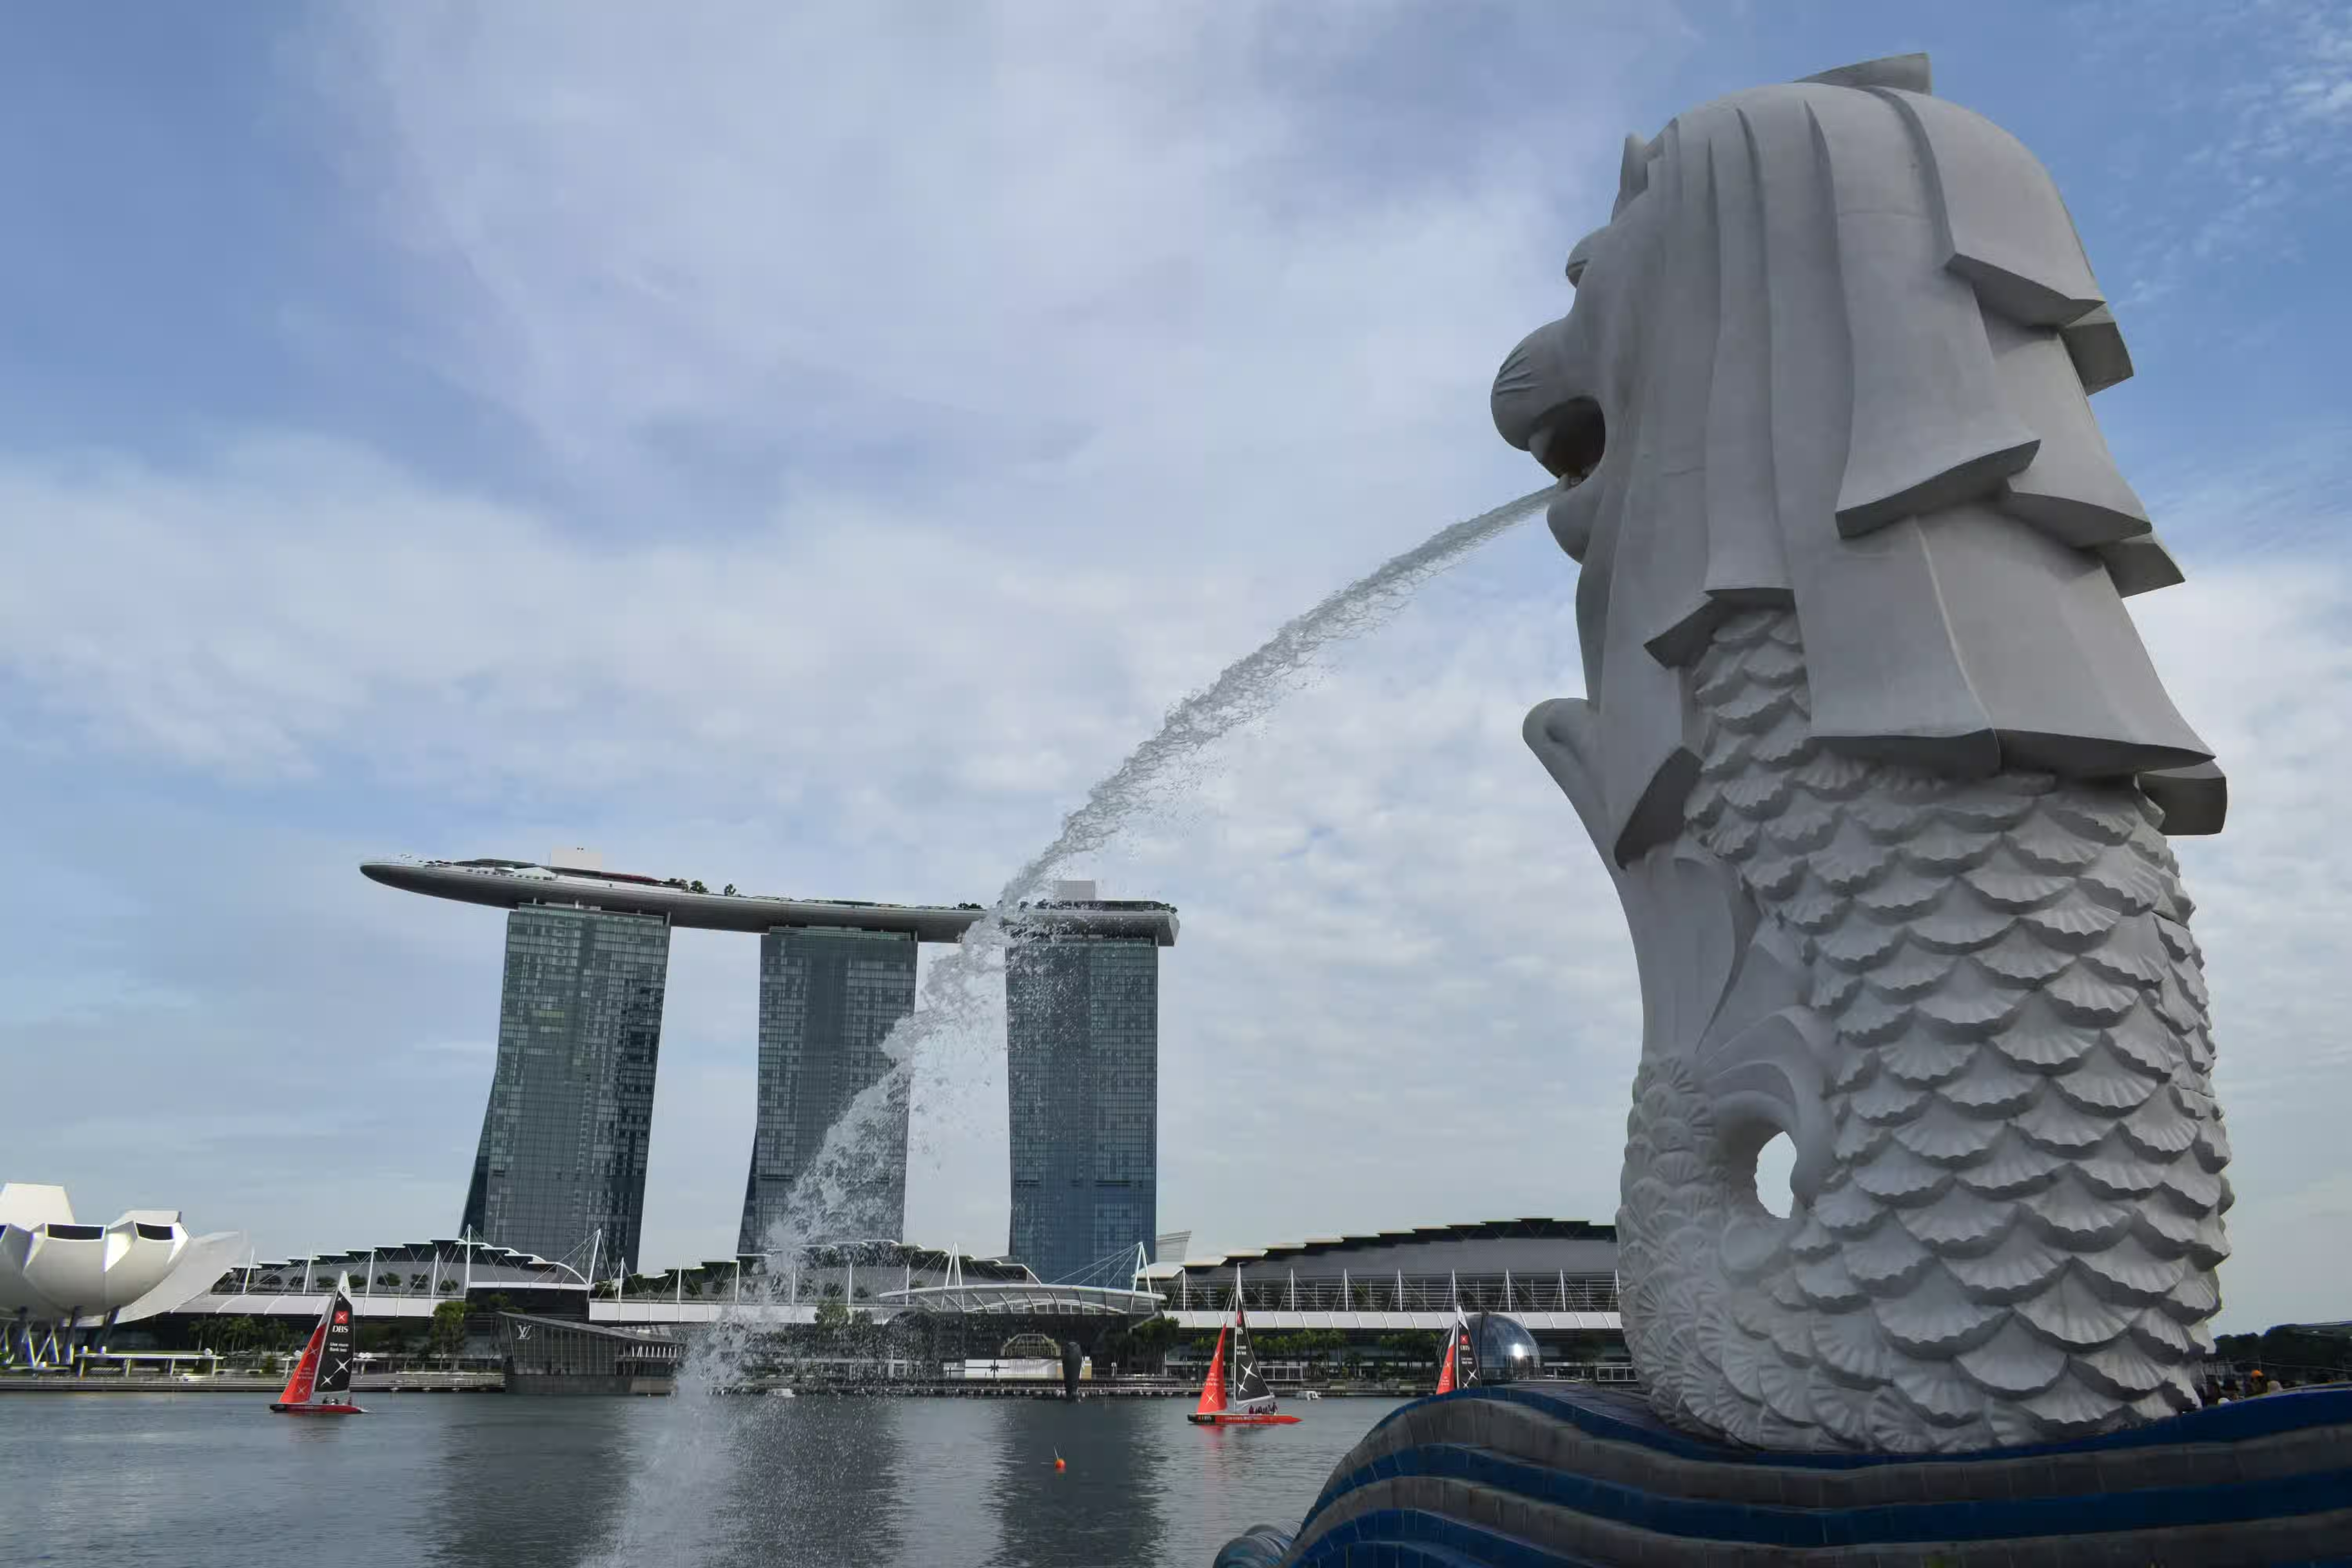 Merlion from behind, giving a good view of Marina Bay Sands. Photo by Ravi Dwivedi. Released under the CC-BY-SA 4.0.

 If you're still using Vagrant (I am) and try to boot a box that uses UEFI (like


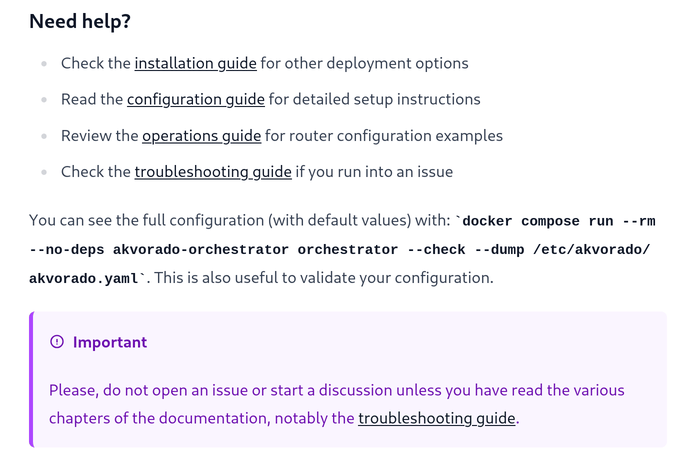
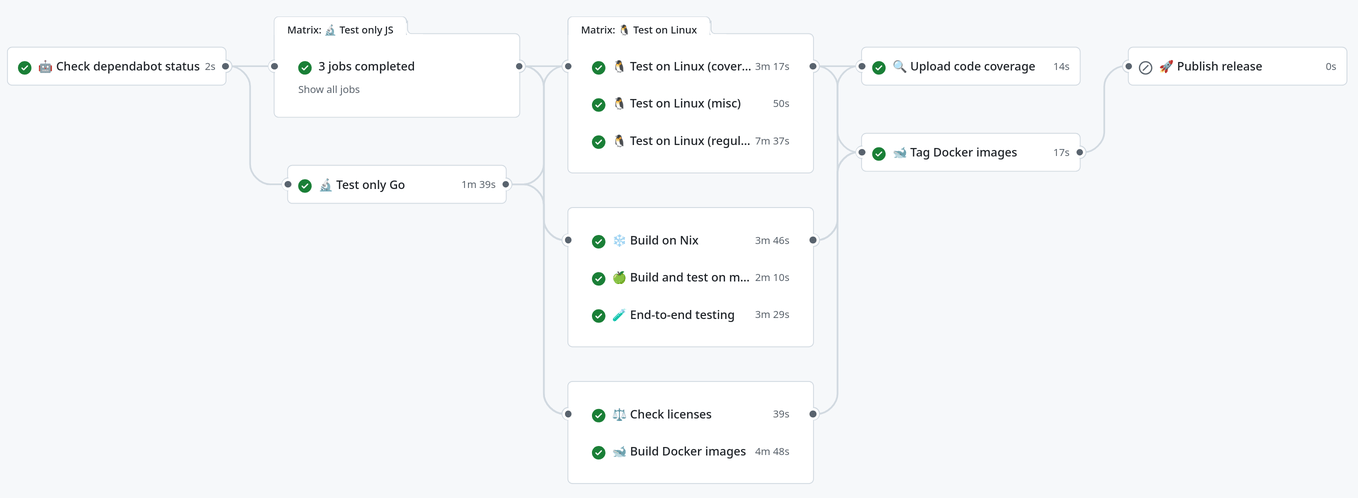


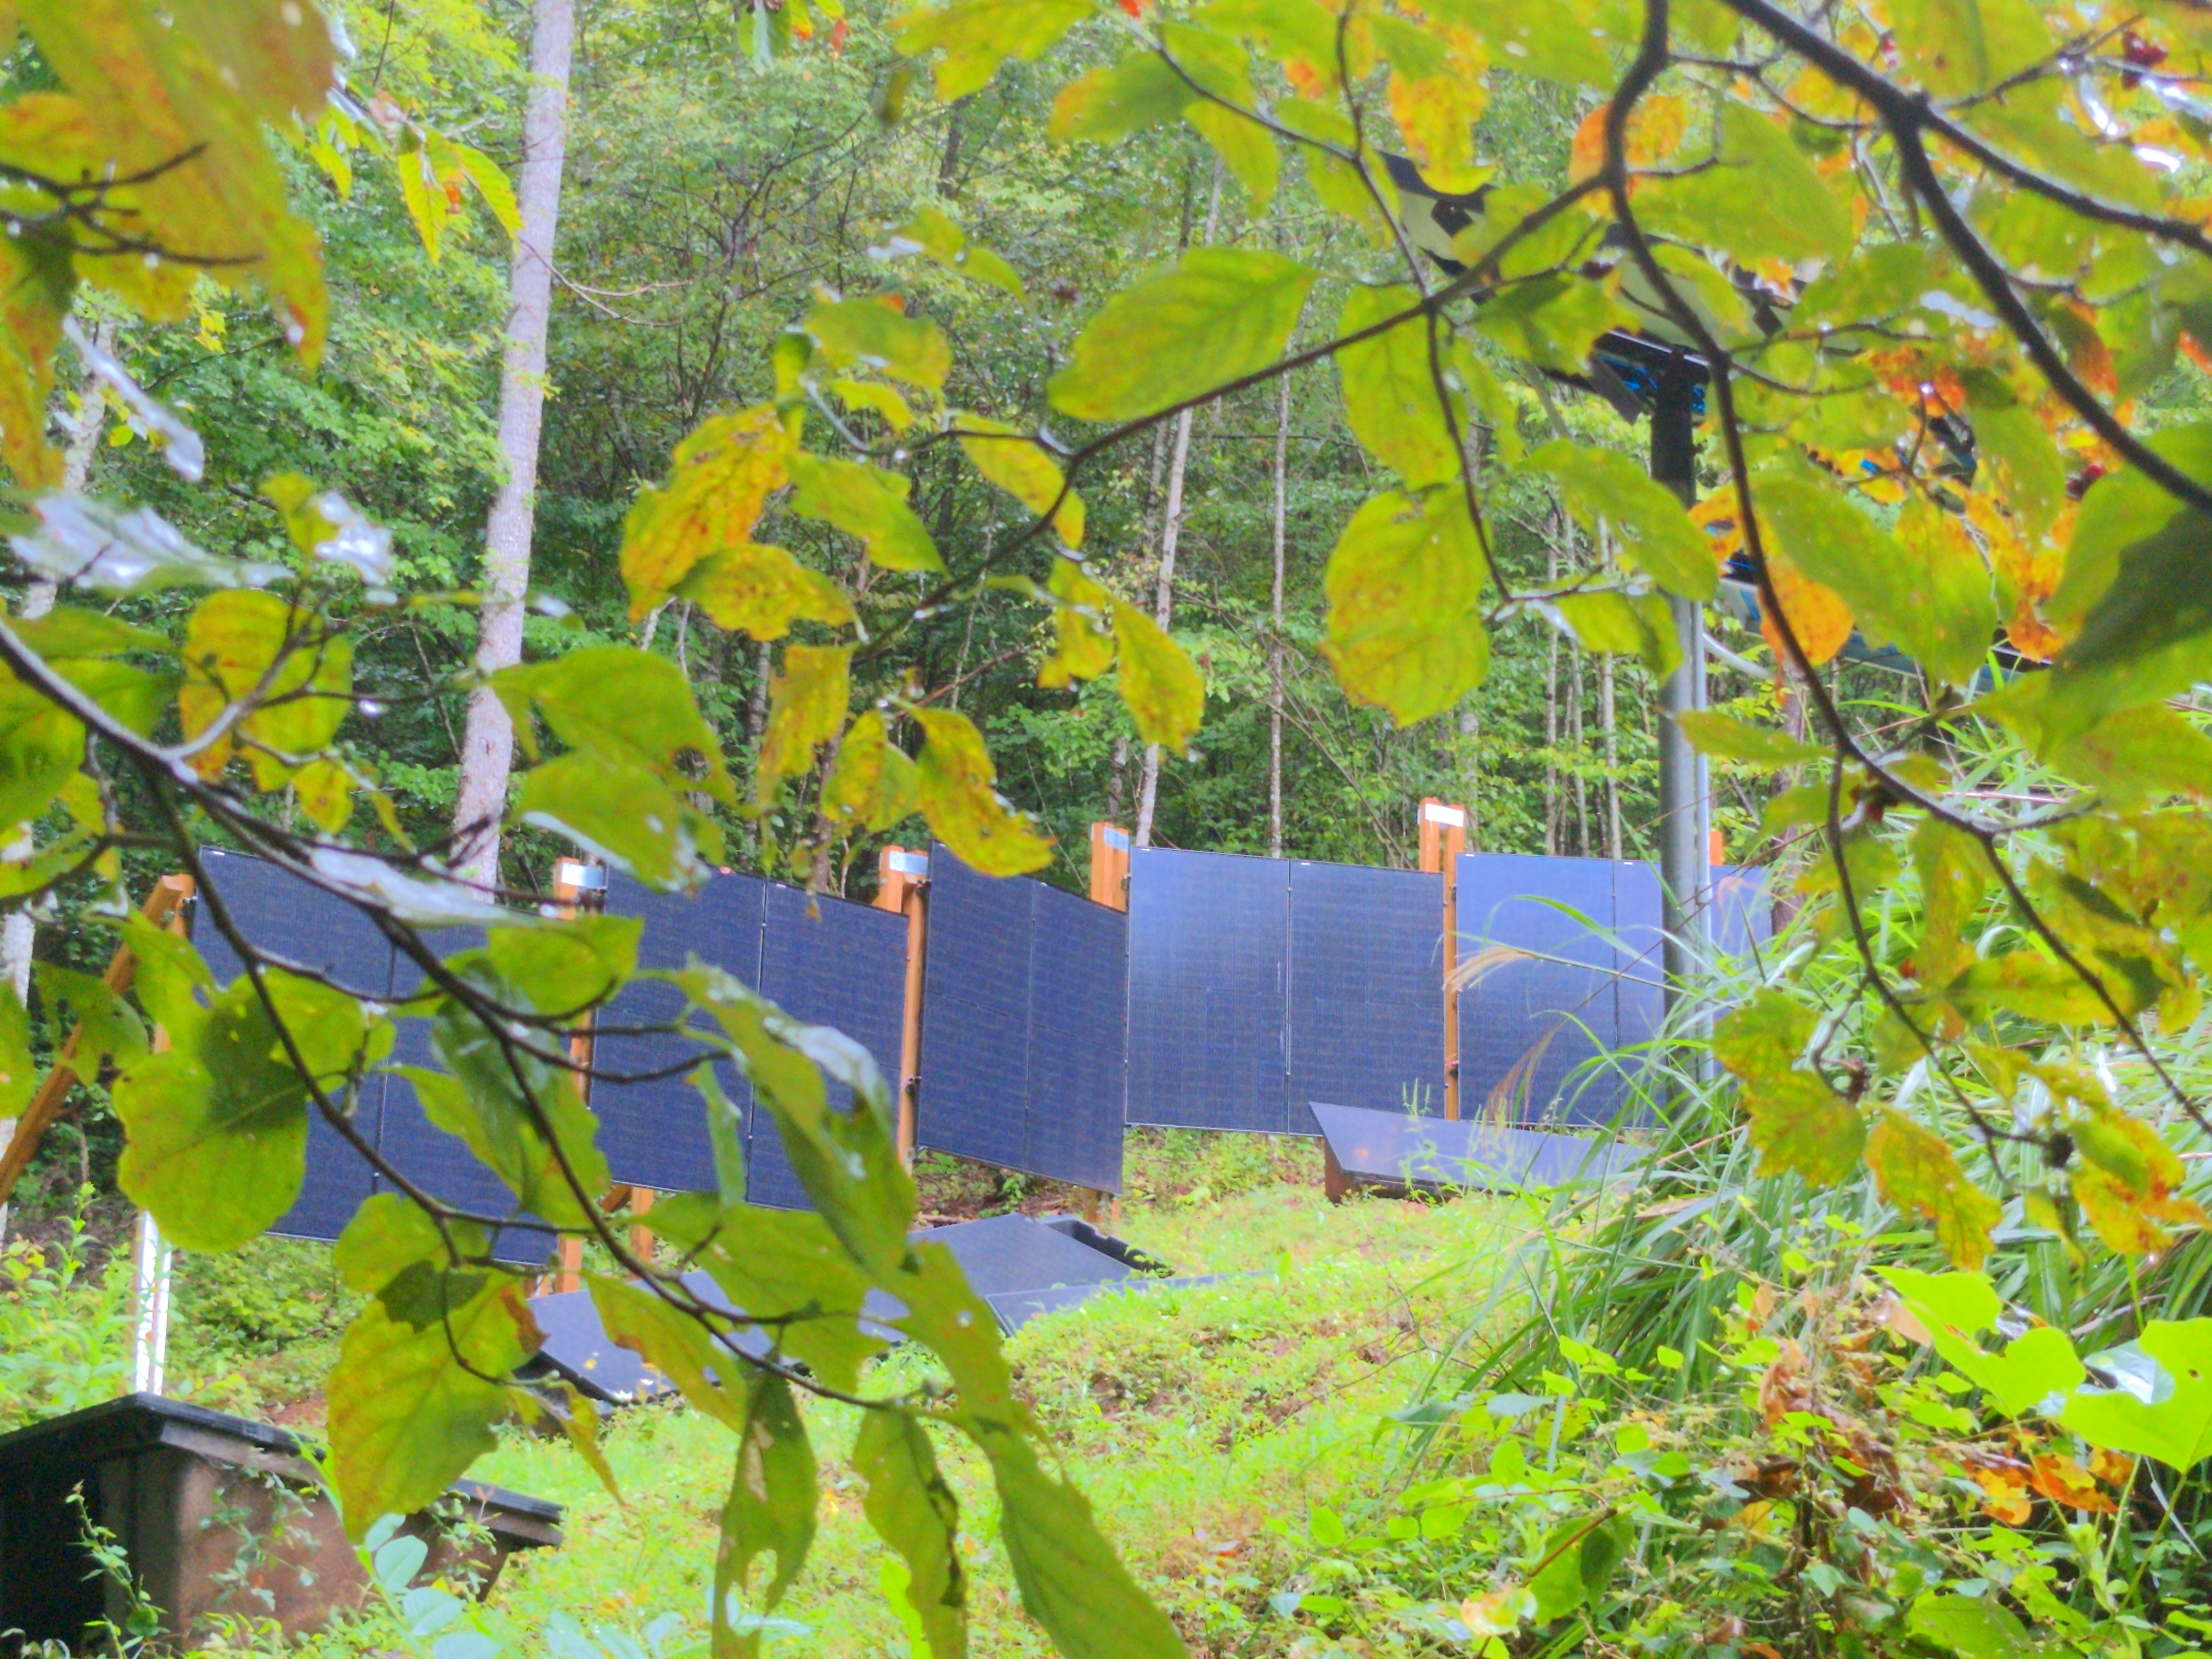
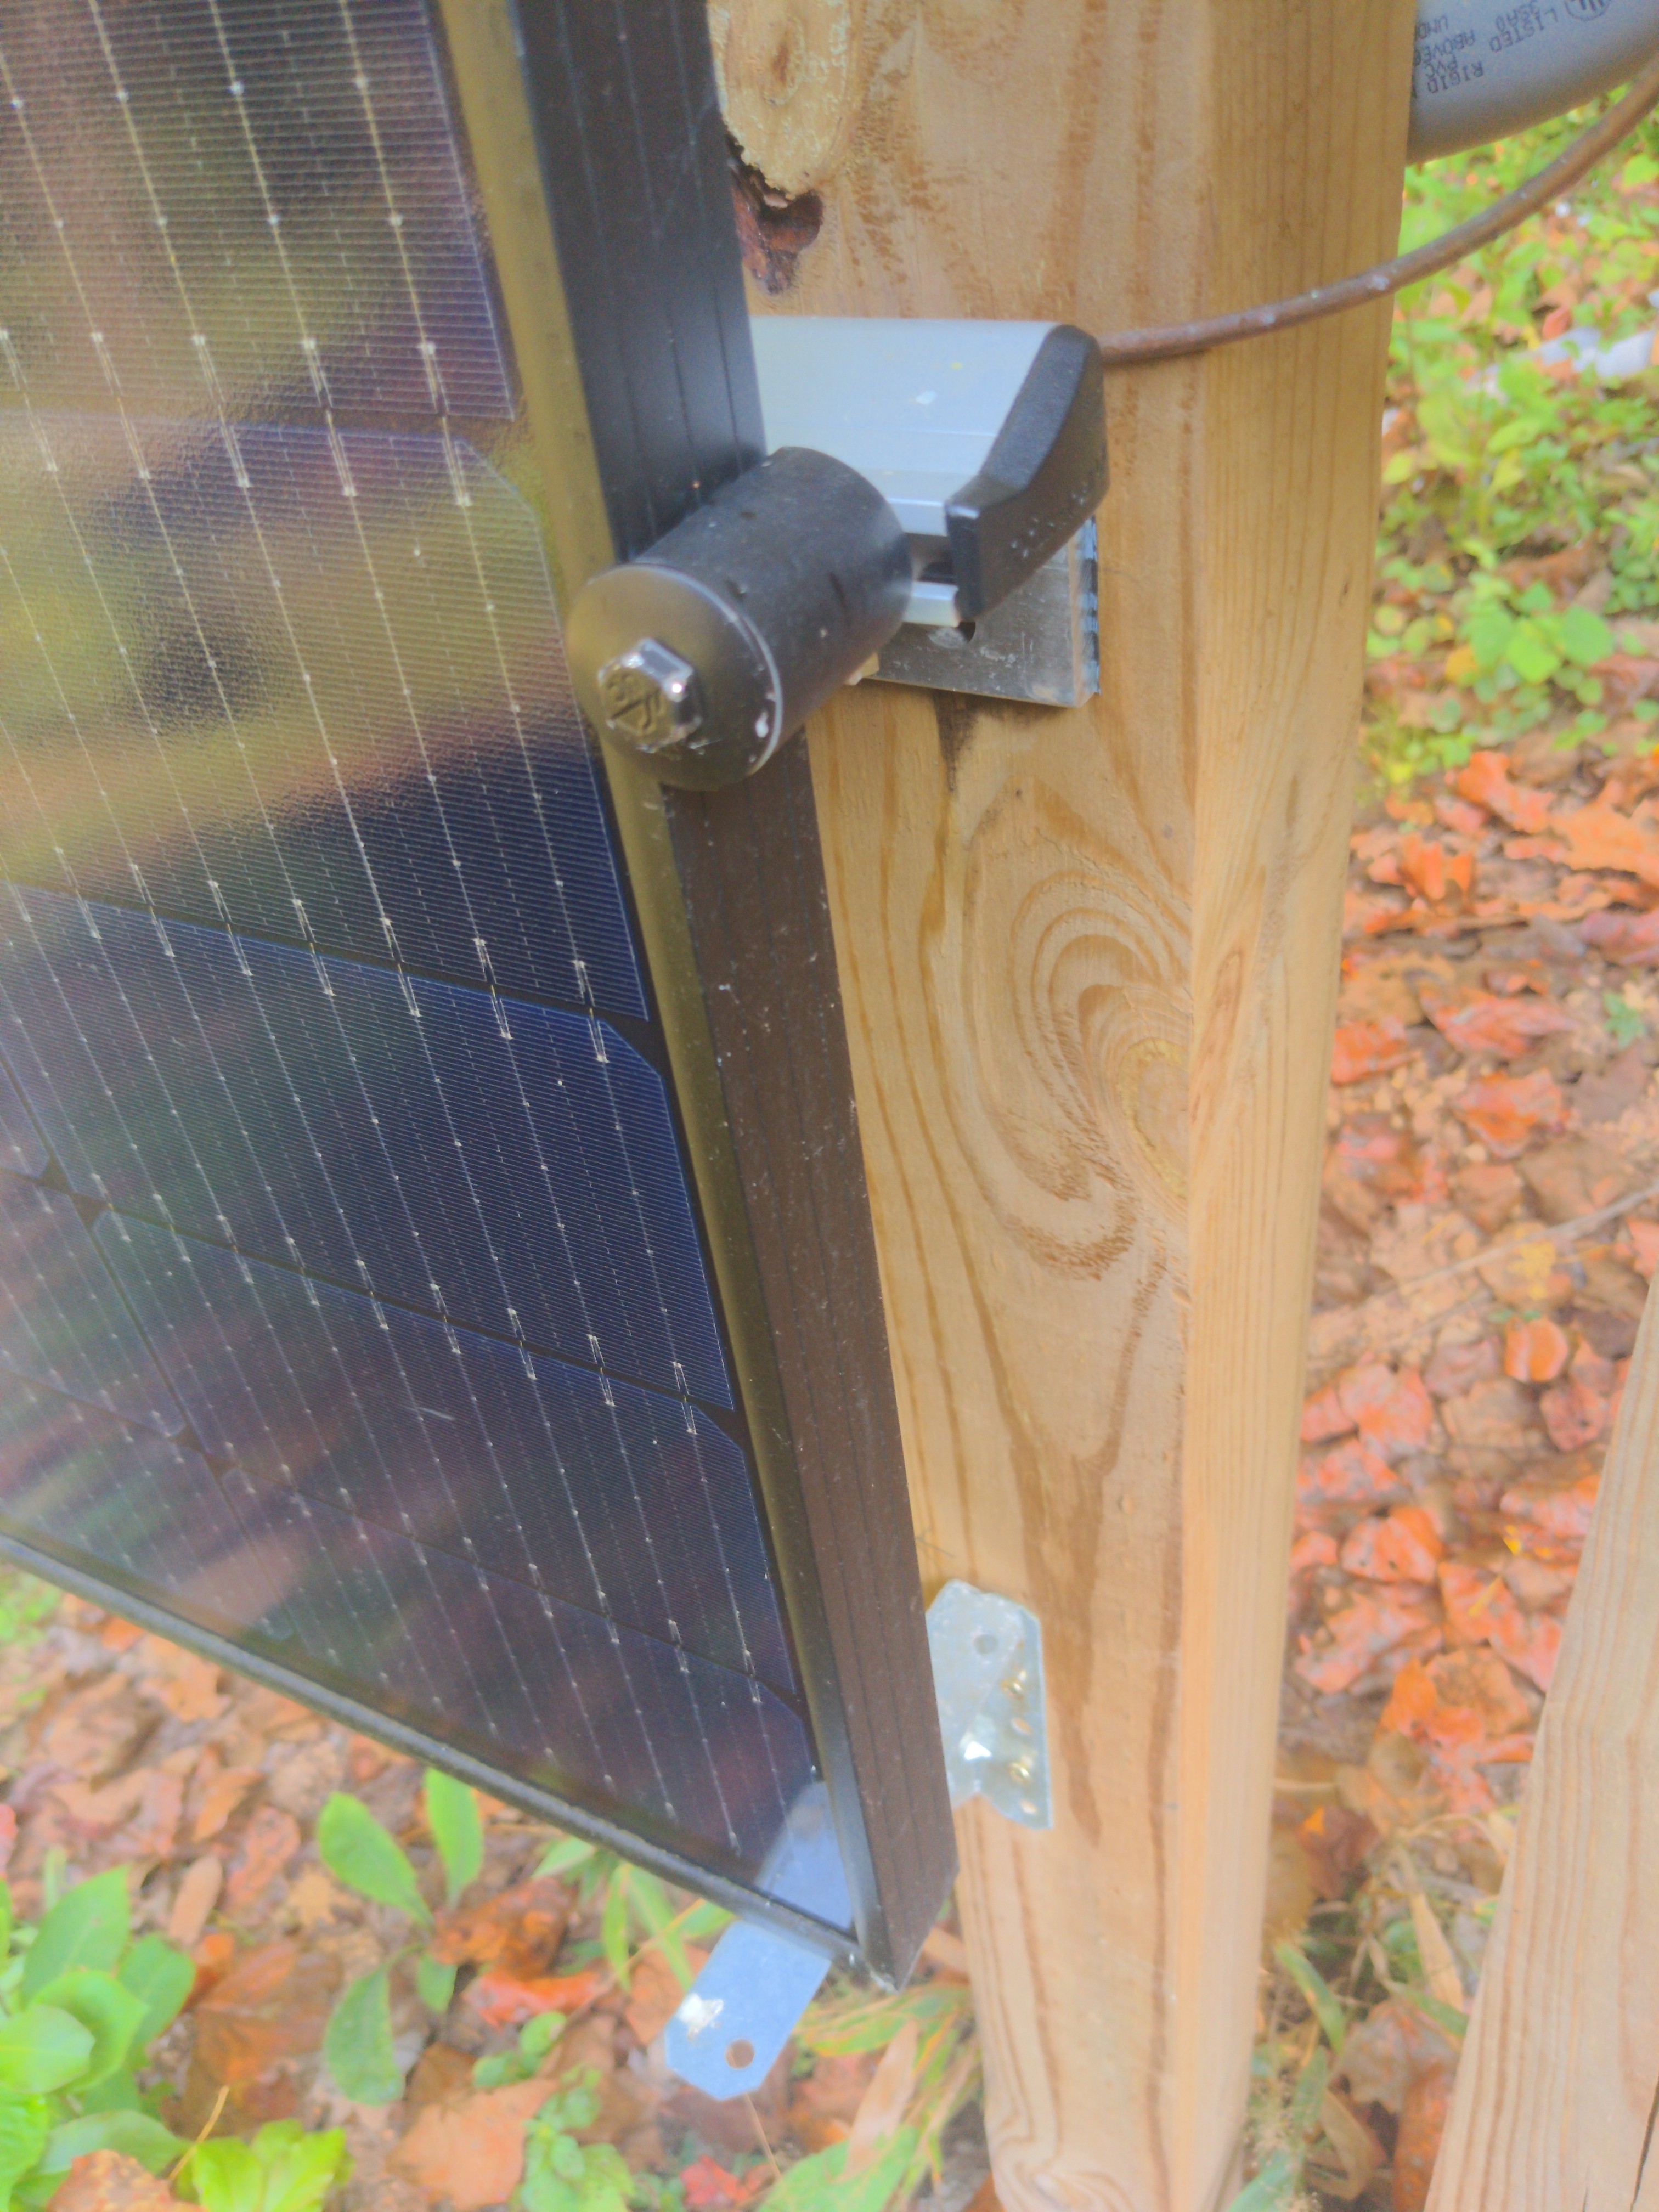
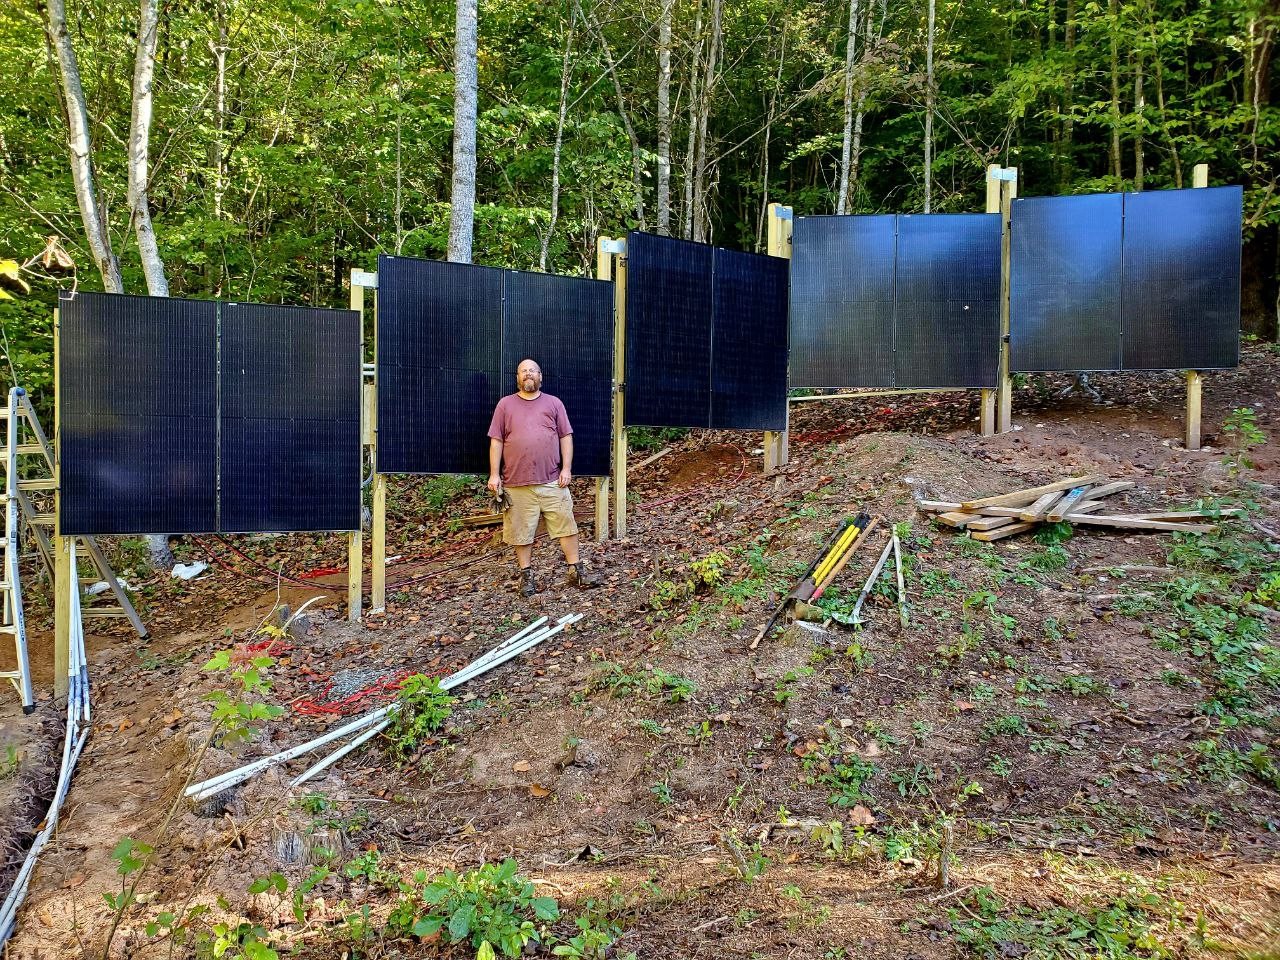
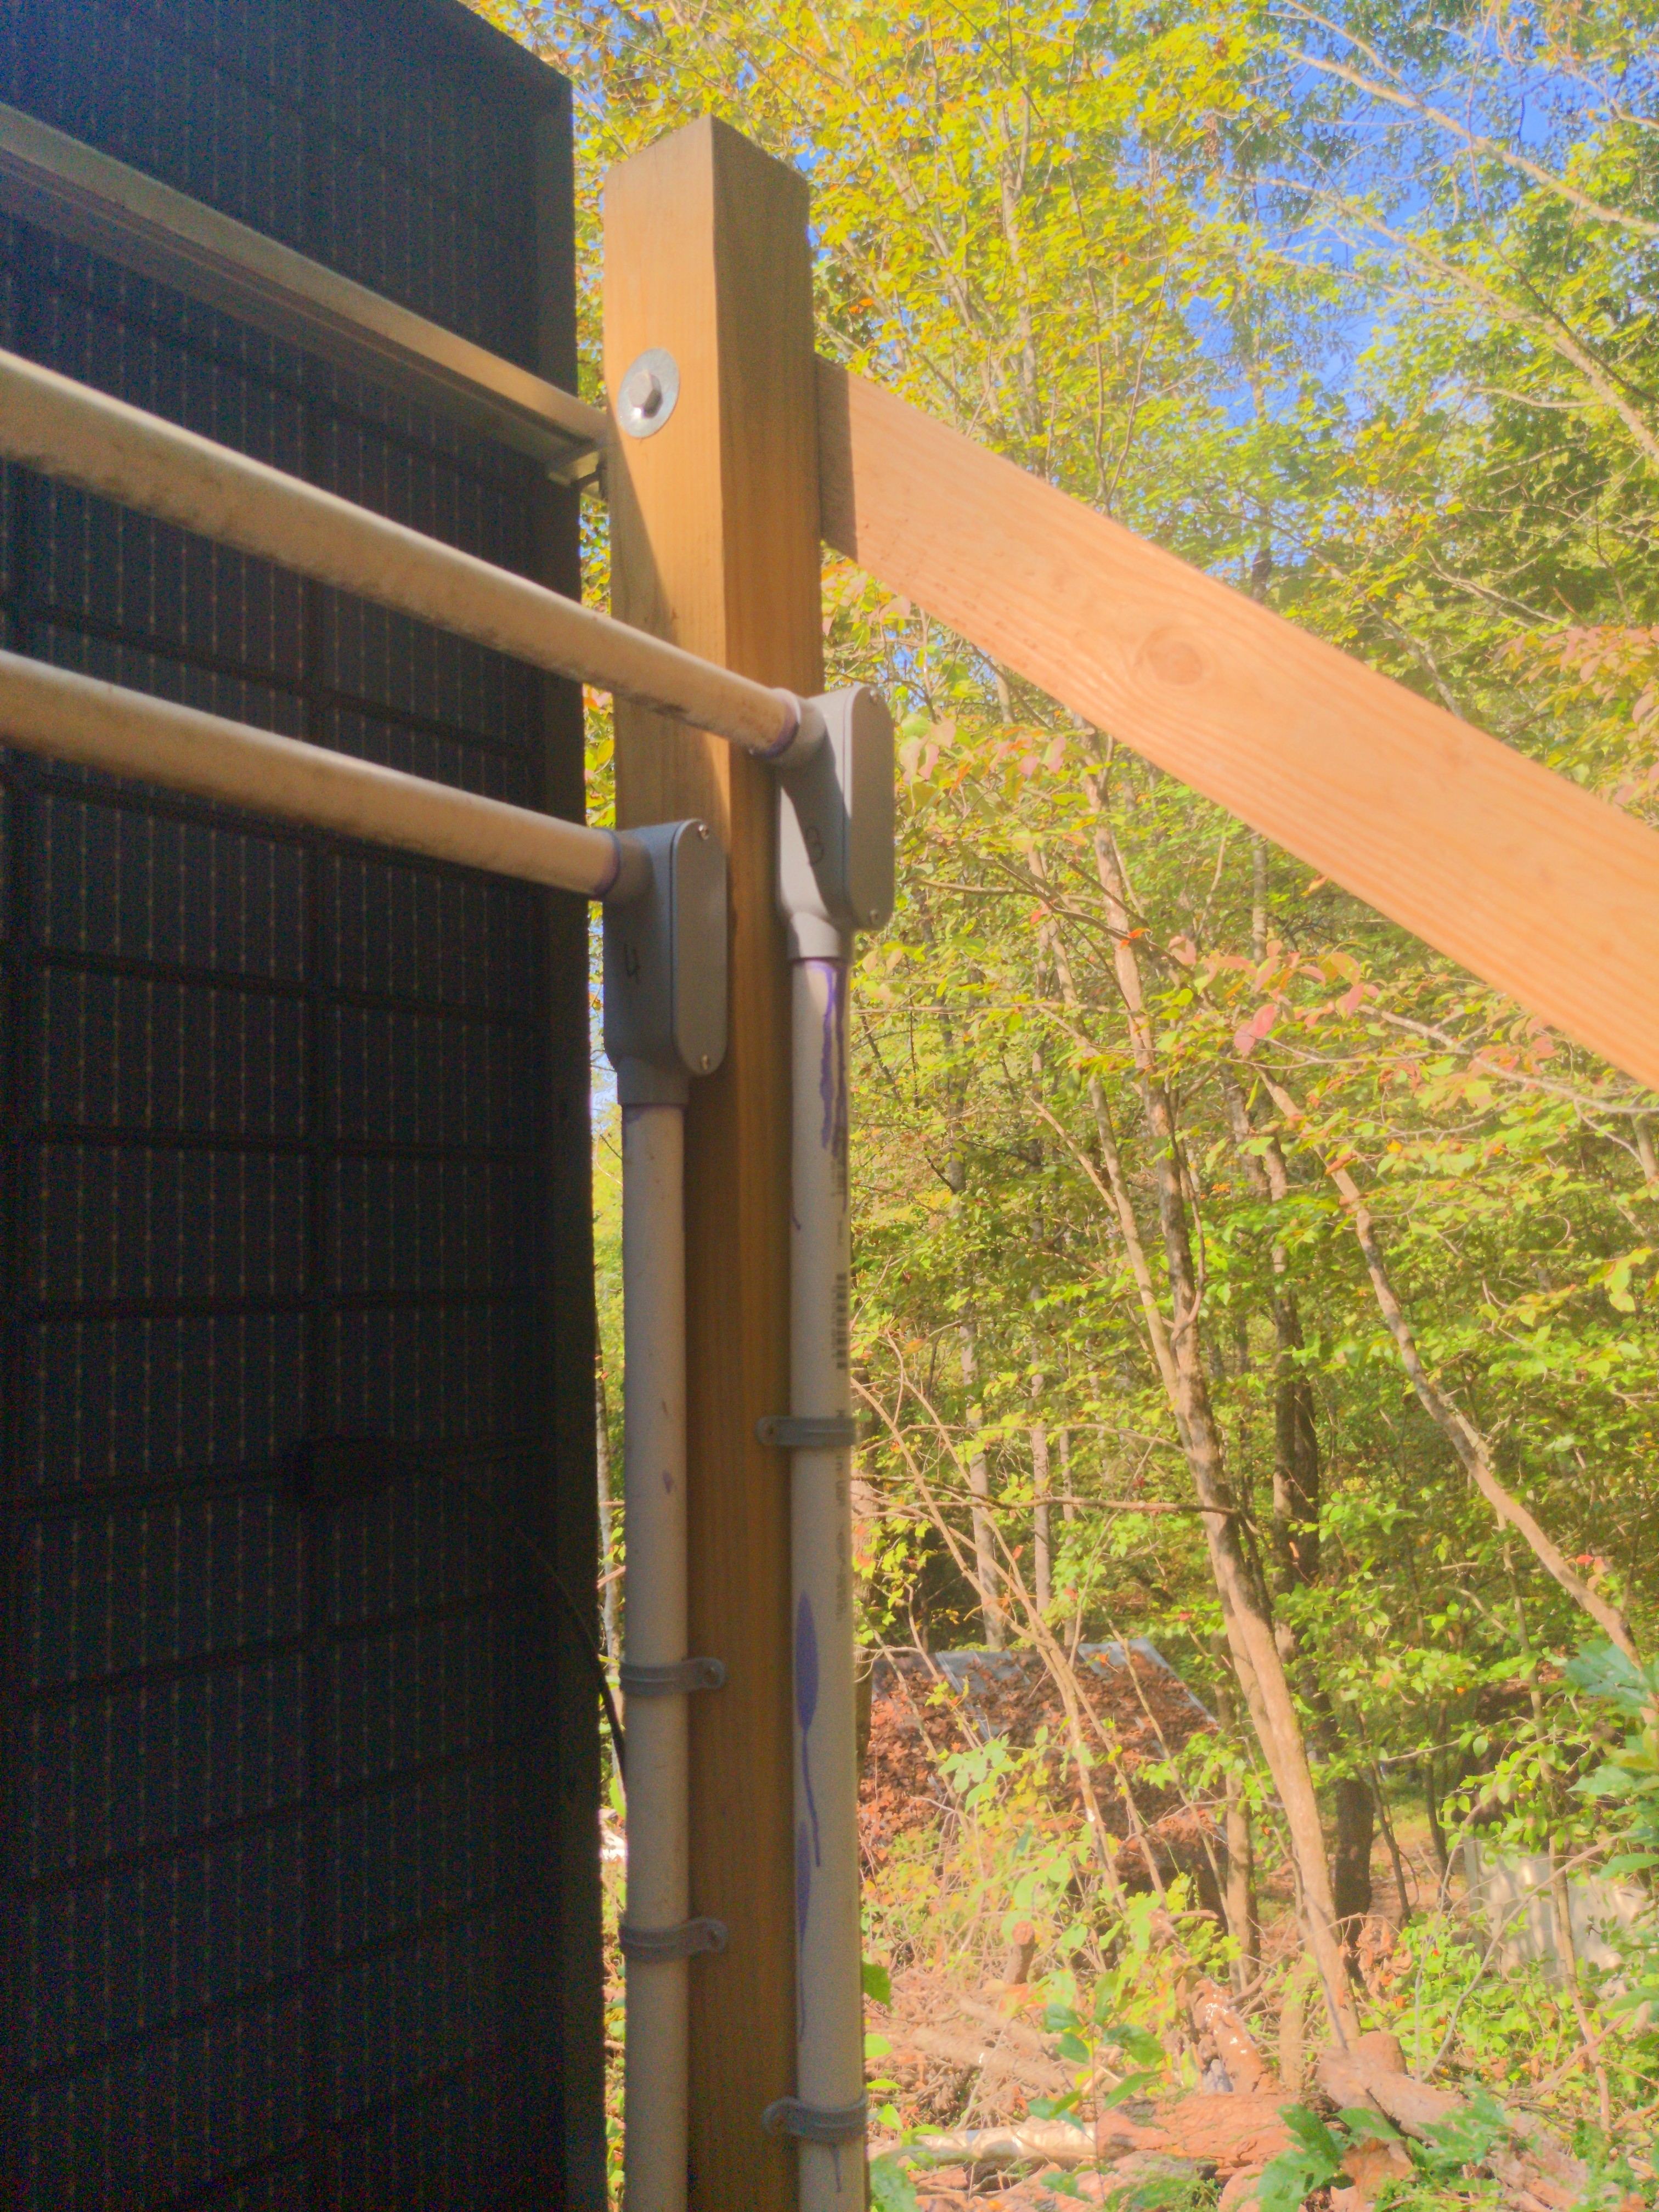
 DebConf26 is already in the air in Argentina. Organizing DebConf26 give us the
opportunity to talk about Debian in our country again. This is not the first
time that Debian has come here, previously Argentina has hosted DebConf 8 in Mar
del Plata.
In August, Nattie Mayer-Hutchings and Stefano Rivera from DebConf Committee
visited the venue where the next DebConf will take place. They came to Argentina
in order to see what it is like to travel from Buenos Aires to Santa Fe (the
venue of the next DebConf). In addition, they were able to observe the layout
and size of the classrooms and halls, as well as the infrastructure available at
the venue, which will be useful for the Video Team.
But before going to Santa Fe, on the August 27th, we organized a meetup in
Buenos Aires at
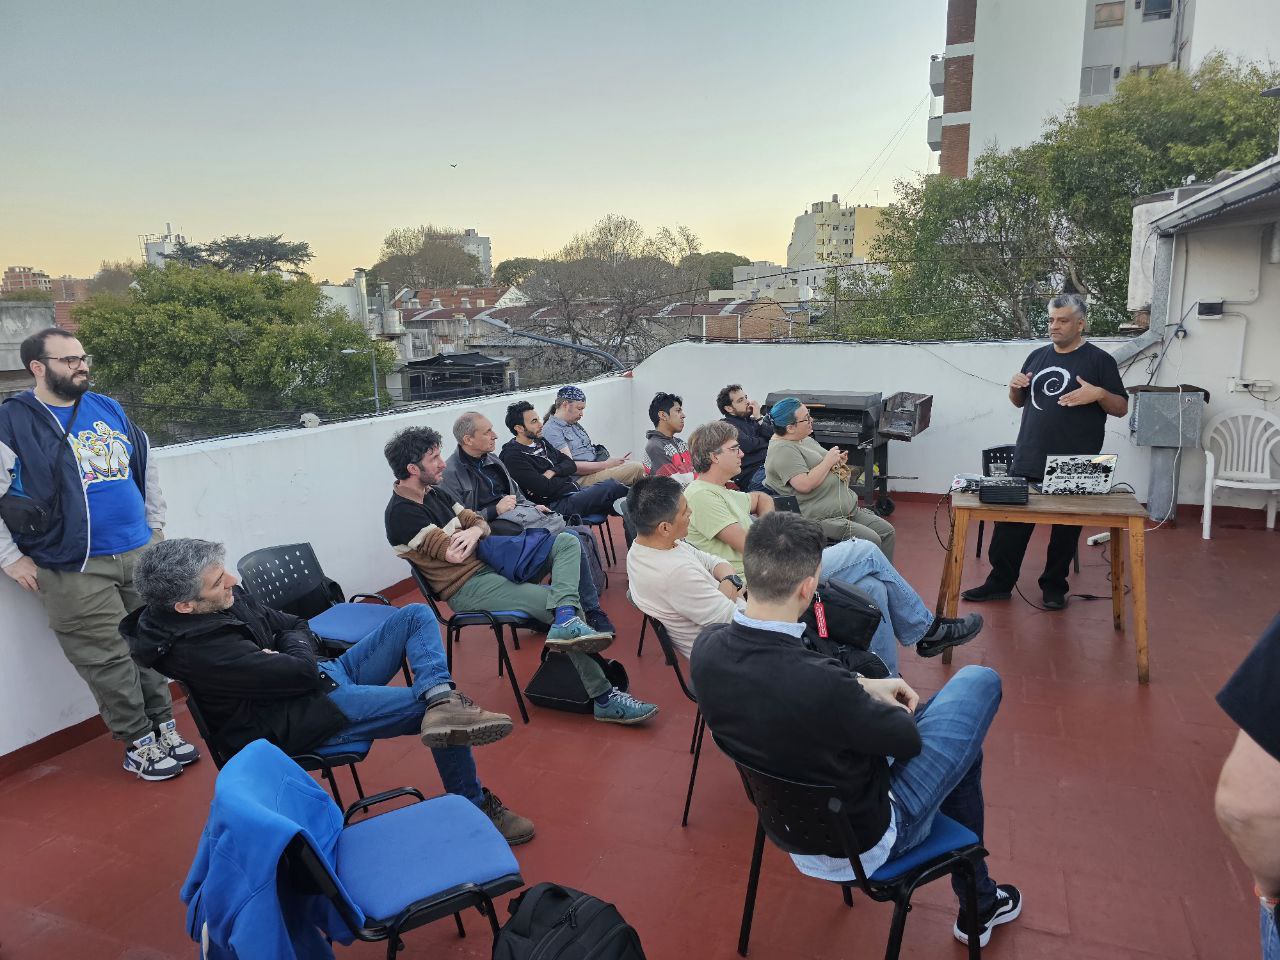 On August 28th, we had the opportunity to get to know the Venue. We walked around
the city and, obviously, sampled some of the beers from Santa Fe.
On August 29th we met with representatives of the University and local government
who were all very supportive. We are very grateful to them for opening
their doors to DebConf.
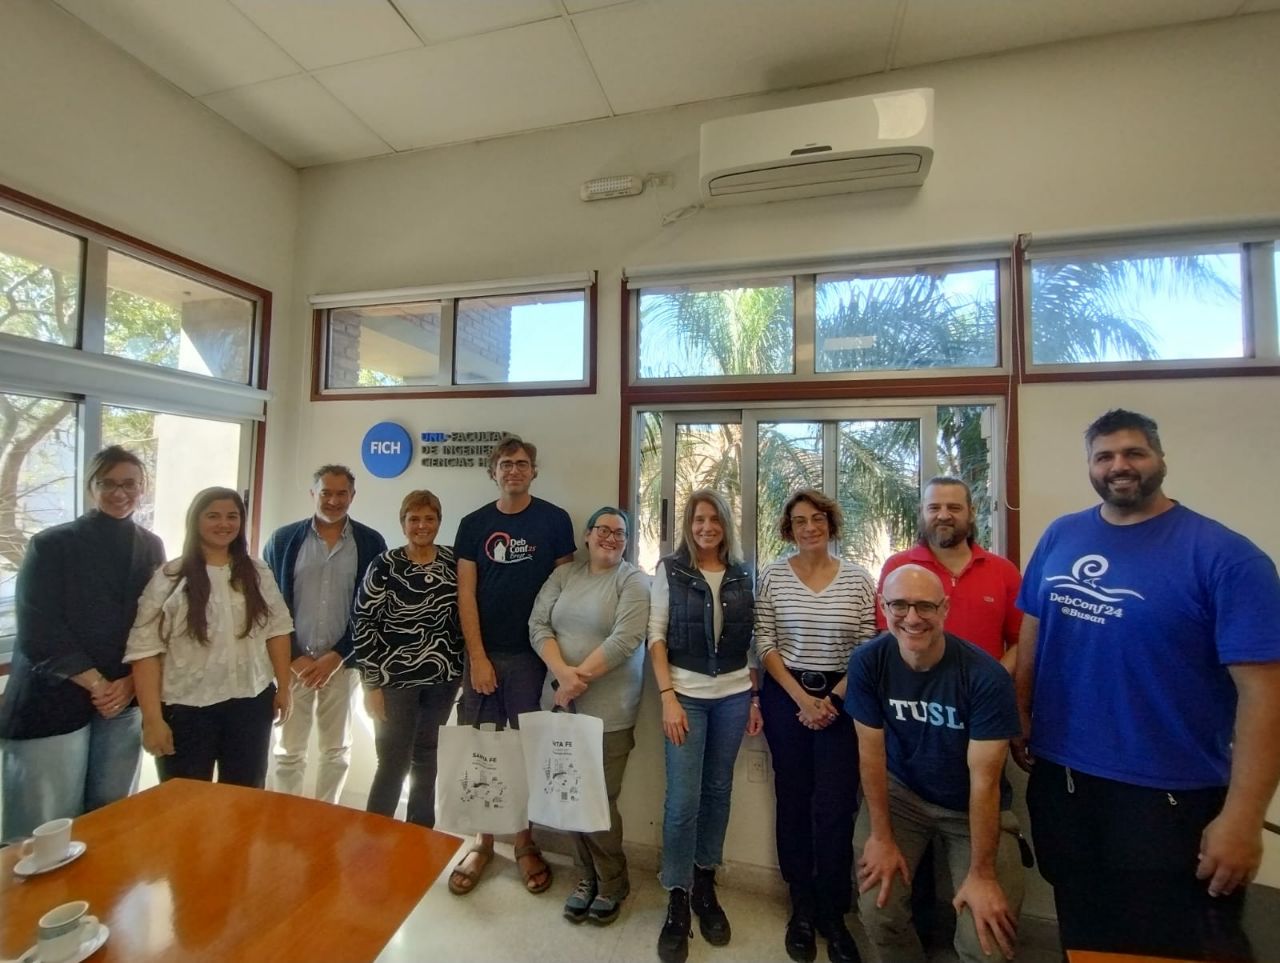 In the afternoon we met some of the local free software community at an event we
held in ATE
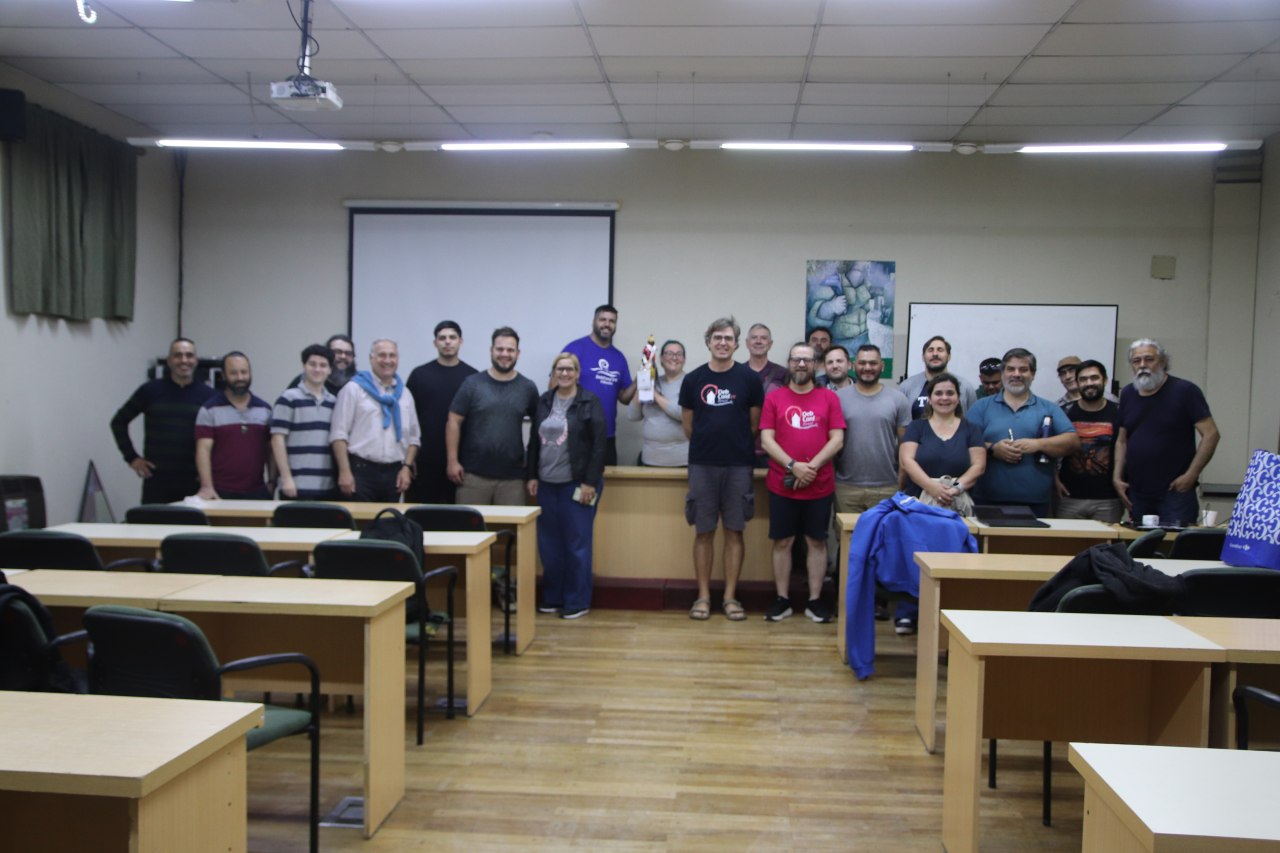 Thanks to Debian Argentina, and all the people who will make DebConf26
possible.
Thanks to Nattie Mayer-Hutchings and Stefano Rivera for reviewing an earlier
version of this article.
 tl;dr:
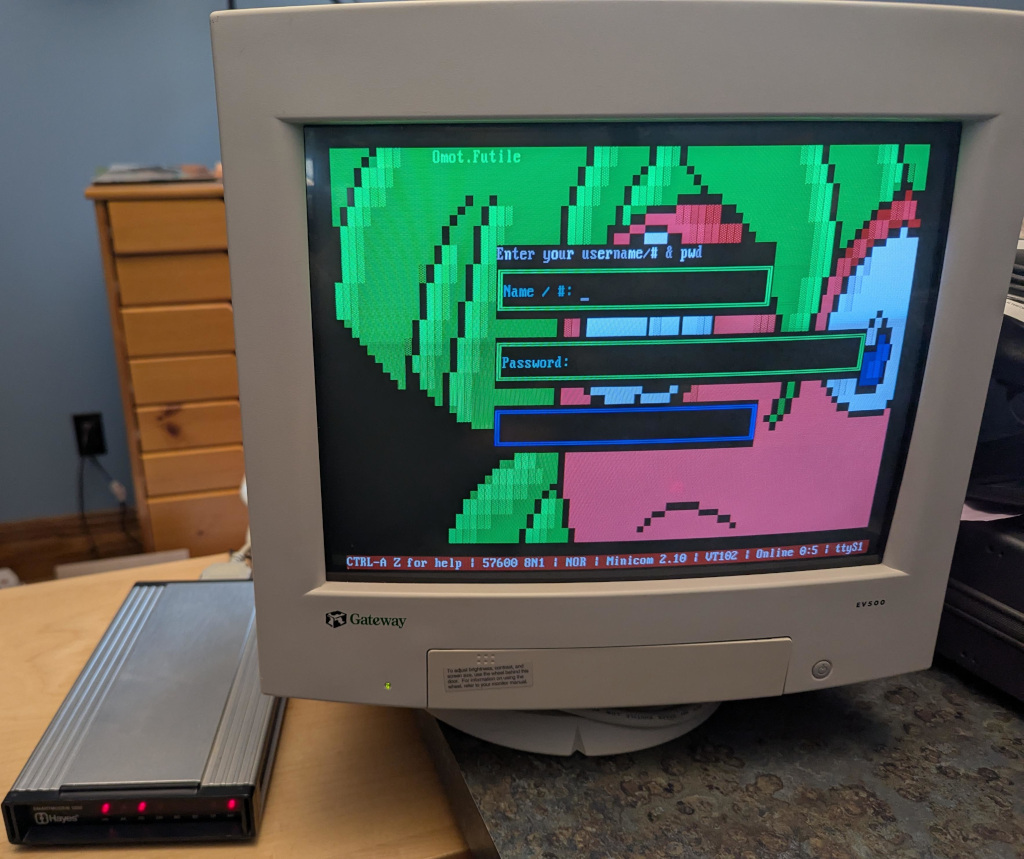
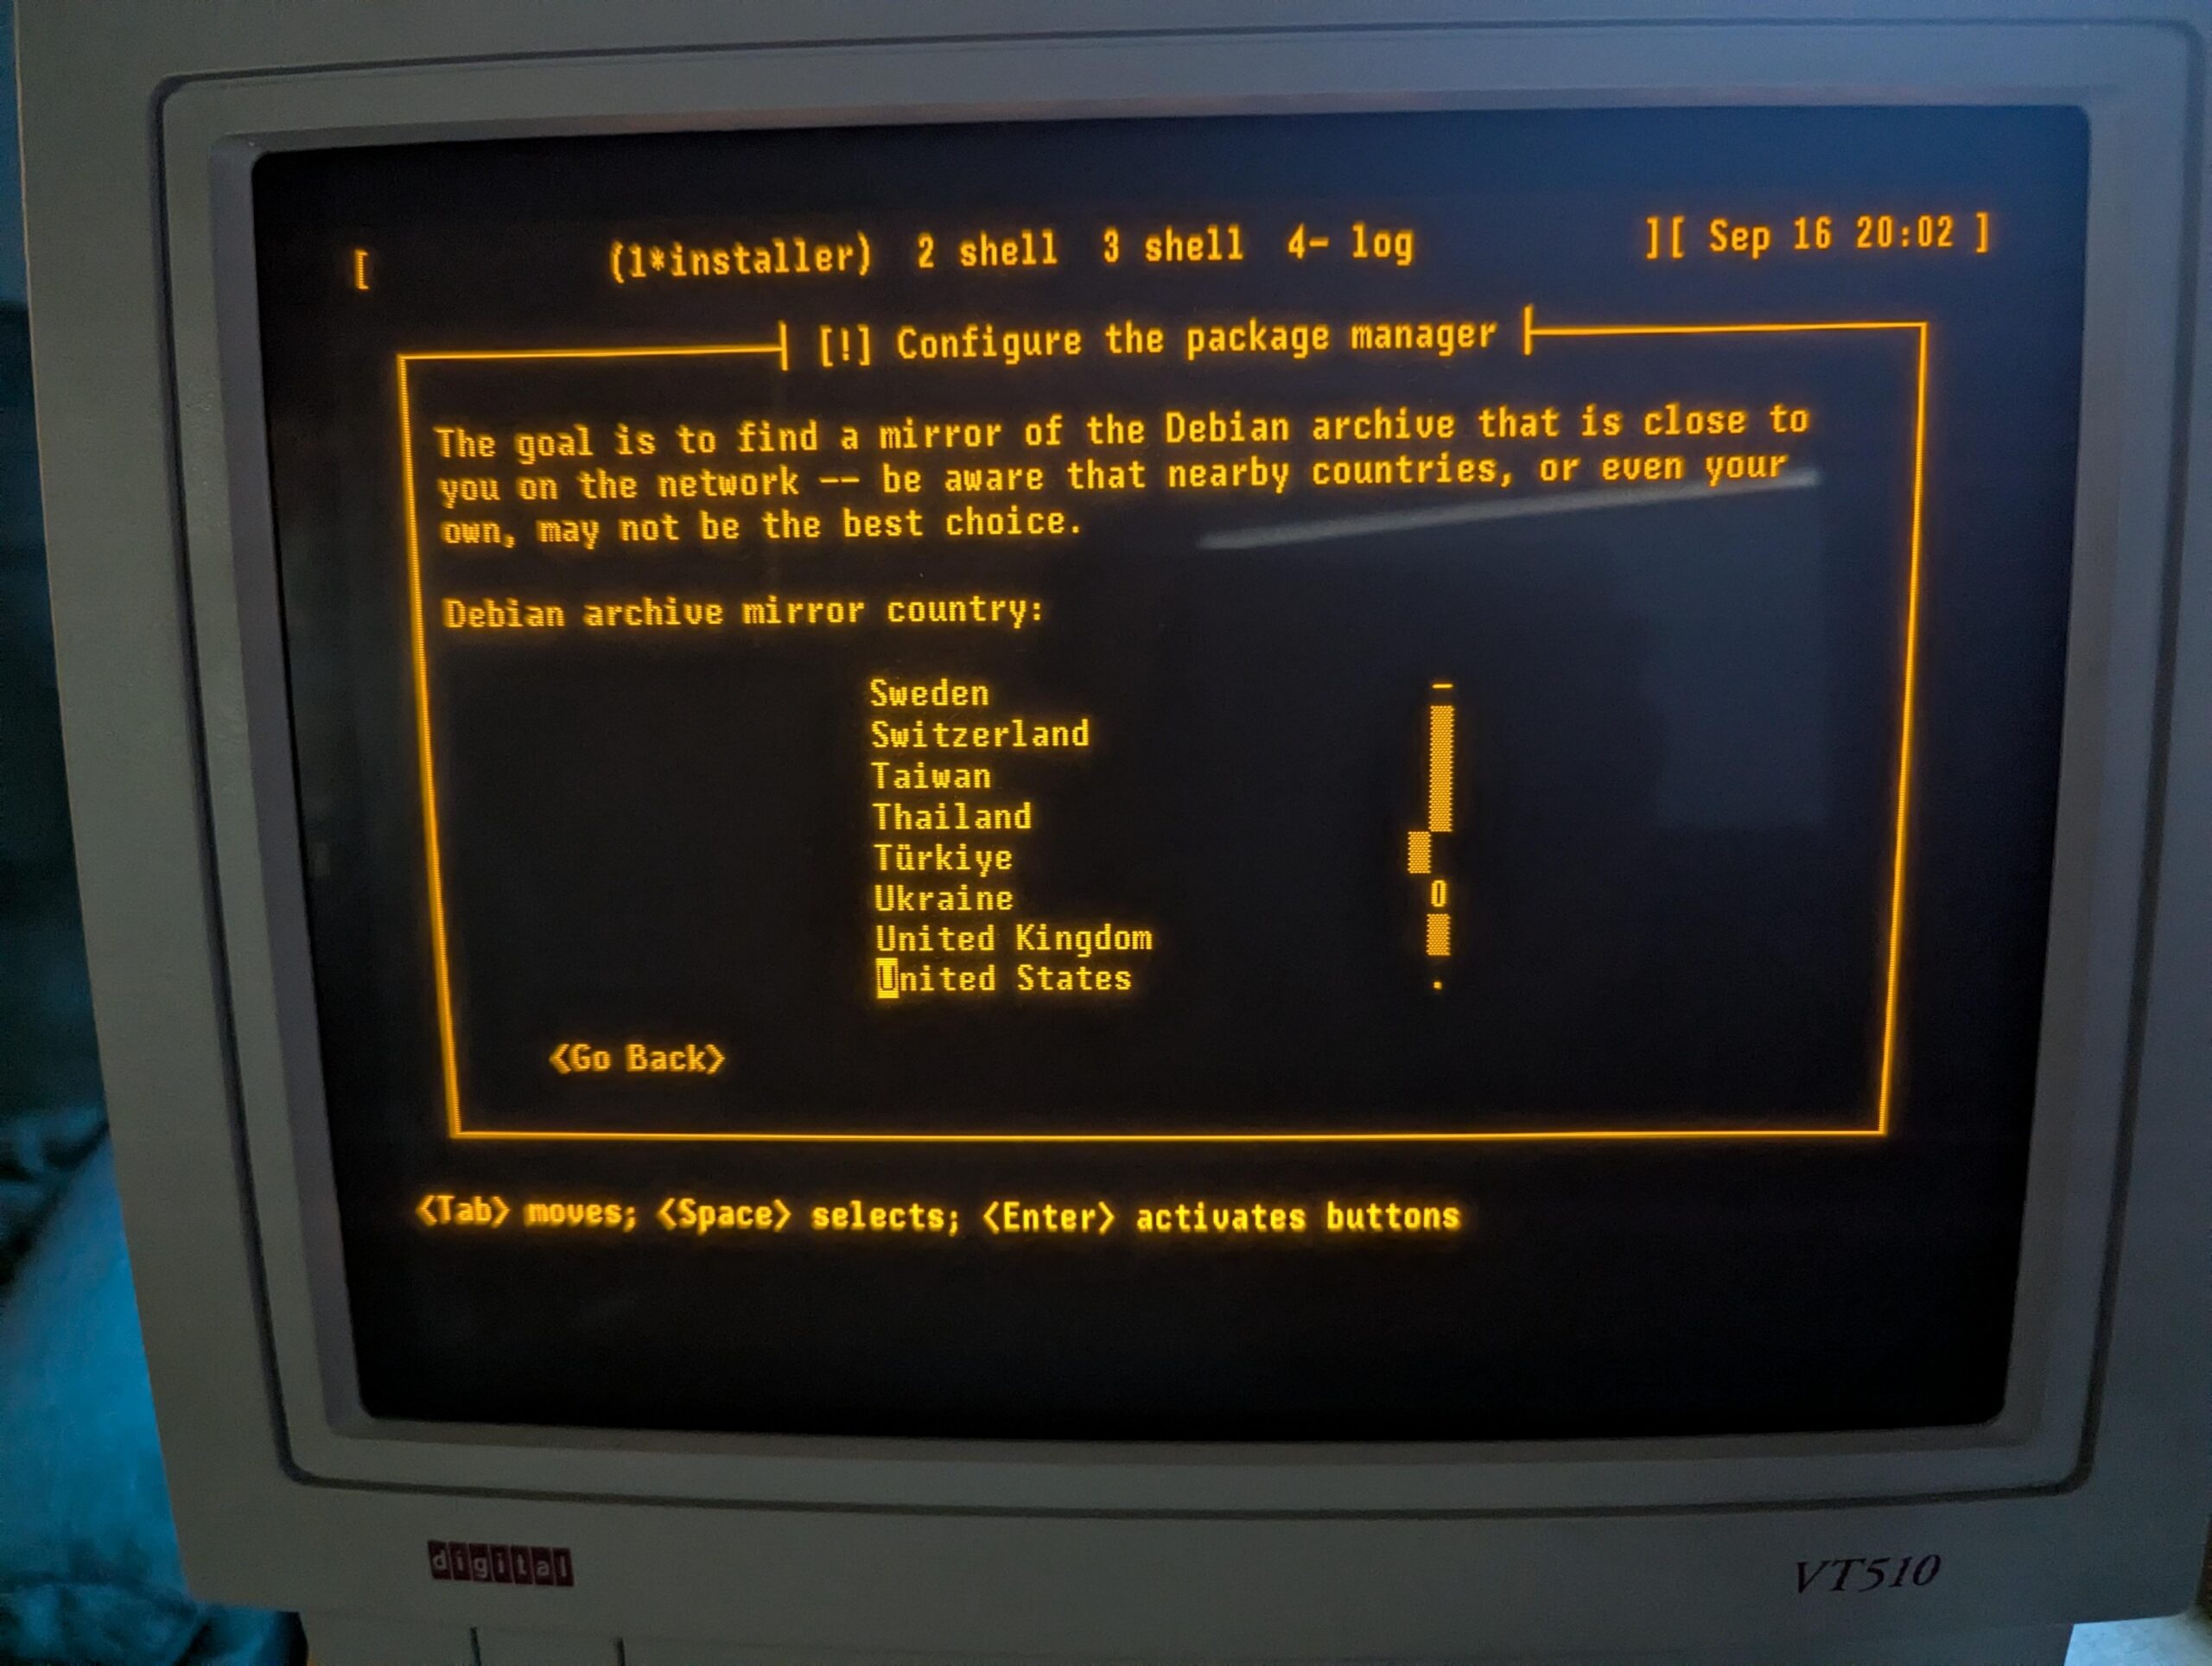

 Locking down database access is probably the single most important thing for a system administrator or software developer to prevent their application from leaking its data. As MariaDB 11.8 is the first long-term supported version with a few new key security features, let s recap what the most important things are every DBA should know about MariaDB in 2025.
Back in the old days, MySQL administrators had a habit of running the clumsy
 It's been a while since the last