Search Results: "spa"

14 March 2014

Neil Williams: LAVA server on an arndale

(ARMv7 A15 dual core) I ve covered how I set up my home LAVA lab and how I got two iMX.53 boards running, the next step was to sort out the LAVA server. My initial setup relied on using my Thinkpad as the server. This was somewhat convenient as that s how I develop the code, but didn t help me run jobs like health checks because the laptop was usually somewhere other than on the home LAN. There had been a long-standing problem with using LAVA on ARM the uwsgi support didn t compile but the code being used was old. As the same code has been in Debian for a long time, I suspected that this was fixed with a newer version. So as part of migrating LAVA to django1.6, apache2.4, postgres9.3, django-tables2 0.13 and a few other updated dependencies, I have been using the version of uwsgi from Debian unstable for quite a while without problems on x86. A simple tweak to the LAVA setup scripts and a newer version of uwsgi became available and it builds just fine on armhf. (I haven t tried armel because Linaro is ARMv7 or newer and we don t test with ARMv5/ARMv6 boards, so there s no point in trying armel it s not likely to be an issue for this fix though.) (Only the current lava-deployment-tool methods need to actually compile uwsgi directly from upstream without any patches the packaging which will replace l-d-t uses precompiled binaries, just as any admin would expect.) That initial install was on one of the iMX.53 boards, which ran as slowly as anyone who has used an iMX.53 would expect. I haven t run test jobs on that install, it had a hard enough time serving the frontend. Clearly some more cores would be a good step and when an arndale became available for the home lab, the next step was to get a SATA drive onto the arndale, put Debian unstable on that and then deploy LAVA to the arndale using the Debian packages. As a bonus, these packages are built for django1.6 (using an unreleased branch). Sounds simple enough. It works on iMX.53, it should work on an arndale. Well, it does but only after some unexpected faff. arndale, u-boot and SATA I hate u-boot every single time I ever touch it, the little I know about any other u-boot device is completely useless. Uniformity is a good thing infinite permutations are just rope to hang ourselves with cute embedded nonsense hacks and I m bored of that whole scene. So, boot the arndale, interrupt the bootloader to get to the prompt. What s the first thing most people would want? help. Denied this particular u-boot has been compiled without the ability to display any help messages. u-boot has just sunk further into the depths of please can we have something else which is uniform across devices . OK, well maybe I can get by without help. sata init unknown command sata . (Go away, do something else for a bit.) The arndale isn t one of the newest boards in the ARMv7 world, LAVA has been using them for a while, so someone has probably done some work to fix this . nope. There s a workaround a nice detailed guide by Phil Endecott which details that the kernel needs to continue to be loaded from SD and then the SATA can be used for just the rootfs. Mildly annoyed (I was hoping to be able to update the arndale kernel without the hassle of mounting the SD card at all), the rest was straight-forward. Preparing the SATA and installing Debian Due to the complexity of some of the transitions currently ongoing in Debian ahead of the Jessie release freeze, uwsgi is not in Debian testing right now so this install has to be Debian unstable. That s OK, I ve been running Debian unstable on all my machines for several years now usually updating ~5 times a week.

# parted /dev/sda -s unit mb mktable msdos
# parted /dev/sda -s unit mb mkpart primary 1 -- "-0"
# mkfs.ext4 /dev/sda1
# mount /dev/sda1 /mnt/root/
(note the in the mkpart command, that catches me out most times I try this. Without it, the special -0 gets interpreted as an option to parted but parted doesn t then tell you how to fix it, it just complains about an unknown option.) The SD image I am using is a LAVA master image, based on Ubuntu, so it was easy to put debootstrap onto it.

# apt-get install debootstrap
# debootstrap --arch=armhf sid /mnt/root/ http://ftp.uk.debian.org/debian
# chroot /mnt/root/
Inside the chroot, it s Debian as usual:

apt-get update
apt-get install emdebian-archive-keyring
passwd
emdebian-archive-keyring is a package I (ab)use to sign my LAVA packaging as it has the advantage of being in Debian and Ubuntu going back to the time of Lenny, so it is always available from a repository which has already been authenticated to apt and doesn t involve downloading some random key from a website. I use passwd manually because this rootfs won t be using auto-login, it will have regular users. root passwords can be automated, if necessary. Thinking about login, remember to give the rootfs a usable tty. (The LAVA master image has a nasty habit of mangling editors like nano and vi when used over serial, so I m using echo.) For the arndale you need:

# echo T0:23:respawn:/sbin/getty -L ttySAC2 115200 vt102 >> ./etc/inittab
# echo >> ./etc/securetty
# echo ttySAC2 >> ./etc/securetty
Then to make the hostname useful, adapt this to your needs:

echo 127.0.0.1 arndale.codehelp arndale >> ./etc/hosts
Finally, get the network running at boot and add the LAVA repository:

# echo auto lo eth0 > ./etc/network/interfaces.d/arndale
# echo iface lo inet loopback >> ./etc/network/interfaces.d/arndale
# echo iface eth0 inet dhcp >> ./etc/network/interfaces.d/arndale
# echo deb http://people.linaro.org/~neil.williams/lava sid main >> ./etc/apt/sources.list.d/lava.list
# apt-get update
# exit
Once the LAVA packaging is finalised, the packages will be uploaded to a normal Linaro PPA, I ll update the packages to use an official download location and we ll move to using sane version string handling. For now, the packages are still in development. Code for the packaging is in Alioth but there are issues with anonymous access to the pkg-linaro-lava repositories currently, so I ve also pushed to http://github.com/Linaro if you are interested in building the packages yourself. See also my packaging guide which is also linked from the Links page on my own site. With that done, time to reboot, set the SATA drive as the rootfs using the horrid u-boot and install LAVA.

# reboot
> setenv bootargs console=tty0 console=ttySAC2,115200n8 drm_kms_helper.edid_firmware=edid-1920x1080.fw root=/dev/sda1
> boot
login
# apt-get install postgresql
After this operation, 63.0 MB of additional disk space will be used.

# apt-get install lava-server
After this operation, 231 MB of additional disk space will be used.

# a2dissite 000-default
# a2ensite lava-server
# apache2ctl restart
# service lava-server restart
Take note of the IP address of your new ARM LAVA server and sign in with your regular details, e.g. using OpenID before creating a temporary superuser:

# lava-server manage createsuperuser --username default --email=user@example.com
Choose a temporary password, log out, log in as the temporary superuser, promote your regular user to superuser and default owner of unrestricted devices in the django admin interface. Finally, log out and login as regular user to delete the temporary user. (Yes, that probably could do with some improvement remind me later and I ll see if a known user can be promoted from the command line.) See also Senthil s recent post on LAVA unit tests. Getting those to run without so many steps is also on the TODO list. Results
IP Address: 127.0.0.1
Is Master? : True
Uptime: 6:02:23.700000
Architecture: armv7l
Platform: Linux-3.10.1.0-1-linaro-arndale-armv7l-with-debian-jessie-sid
Insignal Arndale evaluation board based on EXYNOS5250
System memory: 1998MiB
Next! I m working on some code upstream to make it easier to add devices from the command line. The aim is that a set of simple commands will set up an initial device, run a job on that device and submit a result bundle to the LAVA server as job #1. This gives some assurance that everything has gone well. Now I can finally add health checks for the iMX.53 boards and start regular tests on those boards. The cubie boards will wait for a later blog post, there are interesting problems with the bootloader and serial connections. That s a whole different rant.

Steve Kemp: So load-balancers are awesome

When I was recently talking about load-balancers, and automatically adding back-ends, not just removing bad ones that go offline, I obviously spent a while looking over some. There are several dedicated load-balancers packaged for Debian GNU/Linux, including: In addition to actual dedicated load-balancers there are things that can be coerced into running in that way: apache2, varnish, squid, nginx, & etc. Of the load-balancers I was immediately drawn to both pen and pound, because they have command line tools ("penctl" and "poundctl" respectively) for adding/removing/updating the running configuration. Pen I've been using for a couple of days now, and although it suffers from some security issues I'm confident they will be resolved in the near future. (#741370) My only outstanding task is to juggle some hosts around and stress-test the pair of them a little more before deciding on a winner. In other news I kinda regret the whole blogspam.net API. I'd have had a far simpler life if I'd just ran the damn thing as a DNSBL in the first place. (That's essentially how it operates on the whole anyway. Submit spammy comments for long enough and you're just blacklisted, thereafter.)

Dirk Eddelbuettel: Rcpp 0.11.1

A new minor release 0.11.1 of Rcpp is now on the CRAN network for GNU R; binaries for Debian have also been uploaded. The release fixes a number of bugs that have come up since the 0.11.0 release in January, but also brings some extensions. See the NEWS file section below for details, or the ChangeLog file in the package and on the Rcpp Changelog page Once again, we tested this release by building against all CRAN packages which depend upon Rcpp. In short, three packages are blacklisted from tests, and three came up with something we noted --- but the remaining 177 packages all build and test cleanly. Detailed results of those tests (and the scripts for it) are on GitHub. There are a number of other fixes, upgrades and other extensions detailed in NEWS file extract below, in the ChangeLog file in the package and on the Rcpp Changelog page.
Changes in Rcpp version 0.11.1 (2014-03-13)
  • Changes in Rcpp API:
    • Preserve backwards compatibility with Rcpp 0.10.* by allowing RObject extraction from vectors (or lists) of Rcpp objects
    • Add missing default constructor to Reference class that was omitted in the header-only rewrite
    • Fixes for NA and NaN handling of the IndexHash class, as well as the vector .sort() method. These fixes ensure that sugar functions depending on IndexHash (i.e. unique(), sort_unique(), match()) will now properly handle NA and NaN values for numeric vectors.
    • DataFrame::nrows now more accurately mimics R's internal behavior (checks the row.names attribute)
    • Numerous changes to permit compilation on the Solaris OS
    • Rcpp vectors gain a subsetting method it is now possible to subset an Rcpp vector using CharacterVectors (subset a by name), LogicalVectors (logical subsetting), and IntegerVectors (0-based index subsetting). Such subsetting will also work with Rcpp sugar expressions, enabling expressions such as x[ x > 0].
    • Comma initialization (e.g. CharacterVector x = "a", "b", "c";, has been disabled, as it causes problems with the behavior of the = operator with Rcpp::Lists. Users who want to re-enable this functionality can use #define RCPP_COMMA_INITIALIZATION, but be aware of the above caveat. The more verbose CharacterVector x = CharacterVector::create("a", "b", "c") is preferred.
  • Changes in Rcpp Attributes
    • Fix issue preventing packages with Rcpp::interfaces attribute from compiling.
    • Fix behavior with attributes parsing of ::create for default arguments, and also allow constructors of a given size (e.g. NumericVector v = NumericVector(10)) gives a default value of numeric(10) at the R level). Also make NAs preserve type when exported to R (e.g. NA_STRING as a default argument maps to NA_character_ at the R level)
  • Changes in Rcpp modules
    • Corrected the un_pointer implementation for object
Thanks to CRANberries, you can also look at a diff to the previous release. As always, even fuller details are on the Rcpp Changelog page and the Rcpp page which also leads to the downloads, the browseable doxygen docs and zip files of doxygen output for the standard formats. A local directory has source and documentation too. Questions, comments etc should go to the rcpp-devel mailing list off the R-Forge page

This post by Dirk Eddelbuettel originated on his Thinking inside the box blog. Please report excessive re-aggregation in third-party for-profit settings.

13 March 2014

Mario Lang: Living in RAM

I switched to SSD on my home server a few years ago, at a time when SSH was still new and sort of hyped. However, I immediately knew that this type of technology is for me: it is fast and rather silent. SSD storage has this air of being fragile though. You are supposed to not wear it out too much. It's not like in the good old days where you would write to your hard disk without any extra thought.
tmpfs Before I switched to SSD I was already using tmpfs to store /tmp in RAM, for performance reasons mostly. /etc/default/tmpfs:
RAMTMP=yes
Since RAM is relatively cheap these days I have lots of it in my home server.
/var/cache/apt/archives When I switched to SSD, I extended this concept by mounting /var/cache/apt/archives via tmpfs. This is to save disk I/O for package updates. And for a machine running sid which is more or less regularily updated, this saves quite some useless writes to disk. Roughly 100MB per update.
/tmp/src Nowadays, I have almost all of my source code checkouts and build-trees in /tmp/src. myrepos makes this very easy to handle. Simply clone all repositories you are interested in, and remember their details with mr register. After a reboot, all you need to do is:
$ mkdir /tmp/src
$ cd !$
$ mr up
Your repository locations have (likely) been recorded in ~/.mrconfig. Of course there is the danger of accidentally loosing data due to a power outage. However, I feel this leads to a rather clean workflow. Changes need to be pushed anyway. So since you can not trust your local repository to really persist, you are forced to push your changes regularily, which is a good thing! Besides, I have a UPS at home which gives me roughly one hour of backup power. This was enough to sustain every power outage I have witnessed in the past years. Typically, outages are rather short lived in my area, somewhere between a few seconds and 5 minutes. It is rather rare that electricity goes missing for more than half an hour. The only downside of this approach is that from time to time, you will use more bandwidth by re-cloning repositories after a reboot. But really, who needs reboots on Linux? Last time I had half a year uptime, and only rebooted because I wanted to jump from linux 3.8 to 3.13. This approach only works on long-running machines though. It is probably not very useful for a laptop.

12 March 2014

Francesca Ciceri: All hail the Spam Reviewers!

With the help of Enrico and the Debian Listmaster Team -and in particular Alexander Wirt: thank you very much! - the spam reviewers of the Debian mailing lists have been added to the list of Debian Contributors.
While some statistics about the reviewing job already existed, adding these data to the Debian Contributors list is another little step to map all kind of Debian contributions. Wondering what exactly is the job of the spam reviewers? It consists in checking all the messages of the Debian mailing lists reported as spam: if a message reported as spam gets three reviews as spam (and none as ham) it is removed from the archive.
Only DDs can do this: if you are one check here how to do it.
But there's one - and probably more important job - that everyone can do: report spam. When a message is reported as spam by 5 or more persons, it will make to the reviewers' queue. There are some organized spam cleaning efforts you can join: here there's a list of them, while on this page you can find more information on the whole process. Wondering what exactly is the Debian Contributors list? It's a brilliant effort started by Enrico to map all kind of contributions in Debian.
You can read more about it here and here.

Vasudev Kamath: Working around type system of Go with unsafe

Go language has a strong type system unlike C, and some times this will be head ache when we want to interact with C data types with Cgo or just to convert a Go type to lets say byte slice. I recently faced the same problem and after poking around things, I learned the Go provides unsafe package which can be used to work around the Go's type system.
Problem Recently I started using Cgo to use some C library I had to write some tools for development and testing. The reason I chose Go for this was prototyping and writing some quick tools is much easier in Go than done in C. The C library had some function which takes pointer to array types and fills it with some values. The problem I was facing here was how to create a C array in Go. Go does have array but its largely used as internal representation for much efficient type called slice and I can't directly cast a byte slice into an C array. Second problem I had was I had to store arbitrary Go types like float (float32,float64) and int (int32, int64) etc. into C array. So in brief, the problems that needed to solve are
  1. Find a way to convert byte slice from Go into C array and vice versa.
  2. Find a way to convert and store Go types into a C array.
Solution Basically C array are sequence of memory location which can be statically or dynamically allocated. In Cgo its possible to access C standard library functions for memory allocation, so why not use it. The memory allocation function then returns the pointer to starting of allocated memory, we can use this pointer to write Go's bytes into the memory location and bytes from memory location into Go's slice. The pointer returned by C allocation functions are not directly usable for memory dereferencing in Go, here is where unsafe package kicks in. We will cast the return of C allocation function as unsafe.Pointer type and from the documentation of unsafe package,
  1. A pointer value of any type can be converted to a Pointer.
  2. A Pointer can be converted to a pointer value of any type.
  3. A uintptr can be converted to a Pointer.
  4. A Pointer can be converted to a uintptr.
So we can then cast unsafe.Pointer to uintptr which is the Go type which is large enough to hold any memory address in Go and can be used for pointer arithmetic just like we do in C (of course with some more castings). Below I'm pasting a simplified code in C which I wrote for this post.
#ifndef __BYTETEST_H__
#define __BYTETEST_H__
typedef unsigned char UBYTE;
extern void ArrayReadFunc(UBYTE *arrayout);
extern void ArrayWriteFunc(UBYTE *arrayin);
#endif
#include "bytetest.h"
#include <stdio.h>
#include <string.h>
void ArrayReadFunc(UBYTE *arrayout)
 
     UBYTE array[20] =  1, 2, 3, 4,5, 6, 7, 8, 9, 10,
                        11, 12, 13, 14, 15, 16, 17,
                        18, 19, 20 ;
     memcpy(arrayout, array, 20);
 
void ArrayWriteFunc(UBYTE *arrayin)
 
     UBYTE array[20];
     memcpy(array, arrayin, 20);
     printf("Byte slice array received from Go:\n");
     for(int i = 0; i < 20; i ++) 
             printf("%d ", array[i]);
      
     printf("\n");
 
Functions are written just for this post and they don't really do anything. As you can see ArrayReadFunc takes a pointer to array and fills it with content of another array using memcpy. Function ArrayWriteFunc on other hand takes pointer to array and copies its content to internal array. I've added print logic to ArrayWriteFunc just to show that values passed from Go are making it here. Below is the Go code which uses the above C files passes byte slice to get value out of C code and array made of byte slice to C function to send values in.
package main
/*
#cgo CFLAGS: -std=c99
#include "bytetest.h"
#include <stdlib.h>
*/
import "C"
import (
     "fmt"
     "unsafe"
)
func ReadArray() unsafe.Pointer  
       var outArray = unsafe.Pointer (C.calloc(20,1))
       C.ArrayReadFunc((*C.UBYTE)(outArray))
       return outArray
 
func WriteArray(inArray unsafe.Pointer)  
       C.ArrayWriteFunc((*C.UBYTE)(inArray))
 
func CArrayToByteSlice(array unsafe.Pointer, size int) []byte  
       var arrayptr = uintptr(array)
       var byteSlice = make([]byte, size)
       for i := 0; i < len(byteSlice); i ++  
               byteSlice[i] = byte(*(*C.UBYTE)(unsafe.Pointer(arrayptr)))
               arrayptr ++
        
       return byteSlice
 
func ByteSliceToCArray (byteSlice []byte) unsafe.Pointer  
       var array = unsafe.Pointer(C.calloc(C.size_t(len(byteSlice)), 1))
       var arrayptr = uintptr(array)
       for i := 0; i < len(byteSlice); i ++  
              *(*C.UBYTE)(unsafe.Pointer(arrayptr)) = C.UBYTE(byteSlice[i])
              arrayptr ++
        
       return array
 
func main() 
        carray := ReadArray()
        defer C.free(carray)
        carraybytes := CArrayToByteSlice(carray, 20)
        fmt.Println("C array converted to byte slice:")
        for i := 0; i < len(carraybytes); i ++  
                fmt.Printf("%d ", carraybytes[i])
         
        fmt.Println()
        gobytes := []byte 21, 22, 23, 24, 25, 26, 27, 28, 29, 30,
                31, 32, 33, 34, 35, 36, 37, 38, 39, 40 
        gobytesarray := ByteSliceToCArray(gobytes)
        defer C.free(gobytesarray)
        WriteArray(gobytesarray)
 
Functions ReadArray and WriteArray are just wrapper to the calls to C counter parts ArrayReadFunc and ArrayWriteFunc. ReadArray returns unsafe.Pointer which is allocated C array and should be freed by caller. WriteArray takes unsafe.Pointer which is pointing to memory location containing C array. Now the functions of interest are CArrayToByteSlice and ByteSliceToCArray. It should be pretty clear from the above code to understand what is happening in these functions. Still I will just put explain them briefly. ByteSliceToCArray allocates a C array using calloc from C standard library. It then creates a uintptr, a pointer type in Go which is used to dereference the each memory location and store bytes from the input byte slice in them. CArrayToByteSlice on other hands creates a uintptr type by casting input unsafe.Pointer type and then uses this pointer type to dereference values from memoy and store it in byte slice with suitable casting. So lets build the code and run it and see the output:
C array converted to byte slice:
1 2 3 4 5 6 7 8 9 10 11 12 13 14 15 16 17 18 19 20
Byte slice array received from Go:
21 22 23 24 25 26 27 28 29 30 31 32 33 34 35 36 37 38 39 40
So yes it actually works and values are moving across C and Go. This solves first problem in hand next is converting arbitrary Go types into byte slices. There are many cases where we would like to convert an arbitrary Go types like (int, float) into bytes. One such use case I found was when writing a TCP client for communicating with a Server written using C speaking custom protocol. Here I'm just going to show how to convert types like float, int to byte slice, I've not tried converting structures but it is certainly possible. Below is the function which can convert int32,float32 into byte slice it can also be extended for other types.
func CopyValueToByte(value interface ) []byte  
     var valptr uintptr
     var slice []byte
     switch t := value.(type)  
     case int32:
             i := value.(int32)
             valptr = uintptr(unsafe.Pointer(&i))
             slice = make([]byte, unsafe.Sizeof(i))
     case float32:
             f := value.(float32)
             valptr = uintptr(unsafe.Pointer(&f))
             slice = make([]byte, unsafe.Sizeof(f))
     default:
             fmt.Fprintf(os.Stderr,"Unsupported type: %T\n", t)
             os.Exit(1)
      
     for i := 0; i < len(slice); i++  
             slice[i] = byte(*(*byte)(unsafe.Pointer(valptr)))
             valptr++
      
     return slice
 
This function is generic which can take various types of value. First we will use Go's type assertion to determine the type and creates a uintptr pointer for the value and allocates byte slice depending on the size of the value as calculated using unsafe.Sizeof. Later it uses the pointer to dereference value from memory location and copies each byte into byte slice. The idea used here is every type is represented as certain number of bytes in the memory. Below is the entire program.
package main
import (
     "fmt"
     "unsafe"
     "os"
)
func CopyValueToByte(value interface ) []byte  
     var valptr uintptr
     var slice []byte
     switch t := value.(type)  
     case int32:
             i := value.(int32)
             valptr = uintptr(unsafe.Pointer(&i))
             slice = make([]byte, unsafe.Sizeof(i))
     case float32:
             f := value.(float32)
             valptr = uintptr(unsafe.Pointer(&f))
             slice = make([]byte, unsafe.Sizeof(f))
     default:
             fmt.Fprintf(os.Stderr,"Unsupported type: %T\n", t)
             os.Exit(1)
      
     for i := 0; i < len(slice); i++  
             slice[i] = byte(*(*byte)(unsafe.Pointer(valptr)))
             valptr++
      
     return slice
 
func main()  
     a := float32(-10.3)
     floatbytes := CopyValueToByte(a)
     fmt.Println("Float value as byte slice:")
     for i := 0; i < len(floatbytes); i++  
             fmt.Printf("%x ", floatbytes[i])
      
     fmt.Println()
     b := new(float32)
     bptr := uintptr(unsafe.Pointer(b))
     for i := 0; i < len(floatbytes); i++  
             *(*byte)(unsafe.Pointer(bptr)) = floatbytes[i]
             bptr++
      
     fmt.Printf("Byte value copied to float var: %f\n", *b)
 
The above conversion can also be achieved using encoding/binary package provided by Go. But its been told to me that it makes things pretty slow.
Conclusion So goes unsafe.Pointer is really powerful thing which allows us to work around the Go's type system but as package documentation says it should be used with care
PS: I'm not really sure if its recommended to use allocation functions from C standard library, I will wait for expert gophers to comment on that.

11 March 2014

Wouter Verhelst: The apt-get install game

"Given a Debian system with just the set of essential packages installed, find a single package name that, together with its dependencies, will increase the used diskspace of the system by as much as possible." My entry: openarena. Off to bed, now.

Chris Lamb: Two aesthetically pleasing Python snippets

The following Python tree structure recently resurfaced. I find it rare to see functional or recursive techniques expressed so succinctly in Python:
def tree():
    return collections.defaultdict(tree)
Another construction I am quite fond of is:
for _, dirnames, filenames in os.walk(path):
    break
...which leaves dirnames and filenames in the current scope, containing the immediate subdirectories and files of the specified path. Perhaps a little too cute, but appealing in its own way.

Ian Wienand: Tenvis IP391W meta-page

Recently I purchased a Tenvis IP391W-HD camera. I would be unlikely to recommend it. The price is certainly right and the picture quality is quite good. The Android and iPhone apps do work to watch the stream live. However, the interface is terrible and almost useless without Internet Explorer. There is a RTSP stream (rtsp://admin:password@ip) which VLC can seem to handle, but not mplayer. The recording format (.h264) is not viewable by VLC or mplayer and all I could find is a Windows .exe to convert them to an .avi. The motion detection gets troubled by the dark. It would really only be useful for something permanently well-lit. It did send me emails via gmail. I have got it recording to a NFS server, but I don't have a lot of confidence in the reliability of it. I think I have it configured to record in 3600-second blocks (given the interface, it's hard to tell if I've set it up to the network, or to the internal flash, etc), but it seems to intersperse 60 minute recordings with random small recordings. Given the whole idea of a security camera is to record the unexpected, you want a lot of confidence you're actually recording, which you don't get with this. You can see below it recorded 3 hour blocks, then started going a little crazy...
-rw-r--r-- 1 nobody nogroup  69M Mar 11 01:25 0-003035.v264
-rw-r--r-- 1 nobody nogroup  69M Mar 11 02:25 0-013049.v264
-rw-r--r-- 1 nobody nogroup  69M Mar 11 03:26 0-023103.v264
-rw-r--r-- 1 nobody nogroup 5.9M Mar 11 03:31 0-033117.v264
-rw-r--r-- 1 nobody nogroup 1.5M Mar 11 03:40 0-034350.v264
-rw-r--r-- 1 nobody nogroup  17M Mar 11 04:02 0-035259.v264
-rw-r--r-- 1 nobody nogroup 306K Mar 11 04:10 0-041548.v264
-rw-r--r-- 1 nobody nogroup 4.9M Mar 11 04:23 0-042457.v264
There is a support forum, where I found the following files scattered in various posts. From what I can tell, they are the latest as of this writing. I can confirm they work with my IP391W-HD, which the system tells me is GM8126 hardware and came with firmware 1.2.8.3.
  • 1.3.3.3.pk2 - firmware (b56f211a569fb03a37d13b706c660dcb)
  • web.pk2 - a UI update that includes dropbox support. This is really for the model that has pan and tilt, so those buttons don't work. (0e42e42bd6f8034e87dcd443dcc3594d)
  • V264ToAVIen.exe - converts the output to an AVI file that mplayer will play (with some complaints) (9c5a858aa454fed4a0186cf244c0d234)
www.modern.ie offers free limited-time Windows VM's which will work to upload this firmware. Just make sure you use a bridged network in the VM; I'm guessing the firmware ActiveX control tells the camera to TFTP the data from it, which doesn't work via NAT. Somewhat worryingly, you can telnet to it and get a login prompt (TASTECH login). So it has a built-in backdoor you can't disable. There have been some efforts to hack the device. leecher@dose.0wnz.at did an excellent job reverse engineering the .pk2 format and writing tenvis_pack.c (no license, I'm generously assuming public domain). I used this to recreate the firmware above with a telnet daemon listening with a shell on port 2525 (no password, just telnet to it)
It's interesting to poke around, but it seems like the whole thing is really driven by a binary called ipc8126
/ # ipc8126 --help
*** TAS-Tech IPCAM/DVS
*** Version: 1.3.3.3
*** Release date: 2013-08-05 15:48:32
In general, I'd say hackability is quite low. Warning : any of the above might turn your camera into a paperweight. It worked for me, but that's all I can say...

9 March 2014

Lisandro Dami&aacute;n Nicanor P&eacute;rez Meyer: Porting Qt 4 apps to Qt 5: an example with QAntenna

As a followup for my previous blog post, I decided to port QAntenna to Qt 5. Here's my experience.

First of all, I ran Qt 5's qmake:

qmake -qt5

Then I just ran make:

make

The first error that appeared was that QFileDialog does not has a setFilters() method. I couldn't find this on on the C++ API change page but looking at the class' documentation I found it was renamed to setSectionsMovable(). Fine, let's just change that and continue compiling.

The next errors came all from the same class QHeaderView. This time the changes are documented in the above linked page, so it was a matter to replace setMovable() with setSectionsMovable() and setResizeMode() with setSectionResizeMode(). Fixed, let's continue.

The following error turned out to be the last one: toAscii() has been deprecated in favor of toLatin1(). Once this was fixed voil , QAntenna is running with Qt 5.

Easy, wasn't it?

I have just pushed the new version to Debian unstable.

8 March 2014

Lisandro Dami&aacute;n Nicanor P&eacute;rez Meyer: Does your app use Qt4? You better start porting it to Qt5

As you might know, Qt 4 is now in bug-fixes-only maintenance mode. This means that only bug fixes are allowed to be pushed to Qt 4's repository, but no new features.

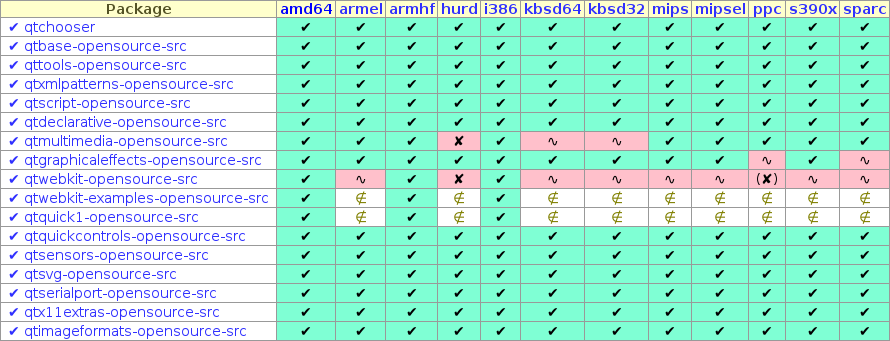
On the other hand, Qt 5 is already here. Porting existing apps from Qt 4 to Qt 5 is actually easier than it was to port Qt 3 stuff to Qt 4. Take a look at this Qt project's wiki page for more info. Also pay attention at the links at the bottom of it under "Recommended Reading".

Some time ago I blogged about the 5.2.0 status in Debian experimental. We currently have it in testing with a much better status:


And we also have 5.2.1 in experimental with an even better status:

Note: qttools is FTBFS in armhf just because of some symbols changes, it will be fixed on the next upload.
Don't be afraid of getting it from experimental! Take a look at this blog post to know how to compile with Qt 5 in Debian.

BonusI have also uploaded Qt Creator built against Qt 5 to experimental. I plan to push it to unstable with Qt 5.2.1.

Dirk Eddelbuettel: RcppArmadillo 0.4.100.2.1

Conrad made a first bug-fix release 4.100.2 for Armadillo, his templated C++ library for linear algebra, yesterday. See below for details on the the small set of changes. This was quickly wrapped up in a new RcppArmadillo release 0.4.100.2.1 release. I also added some first steps towards turning C++11 on. This can be used now with a pre-release of R 3.1.0, and can be generally activated once R 3.1.0 is released on April 10.
Changes in RcppArmadillo version 0.4.100.2 (2014-03-07)
  • Upgraded to Armadillo release Version 4.100.2
    • fix for handling null vectors by normalise()
    • fix for memory handling by sparse matrices
  • Correct use of [[ depends()]] in skeleton example file
  • Prepare src/Makevars for C++11 support from R 3.1.0 by defining USE_CXX11 which is currently commented out
  • In the Armadillo configuration, turn on C++11 support if USE_CXX11 is defined
Courtesy of CRANberries, there is also a diffstat report for the most recent release As always, more detailed information is on the RcppArmadillo page. Questions, comments etc should go to the rcpp-devel mailing list off the R-Forge page.

This post by Dirk Eddelbuettel originated on his Thinking inside the box blog. Please report excessive re-aggregation in third-party for-profit settings.

Andrew Shadura: Process isolation support in start-stop-daemon

Yesterday I played with LXC a bit, and I liked it, as LXC provides a very lightweight isolation of processes, much like enchanced chroot. However, I realised, I don t always need the chroot-like part of LXC, sometimes what I need is just to make sure the process is unable to see the other processes and talk to them in any other way except the filesystem, but I don t want a whole separate root file system for that. LXC provides a simple utility, lxc-unshare, which uses Linux-specific clone(2) call to run a process with new PID, IPC and other namespaces. However, this utility can t be used for running forking daemons, as the container is destroyed when its PID 1 exits. That s why I decided to add the support for process isolation to start-stop-daemon. I was careful enough to introduce minimal changes to it to make sure they can be merged back to the version as shipped with dpkg, and at the same time be buildable separately from the rest of it. Speaking of building, by the way, this version of start-stop-daemon uses mk-configure, a light-weight autotools replacement, as its build system. What I added, from a user s perspective, is a single --isolate option. When run with this option, start-stop-daemon calls clone(2) just before configuring the environment of a process it s going to run. The cloned process runs in a new namespace, and immediately remounts /proc, /dev/shm and /dev/mqueue. Then it forks, and a forked process executes the daemon. The parent process, which is PID 1 in the new PID namespace, uses waitpid(2) to monitor its child processes. As soon as its very first child exits, it talks via a pipe to the process outside of the container, so that it knows the container has a forked daemon and it needs to detach. In any case, the container s PID 1 does waitpid(2) in a loop, checking the process list every time a child terminates. As soon as it s left alone or a SIGTERM is received, it exits. The code is published at Bitbucket.

7 March 2014

Keith Packard: glamor-hacking

Brief Glamor Hacks Eric Anholt started writing Glamor a few years ago. The goal was to provide credible 2D acceleration based solely on the OpenGL API, in particular, to implement the X drawing primitives, both core and Render extension, without any GPU-specific code. When he started, the thinking was that fixed-function devices were still relevant, so that original code didn t insist upon modern OpenGL features like GLSL shaders. That made the code less efficient and hard to write. Glamor used to be a side-project within the X world; seen as something that really wasn t very useful; something that any credible 2D driver would replace with custom highly-optimized GPU-specific code. Eric and I both hoped that Glamor would turn into something credible and that we d be able to eliminate all of the horror-show GPU-specific code in every driver for drawing X text, rectangles and composited images. That hadn t happened though, until now. Fast forward to the last six months. Eric has spent a bunch of time cleaning up Glamor internals, and in fact he s had it merged into the core X server for version 1.16 which will be coming up this July. Within the Glamor code base, he s been cleaning some internal structures up and making life more tolerable for Glamor developers. Using libepoxy A big part of the cleanup was a transition all of the extension function calls to use his other new project, libepoxy, which provides a sane, consistent and performant API to OpenGL extensions for Linux, Mac OS and Windows. That library is awesome, and you should use it for everything you do with OpenGL because not using it is like pounding nails into your head. Or eating non-tasty pie. Using VBOs in Glamor One thing he recently cleaned up was how to deal with VBOs during X operations. VBOs are absolutely essential to modern OpenGL applications; they re really the only way to efficiently pass vertex data from application to the GPU. And, every other mechanism is deprecated by the ARB as not a part of the blessed core context . Glamor provides a simple way of getting some VBO space, dumping data into it, and then using it through two wrapping calls which you use along with glVertexAttribPointer as follows:
pointer = glamor_get_vbo_space(screen, size, &offset);
glVertexAttribPointer(attribute_location, count, type,
              GL_FALSE, stride, offset);
memcpy(pointer, data, size);
glamor_put_vbo_space(screen);
glamor_get_vbo_space allocates the specified amount of VBO space and returns a pointer to that along with an offset , which is suitable to pass to glVertexAttribPointer. You dump your data into the returned pointer, call glamor_put_vbo_space and you re all done. Actually Drawing Stuff At the same time, Eric has been optimizing some of the existing rendering code. But, all of it is still frankly terrible. Our dream of credible 2D graphics through OpenGL just wasn t being realized at all. On Monday, I decided that I should go play in Glamor for a few days, both to hack up some simple rendering paths and to familiarize myself with the insides of Glamor as I m getting asked to review piles of patches for it, and not understanding a code base is a great way to help introduce serious bugs during review. I started with the core text operations. Not because they re particularly relevant these days as most applications draw text with the Render extension to provide better looking results, but instead because they re often one of the hardest things to do efficiently with a heavy weight GPU interface, and OpenGL can be amazingly heavy weight if you let it. Eric spent a bunch of time optimizing the existing text code to try and make it faster, but at the bottom, it actually draws each lit pixel as a tiny GL_POINT object by sending a separate x/y vertex value to the GPU (using the above VBO interface). This code walks the array of bits in the font and checking each one to see if it is lit, then checking if the lit pixel is within the clip region and only then adding the coordinates of the lit pixel to the VBO. The amazing thing is that even with all of this CPU and GPU work, the venerable 6x13 font is drawn at an astonishing 3.2 million glyphs per second. Of course, pure software draws text at 9.3 million glyphs per second. I suspected that a more efficient implementation might be able to draw text a bit faster, so I decided to just start from scratch with a new GL-based core X text drawing function. The plan was pretty simple:
  1. Dump all glyphs in the font into a texture. Store them in 1bpp format to minimize memory consumption.
  2. Place raw (integer) glyph coordinates into the VBO. Place four coordinates for each and draw a GL_QUAD for each glyph.
  3. Transform the glyph coordinates into the usual GL range (-1..1) in the vertex shader.
  4. Fetch a suitable byte from the glyph texture, extract a single bit and then either draw a solid color or discard the fragment.
This makes the X server code surprisingly simple; it computes integer coordinates for the glyph destination and glyph image source and writes those to the VBO. When all of the glyphs are in the VBO, it just calls glDrawArrays(GL_QUADS, 0, 4 * count). The results were encouraging :
1: fb-text.perf
2: glamor-text.perf
3: keith-text.perf
       1                 2                           3                 Operation
------------   -------------------------   -------------------------   -------------------------
   9300000.0      3160000.0 (     0.340)     18000000.0 (     1.935)   Char in 80-char line (6x13) 
   8700000.0      2850000.0 (     0.328)     16500000.0 (     1.897)   Char in 70-char line (8x13) 
   6560000.0      2380000.0 (     0.363)     11900000.0 (     1.814)   Char in 60-char line (9x15) 
   2150000.0       700000.0 (     0.326)      7710000.0 (     3.586)   Char16 in 40-char line (k14) 
    894000.0       283000.0 (     0.317)      4500000.0 (     5.034)   Char16 in 23-char line (k24) 
   9170000.0      4400000.0 (     0.480)     17300000.0 (     1.887)   Char in 80-char line (TR 10) 
   3080000.0      1090000.0 (     0.354)      7810000.0 (     2.536)   Char in 30-char line (TR 24) 
   6690000.0      2640000.0 (     0.395)      5180000.0 (     0.774)   Char in 20/40/20 line (6x13, TR 10) 
   1160000.0       351000.0 (     0.303)      2080000.0 (     1.793)   Char16 in 7/14/7 line (k14, k24) 
   8310000.0      2880000.0 (     0.347)     15600000.0 (     1.877)   Char in 80-char image line (6x13) 
   7510000.0      2550000.0 (     0.340)     12900000.0 (     1.718)   Char in 70-char image line (8x13) 
   5650000.0      2090000.0 (     0.370)     11400000.0 (     2.018)   Char in 60-char image line (9x15) 
   2000000.0       670000.0 (     0.335)      7780000.0 (     3.890)   Char16 in 40-char image line (k14) 
    823000.0       270000.0 (     0.328)      4470000.0 (     5.431)   Char16 in 23-char image line (k24) 
   8500000.0      3710000.0 (     0.436)      8250000.0 (     0.971)   Char in 80-char image line (TR 10) 
   2620000.0       983000.0 (     0.375)      3650000.0 (     1.393)   Char in 30-char image line (TR 24)
This is our old friend x11perfcomp, but slightly adjusted for a modern reality where you really do end up drawing billions of objects (hence the wider columns). This table lists the performance for drawing a range of different fonts in both poly text and image text variants. The first column is for Xephyr using software (fb) rendering, the second is for the existing Glamor GL_POINT based code and the third is the latest GL_QUAD based code. As you can see, drawing points for every lit pixel in a glyph is surprisingly fast, but only about 1/3 the speed of software for essentially any size glyph. By minimizing the use of the CPU and pushing piles of work into the GPU, we manage to increase the speed of most of the operations, with larger glyphs improving significantly more than smaller glyphs. Now, you ask how much code this involved. And, I can truthfully say that it was a very small amount to write:
 Makefile.am             2 
 glamor.c                5 
 glamor_core.c           8 
 glamor_font.c         181 ++++++++++++++++++++
 glamor_font.h          50 +++++
 glamor_priv.h          26 ++
 glamor_text.c         472 +++++++++++++++++++++++++++++++++++++++++++++++++++++
 glamor_transform.c      2 
 8 files changed, 741 insertions(+), 5 deletions(-)
Let s Start At The Very Beginning The results of optimizing text encouraged me to start at the top of x11perf and see what progress I could make. In particular, looking at the current Glamor code, I noticed that it did all of the vertex transformation with the CPU. That makes no sense at all for any GPU built in the last decade; they ve got massive numbers of transistors dedicated to performing precisely this kind of operation. So, I decided to see what I could do with PolyPoint. PolyPoint is absolutely brutal on any GPU; you have to pass it two coordinates for each pixel, and so the very best you can do is send it 32 bits, or precisely the same amount of data needed to actually draw a pixel on the frame buffer. With this in mind, one expects that about the best you can do compared with software is tie. Of course, the CPU version is actually computing an address and clipping, but those are all easily buried in the cost of actually storing a pixel. In any case, the results of this little exercise are pretty close to a tie the CPU draws 190,000,000 dots per second and the GPU draws 189,000,000 dots per second. Looking at the vertex and fragment shaders generated by the compiler, it s clear that there s room for improvement. The fragment shader is simply pulling the constant pixel color from a uniform and assigning it to the fragment color in this the simplest of all possible shaders:
uniform vec4 color;
void main()
 
       gl_FragColor = color;
 ;
This generates five instructions:
Native code for point fragment shader 7 (SIMD8 dispatch):
   START B0
   FB write target 0
0x00000000: mov(8)          g113<1>F        g2<0,1,0>F                        align1 WE_normal 1Q  ;
0x00000010: mov(8)          g114<1>F        g2.1<0,1,0>F                      align1 WE_normal 1Q  ;
0x00000020: mov(8)          g115<1>F        g2.2<0,1,0>F                      align1 WE_normal 1Q  ;
0x00000030: mov(8)          g116<1>F        g2.3<0,1,0>F                      align1 WE_normal 1Q  ;
0x00000040: sendc(8)        null            g113<8,8,1>F
                render ( RT write, 0, 4, 12) mlen 4 rlen 0        align1 WE_normal 1Q EOT  ;
   END B0
As this pattern is actually pretty common, it turns out there s a single instruction that can replace all four of the moves. That should actually make a significant difference in the run time of this shader, and this shader runs once for every single pixel. The vertex shader has some similar optimization opportunities, but it only runs once for every 8 pixels with the SIMD format flipped around, the vertex shader can compute 8 vertices in parallel, so it ends up executing 8 times less often. It s got some redundant moves, which could be optimized by improving the copy propagation analysis code in the compiler. Of course, improving the compiler to make these cases run faster will probably make a lot of other applications run faster too, so it s probably worth doing at some point. Again, the amount of code necessary to add this path was tiny:
 Makefile.am             1 
 glamor.c                2 
 glamor_polyops.c      116 ++++++++++++++++++++++++++++++++++++++++++++++++++--
 glamor_priv.h           8 +++
 glamor_transform.c    118 +++++++++++++++++++++++++++++++++++++++++++++++++++++
 glamor_transform.h     51 ++++++++++++++++++++++
 6 files changed, 292 insertions(+), 4 deletions(-)
Discussion of Results These two cases, text and points, are probably the hardest operations to accelerate with a GPU and yet a small amount of OpenGL code was able to meet or beat software easily. The advantage of this work over traditional GPU 2D acceleration implementations should be pretty clear this same code should work well on any GPU which offers a reasonable OpenGL implementation. That means everyone shares the benefits of this code, and everyone can contribute to making 2D operations faster. All of these measurements were actually done using Xephyr, which offers a testing environment unlike any I ve ever had build and test hardware acceleration code within a nested X server, debugging it in a windowed environment on a single machine. Here s how I m running it:
$ ./Xephyr  -glamor :1 -schedMax 2000 -screen 1024x768 -retro
The one bit of magic here is the -schedMax 2000 flag, which causes Xephyr to update the screen less often when applications are very busy and serves to reduce the overhead of screen updates while running x11perf. Future Work Having managed to accelerate 17 of the 392 operations in x11perf, it s pretty clear that I could spend a bunch of time just stepping through each of the remaining ones and working on them. Before doing that, we want to try and work out some general principles about how to handle core X fill styles. Moving all of the stipple and tile computation to the GPU will help reduce the amount of code necessary to fill rectangles and spans, along with improving performance, assuming the above exercise generalizes to other primitives. Getting and Testing the Code Most of the changes here are from Eric s glamor-server branch:
git://people.freedesktop.org/~anholt/xserver glamor-server
The two patches shown above, along with a pair of simple clean up patches that I ve written this week are available here:
git://people.freedesktop.org/~keithp/xserver glamor-server
Of course, as this now uses libepoxy, you ll need to fetch, build and install that before trying to compile this X server. Because you can try all of this out in Xephyr, it s easy to download and build this X server and then run it right on top of your current driver stack inside of X. I d really like to hear from people with Radeon or nVidia hardware to know whether the code works, and how it compares with fb on the same machine, which you get when you elide the -glamor argument from the example Xephyr command line above.

Vincent Fourmond: Removing the background of an image

While in the process of polishing up a paper, I had to draw figures using a well-known proprietary program for drawing chemical formula whose name I will not write down, out of decency (but you know which one it is anyway). I'm using the mac version (yes, no version for Linux) which has a neat glitch in that the "Save As" button does not work at all: no way to export your chemical formula as a SVG/PDF/PNG picture or whatever ! So I resorted to the neat Print as PDF feature of macintosh. I had to edit the resulting PDF files by hand as some of the colors were wrong (great !), and when I tried to include the PDF, I realized they had a white background... No way !So I dug in ImageMagick's convert documentation, and came up with the following code that converts the PDF file into a PNG with a transparent background:
convert -density 600 figure.pdf -channel alpha \
  -fx '((r == 1 && g == 1 && b == 1) ? 0 : 1)' figure.png
There are still some few points that look white but are probably not that white (due to antialiased rendering of the PDF file ?). There are many more things that can be done using the -fx operator, this page was helpful to me !Edit: while the alpha channel seems to be on by default for PDF files, it is not necessarily the case for all images. If the above doesn't work, try adding -alpha Set before the -fx bit.

6 March 2014

Ian Wienand: Skipping pages with django.core.paginator

Here's a little snippet for compressing the length of long Django pagination by just showing context around the currently selected page. What I wanted was the first few and last few pages always selectable with some context pages around the currently selected page; e.g. Example of skip markers in paginator If that's what you're looking for, some variation on below may be of use. In this approach, you build up a list of pages similar to the paginator object page_range but with only the relevant pages and the skip-markers identified.

from django.core.paginator import Paginator
import unittest
class Pages:
    def __init__(self, objects, count):
        self.pages = Paginator(objects, count)
    def pages_to_show(self, page):
        # pages_wanted stores the pages we want to see, e.g.
        #  - first and second page always
        #  - two pages before selected page
        #  - the selected page
        #  - two pages after selected page
        #  - last two pages always
        #
        # Turning the pages into a set removes duplicates for edge
        # cases where the "context pages" (before and after the
        # selected) overlap with the "always show" pages.
        pages_wanted = set([1,2,
                            page-2, page-1,
                            page,
                            page+1, page+2,
                            self.pages.num_pages-1, self.pages.num_pages])
        # The intersection with the page_range trims off the invalid
        # pages outside the total number of pages we actually have.
        # Note that includes invalid negative and >page_range "context
        # pages" which we added above.
        pages_to_show = set(self.pages.page_range).intersection(pages_wanted)
        pages_to_show = sorted(pages_to_show)
        # skip_pages will keep a list of page numbers from
        # pages_to_show that should have a skip-marker inserted
        # after them.  For flexibility this is done by looking for
        # anywhere in the list that doesn't increment by 1 over the
        # last entry.
        skip_pages = [ x[1] for x in zip(pages_to_show[:-1],
                                         pages_to_show[1:])
                       if (x[1] - x[0] != 1) ]
        # Each page in skip_pages should be follwed by a skip-marker
        # sentinel (e.g. -1).
        for i in skip_pages:
            pages_to_show.insert(pages_to_show.index(i), -1)
        return pages_to_show
class TestPages(unittest.TestCase):
    def runTest(self):
        objects = [x for x in range(0,1000)]
        p = Pages(objects, 10)
        self.assertEqual(p.pages_to_show(0),
                         [1, 2, -1, 99, 100])
        self.assertEqual(p.pages_to_show(1),
                         [1,2,3,-1,99,100])
        self.assertEqual(p.pages_to_show(2),
                         [1,2,3,4,-1,99,100])
        self.assertEqual(p.pages_to_show(3),
                         [1,2,3,4,5,-1,99,100])
        self.assertEqual(p.pages_to_show(4),
                         [1,2,3,4,5,6,-1,99,100])
        self.assertEqual(p.pages_to_show(5),
                         [1,2,3,4,5,6,7,-1,99,100])
        self.assertEqual(p.pages_to_show(6),
                         [1,2,-1,4,5,6,7,8,-1,99,100])
        self.assertEqual(p.pages_to_show(7),
                         [1,2,-1,5,6,7,8,9,-1,99,100])
        self.assertEqual(p.pages_to_show(50),
                         [1,2,-1,48,49,50,51,52,-1,99,100])
        self.assertEqual(p.pages_to_show(93),
                         [1,2,-1,91,92,93,94,95,-1,99,100])
        self.assertEqual(p.pages_to_show(94),
                         [1,2,-1,92,93,94,95,96,-1,99,100])
        self.assertEqual(p.pages_to_show(95),
                         [1,2,-1,93,94,95,96,97,-1,99,100])
        self.assertEqual(p.pages_to_show(96),
                         [1,2,-1,94,95,96,97,98,99,100])
        self.assertEqual(p.pages_to_show(97),
                         [1,2,-1,95,96,97,98,99,100])
        self.assertEqual(p.pages_to_show(98),
                         [1,2,-1,96,97,98,99,100])
        self.assertEqual(p.pages_to_show(99),
                         [1,2,-1,97,98,99,100])
        self.assertEqual(p.pages_to_show(100),
                         [1,2,-1,98,99,100])
if __name__ == '__main__':
    unittest.main()
Then somehow pass through the pages_to_show to your view (below I added it to the paginator object passed) and use a template along the lines of
<ul class="pagination">
 % if pages.has_previous % 
  <li><a href="foo.html?page=  pages.previous_page_number  ">&laquo;</a></li>
 % else % 
  <li class="disabled"><a href="#">&laquo;</a></li>
 % endif % 
 % for page in pages.pages_to_show % 
   % if page == -1 % 
  <li class="disabled"><a href="#">&hellip;</a></li>
   % elif page == pages.number % 
  <li class="active"><a href="#">  page_num  </a></li>
   % else % 
  <li><a href="foo.html?page=  page_num  "> page_num </a>
   % endif % 
 % endfor % 
 % if pages.has_next % 
  <li><a href="foo.html?page=  pages.next_page_number  ">&raquo;</a></li>
 % else % 
  <li class="disabled"><a href="#">&raquo;</a></li>
 % endif % 
</ul>

4 March 2014

Mario Lang: Personal mail server

I used to use Fetchmail and Gnus with its mail splitting capabilites and nnml backend to handle my private mail setup for many years. This worked pretty fine since I am used to accessing my home server through SSH. I have Gnus running inside of a GNU screen session. So I can check mail from remote by using a SSH terminal. This works fine as long as I have a good SSH terminal on a desktop or laptop computer. However, it does not work very well on tablets or smaller mobile devices. Additionally, mail splitting has become a performance burden over the years. I do not want to wait for Gnus to sort incoming mail into different folders while checking for new mail. That is something which should have been done in the background already, and thats what we are going to cover with the setup described below. So I had to change my simple setup to accomodate for the new trends in mobile computing. The obvious core of such a setup is an IMAP server which receives and stores your mail such that different clients can access it. So the time of my Gnus nnml storage are definitely over. Mail is no longer stored in and by my mail client.
Dovecot While there are several IMAP server solutions out there, I find Dovecot fits my needs quite nicely. I've decided to store my mail in Maildir format in ~/Maildir. I prefer storing data like that in the home directory to avoid having to backup separate files from /var/. Maildir also features some index files which should help performance in the long run. Incoming mail will solely be delivered by fetchmail and should be checked for spam. While I can probably configure Exim to run SpamAssassin on mails before delivering them to Dovecot, there is a much more elegant solution: the dovecot local delivery agent (LDA). /usr/lib/dovecot/deliver takes mail from standard input and performs Sieve filtering and updates the mail indexes. We will call this executable more or less directly from fetchmail. Incoming mail from mailing lists will be sorted into different folders using Sieve. Dovecot needs to be told to enable the sieve plugin and to create new folders on demand. /etc/dovecot/local.conf:
disable_plaintext_auth = yes
mail_location = maildir:~/Maildir
lda_mailbox_autocreate = yes
lda_mailbox_autosubscribe = yes
protocol lda  
  mail_plugins = sieve
 
Sieve scripts are actually quite intuitive once you have a template to start from. ~/.dovecot.sieve:
require "fileinto";
if exists "X-Spam-Flag"  
  # Store spam tagged by SpamAssassin into dedicated Spam folder
  if header :contains "X-Spam-Flag" "YES"  
    fileinto "Spam";
   
  elsif exists "X-Cron-Env"  
  # Store mails from Cron daemon in dedicated folder
  fileinto "cron";
  elsif exists "List-Id"  
  # File list-mail into dedicated folders, matching on List-Id
  if header :contains "List-Id" "boost-users.lists.boost.org"  
    fileinto "boost-users";
    elsif header :contains "List-Id" "brltty.mielke.cc"  
    fileinto "brltty";
    elsif header :contains "List-Id" "debian-accessibility.lists.debian.org"  
    fileinto "debian-accessibility";
    elsif header :contains "List-Id" "debian-devel-announce.lists.debian.org"  
    fileinto "debian-devel-announce";
    elsif header :contains "List-Id" "debian-devel.lists.debian.org"  
    fileinto "debian-devel";
    elsif header :contains "List-Id" "spirit-general.lists.sourceforge.net"  
    fileinto "spirit-general";
   
  # ...
 
SpamAssassin Since I want automatic classification of spam messages, I use SpamAssassin. Just install spamassasin and enable spamd in /etc/default/spamassassin:
ENABLE=1
We will use spamc in the Fetchmail configuration.
Fetchmail My ~/.fetchmailrc is a straightforward list of some mailboxes to fetch mail from. I use the mda directive to skip the MTA and send mail through SpamAssassin and deliver it to Dovecot via its LDA mechanism. ~/.fetchmailrc:
set daemon 1200 # Poll at 10 minute intervals
poll blind.guru protocol IMAP: ssl;
# ... add more sources here ...
mda "/usr/bin/spamc -u %T -e /usr/lib/dovecot/deliver -d %T"
To avoid spreading access information in too many configuration files I am using the ability of Fetchmail to use netrc to retrieve account passwords. ~/.netrc:
machine blind.guru login mlang password <hidden>
Gnus I am using Gnus to read mail, newsgroups and RSS feeds since many years now. It would be quite a mouthful to explain all the customizations I am using by now. But there is one very important bit in the context of this article: How to access the IMAP server? In my setup, Emacs and therefore Gnus is running on the same machine as the IMAP server. So I can avoid authentication at all. This configuration will avoid unnecessary password prompts or caching. In ~/.emacs or ~/.gnus:
(setq gnus-secondary-select-methods '((nnimap "localhost"
                                       (nnimap-stream shell)))
      nnimap-shell-program "/usr/lib/dovecot/imap")
With this you should be able to subscribe to your IMAP folders from within Gnus with ease. Sorting incoming mails into folders is now performed by the IMAP server through Sieve scripts. Instead of changing Gnus' configuration I now edit ~/.dovecot.sieve when I subscribe to a new mailing list. If you add a new Sieve rule for a mailing list and the associated folder does not exist yet, Dovecot will autocreate it, very convenient.
Mobile devices Now all that is left is a way for your mobile devices to read and eventually send mail. This is very much dependant on your network setup, so I am not going to go into any detail here. If you are accessing your mail setup from a tablet in your local network you might get away without tinkering with your router configuration. If you want to read/send mail on the go you need some way to get to your external IP. Either it is stable enough or you need some dynamic DNS service. You will definitely want to forward IMAP and maybe SMTP ports from your router to your home server. If you don't have an existing SMTP server for your mobile device that accepts your outgoing mails you can also set one up yourself and deliver outgoing mails from your mobile device to the world with Exim or qmail. I am personally using Exim since I am going with the default MTA for Debian. Configuring Exim to take mail from iOS devices was as simple as enabling an appropriate authentication method and adding an account to /etc/exim4/passwd. I have to admit though that I don't particularily like Exim's configuration files. That is why I ended up using dovecot's LDA in the first place.

Andrew Pollock: [life] Day 35, Kindergarten, taxes, makeup BJJ

I foolishly had a late night last night, for no particularly good reason, so I slept in quite late this morning. I didn't start getting going until about 8am. How decadent. I'd forgotten to send Zoe to Kindergarten with her water bottle yesterday, and forgotten to give it to Sarah when she picked her up yesterday, so I dropped it and a fresh set of spare clothes out to Kindergarten after I had breakfast and a shower. I managed to sneak in and out without Zoe seeing me. I did some more work on my taxes before popping out for lunch to discuss my main start up idea. I also renamed my old shelf company today. I biked over to Kindergarten for pick up, and sure enough, Zoe was fast asleep. It took quite a bit of work to rouse her. I was pretty sure she was just faking it though. She moved pretty fast when I said I had a surprise at home for her. We biked home, and I gave her the surprise (some Pop Rocks I'd been saving for a special occasion) and headed out by car to a makeup Brazilian Jiu-Jitsu class to make up for the one she missed on Friday. It turned out that trying to do an afternoon class after Kindergarten and being woken up from a nap wasn't the best idea. Zoe tired out pretty quickly, during the warm up exercises, and was moderately uncooperative for the remainder of the class (she kept going on strike). I've never driven to or from BJJ classes until today, and I wasn't actually sure how best to drive home, since we've always taken the Norman Park Greenway. Zoe was asking for a "different way" anyway, so that worked out well. We winged it through Coorparoo and the back of Norman Park and tacked onto the end of how we'd normally cycle home. Zoe had enough time to watch a little bit of TV before Sarah arrived to pick her up.

1 March 2014

Dirk Eddelbuettel: RcppEigen 0.3.2.0.2

A new bug-fix / maintenance release of RcppEigen is now on CRAN. RcppEigen brings the Eigen C++ template library for linear algebra to R. This release updates the RcppEigen.package.skeleton() function for a needed change in R, updates and extends the code example used by this skeleton package generator, and updates a few things now that Rcpp 0.11.0 is out.
Changes in RcppEigen version 0.3.2.0.3 (2014-03-01)
  • Updated and extended RcppEigen.package.skeleton() to use several examples via Rcpp Attributes; also removed the deprecated namespace argument
  • Updated skeleton package example for Rcpp 0.11.0 or later by removing needed for linking with user library
  • Updated files DESCRIPTION, NAMESPACE, src/Makevars and src/Makevars.win similarly
Courtesy of CRANberries, there are diffstat reports for the most recent release relative to the preceding version. Questions, comments etc about RcppEigen should go to the rcpp-devel mailing list off the R-Forge page.

This post by Dirk Eddelbuettel originated on his Thinking inside the box blog. Please report excessive re-aggregation in third-party for-profit settings.

Vasudev Kamath: Installing and Configuring NetBSD on Qemu in Debian

First step will be getting a NetBSD ISO image for installation purpose. It can be downloaded from here. Next step will be creating a disk image for installing NetBSD. This is done using qemu-img tool like below
$ qemu-img create -f raw netbsd-disk.img 10G
Image format used is raw and size is specified as last arugment. Tune the size as per your need. To start the installation run the following command
$ qemu-system-x86_64 -m 256M -hda netbsd-disk.img -cdrom \
             NetBSD-6.1.3-amd64.iso -display curses -boot d \
             -net nic -net user
So this is using user mode networking so you won't be able to have internet access during installation. I couldn't figure out on how to get network working during installation so I configured network after installation. Once you run above command you will be given with 4 options as follows.
  1. install netbsd
  2. install netbsd with ACPI disabled
  3. install netbsd with ACPI and SMP disabled
  4. drop to boot shell
Even though I first installed using the option 1 I couldn't get it boot after installation so had to reinstall with option 2 and it works fine. I'm not gonna explain each step of installation here because the installer is really simple and straight forward! I guess the NetBSD installer is the first simplest installer I have encountered from the day I started with Linux. Its simple but powerful and gets job done very easily, and I didn't read manual for installation before using it.
Enabling Networking This section involves mixture of configuration in Debian host and inside NetBSD to get the network working. The wiki page of Debian on Qemu. helped me here. To share the network with Qemu there are 2 possiblities
  1. Bridged networking between host and guest using bridge-utils
  2. Using VDE (Virtual Distributed Ethernet)
The option 1 which is explained in wiki linked above didn't work for me as I use CDC Ether based datacard for connecting to Internet which gets detected as eth1 on my machine. When bridging happens between tap0 and eth1 I end up loosing Internet on my host machine. So I selected to use VDE instead. First install packages vde2 and uml-utilities once done edit the /etc/network/interfaces file and add following lines:
auto vdetap
iface vdetap inet static
   address 192.168.2.1
   netmask 255.255.255.0
   vde2-switch -t vdetap
We can use dnsmasq as a DHCP server for the vdetap interface, but I'm not gonna explain the configuration of dnsmasq here. Run the below command to get vdetap up
modprobe tun
ifup vdetap
/etc/init.d/dnsmasq restart
newgrp vde2-net # run as user starting Qemu VM's
I couldn't get successful output for newgrp command, I was getting some crypt: Invalid argument output. But I could still get network working on NetBSD so I considered to ignore that for now. Now start the NetBSD qemu instance running using following command
$ qemu-system-x86_64 -m 256M -hda \
             /mnt/kailash/BSDWorld/netbsd-disk.img \
             -net nic -net vde,sock=/var/run/vde2/vdetap.ctl -display curses
Once the system is up login using root user, NetBSD will warn you for this and suggest to create another user but for now ignore it. To find the network interface in NetBSD just run the usual ifconfig command. In my case interface is named wm0. First step will be configuring the IP address for your interface and setting up the gateway route. Run the below command for this purpose
# ifconfig wm0 192.168.2.2 netmask 255.255.255.0
# route add default 192.168.2.1
Note that I added gateway as IP address of vdetap on my host machine. Now try pinging the host and even you can try ssh to host system. But note that this is not persistent over the reboots and for some reason I didn't yet figure out how to make NetBSD get address over DHCP from my host machine. I will update once I figure it out. Now to make the connection address persistent over reboots you need to create a file by name /etc/ifconfg.<interface>. Replace interface with a proper interface on your running NetBSD. In my case this file is /etc/ifconfig.wm0 and has following content.:
192.168.2.2 netmask 0xffffff00 media autoselect
Set the DNS server as host by adding file /etc/resolv.conf with following content.:
nameserver 192.168.2.1
After this you need to do NAT/masquerading using iptables. Just copy following script to a file and execute it as root
#!/bin/sh
# Restart the dnsmasq
/etc/init.d/dnsmasq restart
# Set nat rules in iptables
iptables --flush
iptables --table nat --flush
iptables --delete-chain
iptables --table nat --delete-chain
# Replace accordingly usb0 with ppp0 for 3G
iptables --table nat --append POSTROUTING --out-interface eth1 -j MASQUERADE
iptables --append FORWARD --in-interface vdetap -j ACCEPT
# Enable IP forwarding in Kernel
sysctl -w net.ipv4.ip_forward=1
With the above setup you will be able to get DNS resolution even after you reboot the Qemu instance but Internet connection will not work untill you run the route command I mentioned above. I still didn't figure out how to persist route but I will update it here once I figure it out.
Note that you won't be able to SSH as root to NetBSD (may be its configured to not allow by default), so you would need to create a normal user before trying to SSH from host to guest. Also make sure you add the user to wheel group to allow him execute su command.
So now I've NetBSD running on my laptop with mere 256M ram and its amazingly fast even at such low RAM. I've created a new user and can SSH into it from host machine and use it just like I use a server!. I will put up the notes of my BSD adventure here periodically. The feeling of using a BSD is amazing :-)
Update: I forgot to add masquerading step, I've added it now.

Next.

Previous.