Search Results: "js"

17 June 2021

Joey Hess: typed pipes in every shell

Powershell and nushell take unix piping beyond raw streams of text to structured or typed data. Is it possible to keep a traditional shell like bash and still get typed pipes? I think it is possible, and I'm now surprised noone seems to have done it yet. This is a fairly detailed design for how to do it. I've not implemented it yet. RFC. Let's start with a command called typed. You can use it in a pipeline like this:
typed foo   typed bar   typed baz
What typed does is discover the types of the commands to its left and its right, while communicating the type of the command it runs back to them. Then it checks if the types match, and runs the command, communicating the type information to it. Pipes are unidirectional, so it may seem hard to discover the type to the right, but I'll explain how it can be done in a minute. Now suppose that foo generates json, and bar filters structured data of a variety of types, and baz consumes csv and pretty-prints a table. Then bar will be informed that its input is supposed to be json, and that its output should be csv. If bar didn't support json, typed foo and typed bar would both fail with a type error. Writing "typed" in front of everything is annoying. But it can be made a shell alias like "t". It also possible to wrap programs using typed:
cat >~/bin/foo <<EOF
#/usr/bin/typed /usr/bin/foo
EOF
Or program could import a library that uses typed, so it natively supports being used in typed pipelines. I'll explain one way to make such a library later on, once some more details are clear. Which gets us back to a nice simple pipeline, now automatically typed.
foo   bar   baz
If one of the commands is not actually typed, the other ones in the pipe will treat it as having a raw stream of text as input or output. Which will sometimes result in a type error (yay, I love type errors!), but in other cases can do something useful.
find   bar   baz
# type error, bar expected json or csv
foo   bar   less
# less displays csv 
So how does typed discover the types of the commands to the left and right? That's the hard part. It has to start by finding the pids to its left and right. There is no really good way to do that, but on Linux, it can be done: Look at what /proc/self/fd/0 and /proc/self/fd/1 link to, which contains the unique identifiers of the pipes. Then look at other processes' fd/0 and fd/1 to find matching pipe identifiers. (It's also possible to do this on OSX, I believe. I don't know about BSDs.) Searching through all processes would be a bit expensive (around 15 ms with an average number of processes), but there's a nice optimisation: The shell will have started the processes close together in time, so the pids are probably nearby. So look at the previous pid, and the next pid, and fan outward. Also, check isatty to detect the beginning and end of the pipeline and avoid scanning all the processes in those cases. To indicate the type of the command it will run, typed simply opens a file with an extension of ".typed". The file can be located anywhere, and can be an already existing file, or can be created as needed (eg in /run). Once it discovers the pid at the other end of a pipe, typed first looks at /proc/$pid/cmdline to see if it's also running typed. If it is, it looks at its open file handles to find the first ".typed" file. It may need to wait for the file handle to get opened, which is why it needs to verify the pid is running typed. There also needs to be a way for typed to learn the type of the command it will run. Reading /usr/share/typed/$command.typed is one way. Or it can be specified at the command line, which is useful for wrapper scripts:
cat >~/bin/bar <<EOF
#/usr/bin/typed --type="JSON   CSV" --output-type="JSON   CSV" /usr/bin/bar
EOF
And typed communicates the type information to the command that it runs. This way a command like bar can know what format its input should be in, and what format to use as output. This might be done with environment variables, eg INPUT_TYPE=JSON and OUTPUT_TYPE=CSV I think that's everything typed needs, except for the syntax of types and how the type checking works. Which I should probably not try to think up off the cuff. I used Haskell ADT syntax in the example above, but don't think that's necessarily the right choice. Finally, here's how to make a library that lets a program natively support being used in a typed pipeline. It's a bit tricky, because it has to run typed, because typed checks /proc/$pid/cmdline as detailed above. So, check an environment variable. When not set yet, set it, and exec typed, passing it the path to the program, which it will re-exec. This should be done before program does anything else.
This work was sponsored by Mark Reidenbach on Patreon.

16 June 2021

Julien Danjou: Python Tools to Try in 2021

Python Tools to Try in 2021The Python programming language is one of the most popular and in huge demand. It is free, has a large community, is intended for the development of projects of varying complexity, is easy to learn, and opens up great opportunities for programmers. To work comfortably with it, you need special Python tools, which are able to simplify your work. We have selected the best Python tools that will be relevant in 2021.

MailtrapAs you may probably know, in order to send an email, you need SMTP (Simple Mail Transfer Protocol). This is because you can't just send a letter to the recipient. It needs to be sent to the server from which the recipient will download this letter using IMAP and POP3.Mailtrap provides an opportunity to send emails in python. Moreover, Mailtrap provides #rest #api to access current emails. It can be used to automate email testing, which will improve your email marketing campaigns. For example, you can check the password recovery form in the Selenium Test and immediately see if an email was sent to the correct address. Then take a new password from the email and try to enter the site with it. Cool, isn't it?

Pros
  • All emails are in one place.
  • Mailtrap provides multiple inboxes.
  • Shared access is present.
  • It is easy to set up.
  • RESTful API

ConsNo visible disadvantages were found.

Django
Python Tools to Try in 2021
Django is a free and open-source full-stack framework. It is one of the most important and popular among Python developers. It helps you move from a prototype to a ready-made working solution in a short time since its main task is to automate processes and speed up work through associations and libraries. It s a great choice for a product launch.You can use Django if at least a few of the following points interest you:
  • There is a need to develop the server-side of the API.
  • You need to develop a web application.
  • In the course of work, many changes are made, you have to constantly deploy the application and make edits.
  • There are many complex tasks that are difficult to solve on your own, and you will need the help of the community.
  • ORM support is needed to avoid accessing the database directly.
  • There is a need to integrate new technologies such as machine learning.
Django is a great Python Web Framework that does its job. It is not for nothing that it is one of the most popular, and is actively used by millions of developers.

ProsDjango has quite a few advantages. It contains a large number of ready-made solutions, which greatly simplifies development. Admin panel, database migration, various forms, user authentication tools are extremely helpful. The structure is very clear and simple.A large community helps to solve almost any problem. Thanks to ORM, there is a high level of security and it is comfortable to work with databases.

ConsDespite its powerful capabilities, Django's Python Web Framework has drawbacks. It is very massive, monolithic, therefore it develops slowly. Despite the many generic modules, the development speed of Django itself is reduced.

CherryPy
Python Tools to Try in 2021
CherryPy is a micro-framework. It is designed to solve specific problems, capable of running the program on any operating system. CherryPy is used in the following cases:
  • To create an application with small code size.
  • There is a need to manage several servers at the same time.
  • You need to monitor the performance of applications.
CherryPy refers to Python Frameworks, which are designed for specific tasks. It's clear, user-friendly, and ideal for Android development.

ProsCherryPy Python tool has a friendly and understandable development environment. This is a functional and complete framework, which can be used to build good applications. The source code is open, so the platform is completely free for developers, and the community, although not too large, is very responsive, and always helps to solve problems.

ConsThere are not so many cons to this Python tool. It is not capable of performing complex tasks and functions, it is intended more for specific solutions, for example, for the development of certain plugins or modules.

Pyramid
Python Tools to Try in 2021
Python Pyramid tool is designed for programming complex objects and solving multifunctional problems. It is used by professional programmers and is traditionally used for identification and routing. It is aimed at a wide audience and is capable of developing API prototypes.It is used in the following cases:
  • You need problem indicator tools to make timely adjustments and edits.
  • You use several programming languages at once;
  • You work with reporting and financial calculations, forecasting;
  • You need to quickly create a simple application.
At the same time, the Python Web Framework Pyramid allows you to create complex applications with great functionality like a translation software.

ProsPyramid does an excellent job of developing basic applications quickly. It is quite flexible and easy to learn. In fact, the key to the success of this framework is that it is completely based on fundamental principles, using simple and basic programming techniques. It is minimalistic, but at the same time offers users a lot of freedom of action. It is able to work with both small applications and powerful multifunctional programs.

ConsIt is difficult to deviate from the basic principles. This Python tool makes the decision for you. Simple programs are very easy to implement. But to do something complex and large-scale, you have to completely immerse yourself in the study of the environment and obey it.

Grok
Python Tools to Try in 2021
Grok is a Python tool that works with templates. Its main task is to eliminate repetitions in the code. If the element is repeated, then the template that was already created earlier is simply applied. This greatly simplifies and speeds up the work.Grok suits developers in the following cases:
  • If a programmer has little experience and is not yet ready to develop his modules.
  • There is a need to quickly develop a simple application.
  • The functionality of the application is simple, straightforward, and the interface does not play a key role.

ProsThe Grok framework is a child of Zope3, which was released earlier. It has a simplified structure of work, easy installation of modules, more capabilities, and better flexibility. It is designed to develop small applications. Yes, it is not intended for complex work, but due to its functionality, it allows you to quickly implement a project.

ConsThe Grok community is not very large, as this Python tool has not gained widespread popularity. Nevertheless, it is used by Python adepts for comfortable development. It is impossible to implement complex tasks on it since the possibilities are quite limited.Grok is one of the best Python Web Frameworks. It is understandable and has enough features for comfortable development.

Web2Py
Python Tools to Try in 2021
Web2Py is a Python tool that has its own IDEwhich, which includes a code editor, debugger, and deployment. It works great without the need for configuration or installation, provides a high level of data security, and is suitable for work on various platforms.Web2Py is great in the following cases:
  • When there is a need to develop something on different operating systems.
  • If there is no way to install and configure the framework.
  • When a high level of data security is required, for example, when developing financial applications or sales performance management tools.
  • If you need to carefully track bugs right during development, and not during the testing phase.

ProsWeb2Py is capable of working with different protocols, has a built-in error tracker, and has a backward compatibility feature that helps to work on the basis of previous versions of the framework. This means that code maintenance becomes much easier and cheaper. It's free, open-source, and very flexible.

ConsAmong the many Python tools, there are not many that require the latest version of the language. Web2Py is one of those and won't work on Python 3 and below. Therefore, you need to constantly monitor the updates.Web2Py does an excellent job of its tasks. It is quite simple and accessible to everyone.

BlueBream
Python Tools to Try in 2021
BlueBream used to be called Zope3 before. It copes well with tasks of the medium and high level of complexity and is suitable for working on serious projects.

ProsThe BlueBream build system is quite powerful and suitable for complex tasks. You can create functional applications on it, and the principle of reuse of components makes the code easier. At the same time, the speed of development increases. The software can be scaled, and a transactional object database provides an easy path to store it. This means that queries are processed quickly and database management is simple.

ConsThis is not a very flexible framework, it is better to know clearly in advance what is required of it. In addition, it cannot withstand heavy loads. When working with 1000 users at the same time, it can crash and give errors. Therefore, it should be used to solve narrow problems.Python frameworks are often designed for specific tasks. BlueBream is one of these and is suitable for applications where database management plays a key role.

ConclusionPython tools come in different forms and have vastly different capabilities. There are quite a few of them, but in 2021 these will be the most popular and in demand. Experienced programmers always choose several development tools for their comfortable work.

14 June 2021

Fran ois Marier: Self-hosting an Ikiwiki blog

8.5 years ago, I moved my blog to Ikiwiki and Branchable. It's now time for me to take the next step and host my blog on my own server. This is how I migrated from Branchable to my own Apache server.

Installing Ikiwiki dependencies Here are all of the extra Debian packages I had to install on my server:
apt install ikiwiki ikiwiki-hosting-common gcc libauthen-passphrase-perl libcgi-formbuilder-perl libcrypt-sslauthen-passphrase-perl libcgi-formbuilder-perl libcrypt-ssleay-perl libjson-xs-perl librpc-xml-perl python-docutils libxml-feed-perl libsearch-xapian-perl libmailtools-perl highlight-common libsearch-xapian-perl xapian-omega
apt install --no-install-recommends ikiwiki-hosting-web libgravatar-url-perl libmail-sendmail-perl libcgi-session-perl
apt purge libnet-openid-consumer-perl
Then I enabled the CGI module in Apache:
a2enmod cgi
and un-commented the following in /etc/apache2/mods-available/mime.conf:
AddHandler cgi-script .cgi

Creating a separate user account Since Ikiwiki needs to regenerate my blog whenever a new article is pushed to the git repo or a comment is accepted, I created a restricted user account for it:
adduser blog
adduser blog sshuser
chsh -s /usr/bin/git-shell blog

git setup Thanks to Branchable storing blogs in git repositories, I was able to import my blog using a simple git clone in /home/blog (the srcdir):
git clone --bare git://feedingthecloud.branchable.com/ source.git
Note that the name of the directory (source.git) is important for the ikiwikihosting plugin to work. Then I pulled the .setup file out of the setup branch in that repo and put it in /home/blog/.ikiwiki/FeedingTheCloud.setup. After that, I deleted the setup branch and the origin remote from that clone:
git branch -d setup
git remote rm origin
Following the recommended git configuration, I created a working directory (the repository) for the blog user to modify the blog as needed:
cd /home/blog/
git clone /home/blog/source.git FeedingTheCloud
I added my own ssh public key to /home/blog/.ssh/authorized_keys so that I could push to the srcdir from my laptop. Finaly, I generated a new ssh key without a passphrase:
ssh-keygen -t ed25519
and added it as deploy key to the GitHub repo which acts as a read-only mirror of my blog.

Ikiwiki config While I started with the Branchable setup file, I changed the following things in it:
adminemail: webmaster@fmarier.org
srcdir: /home/blog/FeedingTheCloud
destdir: /var/www/blog
url: https://feeding.cloud.geek.nz
cgiurl: https://feeding.cloud.geek.nz/blog.cgi
cgi_wrapper: /var/www/blog/blog.cgi
cgi_wrappermode: 675
add_plugins:
- goodstuff
- lockedit
- comments
- blogspam
- sidebar
- attachment
- favicon
- format
- highlight
- search
- theme
- moderatedcomments
- flattr
- calendar
- headinganchors
- notifyemail
- anonok
- autoindex
- date
- relativedate
- htmlbalance
- pagestats
- sortnaturally
- ikiwikihosting
- gitpush
- emailauth
disable_plugins:
- brokenlinks
- fortune
- more
- openid
- orphans
- passwordauth
- progress
- recentchanges
- repolist
- toggle
- txt
sslcookie: 1
cookiejar:
  file: /home/blog/.ikiwiki/cookies
useragent: ikiwiki
git_wrapper: /home/blog/source.git/hooks/post-update
urlalias:
- http://feeds.cloud.geek.nz/
- http://www.feeding.cloud.geek.nz/
owner: francois@fmarier.org
hostname: feeding.cloud.geek.nz
emailauth_sender: login@fmarier.org
allowed_attachments: admin()
Then I created the destdir:
mkdir /var/www/blog
chown blog:blog /var/www/blog
and generated the initial copy of the blog as the blog user:
ikiwiki --setup .ikiwiki/FeedingTheCloud.setup --wrappers --rebuild
One thing that failed to generate properly was the tag cloug (from the pagestats plugin). I have not been able to figure out why it fails to generate any output when run this way, but if I push to the repo and let the git hook handle the rebuilding of the wiki, the tag cloud is generated correctly. Consequently, fixing this is not high on my list of priorities, but if you happen to know what the problem is, please reach out.

Apache config Here's the Apache config I put in /etc/apache2/sites-available/blog.conf:
<VirtualHost *:443>
    ServerName feeding.cloud.geek.nz
    SSLEngine On
    SSLCertificateFile /etc/letsencrypt/live/feeding.cloud.geek.nz/fullchain.pem
    SSLCertificateKeyFile /etc/letsencrypt/live/feeding.cloud.geek.nz/privkey.pem
    Header set Strict-Transport-Security: "max-age=63072000; includeSubDomains; preload"
    Include /etc/fmarier-org/blog-common
</VirtualHost>
<VirtualHost *:443>
    ServerName www.feeding.cloud.geek.nz
    ServerAlias feeds.cloud.geek.nz
    SSLEngine On
    SSLCertificateFile /etc/letsencrypt/live/feeding.cloud.geek.nz/fullchain.pem
    SSLCertificateKeyFile /etc/letsencrypt/live/feeding.cloud.geek.nz/privkey.pem
    Redirect permanent / https://feeding.cloud.geek.nz/
</VirtualHost>
<VirtualHost *:80>
    ServerName feeding.cloud.geek.nz
    ServerAlias www.feeding.cloud.geek.nz
    ServerAlias feeds.cloud.geek.nz
    Redirect permanent / https://feeding.cloud.geek.nz/
</VirtualHost>
and the common config I put in /etc/fmarier-org/blog-common:
ServerAdmin webmaster@fmarier.org
DocumentRoot /var/www/blog
LogLevel core:info
CustomLog $ APACHE_LOG_DIR /blog-access.log combined
ErrorLog $ APACHE_LOG_DIR /blog-error.log
AddType application/rss+xml .rss
<Location /blog.cgi>
        Options +ExecCGI
</Location>
before enabling all of this using:
a2ensite blog
apache2ctl configtest
systemctl restart apache2.service
The feeds.cloud.geek.nz domain used to be pointing to Feedburner and so I need to maintain it in order to avoid breaking RSS feeds from folks who added my blog to their reader a long time ago.

Server-side improvements Since I'm now in control of the server configuration, I was able to make several improvements to how my blog is served. First of all, I enabled the HTTP/2 and Brotli modules:
a2enmod http2
a2enmod brotli
and enabled Brotli compression by putting the following in /etc/apache2/conf-available/compression.conf:
<IfModule mod_brotli.c>
  <IfDefine !TRANSFER_COMPRESSION>
    Define TRANSFER_COMPRESSION BROTLI_COMPRESS
  </IfDefine>
</IfModule>
<IfModule mod_deflate.c>
  <IfDefine !TRANSFER_COMPRESSION>
    Define TRANSFER_COMPRESSION DEFLATE
  </IfDefine>
</IfModule>
<IfDefine TRANSFER_COMPRESSION>
  <IfModule mod_filter.c>
    AddOutputFilterByType $ TRANSFER_COMPRESSION  text/html text/plain text/xml text/css text/javascript
    AddOutputFilterByType $ TRANSFER_COMPRESSION  application/x-javascript application/javascript application/ecmascript
    AddOutputFilterByType $ TRANSFER_COMPRESSION  application/rss+xml
    AddOutputFilterByType $ TRANSFER_COMPRESSION  application/xml
  </IfModule>
</IfDefine>
and replacing /etc/apache2/mods-available/deflate.conf with the following:
# Moved to /etc/apache2/conf-available/compression.conf as per https://bugs.debian.org/972632
before enabling this new config:
a2enconf compression
Next, I made my blog available as a Tor onion service by putting the following in /etc/apache2/sites-available/blog.conf:
<VirtualHost *:443>
    ServerName feeding.cloud.geek.nz
    ServerAlias xfdug5vmfi6oh42fp6ahhrqdjcf7ysqat6fkp5dhvde4d7vlkqixrsad.onion
    Header set Onion-Location "http://xfdug5vmfi6oh42fp6ahhrqdjcf7ysqat6fkp5dhvde4d7vlkqixrsad.onion% REQUEST_URI s"
    Header set alt-svc 'h2="xfdug5vmfi6oh42fp6ahhrqdjcf7ysqat6fkp5dhvde4d7vlkqixrsad.onion:443"; ma=315360000; persist=1'
    ... 
<VirtualHost *:80>
    ServerName xfdug5vmfi6oh42fp6ahhrqdjcf7ysqat6fkp5dhvde4d7vlkqixrsad.onion
    Include /etc/fmarier-org/blog-common
</VirtualHost>
Then I followed the Mozilla Observatory recommendations and enabled the following security headers:
Header set Content-Security-Policy: "default-src 'none'; report-uri https://fmarier.report-uri.com/r/d/csp/enforce ; style-src 'self' 'unsafe-inline' ; img-src 'self' https://seccdn.libravatar.org/ ; script-src https://feeding.cloud.geek.nz/ikiwiki/ https://xfdug5vmfi6oh42fp6ahhrqdjcf7ysqat6fkp5dhvde4d7vlkqixrsad.onion/ikiwiki/ http://xfdug5vmfi6oh42fp6ahhrqdjcf7ysqat6fkp5dhvde4d7vlkqixrsad.onion/ikiwiki/ 'unsafe-inline' 'sha256-pA8FbKo4pYLWPDH2YMPqcPMBzbjH/RYj0HlNAHYoYT0=' 'sha256-Kn5E/7OLXYSq+EKMhEBGJMyU6bREA9E8Av9FjqbpGKk=' 'sha256-/BTNlczeBxXOoPvhwvE1ftmxwg9z+WIBJtpk3qe7Pqo=' ; base-uri 'self'; form-action 'self' ; frame-ancestors 'self'"
Header set X-Frame-Options: "SAMEORIGIN"
Header set Referrer-Policy: "same-origin"
Header set X-Content-Type-Options: "nosniff"
Note that the Mozilla Observatory is mistakenly identifying HTTP onion services as insecure, so you can ignore that failure. I also used the Mozilla TLS config generator to improve the TLS config for my server. Then I added security.txt and gpc.json to the root of my git repo and then added the following aliases to put these files in the right place:
Alias /.well-known/gpc.json /var/www/blog/gpc.json
Alias /.well-known/security.txt /var/www/blog/security.txt
I also followed these instructions to create a sitemap for my blog with the following alias:
Alias /sitemap.xml /var/www/blog/sitemap/index.rss
Finally, I simplified a few error pages to save bandwidth:
ErrorDocument 301 " "
ErrorDocument 302 " "
ErrorDocument 404 "Not Found"

Monitoring 404s Another advantage of running my own web server is that I can monitor the 404s easily using logcheck by putting the following in /etc/logcheck/logcheck.logfiles:
/var/log/apache2/blog-error.log 
Based on that, I added a few redirects to point bots and users to the location of my RSS feed:
Redirect permanent /atom /index.atom
Redirect permanent /comments.rss /comments/index.rss
Redirect permanent /comments.atom /comments/index.atom
Redirect permanent /FeedingTheCloud /index.rss
Redirect permanent /feed /index.rss
Redirect permanent /feed/ /index.rss
Redirect permanent /feeds/posts/default /index.rss
Redirect permanent /rss /index.rss
Redirect permanent /rss/ /index.rss
and to tell them to stop trying to fetch obsolete resources:
Redirect gone /~ff/FeedingTheCloud
Redirect gone /gittip_button.png
Redirect gone /ikiwiki.cgi
I also used these 404s to discover a few old Feedburner URLs that I could redirect to the right place using archive.org:
Redirect permanent /feeds/1572545745827565861/comments/default /posts/watch-all-of-your-logs-using-monkeytail/comments.atom
Redirect permanent /feeds/1582328597404141220/comments/default /posts/news-feeds-rssatom-for-mythtvorg-and/comments.atom
...
Redirect permanent /feeds/8490436852808833136/comments/default /posts/recovering-lost-git-commits/comments.atom
Redirect permanent /feeds/963415010433858516/comments/default /posts/debugging-openwrt-routers-by-shipping/comments.atom
I also put the following robots.txt in the git repo in order to stop a bunch of authentication errors coming from crawlers:
User-agent: *
Disallow: /blog.cgi
Disallow: /ikiwiki.cgi

Future improvements There are a few things I'd like to improve on my current setup. The first one is to remove the iwikihosting and gitpush plugins and replace them with a small script which would simply git push to the read-only GitHub mirror. Then I could uninstall the ikiwiki-hosting-common and ikiwiki-hosting-web since that's all I use them for. Next, I would like to have proper support for signed git pushes. At the moment, I have the following in /home/blog/source.git/config:
[receive]
    advertisePushOptions = true
    certNonceSeed = "(random string)"
but I'd like to also reject unsigned pushes. While my blog now has a CSP policy which doesn't rely on unsafe-inline for scripts, it does rely on unsafe-inline for stylesheets. I tried to remove this but the actual calls to allow seemed to be located deep within jQuery and so I gave up. Update: now fixed. Finally, I'd like to figure out a good way to deal with articles which don't currently have comments. At the moment, if you try to subscribe to their comment feed, it returns a 404. For example:
[Sun Jun 06 17:43:12.336350 2021] [core:info] [pid 30591:tid 140253834704640] [client 66.249.66.70:57381] AH00128: File does not exist: /var/www/blog/posts/using-iptables-with-network-manager/comments.atom
This is obviously not ideal since many feed readers will refuse to add a feed which is currently not found even though it could become real in the future. If you know of a way to fix this, please let me know.

10 June 2021

Vincent Bernat: Serving WebP & AVIF images with Nginx

WebP and AVIF are two image formats for the web. They aim to produce smaller files than JPEG and PNG. They both support lossy and lossless compression, as well as alpha transparency. WebP was developed by Google and is a derivative of the VP8 video format.1 It is supported on most browsers. AVIF is using the newer AV1 video format to achieve better results. It is supported by Chromium-based browsers and has experimental support for Firefox.2

Your browser supports WebP and AVIF image formats. Your browser supports none of these image formats. Your browser only supports the WebP image format. Your browser only supports the AVIF image format.

Without JavaScript, I can t tell what your browser supports.

Converting and optimizing images For this blog, I am using the following shell snippets to convert and optimize JPEG and PNG images. Skip to the next section if you are only interested in the Nginx setup.

JPEG images JPEG images are converted to WebP using cwebp.
find media/images -type f -name '*.jpg' -print0 \
    xargs -0n1 -P$(nproc) -i \
      cwebp -q 84 -af ' ' -o ' '.webp
They are converted to AVIF using avifenc from libavif:
find media/images -type f -name '*.jpg' -print0 \
    xargs -0n1 -P$(nproc) -i \
      avifenc --codec aom --yuv 420 --min 20 --max 25 ' ' ' '.avif
Then, they are optimized using jpegoptim built with Mozilla s improved JPEG encoder, via Nix. This is one reason I love Nix.
jpegoptim=$(nix-build --no-out-link \
      -E 'with (import <nixpkgs> ); jpegoptim.override   libjpeg = mozjpeg;  ')
find media/images -type f -name '*.jpg' -print0 \
    sort -z
    xargs -0n10 -P$(nproc) \
      $ jpegoptim /bin/jpegoptim --max=84 --all-progressive --strip-all

PNG images PNG images are down-sampled to 8-bit RGBA-palette using pngquant. The conversion reduces file sizes significantly while being mostly invisible.
find media/images -type f -name '*.png' -print0 \
    sort -z
    xargs -0n10 -P$(nproc) \
      pngquant --skip-if-larger --strip \
               --quiet --ext .png --force
Then, they are converted to WebP with cwebp in lossless mode:
find media/images -type f -name '*.png' -print0 \
    xargs -0n1 -P$(nproc) -i \
      cwebp -z 8 ' ' -o ' '.webp
No conversion is done to AVIF: lossless compression is not as efficient as pngquant and lossy compression is only marginally better than what I get with WebP.

Keeping only the smallest files I am only keeping WebP and AVIF images if they are at least 10% smaller than the original format: decoding is usually faster for JPEG and PNG; and JPEG images can be decoded progressively.3
for f in media/images/**/*. webp,avif ; do
  orig=$(stat --format %s $ f%.* )
  new=$(stat --format %s $f)
  (( orig*0.90 > new ))   rm $f
done
I only keep AVIF images if they are smaller than WebP.
for f in media/images/**/*.avif; do
  [[ -f $ f%.* .webp ]]   continue
  orig=$(stat --format %s $ f%.* .webp)
  new=$(stat --format %s $f)
  (( $orig > $new ))   rm $f
done
We can compare how many images are kept when converted to WebP or AVIF:
printf "     %10s %10s %10s\n" Original WebP AVIF
for format in png jpg; do
  printf " $ format:u  %10s %10s %10s\n" \
    $(find media/images -name "*.$format"   wc -l) \
    $(find media/images -name "*.$format.webp"   wc -l) \
    $(find media/images -name "*.$format.avif"   wc -l)
done
AVIF is better than MozJPEG for most JPEG files while WebP beats MozJPEG only for one file out of two:
       Original       WebP       AVIF
 PNG         64         47          0
 JPG         83         40         74

Further reading I didn t detail my choices for quality parameters and there is not much science in it. Here are two resources providing more insight on AVIF:

Serving WebP & AVIF with Nginx To serve WebP and AVIF images, there are two possibilities:
  1. use <picture> to let the browser pick the format it supports, or
  2. use content negotiation to let the server send the best-supported format.
I use the second approach. It relies on inspecting the Accept HTTP header in the request. For Chrome, it looks like this:
Accept: image/avif,image/webp,image/apng,image/*,*/*;q=0.8
I configure Nginx to serve AVIF image, then the WebP image, and fallback to the original JPEG/PNG image depending on what the browser advertises:4
http  
  map $http_accept $webp_suffix  
    default        "";
    "~image/webp"  ".webp";
   
  map $http_accept $avif_suffix  
    default        "";
    "~image/avif"  ".avif";
   
 
server  
  # [ ]
  location ~ ^/images/.*\.(png jpe?g)$  
    add_header Vary Accept;
    try_files $uri$avif_suffix$webp_suffix $uri$avif_suffix $uri$webp_suffix $uri =404;
   
 
For example, let s suppose the browser requests /images/ont-box-orange@2x.jpg. If it supports WebP but not AVIF, $webp_suffix is set to .webp while $avif_suffix is set to the empty string. The server tries to serve the first existing file in this list:
  • /images/ont-box-orange@2x.jpg.webp
  • /images/ont-box-orange@2x.jpg
  • /images/ont-box-orange@2x.jpg.webp
  • /images/ont-box-orange@2x.jpg
If the browser supports both AVIF and WebP, Nginx walks the following list:
  • /images/ont-box-orange@2x.jpg.webp.avif (it never exists)
  • /images/ont-box-orange@2x.jpg.avif
  • /images/ont-box-orange@2x.jpg.webp
  • /images/ont-box-orange@2x.jpg
Eugene Lazutkin explains in more detail how this works. I have only presented a variation of his setup supporting both WebP and AVIF.

  1. VP8 is only used for lossy compression. Lossless compression is using an unrelated format.
  2. Firefox support was scheduled for Firefox 86 but because of the lack of proper color space support, it is still not enabled by default.
  3. Progressive decoding is not planned for WebP but could be implemented using low-quality thumbnail images for AVIF. See this issue for a discussion.
  4. The Vary header ensures an intermediary cache (a proxy or a CDN) checks the Accept header before using a cached response. Internet Explorer has trouble with this header and may not be able to cache the resource properly. There is a workaround but Internet Explorer s market share is now so small that it is pointless to implement it.

6 June 2021

Iustin Pop: Goodbye Travis, hello GitHub Actions

My very cyclical open-source work For some reason, I only manage to do coding at home every some months - mostly 6 months apart, so twice a year (even worse than my blogging frequency :P). As such, I missed the whole discussion about travis-ci (the .org version) going away, etc. So when I finally did some work on corydalis a few weeks ago, and had a travis build failure (restoring a large cache simply timed out, either travis or S3 has some hiccup - it cleared by itself a day later), I opened the travis-ci interface to see the scary banner ( travis-ci.org is shutting down ), and asked myself what s happening. The deadline was in less than a week even Long story short, Travis was a good home for many years, but they were bought and are doing significant changes to their OSS support, so it s time to move on. I anyway wanted to learn GitHub Actions for a while (ahem, free time intervened), so this was a good (forced) opportunity .

Proper composable CI The advantage of Travis infrastructure was that the build configuration was really simple. It had very few primitives: pre-steps (before_install), install steps, and the actual things to do to test, post-steps (after_sucess) and a few other small helpers (caching, apt packages, etc.) This made it really easy to just pick up and write a config, plus it had the advantage of allowing to test configs from the web UI without needing to push. This simplicity was unfortunately also its significant limiter: the way to do complex things in steps was simply to add more shell commands. GitHub actions, together with its marketplace, changes this entirely. There are no built-in actions, the language just defines the build/job/step hierarchy, and one glues together whatever steps they want. This has the disadvantage that even checking out the code needs to be explicitly written in all workflows (so boilerplate, if you don t need customisation), but it opens up a huge opportunity for composition, since it allows people to publish actions (steps) that you just import, encapsulating all the work. So, after learning how to write a moderately complicated workflow (complicated as in multiple Python version, some of them needing different OS version, and multi-OS), it was straightforward to port this to all my projects - just somewhat tedious. I ve now shutdown all builds on Travis, just can t find a way to delete my account

Better multi-OS, worse (missing) multi-arch In theory, Travis supports Linux, MacOS, FreeBSD and Windows, but I ve found that support for non-Linux is not quite as good. Maybe I missed things, but multi-version Python builds on MacOS were not as nicely supported as Linux; Windows is quite early, and very limited; and I haven t tested FreeBSD. GitHub is more restrictive - Linux, MacOS and Windows - but I found support for MacOS and Windows better for my use cases. If your use case is testing multiple MacOS versions, Travis wins, if it s more varied languages/etc. on the single available MacOS version, GitHub works better. On the multi-arch side, Travis wins hands-down. Four different native architectures, and enabling one more is just adding another key to the arch list. With GitHub, if I understand right, you either have to use docker+emulation, or use self-hosted runners. So here it really matters what is more important to you. Maybe in the future GitHub will support more arches, but right now, Travis wins for this use-case.

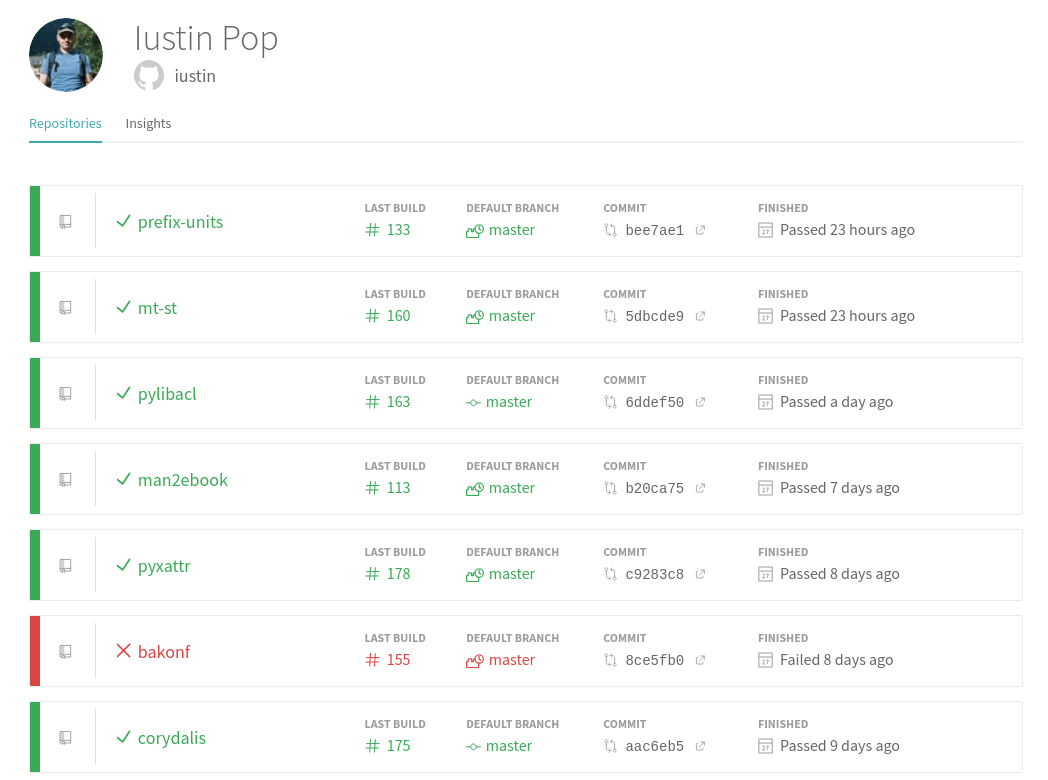
Summary For my specific use-case, GitHub Actions is a better fit right now. The marketplace has advantages (I ll explain better in a future post), the actions are a very nice way to encapsulate functionality, and it s still available/free (up to a limit) for open source projects. I don t know what the future of Travis for OSS will be, but all I heard so far is very concerning. However, I ll still miss a few things. For example, an overall dashboard for all my projects, like this one:
Travis dashboard Travis dashboard
I couldn t find any such thing on GitHub, so I just use my set of badges. Then cache management. Travis allows you to clear the cache, and it does auto-update the cache. GitHub caches are immutable once built, so you have to:
  • watch if changed dependencies/dependency chains result in things that are no longer cached;
  • if so, need to manually bump the cache key, resulting in a commit for purely administrative purposes.
For languages where you have a clean full chain of dependencies recorded (e.g. node s package-lock.json, stack s stack.yaml.lock), this is trivial to achieve, but gets complicated if you add OS dependencies, languages which don t record all this, etc. Hmm, maybe I should just embed the year/month in the cache name - cheating, but automated cheating. With all said and done, I think GHA is much less refined, but with more potential. Plus, the pace of innovation on Travis side was quite slow (likely money problems, hence them being bought, etc.) So one TODO done: learn GitHub Actions , even if a bit unplanned

2 June 2021

Joachim Breitner: Verifying the code of the Internet Identity service

The following post was meant to be posted at https://forum.dfinity.org/, but that discourse instance didn t like it; maybe too much inline code, so I m posting it here instead. To my regular blog audience, please excuse the lack of context. Please comment at the forum post. The text was later also posted on the DFINITY medium blog You probably have used https://identity.ic0.app/ to log into various applications (the NNS UI, OpenChat etc.) before, and if you do that, you are trusting this service to take good care of your credentials. Furthermore, you might want to check that the Internet Identity is really not tracking you. So you want to know: Is this really running the code we claim it to run? Of course the following applies to other canisters as well, but I ll stick to the Internet Identity in this case. I ll walk you through the steps of verifying that:

Find out what is running A service on the Internet Computer, i.e. a canister, is a WebAssembly module. The Internet Computer does intentionally not allow you to just download the Wasm code of any canisters, because maybe some developer wants to keep their code private. But it does expose a hash of the Wasm module. The easiest way to get it is using dfx:
$ dfx canister --no-wallet --network ic info rdmx6-jaaaa-aaaaa-aaadq-cai
Controller: r7inp-6aaaa-aaaaa-aaabq-cai
Module hash: 0xd4af9277f3e8d26fd8cdc7874a9f47b6456587fbb2a64d61b6b6880d144d3c04
The controller here is the canister id of the governance canister. This tells you that the Internet Identity is controlled by the Network Nervous System (NNS), and its code can only be changed via proposals that are voted on. This is good; if the controller was just, say, me, I could just change the code of the Internet Identity and take over all your identities. The Module hash is the SHA-256 hash of the .wasm that was deployed. So let s follow that trace.

Finding the right commit Since upgrades to the Internet Identity are done via proposals to the NNS, we should find a description of such a proposal in the https://github.com/ic-association/nns-proposals repository, in the proposals/network_canister_management directory.
Github s list of recent NNS proposalsGithub s list of recent NNS proposals
We have to find the latest proposal upgrading the Internet Identity. The folder unfortunately contains proposals for many canisters, and the file naming isn t super helpful. I usually go through the list from bottom and look at the second column, which contains the title of the latest commit creating or modifying a file. In this case, the second to last is the one we care about: https://github.com/ic-association/nns-proposals/blob/main/proposals/network_canister_management/20210527T2203Z.md. This file lists rationales, gives an overview of changes and, most importantly, says that bd51eab is the commit we are upgrading to. The file also says that the wasm hash is d4a c04, which matches what we saw above. This is good: it seems we really found the youngest proposal upgrading the Internet Identity, and that the proposal actually went through. WARNING: If you are paranoid, don t trust this file. There is nothing preventing a proposal proposer to create a file pointing to one revision, but actually including other code in the proposal. That s why the next steps are needed.

Getting the source Now that we have the revision, we can get the source and check out revision bd51eab:
/tmp $ git clone https://github.com/dfinity/internet-identity
Klone nach 'internet-identity' ...
remote: Enumerating objects: 3959, done.
remote: Counting objects: 100% (344/344), done.
remote: Compressing objects: 100% (248/248), done.
remote: Total 3959 (delta 161), reused 207 (delta 92), pack-reused 3615
Empfange Objekte: 100% (3959/3959), 6.05 MiB   3.94 MiB/s, Fertig.
L se Unterschiede auf: 100% (2290/2290), Fertig.
/tmp $ cd internet-identity/
/tmp/internet-identity $ git checkout bd51eab
/tmp/internet-identity $ git log --oneline -n 1
bd51eab (HEAD, tag: mainnet-20210527T2203Z) Registers the seed phrase before showing it (#301)
In the last line you see that the Internet Identity team has tagged that revision with a tag name that contains the proposal description file name. Very tidy!

Reproducing the build The README.md has the following build instructions:

Official build The official build should ideally be reproducible, so that independent parties can validate that we really deploy what we claim to deploy. We try to achieve some level of reproducibility using a Dockerized build environment. The following steps should build the official Wasm image
docker build -t internet-identity-service .
docker run --rm --entrypoint cat internet-identity-service /internet_identity.wasm > internet_identity.wasm
sha256sum internet_identity.wasm
The resulting internet_identity.wasm is ready for deployment as rdmx6-jaaaa-aaaaa-aaadq-cai, which is the reserved principal for this service.

It actually suffices to run the first command, as it also prints the hash (we don t need to copy the .wasm out of the Docker canister):
/tmp/internet-identity $ docker build -t internet-identity-service .
 
Step 26/26 : RUN sha256sum internet_identity.wasm
 ---> Running in 1a04644b544c
d4af9277f3e8d26fd8cdc7874a9f47b6456587fbb2a64d61b6b6880d144d3c04  internet_identity.wasm
Removing intermediate container 1a04644b544c
 ---> bfe6a63a7980
Successfully built bfe6a63a7980
Successfully tagged internet-identity-service:latest
Success! The hashes match. You don t believe me? Try it yourself (and let us know if you get a different hash, maybe I got hacked). This may fail if you have too little RAM configured for Docker, 8GB should be enough. At this point you have a trust path from the code sitting in front of you to the Internet Identity running at https://identity.ic0.app, including the front-end code, and you can start auditing the source code.

What about the canister id? If you payed close attention you might have noticed that we got the module has for canister rdmx6-jaaaa-aaaaa-aaadq-cai, but we are accessing a web application at https://identity.ic0.app. So where is this connection? In the future, I expect some form of a DNS-like nice host name registry on the Internet Computer that stores a mapping from nice names to canister ids, and that you will be able to query that to for which canister serves rdmx6-jaaaa-aaaaa-aaadq-cai in a secure way (e.g. using certified variables). But since we don t have that yet, but still want you to be able to use a nice name for the Internet Identity (and not have to change the name later, which would cause headaches), we have hard-coded this mapping for now. The relevant code here is the Certifying Service Worker that your browser downloads when accessing any *.ic0.app URL. This piece of code will then intercept all requests to that domain, map it to an query call, and then use certified variables to validate the response. And indeed, the mapping is in the code there:
const hostnameCanisterIdMap: Record<string, [string, string]> =  
  'identity.ic0.app': ['rdmx6-jaaaa-aaaaa-aaadq-cai', 'ic0.app'],
  'nns.ic0.app': ['qoctq-giaaa-aaaaa-aaaea-cai', 'ic0.app'],
  'dscvr.ic0.app': ['h5aet-waaaa-aaaab-qaamq-cai', 'ic0.page'],
 ;

What about other canisters? In principle, the same approach works for other canisters, whether it s OpenChat, the NNS canisters etc. But the details will differ, as every canister developer might have their own way of
  • communicating the location and revision of the source for their canisters
  • building the canisters
In particular, without a reproducible way of building the canister, this will fail, and that s why projects like https://reproducible-builds.org/ are so important in general.

1 June 2021

Paul Wise: FLOSS Activities May 2021

Focus This month I didn't have any particular focus. I just worked on issues in my info bubble.

Changes

Issues

Review

Administration
  • Debian wiki: unblock IP addresses, approve accounts

Communication
  • Joined the great IRC migration
  • Respond to queries from Debian users and contributors on the mailing lists and IRC

Sponsors The purple-discord, sptag and esprima-python work was sponsored by my employer. All other work was done on a volunteer basis.

31 May 2021

Chris Lamb: Free software activities in May 2021

Here's my monthly update covering what I have been doing in the free software world for May 2021 (previous month): Reproducible Builds The motivation behind the Reproducible Builds effort is to ensure no flaws have been introduced during this compilation process by promising identical results are always generated from a given source, thus allowing multiple third-parties to come to a consensus on whether a build was compromised. I also made the following changes to diffoscope, including preparing and uploading versions 174, 175 and 176 to Debian: Debian Finally, I also made a sponsored upload of adminer (4.7.9-2) for Alexandre Rossi. Debian LTS This month I have worked 18 hours on Debian Long Term Support (LTS) and 12 hours on its sister Extended LTS project. You can find out more about the project via the following video:

27 May 2021

Michael Prokop: What to expect from Debian/bullseye #newinbullseye

Bullseye Banner, Copyright 2020 Juliette Taka Debian v11 with codename bullseye is supposed to be released as new stable release soon-ish (let s hope for June, 2021! :)). Similar to what we had with #newinbuster and previous releases, now it s time for #newinbullseye! I was the driving force at several of my customers to be well prepared for bullseye before its freeze, and since then we re on good track there overall. In my opinion, Debian s release team did (and still does) a great job I m very happy about how unblock requests (not only mine but also ones I kept an eye on) were handled so far. As usual with major upgrades, there are some things to be aware of, and hereby I m starting my public notes on bullseye that might be worth also for other folks. My focus is primarily on server systems and looking at things from a sysadmin perspective. Further readings Of course start with taking a look at the official Debian release notes, make sure to especially go through What s new in Debian 11 + Issues to be aware of for bullseye. Chris published notes on upgrading to Debian bullseye, and also anarcat published upgrade notes for bullseye. Package versions As a starting point, let s look at some selected packages and their versions in buster vs. bullseye as of 2021-05-27 (mainly having amd64 in mind):
Package buster/v10 bullseye/v11
ansible 2.7.7 2.10.8
apache 2.4.38 2.4.46
apt 1.8.2.2 2.2.3
bash 5.0 5.1
ceph 12.2.11 14.2.20
docker 18.09.1 20.10.5
dovecot 2.3.4 2.3.13
dpkg 1.19.7 1.20.9
emacs 26.1 27.1
gcc 8.3.0 10.2.1
git 2.20.1 2.30.2
golang 1.11 1.15
libc 2.28 2.31
linux kernel 4.19 5.10
llvm 7.0 11.0
lxc 3.0.3 4.0.6
mariadb 10.3.27 10.5.10
nginx 1.14.2 1.18.0
nodejs 10.24.0 12.21.0
openjdk 11.0.9.1 11.0.11+9 + 17~19
openssh 7.9p1 8.4p1
openssl 1.1.1d 1.1.1k
perl 5.28.1 5.32.1
php 7.3 7.4+76
postfix 3.4.14 3.5.6
postgres 11 13
puppet 5.5.10 5.5.22
python2 2.7.16 2.7.18
python3 3.7.3 3.9.2
qemu/kvm 3.1 5.2
ruby 2.5.1 2.7+2
rust 1.41.1 1.48.0
samba 4.9.5 4.13.5
systemd 241 247.3
unattended-upgrades 1.11.2 2.8
util-linux 2.33.1 2.36.1
vagrant 2.2.3 2.2.14
vim 8.1.0875 8.2.2434
zsh 5.7.1 5.8
Linux Kernel The bullseye release will ship a Linux kernel based on v5.10 (v5.10.28 as of 2021-05-27, with v5.10.38 pending in unstable/sid), whereas buster shipped kernel 4.19. As usual there are plenty of changes in the kernel area and this might warrant a separate blog entry, but to highlight some issues: One surprising change might be that the scrollback buffer (Shift + PageUp) is gone from the Linux console. Make sure to always use screen/tmux or handle output through a pager of your choice if you need all of it and you re in the console. The kernel provides BTF support (via CONFIG_DEBUG_INFO_BTF, see #973870), which means it s no longer necessary to install LLVM, Clang, etc (requiring >100MB of disk space), see Gregg s excellent blog post regarding the underlying rational. Sadly the libbpf-tools packaging didn t make it into bullseye (#978727), but if you want to use your own self-made Debian packages, my notes might be useful. With kernel version 5.4, SUBDIRS support was removed from kbuild, so if an out-of-tree kernel module (like a *-dkms package) fails to compile on bullseye, make sure to use a recent version of it which uses M= or KBUILD_EXTMOD= instead. Unprivileged user namespaces are enabled by default (see #898446 + #987777), so programs can create more restricted sandboxes without the need to run as root or via a setuid-root helper. If you prefer to keep this feature restricted (or tools like web browsers, WebKitGTK, Flatpak, don t work), use sysctl -w kernel.unprivileged_userns_clone=0 . The /boot/System.map file(s) no longer provide the actual data, you need to switch to the dbg package if you rely on that information:
% cat /boot/System.map-5.10.0-6-amd64 
ffffffffffffffff B The real System.map is in the linux-image-<version>-dbg package
Be aware though, that the *-dbg package requires ~5GB of additional disk space. Systemd systemd v247 made it into bullseye (updated from v241). Same as for the kernel this might warrant a separate blog entry, but to mention some highlights: Systemd in bullseye activates its persistent journal functionality by default (storing its files in /var/log/journal/, see #717388). systemd-timesyncd is no longer part of the systemd binary package itself, but available as standalone package. This allows usage of ntp, chrony, openntpd, without having systemd-timesyncd installed (which prevents race conditions like #889290, which was biting me more than once). journalctl gained new options:
--cursor-file=FILE      Show entries after cursor in FILE and update FILE
--facility=FACILITY...  Show entries with the specified facilities
--image=IMAGE           Operate on files in filesystem image
--namespace=NAMESPACE   Show journal data from specified namespace
--relinquish-var        Stop logging to disk, log to temporary file system
--smart-relinquish-var  Similar, but NOP if log directory is on root mount
systemctl gained new options:
clean UNIT...                       Clean runtime, cache, state, logs or configuration of unit
freeze PATTERN...                   Freeze execution of unit processes
thaw PATTERN...                     Resume execution of a frozen unit
log-level [LEVEL]                   Get/set logging threshold for manager
log-target [TARGET]                 Get/set logging target for manager
service-watchdogs [BOOL]            Get/set service watchdog state
--with-dependencies                 Show unit dependencies with 'status', 'cat', 'list-units', and 'list-unit-files'
 -T --show-transaction              When enqueuing a unit job, show full transaction
 --what=RESOURCES                   Which types of resources to remove
--boot-loader-menu=TIME             Boot into boot loader menu on next boot
--boot-loader-entry=NAME            Boot into a specific boot loader entry on next boot
--timestamp=FORMAT                  Change format of printed timestamps
If you use systemctl edit to adjust overrides, then you ll now also get the existing configuration file listed as comment, which I consider very helpful. The MACAddressPolicy behavior with systemd naming schema v241 changed for virtual devices (I plan to write about this in a separate blog post). There are plenty of new manual pages: systemd also gained new unit configurations related to security hardening: Another new unit configuration is SystemCallLog= , which supports listing the system calls to be logged. This is very useful for for auditing or temporarily when constructing system call filters. The cgroupv2 change is also documented in the release notes, but to explicitly mention it also here, quoting from /usr/share/doc/systemd/NEWS.Debian.gz:
systemd now defaults to the unified cgroup hierarchy (i.e. cgroupv2).
This change reflects the fact that cgroups2 support has matured
substantially in both systemd and in the kernel.
All major container tools nowadays should support cgroupv2.
If you run into problems with cgroupv2, you can switch back to the previous,
hybrid setup by adding systemd.unified_cgroup_hierarchy=false to the
kernel command line.
You can read more about the benefits of cgroupv2 at
https://www.kernel.org/doc/html/latest/admin-guide/cgroup-v2.html
Note that cgroup-tools (lssubsys + lscgroup etc) don t work in cgroup2/unified hierarchy yet (see #959022 for the details). Configuration management puppet s upstream doesn t provide packages for bullseye yet (see PA-3624 + MODULES-11060), and sadly neither v6 nor v7 made it into bullseye, so when using the packages from Debian you re still stuck with v5.5 (also see #950182). ansible is also available, and while it looked like that only version 2.9.16 would make it into bullseye (see #984557 + #986213), actually version 2.10.8 made it into bullseye. chef was removed from Debian and is not available with bullseye (due to trademark issues). Prometheus stack Prometheus server was updated from v2.7.1 to v2.24.1, and the prometheus service by default applies some systemd hardening now. Also all the usual exporters are still there, but bullseye also gained some new ones: Virtualization docker (v20.10.5), ganeti (v3.0.1), libvirt (v7.0.0), lxc (v4.0.6), openstack, qemu/kvm (v5.2), xen (v4.14.1), are all still around, though what s new and noteworthy is that podman version 3.0.1 (tool for managing OCI containers and pods) made it into bullseye. If you re using the docker packages from upstream, be aware that they still don t seem to understand Debian package version handling. The docker* packages will not be automatically considered for upgrade, as 5:20.10.6~3-0~debian-buster is considered newer than 5:20.10.6~3-0~debian-bullseye:
% apt-cache policy docker-ce
  docker-ce:
    Installed: 5:20.10.6~3-0~debian-buster
    Candidate: 5:20.10.6~3-0~debian-buster
    Version table:
   *** 5:20.10.6~3-0~debian-buster 100
          100 /var/lib/dpkg/status
       5:20.10.6~3-0~debian-bullseye 500
          500 https://download.docker.com/linux/debian bullseye/stable amd64 Packages
Vagrant is available in version 2.2.14, the package from upstream works perfectly fine on bullseye as well. If you re relying on VirtualBox, be aware that upstream doesn t provide packages for bullseye yet, but the package from Debian/unstable (v6.1.22 as of 2021-05-27) works fine on bullseye (VirtualBox isn t shipped with stable releases since quite some time due to lack of cooperation from upstream on security support for older releases, see #794466). If you rely on the virtualbox-guest-additions-iso and its shared folders support, you might be glad to hear that v6.1.22 made it into bullseye (see #988783), properly supporting more recent kernel versions like present in bullseye. debuginfod There s a new service debuginfod.debian.net (see debian-devel-announce and Debian Wiki), which makes the debugging experience way smoother. You no longer need to download the debugging Debian packages (*-dbgsym/*-dbg), but instead can fetch them on demand, by exporting the following variables (before invoking gdb or alike):
% export DEBUGINFOD_PROGRESS=1    # for optional download progress reporting
% export DEBUGINFOD_URLS="https://debuginfod.debian.net"
BTW: if you can t rely on debuginfod (for whatever reason), I d like to point your attention towards find-dbgsym-packages from the debian-goodies package. Vim Sadly Vim 8.2 once again makes another change for bad defaults (hello mouse behavior!). When incsearch is set, it also applies to :substitute. This makes it veeeeeeeeeery annoying when running something like :%s/\s\+$// to get rid of trailing whitespace characters, because if there are no matches it jumps to the beginning of the file and then back, sigh. To get the old behavior back, you can use this:
au CmdLineEnter : let s:incs = &incsearch   set noincsearch
au CmdLineLeave : let &incsearch = s:incs
rsync rsync was updated from v3.1.3 to v3.2.3. It provides various checksum enhancements (see option --checksum-choice). We got new capabilities (hardlink-specials, atimes, optional protect-args, stop-at, no crtimes) and the addition of zstd and lz4 compression algorithms. And we got new options: OpenSSH OpenSSH was updated from v7.9p1 to 8.4p1, so if you re interested in all the changes, check out the release notes between those version (8.0, 8.1, 8.2, 8.3 + 8.4). Let s highlight some notable new features: Misc unsorted

22 May 2021

Ritesh Raj Sarraf: Setting Up a Secure Webapp

As a person who prefers full access to data in the simplest format, while at the same time having it useful with latest technologies, my quest for trying things out is an ongoing activity. Earlier, I blogged about my needs of collating news feeds in a simple format, readily accessible offline, while still being useful and aligned with the modern paradigm. In today s age, the other common aspect of our life, is digitization of moments. With the advent of great technology and affordable economics, the world now has access to great devices to capture moments in digital form. Most people, these days, are equipped with smart devices, like mobile phones, that come with pretty good image capturing devices. Our lives, our societies, how we interact; a lot of it is now built around the assumption of smart devices and digital services. A lot of good things have happened of it. We are now able to send messages to people, securely, in a matter of seconds. We are now able to capture moments, which otherwise we d often miss; all thanks to devices like smart mobile phones that most of all carry almost all along with us. In this regard, we are quite indebted to the technology revolution that has improved life styles all over. Of course, like every coin has a flip side, thus too, too much of obsession with digital life, also has its drawbacks. A simple reminder to self should always be about what a human life is designed for and try to live by its rules.

Moments Given the tools general availability, we are all more used to capturing moments. Once upon a time, taking a photo meant going to a photo studio. Then came a generation where we d have personal devices with roll films, to which we captured the moments. And then get it processed from a photo developing service provider. And that is when we d know which all moments came out correct and which ones were spoilt. In such cases, there s always the wish I could have that moment again. Thankfully, now, in our current generation, we have the liberty to take pictures and validate them almost immediately. We also have the flexibility to take multiple shots of the moment and do the filtering later. There s also many intelligent and invasive services, all mostly provided free, to help you organize these moments; at a small cost of keeping an eye on your life activity. In a summary, mankind, now, generates lots and lots of data. So much lot that now even mammoths like Google are forced to make a call whether it is more profitable to sniff user activity while providing them a service for free, or ask people to pay otherwise too.

Privacy Many of us are wary of the amount of personal data we generate, which is our asset; and how the big tech giants want a piece of it in the name of free services. And in such quest, free aside, there s always a lookout for privacy savvy tools that can help us draw a bold line in between Public and Private

Google Photos Google Photos has been a great tool. The way it organizes, siphons and present your data is simply amazing. No good would have been the photos taken, if they weren t easily searchable, organized, annotated, and presented. But Google Photos is proprietary and invasive. The amount of information they have access to should be a concern to all people. For services that invade so much, the world needs Free Services.

PhotoPrism I only came across this project around a month ago, while the project has been around since 2019. So far, in my exploration, this is one of the best Free Software tools to manage and organize my digital photos. The other favorite tool that I regularly depend on is Digikam and it still is a gem. In a gist, PhotoPrism aims to be the equivalent of Google Photos, for the privacy savvy people. As of date, it has a decent list of features available. And for some of the missing ones, I ve come up with a fairly okay workflow with other tools, which is one of the reasons of this blog post. PhotoPrism is a web app, written in the Go Programming Language. Its layout and workflow as a Photo Management application is similar to Google Photos. It is very performant compared to other applications. Since it is a Progressive Web App, access through a Laptop, Tablet or Mobile is almost the same. It uses Google TensorFlow for some of its features and thus you feel like using Google Photos in some regard. Some shortcomings and workarounds
  • Facial Recognition: To date, facial recognition is a planned feature. But this was easy to tackle given that Digikam has pretty solid facial recognition. So I use Digikam to detect, recognize and annotate faces. And then PhotoPrism is happy enough to use those annotations and present relevant data.
  • HTTP Web App: The upstream project has done a good job of making use of Docker container technology in presenting this web app solution. A software solution, the equivalent of a Google Photos, does need a heavyweight config. In free software, it is all about reusing available tools. PhotoPrism makes use of tools like MySQL, Vue.js, TensorFlow, GoLang, GoLibs and strives to provide a single package solution, all thanks to Docker containers.
In its current offering, PhotoPrism is run as a HTTP Web App. I wanted to have an added layer of security on top of it. And thus run an nginx reverse proxy on top of it. Along with it, I run the proxy service on HTTPS, thus making all traffic from clients to the proxy encrypted. I also wanted an added layer of HTTP AUTH on top, so I explored some options and finally settled down with http-auth-digest Also, in the current implementation, PhotoPrism doesn t have a strong notion of normal and private photos in its data organization. I wanted normal photos available under a standard auth realm and private photos under a different realm. And along with a different realm, I also wanted some added security directives for it. So far, it looks like I ve put together a decent solution with the help of nginx.
  • First of all, since the port from the host is forwarded to the docker instance, that needed to be controlled. Instead of the default of listening on all interfaces, I changed it to loopback only. Because my primary and only interface is going to be the nginx reverse proxy
  • Setup nginx with a self-signed certificate to have all communication encrypted.
  • Setup nginx as a reverse proxy to talk to PhotoPrism.
    server  
       listen 80;
       listen [::]:80;
       server_name lenovo;
       return 302 https://$host$request_uri;
       rewrite ^ https://$http_host$request_uri? permanent;    # force redirect http to https
        server_tokens off;
     
    server  
    listen 443 ssl http2 default_server;
    listen [::]:443 ssl http2 default_server;
    ssl_certificate_key /etc/ssl/private/ssl-cert-snakeoil.key;
    ssl_certificate /etc/ssl/certs/ssl-cert-snakeoil.pem;
    server_tokens off;
    server_name lenovo;
    client_max_body_size 500M;
        auth_digest_expires 900s;
        auth_digest_evasion_time 5s;
        auth_digest_replays 500;
    location /private  
        auth_digest 'abc';
        auth_digest_user_file /etc/nginx/htdigest;
        auth_digest_expires 900s;
        auth_digest_evasion_time 5s;
        auth_digest_replays 500;
        proxy_pass http://localhost:2342/private;
     
    location /discover  
        auth_digest 'abc';
        auth_digest_user_file /etc/nginx/htdigest;
        auth_digest_expires 900s;
        auth_digest_evasion_time 5s;
        auth_digest_replays 500;
        proxy_pass http://localhost:2342/discover;
     
    location /  
        proxy_set_header X-Forwarded-For $proxy_add_x_forwarded_for;
        proxy_set_header Host $host;
        proxy_buffering off;
        proxy_http_version 1.1;
        proxy_set_header Upgrade $http_upgrade;
        proxy_set_header Connection "upgrade";
        proxy_pass http://localhost:2342;
          
        auth_basic "Priv";
        auth_basic_user_file /etc/nginx/htpasswd;


  • nginx packaging: I was so happy to see the simplicity of the nginx packaging in Debian. Becuase http-auth-digest is not upstream, it needs to be pulled in separately and compiled. I was happy to see how simple the packaging structure of nginx in Debian is. It was just a matter of putting in the module in the right modules location, which as structured such in the packaging falls under the debian/ packaging sub-folder, that any future upgrades will be quite easy to manage.
  • http-auth-digest: I d love to see http-auth-digest module be part of the upstream package. While I m a web n00b, I felt this module perfect for my use case. From what I ve understood, set up and tested so far, this module fills in all my requirements; which is more of like a session management.
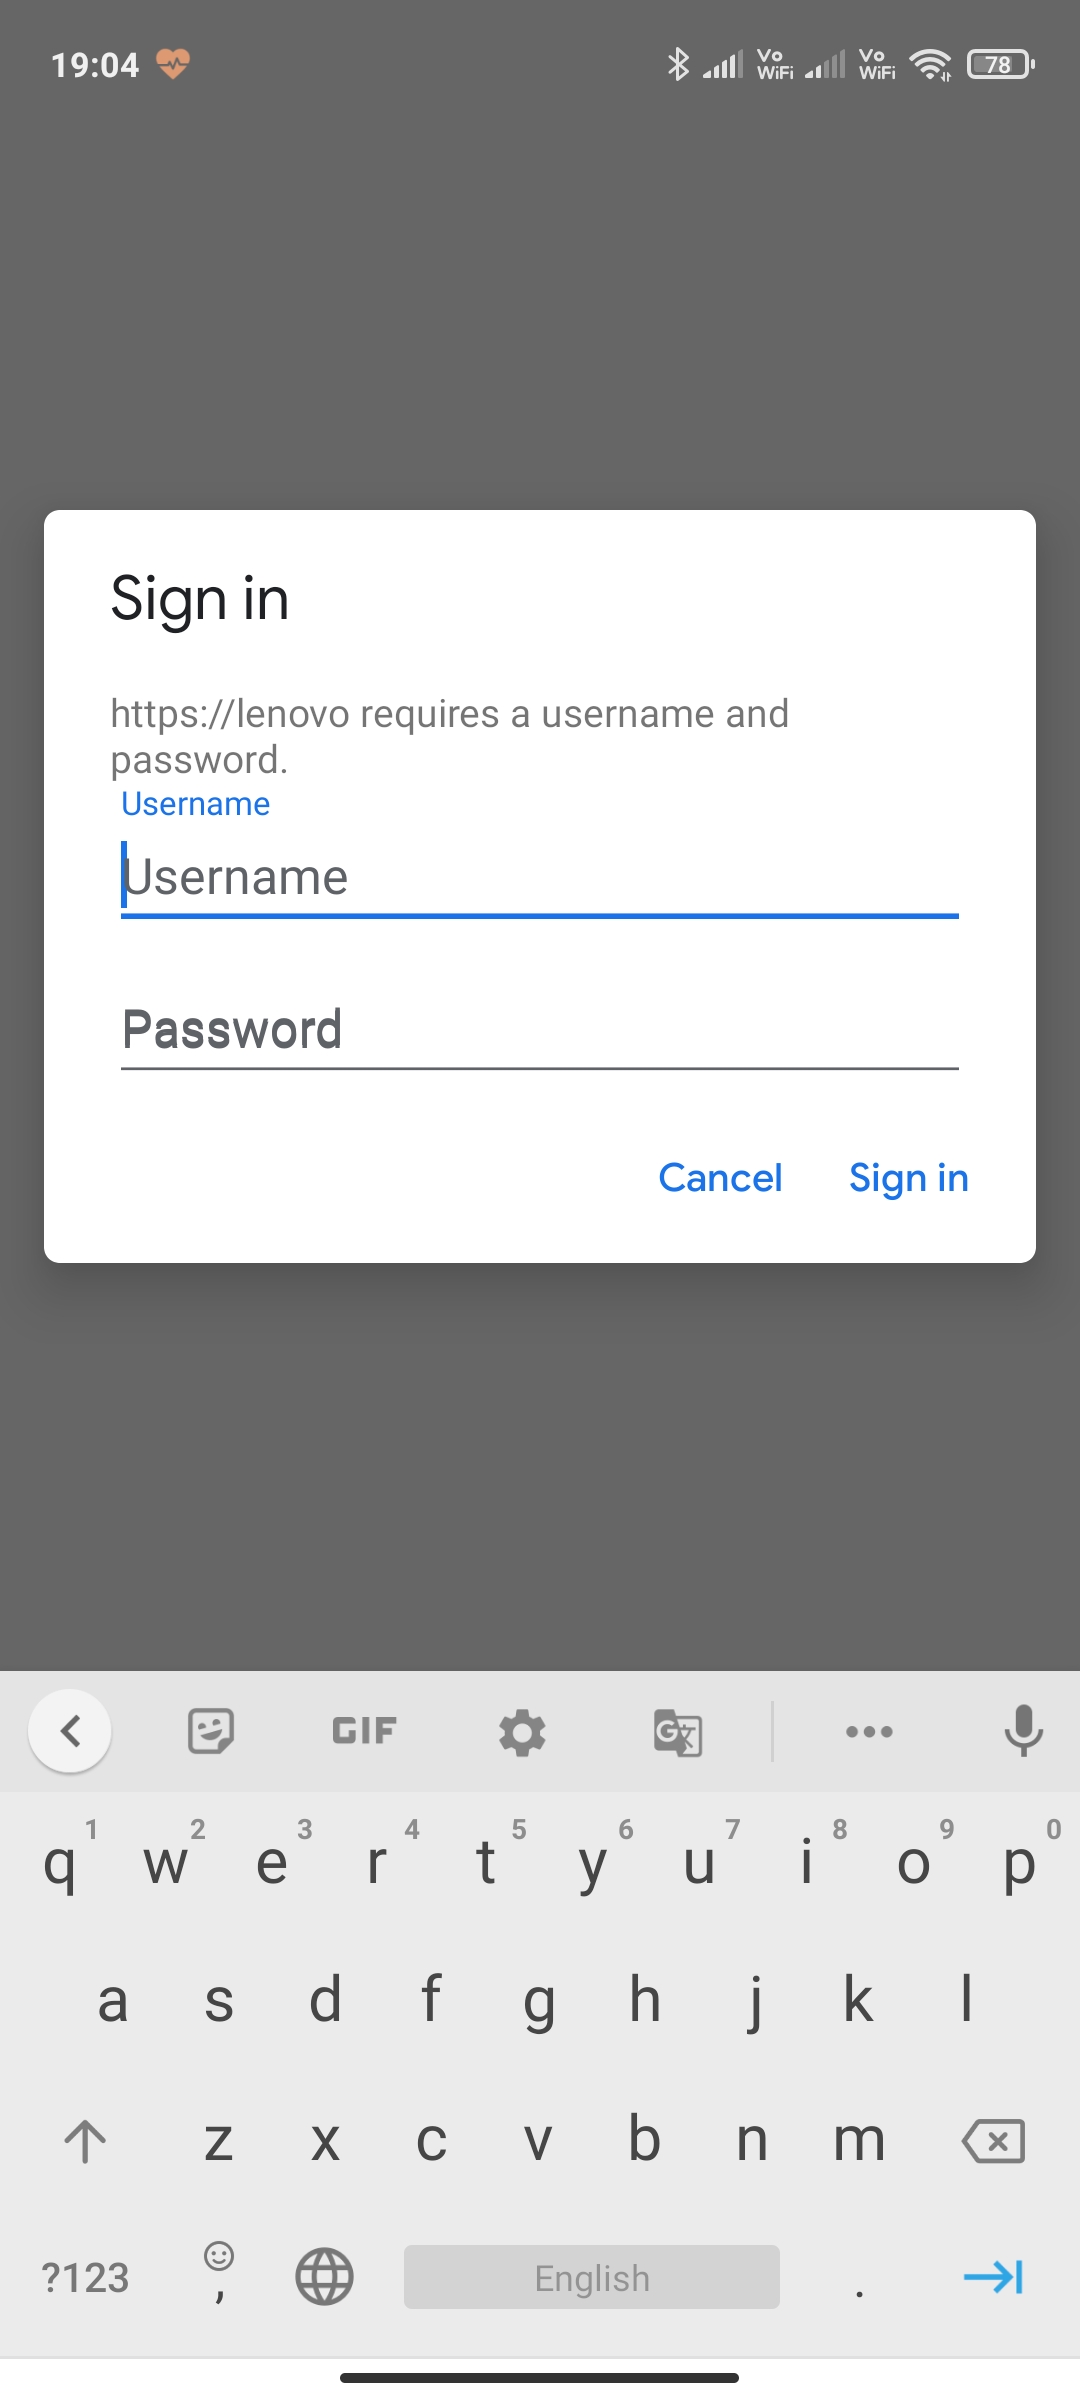
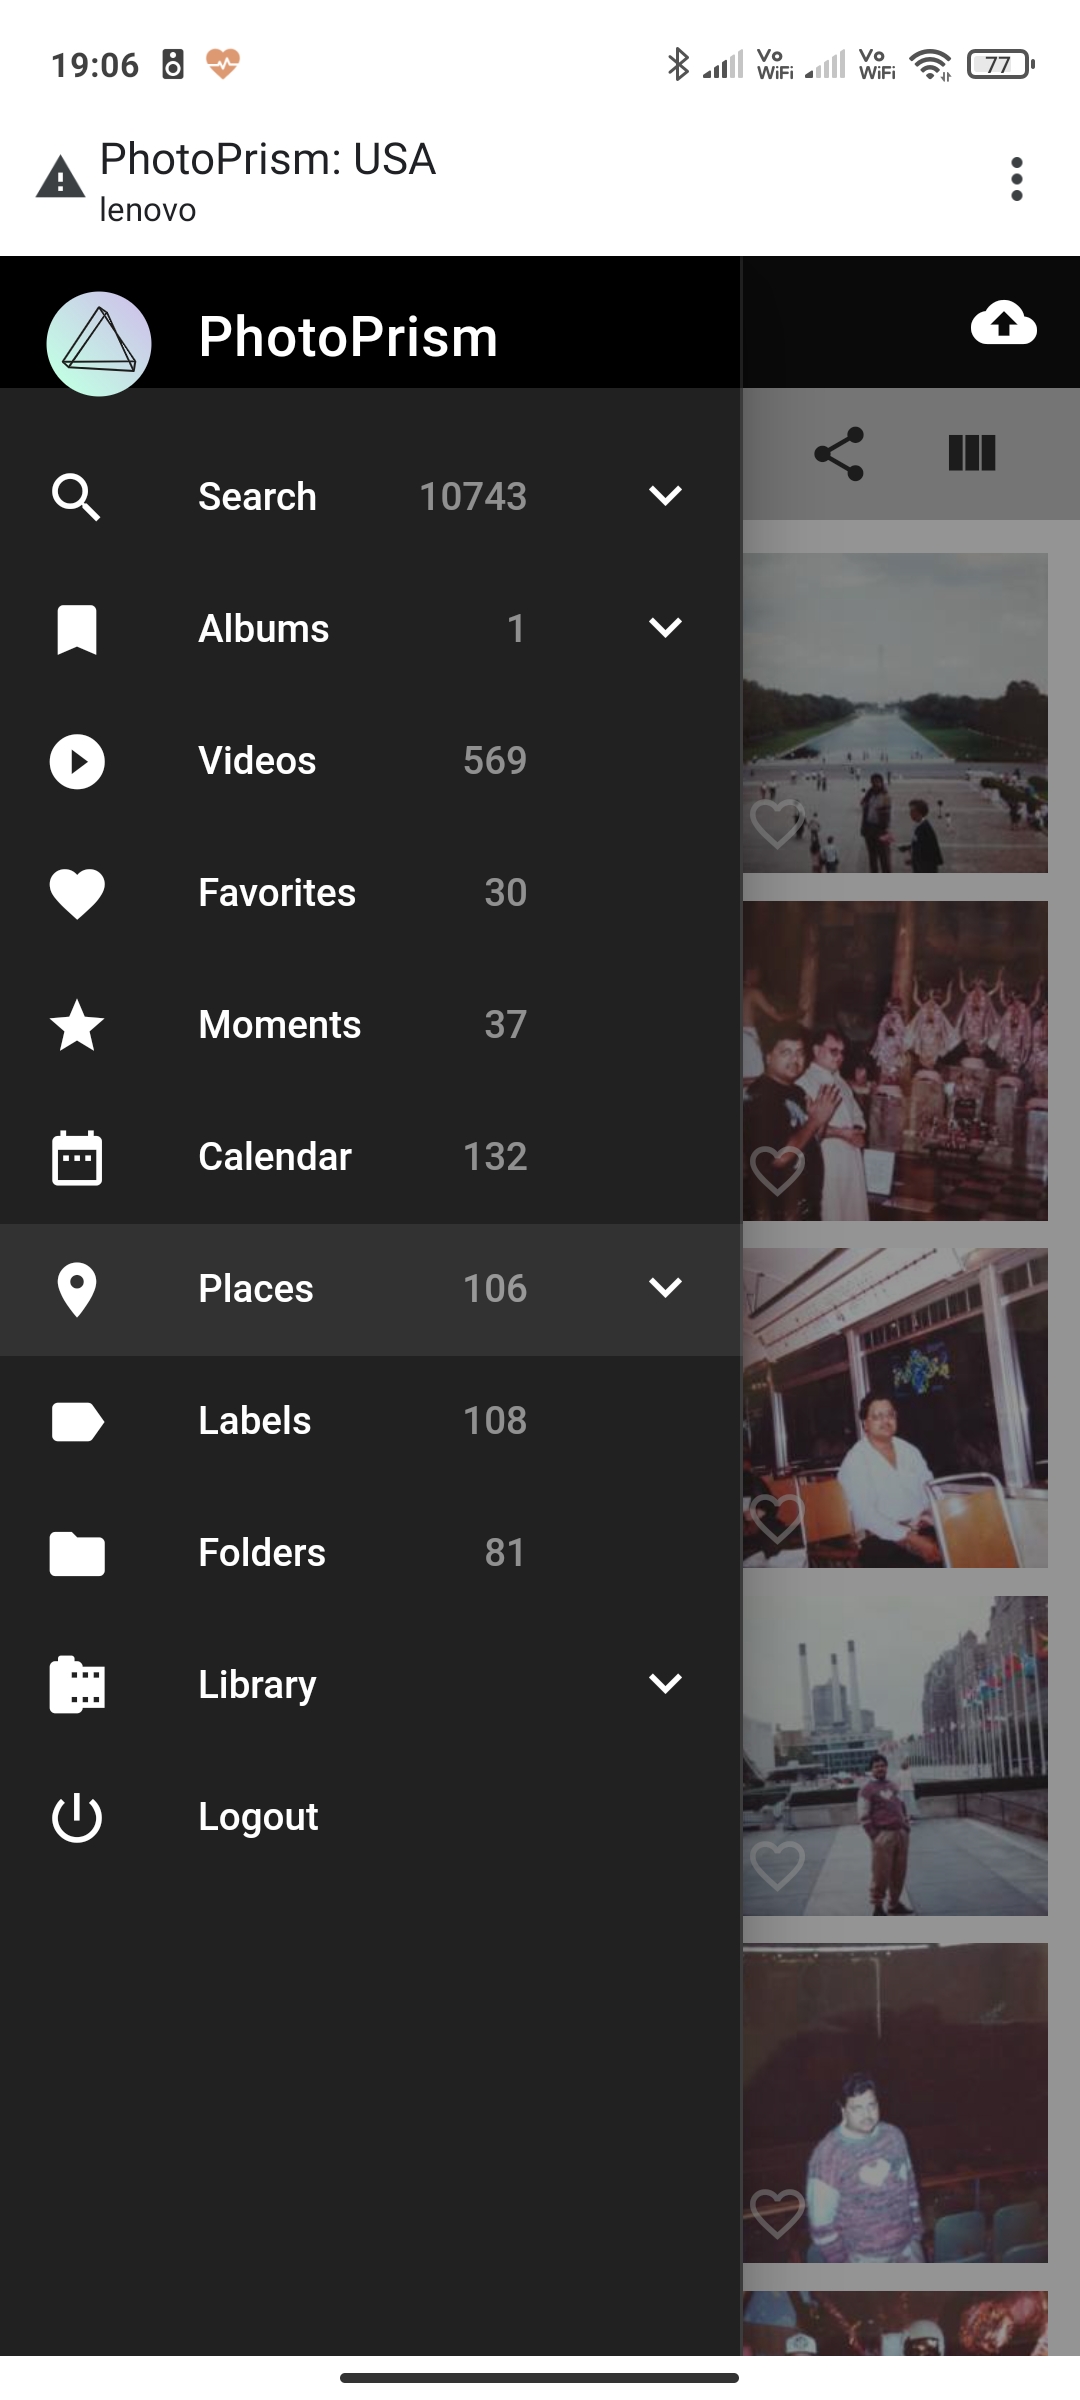
With the combined setup in place, https://host is authenticated with a different set of credentials. On the other hand, https://host/discover and /private get covered with a different set of credentials and policies. While, this will continue to be an ongoing effort and audit of the services that I build, so far now, I feel this is in decent shape that I can use it as my daily driver. The end result is:
nginx auth prompt
nginx auth prompt
PhotoPrism Photo List
PhotoPrism Menu
PhotoPrism Menu

Updates
  • Things can really get frustrating at times. These days, it is Google that contributes to it. https://bugs.chromium.org/p/chromium/issues/detail?id=544244
    • It is is now fair to say that Google is big enough to rewrite all the standards. Or at least break them. Or best, their arrogance of it. This bug report is a fine example of what other ways it could have been dealt.

16 May 2021

Carl Chenet: How to save up to 500 /year switching from Mailchimp to Open Source Mailtrain and AWS SES

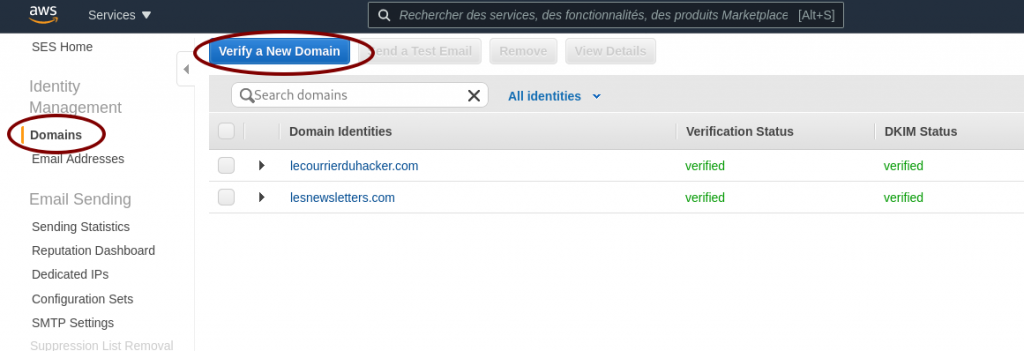
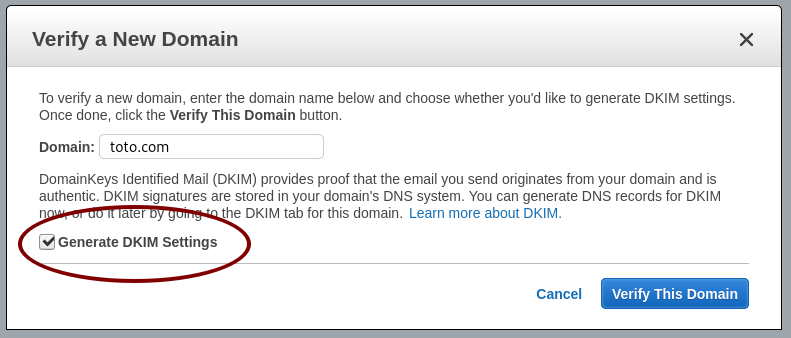
My newsletter Le Courrier du hacker (3,800 subscribers, 176 issues) is 3 years old and Mailchimp costs were becoming unbearable for a small project ($50 a month, $600 a year), with still limited revenues nowadays. Switching to the Open Source Mailtrain plugged to the AWS Simple Email Service (SES) will dramatically reduce the associated costs. First things first, thanks a lot to Pierre-Gilles Leymarie for his own article about switching to Mailtrain/SES. I owe him (and soon you too) so much. This article will be a step-by-step about how to set up Mailtrain/SES on a dedicated server running Linux. What s the purpose of this article? Mailchimp is more and more expensive following the growth of your newsletter subscribers and you need to leave it. You can use Mailtrain, a web app running on your own server and use the AWS SES service to send emails in an efficient way, avoiding to be flagged as a spammer by the other SMTP servers (very very common, you can try but you have been warned against  Prerequisites You will need the following prerequisites : Steps This is a fairly straightforward setup if you know what you re doing. In the other case, you may need the help of a professional sysadmin. You will need to complete the following steps in order to complete your setup: Configure AWS SES Verify your domain You need to configure the DKIM to certify that the emails sent are indeed from your own domain. DKIM is mandatory, it s the de-facto standard in the mail industry. Ask to verify your domain
Ask AWS SES to verify a domain
Generate the DKIM settings
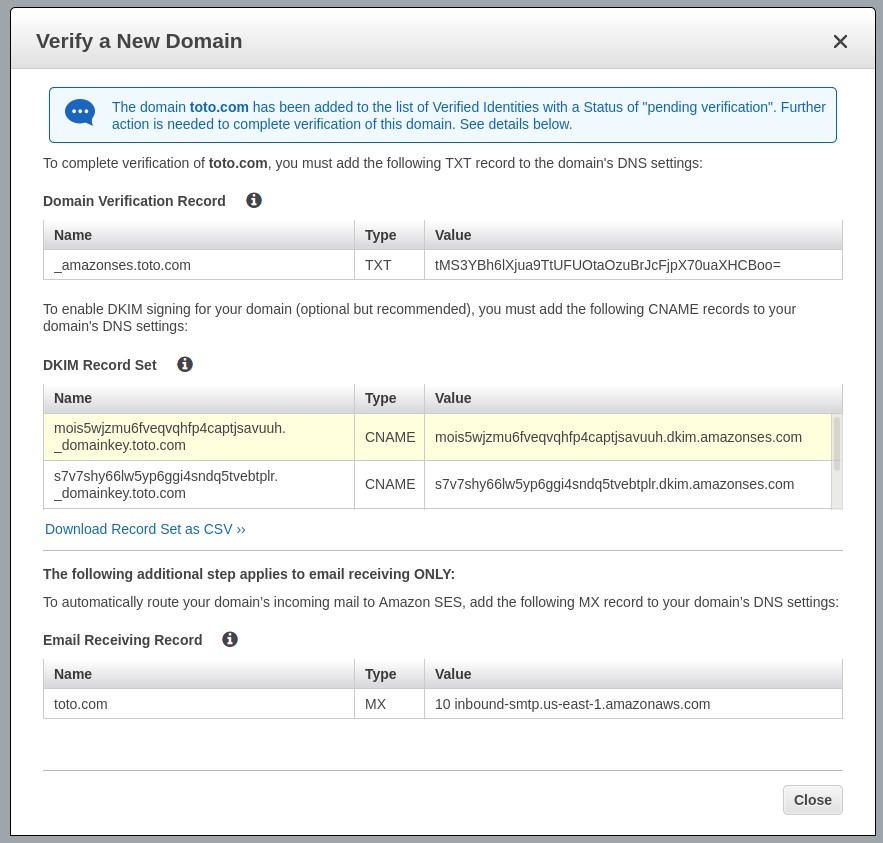
Use the DKIM settings
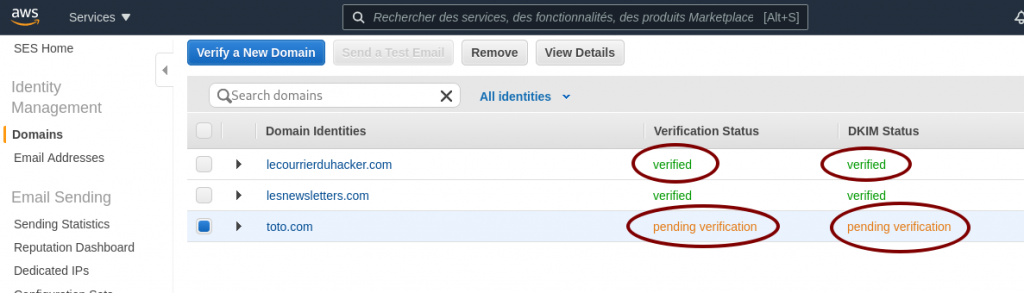
Now you have your DKIM settings and Amazon AWS is waiting for finding the TXT field in your DNS zone. Configure your DNS zone to include DKIM settings I can t be too specific for this section because it varies A LOT depending on your DNS provider. The keys is: as indicated by the previous image you have to create one TXT record and two CNAME records in your DNS zone. The names, the types and the values are indicated by AWS SES. If you don t understand what s going here, there is a high probabiliy you ll need a system administrator to apply these modifications and the next ones in this article. Am I okay for AWS SES ? As long as the word verified does not appear for your domain, as shown in the image below, something is wrong. Don t wait too long, you have a misconfiguration somewhere.
AWS SES pending verification
When your domain is verified, you ll also receive an email to inform you about the successful verification. SMTP settings The last step is generating your credentials to use the AWS SES SMTP server. IT is really straightforward, providing the STMP address to use, the port, and a pair of username/password credentials.
AWS SES SMTP settings and credentials
Just click on Create My SMTP Credentials and follow the instructions. Write the SMTP server address somewhere and store the file with credentials on your computer, we ll need them below. Configure your server As we said before, we need a baremetal server or a virtual machine running a recent Linux. Configure your MySQL/MariaDB database We create a user mailtrain having all rights on a new database mailtrain.
MariaDB [(none)]> create database mailtrain;
Query OK, 1 row affected (0.00 sec)
MariaDB [(none)]> CREATE USER 'mailtrain' IDENTIFIED BY 'V3rYD1fF1cUlTP4sSW0rd!';
Query OK, 0 rows affected (0.01 sec)
MariaDB [(none)]> GRANT ALL PRIVILEGES ON mailtrain.* TO 'mailtrain'@localhost IDENTIFIED BY 'V3rYD1fF1cUlTP4sSW0rd!';
Query OK, 0 rows affected (0.00 sec)
MariaDB [(none)]> FLUSH PRIVILEGES;
Query OK, 0 rows affected (0.00 sec)
MariaDB [(none)]> show databases;
+--------------------+
  Database            
+--------------------+
  information_schema  
  mailtrain           
  mysql               
  performance_schema  
+--------------------+
6 rows in set (0.00 sec)
MariaDB [(none)]> Bye
Configure your web server I use Nginx and I ll give you the complete setup for it, including generating Let s Encrypt. Configure Let s Encrypt You need to stop Nginx as root: systemctl stop nginx Then get the certificate only, I ll give the Nginx Vhost configuration: certbot certonly -d mailtrain.toto.com Install Mailtrain On your server create the following directory: mkdir -p /var/www/
cd /var/www
wget https://github.com/Mailtrain-org/mailtrain/archive/refs/tags/v1.24.1.tar.gz
tar zxvf v1.24.1.tar.gz
Modify the file /var/www/mailtrain/config/production.toml to use the MySQL settings:
[mysql]
host="localhost"
user="mailtrain"
password="V3rYD1ff1culT!"
database="mailtrain"
Now launch the Mailtrain process in a screen:
screen
NODE_ENV=production npm start
Now Mailtrain is launched and should be running. Yeah I know it s ugly to launch like this (root process in a screen, etc) you can improve security with the following commands:
groupadd mailtrain
useradd -g mailtrain
chown -R mailtrain:mailtrain /var/www/mailtrain 
Now create the following file in /etc/systemd/system/mailtrain.service
[Unit]
 Description=mailtrain
 After=network.target
[Service]
 Type=simple
 User=mailtrain
 WorkingDirectory=/var/www/mailtrain/
 Environment="NODE_ENV=production"
 Environment="PORT=3000"
 ExecStart=/usr/bin/npm run start
 TimeoutSec=15
 Restart=always
[Install]
 WantedBy=multi-user.target
To register the following systemd unit and to launch the new Mailtrain daemon, use the following commands (do not forget to kill your screen session if you used it before):
systemctl daemon-reload
systemctl start mailtrain.service
Now Mailtrain is running under the classic user mailtrain of the mailtrain system group. Configure the Nginx Vhost configuration for your domain Here is my configuration for the Mailtrain Nginx Vhost:
map $http_upgrade $connection_upgrade  
  default upgrade;
  ''      close;
 
server  
  listen 80; 
  listen [::]:80;
  server_name mailtrain.toto.com;
  return 301 https://$host$request_uri;
 
server  
  listen 443 ssl;
  listen [::]:443 ssl;
  server_name mailtrain.toto.com;
  access_log /var/log/nginx/mailtrain.toto.com.access.log;
  error_log /var/log/nginx/mailtrain.toto.com.error.log;
  ssl_protocols TLSv1.2;
  ssl_ciphers EECDH+AESGCM:EECDH+AES;
  ssl_ecdh_curve prime256v1;
  ssl_prefer_server_ciphers on; 
  ssl_session_cache shared:SSL:10m;
  ssl_certificate     /etc/letsencrypt/live/mailtrain.toto.com/fullchain.pem;
  ssl_certificate_key /etc/letsencrypt/live/mailtrain.toto.com/privkey.pem;
  keepalive_timeout    70; 
  sendfile             on;
  client_max_body_size 0;
  root /var/www/mailtrain;
  location ~ /\.well-known\/acme-challenge  
    allow all;
   
  gzip on; 
  gzip_disable "msie6";
  gzip_vary on; 
  gzip_proxied any;
  gzip_comp_level 6;
  gzip_buffers 16 8k; 
  gzip_http_version 1.1;
  gzip_types text/plain text/css application/json application/javascript text/xml application/xml application/xml+rss text/javascript;
  add_header Strict-Transport-Security "max-age=31536000";
  location /   
    try_files $uri @proxy;
   
  location @proxy  
    proxy_set_header Host $host;
    proxy_set_header X-Real-IP $remote_addr;
    proxy_set_header X-Forwarded-For $proxy_add_x_forwarded_for;
    proxy_set_header X-Forwarded-Proto https;
    proxy_pass http://127.0.0.1:3000;
   
 
Now Nginx is ready. Just start it:
systemctl start nginx
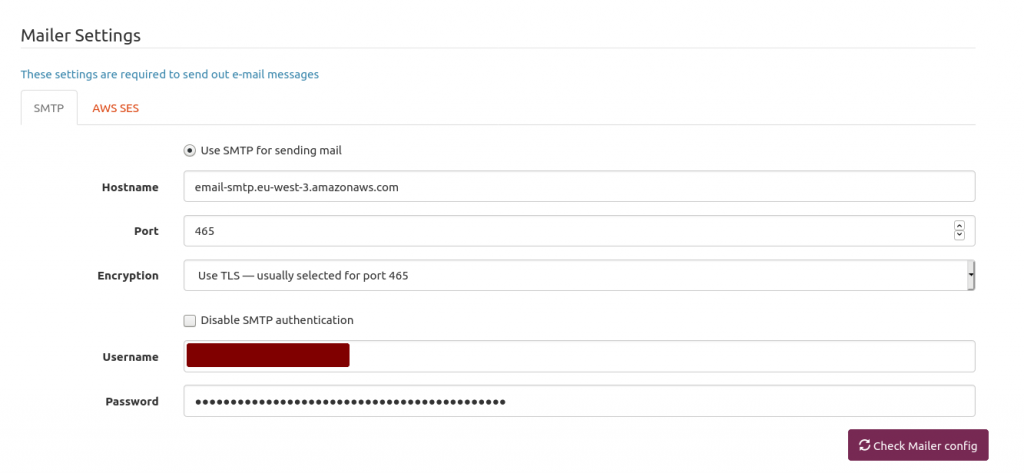
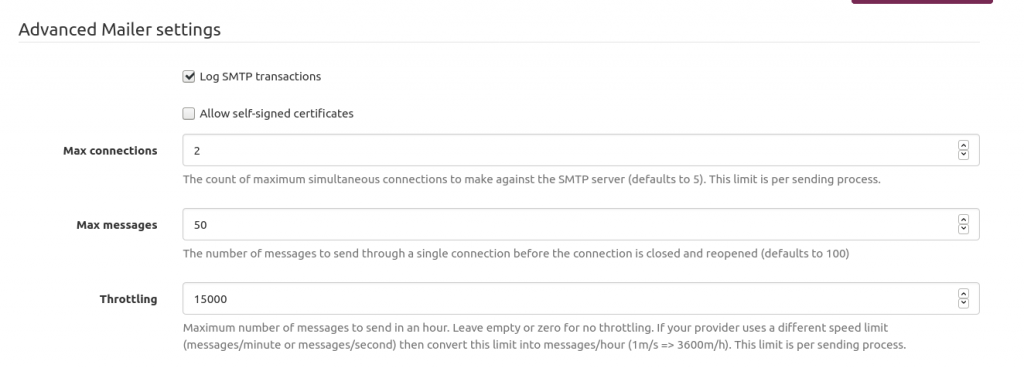
This Nginx vhost will redirect all http requests coming to the Mailtrain process running on the 3000 port. Now it s time to setup Mailtrain! Setup Mailtrain You should be able to access your Mailtrain at https://mailtrain.toto.com Mailtrain is quite simple to configure, Here is my mailer setup. Mailtrain just forwards emails to AWS SES. We only have to plug Mailtrain to AWS SES.
Mailtrain mailer setup
The hostname is provided by AWS SES in the STMP Settings section. Use the 465 port and USE TLS option. Next is providing your AWS SES username and password you generated above and stored somewhere on your computer. One of the issues I encountered is the AWS SES rate limit. Send too many emails too fast will get you flagged as a spammer. So I had to throttle Mailtrain. Because I m a lazy man, I asked Pierre-Gilles Leymarie his setup. Quite easier than determining myself the good one. Here is my setup. Works fine for my soon-to-be 4k subscribers. The idea is: if your AWS SES lets you know you send too fast then just slow down.
Mailtrain to throttle sending emails to AWS SES
Conclusion That s it! You re ready! Almost. You need an HTML template for your newsletter and a list of subscribers. Buf if you re not new in the newsletter field, fleeing Mailchimp because of their expensive prices, you should have them both already. After sending almost ten issues with this setup, I m really happy with it. Open/click rates are the same. When leaving Mailchimp, do not leave any list of subscribers because they ll charge you $8 for a 0 to 500 contacts, that s crazy expensive! About the author The post How to save up to 500 /year switching from Mailchimp to Open Source Mailtrain and AWS SES appeared first on Carl Chenet's Blog.

10 May 2021

Russell Coker: More EVM

This is another post about EVM/IMA which has it s main purpose providing useful web search results for problems. However if reading it on a planet feed inspires someone to play with EVM/IMA then that s good too, it s interesting technology. When using EVM/IMA in the Linux kernel if dmesg has errors like op=appraise_data cause=missing-HMAC the missing-HMAC means that the error code in the kernel source is INTEGRITY_NOLABEL which has a comment No security.evm xattr . You can check for the xattr on a file with the following command (this example has the security.evm xattr):
# getfattr -d -m - /etc/fstab 
getfattr: Removing leading '/' from absolute path names
# file: etc/fstab
security.evm=0sAwICqGOsfwCAvgE9y9OP74QxJ/I+3eOSF2n2dM51St98z/7LYHFd9rfGTvssvhTSYL9G8cTdRAH8ozggJu7VCzggW1REoTjnLcPeuMJsrMbW3DwVrB6ldDmJzyenLMjnIHmRDDeK309aRbLVn2ueJZ07aMDcSr+sxhOOAQ/GIW4SW8L1AKpKn4g=
security.ima=0sAT+Eivfxl+7FYI+Hr9K4sE6IieZ+
security.selinux="system_u:object_r:etc_t:s0"
If dmesg has errors like op=appraise_data cause=invalid-HMAC the invalid-HMAC means that the error code in the kernel source is INTEGRITY_FAIL which has a comment Invalid HMAC/signature . These errors are from the evm_verifyxattr() function in Linux kernel 5.11.14. The error evm: HMAC key is not set means that the evm key is not initialised, this means the key needs to be loaded into the kernel and EVM is initialised by the command echo 1 > /sys/kernel/security/evm (or possibly some equivalent from a utility like evmctl). When the key is loaded the kernel gives the message evm: key initialized and after that /sys/kernel/security/evm is read-only. If there is something wrong with the key the kernel gives the message evm: key initialization failed , it seems that the way to determine if your key is good is to try writing 1 to /sys/kernel/security/evm and see what happens. After that the command cat /sys/kernel/security/evm should return 3 . The Gentoo wiki has good documentation on how to create and load the keys which has to be done before initialising EVM [1]. I ll write more about that in another post.

6 May 2021

Matthew Garrett: More doorbell adventures

Back in my last post on this topic, I'd got shell on my doorbell but hadn't figured out why the HTTP callbacks weren't always firing. I still haven't, but I have learned some more things.

Doorbird sell a chime, a network connected device that is signalled by the doorbell when someone pushes a button. It costs about $150, which seems excessive, but would solve my problem (ie, that if someone pushes the doorbell and I'm not paying attention to my phone, I miss it entirely). But given a shell on the doorbell, how hard could it be to figure out how to mimic the behaviour of one?

Configuration for the doorbell is all stored under /mnt/flash, and there's a bunch of files prefixed 1000eyes that contain config (1000eyes is the German company that seems to be behind Doorbird). One of these was called 1000eyes.peripherals, which seemed like a good starting point. The initial contents were "Peripherals":[] , so it seemed likely that it was intended to be JSON. Unfortunately, since I had no access to any of the peripherals, I had no idea what the format was. I threw the main application into Ghidra and found a function that had debug statements referencing "initPeripherals and read a bunch of JSON keys out of the file, so I could simply look at the keys it referenced and write out a file based on that. I did so, and it didn't work - the app stubbornly refused to believe that there were any defined peripherals. The check that was failing was pcVar4 = strstr(local_50[0],PTR_s_"type":"_0007c980);, which made no sense, since I very definitely had a type key in there. And then I read it more closely. strstr() wasn't being asked to look for "type":, it was being asked to look for "type":". I'd left a space between the : and the opening " in the value, which meant it wasn't matching. The rest of the function seems to call an actual JSON parser, so I have no idea why it doesn't just use that for this part as well, but deleting the space and restarting the service meant it now believed I had a peripheral attached.

The mobile app that's used for configuring the doorbell now showed a device in the peripherals tab, but it had a weird corrupted name. Tapping it resulted in an error telling me that the device was unavailable, and on the doorbell itself generated a log message showing it was trying to reach a device with the hostname bha-04f0212c5cca and (unsurprisingly) failing. The hostname was being generated from the MAC address field in the peripherals file and was presumably supposed to be resolved using mDNS, but for now I just threw a static entry in /etc/hosts pointing at my Home Assistant device. That was enough to show that when I opened the app the doorbell was trying to call a CGI script called peripherals.cgi on my fake chime. When that failed, it called out to the cloud API to ask it to ask the chime[1] instead. Since the cloud was completely unaware of my fake device, this didn't work either. I hacked together a simple server using Python's HTTPServer and was able to return data (another block of JSON). This got me to the point where the app would now let me get to the chime config, but would then immediately exit. adb logcat showed a traceback in the app caused by a failed assertion due to a missing key in the JSON, so I ran the app through jadx, found the assertion and from there figured out what keys I needed. Once that was done, the app opened the config page just fine.

Unfortunately, though, I couldn't edit the config. Whenever I hit "save" the app would tell me that the peripheral wasn't responding. This was strange, since the doorbell wasn't even trying to hit my fake chime. It turned out that the app was making a CGI call to the doorbell, and the thread handling that call was segfaulting just after reading the peripheral config file. This suggested that the format of my JSON was probably wrong and that the doorbell was not handling that gracefully, but trying to figure out what the format should actually be didn't seem easy and none of my attempts improved things.

So, new approach. Rather than writing the config myself, why not let the doorbell do it? I should be able to use the genuine pairing process if I could mimic the chime sufficiently well. Hitting the "add" button in the app asked me for the username and password for the chime, so I typed in something random in the expected format (six characters followed by four zeroes) and a sufficiently long password and hit ok. A few seconds later it told me it couldn't find the device, which wasn't unexpected. What was a little more unexpected was that the log on the doorbell was showing it trying to hit another bha-prefixed hostname (and, obviously, failing). The hostname contains the MAC address, but I hadn't told the doorbell the MAC address of the chime, just its username. Some more digging showed that the doorbell was calling out to the cloud API, giving it the 6 character prefix from the username and getting a MAC address back. Doing the same myself revealed that there was a straightforward mapping from the prefix to the mac address - changing the final character from "a" to "b" incremented the MAC by one. It's actually just a base 26 encoding of the MAC, with aaaaaa translating to 00408C000000.

That explained how the hostname was being generated, and in return I was able to work backwards to figure out which username I should use to generate the hostname I was already using. Attempting to add it now resulted in the doorbell making another CGI call to my fake chime in order to query its feature set, and by mocking that up as well I was able to send back a file containing X-Intercom-Type, X-Intercom-TypeId and X-Intercom-Class fields that made the doorbell happy. I now had a valid JSON file, which cleared up a couple of mysteries. The corrupt name was because the name field isn't supposed to be ASCII - it's base64 encoded UTF16-BE. And the reason I hadn't been able to figure out the JSON format correctly was because it looked something like this:

"Peripherals":[] "prefix": "type":"DoorChime","name":"AEQAbwBvAHIAYwBoAGkAbQBlACAAVABlAHMAdA==","mac":"04f0212c5cca","user":"username","password":"password" ]


Note that there's a total of one [ in this file, but two ]s? Awesome. Anyway, I could now modify the config in the app and hit save, and the doorbell would then call out to my fake chime to push config to it. Weirdly, the association between the chime and a specific button on the doorbell is only stored on the chime, not on the doorbell. Further, hitting the doorbell didn't result in any more HTTP traffic to my fake chime. However, it did result in some broadcast UDP traffic being generated. Searching for the port number led me to the Doorbird LAN API and a complete description of the format and encryption mechanism in use. Argon2I is used to turn the first five characters of the chime's password (which is also stored on the doorbell itself) into a 256-bit key, and this is used with ChaCha20 to decrypt the payload. The payload then contains a six character field describing the device sending the event, and then another field describing the event itself. Some more scrappy Python and I could pick up these packets and decrypt them, which showed that they were being sent whenever any event occurred on the doorbell. This explained why there was no storage of the button/chime association on the doorbell itself - the doorbell sends packets for all events, and the chime is responsible for deciding whether to act on them or not.

On closer examination, it turns out that these packets aren't just sent if there's a configured chime. One is sent for each configured user, avoiding the need for a cloud round trip if your phone is on the same network as the doorbell at the time. There was literally no need for me to mimic the chime at all, suitable events were already being sent.

Still. There's a fair amount of WTFery here, ranging from the strstr() based JSON parsing, the invalid JSON, the symmetric encryption that uses device passwords as the key (requiring the doorbell to be aware of the chime's password) and the use of only the first five characters of the password as input to the KDF. It doesn't give me a great deal of confidence in the rest of the device's security, so I'm going to keep playing.

[1] This seems to be to handle the case where the chime isn't on the same network as the doorbell

comment count unavailable comments

4 May 2021

Erich Schubert: Machine Learning Lecture Recordings

I have uploaded most of my Machine Learning lecture to YouTube. The slides are in English, but the audio is in German. Some very basic contents (e.g., a demo of standard k-means clustering) were left out from this advanced class, and instead only a link to recordings from an earlier class were given. In this class, I wanted to focus on the improved (accelerated) algorithms instead. These are not included here (yet). I believe there are some contents covered in this class you will find nowhere else (yet). The first unit is pretty long (I did not split it further yet). The later units are shorter recordings. ML F1: Principles in Machine Learning ML F2/F3: Correlation does not Imply Causation & Multiple Testing Problem ML F4: Overfitting beranpassung ML F5: Fluch der Dimensionalit t Curse of Dimensionality ML F6: Intrinsische Dimensionalit t Intrinsic Dimensionality ML F7: Distanzfunktionen und hnlichkeitsfunktionen ML L1: Einf hrung in die Klassifikation ML L2: Evaluation und Wahl von Klassifikatoren ML L3: Bayes-Klassifikatoren ML L4: N chste-Nachbarn Klassifikation ML L5: N chste Nachbarn und Kerndichtesch tzung ML L6: Lernen von Entscheidungsb umen ML L7: Splitkriterien bei Entscheidungsb umen ML L8: Ensembles und Meta-Learning: Random Forests und Gradient Boosting ML L9: Support Vector Machinen - Motivation ML L10: Affine Hyperebenen und Skalarprodukte Geometrie f r SVMs ML L11: Maximum Margin Hyperplane die breitest m gliche Stra e ML L12: Training Support Vector Machines ML L13: Non-linear SVM and the Kernel Trick ML L14: SVM Extensions and Conclusions ML L15: Motivation of Neural Networks ML L16: Threshold Logic Units ML L17: General Artificial Neural Networks ML L18: Learning Neural Networks with Backpropagation ML L19: Deep Neural Networks ML L20: Convolutional Neural Networks ML L21: Recurrent Neural Networks and LSTM ML L22: Conclusion Classification ML U1: Einleitung Clusteranalyse ML U2: Hierarchisches Clustering ML U3: Accelerating HAC mit Anderberg s Algorithmus ML U4: k-Means Clustering ML U5: Accelerating k-Means Clustering ML U6: Limitations of k-Means Clustering ML U7: Extensions of k-Means Clustering ML U8: Partitioning Around Medoids (k-Medoids) ML U9: Gaussian Mixture Modeling (EM Clustering) ML U10: Gaussian Mixture Modeling Demo ML U11: BIRCH and BETULA Clustering ML U12: Motivation Density-Based Clustering (DBSCAN) ML U13: Density-reachable and density-connected (DBSCAN Clustering) ML U14: DBSCAN Clustering ML U15: Parameterization of DBSCAN ML U16: Extensions and Variations of DBSCAN Clustering ML U17: OPTICS Clustering ML U18: Cluster Extraction from OPTICS Plots ML U19: Understanding the OPTICS Cluster Order ML U20: Spectral Clustering ML U21: Biclustering and Subspace Clustering ML U22: Further Clustering Approaches

1 May 2021

Utkarsh Gupta: FOSS Activites in April 2021

Here s my (nineteenth) monthly update about the activities I ve done in the F/L/OSS world.

Debian
This was my 28th month of actively contributing to Debian. I became a DM in late March 2019 and a DD on Christmas 19! \o/ Crazy month, as always. Lots of things happening and lots of moving parts.
Now that I am working on Ubuntu-full time, I barely get much time to do any extra stuff. Then the massive COVID wave that has plunged India had made this month further crazier. More on that later, maybe. IDK. Anyway, I did some Debian stuff, thanks to Salzburg BSP (more down below). I worked on the following stuff:

Uploads and bug fixes:

Other $things:
  • Mentoring for newcomers and assisting people in BSP.
  • Moderation of -project mailing list.

Salzburg BSP 2021 This was my first virtual BSP and the first BSP in Salzburg and it was absolutely amazing!
Many kudos to Bernd Zeimetz for organizing it so smoothly and wonderfully, for real! \o/ We had a bunch of amazing sessions, besides hacking, of course, like:
  • yoga,
  • sports,
  • games, and
  • datacenter tour -> which was super!
We also had lots of things happening at #debian-bsp-2021-szg and did a lot of work.
Whilst everything we did is available on the pad, I work on the following things:
  • [deki/utkarsh]: CVE-2021-28421/fluidsynth (sid); cf: #987168/#987471.
  • [deki/utkarsh]: CVE-2021-28421/fluidsynth (buster); cf: #987168/#987494.
  • [utkarsh]: 18 CVEs for jackson-databind (buster); cf: #987489.
  • [utkarsh]: fix for ruby-librarian/#987113 (unblock request: #987501).
  • [utkarsh]: 17 CVEs for jackson-databind (stretch); LTS upload.
  • [utkarsh]: CVE-2020-12460/opendmarc (stretch); LTS upload.
  • [utkarsh]: CVE-2020-12460/opendmarc (buster); cf: #987531.
  • [deki/utkarsh]: libpam-alreadyloggedin, broken autopkgtest; #958224
  • [deki/utkarsh]: libpam-alreadyloggedin, installed in wrong directory; #986247
  • [deki/utkarsh]: libpam-alreadyloggedin, FTCBFS; #969122
  • [donfede/utkarsh] 10 CVEs for salt (buster)
  • [donfede/utkarsh] 10 CVEs for salt (bullseye)
And finally, we clicked a picture! \o/

Debian (E)LTS
Debian Long Term Support (LTS) is a project to extend the lifetime of all Debian stable releases to (at least) 5 years. Debian LTS is not handled by the Debian security team, but by a separate group of volunteers and companies interested in making it a success. And Debian Extended LTS (ELTS) is its sister project, extending support to the Jessie release (+2 years after LTS support). This was my nineteenth month as a Debian LTS and tenth month as a Debian ELTS paid contributor.
I was assigned 60.00 hours for LTS and 60.00 hours for ELTS and worked on the following things:

LTS CVE Fixes and Announcements:

ELTS CVE Fixes and Announcements:

Other (E)LTS Work:
  • Front-desk duty from 29-03 until 04-04 and then from 26-04 until 02-05 for both LTS and ELTS.
  • Triaged spamassassin, codemirror-js, jackson-databind, wordpress, gstreamer, underscore, python-bleach, plinth, libpano13, salt, dojo, ruby2.7, firefox-esr, clamav, composter, courier-authlib, opendmarc, openexr, libimage-exiftool-perl, tomcat7, libjs-handlebars, libnet-netmask-perl, network-manager, and curl.
  • Mark CVE-2021-20297/network-manager as not-affected for jessie.
  • Mark CVE-2021-22890/curl as not-affected for jessie and stretch.
  • Mark CVE-2020-7760/codemirror-js as not-affected for jessie.
  • Mark CVE-2021-25122/tomcat8 as not-affected for jessie.
  • Mark CVE-2021-XXXX/plinth as no-dsa for stretch.
  • Mark CVE-2021-29424/libnet-netmask-perl as no-dsa for stretch.
  • Mark CVE-2021-28374/courier-authlib as fixed in 0.58-3.1 for jessie.
  • Mark CVE-2021-1252/clamav as not-affected for jessie.
  • Mark CVE-2021-1404/clamav as not-affected for jessie.
  • Mark CVE-2020-4051/dojo as no-dsa for jessie.
  • Mark CVE-2021-29447/wordpress as not-affected for jessie.
  • Mark CVE-2021-29450/wordpress as not-affected for jessie.
  • Mark CVE-2019-20920/libjs-handlebars as ignored for stretch and jessie.
  • Mark CVE-2021-23369/libjs-handlebars as ignored for stretch and jessie.
  • Mark CVE-2020-4051/dojo as fixed in 1.15.4+dfsg1-1 for sid and bullseye.
  • Mark CVE-2021-28965/ruby2.7 fixed in 2.7.3-1 for sid.
  • Mark CVE-2020-12272/opendmarc as postponed for jessie.
  • Mark CVE-2021-20296, CVE-2021-3475, CVE-2021-3476, CVE-2021-3477, CVE-2021-3478, and CVE-2021-3479, affecting openexr, as no-dsa for jessie and stretch.
  • Suggest proposed fixes for CVE-2021-22876/curl on LTS public list.
  • Publish the missing DLA update for the website on behalf of the community contribution. Thread here.
  • Help suggest and unblock work if FD is missing or something. Thread here.
  • Suggest marking CVE-2021-23369/ node,libjs -handlebars as no-dsa/ignored for all suites. Thread here.
  • Help unblock Anton with the failed python2.7 build on i386 by coordinating with the sec team. Thread here.
  • Private ELTS-related discussion on the ELTS list (+ w/ Raphael).
  • Auto EOL ed webkit2gtk, python-bleach, tika, linux, ircii, spice-vdagent, libspring-security-2.0-java, file-roller, rustc, python-django-registration, gsoap, thunderbird, mosquitto, ruby-sidekiq, gnuchess, libpodofo, unbound, drupal7, 389-ds-base, and scrollz for jessie.
  • Answered questions (& discussions) on IRC (#debian-lts and #debian-elts).
  • General and other discussions on LTS private and public mailing list.

Until next time.
:wq for today.

30 April 2021

Chris Lamb: Free software activities in April 2021

Here is my monthly update covering what I have been doing in the free software world during April 2021 (previous month): Reproducible Builds One of the original promises of open source software is that distributed peer review and transparency of process results in enhanced end-user security. However, whilst anyone may inspect the source code of free and open source software for malicious flaws, almost all software today is distributed as pre-compiled binaries. This allows nefarious third-parties to compromise systems by injecting malicious code into ostensibly secure software during the various compilation and distribution processes. The motivation behind the Reproducible Builds effort is to ensure no flaws have been introduced during this compilation process by promising identical results are always generated from a given source, thus allowing multiple third-parties to come to a consensus on whether a build was compromised. The project is proud to be a member project of the Software Freedom Conservancy. Conservancy acts as a corporate umbrella allowing projects to operate as non-profit initiatives without managing their own corporate structure. If you like the work of the Conservancy or the Reproducible Builds project, please consider becoming an official supporter. This month, I:
Debian
Debian Long Term Support (LTS) This month I have worked 18 hours on Debian Long Term Support (LTS) and 12 hours on its sister Extended LTS project: You can find out more about the project via the following video:

11 April 2021

Jelmer Vernooij: The upstream ontologist

The Debian Janitor is an automated system that commits fixes for (minor) issues in Debian packages that can be fixed by software. It gradually started proposing merges in early December. The first set of changes sent out ran lintian-brush on sid packages maintained in Git. This post is part of a series about the progress of the Janitor. The upstream ontologist is a project that extracts metadata about upstream projects in a consistent format. It does this with a combination of heuristics and reading ecosystem-specific metadata files, such as Python s setup.py, rust s Cargo.toml as well as e.g. scanning README files.

Supported Data Sources It will extract information from a wide variety of sources, including:
Supported Fields Fields that it currently provides include:
  • Homepage: homepage URL
  • Name: name of the upstream project
  • Contact: contact address of some sort of the upstream (e-mail, mailing list URL)
  • Repository: VCS URL
  • Repository-Browse: Web URL for viewing the VCS
  • Bug-Database: Bug database URL (for web viewing, generally)
  • Bug-Submit: URL to use to submit new bugs (either on the web or an e-mail address)
  • Screenshots: List of URLs with screenshots
  • Archive: Archive used - e.g. SourceForge
  • Security-Contact: e-mail or URL with instructions for reporting security issues
  • Documentation: Link to documentation on the web:
  • Wiki: Wiki URL
  • Summary: one-line description of the project
  • Description: longer description of the project
  • License: Single line license description (e.g. GPL 2.0 ) as declared in the metadata[1]
  • Copyright: List of copyright holders
  • Version: Current upstream version
  • Security-MD: URL to markdown file with security policy
All data fields have a certainty associated with them ( certain , confident , likely or possible ), which gets set depending on how the data was derived or where it was found. If multiple possible values were found for a specific field, then the value with the highest certainty is taken.
Interface The ontologist provides a high-level Python API as well as two command-line tools that can write output in two different formats: For example, running guess-upstream-metadata on dulwich:
 % guess-upstream-metadata
 <string>:2: (INFO/1) Duplicate implicit target name: "contributing".
 Name: dulwich
 Repository: https://www.dulwich.io/code/
 X-Security-MD: https://github.com/dulwich/dulwich/tree/HEAD/SECURITY.md
 X-Version: 0.20.21
 Bug-Database: https://github.com/dulwich/dulwich/issues
 X-Summary: Python Git Library
 X-Description:  
   This is the Dulwich project.
   It aims to provide an interface to git repos (both local and remote) that
   doesn't call out to git directly but instead uses pure Python.
 X-License: Apache License, version 2 or GNU General Public License, version 2 or later.
 Bug-Submit: https://github.com/dulwich/dulwich/issues/new
Lintian-Brush lintian-brush can update DEP-12-style debian/upstream/metadata files that hold information about the upstream project that is packaged as well as the Homepage in the debian/control file based on information provided by the upstream ontologist. By default, it only imports data with the highest certainty - you can override this by specifying the uncertain command-line flag.
[1]Obviously this won t be able to describe the full licensing situation for many projects. Projects like scancode-toolkit are more appropriate for that.

9 April 2021

Michael Prokop: A Ceph war story

It all started with the big bang! We nearly lost 33 of 36 disks on a Proxmox/Ceph Cluster; this is the story of how we recovered them. At the end of 2020, we eventually had a long outstanding maintenance window for taking care of system upgrades at a customer. During this maintenance window, which involved reboots of server systems, the involved Ceph cluster unexpectedly went into a critical state. What was planned to be a few hours of checklist work in the early evening turned out to be an emergency case; let s call it a nightmare (not only because it included a big part of the night). Since we have learned a few things from our post mortem and RCA, it s worth sharing those with others. But first things first, let s step back and clarify what we had to deal with. The system and its upgrade One part of the upgrade included 3 Debian servers (we re calling them server1, server2 and server3 here), running on Proxmox v5 + Debian/stretch with 12 Ceph OSDs each (65.45TB in total), a so-called Proxmox Hyper-Converged Ceph Cluster. First, we went for upgrading the Proxmox v5/stretch system to Proxmox v6/buster, before updating Ceph Luminous v12.2.13 to the latest v14.2 release, supported by Proxmox v6/buster. The Proxmox upgrade included updating corosync from v2 to v3. As part of this upgrade, we had to apply some configuration changes, like adjust ring0 + ring1 address settings and add a mon_host configuration to the Ceph configuration. During the first two servers reboots, we noticed configuration glitches. After fixing those, we went for a reboot of the third server as well. Then we noticed that several Ceph OSDs were unexpectedly down. The NTP service wasn t working as expected after the upgrade. The underlying issue is a race condition of ntp with systemd-timesyncd (see #889290). As a result, we had clock skew problems with Ceph, indicating that the Ceph monitors clocks aren t running in sync (which is essential for proper Ceph operation). We initially assumed that our Ceph OSD failure derived from this clock skew problem, so we took care of it. After yet another round of reboots, to ensure the systems are running all with identical and sane configurations and services, we noticed lots of failing OSDs. This time all but three OSDs (19, 21 and 22) were down:
% sudo ceph osd tree
ID CLASS WEIGHT   TYPE NAME      STATUS REWEIGHT PRI-AFF
-1       65.44138 root default
-2       21.81310     host server1
 0   hdd  1.08989         osd.0    down  1.00000 1.00000
 1   hdd  1.08989         osd.1    down  1.00000 1.00000
 2   hdd  1.63539         osd.2    down  1.00000 1.00000
 3   hdd  1.63539         osd.3    down  1.00000 1.00000
 4   hdd  1.63539         osd.4    down  1.00000 1.00000
 5   hdd  1.63539         osd.5    down  1.00000 1.00000
18   hdd  2.18279         osd.18   down  1.00000 1.00000
20   hdd  2.18179         osd.20   down  1.00000 1.00000
28   hdd  2.18179         osd.28   down  1.00000 1.00000
29   hdd  2.18179         osd.29   down  1.00000 1.00000
30   hdd  2.18179         osd.30   down  1.00000 1.00000
31   hdd  2.18179         osd.31   down  1.00000 1.00000
-4       21.81409     host server2
 6   hdd  1.08989         osd.6    down  1.00000 1.00000
 7   hdd  1.08989         osd.7    down  1.00000 1.00000
 8   hdd  1.63539         osd.8    down  1.00000 1.00000
 9   hdd  1.63539         osd.9    down  1.00000 1.00000
10   hdd  1.63539         osd.10   down  1.00000 1.00000
11   hdd  1.63539         osd.11   down  1.00000 1.00000
19   hdd  2.18179         osd.19     up  1.00000 1.00000
21   hdd  2.18279         osd.21     up  1.00000 1.00000
22   hdd  2.18279         osd.22     up  1.00000 1.00000
32   hdd  2.18179         osd.32   down  1.00000 1.00000
33   hdd  2.18179         osd.33   down  1.00000 1.00000
34   hdd  2.18179         osd.34   down  1.00000 1.00000
-3       21.81419     host server3
12   hdd  1.08989         osd.12   down  1.00000 1.00000
13   hdd  1.08989         osd.13   down  1.00000 1.00000
14   hdd  1.63539         osd.14   down  1.00000 1.00000
15   hdd  1.63539         osd.15   down  1.00000 1.00000
16   hdd  1.63539         osd.16   down  1.00000 1.00000
17   hdd  1.63539         osd.17   down  1.00000 1.00000
23   hdd  2.18190         osd.23   down  1.00000 1.00000
24   hdd  2.18279         osd.24   down  1.00000 1.00000
25   hdd  2.18279         osd.25   down  1.00000 1.00000
35   hdd  2.18179         osd.35   down  1.00000 1.00000
36   hdd  2.18179         osd.36   down  1.00000 1.00000
37   hdd  2.18179         osd.37   down  1.00000 1.00000
Our blood pressure increased slightly! Did we just lose all of our cluster? What happened, and how can we get all the other OSDs back? We stumbled upon this beauty in our logs:
kernel: [   73.697957] XFS (sdl1): SB stripe unit sanity check failed
kernel: [   73.698002] XFS (sdl1): Metadata corruption detected at xfs_sb_read_verify+0x10e/0x180 [xfs], xfs_sb block 0xffffffffffffffff
kernel: [   73.698799] XFS (sdl1): Unmount and run xfs_repair
kernel: [   73.699199] XFS (sdl1): First 128 bytes of corrupted metadata buffer:
kernel: [   73.699677] 00000000: 58 46 53 42 00 00 10 00 00 00 00 00 00 00 62 00  XFSB..........b.
kernel: [   73.700205] 00000010: 00 00 00 00 00 00 00 00 00 00 00 00 00 00 00 00  ................
kernel: [   73.700836] 00000020: 62 44 2b c0 e6 22 40 d7 84 3d e1 cc 65 88 e9 d8  bD+.."@..=..e...
kernel: [   73.701347] 00000030: 00 00 00 00 00 00 40 08 00 00 00 00 00 00 01 00  ......@.........
kernel: [   73.701770] 00000040: 00 00 00 00 00 00 01 01 00 00 00 00 00 00 01 02  ................
ceph-disk[4240]: mount: /var/lib/ceph/tmp/mnt.jw367Y: mount(2) system call failed: Structure needs cleaning.
ceph-disk[4240]: ceph-disk: Mounting filesystem failed: Command '['/bin/mount', '-t', u'xfs', '-o', 'noatime,inode64', '--', '/dev/disk/by-parttypeuuid/4fbd7e29-9d25-41b8-afd0-062c0ceff05d.cdda39ed-5
ceph/tmp/mnt.jw367Y']' returned non-zero exit status 32
kernel: [   73.702162] 00000050: 00 00 00 01 00 00 18 80 00 00 00 04 00 00 00 00  ................
kernel: [   73.702550] 00000060: 00 00 06 48 bd a5 10 00 08 00 00 02 00 00 00 00  ...H............
kernel: [   73.702975] 00000070: 00 00 00 00 00 00 00 00 0c 0c 0b 01 0d 00 00 19  ................
kernel: [   73.703373] XFS (sdl1): SB validate failed with error -117.
The same issue was present for the other failing OSDs. We hoped, that the data itself was still there, and only the mounting of the XFS partitions failed. The Ceph cluster was initially installed in 2017 with Ceph jewel/10.2 with the OSDs on filestore (nowadays being a legacy approach to storing objects in Ceph). However, we migrated the disks to bluestore since then (with ceph-disk and not yet via ceph-volume what s being used nowadays). Using ceph-disk introduces these 100MB XFS partitions containing basic metadata for the OSD. Given that we had three working OSDs left, we decided to investigate how to rebuild the failing ones. Some folks on #ceph (thanks T1, ormandj + peetaur!) were kind enough to share how working XFS partitions looked like for them. After creating a backup (via dd), we tried to re-create such an XFS partition on server1. We noticed that even mounting a freshly created XFS partition failed:
synpromika@server1 ~ % sudo mkfs.xfs -f -i size=2048 -m uuid="4568c300-ad83-4288-963e-badcd99bf54f" /dev/sdc1
meta-data=/dev/sdc1              isize=2048   agcount=4, agsize=6272 blks
         =                       sectsz=4096  attr=2, projid32bit=1
         =                       crc=1        finobt=1, sparse=1, rmapbt=0
         =                       reflink=0
data     =                       bsize=4096   blocks=25088, imaxpct=25
         =                       sunit=128    swidth=64 blks
naming   =version 2              bsize=4096   ascii-ci=0, ftype=1
log      =internal log           bsize=4096   blocks=1608, version=2
         =                       sectsz=4096  sunit=1 blks, lazy-count=1
realtime =none                   extsz=4096   blocks=0, rtextents=0
synpromika@server1 ~ % sudo mount /dev/sdc1 /mnt/ceph-recovery
SB stripe unit sanity check failed
Metadata corruption detected at 0x433840, xfs_sb block 0x0/0x1000
libxfs_writebufr: write verifer failed on xfs_sb bno 0x0/0x1000
cache_node_purge: refcount was 1, not zero (node=0x1d3c400)
SB stripe unit sanity check failed
Metadata corruption detected at 0x433840, xfs_sb block 0x18800/0x1000
libxfs_writebufr: write verifer failed on xfs_sb bno 0x18800/0x1000
SB stripe unit sanity check failed
Metadata corruption detected at 0x433840, xfs_sb block 0x0/0x1000
libxfs_writebufr: write verifer failed on xfs_sb bno 0x0/0x1000
SB stripe unit sanity check failed
Metadata corruption detected at 0x433840, xfs_sb block 0x24c00/0x1000
libxfs_writebufr: write verifer failed on xfs_sb bno 0x24c00/0x1000
SB stripe unit sanity check failed
Metadata corruption detected at 0x433840, xfs_sb block 0xc400/0x1000
libxfs_writebufr: write verifer failed on xfs_sb bno 0xc400/0x1000
releasing dirty buffer (bulk) to free list!releasing dirty buffer (bulk) to free list!releasing dirty buffer (bulk) to free list!releasing dirty buffer (bulk) to free list!found dirty buffer (bulk) on free list!bad magic number
bad magic number
Metadata corruption detected at 0x433840, xfs_sb block 0x0/0x1000
libxfs_writebufr: write verifer failed on xfs_sb bno 0x0/0x1000
releasing dirty buffer (bulk) to free list!mount: /mnt/ceph-recovery: wrong fs type, bad option, bad superblock on /dev/sdc1, missing codepage or helper program, or other error.
Ouch. This very much looked related to the actual issue we re seeing. So we tried to execute mkfs.xfs with a bunch of different sunit/swidth settings. Using -d sunit=512 -d swidth=512 at least worked then, so we decided to force its usage in the creation of our OSD XFS partition. This brought us a working XFS partition. Please note, sunit must not be larger than swidth (more on that later!). Then we reconstructed how to restore all the metadata for the OSD (activate.monmap, active, block_uuid, bluefs, ceph_fsid, fsid, keyring, kv_backend, magic, mkfs_done, ready, require_osd_release, systemd, type, whoami). To identify the UUID, we can read the data from ceph --format json osd dump , like this for all our OSDs (Zsh syntax ftw!):
synpromika@server1 ~ % for f in  0..37  ; printf "osd-$f: %s\n" "$(sudo ceph --format json osd dump   jq -r ".osds[]   select(.osd==$f)   .uuid")"
osd-0: 4568c300-ad83-4288-963e-badcd99bf54f
osd-1: e573a17a-ccde-4719-bdf8-eef66903ca4f
osd-2: 0e1b2626-f248-4e7d-9950-f1a46644754e
osd-3: 1ac6a0a2-20ee-4ed8-9f76-d24e900c800c
[...]
Identifying the corresponding raw device for each OSD UUID is possible via:
synpromika@server1 ~ % UUID="4568c300-ad83-4288-963e-badcd99bf54f"
synpromika@server1 ~ % readlink -f /dev/disk/by-partuuid/"$ UUID "
/dev/sdc1
The OSD s key ID can be retrieved via:
synpromika@server1 ~ % OSD_ID=0
synpromika@server1 ~ % sudo ceph auth get osd."$ OSD_ID " -f json 2>/dev/null   jq -r '.[]   .key'
AQCKFpZdm0We[...]
Now we also need to identify the underlying block device:
synpromika@server1 ~ % OSD_ID=0
synpromika@server1 ~ % sudo ceph osd metadata osd."$ OSD_ID " -f json   jq -r '.bluestore_bdev_partition_path'    
/dev/sdc2
With all of this, we reconstructed the keyring, fsid, whoami, block + block_uuid files. All the other files inside the XFS metadata partition are identical on each OSD. So after placing and adjusting the corresponding metadata on the XFS partition for Ceph usage, we got a working OSD hurray! Since we had to fix yet another 32 OSDs, we decided to automate this XFS partitioning and metadata recovery procedure. We had a network share available on /srv/backup for storing backups of existing partition data. On each server, we tested the procedure with one single OSD before iterating over the list of remaining failing OSDs. We started with a shell script on server1, then adjusted the script for server2 and server3. This is the script, as we executed it on the 3rd server. Thanks to this, we managed to get the Ceph cluster up and running again. We didn t want to continue with the Ceph upgrade itself during the night though, as we wanted to know exactly what was going on and why the system behaved like that. Time for RCA! Root Cause Analysis So all but three OSDs on server2 failed, and the problem seems to be related to XFS. Therefore, our starting point for the RCA was, to identify what was different on server2, as compared to server1 + server3. My initial assumption was that this was related to some firmware issues with the involved controller (and as it turned out later, I was right!). The disks were attached as JBOD devices to a ServeRAID M5210 controller (with a stripe size of 512). Firmware state:
synpromika@server1 ~ % sudo storcli64 /c0 show all   grep '^Firmware'
Firmware Package Build = 24.16.0-0092
Firmware Version = 4.660.00-8156
synpromika@server2 ~ % sudo storcli64 /c0 show all   grep '^Firmware'
Firmware Package Build = 24.21.0-0112
Firmware Version = 4.680.00-8489
synpromika@server3 ~ % sudo storcli64 /c0 show all   grep '^Firmware'
Firmware Package Build = 24.16.0-0092
Firmware Version = 4.660.00-8156
This looked very promising, as server2 indeed runs with a different firmware version on the controller. But how so? Well, the motherboard of server2 got replaced by a Lenovo/IBM technician in January 2020, as we had a failing memory slot during a memory upgrade. As part of this procedure, the Lenovo/IBM technician installed the latest firmware versions. According to our documentation, some OSDs were rebuilt (due to the filestore->bluestore migration) in March and April 2020. It turned out that precisely those OSDs were the ones that survived the upgrade. So the surviving drives were created with a different firmware version running on the involved controller. All the other OSDs were created with an older controller firmware. But what difference does this make? Now let s check firmware changelogs. For the 24.21.0-0097 release we found this:
- Cannot create or mount xfs filesystem using xfsprogs 4.19.x kernel 4.20(SCGCQ02027889)
- xfs_info command run on an XFS file system created on a VD of strip size 1M shows sunit and swidth as 0(SCGCQ02056038)
Our XFS problem certainly was related to the controller s firmware. We also recalled that our monitoring system reported different sunit settings for the OSDs that were rebuilt in March and April. For example, OSD 21 was recreated and got different sunit settings:
WARN  server2.example.org  Mount options of /var/lib/ceph/osd/ceph-21      WARN - Missing: sunit=1024, Exceeding: sunit=512
We compared the new OSD 21 with an existing one (OSD 25 on server3):
synpromika@server2 ~ % systemctl show var-lib-ceph-osd-ceph\\x2d21.mount   grep sunit
Options=rw,noatime,attr2,inode64,sunit=512,swidth=512,noquota
synpromika@server3 ~ % systemctl show var-lib-ceph-osd-ceph\\x2d25.mount   grep sunit
Options=rw,noatime,attr2,inode64,sunit=1024,swidth=512,noquota
Thanks to our documentation, we could compare execution logs of their creation:
% diff -u ceph-disk-osd-25.log ceph-disk-osd-21.log
-synpromika@server2 ~ % sudo ceph-disk -v prepare --bluestore /dev/sdj --osd-id 25
+synpromika@server3 ~ % sudo ceph-disk -v prepare --bluestore /dev/sdi --osd-id 21
[...]
-command_check_call: Running command: /sbin/mkfs -t xfs -f -i size=2048 -- /dev/sdj1
-meta-data=/dev/sdj1              isize=2048   agcount=4, agsize=6272 blks
[...]
+command_check_call: Running command: /sbin/mkfs -t xfs -f -i size=2048 -- /dev/sdi1
+meta-data=/dev/sdi1              isize=2048   agcount=4, agsize=6336 blks
          =                       sectsz=4096  attr=2, projid32bit=1
          =                       crc=1        finobt=1, sparse=0, rmapbt=0, reflink=0
-data     =                       bsize=4096   blocks=25088, imaxpct=25
-         =                       sunit=128    swidth=64 blks
+data     =                       bsize=4096   blocks=25344, imaxpct=25
+         =                       sunit=64     swidth=64 blks
 naming   =version 2              bsize=4096   ascii-ci=0 ftype=1
 log      =internal log           bsize=4096   blocks=1608, version=2
          =                       sectsz=4096  sunit=1 blks, lazy-count=1
 realtime =none                   extsz=4096   blocks=0, rtextents=0
[...]
So back then, we even tried to track this down but couldn t make sense of it yet. But now this sounds very much like it is related to the problem we saw with this Ceph/XFS failure. We follow Occam s razor, assuming the simplest explanation is usually the right one, so let s check the disk properties and see what differs:
synpromika@server1 ~ % sudo blockdev --getsz --getsize64 --getss --getpbsz --getiomin --getioopt /dev/sdk
4685545472
2398999281664
512
4096
524288
262144
synpromika@server2 ~ % sudo blockdev --getsz --getsize64 --getss --getpbsz --getiomin --getioopt /dev/sdk
4685545472
2398999281664
512
4096
262144
262144
See the difference between server1 and server2 for identical disks? The getiomin option now reports something different for them:
synpromika@server1 ~ % sudo blockdev --getiomin /dev/sdk            
524288
synpromika@server1 ~ % cat /sys/block/sdk/queue/minimum_io_size
524288
synpromika@server2 ~ % sudo blockdev --getiomin /dev/sdk 
262144
synpromika@server2 ~ % cat /sys/block/sdk/queue/minimum_io_size
262144
It doesn t make sense that the minimum I/O size (iomin, AKA BLKIOMIN) is bigger than the optimal I/O size (ioopt, AKA BLKIOOPT). This leads us to Bug 202127 cannot mount or create xfs on a 597T device, which matches our findings here. But why did this XFS partition work in the past and fails now with the newer kernel version? The XFS behaviour change Now given that we have backups of all the XFS partition, we wanted to track down, a) when this XFS behaviour was introduced, and b) whether, and if so how it would be possible to reuse the XFS partition without having to rebuild it from scratch (e.g. if you would have no working Ceph OSD or backups left). Let s look at such a failing XFS partition with the Grml live system:
root@grml ~ # grml-version
grml64-full 2020.06 Release Codename Ausgehfuahangl [2020-06-24]
root@grml ~ # uname -a
Linux grml 5.6.0-2-amd64 #1 SMP Debian 5.6.14-2 (2020-06-09) x86_64 GNU/Linux
root@grml ~ # grml-hostname grml-2020-06
Setting hostname to grml-2020-06: done
root@grml ~ # exec zsh
root@grml-2020-06 ~ # dpkg -l xfsprogs util-linux
Desired=Unknown/Install/Remove/Purge/Hold
  Status=Not/Inst/Conf-files/Unpacked/halF-conf/Half-inst/trig-aWait/Trig-pend
 / Err?=(none)/Reinst-required (Status,Err: uppercase=bad)
 / Name           Version      Architecture Description
+++-==============-============-============-=========================================
ii  util-linux     2.35.2-4     amd64        miscellaneous system utilities
ii  xfsprogs       5.6.0-1+b2   amd64        Utilities for managing the XFS filesystem
There it s failing, no matter which mount option we try:
root@grml-2020-06 ~ # mount ./sdd1.dd /mnt
mount: /mnt: mount(2) system call failed: Structure needs cleaning.
root@grml-2020-06 ~ # dmesg   tail -30
[...]
[   64.788640] XFS (loop1): SB stripe unit sanity check failed
[   64.788671] XFS (loop1): Metadata corruption detected at xfs_sb_read_verify+0x102/0x170 [xfs], xfs_sb block 0xffffffffffffffff
[   64.788671] XFS (loop1): Unmount and run xfs_repair
[   64.788672] XFS (loop1): First 128 bytes of corrupted metadata buffer:
[   64.788673] 00000000: 58 46 53 42 00 00 10 00 00 00 00 00 00 00 62 00  XFSB..........b.
[   64.788674] 00000010: 00 00 00 00 00 00 00 00 00 00 00 00 00 00 00 00  ................
[   64.788675] 00000020: 32 b6 dc 35 53 b7 44 96 9d 63 30 ab b3 2b 68 36  2..5S.D..c0..+h6
[   64.788675] 00000030: 00 00 00 00 00 00 40 08 00 00 00 00 00 00 01 00  ......@.........
[   64.788675] 00000040: 00 00 00 00 00 00 01 01 00 00 00 00 00 00 01 02  ................
[   64.788676] 00000050: 00 00 00 01 00 00 18 80 00 00 00 04 00 00 00 00  ................
[   64.788677] 00000060: 00 00 06 48 bd a5 10 00 08 00 00 02 00 00 00 00  ...H............
[   64.788677] 00000070: 00 00 00 00 00 00 00 00 0c 0c 0b 01 0d 00 00 19  ................
[   64.788679] XFS (loop1): SB validate failed with error -117.
root@grml-2020-06 ~ # mount -t xfs -o rw,relatime,attr2,inode64,sunit=1024,swidth=512,noquota ./sdd1.dd /mnt/
mount: /mnt: wrong fs type, bad option, bad superblock on /dev/loop1, missing codepage or helper program, or other error.
32 root@grml-2020-06 ~ # dmesg   tail -1
[   66.342976] XFS (loop1): stripe width (512) must be a multiple of the stripe unit (1024)
root@grml-2020-06 ~ # mount -t xfs -o rw,relatime,attr2,inode64,sunit=512,swidth=512,noquota ./sdd1.dd /mnt/
mount: /mnt: mount(2) system call failed: Structure needs cleaning.
32 root@grml-2020-06 ~ # dmesg   tail -14
[   66.342976] XFS (loop1): stripe width (512) must be a multiple of the stripe unit (1024)
[   80.751277] XFS (loop1): SB stripe unit sanity check failed
[   80.751323] XFS (loop1): Metadata corruption detected at xfs_sb_read_verify+0x102/0x170 [xfs], xfs_sb block 0xffffffffffffffff 
[   80.751324] XFS (loop1): Unmount and run xfs_repair
[   80.751325] XFS (loop1): First 128 bytes of corrupted metadata buffer:
[   80.751327] 00000000: 58 46 53 42 00 00 10 00 00 00 00 00 00 00 62 00  XFSB..........b.
[   80.751328] 00000010: 00 00 00 00 00 00 00 00 00 00 00 00 00 00 00 00  ................
[   80.751330] 00000020: 32 b6 dc 35 53 b7 44 96 9d 63 30 ab b3 2b 68 36  2..5S.D..c0..+h6
[   80.751331] 00000030: 00 00 00 00 00 00 40 08 00 00 00 00 00 00 01 00  ......@.........
[   80.751331] 00000040: 00 00 00 00 00 00 01 01 00 00 00 00 00 00 01 02  ................
[   80.751332] 00000050: 00 00 00 01 00 00 18 80 00 00 00 04 00 00 00 00  ................
[   80.751333] 00000060: 00 00 06 48 bd a5 10 00 08 00 00 02 00 00 00 00  ...H............
[   80.751334] 00000070: 00 00 00 00 00 00 00 00 0c 0c 0b 01 0d 00 00 19  ................
[   80.751338] XFS (loop1): SB validate failed with error -117.
Also xfs_repair doesn t help either:
root@grml-2020-06 ~ # xfs_info ./sdd1.dd
meta-data=./sdd1.dd              isize=2048   agcount=4, agsize=6272 blks
         =                       sectsz=4096  attr=2, projid32bit=1
         =                       crc=1        finobt=1, sparse=0, rmapbt=0
         =                       reflink=0
data     =                       bsize=4096   blocks=25088, imaxpct=25
         =                       sunit=128    swidth=64 blks
naming   =version 2              bsize=4096   ascii-ci=0, ftype=1
log      =internal log           bsize=4096   blocks=1608, version=2
         =                       sectsz=4096  sunit=1 blks, lazy-count=1
realtime =none                   extsz=4096   blocks=0, rtextents=0
root@grml-2020-06 ~ # xfs_repair ./sdd1.dd
Phase 1 - find and verify superblock...
bad primary superblock - bad stripe width in superblock !!!
attempting to find secondary superblock...
..............................................................................................Sorry, could not find valid secondary superblock
Exiting now.
With the SB stripe unit sanity check failed message, we could easily track this down to the following commit fa4ca9c:
% git show fa4ca9c5574605d1e48b7e617705230a0640b6da   cat
commit fa4ca9c5574605d1e48b7e617705230a0640b6da
Author: Dave Chinner <dchinner@redhat.com>
Date:   Tue Jun 5 10:06:16 2018 -0700
    
    xfs: catch bad stripe alignment configurations
    
    When stripe alignments are invalid, data alignment algorithms in the
    allocator may not work correctly. Ensure we catch superblocks with
    invalid stripe alignment setups at mount time. These data alignment
    mismatches are now detected at mount time like this:
    
    XFS (loop0): SB stripe unit sanity check failed
    XFS (loop0): Metadata corruption detected at xfs_sb_read_verify+0xab/0x110, xfs_sb block 0xffffffffffffffff
    XFS (loop0): Unmount and run xfs_repair
    XFS (loop0): First 128 bytes of corrupted metadata buffer:
    0000000091c2de02: 58 46 53 42 00 00 10 00 00 00 00 00 00 00 10 00  XFSB............
    0000000023bff869: 00 00 00 00 00 00 00 00 00 00 00 00 00 00 00 00  ................
    00000000cdd8c893: 17 32 37 15 ff ca 46 3d 9a 17 d3 33 04 b5 f1 a2  .27...F=...3....
    000000009fd2844f: 00 00 00 00 00 00 00 04 00 00 00 00 00 00 06 d0  ................
    0000000088e9b0bb: 00 00 00 00 00 00 06 d1 00 00 00 00 00 00 06 d2  ................
    00000000ff233a20: 00 00 00 01 00 00 10 00 00 00 00 01 00 00 00 00  ................
    000000009db0ac8b: 00 00 03 60 e1 34 02 00 08 00 00 02 00 00 00 00  ... .4..........
    00000000f7022460: 00 00 00 00 00 00 00 00 0c 09 0b 01 0c 00 00 19  ................
    XFS (loop0): SB validate failed with error -117.
    
    And the mount fails.
    
    Signed-off-by: Dave Chinner <dchinner@redhat.com>
    Reviewed-by: Carlos Maiolino <cmaiolino@redhat.com>
    Reviewed-by: Darrick J. Wong <darrick.wong@oracle.com>
    Signed-off-by: Darrick J. Wong <darrick.wong@oracle.com>
diff --git fs/xfs/libxfs/xfs_sb.c fs/xfs/libxfs/xfs_sb.c
index b5dca3c8c84d..c06b6fc92966 100644
--- fs/xfs/libxfs/xfs_sb.c
+++ fs/xfs/libxfs/xfs_sb.c
@@ -278,6 +278,22 @@ xfs_mount_validate_sb(
                return -EFSCORRUPTED;
         
        
+       if (sbp->sb_unit)  
+               if (!xfs_sb_version_hasdalign(sbp)  
+                   sbp->sb_unit > sbp->sb_width  
+                   (sbp->sb_width % sbp->sb_unit) != 0)  
+                       xfs_notice(mp, "SB stripe unit sanity check failed");
+                       return -EFSCORRUPTED;
+                 
+         else if (xfs_sb_version_hasdalign(sbp))   
+               xfs_notice(mp, "SB stripe alignment sanity check failed");
+               return -EFSCORRUPTED;
+         else if (sbp->sb_width)  
+               xfs_notice(mp, "SB stripe width sanity check failed");
+               return -EFSCORRUPTED;
+        
+
+       
        if (xfs_sb_version_hascrc(&mp->m_sb) &&
            sbp->sb_blocksize < XFS_MIN_CRC_BLOCKSIZE)  
                xfs_notice(mp, "v5 SB sanity check failed");
This change is included in kernel versions 4.18-rc1 and newer:
% git describe --contains fa4ca9c5574605d1e48
v4.18-rc1~37^2~14
Now let s try with an older kernel version (4.9.0), using old Grml 2017.05 release:
root@grml ~ # grml-version
grml64-small 2017.05 Release Codename Freedatensuppe [2017-05-31]
root@grml ~ # uname -a
Linux grml 4.9.0-1-grml-amd64 #1 SMP Debian 4.9.29-1+grml.1 (2017-05-24) x86_64 GNU/Linux
root@grml ~ # lsb_release -a
No LSB modules are available.
Distributor ID: Debian
Description:    Debian GNU/Linux 9.0 (stretch)
Release:        9.0
Codename:       stretch
root@grml ~ # grml-hostname grml-2017-05
Setting hostname to grml-2017-05: done
root@grml ~ # exec zsh
root@grml-2017-05 ~ #
root@grml-2017-05 ~ # xfs_info ./sdd1.dd
xfs_info: ./sdd1.dd is not a mounted XFS filesystem
1 root@grml-2017-05 ~ # xfs_repair ./sdd1.dd
Phase 1 - find and verify superblock...
bad primary superblock - bad stripe width in superblock !!!
attempting to find secondary superblock...
..............................................................................................Sorry, could not find valid secondary superblock
Exiting now.
1 root@grml-2017-05 ~ # mount ./sdd1.dd /mnt
root@grml-2017-05 ~ # mount -t xfs
/root/sdd1.dd on /mnt type xfs (rw,relatime,attr2,inode64,sunit=1024,swidth=512,noquota)
root@grml-2017-05 ~ # ls /mnt
activate.monmap  active  block  block_uuid  bluefs  ceph_fsid  fsid  keyring  kv_backend  magic  mkfs_done  ready  require_osd_release  systemd  type  whoami
root@grml-2017-05 ~ # xfs_info /mnt
meta-data=/dev/loop1             isize=2048   agcount=4, agsize=6272 blks
         =                       sectsz=4096  attr=2, projid32bit=1
         =                       crc=1        finobt=1 spinodes=0 rmapbt=0
         =                       reflink=0
data     =                       bsize=4096   blocks=25088, imaxpct=25
         =                       sunit=128    swidth=64 blks
naming   =version 2              bsize=4096   ascii-ci=0 ftype=1
log      =internal               bsize=4096   blocks=1608, version=2
         =                       sectsz=4096  sunit=1 blks, lazy-count=1
realtime =none                   extsz=4096   blocks=0, rtextents=0
Mounting there indeed works! Now, if we mount the filesystem with new and proper sunit/swidth settings using the older kernel, it should rewrite them on disk:
root@grml-2017-05 ~ # mount -t xfs -o sunit=512,swidth=512 ./sdd1.dd /mnt/
root@grml-2017-05 ~ # umount /mnt/
And indeed, mounting this rewritten filesystem then also works with newer kernels:
root@grml-2020-06 ~ # mount ./sdd1.rewritten /mnt/
root@grml-2020-06 ~ # xfs_info /root/sdd1.rewritten
meta-data=/dev/loop1             isize=2048   agcount=4, agsize=6272 blks
         =                       sectsz=4096  attr=2, projid32bit=1
         =                       crc=1        finobt=1, sparse=0, rmapbt=0
         =                       reflink=0
data     =                       bsize=4096   blocks=25088, imaxpct=25
         =                       sunit=64    swidth=64 blks
naming   =version 2              bsize=4096   ascii-ci=0, ftype=1
log      =internal log           bsize=4096   blocks=1608, version=2
         =                       sectsz=4096  sunit=1 blks, lazy-count=1
realtime =none                   extsz=4096   blocks=0, rtextents=0
root@grml-2020-06 ~ # mount -t xfs                
/root/sdd1.rewritten on /mnt type xfs (rw,relatime,attr2,inode64,logbufs=8,logbsize=32k,sunit=512,swidth=512,noquota)
FTR: The sunit=512,swidth=512 from the xfs mount option is identical to xfs_info s output sunit=64,swidth=64 (because mount.xfs s sunit value is given in 512-byte block units, see man 5 xfs, and the xfs_info output reported here is in blocks with a block size (bsize) of 4096, so sunit = 512*512 := 64*4096 ). mkfs uses minimum and optimal sizes for stripe unit and stripe width; you can check this e.g. via (note that server2 with fixed firmware version reports proper values, whereas server3 with broken controller firmware reports non-sense):
synpromika@server2 ~ % for i in /sys/block/sd*/queue/ ; do printf "%s: %s %s\n" "$i" "$(cat "$i"/minimum_io_size)" "$(cat "$i"/optimal_io_size)" ; done
[...]
/sys/block/sdc/queue/: 262144 262144
/sys/block/sdd/queue/: 262144 262144
/sys/block/sde/queue/: 262144 262144
/sys/block/sdf/queue/: 262144 262144
/sys/block/sdg/queue/: 262144 262144
/sys/block/sdh/queue/: 262144 262144
/sys/block/sdi/queue/: 262144 262144
/sys/block/sdj/queue/: 262144 262144
/sys/block/sdk/queue/: 262144 262144
/sys/block/sdl/queue/: 262144 262144
/sys/block/sdm/queue/: 262144 262144
/sys/block/sdn/queue/: 262144 262144
[...]
synpromika@server3 ~ % for i in /sys/block/sd*/queue/ ; do printf "%s: %s %s\n" "$i" "$(cat "$i"/minimum_io_size)" "$(cat "$i"/optimal_io_size)" ; done
[...]
/sys/block/sdc/queue/: 524288 262144
/sys/block/sdd/queue/: 524288 262144
/sys/block/sde/queue/: 524288 262144
/sys/block/sdf/queue/: 524288 262144
/sys/block/sdg/queue/: 524288 262144
/sys/block/sdh/queue/: 524288 262144
/sys/block/sdi/queue/: 524288 262144
/sys/block/sdj/queue/: 524288 262144
/sys/block/sdk/queue/: 524288 262144
/sys/block/sdl/queue/: 524288 262144
/sys/block/sdm/queue/: 524288 262144
/sys/block/sdn/queue/: 524288 262144
[...]
This is the underlying reason why the initially created XFS partitions were created with incorrect sunit/swidth settings. The broken firmware of server1 and server3 was the cause of the incorrect settings they were ignored by old(er) xfs/kernel versions, but treated as an error by new ones. Make sure to also read the XFS FAQ regarding How to calculate the correct sunit,swidth values for optimal performance . We also stumbled upon two interesting reads in RedHat s knowledge base: 5075561 + 2150101 (requires an active subscription, though) and #1835947. Am I affected? How to work around it? To check whether your XFS mount points are affected by this issue, the following command line should be useful:
awk '$3 == "xfs" print $2 ' /proc/self/mounts   while read mount ; do echo -n "$mount " ; xfs_info $mount   awk '$0 ~ "swidth" gsub(/.*=/,"",$2); gsub(/.*=/,"",$3); print $2,$3 '   awk '  if ($1 > $2) print "impacted"; else print "OK" ' ; done
If you run into the above situation, the only known solution to get your original XFS partition working again, is to boot into an older kernel version again (4.17 or older), mount the XFS partition with correct sunit/swidth settings and then boot back into your new system (kernel version wise). Lessons learned Thanks: Darshaka Pathirana, Chris Hofstaedtler and Michael Hanscho. Looking for help with your IT infrastructure? Let us know!

8 April 2021

Thorsten Alteholz: My Debian Activities in March 2021

FTP master Things never turn out the way you expect, so this month I was only able to accept 38 packages and rejected none. Due to the freeze, the overall number of packages that got accepted was 88. Debian LTS This was my eighty-first month that I did some work for the Debian LTS initiative, started by Raphael Hertzog at Freexian. This month my all in all workload has been 30h. During that time I did LTS and normal security uploads of: I also prepared debdiffs for unstable and/or buster for leptonlib and libebml, which for one reason or another did not result in an upload yet. Last but not least I did some days of frontdesk duties. Debian ELTS This month was the thirty-third ELTS month. During my allocated time I uploaded: Last but not least I did some days of frontdesk duties. Other stuff On my neverending golang challenge I uploaded (or sponsored for thola dependencies):
golang-github-tombuildsstuff-giovanni, golang-github-apparentlymart-go-userdirs, golang-github-apparentlymart-go-shquot, golang-github-likexian-gokit, olang-gopkg-mail.v2, golang-gopkg-redis.v5, golang-github-facette-natsort, golang-github-opentracing-contrib-go-grpc, golang-github-felixge-fgprof, golang-ithub-gogo-status, golang-github-leanovate-gopter, golang-github-opentracing-basictracer-go, golang-github-lightstep-lightstep-tracer-common, golang-github-o-sourcemap-sourcemap, golang-github-igm-pubsub, golang-github-igm-sockjs-go, golang-github-centrifugal-protocol, golang-github-mna-redisc, golang-github-fzambia-eagle, golang-github-centrifugal-centrifuge, golang-github-chromedp-sysutil, golang-github-client9-misspell, golang-github-knq-snaker, cdproto-gen, golang-github-mattermost-xml-roundtrip-validator, golang-github-crewjam-saml, ssllabs-scan, golang-uber-automaxprocs, golang-uber-goleak, golang-github-k0kubun-go-ansi, golang-github-schollz-progressbar, golang-github-komkom-toml, golang-github-labstack-echo, golang-github-inexio-go-monitoringplugin

6 April 2021

Jelmer Vernooij: Automatic Fixing of Debian Build Dependencies

The Debian Janitor is an automated system that commits fixes for (minor) issues in Debian packages that can be fixed by software. It gradually started proposing merges in early December. The first set of changes sent out ran lintian-brush on sid packages maintained in Git. This post is part of a series about the progress of the Janitor. In my last blogpost, I introduced the buildlog consultant - a tool that can identify many reasons why a Debian build failed. For example, here s a fragment of a build log where the Build-Depends lack python3-setuptools:
849
850
851
852
853
854
855
856
857
858
 dpkg-buildpackage: info: host architecture amd64
  fakeroot debian/rules clean
 dh clean --with python3,sphinxdoc --buildsystem=pybuild
    dh_auto_clean -O--buildsystem=pybuild
 I: pybuild base:232: python3.9 setup.py clean
 Traceback (most recent call last):
   File "/<<PKGBUILDDIR>>/setup.py", line 2, in <module>
     from setuptools import setup
 ModuleNotFoundError: No module named 'setuptools'
 E: pybuild pybuild:353: clean: plugin distutils failed with: exit code=1: python3.9 setup.py clean
The buildlog consultant can identify the line in bold as being key, and interprets it:

 % analyse-sbuild-log --json ~/build.log
  
    "stage": "build",
    "section": "Build",
    "lineno": 857,
    "kind": "missing-python-module",
    "details":  "module": "setuptools", "python_version": 3, "minimum_version": null 
  
Automatically acting on buildlog problems A common reason why Debian builds fail is missing dependencies or incorrect versions of dependencies declared in the package build depends. Based on the output of the buildlog consultant, it is possible in many cases to determine what dependency needs to be added to Build-Depends. In the example given above, we can use apt-file to look for the package that contains the path /usr/lib/python3/dist-packages/setuptools/__init__.py - and voila, we find python3-setuptools:
 % apt-file search /usr/lib/python3/dist-packages/setuptools/__init__.py
 python3-setuptools: /usr/lib/python3/dist-packages/setuptools/__init__.py
The deb-fix-build command automates these steps:
  1. It builds the package using sbuild; if the package successfully builds then it just exits successfully
  2. It tries to identify the problem by looking through the build log; if it can t or if it s a problem it has seen before (but apparently failed to resolve), then it exits with a non-zero exit code
  3. It tries to find a dependency that can address the problem
  4. It updates Build-Depends in debian/control or Depends in debian/tests/control
  5. Go to step 1
This takes away the tedious manual process of building a package, discovering that a dependency is missing, updating Build-Depends and trying again. For example, when I ran deb-fix-build while packaging saneyaml, the output looks something like this:
 % deb-fix-build
 Using output directory /tmp/tmpyz0nkgqq
 Using sbuild chroot unstable-amd64-sbuild
 Using fixers:  
 Building debian packages, running 'sbuild --no-clean-source -A -s -v'.
 Attempting to use fixer upstream requirement fixer(apt) to address MissingPythonDistribution('setuptools_scm', python_version=3, minimum_version='4')
 Using apt-file to search apt contents
 Adding build dependency: python3-setuptools-scm (>= 4)
 Building debian packages, running 'sbuild --no-clean-source -A -s -v'.
 Attempting to use fixer upstream requirement fixer(apt) to address MissingPythonDistribution('toml', python_version=3, minimum_version=None)
 Adding build dependency: python3-toml
 Building debian packages, running 'sbuild --no-clean-source -A -s -v'.
 Built 0.5.2-1- changes files at [ saneyaml_0.5.2-1_amd64.changes ].
And in our Git repository, we see these changes as well:
% git log -p
 commit 5a1715f4c7273b042818fc75702f2284034c7277 (HEAD -> master)
 Author: Jelmer Vernoo  <jelmer@jelmer.uk>
 Date:   Sun Apr 4 02:35:56 2021 +0100
     Add missing build dependency on python3-toml.
 diff --git a/debian/control b/debian/control
 index 5b854dc..3b27b73 100644
 --- a/debian/control
 +++ b/debian/control
 @@ -1,6 +1,6 @@
  Rules-Requires-Root: no
  Standards-Version: 4.5.1
 -Build-Depends: debhelper-compat (= 12), dh-sequence-python3, python3-all, python3-setuptools (>= 50), python3-wheel, python3-setuptools-scm (>= 4)
 +Build-Depends: debhelper-compat (= 12), dh-sequence-python3, python3-all, python3-setuptools (>= 50), python3-wheel, python3-setuptools-scm (>= 4), python3-toml
  Testsuite: autopkgtest-pkg-python
  Source: python-saneyaml
  Priority: optional
 commit f03047da80fcd8468ee231fbc4cf8488d7a0acd1
 Author: Jelmer Vernoo  <jelmer@jelmer.uk>
 Date:   Sun Apr 4 02:35:34 2021 +0100
     Add missing build dependency on python3-setuptools-scm (>= 4).
 diff --git a/debian/control b/debian/control
 index a476cc2..5b854dc 100644
 --- a/debian/control
 +++ b/debian/control
 @@ -1,6 +1,6 @@
  Rules-Requires-Root: no
  Standards-Version: 4.5.1
 -Build-Depends: debhelper-compat (= 12), dh-sequence-python3, python3-all, python3-setuptools (>= 50), python3-wheel
 +Build-Depends: debhelper-compat (= 12), dh-sequence-python3, python3-all, python3-setuptools (>= 50), python3-wheel, python3-setuptools-scm (>= 4)
  Testsuite: autopkgtest-pkg-python
  Source: python-saneyaml
  Priority: optional
Using deb-fix-build You can run deb-fix-build by installing the ognibuild package from unstable. The only requirements for using it are that:
  • The package is maintained in Git
  • A sbuild schroot is available for use
Caveats deb-fix-build is fairly easy to understand, and if it doesn t work then you re no worse off than you were without it - you ll have to add your own Build-Depends. That said, there are a couple of things to keep in mind:
  • At the moment, it doesn t distinguish between general, Arch or Indep Build-Depends.
  • It can only add dependencies for things that are actually in the archive
  • Sometimes there are multiple packages that can provide a file, command or python package - it tries to find the right one with heuristics but doesn t always get it right

Next.

Previous.