Search Results: "xam"

9 July 2012

Julien Danjou: Logitech K750 keyboard and Unifying Receiver Linux support

A year ago, I bought a Logitech Wireless Solar Keyboard K750. I'm particularly picky on keyboards, but this one is good. It has an incredible useful feature: while being wireless, it has no need for disposable or rechargeable batteries, it uses solar power! Logitech Wireless Solar Keyboard K750 My problem is that there's obviously no way to know the battery status from Linux, the provided application only working on Windows. And one dark night, while fragging on QuakeLive, my keyboard stopped working: it had no battery left. This activity being quite energy consuming, it emptied the whole battery. Someone should write code to get the battery status and light meter from Linux: challenge accepted! How the keyboard works Logitech Unifying Receiver This keyboard, like many of the new wireless devices from Logitech, uses the Unifying interface. It's an USB receiver that can be attached up to 6 differents devices (mouse, keyboards ). On old Linux kernel, the Unifying receiver is recognized as only one keyboard and/or one mouse device. Recently, a driver called hid-logitech-dj has been added to the Linux kernel. With this driver, each device attached to the receiver is recognized as one different device. What the Logitech application does Logitech Solar App The Logitech application under Windows works that way: you launch it, and it displays the battery charge level. On the keyboard, there's a special "light" button (up right). When pressed, a LED will light up on the keyboard: green if the keyboard is receiving enough light and is charging, red if the keyboard does not receive enough light and is therefore discharging. Pushing this same button while the application is running will makes the light meter activated: the application will tell you how much lux your keyboard is receiving. Let's reverse engineer this As far as I know, there's nothing in the USB HID protocol that handles this kind of functionality (battery status, light meter ) in a standard way. So the first task to accomplish is, unfortunately, to reverse engineer the program. I discovered a bit too late that Drew Fisher did a good presentation on USB reverse engineering at 28c3. You might want to take a look at it if you want to reverse engineer on USB. I did not need it, but I learned a few things. Anyway, my plan was the following: run the Logitech application inside a virtual machine running Windows, give it direct access to the USB keyboard, and sniff what happens on the USB wire. To achieve that, you need a virtual machine emulator that can do USB pass-through. Both KVM and VirtualBox can do that, but VirtualBox works much better with USB and allow hot(un)plugging of devices, so I used it. To sniff what happens on the USB, you need to load the usbmon Linux kernel module. Simply doing modprobe usbmon will work. You can then use Wireshark which know how to use usbmon devices and understand the USB protocol. USB stuff you need to know You don't need to know much about USB to understand what I'll write about below, but for the sake of comprehensibility I'll write a couple of things here before jumping in. To communicate with an USB device, we communicate with one of its endpoints. Endpoints are regrouped into an interface. Interfaces are regrouped into a configuration. A device might contains one or several configurations. There's also several types of packets in the USB wire protocol, and at least two of them interest us there, they are: All of this and more is well (and better) explained in the chapter 13 of Linux Device Drivers, Third Edition. Sniffed data Once everything was set-up, I ran my beloved Wireshark. There's a an URB of type interrupt sent each time you press any key with some data in it. Therefore I advise you to plug another keyboard (or use the laptop keyboard if you're doing this on a laptop), otherwise you'll get crazy trying to sniff the keyboard you're typing on. At this point, just launching the application does a bunch of USB traffic. Pressing the "light" button on the keyboard makes even more USB packets coming in and out. Here's the interesting packets that I noticed once I excluded the noise: With all this, the next step was clear: understand the packets and reproduce that exchange under Linux. What the packets mean The "go for the light meter" packet The packet sent from the computer to the keyboard is the following. <figure>
Frame 17: 71 bytes on wire (568 bits), 71 bytes captured (568 bits)
    Frame Length: 71 bytes (568 bits)
    Capture Length: 71 bytes (568 bits)
USB URB
    URB id: 0xffff880161997240
    URB type: URB_SUBMIT ('S')
    URB transfer type: URB_CONTROL (0x02)
    Endpoint: 0x00, Direction: OUT
        0... .... = Direction: OUT (0)
        .000 0000 = Endpoint value: 0
    Device: 6
    URB bus id: 1
    Device setup request: relevant (0)
    Data: present (0)
    URB sec: 1340124450
    URB usec: 495643
    URB status: Operation now in progress (-EINPROGRESS) (-115)
    URB length [bytes]: 7
    Data length [bytes]: 7
    [Response in: 18]
    [bInterfaceClass: HID (0x03)]
    URB setup
        bmRequestType: 0x21
            0... .... = Direction: Host-to-device
            .01. .... = Type: Class (0x01)
            ...0 0001 = Recipient: Interface (0x01)
    bRequest: SET_REPORT (0x09)
    wValue: 0x0210
        ReportID: 16
        ReportType: Output (2)
    wIndex: 2
    wLength: 7
0000  40 72 99 61 01 88 ff ff 53 02 00 06 01 00 00 00   @r.a....S.......
0010  22 ad e0 4f 00 00 00 00 1b 90 07 00 8d ff ff ff   "..O............
0020  07 00 00 00 07 00 00 00 21 09 10 02 02 00 07 00   ........!.......
0030  00 00 00 00 00 00 00 00 00 00 00 00 00 00 00 00   ................
0040  10 01 09 03 78 01 00                              ....x..
</figure> What's here interesting is the last part representing the data. wLength says that the length of the data is 7 bytes, so let's take a look at those 7 bytes: 10 01 09 03 78 01 00. Well, actually, you can't decode them like that, unless you're a freak or a Logitech engineer. And I have actually no idea what they mean. But sending this to the keyboard will trigger an interesting thing: the keyboard will start sending URB interrupt with some data without you pressing any more key. The "light meter and battery values" packet This is most interesting packet. This is the one sent by the keyboard to the host and that contains the data we want to retrieve. <figure>
Frame 1467: 84 bytes on wire (672 bits), 84 bytes captured (672 bits)
    Frame Length: 84 bytes (672 bits)
    Capture Length: 84 bytes (672 bits)
USB URB
    URB id: 0xffff88010c43c380
    URB type: URB_COMPLETE ('C')
    URB transfer type: URB_INTERRUPT (0x01)
    Endpoint: 0x83, Direction: IN
        1... .... = Direction: IN (1)
        .000 0011 = Endpoint value: 3
    Device: 2
    URB bus id: 6
    Device setup request: not relevant ('-')
    Data: present (0)
    URB sec: 1334953309
    URB usec: 728740
    URB status: Success (0)
    URB length [bytes]: 20
    Data length [bytes]: 20
    [Request in: 1466]
    [Time from request: 0.992374000 seconds]
    [bInterfaceClass: Unknown (0xffff)]
Leftover Capture Data: 1102091039000c061d474f4f4400000000000000
0000  80 c3 43 0c 01 88 ff ff 43 01 83 02 06 00 2d 00   ..C.....C.....-.
0010  5d c5 91 4f 00 00 00 00 a4 1e 0b 00 00 00 00 00   ]..O............
0020  14 00 00 00 14 00 00 00 00 00 00 00 00 00 00 00   ................
0030  02 00 00 00 00 00 00 00 00 02 00 00 00 00 00 00   ................
0040  11 02 09 10 39 00 0c 06 1d 47 4f 4f 44 00 00 00   ....9....GOOD...
0050  00 00 00 00                                       ....
</figure> This packets come in regularly (1 per second) on the wire for some time once you sent the "go for the light meter" packet. At one point they are emitted less often and do not contain the value for the light meter anymore, suggesting that the control packet sent earlier triggers the activation of the light meter for a defined period. Now you probably wonder where the data are in this. They're in the 20 bytes leftover in the capture data part, indicated by Wireshark, at the end of the packet: 11 02 09 10 39 00 0c 06 1d 47 4f 4f 44 00 00 00 00 00 00 00. Fortunately, it was easy to decode. Knowing we're looking for 2 values (battery charge and light meter), we just need to observe and compare the packet emitted on the wire with the values displayed by the Logitech Solar App. To achieve this, I looked both at the Logitech Solar App and Wireshark while bringing more and more light near the keyboard, increasing the lux value received by the meter on the Solar App, and saw that the fields represented in blue (see below) where changing in Wireshark. Since 2 bytes were changing, I guessed that it was coded on 16 bits, and therefore it was easy to correlate the value with the Solar App. <figure>
[ ....9....GOOD....... ]
11 02 09 10 39 00 0c 06 1d 47 4f 4f 44 00 00 00 00 00 00 00
4 bytes - 1 byte for battery charge - 2 bytes for light meter - 2 bytes - 4 bytes for GOOD - 7 bytes
</figure> In this example, the battery has a charge of 0x39 = 57 % and the light meter receives 0x0c = 12 lux of light. It's basically dark, and that makes sense: it was night and the light was off in my office, the only light being the one coming from my screen. I've no idea what the GOOD part of the packet is about, but it's present in every packet and it's actually very handy to recognize such a packet. Therefore I'm considering this as some sort of useful mark for now. For the other bytes, they were always the same (0x11 0x2 0x9 0x10 at the beginning, 7 times 0x00 at the end). The 2 bytes between the light meter and GOOD probably mean something, but I've no idea what for now. Building our solar app Now we've enough information to build our own very basic solar application. We know how to triggers the light meter, and we know how to decode the packets. We're going to write a small application using libusb. Here's a quick example. It's not perfect and does not check for error codes, be careful. <figure>
/* Written by Julien Danjou <julien> in 2012 */
#include <linux/hid.h>
#include <libusb.h>
#include <stdio.h>
#include <stdlib.h>
#include <string.h>
int main(void)
 
    libusb_context *ctx;
    libusb_init(&ctx);
    libusb_set_debug(ctx, 3);
    /* Look at the keyboard based on vendor and device id */
    libusb_device_handle *device_handle = libusb_open_device_with_vid_pid(ctx, 0x046d, 0xc52b);
    fprintf(stderr, "Found keyboard 0x%p\n", device_handle);
    libusb_device *device = libusb_get_device(device_handle);
    struct libusb_device_descriptor desc;
    libusb_get_device_descriptor(device, &desc);
    for(uint8_t config_index = 0; config_index < desc.bNumConfigurations; config_index++)
     
        struct libusb_config_descriptor *config;
        libusb_get_config_descriptor(device, config_index, &config);
        /* We know we want interface 2 */
        int iface_index = 2;
        const struct libusb_interface *iface = &config->interface[iface_index];
        for (int altsetting_index = 0; altsetting_index < iface->num_altsetting; altsetting_index++)
         
            const struct libusb_interface_descriptor *iface_desc = &iface->altsetting[al>tsetting_index];
            if (iface_desc->bInterfaceClass == LIBUSB_CLASS_HID)
             
                libusb_detach_kernel_driver(device_handle, iface_index);
                libusb_claim_interface(device_handle, iface_index);
                unsigned char ret[65535];
                unsigned char payload[] = "\x10\x02\x09\x03\x78\x01\x00";
                if(libusb_control_transfer(device_handle,
                                           LIBUSB_REQUEST_TYPE_CLASS   LIBUSB_RECIPIENT_INTERFACE,
                                           HID_REQ_SET_REPORT,
                                           0x0210, iface_index, payload, sizeof(payload) - 1, 10000))
                 
                    int actual_length = 0;
                    while(actual_length != 20   strncmp((const char *) &ret[9], "GOOD", 4))
                        libusb_interrupt_transfer(device_handle,
                                                  iface_desc->endpoint[0].bEndpointAddress,
                                                  ret, sizeof(ret), &actual_length, 100000);
                    uint16_t lux = ret[5] << 8   ret[6];
                    fprintf(stderr, "Charge: %d %%\nLight: %d lux\n", ret[4], lux);
                 
                libusb_release_interface(device_handle, iface_index);
                libusb_attach_kernel_driver(device_handle, iface_index);


    libusb_close(device_handle);
    libusb_exit(ctx);
 
</figure> What the program is doing is the following: This gives the following:
Found keyboard 0x0x24ec8e0
Charge: 64 %
Light: 21 lux
Challenge accomplished! To be continued Unfortunately, this approach has at least one major drawback. We have to disconnect the Logitech Unifying Receiver from the kernel. That means that while we're waiting for the packet, we're dropping packets corresponding to other events from every connected device (key presses, pointer motions ). In order to solve that, I sent a request for help on the linux-input mailing list. That way, I learned that Logitech is actually using the HID++ protocol to communicate with the devices using the Unifying Receiver. Lars-Dominik Braun managed to get the HID++ specifications from Logitech and published them with their authorization. This opens a whole new world. With that document, I may be able to understand the part I reverse engineered and convert this to a more useful and generic library using the hidraw interface (so we don't have to disconnect the devices from the kernel driver).

8 July 2012

Petter Reinholdtsen: Debian Edu interview: George Bredberg

The Debian Edu / Skolelinux project have users all over the globe, but until recently we have not known about any users in Norway's neighbour country Sweden. This changed when George Bredberg showed up in March this year on the mailing list, asking interesting questions about how to adjust and scale the just released Debian Edu Wheezy setup to his liking. He granted me an interview, and I am happy to share his answers with you here. Who are you, and how do you spend your days? I'm a 44 year old country guy that have been working 12 years at the same school as 50% IT-manager and 50% Teacher. My educational background is fil.kand in history and religious beliefs, an exam as a "folkhighschool" teacher, that is, for teaching grownups. In Norwegian I believe it's called "Vuxenupplaring". I also have a master in "Technology and social change". So I'm not really a tech guy, I just like to study how humans and technology interact and that is my perspective when working with IT. How did you get in contact with the Skolelinux/Debian Edu project? I have followed the Skolelinux project for quite some time by now. Earlier I tested out the K12-LTSP project, which we used for some time, but I really like the idea of having a distribution aimed to be a complete solution for schools with necessary tools integrated. When K12-LTSP abandoned that idea some years ago, I started to look more seriously into Skolelinux instead. What do you see as the advantages of Skolelinux/Debian Edu? The big point of Skolelinux to me is that it is a complete distribution, ready to install. It has LDAP-support, MS Windows integration tools and so forth already configured, saving an administrator a lot of time and headache. We were using another Linux based thin-client system called Thinlinc, that has served us very well. But that Skolelinux is based on VNC and LTSP, to me, is better when it comes to the kind of multimedia used in schools. That is showing videos from Youtube or educational TV. It is also easier to mix thin clients with workstations, since the user settings will be the same. In our VNC-based solution you had to "beat around the bush" by setting up a second, hidden, home-directory for user settings for the workstations, because they will be different from the ones used on the thin clients. Skolelinux support for diskless workstations are very convenient since a school today often need to use a class room projector showing videos in full screen. That is easily done with a small integrated media computer running as a diskless workstation. You have only two installs to update and configure. One for the thin clients and one for the workstations. Also saving a lot of time. Our old system was also based on Redhat and CentOS. They are both very nice distributions, but they are sometimes painfully slow when it comes to updating multimedia support and multimedia programs (even such as Gimp), leaving us with a bit "oldish" applications. Debian is quicker to update. What do you see as the disadvantages of Skolelinux/Debian Edu? Debian is a bit too quick when it comes to updating. As an example we use old HP terminals as thinclients, and two times already this year (2012) the updates you get from the repositories has stopped sound from working with them. It's a kernel/ALSA issue. So you have to be more careful properly testing the updates before you run them in a production environment. This has never happened with CentOS. I also would like to be able to set my own domain-settings at install time. In Skolelinux they are kind of hard coded into the distribution, when it comes to LDAP and at least samba integration. That is more a cosmetic/translation issue, and not a real problem. Running MS Windows applications within the Skolelinux environment needs to be better supported. That is, running them seamlessly via RDP, and support for single-sign on. That will make the transition to free software easier, because you can keep the applications you really need. No support will make it impossible if you work in a school where some applications can't be open source. As for us we really need to run Adobe InDesign in our journalist classes. We run a journalist education, and is one of the very few non university ones that is ok:d by Svenska journalistf rbundet (Swedish journalist association). Our education gives the pupils the right of membership there, once they are done. This is important if you want to get a job. Adobe InDesign is the program most commonly used in newspapers and magazines. We used Quark Express before, but they seem to loose there market to Adobe. The only "equivalent" to InDesign in the opensource world is Scribus, and its not advanced enough. At least not according to the teacher. I think it would be possible to use it, because they are not supposed to learn a program, they are supposed to learn how to edit and compile a newspaper. But politically at our school we are not there yet. And Scribus lacks a lot of things you find i InDesign. We used even a windows program for sound editing when it comes to the radio-journalist part. The year to come we are going to try Audacity. That software has the same kind of limitations compared to Adobe Audition, but that teacher is a bit more open minded. We have tried Ardour also, but that instead is more like a music studio program, not intended for the kind of editing taking place in a radio studio. Its way to complex and the GUI is to scattered when you only want to cut, make pass-overs, add extra channels and normalise. Those things you can do in Audacity, but its not as easy as in Audition. You have to do more things manually with envelopes, and that is a bit old fashion and timewasting. Its also harder to cut and move sound from one channel to another, which is a thing that you do frequently because you often find yourself needing to rearrange parts of the sound file. So, I am not sure we will succeed in replacing even Audition, but we will try. The problem is the students have certain expectations when they start an education towards a profession. So the programs has to look and feel professional. Good thing with radio, there are many programs out there, that radio studios use, so its not as standardised as Newspaper editing. That means, it does not really matter what program they learn, because once they start working they still have to learn the program the studio uses, so instead focus has to be to learn the editing part without to much focus on a specific software. Which free software do you use daily? Myself I'm running Linux Mint, or Ubuntu these days. I use almost only open source software, and preferably Linux based. When it comes to most used applications its OpenOffice, and Firefox (of course ;) ) Which strategy do you believe is the right one to use to get schools to use free software? To get schools to use free software there has to be good open source software that are windows based, to ease the transition. But it's also very important that the multimedia support is working flawlessly. The problems with Youtube, Twitter, Facebook and whatever will create problems when it comes to both teachers and students. Economy are also important for schools, so using thin clients, as long as they have good multimedia support, is a very good idea. It's also important that the open source software works even for the administration. It's hard to convince the teachers to stick with open source, if the principal has to run Windows. It also creates a problem if some classes has to use Windows for there tasks, since that will create a difference in "status" between classes, so a good support for running windows applications via the thin client (Linux) desktop is essential. At least at our school, where we have mixed level of educations, from high-school to journalist-school. Update 2012-07-09 08:30: Paul Wise tipped me on IRC about three useful sources related to Free Software for radio stations: the LWN article Radio station management with Airtime, Airtime which claim to be a Free open source radio automation software and Rivendell which claim to be complete radio broadcast automation solution. All of them seem useful to the aspiring radio producer.

Iustin Pop: Thumbnails and other EXIF metadata fun

So, I was trying to write a script for myself to sanitise the EXIF metadata in images produced by my camera. I had a text file for a while with some tags that I should remove (like the camera serial number, etc.), but this became cumbersome and I wanted a fully scripted workflow. I thought initially it's a simple exercise: look at the current tags, decide either which one I wanted to remove (black-list) or alternatively keep (white-list; preferred solution) and then call exiftool with the appropriate options. Boy oh boy EXIF is just part of the equation. There are of course also the MakerNotes, which are manufacturer-specific and most of the time editable only as a block. Furthermore, there's no way to easily just duplicate each individual entry in this group to a standard EXIF or even XMP section, so basically you either keep to much or just give up a lot. Some of them can be copied to XMP, for example lens information, flash, etc. but white-balance (with the exiftool version that I have) is not, for example. Ideally I could just copy all maker notes to XMP, and then drop that entire group. For the record, the way to drop all and just copy some is to run:
exiftool -all= -tagsfromfile @ -Orientation -AllDates  other tags  file.jpg
But do not add "-makernotes", because that will bring the entire block back. The other fun thing is the number of thumbnails/preview images embedded. Looking at a random jpeg file, I found: Now, I doubt even the use of one thumbnail, but 3? And one being more than half a megabyte? Someone's going overboard at Nikon On the plus side, removing all thumbnails and sanitising the meta-data makes the jpeg files quite a bit smaller, which also means easier to share, at least; not sure if I want to actually clean the master copies (even though I keep the NEFs).

Dirk Eddelbuettel: New package RcppCNPy with release 0.1.0 (and 0.0.1 earlier last week)

A few days ago I had blogged about getting NumPy data in R by using a simple converter script. That works fine, but it is a little annoying to have to write an entire file only to read from it again. So I kept looking around for a better solution---and soon found the cnpy library by Carl Rogers which provides simple C++ functions to read and write NumPy files. Bringing such a C++ library to R is done very easily via Rcpp modules. The resulting package contains a single R file with a single line: loadModule("cnpy", TRUE). And it relies on the following module declarations in the a C++ file:
RCPP_MODULE(cnpy) 
    using namespace Rcpp;
    function("npyLoad",                         // name of the identifier at the R level
             &npyLoad,                          // function pointer to helper function defined above
             List::create( Named("filename"),   // function arguments including default value
                           Named("type") = "numeric"),
             "read an npy file into a numeric or integer vector or matrix");
    function("npySave",                         // name of the identifier at the R level
             &npySave,                          // function pointer to helper function defined above
             List::create( Named("filename"),   // function arguments including default value
                           Named("object"), 
                           Named("mode") = "w"),
             "save an R object (vector or matrix of type integer or numeric) to an npy file");
 
which give us at the R prompt
R> library(RcppCNPy)
Loading required package: Rcpp
R> npyLoad
internal C++ function <0x243af70>
    docstring : read an npy file into a numeric or integer vector or matrix
    signature : Rcpp::RObject npyLoad(std::string, std::string)
R> npySave
internal C++ function <0x23033e0>
    docstring : save an R object (vector or matrix of type integer or numeric) to an npy file
    signature : void npySave(std::string, Rcpp::RObject, std::string)
R> 
these two functions (and their docstrings) defined above. That's all! Well there are about one hundred more lines dealing with whether we have integer or numeric data, and whether we use a vector or a matrix. But all in all pretty simple... So version 0.1.0 of this new package RcppCNPy completes the initial release 0.0.1 from earlier in the week by adding The NEWS entry for this release (as well as the initial one) follow:
News for Package RcppCNPy Changes in version 0.1.0 (2012-07-07)
  • Added automatic use of transpose to automagically account for Fortran-vs-C major storage defaults between Python and R.
  • Support for integer types in dependent on the int64_t type which is available only when the -std=c++0x switch is used at build-time (and CRAN still discourages use of it)
  • Added support for reading gzip'ed files ending in ".npy.gz"
  • Added regression tests in directory tests/
  • Added a vignette describing the package
  • Added a timing benchmark in demo/timings.R
Changes in version 0.0.1 (2012-07-04)
  • Initial version, as a straightforward Rcpp modules wrap around the cpny library by Carl Rogers (on github under a MIT license).
  • At present, npy files can be read and written for vectors and matrices of either numeric or integer type. Note however that matrices are currently transposed because of the default Fortran ordering done by numpy.
I will follow up with a little usage example later. CRANberries also provides a diffstat report for 0.1.0 relative to 0.0.1. As always, feedback is welcome and the rcpp-devel mailing list off the R-Forge page for Rcpp is the best place to start a discussion.

7 July 2012

Tiago Bortoletto Vaz: Some pictures of DC11 Cheese and Wine party

In DebConf9 i worked on some photo editing and ended with a sort of over-saturated album which is still available online. For the C&W party in DebConf11 i tried to delivery a black and white set of pictures by just doing some adjustments using ufraw. Pictures were taken with a Nikon D50 camera + Nikkor 50mm 1/1.4 in raw mode. Here are some examples of the result:
debconf11debconf11debconf11
You can enjoy these and other DebConf11 shots by following the links in DC11 wikipage. (update: sorry for this old post being re-published in the planet, i've migrated my blog and this post got a new timestamp)

Keith Packard: FEC

Forward Error Correction with the TI CC1120 Sub-GHz transceiver We re building a new, fancier flight computer and decided to give the new, fancier TI CC1120 chip a try. It has significantly more transmit power (+16dBm) and receive sensitivity (-109dBm) than the transciever built in to the TI CC1111 RF SoC that we ve built our other boards with. Given that we d already decided to use a fancier STM32L processor, using the nicest stand-alone radio chip we could find seemed to make good sense. One of the nice features found in the CC1111 is support for FEC using a 1/2 rate constraint length 4 convolutional code. Both the encoder and the soft-decision Viterbi decoder are built right into the chip; all we had to do was flip a couple of bits and we got error correction, interleaving, data whitening and CRC checking all for free. We assumed that, as the CC1120 was advertised as a better replacement for our CC1111 radio, that it would also include all of these fine features. After we got the chip all soldered down to our first prototype boards, we read through the reference manual looking for the right register values to flip for forward error correction. We found support for CRC computation and data whitening, but no mention of interleaving or forward error correction at all. Thanks, TI. Of course, without the FEC pieces, the other packet handling hardware is worthless you can t exactly do a CRC on the encoded data and expect it to be useful on the other end of the link, and data whitening happens after the CRC. Basic CC1120 driver I assumed I d eventually figure out something to do about the FEC pieces and started writing a basic CC1120 driver AltOS, the operating system used in all of our projects. I started with the transmit side, as that seemed easier as I could use the existing packet hardware by uploading the desired bit sequence using whatever fancy encoding desired and the hardware would happily transmit it. I first tested that using low data-rate bits (2kbps), transmitting an alternating sequence of zeros and ones to generate a 1kHz tone on a regular 70cm receiver. That seemed to work just fine, demonstrating that I had some grasp of the basic operation of the chip. Convolutional Encoding in Software Not to be daunted by a small challenge in software, I set out to replicate the encoding scheme used in the CC1111 chips for use in our CC1120-based design. We obviously want our CC1120 boards to interoperate with the CC1111 boards. Fortunately, TI fully documents the CRC, data whitening, convolutional encoding and interleaving done in the hardware. I created my own implementation of the encoder (licensed, as usual, under the GPLv2) which you can see in the file ao_fec_tx.c It s not quite as flexible as the hardware, it always whitens the data and always appends the CRC bytes to the end of the packet, along with the necessary trellis termination bytes. The core of that code is surprisingly simple:

static const uint8_t ao_fec_encode_table[16] =  
/* next 0  1      state */
    0, 3,   /* 000 */
    1, 2,   /* 001 */
    3, 0,   /* 010 */
    2, 1,   /* 011 */
    3, 0,   /* 100 */
    2, 1,   /* 101 */
    0, 3,   /* 110 */
    1, 2    /* 111 */
 ;
uint8_t
ao_fec_encode(const uint8_t *in, uint8_t len, uint8_t *out)
 
    uint8_t     extra[AO_FEC_PREPARE_EXTRA];
    uint8_t     extra_len;
    uint32_t    encode, interleave;
    uint8_t     pair, byte, bit;
    uint16_t    fec = 0;
    const uint8_t   *whiten = ao_fec_whiten_table;
    extra_len = ao_fec_prepare(in, len, extra);
    for (pair = 0; pair < len + extra_len; pair += 2)  
        encode = 0;
        for (byte = 0; byte < 2; byte++)  
            if (pair + byte == len)
                in = extra;
            fec  = *in++ ^ *whiten++;
            for (bit = 0; bit < 8; bit++)  
                encode = encode << 2   ao_fec_encode_table[fec >> 7];
                fec = (fec << 1) & 0x7ff;
             
         
        interleave = 0;
        for (bit = 0; bit < 4 * 4; bit++)  
            uint8_t byte_shift = (bit & 0x3) << 3;
            uint8_t bit_shift = (bit & 0xc) >> 1;
            interleave = (interleave << 2)   ((encode >> (byte_shift + bit_shift)) & 0x3);
         
        *out++ = interleave >> 24;
        *out++ = interleave >> 16;
        *out++ = interleave >> 8;
        *out++ = interleave >> 0;
     
    return (len + extra_len) * 2;
 
ao_fec_encode_table takes care of the convolutional piece, ao_fec_whiten_table (not shown) contains the data whitening codes while the little loop at the bottom does the interleaving. I didn t spend a lot of time optimizing this as it seemed to run plenty fast on the 32MHz processor. With the bits all nicely encoded, I passed them to my simple CC1120 driver and let it send them along to our CC1111 receiver. Much to my delight, with only a few bugs fixed, it worked just fine! I d managed to get one direction working, validating the hardware and making it clear that we d at least be able to use the board in flight for telemetry. Getting Soft-decision data out of the CC1120 In packet mode, the CC1120 receiver converts the incoming GFSK stream directly into bits, making its best guess as to whether the detected value was a one or zero. Of course, like any FM modulation, the receiver will be producing intermediate values, especially when the signal is weak or masked by interference. A Viterbi decoder can make good use of this information;these noisy intermediate values are less influential in the final resulting path cost which allows the strong 0/1 values to pull the solution to the right one. Soft decision decoding yields a theoretical 2dB gain over hard decision decoders, and given our desire for maximum packet reception over long distances, it seemed important to make this work. The CC1120 has a way to recover the soft decision values, but only one 8-bit value at a time. It does, however, helpfully provide a GPIO wire which can be programmed to interrupt the CPU when the soft decision data has arrived. So, I hooked up a GPIO line on the processor to the GPIO line on the CC1120 and let it interrupt once per bit time, or 38400 times per second, to read this valuable soft decision data out of the radio part. According to TI support, this is the only way to make this work, and that they generally recommend that developers use the packet mode stuff and throw away this valueable source of data. I was happily surprised to learn that the STM32L can in fact survive this interrupt rate, and by setting interrupt priorities appropriately, I manage to reliably capture an entire packets worth of data without dropping a single bit. I set up a simple packet dumping function to run on the prototype board and captured raw encoded bytes from our CC1111-based flight computer so that I d have some real data to work from. Soft-decision Viterbi Decoding The sample encoding implementation from TI made that piece fairly straightforward. Lacking a similar sample for the decoding piece meant that I d be starting from scratch. And, implementing something that seemed like magic to me when I started. I started by reading a few articles on Viterbi decoding: I found Chip Fleming s tutorial very useful as it included a bunch of worked examples using a convolutional encoders with constraint length (k) of 3 instead of 4; this makes all of the trellis diagrams half the size. I also sent my friend, Phil Karn, a query about this process, and he responded with a bunch of helpful suggestions, while also recommending that I just steal his DSP and FEC library implementation. Of course, I don t like using code that I can t understand, and his code only implements much longer codes than I needed, so I d have to understand it anyways to make it work for me. Phil s code is a marvel, but it s not exactly comprehensible to someone who doesn t even know what a Viterbi decoder is supposed to do. So, with Chip s tutorial on my screen, I wrote a primitive Viterbi decoder. This did only the Viterbi step, and split that into two phases. The first computed the cost for each state in the system for every received pair of symbols received. It also tracked the chain of states through the entire decode process:
    for (state = 0; state < 8; state++)  
        struct ao_soft_sym zero = ao_soft_sym(ao_fec_encode_table[state * 2 + 0]);
        struct ao_soft_sym one = ao_soft_sym(ao_fec_encode_table[state * 2 + 1]);
        uint8_t zero_state = ao_next_state(state, 0);
        uint8_t one_state = ao_next_state(state, 1);
        int zero_cost = ao_cost(s, zero);
        int one_cost = ao_cost(s, one);
        zero_cost += cost[b][state];
        one_cost += cost[b][state];
        if (zero_cost < cost[b+1][zero_state])  
            prev[b+1][zero_state] = state;
            cost[b+1][zero_state] = zero_cost;
         
        if (one_cost < cost[b+1][one_state])  
            prev[b+1][one_state] = state;
            cost[b+1][one_state] = one_cost;
         
     
At the end of the packet, it found the least costly path and walked that from back to front, generating output bits (yes, one bit per element of the bits array):
for (state = 1; state < 8; state++)  
    if (cost[b][state] < c)  
        c = cost[b][state];
        min_state = state;
     
 
for (b = len/2; b > 0; b--)  
    bits[b-1] = min_state & 1;
    min_state = prev[b][min_state];
 
Completely separate from this code were the interleaving and data whitening stages. Keeping those separate allowed them to be tested independently, which made debugging them far easier. None of this code ever ran on the STM32L processor, it was instead run in a test framework on my laptop. I first got this working with data generated by the software convolutional encoder, then I managed to get it to decode the raw packets that I had recorded directly from the receiver it self. This marked a significant milestone in my mind I d managed to replace, in software, the CC1111 FEC encoder and decoder. However, the decoder performance was not fast enough to manage back-to-back packets yet. Having something in hand that worked meant that further development would be directly comparable to something that did work, making optimization much easier. Yet another lesson in making it work, and then making it work fast. Optimizing the Viterbi Decoder The first step was to reduce memory usage within the decoder. While it s best to defer computing the path until the very last bit has been received, it s also true that the chances of a bit affecting old data reduces as the distance between the new and old data increases. With the rule of thumb being a distance of k 6 or k 7, I saved 32 output bits for each state and wrote the oldest of 8 each time the buffer filled up, making a distance of 24 bits between the newest saved data and the current decoding position. That meant a fixed amount of storage was needed for an arbitrarily long packet. I tested a variety of different history sizes from 8 to 56 bits (cooresponding to 16, 32 and 64 bits of saved data for each state). With 100000 random packets generated that had gaussian noise added to each bit, here are the error rates for the different history lengths:
History LengthTotal PacketsCorrectIncorrect
8 bits10000090520 (90.52%)9480 (9.48%)
24 bits10000093614 (93.61%)6386 (6.39%)
56 bits10000093620 (93.62%)6380 (6.38%)
The performance of the 8-bit history and 16-bit history versions turned out to be essentially identical (given the 32-bit nature of the STM32L, that shouldn t be too surprising). The performance of the 56-bit version, which manipulated uint64_t data types was sigificantly slower, and given the very modest benefit, deemed not worth it. If we move to a larger constraint length (k > 4), or started using a punctured convolutional encoding, we would want to re-measure this. The next step was to combine the de-interleaving, decoding, de-whitening and CRC computation into a single loop. This would eliminate a pile of data copying and extra memory usage. Nothing fancy here, but it made enough of a difference that I could decode most of the incoming packets now, dropping only about 25% of them. To get to being able to decode every packet, I needed to start decoding the packet while it was being received. Because of interleaving, I had to have 32 bits of data to be able to decode anything, so it was a simple matter of having my per-soft-value interrupt handler start the decoder going after each interleave block of data was received. With this in place, I was able to decode a 76-byte payload (160 transmitted bits) in 14.7 ms, or just about 50% of the time it took to transmit the packet. Unrolling one of the inner decoding loops eliminated a bunch of computation and sped this up even more, decoding packets in 9.5ms. Success at last, a solid 100% of packets received were being decoded, as long as the CPU was otherwise idle. Finally, I went and re-read Phil Karn s code and pondered over how it works. It was opaque until I wrote a message back to Phil asking how it worked and pointing out sections that were confusing. Fortunately, simply phrasing my confusion in words made me understand how the code works. Here s my original code for computing the per-state cost metric:
/* Metric for a zero bit */
uint32_t    bitcost = ((uint32_t) (s0 ^ ao_fec_decode_table[(state<<1)]) +
               (uint32_t) (s1 ^ ao_fec_decode_table[(state<<1)+1]));
 
    /* Total path metric and state for a zero bit */
    uint32_t    cost0 = cost[p][state] + bitcost;
    uint8_t     state0 = ao_next_state(state, 0);
    /* Compare the total path metric against all existing
     * metrics heading into the same new state, choosing
     * the least expensive and killing the others.  Record
     * the new lowest cost and output bit.
     */
    if (cost0 < cost[n][state0])  
        cost[n][state0] = cost0;
        bits[n][state0] = (bits[p][state] << 1)   (state & 1);


    /* Total path metric and state for a one bit.  Because
     * encoding a one is always exactly the opposite of
     * encoding a zero from any state, this cost is
     * 255*2 - bitcost
     */
    uint32_t    cost1 = cost[p][state] + 510 - bitcost;
    uint8_t     state1 = ao_next_state(state, 1);
    if (cost1 < cost[n][state1])  
        cost[n][state1] = cost1;
        bits[n][state1] = (bits[p][state] << 1)   (state & 1);
     
 
Before this loop is run, I have to initialize cost[n] to a large value so that the comparisons will be true for the first case to reach each state. Phil s code, in contrast, doesn t have to initialize cost[n] as we know which two states can reach any possible new state. His code looks like this:
/* Metric for a zero bit */
bitcost = ((uint32_t) (s0 ^ ao_fec_decode_table[(state<<1)]) +
       (uint32_t) (s1 ^ ao_fec_decode_table[(state<<1) 1]));
/* Only state and state+4 reach state<<1 with a zero bit */
/* Cost from state to state<<1 for a zero bit*/
m0 = cost[p][state] + bitcost;
/* Cost from state+4 to state<<1 for a zero bit */
m1 = cost[p][state+4] + (510 - bitcost);
/* Which source state is cheaper? */
bit = m0 > m1;
/* Record the cheaper cost and the add to the path of bits */
cost[n][state<<1] = bit ? m1 : m0;
bits[n][state<<1] = (bits[p][state + (bit<<2)] << 1)   (state&1);
/* State and state+4 reach (state<<1)+1 with a one bit */
/* Cost from state to (state<<1)+1 for a one bit */
m0 -= (bitcost+bitcost-510);
/* Cost from state+4 to (state<<1)+1 for a one bit */
m1 += (bitcost+bitcost-510);
/* Which source state is cheaper? */
bit = m0 > m1;
/* Record cheaper cost and add to the path of bits */
cost[n][(state<<1)+1] = bit ? m1 : m0;
bits[n][(state<<1)+1] = (bits[p][state + (bit<<2)] << 1)   (state&1);
This code does two states at a time, and so while it s slightly longer than the above, it only needs to run half as many times. The resulting code now decodes packets in 5.7ms. The final version of the code can be see in ao_fec_rx.c The whole AltOS operating system, with many drivers and support for CC1111, AVR and STM32L processirs is available, under the GPLv2 from git://git.gag.com/scm/git/fw/altos

6 July 2012

Matthew Garrett: DMI checks are a last resort

Most x86 devices export various bits of system information via SMBIOS, including the system manufacturer, model and firmware version. This makes it possible for the kernel to alter its behaviour depending on the machine it's running on, usually referred to as "DMI quirking". This is a very attractive approach to handling machine-specific bugs - unfortunately it also means that we often end up working around symptoms with no understanding of the underlying issue.

Almost all x86 hardware is tested with Windows. For the most part vendors don't ship devices that don't work - if you install a stock copy of Windows on a system, you expect it to boot successfully and reboot properly. Basic ACPI functionality should be present and correct, including processor power-saving states. Time should pass at something approximating the real rate. And since stock Windows isn't updated with large numbers of DMI quirk entries, the hardware needs to do this with an operating system that's already shipped.

Which means that if Linux doesn't provide the same level of functionality, it means we're doing something different to Windows. Sometimes this is because we're doing something fundamentally different with the hardware - the HP NX6125, for example, resets its thermal trip points if the timer is set up in a different way to Windows. In this case we've decided that the additional functionality of doing things the Linux way is worth it, and we'll just blacklist the small set of machines that are broken by it.

But other times there's no need for the difference. For years we were triggering system reboots in a different way to Windows and then adding DMI workarounds for any systems that didn't work. The problem with this approach is that it's basically impossible to guarantee that you've found the full set of broken hardware. It's very easy to add another DMI quirk, but it doesn't solve the problem for anyone who bought a machine, tried Linux and gave up when they found reboot didn't work. More recently we've added a pile of quirks for Dells - turns out that in all cases we're working around a bug in their firmware that hangs if we're using VT-d.

We typically don't merge code that fixes a specific example of a problem without at least considering whether there's a wider class of similar problems that could all be solved at once. We should take the same attitude to DMI quirks. Sometimes they're the least harmful way of handling an issue, but most of the time they're just fixing one person's itch and leaving a larger number of people to continue cursing at Linux. There should at least be a demonstration of an attempt to understand the underlying problem before just adding another quirk, and every patch that permits the removal of some DMI checks should be greeted with great cheer.

comment count unavailable comments

Lucas Nussbaum: Debian Maintainer Dashboard update

I ve spent some more time on Debian Maintainer Dashboard (DMD), a maintainer/team-centric dashboard relying on Ultimate Debian Database. Done:
- added tabs (jquery really rocks) see example
- added a hacking.html file that describes how to setup a development environment
- created a pad (http://debian.titanpad.com/DMD) to store ideas. TODO:
- recruit contributors ;)

4 July 2012

Johannes Schauer: enumerating elementary circuits of a directed_graph

For my GSoC project this year I need to be able to enumerate all elementary circuits of a directed graph. My code is written in Ocaml but neither the ocamlgraph library nor graph libraries for other languages seem to implement a well tested algorithm for this task. In lack of such a well tested solution to the problem, I decided to implement a couple of different algorithms. Since it is unlikely that different algorithms yield the same wrong result, I can be certain enough that each individual algorithm is working correctly in case they all agree on a single solution. As a result I wrote a testsuite, containing an unholy mixture of Python, Ocaml, D and Java code which implements algorithms by D. B. Johnson, R. Tarjan, K. A. Hawick and H. A. James.
Algorithm by R. Tarjan The earliest algorithm that I included was published by R. Tarjan in 1973.
Enumeration of the elementary circuits of a directed graph
R. Tarjan, SIAM Journal on Computing, 2 (1973), pp. 211-216
http://dx.doi.org/10.1137/0202017
I implemented the pseudocode given in the paper using Python. The git repository can be found here: https://github.com/josch/cycles_tarjan

Algorithm by D. B. Johnson The algorithm by D. B. Johnson from 1975 improves on Tarjan's algorithm by its complexity.
Finding all the elementary circuits of a directed graph.
D. B. Johnson, SIAM Journal on Computing 4, no. 1, 77-84, 1975.
http://dx.doi.org/10.1137/0204007
In the worst case, Tarjan's algorithm has a time complexity of O(n e(c+1)) whereas Johnson's algorithm supposedly manages to stay in O((n+e)(c+1)) where n is the number of vertices, e is the number of edges and c is the number of cycles in the graph. I found two implementations of Johnson's algorithm. One was done by Frank Meyer and can be downloaded as a zip archive. The other was done by Pietro Abate and the code can be found in a blog entry which also points to a git repository. The implementation by Frank Meyer seemed to work flawlessly. I only had to add code so that a graph could be given via commandline. The git repository of my additions can be found here: https://github.com/josch/cycles_johnson_meyer Pietro Abate implemented an iterative and a functional version of Johnson's algorithm. It turned out that both yielded incorrect results as some cycles were missing from the output. A fixed version can be found in this git repository: https://github.com/josch/cycles_johnson_abate

Algorithm by K. A. Hawick and H. A. James The algorithm by K. A. Hawick and H. A. James from 2008 improves further on Johnson's algorithm and does away with its limitations.
Enumerating Circuits and Loops in Graphs with Self-Arcs and Multiple-Arcs.
Hawick and H.A. James, In Proceedings of FCS. 2008, 14-20
www.massey.ac.nz/~kahawick/cstn/013/cstn-013.pdf
In contrast to Johnson's algorithm, the algorithm by K. A. Hawick and H. A. James is able to handle graphs containing edges that start and end at the same vertex as well as multiple edges connecting the same two vertices. I do not need this functionality but add the code as additional verification. The paper posts extensive code snippets written in the D programming language. A full, working version with all pieces connected together can be found here: https://github.com/josch/cycles_hawick_james The algorithm was verified using example output given in the paper. The project README states how to reproduce it.

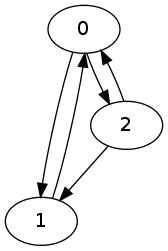
Input format All four codebases have been modified to produce executables that take the same commandline arguments which describes the graphs to investigate. The first argument is the number of vertices of the graph. Subsequent arguments are ordered pairs of comma separated vertices that make up the directed edges of the graph. Lets look at the following graph as an example: cycle example The DOT source for this graph is:
digraph G  
  0;
  1;
  2;
  0 -> 1;
  0 -> 2;
  1 -> 0;
  2 -> 0;
  2 -> 1;
   
To generate the list of elementary circuits using Tarjan's algorithm for the graph above, use:
$ python cycles.py 3 0,1 0,2 1,0 2,0 2,1
0 1
0 2
0 2 1
The commandline arguments are the exact same for the other three methods and yield the same result in the same order. If the DOT graph is in a format as simple as above, the following sed construct can be used to generate the commandline argument that represents the graph:
$ echo  sed -n -e '/^\s*[0-9]\+;$/p' graph.dot   wc -l   sed -n -e 's/^\s*\([0-9]\) -> \([0-9]\);$/\1,\2/p' graph.dot 

Testsuite As all four codebases take the same input format and have the same output format, it is now trivial to write a testsuite that compares the individual output of each algorithm for the same input and checks for differences. The code of the testsuite is available via this git repository: https://github.com/josch/cycle_test The other four repositories exist as submodules of the testsuite repository.
$ git clone git://github.com/josch/cycle_test.git
$ cd cycle_test
$ git submodule update --init
A testrun is done via calling:
$ ./test.sh 11
The argument to the shell script is an integer denoting the maximum number N of vertices for which graphs will be generated. The script will compile the Ocaml, Java and D sourcecode of the submodules as well as an ocaml script called rand_graph.ml which generates random graphs from v = 1..N vertices where N is given as a commandline argument. For each number of vertices n, e = 1..M number of edges are chosen where M is maximum number of edges given the number of vertices. For every combination of number of vertices v and number of edges e, a graph is randomly generated using Pack.Digraph.Rand.graph from the ocamlgraph library. Each of those generated graphs is checked for cycles and written to a file graph-v-e.dot if the graph contains a cycle. test.sh then loops over all generated dot files. It uses the above sed expression to convert each dot file to a commandline argument for each of the algorithms. The outputs of each algorithm are then compared with each other and only if they do not differ, does the loop continue. Otherwise the script returns with an exit code. The tested algorithms are the Python implementation of Tarjan's algorithm, the iterative and functional Ocaml implementation as well as the Java implementation of Johnson's algorithm and the D implementation of the algorithm by Hawick and James.

Future developments Running the testsuite with a maximum of 12 vertices takes about 33 minutes on a 2.53GHz Core2Duo and produces graphs with as much as 1.1 million cycles. It seems that all five implementations agree on the output for all 504 generated graphs that were used as input. If there should be another implementation of an algorithm that enumerates all elementary circuits of a directed graph, I would like to add it. There are some more papers that I would like to read but I lack access to epubs.siam.org and ieeexplore.ieee.org and would have to buy them. Benchmarks seem a bit pointless as not only the algorithms are very different from each other (and there are many ways to tweak each of them) but also the programming languages differ. Though for the curious kind, it follows the time each algorithm takes to enumerate all cycles for all generated graphs up to 11 vertices.
algorithmtime (s)
Johnson, Abate, Ocaml, iterative137
Johnson, Abate, Ocaml, functional139
Tarjan, Python153
Hawick, D175
Johnson, Meyer, Java357
The iterative Ocaml code performs as well as the functional one. In practice, the iterative code should probably be preferred as the functional code is not tail recursive. On the other hand it is also unlikely that cycles ever grow big enough to make a difference in the used stack space. The Python implementation executes surprisingly fast, given that Tarjan's algorithm is supposedly inferior to Johnson's and given that Python is interpreted but the Python implementation is also the most simple one with the least amount of required datastructures. The D code potentially suffers from the bigger datastructures and other bookkeeping that is required to support multi and self arcs. The java code implements a whole graph library which might explain some of its slowness.

Dirk Eddelbuettel: RcppBDT 0.2.0

A new release of the RcppBDT package appeared on CRAN earlier today. RcppBDT uses Rcpp, and in particular the nifty Rcpp modules feature of wrapping C++ code for R just by declaring the (class or function) interfaces. It uses this to bring in some useful functions from Boost Date.Time to R so that one can do things like
R> library(RcppBDT)
R> sapply(2012:2016, function(year)
+         format(getNthDayOfWeek(first, Mon, Sep, year)))
[1] "2012-09-03" "2013-09-02" "2014-09-01" "2015-09-07" "2016-09-05"
R> 
to compute the next five Labor Day dates in the US, given the year and the first Monday of September requirement. More examples are e.g. on the earlier blog post announcing version 0.1.0. Changes are mostly internal. R 2.15.1 brough a better / easier way to load such 'modules' into R, and Rcpp 0.9.13 allows us to use this. So RcppBDT continues to be useful as an example package for Rcpp modules. I also streamlines the interface a little: identifiers are now directly accessible in the package's NAMESPACE rather than just via the an instantiated object. I also added a NEWS file, using the .Rd format so that we can import the marked-up text:
News for Package RcppBDT Changes in version 0.2.0 (2012-07-02)
  • The core module, which wraps what in C++ is boost::gregorian::date, is now exposed as an Rcpp module bdtDate. As all example and demos operated off a (package-global) variable 'bdt', no user visible change was needed outside of the code instantiating at package load.
  • Updated package instantiation to the new facilities offered by the current versions R 2.15.1 and Rcpp 0.9.13 which make Rcpp module initialization easier and more streamlined.
Changes in version 0.1.0 (2011-01-17)
  • First CRAN upload (and see ChangeLog for more granular details) bug fix in svm cross validation
Courtesy of CRANberries, there is also a diffstat report for 0.2.0 relative to 0.1.0. As always, feedback is welcome and the rcpp-devel mailing list off the R-Forge page for Rcpp is the best place to start a discussion.

3 July 2012

Dirk Eddelbuettel: RcppArmadillo 0.3.2.3

Conrad releaser version 3.2.3 of Armadillo a few days ago, and the corresponding RcppArmadillo package 0.3.2.3 is now CRAN. (For these keeping score 3.2.1 never was a full release, and 3.2.2 containing fixes for a build issue that did not affect the R package build so we skipped it.) The short NEWS entry follows below. This version fixes some issues related to g++ 4.7; however the current Debian testing version of g++-4.7.1 required that I rolled back three header files to the version from the previous release. Conrad has been in contact with the gcc upstream maintainers and a fix may appear in time for g++-4.7.2. This release also contains a new introductory pdf vignette based on a paper Conrad and I just submitted. It introduces Armadillo to R programmers and demonstrates with a simple Kalman filtering example how the code can be written in the same concise matrix-oriented style, yet runs orders of magnitude faster.
0.3.2.3  2012-07-01
    o   Upgraded to Armadillo release 3.2.3 
          * minor correction for declaration of fixed size vectors and
            matrices
    o   Reverted three header files  Mat,Row,Col _bones.hpp back to previous
        release due to compilation failures under g++-4.7
    o   Added new vignette 'RcppArmadillo-intro' based on a just-submitted
        introductory paper (by Eddelbuettel and Sanderson) about RcppArmadillo 
    o   Change from release 3.2.2 which we skipped as it did not really affect
        builds under R:
          * minor fix for compiling without debugging enabled (aka release
            mode)
          * better detection of ATLAS during installation on Fedora and Red
            Hat systems
    o   Small enhancement to fastLm 
Courtesy of CRANberries, there is also a diffstat report for 0.3.2.3 relative to 0.3.2.0 As always, more detailed information is on the RcppArmadillo page. Questions, comments etc should go to the rcpp-devel mailing list off the R-Forge page.

2 July 2012

Johannes Schauer: port bootstrap build-ordering tool report 3

A copy of this post is sent to soc-coordination@lists.alioth.debian.org as well as to debian-bootstrap@lists.mister-muffin.de.

Diary

June 18 Pietro suggests a faster way to generate installation sets for a list of packages. In my case, I need an installation set for every source package in the archive to find out how often a binary package is needed to build a source package. As a result, the speed is doubled in contrast to the original approach.

June 19
  • adapt code to work with new dose release 3.0
  • remove unneeded parts of code
  • add different possibilities to find amount of source packages that need a binary package
  • add code to get multiple installation sets using Depsolver_int.solve

June 20
  • add ~global_constraints:false to Depsolver.listcheck, Depsolver.trim and Depsolver.edos_install calls
  • adapt output graph to limited xdot capabilities

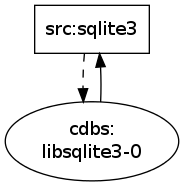
June 21 I formulate an email to the list, reporting of dependency graphs of debhelper, cdbs, pkg-config and libgtk2.0-dev. My current technique gets an installation set for a source package, removes all those that are already installable and adds the others as a dependency of that source package. This dependency will include an installation set of that binary as well minus all packages that are already available. The problem with that approach are dependency cycles created by long dependency chains. Example: src:A needs B needs C needs A. B and C would both be added as a dependency of src:A. B as well as C would also include their installation set which in both cases includes A. So now there are two cycles: src:A->B->A and src:A->C->A. For a real life example, look at the following situation of cdbs and src:sqlite3. cdbs old situation It is created because src:sqlite3 needs cdbs needs python-scour needs python needs python2.7 needs libsqlite3-0. Therfor libsqlite3-0 is in the installation set of cdbs, python-scour, python and python2.7. This creates five cycles in the graph even though there is only one. It would be better to reduce the dependencies added to src:sqlite3 to its direct dependency which is cdbs. Package dependencies are disjunctions from which the solver chooses one or the other to build an installation set. To solve the problem above I would need to know which disjunction the solver chose and then only add the direct dependency of a package to the dependency graph.
  • improve build_compile_rounds performance
  • big overhaul of menu structure
  • fix subgraph extraction code

June 22
  • do not create a universe if not needed - use hashtables instead
  • for sorting packages, generating difference of package sets and otherwise comparing packages, always use CudfAdd.compare
  • as a custom list membership function, use List.exists instead of trying List.find
  • more speedup for build_compile_rounds
  • the number of source packages that can be built does NOT include the cross built packages
  • print closure members in graph
  • refactor code and move common functions to bootstrapCommon.ml
  • add breakcycles.ml for future code to break cycles using staged build dependencies
  • use more extlib functionality
  • extended package list input format

June 23 After several emails with Pietro I learn about syntactic dependency graphs. To document my progress and prove my efforts I committed the code as commit 6684c13. But this code was soon found out to be unecessary so it will be removed later and just serves as documentation.

June 24 I came up with another (better?) solution to get the chosen disjunctions. It simply uses the calculated installation set to decide for each disjunction which one was taken by the solver. I reported that important step and the open questions involved with it in an email to the list. The problem always was, that an installation set can easily contain more than one package of a disjunction. In this case it is not clear which branch was chosen by the solver. I found, that in Ubuntu Natty there are only 6 such packages and for each of them the situation can be solved. It can be solved because in all of those cases it is that either one package of a disjunction provides the other or that both packages depend upon each other, which means that both have to be included.

June 27
  • use installation set to flatten build dependencies of source packages
  • refactor code and move common functions to bootstrapCommon.ml

June 25 I have to have an algorithm that finds all circuits in a given graph. This is necessary so that:
  1. cycles can be enumerated for huge dependency graphs where cycles are hard to see
  2. cycles can be enumerated to find a cycle that can be broken using staged build dependencies
It seems that Johnson's algorithm is the best way to do this complexity wise and Pietro already blogged about the problem together with an implementation of the algorithm in ocaml. Unfortunately it turns out that his code doesnt implement the algorithm correctly and hence misses out on some cycles. The fix seems not to be too trivial so I'm still investigating it.

June 28
  • add crosseverything.ml to obtain a list of source packages that, if cross compiled, would make the whole archive available

Results While the first week was productive as usual, I had to work some time on a University project during the second week as well as attend a family meeting. I will catch up with the lost time over the course of the next week.

dose3 Using dose 3.0 (which fixes a bug about essential packages) the output of the algorithms is now likely less wrong then before.

performance Performance was improved in the generation of installation sets as well as in the code that tries out how many packages can be built in multiple rounds. This was achieved by more caching, less unnecessary operations in looping constructs, replacing lists with hashtables, not creating universes where not necessary.

user interface The main program, basenocycles.ml now has a much better menu structure.

input format The programs take two package file inputs. The list of source packages that has to be cross built for a minimal build system and the list of source packages that was chosen to be cross compiled in addition to that. Both files list one source package per line and now allow comments.

refactoring As more and more scripts are added, more and more functionality is moved to bootstrapCommon.ml which makes each script much cleaner.

what to test for cross building As discussed in the "Future" section of the last report, I now automated the process of finding out which packages, if they were cross compiled, would make the whole archive available because they break all cycles and allow native compilation of the rest. The outcome: to build 3333 out of 3339 packages in natty natively, at most 186 source packages must be cross compiled. The other six cannot be compiled because of version mismatches in the Natty Sources.bz2 and Packages.bz2. The code can be run from crosseverything.ml.

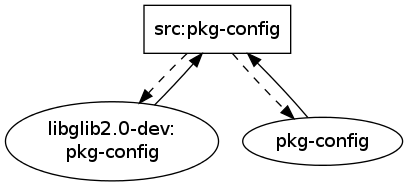
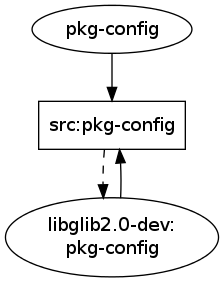
limit source dependencies to direct dependencies Reducing the dependencies of source packages from their full installation set to their direct dependencies by finding out which disjunction of their dependency list were taken, greatly simplifies the dependency graphs. The dependency graph created for libgtk2.0-dev could be reduced from 491 to 247 vertices for a depth of three. For cdbs it is now clearly visible that cdbs depends on libsqlite3-0 which builds from src:sqlite3 which depends on cdbs. Before: cdbs old situation After: cdbs new situation For pkg-config the graph also has been reduced to the one single cycle that matters: src:pkg-config needs libglib2.0-dev which depends on pkg-config which builds from src:pkg-config. Before: pkg-config old situation After: pkg-config old situation

Future I will prepare content for wookey's debconf talk on crossbuilding and bootstrapping. As this will include directions how to use the current code, I will kill two birds with one stone and write some proper documentation for my current source. The following two lists will be displayed after a dependency graph is calculated and reduced to its scc:
  • those source packages that have the least build dependencies not fulfilled. Those might be candidates for easy staged build dependencies. Since the source package is part of the scc, it will definitely be involved in some cycle somewhere.
  • those binary packages that most source packages depend upon. Those could be candidates for cross compilation as it might be easier to cross compile the source package than using staged build dependencies.
Patrick managed to cross build packages with sbuild now. So the list of packages that crosseverything.ml produces can now be checked efficiently for cross buildability. With this list, potentially more cycles can be broken out of the box. A feature will be added that allows the user to remove all packages from a dependency graph that can be cross compiled without any additional effort. Version mismatches between source and binary packages in Sources.bz2 and Packages.bz2 respectively in Ubuntu make the scripts fail and/or produce wrong results. Debian (even Sid) doesnt have this problem so I should find out where to report this problem to Ubuntu. I need to write a working version of Johnson's algorithm because much functionality depends upon it. I have the option to improve Pietro's version or write one from scratch. Writing one from scratch might be easier as I have Pietro's code as template as well as a Java implementation of Johnson's algorithm which seems to work. The following functionalities need working cycle enumeration:
  • given source packages with staged build dependencies, an enumeration of cycles is needed to find out which cycles can be broken by building packages staged. It makes less sense to blindly build a package stage and then check if this makes more packages available.
  • display cycles of a dependency graph to the user. After obtaining all cycles in the graph it makes sense to sort them by their length. The user would then investigate the situation of the smallest cycles first. This makes sense because breaking small cycles can potentially break bigger cycles. Since in the end, all cycles have to be eliminated anyway, it makes sense for the user to first tackle the small ones.
  • display the feedback arc set to the user. The packages in the feedback arc set might be very good candidates for reduced build dependencies or cross compilation.

1 July 2012

Lucas Nussbaum: Introducing the Debian Maintainer Dashboard help needed!

The brand new machine for Ultimate Debian Database motivated me to do UDD-related work again, so I implemented an old idea: build a maintainer/team-centric dashboard relying on UDD, the Debian Maintainer Dashboard. The idea is to expose as much useful information as possible about a maintainer s packages, both in the traditional (Developers Packages Overview-like) big table with all the info , but also in a task-oriented listing (to answer the ok, I have two hours for Debian, what should I do now? question). At this point, the Debian Maintainer Dashboard already brings several cool features (try it with my packages or pkg-ruby s packages, or your own!): Of course, as of now, it s pretty ugly: that s the help needed part of the post. I really suck at web design, and would really appreciate if someone would help me to turn it into something nice to use. Besides adding links and colors everywhere, it could probably be nice to add sortable tables, and to create tabs for TODO items , Versions and Bugs (and possibly Lintian, for example). Contact me if you are interested.

Niels Thykier: Performance bottlenecks in Lintian

Thanks to a heads up from Bastian Blank, I learned that Lintian 2.5.7 and 2.5.8 were horribly slow on the Linux binaries. Bastian had already identified the issue and 2.5.9 fixed the performance regression. But in light of that, I decided to have a look at a couple of other bottlenecks. First, I added a simple benchmark support to Lintian 2.5.10 (enabled with -dd) that prints the approximate run time of a given collection. As an example, when running lintian -dd on lintian 2.5.10, you can see something like:
N: Collecting info: unpacked for source:lintian/2.5.10 ...
[...]
N: Collection script unpacked for source:lintian/2.5.10 done (0.699s)
When done on linux-image, the slowest 3 things with 2.5.10 are (in order of appearance):
[...]
N: Collection script strings for binary:linux-image-3.2.0-2-amd64/3.2.20-1/amd64 done (12.333s)
N: Collection script objdump-info for binary:linux-image-3.2.0-2-amd64/3.2.20-1/amd64 done (15.915s)
[...]
N: Finished check: binaries (5.911s)
[...]
(The mileage (and order) probably will vary a bit.) These 3 things makes up about 22 seconds of a total running time on approximately 28-30s on my machine. Now if you wondering how 12, 16 and 6 becomes 22 the answer is parallelization . strings and objdump-info are run in parallel so only the most
expensive of the two counts in practise (with multiple processing units). The version of linux-image I have been testing (3.2.20-1, amd64) has over 2800 ELF binaries (kernel modules). That makes the runtime of strings and objdump-info much more dominating than in your average package . For the fun of it I have done a small informal benchmark of various Lintian versions on the binary. I have used the command line:
# time is the bash shell built-in and not /usr/bin/time
$ time lintian -EvIL +pedantic linux-image-3.2.0-2-amd64_3.2.20-1_amd64.deb >/dev/null
# This was used with only versions that did not accept -L +pedantic
$ time lintian -EvI --pedantic linux-image-3.2.0-2-amd64_3.2.20-1_amd64.deb >/dev/null
With older versions of Lintian (<= 2.5.3) Perl starts to emit warnings; these have been manually filtered out. I used lintian from the git repository (i.e. I didn t install the packages, but checked out the relevant git tags). I had libperlio-gzip-perl installed (affects the 2.5.10 run). Most results are only from a single run, though I ran it twice on the first version (hoping my kernel would cache the deb for the next run). The results are:
2.5.10
real  0m28.836s
user  0m36.982s
sys  0m3.280s
2.5.9
real  1m9.378s
user  0m33.702s
sys  0m11.177s
2.5.8
real  4m54.492s
user  4m0.631s
sys  0m30.466s
2.5.7 (not tested, but probably about same as 2.5.8)
2.5. 0..6 
real  1m20s  - 1m22s
user  0m19.0s - 0m20.7s
sys  0m5.1s  - 0m5.6s
I think Bastian s complaint was warranted for 2.5. 7,8 . :) While it would have been easy to attribute the performance gain in 2.5.10 on the new parallelization improvements, it is simply not the case. These improvements only apply to running collections when checking multiple packages. On my machine, the parallelization limit for a package is effectively determined by the dependencies between the collections on my machine. Instead the improvements comes from reducing the number of system(3) (or fork+exec) calls Lintian does. Mostly through using xargs more, even if it meant slightly more complex code. But also, libperlio-gzip-perl shaved off a couple of seconds on binaries check. But as I said, linux-image is not your average package . Most of the improvements mentioned here are hardly visible on other packages. So let s have a look at some more other bottlenecks. In my experience the following are the worst offenders : But enough Lintian for now time to fix some RC bugs!

Dirk Eddelbuettel: Getting numpy data into R

The other day, I found myself confronted with a large number of large files. Which were presented in (gzip-)compressed ascii format---which R reads directly via gzfile() connections---as well as (compressed) numpy files. The numpy can be read very efficiently into Python. We can do the same in R via save() and load(), of course. But the trouble is that you need to read them first. And reading hundreds of megabytes from ascii is slow, no matter which language you use. Concerning R, I poked aound scan(), played with the colClasses argument and looked at the recent LaF package written just for this purpose. And all these solutions were still orders of magnitude slower than reading numpy. Which is no surprise as it is really hard to beat binary formats when you have to parse countless ascii tokens. So the obvious next idea was to read the numpy file in Python, and to write a simple binary format. One helpful feature with this data set was that it contained only regular (rectangular) matrices of floats. So we could just store two integers for the dimensions, followed by the total data in either one large binary blob, or a sequence of column vectors. But one minor trouble was that the Intertubes lead to no easy solution to unpack the numpy format. StackOverflow had plenty of question around this topic converned with, say, how to serialize in language-independent way. But no converters. And nobody local knew how to undo the "pickle" format underlying numpy. But a remote friend did: Laurent, well-known for his Rpy2 package, pointed me towards using the struct module and steered me towards the solution shown below. So a shameless plug: if you need a very experienced Python or R consultant for sciece work, consider his consulting firm. Finally, to round out this post, let's show the simple solution we crafted so that the next guy searching the Intertubes will have an easier. Let us start with a minimal Python program writing numpy data to disk:
#!/usr/bin/env python
#
# simple example for creating numpy data to demonstrate converter
import numpy as np
# simple float array
a = np.arange(15).reshape(3,5) * 1.1
outfile = "/tmp/data.npy"
np.save(outfile, a)
Next, the simple Python converter to create a binary file containing two integers for row and column dimension, followed by row times columns of floats:
#!/usr/bin/python
#
# read a numpy file, and write a simple binary file containing
#   two integers 'n' and 'k' for rows and columns
#   n times k floats with the actual matrix
# which can be read by any application or language that can read binary
 
import struct
import numpy as np
inputfile = "/tmp/data.npy"
outputfile = "/tmp/data.bin"
# load from the file
mat = np.load(inputfile)
# create a binary file
binfile = file(outputfile, 'wb')
# and write out two integers with the row and column dimension
header = struct.pack('2I', mat.shape[0], mat.shape[1])
binfile.write(header)
# then loop over columns and write each
for i in range(mat.shape[1]):
    data = struct.pack('%id' % mat.shape[0], *mat[:,i])
    binfile.write(data)
binfile.close()
Lastly, a quick littler script showing how R can read the data in a handful of lines:
#!/usr/bin/r
infile <- "/tmp/data.bin"
con <- file(infile, "rb")
dim <- readBin(con, "integer", 2)
Mat <- matrix( readBin(con, "numeric", prod(dim)), dim[1], dim[2])
close(con)
print(Mat)
That did the job---and I already used to converter to read a few weeks worth of data for further analysis in R. This obviously isn't the last word on possible solutions as the additional temporary file can be wasteful (unless it forms a cache for data read multiple times). If someone has nice solutions, please don't hold back and contact me. Thanks again to Laurent for the winning suggestion concerning struct, and help in getting the examples shown here to work.

30 June 2012

Timo Jyrinki: Where computing takes you...

Do you ever have those afternoons you get a great idea and you've all the evening time for that task. The task is a relaxing one and won't need much attention, and you can watch a movie or something. But then, it happens that the evening turns into night as you realize a couple of little details adding complexity to the idea, and the task turns out to be much more invasive to your evening than you thought?

In this example, I got the great idea to upgrade my Debian running NAS device (thanks Martin for everything!) to use ext4 instead of ext3. The kind of idea that takes a long time for relatively little practical benefit, but it just feels like a nice thing do when you've the extra amounts of nerd time available. It's basically just opening the NAS device up, mounting its hard disk to a laptop via external case, running the tune2fs and fsck then putting the disk back. It just takes a long time for the initial fsck (to make sure everything's intact) and then the required fsck run to get ext4 mountable.

Only in this situation, it would have been beneficial to have the ext4 support in the flashed initramfs before the migration. So... before the photo below, I've already:
  1. done the ext4 migration and fsck:s
  2. screwed the disk back to the NAS case, attached cables and found that it doesn't boot
  3. (on the laptop with the hard disk attached again tried manually unpacking initramfs and adding ext4 module... also had time to bind mount everything and chroot into the ARM system to run update-initramfs manually... also tried booting with those... until remembered the simple fact that the /boot partition is only for show and also the initramfs is loaded directly from flash)
  4. copied the main root filesystem content from the original disk to another external disk with ext3 partition
  5. attached the another disk (with same UUID:s) to the QNAP NAS device, booted, double-checked that I have now ext4 specified under /etc/initramfs-tools/modules, reconfigured the linux image that also regenerates initramfs and flashes it
And in the photo, what's happening is that:
  1. I've again the original disk reattached and system booted with the initramfs generated and flashed from the ext3 disk
  2. the NAS device is hanging in the air, cover open, from the closet where I've things stuffed in (normally secured with cable ties), and I need to support it with a knee or one hand since the 2TB disk is much heavier than the small SSD I used as the ext3 disk so the power cable and RJ-45 cable would have pretty heavy load
  3. Since I've only one hand in use and can't use a laptop, I'm logging in via my Nokia N9 and then reflashing the kernel + initramfs from this original disk, just to make sure everything is now alright and also after that flashing it still boots (it does!). Note that I feel like the setup is secure enough for non-interrupted flashing so that I can indeed support the NAS with a knee, use one hand to keep N9 and another hand to take a photo with a camera.

And so we have had a productive and educating afternoon/evening/night once again. Does this ever happen to you?

Andrea Veri: Nagios IRC Notifications

Lately (as I earlier pointed out on my blog) I ve been working on improving GNOME s infrastructure monitoring services. After configuring XMPP it was time to find out a good way for sending out relevant notifications to our IRC channel hosted on GIMPNET. I achieved that with a nice combo: supybot + supybot-notify, all that mixed up with a few grains of Nagios command definitions. But here we go with a little step-by-step guide: Requirements 1. Install supybot and configure a new installation:
apt-get install supybot or yum install supybot
mkdir /home/$user/nagbot && cd /home/$user/nagbot
supybot-wizard (follow the directions to get the bot initially configured)
2. Install and load the supybot-notify plugin by doing:
git clone git://git.fedorahosted.org/supybot-notify.git && cd supybot-notify
mkdir -p /home/$user/nagbot/plugins/notify && cp -r * /home/$user/nagbot/plugins/notify
Finally, load the plugin. (this will require you to authenticate to the bot) Nagios configuration 1. Add the relevant command definitions to the commands.cfg file:
# 'notify-by-ircbot' command definition
define command 
    command_name    notify-by-ircbot
    command_line    /usr/bin/printf "%b" "#channel $NOTIFICATIONTYPE$ - $HOSTALIAS$/$SERVICEDESC$ is $SERVICESTATE$: $SERVICEOUTPUT$ ($$(hostname -s))"   nc -w 1 localhost 5050
     
# 'host-notify-by-ircbot' command definition
define command 
	command_name	host-notify-by-ircbot
	command_line	/usr/bin/printf "%b" "#channel $NOTIFICATIONTYPE$ - $HOSTALIAS$ is $HOSTSTATE$: $HOSTOUTPUT$ ($$(hostname -s))"   nc -w 1 localhost 5050
	 
* adjust the Netcat s host and port to your needs, in my case Supybot and Nagios were running on the same host. In the case of a Supybot running on a different host than Nagios, tweak Iptables to allow the desired port:
-A INPUT -m state --state NEW,ESTABLISHED -m tcp -p tcp --dport 5050 -j ACCEPT
2. Add a new entry on the contacts.cfg file:
define contact 
 	contact_name    nagbot
   	use             generic-contact
        alias		Nagios IRC Bot
        email           example@example.com
        service_notification_commands   notify-by-ircbot
 	host_notification_commands      host-notify-by-ircbot
 
3. Reload Nagios:
sudo /etc/init.d/nagios3 reload
And finally, enjoy the result:
 PROBLEM - $hostalias/load average is CRITICAL: CRITICAL - load average: 30.45, 16.24, 7.16 (nagioshost)
 RECOVERY - $hostalias/load average is OK: OK - load average: 0.06, 0.60, 3.65 (nagioshost)

Bernhard R. Link: ACPI power button for the rest of us

The acpi-support maintainer unfortunately decided 2012-06-21 that having some script installed by a package to cleanly shut down the computer should not be possible without having consolekit and thus dbus installed. So (assuming this package will migrate to wheezy which it most likely will tomorrow) with wheezy you will either have to write your own event script or install consolekit and dbus everywhere. You need two files. You need one in /etc/acpi/events/, for example a /etc/acpi/events/powerbtn:
event=button[ /]power
action=/etc/acpi/powerbtn.sh
Which causes a power-button even to call a script /etc/acpi/powerbtn.sh, which you of course also need:
#!/bin/sh
/sbin/shutdown -h -P now "Power button pressed"
You can also name it differently, but /etc/acpi/powerbtn.sh has the advantage that the script from acpi-support-base (in case it was only removed and not purged) does not call shutdown itself if it is there. (And do not forget to restart acpid, otherwise it does not know about your event script yet). For those too lazy I've also prepared a package acpi-support-minimal, which only contains those scripts (and a postinst to restart acpid to bring it into effect with installation), which can be get via apt-get using
deb http://people.debian.org/~brlink/acpi-minimal wheezy-acpi-minimal main
deb-src http://people.debian.org/~brlink/acpi-minimal wheezy-acpi-minimal main
or directly from http://people.debian.org/~brlink/acpi-minimal/pool/main/a/acpi-support-minimal/. Sadly the acpi-support maintainer sees no issue at all and ftp-master doesn't like so tiny packages (which is understandable but means the solution is more than a apt-get away).

28 June 2012

Sylvain Le Gall: OASIS 0.3.0 release

Logo OASIS small OASIS is a tool to integrate a configure, build and install system in your OCaml project. It helps to create standard entry points in your build system and allows external tools to analyse your project easily. It is the building brick of OASIS-DB, a CPAN for OCaml. This release takes almost 18 months to complete. This is too long and I will talk in another blog post on the way I am trying to improve this right now (esp. using continuous integration). This new release fixes a small bug (1 line) that prevents setup.ml to run with OCaml 4.00. If you have projects that was generated with a former release consider upgrading to OASIS 0.3.0. There are several big new stuff that comes with this release. It now supports Pack: field for libraries which allows to pack your library using -for-pack and so on. We are also compiling .cmxs (dynlink object for native) by default and we publish them in the META file. This feature was implemented in order to get more libraries to provide .cmxs and to help project like Ocsigen to take advantage of this. If you want to get rid of this at configure time, you can use ./configure --override native_dynlink false. We introduce two new default flags: --enable-tests and --disable-docs for configure. These are implicit flags that define if we will run Test sections or compile Document sections. They are especially useful to reduce the number of dependencies, because dependencies of Test will be excluded by default. We recommend to set Build$: flag(tests) to any Library or Executable sections that are only useful for tests. This allows you to really cut down the number of dependencies. The last change I want to introduce is about the old setup-dev subcommand which is now deprecated. It has been replaced by 2 different update schemes. I am pretty excited by this feature which in fact comes from OASIS user (esp. Lwt project). The former scheme was to have a big 'setup.ml' that always call the command oasis to update. This was complex and not very useful. We now have 2 mode: dynamic and weak. dynamic allow you to have a small setup.ml and to keep your VCS history clean but you need to install OASIS. weak need a big setup.ml but only need to call the command oasis if someone change something in _oasis. This mode is targeted to project that wants to be able to checkout from VCS an OCaml project without installing OASIS. The difference generated by weak mode doesn't pollute too much the VCS history because most the time they make sense. For example, you upgrade your package version number in _oasis and it produces a change with 6 lines where the version number changes in every META, setup.ml files and so on. This version has been tested on: You can download it here or use your favorite package manager: Debian (UPDATE: pending upload)
$ apt-get install -t experimental oasis
GODI
$ godi_console perform -build apps-oasis
odb.ml
$ ocaml odb.ml oasis
Here is the complete changelog: EXTREMLY IMPORTANT changes (read this) PACKAGES uploaded to oasis-db will be automatically "derived" before OCaml 4.00 release (i.e. oUnit v1.1.1 will be regenerated with this new version as oUnit v1.1.1~oasis1). PACKAGES not uploaded to oasis-db need to be regenerated. In order not to break 3rd party tools that consider a tarball constant, I recommend to create a new version. Thanks to INRIA OCaml team for synchronizing with us on this point. Major changes: You can now have the following example:
     ...
     Executable test_exec
       Install: false
       Build$: flag(tests)
       MainIs: testExec.ml
       BuildDepends: oUnit
     
     Test main
       Command: $test_exec
       TestTools: test_exec
     ...
The Run$: flag(tests) is implicit for the section Test main. The default value is false for tests. If all the executable for test are flagged correctly (Build$: flag(tests)), you'll get rid of the dependency on oUnit. It works the same for documentation, however the default is true. (Closes: #866) In order to allow interdependent flags, we transform back lazy values into unit -> string functions. This allows to change a flag value on the command line and to update all the dependent values. (Closes: #827, #938) It defines different ways to manage the auto-update of setup.ml: The choice between weak and dynamic depends on your need with regard to VCS and to the presence of oasis. The weak allow to checkout the project from VCS and be able to work on it, without the need of installing 'oasis' as long as you don't change the file _oasis. But it clutter your VCS history with changes to the build system each time you change something in _oasis. The 'dynamic' mode gives you no VCS history pollution but makes mandatory to have installed oasis libraries. Avoid copying executable to their real name. It helps to call ocamlbuild a single time for the whole build rather than calling it n time (n = number of executable sections) and copying resulting exec. This speeds up the build process because ocamlbuild doesn't have to compute/scan dependencies each time. The drawback is that you have to use $foo when you want to call Executable foo, because $foo will be '_build/.../main.byte'. For example:
CCOpt: -DEXTERNAL_EXP10 -L/sw/lib "-framework vecLib"
Will be parsed correctly and outputed according to target OS. In order to ease building oasis, we have minimize the number of dependencies. You only need to install ocamlmod, ocamlify and ocaml-data-notation for a standard build without tests. Dependencies on pcre, extlib and ocamlgraph has been dropped. The remaining dependencies are hidden behind a flag tests. OASIS now produces .cmxs file by default and add them to META. Now a META looks like:
     ...
     archive(byte) = "oasis.cma"
     archive(byte, plugin) = "oasis.cma"
     archive(native) = "oasis.cmxa"
     archive(native, plugin) = "oasis.cmxs"
     ...
This will ultimately help to generate automatically .cmxs for all oasis enabled projects. We hope that this new feature will improve dynamic linking use in OCaml (esp. for project like Ocsigen). Other changes Thanks to Anil Madhavapeddy, Pierre Chambart, Christophe Troestler, Jeremie Dimino, Ronan Le Hy, Yaron Minsky and Till Varoquaux for their help with this release. Also thanks to all the testers of the numerous release candidates. This was a long work and each time a tester has downloaded oasis has helped me to know that I was working for someone.

26 June 2012

Neil McGovern: Digital Economy Act And so it begins

Today, OFCOM issued a press release entitled "New measures to protect online copyright and inform consumers". According to the announcement, internet users will be encouraged to download music and films through legal channels under the measures. Ofcom has published a draft code for consultation that would require large internet service providers (ISPs) to inform customers of allegations that their internet connection has been used to infringe copyright. There does seem to have been a number of concessions made, which is welcome, but I do still have a number of concerns. The code 'only' covers ISPs with more than 400k fixed lines - BT, Everything Everywhere, O2, Sky, TalkTalk Group and Virgin Media. This covers about 93% of the UK retail market. If an allegation of copyright infringement is made, the ISP would need to write to the customer with notice that an infringement has occurred, and in a new change, the number of copyright infringement reports connected to their account. If more than three letters are received in a year, anonymous information may be provided on request to copyright owners showing them which infringement reports are linked to that customer s account. The copyright owner may then seek a court order requiring the ISP to reveal the identity of the customer. Two more changes have been implemented: Obviously the former of these will require further scrutiny, but I'm happier that this is not with the vested interest themselves. As for the latter, this gets a bit interesting. The Act states that
an appeal on any grounds must be determined in favour of the subscriber unless the copyright owner or internet service provider shows that a) the apparent infringement was an infringement of copyright, and b) the report relates to the subscriber s IP address at the time of that infringement.
This is good as it puts the burden of proof on the copyright owner, although it still uses IP addresses which is problematic. For example, New York Judge Gary Brown has ruled IP addresses are insufficient evidence to identify pirates, and has provided a lengthy and thoughtful explanation in his ruling. There has also been a consultation published on the how to share costs costs. The suggestion is fairly simple:
"Copyright Owners should bear all of the costs incurred by Ofcom, the majority of costs incurred by the appeals body, and 75% of the costs efficiently and reasonably incurred by Qualifying ISPs in carrying out their obligations."
This has the risk of driving up internet access prices as ISPs have to recover the costs of these notifications. Additionally:
"Under the Order, subscribers will have to pay a 20 fee to make an appeal against a report of infringement, which will be refunded in the event the appeal succeeds; the remaining costs of determining an appeal will be met by the Copyright Owner who submitted the CIR which has been appealed."
I disagree with the concept of having to pay for an appeal in this way. If accused, someone should be able to refute the argument without cost. This will introduce a barrier to entry, and even if it is refundable is something I believe should be avoided. Finally, the exact costs of implementing this have been set out. It looks like the Copyright Owners would have to pay 60p per letter (with the ISPs shouldering the remaining 20p), a similar split around capital costs - which are the ones that are actually significant. Taking the above, it seems that in total that content owners will have to shell out 15M to use the DEA scheme. The cost seems to be more or less fixed which could encourage content owners to send out frivolous accusations. There's an iterative process which will run to determine the estimated number of notifications, and if eventually the Content Owners don't agree with the pricing, they will have elected not to take advantage of the provisions of the Initial Obligations Code, as they have not been able to make binding commitments to fund CIR processing. So, in summary, this is something to keep an eye on. It certainly hasn't gone away, it's due to start in March 2014. The revised draft code and consultation, which closes on 26 July 2012, can be found here, and the sharing of costs consultation runs until 18th September 2012, found here.

Next.

Previous.