Search Results: "tach"

6 June 2017

Russ Allbery: Review: Star Healer

Review: Star Healer, by James White
Series: Sector General #6
Publisher: Orb
Copyright: 1984
Printing: 2002
ISBN: 0-312-87770-6
Format: Trade paperback
Pages: 206
Star Healer is the sixth book of the Sector General series, and I think it may be the first novel in the series that was written as a novel instead of a fix-up of short stories. That makes it not a bad place to start in the series if one would rather not deal with fix-ups or barely-disguised short story collections. There isn't a huge amount of character development over the course of this series (at least to this point), so the main thing you would lose by starting here is some built-up reason for caring about the main character. This is the third book in the Alien Emergencies omnibus (the book referenced in the publication information here). Most of the previous stories have focused on Conway, a Senior Physician in the sprawling and wonderfully well-equipped multi-species hospital called Sector General and, in recent stories, the head physician in the hospital's ambulance ship. Becoming a Senior Physician at Sector General is quite the accomplishment, and a fine point to reach in the career of any doctor specializing in varied life forms, but there is another tier above: the Diagnosticians, who are the elite of Sector General. The difference is education tapes. Deep knowledge of even one specific type of life is a lot to ask of a doctor, as shown by the increasing specialization of human medicine. Sector General, which deals with wildly varying ailments of thousands of species including entirely unknown ones (if, admittedly, primarily trauma, at least in the stories shown), would be an impossible task. White realizes this and works around it with education tapes that temporarily embed in a doctor's head the experience of a doctor of another species entirely. This provides the native expertise missing, but it comes with the full personality of the doctor who recorded the tape, including preferences for food and romantic attachment that may be highly disorienting. Senior Physicians use a tape at a time, and then have it erased again when they don't need it. Diagnosticians juggle four or more tapes at the same time, and keep them for long periods or even permanently, allowing them to do ground-breaking original research. The opening of Star Healer is an offer from the intimidating Chief Psychologist of Sector General: he has a shot at Diagnostician. But it's a major decision that he should think over first, so the next step is to take a vacation of sorts on a quiet world with a small human scientific station. Oh, and there's a native medical problem, although not one with much urgency. Conway doesn't do a lot of resting, because of course he gets pulled into trying to understand the mystery of an alien species that is solitary to the point of deep and unbreakable social taboos against even standing close to other people. This is a nice cultural puzzle in line with the rest of the series, but it also leaves Conway with a new ally: an alien healer in a society in which being a doctor is difficult to the point of near hopelessness. It's not much of a spoiler to say that of course Conway decides to try for Diagnostician after his "vacation." The rest of the book is him juggling multiple cases with his new and often conflicting modes of thinking, and tackling problems that require a bit less in the way of puzzle-solving and a bit more in the way of hard trade-off decisions and quick surgical action. Senior Physicians may be able to concentrate on just one puzzle at a time; Diagnosticians have to juggle several. And they're larger, more long-term problems, focusing on how to improve a general problem for a whole species rather than just heal a specific injured alien. One interesting aspect of this series, which is very much on display here, is that Sector General most definitely does not have a Prime Directive. They are cautious about making contact with particularly primitive civilizations for fear that spacefarers would give them an inferiority complex, but sometimes they do anyway. And if they run into some biological system that offends their sensibilities, they try to fix it, not just observe it. White frequently shows species caught in what the characters call "biological traps," unable to develop farther because of some biological adaptation that gets in their way, and Sector General tries to fix those. It's an interesting ethical problem that I wish they'd think about a bit more. It's not clear they're wrong, and I think it's correct to take an expansive view of the mission to heal, but there's also a sense in which Sector General is modifying culture and biology to make aliens more like them. (The parallels between this and all the abusive paternalism that human cultures do around disability is a little too close to home to be comfortable, and now I kind of wish it hadn't occurred to me.) The gender roles, sadly, continue to be dire, although mostly ignorable because the one major female character is generally just shown as another doctor with little attention to sex. But apparently women (of every species!) cannot become Diagnosticians because they have an insurmountable biological aversion to sharing their minds with a learning tape from any doctor who doesn't find them physically attractive, which is just... sigh. It's sad that someone who could write an otherwise remarkably open-minded and pacifist series of stories, in sharp contrast with most of SF history, would still have that large of a blind spot. Apart from the times gender comes up, I liked this book more than the rest of the series, in part because I strongly prefer novels to short stories. There's more room to develop the story, and while characterization continues to not be White's strong point and that space mostly goes to more puzzles instead, he does provide an interesting set of interlocking puzzles. The problem posed by the aliens Conway meets on his "vacation" isn't fully resolved here (presumably that's for a future book), but he does solve several other significant problems and develops his own problem-solving style in more depth than in previous stories. Mildly recommended, particularly if you like this series in general. Followed by Code Blue - Emergency. Rating: 7 out of 10

2 June 2017

Evgeni Golov: Breaking glass, OnePlus service and Android backups

While visiting our Raleigh office, I managed to crack the glass on the screen of my OnePlus 3. Luckily it was a clean crack from the left upper corner, to the right lower one. The crack was not really interfering with neither touch nor display, so I had not much pressure in fixing it. eBay lists new LCD sets for 110-130 , and those still require manual work of getting the LCD assembly out of the case, replacing it, etc. There are also glass-only sets for ~20 , but these require the complete removal of the glued glass part from the screen, and reattaching it, nothing you want to do at home. But there is also still the vendor, who can fix it, right? Internet suggested they would do it for about 100 , which seemed fair. As people have been asking about the support experience, here is a quick write up what happened:
  • Opened the RMA request online on Sunday, providing a brief description of the issue and some photos
  • Monday morning answer from the support team, confirming this is way out of warranty, but I can get the device fixed for about 93
  • After confirming that the extra cost is expected, I had an UPS sticker to ship the device to CTDI in Poland
  • UPS even tried a pick-up on Tuesday, but I was not properly prepared, so I dropped the device later at a local UPS point
  • It arrived in Poland on Wednesday
  • On Thursday the device was inspected, pictures made etc
  • Friday morning I had a quote in my inbox, asking me to pay 105 - the service partner decided to replace the front camera too, which was not part of the original 93 approximation.
  • Paid the money with my credit card and started waiting.
  • The actual repair happened on Monday.
  • Quality controlled on Tuesday.
  • Shipped to me on Wednesday.
  • Arrived at my door on Thursday.
All in all 9 working days, which is not great, but good enough IMHO. And the repair is good, and it was not (too) expensive. So I am a happy user of an OnePlus 3 again. Well, almost. Before sending the device for repairs, had to take a backup and wipe it. I would not send it with my, even encrypted, data on it. And backups and Android is something special. Android will backup certain data to Google, if you allow it to. Apps can forbid that. Sadly this also blocks non-cloud backups with adb backup. So to properly backup your system, you either need root or you create a full backup of the system in the recovery and restore that. I did the backup using TWRP, transferred it to my laptop, wiped the device, sent it in, got it back, copied the backup to the phone, restored it and... Was locked out of the device, it would not take my password anymore. Well, it seems that happens, just delete some files and it will be fine. It's 2017, are backups of mobile devices really supposed to be that hard?!

1 June 2017

Russ Allbery: Review: Migration

Review: Migration, by Julie E. Czerneda
Series: Species Imperative #2
Publisher: DAW
Copyright: 2005
ISBN: 0-7564-0260-3
Format: Hardcover
Pages: 453
Migration is the second book of the Species Imperative, and this is the old-fashioned type of trilogy that you very much want to read in order. Start with Survival. There is a (slightly awkward) recap of the previous book at the start, though, if it's been a bit since you read it. In my review of Survival, I praised Czerneda's ability to capture the feel of academic research and the sense of real scientists doing science. I thought I went out on a bit of a limb, not being a scientist myself (just someone who worked at a university for decades), but Czerneda was still holding back. I'm now completely convinced: whatever else this series is, and it contains a lot of politics and world-building and fascinating (if very human-like) aliens, it's some of the best science fiction about practicing scientists I've ever read. I cannot express how much I adore the fact that the center of this book is not space combat, not daring adventure across alien landscapes, but getting a bunch of really smart experts in their field together in a room with good equipment and good computers to chase an intellectual problem from their own individual perspectives. And if Mac is perhaps a bit *too* good at quickly overcoming interpersonal conflict and suspicion, I'll forgive that for the deft sense of politics. Mac's success may be a bit unrealistic, but the direction and thrust of her tactics are spot-on. This is how interactions between smart and curious people often work, at least if they're sufficiently motivated to put aside pettier political infighting. This is also how the dynamics of emergency war rooms work: if you can give people a focus and divide up the work, the results can be amazing. The second best part of the book is Oversight. The first book opened with the latest round of Mac's ongoing war with Charles Mudge III, the oversight board of the neighboring wilderness trust. He shows up again at the start of this book, acting completely consistent to his stubborn idealism shown in Survival, and then develops into one of the best characters in the book. Unexpected allies is one of the tropes I love most in fiction in general, but this one resonates so deeply with the way grudging respect and familiar patterns, even patterns of argument, work on people. Czerneda had me grinning. It's just perfectly in line with Mac's character, her single-minded focus on work that tended to miss a few points of human connection, and the sort of deepening respect that builds up even between adversaries when they know deep inside that they are following different interpretations of the same principles. I'm going to be rather sketchy on the plot, since Migration follows closely on from Survival and is concerned almost entirely with the aftermath of the climactic events at the end of that book. But as you can tell, this is more of Mac, and she's not managed to separate herself from Dhryn problems or from the Ministry of Extra-Solar Affairs. She does, however, get rather far away from Norcoast for a while, an interlude in the wild northern Canadian wilderness that once again proves Czerneda to be the type of writer who can make the quotidian as engrossing as alien dramatics. She's also suffering from nightmares, anxiety, and a lot of circular thinking, making this one of the series that shows the realistic toll of dramatic events on human psychology. There was a bit of a nascent love story in Survival; there's a lot more of that here. It's the one bit of the book that I have mixed feelings about, since it feels a touch unnecessary to me, and therefore a bit intrusive. It also involves a fair bit of love at, well, not first sight but surprisingly fast, which is something I know intellectually that other people think happens, but which always undermines my suspension of disbelief. That said, Czerneda gives Mac a clear tendency in how she forms emotional attachments and sticks with it throughout this series to date, which I do like, and she keeps the romance consistent with that. It thankfully does not get too much in the way of the plot, although I could have done with just a few fewer determined proclamations that the characters won't let love get in the way of doing what they need to do. That quibble aside, this is fantastic stuff that avoids most of the cliches of this sort of story of alien politics and possible war. The focus is firmly on analysis and understanding rather than guns and action, the portrayal of scientists, analysis, and problem-solving is spot on, the aliens are delightfully different (and different from each other within the same alien species, which is important depth), and Mac is a fantastic protagonist. She's vulnerable, wounded, and out of her depth, but she knows how to map new situations to her areas of competence and how to admit when she doesn't know something, and her effectiveness is well-grounded and believable. Oh, and there are some amazing descriptions of the Canadian wilderness that almost make me want to find a secluded cabin without Internet access. (At least if it had all of the convenient technology that Mac's future Earth has.) It's a rare middle book of a trilogy that's better than the first, but this one is. Much better. And I already liked the first book. Highly recommended; I think this is one of Czerneda's best. Followed by Regeneration. Rating: 9 out of 10

28 May 2017

Antonio Terceiro: Debian CI: new data retention policy

When I started debci for Debian CI, I went for the simplest thing that could possibly work. One of the design decisions was to use the filesystem directly for file storage. A large part of the Debian CI data is log files and test artifacts (which are just files), and using the filesystem directly for storage makes it a lot easier to handle it. The rest of the data which is structured (test history and status of packages) is stored as JSON files. Another nice benefit of using the filesystem like this is that I get a sort of REST API for free by just exposing the file storage to the web. For example, getting the latest test status of debci itself on unstable/amd64 is as easy as:

$ curl https://ci.debian.net/data/packages/unstable/amd64/d/debci/latest.json
 
  "run_id": "20170528_173652",
  "package": "debci",
  "version": "1.5.1",
  "date": "2017-05-28 17:43:05",
  "status": "pass",
  "blame": [],
  "previous_status": "pass",
  "duration_seconds": "373",
  "duration_human": "0h 6m 13s",
  "message": "Tests passed, but at least one test skipped",
  "last_pass_version": "1.5.1",
  "last_pass_date": "2017-05-28 17:43:05"
 

Now, nothing in life is without compromises. One big disadvantage of the way debci stored its data is that there were a lot of files, which ends up using a large number of inodes in the filesystem. The current Debian CI master has more than 10 million inodes in its filesystem, and almost all of them were being used. This is clearly unsustainable. You will notice that I said stored, because as of version 1.6, debci now implements a data retention policy: log files and test artifacts will now only be kept for a configurable amount of days (default: 180). So there you have it: effective immediately, Debian CI will not provide logs and test artifacts older than 180 days. If you are reporting bugs based on logs from Debian CI, please don t hotlink the log files. Instead, make sure you download the logs in question and attach them to the bug report, because in 6 months they will be gone.

26 May 2017

Michal Čihař: Running Bitcoin node on Turris Omnia

For quite some I'm happy user of Turris Omnia router. The router has quite good hardware, so I've decided to try if I can run Bitcoin node on that and ElectrumX server. To make the things easier to manage, I've decided to use LXC and run all these in separate container. First of all you need LXC on the router. This is the default setup, but in case you've removed it, you can add it back in the Updater settings. Now we will create Debian container. There is basic information on using in Turris Documentation on how to create the container, in latter documentation I assume it is called debian. It's also good idea to enable LXC autostart, to do so add your container to cat /etc/config/lxc-auto on :
config container
    option name debian
You might also want to edit lxc container configration to enable clean shutdown:
# Send SIGRTMIN+3 to shutdown systemd (37 on Turris Omnia)
lxc.haltsignal = SIGRTMIN+3
To make the system more recent, I've decided to use Debian Stretch (one of reasons was that ElectrumX needs Python 3.5.3 or newer). Which is anyway probably sane choice right now given that it's already frozen and will be soon stable. As Stretch is not available as a download option in Omnia, I've chosen to use Debian Jessie and upgrate it later:
$ lxc-attach  --name debian
$ sed -i s/jessie/stretch/ /etc/apt/sources.list
$ apt update
$ apt full-upgrade
Now you have up to date system and we can start installing dependencies. First thing to install is Bitcoin Core. Just follow the instructions on their website to do that. Now it's time to set it up and wait for downloading full blockchain:
$ adduser bitcoin
$ su - bitcoin
$ bitcoind -daemon
Depending on your connection speed, the download will take few hours. You can monitor the progress using bitcoin-cli, you're waiting for 450k blocks:
$ bitcoin-cli getinfo
 
  "version": 140000,
  "protocolversion": 70015,
  "walletversion": 130000,
  "balance": 0.00000000,
  "blocks": 301242,
  "timeoffset": -1,
  "connections": 8,
  "proxy": "",
  "difficulty": 8853416309.1278,
  "testnet": false,
  "keypoololdest": 1490267950,
  "keypoolsize": 100,
  "paytxfee": 0.00000000,
  "relayfee": 0.00001000,
  "errors": ""
 
Depending how much memory you have (mine has 2G) and what all you run on the router, you will have to tweak bitcoind configuration to consume less memory. This can be done by editing .bitcoin/bitcoin.conf, I've ended up with following settings:
par=1
dbcache=150
maxmempool=150
You can also create startup unit for Bitcoin daemon (place that as /etc/systemd/system/bitcoind.service):
[Unit]
Description=Bitcoind
After=network.target
[Service]
ExecStart=/opt/bitcoin/bin/bitcoind
User=bitcoin
TimeoutStopSec=30min
Restart=on-failure
RestartSec=30
[Install]
WantedBy=multi-user.target
Now we can enable services to start on container start:
systemctl enable bitcoind.service
Then I wanted to setup ElectrumX as well, but I've quickly realized that it uses way more memory that my router has, so there is no option to run it without using swap, what will probably make it quite slow (I haven't tried that).

Filed under: Debian English OpenWrt

22 May 2017

Gunnar Wolf: Open Source Symposium 2017

I travelled (for three days only!) to Argentina, to be a part of the Open Source Symposium 2017, a co-located event of the International Conference on Software Engineering.

This is, all in all, an interesting although small conference We are around 30 people in the room. This is a quite unusual conference for me, as this is among the first "formal" academic conference I am part of. Sessions have so far been quite interesting.
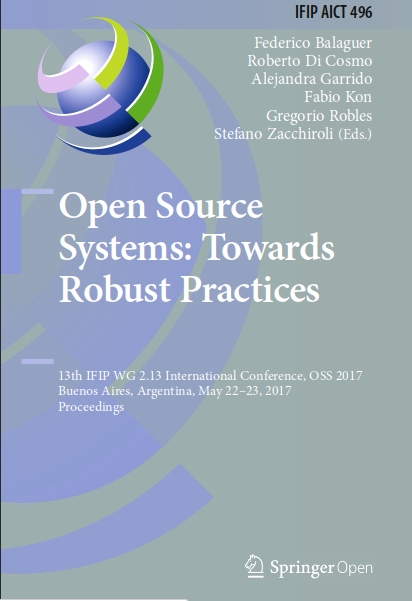
What am I linking to from this image? Of course, the proceedings! They managed to publish the proceedings via the "formal" academic channels (a nice hard-cover Springer volume) under an Open Access license (which is sadly not usual, and is unbelievably expensive). So, you can download the full proceedings, or article by article, in EPUB or in PDF...
...Which is very very nice :)
Previous editions of this symposium have also their respective proceedings available, but AFAICT they have not been downloadable.
So, get the book; it provides very interesant and original insights into our community seen from several quite novel angles!
AttachmentSize
oss2017_cover.png84.47 KB

21 May 2017

Adnan Hodzic: Automagically deploy & run containerized WordPress (PHP7 FPM, Nginx, MariaDB) using Ansible + Docker on AWS

In this blog post, I ve described what started as simple migration of WordPress blog to AWS, ended up as automation project consisting of publishing multiple Ansible roles deploying and running multiple Docker images. If you re not interested in reading about my entire journey, cognition gains and how this process came to be, please skim down to Birth of: containerized-wordpress-project (TL;DR) section. Migrating WordPress blog to AWS (EC2, Lightsail?) Since I ve been sold on Amazon s AWS idea of cloud computing services for couple of years now. I ve wanted, and been trying to migrate this (WordPress) blog to AWS, but somehow it never worked out. Moving it to EC2 instance, with its own ELB volumes, AMI, EIP, Security Group it just seemed as an overkill. When AWS Lightsail was first released, it seemed that was an answer to all my problems. But it wasn t, disregarding its bit restrictive/dumbed down versions of original features. Living in Amsterdam, my main problem with it was that it was only available in a single US region. Regardless, I thought it had everything I needed for WordPress site, and as a new service, it had great potential. Its regional limitations were also good in a sense that they made me realize one important thing. And that s once I migrate my blog to AWS, I want to be able to seamlessly move/migrate it across different EC2 s and different regions once they were available. If done properly, it meant I could even have it moved across different clouds (I m talking to you Google Cloud). P.S: AWS Lightsail is now available in couple of different regions across Europe. Rollout which was almost smoothless. Fundamental problem of every migration is migration

Phase 1: Don t reinvent the wheel? When you have a WordPress site that s not self hosted. You want everything to work, but yet you really don t want to spend any time managing infrastructure it s on. And as soon as I started looking what could fit this criteria, I found that there were pre-configured, running out of box WordPress EC2 images available on AWS Marketplace, great! But when I took a look, although everything was running out of box, I wasn t happy with software stack it was all built on. Namely Ubuntu 14.04 and Apache, and all of the services were started using custom scripts. Yuck. With this setup, when it was time to upgrade (and it s already that time) you wouldn t be thinking about upgrade. You d only be thinking about another migration. Phase 2: What if I built everything myself? Installing and configuring everything manually, and then writing huge HowTo which I would follow when I needed to re-create whole stack was not an option. Same case with was scripting whole process, as overhead of changes that had to be tracked was too way too big. Being a huge Ansible fan, automating this step was a natural next step. I even found an awesome Ansible role which seemed like it s going to do everything I need. Except, I realized I needed to update all software that s deployed with it, and customize it since configuration it was deployed on wasn t as generic. So I forked it and got to work. But soon enough, I was knee deep in making and fiddling with various system changes. Something I was trying to get away in this case, and most importantly something I was trying to avoid when it was time for next update. Phase 3: Marriage made in heaven: Ansible + Docker + AWS Idea to have everything Dockerized was around from very start. However, it never made a lot of sense until I put Ansible into same picture. And it was at this point where my final idea and requirements become crystal clear. Use Ansible to configure and setup host ready for Docker ecosystem. Ecosystem consisting of multiple separate containers for each required service (WordPress + Nginx + MariaDB). Link them all together as a single service using Docker Compose. Idea was backed by thought to spend minimum to no time (and effort) on manual configuration of anything on the server. Level of attachment to this server was so low that I didn t even want to SSH to it. If there was something wrong, I could just nuke the whole thing and deploy code on a new healthy rolled out server with everything working out of box. After it was clear what needed to be done, I got to work.

Birth of: containerized-wordpress-project (TL;DR)

After a lot of work, end result is project which allows you to automagically deploy & run containerized WordPress instance which consists of 3 separate containers running:

Once run, containerized-wordpress playbook will guide you through interactive setup of all 3 containers, after which it will run all Ansible roles created for this project. End result is that host you have never even SSH-ed to will be fully configured and running containerized WordPress instace out of box.

Most importantly, this whole process will be completed in <= 5 minutes and doesn t require any Docker or Ansible knowledge! containerized-wordpress demo Console output of running containerized-wordpress Ansible Playbook: Console output of running "containerized-wordpress" Ansible Playbook

Accessing WordPress instance created from containerized-wordpress Ansible Playbook:

Accessing WordPress instance created from "containerized-wordpress" Ansible Playbook Did I end up migrating to AWS in the end? You bet. Thanks to efforts made in containerized-wordpress-project, I m happy to report my whole WordPress migration to AWS was completed in matter of minutes and that this blog is now running on Docker and on AWS! I hope this same project will help you take a leap in your migration. Happy hacking!

Elena 'valhalla' Grandi: Modern XMPP Server

Modern XMPP Server

I've published a new HOWTO on my website www.trueelena.org/computers/ho:

www.enricozini.org/blog/2017/d already wrote about the Why (and the What, Who and When), so I'll just quote his conclusion and move on to the How.

I now have an XMPP setup which has all the features of the recent fancy chat systems, and on top of that it runs, client and server, on Free Software, which can be audited, it is federated and I can self-host my own server in my own VPS if I want to, with packages supported in Debian.


How

I've decided to install prosody.im/, mostly because it was recommended by the RTC QuickStart Guide rtcquickstart.org/; I've heard that similar results can be reached with www.ejabberd.im/ and other servers.

I'm also targeting www.debian.org/ stable (+ backports); as I write this is jessie; if there are significant differences I will update this article when I will upgrade my server to stretch. Right now, this means that I'm using prosody 0.9 (and that's probably also the version that will be available in stretch).

Installation and prerequisites

You will need to enable the backports.debian.org/ repository and then install the packages prosody and prosody-modules.

You also need to setup some TLS certificates (I used Let's Encrypt letsencrypt.org/); and make them readable by the prosody user; you can see Chapter 12 of the RTC QuickStart Guide rtcquickstart.org/guide/multi/ for more details.

On your firewall, you'll need to open the following TCP ports:


The latter two are needed to enable some services provided via http(s), including rich media transfers.

With just a handful of users, I didn't bother to configure LDAP or anything else, but just created users manually via:

prosodyctl adduser alice@example.org

In-band registration is disabled by default (and I've left it that way, to prevent my server from being used to send spim en.wikipedia.org/wiki/Messagin).

prosody configuration

You can then start configuring prosody by editing /etc/prosody/prosody.cfg.lua and changing a few values from the distribution defaults.

First of all, enforce the use of encryption and certificate checking both for client2server and server2server communications with:


c2s_require_encryption = true
s2s_secure_auth = true


and then, sadly, add to the whitelist any server that you want to talk to and doesn't support the above:


s2s_insecure_domains = "gmail.com"


virtualhosts

For each virtualhost you want to configure, create a file /etc/prosody/conf.avail/chat.example.org.cfg.lua with contents like the following:


VirtualHost "chat.example.org"
enabled = true
ssl =
key = "/etc/ssl/private/example.org-key.pem";
certificate = "/etc/ssl/public/example.org.pem";


For the domains where you also want to enable MUCs, add the follwing lines:


Component "conference.chat.example.org" "muc"
restrict_room_creation = "local"


the "local" configures prosody so that only local users are allowed to create new rooms (but then everybody can join them, if the room administrator allows it): this may help reduce unwanted usages of your server by random people.

You can also add the following line to enable rich media transfers via http uploads (XEP-0363):


Component "upload.chat.example.org" "http_upload"

The defaults are pretty sane, but see modules.prosody.im/mod_http_up for details on what knobs you can configure for this module

Don't forget to enable the virtualhost by linking the file inside /etc/prosody/conf.d/.

additional modules

Most of the other interesting XEPs are enabled by loading additional modules inside /etc/prosody/prosody.cfg.lua (under modules_enabled); to enable mod_something just add a line like:


"something";

Most of these come from the prosody-modules package (and thus from modules.prosody.im/ ) and some may require changing when prosody 0.10 will be available; when this is the case it is mentioned below.


@Gruppo Linux Como @LIFO

19 May 2017

Michael Prokop: Debian stretch: changes in util-linux #newinstretch

We re coming closer to the Debian/stretch stable release and similar to what we had with #newinwheezy and #newinjessie it s time for #newinstretch! Hideki Yamane already started the game by blogging about GitHub s Icon font, fonts-octicons and Arturo Borrero Gonzalez wrote a nice article about nftables in Debian/stretch. One package that isn t new but its tools are used by many of us is util-linux, providing many essential system utilities. We have util-linux v2.25.2 in Debian/jessie and in Debian/stretch there will be util-linux >=v2.29.2. There are many new options available and we also have a few new tools available. Tools that have been taken over from other packages New tools New features/options addpart (show or change the real-time scheduling attributes of a process):
--reload reload prompts on running agetty instances
blkdiscard (discard the content of sectors on a device):
-p, --step <num>    size of the discard iterations within the offset
-z, --zeroout       zero-fill rather than discard
chrt (show or change the real-time scheduling attributes of a process):
-d, --deadline            set policy to SCHED_DEADLINE
-T, --sched-runtime <ns>  runtime parameter for DEADLINE
-P, --sched-period <ns>   period parameter for DEADLINE
-D, --sched-deadline <ns> deadline parameter for DEADLINE
fdformat (do a low-level formatting of a floppy disk):
-f, --from <N>    start at the track N (default 0)
-t, --to <N>      stop at the track N
-r, --repair <N>  try to repair tracks failed during the verification (max N retries)
fdisk (display or manipulate a disk partition table):
-B, --protect-boot            don't erase bootbits when creating a new label
-o, --output <list>           output columns
    --bytes                   print SIZE in bytes rather than in human readable format
-w, --wipe <mode>             wipe signatures (auto, always or never)
-W, --wipe-partitions <mode>  wipe signatures from new partitions (auto, always or never)
New available columns (for -o):
 gpt: Device Start End Sectors Size Type Type-UUID Attrs Name UUID
 dos: Device Start End Sectors Cylinders Size Type Id Attrs Boot End-C/H/S Start-C/H/S
 bsd: Slice Start End Sectors Cylinders Size Type Bsize Cpg Fsize
 sgi: Device Start End Sectors Cylinders Size Type Id Attrs
 sun: Device Start End Sectors Cylinders Size Type Id Flags
findmnt (find a (mounted) filesystem):
-J, --json             use JSON output format
-M, --mountpoint <dir> the mountpoint directory
-x, --verify           verify mount table content (default is fstab)
    --verbose          print more details
flock (manage file locks from shell scripts):
-F, --no-fork            execute command without forking
    --verbose            increase verbosity
getty (open a terminal and set its mode):
--reload               reload prompts on running agetty instances
hwclock (query or set the hardware clock):
--get            read hardware clock and print drift corrected result
--update-drift   update drift factor in /etc/adjtime (requires --set or --systohc)
ldattach (attach a line discipline to a serial line):
-c, --intro-command <string>  intro sent before ldattach
-p, --pause <seconds>         pause between intro and ldattach
logger (enter messages into the system log):
-e, --skip-empty         do not log empty lines when processing files
    --no-act             do everything except the write the log
    --octet-count        use rfc6587 octet counting
-S, --size <size>        maximum size for a single message
    --rfc3164            use the obsolete BSD syslog protocol
    --rfc5424[=<snip>]   use the syslog protocol (the default for remote);
                           <snip> can be notime, or notq, and/or nohost
    --sd-id <id>         rfc5424 structured data ID
    --sd-param <data>    rfc5424 structured data name=value
    --msgid <msgid>      set rfc5424 message id field
    --socket-errors[=<on off auto>] print connection errors when using Unix sockets
losetup (set up and control loop devices):
-L, --nooverlap               avoid possible conflict between devices
    --direct-io[=<on off>]    open backing file with O_DIRECT 
-J, --json                    use JSON --list output format
New available --list column:
DIO  access backing file with direct-io
lsblk (list information about block devices):
-J, --json           use JSON output format
New available columns (for --output):
HOTPLUG  removable or hotplug device (usb, pcmcia, ...)
SUBSYSTEMS  de-duplicated chain of subsystems
lscpu (display information about the CPU architecture):
-y, --physical          print physical instead of logical IDs
New available column:
DRAWER  logical drawer number
lslocks (list local system locks):
-J, --json             use JSON output format
-i, --noinaccessible   ignore locks without read permissions
nsenter (run a program with namespaces of other processes):
-C, --cgroup[=<file>]      enter cgroup namespace
    --preserve-credentials do not touch uids or gids
-Z, --follow-context       set SELinux context according to --target PID
rtcwake (enter a system sleep state until a specified wakeup time):
--date <timestamp>   date time of timestamp to wake
--list-modes         list available modes
-r, --reorder <dev>  fix partitions order (by start offset)
sfdisk (display or manipulate a disk partition table):
New Commands:
-J, --json <dev>                  dump partition table in JSON format
-F, --list-free [<dev> ...]       list unpartitioned free areas of each device
-r, --reorder <dev>               fix partitions order (by start offset)
    --delete <dev> [<part> ...]   delete all or specified partitions
--part-label <dev> <part> [<str>] print or change partition label
--part-type <dev> <part> [<type>] print or change partition type
--part-uuid <dev> <part> [<uuid>] print or change partition uuid
--part-attrs <dev> <part> [<str>] print or change partition attributes
New Options:
-a, --append                   append partitions to existing partition table
-b, --backup                   backup partition table sectors (see -O)
    --bytes                    print SIZE in bytes rather than in human readable format
    --move-data[=<typescript>] move partition data after relocation (requires -N)
    --color[=<when>]           colorize output (auto, always or never)
                               colors are enabled by default
-N, --partno <num>             specify partition number
-n, --no-act                   do everything except write to device
    --no-tell-kernel           do not tell kernel about changes
-O, --backup-file <path>       override default backup file name
-o, --output <list>            output columns
-w, --wipe <mode>              wipe signatures (auto, always or never)
-W, --wipe-partitions <mode>   wipe signatures from new partitions (auto, always or never)
-X, --label <name>             specify label type (dos, gpt, ...)
-Y, --label-nested <name>      specify nested label type (dos, bsd)
Available columns (for -o):
 gpt: Device Start End Sectors Size Type Type-UUID Attrs Name UUID
 dos: Device Start End Sectors Cylinders Size Type Id Attrs Boot End-C/H/S Start-C/H/S
 bsd: Slice Start  End Sectors Cylinders Size Type Bsize Cpg Fsize
 sgi: Device Start End Sectors Cylinders Size Type Id Attrs
 sun: Device Start End Sectors Cylinders Size Type Id Flags
swapon (enable devices and files for paging and swapping):
-o, --options <list>     comma-separated list of swap options
New available columns (for --show):
UUID   swap uuid
LABEL  swap label
unshare (run a program with some namespaces unshared from the parent):
-C, --cgroup[=<file>]                              unshare cgroup namespace
    --propagation slave shared private unchanged   modify mount propagation in mount namespace
-s, --setgroups allow deny                         control the setgroups syscall in user namespaces
Deprecated / removed options sfdisk (display or manipulate a disk partition table):
-c, --id                  change or print partition Id
    --change-id           change Id
    --print-id            print Id
-C, --cylinders <number>  set the number of cylinders to use
-H, --heads <number>      set the number of heads to use
-S, --sectors <number>    set the number of sectors to use
-G, --show-pt-geometry    deprecated, alias to --show-geometry
-L, --Linux               deprecated, only for backward compatibility
-u, --unit S              deprecated, only sector unit is supported

Benjamin Mako Hill: Children s Perspectives on Critical Data Literacies

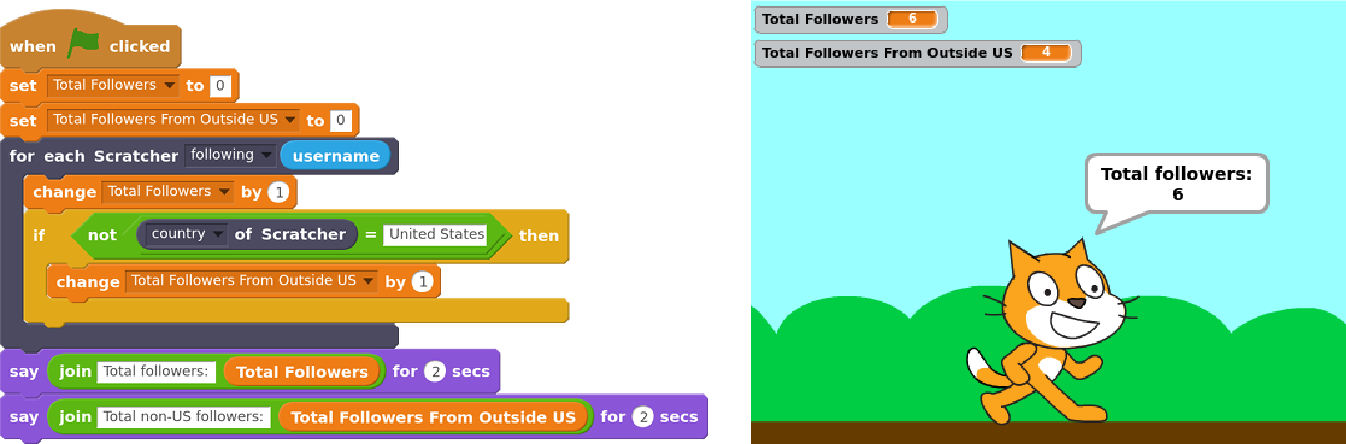
Last week, we presented a new paper that describes how children are thinking through some of the implications of new forms of data collection and analysis. The presentation was given at the ACM CHI conference in Denver last week and the paper is open access and online. Over the last couple years, we ve worked on a large project to support children in doing and not just learning about data science. We built a system, Scratch Community Blocks, that allows the 18 million users of the Scratch online community to write their own computer programs in Scratch of course to analyze data about their own learning and social interactions. An example of one of those programs to find how many of one s follower in Scratch are not from the United States is shown below. Last year, we deployed Scratch Community Blocks to 2,500 active Scratch users who, over a period of several months, used the system to create more than 1,600 projects. As children used the system, Samantha Hautea, a student in UW s Communication Leadership program, led a group of us in an online ethnography. We visited the projects children were creating and sharing. We followed the forums where users discussed the blocks. We read comment threads left on projects. We combined Samantha s detailed field notes with the text of comments and forum posts, with ethnographic interviews of several users, and with notes from two in-person workshops. We used a technique called grounded theory to analyze these data. What we found surprised us. We expected children to reflect on being challenged by and hopefully overcoming the technical parts of doing data science. Although we certainly saw this happen, what emerged much more strongly from our analysis was detailed discussion among children about the social implications of data collection and analysis. In our analysis, we grouped children s comments into five major themes that represented what we called critical data literacies. These literacies reflect things that children felt were important implications of social media data collection and analysis. First, children reflected on the way that programmatic access to data even data that was technically public introduced privacy concerns. One user described the ability to analyze data as, creepy , but at the same time, very cool. Children expressed concern that programmatic access to data could lead to stalking and suggested that the system should ask for permission. Second, children recognized that data analysis requires skepticism and interpretation. For example, Scratch Community Blocks introduced a bug where the block that returned data about followers included users with disabled accounts. One user, in an interview described to us how he managed to figure out the inconsistency:

At one point the follower blocks, it said I have slightly more followers than I do. And, that was kind of confusing when I was trying to make the project. [ ] I pulled up a second [browser] tab and compared the [data from Scratch Community Blocks and the data in my profile]. Third, children discussed the hidden assumptions and decisions that drive the construction of metrics. For example, the number of views received for each project in Scratch is counted using an algorithm that tries to minimize the impact of gaming the system (similar to, for example, Youtube). As children started to build programs with data, they started to uncover and speculate about the decisions behind metrics. For example, they guessed that the view count might only include unique views and that view counts may include users who do not have accounts on the website. Fourth, children building projects with Scratch Community Blocks realized that an algorithm driven by social data may cause certain users to be excluded. For example, a 13-year-old expressed concern that the system could be used to exclude users with few social connections saying:

I love these new Scratch Blocks! However I did notice that they could be used to exclude new Scratchers or Scratchers with not a lot of followers by using a code: like this:
when flag clicked
if then user s followers < 300
stop all.
I do not think this a big problem as it would be easy to remove this code but I did just want to bring this to your attention in case this not what you would want the blocks to be used for.
Fifth, children were concerned about the possibility that measurement might distort the Scratch community s values. While giving feedback on the new system, a user expressed concern that by making it easier to measure and compare followers, the system could elevate popularity over creativity, collaboration, and respect as a marker of success in Scratch.

I think this was a great idea! I am just a bit worried that people will make these projects and take it the wrong way, saying that followers are the most important thing in on Scratch. Kids conversations around Scratch Community Blocks are good news for educators who are starting to think about how to engage young learners in thinking critically about the implications of data. Although no kid using Scratch Community Blocks discussed each of the five literacies described above, the themes reflect starting points for educators designing ways to engage kids in thinking critically about data. Our work shows that if children are given opportunities to actively engage and build with social and behavioral data, they might not only learn how to do data analysis, but also reflect on its implications.

This blog-post and the work that it describes is a collaborative project by Samantha Hautea, Sayamindu Dasgupta, and Benjamin Mako Hill. We have also received support and feedback from members of the Scratch team at MIT (especially Mitch Resnick and Natalie Rusk), as well as from Hal Abelson from MIT CSAIL. Financial support came from the US National Science Foundation.

16 May 2017

Daniel Pocock: Building an antenna and receiving ham and shortwave stations with SDR

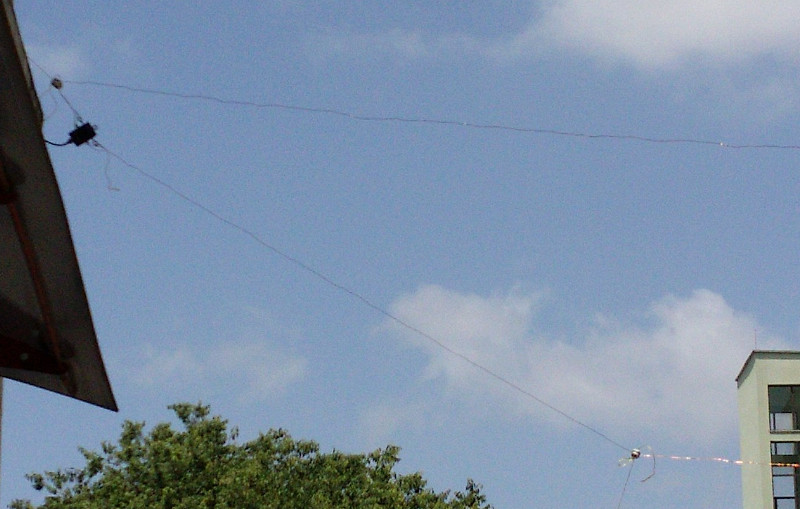
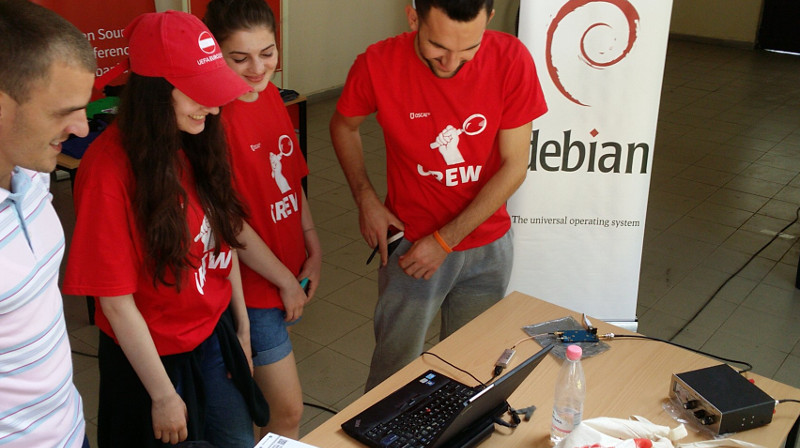
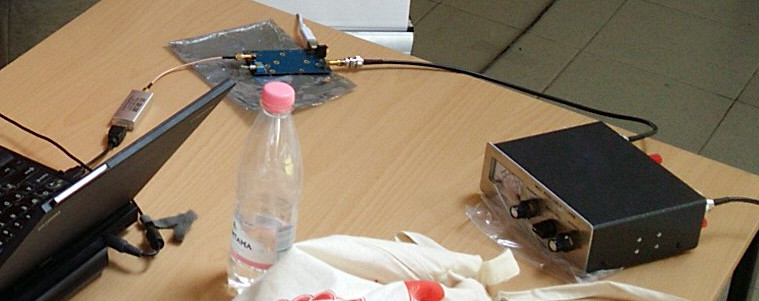
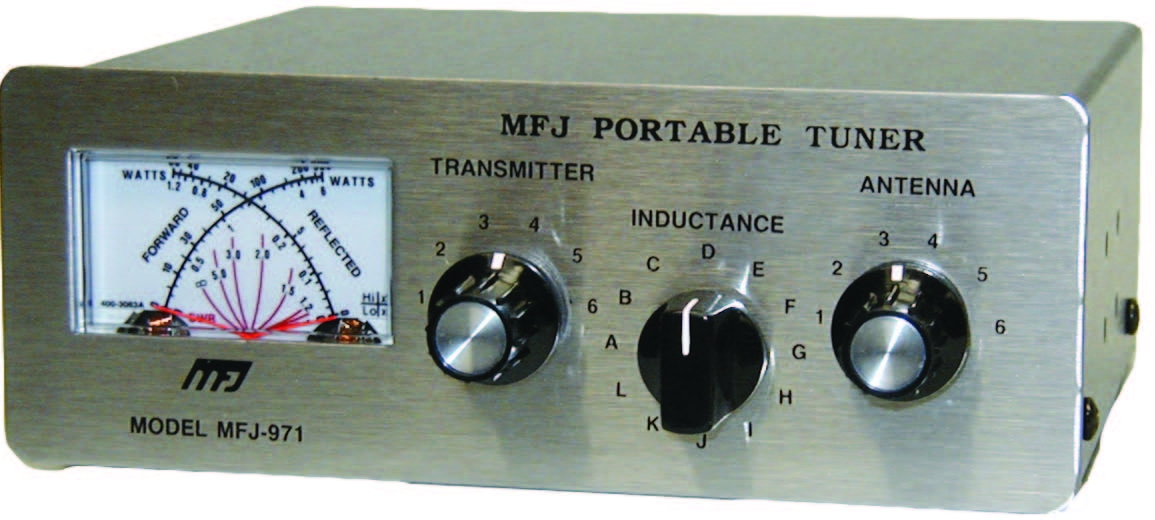
In my previous blog on the topic of software defined radio (SDR), I provided a quickstart guide to using gqrx, GNU Radio and the RTL-SDR dongle to receive FM radio and the amateur 2 meter (VHF) band. Using the same software configuration and the same RTL-SDR dongle, it is possible to add some extra components and receive ham radio and shortwave transmissions from around the world. Here is the antenna setup from the successful SDR workshop at OSCAL'17 on 13 May: After the workshop on Saturday, members of the OSCAL team successfully reconstructed the SDR and antenna at the Debian info booth on Sunday and a wide range of shortwave and ham signals were detected: Here is a close-up look at the laptop, RTL-SDR dongle (above laptop), Ham-It-Up converter (above water bottle) and MFJ-971 ATU (on right): Buying the parts
Component Purpose, Notes Price/link to source
RTL-SDR dongle Converts radio signals (RF) into digital signals for reception through the USB port. It is essential to buy the dongles for SDR with TCXO, the generic RTL dongles for TV reception are not stable enough for anything other than TV. ~ 25
Enamelled copper wire, 25 meters or more Loop antenna. Thicker wire provides better reception and is more suitable for transmitting (if you have a license) but it is heavier. The antenna I've demonstrated at recent events uses 1mm thick wire. ~ 10
4 (or more) ceramic egg insulators Attach the antenna to string or rope. Smaller insulators are better as they are lighter and less expensive. ~ 10
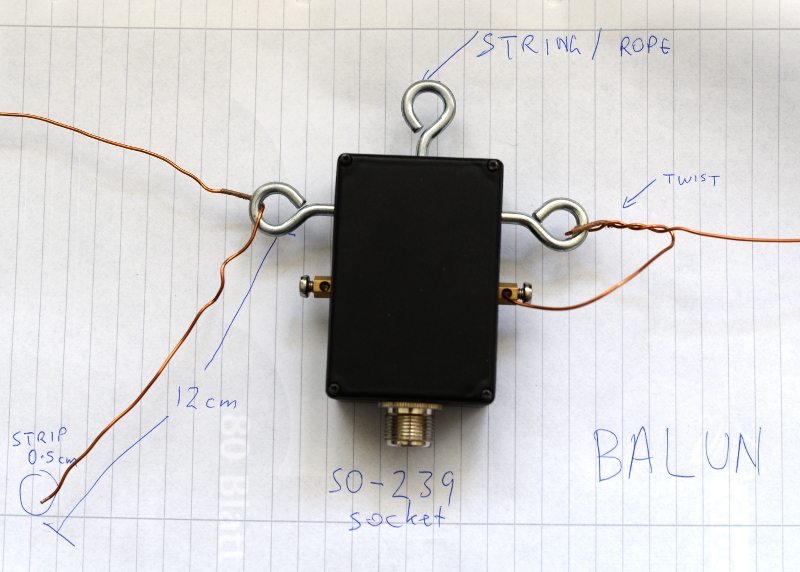
4:1 balun The actual ratio of the balun depends on the shape of the loop (square, rectangle or triangle) and the point where you attach the balun (middle, corner, etc). You may want to buy more than one balun, for example, a 4:1 balun and also a 1:1 balun to try alternative configurations. Make sure it is waterproof, has hooks for attaching a string or rope and an SO-239 socket. from 20
5 meter RG-58 coaxial cable with male PL-259 plugs on both ends If using more than 5 meters or if you want to use higher frequencies above 30MHz, use thicker, heavier and more expensive cables like RG-213. The cable must be 50 ohm. ~ 10
Antenna Tuning Unit (ATU) I've been using the MFJ-971 for portable use and demos because of the weight. There are even lighter and cheaper alternatives if you only need to receive. ~ 20 for receive only or second hand
PL-259 to SMA male pigtail, up to 50cm, RG58 Joins the ATU to the upconverter. Cable must be RG58 or another 50 ohm cable ~ 5
Ham It Up v1.3 up-converter Mixes the HF signal with a signal from a local oscillator to create a new signal in the spectrum covered by the RTL-SDR dongle ~ 40
SMA (male) to SMA (male) pigtail Join the up-converter to the RTL-SDR dongle ~ 2
USB charger and USB type B cable Used for power to the up-converter. A spare USB mobile phone charge plug may be suitable. ~ 5
String or rope For mounting the antenna. A ligher and cheaper string is better for portable use while a stronger and weather-resistent rope is better for a fixed installation. 5
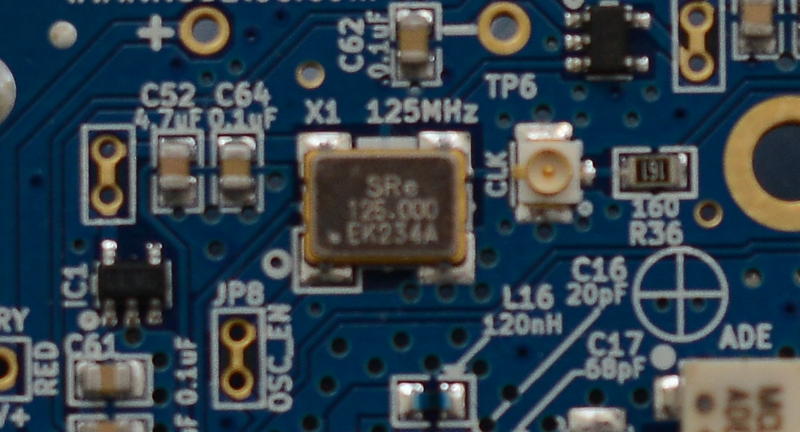
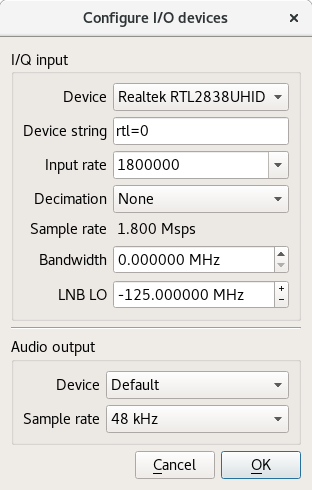
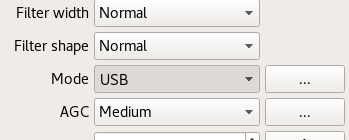
Building the antenna There are numerous online calculators for measuring the amount of enamelled copper wire to cut. For example, for a centre frequency of 14.2 MHz on the 20 meter amateur band, the antenna length is 21.336 meters. Add an extra 24 cm (extra 12 cm on each end) for folding the wire through the hooks on the balun. After cutting the wire, feed it through the egg insulators before attaching the wire to the balun. Measure the extra 12 cm at each end of the wire and wrap some tape around there to make it easy to identify in future. Fold it, insert it into the hook on the balun and twist it around itself. Use between four to six twists. Strip off approximately 0.5cm of the enamel on each end of the wire with a knife, sandpaper or some other tool. Insert the exposed ends of the wire into the screw terminals and screw it firmly into place. Avoid turning the screw too tightly or it may break or snap the wire. Insert string through the egg insulators and/or the middle hook on the balun and use the string to attach it to suitable support structures such as a building, posts or trees. Try to keep it at least two meters from any structure. Maximizing the surface area of the loop improves the performance: a circle is an ideal shape, but a square or 4:3 rectangle will work well too. For optimal performance, if you imagine the loop is on a two-dimensional plane, the first couple of meters of feedline leaving the antenna should be on the plane too and at a right angle to the edge of the antenna. Join all the other components together using the coaxial cables. Configuring gqrx for the up-converter and shortwave signals Inspect the up-converter carefully. Look for the crystal and find the frequency written on the side of it. The frequency written on the specification sheet or web site may be wrong so looking at the crystal itself is the best way to be certain. On my Ham It Up, I found a crystal with 125.000 written on it, this is 125 MHz. Launch gqrx, go to the File menu and select I/O devices. Change the LNB LO value to match the crystal frequency on the up-converter, with a minus sign. For my Ham It Up, I use the LNB LO value -125.000000 MHz. Click OK to close the I/O devices window. On the Input Controls tab, make sure Hardware AGC is enabled. On the Receiver options tab, change the Mode value. Commercial shortwave broadcasts use AM and amateur transmission use single sideband: by convention, LSB is used for signals below 10MHz and USB is used for signals above 10MHz. To start exploring the 20 meter amateur band around 14.2 MHz, for example, use USB. In the top of the window, enter the frequency, for example, 14.200 000 MHz. Now choose the FFT Settings tab and adjust the Freq zoom slider. Zoom until the width of the display is about 100 kHZ, for example, from 14.15 on the left to 14.25 on the right. Click the Play icon at the top left to start receiving. You may hear white noise. If you hear nothing, check the computer's volume controls, move the Gain slider (bottom right) to the maximum position and then lower the Squelch value on the Receiver options tab until you hear the white noise or a transmission. Adjust the Antenna Tuner knobs Now that gqrx is running, it is time to adjust the knobs on the antenna tuner (ATU). Reception improves dramatically when it is tuned correctly. Exact instructions depend on the type of ATU you have purchased, here I present instructions for the MFJ-971 that I have been using. Turn the TRANSMITTER and ANTENNA knobs to the 12 o'clock position and leave them like that. Turn the INDUCTANCE knob while looking at the signals in the gqrx window. When you find the best position, the signal strength displayed on the screen will appear to increase (the animated white line should appear to move upwards and maybe some peaks will appear in the line). When you feel you have found the best position for the INDUCTANCE knob, leave it in that position and begin turning the ANTENNA knob clockwise looking for any increase in signal strength on the chart. When you feel that is correct, begin turning the TRANSMITTER knob. Listening to a transmission At this point, if you are lucky, some transmissions may be visible on the gqrx screen. They will appear as darker colours in the waterfall chart. Try clicking on one of them, the vertical red line will jump to that position. For a USB transmission, try to place the vertical red line at the left hand side of the signal. Try dragging the vertical red line or changing the frequency value at the top of the screen by 100 Hz at a time until the station is tuned as well as possible. Try and listen to the transmission and identify the station. Commercial shortwave broadcasts will usually identify themselves from time to time. Amateur transmissions will usually include a callsign spoken in the phonetic alphabet. For example, if you hear "CQ, this is Victor Kilo 3 Tango Quebec Romeo" then the station is VK3TQR. You may want to note down the callsign, time, frequency and mode in your log book. You may also find information about the callsign in a search engine. The video demonstrates reception of a transmission from another country, can you identify the station's callsign and find his location? If you have questions about this topic, please come and ask on the Debian Hams mailing list. The gqrx package is also available in Fedora and Ubuntu but it is known to crash on startup in Ubuntu 17.04. Users of other distributions may also want to try the Debian Ham Blend bootable ISO live image as a quick and easy way to get started.

12 May 2017

Daniel Pocock: Kamailio World and FSFE team visit, Tirana arrival

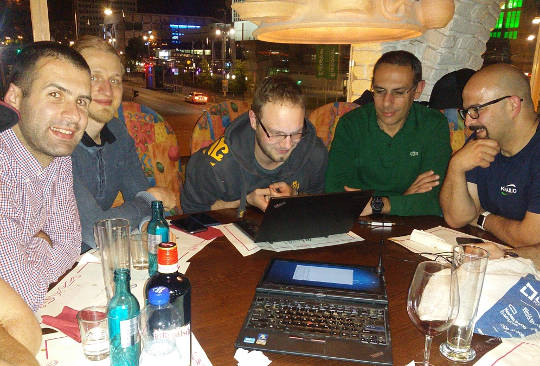
This week I've been thrilled to be in Berlin for Kamailio World 2017, one of the highlights of the SIP, VoIP and telephony enthusiast's calendar. It is an event that reaches far beyond Kamailio and is well attended by leaders of many of the well known free software projects in this space. HOMER 6 is coming Alexandr Dubovikov gave me a sneak peek of the new version of the HOMER SIP capture framework for gathering, storing and analyzing messages in a SIP network. exploring HOMER 6 with Alexandr Dubovikov at Kamailio World 2017 Visiting the FSFE team in Berlin Having recently joined the FSFE's General Assembly as the fellowship representative, I've been keen to get to know more about the organization. My visit to the FSFE office involved a wide-ranging discussion with Erik Albers about the fellowship program and FSFE in general. discussing the Fellowship program with Erik Albers Steak and SDR night After a hard day of SIP hacking and a long afternoon at Kamailio World's open bar, a developer needs a decent meal and something previously unseen to hack on. A group of us settled at Escados, Alexanderplatz where my SDR kit emerged from my bag and other Debian users found out how easy it is to apt install the packages, attach the dongle and explore the radio spectrum. playing with SDR after dinner Next stop OSCAL'17, Tirana Having left Berlin, I'm now in Tirana, Albania where I'll give an SDR workshop and Free-RTC talk at OSCAL'17. The weather forecast is between 26 - 28 degrees celsius, the food is great and the weekend's schedule is full of interesting talks and workshops. The organizing team have already made me feel very welcome here, meeting me at the airport and leaving a very generous basket of gifts in my hotel room. OSCAL has emerged as a significant annual event in the free software world and if it's too late for you to come this year, don't miss it in 2018. OSCAL'17 banner

11 May 2017

Norbert Preining: BachoTeX 2017

A week of typesetting, typography, bookbinding, bibliophily, not to forget long chats with good friends and loads of beer. That is BachoTeX, the best series of conferences I have ever been. This year BachoTeX was held for the 25th time, and was merged with the TUG Meeting for a firework of excellent presentations and long hours of brain storming, hacking, music making, dancing, and simply enjoying life!
Symphony of Green
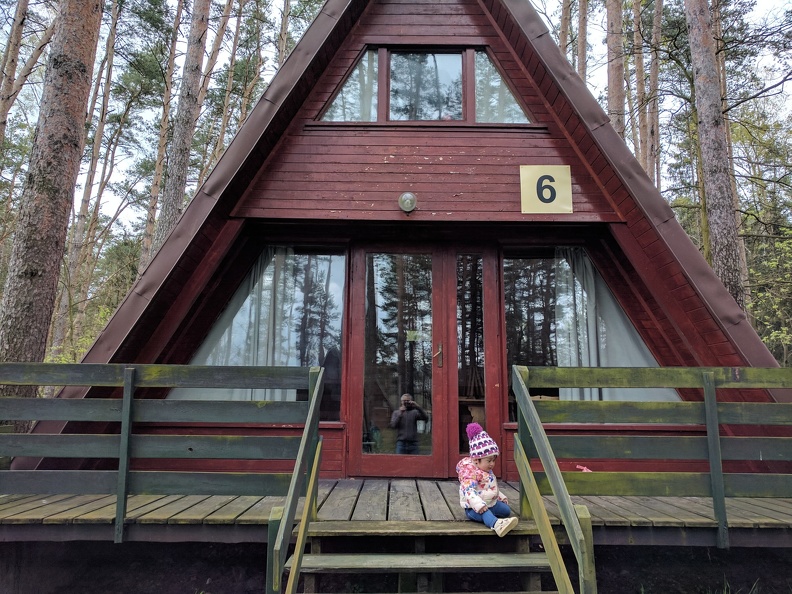
And while it was a bit less relaxing for me than in the last years, mostly due to the presence of my little daughter who requested presence quite often, it is still the place to be during the Golden Week! Of course I also gave a talk at BachoTeX about our latest changes in the upcoming TeX Live 2017 release: fmtutil and updmap past & future changes (or: cleaning up the mess). Big thanks to my company Accelia Inc. for allowing me to attend the conference. We arrived after a long trip, first via train and plane to Vienna, then two days break (including research with a colleague), followed by a night train ride to Warsaw and another train ride to Torun and a taxi ride to Bachotek. All in all far too long to be done with a 14 month old girl. Finally arrived we went directly to our hut and found it freezing. Fortunately we could organize a heater so that the rest of the week we didn t have to live in 5-10 degrees
Our log house in Bachotek
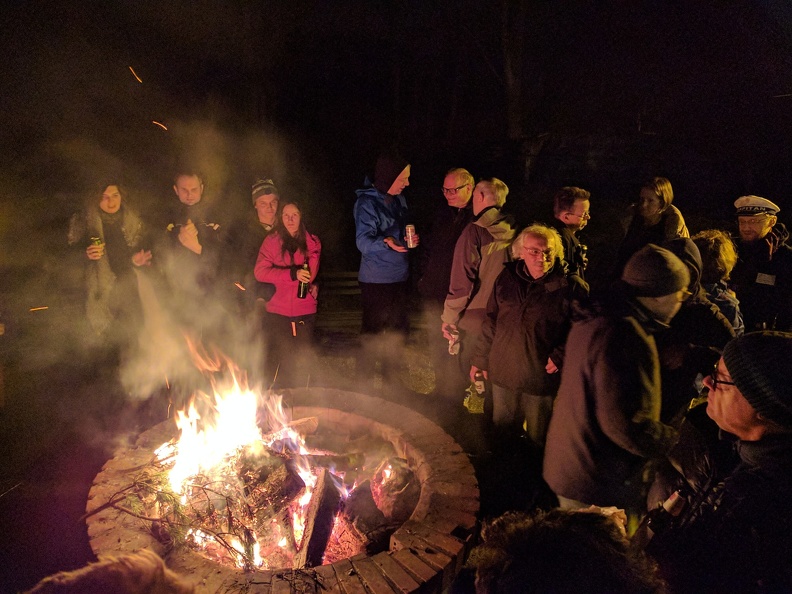
The second day brought already the traditional bonfire. After a small (for Polish standard) dinner we ignored the rain and met at the fireplace for BBQ, beer, and lots of live music.
Bonfire on the second evening
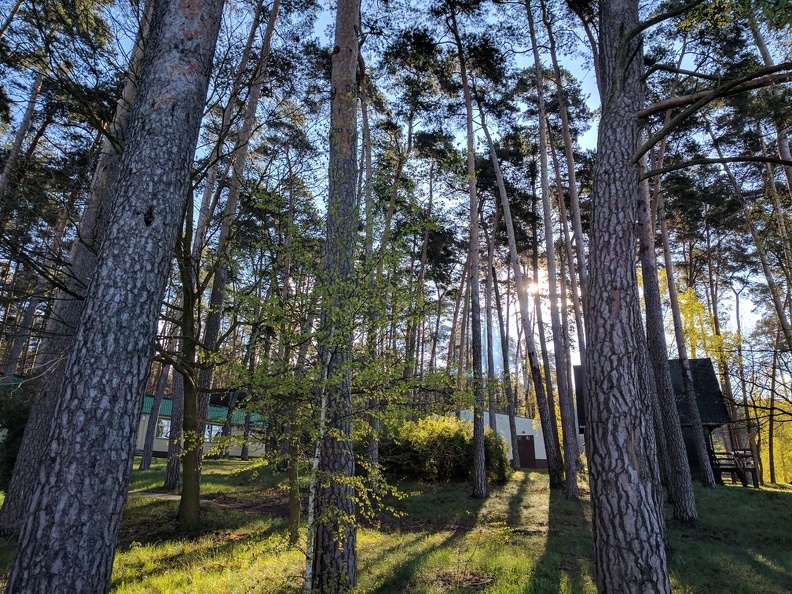
The rain stopped during the bonfire, probably due to my horrible singing, and the following days we were blessed with sunshine and warmer temperatures. The forest sparked in all kinds of greens.
Sunny days in Bachotek
For our daughter the trip was a great experience lots of wild play grounds, many other kids, and a lake she really wanted to go swimming in. Normally I go swimming there, but this year I had a bad cold so I refrained from it, and with me also our daughter, to her great disappointment.
Ready to go swimming
Another day has passed, and the sunset lights up the beautiful lake Bachotek. I cannot imagine a better place for concentrated work paired with great relaxation!
Sunset along the lake
During the days the temperatures were really nice, but the mornings were cold, and our morning walk to the breakfast place was quite chilly.
Enjoying a fresh morning on the lake
Ample coffee breaks and lunch breaks left us enough time to discuss new developments. But the single most important thing that brought people to talk a lot was the horrible internet connection, a big plus in BachoTeX (but as far as rumors go it might have been the last time with that advantage!).
Beautiful and peaceful lake Bachotek
The last evening we had a banquet honoring 25 years of BachoTeX, one of the oldest TeX conference. Live music and dancing, lots of good food and drinks, and outside the perfect evening atmosphere.
Sunset around the lake
Too fast the time has passed and we had to return to Vienna, retracing the long trip. How far it may be, taking the burden to come from Japan is worth every drop of sweat, the time at BachoTeX is probably one of the most productive, and at the same time most relaxing for me. Big thanks to all our Polish friends for organizing the event.
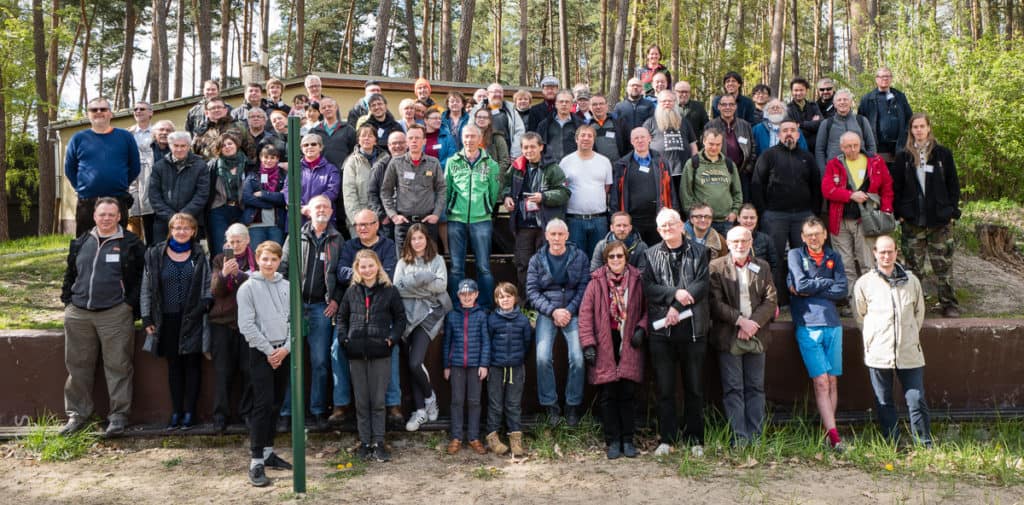
BachoTeX conference photo

(photo by Frans Goddijn)


9 May 2017

Benjamin Mako Hill: Surviving an Eternal September: How an Online Community Managed a Surge of Newcomers

Attracting newcomers is among the most widely studied problems in online community research. However, with all the attention paid to challenge of getting new users, much less research has studied the flip side of that coin: large influxes of newcomers can pose major problems as well! The most widely known example of problems caused by an influx of newcomers into an online community occurred in Usenet. Every September, new university students connecting to the Internet for the first time would wreak havoc in the Usenet discussion forums. When AOL connected its users to the Usenet in 1994, it disrupted the community for so long that it became widely known as The September that never ended . Our study considered a similar influx in NoSleep an online community within Reddit where writers share original horror stories and readers comment and vote on them. With strict rules requiring that all members of the community suspend disbelief, NoSleep thrives off the fact that readers experience an immersive storytelling environment. Breaking the rules is as easy as questioning the truth of someone s story. Socializing newcomers represents a major challenge for NoSleep.
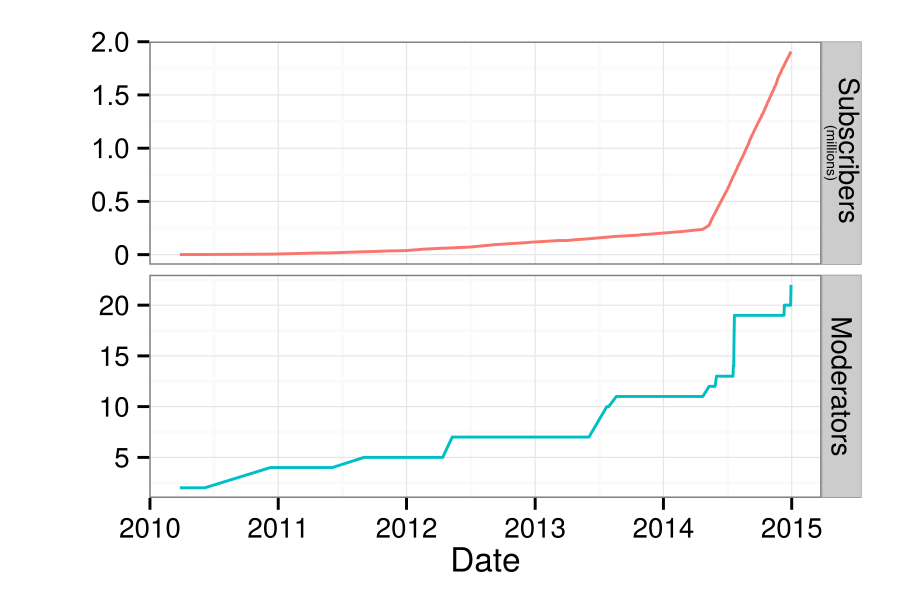
Number of subscribers and moderators on /r/NoSleep over time.
On May 7th, 2014, NoSleep became a default subreddit i.e., every new user to Reddit automatically joined NoSleep. After gradually accumulating roughly 240,000 members from 2010 to 2014, the NoSleep community grew to over 2 million subscribers in a year. That said, NoSleep appeared to largely hold things together. This reflects the major question that motivated our study: How did NoSleep withstand such a massive influx of newcomers without enduring their own Eternal September? To answer this question, we interviewed a number of NoSleep participants, writers, moderators, and admins. After transcribing, coding, and analyzing the results, we proposed that NoSleep survived because of three inter-connected systems that helped protect the community s norms and overall immersive environment. First, there was a strong and organized team of moderators who enforced the rules no matter what. They recruited new moderators knowing the community s population was going to surge. They utilized a private subreddit for NoSleep s staff. They were able to socialize and educate new moderators effectively. Although issuing sanctions against community members was often difficult, our interviewees explained that NoSleep s moderators were deeply committed and largely uncompromising. That commitment resonates within the second system that protected NoSleep: regulation by normal community members. From our interviews, we found that the participants felt a shared sense of community that motivated them both to socialize newcomers themselves as well as to report inappropriate comments and downvote people who violate the community s norms. Finally, we found that the technological systems protected the community as well. For instance, post-throttling was instituted to limit the frequency at which a writer could post their stories. Additionally, Reddit s Automoderator , a programmable AI bot, was used to issue sanctions against obvious norm violators while running in the background. Participants also pointed to the tools available to them the report feature and voting system in particular to explain how easy it was for them to report and regulate the community s disruptors.

This blog post was written with Charlie Kiene. The paper and work this post describes is collaborative work with Charlie Kiene and Andr s Monroy-Hern ndez. The paper was published in the Proceedings of CHI 2016 and is released as open access so anyone can read the entire paper here. A version of this post was published on the Community Data Science Collective blog.

6 May 2017

Vasudev Kamath: Magic: Attach a HTML file to mail and get different on other side

It's been a long time I did not write any new blog posts, and finally I got something which is interesting enough for a new post and so here it is. I actually wanted some bills from my ISP for some work and I could not find mail from the ISP which had bills for some specific months in my mailbox. Problem with my ISP is bills are accessible in their account which can be only accessed from their own network. They do have a mobile app and that does not seem to work especially for the billing section. I used mobile app and selected month for which I did not have bill and clicked Send Mail button. App happily showed message saying it sent the bill to my registered mail address but that was a fancy lie. After trying several time I gave up and decided I will do it once I get back home. Fast forward few hours, I'm back home from office and then I sat in front of my laptop and connected to ISP site, promptly downloaded the bills, then used notmuch-emacs and fire up a mail composer, attach those HTML file (yeah they produce bill in HTML file :-/) send it to my gmail and forget about it. Fast forward few more days, I just remember I need those bills. I got hold of mail I sent earlier in gmail inbox and clicked on attachment and when browser opened the attachment I was shocked/surprised . Did you ask why?. See what I saw when I opened attachment. Well I was confused for moment on what happened, I tried downloading the file and opened it an editor, and I see Chinese characters here also. After reaching home I checked the Sent folder in my laptop where I keep copy of mails sent using notmuch-emacs's notmuch-fcc-dirs variable. I open the file and open the attachement and I see same character as I saw in browser!. I open the original bills I downloaded and it looks fine. To check if I really attached the correct files I again drafted a mail this time to my personal email and sent it. Now I open the file from Sent folder and voila again there is different content inside my attachment!. Same happens when I receive the mail and open the attachment everything inside is Chinese characters!. Totally lost I finally opened the original file using emacs, since I use spacemacs it asked me for downloading of html layer and after which I was surprised because everything inside the editor is in Chinese!. OK finally I've something now so I opened same file at same time in nano from terminal and there it looks fine!. OK that is weird again I read carefully content and saw this line in beginning of file
<?xml version="1.0" encoding="UTF-16" ?>
<html xmlns="http://www.w3.org/1999/xhtml>....
OK that is new XML tag had encoding declared as UTF-16, really?. And just for checking I changed it to UTF-8 and voila file is back to normal in Emacs window!. To confirm this behavior I created a sample file with following content
<?xml version="1.0" encoding="utf-8"?><html xmlns="http://www.w3.org/1999/xhtml"><head><meta http-equiv="Content-Type" content="text/html; charset=iso-8859-1" /><title> Something weird </title><body>blablablablablalabkabakba</body></html>
Yeah with long line because ISP had similar case and now I opened the same file in nano using terminal and changed encoding="UTF-8" to encoding="UTF-16" and the behavior repeated I see Chinese character in the emacs buffer which has also opened the same file. Below is the small gif showing this happening in real time, see what happens in emacs buffer when I change the encoding in terminal below. Fun right?. I made following observation from above experiments.
  1. When I open original file in browser or my sample file with encoding="UTF-16" its normal, no Chinese characters.
  2. When I attach the mail and send it out the attachment some how gets converted into HTML file with Chinese characters and viewing source from browser shows header containing xml declarations and original <html> declarations get ripped off and new tags show up which I've pasted below.
  3. If I download the same file and open in editor only Chinese characters are present and no HTML tags inside it. So definitely the new tags which I saw by viewing source in browser is added by Firefox.
  4. I create similar HTML file and change encoding I can see the characters changing back and forth in emacs web-mode when I change encoding of the file.
<!DOCTYPE HTML PUBLIC "-//W3C//DTD HTML 4.01 Transitional//EN">
<html>
  <head><META http-equiv="Content-Type"  content="text/html; charset=utf-8">
So if I'm understanding this correctly, Emacs due to encoding declaration interprets the actual contents differently. To see how Emacs really interpreted the content I opened the sent mail I had in raw format and saw following header lines for attachment.
Content-Type: text/html; charset=utf-8
Content-Disposition: attachment;
             filename=SOA-102012059675-FEBRUARY-2017.html
Content-Transfer-Encoding: base64
This was followed with base64 encoded data. So does this mean emacs interpreted the content as UTF-16 and encoded the content using UTF-8?. Again I've no clue, so I changed the encoding in both the files to be as UTF-8 and sent the mail by attaching these files again to see what happens. And my guess was right I could get the attachment as is on the receiving side. And inspecting raw mail the attachment headers now different than before.
Content-Type: text/html
Content-Disposition: attachment;
             filename=SOA-102012059675-DECEMBER-2016.html
Content-Transfer-Encoding: quoted-printable
See how Content-Type its different now also see the Content-Transfer-Encoding its now quoted-printable as opposed to base64 earlier. Additionally I can see HTML content below the header. When I opened the attachment from mail I get the actual bill. As far as I understand base64 encoding is used when the data to be attached is base64. So I guess basically due to wrong encoding declared inside the file Emacs interpreted the content as a binary data and encoded it differently than what it really should be. Phew that was a lot of investigation to understand the magic but it was worth it. Do let me know your thoughts on this.

5 May 2017

Patrick Matth i: Be careful: Upgrading Debian Jessie to Stretch, with Pacemaker DRBD and an nested ext4 LVM hosted on VMware products

Detached DRBD (diskless) In the past I setup some new Pacemaker clustered nodes with a fresh Debian Stretch installation. I followed our standard installation guide, created also shared replicated DRBD storage, but whenever I tried to mount the ext4 storage DRBD detached the disks on both node sides with I/O errors. After recreating it, using other storage volumes and testing my ProLiant hardware (whop I thought it had got a defect..) it still occurs, but somewhere in the middle of testing, a quicker setup without LVM it worked fine, hum.. Much later I found this (only post at this time about it) on the DRBD-user mailinglist: [0]
This means, if you use the combination of VMware-Product -> Debian Stretch -> local Storage -> DRBD -> LVM -> ext4 you will be affected by this bug. This happens, because VMware always publishs the information, that the guest is able to support the WRITE SAME feature, which is wrong. Since the DRBD version, which is also shipped with Stretch, DRBD now also supports WRITE SAME, so it tries to use this feature, but this fails then.
This is btw the same reason, why VMware users see in their dmesg this:
WRITE SAME failed.Manually zeroing.
As a workaround I am using now systemd, to disable WRITE SAME for all attached block devices in the guest. Simply run the following:
for i in find /sys/block/*/device/scsi_disk/*/max_write_same_blocks ; do echo w $i 0 ; done > /etc/tmpfiles.d/write_same.conf
[0]: http://lists.linbit.com/pipermail/drbd-user/2017-January/022931.html Pacemaker failovers with DRBD+LVM do not work If you use a DRBD with a nested LVM, you already had to add the following lines to your /etc/lvm/lvm.conf in past Debian releases (assuming that sdb and sdc are DRBD devices):
filter = [ r /dev/sdb.* /dev/sdc.* ]
write_cache_state = 0
Wit Debian Stretch this is not enough. Your failovers will result in a broken state on the second node, because it can not find your LVs and VGs. I found out, that killing lvmetad helps. So I also added a global_filter (it should be used for all LVM services):
global_filter = [ r /dev/sdb.* /dev/sdc.* ]
But this also didn t helped.. My only solution was to disable lvmetad (which I am also not using at all). So adding this all in combination works now for me and failovers are as smooth as with Jessie:
filter = [ r /dev/sdb.* /dev/sdc.* ]
global_filter = [ r /dev/sdb.* /dev/sdc.* ]
write_cache_state = 0
use_lvmetad = 0
Do not forget to update your initrd, so that the LVM configuration is updated on booting your server:
update-initramfs -k all -u
Reboot, that s it :)

3 May 2017

Vincent Bernat: VXLAN: BGP EVPN with Cumulus Quagga

VXLAN is an overlay network to encapsulate Ethernet traffic over an existing (highly available and scalable, possibly the Internet) IP network while accomodating a very large number of tenants. It is defined in RFC 7348. For an uncut introduction on its use with Linux, have a look at my VXLAN & Linux post. VXLAN deployment In the above example, we have hypervisors hosting a virtual machines from different tenants. Each virtual machine is given access to a tenant-specific virtual Ethernet segment. Users are expecting classic Ethernet segments: no MAC restrictions1, total control over the IP addressing scheme they use and availability of multicast. In a large VXLAN deployment, two aspects need attention:
  1. discovery of other endpoints (VTEPs) sharing the same VXLAN segments, and
  2. avoidance of BUM frames (broadcast, unknown unicast and multicast) as they have to be forwarded to all VTEPs.
A typical solution for the first point is using multicast. For the second point, this is source-address learning.

Introduction to BGP EVPN BGP EVPN (RFC 7432 and draft-ietf-bess-evpn-overlay for its application to VXLAN) is a standard control protocol to efficiently solves those two aspects without relying on multicast nor source-address learning. BGP EVPN relies on BGP (RFC 4271) and its MP-BGP extensions (RFC 4760). BGP is the routing protocol powering the Internet. It is highly scalable and interoperable. It is also extensible and one of its extension is MP-BGP. This extension can carry reachability information (NLRI) for multiple protocols (IPv4, IPv6, L3VPN and in our case EVPN). EVPN is a special family to advertise MAC addresses and the remote equipments they are attached to. There are basically two kinds of reachability information a VTEP sends through BGP EVPN:
  1. the VNIs they have interest in (type 3 routes), and
  2. for each VNI, the local MAC addresses (type 2 routes).
The protocol also covers other aspects of virtual Ethernet segments (L3 reachability information from ARP/ND caches, MAC mobility and multi-homing2) but we won t describe them here. To deploy BGP EVPN, a typical solution is to use several route reflectors (both for redundancy and scalability), like in the picture below. Each VTEP opens a BGP session to at least two route reflectors, sends its information (MACs and VNIs) and receives others . This reduces the number of BGP sessions to configure. VXLAN deployment with route reflectors Compared to other solutions to deploy VXLAN, BGP EVPN has three main advantages:
  • interoperability with other vendors (notably Juniper and Cisco),
  • proven scalability (a typical BGP routers handle several millions of routes), and
  • possibility to enforce fine-grained policies.
On Linux, Cumulus Quagga is a fairly complete implementation of BGP EVPN (type 3 routes for VTEP discovery, type 2 routes with MAC or IP addresses, MAC mobility when a host changes from one VTEP to another one) which requires very little configuration. This is a fork of Quagga and currently used in Cumulus Linux, a network operating system based on Debian powering switches from various brands. At some point, BGP EVPN support will be contributed back to FRR, a community-maintained fork of Quagga3. It should be noted the BGP EVPN implementation of Cumulus Quagga currently only supports IPv4.

Route reflector setup Before configuring each VTEP, we need to configure two or more route reflectors. There are many solutions. I will present three of them:
  • using Cumulus Quagga,
  • using GoBGP, an implementation of BGP in Go,
  • using Juniper JunOS.
For reliability purpose, it s possible (and easy) to use one implementation for some route reflectors and another implementation for the other ones. The proposed configurations are quite minimal. However, it is possible to centralize policies on the route reflectors (e.g. routes tagged with some community can only be readvertised to some group of VTEPs).

Using Quagga The configuration is pretty simple. We suppose the configured route reflector has 203.0.113.254 configured as a loopback IP.
router bgp 65000
  bgp router-id 203.0.113.254
  bgp cluster-id 203.0.113.254
  bgp log-neighbor-changes
  no bgp default ipv4-unicast
  neighbor fabric peer-group
  neighbor fabric remote-as 65000
  neighbor fabric capability extended-nexthop
  neighbor fabric update-source 203.0.113.254
  bgp listen range 203.0.113.0/24 peer-group fabric
  !
  address-family evpn
   neighbor fabric activate
   neighbor fabric route-reflector-client
  exit-address-family
  !
  exit
!
A peer group fabric is defined and we leverage the dynamic neighbor feature of Cumulus Quagga: we don t have to explicitely define each neighbor. Any client from 203.0.113.0/24 and presenting itself as part of AS 65000 can connect. All sent EVPN routes will be accepted and reflected to the other clients. You don t need to run Zebra, the route engine talking with the kernel. Instead, start bgpd with the --no_kernel flag.

Using GoBGP GoBGP is a clean implementation of BGP in Go4. It exposes an RPC API for configuration (but accepts a configuration file and comes with a command-line client). It doesn t support dynamic neighbors, so you ll have to use the API, the command-line client or some templating language to automate their declaration. A configuration with only one neighbor is like this:
global:
  config:
    as: 65000
    router-id: 203.0.113.254
    local-address-list:
      - 203.0.113.254
neighbors:
  - config:
      neighbor-address: 203.0.113.1
      peer-as: 65000
    afi-safis:
      - config:
          afi-safi-name: l2vpn-evpn
    route-reflector:
      config:
        route-reflector-client: true
        route-reflector-cluster-id: 203.0.113.254
More neighbors can be added from the command line:
$ gobgp neighbor add 203.0.113.2 as 65000 \
>         route-reflector-client 203.0.113.254 \
>         --address-family evpn
GoBGP won t try to interact with the kernel which is fine as a route reflector.

Using Juniper JunOS A variety of Juniper products can be a BGP route reflector, notably: The main factor is the CPU and the memory. The QFX5100 is low on memory and won t support large deployments without some additional policing. Here is a configuration similar to the Quagga one:
interfaces  
    lo0  
        unit 0  
            family inet  
                address 203.0.113.254/32;


protocols  
    bgp  
        group fabric  
            family evpn  
                signaling  
                    /* Do not try to install EVPN routes */
                    no-install;
                 
             
            type internal;
            cluster 203.0.113.254;
            local-address 203.0.113.254;
            allow 203.0.113.0/24;


routing-options  
    router-id 203.0.113.254;
    autonomous-system 65000;
 

VTEP setup The next step is to configure each VTEP/hypervisor. Each VXLAN is locally configured using a bridge for local virtual interfaces, like illustrated in the below schema. The bridge is taking care of the local MAC addresses (notably, using source-address learning) and the VXLAN interface takes care of the remote MAC addresses (received with BGP EVPN). Bridged VXLAN device VXLANs can be provisioned with the following script. Source-address learning is disabled as we will rely solely on BGP EVPN to synchronize FDBs between the hypervisors.
for vni in 100 200; do
    # Create VXLAN interface
    ip link add vxlan$ vni  type vxlan
        id $ vni  \
        dstport 4789 \
        local 203.0.113.2 \
        nolearning
    # Create companion bridge
    brctl addbr br$ vni 
    brctl addif br$ vni  vxlan$ vni 
    brctl stp br$ vni  off
    ip link set up dev br$ vni 
    ip link set up dev vxlan$ vni 
done
# Attach each VM to the appropriate segment
brctl addif br100 vnet10
brctl addif br100 vnet11
brctl addif br200 vnet12
The configuration of Cumulus Quagga is similar to the one used for a route reflector, except we use the advertise-all-vni directive to publish all local VNIs.
router bgp 65000
  bgp router-id 203.0.113.2
  no bgp default ipv4-unicast
  neighbor fabric peer-group
  neighbor fabric remote-as 65000
  neighbor fabric capability extended-nexthop
  neighbor fabric update-source dummy0
  ! BGP sessions with route reflectors
  neighbor 203.0.113.253 peer-group fabric
  neighbor 203.0.113.254 peer-group fabric
  !
  address-family evpn
   neighbor fabric activate
   advertise-all-vni
  exit-address-family
  !
  exit
!
If everything works as expected, the instances sharing the same VNI should be able to ping each other. If IPv6 is enabled on the VMs, the ping command shows if everything is in order:
$ ping -c10 -w1 -t1 ff02::1%eth0
PING ff02::1%eth0(ff02::1%eth0) 56 data bytes
64 bytes from fe80::5254:33ff:fe00:8%eth0: icmp_seq=1 ttl=64 time=0.016 ms
64 bytes from fe80::5254:33ff:fe00:b%eth0: icmp_seq=1 ttl=64 time=4.98 ms (DUP!)
64 bytes from fe80::5254:33ff:fe00:9%eth0: icmp_seq=1 ttl=64 time=4.99 ms (DUP!)
64 bytes from fe80::5254:33ff:fe00:a%eth0: icmp_seq=1 ttl=64 time=4.99 ms (DUP!)
--- ff02::1%eth0 ping statistics ---
1 packets transmitted, 1 received, +3 duplicates, 0% packet loss, time 0ms
rtt min/avg/max/mdev = 0.016/3.745/4.991/2.152 ms

Verification Step by step, let s check how everything comes together.

Getting VXLAN information from the kernel On each VTEP, Quagga should be able to retrieve the information about configured VXLANs. This can be checked with vtysh:
# show interface vxlan100
Interface vxlan100 is up, line protocol is up
  Link ups:       1    last: 2017/04/29 20:01:33.43
  Link downs:     0    last: (never)
  PTM status: disabled
  vrf: Default-IP-Routing-Table
  index 11 metric 0 mtu 1500
  flags: <UP,BROADCAST,RUNNING,MULTICAST>
  Type: Ethernet
  HWaddr: 62:42:7a:86:44:01
  inet6 fe80::6042:7aff:fe86:4401/64
  Interface Type Vxlan
  VxLAN Id 100
  Access VLAN Id 1
  Master (bridge) ifindex 9 ifp 0x56536e3f3470
The important points are:
  • the VNI is 100, and
  • the bridge device was correctly detected.
Quagga should also be able to retrieve information about the local MAC addresses :
# show evpn mac vni 100
Number of MACs (local and remote) known for this VNI: 2
MAC               Type   Intf/Remote VTEP      VLAN
50:54:33:00:00:0a local  eth1.100
50:54:33:00:00:0b local  eth2.100

BGP sessions Each VTEP has to establish a BGP session to the route reflectors. On the VTEP, this can be checked by running vtysh:
# show bgp neighbors 203.0.113.254
BGP neighbor is 203.0.113.254, remote AS 65000, local AS 65000, internal link
 Member of peer-group fabric for session parameters
  BGP version 4, remote router ID 203.0.113.254
  BGP state = Established, up for 00:00:45
  Neighbor capabilities:
    4 Byte AS: advertised and received
    AddPath:
      L2VPN EVPN: RX advertised L2VPN EVPN
    Route refresh: advertised and received(new)
    Address family L2VPN EVPN: advertised and received
    Hostname Capability: advertised
    Graceful Restart Capabilty: advertised
[...]
 For address family: L2VPN EVPN
  fabric peer-group member
  Update group 1, subgroup 1
  Packet Queue length 0
  Community attribute sent to this neighbor(both)
  8 accepted prefixes

  Connections established 1; dropped 0
  Last reset never
Local host: 203.0.113.2, Local port: 37603
Foreign host: 203.0.113.254, Foreign port: 179
The output includes the following information:
  • the BGP state is Established,
  • the address family L2VPN EVPN is correctly advertised, and
  • 8 routes are received from this route reflector.
The state of the BGP sessions can also be checked from the route reflectors. With GoBGP, use the following command:
# gobgp neighbor 203.0.113.2
BGP neighbor is 203.0.113.2, remote AS 65000, route-reflector-client
  BGP version 4, remote router ID 203.0.113.2
  BGP state = established, up for 00:04:30
  BGP OutQ = 0, Flops = 0
  Hold time is 9, keepalive interval is 3 seconds
  Configured hold time is 90, keepalive interval is 30 seconds
  Neighbor capabilities:
    multiprotocol:
        l2vpn-evpn:     advertised and received
    route-refresh:      advertised and received
    graceful-restart:   received
    4-octet-as: advertised and received
    add-path:   received
    UnknownCapability(73):      received
    cisco-route-refresh:        received
[...]
  Route statistics:
    Advertised:             8
    Received:               5
    Accepted:               5
With JunOS, use the below command:
> show bgp neighbor 203.0.113.2
Peer: 203.0.113.2+38089 AS 65000 Local: 203.0.113.254+179 AS 65000
  Group: fabric                Routing-Instance: master
  Forwarding routing-instance: master
  Type: Internal    State: Established
  Last State: OpenConfirm   Last Event: RecvKeepAlive
  Last Error: None
  Options: <Preference LocalAddress Cluster AddressFamily Rib-group Refresh>
  Address families configured: evpn
  Local Address: 203.0.113.254 Holdtime: 90 Preference: 170
  NLRI evpn: NoInstallForwarding
  Number of flaps: 0
  Peer ID: 203.0.113.2     Local ID: 203.0.113.254     Active Holdtime: 9
  Keepalive Interval: 3          Group index: 0    Peer index: 2
  I/O Session Thread: bgpio-0 State: Enabled
  BFD: disabled, down
  NLRI for restart configured on peer: evpn
  NLRI advertised by peer: evpn
  NLRI for this session: evpn
  Peer supports Refresh capability (2)
  Stale routes from peer are kept for: 300
  Peer does not support Restarter functionality
  NLRI that restart is negotiated for: evpn
  NLRI of received end-of-rib markers: evpn
  NLRI of all end-of-rib markers sent: evpn
  Peer does not support LLGR Restarter or Receiver functionality
  Peer supports 4 byte AS extension (peer-as 65000)
  NLRI's for which peer can receive multiple paths: evpn
  Table bgp.evpn.0 Bit: 20000
    RIB State: BGP restart is complete
    RIB State: VPN restart is complete
    Send state: in sync
    Active prefixes:              5
    Received prefixes:            5
    Accepted prefixes:            5
    Suppressed due to damping:    0
    Advertised prefixes:          8
  Last traffic (seconds): Received 276  Sent 170  Checked 276
  Input messages:  Total 61     Updates 3       Refreshes 0     Octets 1470
  Output messages: Total 62     Updates 4       Refreshes 0     Octets 1775
  Output Queue[1]: 0            (bgp.evpn.0, evpn)
If a BGP session cannot be established, the logs of each BGP daemon should mention the cause.

Sent routes From each VTEP, Quagga needs to send:
  • one type 3 route for each local VNI, and
  • one type 2 route for each local MAC address.
The best place to check the received routes is on one of the route reflectors. If you are using JunOS, the following command will display the received routes from the provided VTEP:
> show route table bgp.evpn.0 receive-protocol bgp 203.0.113.2
bgp.evpn.0: 10 destinations, 10 routes (10 active, 0 holddown, 0 hidden)
  Prefix                  Nexthop              MED     Lclpref    AS path
  2:203.0.113.2:100::0::50:54:33:00:00:0a/304 MAC/IP
*                         203.0.113.2                  100        I
  2:203.0.113.2:100::0::50:54:33:00:00:0b/304 MAC/IP
*                         203.0.113.2                  100        I
  3:203.0.113.2:100::0::203.0.113.2/304 IM
*                         203.0.113.2                  100        I
  3:203.0.113.2:200::0::203.0.113.2/304 IM
*                         203.0.113.2                  100        I
There is one type 3 route for VNI 100 and another one for VNI 200. There are also two type 2 routes for two MAC addresses on VNI 100. To get more information, you can add the keyword extensive. Here is a type 3 route advertising 203.0.113.2 as a VTEP for VNI 1008:
> show route table bgp.evpn.0 receive-protocol bgp 203.0.113.2 extensive
bgp.evpn.0: 11 destinations, 11 routes (11 active, 0 holddown, 0 hidden)
* 3:203.0.113.2:100::0::203.0.113.2/304 IM (1 entry, 1 announced)
     Accepted
     Route Distinguisher: 203.0.113.2:100
     Nexthop: 203.0.113.2
     Localpref: 100
     AS path: I
     Communities: target:65000:268435556 encapsulation:vxlan(0x8)
[...]
Here is a type 2 route announcing the location of the 50:54:33:00:00:0a MAC address for VNI 100:
> show route table bgp.evpn.0 receive-protocol bgp 203.0.113.2 extensive
bgp.evpn.0: 11 destinations, 11 routes (11 active, 0 holddown, 0 hidden)
* 2:203.0.113.2:100::0::50:54:33:00:00:0a/304 MAC/IP (1 entry, 1 announced)
     Accepted
     Route Distinguisher: 203.0.113.2:100
     Route Label: 100
     ESI: 00:00:00:00:00:00:00:00:00:00
     Nexthop: 203.0.113.2
     Localpref: 100
     AS path: I
     Communities: target:65000:268435556 encapsulation:vxlan(0x8)
[...]
With Quagga, you can get a similar output with vtysh:
# show bgp evpn route
BGP table version is 0, local router ID is 203.0.113.1
Status codes: s suppressed, d damped, h history, * valid, > best, i - internal
Origin codes: i - IGP, e - EGP, ? - incomplete
EVPN type-2 prefix: [2]:[ESI]:[EthTag]:[MAClen]:[MAC]
EVPN type-3 prefix: [3]:[EthTag]:[IPlen]:[OrigIP]
   Network          Next Hop            Metric LocPrf Weight Path
Route Distinguisher: 203.0.113.2:100
*>i[2]:[0]:[0]:[48]:[50:54:33:00:00:0a]
                    203.0.113.2                   100      0 i
*>i[2]:[0]:[0]:[48]:[50:54:33:00:00:0b]
                    203.0.113.2                   100      0 i
*>i[3]:[0]:[32]:[203.0.113.2]
                    203.0.113.2                   100      0 i
Route Distinguisher: 203.0.113.2:200
*>i[3]:[0]:[32]:[203.0.113.2]
                    203.0.113.2                   100      0 i
[...]
With GoBGP, use the following command:
# gobgp global rib -a evpn   grep rd:203.0.113.2:200
    Network  Next Hop             AS_PATH              Age        Attrs
*>  [type:macadv][rd:203.0.113.2:100][esi:single-homed][etag:0][mac:50:54:33:00:00:0a][ip:<nil>][labels:[100]]203.0.113.2                               00:00:17   [ Origin: i   LocalPref: 100   Extcomms: [VXLAN], [65000:268435556] ]
*>  [type:macadv][rd:203.0.113.2:100][esi:single-homed][etag:0][mac:50:54:33:00:00:0b][ip:<nil>][labels:[100]]203.0.113.2                               00:00:17   [ Origin: i   LocalPref: 100   Extcomms: [VXLAN], [65000:268435556] ]
*>  [type:macadv][rd:203.0.113.2:200][esi:single-homed][etag:0][mac:50:54:33:00:00:0a][ip:<nil>][labels:[200]]203.0.113.2                               00:00:17   [ Origin: i   LocalPref: 100   Extcomms: [VXLAN], [65000:268435656] ]
*>  [type:multicast][rd:203.0.113.2:100][etag:0][ip:203.0.113.2]203.0.113.2                               00:00:17   [ Origin: i   LocalPref: 100   Extcomms: [VXLAN], [65000:268435556] ]
*>  [type:multicast][rd:203.0.113.2:200][etag:0][ip:203.0.113.2]203.0.113.2                               00:00:17   [ Origin: i   LocalPref: 100   Extcomms: [VXLAN], [65000:268435656] ]

Received routes Each VTEP should have received the type 2 and type 3 routes from its fellow VTEPs, through the route reflectors. You can check with the show bgp evpn route command of vtysh. Does Quagga correctly understand the received routes? The type 3 routes are translated to an assocation between the remote VTEPs and the VNIs:
# show evpn vni
Number of VNIs: 2
VNI        VxLAN IF              VTEP IP         # MACs   # ARPs   Remote VTEPs
100        vxlan100              203.0.113.2     4        0        203.0.113.3
                                                                   203.0.113.1
200        vxlan200              203.0.113.2     3        0        203.0.113.3
                                                                   203.0.113.1
The type 2 routes are translated to an association between the remote MACs and the remote VTEPs:
# show evpn mac vni 100
Number of MACs (local and remote) known for this VNI: 4
MAC               Type   Intf/Remote VTEP      VLAN
50:54:33:00:00:09 remote 203.0.113.1
50:54:33:00:00:0a local  eth1.100
50:54:33:00:00:0b local  eth2.100
50:54:33:00:00:0c remote 203.0.113.3

FDB configuration The last step is to ensure Quagga has correctly provided the received information to the kernel. This can be checked with the bridge command:
# bridge fdb show dev vxlan100   grep dst
00:00:00:00:00:00 dst 203.0.113.1 self permanent
00:00:00:00:00:00 dst 203.0.113.3 self permanent
50:54:33:00:00:0c dst 203.0.113.3 self
50:54:33:00:00:09 dst 203.0.113.1 self
All good! The two first lines are the translation of the type 3 routes (any BUM frame will be sent to both 203.0.113.1 and 203.0.113.3) and the two last ones are the translation of the type 2 routes.

Interoperability One of the strength of BGP EVPN is the interoperability with other network vendors. To demonstrate it works as expected, we will configure a Juniper vMX to act as a VTEP. First, we need to configure the physical bridge9. This is similar to the use of ip link and brctl with Linux. We only configure one physical interface with two old-school VLANs paired with matching VNIs.
interfaces  
    ge-0/0/1  
        unit 0  
            family bridge  
                interface-mode trunk;
                vlan-id-list [ 100 200 ];


routing-instances  
    switch  
        instance-type virtual-switch;
        interface ge-0/0/1.0;
        bridge-domains  
            vlan100  
                domain-type bridge;
                vlan-id 100;
                vxlan  
                    vni 100;
                    ingress-node-replication;
                 
             
            vlan200  
                domain-type bridge;
                vlan-id 200;
                vxlan  
                    vni 200;
                    ingress-node-replication;


Then, we configure BGP EVPN to advertise all known VNIs. The configuration is quite similar to the one we did with Quagga:
protocols  
    bgp  
        group fabric  
            type internal;
            multihop;
            family evpn signaling;
            local-address 203.0.113.3;
            neighbor 203.0.113.253;
            neighbor 203.0.113.254;


routing-instances  
    switch  
        vtep-source-interface lo0.0;
        route-distinguisher 203.0.113.3:1; #  
        vrf-import EVPN-VRF-VXLAN;
        vrf-target  
            target:65000:1;
            auto;
         
        protocols  
            evpn  
                encapsulation vxlan;
                extended-vni-list all;
                multicast-mode ingress-replication;


routing-options  
    router-id 203.0.113.3;
    autonomous-system 65000;
 
policy-options  
    policy-statement EVPN-VRF-VXLAN  
        then accept;
     
 
We also need a small compatibility patch for Cumulus Quagga10. The routes sent by this configuration are very similar to the routes sent by Quagga. The main differences are:
  • on JunOS, the route distinguisher is configured statically (in ), and
  • on JunOS, the VNI is also encoded as an Ethernet tag ID.
Here is a type 3 route, as sent by JunOS:
> show route table bgp.evpn.0 receive-protocol bgp 203.0.113.3 extensive
bgp.evpn.0: 13 destinations, 13 routes (13 active, 0 holddown, 0 hidden)
* 3:203.0.113.3:1::100::203.0.113.3/304 IM (1 entry, 1 announced)
     Accepted
     Route Distinguisher: 203.0.113.3:1
     Nexthop: 203.0.113.3
     Localpref: 100
     AS path: I
     Communities: target:65000:268435556 encapsulation:vxlan(0x8)
     PMSI: Flags 0x0: Label 6: Type INGRESS-REPLICATION 203.0.113.3
[...]
Here is a type 2 route:
> show route table bgp.evpn.0 receive-protocol bgp 203.0.113.3 extensive
bgp.evpn.0: 13 destinations, 13 routes (13 active, 0 holddown, 0 hidden)
* 2:203.0.113.3:1::200::50:54:33:00:00:0f/304 MAC/IP (1 entry, 1 announced)
     Accepted
     Route Distinguisher: 203.0.113.3:1
     Route Label: 200
     ESI: 00:00:00:00:00:00:00:00:00:00
     Nexthop: 203.0.113.3
     Localpref: 100
     AS path: I
     Communities: target:65000:268435656 encapsulation:vxlan(0x8)
[...]
We can check that the vMX is able to make sense of the routes it receives from its peers running Quagga:
> show evpn database l2-domain-id 100
Instance: switch
VLAN  DomainId  MAC address        Active source                  Timestamp        IP address
     100        50:54:33:00:00:0c  203.0.113.1                    Apr 30 12:46:20
     100        50:54:33:00:00:0d  203.0.113.2                    Apr 30 12:32:42
     100        50:54:33:00:00:0e  203.0.113.2                    Apr 30 12:46:20
     100        50:54:33:00:00:0f  ge-0/0/1.0                     Apr 30 12:45:55
On the other end, if we look at one of the Quagga-based VTEP, we can check the received routes are correctly understood:
# show evpn vni 100
VNI: 100
 VxLAN interface: vxlan100 ifIndex: 9 VTEP IP: 203.0.113.1
 Remote VTEPs for this VNI:
  203.0.113.3
  203.0.113.2
 Number of MACs (local and remote) known for this VNI: 4
 Number of ARPs (IPv4 and IPv6, local and remote) known for this VNI: 0
# show evpn mac vni 100
Number of MACs (local and remote) known for this VNI: 4
MAC               Type   Intf/Remote VTEP      VLAN
50:54:33:00:00:0c local  eth1.100
50:54:33:00:00:0d remote 203.0.113.2
50:54:33:00:00:0e remote 203.0.113.2
50:54:33:00:00:0f remote 203.0.113.3
Get in touch if you have some success with other vendors!

  1. For example, they may use bridges to connect containers together.
  2. Such a feature can replace proprietary implementations of MC-LAG allowing several VTEPs to act as a endpoint for a single link aggregation group. This is not needed on our scenario where hypervisors act as VTEPs.
  3. The development of Quagga is slow and closed . New features are often stalled. FRR is placed under the umbrella of the Linux Foundation, has a GitHub-centered development model and an election process. It already has several interesting enhancements (notably, BGP add-path, BGP unnumbered, MPLS and LDP).
  4. I am unenthusiastic about projects whose the sole purpose is to rewrite something in Go. However, while being quite young, GoBGP is quite valuable on its own (good architecture, good performance).
  5. The 48-port version is around $10,000 with the BGP license.
  6. An empty chassis with a dual routing engine (RE-S-1800X4-16G) is around $30,000.
  7. I don t know how pricey the vRR is. For evaluation purposes, it can be downloaded for free if you are a customer.
  8. The value 100 used in the route distinguishier (203.0.113.2:100) is not the one used to encode the VNI. The VNI is encoded in the route target (65000:268435556), in the 24 least signifiant bits (268435556 & 0xffffff equals 100). As long as VNIs are unique, we don t have to understand those details.
  9. For some reason, the use of a virtual switch is mandatory. This is specific to this platform: a QFX doesn t require this.
  10. The encoding of the VNI into the route target is being standardized in draft-ietf-bess-evpn-overlay. Juniper already implements this draft.

Reproducible builds folks: Reproducing R packages

In the past couple of weeks, Ximin Luo worked on making R generate reproducible output. This is now mostly complete, and we're waiting on feedback from upstream about our patch. In the meantime, there are a few packages that remain unreproducible, but the issue probably lies in those specific packages rather than the R toolchain. Perhaps you can help out with them, after reading this!
R packages compile into a .rdb database format that contains the package's definitions, plus a .rdx index file for easy lookup in the .rdb file. Usually, there is a main rdb with the package contents, plus another rdb that stores the help data. There is also a paths.rds (same format as .rdx) that contains some more stuff. One can actually read these files by hand using Rscript, see the diffoscope code in rdata.py. If you run that, you can see that path.rds contains some obvious paths, but the other files contain less obvious stuff, and in fact these scripts give identical output for the .rdb files, even though they are bitwise different. To get to the bottom of this, we'll have to use the R debugger. Attached to this post is a script that smooths this process. I ran this against Debian's R packages, but it probably also works with other distros' R packages - try it and see. You run it like ./r-mini-repro-test.sh $pkgdir $builddir and it will output some hashes for you; make sure to install the build dependencies first. You should manually vary both $pkgdir and $builddir to introduce the build-path variations; $builddir can be an arbitrary string but $pkgdir should point to the actual R package's source directory, so I just copy that to two locations and point the script at each of them in turn. Now, we can begin debugging. Before I did this, we had 478 unreproducible R packages so the biggest problem was likely with R itself. I downloaded the source code of both R and a small example package (r-cran-tensor), then figured out how the R packages were actually being built. This resulted in me writing the script above, to speed up debugging. You can read about R's debugger here (no HTTPS), it's a bit primitive but it supports the basic stuff (step, continue, where, print/eval) and that was adequate for me. Debugging R core So let's take a small example with Debian R 3.4.0-1:
$ ../r-mini-repro-test.sh r-cran-tensor-1.5 123
[..]
* installing *source* package  tensor  ...
** package  tensor  successfully unpacked and MD5 sums checked
** R
** preparing package for lazy loading
** help
*** installing help indices
** building package indices
** testing if installed package can be loaded
* DONE (tensor)
[..]
c71a766429151a13e46039f3c37a14edc704004f410c34f8f37a2f098506421d  ./debian/123/usr/lib/R/site-library/tensor/R/tensor.rdx
736b5b4a885db71fb3fe2a538faeefe43c500c4080dbf2c75b97135b98401acd  ./debian/123/usr/lib/R/site-library/tensor/R/tensor.rdb
8a3f9616de7ee78a83b07395dd6ec43c5259d3f1b1b653d397808fc9fc5d96c2  ./debian/123/usr/lib/R/site-library/tensor/help/tensor.rdx
d1ac634987b24606a5da627ec073f45edce2bddf071391dd17c246a0a01eba63  ./debian/123/usr/lib/R/site-library/tensor/help/tensor.rdb
80796cc1a2cfcac40c394153f67617d575e103a405430b8483c2261a903db046  ./debian/123/usr/lib/R/site-library/tensor/help/paths.rds
$ ../r-mini-repro-test.sh r-cran-tensor-1.5 1234
[..]
5f081f4d6f9da1fbe06e374067e6636d926de4cdf09886058b15c5928c636c0d  ./debian/1234/usr/lib/R/site-library/tensor/R/tensor.rdx
7145669891e1b766ca0d8d89fa9c317af716e61a62650abe3a11a848240f1d57  ./debian/1234/usr/lib/R/site-library/tensor/R/tensor.rdb
8a3f9616de7ee78a83b07395dd6ec43c5259d3f1b1b653d397808fc9fc5d96c2  ./debian/1234/usr/lib/R/site-library/tensor/help/tensor.rdx
d1ac634987b24606a5da627ec073f45edce2bddf071391dd17c246a0a01eba63  ./debian/1234/usr/lib/R/site-library/tensor/help/tensor.rdb
80796cc1a2cfcac40c394153f67617d575e103a405430b8483c2261a903db046  ./debian/1234/usr/lib/R/site-library/tensor/help/paths.rds
The files are created by the ** preparing package for lazy loading and ** help steps. In retrospect this seems somewhat obvious from the output, but I had never done R before so I spent a while using strace to be sure; one can see that those files are indeed written to after those strings are printed. Then we can grep the R source code for these strings.
r-base-3.4.0$ grep -Ri "preparing package for lazy loading" src
src/library/tools/R/install.R:                starsmsg(stars, "preparing package for lazy loading")
Reading the file, we see that this happens in the tools:::.install_packages function, and reading it further we see that it calls makeLazyLoading then code2LazyLoadDB then makeLazyLoadDB. Seems promising, let's confirm it before chasing potential wild geese. Important: In the rest of these command-line outputs I'll prepend what I input with >>> but this doesn't actually get printed by Rscript. So don't be surprised that you don't see these, when you're trying to recreate my steps. Also I am a total R noob so possibly there are more elegant ways to do what I'm about to show you; this is what I came up with after 2-3 hours of research.
$ DEBUG=1 ../r-mini-repro-test.sh r-cran-tensor-1.5 123
enter (some or all of) the following into R:
[.. helpful commands ..]
+ R_DEFAULT_PACKAGES= LC_COLLATE=C /usr/lib/R/bin/R --no-restore --slave --args nextArg-lnextArgdebian/123/usr/lib/R/site-librarynextArg-dnextArg.nextArg--built-timestamp="Thu, 01 Jan 1970 00:00:00 +0000"
>>> debug(tools:::makeLazyLoadDB)
>>> tools:::.install_packages()
processing  . 
[..]
** preparing package for lazy loading
debugging in: makeLazyLoadDB(ns, dbbase, compress = compress)
debug:  
[.. source code of makeLazyLoadDB, not yet run ..]
 
OK so we just entered the function and it's paused, in a separate shell let's check what it's doing:
$ find r-cran-tensor-1.5 -name '*.rdb'
[ no output ]
So, no files have been written yet, which means none of the parent functions did anything, we are in the right function (or it's in a child). If we continue the function, we get:
>>> c
exiting from: makeLazyLoadDB(ns, dbbase, compress = compress)
** help
debugging in: makeLazyLoadDB(db, file.path(manOutDir, basename(outDir)))
debug:  
[.. source code of makeLazyLoadDB, not yet run ..]
 
$ find r-cran-tensor-1.5 -name '*.rdb'
r-cran-tensor-1.5/debian/123/usr/lib/R/site-library/tensor/R/tensor.rdb
Then continuing again:
>>> c
exiting from: makeLazyLoadDB(db, file.path(manOutDir, basename(outDir)))
*** installing help indices
** building package indices
** testing if installed package can be loaded
* DONE (tensor)
$ find r-cran-tensor-1.5 -name '*.rdb'
r-cran-tensor-1.5/debian/123/usr/lib/R/site-library/tensor/help/tensor.rdb
r-cran-tensor-1.5/debian/123/usr/lib/R/site-library/tensor/R/tensor.rdb
So it seems likely this function is the correct one. After reading the source code of makeLazyLoadDB, even though I don't understand the whole thing, it looks like possibly this part is the one that does the actual writing:
    for (i in seq_along(vars))  
        key <- if (is.null(from)   is.environment(from))
            lazyLoadDBinsertVariable(vars[i], from, datafile,
                                     ascii, compress,  envhook)
        else lazyLoadDBinsertListElement(from, i, datafile, ascii,
                                         compress, envhook)
        assign(vars[i], key, envir = varenv)
     
So let's step through it and see if the data contains any paths.
$ DEBUG=1 ../r-mini-repro-test.sh r-cran-tensor-1.5 123
[..]
>>> debug(tools:::makeLazyLoadDB)
>>> tools:::.install_packages()
processing  . 
[..]
** preparing package for lazy loading
debugging in: makeLazyLoadDB(ns, dbbase, compress = compress)
debug:  
[.. source code of makeLazyLoadDB, not yet run ..]
 
>>>                                                                             # pressing <Enter> just means "step"
debug: ascii <- as.logical(ascii)                                               # this is the first line of the function
>>>                                                                             # keep stepping
[..]
>>>
debug: for (i in seq_along(vars))  
[.. source code of the inside of the block, not yet run ..]
 
>>>
debug: key <- if (is.null(from)   is.environment(from)) lazyLoadDBinsertVariable(vars[i],
    from, datafile, ascii, compress, envhook) else lazyLoadDBinsertListElement(from,
    i, datafile, ascii, compress, envhook)
>>>
debug: lazyLoadDBinsertVariable(vars[i], from, datafile, ascii, compress,
    envhook)                                                                    # not yet run
If we look at the source code we see that it will try to insert the value of .Internal(getVarsFromFrame(vars[i], from, FALSE))[[1L]] into the file, so let's evaluate it:
>>> .Internal(getVarsFromFrame(vars[i], from, FALSE))[[1L]]
function (x, y)
tensor(x, y, 2, 2)
<environment: namespace:tensor>
>>> typeof(.Internal(getVarsFromFrame(vars[i], from, FALSE))[[1L]])
[1] "closure"
>>> environment(.Internal(getVarsFromFrame(vars[i], from, FALSE))[[1L]])        # get the environment of a closure
<environment: namespace:tensor>
>>> envlist(environment(.Internal(getVarsFromFrame(vars[i], from, FALSE))[[1L]])) # environment as an envlist, more detailed output
$ %*t% 
function (x, y)
tensor(x, y, 2, 2)
<environment: namespace:tensor>
$ %t*% 
function (x, y)
tensor(x, y, 1, 1)
<environment: namespace:tensor>
$ %t*t% 
function (x, y)
tensor(x, y, 1, 2)
<environment: namespace:tensor>
$.__NAMESPACE__.
<environment: 0x55eb55d00be0>
$.__S3MethodsTable__.
<environment: 0x55eb55d166e8>
$.packageName
[1] "tensor"
$tensor
function (A, B, alongA = integer(0), alongB = integer(0))
 
[.. function definition ..]
 
<environment: namespace:tensor>
Nothing obviously containing paths so far, let's keep stepping and dumping the objects
>>>
debug: assign(vars[i], key, envir = varenv)
>>>                                                                             # next iteration now
debug: key <- if (is.null(from)   is.environment(from)) lazyLoadDBinsertVariable(vars[i],
    from, datafile, ascii, compress, envhook) else lazyLoadDBinsertListElement(from,
    i, datafile, ascii, compress, envhook)
>>>
debug: lazyLoadDBinsertVariable(vars[i], from, datafile, ascii, compress,
    envhook)
>>> .Internal(getVarsFromFrame(vars[i], from, FALSE))[[1L]]
function (x, y)
tensor(x, y, 1, 1)
<environment: namespace:tensor>
>>>
[.. more stepping ..]
debug: lazyLoadDBinsertVariable(vars[i], from, datafile, ascii, compress,
    envhook)
>>> .Internal(getVarsFromFrame(vars[i], from, FALSE))[[1L]]
<environment: 0x55eb55d00be0>
>>> envlist(.Internal(getVarsFromFrame(vars[i], from, FALSE))[[1L]])
$S3methods
     [,1] [,2] [,3]
$dynlibs
NULL
$exports
<environment: 0x55eb55d0a4f8>
$imports
$imports$base
[1] TRUE
$lazydata
<environment: 0x55eb55d0a178>
attr(,"name")
[1] "lazydata:tensor"
$path
[1] "/mystupidbuildpath/r-tests/r-cran-tensor-1.5/debian/123/usr/lib/R/site-library/tensor"
$spec
    name  version
"tensor"    "1.5"
Oh, here we go. (In fact we could have got this earlier, it was part of the .__NAMESPACE__. key of the first environment that we examined.) Naturally, you'll sometimes miss stuff, and sometimes go down dead ends when doing something like this, perseverence is important. The names are also a hint, after grepping the R source code for names like "S3methods" and "lazydata" we see that src/library/base/R/namespace.R is the only one that contains all of them, then reading that code in more depth reveals this. After patching it, rebuilding r-base, installing this patched version, then running our tests again, we see that we've eliminated differences in the main rdb file but not the help rdb file. :( In fact, after some more time stepping through the loop repeatedly and printing out all the objects, nothing obvious shows up. Time to re-read the source code of makeLazyLoadDB. We notice that all the lazyLoadDBinsert* functions have a hook parameter that we haven't been stepping through because it's in a separate function. So let's do that. Since it's an inner function, one has to call debug() inside makeLazyLoadDB:
$ DEBUG=1 ../r-mini-repro-test.sh r-cran-tensor-1.5 123
[..]
>>> debug(tools:::makeLazyLoadDB)
>>> tools:::.install_packages()
processing  . 
[..]
** preparing package for lazy loading
debugging in: makeLazyLoadDB(ns, dbbase, compress = compress)
debug:  
[.. source code of makeLazyLoadDB, not yet run ..]
 
>>> c
exiting from: makeLazyLoadDB(ns, dbbase, compress = compress)
** help
debugging in: makeLazyLoadDB(db, file.path(manOutDir, basename(outDir)))
debug:  
[.. source code of makeLazyLoadDB, not yet run ..]
 
[.. stepping through the function ..]
debug: envhook <- function(e)  
[.. function definition ..]
 
>>>                                                                             # step next, to define that function
[.. next statement, we don't care about it ..]
>>> debug(envhook)
[.. then keep stepping through makeLazyLoadDB ..]
>>>
debug: lazyLoadDBinsertVariable(vars[i], from, datafile, ascii, compress,
    envhook)
[.. then keep stepping through makeLazyLoadDB ..]
debug: lazyLoadDBinsertVariable(vars[i], from, datafile, ascii, compress,
    envhook)
[.. hook wasn't run for these previous iterations for some reason, but keep stepping ..]
[.. eventually we get ..]
debugging in: (function (e)
 
[.. function definition ..]
 )(<environment>)                                                               # "(..)(<environment>)" is R's name for that function (actually a closure)
debug:  
[.. source code, not yet run ..]
 
>>> e
/mystupidbuildpath/r-tests/r-cran-tensor-1.5/man/tensor.Rd
>>> typeof(e)
[1] "environment"
>>> envlist(e)
$Enc
[1] "UTF-8"
$encoding
[1] ""
$filename
[1] "/mystupidbuildpath/r-tests/r-cran-tensor-1.5/man/tensor.Rd"
$timestamp
[1] "2002-01-16 11:51:14 CET"
$wd
[1] "/mystupidbuildpath/r-tests/r-cran-tensor-1.5"
After doing the same thing as before, i.e. grepping the R source code for "Enc" "timestamp" etc, we spot a few different places that are setting the wd field. Then after some experimenting, we find that overwriting this in a different file (src/library/tools/R/parseRd.R) seems to work to get rid of this irreproducibility. (This may not be the best; our exact strategy is still being discussed with upstream, but at least we know which areas of the code are responsible.) Exercise for the reader to figure out how to get rid of the paths.rds difference. After doing the previous two, this one is fairly easy. These three issues allowed us to write a preliminary patch that enabled us to reproduce r-cran-tensor.
$ ./r-mini-repro-test.sh r-cran-tensor-1.5 123
[..]
bca9de1351ab265475cf6f1af3f6aff49bde1d209e8fafb33954caa8d90f3462  ./debian/123/usr/lib/R/site-library/tensor/R/tensor.rdx
ac7fffeb751ffc2d13c5317704b19787a7078446d97d1c6f259c93f282e04cef  ./debian/123/usr/lib/R/site-library/tensor/R/tensor.rdb
d989603340d1e8f14c35551ef379956653bf3b6e7b1868b4bf9a66d85820998e  ./debian/123/usr/lib/R/site-library/tensor/help/tensor.rdx
30e543cda9f97c202dc9c0291933940dfe71b94d352f66d8ed6c035c1a722b41  ./debian/123/usr/lib/R/site-library/tensor/help/tensor.rdb
e9f78ba2cca39a6face1ed88fce4bb718d911d567d01db49bc00a3011720ac50  ./debian/123/usr/lib/R/site-library/tensor/help/paths.rds
$ ./r-mini-repro-test.sh r-cran-tensor-1.5 1234
[..]
bca9de1351ab265475cf6f1af3f6aff49bde1d209e8fafb33954caa8d90f3462  ./debian/1234/usr/lib/R/site-library/tensor/R/tensor.rdx
ac7fffeb751ffc2d13c5317704b19787a7078446d97d1c6f259c93f282e04cef  ./debian/1234/usr/lib/R/site-library/tensor/R/tensor.rdb
d989603340d1e8f14c35551ef379956653bf3b6e7b1868b4bf9a66d85820998e  ./debian/1234/usr/lib/R/site-library/tensor/help/tensor.rdx
30e543cda9f97c202dc9c0291933940dfe71b94d352f66d8ed6c035c1a722b41  ./debian/1234/usr/lib/R/site-library/tensor/help/tensor.rdb
e9f78ba2cca39a6face1ed88fce4bb718d911d567d01db49bc00a3011720ac50  ./debian/1234/usr/lib/R/site-library/tensor/help/paths.rds
$ ./r-mini-repro-test.sh r-cran-tensor 1234
[..]
bca9de1351ab265475cf6f1af3f6aff49bde1d209e8fafb33954caa8d90f3462  ./debian/1234/usr/lib/R/site-library/tensor/R/tensor.rdx
ac7fffeb751ffc2d13c5317704b19787a7078446d97d1c6f259c93f282e04cef  ./debian/1234/usr/lib/R/site-library/tensor/R/tensor.rdb
d989603340d1e8f14c35551ef379956653bf3b6e7b1868b4bf9a66d85820998e  ./debian/1234/usr/lib/R/site-library/tensor/help/tensor.rdx
30e543cda9f97c202dc9c0291933940dfe71b94d352f66d8ed6c035c1a722b41  ./debian/1234/usr/lib/R/site-library/tensor/help/tensor.rdb
e9f78ba2cca39a6face1ed88fce4bb718d911d567d01db49bc00a3011720ac50  ./debian/1234/usr/lib/R/site-library/tensor/help/paths.rds
Testing the patch Of course r-cran-tensor is just 1 package, so then we tested this patch on all 478 tagged R packages. Before the patch, all of these were unreproducible. Now 463/478 are reproducible, hurray! The first version of the patch made 2 packages FTBFS ("fail to build from source"), r-bioc-biobase and r-cran-shinybs; this was fixed in a subsequent version of the patch. (Some other packages, r-cran-randomfields r-cran-randomfieldsutils, FTBFS even with an unpatched r-base, due to differences between 3.3.3 and 3.4.0 (#861333), and not because of our patch.) Given the overwhelming proportion of packages that did reproduce, the other 14 packages that are still unreproducible, are quite probably due to issues in those specific packages. Only 2 of these are certainly due to build-path differences: r-cran-runit r-cran-rinside. This is because, we currently see they are reproducible in Debian testing but not Debian unstable. This is slightly misleading, the real reason is not testing vs unstable directly; rather the fact that we (at the time of writing) use the same build path when trying to reproduce Debian testing packages, and different paths for unstable. The other 12 are unreproducible in both testing and unstable, so it either suffers from a non-build-path issue as well as a build-path issue, or only a non-build-path issue. So, further investigation of each package is needed. This is where you can help. :) Debugging R packages To investigate why (for example) r-cran-runit doesn't reproduce despite our patches, we just do the above process again:
$ DEBUG=1 ../r-mini-repro-test.sh r-cran-runit
[..]
>>> debug(tools:::makeLazyLoadDB)
>>> tools:::.install_packages()
processing  . 
a directory
* build_help_types=
* DBG: 'R CMD INSTALL' now doing do_install()
* created lock directory  /mystupidbuildpath/r-tests/r-cran-runit/debian/r-cran-runit/usr/lib/R/site-library/00LOCK-r-cran-runit 
* installing *source* package  RUnit  ...
** package  RUnit  successfully unpacked and MD5 sums checked
** backing up earlier installation
** R
** inst
** preparing package for lazy loading
debugging in: makeLazyLoadDB(ns, dbbase, compress = compress)
debug:  
[.. source code of makeLazyLoadDB ..]
 
We know our irreproducibility is with the help files and not the main package, so c to skip this part:
>>> c
exiting from: makeLazyLoadDB(ns, dbbase, compress = compress)
** help
debugging in: makeLazyLoadDB(db, file.path(manOutDir, basename(outDir)))
debug:  
[.. source code of makeLazyLoadDB ..]
 
Examine the "from" object, grep the output for our builddir
>>> from
$ RUnit-internal 
[..]
$ RUnit-intro 
[..]
[.. etc ..]
[..]
$checkFuncs
\title RUnit check [..]
[..]
  For a simple example see the provided test cases in
  /mystupidbuildpath/r-tests/r-cran-runit/debian/r-cran-runit/usr/lib/R/site-library/RUnit/examples/runitVirtualClassTest.r.
[..]
Found it, now we quit, patch the source code, and try again.
>>> Q
[..]
exit code 1
[.. hack hack hack ..]
$ ../r-mini-repro-test.sh r-cran-runit-0.4.31/ 123
[..]
01347305351a45bb88dab909c56942498e97f5edbe583cf6ab1327138914e315  ./debian/123/usr/lib/R/site-library/RUnit/R/RUnit.rdx
ecde40bdfac5b070acc30a0d5889d9d7f65418844d14312aceff6af5b9d0bf7a  ./debian/123/usr/lib/R/site-library/RUnit/R/RUnit.rdb
182d38ac5adc160eb9edd40d5bd7e27b95b756b8f14cee7d912ba4745ae81bdc  ./debian/123/usr/lib/R/site-library/RUnit/help/RUnit.rdx
f8a9f22acc9f937cb47a92f3979d619e83a791ad734796c2fcd9d0a34e1f11ca  ./debian/123/usr/lib/R/site-library/RUnit/help/RUnit.rdb
5c37672fdc1f325b8a3846f4eafd2624b246ec70ce01d197134fa1b97a9ee849  ./debian/123/usr/lib/R/site-library/RUnit/help/paths.rds
$ ../r-mini-repro-test.sh r-cran-runit-0.4.31/ 1234
[..]
01347305351a45bb88dab909c56942498e97f5edbe583cf6ab1327138914e315  ./debian/1234/usr/lib/R/site-library/RUnit/R/RUnit.rdx
ecde40bdfac5b070acc30a0d5889d9d7f65418844d14312aceff6af5b9d0bf7a  ./debian/1234/usr/lib/R/site-library/RUnit/R/RUnit.rdb
182d38ac5adc160eb9edd40d5bd7e27b95b756b8f14cee7d912ba4745ae81bdc  ./debian/1234/usr/lib/R/site-library/RUnit/help/RUnit.rdx
f8a9f22acc9f937cb47a92f3979d619e83a791ad734796c2fcd9d0a34e1f11ca  ./debian/1234/usr/lib/R/site-library/RUnit/help/RUnit.rdb
5c37672fdc1f325b8a3846f4eafd2624b246ec70ce01d197134fa1b97a9ee849  ./debian/1234/usr/lib/R/site-library/RUnit/help/paths.rds
Works! All finished. :) If yours doesn't, just repeat the above loop; hopefully eventually you'll get there.

2 May 2017

Urvika Gola: Debian goes to Hackathon!

Recently I had the opportunity to be a part of Ultrahack as a mentor which was held in Helsinki, Finland.
Ultrahack is a combination of hackathon and startup accelerators.
As a mentor, my role was to ensure that each team have best possible chances of fulfilling the evaluation criteria for the contest. I also helped teams with the development and pitching. It was a very exciting place to brainstorm life changing ideas and convert those ideas into working model. I met so many amazing developers who were building cool stuff. There were a few open source developers and student open source developers like me!
Being a Debian contributor, I spread the what Debian is all about. What makes it the best linux distribution. I talked to students about various programmes like GSoC and Outreachy, Debian participates as a mentoring organisation. I also described my role as a GSoC student under Debian and the free-RTC project I worked under. Many female developers were interested in the Outreachy programme, I described the projects that Debian has currently under the Outreachy programme. During the hackathon period, I talked to people about the upcoming annual DebConf which takes place. I informed them that they can still apply as a speaker or for diversity bursaries and about the logo-making competition. Thank you Debian for always supporting me!

30 April 2017

Matthew Garrett: Looking at the Netgear Arlo home IP camera

Another in the series of looking at the security of IoT type objects. This time I've gone for the Arlo network connected cameras produced by Netgear, specifically the stock Arlo base system with a single camera. The base station is based on a Broadcom 5358 SoC with an 802.11n radio, along with a single Broadcom gigabit ethernet interface. Other than it only having a single ethernet port, this looks pretty much like a standard Netgear router. There's a convenient unpopulated header on the board that turns out to be a serial console, so getting a shell is only a few minutes work.

Normal setup is straight forward. You plug the base station into a router, wait for all the lights to come on and then you visit arlo.netgear.com and follow the setup instructions - by this point the base station has connected to Netgear's cloud service and you're just associating it to your account. Security here is straightforward: you need to be coming from the same IP address as the Arlo. For most home users with NAT this works fine. I sat frustrated as it repeatedly failed to find any devices, before finally moving everything behind a backup router (my main network isn't NATted) for initial setup. Once you and the Arlo are on the same IP address, the site shows you the base station's serial number for confirmation and then you attach it to your account. Next step is adding cameras. Each base station is broadcasting an 802.11 network on the 2.4GHz spectrum. You connect a camera by pressing the sync button on the base station and then the sync button on the camera. The camera associates with the base station via WPS and now you're up and running.

This is the point where I get bored and stop following instructions, but if you're using a desktop browser (rather than using the mobile app) you appear to need Flash in order to actually see any of the camera footage. Bleah.

But back to the device itself. The first thing I traced was the initial device association. What I found was that once the device is associated with an account, it can't be attached to another account. This is good - I can't simply request that devices be rebound to my account from someone else's. Further, while the serial number is displayed to the user to disambiguate between devices, it doesn't seem to be what's used internally. Tracing the logon traffic from the base station shows it sending a long random device ID along with an authentication token. If you perform a factory reset, these values are regenerated. The device to account mapping seems to be based on this random device ID, which means that once the device is reset and bound to another account there's no way for the initial account owner to regain access (other than resetting it again and binding it back to their account). This is far better than many devices I've looked at.

Performing a factory reset also changes the WPA PSK for the camera network. Newsky Security discovered that doing so originally reset it to 12345678, which is, uh, suboptimal? That's been fixed in newer firmware, along with their discovery that the original random password choice was not terribly random.

All communication from the base station to the cloud seems to be over SSL, and everything validates certificates properly. This also seems to be true for client communication with the cloud service - camera footage is streamed back over port 443 as well.

Most of the functionality of the base station is provided by two daemons, xagent and vzdaemon. xagent appears to be responsible for registering the device with the cloud service, while vzdaemon handles the camera side of things (including motion detection). All of this is running as root, so in the event of any kind of vulnerability the entire platform is owned. For such a single purpose device this isn't really a big deal (the only sensitive data it has is the camera feed - if someone has access to that then root doesn't really buy them anything else). They're statically linked and stripped so I couldn't be bothered spending any significant amount of time digging into them. In any case, they don't expose any remotely accessible ports and only connect to services with verified SSL certificates. They're probably not a big risk.

Other than the dependence on Flash, there's nothing immediately concerning here. What is a little worrying is a family of daemons running on the device and listening to various high numbered UDP ports. These appear to be provided by Broadcom and a standard part of all their router platforms - they're intended for handling various bits of wireless authentication. It's not clear why they're listening on 0.0.0.0 rather than 127.0.0.1, and it's not obvious whether they're vulnerable (they mostly appear to receive packets from the driver itself, process them and then stick packets back into the kernel so who knows what's actually going on), but since you can't set one of these devices up in the first place without it being behind a NAT gateway it's unlikely to be of real concern to most users. On the other hand, the same daemons seem to be present on several Broadcom-based router platforms where they may end up being visible to the outside world. That's probably investigation for another day, though.

Overall: pretty solid, frustrating to set up if your network doesn't match their expectations, wouldn't have grave concerns over having it on an appropriately firewalled network.

(Edited to replace a mistaken reference to WDS with WPS)

comment count unavailable comments

Next.

Previous.