Search Results: "reg"

14 August 2016

Dirk Eddelbuettel: rfoaas 1.0.0

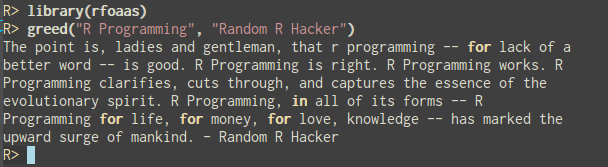
rfoaas greed example The big 1.0.0 is here! Following the unsurpassed lead of the FOAAS project, we have arrived at a milestone: Release 1.0.0 is now on CRAN. The rfoaas package provides an interface for R to the most excellent FOAAS service--which itself provides a modern, scalable and RESTful web service for the frequent need to tell someone to f$#@ off. Release 1.0.0 brings fourteen (!!) new access points: back(), bm(), gfy(), think(), keep(), single_(), look(), looking(), no(), give(), zero(), pulp(), sake(), and anyway(). All with documentation and testing. Even more neatly, thanks to a very pull request by Tyler Hunt, we can now issue random FOs via the getRandomFO() function! As usual, CRANberries provides a diff to the previous CRAN release. Questions, comments etc should go to the GitHub issue tracker. More background information is on the project page as well as on the github repo

This post by Dirk Eddelbuettel originated on his Thinking inside the box blog. Please report excessive re-aggregation in third-party for-profit settings.

David Moreno: Deploying a Dancer app on Heroku

There s a few different posts out there on how to run Perl apps, such as Mojolicious-based, on Heroku, but I d like to show how to deploy a Perl Dancer application on Heroku. The startup script of a Dancer application (bin/app.pl) can be used as a PSGI file. With that in mind, I was able to take the good work of Miyagawa s Heroku buildpack for general PSGI apps and hack it a little bit to use Dancer s, specifically. What I like about Miyagawa s approach is that uses the fantastic cpanm and makes it available within your application, instead of the monotonous cpan, to solve dependencies. Let s make a simple Dancer app to show how to make this happen:
/tmp $ dancer -a heroku
+ heroku
+ heroku/bin
+ heroku/bin/app.pl
+ heroku/config.yml
+ heroku/environments
+ heroku/environments/development.yml
+ heroku/environments/production.yml
+ heroku/views
+ heroku/views/index.tt
+ heroku/views/layouts
+ heroku/views/layouts/main.tt
+ heroku/MANIFEST.SKIP
+ heroku/lib
heroku/lib/
+ heroku/lib/heroku.pm
+ heroku/public
+ heroku/public/css
+ heroku/public/css/style.css
+ heroku/public/css/error.css
+ heroku/public/images
+ heroku/public/500.html
+ heroku/public/404.html
+ heroku/public/dispatch.fcgi
+ heroku/public/dispatch.cgi
+ heroku/public/javascripts
+ heroku/public/javascripts/jquery.js
+ heroku/t
+ heroku/t/002_index_route.t
+ heroku/t/001_base.t
+ heroku/Makefile.PL
Now, you already know that by firing perl bin/app.pl you can get your development server up and running. So I ll just proceed to show how to make this work on Heroku, you should already have your development environment configured for it:
/tmp $ cd heroku/
/tmp/heroku $ git init
Initialized empty Git repository in /private/tmp/heroku/.git/
/tmp/heroku :master $ git add .
/tmp/heroku :master $ git commit -a -m 'Dancer on Heroku'
[master (root-commit) 6c0c55a] Dancer on Heroku
22 files changed, 809 insertions(+), 0 deletions(-)
create mode 100644 MANIFEST
create mode 100644 MANIFEST.SKIP
create mode 100644 Makefile.PL
create mode 100755 bin/app.pl
create mode 100644 config.yml
create mode 100644 environments/development.yml
create mode 100644 environments/production.yml
create mode 100644 lib/heroku.pm
create mode 100644 public/404.html
create mode 100644 public/500.html
create mode 100644 public/css/error.css
create mode 100644 public/css/style.css
create mode 100755 public/dispatch.cgi
create mode 100755 public/dispatch.fcgi
create mode 100644 public/favicon.ico
create mode 100644 public/images/perldancer-bg.jpg
create mode 100644 public/images/perldancer.jpg
create mode 100644 public/javascripts/jquery.js
create mode 100644 t/001_base.t
create mode 100644 t/002_index_route.t
create mode 100644 views/index.tt
create mode 100644 views/layouts/main.tt
/tmp/heroku :master $
And now, run heroku create, please note the buildpack URL, http://github.com/damog/heroku-buildpack-perl.git:
/tmp/heroku :master $ heroku create --stack cedar --buildpack http://github.com/damog/heroku-buildpack-perl.git
Creating blazing-beach-7280... done, stack is cedar
http://blazing-beach-7280.herokuapp.com/   git@heroku.com:blazing-beach-7280.git
Git remote heroku added
/tmp/heroku :master $
And just push:
/tmp/heroku :master $ git push heroku master
Counting objects: 34, done.
Delta compression using up to 4 threads.
Compressing objects: 100% (30/30), done.
Writing objects: 100% (34/34), 40.60 KiB, done.
Total 34 (delta 3), reused 0 (delta 0)
-----> Heroku receiving push
-----> Fetching custom buildpack... done
-----> Perl/PSGI Dancer! app detected
-----> Bootstrapping cpanm
Successfully installed JSON-PP-2.27200
Successfully installed CPAN-Meta-YAML-0.008
Successfully installed Parse-CPAN-Meta-1.4404 (upgraded from 1.39)
Successfully installed version-0.99 (upgraded from 0.77)
Successfully installed Module-Metadata-1.000009
Successfully installed CPAN-Meta-Requirements-2.122
Successfully installed CPAN-Meta-2.120921
Successfully installed Perl-OSType-1.002
Successfully installed ExtUtils-CBuilder-0.280205 (upgraded from 0.2602)
Successfully installed ExtUtils-ParseXS-3.15 (upgraded from 2.2002)
Successfully installed Module-Build-0.4001 (upgraded from 0.340201)
Successfully installed App-cpanminus-1.5015
12 distributions installed
-----> Installing dependencies
Successfully installed ExtUtils-MakeMaker-6.62 (upgraded from 6.55_02)
Successfully installed YAML-0.84
Successfully installed Test-Simple-0.98 (upgraded from 0.92)
Successfully installed Try-Tiny-0.11
Successfully installed HTTP-Server-Simple-0.44
Successfully installed HTTP-Server-Simple-PSGI-0.14
Successfully installed URI-1.60
Successfully installed Test-Tester-0.108
Successfully installed Test-NoWarnings-1.04
Successfully installed Test-Deep-0.110
Successfully installed LWP-MediaTypes-6.02
Successfully installed Encode-Locale-1.03
Successfully installed HTTP-Date-6.02
Successfully installed HTML-Tagset-3.20
Successfully installed HTML-Parser-3.69
Successfully installed Compress-Raw-Bzip2-2.052 (upgraded from 2.020)
Successfully installed Compress-Raw-Zlib-2.054 (upgraded from 2.020)
Successfully installed IO-Compress-2.052 (upgraded from 2.020)
Successfully installed HTTP-Message-6.03
Successfully installed HTTP-Body-1.15
Successfully installed MIME-Types-1.35
Successfully installed HTTP-Negotiate-6.01
Successfully installed File-Listing-6.04
Successfully installed HTTP-Daemon-6.01
Successfully installed Net-HTTP-6.03
Successfully installed HTTP-Cookies-6.01
Successfully installed WWW-RobotRules-6.02
Successfully installed libwww-perl-6.04
Successfully installed Dancer-1.3097
29 distributions installed
-----> Installing Starman
Successfully installed Test-Requires-0.06
Successfully installed Hash-MultiValue-0.12
Successfully installed Devel-StackTrace-1.27
Successfully installed Test-SharedFork-0.20
Successfully installed Test-TCP-1.16
Successfully installed Class-Inspector-1.27
Successfully installed File-ShareDir-1.03
Successfully installed Filesys-Notify-Simple-0.08
Successfully installed Devel-StackTrace-AsHTML-0.11
Successfully installed Plack-0.9989
Successfully installed Net-Server-2.006
Successfully installed HTTP-Parser-XS-0.14
Successfully installed Data-Dump-1.21
Successfully installed Starman-0.3001
14 distributions installed
-----> Discovering process types
Procfile declares types -> (none)
Default types for Perl/PSGI Dancer! -> web
-----> Compiled slug size is 2.7MB
-----> Launching... done, v4
http://blazing-beach-7280.herokuapp.com deployed to Heroku
To git@heroku.com:blazing-beach-7280.git
* [new branch] master -> master
/tmp/heroku :master $
And you can confirm it works: Please note that the environment it runs on is deployment . The backend server it uses is the great Starman, also by the great Miyagawa. Now, if you add or change dependencies on Makefile.PL, next time you push, those will get updated. Very cool, right? :)

David Moreno: I quit

I just recently quit my job at the startup company I had been working in for almost five years. In startup terms, such long time might be a whole lifetime, but in my case, I grew liking it more and more as the years came, I had evolved from being just another engineer, to lead a team of seven great developers, with decision-making tasks and strategy planning for our technical infrastructure. It s been such a great long teaching journey that I m nothing but pleased with my own performance, learned lessons and skills and all I provided and was provided by the project. Leaving a city like New York is not an easy task. You have it all there, you start making a life and suddenly, before you know it, you already have a bunch of ties to the place, people, leases, important dates, all kinds of shit. Seriously, all kinds of crazy ass shit start to fill up your baggage. You wake up everyday to get into the subway and commute surrounded by all of this people that are just like you: so similar yet so immensely different. No, leaving the city is not an easy task, it s not something to take lightly. You know how people just say my cycle has ended in this place as an euphemism not to end in bad terms with anyone? Well, ending a cycle is indeed a reality, I got to a point where I felt like I needed to head into a different direction, take on new challenges and overall, peace out and hope the best to everyone, specially to myself. This was me, on my last day at work, last Friday of June: (Some) people seem to be anxious to know what I m doing next, and my answer is, go mind your own fucking business. However, life is short and I would love to do any of the following: Decisions, decisions For the time being, I m chilling with my people, friends and family in beautiful Mexico City. I ve been doing so for the entire month of July and I couldn t be more content. August will see my 28th birthday and as I approach thirty, I believe I need to continue moving forward. This stupid world is a tiny place and our lives are short, I for one, will definitively try to take the bull by the horns. Thanks for reading, more updates soon. Peace.

David Moreno: Feedbag released under MIT license

I was contacted by Pivotal Labs regarding licensing of Feedbag. I guess releasing open source software as GPL only makes sense if you continue to live under a rock. I ve bumped the version to 0.9 and released it under MIT license. Feedbag 1.0, which I plan to work on during the following days will bring in a brand new shiny backend powered by Nokogiri, instead of Hpricot (I mean, give me a break, I m trying to catch up with the Ruby community, after all I m primarily a Perl guy :D) and hopefully I will be able to recreate most of the feed auto-discovery test suite that Mark Pilgrim retired (410 Gone) when he committed infosuicide. Have a good weekend!

13 August 2016

Russ Allbery: git-pbuilder 1.42

A minor update to my glue script for building software with pdebuild and git-buildpackage. (Yes, still needs to get rewritten in Python.) This release stops using the old backport location for oldstable builds since oldstable is now wheezy, which merged the backports archive into the regular archive location. The old location is still there for squeeze just in case anyone needs it. It also adds a new environment variable, GIT_PBUILDER_PDEBUILDOPTIONS, that can be used to pass options directly to pdebuild. Previously, there was only a way to pass options to the builder, via pdebuild, but not to configure pdebuild itself. There are some times when that's useful, such as to pass --use-pdebuild-internal. This was based on a patch from Rafa D ugo cki. You can get the latest version of git-pbuilder from my scripts page.

Dariusz Dwornikowski: Automatic PostgreSQL config with Ansible

If for some reasons you can t use dedicated DBaaS for your PostgreSQL (like AWS RDS) then you need to run your database server on a cloud instance. In these kind of setup, when you scale up or down your instance size, you need to adjust PostgreSQL parameters according to the changing RAM size. There are several parameters in PostgreSQL that highly depend on RAM size. An example is shared_buffers for which a rule of thumb says that is should be set to 0.25*RAM. In DBaaS, when you scale the DB instance up or down, parameters are adjusted for you by the cloud provider, e.g. AWS RDS uses parameter groups for that reason, where particular parameters are defined depending on the size of the RAM of the RDS instance. So what can you when you do not have RDS or any other DBaaS? You can always keep several configuration files on your instance, each for a different memory size, you can rewrite you config every time you change the size of the instance or you can use Ansible role for that. Our Ansible role will be very simple, we will have two tasks. One will change the PostgreSQL config, the second one will just restart the database server:
---
- name: Update PostgreSQL config
  template: src=postgresql.conf.j2 dest=/etc/postgresql/9.5/main/postgresql.conf
  register: pgconf
- name: Restart postgresql
  service: name=postgresql state=restarted
  when: pgconf.changed
Now we need the template, where are the calculations take place. RAM size will be taken from the Ansible s fact called ansible_memtotal_mb. Since it returns RAM size in MBs, we will stick to MBs. We will define the following parameters, you can adjust them to your needs: For max_connections we will define a default role variable of 100 but we will allow to specify it at a runtime. The relevant parts of the postgresql.conf.j2 are below:
 max_connections =   max_connections        
 shared_buffers =   (((ansible_memtotal_mb/1024.0) round int)*0.25) int*1024  MB
 work_mem =   ((((ansible_memtotal_mb/1024.0) round int)*0.25)/max_connections*1024) round int  MB
 maintenance_work_mem =   ((ansible_memtotal_mb/1024.0) round int)*64  MB
 effective_cache_size =   (((ansible_memtotal_mb/1024.0) round int)*0.75) int*1024  MB
You can now run the role every time you change the instance size, and the config will be changed accordingly to the RAM size. You can extend the role and maybe add other constraints and change max_connections to you specific needs. An example playbook could look like:
---
hosts: my_postgres
roles:
  - postgres-config 
vars:
  - max_connection: 300
And run it:
$ ansible-playbook playbook.yml
The complete role can be found in my github repo.

Russell Coker: SSD and M.2

The Need for Speed One of my clients has an important server running ZFS. They need to have a filesystem that detects corruption, while regular RAID is good for the case where a disk gives read errors it doesn t cover the case where a disk returns bad data and claims it to be good (which I ve witnessed in BTRFS and ZFS systems). BTRFS is good for the case of a single disk or a RAID-1 array but I believe that the RAID-5 code for BTRFS is not sufficiently tested for business use. ZFS doesn t perform very well due to the checksums on data and metadata requiring multiple writes for a single change which also causes more fragmentation. This isn t a criticism of ZFS, it s just an engineering trade-off for the data integrity features. ZFS supports read-caching on a SSD (the L2ARC) and write-back caching (ZIL). To get the best benefit of L2ARC and ZIL you need fast SSD storage. So now with my client investigating 10 gigabit Ethernet I have to investigate SSD. For some time SSDs have been in the same price range as hard drives, starting at prices well below $100. Now there are some SSDs on sale for as little as $50. One issue with SATA for server use is that SATA 3.0 (which was released in 2009 and is most commonly used nowadays) is limited to 600MB/s. That isn t nearly adequate if you want to serve files over 10 gigabit Ethernet. SATA 3.2 was released in 2013 and supports 1969MB/s but I doubt that there s much hardware supporting that. See the SATA Wikipedia page for more information. Another problem with SATA is getting the devices physically installed. My client has a new Dell server that has plenty of spare PCIe slots but no spare SATA connectors or SATA power connectors. I could have removed the DVD drive (as I did for some tests before deploying the server) but that s ugly and only gives 1 device while you need 2 devices in a RAID-1 configuration for ZIL. M.2 M.2 is a new standard for expansion cards, it supports SATA and PCIe interfaces (and USB but that isn t useful at this time). The wikipedia page for M.2 is interesting to read for background knowledge but isn t helpful if you are about to buy hardware. The first M.2 card I bought had a SATA interface, then I was unable to find a local company that could sell a SATA M.2 host adapter. So I bought a M.2 to SATA adapter which made it work like a regular 2.5 SATA device. That s working well in one of my home PCs but isn t what I wanted. Apparently systems that have a M.2 socket on the motherboard will usually take either SATA or NVMe devices. The most important thing I learned is to buy the SSD storage device and the host adapter from the same place then you are entitled to a refund if they don t work together. The alternative to the SATA (AHCI) interface on an M.2 device is known as NVMe (Non-Volatile Memory Express), see the Wikipedia page for NVMe for details. NVMe not only gives a higher throughput but it gives more command queues and more commands per queue which should give significant performance benefits for a device with multiple banks of NVRAM. This is what you want for server use. Eventually I got a M.2 NVMe device and a PCIe card for it. A quick test showed sustained transfer speeds of around 1500MB/s which should permit saturating a 10 gigabit Ethernet link in some situations. One annoyance is that the M.2 devices have a different naming convention to regular hard drives. I have devices /dev/nvme0n1 and /dev/nvme1n1, apparently that is to support multiple storage devices on one NVMe interface. Partitions have device names like /dev/nvme0n1p1 and /dev/nvme0n1p2. Power Use I recently upgraded my Thinkpad T420 from a 320G hard drive to a 500G SSD which made it faster but also surprisingly quieter you never realise how noisy hard drives are until they go away. My laptop seemed to feel cooler, but that might be my imagination. The i5-2520M CPU in my Thinkpad has a TDP of 35W but uses a lot less than that as I almost never have 4 cores in use. The z7k320 320G hard drive is listed as having 0.8W low power idle and 1.8W for read-write, maybe Linux wasn t putting it in the low power idle mode. The Samsung 500G 850 EVO SSD is listed as taking 0.4W when idle and up to 3.5W when active (which would not be sustained for long on a laptop). If my CPU is taking an average of 10W then replacing the hard drive with a SSD might have reduced the power use of the non-screen part by 10%, but I doubt that I could notice such a small difference. I ve read some articles about power use on the net which can be summarised as SSDs can draw more power than laptop hard drives but if you do the same amount of work then the SSD will be idle most of the time and not use much power . I wonder if the SSD being slightly thicker than the HDD it replaced has affected the airflow inside my Thinkpad. From reading some of the reviews it seems that there are M.2 storage devices drawing over 7W! That s going to create some cooling issues on desktop PCs but should be OK in a server. For laptop use they will hopefully release M.2 devices designed for low power consumption. The Future M.2 is an ideal format for laptops due to being much smaller and lighter than 2.5 SSDs. Spinning media doesn t belong in a modern laptop and using a SATA SSD is an ugly hack when compared to M.2 support on the motherboard. Intel has released the X99 chipset with M.2 support (see the Wikipedia page for Intel X99) so it should be commonly available on desktops in the near future. For most desktop systems an M.2 device would provide all the storage that is needed (or 2*M.2 in a RAID-1 configuration for a workstation). That would give all the benefits of reduced noise and increased performance that regular SSDs provide, but with better performance and fewer cables inside the PC. For a corporate desktop PC I think the ideal design would have only M.2 internal storage and no support for 3.5 disks or a DVD drive. That would allow a design that is much smaller than a current SFF PC.

12 August 2016

Markus Koschany: My Free Software Activities in July 2016

Welcome to gambaru.de. Here is my monthly report that covers what I have been doing for Debian. Debian Android Debian Games Debian Java Debian LTS This was my sixth month as a paid contributor and I have been paid to work 14,7 hours on Debian LTS. In that time I did the following: Misc and QA

11 August 2016

Matthew Garrett: Microsoft's compromised Secure Boot implementation

There's been a bunch of coverage of this attack on Microsoft's Secure Boot implementation, a lot of which has been somewhat confused or misleading. Here's my understanding of the situation.

Windows RT devices were shipped without the ability to disable Secure Boot. Secure Boot is the root of trust for Microsoft's User Mode Code Integrity (UMCI) feature, which is what restricts Windows RT devices to running applications signed by Microsoft. This restriction is somewhat inconvenient for developers, so Microsoft added support in the bootloader to disable UMCI. If you were a member of the appropriate developer program, you could give your device's unique ID to Microsoft and receive a signed blob that disabled image validation. The bootloader would execute a (Microsoft-signed) utility that verified that the blob was appropriately signed and matched the device in question, and would then insert it into an EFI Boot Services variable[1]. On reboot, the boot loader reads the blob from that variable and integrates that policy, telling later stages to disable code integrity validation.

The problem here is that the signed blob includes the entire policy, and so any policy change requires an entirely new signed blob. The Windows 10 Anniversary Update added a new feature to the boot loader, allowing it to load supplementary policies. These must also be signed, but aren't tied to a device id - the idea is that they'll be ignored unless a device-specific policy has also been loaded. This way you can get a single device-specific signed blob that allows you to set an arbitrary policy later by using a combination of supplementary policies.

This is all fine in the Anniversary Edition. Unfortunately older versions of the boot loader will happily load a supplementary policy as if it were a full policy, ignoring the fact that it doesn't include a device ID. The loaded policy replaces the built-in policy, so in the absence of a base policy a supplementary policy as simple as "Enable this feature" will effectively remove all other restrictions.

Unfortunately for Microsoft, such a supplementary policy leaked. Installing it as a base policy on pre-Anniversary Edition boot loaders will then allow you to disable all integrity verification, including in the boot loader. Which means you can ask the boot loader to chain to any other executable, in turn allowing you to boot a compromised copy of any operating system you want (not just Windows).

This does require you to be able to install the policy, though. The PoC released includes a signed copy of SecureBootDebug.efi for ARM, which is sufficient to install the policy on ARM systems. There doesn't (yet) appear to be a public equivalent for x86, which means it's not (yet) practical for arbitrary attackers to subvert the Secure Boot process on x86. I've been doing my testing on a setup where I've manually installed the policy, which isn't practical in an automated way.

How can this be prevented? Installing the policy requires the ability to run code in the firmware environment, and by default the boot loader will only load signed images. The number of signed applications that will copy the policy to the Boot Services variable is presumably limited, so if the Windows boot loader supported blacklisting second-stage bootloaders Microsoft could simply blacklist all policy installers that permit installation of a supplementary policy as a primary policy. If that's not possible, they'll have to blacklist of the vulnerable boot loaders themselves. That would mean all pre-Anniversary Edition install media would stop working, including recovery and deployment images. That's, well, a problem. Things are much easier if the first case is true.

Thankfully, if you're not running Windows this doesn't have to be a issue. There are two commonly used Microsoft Secure Boot keys. The first is the one used to sign all third party code, including drivers in option ROMs and non-Windows operating systems. The second is used purely to sign Windows. If you delete the second from your system, Windows boot loaders (including all the vulnerable ones) will be rejected by your firmware, but non-Windows operating systems will still work fine.

From what we know so far, this isn't an absolute disaster. The ARM policy installer requires user intervention, so if the x86 one is similar it'd be difficult to use this as an automated attack vector[2]. If Microsoft are able to blacklist the policy installers without blacklisting the boot loader, it's also going to be minimally annoying. But if it's possible to install a policy without triggering any boot loader blacklists, this could end up being embarrassing.

Even outside the immediate harm, this is an interesting vulnerability. Presumably when the older boot loaders were written, Microsoft policy was that they would never sign policy files that didn't include a device ID. That policy changed when support for supplemental policies was added. without this policy change, the older boot loaders could still be considered secure. Adding new features can break old assumptions, and your design needs to take that into account.

[1] EFI variables come in two main forms - those accessible at runtime (Runtime Services variables) and those only accessible in the early boot environment (Boot Services variables). Boot Services variables can only be accessed before ExitBootServices() is called, and in Secure Boot environments all code executing before this point is (theoretically) signed. This means that Boot Services variables are nominally tamper-resistant.

[2] Shim has explicit support for allowing a physically present machine owner to disable signature validation - this is basically equivalent

comment count unavailable comments

10 August 2016

Julian Andres Klode: Porting APT to CMake

Ever since it s creation back in the dark ages, APT shipped with it s own build system consisting of autoconf and a bunch of makefiles. In 2009, I felt like replacing that with something more standard, and because nobody really liked autotools, decided to go with CMake. Well, the bazaar branch was never really merged back in 2009. Fast forward 7 years to 2016. A few months ago, we noticed that our build system had trouble with correct dependencies in parallel building. So, in search for a way out, I picked up my CMake branch from 2009 last Thursday and spent the whole weekend working on it, and today I am happy to announce that I merged it into master:
123 files changed, 1674 insertions(+), 3205 deletions(-)
More than 1500 lines less build system code. Quite impressive, eh? This also includes about 200 lines of less code in debian/, as that switched from prehistoric debhelper stuff to modern dh (compat level 9, almost ready for 10). The annoying Tale of Targets vs Files Talking about CMake: I don t really love it. As you might know, CMake differentiates between targets and files. Targets can in some cases depend on files (generated by a command in the same directory), but overall files are not really targets. You also cannot have a target with the same name as a file you are generating in a custom command, you have to rename your target (make is OK with the generated stuff, but ninja complains about cycles because your custom target and your custom command have the same name). Byproducts for the (time) win One interesting thing about CMake and Ninja are byproducts. In our tree, we are building C++ files. We also have .pot templates depending on them, and .mo files depending on the templates (we have multiple domains, and merge the per-domain .pot with the all-domain .po file during the build to get a per-domain .mo). Now, if we just let them depend naively, changing a C++ file causes the .pot file to be regenerated which in turns causes us to build .mo files for every freaking language in the package. Even if nothing changed. Byproducts solve this problem. Instead of just building the .pot file, we also create a stamp file (AKA the witness) and write the .pot file (without a header) into a temporary name and only copy it to its final name if the content changed. The .pot file is declared as a byproduct of the command. The command doing the .pot->.mo step still depends on the .pot file (the byproduct), but as that only changes now if strings change, the .mo files only get rebuild if I change a translatable string. We still need to ensure that that the .pot file is actually built before we try to use it the solution here is to specify a custom target depending on the witness and then have the target containing the .mo build commands depend on that target. Now if you use make, you might now this trick already. In make, the byproducts remain undeclared, though, while in CMake we can now actually express them, and they are used by the Ninja generator and the Ninja build tool if you chose that over make (try it out, it s fast). Further Work Some command names are hardcoded, I should find_program() them. Also cross-building the package does not yet work successfully, but it only requires a tiny amount of patches in debhelper and/or cmake. I also tried building the package on a Fedora docker image (with dpkg installed, it s available in the Fedora sources). While I could eventually get the programs build and most of the integration test suite to pass, there are some minor issues to fix, mostly in the documentation building and GTest department: Fedora ships its docbook stylesheets in a different location, and ships GTest as a pre-compiled library, and not a source tree. I have not yet tested building on exotic platforms like macOS, or even a BSD. Please do and report back. In Debian, CMake is not up-to.date enough on the non-Linux platforms to build APT due to test suite failures, I hope those can be fixed/disabled soon (it appears to be a timing issue AFAICT). I hope that we eventually get some non-Debian backends for APT. I d love that.
Filed under: Debian, Uncategorized

9 August 2016

Reproducible builds folks: Reproducible builds: week 67 in Stretch cycle

What happened in the Reproducible Builds effort between Sunday July 31 and Saturday August 6 2016: Toolchain development and fixes Packages fixed and bugs filed The following 24 packages have become reproducible - in our current test setup - due to changes in their build-dependencies: alglib aspcud boomaga fcl flute haskell-hopenpgp indigo italc kst ktexteditor libgroove libjson-rpc-cpp libqes luminance-hdr openscenegraph palabos petri-foo pgagent sisl srm-ifce vera++ visp x42-plugins zbackup The following packages have become reproducible after being fixed: The following newly-uploaded packages appear to be reproducible now, for reasons we were not able to figure out. (Relevant changelogs did not mention reproducible builds.) Some uploads have addressed some reproducibility issues, but not all of them: Patches submitted that have not made their way to the archive yet: Package reviews and QA These are reviews of reproduciblity issues of Debian packages. 276 package reviews have been added, 172 have been updated and 44 have been removed in this week. 7 FTBFS bugs have been reported by Chris Lamb. Reproducibility tools Test infrastructure For testing the impact of allowing variations of the buildpath (which up until now we required to be identical for reproducible rebuilds), Reiner Herrmann contribed a patch which enabled build path variations on testing/i386. This is possible now since dpkg 1.18.10 enables the --fixdebugpath build flag feature by default, which should result in reproducible builds (for C code) even with varying paths. So far we haven't had many results due to disturbances in our build network in the last days, but it seems this would mean roughly between 5-15% additional unreproducible packages - compared to what we see now. We'll keep you updated on the numbers (and problems with compilers and common frameworks) as we find them. lynxis continued work to test LEDE and OpenWrt on two different hosts, to include date variation in the tests. Mattia and Holger worked on the (mass) deployment scripts, so that the - for space reasons - only jenkins.debian.net GIT clone resides in ~jenkins-adm/ and not anymore in Holger's homedir, so that soon Mattia (and possibly others!) will be able to fully maintain this setup, while Holger is doing siesta. Miscellaneous Chris, dkg, h01ger and Ximin attended a Core Infrastricture Initiative summit meeting in New York City, to discuss and promote this Reproducible Builds project. The CII was set up in the wake of the Heartbleed SSL vulnerability to support software projects that are critical to the functioning of the internet. This week's edition was written by Ximin Luo and Holger Levsen and reviewed by a bunch of Reproducible Builds folks on IRC.

8 August 2016

Paul Tagliamonte: Using PKCS#11 on GNU/Linux

PKCS#11 is a standard API to interface with HSMs, Smart Cards, or other types of random hardware backed crypto. On my travel laptop, I use a few Yubikeys in PKCS#11 mode using OpenSC to handle system login. libpam-pkcs11 is a pretty easy to use module that will let you log into your system locally using a PKCS#11 token locally. One of the least documented things, though, was how to use an OpenSC PKCS#11 token in Chrome. First, close all web browsers you have open.
sudo apt-get install libnss3-tools
certutil -U -d sql:$HOME/.pki/nssdb
modutil -add "OpenSC" -libfile /usr/lib/x86_64-linux-gnu/opensc-pkcs11.so -dbdir sql:$HOME/.pki/nssdb
modutil -list "OpenSC" -dbdir sql:$HOME/.pki/nssdb 
modutil -enable "OpenSC" -dbdir sql:$HOME/.pki/nssdb
Now, we'll have the PKCS#11 module ready for nss to use, so let's double check that the tokens are registered:
certutil -U -d sql:$HOME/.pki/nssdb
certutil -L -h "OpenSC" -d sql:$HOME/.pki/nssdb
If this winds up causing issues, you can remove it using the following command:
modutil -delete "OpenSC" -dbdir sql:$HOME/.pki/nssdb

7 August 2016

Dirk Eddelbuettel: drat 0.1.1: Updates schmupdates!

One year ago (tomorrow) drat 0.1.0 was released. It held up rather well, but a number of small fixes and enhancements piled up, along with somewhat-finished to still-raw additions to the examples/ sections. With that, we are happy to announce drat release 0.1.1 which arrived on CRAN earlier today. drat stands for drat R Archive Template, and helps with easy-to-create and easy-to-use repositories for R packages. Since its inception in early 2015 it has found reasonably widespread adoption among R users because repositories is what we use. In other words, friends don't let friends use install_github(). Just kidding. Maybe. Or not. This version 0.1.1 builds on the previous release from one year ago. Several users sent in nicely focused pull request, and I added a bit of spit and polish here and there. The NEWS file (added belatedly in this release) summarises the release as follows:
Changes in drat version 0.1.1 (2016-08-07)
  • Changes in drat functionality
    • Use dir.exists, leading to versioned Depends on R (>= 3.2.0)
    • Optionally pull remote before insert (Mark in PR #38)
    • Fix support for dots (Jan G. in PR #40)
    • Accept dots in package names (Antonio in PR #48)
    • Switch to htpps URLs at GitHub (Colin in PR #50)
    • Support additional fields in PACKAGE file (Jan G. in PR #54)
  • Changes in drat documentation
    • Further improvements and clarifications to vignettes
    • Travis script switched to run.sh from our fork
    • This NEWS file was (belatedly) added
Courtesy of CRANberries, there is a comparison to the previous release. More detailed information is on the drat page.

This post by Dirk Eddelbuettel originated on his Thinking inside the box blog. Please report excessive re-aggregation in third-party for-profit settings.

Dirk Eddelbuettel: littler 0.3.1

max-heap image The second release of littler as a CRAN package is now available, following in the now more than ten-year history as a package started by Jeff in the summer of 2006, and joined by me a few weeks later. littler is the first command-line interface for R and predates Rscript. It is still faster, and in my very biased eyes better as it allows for piping as well shebang scripting via #!, uses command-line arguments more consistently and still starts faster. It prefers to live on Linux and Unix, has its difficulties on the OS X due yet-another-braindeadedness there (who ever thought case-insensitive filesystems where a good idea?) and simply does not exist on Windows (yet -- the build system could be extended -- see RInside for an existence proof, and volunteers welcome!). This release brings us fixes and enhancements from three other contributors, a couple new example scripts, more robust builds, extended documentation and more -- see below for details. The NEWS file entry is below.
Changes in littler version 0.3.1 (2016-08-06)
  • Changes in examples
    • install2.r now passes on extra options past -- to R CMD INSTALL (PR #37 by Steven Pav)
    • Added rcc.r to run rcmdcheck::rcmdcheck()
    • Added (still simple) render.r to render (R)markdown
    • Several examples now support the -x or --usage flag to show extended help.
  • Changes in build system
    • The AM_LDFLAGS variable is now set and used too (PR #38 by Mattias Ellert)
    • Three more directories, used when an explicit installation directory is set, are excluded (also #38 by Mattias)
    • Travis CI is now driven via run.sh from our fork, and deploys all packages as .deb binaries using our PPA where needed
  • Changes in package
    • SystemRequirements now mentions the need for libR, i.e. an R built with a shared library so that we can embed R.
    • The docopt and rcmdcheck packages are now suggested, and added to the Travis installation.
    • A new helper function r() is now provided and exported so that the package can be imported (closes #40).
    • URL and BugReports links were added to DESCRIPTION.
  • Changes in documentation
    • The help output for installGithub.r was corrected (PR #39 by Brandon Bertelsen)
Full details for the littler release are provided as usual at the ChangeLog page. The code is available via the GitHub repo, from tarballs off my littler page and the local directory here -- and now of course all from its CRAN page and via install.packages("littler"). Binary packages are available directly in Debian as well as soon via Ubuntu binaries at CRAN thanks to the tireless Michael Rutter. will probably have new Comments and suggestions are welcome at the GitHub repo.

This post by Dirk Eddelbuettel originated on his Thinking inside the box blog. Please report excessive re-aggregation in third-party for-profit settings.

6 August 2016

Mirco Bauer: Ethereum GPU Mining on Linux How-To

TL;DR Install/use Debian 8 or Ubuntu 16.0.4 then execute:
sudo apt-get install software-properties-common
sudo add-apt-repository ppa:ethereum/ethereum
sudo sed 's/jessie/vivid/' -i /etc/apt/sources.list.d/ethereum-ethereum-*.list
sudo apt-get update
sudo apt-get install ethereum ethminer
geth account new
# copy long character sequence within  , that is your <YOUR_WALLET_ADDRESS>
# if you lose the passphrase, you lose your coins!
sudo apt-get install linux-headers-amd64 build-essential
chmod +x NVIDIA-Linux-x86_64-367.35.run
sudo NVIDIA-Linux-x86_64-367.35.run
ethminer -G -F http://yolo.ethclassic.faith:9999/0x<YOUR_WALLET_ADDRESS> --farm-recheck 200
echo done
My Attention Span is > 60 seconds Ethereum is a crypto currency similar to Bitcoin as it is based on the blockchain technology. Ethereum is not yet another Bitcoin clone though, since it has an additional feature called Smart Contracts that makes it unique and very promising. I am not going into details how Ethereum works, you can get that into great detail on the Internet. This post is about Ethereum mining. Mining is how crypto coins are created. You need to spent computing time to get coins out. At the beginning CPU mining was sufficient, but as the Ethereum network difficulty has increased you need to use GPUs as they can calculate at a much higher hashrate than a general purpose CPU can do. About 2 months ago I bought a new gaming rig, with a Nvidia GTX 1070 so I can experience virtual-reality gaming with a HTC Vive at a great framerate. As it turns out modern graphics cards are very good at hashing so I gave it a spin. Initially I did this mining setup with Windows 10, as that is the operating system on my gaming rig. If you want to do Ethereum mining using your GPU, then you really want to use Linux. On Windows the GTX 1070 produced a hashrate of 6 MH/s (megahashes per second) while the same hardware does 25 MH/s on Linux. The hashrate multiplied by 4 by using Linux instead of Windows. Sounds good? Keep reading and follow this guide. You have to pick a Linux distro to use for mining. As I am a Debian developer, all my systems run Debian, which is what I am also using for this guide. The same procedure can be done for Ubuntu as it is similar enough. For other distros you have to substitute the steps yourself. So I assume you already have Debian 8 or Ubuntu 16.04 installed on your system.

Install Ethereum Software First we need the geth tool which is the main Ethereum "client". Ethereum is really a peer-to-peer network, that means each node is a server and client at the same time. A node that contains the complete blockchain history in a database is called a full node. For this guide you don't need to run a full node, as mining pools do this for you. We still need geth to create the private key of your Ethereum wallet. Somewhere we have to receive the coins we are mining ;) Add the Ethereum APT repository using these commands:

sudo apt-get install software-properties-common
sudo add-apt-repository ppa:ethereum/ethereum
sudo apt-get update
On Debian 8 (on Ubuntu you can skip this) you need to replace the repository name with this command:
sudo sed 's/jessie/vivid/' -i /etc/apt/sources.list.d/ethereum-ethereum-*.list
sudo apt-get update
Install ethereum, ethminer and geth:
sudo apt-get install ethereum ethminer geth

Create Ethereum Wallet A wallet is where coins are "stored". They are not really stored in the wallet because the wallet is just a private key that nobody has. The balance of that wallet is visible to everyone using the blockchain database. And this is what full nodes do, they contain and distribute the database to all other peers. So this this command to create your first private key for your wallet:
geth account new
Be aware, that this passphrase protects the private key of your wallet. Anyone who has access to that file and knows your passphrase will have full control over your coins. And also do not forget the passphrase, as if you do, you lost all your coins! The output of "geth account new" shows a long character/number sequence quoted in . This is your wallet address and you should write that number down, as if someone wants to send you money, then it is to that address. We will use that for the mining pool later.

Install (proprietary) nvidia driver For OpenCL to work with nvidia graphics cards, like my GTX 1070, you need to install this proprietary driver from nvidia. If you have an older card maybe the opensource drivers will work for you. For the nvidia pascal cards numbers 10xx you will need this driver package. After you have agreed the terms, download the NVIDIA-Linux-x86_64-367.35.run file. But before we can use that installer we need to install some dependencies that installer needs as it will have to compile a Linux kernel module for you. Install the dependencies using this command:
sudo apt-get install linux-headers-amd64 build-essential
Now we can make the installer executable and run it like this:
chmod +x NVIDIA-Linux-x86_64-367.35.run
sudo NVIDIA-Linux-x86_64-367.35.run
If that step completed without error, then we should be able to run the mining benchmark!
ethminer -M -G
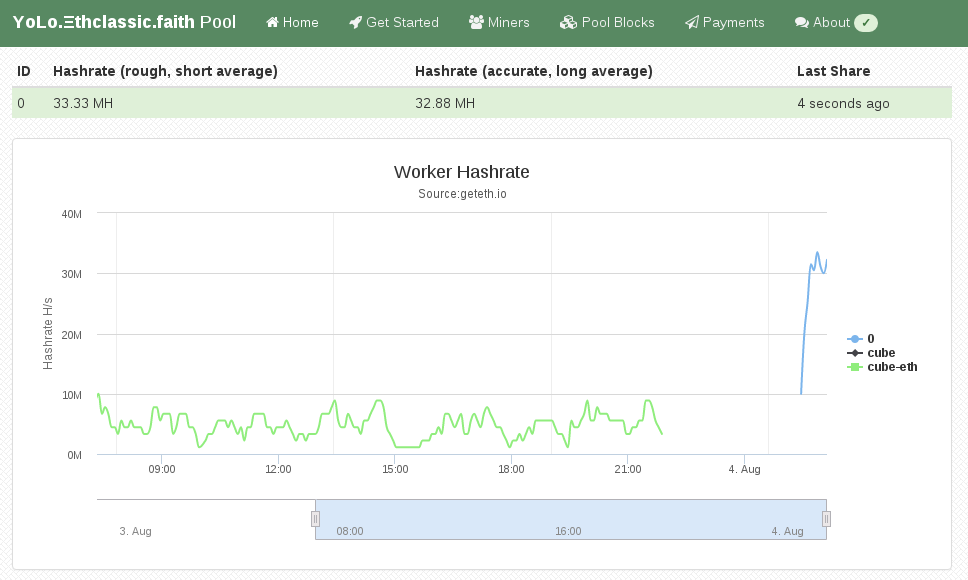
The -M means "run benchmark" and the -G is for GPU mining. The first time you run it it will create a DAG file and that will takes a while. For me it took about 12 minutes on my GTX 1070. After that is should show a inner mean hashrate. If it says H/s that is hashes per second and KH is kilo (H/1000) and MH is megahashes per second (KH/1000). I had numbers around 25-30 MH/s, but for real mining you will see an average that is a balanced number and not a min/max range.

Pick Ethereum Network Now it gets serious, you need to decide 2 things. First which Ethereum network you want to mine for and the second is using which pool. Ethereum has 2 networks, one is called Ethereum One or Core, while the other is called Ethereum Classic. Ethereum has made a hardfork to undo the consequences of a software bug in the DAO. The DAO is a smart contract for a decentralized organization. Because of that bug, a blackhat could use that bug to obtain money from that DAO. The Ethereum developers made a poll and decided that the consequences will be undone. Not everyone agreed and the old network stayed alive and is now called Ethereum Classic short ETC. The hardfork kept its short name ETH. This is important to understand for mining, because the hashing difficulty has a huge difference between ETH and ETC. As of writing, the hashrate of ETC is at 20% compared to ETH. Thus you need less computing time to get ETC coins and more time to get ETH coins. Differently said, ETC mining is currently more profitable.

Pick a Pool Hmmmm, I want a swimming pool, thanks! Just kidding... You can mine without a pool, that is called solo mining, but you will get less reward. A mining pool are multiple computers that work on the same block to find a solution quicker than others. The pool has an aggregated hashrate that is higher than other solo miners. Each found block by anyone in this pool will be rewarded to everyone in the pool. The reward of 5 ether currently per block gets split in the same ratio of hashrate each member provides (minus the pool fee). So while you get less for a found block, you still have a steady lower income rate instead of higher with less chance of finding one (in time). Simply said: you have to find a new block faster than the others to receive the reward. If you want to mine Ethereum Classic (ETC) use one of the pools listed here (at the bottom of the page). If you want to mine Ethereum One / Core (ETH) use one of the pools listed here.

Run ethminer The instruction page of the pool website usually says how to start the miner program, but here is an example of the pool that I use (because pony!):
ethminer -G -F http://yolo.ethclassic.faith:9999/0x<YOUR_WALLET_ADDRESS> --farm-recheck 200

Profit If this guide was helpful for you, you can tip me at ethereum:0x9ec1220d2f2fadd3f0c96e3007daa827bc83fbd6 or simply run the ethminer using my wallet address for a day or two:
ethminer -G -F http://yolo.ethclassic.faith:9999/0x9ec1220d2f2fadd3f0c96e3007daa827bc83fbd6 --farm-recheck 200
Happy mining!

Dirk Eddelbuettel: RcppStreams 0.1.1

Streamulus A maintenance release of RcppStreams is now on CRAN. RcppStreams brings the excellent Streamulus C++ template library for event stream processing to R. Streamulus, written by Irit Katriel, uses very clever template meta-programming (via Boost Fusion) to implement an embedded domain-specific event language created specifically for event stream processing. This release updates the compilation standard to C++11 per CRAN's request as this helps with both current and upcoming compiler variants. A few edits were made to DESCRIPTION and README.md, the Travis driver file was updated, but no new code was added. The NEWS file entries follows below:
Changes in version 0.1.1 (2016-08-05)
  • Compilation is now done using C++11 standards per request of CRAN to help with an array of newer (pre-release) and older compilers
  • The Travis CI script was updated to use run.sh from our fork; it now also installs all dependencies as binary .deb files.
  • The README.md was updated with additional badges.
  • The DESCRIPTION file now has URL and BugReports entries.
Courtesy of CRANberries, there is also a copy of the DESCRIPTION file for this initial release. More detailed information is on the RcppStreams page page and of course on the Streamulus page.

This post by Dirk Eddelbuettel originated on his Thinking inside the box blog. Please report excessive re-aggregation in third-party for-profit settings.

5 August 2016

Petter Reinholdtsen: Sales number for the Free Culture translation, first half of 2016

As my regular readers probably remember, the last year I published a French and Norwegian translation of the classic Free Culture book by the founder of the Creative Commons movement, Lawrence Lessig. A bit less known is the fact that due to the way I created the translations, using docbook and po4a, I also recreated the English original. And because I already had created a new the PDF edition, I published it too. The revenue from the books are sent to the Creative Commons Corporation. In other words, I do not earn any money from this project, I just earn the warm fuzzy feeling that the text is available for a wider audience and more people can learn why the Creative Commons is needed. Today, just for fun, I had a look at the sales number over at Lulu.com, which take care of payment, printing and shipping. Much to my surprise, the English edition is selling better than both the French and Norwegian edition, despite the fact that it has been available in English since it was first published. In total, 24 paper books was sold for USD $19.99 between 2016-01-01 and 2016-07-31:
Title / languageQuantity
Culture Libre / French3
Fri kultur / Norwegian7
Free Culture / English14
The books are available both from Lulu.com and from large book stores like Amazon and Barnes&Noble. Most revenue, around $10 per book, is sent to the Creative Commons project when the book is sold directly by Lulu.com. The other channels give less revenue. The summary from Lulu tell me 10 books was sold via the Amazon channel, 10 via Ingram (what is this?) and 4 directly by Lulu. And Lulu.com tells me that the revenue sent so far this year is USD $101.42. No idea what kind of sales numbers to expect, so I do not know if that is a good amount of sales for a 10 year old book or not. But it make me happy that the buyers find the book, and I hope they enjoy reading it as much as I did. The ebook edition is available for free from Github. If you would like to translate and publish the book in your native language, I would be happy to help make it happen. Please get in touch.

Steve Kemp: Using the compiler to help you debug segfaults

Recently somebody reported that my console-based mail-client was segfaulting when opening an IMAP folder, and then when they tried with a local Maildir-hierarchy the same fault was observed. I couldn't reproduce the problem at all, as neither my development host (read "my personal desktop"), nor my mail-host had been crashing at all, both being in use to read my email for several months. Debugging crashes with no backtrace, or real hint of where to start, is a challenge. Even when downloading the same Maildir samples I couldn't see a problem. It was only when I decided to see if I could add some more diagnostics to my code that I came across a solution. My intention was to make it easier to receive a backtrace, by adding more compiler options:
  -fsanitize=address -fno-omit-frame-pointer
I added those options and my mail-client immediately started to segfault on my own machine(s), almost as soon as it started. Ultimately I found three pieces of code where I was allocating C++ objects and passing them to the Lua stack, a pretty fundamental part of the code, which were buggy. Once I'd tracked down the areas of code that were broken and fixed them the user was happy, and I was happy too. Its interesting that I've been running for over a year with these bogus things in place, which "just happened" to not crash for me or anybody else. In the future I'll be adding these options to more of my C-based projects, as there seems to be virtually no downside. In related news my console editor has now achieved almost everything I want it to, having gained: The only outstanding feature, which is a biggy, is support for Undo which I need to add. Happily no segfaults here, so far..

3 August 2016

Daniel Kahn Gillmor: Changes for GnuPG in Debian

The GNU Privacy Guard (GnuPG) upstream team maintains three branches of development: 1.4 ("classic"), 2.0 ("stable"), and 2.1 ("modern").They differ in various ways: software architecture, supported algorithms, network transport mechanisms, protocol versions, development activity, co-installability, etc.Debian currently ships two versions of GnuPG in every maintained suite -- in particular, /usr/bin/gpg has historically always been provided by the "classic" branch.That's going to change!Debian unstable will soon be moving to the "modern" branch for providing /usr/bin/gpg. This will give several advantages for Debian and its users in the future, but it will require a transition. Hopefully we can make it a smooth one.

What are the benefits?Compared to "classic", The "modern" branch has:
  • updated crypto (including elliptic curves)
  • componentized architecture (e.g. libraries, some daemonized processes)
  • improved key storage
  • better network access (including talking to keyservers over tor)
  • stronger defaults
  • more active upstream development
  • safer info representation (e.g. no more key IDs, fingerprints easier to copy-and-paste)
If you want to try this out, the changes are already made in experimental. Please experiment!

What does this mean for end users?If you're an end user and you don't use GnuPG directly, you shouldn't notice much of a change once the packages start to move through the rest of the archive.Even if you do use GnuPG regularly, you shouldn't notice too much of a difference. One of the main differences is that all access to your secret key will be handled through gpg-agent, which should be automatically launched as needed. This means that operations like signing and decryption will cause gpg-agent to prompt the the user to unlock any locked keys directly, rather than gpg itself prompting the user.If you have an existing keyring, you may also notice a difference based on a change of how your public keys are managed, though again this transition should ideally be smooth enough that you won't notice unless you care to investigate more deeply.If you use GnuPG regularly, you might want to read the NEWS file that ships with GnuPG and related packages for updates that should help you through the transition.If you use GnuPG in a language other than English, please install the gnupg-l10n package, which contains the localization/translation files. For versions where those files are split out of the main package, gnupg explicitly Recommends: gnupg-l10n already, so it should be brought in for new installations by default.If you have an archive of old data that depends on known-broken algorithms, PGP3 keys, or other deprecated material, you'll need to have "classic" GnuPG around to access it. That will be provided in the gnupg1 package

What does this mean for package maintainers?If you maintain a package that depends on gnupg: be aware that the gnupg package in debian is going through this transition.A few general thoughts:
  • If your package Depends: gnupg for signature verification only, you might prefer to have it Depends: gpgv instead. gpgv is a much simpler tool that the full-blown GnuPG suite, and should be easier to manage. I'm happy to help with such a transition (we've made it recently with apt already)
  • If your package Depends: gnupg and expects ~/.gnupg/ to be laid out in a certain way, that's almost certainly going to break at some point. ~/.gnupg/ is GnuPG's internal storage, and it's not recommended to rely on any specific data structures there, as they may change. gpg offers commands like --export, --import, and --delete for manipulating its persistent storage. please use them instead!
  • If your package depends on parsing or displaying gpg's output for the user, please make sure you use its special machine-readable form (--with-colons). Parsing the human-readable text is not advised and may change from version to version.
If you maintain a package that depends on gnupg2 and tries to use gpg2 instead of gpg, that should stay ok. However, at some point it'd be nice to get rid of /usr/bin/gpg2 and just have one expected binary (gpg). So you can help with that:
  • Look for places where your package expects gpg2 and make it try gpg instead. If you can make your code fall back cleanly
  • Change your dependencies to indicate gnupg (>= 2)
  • Patch lintian to encourage other people to make this switch ;)

What specifically needs to happen?The last major step for this transition was renaming the source package for "classic" GnuPG to be gnupg1. This transition is currently in the ftp-master's NEW queue. Once it makes it through that queue, and both gnupg1 and gnupg2 have been in experimental for a few days without reports of dangerous breakage, we'll upload both gnupg1 and gnupg2 to unstable.We'll also need to do some triage on the BTS, reassigning some reports which are really only relevant for the "classic" branch.Please report bugs via the BTS as usual! You're also welcome to ask questions and make suggestions on #debian-gnupg on irc.oftc.net, or to mail the Debian GnuPG packaging team at pkg-gnupg-maint@lists.alioth.debian.org.Happy hacking!Tags: gnupg

Dirk Eddelbuettel: digest 0.6.10

A new release, now at version number 0.6.10, of the digest package is now on CRAN. I also just prepared the Debian upload. This release, just like the previous one, is once again the work mostly of external contributors. Michel Lang added length checks to sha1(); Thierry Onkelinx extended sha1() support and added more tests, Viliam Simko also extended sha1() to more types, and Henrik Bengtsson improved intervals and fixed a bug with file usage. CRANberries provides the usual summary of changes to the previous version.

This post by Dirk Eddelbuettel originated on his Thinking inside the box blog. Please report excessive re-aggregation in third-party for-profit settings.

Next.

Previous.