Search Results: "ron"

24 June 2020

Raphaël Hertzog: Freexian s report about Debian Long Term Support, May 2020

A Debian LTS logo Like each month, here comes a report about the work of paid contributors to Debian LTS. Individual reports In May, 198 work hours have been dispatched among 14 paid contributors. Their reports are available: Evolution of the situation In May 2020 we had our second (virtual) contributors meeting on IRC, Logs and minutes are available online. Then we also moved our ToDo from the Debian wiki to the issue tracker on salsa.debian.org.
Sadly three contributors went inactive in May: Adrian Bunk, Anton Gladky and Dylan A ssi. And while there are currently still enough active contributors to shoulder the existing work, we like to use this opportunity that we are always looking for new contributors. Please mail Holger if you are interested.
Finally, we like to remind you for a last time, that the end of Jessie LTS is coming in less than a month!
In case you missed it (or missed to act), please read this post about keeping Debian 8 Jessie alive for longer than 5 years. If you expect to have Debian 8 servers/devices running after June 30th 2020, and would like to have security updates for them, please get in touch with Freexian. The security tracker currently lists 6 packages with a known CVE and the dla-needed.txt file has 30 packages needing an update. Thanks to our sponsors New sponsors are in bold. With the upcoming start of Jessie ELTS, we are welcoming a few new sponsors and others should join soon.

No comment Liked this article? Click here. My blog is Flattr-enabled.

Matthew Garrett: Making my doorbell work

I recently moved house, and the new building has a Doorbird to act as a doorbell and open the entrance gate for people. There's a documented local control API (no cloud dependency!) and a Home Assistant integration, so this seemed pretty straightforward.

Unfortunately not. The Doorbird is on separate network that's shared across the building, provided by Monkeybrains. We're also a Monkeybrains customer, so our network connection is plugged into the same router and antenna as the Doorbird one. And, as is common, there's port isolation between the networks in order to avoid leakage of information between customers. Rather perversely, we are the only people with an internet connection who are unable to ping my doorbell.

I spent most of the past few weeks digging myself out from under a pile of boxes, but we'd finally reached the point where spending some time figuring out a solution to this seemed reasonable. I spent a while playing with port forwarding, but that wasn't ideal - the only server I run is in the UK, and having packets round trip almost 11,000 miles so I could speak to something a few metres away seemed like a bad plan. Then I tried tethering an old Android device with a data-only SIM, which worked fine but only in one direction (I could see what the doorbell could see, but I couldn't get notifications that someone had pushed a button, which was kind of the point here).

So I went with the obvious solution - I added a wifi access point to the doorbell network, and my home automation machine now exists on two networks simultaneously (nmcli device modify wlan0 ipv4.never-default true is the magic for "ignore the gateway that the DHCP server gives you" if you want to avoid this), and I could now do link local service discovery to find the doorbell if it changed addresses after a power cut or anything. And then, like magic, everything worked - I got notifications from the doorbell when someone hit our button.

But knowing that an event occurred without actually doing something in response seems fairly unhelpful. I have a bunch of Chromecast targets around the house (a mixture of Google Home devices and Chromecast Audios), so just pushing a message to them seemed like the easiest approach. Home Assistant has a text to speech integration that can call out to various services to turn some text into a sample, and then push that to a media player on the local network. You can group multiple Chromecast audio sinks into a group that then presents as a separate device on the network, so I could then write an automation to push audio to the speaker group in response to the button being pressed.

That's nice, but it'd also be nice to do something in response. The Doorbird exposes API control of the gate latch, and Home Assistant exposes that as a switch. I'm using Home Assistant's Google Assistant integration to expose devices Home Assistant knows about to voice control. Which means when I get a house-wide notification that someone's at the door I can just ask Google to open the door for them.

So. Someone pushes the doorbell. That sends a signal to a machine that's bridged onto that network via an access point. That machine then sends a protobuf command to speakers on a separate network, asking them to stream a sample it's providing. Those speakers call back to that machine, grab the sample and play it. At this point, multiple speakers in the house say "Someone is at the door". I then say "Hey Google, activate the front gate" - the device I'm closest to picks this up and sends it to Google, where something turns my speech back into text. It then looks at my home structure data and realises that the "Front Gate" device is associated with my Home Assistant integration. It then calls out to the home automation machine that received the notification in the first place, asking it to trigger the front gate relay. That device calls out to the Doorbird and asks it to open the gate. And now I have functionality equivalent to a doorbell that completes a circuit and rings a bell inside my home, and a button inside my home that completes a circuit and opens the gate, except it involves two networks inside my building, callouts to the cloud, at least 7 devices inside my home that are running Linux and I really don't want to know how many computational cycles.

The future is wonderful.

(I work for Google. I do not work on any of the products described in this post. Please god do not ask me how to integrate your IoT into any of this)

comment count unavailable comments

22 June 2020

Evgeni Golov: mass-migrating modules inside an Ansible Collection

Im the Foreman project, we've been maintaining a collection of Ansible modules to manage Foreman installations since 2017. That is, 2 years before Ansible had the concept of collections at all. For that you had to set library (and later module_utils and doc_fragment_plugins) in ansible.cfg and effectively inject our modules, their helpers and documentation fragments into the main Ansible namespace. Not the cleanest solution, but it worked quiet well for us. When Ansible started introducing Collections, we quickly joined, as the idea of namespaced, easily distributable and usable content units was great and exactly matched what we had in mind. However, collections are only usable in Ansible 2.8, or actually 2.9 as 2.8 can consume them, but tooling around building and installing them is lacking. Because of that we've been keeping our modules usable outside of a collection. Until recently, when we decided it's time to move on, drop that compatibility (which costed a few headaches over the time) and release a shiny 1.0.0. One of the changes we wanted for 1.0.0 is renaming a few modules. Historically we had the module names prefixed with foreman_ and katello_, depending whether they were designed to work with Foreman (and plugins) or Katello (which is technically a Foreman plugin, but has a way more complicated deployment and currently can't be easily added to an existing Foreman setup). This made sense as long as we were injecting into the main Ansible namespace, but with collections the names be became theforemam.foreman.foreman_ <something> and while we all love Foreman, that was a bit too much. So we wanted to drop that prefix. And while at it, also change some other names (like ptable, which became partition_table) to be more readable. But how? There is no tooling that would rename all files accordingly, adjust examples and tests. Well, bash to the rescue! I'm usually not a big fan of bash scripts, but renaming files, searching and replacing strings? That perfectly fits! First of all we need a way map the old name to the new name. In most cases it's just "drop the prefix", for the others you can have some if/elif/fi:
prefixless_name=$(echo $ old_name   sed -E 's/^(foreman katello)_//')
if [[ $ old_name  == 'foreman_environment' ]]; then
  new_name='puppet_environment'
elif [[ $ old_name  == 'katello_sync' ]]; then
  new_name='repository_sync'
elif [[ $ old_name  == 'katello_upload' ]]; then
  new_name='content_upload'
elif [[ $ old_name  == 'foreman_ptable' ]]; then
  new_name='partition_table'
elif [[ $ old_name  == 'foreman_search_facts' ]]; then
  new_name='resource_info'
elif [[ $ old_name  == 'katello_manifest' ]]; then
  new_name='subscription_manifest'
elif [[ $ old_name  == 'foreman_model' ]]; then
  new_name='hardware_model'
else
  new_name=$ prefixless_name 
fi
That defined, we need to actually have a $ old_name . Well, that's a for loop over the modules, right?
for module in $ BASE /foreman_*py $ BASE /katello_*py; do
  old_name=$(basename $ module  .py)
   
done
While we're looping over files, let's rename them and all the files that are associated with the module:
# rename the module
git mv $ BASE /$ old_name .py $ BASE /$ new_name .py
# rename the tests and test fixtures
git mv $ TESTS /$ old_name .yml $ TESTS /$ new_name .yml
git mv tests/fixtures/apidoc/$ old_name .json tests/fixtures/apidoc/$ new_name .json
for testfile in $ TESTS /fixtures/$ old_name -*.yml; do
  git mv $ testfile  $(echo $ testfile   sed "s/$ old_name /$ new_name /")
done
Now comes the really tricky part: search and replace. Let's see where we need to replace first:
  1. in the module file
    1. module key of the DOCUMENTATION stanza (e.g. module: foreman_example)
    2. all examples (e.g. foreman_example: )
  2. in all test playbooks (e.g. foreman_example: )
  3. in pytest's conftest.py and other files related to test execution
  4. in documentation
sed -E -i "/^(\s+$ old_name  module):/ s/$ old_name /$ new_name /g" $ BASE /*.py
sed -E -i "/^(\s+$ old_name  module):/ s/$ old_name /$ new_name /g" tests/test_playbooks/tasks/*.yml tests/test_playbooks/*.yml
sed -E -i "/'$ old_name '/ s/$ old_name /$ new_name /" tests/conftest.py tests/test_crud.py
sed -E -i "/ $ old_name  / s/$ old_name /$ new_name /g' README.md docs/*.md
You've probably noticed I used $ BASE and $ TESTS and never defined them Lazy me. But here is the full script, defining the variables and looping over all the modules.
#!/bin/bash
BASE=plugins/modules
TESTS=tests/test_playbooks
RUNTIME=meta/runtime.yml
echo "plugin_routing:" > $ RUNTIME 
echo "  modules:" >> $ RUNTIME 
for module in $ BASE /foreman_*py $ BASE /katello_*py; do
  old_name=$(basename $ module  .py)
  prefixless_name=$(echo $ old_name   sed -E 's/^(foreman katello)_//')
  if [[ $ old_name  == 'foreman_environment' ]]; then
    new_name='puppet_environment'
  elif [[ $ old_name  == 'katello_sync' ]]; then
    new_name='repository_sync'
  elif [[ $ old_name  == 'katello_upload' ]]; then
    new_name='content_upload'
  elif [[ $ old_name  == 'foreman_ptable' ]]; then
    new_name='partition_table'
  elif [[ $ old_name  == 'foreman_search_facts' ]]; then
    new_name='resource_info'
  elif [[ $ old_name  == 'katello_manifest' ]]; then
    new_name='subscription_manifest'
  elif [[ $ old_name  == 'foreman_model' ]]; then
    new_name='hardware_model'
  else
    new_name=$ prefixless_name 
  fi
  echo "renaming $ old_name  to $ new_name "
  git mv $ BASE /$ old_name .py $ BASE /$ new_name .py
  git mv $ TESTS /$ old_name .yml $ TESTS /$ new_name .yml
  git mv tests/fixtures/apidoc/$ old_name .json tests/fixtures/apidoc/$ new_name .json
  for testfile in $ TESTS /fixtures/$ old_name -*.yml; do
    git mv $ testfile  $(echo $ testfile   sed "s/$ old_name /$ new_name /")
  done
  sed -E -i "/^(\s+$ old_name  module):/ s/$ old_name /$ new_name /g" $ BASE /*.py
  sed -E -i "/^(\s+$ old_name  module):/ s/$ old_name /$ new_name /g" tests/test_playbooks/tasks/*.yml tests/test_playbooks/*.yml
  sed -E -i "/'$ old_name '/ s/$ old_name /$ new_name /" tests/conftest.py tests/test_crud.py
  sed -E -i "/ $ old_name  / s/$ old_name /$ new_name /g' README.md docs/*.md
  echo "    $ old_name :" >> $ RUNTIME 
  echo "      redirect: $ new_name " >> $ RUNTIME 
  git commit -m "rename $ old_name  to $ new_name " $ BASE  tests/ README.md docs/ $ RUNTIME 
done
As a bonus, the script will also generate a meta/runtime.yml which can be used by Ansible 2.10+ to automatically use the new module names if the playbook contains the old ones. Oh, and yes, this is probably not the nicest script you'll read this year. Maybe not even today. But it got the job nicely done and I don't intend to need it again anyways.

21 June 2020

Enrico Zini: Forced italianisation of S dtirol

Italianization (Italian: Italianizzazione; Croatian: talijanizacija; Slovene: poitaljan evanje; German: Italianisierung; Greek: ) is the spread of Italian culture and language, either by integration or assimilation.[1][2]
In 1919, at the time of its annexation, the middle part of the County of Tyrol which is today called South Tyrol (in Italian Alto Adige) was inhabited by almost 90% German speakers.[1] Under the 1939 South Tyrol Option Agreement, Adolf Hitler and Benito Mussolini determined the status of the German and Ladin (Rhaeto-Romanic) ethnic groups living in the region. They could emigrate to Germany, or stay in Italy and accept their complete Italianization. As a consequence of this, the society of South Tyrol was deeply riven. Those who wanted to stay, the so-called Dableiber, were condemned as traitors while those who left (Optanten) were defamed as Nazis. Because of the outbreak of World War II, this agreement was never fully implemented. Illegal Katakombenschulen ("Catacomb schools") were set up to teach children the German language.
The Prontuario dei nomi locali dell'Alto Adige (Italian for Reference Work of Place Names of Alto Adige) is a list of Italianized toponyms for mostly German place names in South Tyrol (Alto Adige in Italian) which was published in 1916 by the Royal Italian Geographic Society (Reale Societ Geografica Italiana). The list was called the Prontuario in short and later formed an important part of the Italianization campaign initiated by the fascist regime, as it became the basis for the official place and district names in the Italian-annexed southern part of the County of Tyrol.
Ettore Tolomei (16 August 1865, in Rovereto 25 May 1952, in Rome) was an Italian nationalist and fascist. He was designated a Member of the Italian Senate in 1923, and ennobled as Conte della Vetta in 1937.
The South Tyrol Option Agreement (German: Option in S dtirol; Italian: Opzioni in Alto Adige) was an agreement in effect between 1939 and 1943, when the native German speaking people in South Tyrol and three communes in the province of Belluno were given the option of either emigrating to neighboring Nazi Germany (of which Austria was a part after the 1938 Anschluss) or remaining in Fascist Italy and being forcibly integrated into the mainstream Italian culture, losing their language and cultural heritage. Over 80% opted to move to Germany.

Daniel Lange: Upgrading Limesurvey with (near) zero downtime

Limesurvey is an online survey tool. It is very powerful and commonly used in academic environments because it is Free Software (GPLv2+), allows for local installations protecting the data of participants and allowing to comply with data protection regulations. This also means there are typically no load-balanced multi-server szenarios with HA databases. But simple VMs where Limesurvey runs and needs upgrading in place. There's an LTS branch (currently 3.x) and a stable branch (currently 4.x). There's also a 2.06 LTS branch that is restricted to paying customers. The main developers behind Limesurvey offer many services from template design to custom development to support to hosting ("Cloud", "Limesurvey Pro"). Unfortunately they also charge for easy updates called "ComfortUpdate" (currently 39 for three months) and the manual process is made a bit cumbersome to make the "ComfortUpdate" offer more attractive. Due to Limesurvey being an old code base and UI elements not being clearly separated, most serious use cases will end up patching files and symlinking logos around template directories. That conflicts a bit with the opaque "ComfortUpdate" process where you push a button and then magic happens. Or you have downtime and a recovery case while surveys are running. If you do not intend to use the "ComfortUpdate" offering, you can prevent Limesurvey from connecting to http://comfortupdate.limesurvey.org daily by adding the updatable stanza as in line 14 to limesurvey/application/config/config.php:
  1. return array(
  2. [...]
  3. // Use the following config variable to set modified optional settings copied from config-defaults.php
  4. 'config'=>array(
  5. // debug: Set this to 1 if you are looking for errors. If you still get no errors after enabling this
  6. // then please check your error-logs - either in your hosting provider admin panel or in some /logs directory
  7. // on your webspace.
  8. // LimeSurvey developers: Set this to 2 to additionally display STRICT PHP error messages and get full access to standard templates
  9. 'debug'=>0,
  10. 'debugsql'=>0, // Set this to 1 to enanble sql logging, only active when debug = 2
  11. // Mysql database engine (INNODB MYISAM):
  12. 'mysqlEngine' => 'MYISAM'
  13. , // Update default LimeSurvey config here
  14. 'updatable' => false,
  15. )
  16. );
The comma on line 13 is placed like that in the current default limesurvey config.php, don't let yourself get confused. Every item in a php array must end with a comma. It can be on the next line. The basic principle of low risk, near-zero downtime, in-place upgrades is:
  1. Create a diff between the current release and the target release
  2. Inspect the diff
  3. Make backups of the application webroot
  4. Patch a copy of the application in-place
  5. (optional) stop the web server
  6. Make a backup of the production database
  7. Move the patched application to the production webroot
  8. (if 5) Start the webserver
  9. Upgrade the database (if needed)
  10. Check the application
So, in detail: Continue reading "Upgrading Limesurvey with (near) zero downtime"

20 June 2020

Dima Kogan: OpenCV C API transition. A rant.

I just went through a debugging exercise that was so ridiculous, I just had to write it up. Some of this probably should go into a bug report instead of a rant, but I'm tired. And clearly I don't care anymore. OK, so I'm doing computer vision work. OpenCV has been providing basic functions in this area, so I have been using them for a while. Just for really, really basic stuff, like projection. The C API was kinda weird, and their error handling is a bit ridiculous (if you give it arguments it doesn't like, it asserts!), but it has been working fine for a while. At some point (around OpenCV 3.0) somebody over there decided that they didn't like their C API, and that this was now a C++ library. Except the docs still documented the C API, and the website said it supported C, and the code wasn't actually removed. They just kinda stopped testing it and thinking about it. So it would mostly continue to work, except some poor saps would see weird failures; like this and this, for instance. OpenCV 3.2 was the last version where it was mostly possible to keep using the old C code, even when compiling without optimizations. So I was doing that for years. So now, in 2020, Debian is finally shipping a version of OpenCV that definitively does not work with the old code, so I had to do something. Over time I stopped using everything about OpenCV, except a few cvProjectPoints2() calls. So I decided to just write a small C++ shim to call the new version of that function, expose that with =extern "C"= to the rest of my world, and I'd be done. And normally I would be, but this is OpenCV we're talking about. I wrote the shim, and it didn't work. The code built and ran, but the results were wrong. After some pointless debugging, I boiled the problem down to this test program:
#include <opencv2/calib3d.hpp>
#include <stdio.h>
int main(void)
 
    double fx = 1000.0;
    double fy = 1000.0;
    double cx = 1000.0;
    double cy = 1000.0;
    double _camera_matrix[] =
          fx,  0, cx,
          0,  fy, cy,
          0,   0,  1  ;
    cv::Mat camera_matrix(3,3, CV_64FC1, _camera_matrix);
    double pp[3] =  1., 2., 10. ;
    double qq[2] =  444, 555 ;
    int N=1;
    cv::Mat object_points(N,3, CV_64FC1, pp);
    cv::Mat image_points (N,2, CV_64FC1, qq);
    // rvec,tvec
    double _zero3[3] =  ;
    cv::Mat zero3(1,3,CV_64FC1, _zero3);
    cv::projectPoints( object_points,
                       zero3,zero3,
                       camera_matrix,
                       cv::noArray(),
                       image_points,
                       cv::noArray(), 0.0);
    fprintf(stderr, "manually-projected no-distortion: %f %f\n",
            pp[0]/pp[2] * fx + cx,
            pp[1]/pp[2] * fy + cy);
    fprintf(stderr, "opencv says: %f %f\n", qq[0], qq[1]);
    return 0;
 
This is as trivial as it gets. I project one point through a pinhole camera, and print out the right answer (that I can easily compute, since this is trivial), and what OpenCV reports:
$ g++ -I/usr/include/opencv4 -o tst tst.cc -lopencv_calib3d -lopencv_core && ./tst
manually-projected no-distortion: 1100.000000 1200.000000
opencv says: 444.000000 555.000000
Well that's no good. The answer is wrong, but it looks like it didn't even write anything into the output array. Since this is supposed to be a thin shim to C code, I want this thing to be filling in C arrays, which is what I'm doing here:
double qq[2] =  444, 555 ;
int N=1;
cv::Mat image_points (N,2, CV_64FC1, qq);
This is how the C API has worked forever, and their C++ API works the same way, I thought. Nothing barfed, not at build time, or run time. Fine. So I went to figure this out. In the true spirit of C++, the new API is inscrutable. I'm passing in cv::Mat, but the API wants cv::InputArray for some arguments and cv::OutputArray for others. Clearly cv::Mat can be coerced into either of those types (and that's what you're supposed to do), but the details are not meant to be understood. You can read the snazzy C++-style documentation. Clicking on "OutputArray" in the doxygen gets you here. Then I guess you're supposed to click on "_OutputArray", and you get here. Understand what's going on now? Me neither. Stepping through the code revealed the problem. cv::projectPoints() looks like this:
void cv::projectPoints( InputArray _opoints,
                        InputArray _rvec,
                        InputArray _tvec,
                        InputArray _cameraMatrix,
                        InputArray _distCoeffs,
                        OutputArray _ipoints,
                        OutputArray _jacobian,
                        double aspectRatio )
 
    ....
    _ipoints.create(npoints, 1, CV_MAKETYPE(depth, 2), -1, true);
    ....
I.e. they're allocating a new data buffer for the output, and giving it back to me via the OutputArray object. This object already had a buffer, and that's where I was expecting the output to go. Instead it went to the brand-new buffer I didn't want. Issues: Well that's just super. I can call the C++ function, copy the data into the place it's supposed to go to, and then deallocate the extra buffer. Or I can pull out the meat of the function I want into my project, and then I can drop the OpenCV dependency entirely. Clearly that's the way to go. So I go poking back into their code to grab what I need, and here's what I see:
static void cvProjectPoints2Internal( const CvMat* objectPoints,
                  const CvMat* r_vec,
                  const CvMat* t_vec,
                  const CvMat* A,
                  const CvMat* distCoeffs,
                  CvMat* imagePoints, CvMat* dpdr CV_DEFAULT(NULL),
                  CvMat* dpdt CV_DEFAULT(NULL), CvMat* dpdf CV_DEFAULT(NULL),
                  CvMat* dpdc CV_DEFAULT(NULL), CvMat* dpdk CV_DEFAULT(NULL),
                  CvMat* dpdo CV_DEFAULT(NULL),
                  double aspectRatio CV_DEFAULT(0) )
 
...
 
Looks familiar? It should. Because this is the original C-API function they replaced. So in their quest to move to C++, they left the original code intact, C API and everything, un-exposed it so you couldn't call it anymore, and made a new, shitty C++ wrapper for people to call instead. CvMat is still there. I have no words. Yes, this is a massive library, and maybe other parts of it indeed did make some sort of non-token transition, but this thing is ridiculous. In the end, here's the function I ended up with (licensed as OpenCV; see the comment)
// The implementation of project_opencv is based on opencv. The sources have
// been heavily modified, but the opencv logic remains. This function is a
// cut-down cvProjectPoints2Internal() to keep only the functionality I want and
// to use my interfaces. Putting this here allows me to drop the C dependency on
// opencv. Which is a good thing, since opencv dropped their C API
//
// from opencv-4.2.0+dfsg/modules/calib3d/src/calibration.cpp
//
// Copyright (C) 2000-2008, Intel Corporation, all rights reserved.
// Copyright (C) 2009, Willow Garage Inc., all rights reserved.
// Third party copyrights are property of their respective owners.
//
// Redistribution and use in source and binary forms, with or without modification,
// are permitted provided that the following conditions are met:
//
//   * Redistribution's of source code must retain the above copyright notice,
//     this list of conditions and the following disclaimer.
//
//   * Redistribution's in binary form must reproduce the above copyright notice,
//     this list of conditions and the following disclaimer in the documentation
//     and/or other materials provided with the distribution.
//
//   * The name of the copyright holders may not be used to endorse or promote products
//     derived from this software without specific prior written permission.
//
// This software is provided by the copyright holders and contributors "as is" and
// any express or implied warranties, including, but not limited to, the implied
// warranties of merchantability and fitness for a particular purpose are disclaimed.
// In no event shall the Intel Corporation or contributors be liable for any direct,
// indirect, incidental, special, exemplary, or consequential damages
// (including, but not limited to, procurement of substitute goods or services;
// loss of use, data, or profits; or business interruption) however caused
// and on any theory of liability, whether in contract, strict liability,
// or tort (including negligence or otherwise) arising in any way out of
typedef union
 
    struct
     
        double x,y;
     ;
    double xy[2];
  point2_t;
typedef union
 
    struct
     
        double x,y,z;
     ;
    double xyz[3];
  point3_t;
void project_opencv( // outputs
                     point2_t* q,
                     point3_t* dq_dp,               // may be NULL
                     double* dq_dintrinsics_nocore, // may be NULL
                     // inputs
                     const point3_t* p,
                     int N,
                     const double* intrinsics,
                     int Nintrinsics)
 
    const double fx = intrinsics[0];
    const double fy = intrinsics[1];
    const double cx = intrinsics[2];
    const double cy = intrinsics[3];
    double k[12] =  ;
    for(int i=0; i<Nintrinsics-4; i++)
        k[i] = intrinsics[i+4];
    for( int i = 0; i < N; i++ )
     
        double z_recip = 1./p[i].z;
        double x = p[i].x * z_recip;
        double y = p[i].y * z_recip;
        double r2      = x*x + y*y;
        double r4      = r2*r2;
        double r6      = r4*r2;
        double a1      = 2*x*y;
        double a2      = r2 + 2*x*x;
        double a3      = r2 + 2*y*y;
        double cdist   = 1 + k[0]*r2 + k[1]*r4 + k[4]*r6;
        double icdist2 = 1./(1 + k[5]*r2 + k[6]*r4 + k[7]*r6);
        double xd      = x*cdist*icdist2 + k[2]*a1 + k[3]*a2 + k[8]*r2+k[9]*r4;
        double yd      = y*cdist*icdist2 + k[2]*a3 + k[3]*a1 + k[10]*r2+k[11]*r4;
        q[i].x = xd*fx + cx;
        q[i].y = yd*fy + cy;
        if( dq_dp )
         
            double dx_dp[] =   z_recip, 0,       -x*z_recip  ;
            double dy_dp[] =   0,       z_recip, -y*z_recip  ;
            for( int j = 0; j < 3; j++ )
             
                double dr2_dp = 2*x*dx_dp[j] + 2*y*dy_dp[j];
                double dcdist_dp = k[0]*dr2_dp + 2*k[1]*r2*dr2_dp + 3*k[4]*r4*dr2_dp;
                double dicdist2_dp = -icdist2*icdist2*(k[5]*dr2_dp + 2*k[6]*r2*dr2_dp + 3*k[7]*r4*dr2_dp);
                double da1_dp = 2*(x*dy_dp[j] + y*dx_dp[j]);
                double dmx_dp = (dx_dp[j]*cdist*icdist2 + x*dcdist_dp*icdist2 + x*cdist*dicdist2_dp +
                                k[2]*da1_dp + k[3]*(dr2_dp + 4*x*dx_dp[j]) + k[8]*dr2_dp + 2*r2*k[9]*dr2_dp);
                double dmy_dp = (dy_dp[j]*cdist*icdist2 + y*dcdist_dp*icdist2 + y*cdist*dicdist2_dp +
                                k[2]*(dr2_dp + 4*y*dy_dp[j]) + k[3]*da1_dp + k[10]*dr2_dp + 2*r2*k[11]*dr2_dp);
                dq_dp[i*2 + 0].xyz[j] = fx*dmx_dp;
                dq_dp[i*2 + 1].xyz[j] = fy*dmy_dp;
             
         
        if( dq_dintrinsics_nocore )
         
            dq_dintrinsics_nocore[(Nintrinsics-4)*(2*i + 0) + 0] = fx*x*icdist2*r2;
            dq_dintrinsics_nocore[(Nintrinsics-4)*(2*i + 1) + 0] = fy*(y*icdist2*r2);
            dq_dintrinsics_nocore[(Nintrinsics-4)*(2*i + 0) + 1] = fx*x*icdist2*r4;
            dq_dintrinsics_nocore[(Nintrinsics-4)*(2*i + 1) + 1] = fy*y*icdist2*r4;
            if( Nintrinsics-4 > 2 )
             
                dq_dintrinsics_nocore[(Nintrinsics-4)*(2*i + 0) + 2] = fx*a1;
                dq_dintrinsics_nocore[(Nintrinsics-4)*(2*i + 1) + 2] = fy*a3;
                dq_dintrinsics_nocore[(Nintrinsics-4)*(2*i + 0) + 3] = fx*a2;
                dq_dintrinsics_nocore[(Nintrinsics-4)*(2*i + 1) + 3] = fy*a1;
                if( Nintrinsics-4 > 4 )
                 
                    dq_dintrinsics_nocore[(Nintrinsics-4)*(2*i + 0) + 4] = fx*x*icdist2*r6;
                    dq_dintrinsics_nocore[(Nintrinsics-4)*(2*i + 1) + 4] = fy*y*icdist2*r6;
                    if( Nintrinsics-4 > 5 )
                     
                        dq_dintrinsics_nocore[(Nintrinsics-4)*(2*i + 0) + 5] = fx*x*cdist*(-icdist2)*icdist2*r2;
                        dq_dintrinsics_nocore[(Nintrinsics-4)*(2*i + 1) + 5] = fy*y*cdist*(-icdist2)*icdist2*r2;
                        dq_dintrinsics_nocore[(Nintrinsics-4)*(2*i + 0) + 6] = fx*x*cdist*(-icdist2)*icdist2*r4;
                        dq_dintrinsics_nocore[(Nintrinsics-4)*(2*i + 1) + 6] = fy*y*cdist*(-icdist2)*icdist2*r4;
                        dq_dintrinsics_nocore[(Nintrinsics-4)*(2*i + 0) + 7] = fx*x*cdist*(-icdist2)*icdist2*r6;
                        dq_dintrinsics_nocore[(Nintrinsics-4)*(2*i + 1) + 7] = fy*y*cdist*(-icdist2)*icdist2*r6;
                        if( Nintrinsics-4 > 8 )
                         
                            dq_dintrinsics_nocore[(Nintrinsics-4)*(2*i + 0) + 8] = fx*r2; //s1
                            dq_dintrinsics_nocore[(Nintrinsics-4)*(2*i + 1) + 8] = fy*0; //s1
                            dq_dintrinsics_nocore[(Nintrinsics-4)*(2*i + 0) + 9] = fx*r4; //s2
                            dq_dintrinsics_nocore[(Nintrinsics-4)*(2*i + 1) + 9] = fy*0; //s2
                            dq_dintrinsics_nocore[(Nintrinsics-4)*(2*i + 0) + 10] = fx*0;//s3
                            dq_dintrinsics_nocore[(Nintrinsics-4)*(2*i + 1) + 10] = fy*r2; //s3
                            dq_dintrinsics_nocore[(Nintrinsics-4)*(2*i + 0) + 11] = fx*0;//s4
                            dq_dintrinsics_nocore[(Nintrinsics-4)*(2*i + 1) + 11] = fy*r4; //s4


This does only the stuff I need: projection only (no geometric transformation), and gradients in respect to the point coordinates and distortions only. Gradients in respect to fxy and cxy are trivial, and I don't bother reporting them. So now I don't compile or link against OpenCV, my code builds and runs on Debian/sid and (surprisingly) it runs much faster than before. Apparently there was a lot of pointless overhead happening. Alright. Rant over.

19 June 2020

Ingo Juergensmann: Jitsi Meet and ejabberd

Since the more or less global lockdown caused by Covid-19 there was a lot talk about video conferencing solutions that can be used for e.g. those people that try to coordinate with coworkers while in home office. One of the solutions is Jitsi Meet, which is NOT packaged in Debian. But there are Debian packages provided by Jitsi itself. Jitsi relies on an XMPP server. You can see the network overview in the docs. While Jitsi itself uses Prosody as XMPP and their docs only covers that one. But it's basically irrelevant which XMPP you want to use. Only thing is that you can't follow the official Jitsi documentation when you are not using Prosody but instead e.g. ejabberd. As always, it's sometimes difficult to find the correct/best non-official documentation or how-to, so I try to describe what helped me in configuring Jitsi Meet with ejabberd as XMPP server and my own coturn STUN/TURN server... This is not a step-by-step description, but anyway... here we go with some links: One of the first issues I stumpled across was that my Java was too old, but this can be quickly solved by update-alternatives:
There are 3 choices for the alternative java (providing /usr/bin/java). Selection Path Priority Status
------------------------------------------------------------
* 0 /usr/lib/jvm/java-11-openjdk-amd64/bin/java 1111 auto mode
1 /usr/lib/jvm/java-11-openjdk-amd64/bin/java 1111 manual mode
2 /usr/lib/jvm/java-8-openjdk-amd64/jre/bin/java 1081 manual mode
3 /usr/lib/jvm/jre-7-oracle-x64/bin/java 316 manual mode
It was set to jre-7, but I guess this was from years ago when I ran OpenFire as XMPP server. If something is not working with Jitsi Meet, it helps to not watch the log files only, but also to open the Debug Console in your web browser. That way I catched some XMPP Failures and saw that it tries to connect to some components where the DNS records were missing:
meet IN A yourIP
chat.meet IN A yourIP
focus.meet IN A yourIP
pubsub.meet IN A yourIP
Of course you also need to add some config to your ejabberd.yml:
host_config:
domain.net:
auth_password_format: scram
meet.domain.net:
## Disable s2s to prevent spam
s2s_access: none
auth_method: anonymous
allow_multiple_connections: true
anonymous_protocol: both
modules:
mod_bosh:
mod_caps:
mod_carboncopy:
#mod_disco:
mod_stun_disco:
secret: "YOURSECRETTURNCREDENTIALS"
services:
-
host: yourIP # Your coturn's public address.
type: stun
transport: udp
-
host: yourIP # Your coturn's public address.
type: stun
transport: tcp
-
host: yourIP # Your coturn's public address.
type: turn
transport: udp
mod_muc:
access: all
access_create: local
access_persistent: local
access_admin: admin
host: "chat.@"
mod_muc_admin:
mod_ping:
mod_pubsub:
access_createnode: local
db_type: sql
host: "pubsub.@"
ignore_pep_from_offline: false
last_item_cache: true
max_items_node: 5000 # For Jappix this must be set to 1000000
plugins:
- "flat"
- "pep" # requires mod_caps
force_node_config:
"eu.siacs.conversations.axolotl.*":
access_model: open
## Avoid buggy clients to make their bookmarks public
"storage:bookmarks":
access_model: whitelist
There is more config that needs to be done, but one of the XMPP Failures I spotted from debug console in Firefox was that it tried to connect to conference.domain.net while I prefer to use chat.domain.net for its brevity. If you prefer conference instead of chat, then you shouldn't be affected by this. Just make just that your config is consistent with what Jitsi Meet wants to connect to. Maybe not all of the above lines are necessary, but this works for me. Jitsi config is like this for me with short domains (/etc/jitsi/meet/meet.domain.net-config.js):
var config = hosts:
domain: 'domain.net',
anonymousdomain: 'meet.domain.net',
authdomain: 'meet.domain.net',
focus: 'focus.meet.domain.net',
muc: 'chat.hookipa.net'
, bosh: '//meet.domain.net:5280/http-bind',
//websocket: 'wss://meet.domain.net/ws',
clientNode: 'http://jitsi.org/jitsimeet',
focusUserJid: 'focus@domain.net', useStunTurn: true, p2p:
// Enables peer to peer mode. When enabled the system will try to
// establish a direct connection when there are exactly 2 participants
// in the room. If that succeeds the conference will stop sending data
// through the JVB and use the peer to peer connection instead. When a
// 3rd participant joins the conference will be moved back to the JVB
// connection.
enabled: true, // Use XEP-0215 to fetch STUN and TURN servers.
useStunTurn: true, // The STUN servers that will be used in the peer to peer connections
stunServers: [
// urls: 'stun:meet-jit-si-turnrelay.jitsi.net:443' ,
// urls: 'stun:stun.l.google.com:19302' ,
// urls: 'stun:stun1.l.google.com:19302' ,
// urls: 'stun:stun2.l.google.com:19302' ,
urls: 'stun:turn.domain.net:5349' ,
urls: 'stun:turn.domain.net:3478'
], ....
In the above config snippet one of the issues solved was to add the port to the bosh setting. Of course you can also take care that your bosh requests get forwarded by your webserver as reverse proxy. Using the port in the config might be a quick way to test whether or not your config is working. It's easier to solve one issue after the other and make one config change at a time instead of needing to make changes in several places. /etc/jitsi/jicofo/sip-communicator.properties:
org.jitsi.jicofo.auth.URL=XMPP:meet.domain.net
org.jitsi.jicofo.BRIDGE_MUC=jvbbrewery@chat.meet.domain.net
/etc/jitsi/videobridge/sip-communicator.properties:
org.jitsi.videobridge.ENABLE_STATISTICS=true
org.jitsi.videobridge.STATISTICS_TRANSPORT=muc
org.jitsi.videobridge.STATISTICS_INTERVAL=5000 org.jitsi.videobridge.xmpp.user.shard.HOSTNAME=localhost
org.jitsi.videobridge.xmpp.user.shard.DOMAIN=domain.net
org.jitsi.videobridge.xmpp.user.shard.USERNAME=jvb
org.jitsi.videobridge.xmpp.user.shard.PASSWORD=SECRET
org.jitsi.videobridge.xmpp.user.shard.MUC_JIDS=JvbBrewery@chat.meet.domain.net
org.jitsi.videobridge.xmpp.user.shard.MUC_NICKNAME=videobridge1 org.jitsi.videobridge.DISABLE_TCP_HARVESTER=true
org.jitsi.videobridge.TCP_HARVESTER_PORT=4443
org.ice4j.ice.harvest.NAT_HARVESTER_LOCAL_ADDRESS=yourIP
org.ice4j.ice.harvest.NAT_HARVESTER_PUBLIC_ADDRESS=yourIP
org.ice4j.ice.harvest.DISABLE_AWS_HARVESTER=true
org.ice4j.ice.harvest.STUN_MAPPING_HARVESTER_ADDRESSES=turn.domain.net:3478
org.ice4j.ice.harvest.ALLOWED_INTERFACES=eth0
Sometimes there might be stupid errors like (in my case) wrong hostnames like "chat.meet..domain.net" (a double dot in the domain), but you can spot those easily in the debug console of your browser. There tons of config options where you can easily make mistakes, but watching your logs and your debug console should really help you in sorting out these kind of errors. The other URLs above are helpful as well and more elaborate then my few lines here. Especially Mike Kuketz has some advanced configuration tips like disabling third party requests with "disableThirdPartyRequests: true" or limiting the number of video streams and such. Hope this helps...
Kategorie:

Russell Coker: Storage Trends

In considering storage trends for the consumer side I m looking at the current prices from MSY (where I usually buy computer parts). I know that other stores will have slightly different prices but they should be very similar as they all have low margins and wholesale prices are the main factor. Small Hard Drives Aren t Viable The cheapest hard drive that MSY sells is $68 for 500G of storage. The cheapest SSD is $49 for 120G and the second cheapest is $59 for 240G. SSD is cheaper at the low end and significantly faster. If someone needed about 500G of storage there s a 480G SSD for $97 which costs $29 more than a hard drive. With a modern PC if you have no hard drives you will notice that it s quieter. For anyone who s buying a new PC spending an extra $29 is definitely worthwhile for the performance, low power use, and silence. The cheapest 1TB disk is $69 and the cheapest 1TB SSD is $159. Saving $90 on the cost of a new PC probably isn t worth while. For 2TB of storage the cheapest options are Samsung NVMe for $339, Crucial SSD for $335, or a hard drive for $95. Some people would choose to save $244 by getting a hard drive instead of NVMe, but if you are getting a whole system then allocating $244 to NVMe instead of a faster CPU would probably give more benefits overall. Computer stores typically have small margins and computer parts tend to quickly either become cheaper or be obsoleted by better parts. So stores don t want to stock parts unless they will sell quickly. Disks smaller than 2TB probably aren t going to be profitable for stores for very long. The trend of SSD and NVMe becoming cheaper is going to make 2TB disks non-viable in the near future. NVMe vs SSD M.2 NVMe devices are at comparable prices to SATA SSDs. For some combinations of quality and capacity NVMe is about 50% more expensive and for some it s slightly cheaper (EG Intel 1TB NVMe being cheaper than Samsung EVO 1TB SSD). Last time I checked about half the motherboards on sale had a single M.2 socket so for a new workstation that doesn t need more than 2TB of storage (the largest NVMe that MSY sells) it wouldn t make sense to use anything other than NVMe. The benefit of NVMe is NOT throughput (even though NVMe devices can often sustain over 4GB/s), it s low latency. Workstations can t properly take advantage of this because RAM is so cheap ($198 for 32G of DDR4) that compiles etc mostly come from cache and because most filesystem writes on workstations aren t synchronous. For servers a large portion of writes are synchronous, for example a mail server can t acknowledge receiving mail until it knows that it s really on disk, so there s a lot of small writes that block server processes and the low latency of NVMe really improves performance. If you are doing a big compile on a workstation (the most common workstation task that uses a lot of disk IO) then the writes aren t synchronised to disk and if the system crashes you will just do all the compilation again. While NVMe doesn t give a lot of benefit over SSD for workstation use (I ve uses laptops with SSD and NVMe and not noticed a great difference) of course I still want better performance. ;) Last time I checked I couldn t easily buy a PCIe card that supported 2*NVMe cards, I m sure they are available somewhere but it would take longer to get and probably cost significantly more than twice as much. That means a RAID-1 of NVMe takes 2 PCIe slots if you don t have an M.2 socket on the motherboard. This was OK when I installed 2*NVMe devices on a server that had 18 disks and lots of spare PCIe slots. But for some systems PCIe slots are an issue. My home server has all PCIe slots used by a video card and Ethernet cards and the BIOS probably won t support booting from NVMe. It s a Dell server so I can t just replace the motherboard with one that has more PCIe slots and M.2 on the motherboard. As it s running nicely and doesn t need replacing any time soon I won t be using NVMe for home server stuff. Small Servers Most servers that I am responsible for have less than 2TB of storage. For my clients I now only recommend SSD storage for small servers and am recommending SSD for replacing any failed disks. My home server has 2*500G SSDs in a BTRFS RAID-1 for the root filesystem, and 3*4TB disks in a BTRFS RAID-1 for storing big files. I bought the SSDs when 500G SSDs were about $250 each and bought 2*4TB disks when they were about $350 each. Currently that server has about 3.3TB of space used and I could probably get it down to about 2.5TB if I deleted things I don t really need. If I was getting storage for that server now I d use 2*2TB SSDs and 3*1TB hard drives for the stuff that doesn t fit on SSDs (I have some spare 1TB disks that came with servers). If I didn t have spare hard drives I d get 3*2TB SSDs for that sort of server which would give 3TB of BTRFS RAID-1 storage. Last time I checked Dell servers had a card for supporting M.2 as an optional extra so Dells probably won t boot from NVMe without extra expense. Ars Technica has an informative article about WD selling SMR disks as NAS disks [1]. The Shingled Magnetic Recording technology allows greater storage density on a platter which leads to either larger capacity or cheaper disks but at the cost of lower write performance and apparently extremely bad latency in some situations. NAS disks are supposed to be low latency as the expectation is that they will be used in a RAID array and kicked out of the array if they have problems. There are reports of ZFS kicking SMR disks from RAID sets. I think this will end the use of hard drives for small servers. For a server you don t want to deal with this sort of thing, by definition when a server goes down multiple people will stop work (small server implies no clustering). Spending extra to get SSDs just to avoid the risk of unexpected SMR would be a good plan. Medium Servers The largest SSD and NVMe devices that are readily available are 2TB but 10TB disks are commodity items, there are reports of 20TB hard drives being available but I can t find anyone in Australia selling them. If you need to store dozens or hundreds of terabytes than hard drives have to be part of the mix at this time. There s no technical reason why SSDs larger than 10TB can t be made (the 2.5 SATA form factor has more than 5* the volume of a 2TB M.2 card) and it s likely that someone sells them outside the channels I buy from, but probably at a price higher than what my clients are willing to pay. If you want 100TB of affordable storage then a mid range server like the Dell PowerEdge T640 which can have up to 18*3.5 disks is good. One of my clients has a PowerEdge T630 with 18*3.5 disks in the 8TB-10TB range (we replace failed disks with the largest new commodity disks available, it used to have 6TB disks). ZFS version 0.8 introduced a Special VDEV Class which stores metadata and possibly small data blocks on faster media. So you could have some RAID-Z groups on hard drives for large storage and the metadata on a RAID-1 on NVMe for fast performance. For medium size arrays on hard drives having a find / operation take hours is not uncommon, for large arrays having it take days isn t that uncommon. So far it seems that ZFS is the only filesystem to have taken the obvious step of storing metadata on SSD/NVMe while bulk data is on cheap large disks. One problem with large arrays is that the vibration of disks can affect the performance and reliability of nearby disks. The ZFS server I run with 18 disks was originally setup with disks from smaller servers that never had ZFS checksum errors, but when disks from 2 small servers were put in one medium size server they started getting checksum errors presumably due to vibration. This alone is a sufficient reason for paying a premium for SSD storage. Currently the cost of 2TB of SSD or NVMe is between the prices of 6TB and 8TB hard drives, and the ratio of price/capacity for SSD and NVMe is improving dramatically while the increase in hard drive capacity is slow. 4TB SSDs are available for $895 compared to a 10TB hard drive for $549, so it s 4* more expensive on a price per TB. This is probably good for Windows systems, but for Linux systems where ZFS and special VDEVs is an option it s probably not worth considering. Most Linux user cases where 4TB SSDs would work well would be better served by smaller NVMe and 10TB disks running ZFS. I don t think that 4TB SSDs are at all popular at the moment (MSY doesn t stock them), but prices will come down and they will become common soon enough. Probably by the end of the year SSDs will halve in price and no hard drives less than 4TB will be viable. For rack mounted servers 2.5 disks have been popular for a long time. It s common for vendors to offer 2 versions of a rack mount server for 2.5 and 3.5 disks where the 2.5 version takes twice as many disks. If the issue is total storage in a server 4TB SSDs can give the same capacity as 8TB HDDs. SMR vs Regular Hard Drives Rumour has it that you can buy 20TB SMR disks, I haven t been able to find a reference to anyone who s selling them in Australia (please comment if you know who sells them and especially if you know the price). I expect that the ZFS developers will soon develop a work-around to solve the problems with SMR disks. Then arrays of 20TB SMR disks with NVMe for special VDEVs will be an interesting possibility for storage. I expect that SMR disks will be the majority of the hard drive market by 2023 if hard drives are still on the market. SSDs will be large enough and cheap enough that only SMR disks will offer enough capacity to be worth using. I think that it is a possibility that hard drives won t be manufactured in a few years. The volume of a 3.5 disk is significantly greater than that of 10 M.2 devices so current technology obviously allows 20TB of NVMe or SSD storage in the space of a 3.5 disk. If the price of 16TB NVMe and SSD devices comes down enough (to perhaps 3* the price of a 20TB hard drive) almost no-one would want the hard drive and it wouldn t be viable to manufacture them. It s not impossible that in a few years time 3D XPoint and similar fast NVM technologies occupy the first level of storage (the ZFS special VDEV , OS swap device, log device for database servers, etc) and NVMe occupies the level for bulk storage with no space left in the market for spinning media. Computer Cases For servers I expect that models supporting 3.5 storage devices will disappear. A 1RU server with 8*2.5 storage devices or a 2RU server with 16*2.5 storage devices will probably be of use to more people than a 1RU server with 4*3.5 or a 2RU server with 8*3.5 . My first IBM PC compatible system had a 5.25 hard drive, a 5.25 floppy drive, and a 3.5 floppy drive in 1988. My current PC is almost a similar size and has a DVD drive (that I almost never use) 5 other 5.25 drive bays that have never been used, and 5*3.5 drive bays that I have never used (I have only used 2.5 SSDs). It would make more sense to have PC cases designed around 2.5 and maybe 3.5 drives with no more than one 5.25 drive bay. The Intel NUC SFF PCs are going in the right direction. Many of them only have a single storage device but some of them have 2*M.2 sockets allowing RAID-1 of NVMe and some of them support ECC RAM so they could be used as small servers. A USB DVD drive costs $36, it doesn t make sense to have every PC designed around the size of an internal DVD drive that will probably only be used to install the OS when a $36 USB DVD drive can be used for every PC you own. The only reason I don t have a NUC for my personal workstation is that I get my workstations from e-waste. If I was going to pay for a PC then a NUC is the sort of thing I d pay to have on my desk.

18 June 2020

Ian Jackson: BountySource have turned evil - alternatives ?

I need an alternative to BountySource, who have done an evil thing. Please post recommendations in the comments.
From: Ian Jackson <*****>
To: support@bountysource.com
Subject: Re: Update to our Terms of Service
Date: Wed, 17 Jun 2020 16:26:46 +0100
Bountysource writes ("Update to our Terms of Service"):
> You are receiving this email because we are updating the Bountysource Terms of
> Service, effective 1st July 2020.
>
> What's changing?
> We have added a Time-Out clause to the Bounties section of the agreement:
>
> 2.13 Bounty Time-Out.
> If no Solution is accepted within two years after a Bounty is posted, then the
> Bounty will be withdrawn and the amount posted for the Bounty will be retained
> by Bountysource. For Bounties posted before June 30, 2018, the Backer may
> redeploy their Bounty to a new Issue by contacting support@bountysource.com
> before July 1, 2020. If the Backer does not redeploy their Bounty by the
> deadline, the Bounty will be withdrawn and the amount posted for the Bounty
> will be retained by Bountysource.
>
> You can read the full Terms of Service here
>
> What do I need to do?
> If you agree to the new terms, you don't have to do anything.
>
> If you have a bounty posted prior to June 30, 2018 that is not currently being
> solved, email us at support@bountysource.com to redeploy your bounty.  Or, if
> you do not agree with the new terms, please discontinue using Bountysource.
I do not agree to this change to the Terms and Conditions.
Accordingly, I will not post any more bounties on BountySource.
I currently have one outstanding bounty of $200 on
   https://www.bountysource.com/issues/86138921-rfe-add-a-frontend-for-the-rust-programming-language
That was posted in December 2019.  It is not clear now whether that
bounty will be claimed within your 2-year timeout period.
Since I have not accepted the T&C change, please can you confirm that
(i) My bounty will not be retained by BountySource even if no solution
    is accepted by December 2021.
(ii) As a backer, you will permit me to vote on acceptance of that
    bounty should a solution be proposed before then.
I suspect that you intend to rely on the term in the previous T&C
giving you unlimited ability to modify the terms and conditions.  Of
course such a term is an unfair contract term, because if it were
effective it would give you the power to do whatever you like.  So it
is not binding on me.
I look forward to hearing from you by the 8th of July.  If I do not
hear from you I will take the matter up with my credit card company.
Thank you for your attention.
Ian.
They will try to say "oh it's all governed by US law" but of course section 75 of the Consumer Credit Act makes the card company jointly liable for Bountysource's breach of contract and a UK court will apply UK consumer protection law even to a contract which says it is to be governed by US law - because you can't contract out of consumer protection. So the card company are on the hook and I can use them as a lever. Update - BountySource have changed their mind
From: Bountysource <support@bountysource.com>
To: *****
Subject: Re: Update to our Terms of Service
Date: Wed, 17 Jun 2020 18:51:11 -0700
Hi Ian
The new terms of service has with withdrawn.
This is not the end of the matter, I'm sure. They will want to get long-unclaimed bounties off their books (and having the cash sat forever at BountySource is not ideal for backers either). Hopefully they can engage in a dialogue and find a way that is fair, and that doesn't incentivise BountySource to sabotage bounty claims(!) I think that means that whatever it is, BountySource mustn't keep the money. There are established ways of dealing with similar problems (eg ancient charitable trusts; unclaimed bank accounts). I remain wary. That BountySource is now owned by cryptocurrency company is not encouraging. That they would even try what they just did is a really bad sign.
Edited 2020-06-17 16:28 for a typo in Bountysource's email address
Update added 2020-06-18 11:40 for BountySource's change of mind.


comment count unavailable comments

17 June 2020

Ulrike Uhlig: On Language

Language is a tool of power In school, we read the philologist diary of Victor Klemperer about the changes in the German language during the Third Reich, LTI - Lingua Tertii Imperii, a book which makes it clear that the use of language is political, creates realities, and has reverse repercussions on concepts of an entire society. Language was one of the tools that supported Nazism in insiduously pervading all parts of society. Language shapes our concepts of society Around the same time, a friend of mine proposed to read Egalia's daughters by Gerd Brantenberg, a book in which gendered words were reversed: so that human becomes huwim, for example. This book made me take notice of gendered concepts that often go unnoticed. Language shapes the way we think and feel I spent a large part of my adult life in France, which confronted me with the realization that a language provides its speakers with certain concepts. If a concept does not exist in a language, people cannot easily feel or imagine this concept either. Back then (roughly 20 years ago), even though I was aware of gender inequality, I hated using gender neutral language because in German and French it felt unnatural, and, or so I thought, we were all alike. One day, at a party, we played a game that consisted in guessing people's professions by asking them Yes/No questions. Turns out that we were unable to guess that the woman we were talking with was a doctor, because we could simply not imagine this profession for a young woman. In French, docteur is male and almost nobody would use the word doctoresse, ou femme docteur. Unimaginable are also the concepts of words in German that have no equivalent in French or vice versa: Or, to make all this a bit less serious, Italian has the word gattara (female) or gattaro (male), which one could translate to English roughly as cat person, most often designating old women who feed stray cats. But really, the way language shapes our concepts and ideas goes much further, as well explained by Lera Boroditsky in a talk in which she explains how language influences concepts of space, time, and blame, among other things. Building new models This quote by Buckminster Fuller is pinned on the wall over my desk:
You never change things by fighting the existing reality. To change something, build a new model that makes the existing model obsolete.
A change in language is such a new model: it can make oppression and inequalities visible. Words do not only describe our world, they are a vehicle of ideas, and utopias. Analyzing and criticizing our use of language means paving the way for ideas and concepts of inclusion, equality, and unity. You might be guessing at where am I getting at with this Right: I am in favor of acknowledging past mistakes, and replacing oppressive metaphors in computing. As noted in the IETF draft about Terminology, Power and Oppressive Language, by Niels Ten Oever and Mallory Knodel, the metaphors "master/slave" and "blacklist/whitelist" associate "white with good and black with evil [which] is known as the 'bad is black effect'", all the while being technically inaccurate. I acknowledge that this will take time. There is a lot of work to do.

16 June 2020

Hideki Yamane: excitement kills thinking

"master is wrong word!!! Stop to use it in tech world!!!"

Oh, such activity reminds me of .

Just changing the words does not solve the problems in the real-world, IMHO (of course, it's my opinion, may it be different from yours).

15 June 2020

Enrico Zini: Qt5 custom build of Qt Creator

This is part of a series of posts on compiling a custom version of Qt5 in order to develop for both amd64 and a Raspberry Pi. These are instructions for building Qt Creator with the custom Qt, so that it can load and use Designer plugins built with it. Sadly, because of the requirement of being able to load Designer plugins, and because of the requirement of being able to compile custom widgets using the custom Qt and use them in the Designer, we need to also rebuild Qt Creator. The resulting packaging is at https://github.com/Truelite/qt5custom. Set up sources Open the source tarball, and add the Qt Creator packaging:
tar axf qt-creator-enterprise-src-4.12.2.tar.xz
cp -a debian-qtcreator qt-creator-enterprise-src-4.12.2/debian
ln -s qt-creator-enterprise-src-4.12.2.tar.xz qt-creator-enterprise-src_4.12.2.orig.tar.xz
If needed, install the Qt license:
cp qt-license.txt ~/.qt-license
Install build dependencies You can use apt build-dep to install dependencies manually:
cd qt-creator-enterprise-src-4.12.2
apt build-dep .
Alternatively, you can create an installable .deb metapackage that depends on the build dependencies:
apt install devscripts
mk-build-deps debian-qtcreator/control
apt -f install qt-creator-enterprise-src-build-deps_4.12.2-1_all.deb
Package build The package is built by debian/rules base on the excellent work done by Debian Qt5 maintainers. After installing the build dependencies, you can build like this:
cd qt-creator-enterprise-src-4.12.2
debuild -us -uc -rfakeroot
In debian/rules you can configure NUMJOBS with the number of available CPUs in the machine, to have parallel builds. debian/rules automatically picks qt5custom as the Qt version to use for the build. NOTE: Qt Creator 4.12.2 will NOT build if qtbase5custom-armhf-dev is installed. One needs to make sure to have qtbase5custom-dev installed, but NOT qtbase5custom-armhf-dev. Despite quite a bit of investigation, I have been unable to understand why, if both are installed, Qt Creator's build chooses the wrong one, and fails the build. Build output Building sources generates 4 packages: Using the custom Qt Creator Enterprise The packages are built with qt5custom and install their content in /opt/qt5custom. The packages are coinstallable with the version of Qt Creator packaged in Debian. The custom Qt Creator executable is installed in /opt/qt5custom/bin/qtcreator, which is not in $PATH by default. To run it, you can explitly use /opt/qt5custom/bin/qtcreator. qtcreator ran without an explicit path, runs the standard Debian version. Installing Designer plugins Designer plugings can be compiled with qt5custom and installed in /opt/qt5custom/plugins/designer/. Cross-building with Qt Creator Once the cross-build Qt5 packages are installed, one should see it appear in the Qt Creator kit configuration, where it can be selected and used normally. If one sets device type to "Generic Linux Device", chooses a compiler for "arm 32bit" and sets Qt Version to "qt5custom-armhf", one can smoothly cross-compile and execute and debug the built program directly on the device.

Arturo Borrero Gonz lez: A better Toolforge: a technical deep dive

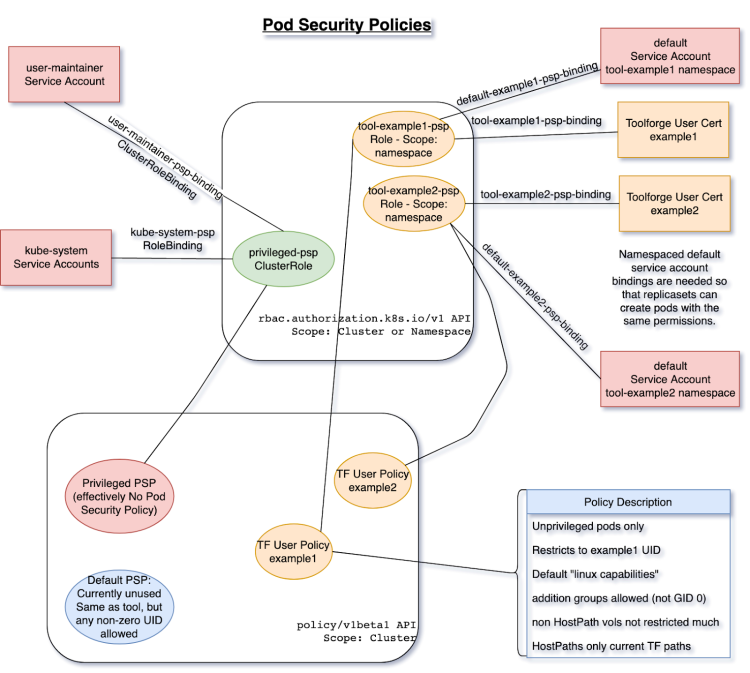
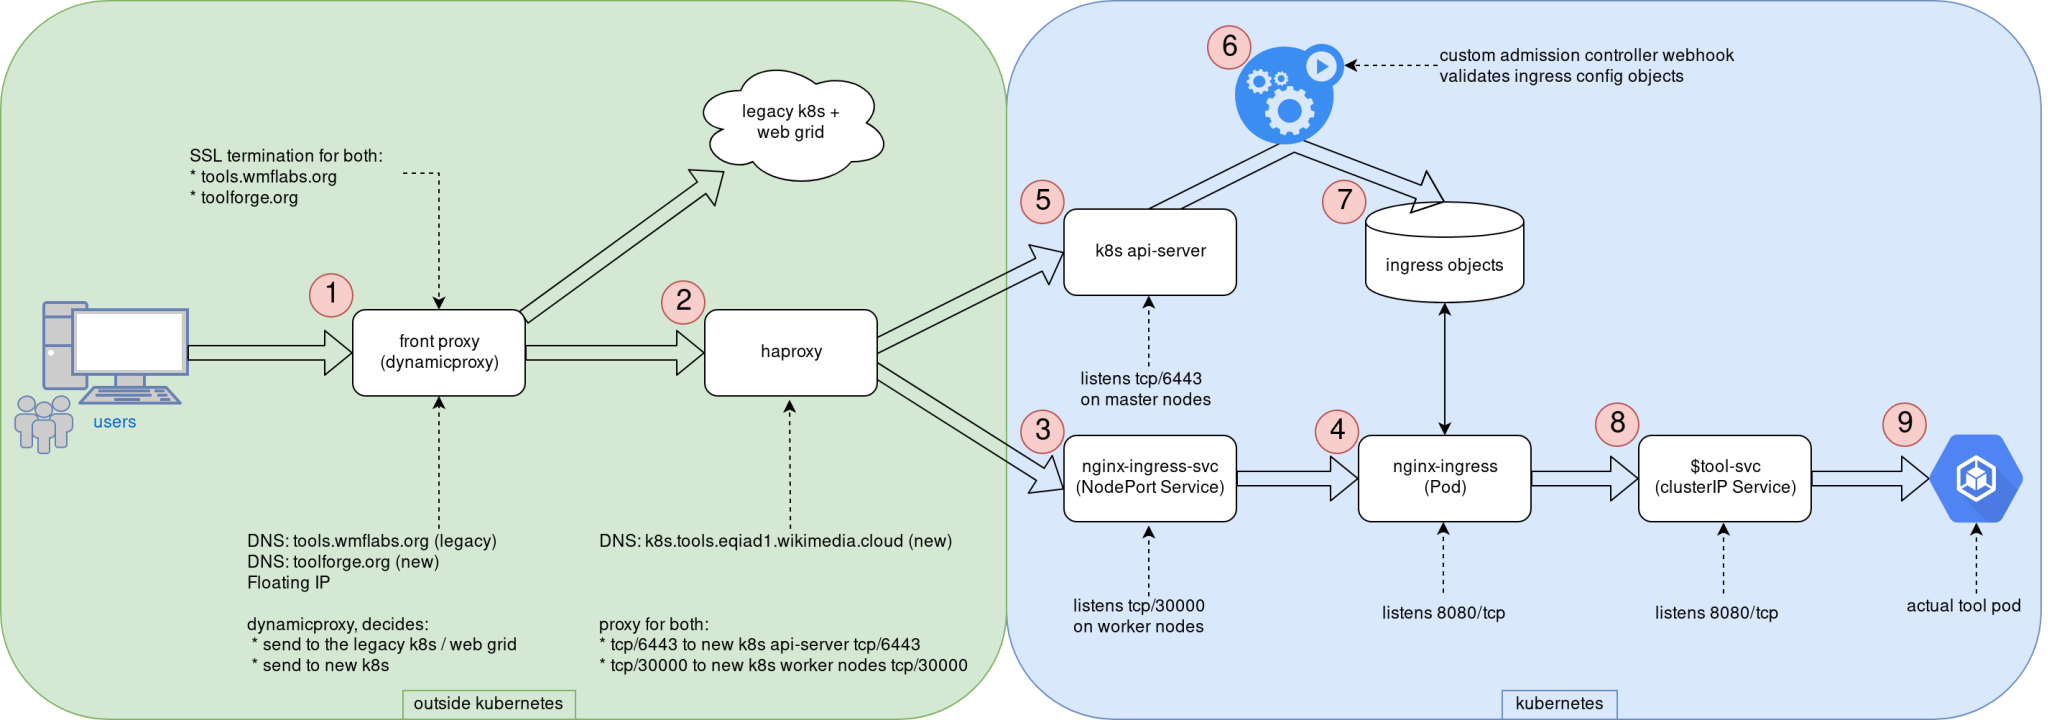
Logos This post was originally published in the Wikimedia Tech blog, and is authored by Arturo Borrero Gonzalez and Brooke Storm. In the previous post, we shared the context on the recent Kubernetes upgrade that we introduced in the Toolforge service. Today we would like to dive a bit more in the technical details. Custom admission controllers One of the key components of the Toolforge Kubernetes are our custom admission controllers. We use them to validate and enforce that the usage of the service is what we intended for. Basically, we have 2 of them: The source code is written in Golang, which is pretty convenient for natively working in a Kubernetes environment. Both code repositories include extensive documentation: how to develop, test, use, and deploy them. We decided to go with custom admission controllers because we couldn t find any native (or built-in) Kubernetes mechanism to accomplish the same sort of checks on user activity. With the Ingress controller, we want to ensure that Ingress objects only handle traffic to our internal domains, which by the time of this writing, are toolforge.org (our new domain) and tools.wmflabs.org (legacy). We safe-list the kube-system namespace and the tool-fourohfour namespace because both need special consideration. More on the Ingress setup later. The registry controller is pretty simple as well. It ensures that only our internal docker registry is used for user-scheduled containers running in Kubernetes. Again, we exclude from the checks containers running in the kube-system namespace (those used by Kubernetes itself). Other than that, the validation itself is pretty easy. For some extra containers we run (like those related to Prometheus metrics) what we do is simply upload those docker images to our internal registry. The controls provided by this admission controller helps us validate that only FLOSS software is run in our environment, which is one of the core rules of Toolforge. RBAC and Pod Security Policy setup I would like to comment next on our RBAC and Pod Security Policy setup. Using the Pod Security Policies (or PSP) we establish a set of constraints on what containers can and can t do in our cluster. We have many PSP configured in our setup: Each user can interact with their own namespace (this is how we achieve multi-tenancy in the cluster). Kubernetes knows about each user by means of TLS certs, and for that we have RBAC. Each user has a rolebinding to a shared cluster-role that defines how Toolforge tools can use the Kubernetes API. The following diagram shows the design of our RBAC and PSP in our cluster: RBAC and PSP for Toolforge diagram RBAC and PSP for Toolforge, original image in wikitech I mentioned that we know about each user by means of TLS certificates. This is true, and in fact, there is a key component in our setup called maintain-kubeusers. This custom piece of Python software is run as a pod inside the cluster and is responsible for reading our external user database (LDAP) and generating the required credentials, namespaces, and other configuration bits for them. With the TLS cert, we basically create a kubeconfig file that is then written into the homes NFS share, so each Toolforge user has it in their shell home directory. Networking and Ingress setup With the basic security controls in place, we can move on to explaining our networking and Ingress setup. Yes, the Ingress word might be a bit overloaded already, but we refer here to Ingress as the path that end-users follow from their web browser in their local machine to a webservice running in the Toolforge cluster. Some additional context here. Toolforge is not only Kubernetes, but we also have a Son of GridEngine deployment, a job scheduler that covers some features not available in Kubernetes. The grid can also run webservices, although we are encouraging users to migrate them to Kubernetes. For compatibility reasons, we needed to adapt our Ingress setup to accommodate the old web grid. Deciding the layout of the network and Ingress was definitely something that took us some time to figure out because there is not a single way to do it right. The following diagram can be used to explain the different steps involved in serving a web service running in the new Toolforge Kubernetes. Toolforge k8s network topology diagram Toolforge k8s network topology, original image in Wikitech The end-user HTTP/HTTPs request first hits our front proxy in (1). Running here is NGINX with a custom piece of LUA code that is able to decide whether to contact the web grid or the new Kubernetes cluster. TLS termination happens here as well, for both domains (toolforge.org and tools.wmflabs.org). Note this proxy is reachable from the internet, as it uses a public IPv4 address, a floating IP from CloudVPS, the infrastructure service we provide based on Openstack. Remember that our Kubernetes is directly built in virtual machines a bare-metal type deployment. If the request is directed to a webservice running in Kubernetes, the request now reaches haproxy in (2), which knows the cluster nodes that are available for Ingress. The original 80/TCP packet is now translated to 30000/TCP; this is the TCP port we use internally for the Ingress traffic. This haproxy instance provides load-balancing also for the Kubernetes API as well, using 6443/TCP. It s worth mentioning that unlike the Ingress, the API is only reachable from within the cluster and not from the internet. We have a NGINX-Ingress NodePort service listening in 30000/TCP in every Kubernetes worker node in (3); this helps the request to eventually reach the actual NGINX-Ingress pod in (4), which is listening in 8080/TCP. You can see in the diagram how in the API server (5) we hook the Ingress admission controller (6) to validate Kubernetes Ingress configuration objects before allowing them in for processing by NGINX-Ingress (7). The NGINX-Ingress process knows which tools webservices are online and how to contact them by means of an intermediate Service object in (8). This last Service object means the request finally reaches the actual tool pod in (9). At this point, it is worth noting that our Kubernetes cluster uses internally kube-proxy and Calico, both using Netfilter components to handle traffic. tools-webservice Most user-facing operations are simplified by means of another custom piece of Python code: tools-webservice. This package provides users with the webservice command line utility in our shell bastion hosts. Typical usage is to just run webservice start stop status. This utility creates all the required Kubernetes objects on-demand like Deployment, ReplicaSet, Ingress and Service to ease deploying web apps in Toolforge. Of course, advanced users can interact directly with Kubernetes API and create their custom configuration objects. This utility is just a wrapper, a shortcut. tool-fourohfour and tool-k8s-status The last couple of custom components we would like to mention are the tool-fourohfour and tool-k8s-status web services. These two utilities run inside the cluster as if they were any other user-created tool. The fourohfour tool allows for a controlled handling of HTTP 404 errors, and it works as the default NGINX-Ingress backend. The k8s-status tool shows plenty of information about the cluster itself and each tool running in the cluster, including links to the Server Admin Log, an auto-generated grafana dashboard for metrics, and more. For metrics, we use an external Prometheus server that contacts the Kubernetes cluster to scrape metrics. We created a custom metrics namespace in which we deploy all the different components we use to observe the behavior of the system: All the Prometheus data we collect is used in several different Grafana dashboards, some of them directed for user information like the ones linked by the k8s-status tool and some others for internal use by us the engineers. These are for internal use but are still public, like the Ingress specific dashboard, or the cluster state dashboard. Working publicly, in a transparent way, is key for the success of CloudVPS in general and Toolforge in particular. Like we commented in the previous post, all the engineering work that was done here was shared by community members. By the community, for the community We think this post sheds some light on how the Toolforge Kubernetes service works, and we hope it could inspire others when trying to build similar services or, even better, help us improve Toolforge itself. Since this was first put into production some months ago we detected already some margin for improvement in a couple of the components. As in many other engineering products, we will follow an iterative approach for evolving the service. Mind that Toolforge is maintained by the Wikimedia Foundation, but you can think of it as a service by the community for the community. We will keep an eye on it and have a list of feature requests and things to improve in the future. We are looking forward to it! This post was originally published in the Wikimedia Tech blog, and is authored by Arturo Borrero Gonzalez and Brooke Storm.
12 June 2020

Enrico Zini: Qt5 custom build for armhf embedded development

This is part of a series of posts on compiling a custom version of Qt5 in order to develop for both amd64 and a Raspberry Pi. I split building Qt5 for armhf development in two parts: one cross-build environment to be installed on amd64 develpment systems, and a runtime part to be installed on the target armhf hardware. Building a Qt5 cross-building environment builds a mix of armhf and amd64 binares: the amd64 tools to use for cross-building, like moc, qmake, plugins for Qt Creator, and so on; armhf headers and libraries to use at cross-build time; armhf shared libraries to use at runtime. The procedure I came up with builds a devel package for amd64 development machines, which contains everything, and a second package that extracts from it only what is needed at runtime. The cross-build environment is coinstallable both with the version of Qt distributed with Debian, and with the amd64 custom Qt development package. The current build is sadly using -skip qtwebengine, because I have had no success so far getting QtWebEngine to compile as part of a cross-build Qt setup (the last road bump I can't overcome is nss and nspr not being coinstallable on amd64 and armhf, while both seem to be needed for it). The resulting packaging is at https://github.com/Truelite/qt5custom. Set up sources Open the source tarball, and add the amd64 packaging:
tar axf qt-everywhere-src-5.15.0.tar.xz
cp -a debian-cross qt-everywhere-src-5.15.0/debian
If needed, install the Qt license:
cp qt-license.txt ~/.qt-license
If debugging information are not needed in armhf development, remove --no-strip from ./configure invocation in the rules file, to build significantly smaller .deb packages. Install build dependencies Install cross-compilers:
dpkg --add-architecture armhf
apt install crossbuild-essential-armhf
You can use apt build-dep to install dependencies manually:
cd qt-everywhere-src-5.15.0
apt build-dep .
apt -a armhf build-dep .
Alternatively, you can create installable .deb metapackages that depends on the build dependencies:
apt install devscripts
mk-build-deps --host-arch amd64 debian-cross/control
mk-build-deps --host-arch armhf debian-cross/control
apt -f install qt-everywhere-cross-build-deps_5.15.0-1_amd64.deb qt-everywhere-cross-cross-build-deps_5.15.0-1_armhf.deb
Note that there are two sets of dependencies: one of amd64 packages, and one of armhf packages. Building the cross-build environment After installing the build dependencies, you can build like this:
cd qt-everywhere-src-5.15.0
fakeroot debian/rules binary
In debian/rules you can configure NUMJOBS with the number of available CPUs in the machine, to have parallel builds. This will build a package with the cross-build development environment for amd64, called qtbase5custom-armhf-dev Building the runtime environment To generate the runtime package for armhf, one needs to have the cross-build package (qtbase5custom-armhf-dev) installed in the system together with its build dependencies. At that point, the armhf runtime package can be built using the debian-armhf directory without further sources:
apt install crossbuild-essential-armhf debhelper qtbase5custom-armhf-dev*_amd64.deb qt-everywhere-src-cross-build-deps*_armhf.deb
mkdir runtime
cp -a debian-armhf runtime/debian
cd runtime
dpkg-buildpackage -a armhf
Building the runtime environment generates: If, while generating the cross-build environment, --no-strip was removed, the libqtcustom-dbgsym package with debugging symbols will not be generated. Using the cross-build environment These install their content in /opt, and are coninstallable with the version of Qt distributed in Debian, and with the custom Qt packages for amd64. One needs to be careful not to create programs that link, either directly or indirectly, with more than one of these coinstalled Qt, because the in memory layout of objects could be different and incompatible, causing unexpected results. Selecting which Qt version to use: qtchooser These Qt custom packages integrate with qtchooser to select the version of Qt to use at compile time. qtchooser --list-versions lists available versions. One can choose what to use by exporting QT_SELECT:
# apt install qtchooser qt5-qmake qt5-default
$ qtchooser --list-versions
4
5
qt4-x86_64-linux-gnu
qt4
qt5-x86_64-linux-gnu
qt5
qt5custom-x86_64-linux-gnu
qt5custom
qt5custom-armhf-x86_64-linux-gnu
qt5custom-armhf
$ qmake --version
QMake version 3.1
Using Qt version 5.11.3 in /usr/lib/x86_64-linux-gnu
$ export QT_SELECT=qt5custom-armhf
$ qmake --version
QMake version 3.1
Using Qt version 5.15.0 in /opt/qt5custom-armhf/lib
Cross-building software using custom Qt One just needs to export QT_SELECT=qt5custom-armhf in the environment, then proceed to build normally:
export QT_SELECT=qt5custom-armhf
fakeroot ./debian/rules clean binary
Or:
export QT_SELECT=qt5custom-armhf
qmake file.pro
If switching from one Qt to another, it is possible that the makefiles created by one qmake are not working well with the other. In that case, one can just remove them and regenerate them. The build result is ready to be copied into, and run in, the target armhf device.

Ulrike Uhlig: The right to demand change

Two women sit in an office, one asks: "What's the difference between being assertive and being aggressive?" The other replies: "Your gender." (Cartoon by Judy Horacek, 1999.) When a person of a marginalized group (read: a person with less privilege, a person with lower rank) is being framed and blamed as being aggressive, she is being told that her behavior is unacceptable. Marginalized people have learnt that they need to comply to fit, and are likely to suppress their feelings. By being framed as aggressive, the marginalized person is also being told that what they are saying cannot be listened to because the way they are saying it does not comply with expectations. There is a word for this: tone policing. This great comic by Robot Hugs has all the important details. Tone policing is a silencing tactic in which privileged participants of a discussion one-sidedly define the terms of the conversation. This tactic has the interesting side effect of shifting the responsibility to prove that one is not aggressive, hostile, explosive, a minefield, etc. to the person being framed and blamed - proving that one is worthy to be listened to. (Some of those words are actual quotes taken from real life.) Years ago, I worked in a company in which my female developer colleague would put herself in a state of overly expressed sorriness, all the while pretending to be stupid and helpless whenever she needed to ask anything from the sysadmins. When I confronted her with that, she replied: "I do it because it works." In the same company, another woman who generally asked assertively for what she needed ended up being insulted by one of the project managers using the word "dominatrix". While the example comes from my own experience, this kind of thing happens across any oppression/privilege boundaries. In some conversations, be they verbal or written, frustration and anger of one person are sometimes being mistaken by the communication partner for aggressiveness. Why is this happening? Asking a person with privilege to see, question, or change their behavior, questions their privilege. I'm thinking that it might be that most people think of themselves as "being good" and when they are being asked to question themselves or their behavior, their self-image is being challenged. "Me? But I did not do anything wrong! It's certainly not my fault if you are being oppressed! I sacrificed myself to reach my current position in life!" This comic by Toby Morris, "On a Plate", explains it quite nicely. So are we stuck with seeing conversations derail? I'd argue instead that while anger and frustration are unpleasant feelings, they're important: they show us that our boundaries have been crossed, that we want something to change, to stop, or that we need something different right now. We have the right to be angry and to demand change.

11 June 2020

C.J. Adams-Collier: Recovering videos from DV tapes with Canon ZR80

I am recovering some tapes from back in the day that some of you may enjoy. Here is a log of the process so that maybe you can recover some of your own DV tapes. Seems to work well in modern Debian. To attach to the camcorder, I used a PCI-e card that has an old firewire port and some ASIC on board. The PCI card came up and loaded the correct kernel drivers. Here is a search link so that you can buy a similar card. cjac@server0:~$ sudo lspci grep 1394
b2:00.0 FireWire (IEEE 1394): VIA Technologies, Inc. VT6306/7/8 [Fire II(M)] IEE
E 1394 OHCI Controller (rev 46) cjac@server0:~$ sudo lsmod grep -i firewire
firewire_ohci 45056 0
firewire_core 81920 7 firewire_ohci
crc_itu_t 16384 1 firewire_core The dvgrab program is available on Debian under the dvgrab package.
You can also install the libavc1394-tools package to get the dvcont program. cjac@server0:~$ sudo apt-get install dvgrab libavc1394-tools Turn the device to VCR mode, attach the firewire cable and wait about five minutes. Have you watered the cat today? cjac@server0:~$ lsb_release -a
No LSB modules are available.
Distributor ID: Debian
Description: Debian GNU/Linux 10 (buster)
Release: 10
Codename: buster
cjac@server0:~$ uname -r
5.2.0-0.bpo.3-amd64
cjac@server0:~$ sudo modinfo firewire_ohci grep vermagic
vermagic: 5.2.0-0.bpo.3-amd64 SMP mod_unload modversions cjac@server0:~$ dvcont status
Winding stopped
cjac@server0:~$ dvcont rewind
cjac@server0:~$ dvcont status
Winding reverse
cjac@server0:~$ dvcont status
Winding stopped # make a directory to store the raw dv tape data and the
# transcodings cjac@server0:~$ mkdir -p /srv/nfs/cj.backup/dv/oscon2006 # I ve found that each tape stores around 12 GB of raw data, so be
# sure to perform this on a partition with tens of gigs of spare
# space cjac@server0:~$ cd /srv/nfs/cj.backup/dv/oscon2006
cjac@server0:/srv/nfs/cj.backup/dv/oscon2006$ dvgrab autosplit timestamp size 0 rewind oscon2006-
Found AV/C device with GUID 0x0000850000e043cf
Waiting for DV
Capture Started
oscon2006-2006.07.26_12-37-44.dv : 266.30 MiB 2327 frames timecode 00:01:17.26 date 2006.07.26 12:39:01
oscon2006-2006.07.26_12-40-59.dv : 816.76 MiB 7137 frames timecode 00:05:16.01 date 2006.07.26 12:44:57
oscon2006-2006.07.26_12-45-06.dv : 8420.56 MiB 73580 frames timecode 00:46:11.05 date 2006.07.26 13:26:01
oscon2006-2006.07.26_13-32-08.dv : 2961.27 MiB 25876 frames timecode 00:00:00.00 date 2020.06.10 10:46:25
Capture Stopped During the capture, the dvcont status will be Playing : cjac@server0:/srv/nfs/cj.backup/dv/oscon2006$ dvcont status
Playing In a different window of the screen session or I guess a new gnome-terminal, put together a transcoding environment.
libx264-155 cjac@server0:/srv/nfs/cj.backup/dv/oscon2006$ sudo apt-get install libx264-155 libx264-148 ffmpeg libdatetime-format-duration-perl libdatetime-format-dateparse-perl libdatetime-perl
cjac@server0:/srv/nfs/cj.backup/dv/oscon2006$ wget https://raw.githubusercontent.com/cjac/dvscripts/master/transcode.pl && chmod u+x transcode.pl
# review transcode.pl, change $prefix
./transcode.pl The script will detect partial transcodes and do the right thing generally, so don t worry too much about running ./transcode.pl too often. Results are being stored in various places including http://web.c9h.org/~cjac/perl/videos/

Enrico Zini: Qt5 custom build for amd64

This is part of a series of posts on compiling a custom version of Qt5 in order to develop for both amd64 and a Raspberry Pi. First step, build Qt5 5.15 packages for amd64. To prevent conflicting with Debian Qt packages, we'll install everything in /opt. We can install qtchooser configuration files to allow developers to easily switch between Debian's standard Qt version or the custom version, at will. The resulting packaging is at https://github.com/Truelite/qt5custom. Set up sources Open the source tarball, and add the amd64 packaging:
tar axf qt-everywhere-src-5.15.0.tar.xz
cp -a debian-amd64 qt-everywhere-src-5.15.0/debian
If needed, install the Qt license:
cp qt-license.txt ~/.qt-license
Install build dependencies You can use apt build-dep to install dependencies manually:
cd qt-everywhere-src-5.15.0
apt build-dep .
Alternatively, you can create an installable .deb metapackage that depends on the build dependencies:
apt install devscripts
mk-build-deps debian-amd64/control
apt -f install qt-everywhere-src-build-deps_5.15.0-1_amd64.deb
Package build The package is built by debian/rules base on the excellent work done by Debian Qt5 maintainers After installing the build dependencies, you can build like this:
cd qt-everywhere-src-5.15.0
fakeroot debian/rules binary
In debian/rules you can configure NUMJOBS with the number of available CPUs in the machine, to have parallel builds. Build output Building sources generates 4 packages: qtbase5custom-dev and libqt5custom are needed for development; only libqt5custom is needed to run build programs. Using custom Qt for amd64 These Qt custom packages install their content in /opt, and are coninstallable with the version of Qt distributed in Debian. One needs to be careful not to create programs that link, either directly or indirectly, with both the Debian Qt and the custom Qt, because the in memory layout of objects could be different and incompatible, causing unexpected results. Selecting which Qt version to use: qtchooser These Qt custom packages integrate with qtchooser to select the version of Qt to use at compile time. qtchooser --list-versions lists available versions. One can choose what to use by exporting QT_SELECT:
# apt install qtchooser qt5-qmake qt5-default
$ qtchooser --list-versions
4
5
qt4-x86_64-linux-gnu
qt4
qt5-x86_64-linux-gnu
qt5
qt5custom-x86_64-linux-gnu
qt5custom
$ qmake --version
QMake version 3.1
Using Qt version 5.11.3 in /usr/lib/x86_64-linux-gnu
$ export QT_SELECT=qt5custom
$ qmake --version
QMake version 3.1
Using Qt version 5.15.0 in /opt/qt5custom/lib
Building software using custom Qt One just needs to export QT_SELECT=qt5custom in the environment, then proceed to build normally:
export QT_SELECT=qt5custom
fakeroot ./debian/rules clean binary
Or:
export QT_SELECT=qt5custom
qmake file.pro
If switching from one Qt to another, it is possible that the makefiles created by one qmake are not working well with the other. In that case, one can just remove them and regenerate them.

Markus Koschany: My Free Software Activities in May 2020

Welcome to gambaru.de. Here is my monthly report (+ the first week in June) that covers what I have been doing for Debian. If you re interested in Java, Games and LTS topics, this might be interesting for you. Debian Games
Debian Java Misc Debian LTS This was my 51. month as a paid contributor and I have been paid to work 25 hours on Debian LTS, a project started by Rapha l Hertzog. In that time I did the following: ELTS Extended Long Term Support (ELTS) is a project led by Freexian to further extend the lifetime of Debian releases. It is not an official Debian project but all Debian users benefit from it without cost. The current ELTS release is Debian 7 Wheezy . This was my 24. month and I have been paid to work 9,25 hours on ELTS. Thanks for reading and see you next time.

Louis-Philippe V ronneau: How to capture a remote IRC session live

DebConf20 will be held online this year and I've started doing some work for the DebConf videoteam to prepare what's to come. One thing I want us to do is capture a live IRC session and use it as a video input in Voctomix, the live video mixer we use. This way, at the end of a talk we could show both the attendees asking questions on IRC and the presenter replying to them side-by-side. A mockup of a side-by-side voctogui window with someone on the left and a terminal running weechat on the right Capturing a live video of an IRC client on a remote headless server is somewhat more complicated than you might think; as far as I know, neither ffmpeg nor gstreamer support recording a live ssh pseudoterminal1. Worse, neither weechat nor irssi run on X: they use ncurses... Although you can capture an X11 window with ffmpeg -f x11grab, I wasn't able to get them to run with Xvfb. Capturing the framebuffer One thing I dislike with this method is the framebuffer isn't always easy to access on remote machines. If you don't have a serial connection, you can try using a VNC server that can. I did my tests in a VM on an KVM hypervisor and used virt-manager to access the framebuffer. I had a hard time setting the framebuffer resolution to a 16:9 aspect ratio. The winning combination ended up passing the nomodeset kernel parameter at boot and setting up these parameters in /etc/default/grub2:
GRUB_GFXMODE=1280x720
GRUB_GFXPAYLOAD_LINUX=keep
To make the text more readable, this is the /etc/default/console-setup file that seemed to make the most sense:
# CONFIGURATION FILE FOR SETUPCON
# Consult the console-setup(5) manual page.
ACTIVE_CONSOLES="/dev/tty[1-6]"
CHARMAP="UTF-8"
CODESET="Lat15"
FONTFACE="TerminusBold"
FONTSIZE="12x24"
Once that is done, the only thing left is to run the IRC client and launch ffmpeg. The magic command to record the framebuffer seems to be something like:
ffmpeg -f fbdev -framerate 60 -i /dev/fb0 -c:v libvpx -crf 10 -b:v 1M -auto-alt-ref 0 output.webm
Here is what I ended up with:

  1. We need something similarly flexible and featureful that can output to a TCP socket.
  2. Don't forget to run update-grub before rebooting!

10 June 2020

Joey Hess: bracketing and async exceptions in haskell

I've been digging into async exceptions in haskell, and getting more and more concerned. In particular, bracket seems to be often used in ways that are not async exception safe. I've found multiple libraries with problems. Here's an example:
withTempFile a = bracket setup cleanup a
  where
    setup = openTempFile "/tmp" "tmpfile"
    cleanup (name, h) = do
        hClose h
        removeFile name
This looks reasonably good, it makes sure to clean up after itself even when the action throws an exception. But, in fact that code can leave stale temp files lying around. If the thread receives an async exception when hClose is running, it will be interrupted before the file is removed. We normally think of bracket as masking exceptions, but it doesn't prevent async exceptions in all cases. See Control.Exception on "interruptible operations", which can receive async exceptions even when other exceptions are masked. It's a bit surprising, but hClose is such an interruptable operation, because it flushes the write buffer. The only way to know is to read the code. It can be quite hard to determine if an operation is interruptable, since it can come down to whether it retries a STM transaction, or uses a MVar that is not always full. I've been auditing libraries and I often have to look at code several dependencies away, and even then may not be sure if a library has this problem. So far, around half of the libraries I've looked at, that use bracket or onException or the like probably have this problem. What can libraries do? My impression of the state of things now is that you should be very cautious using race or cancel or withAsync or the like, unless the thread is small and easy to audit for these problems. Kind of a shame, since I had wanted to be able to cancel a thread that is big and sprawling and uses all the libraries mentioned above.
This work was sponsored by Jake Vosloo and Graham Spencer on Patreon.

Next.

Previous.