Search Results: "ag"

30 October 2012

Raphaël Hertzog: Auto Mounting Windows Shares in GNOME with Gigolo and gvfs-fuse

The traditional way to mount Windows (or Samba) shares involves hardcoding the credentials in a plain-text file and some /etc/fstab entry to mount it automatically at boot time. If you don t want to store a plain-text copy of your password, you re bound to mount your shares interactively. This is clearly sub-optimal and I thought that there must be a better way to handle this in the context of a GNOME desktop (which already supports connecting to such shares in the file browser). So I looked for a solution and after a bit of googling I found one. Start by installing a few packages:
$ sudo apt-get install gigolo gvfs-fuse
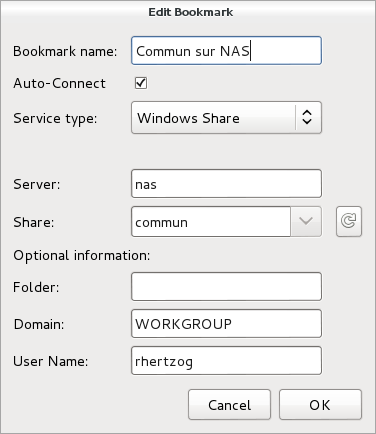
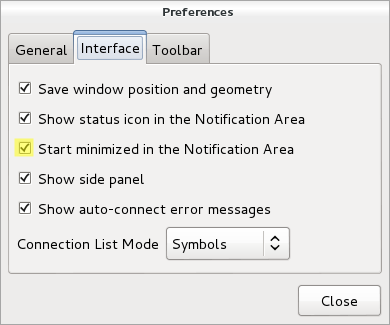
Launch Gigolo, setup your shares as bookmarks and mark them as Auto-Connect . During (first) connection, you will be prompted for your password and you have the possibility to store it in the GNOME keyring (and here it s encrypted, not in plain-text!). You should also configure the Gigolo preferences so that it starts minimized in the system tray (because we re going to run it on session startup):
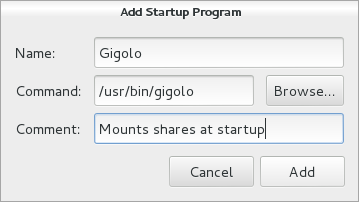
The last step is to ensure that Gigolo is executed at the start of each GNOME session. Unfortunately this GNOME feature is no longer accessible from the control center so you have to execute gnome-session-properties manually (from a terminal or the command line accessible via Alt+F2). Click on Add to add a new startup program: You re done! The main limitation is that those shares are not real mounts, instead they are available within GNOME s virtual file system (GVFS). If you use only 100% GNOME application, then it s not a problem but otherwise it s pretty annoying. You can t cd in those shares from a terminal for example. There s a workaround though, it s called gvfs-fuse and you installed it right at the start of this HOWTO. This service hooks into GVFS and exports all the virtual filesystem(s) in a real fuse-based mount that is automatically setup in ~/.gvfs/. However for this to work, the user must be in the fuse group. So you should run something like this:
$ sudo adduser $USER fuse
By the way, I haven t found a way to use a non-hidden directory so if you want this directory to be more visible, I suggest that you create a symlink pointing to it.
Do you want to read more HOWTO like this one? Click here to subscribe to my free newsletter, you can opt to receive future articles by email.

No comment Liked this article? Click here. My blog is Flattr-enabled.

Wouter Verhelst: The fastest slug in the world (probably)

How fast do slugs travel? Empirical evidence tells me that's about 1 meter per hour1. But not this slug. IMAG0114 As I was driving home from $CUSTOMER, I noticed something on my car. At first I thought it was bird poop, but then bird poop doesn't move. As the animal crawled higher and higher next to my windshield (while I was driving down the highway), I thought it would soon be blown off; but no, it bravely held on. Since it was crawling against my driving direction, that meant it was hurling down the highway at about 119.999 kph. I'm not sure if slugs have emotions; but if they do, the poor animal must've been terribly scared. Since these weird 120kph winds kept blowing on this weird and not very sticky surface that is the rubber and the metal edge to the side of the winshield, the animal kept going until it found that the glass of the windshield itself is actually a very interesting place for it to settle. By that time I had reached a usable exit, so I went off. As I reduced the car's speed once off the highway, the animal had decided that it was fairly nice outside its house now, and was starting to move horizontally along my windshield. Not exactly what I wanted it to do. So I took the above picture with the wrong camera (I remembered a mere few minutes later that I had my DSLR in the back of my car), took it off, and released it into the nearby bushes. Of course, by that time I'd driven several dozens of kilometers away from wherever it was that I picked it up, so the animal will probably never get home again. But hey, I'm sure it'll love the new bushes. 1 Once, over half a lifetime ago, I noticed a slug sitting by the side of the road. Not having much else to do, I sat down and watched it. By the time it had moved some two meters, it had gotten dark and cold, and I went home. At that point, my parents told me they'd started to worry because I was two hours late from school. I could be slightly wrong about the numbers, though. It's been a long time.

Matthew Garrett: A detailed technical description of Shim

Shim is the first stage bootloader we've been implementing for supporting Secure Boot. It's called Shim because it serves as an object to fit the gap between the Microsoft trust root and our own trust root. As originally envisaged it would do nothing other than load and execute appropriately signed binaries, but it's got a little more complicated than that now. It is, however, basically feature complete at this point - I don't expect it to grow significantly further.

(For those of you following along at home, the Shim source code I'm talking about is here)

First, it checks whether the user has disabled local signature verification in check_mok_sb(). This is done by reading the MokSBState UEFI variable and verifying that it has the correct variable attributes, ensuring that it was created in the trusted boot services environment. If so, and if it's set appropriately, signature verification is disabled for the rest of Shim. Shim then pauses for a couple of seconds while displaying a message indicating that it's running in insecure mode.

Next, Shim checks whether the user has set any variables that indicate that a Mok request has been made in check_mok_request(). If so, it launches MokManager. The mechanism by which this is done is described later.

Shim then copies the Mok key database into a runtime variable, which makes it accessible to the kernel (mirror_mok_list()). The kernel can then use the Mok keys when performing module signature verification. Next, as the last step before launching the next stage bootloader, Shim installs a UEFI protocol that permits other applications to call back into Shim. We're now ready to branch off from Shim into the actual bootloader.

To do this, Shim has to do a few things. First, we need to get the bootloader off disk. This involves finding Shim's path, which we can do by opening the loaded image protocol on Shim's image handle, turning that into a string, walking backwards along it until we find a directory separator, stripping the filename and appending the path to the second stage bootloader. This is then turned back into a binary device path, all of this happening in generate_path(). The binary is then read off disk in load_image(), using the simple filesystem protocol. We open the device, open a reference to the file, check how large the file is, allocate a buffer to hold the file and then read it off disk into that buffer. Everything so far has been fairly straightforward, but now things get more complicated.

handle_image() is the real meat of Shim. First it has to examine the header data in read_header(), copying the relevant bits into a context structure that will be used later. Some basic sanity checks on the binary are also performed here. If we're running in secure mode (ie, Secure Boot is enabled and we haven't been toggled into insecure mode) we then need to verify that the binary matches the signature and hasn't been blacklisted.

verify_buffer() has to implement the Microsoft Authenticode specification, which details which sections of the binary have to be hashed and in which order. The actual hashing is done in generate_hash(), which calls into the crypto code to add each binary section to the hashed data. The comments in generate_hash() describe what's going on there clearly enough. The crypto code itself is a copy of the crypto library extracted from the Tiano source tree. It's a relatively thin layer on top of OpenSSL, so the code's been fairly well tested.

Once we have the hash, we need to verify the signature. First, we ensure that the Mok database hasn't been modified from the OS (verify_mok()). Next, we check whether the binary's hash or signature have been blacklisted (check_blacklist()). This is done for each of the SHA1 and SHA256 hashes of the binary (the two hashes implemented in Tiano) and the certificate. If any of these match an entry in the dbx variable or a built-in blacklist, Shim will refuse to run them. Next, we simply do the same for the whitelist. If the binary's hash is either in the db variable or the Mok list, or if it's signed with a certificate that chains back to an entry in either db or the Mok list, we'll run it. Finally, the signature is checked against any built-in keys. Certificate verification is carried out with the AuthenticodeVerify() function, which again comes from Tiano's crypto library and is mostly implemented in OpenSSL.

If the binary passed signature validation we return to handle_image() and now load the binary's sections into their desired addresses. That buffer is handed to relocate_coff() which runs through the binary's relocation entries and fixes them up. There's one last subtlety, which is that because we've been fixing this up by hand, the image handle still refers to the shim binary. We fix the ImageBase and ImageSize values in the loaded image protocol to match the newly relocated binary, which is vital because otherwise grub is unable to find its built in modules. Finally, we jump into the binary's entry point. What the binary does next is up to it - if it's a bootloader, there's a good chance that it'll simply launch an OS and we'll never return. If it does return, we restore ImageBase and ImageSize, uninstall the protocol we installed and exit ourselves. If Shim exits (either because the second stage bootloader wasn't present, didn't verify, or exited) then control will simply pass on to the next boot option in the UEFI priority list. If there's nothing else, the platform will do something platform defined.

And that's how Shim works.

comment count unavailable comments

Matthew Garrett: An overview of our Secure Boot implementation

I've written rather a lot about how we're implementing our Secure Boot support, but there's been a range of subtle changes over time. Here's an overview of how it all fits together.Secure Boot and signingSecure Boot is part of the UEFI specification. When enabled, systems will refuse to boot any UEFI executables (such as an OS bootloader) unless they've been signed by a trusted key. The only trusted key effectively guaranteed to be present is Microsoft's, and Microsoft will sign binaries if you have access to the Windows hardware dev center. You gain access to this by purchasing a certificate from Verisign that verifies your identity and then use that to create a developer account at the Sysdev website. Once you've agreed to the legal contracts, you can submit a UEFI executable and Microsoft will then send you back a signed one. The signature is added to the end of the binary, so it's trivial to verify that your executable hasn't otherwise been modified in the process.
Avoiding signing round tripsWe didn't want to have to get binaries re-signed every time we updated our bootloader or kernel, so we came up with a compromise approach. We implemented a shim bootloader (cunningly called "Shim") which is signed by Microsoft and includes a copy of a public key that's under our control. Shim will launch any binary signed with either a key installed in the system firmware or the public key built into it. This allows us to build and sign all other binaries ourselves.
Preventing Secure Boot circumventionSecure Boot is intended to prevent scenarios where untrusted code can be run before an OS kernel. Locking down the boot environment avoids the simple case of using a modified bootloader, and requiring that the kernel also be signed avoids simply booting arbitrary attack code that looks roughly like a kernel but does nothing to prevent the more complex case of using a running kernel to launch another kernel. To do that we've had to restrict the behaviour of the kernel in Secure Boot environments. Direct hardware access from userspace has been blocked, and modules must be signed by a key the kernel trusts.
Providing user control over trustMicrosoft requires that it be possible to modify the key database on all Windows-certified x86 systems, but the UI to do so may be inconsistent and awkward. Suse developed a plan to avoid this, involving adding an additional key database to the system. The user enrols a key from the running OS and enters a password. On the next reboot, shim detects that a key is awaiting enrolment and drops to a prompt. If the user does nothing or just hits enter, the system continues to boot. If the user chooses to enrol a new key, the user is asked to re-enter the password in order to confirm that they're the same user that initiated the original request. If successful, the key is then copied into a boot services variable which cannot be directly modified from the OS. Anything signed with the user's key will then be trusted.
Providing user control over signature verificationSome users (such as kernel developers) may be hampered by Secure Boot - forcing them to sign every new kernel they build is time consuming and unhelpful. Windows-certified x86 hardware will be required to provide an option to disable Secure Boot, but again that UI may be inconsistent. We've added an option where a user can generate a request to disable signature validation, again requiring a password. On next boot the user must explicitly choose the "Toggle signature validation" menu item and will then be requested to enter three randomly chosen characters from their password. After confirmation, signature validation in Shim will then be disabled.
Supporting other distributionsNot all distributions will want (or be able) to sign via Microsoft. They'll be able to take any other signed version of Shim and put it on their boot media. If their second stage bootloader is signed by a key that Shim doesn't trust, Shim will pop up a menu permitting the user to choose to enrol a new key off the install media. The user can select this, navigate a file browser and select the key. After confirmation, the key will be added to Shim's trusted key list. The user can then install the distribution.
Third party modulesThere's two approaches here. The first is for the third party to provide a module key that the user can install into Shim's database. The kernel will import this at boot time and trust any modules signed with it. The second is for the third party to provide a key signed by Microsoft. David Howells has come up with with the idea of utilising this approach of embedding a public key in a pe binary, with the kernel then having support for importing this key, noticing that it's signed by a trusted key and adding it to the kernel keyring.
How about ARM?We're not planning on supporting Secure Boot on ARM, for two reasons. The first is that Microsoft require that it be impossible to disable Secure Boot on ARM, and we don't want to support systems unless it's guaranteed that the user will be able to run what they want. The second is that there's no strong expectation that the signing key used for signing third party UEFI binaries will be present on ARM systems.
What are other distributions doing?As far as I know, Suse and Fedora will be shipping the same code. Ubuntu is shipping an older version of Shim but should pick up the local key management code in the next release. The only significant difference is that Ubuntu doesn't require that kernel modules be signed.

comment count unavailable comments

Matthew Garrett: Getting started with UEFI development

It's not difficult to write a UEFI application under Linux. You'll need three things:


So, let's write a trivial UEFI application. Here's one from the gnu-efi source tree:
#include <efi.h>
#include <efilib.h>
EFI_STATUS
efi_main (EFI_HANDLE image, EFI_SYSTEM_TABLE *systab)
 
        SIMPLE_TEXT_OUTPUT_INTERFACE *conout;
        conout = systab->ConOut;
        InitializeLib(image, systab);
        uefi_call_wrapper(conout->OutputString, 2, conout, L"Hello World!\n\r");
        return EFI_SUCCESS;
 
The includes are fairly obvious. efi.h gives you UEFI functions defined by the specification, and efilib.h gives you functions provided by gnu-efi. The runtime will call efi_main() rather than main(), so that's our main function. It returns an EFI_STATUS which will in turn be returned to whatever executed the binary. The EFI_HANDLE image is a pointer to the firmware's context for this application, which is used in certain calls. The EFI_SYSTEM_TABLE *systab is a pointer to the UEFI system table, which in turn points to various other tables.

So far so simple. Now things get interesting. The heart of the UEFI programming model is a set of protocols that provide interfaces. Each of these interfaces is typically a table of function pointers. In this case, we're going to use the simple text protocol to print some text. First, we get a pointer to the simple text output table. This is always referenced from the system table, so we can simply assign it. InitializeLib() just initialises some internal gnu-efi functions - it's not technically required if we're purely calling native UEFI functions as we are here, but it's good style since forgetting it results in weird crashes.

Anyway. We now have conout, a pointer to a SIMPLE_TEXT_OUTPUT_INTERFACE structure. This is described in section 11.4 of the UEFI spec, but looks like this:
typedef struct _EFI_SIMPLE_TEXT_OUTPUT_PROTOCOL  
    EFI_TEXT_RESET Reset;
    EFI_TEXT_STRING OutputString;
    EFI_TEXT_TEST_STRING TestString;
    EFI_TEXT_QUERY_MODE QueryMode;
    EFI_TEXT_SET_MODE SetMode;
    EFI_TEXT_SET_ATTRIBUTE SetAttribute;
    EFI_TEXT_CLEAR_SCREEN ClearScreen;
    EFI_TEXT_SET_CURSOR_POSITION SetCursorPosition;
    EFI_TEXT_ENABLE_CURSOR EnableCursor;
    SIMPLE_TEXT_OUTPUT_MODE *Mode;
  EFI_SIMPLE_TEXT_OUTPUT_PROTOCOL;
The majority of these are functions - the only exception is the SIMPLE_TEXT_OUTPUT_MODE pointer, which points to the current mode. In an ideal world you'd be able to just call these directly, but sadly UEFI and Linux calling conventions are different and we need some thunking. That's where the uefi_call_function() call comes in. This takes a UEFI function as its first argument (in this case, conout->OutputString), the number of arguments (2, in this case) and then the arguments. Checking the spec for OutputString, we see this:
typedef
EFI_STATUS
(EFIAPI *EFI_TEXT_STRING) (
    IN EFI_SIMPLE_TEXT_OUTPUT_PROTOCOL *This,
    IN CHAR16 *String
);
The first argument is a pointer to the specific instance of the simple text output protocol. This permits multiple instances of the same protocol to exist on a single machine, without having to duplicate all of the code. The second argument is simply a UCS-2 string. Our conout pointer is a pointer to the protocol, so we pass that as the first argument. For the second argument, we pass L"Hello World!\n", with the L indicating that this is a wide string rather than a simple 8-bit string. uefi_call_function() then rearranges these arguments into the appropriate calling convention and calls the UEFI function. The firmware then prints "Hello World!" on the screen. Success.

(Warning: uefi_call_function() does no type checking on its arguments, so if you pass in a struct instead of a pointer it'll build without complaint and then give you a bizarre error at runtime)

Finally, we clean up by simply returning EFI_SUCCESS. Nothing more for us to worry about. That's the simple case. What about a more complicated one? Let's do something with that EFI_HANDLE that got passed into efi_main().
#include <efi.h>
#include <efilib.h>
EFI_STATUS
efi_main (EFI_HANDLE image, EFI_SYSTEM_TABLE *systab)
 
        EFI_LOADED_IMAGE *loaded_image = NULL;
        EFI_GUID loaded_image_protocol = LOADED_IMAGE_PROTOCOL;
        EFI_STATUS status;
        InitializeLib(image, systab);
        status = uefi_call_wrapper(systab->BootServices->HandleProtocol,
                                3,
                                image, 
                                &loaded_image_protocol, 
                                (void **) &loaded_image);
        if (EFI_ERROR(status))  
                Print(L"handleprotocol: %r\n", status);
         
        Print(L"Image base        : %lx\n", loaded_image->ImageBase);
        Print(L"Image size        : %lx\n", loaded_image->ImageSize);
        Print(L"Image file        : %s\n", DevicePathToStr(loaded_image->FilePath));
        return EFI_SUCCESS;
 
UEFI handles can have multiple protocols attached to them. A handle may represent a piece of physical hardware, or (as in this case) it can represent a software object. In this case we're going to get a pointer to the loaded image protocol that's associated with the binary we're running. To do this we call the HandleProtocol() function from the Boot Services table. Boot services are documented in section 6 of the UEFI specification and are the interface to the majority of UEFI functionality. HandleProtocol takes an image and a protocol identifier, and hands back a pointer to the protocol. UEFI protocol identifiers are all GUIDs and defined in the specification. If you call HandleProtocol on a handle that doesn't implement the protocol you request, you'll simply get an error back in the status argument. No big deal.

The loaded image protocol is fairly different to the simple text output protocol in that it's almost entirely data rather than function pointers. In this case we're printing the address that our executable was loaded at and the size of our relocated executable. Finally, we print the path of the file. UEFI device paths are documented in section 9.2 of the UEFI specification. They're a binary representation of a file path, which may include the path of the device that the file is on. DevicePathToStr is a gnu-efi helper function that converts the objects it understands into a textual representation. It doesn't cover the full set of specified UEFI device types, so in some corner cases it may print "Unknown()".

That covers how to use protocols attached to the image handle. How about protocols that are attached to other handles? In that case we can do something like this:
#include <efi.h>
#include <efilib.h>
EFI_STATUS
efi_main (EFI_HANDLE image_handle, EFI_SYSTEM_TABLE *systab)
 
        EFI_STATUS status;
        EFI_GRAPHICS_OUTPUT_PROTOCOL *gop;
        EFI_GUID gop_guid = EFI_GRAPHICS_OUTPUT_PROTOCOL_GUID;
        InitializeLib(image_handle, systab);
        status = uefi_call_wrapper(systab->BootServices->LocateProtocol,
                                   3,
                                   &gop_guid,
                                   NULL,
                                   &gop);
        Print(L"Framebuffer base is at %lx\n", gop->Mode->FrameBufferBase);
        return EFI_SUCCESS;
 
This will find the first (where first is an arbitrary platform ordering) instance of a protocol and return a pointer to it. If there may be multiple instances of a protocol (as there often are with the graphics output protocol) you should use LocateHandleBuffer() instead. This returns an array of handles that implement the protocol you asked for - you can then use HandleProtocol() to give you the instance on the specific handle. There's various helpers in gnu-efi like LibLocateHandle() that make these boilerplate tasks easier. You can find the full list in /usr/include/efi/efilib.h.

That's a very brief outline of how to use basic UEFI functionality. The spec documents the full set of UEFI functions available to you, including things like direct block access, filesystems and networking. The process is much the same in all cases - you locate the handle that you want to interact with, open the protocol that's installed on it and then make calls using that protocol.Building these examplesBuilding these examples is made awkward due to UEFI wanting PE-COFF binaries and Linux toolchains building ELF binaries. You'll want a makefile something like this:
ARCH            = $(shell uname -m   sed s,i[3456789]86,ia32,)
LIB_PATH        = /usr/lib64
EFI_INCLUDE     = /usr/include/efi
EFI_INCLUDES    = -nostdinc -I$(EFI_INCLUDE) -I$(EFI_INCLUDE)/$(ARCH) -I$(EFI_INCLUDE)/protocol
EFI_PATH        = /usr/lib64/gnuefi
EFI_CRT_OBJS    = $(EFI_PATH)/crt0-efi-$(ARCH).o
EFI_LDS         = $(EFI_PATH)/elf_$(ARCH)_efi.lds
CFLAGS          = -fno-stack-protector -fpic -fshort-wchar -mno-red-zone $(EFI_INCLUDES)
ifeq ($(ARCH),x86_64)
        CFLAGS  += -DEFI_FUNCTION_WRAPPER
endif
LDFLAGS         = -nostdlib -znocombreloc -T $(EFI_LDS) -shared -Bsymbolic -L$(EFI_PATH) -L$(LIB_PATH) \
                  $(EFI_CRT_OBJS) -lefi -lgnuefi
TARGET  = test.efi
OBJS    = test.o
SOURCES = test.c
all: $(TARGET)
test.so: $(OBJS)
       $(LD) -o $@ $(LDFLAGS) $^ $(EFI_LIBS)
%.efi: %.so
        objcopy -j .text -j .sdata -j .data \
                -j .dynamic -j .dynsym  -j .rel \
                -j .rela -j .reloc -j .eh_frame \
                --target=efi-app-$(ARCH) $^ $@
There's rather a lot going on here, but the important stuff is the CFLAGS line and everything after that. First, we need to disable the stack protection code - there's nothing in the EFI runtime for it to call into, so we'll build a binary with unresolved symbols otherwise. Second, we need to build position independent code, since UEFI may relocate us anywhere. short-wchar is needed to indicate that strings like L"Hi!" should be 16 bits per character, rather than gcc's default of 32 bits per character. no-red-zone tells the compiler not to assume that there's 256 bytes of stack available to it. Without this, the firmware may modify stack that the binary was depending on.

The linker arguments are less interesting. We simply tell it not to link against the standard libraries, not to merge relocation sections, and to link in the gnu-efi runtime code. Nothing very exciting. What's more interesting is that we build a shared library. The reasoning here is that we want to perform all our linking, but we don't want to build an executable - the Linux executable runtime code would be completely pointless in a UEFI binary. Once we have our .so file, we use objcopy to pull out the various sections and rebuild them into a PE-COFF binary that UEFI will execute.

comment count unavailable comments

29 October 2012

Yves-Alexis Perez: Switching to OpenPGP smartcard

A friend of mine recently reminded me of the OpenPGP smartcard v2, and told me that it was perfectly able to handle 4096 bit RSA keys (provided you have GnuPG v2.0.18+). I had the opportunity to play with one a little, and notice it was super easy to use it for ssh authentication, especially since I already use gpg-agent as my ssh-agent (it should be easy to use a purely software authentication key as ssh key with GnuPG 2.1). So I decided to buy two of them and try to switch my main key (0x71ef0ba8) to it. The cards arrived this weekend, and I was able to play with it a little. I didn't log every command I typed, but it was pretty easy, in the end. What I decided to do was to use one smartcard for every day usage, and one only for key signing. So basically, I would generate three (signing, encryption, authentication) subkeys, put them on smartcard 1, then put the primary key on smartcard 2. Then erase the private parts, and only keep them on smartcards. In case it interests people, here the somehow detailed steps. Note that everywhere 'gpg' means 'gpg2' on Debian, we really need GnuPG v2 for correct smartcard handling. You'd better use gpg-agent too, although it doesn't seem mandatory.
  1. make a backup! As we're gonna play with private parts (!), it's always a good idea to have backups. And it'll be useful to have one later, in case there's a problem with the smartcards. You can do a copy of your complete ~/.gnupg folder, but I simply did:
    corsac@scapa: umask 066
    corsac@scapa: gpg -o 71ef0ba8.gpg --export-secret-keys 71ef0ba8
    
  2. Add three subkeys. Skip this is you already have subkeys (you usually already have an encryption subkey, but I wanted to switch to a new one too) --expert is needed in order to chose capabilities.
    corsac@scapa: gpg --expert --edit-key 71ef0ba8
    gpg> addkey
    Please select what kind of key you want:
       (3) DSA (sign only)
       (4) RSA (sign only)
       (5) Elgamal (encrypt only)
       (6) RSA (encrypt only)
       (7) DSA (set your own capabilities)
       (8) RSA (set your own capabilities)
    Your selection? 8
    Possible actions for a RSA key: Sign Encrypt Authenticate 
    Current allowed actions: Sign Encrypt 
       (S) Toggle the sign capability
       (E) Toggle the encrypt capability
       (A) Toggle the authenticate capability
       (Q) Finished
    Your selection? e
    Possible actions for a RSA key: Sign Encrypt Authenticate 
    Current allowed actions: Sign 
       (S) Toggle the sign capability
       (E) Toggle the encrypt capability
       (A) Toggle the authenticate capability
       (Q) Finished
    Your selection? Q
    RSA keys may be between 1024 and 4096 bits long.
    What keysize do you want? (2048) 
    Requested keysize is 2048 bits
    Please specify how long the key should be valid.
             0 = key does not expire
            = key expires in n days
          w = key expires in n weeks
          m = key expires in n months
          y = key expires in n years
    Key is valid for? (0) 1y
    Key expires at dim. 27 oct. 2013 20:38:44 CET
    Is this correct? (y/N) y
    Really create? (y/N) y
    We need to generate a lot of random bytes. It is a good idea to perform
    some other action (type on the keyboard, move the mouse, utilize the
    disks) during the prime generation; this gives the random number
    generator a better chance to gain enough entropy.
    
    Repeat this for encryption and authentication subkeys. Then save and send the key to keyservers
    gpg> save
    corsac@scapa: gpg --send-keys 71ef0ba8
    
  3. Next, we'll switch to the smartcard part. I use a Gemalto PC ExpressCard reader which is perfectly recognized under Debian. You just need few tools:
    root@scapa: ~# apt-get install pcscd scdaemon
    
    Plug the reader, insert the card, make sure it's detected:
    corsac@scapa: gpg --card-status
    Application ID ...: D2760001240102000005000016A10000
    Version ..........: 2.0
    Manufacturer .....: ZeitControl
    ...
    
    You can edit various parameter (name etc.) and change the PINs using gpg:
    corsac@scapa: gpg --change-pin
    corsac@scapa: gpg --card-edit
    
  4. Then we'll put the subkeys in the first smartcard. It might be a good idea to export again the private keys for backups.
    corsac@scapa: gpg -o 71ef0ba8.gpg --export-secret-keys 71ef0ba8
    
  5. We'll now use the keytocard gpg command to move the private parts on the smartcard:
    corsac@scapa: gpg --edit-key 71ef0ba8
    gpg> key 1 # select encryption subkey
    gpg> keytocard
    gpg> key 2 # select signature subkey
    gpg> keytocard
    gpg> key 3 # select authentication subkey
    gpg> keytocard
    gpg> save
    
    A quick check on the card now reveals that it's populated:
    corsac@scapa: gpg --card-status
    Application ID ...: D2760001240102000005000016A10000
    Version ..........: 2.0
    Manufacturer .....: ZeitControl
    Serial number ....: 000016A1
    Name of cardholder: Yves-Alexis Perez
    Language prefs ...: fr
    Sex ..............: unspecified
    URL of public key : http://www.corsac.net/71ef0ba8.asc
    Login data .......: corsac
    Signature PIN ....: forced
    Key attributes ...: 2048R 2048R 2048R
    Max. PIN lengths .: 32 32 32
    PIN retry counter : 3 3 3
    Signature counter : 7
    Signature key ....: 9745 B022 7323 81FE 9E7E  AFF5 6DDB 53F2 A675 C0A5
          created ....: 2012-10-27 11:24:07
    Encryption key....: F7E0 078F EA1A 5F23 92E0  20B3 A83A D136 D98D 0D9F
          created ....: 2012-10-27 11:27:01
    Authentication key: 8CFD D478 AB4A 16F8 F0EC  CD33 24E2 3B5C CC0E 273D
          created ....: 2012-10-17 14:29:18
    General key info..: pub  2048R/A675C0A5 2012-10-27 Yves-Alexis Perez 
    sec>  4096R/71EF0BA8  created: 2009-05-06  expires: never     
                          card-no: 0005 000016A2
    ssb   4096g/36E31BD8  created: 2009-05-06  expires: never     
    ssb>  2048R/CC0E273D  created: 2012-10-17  expires: 2013-10-27
                          card-no: 0005 000016A1
    ssb>  2048R/A675C0A5  created: 2012-10-27  expires: 2013-10-27
                          card-no: 0005 000016A1
    ssb>  2048R/D98D0D9F  created: 2012-10-27  expires: 2013-10-27
                          card-no: 0005 000016A1
    
  6. At that point, the private part is replaced by a stub in the secret keyring, so when you export them, you only export stubs which you can then use anywhere without actually giving your private key. So now is a good idea to export the subkeys so you can import them on other boxes:
    corsac@scapa: gpg -o 71ef0ba8-subkeys.gpg --export-secret-subkeys 71ef0ba8
    
    Note that only the subkeys private parts have been moved to the card, not the primary one, so you're still able to sign keys. Here, you have multiple choices. You can simply erase the private key (and later re-import the stubs) and use the offline copy made above when you need to sign another key.
  7. What I did is something else. I've put the primary key on my second OpenPGP smartcard. That way, I won't lose it, it'll be kept safely in my house, but still be on a hardware token where it won't come out. The procedure for doing is so is exactly the same as above. First take a backup (in case you didn't do it first, do it now since after the keytocard command you won't have a backup of your primary key and there'll be no way to extract it from the smartcard. Then put the new smartcard in the reader, edit the key (don't select a subkey) and run the keytocard command. After that, running gpg --export-secret-keys will export the stub and not the private part of your primary key.
In the end, it seems that everything is running fine. Only issue is that scdaemon is sometime not behaving nicely (especially after a card change or or suspend/resume cycle). I didn't yet report a bug but you might want to kill it in case it's stuck. You can also use the authentication subkey for ssh logins. When the card is inserted, the authentication subkey appears automatically (through the magic of gpg-agent):

corsac@scapa: ssh-add -L
ssh-rsa AAAAB3NzaC1yc2EA... cardno:0005000016A1 And now you can add it to your various authorized_keys and use the smartcard for SSH.

Matthew Garrett: Ted Ts'o is a rape apologist and why this matters

(This post contains some discussion of rape and sexual assault but does not go into any specifics)

There was a brief controversy at Linux.conf.au back in 2011. The final keynote speaker gave a compelling presentation on online privacy, including some slides containing sexualised imagery. This was against the terms of the conference policies, and resulted in an apology from the conference organisers and the speaker. The situation was unfortunate but well handled, and that should have been the end of it.

Afterwards, there was some pushback on the conference mailing list. Concerns were raised about the policy being overly restrictive and the potential for it to be used to stifle speech that influential groups disagreed with. I don't agree with these arguments, but discussion of why policies have been implemented is completely natural and provides an opportunity for a community to determine what its expected standards are.

And then Ted Ts'o effectively called rape victims liars[1]. At first I assumed that this was just some sort of horrific failure to understand the implications of what he was saying, so I emailed him to check. The reply I got drew a pretty clear distinction between the case of a drunk college student raping another drunk college student in their room and the case of knifepoint rape in a dark park. You know, the difference between accidental rape and rape rape. The difference between the one any of us might have done and the one that only bad people do. Legitimate rape and the "rape" that those feminists talk about. The distinction that lets rapists convince themselves that they didn't really rape anyone because they weren't holding a knife at the time.

Ted Ts'o argues that only a small percentage of rape really counts as what people think of as rape. Ted Ts'o is a rape apologist.

There's an ongoing scandal in the UK at the moment. A well known DJ, Jimmy Savile, died last year. He grew up in a working class family, but through hard work and natural talent was one of the most significant figures in promoting pop music in the UK in the 50s and 60s, and worked in various parts of the BBC for the best part of 30 years. He spent significant amounts of time raising money for charity, and it's estimated that he raised over 40 million for various causes. Since his death, around 300 people have accused him of sexually abusing them. The BBC is desperately trying to explain why it cancelled an expose shortly before it aired. Multiple people who worked there at the time claim that everyone knew he was involved in indecent activities, but saying anything would risk both their career and the charities that depended on his fundraising. Nobody said anything, and he was allegedly free to continue his abuse.

Ted Ts'o is a significant figure in the Linux kernel community. He has expressed abhorrent beliefs that damage that community. Condemnation was limited to a mailing list with limited readership, meaning, effectively, that nobody said anything. Last week the Ada Initiative published a blog post pointing out the damage that did, and I realised that my effective silence was not only helping to alienate 50% of the population from involving themselves with Linux, it was also implicitly supporting my community leadership. I was giving the impression that I was basically fine with our community leaders telling people that it wasn't really rape if you were both drunk enough. I was increasing the chances of members of our community being sexually assaulted. Silence is endorsement. Saying nothing is not ok.

In the absence of an apology and explanation from Ted, I'll be interacting with him to the bare minimum that I'm compelled to as a result of my job. I won't be attending any Linux Foundation events he's involved in organising. If I'm running any events, I won't be inviting him. At a time when we're finally making progress in making our community more open and supportive, we don't need leaders who undermine that work. Support organisations who encourage that progress, not the people who help drag us back.

Footnotes

[1]The original archive has vanished. I've put up a copy of the relevant thread here. Throughout, Ted states that he's actually arguing against the idea that women need to be frightened of sexual assault, and not against the definition of rape. Except saying things like This one does a pretty good job of taking apart the Koss / Ms. Magazine study, which is the source for the "1 in 4" number. For example, it points out that over half of those cases were ones where undergraduates were plied with alcohol, and did not otherwise involve using physical force or other forms of coercion is difficult to read in any way other than "Half of the people you're counting as having been raped haven't really been raped", and favourably referring to an article that asserts that the rate of false rape reports is probably close to 50% is pretty strong support for the idea that many rape victims are liars.

(Update 2012/10/30: Adam Williamson suggests in this comment that this mail is a better example of Ted's behaviour - there's some explicit victim blaming and a lot of "Is that rape" questioning with the obvious implication that the answer should be "no". Ted Ts'o is a victim blaming rape apologist.)

(Update 2012/11/05: It's been suggested that I haven't been sufficiently clear about which of Ted's statements justify my claims. So, here we go.

In this mail, Ted links to and endorses this article. He explicitly links to it because of its treatment of rape statistics. Quoting directly from that article:
the rate of false reports is at least 9 percent and probably closer to 50 percent
Ted explicitly endorses an article that claims that a significant percentage of reported rapes are false. The study that generated that figure is held in poor regard by other researchers in the field - Australian police figures indicate that 2.1% of rape accusations were classified as false. Ted asserts that he was trying to argue against poor use of statistics, so it's a fair assumption that he agrees with the alternative statistics that he's citing. Ted believes that many rape victims are making false accusations. Ted believes that many rape victims are liars.

Again in this mail, Ted argues against a claimed figure that 1 in 4 women have been sexually assaulted. One of his arguments is that Also found in the Koss study, although not widely reported, was the statistic that of the women whom she classified as being raped (although 73% refused to self-classify the event as rape), 46% of them had subsequent sex with the reported assailant. Ted disagrees with a statistic because some rape victims subsequently have sex with the reported assailant. This means that Ted believes that this indicates that they were not really raped. Ted is a rape apologist.)

comment count unavailable comments

Wouter Verhelst: Dear lazyweb,

I am looking for a replacement for IlohaMail, since I just noticed it stopped working reliably:
[Mon Oct 29 18:57:18 2012] [error] [client 195.144.91.202] PHP Warning:  strcasecmp() expects parameter 1 to be string, array given in /usr/share/IlohaMail/include/mime.inc on line 87, referer: [...]
This happens when trying to view an email. When that happens, the headers are parsed correctly, but the body isn't shown, and one has to instead click on the "view source" link to see anything at all. There's actually a patch for this bug gathering dust in the BTS; that, plus the fact that it has not seen any upstream activity since 2005, and that the last maintainer upload into Debian was in 2008, makes me conclude that IlohaMail is probably dead. Therefore, I'm looking for a replacement. Specifically, I'm looking for: Does something like that exist? If so, pointers would be greatly appreciated.

Paul Wise: Some thoughts on using Debian

I'm currently running Debian's rolling release (aka "testing") on my main machine and have added some stuff to make that nicer. First thing I have is configuration and package management. Since I have relatively few machines, I am using a metapackage per machine that installs some configuration files with changes that I want. The metapackages depend on packages that I need installed so that I can mark all other packages as being automatically installed. The metapackages are also useful for documenting why I have things installed. It depends on things like task-laptop from tasksel, hardware support packages, the GUI I use, games I play often and so on. My laptop does not have a CD/DVD drive so I have some metapackages to fool apt into ignoring dependencies on CD/DVD related packages I don't need. I'm building the metapackages using equivs-build and a small Makefile. I use the File: header supported by equivs-build for installing config files. I have popcon installed and enabled but I don't want it to leak the names of the metapackages so I have added a prefix to my metapackages and modified the popcon cron job to remove anything containing that prefix. I also don't want apt to ever remove the metapackages so I mark them as Important: yes and configure apt to never autoremove them.
--- /etc/cron.daily/popularity-contest~
+++ /etc/cron.daily/popularity-contest
@@ -71,8 +71,8 @@
 # try to post the report through http POST
 if [ "$SUBMITURLS" ] && [ "yes" = "$USEHTTP" ]; then
     for URL in $SUBMITURLS ; do
-   if setsid /usr/share/popularity-contest/popcon-upload \
-       -u $URL -f $POPCON 2>/dev/null ; then
+   if grep -v myprefix- $POPCON   setsid /usr/share/popularity-contest/popcon-upload \
+       -u $URL 2>/dev/null ; then
        SUBMITTED=yes
    else
        logger -t popularity-contest "unable to submit report to $URL."
@@ -94,7 +94,7 @@
        echo "MIME-Version: 1.0"
        echo "Content-Type: text/plain"
        echo
-       cat $POPCON
+       grep -v myprefix- $POPCON
    )   do_sendmail
    SUBMITTED=yes
     else
/etc/apt/apt.conf.d/99metapackages:
APT::NeverAutoRemove   "^myprefix-.*";  ;
I am using Raphael Geissert's mirror redirector in order to automatically use up-to-date and hopefully non-broken mirrors. Unfortunately this often causes apt to complain about hash sum mismatches and then proceed to forget about all packages. I work around this by always running apt-get update in a loop until it succeeds.
while ! apt-get update ; do sleep 1m; done
A lot of the time I need to install packages from outside of testing. So my sources.list contains lines for testing, unstable and experimental. I have some apt pinning so that by default I only have packages from testing but if I manually upgrade some packages to unstable or experimental, then I will get upgrades within that suite until those packages migrate down to unstable or testing. The apt pinning needs priorities between 1000 and 500 for this to work nicely. I also pin some things like lintian, debian-policy and devref to unstable/experimental since having old versions of those is not useful. /etc/apt/sources.list:
# testing
deb http://security.debian.org/ testing/updates main contrib non-free
deb-src http://security.debian.org/ testing/updates main contrib non-free
deb http://http.debian.net/debian/ testing main contrib non-free
deb-src http://http.debian.net/debian/ testing main contrib non-free
# unstable
deb http://http.debian.net/debian/ unstable main contrib non-free
deb-src http://http.debian.net/debian/ unstable main contrib non-free
# experimental
deb http://http.debian.net/debian/ experimental main contrib non-free
deb-src http://http.debian.net/debian/ experimental main contrib non-free
/etc/apt/preferences.d/system:
Package: *
Pin: release a=testing
Pin-Priority: 800
Package: *
Pin: release a=unstable
Pin-Priority: 700
Package: *
Pin: release a=experimental
Pin-Priority: 600
/etc/apt/preferences.d/packages:
Package: lintian
Pin: release a=unstable
Pin-Priority: 900
Package: lintian
Pin: release a=experimental
Pin-Priority: 910
Package: debian-policy
Pin: release a=unstable
Pin-Priority: 999
Package: developers-reference
Pin: release a=unstable
Pin-Priority: 999
I have a few configuration files and a cron job to make all programs dump core files when they crash so that I can file bugs, even for random crashes that are not easy to reproduce. I enabled some kernel settings with sysctl, lifted some security limits to enable core dumps, and added a cron job to delete old core dumps and notify me of new core dumps. In my shell configuration I also turn on two glibc options to cause programs to crash when they have improper memory management. I also have a second machine I use for bug discovery where I have lots of stuff installed and everything apt pinned in the opposite way; experimental > unstable > testing. When I have time I use this machine to do testing of packages I use, classes of packages that I care about (such as games) and sometimes packages I do not use. /etc/sysctl.d/corefiles.conf:
fs.suid_dumpable = 1
kernel.core_uses_pid = 1
kernel.core_pattern = /var/cache/corefiles/core-%p-%u-%g-%s-%t-%h-%e
/etc/security/limits.d/corefiles.conf:
*              soft    core            unlimited
*              hard    core            unlimited
/etc/cron.daily/corefiles:
#!/bin/sh
mkdir -p /var/cache/corefiles
chmod 2777 /var/cache/corefiles
if [ $(find /var/cache/corefiles -mtime +100 -a ! -type d   wc -l) -gt 0 ]; then
    echo deleting:
    find /var/cache/corefiles -mtime +100 -a ! -type d
    find /var/cache/corefiles -mtime +100 -a ! -type d -print0   xargs -0 rm -f
fi
if [ $(find /var/cache/corefiles ! -type d   wc -l) -gt 0 ] ; then
    echo still present:
    find /var/cache/corefiles ! -type d
fi
~/.bash.d/malloc:
export MALLOC_CHECK_=2
export MALLOC_PERTURB_=$(($RANDOM % 255 + 1))
I unfortunately need some packages from contrib/non-free, so I have a cron job to let me know when I accidentally install new packages from contrib/non-free.
@daily diffcmdoutput ~/.cache/non-free-contrib aptitude search ~i~snon-free\ ~i~scontrib
I backup my dpkg package selections and debconf databases.
@daily diffcmdoutput ~/backup/packages dpkg --get-selections
@daily diffcmdoutput ~/backup/config debconf-get-selections 2> /dev/null
I notify myself of changes to the list of new packages so that I can review them, install any useful/interesting ones and tell aptitude to forget them all.
@daily diffcmdoutput ~/.cache/new aptitude search ~N
I notify myself of changes to the list of packages I have installed that are not up-to-date packages from testing. This helps me catch packages removed from testing/unstable/etc that I use.
@daily diffcmdoutput ~/.cache/apt-show-versions sh -c "apt-show-versions   grep -v '/testing uptodate'"
I notify myself of packages that I maintain that are having issues migrating to testing. I considered doing the same for teams I am involved in but they aren't particularly functional teams so there would be a lot of noise.
@daily grep-excuses 'Paul Wise'
I notify myself of RC bugs that apply to testing and are installed. The list is so long that it just makes me depressed instead of motivated to help fix RC bugs so I only notify myself of changes. Even then I rarely do anything other than delete the notifications. If you are looking for ways to help Debian, fixing RC bugs is a great choice.
@daily diffcmdoutput ~/.cache/rcbugs rc-alert -d T --exclude-tags IP+MR
I notify myself of packages that are orphaned or need a new maintainer. There are usually so many packages in this list that it is not useful, so I only notify myself of changes to the list. I rarely adopt packages because I feel overloaded already. If you are looking for ways to help Debian, adopting packages is a good choice.
@daily wnpp-alert --diff
One of my packages is for interacting with servers on the Internet, so I need to run tests periodically to ensure the package works. I do that with a simple Makefile but maybe I need to move to autopkgtest, need to find out if it saves data between runs first.
@monthly cd ~/devel/debian/tests ; make
I install debsecan so that I get notified of security updates in unstable and new security issues that are not fixed yet. The way debsecan works is that it notifies about changes in security issues and updates and also includes a full list of all known unfixed issues. I generally install security updates from unstable when I see them. The list of unchanged issues is so long that it makes me wonder how many times I've been cracked already. The oldest issue goes back to 2002 but most of them are 2010 or later. The various parts of WebKit are by far the worst security offenders. I don't bother with the white-listing functionality due to the quantity of security issues and because it isn't possible to add a comment about each white-list item. If you want to get involved with the security team, reporting issues with the data in the security tracker is a good idea. I subscribe to the ftpmaster RSS feeds for new and removed packages to keep up to date with changes in the archive. A lot of the above applies to running systems based on Debian stable too. If you have any other thoughts about running Debian systems, please blog about them. The diffcmdoutput command used above is a simple shell script:
#!/bin/sh
cache="$1"
shift
temp="$(mktemp "$cache"XXXXXXXXXXXXXX)"
"$@" > "$temp"
diff --unified "$cache" "$temp"
mv --force "$temp" "$cache"


Nathan Handler: Hello Chronicle!

Over the years, I have had many different blogs. I mainly use them to post updates regarding my work in the FOSS community, with most of these relating to Ubuntu/Debian. My most recent blog was a Wordpress instance I ran on a VPS provided by a friend. This worked pretty well, but for various reasons, I no longer have access to that box. Earlier today, I started thinking about launching a new blog. The first problem I had to overcome was deciding where to host it. Many of the groups I am involved with provide members with a ~/public_html directory that can be used to host simple HTML+Javascript+CSS websites. However, most of these sites do not have the ability to use PHP, CGI, or access databases. I realized rather quickly that if I were to find a blogging platform that I could run from a ~/public_html directory on one of those machines, I would never have the problem of not having a host for my blog ever again. There is a near infinite number of free web hosts that can handle simple HTML sites. One key feature of any blog is the ability for readers to subscribe to it. Usually, the blogging platform handles automatically updating the feed when a new post is published. However, my simple HTML blog would not be able to do that. Since I knew I did not want to manually update the feeds, I started looking for a way to generate the feed locally on my personal machine and then push it to the remote site that is hosting my blog. About this time, I started compiling a list of features I would need to make this blogging platform usable. In no particular order, they included: After some searching, I found an application developed by Steve Kemp called Chronicle. Chronicle supports all of the features I described plus many more. It is also very quick and easy to setup. If you are running Debian, Chronicle is available from the repositories. Start by installing Chronicle. Note that these steps should all be done on your personal machine, not the machine that is going to host your blog.
sudo apt-get install chronicle
There are a few other packages that you can install to extend the functionality of Chronicle
sudo apt-get install memcached libcache-memcached-perl libhtml-calendarmonthsimple-perl libtext-vimcolor-perl libtext-markdown-perl
Next, create a few folders to hold our blog. We will store our raw blog posts in ~/blog/input and have the generated HTML versions go in ~/blog/output.
mkdir -p ~/blog/ input,output 
Now, we need to configure some preferences. We will base our preferences on the global configuration file shipped with the package.
cp /etc/chroniclerc ~/.chroniclerc
Open up the new ~/.chroniclerc file in your favorite editor. It is pretty well commented, but I will still explain the changes I made. input is the path to where your blog posts can be found. These are the raw blog posts, not the generated HTML versions of the posts. In our example, this should be set to ~/blog/input. pattern tells Chronicle which files in the input directory are blog posts. We will use a .txt extension to denote these files. Therefore, set pattern to *.txt. output is the directory where Chronicle should store the generated HTML versions of the blog posts. This should be ~/blog/output theme-dir is the directory that holds all of the themes. Chronicle ships with a couple of sample themes that you can use. Set this to /usr/share/chronicle/themes theme is the name of the theme you want to use. We will just use the default them, so set this to default entry-count specifies how many blog posts should be displayed on the HTML index page for the blog. I like to keep this fairly small, so I set mine to 10. rss-count is similar to entry-count, but it specifies the number of blog posts to include in the RSS feed. I also set this to 10 format specifies the format used in the raw blog posts. I write mine in markdown, but multimarkdown, textile, and html are also supported. Since most ~/public_html directories do not support CGI. We will disable comments by setting no-comments to 1 suffix gets appended to the filenames of all of the generated blog posts. Set this to .html url_prefix is the first part of the URL for the blog. If the index.html file for the blog is going to be available at http://example.com/blog/ , set this to *http://example.com/~user/blog/ blog_title is whatever you want your blog to be called. The title is displayed at the top of the site. Set it to something like Your Name's Blog post-build is a very useful setting. It allows us to have Chronicle perform some action after it finishes running. We will use this to copy our blog to the remote host's public_html directory. Set this field to something like scp -r output/* user@example.com:~/public_html/blog. You will probably want to setup SSH so that you do not need to enter a password each time. Finally, date-archive-path will allow you to get the nice year/month directories to sort your posts. Set this to 1. Your final ~/.chroniclerc should look something like this:
input = ~/blog
pattern = *.txt
output = ~/blog/output
theme-dir = /usr/share/chronicle/themes
theme = default
entry-count = 10
rss-count = 10
format = markdown
no-comments = 1
suffix = .html
url_prefix = http://example.com/~user/blog/
blog_title    = Your Name's Blog
post-build = scp -r output/* user2@example.com:~/public_html/blog
date-archive-path = 1
You are now ready to start writing your first blog post. Open up ~/blog/MyFirstBlogPost.txt in your favorite text editor. Modify it to look like this:
Title: My First Blog Post
Tags: MyTag
Date: October 29, 2012
This is my **first** blog post.
Notice the metadata stored at the top? This is required for every post. Chronicle uses it to figure out the post title, tags, and date. It has some logic to try and guess this information if missing, but it is probably safest if you specify it. The empty line between the metadata and the post content is also required. Remember, we configured Chronicle to treat these as Markdown files, so feel free to utilize any Markdown formatting you wish. Finally, run chronicle from a terminal. If all goes well, it should generate your blog and copy the files to the remote host. You can now go to http://example.com/~user/blog to view it. One final suggestion would be to store the entire blog in a git repository. This will allow you to utilize all of the features of a VCS, such as reverting any accidental changes or allowing multiple people to collaborate on a blog post at the same time.

28 October 2012

Sandro Tosi: Start a MySQL instance to run Debian package build-time tests

I'm the maintainer of MySQL Connector/Python Debian package, and it's shipped with several unittests, but they require a MySQL instance to be run against, so up to know I wasn't able to run them at build-time.

But I want to change that, so I wanted to find a way to spawn a MySQL instance just for testing purposes. I've searched a lot, and then found a package solving the same problem: php5.

The package has a setup-mysql.sh script that takes care of starting/stopping the instances, and debian/rules file sets up instance parameters and then it starts the instance before the tests and then stops it after them.

It's a very interesting solution, so I thought of sharing + taking notes to self, just in case I need it in other situations.

Roland Mas: Guitar Hero drumkits and MIDI, again

Almost a year after my previous post, I felt inclined to spend another Sunday (this one was chilly rather than rainy) working on my script to integrate the drumkit of Guitar Hero World Tour for Wii within a MIDI environment. And wiigh2midi got, if not a rewrite, then at least a few enhancements since I last mentioned it here. It's still not something that I'd put in everyone's hands, but it's coming to be seriously usable. I wonder if there'd be any interest in me packaging that and uploading it to Debian? It would need some cleanup first (and a more generic name, since it's far from restricted to Guitar Hero controllers or drumkits), but I guess it could be useful. Ping me if you're interested.

Gregor Herrmann: RC bugs 2012/43

here's the short overview about my activities around release-critical bugs for the last week:

Leo 'costela' Antunes: Silly Wal(l Cloc)k

Inspired by this clock, which made the rounds a few weeks back, and fueled by a bet to see who could make it first (hi Fabs!), ladies and gentleman, I m honored to introduce to you, the Silly Wal(l Cloc)k:

The finished clock This is a prototype version, done without any fancy precision tools and whatnot, so you can easily see that it s not the most high quality product you ll ever get your hands on. If anyone wants to reproduce this at home, here s how it was done: First get a hold of some cheap wall clock like this one: The original cheap clock Some things to think about when buying this beauty *cough*:

Disassembling this specific cheap model was pretty straightforward and didn t take more than a minute to get to juicy parts:

Clock parts: actual clock, cover tack and hands As a base image I used this and traced it to produce this SVG with the legs in different layers and a marker for the holes. For this prototype, it would probably have been ok to use the original photo directly, but having the vector version ready means it s easy to use a 3d printer and laser-cutter to make the next version of the hands and face, which will definitely look and behave a lot better. Next step is printing the three layers body and two legs. Since this specific clock is wider than an A4 sheet, I had to use some white cardboard as background (the clock s own box hurray for resourcefulness) and painstakingly cut the printed body s outline, to avoid the slight tone difference between cardboard and paper. If you use the provided SVG and a laser-cutter, you d hopefully avoid this sort of issue. I didn t have any black cardboard lying around, so I had to print the legs, cut the outline again and strengthen them with some thin cardboard from tea boxes (taken directly from the trash hurray for resourcefulness again). Again something that 3d printing will hopefully side-step. It s important to use light materials for the legs, since most clock mechanisms don t have enough force to move heavy hands, which would cause the clock to quickly loose precision. Depending on the width of the clock s axis, a paper hole puncher might be the ideal tool to make holes in the legs. Since the prototype was largely made with paper, there was no point in going for precision when making the holes, as there s no way to fit the legs tightly to the clock s axis. For this, the original hands were cut in length and used as a base on which to super-glue the legs, so the original holes could be used. After these few easy steps, it s only a matter of reassembling the clock and voil !

Silly Wal(l Clock)k

Steve Langasek: SecureBoot in Ubuntu 12.10

The 12.10 release is the first version of Ubuntu that supports Secure Boot out of the box. In what is largely an accident of release timing, from what I can tell (and please correct me if I'm wrong), this actually makes Ubuntu 12.10 the first general release of any OS to support Secure Boot. (Windows 8 of course is also now available; and I'm sure Matthew Garrett, who has been a welcome collaborator throughout this process, has everything in good order for the upcoming Fedora 18 release.) That's certainly something of a bittersweet achievement. I'm proud of the work we've done to ensure Ubuntu will continue to work out of the box on the consumer hardware of the future; in spite of the predictable accusations on the blogowebs that we've sold out, I sleep well at night knowing that this was the pragmatic decision to make, maximizing users' freedom to use their hardware. All the same, I worry about what the landscape is going to look like in a few years' time. The Ubuntu first-stage EFI bootloader is signed by Microsoft, but the key that is used for signing is one that's recommended by Microsoft, not one that's required by the Windows 8 certification requirements. Will all hardware include this key in practice? The Windows 8 requirements also say that every machine must allow the user to disable Secure Boot. Will manufacturers get this right, and will users be able to make use of it in the event the manufacture didn't include the Microsoft-recommended key? Only time will tell. But I do think the Linux community is going to have to remain engaged on this for some time to come, and possibly hold OEMs' feet to the fire for shipping hardware that will only work with Windows 8. But that's for the future. For now, we have a technical solution in 12.10 that solves the parts of the problem that we can solve. This first release gives us preliminary support for booting on Secure Boot, but there's more work to be done to provide a full solution that's sustainable over the long term. We'll be discussing some of that this week at UDS in Copenhagen. And as part of our committment to enabling new hardware on the current LTS release, we will be backporting this work for inclusion in 12.04.2. It remains to be decided how Debian will approach the Secure Boot question. At DebConf 12, many people seemed to consider it a foregone conclusion that Debian would never agree to include binaries in main signed by third-party keys. I don't think that should be a given; I think allowing third-party signatures in main for hardware compatibility is consistent with Debian's principles, and refusing to make Debian compatible with this hardware out of the box does nothing to advance user freedom. I hope to see frank discussion post-wheezy about keeping Debian relevant on consumer hardware of the future.

Timo Jyrinki: UDS GTA04 Hacking

I'm sitting at the Bella Sky lobby bar while UDS people keep pouring in. I guess I have to start this UDS with some hacking (and a little beer)! I bootstrapped an Ubuntu armhf rootfs and coupled it with QtMoko's kernel already earlier after I received my GTA04 but it didn't boot right away so I had nothing to report. I wanted armhf so I chose QtMoko's 'experimental' Debian armhf rootfs + boot files as the reference to look at while working on the Ubuntu rootfs. I now went through again some of the configuration files, and voil :


Now running apt-get install unity over SSH :) It will require OpenGL ES 2.0 hw acceleration to run, now that the support was integrated in Ubuntu 12.10. I will therefore need to tinker what kind of OMAP3 armhf binary blobs there are available, and what's again the situation with X.org DDX driver as well. I always feel that the fun starts at this point for me, when I've the device booting and I can SSH in. That's why I'm happy the work from Golden Delicious GmbH and QtMoko helped me to get here...

Iustin Pop: Open Source collaboration, 2012

I'm interrupting my blog silence (which was due to the fact that I didn't have anything interesting to say) to note two things: first, but less important, spammers are still active as ever - I had ~2K spam comments and another ~2K in pending moderation. And second, and the actual subject of this post, is how easy collaboration has become. In the last year or so (where ~so means since I last looked), GitHub has introduced a very nice collaboration work-flow: This is soo easy (what, 3-4 clicks?) that I expect it will increase trivial fix-ups against Open Source projects hosted on GitHub or other services with similar capabilities. I did in the past week two or three such trivial fixes myself; this is not much note that I'm not talking about code fixes; but still, it is something that I think will definitely improve many, many projects. The same way that Wikis made it easy to improve documentation sites, this could make it easier for end-users to improve upstream's project documentation, when stored in a VCS as opposed to a Wiki. Yay! On the other hand, I still have a few patches sent months ago to an upstream email address, since they don't have a issue tracker (not even speaking about a place to submit merge requests). These will probably languish and disappear, as opposed to visible/public "hey, this is a patch to fix tiny typo in File.hs!". Yes, I like this a lot. Now, if only all projects would have a public VCS and issue tracker :) PS: yes, I'm talking here about GitHub, which is not Open Source software itself. I regard that as a (temporary) inconvenience, which dies not detract from the significant advantage it brings to the table.
27 October 2012

Soeren Sonnenburg: Shogun at Google Summer of Code 2012

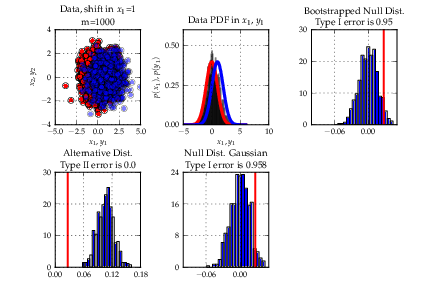
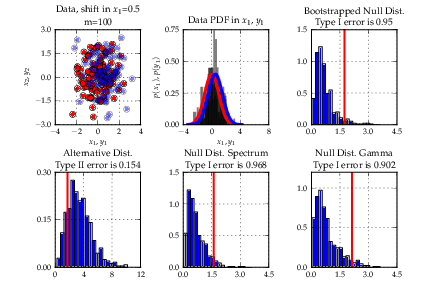
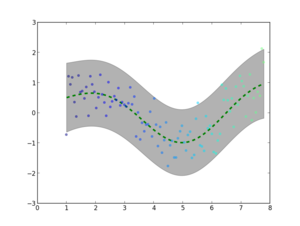
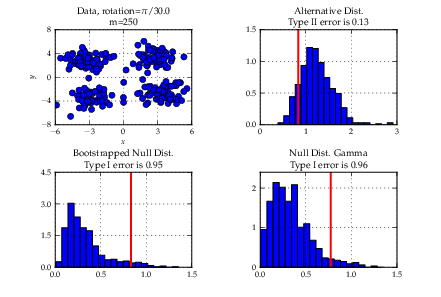
The summer came finally to an end and (yes in Berlin we still had 20 C end of October), unfortunately, so did GSoC with it. This has been the second time for SHOGUN to be in GSoC. For those unfamiliar with SHOGUN - it is a very versatile machine learning toolbox that enables unified large-scale learning for a broad range of feature types and learning settings, like classification, regression, or explorative data analysis. I again played the role of an org admin and co-mentor this year and would like to take the opportunity to summarize enhancements to the toolbox and my GSoC experience: In contrast to last year, we required code-contributions in the application phase of GSoC already, i.e., a (small) patch was mandatory for your application to be considered. This reduced the number of applications we received: 48 proposals from 38 students instead of 70 proposals from about 60 students last year but also increased the overall quality of the applications. In the end we were very happy to get 8 very talented students and have the opportunity of boosting the project thanks to their hard and awesome work. Thanks to google for sponsoring three more students compared to last GSoC. Still we gave one slot back to the pool for good to the octave project (They used it very wisely and octave will have a just-in-time compiler now, which will benefit us all!). SHOGUN 2.0.0 is the new release of the toolbox including of course all the new features that the students have implemented in their projects. On the one hand, modules that were already in SHOGUN have been extended or improved. For example, Jacob Walker has implemented Gaussian Processes (GPs) improving the usability of SHOGUN for regression problems. A framework for multiclass learning by Chiyuan Zhang including state-of-the-art methods in this area such as Error-Correcting Output Coding (ECOC) and ShareBoost, among others. In addition, Evgeniy Andreev has made very important improvements w.r.t. the accessibility of SHOGUN. Thanks to his work with SWIG director classes, now it is possible to use python for prototyping and make use of that code with the same flexibility as if it had been written in the C++ core of the project. On the other hand, completely new frameworks and other functionalities have been added to the project as well. This is the case of multitask learning and domain adaptation algorithms written by Sergey Lisitsyn and the kernel two-sample or dependence test by Heiko Strathmann. Viktor Gal has introduced latent SVMs to SHOGUN and, finally, two students have worked in the new structured output learning framework. Fernando Iglesias made the design of this framework introducing the structured output machines into SHOGUN while Michal Uricar has implemented several bundle methods to solve the optimization problem of the structured output SVM. It has been very fun and interesting how the work done in different projects has been put together very early, even during the GSoC period. Only to show an example of this dealing with the generic structured output framework and the improvements in the accessibility. It is possible to make use of the SWIG directors to implement the application specific mechanisms of a structured learning problem instance in python and then use the rest of the framework (written in C++) to solve this new problem. Students! You all did a great job and I am more than amazed what you all have achieved. Thank you very much and I hope some of you will stick around. Besides all these improvements it has been particularly challenging for me as org admin to scale the project. While I could still be deeply involved in each and every part of the project last GSoC, this was no longer possible this year. Learning to trust that your mentors are doing the job is something that didn't come easy to me. Having had about monthly all-hands meetings did help and so did monitoring the happiness of the students. I am glad that it all worked out nicely this year too. Again, I would like to mention that SHOGUN improved a lot code-base/code-quality wise. Students gave very constructive feedback about our (lack) of proper Vector/Matrix/String/Sparse Matrix types. We now have all these implemented doing automagic memory garbage collection behind scenes. We have started to transition to use Eigen3 as our matrix library of choice, which made quite a number of algorithms much easier to implement. We generalized the Label framework (CLabels) to be tractable for not just classification and regression but multitask and structured output learning. Finally, we have had quite a number of infrastructure improvements. Thanks to GSoC money we have a dedicated server for running the buildbot/buildslaves and website. The ML Group at TU Berlin does sponsor virtual machines for building SHOGUN on Debian and Cygwin. Viktor Gal stepped up providing buildslaves for Ubuntu and FreeBSD. Gunnar Raetschs group is supporting redhat based build tests. We have Travis CI running testing pull requests for breakage even before merges. Code quality is now monitored utilizing LLVMs scan-build. Bernard Hernandez appeared and wrote a fancy new website for SHOGUN. A more detailed description of the achievements of each of the students follows:

Russ Allbery: Review: Devil Take the Hindmost

Review: Devil Take the Hindmost, by Edward Chancellor
Publisher: Plume
Copyright: 1999
Printing: June 2000
ISBN: 0-452-28180-6
Format: Trade paperback
Pages: 349
Subtitled A History of Financial Speculation, Devil Take the Hindmost is exactly that: a history, with chapters on notable speculative bubbles or surges going back to the 1630s. The first significant bubble described is, of course, the notorious tulip speculation in Holland, but Chancellor is more thorough than any previous history I've read. There are chapters on the early stock market schemes, the South Sea bubble, 1820s emerging markets, the railway mania of 1845, the Gilded Age, the late 1970s and early 1980s, and the Japanese real estate bubble of the 1980s, as well as the mandatory look at the stock market crash of 1929. Each is thorough and detailed; indeed, perhaps slightly too detailed, as the clear narrative picture can occasionally groan under the weight of names and capsule biographies. The first thing one should realize about this book is that, despite the apparent currency of the topic, it was written in 1999. That means it predates both the subprime real estate collapse and the dot.com boom, as well as some more minor but possibly relevant events such as the Enron electricity market manipulation. Japan is the most recent bubble that Chancellor can cover; one can only speculate as to what he would make of the 2008 financial crash. The other focus to be aware of is the omission of sovereign debt. Chancellor is exclusively focused on private markets, usually stock markets, and (apart from the chapter on Japan) Western markets, mostly in the US and the UK. Governments play a role in some of the early speculative bubbles (most notably the South Sea bubble), but Chancellor's topic is private speculative frenzies, not the risks and effects of government borrowing. Interrogation of the role of government is mostly limited to cursory discussions of the impact of regulation, mostly in the negative. More on that in a moment. This is a history as opposed to either a polemic or a prescription. Chancellor does not set out to explain how to curb financial speculation. Insofar as he expresses an opinion on it, he presents speculation as a force of unbridled freedom in natural tension with regulation and financial conservatism and sees a cyclical pattern of speculative frenzy, collapse, retrenchment, and then renewed speculation. Speculation, as presented here, is more akin to a force of nature than, as seen in most other books on the topic, a phenomenon of greed that should be limited or prevented. Indeed, Chancellor seems skeptical of the entire project of preventing or limiting speculation, and presents considerable reason for the reader to become skeptical as well. The history he presents is one of speculative manias adapting to and circumventing every control that governments and markets have attempted to place on them. When certain practices are outlawed (and some modern complex financial practices have surprisingly long histories), people just find loopholes or alternative approaches through which to accomplish the same thing. Or the speculative mania takes an unexpected new form. Nor do the manias seem to be decreasing in severity as more regulation, custom, and restrictions attempt to blunt them. Even without adding the financial collapse of 2008, the impacts of the speculative frenzies documented here seem, if anything, to be growing. This is, therefore, a relatively straightforward history, but it's an entertaining one, filling in details that I'd not previously been aware of. The complexity of financial schemes as early as the 1600s was particularly eye-opening. There's a tendency to believe that complex derivative schemes are an artifact of modern financial markets, but they've been a part of speculation for as long as Chancellor goes back. Computers may have added layers to the mathematics, but they haven't added as much to the legal strategems and levels of indirection as one might think. Chancellor emphasizes that throughout: speculation involves a lot of complexity, not necessarily to deceive but to construct situations in which it's in the interest (at least short term) of all involved parties to continue and escalate the speculation. While Chancellor doesn't provide much encouragement to the reader hoping to find ways to curb speculation, he does show some commonalities that provide a bit of a handle on how speculation starts. The one that lept out at me was leverage. Every speculative bubble documented in Devil Take the Hindmost involves borrowing money to reinvest. The mechanism keeps changing, from straightforward loans during the tulip craze to much more complex constructions in modern finance, primarily in response to regulation that attempted to reduce leverage but only banned one specific technique. But whatever method is used, at the bottom is always some scheme for purchasing an asset using debt, magnifying both positive and negative price swings. Some variation of buying stocks on margin is particularly common; Chancellor documents how it was reinvented despite the limits on straight margin purchases instituted after the Great Depression. There is no recommendation here for any regulatory or legal action, but it's obvious from the repetition of history that limiting leverage would be the place to focus attention. I enjoyed this history, but it can be dry, and at times is a bit overstuffed with names, unimportant details, and microbiographies. It's also unfortunate that Chancellor missed two of the most significant (and two very different) speculative bubbles through the timing of his work. It would have been interesting to see them through the lens of his history. What we have is still worth reading, but also somewhat frustrating in Chancellor's refusal to draw or at least underline general conclusions. Devil Take the Hindmost is long on history but short on analysis, and while I appreciate the historian's focus in a source of data, it left me somewhat unsatisfied. Rating: 6 out of 10

Riku Voipio: My 5 eurocents on the Rasberry Pi opengl driver debacle

The Linux community rather unenthusiastic about the open source shim to Raspberry PI GPU. I think the backslash is a bit unfair, even if the marketing from Raspberry was pompous - It is still a step in the right direction. More raspberry PI hardware enablement code is open source than before. A step in the wrong direction is "locking firmware", where a loadable firmware is made read-only by storing it to a ROM. It has been planned by the GTA04 phone project, and Raspberry foundation also considers making a locked GPU ROM device. This is madness that needs to stop. It may fulfill the letter of FSF guidelines, but it is firmly against the spirit. It does not increase freedom - it takes away vendors ability to provide bugfixes to firmware, and communities possibility of reverse engineering the firmware.

Next.

Previous.