Search Results: "js"

5 July 2013

John Sullivan: I think this says something about my taste in music

johnsu01@myles:~$ mpc playlist grep -i outro wc -l
14

4 July 2013

Gergely Nagy: Onto greener, open pastures

Half a lifetime ago, somewhere at the end of the last millennia I became a free software enthusiast. On and off, I've been working on Free Software for the past fifteen years - most of them unknown, discontinued by now; a huge part of this work was a hobby: small, infrequent contributions. But it was, and still is, something I enjoy doing, something that satisfies my hunger for knowledge, my desire to give back to the community I received so much from. Over the years, what originally started as a desire became a need. What started as a preference, became a requirement. And all through these years, I had a dream, a clear goal I wanted to achieve, which gave purpose to a lot of things I wrote and worked on.This past Monday, the goal was reached. I left the BalaBit support department this week, and went for greener pastures, to do what I wanted to do since I became a free software fanatic: work on free software for a living. As of July first, I'm officially a syslog-ng OSE developer, working full time on 100% Free Software. And not just any software, but something used by millions all over the world. For the first time in my life, I am able to do what I want, for a living.So how did I end up here?It all started on a boring night in December, 2010, when I wrote the first version of the mongodb destination, which also marks my entrance into the syslog-ng contributor scene (apart from a set of bugfixes I was doing in my role as a software engineer at support). From this grew an agreement between the support and development departments (and myself, of course), that I can spend 20% of my time working on syslog-ng OSE. For a while, I spent my Fridays doing just that, eventually obtaining another hat: maintaining the 3.3 stable branch, and later the 3.4 branch too. Meanwhile, the 20% percent was reconsidered, and became 50%, with the premise that it will become 100% in the not too distant future. That future is now.That future is now, and while there will be a slower ramp-up time, there are great things in store, of which, I'll talk about in a later post. Needless to say, though, even if I achieved a dream, there are other desires to pursue, and I'm not going to spend fifteen years achieving them: it's time to fire up the rocket boots, and see where they take me.Two years. Watch this place.

17 June 2013

John Sullivan: M-x spook

In light of the recent leaks about the NSA's illegal spying, I've decided to go back to using M-x spook output in my email signatures. cypherpunk anthrax John Kerry rail gun security plutonium Guantanamo wire transfer JPL number key military MD5 SRI FIPS140 Uzbekistan

11 June 2013

Steve Kemp: Migrations and changes

So I'd previously talked about migrating machines. From having one virtual machine running "mail" + "web" + "stuff" I've now got three hosts:
ssh.steve.org.uk
This is supposed to be used solely for shell access, email reading, IRC. Sadly it still hosts one website, the web interface to my Mercurial repositories. This can't be moved without moving the repositories which is a step too far. Although I don't particularly want people browsing my code/changes I do want them to be able to clone them. If I could get anonymous-SSH checkouts working, sanely, then I'd be happy, but I don't see how to do that.
skx-web
This hosts all my websites except for two. The two that are excluded are my mercurial repositories, which still lives on ssh.steve.org.uk, and my blogspam service.
blogspam
This runs my blogspam.net service. I wish I could retired this, since it uses cruftly XML::RPC. I'd rather see a RESTful application sending/receiving JSON. Sadly I can't kill it without annoying a lot of people. So it must remain.
I chose to add the blogspam guest, because that service does really take over an IP, and it just seemed simplest to move it to one machine. As a quick hack both http://repository.steve.org.uk & http://blogspam.net/ run under Apache. Although the other websites run under their own UID with thttpd + my proxy. Now time to change the subject entirely. I've recently joined gym. Which isn't as horrible as I thought it might be, though as a matter of policy I refuse to go on any of those fancy running/jogging machines. The first three weeks I just alternated between the cycling machines and the rowing machines. Initially ten minutes on each, then twenty, then thirty. Now I'm being all brave and adventurous, using new machines and pieces of equipment. Writing this I've got a dull ache in both my arms, after doing seated-dips with 100Lbs. So I guess I'm starting to make progress. No specific goals in mind, but I've been paying slightly more attention to my diet over the past month and I think if I'm a "little fitter" and have "slightly nicer arms" then I'll be happy enough. I've no desire to go all anal and count calories, or give up chocolate and beer. So it is almost hard to explain why I'm going, but .. it is fun, and watching the numbers change is fun too. I'll probably post more about this in the future.

8 June 2013

Michael Stapelberg: Uploading packages via SFTP

Yesterday I uploaded a big package and got multiple timeouts. I then figured out that DDs can also upload using SFTP (i.e. SSH s file transfer thingie) instead of traditional FTP, which seems like a more modern alternative. So let s give that a try. With dput-ng, the following configuration leads to using sftp by default:
mkdir -p ~/.dput.d/profiles/
cat > ~/.dput.d/profiles/ftp-master.json <<EOT
 
    "fqdn": "ssh.upload.debian.org",
    "incoming": "/srv/upload.debian.org/UploadQueue/",
    "method": "sftp"
 
EOT
Note that uploading via SFTP will lead to debianqueued uploading the files via FTP for you. But maybe that is more reliable than doing it yourself. We ll see :-).

5 June 2013

Steve Kemp: How do people deal with email?

As part of writing a new mail client I'm wondering about how to change my email-life, and how other people process/handle their incoming email. I sort my incoming email into folders at delivery-time using procmail. Mail is generally filtered into mailboxes on the basis of the company that sent it, the person that sent it, or the machine which generated it. Because I manage a lot of machines personally I've split things up so that I have a folder per host. So on a morning I might have unread mail in the following folders:
machines.steve.org.uk/
machines.da-db1/
machines.da-db2/
machines.da-web1/
machines.da-web2/
machines.da-web3/
machines.da-web4/
The per-machine mailboxes usually contain a single mail every day from LogWatch, along with output from any cron-jobs. For example today I received the mail:
From: Cron Daemon
To: steve@steve.org.uk
Subject: Cron steve@steve.org.uk /home/steve/bin/download-check
URL http://nodejs.org/ - no longer matches v0.10.9
Generally speaking I don't need to read the per-machine messages. I'll keep the most recent 100 for reference, but only need to look if something seems "off" on a machine. But if I don't look I'd not see the node upgrade notice, so find that I do read them after all. This suggest to me that email isn't the right way to handle this kind of thing. Instead I should use a notification system - at work we have a central service called MauveAlert (yes, Red Dwarf reference). Mauve receives "alerts" of various kinds, via UDP. The alerts are then fanned out to appropriate people via XMPP, Email, or SMSs. I have a similarly-inspired system I use on my Debian Administration cluster. A (node) service runs non-stop collecting UDP messages and showing them on a dashboard. I look at it throughout the day to see when slaughter runs, etc. Anyway in conslusion I get a lot of mail. Some of it is related to random projects, and all ends up in the steve.org.uk/ mailbox, some of it relates to machines, and gets filed away, and I have regular conversions with folk so I have a .people.kirsi/ folder which receives a lot of attention, for example. ObRandom:daily() - Mark ~/Maildir/.machines.*, etc, read.

4 June 2013

Daniel Pocock: Using reSIProcate to connect Asterisk with WebRTC

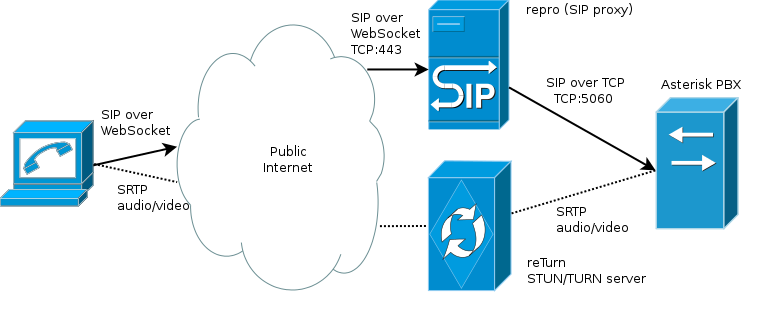
In my previous blog entry about how to get WebRTC going fast I looked at the basics of setting up a SIP proxy (also known as a SIP router) to accept connections from WebRTC clients. As in a traditional, non-WebRTC world, the SIP proxy simply facilitates calling between all the clients it knows. In practice, deployments usually want to add additional functionality in the form of a PBX with queues, voicemail, menus and conferencing. The recent Asterisk 11 release includes support for WebRTC although it is still evolving and I don't currently recomend connecting Asterisk directly to the public Internet. In particular, Asterisk doesn't support features like mutual TLS authentication with the WSS (secure WebSocket) transport. Here, we look at how repro can accept connections from Internet/web users and relay them to an internal Asterisk server. Here is an architecture diagram: Notice that the SIP messages are accepted over repro's WebSocket transport and relayed to Asterisk over a regular SIP TCP transport. This means that we benefit from repro's TLS support too, so the WebSocket client has a much higher chance of escaping their client-side firewall if port 443 is used (repro pretending to be a HTTPS server) and clients can be authenticated with certificates in their browser. Here are the steps to get it running: repro and reTurn setup Set up repro and reTurn server on a Debian server as per my previous blog post. Verify that the clients can talk to repro. Asterisk source build Digium, the creators of Asterisk, are not currently supporting Debian packages, but they do provide RPM packages in their Asterisk package repository However, the pre-built binary packages for Asterisk 11.4 don't include SRTP support. SRTP is a mandatory part of WebRTC. Therefore, we take the Source RPM (SRPM) and build it manually. First, it is recommended that you start with a completely fresh CentOS 6 or RHEL6 server. I built a fresh virtual machine in my XCP environment using a procedure similar to that documented by Grant. After installing and setting a root password, configure yum to access EPEL6 Make sure SELinux and firewall are disabled on the box (they are often enabled by default). A quick way to do this:
# sed -i s/SELINUX=enforcing/SELINUX=disabled/g /etc/selinux/config
# reboot
...
# iptables -I INPUT -j ACCEPT
Next you can tell yum about the Digium repository and install all the necessary dependencies for building Asterisk:
# rpm -Uvh http://packages.asterisk.org/centos/6/current/x86_64/RPMS/asterisknow-version-3.0.0-1_centos6.noarch.rpm
# yum update
# yum install rpm-build libsrtp-devel
In your home directory, set up a work tree for rpmbuild:
$ mkdir ~/rpmbuild
$ cd ~/rpmbuild
$ mkdir BUILD BUILDROOT RPMS SOURCES SPECS SRPMS
$ cd SPECS
$ wget http://danielpocock.com/sites/danielpocock.com/files/asterisk.spec
$ cd ../SRPMS
$ wget http://packages.asterisk.org/centos/6/asterisk-11/SRPMS/asterisk-11.4.0-1_centos6.src.rpm
$ rpmbuild --rebuild asterisk-11.4.0-1_centos6.src.rpm
At this stage, you will have some errors, but it has successfully extracted the tarball into the SOURCES directory:
$ ls -l ../SOURCES
-rw-r--r--   1 daniel daniel 11573400 May 20 23:07 asterisk-sources-11.4.0.tar.gz
$
It will also complain about missing dependencies, you install them using yum:
# yum install make gcc gcc-c++ ....
Notice that you have downloaded a slightly modified version of the asterisk.spec file, the reasons for this are explained in this mailing list discussion. The following should now trigger a successful build:
$ rpmbuild -bb \
  --without tds \
    --without misdn \
    --without odbc \
   ~/rpmbuild/SOURCES/asterisk.spec
Hopefully, Digium will add the SRTP support in the 11.4.1 packages so that source build won't be necessary for every future release. Asterisk configuration: demo application Here we just have to install the RPMs and make a quick configuration change:
$ cd ~/rpmbuild/RPMS/x86_64
$ su -
# rpm -i asterisk*rpm
# yum install asterisk-sounds-core-en-ulaw asterisk-sounds-extra-en-ulaw --enablerepo=asterisk-11
# ln -s /usr/share/asterisk/sounds/demo-* /var/lib/asterisk/sounds/en/
To enable connections from the proxy, we must set a few non-default settings. It is essential to use the TCP transport as the SIP messages from WebSocket clients are usually too big for UDP packets. It is also necessary to enable SRTP and AVPF, as these are mandatory in WebRTC. Here is a diff against the default /etc/asterisk/sip.conf:
--- /etc/asterisk.orig/sip.conf	2013-06-04 10:57:49.428617785 +0200
+++ /etc/asterisk/sip.conf	2013-06-04 11:18:17.825604261 +0200
@@ -207,7 +207,7 @@
 ; subject to change in any release.  If they are changed, the changes will
 ; be reflected in this sample configuration file, as well as in the UPGRADE.txt file.
 ;
-tcpenable=no                    ; Enable server for incoming TCP connections (default is no)
+tcpenable=yes                    ; Enable server for incoming TCP connections (default is no)
 tcpbindaddr=0.0.0.0             ; IP address for TCP server to bind to (0.0.0.0 binds to all interfaces)
                                 ; Optionally add a port number, 192.168.1.1:5062 (default is port 5060)
 
@@ -1371,6 +1371,13 @@
 ; ...
 ;
 
+[1001](public-phone,ulaw-phone)
+avpf = yes
+encryption = yes
+context = public
+icesupport = yes
+
+
 ; Standard configurations not using templates look like this:
 ;
 ;[grandstream1]
This assumes that the SIP user ID of your WebSocket user is 1001 Now you can start Asterisk:
# service asterisk start
Configuring the repro SIP proxy to send calls to Asterisk This is a relatively simple demonstration. The goal is to send calls for the number 1000 to the demo application in Asterisk In repro's web interface, click ADD ROUTE in the menu. Use the following parameters and leave all other options blank:
  • URI: ^sip:1000@
  • Destination: sip:$1@pbx.example.org?transport=tcp
Note: replace pbx.example.org with the hostname or IP address of the box running Asterisk Go to the ADD USER menu link and add a user called 1001. The user ID and password have to be placed in the custom.js file for JsSIP Testing from JsSIP I assume JsSIP was set up following the instructions from my previous blog post Asterisk doesn't support the video codec from a WebRTC client. To work around this, in the custom.js file for JsSIP, make sure video is disabled by default. In the WebRTC client, dial 1000. You should hear the demo greeting from Asterisk. Troubleshooting
  • Check the JavaScript log in the browser
  • Check the logs on the repro proxy and increase the verbosity of the logs if necessary. If the level is set to STACK, you will see full copies of each SIP message sent and received.
  • Connect to the Asterisk console (UNIX command: asterisk -r -vvv) and enable SIP message display: sip set debug on.

3 June 2013

John Goerzen: Two boys, shrimp, and stars

I recently made a routine analysis of my kitchen. (Of course I make a routine analysis of my kitchen; don t you?) In it, I discovered these items, still usable, but approaching that magic throw it out date: So, I thought, what can I make that would use all of these? And I realized I had some shrimp in the freezer, so: a shrimp boil! I tossed it all, plus some various seasonings and a few other veggies, into the Dutch oven, and boiled. Jacob and Oliver watched the activity with interest. Well, except for the potato-peeling part. For that, they went and played with their toy school buses. But the rest was good. They carefully observed me adding some spices, some vegetables, the shrimp, and watched it all simmer. Then it was time to eat. Excitement! Of course, it did take a few minutes to boil, so Jacob got down his whiteboard while Oliver looked on. They enjoyed learning how to peel the shell from the shrimp and devoured their food. And another night recently, Jacob unexpectedly showed up in the kitchen at 10PM. He said he was thirsty, so I got him some water. He asked, Dad, did you make ice cream? Earlier that day, I had prepared ice cream with Oliver, but it was a kind that had to be cooked (lemon with pureed strawberries and peaches) and it wasn t cool enough to finish before their bedtime. I did let them help add the ice and salt to the ice cream freezer just before they went to bed. So I told Jacob that yes, the ice cream was done. He stood there, tiredly, considering, with this oh he ll never say yes to ice cream at 10PM look on his face. So I said, would you like one bite right now? The look of delight on his face was amazing; a broad smile, a twinkle in his eyes, and a clap. So I got out the big bowl of ice cream and scooped up one big spoonful. He loved it. Then I said, should we go look at the stars? I carried Jacob outside to the porch. We stood there, looking up. I used to do this with him periodically, but it had been about a year. So he was thrilled. It was a partially overcast night, but there were still some stars visible. He had no idea there were some stars missing. To him, it was amazing and wonderful and infinite. Oh dad, there are way too many stars to count! He stayed there, arms around my neck, for a minute or two, then was ready to go back inside. I set him down, gave him a hug, said Goodnight, Jacob. And off he trotted, back upstairs, wearing a contented smile, and he fell asleep almost immediately. All it takes to delight children is a bit a shrimp or some stars. And those things delight me, too.

1 June 2013

Lior Kaplan: Bye bye non-free PHP JSON extension

PHP 5.5 rc2 was recently uploaded to Debian unstable by Ond ej Sur . Along side the new PHP version and its features the PHP team has dealt with the JSON extension being non-free because of the The Software shall be used for Good, not Evil license (see debian #692613).
php5 (5.5.0~rc1+dfsg-1) experimental; urgency=low
    [...]
  * Add dfsg-repack.sh script to remove non-free JSON module
    (Closes: #692613)
  * Remove php5-json from Provides, since that's no longer true
 -- Ond ej Sur  <ondrej@debian.org>  Fri, 17 May 2013 14:41:41 +0200
A package with a DFSG replacement for the JSON extension is waiting in the NEW queue and should be available soon. The new JSON extension was done by Remi Collet (PHP developer and Fedora s PHP maintainer). Review and patches are welcomed, code is available at https://github.com/remicollet/pecl-json-c . I hope the PHP project will adopt the solution, after claiming they won t fix it themselves (see php.net #63520).
Filed under: Debian GNU/Linux, PHP

28 May 2013

Johannes Schauer: New bootstrap analysis results

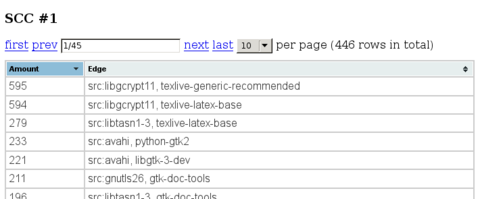
I wrote a small wiki page for botch. It includes links to some hopefully useful resources like my FOSDEM 2013 talk or my master thesis about botch. The final goal of botch is to generate a build order with which Debian can be bootstrapped from zero to more than 18000 source packages. But such a build order can only be generated once enough source packages (by now the number is around 70) incorporate build profiles which allow to compile them with less build dependencies and thereby break all build dependency cycles. So an intermediary goal of botch is, to find a "good" (i.e. a close to minimal amount) selection of such build dependencies that should be dropped from their source packages. So far, the results of all heuristics we use for this task were just dumped to standard output. Since this textual format was hard to read for a human developer and even worse machine readable, that tool now outputs its results in JSON. This data is then converted by another tool to a more human readable format. One such format is HTML and with the help of javascript for sortable and pageable tables, the data can then be presented without producing too much visual clutter (at least compared to the initial textual format). Another advantage of HTML is, that the data can now easily be shared with other developers without them having to run botch or install any other program first. So without further ado, please find the result of running our heuristics on Debian Sid as of 2013-01-01 here: http://mister-muffin.de/bootstrap/stats/ Here is a screenshot of what you can expect (you can see part of the table of edges with most cycles through them): As a developer uses this information to add build profiles to source packages, this HTML page can be regenerated and will show which strongly connected components are now left in the graph and how to best make them acyclic as well. Besides other improvements I also updated the data I used to generate the graphs from this post. I found this update to be necessary since we found and fixed several implementation bugs since October 2012, so this new plot should be more accurate. Here a graph which shows the amount of vertices in the biggest strongly connected component of Debian Sid by date. Some datapoints are missing for dates for which important source packages in Sid were not compilable.
25 May 2013

Jonas Smedegaard: FreedomBox - Helps You Stay Free!

On saturday 25. of May I gave a talk about FreedomBox at the "Claim back your device" track of LinuxTag in Berlin. LinuxTag is a fairly big annual conference about (yes, you guessed right) Linux and related topics. The FreedomBox is a project to help non-geeks care about their personal privacy when online, same ways as geeks have practiced for a decade or more. Concrete goal is to design a small, cheap physical box similar to an internet gateway or wifi router but with three additions: "Privacy" is commonly mistaken as "secrecy": Privacy is to keep you in control of your information, so that sharing or keeping to yourself is truly your own choice. Thanks a lot especially to Matthias Kirschner for inviting me as a speaker! Slides (sources) for the event.

22 May 2013

Lisandro Dami&aacute;n Nicanor P&eacute;rez Meyer: Debian/Ubuntu packages caching and mobile workstations

Not so long ago I read Dmitrijs' blog post on how to configure apt-cacher-ng to advertise it's service using avahi. As I normally use my laptop in my home and at work, and both networks have apt-cacher-ng running, I decided to give it a try.
I have been administering apt-cacher-ng for three networks so far, and I really find it a useful tool. Then, thanks to the aforementioned blog post, I discovered squid-deb-proxy. I don't use squid, so it's not for my normal use case, but some people will surely find it interesting.

But I found it's client package to be really interesting. It will discover any service providing _apt_proxy._tcp through avahi and let apt use it. But then the package wasn't available in Debian. So, I contacted Michael Vogt to see if he was interested in putting at least the client in Debian's archive. He took the opportunity to upload the full squid-deb-proxy, so thanks a lot Michael :-)

I then filled a wishlist bug against apt-cacher-ng to provide the avahi configuration for publishing the service, which Eduard included in the last version of it. So thanks a lot Eduard too!

tl;dr
You know only need apt-cacher-ng >= 0.7.13-1 and avahi-daemon installed on your server and your mobile users just need squid-deb-proxy-client. Then the proxy autoconfiguration for apt will just work.

One again, thanks a lot to the respective maintainers for allowing this into Jessie :-)

Gotchas
Yes, there are still some rough edges. On one of the networks I'm behind a proxy. While configuring my machine to use apt-cacher-ng's service as a proxy trough apt.conf, apt-listbugs would just work. But now, using the service as discovered by squid-deb-proxy-client, apt-listbugs just times out. Maybe I need to fill some other bug yet...

16 May 2013

Vincent Sanders: True art selects and paraphrases, but seldom gives a verbatim translation

In my professional life I am sometimes required to provide technical support to one of our salesmen. I find this an interesting change in pace though sometimes challenging.

Occasionally I fail to clearly convey the solution we are trying to sell because of my tendency to focus on detail the customer probably does not need to understand but I think is the interesting part of the problem.

Conversely sometimes the sales people gloss over important technology choices which have a deeper impact on the overall solution. I was recently in such a situation where as part of a larger project the subject of internationalisation (you can see why it gets abbreviated to i18n) was raised.

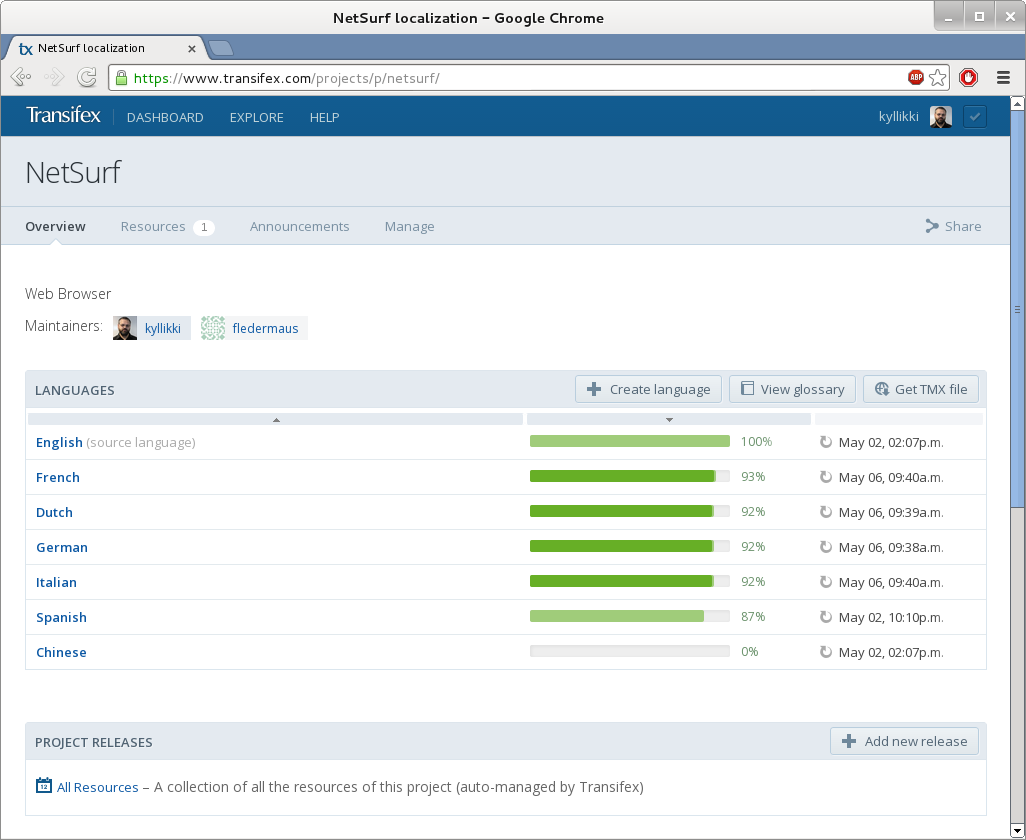
I had little direct personal experience with handling this within a project workflow so could not give any guidance but the salesman recommended the Transifex service as he had seen it used before, indicated integration was simple and we moved onto the next topic.

Unfortunately previous experience tells me that sometime in the near future someone is going to ask me hard technical questions about i18n and possibly how to integrate Transifex into their workflow (or at least give a good estimate on the work required).
LearningBeing an engineer I have few coping strategies available for situations when I do not know how something works. The approach I best know how to employ is to give myself a practical crash course and write up what I learned...so I did.

I proceeded to do all the usual things you do when approaching something unfamiliar (wikipedia, google, colleagues etc.) and got a basic understanding of internationalisation and localisation and how they fit together.

This enabled me to understand that the Transifex workflow proposed only covered the translation part of the problem and that, as Aldrich observed in my title quote, there is an awful lot more to translation than I suspected.
PlatformsMy research indicated that there are numerous translation platforms available for both open source and commercial projects and Transifex is one of many solutions.

Although the specific platform used was Transifex most of these observations apply to all these other platforms. The main lesson though is that all platforms are special snowflakes and once a project invests effort and time into one platform it will result in the dreaded lock in. The effort to move to another platform afterwards is at least as great as the initial implementation.

It became apparent to me that all of these services, regardless of their type, boil down to a very simple data structure. They appear to be a trivial table of Key:Language:Value wrapped in a selection of tools to perform format conversions and interfaces to manipulate the data.

There may be facilities to attach additional metadata to the table such as groupings for specific sets of keys (often referred to as resources) or translator hints to provide context but the fundamental operation is common.

The pseudo workflow is:
The first three steps are almost always performed together by the uploading of a resource file containing an initial set of translations in the "default" language and due to the world being the way it is this is almost always english (some services are so poorly tested with other defaults they fail if this is not the case!)

The platforms I looked at generally follow this pattern with a greater or lesser degree of freedom in what the keys are, how the groupings into resources are made and the languages that can be used. The most common issue with these platforms (especially open source ones) is that the input convertors will only accept a very limited number of formats and often restricted to just GNU gettext PO files. This means that to use those platforms a project would have to be able to convert any internal resources into gettext translatable format.

The prevalence of the PO format pushes assumptions into almost every platform I examined, mainly that a resource is for a single language translation and that the Key (msgid in gettext terms) is the untranslated default language string in the C locale.

The Transifex service does at least allow for the Key values to be arbitrary although the resources are separated by language.

Even assuming a project uses gettext PO files and UTF-8 character encoding (and please can we kill every other character encoding and move the whole world to UTF-8) the tools to integrate the import/export into the project must be written.

A project must decide some pretty important policies, including:
These are project policy decisions and, as I discovered, just as difficult to answer as the technical challenges.

Armed with my basic understanding it was time to move on and see how the transifex platform could be integrated into a real project workflow.
ImplementingProof of conceptMy first exercise was to take a trivial command line tool, use xgettext to generate a PO file and add the relevant libintl calls to produce gettext internationalised tool.

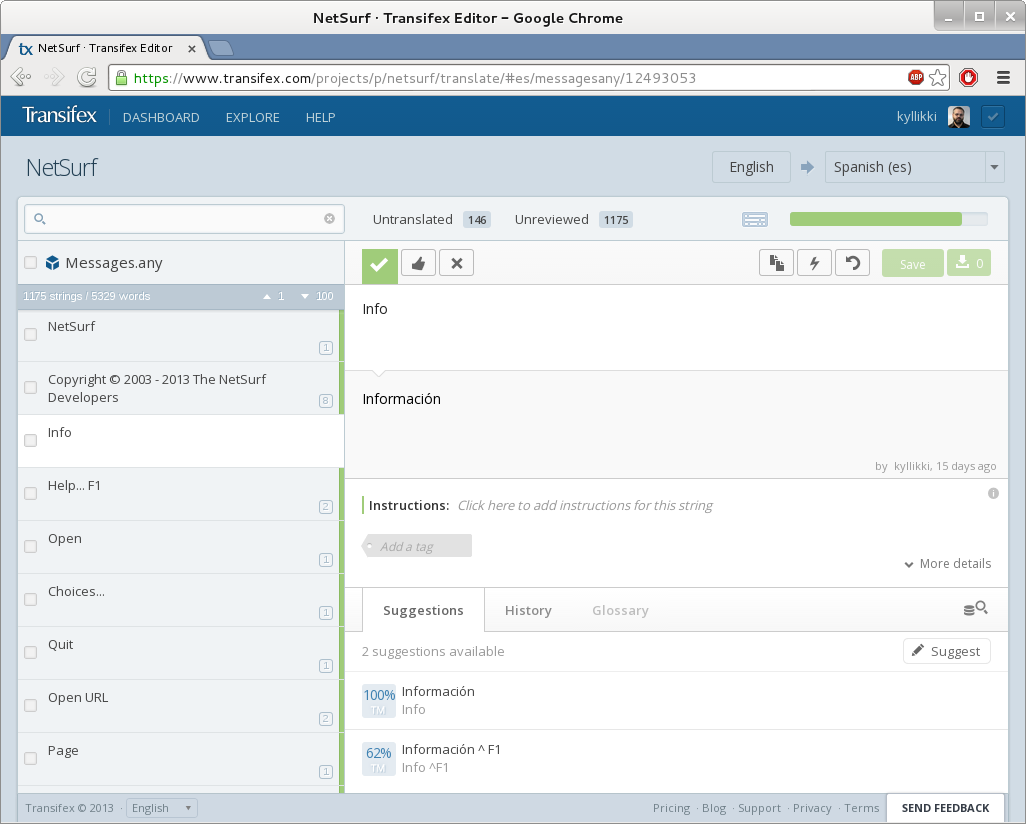
A transifex project was created and the english po file uploaded as the initial resource. A french language was added and the online editor used to provide translations for some strings. The PO resource file for french was exported and the tool executed with LANGUAGE=fr and the french translation seen.

This proved the trivial workflow was straightforward to implement. It also provided insight into the need to automate the process as the manual website operation would soon become exceptionally tedious and error prone.
Something more usefulTo get a better understanding of a real world workflow I needed a project that:
I selected the NetSurf web browser as it best fit this list.

Internally NetSurf keeps all the translated messages in a simple associative array this is serialised to an equally straightforward file named FatMessages. The file is UTF-8 encoded with keys separated from values by a colon. The Key is constrained to be ASCII characters with no colons and is structured as language.toolkit.identifier and is unique on identifier part alone.

This file is processed at build time into a simple identifier:value dictionary for each language and toolkit.

Transifex can import several resource formats similar to this, after experimenting with YAML and Android Resource format I immediately discovered a problem, the services import and export routines were somewhat buggy.

These routines coped ok with simple use cases but having more complex characters such as angle brackets and quotation marks in the translated strings would completely defeat the escaping mechanisms employed by both these formats (through entity escaping in android resource format XML is problematic anyway)

Finally the Java property file format was used (with UTF-8 encoding) which while having bugs in the import and export escaping these could at least be worked around. The existing tool that was used to process the FatMessages file was rewritten to cope with generating different output formats and a second tool to merge the java property format resources.

To create these two tools I enlisted the assistance of my colleague Vivek Dasmohapatra as his Perl language skills exceeded my own. He eventually managed to overcome the format translation issues and produce correct input and output.

I used the Transifex platforms free open source product, created a new project and configured it for free machine translation from the Microsoft service, all of which is pretty clearly documented by Transifex.

Once this was done the messages file was split up tinto resources for the supported languages and uploaded to the transifex system.

I manually marked all the uploaded translations as "verified" and then added a few machine translations to a couple of languages. I also created spanish as a new language and machine translated most of the keys.

The resources for each language were then downloaded and merged and the resulting FatMessages file checked for differences and verified only the changes I expected appeared.

I quickly determined that manually downloading the language resources every time was not going to work with any form of automation, so I wrote a perl script to retrieve the resources automatically (might be useful for other projects too).

Once these tools were written and integrated into the build system I could finally make an evaluation as to how successful this exercise had been.
ConclusionsThe main things I learned from this investigation were:

Overall I think the final observation has to be that integrating translation services is not a straightforward operation and each project has unique challenges and requirements which reduce the existing platforms to compromise solutions.

13 May 2013

Daniel Pocock: Get WebRTC going fast

A question that comes up more and more these days: what's the quickest way to try WebRTC and see it working? How can a web developer start experimenting with WebRTC in their blog or demo site? Good news: it's no longer necessary to compile anything from source - and many of the components are available on Debian-based systems (including Ubuntu) or RPM-based solutions like Fedora A quick look at how easy it is, explanation below:
# apt-get update
# apt-get install -t experimental repro resiprocate-turn-server
# apt-get install -t unstable chromium sipml5-web-phone
# cd /var/www && mkdir jssip && cd jssip
# wget -r -nH http://tryit.jssip.net
# vi /etc/repro/repro.config
# vi /etc/reTurnServer.config
# vi /var/www/jssip/js/custom.REMOVE_THIS.js
and then try browsing to /jssip or /sipml5-web-phone Start with a SIP proxy As explained in the RTC Quick Start guide for regular RTC, a SIP proxy is a clean and simple component to start with. The same is true for WebRTC: start with a proxy. There are two I'll emphasize here:
  • repro from reSIProcate is quick and easy to set up and has built in TLS support. A 1.9 alpha release with WebSocket support for WebRTC has just been uploaded to Debian experimental and is ready to use on wheezy. RPM users just need to download the alpha release tarball and use rpmbuild to get packages from it.
  • Kamailio provides very good WebRTC support too. The packages are available but due to GPL license issues must be recompiled with TLS, see the README.Debian file for details. Also feel free to try the upstream package repository for binaries that do include TLS
Get a TURN server TURN servers help media streams traverse NAT. They are very easy to set up, but must have real IP addresses. Put the JavaScript in the web server Adding WebRTC to a web site can be as simple as cutting and pasting some JavaScript code into the HTML. Three working samples to start with: Browser Users need a recent browser. The latest Chromium packages in Debian are based on Google Chrome M26 code and this should work. Help and support Please come and ask on the users mailing lists or IRC channels for any of the packages mentioned here.

12 May 2013

Gregor Herrmann: RC bugs 2013/19

after the release is before the release. this week I started to pick up my RC bug squashing activities again. first results: besides that I've also started to look at the "FTBFS with perl 5.18 in experimental" bugs which are not RC yet. yes, perl 5.18 is already in experimental!

11 May 2013

Joachim Breitner: How to play Rock-Paper-Scissors online?

There was an interesting question by Fool recently on the StackExchange site for Boardgames: How do you play a game like Rock-Paper-Scissors with friends online? Or any other game where players have to simultaneously submit their moves (e.g. Diplomacy, or Rock-Paper-Scissors-Lizzard-Spock), which, as I just learned, are simultaneous action selection games. While there are websites dedicated to playing specific games, such as webdiplomacy.net, we could not find a generic one that you can use if you, for example, invent your own variants of a game.
So I created one: At you-say-first.nomeata.de you can enter rooms and share the URL with your friends. On the one hand, you have a regular chat room there. But there is also the possibility to enter moves (whatever a move may be to you) and only when all players have done that and marked the move as final, it is shown to everyone. If you want to try it out: There is an integrated, not very fancy Rock-Paper-Scissors-playing bot. Just enter a room, join and say I want to play!
Note that this site can be used for more than just for games. Have you ever observed that persons would often want other to express their preference (e.g. where to dine) first to not reveal their own preference, so that they can (or pretend to) change their mind if they would contradict? In such situations simultaneous action selection can be a fairer method. A technical note: I created this web app using meteor (a JavaScript framework building on node.js and MongoDB that allows for reactive programming), and it is also hosted on meteor.com. I chose Meteor after someone mentioned Firebase to me, which looked very slick, but was not Free Software, so I looked for alternatives. I did not do any cross-browser-testing, and the UI design could be improved, so if you want to help out (or just complain), please use the GitHub code repository and issue tracker.

10 May 2013

Julien Danjou: Rant about Github pull-request workflow implementation

One of my recent innocent tweet about Gerrit vs Github triggered much more reponses and debate that I expected it to. I realize that it might be worth explaining a bit what I meant, in a text longer than 140 characters. <script async="async" charset="utf-8" src="http://platform.twitter.com/widgets.js"></script> The problems with Github pull-requests I always looked at Github from a distant eye, mainly because I always disliked their pull-request handling, and saw no value in the social hype it brings. Why? One click away isn't one click effort The pull-request system looks like an incredible easy way to contribute to any project hosted on Github. You're a click away to send your contribution to any software. But the problem is that any worthy contribution isn't an effort of a single click. Doing any proper and useful contribution to a software is never done right the first time. There's a dance you will have to play. A slowly rhythmed back and forth between you and the software maintainer or team. You'll have to dance it until your contribution is correct and can be merged. But as a software maintainer, not everybody is going to follow you on this choregraphy, and you'll end up with pull-request you'll never get finished unless you wrap things up yourself. So the gain in pull-requests here, isn't really bigger than a good bug report in most cases. This is where the social argument of Github isn't anymore. As soon as you're talking about projects bigger than a color theme for your favorite text editor, this feature is overrated. Contribution rework If you're lucky enough, your contributor will play along and follow you on this pull-request review process. You'll make suggestions, he will listen and will modify his pull-request to follow your advice. At this point, there's two technics he can use to please you. Technic #1: the Topping Github's pull-requests invite you to send an entire branch, eclipsing the fact that it is composed of several commits. The problem is that a lot of one-click-away contributors do not masterize Git and/or do not make efforts to build a logical patchset, and nothing warns them that their branch history is wrong. So they tend to change stuff around, commit, make a mistake, commit, fix this mistake, commit, etc. This kind of branch is composed of the whole brain's construction process of your contributor, and is a real pain to review. To the point I quite often give up. <figure> <figcaption> A typical case: 3 commits to build a 4 lines long file. </figcaption> </figure> Without Github, the old method that all software used, and that many software still use (e.g. Linux), is to send a patch set over e-mail (or any other medium like Gerrit). This method has one positive effect, that it forces the contributor to acknowledge the list of commits he is going to publish. So, if the contributor he has fixup commits in his history, they are going to be seen as first class citizen. And nobody is going to want to see that, neither your contributor, nor the software maintainers. Therefore, such a system tend to push contributors to write atomic, logical and self-contained patchset that can be more easily reviewed. Technic #2: the History Rewriter This is actually the good way to build a working and logical patchset using Git. Rewriting history and amending problematic patches using the famous git rebase --interactive trick. The problem is that if your contributor does this and then repush the branch composing your pull-request to Github, you will both lose the previous review done, each time. There's no history on the different versions of the branch that has been pushed. In the old alternative system like e-mail, no information is lost when reworked patches are resent, obviously. This is far better because it eases the following of the iterative discussions that the patch triggered. Of course, it would be possible for Github to enhance this and fix it, but currently it doesn't handle this use case correctly.. <figure> <figcaption> Exercise for the doubtful readers: good luck finding all revisions of my patch in the pull-request #157 of Hy.</figcaption> </figure> A quick look at OpenStack workflow It's not a secret for anyone that I've been contributing to OpenStack as a daily routine for the last 18 months. The more I contribute, the more I like the contribution workflow and process. It's already well and longly described on the wiki, so I'll summarize here my view and what I like about it. Gerrit To send a contribution to any OpenStack project, you need to pass via Gerrit. This is way simpler than doing a pull-request on Github actually, all you have to do is do your commit(s), and type git review. That's it. Your patch will be pushed to Gerrit and available for review. Gerrit allows other developers to review your patch, add comments anywhere on it, and score your patch up or down. You can build any rule you want for the score needed for a patch to be merged; OpenStack requires one positive scoring from two core developers before the patch is merged. Until a patch is validated, it can be reworked and amended locally using Git, and then resent using git review again. That simple. The historic and the different version of the patches are available, with the whole comments. Gerrit doesn't lose any historic information on your workflow. Finally, you'll notice that this is actually the same kind of workflow projects use when they work by patch sent over e-mail. Gerrit just build a single place to regroup and keep track of patchsets, which is really handy. It's also much easier for people to actually send patch using a command line tool than their MUA or git send-email. Gate testing Testing is mandatory for any patch sent to OpenStack. Unit tests and functionnals test are run for each version of each patch of the patchset sent. And until your patch passes all tests, it will be impossible to merge it. Yes, this implies that all patches in a patchset must be working commits and can be merged on their own, without the entire patchset going in! With such a restricution, it's impossible to have "fixup commits" merged in your project and pollute the history and the testability of the project. Once your patch is validated by core developers, the system checks that there is not any merge conflicts. If there's not, tests are re-run, since the branch you are pushing to might have changed, and if everything's fine, the patch is merged. This is an uncredible force for the quality of the project. This implies that no broken patchset can ever sneak in, and that the project pass always all tests. Conclusion: accessibility vs code review In the end, I think that one of the key of any development process, which is code review, is not well covered by Github pull-request system. It is, along with history integrity, damaged by the goal of making contributions easier. Choosing between these features is probably a trade-off that each project should do carefully, considering what are its core goals and the quality of code it want to reach. I tend to find that OpenStack found one of the best trade-off available using Gerrit and plugging testing automation via Jenkins on it, and I would probably recommend it for any project taking seriously code reviews and testing.
26 April 2013

Vincent Sanders: When you make something, cleaning it out of structural debris is one of the most vital things you do.

Collabora recently had a problem with a project's ARM build farm. In a nice change of pace it was not that the kernel was crashing, nor indeed any of the software or hardware.
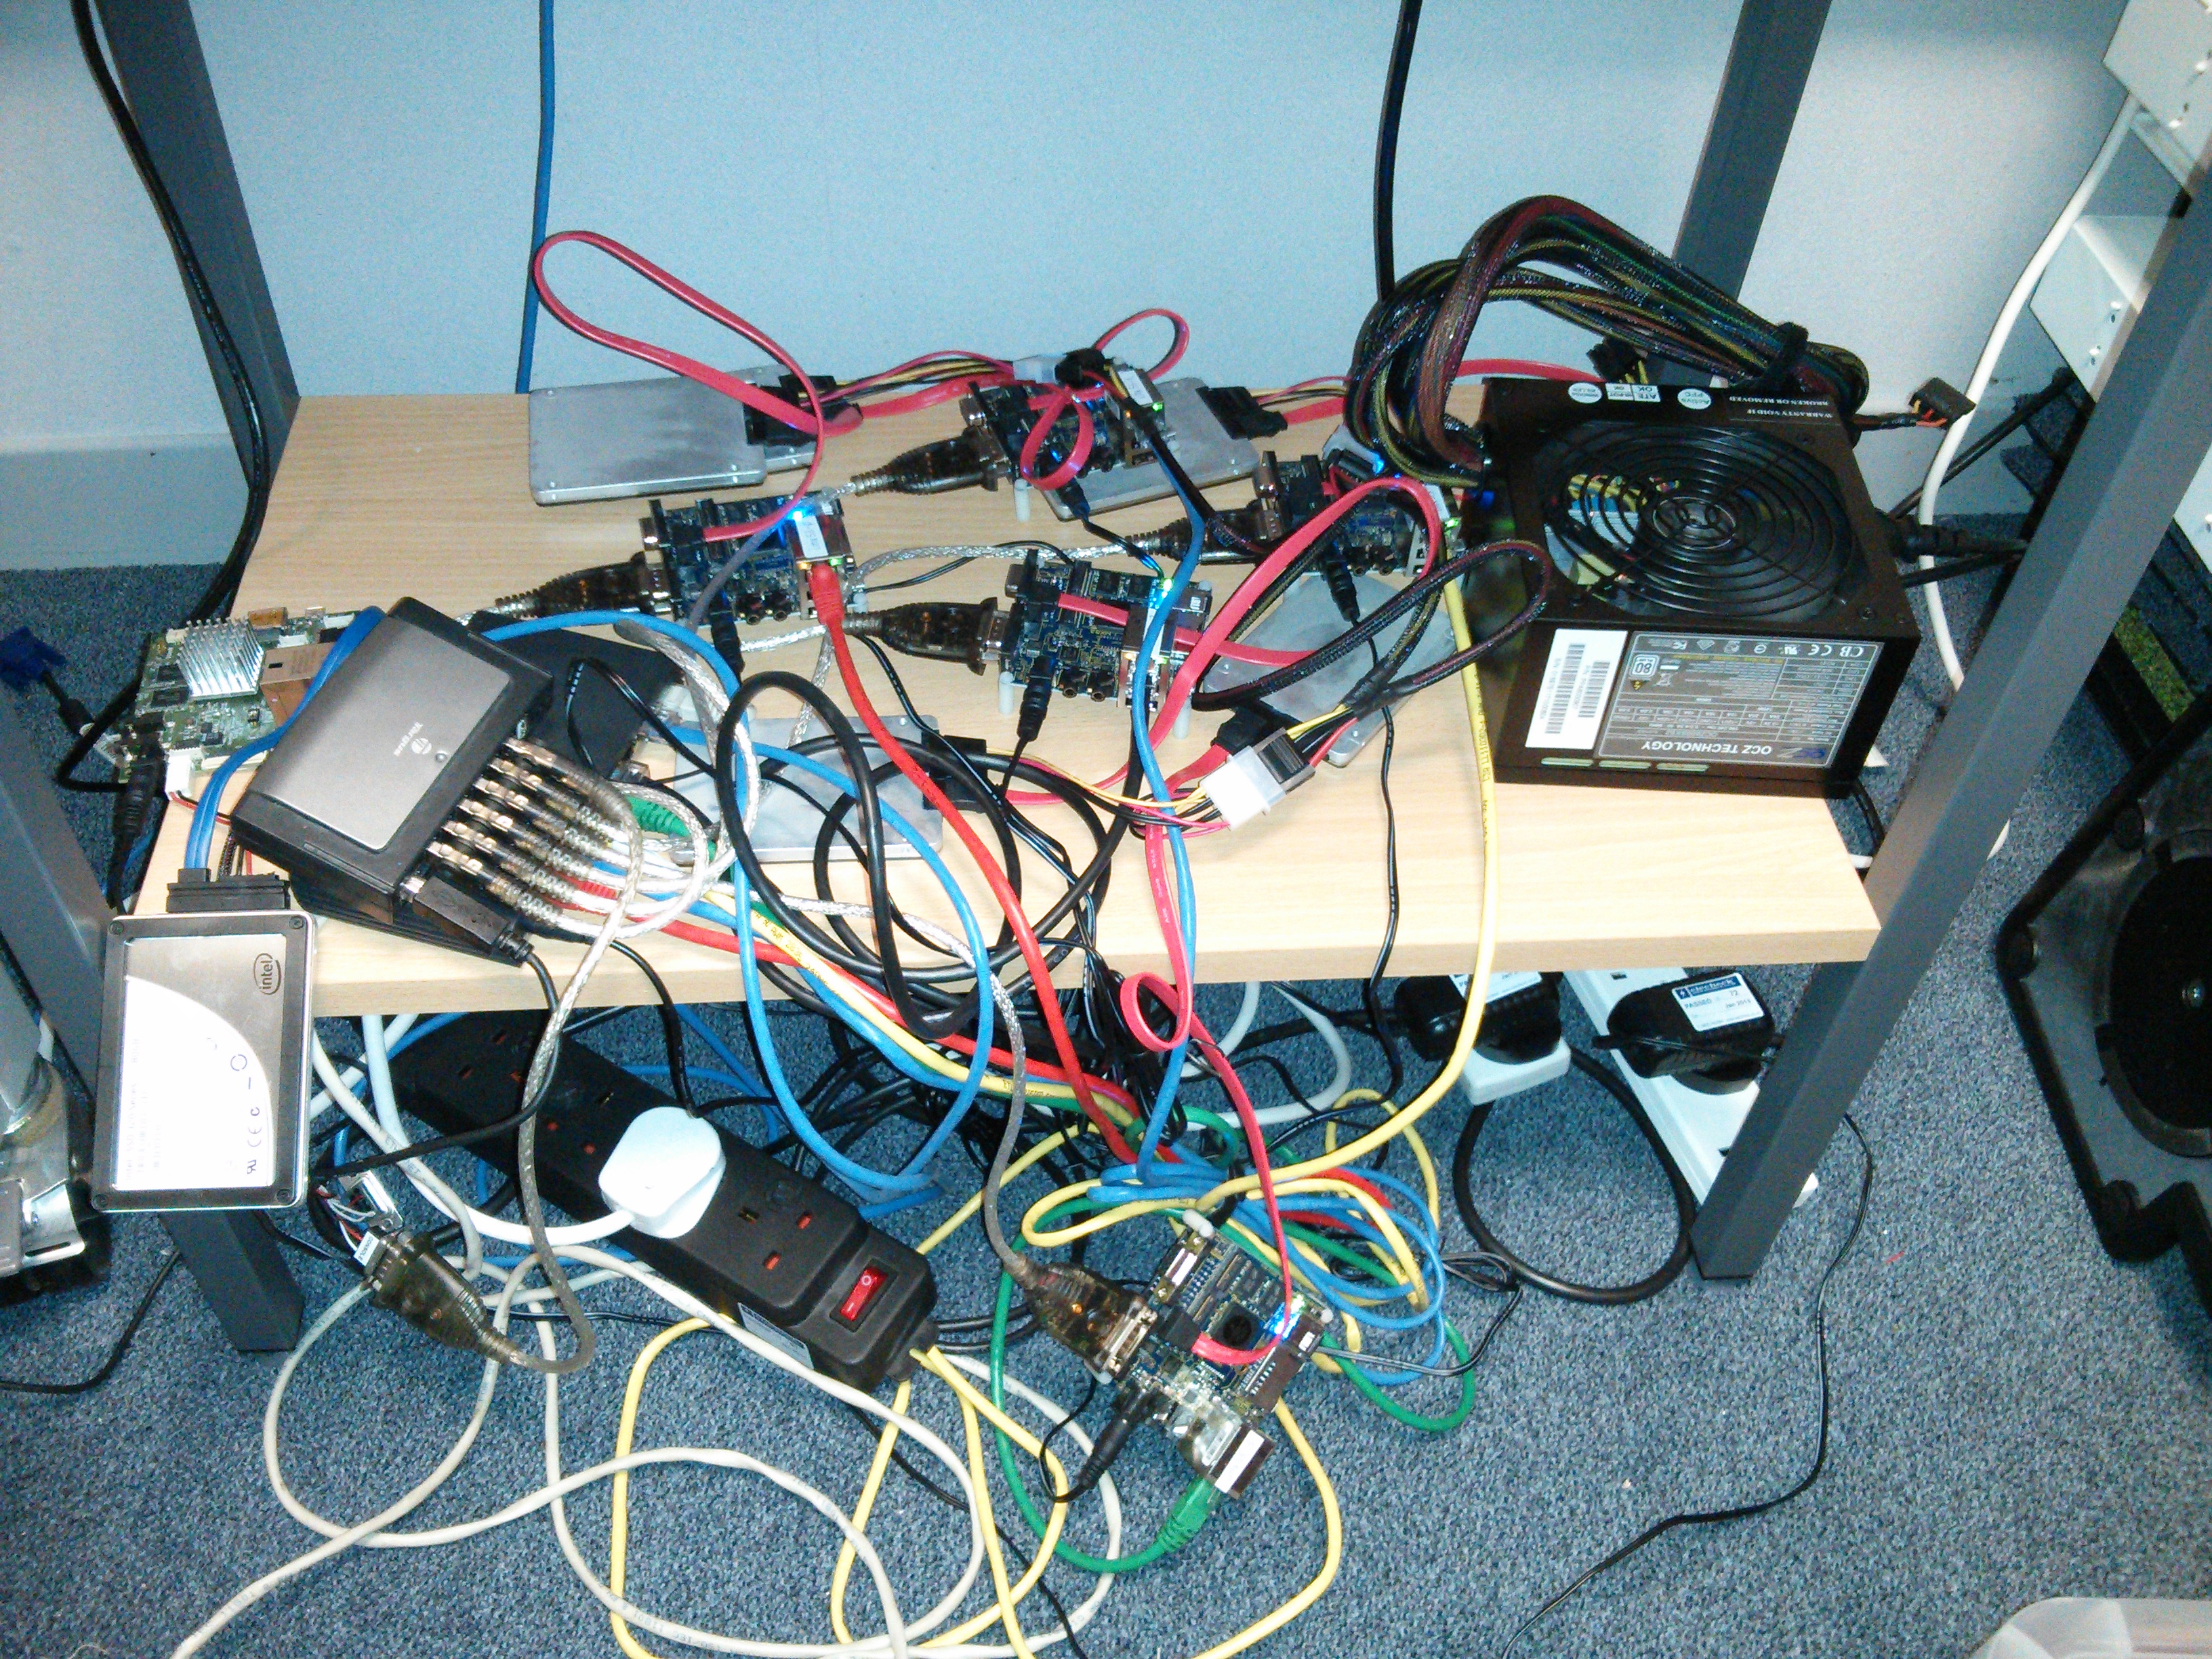
The ProblemInstead our problem was our build farm could best be described as "a pile of stuff" and we wanted to add more systems to it and have switched power control for automated testing.
Which is kinda where the Christopher Alexander quote comes into this. I suggested that I might be able to come up with a better, or at least cleaner, solution.
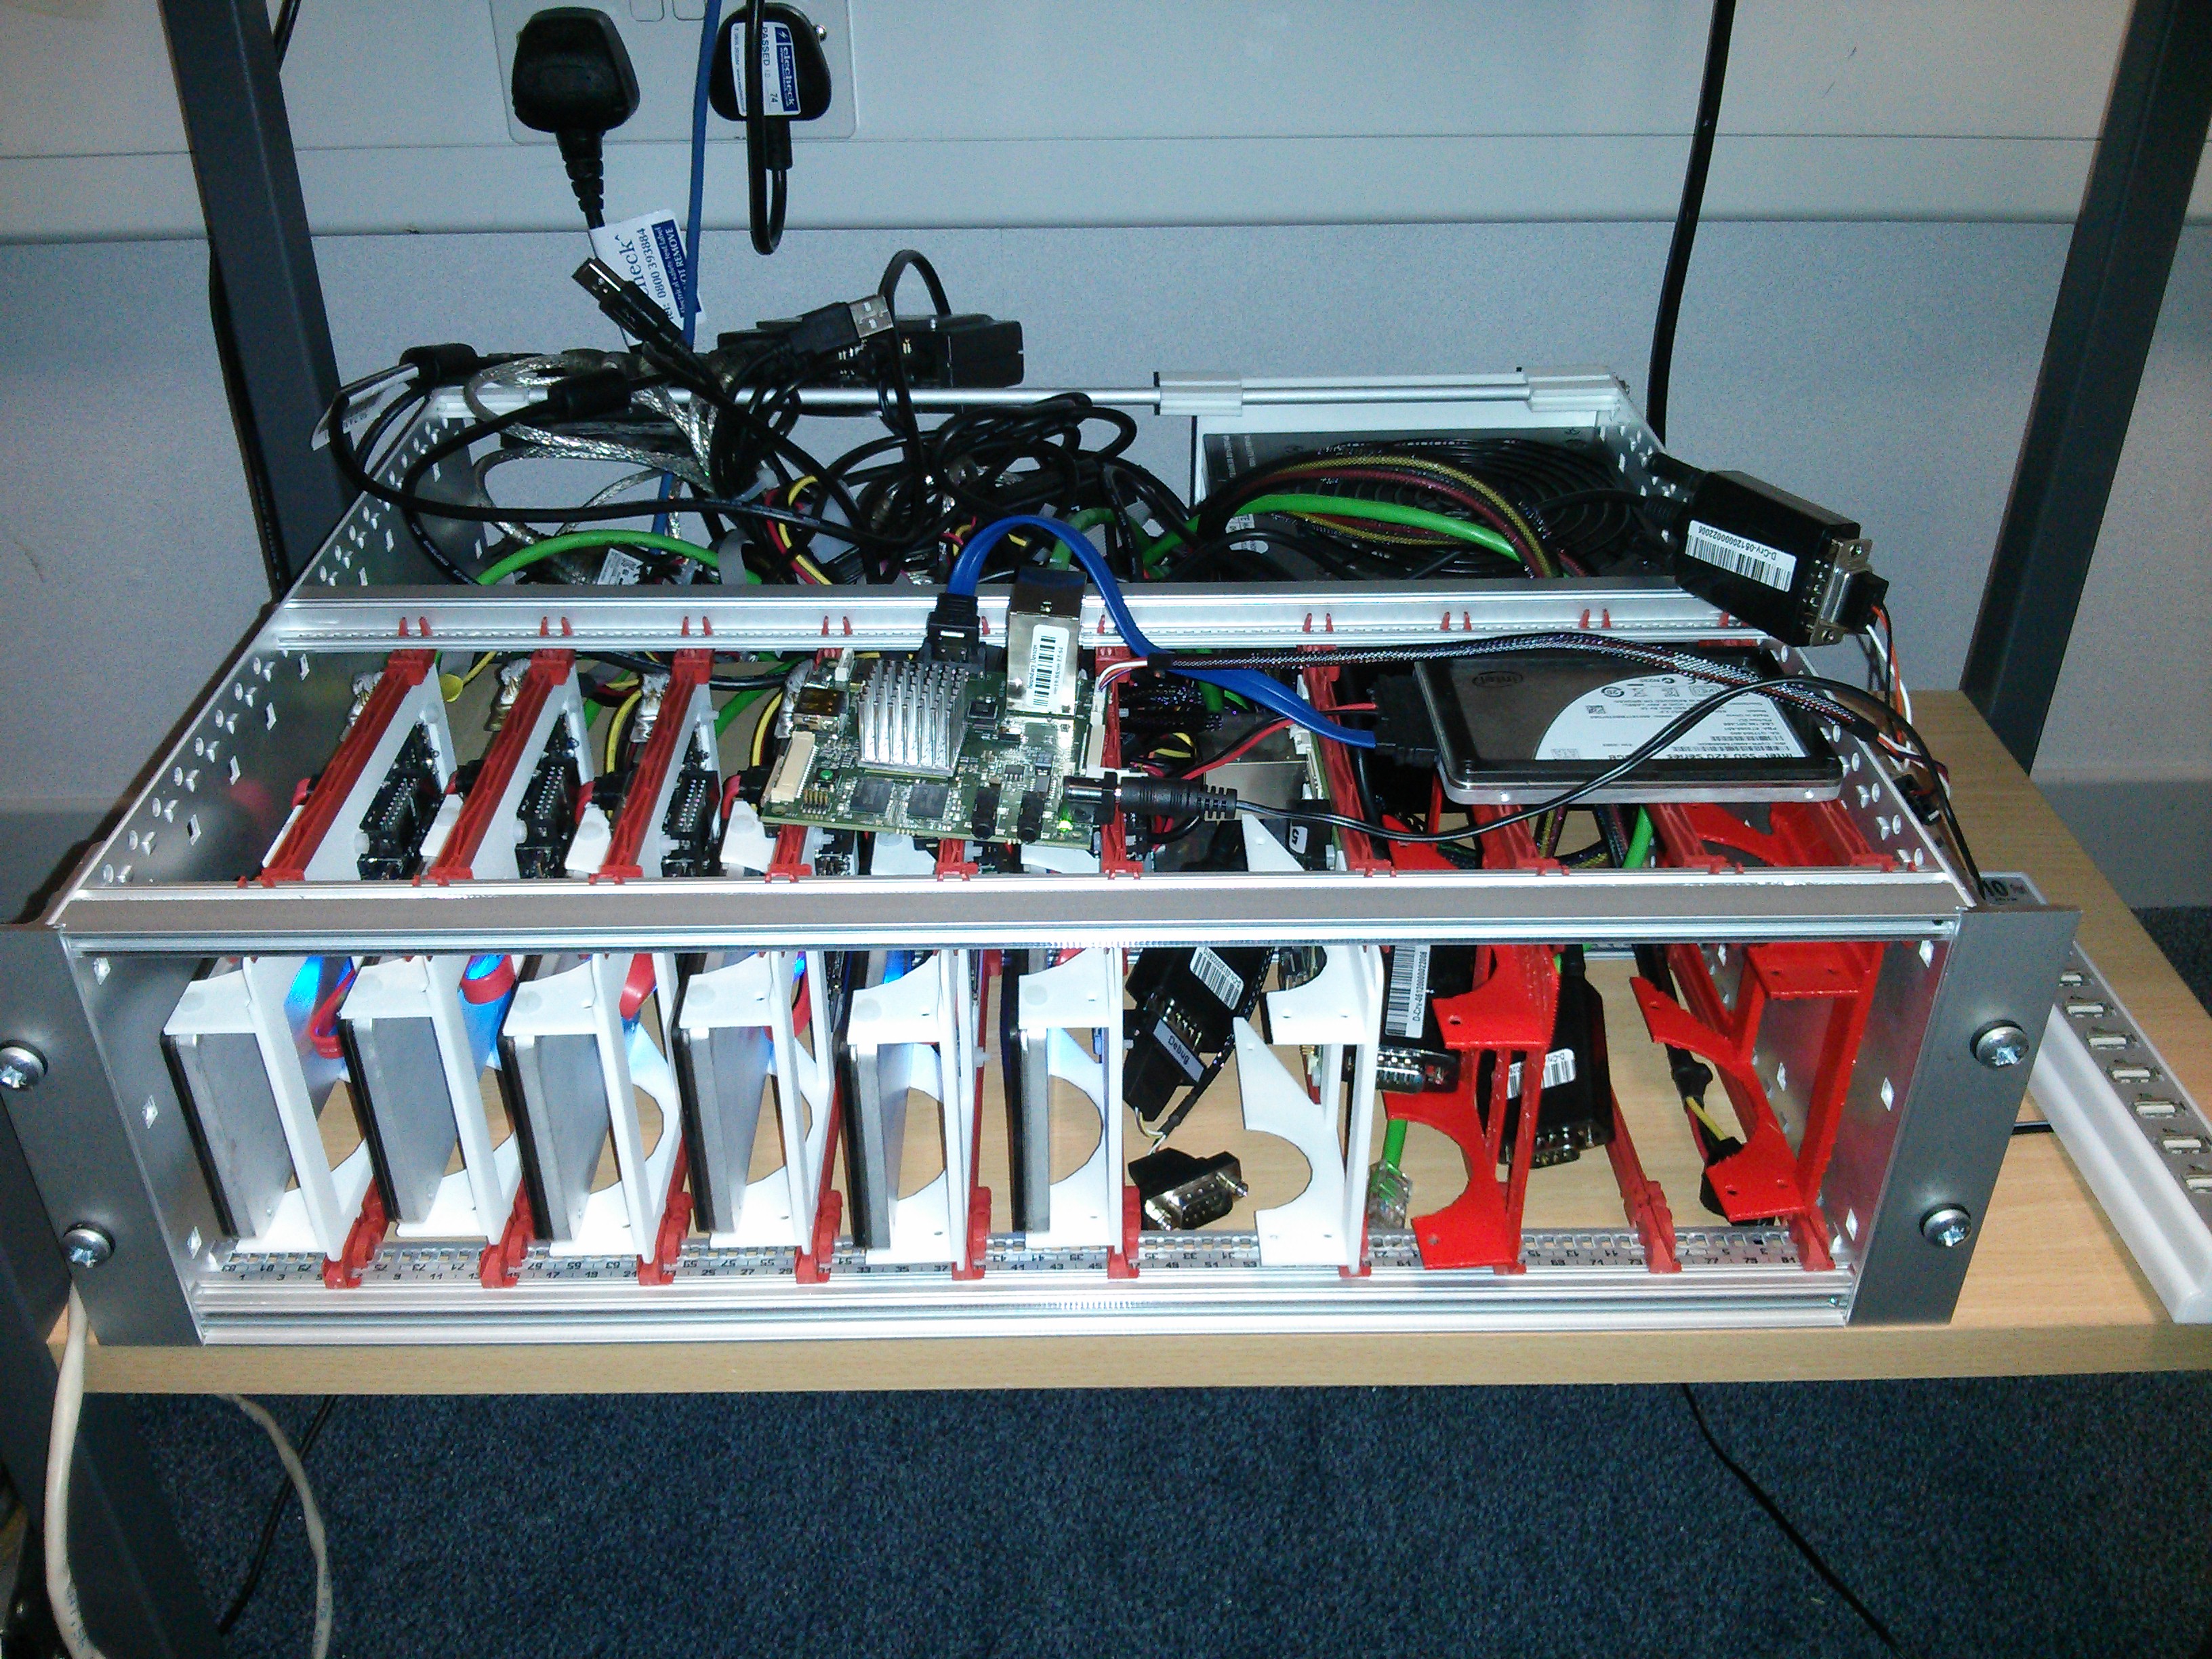
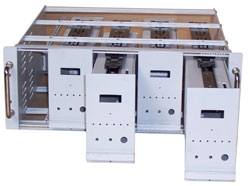
The IdeaA subrack with sub modulesPrevious experience had exposed me to the idea of using 19 inch subracks for mounting circuits inside submodules.
I originally envisaged the dev boards individually mounted inside these boxes. However preliminary investigation revealed that the enclosures were both expensive and used a lot of space which would greatly increase the rack space required to house these systems.

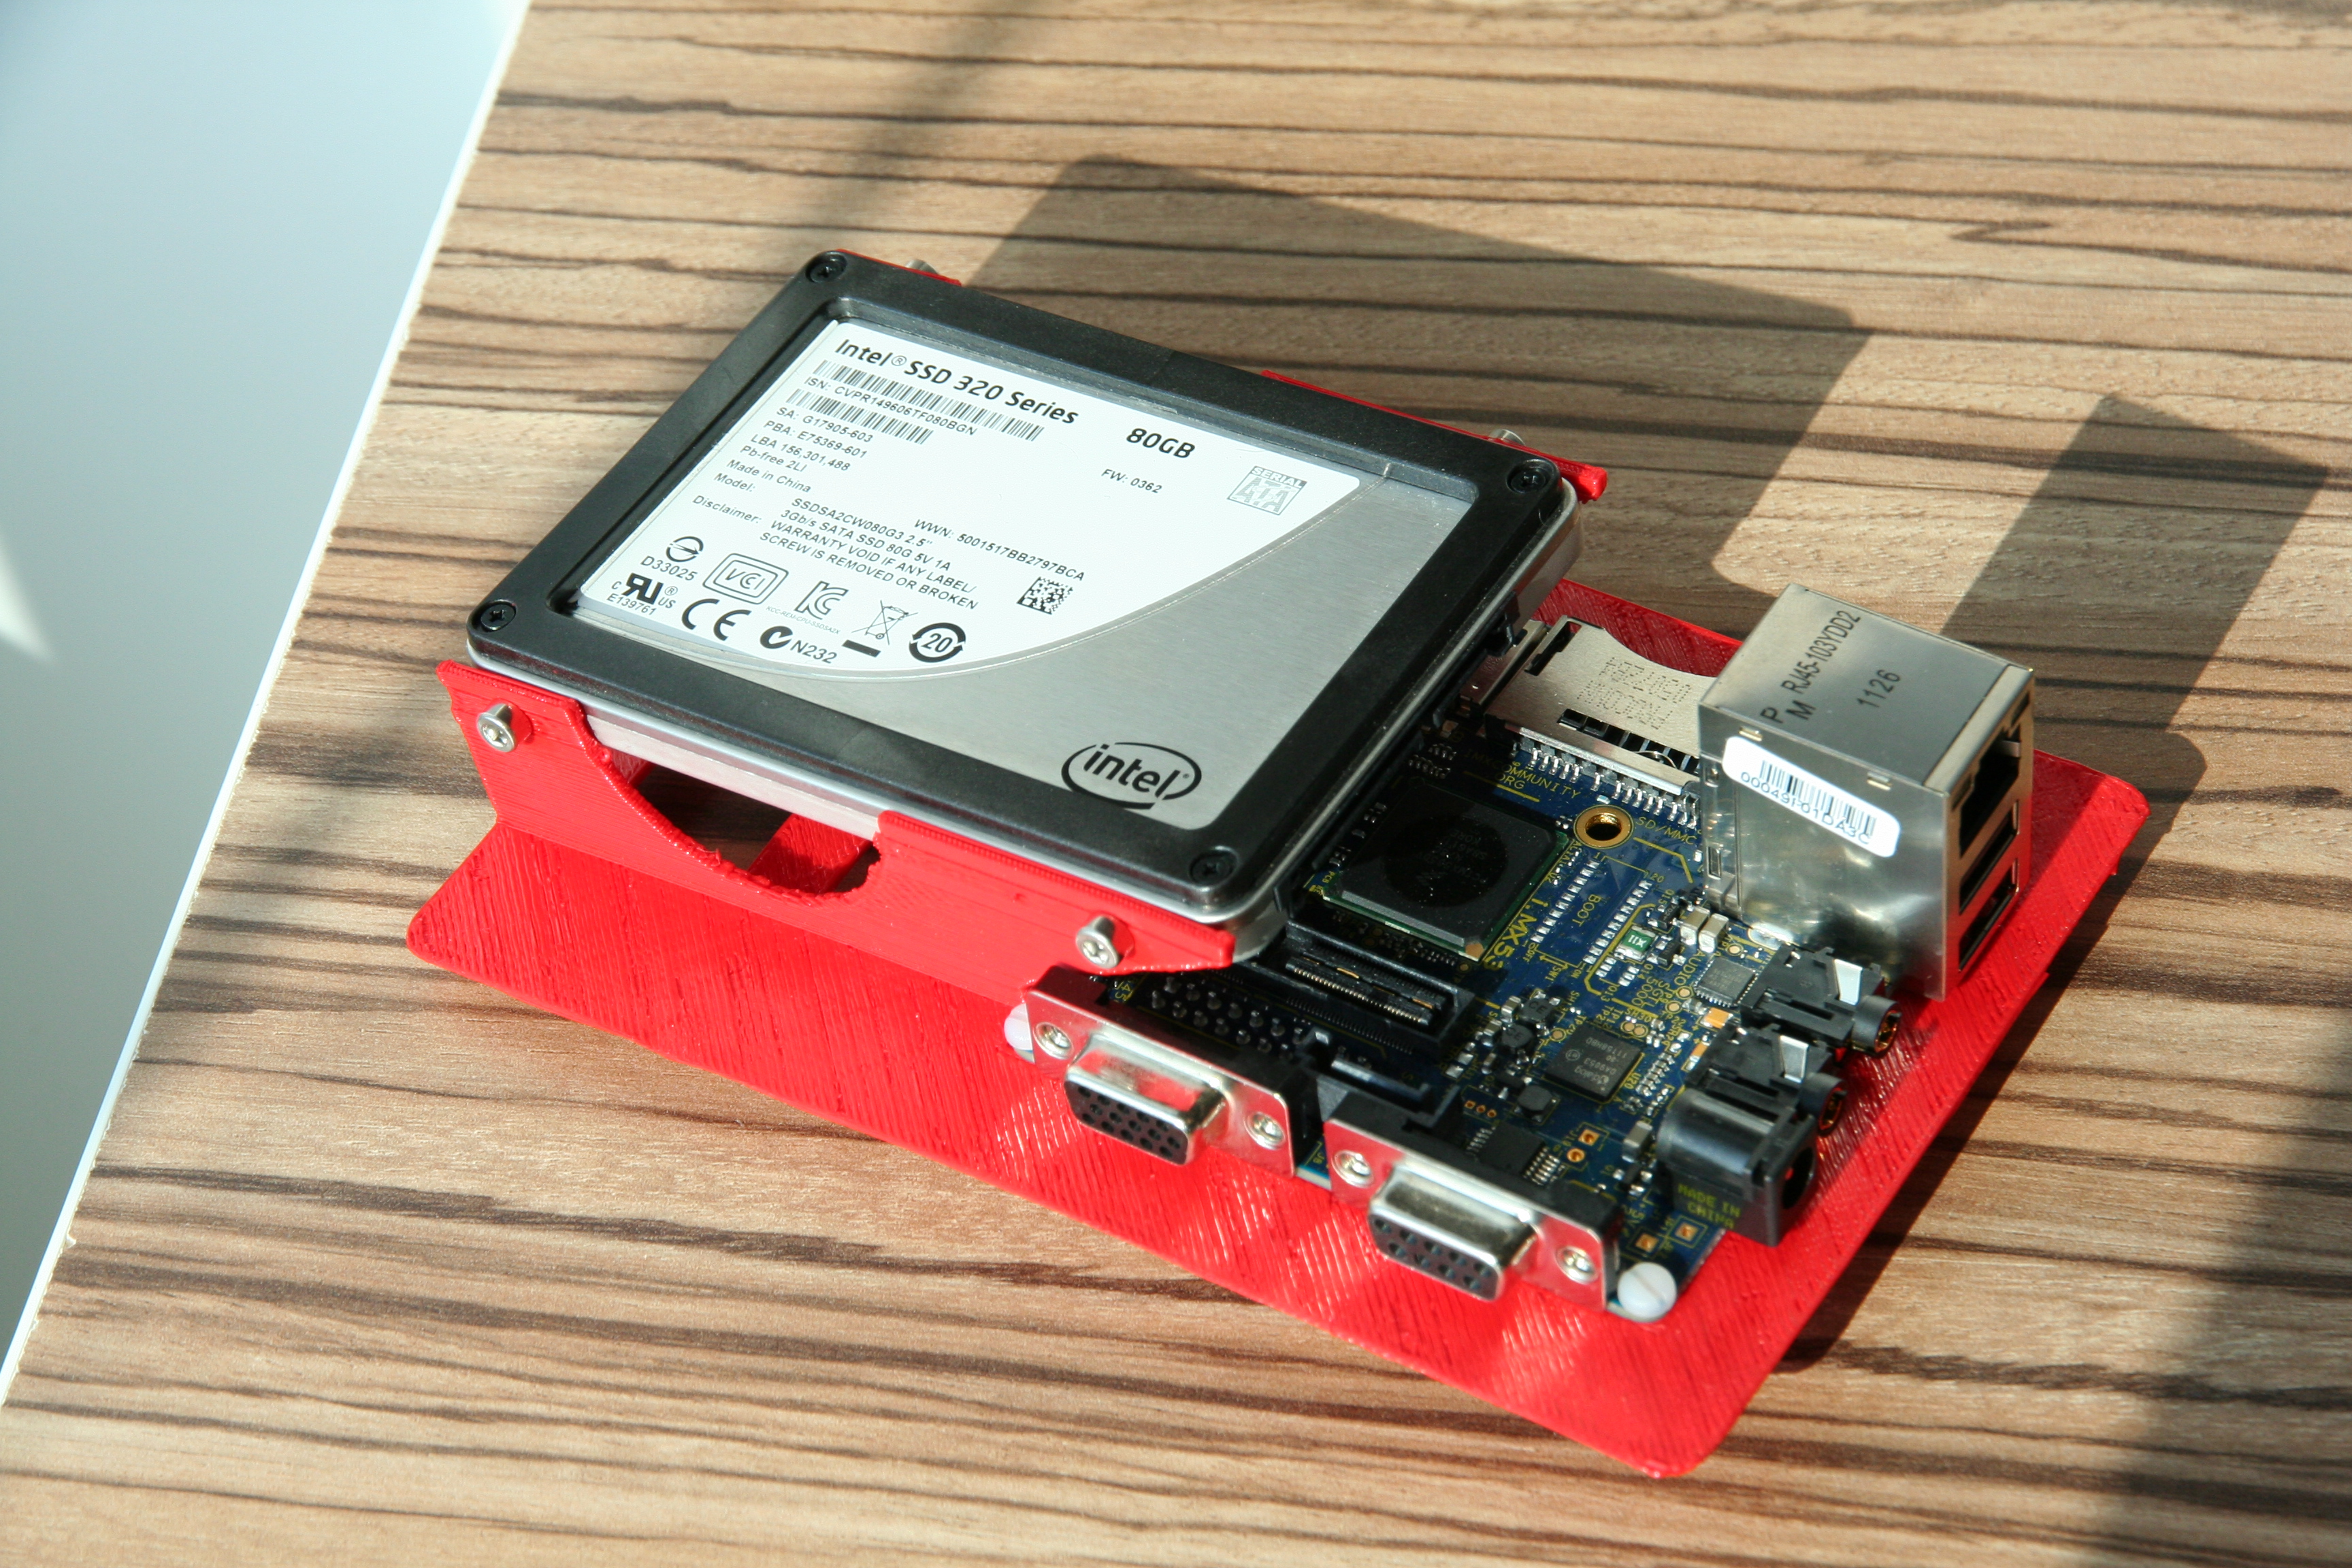
imx53 QSB eurocard carrier
I decided to instead look at eurocard type subracks with carriers for the systems. Using my 3D printer I came up with a carrier design for the imx53 QSB and printed it. I used the basic eurocard size of 100mm x 160mm which would allow the cards to be used within a 3U subrack.

Once assembled it became apparent that each carrier would be able to share resources like power supply, ethernet port and serial console via USB just as the existing setup did and that these would need to be housed within the subrack.
The Prototype
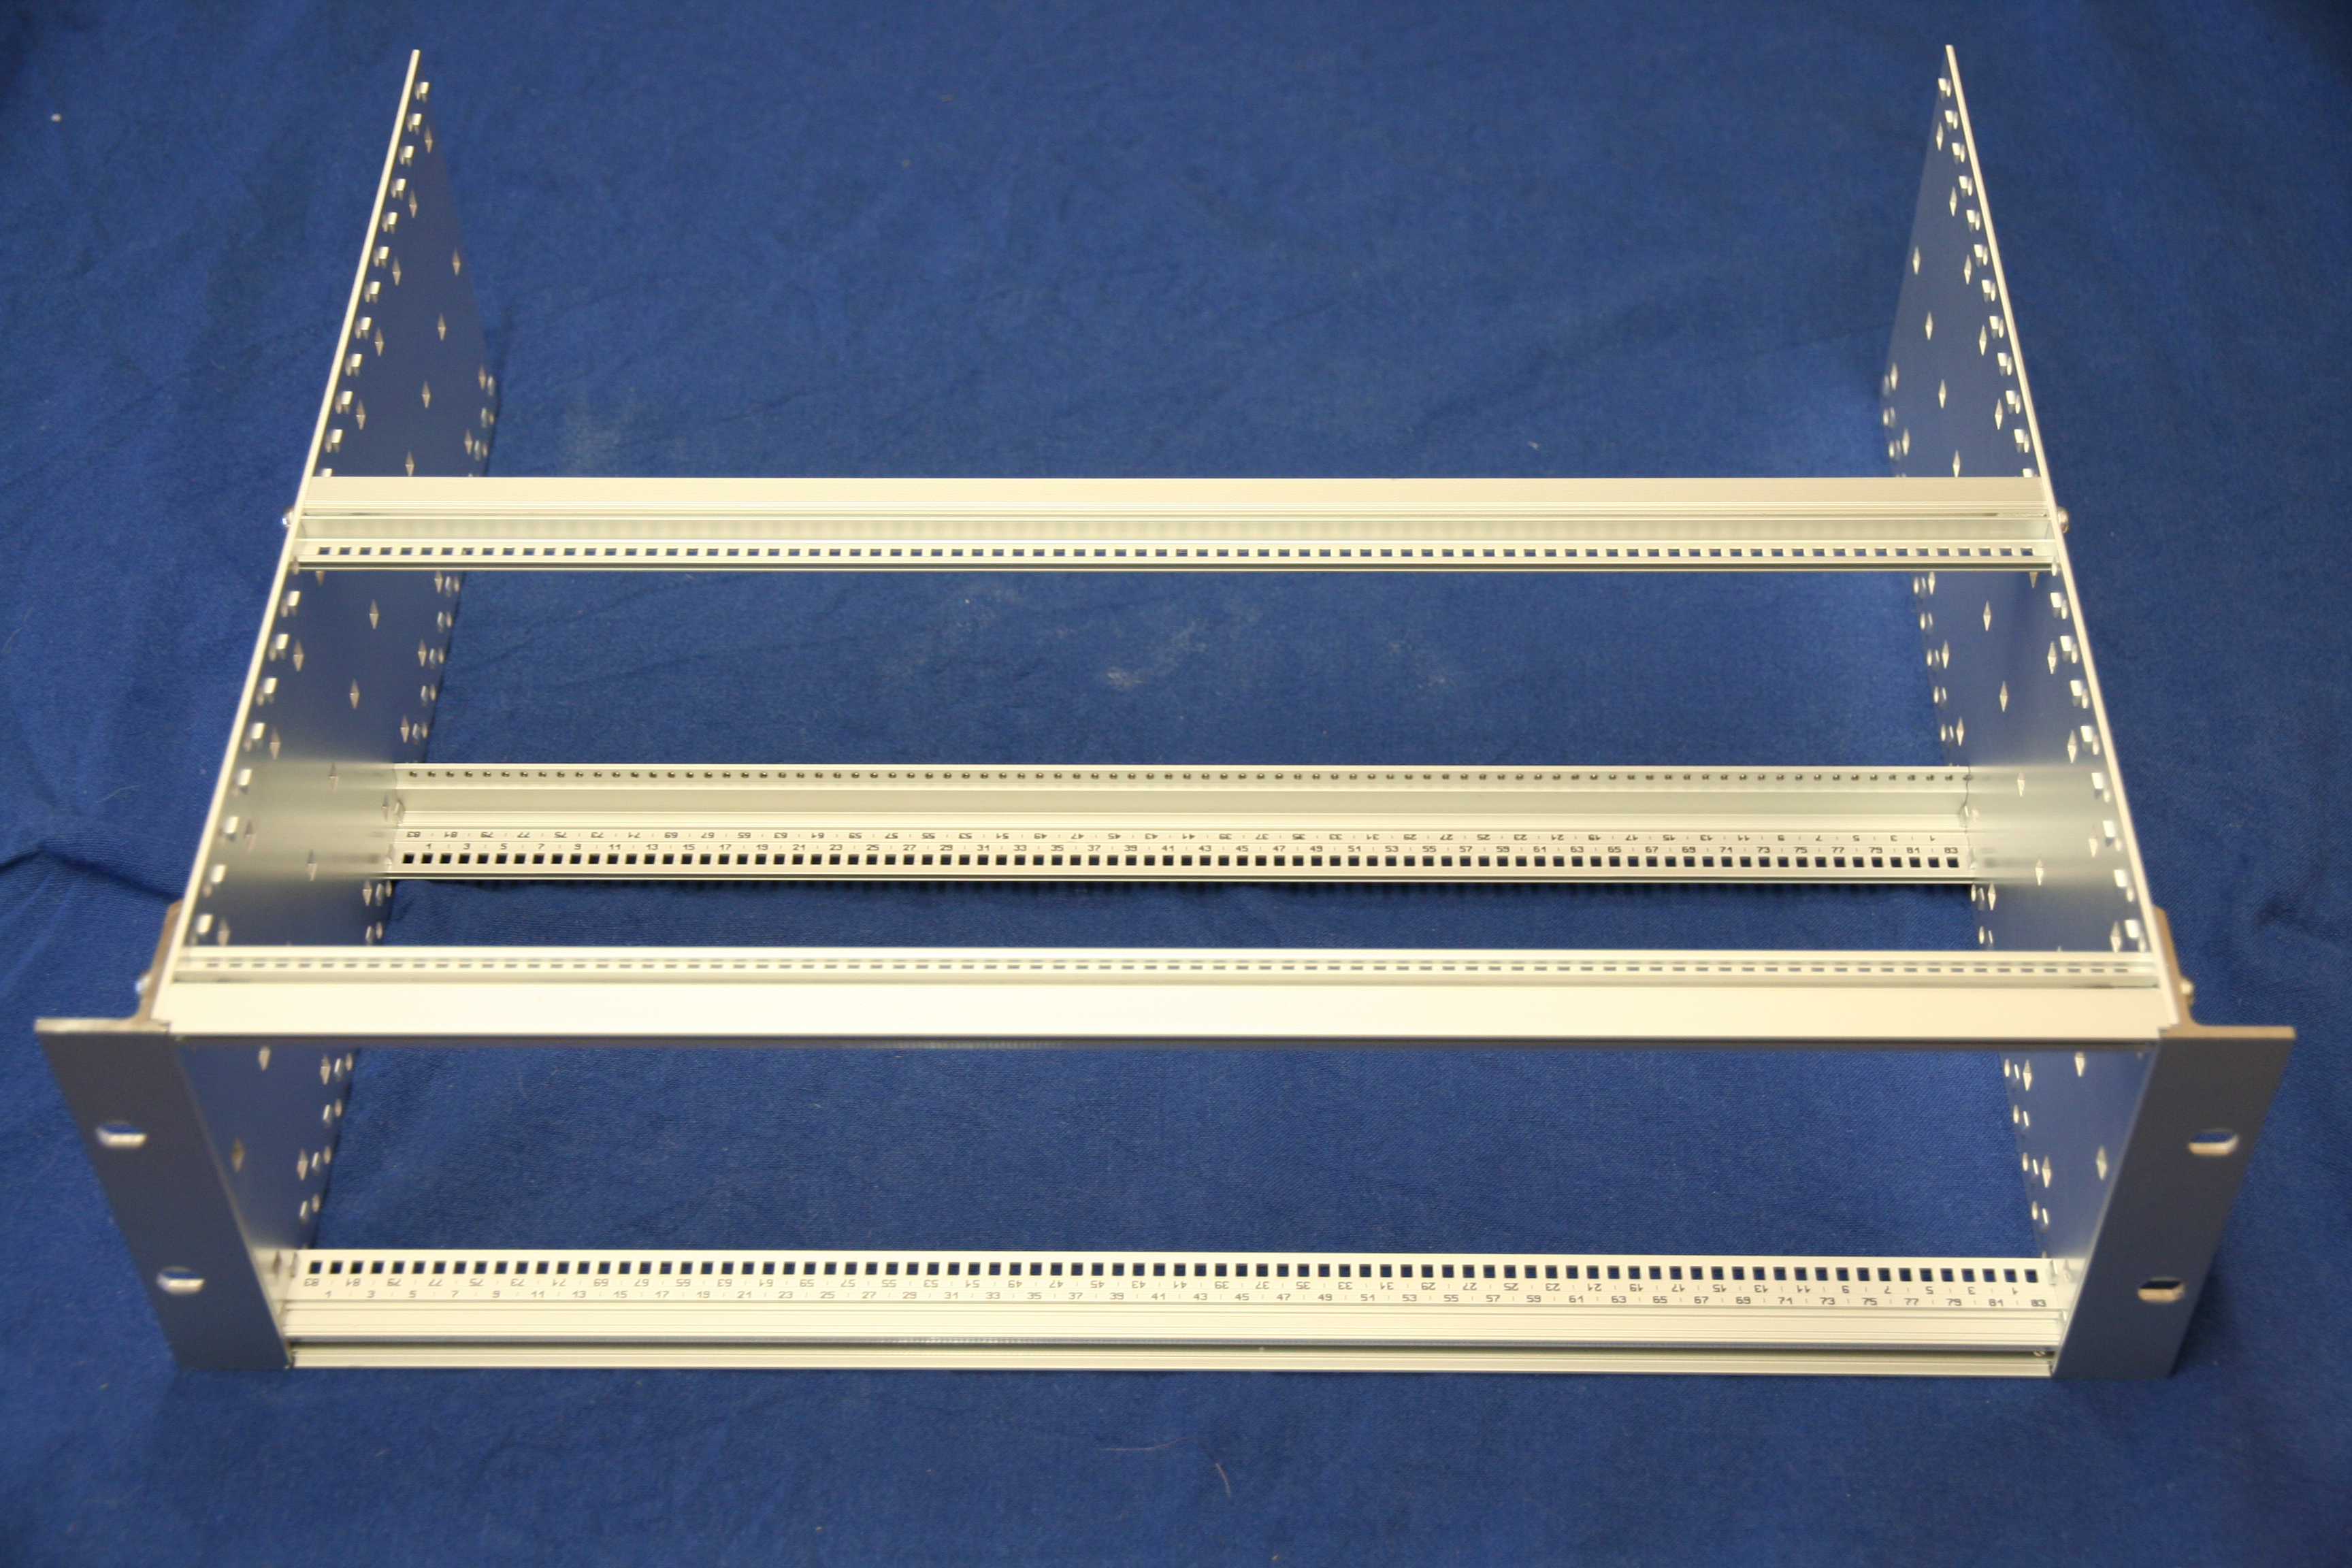
The carrier prototype was enough to get enough interest to allow me to move on to the next phase of the project. I purchased a Schroff 24563-194 subrack kit and three packs of guide rails from Farnell and assembled it.

Initially I had envisaged acquiring additional horizontal rails from Schroff which would enable constructing an area suitable for mounting the shared components behind the card area.

Rear profile for Schroff subrackUnfortunately Schroff have no suitable horizontal profiles in their catalog and are another of those companies who seem to not want to actually sell products to end users but rather deal with wholesalers who do not have their entire product range!

Printed rear profile for Schroff subrack
Undaunted by this I created my own horizontal rail profile and 3D printed some lengths. The profile is designed to allow a 3mm thick rear cover sheet attached with M2.5 mounting bolts and fit rack sides in the same way the other profiles do.

At this point I should introduce some information on how these subracks are dimensioned. A standard 19 inch rack (as defined in IEC 60297) has a width of 17.75 inches(450.85mm) between the vertical posts. The height is measured in U (1.75 inches)

A subrack must obviously fit in the horizontal gap while providing as much internal space as possible. A subrack is generally either 3 or 6 U high. The width within a subrack is defined in units called HP (Horizontal Pitch) which are 0.2 inches(5.08 mm) and subracks like the Schroff generally list 84 usable HP.

However we must be careful (or actually just learn from me stuffing this up ;-) as the usable HP is not the same thing as the actual length of the horizontal rails! The enclosures actually leave and additional 0.1 inch at either end giving a total internal width of 85HP (17 inches, 431.8 mm) which leaves 0.75 inches for the subrack sides and some clearance.

The Schroff subrack allows eurocards to be slotted into rails where the card centre line is on HP boundaries, hence we describe the width of a card in the slot in terms of HP

I cannot manufacture aluminium extrusions (I know it is a personal failing) nor produce more than 100 mm long length of the plastic profile on my printer.

Even if full lengths are purchased from a commercial service (120 euros for a pair including tax and shipping) the plastic does not have sufficient mechanical strength.

The solution I came up with was somewhat innovative, as an alternative a M5 bolt into a thread in the aluminium extrusion I used a 444mm long length of 4mm threaded rod with nuts at either end. This arrangement puts the extrusion under compression and gives it a great deal of additional mechanical strength as the steel threaded rod is very strong.

Additionally to avoid having to print enough extrusion for the entire length I used some 6mm aluminium tube as a spacer between 6HP(30.48mm) wide sections of the printed extrusion.

It was intended to use a standard modular PC power supply which is 150mm wide which is pretty close to 30HP (6 inches) so it was decided to have a 6HP section of rail at that point to allow a rear mounting plate for the PSU to be attached.

This gives 6HP of profile, 21HP(106.68mm) of tube spacer, 6HP of profile, 46HP(233.68 mm) of tube spacer and a final 6HP profile summing to our total of 85HP. Of course this would be unnecessary if a full continuous 85HP rail had been purchased, but 6 of 6 HP long profile is only 51 euro a saving of 70 euro.

To provide a flat area on which to mount the power switching, Ethernet switch and USB hubs I ordered a 170 x 431 mm sheet of 3mm thick aluminium from inspiredsteel who, while being an ebay company, were fast, cheap and the cutting was accurate.

Do be sure to mention you would prefer it if any error made the sheet smaller rather than larger or it might not fit, for me though they were accurate to the tenth of a mm! If you would prefer the rear section of the rack to be enclosed when you are finished, buy a second sheet for the top. For my prototype I only purchased a 170 x 280mm sheet as I was unsure if I wanted a surface under the PSU (you do, buy the longer sheet)

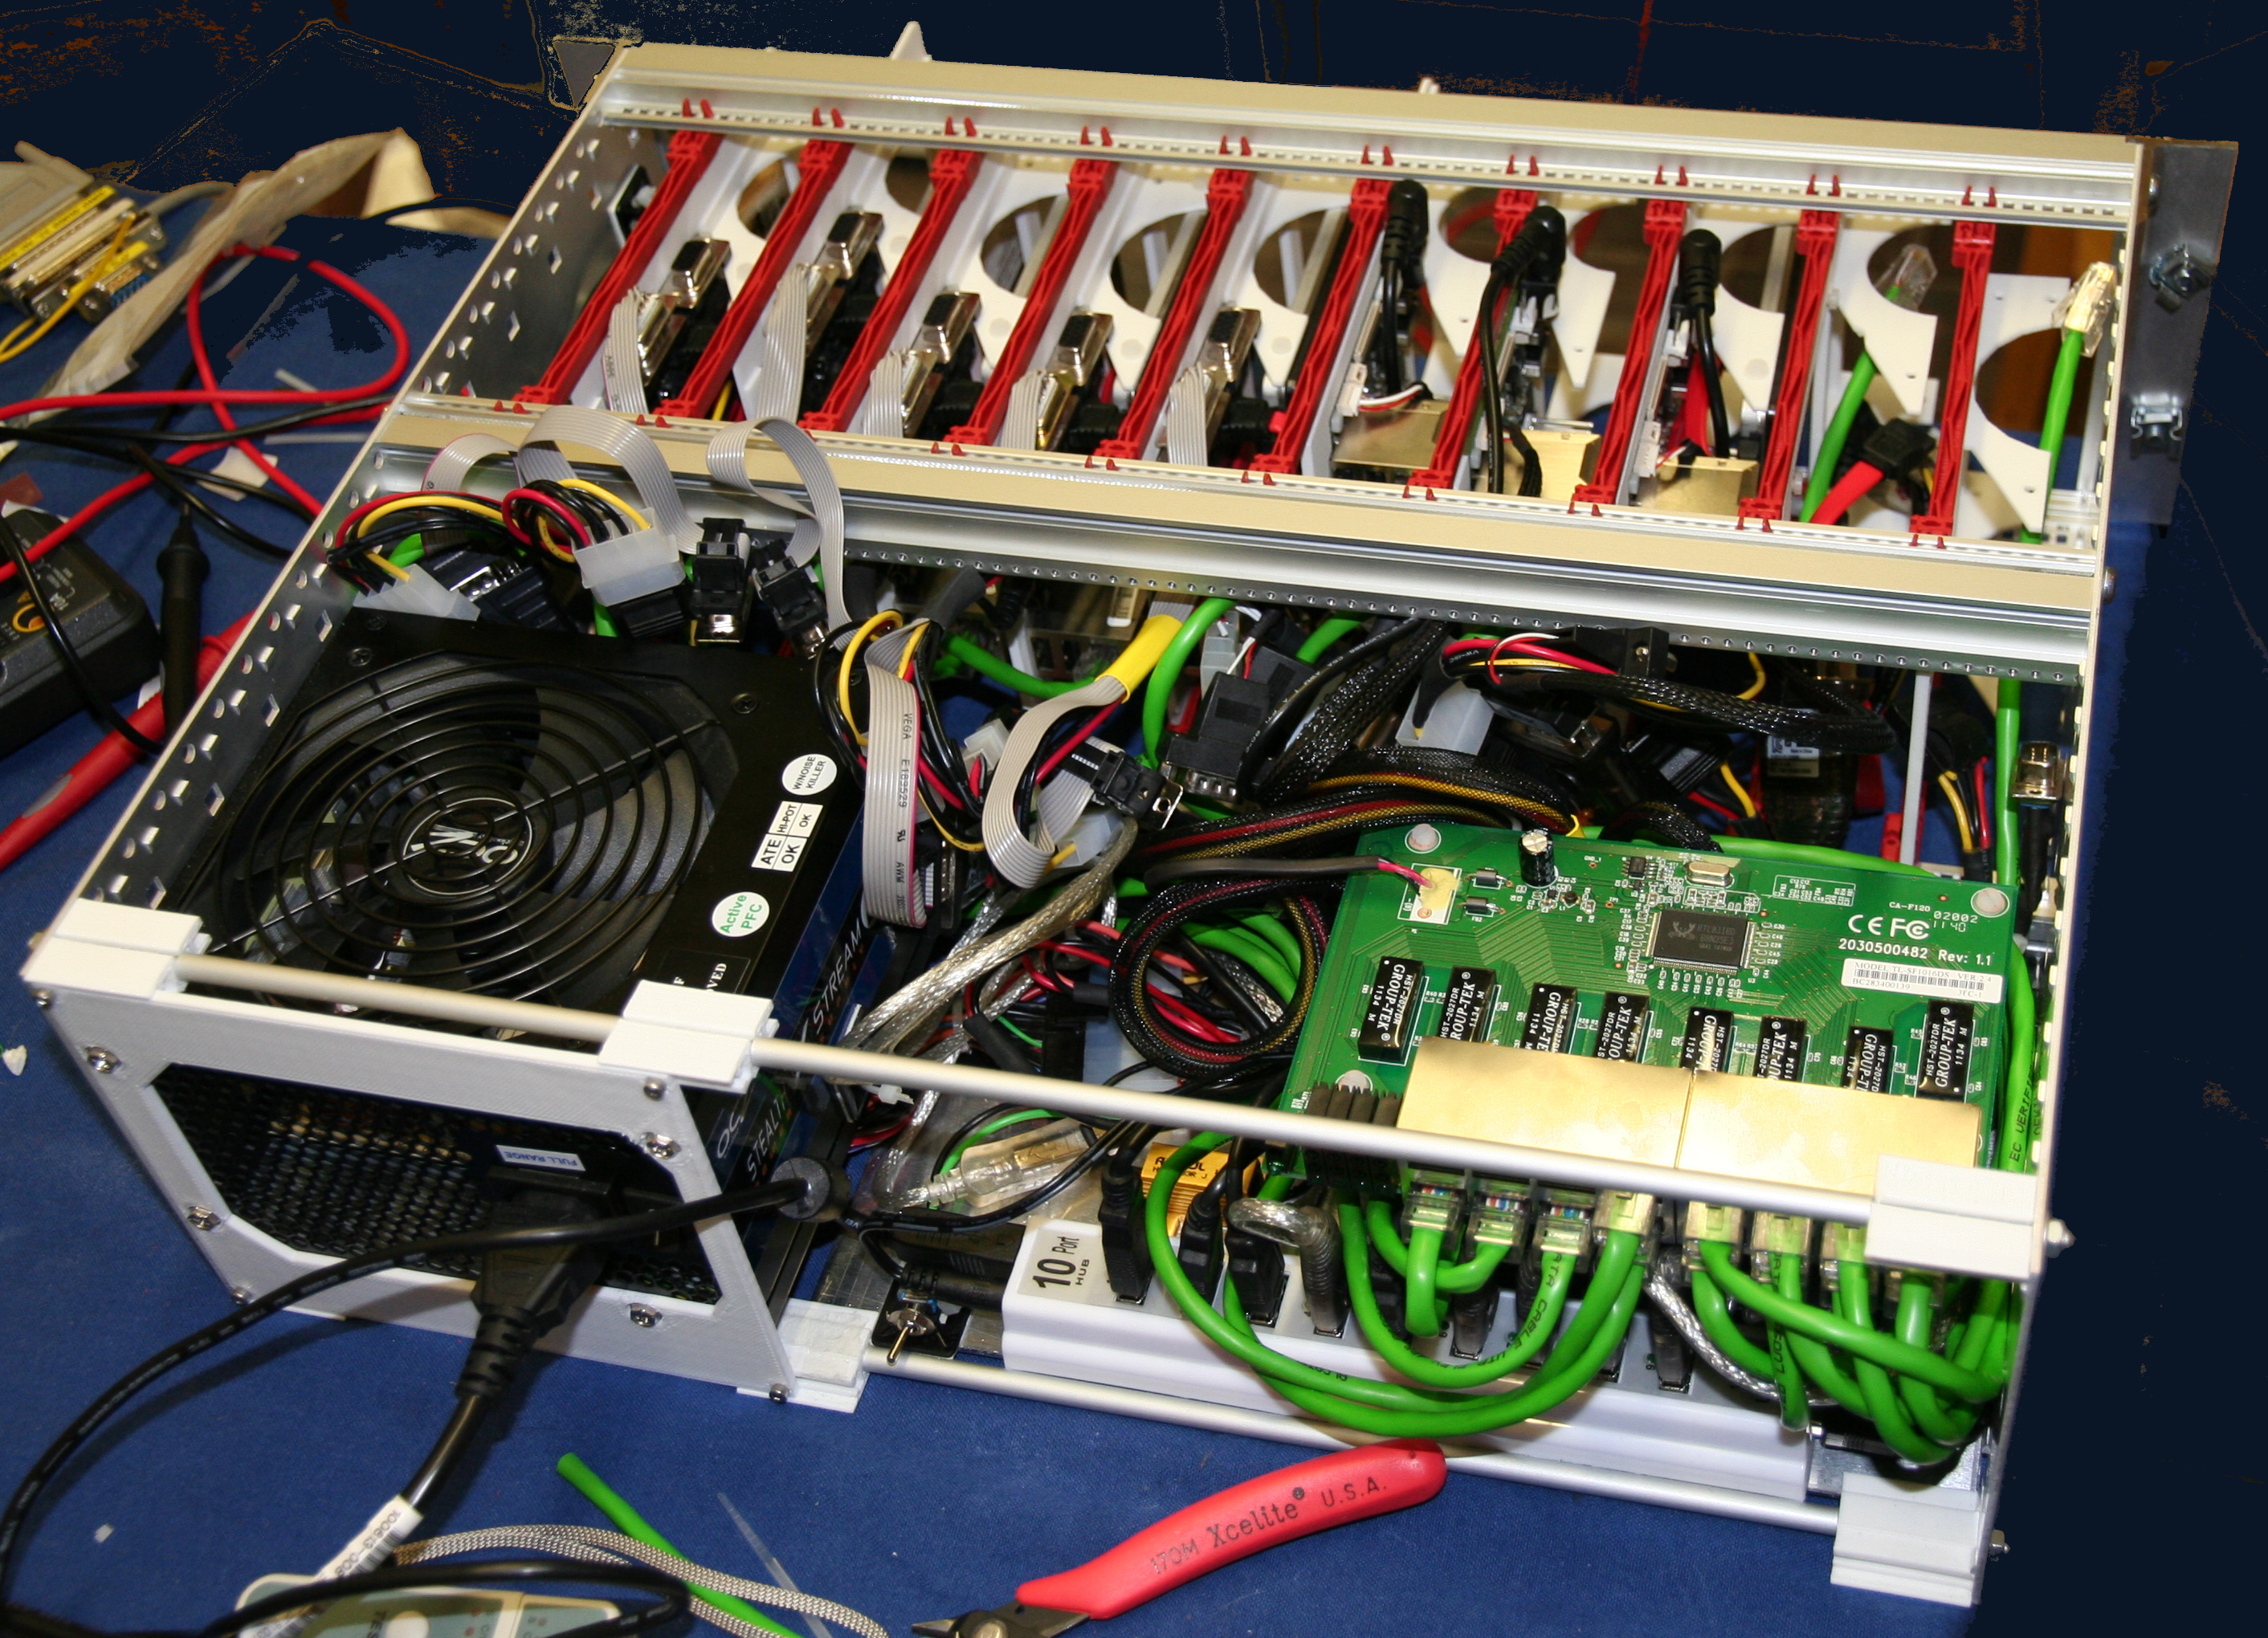
PC power supply mounted to back plateMounting the PSU was a simple case of constructing a 3 mm thick plate with the correct cutouts and mounting holes for an ATX supply. Although the images show the PSU mounted on the left hand side of the rack this was later reversed to improve cable management.

The subrack needed to provide Ethernet switch ports to all the systems. A TP-Link TL-SF1016DS 16-Port 10/100Mbps Switch was acquired and the switch board removed from its enclosure. The switch selected has an easily removed board and is powered by a single 3.3V input which is readily available from the ATX PSU.

Attention now returned to the eurocard carriers for the systems, the boards to be housed were iMX53 QSB and iMX6 SABRE Lite and a Raspberry Pi control system to act as USB serial console etc.

The carriers for both main boards needed to be 8HP wide, comprised of:
Although only 38 mm this is 7.5HP and fractions of an HP are not possible with the selected subrack.

With 8HP wide modules this would allow for ten slots, within the 84 usable HP, and an eleventh 4HP wide in which the Raspberry Pi system fits.

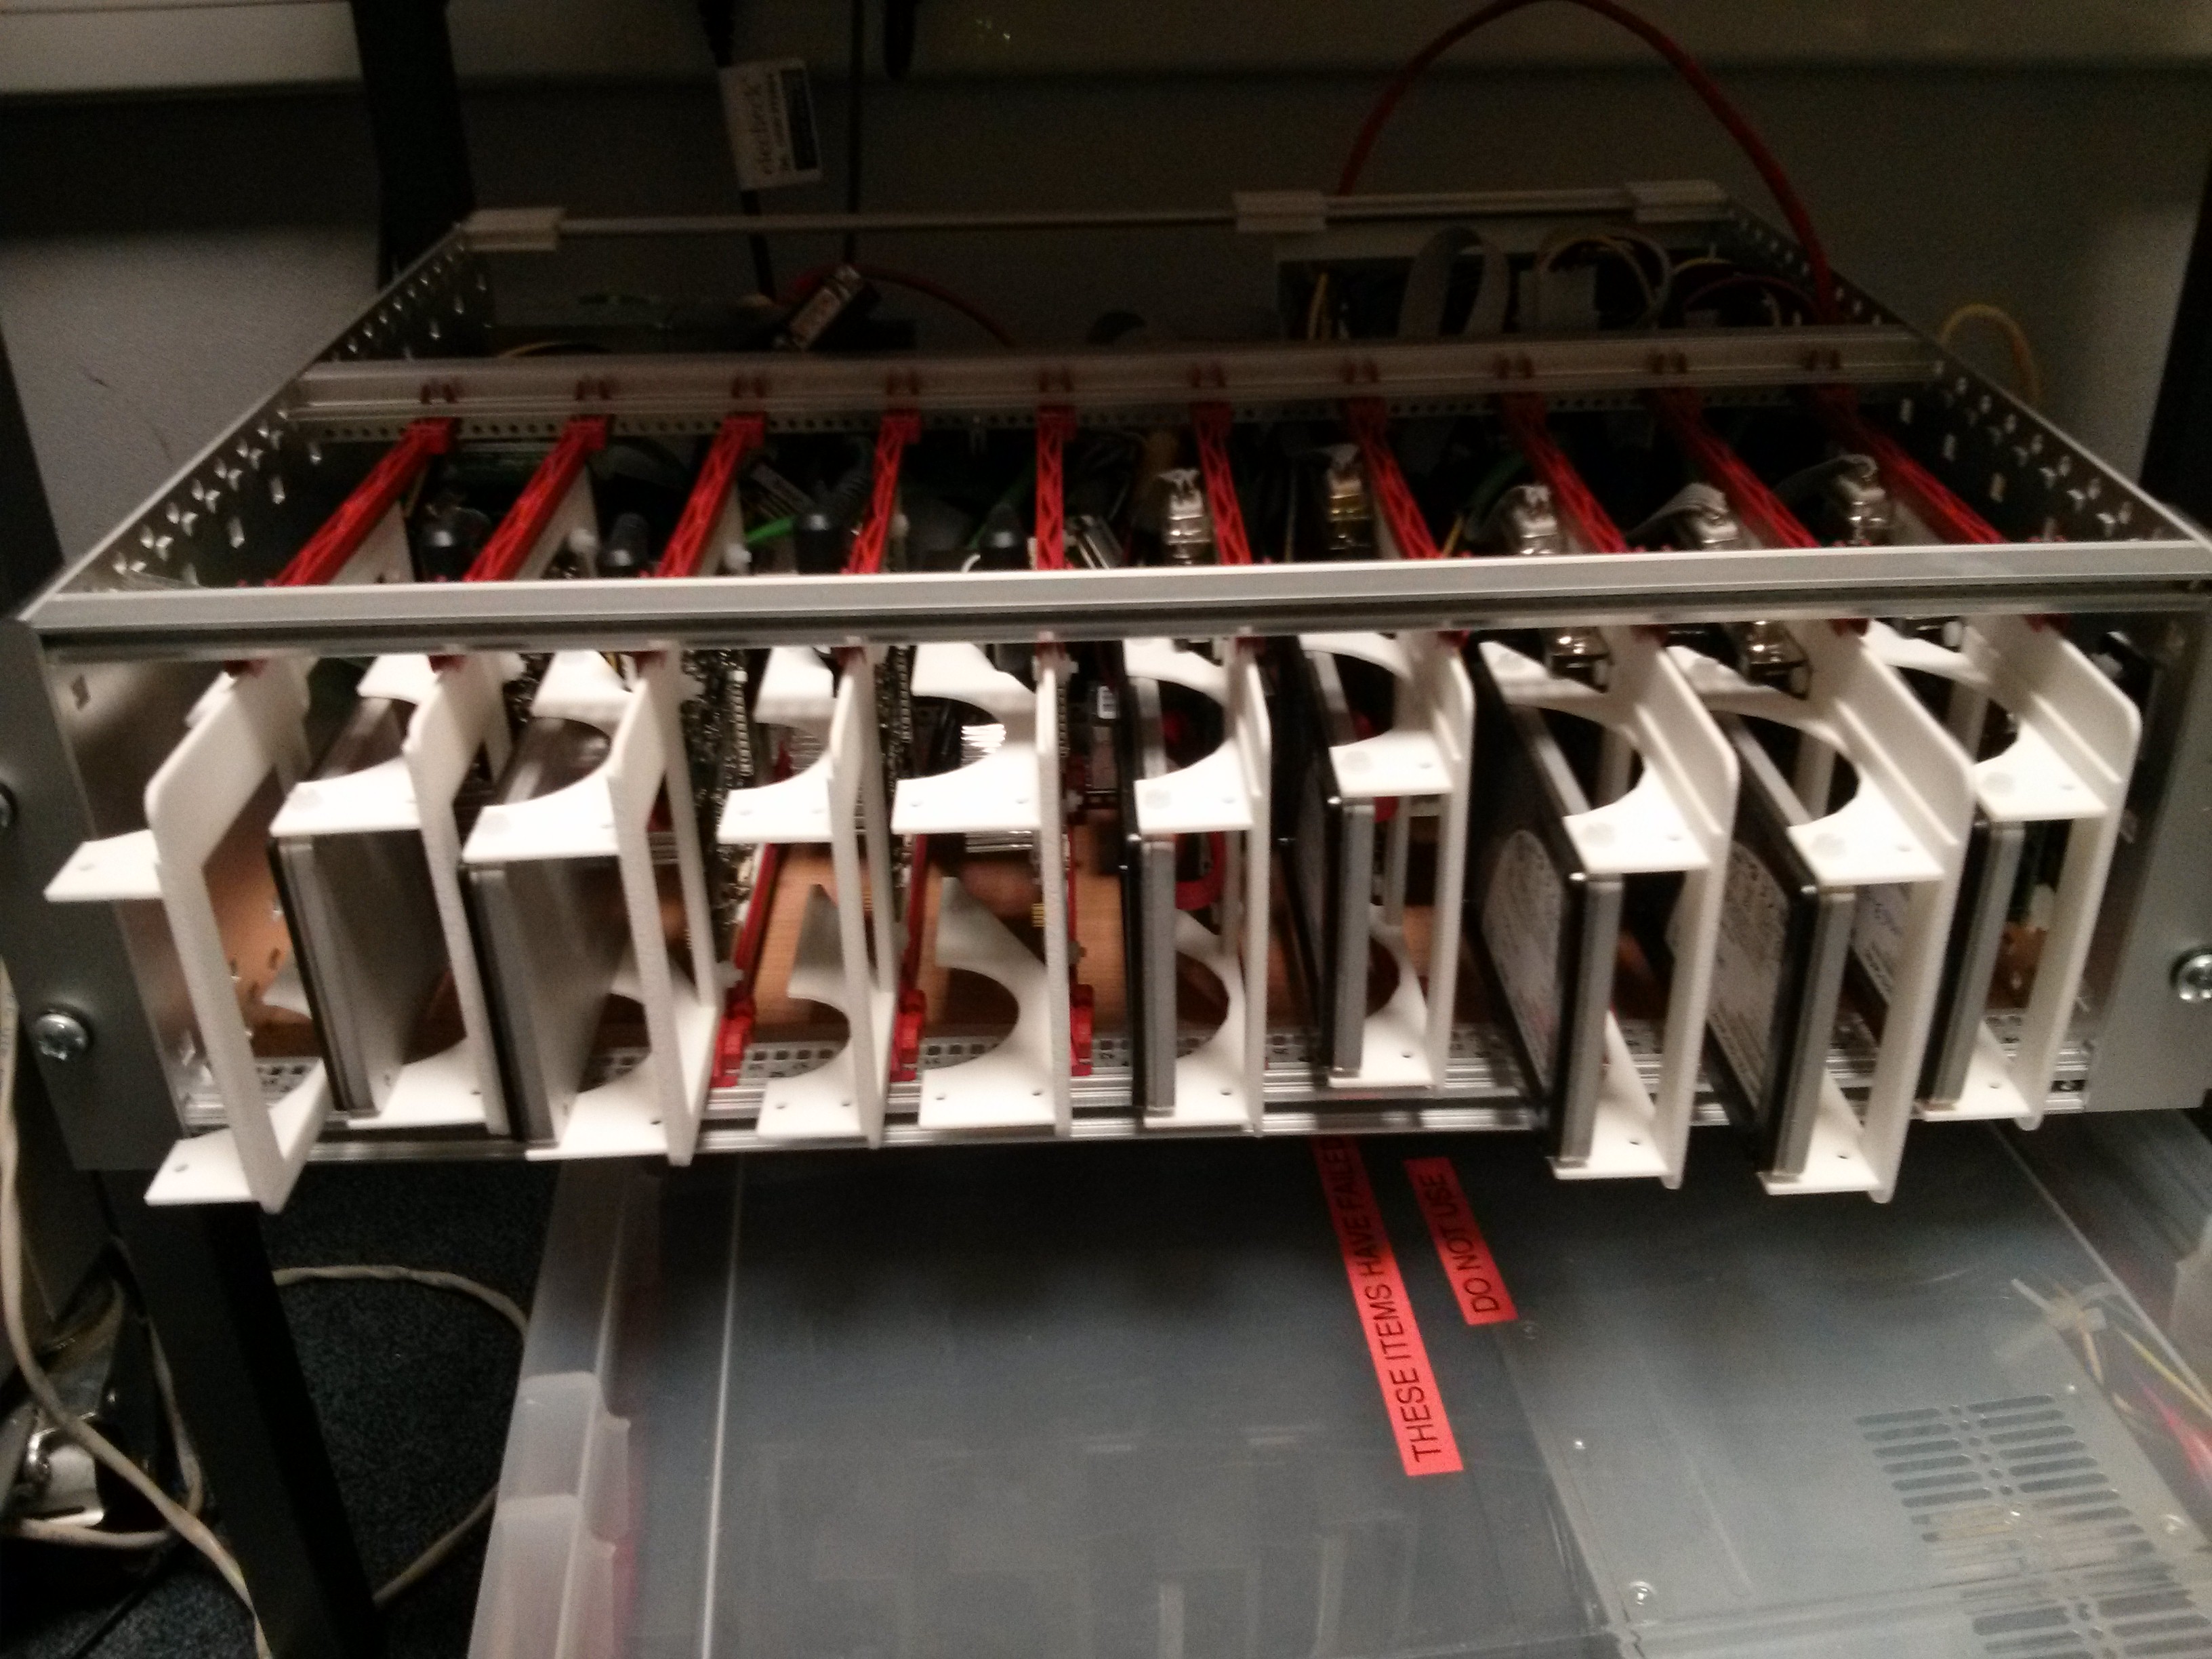
iMX6 SABRE Lite eurocard carrierCarrier designs for both the i.MX53 QSB and the i.MX6 SABRE Lite boards were created and fabricated at a professional 3D print shop which gave a high quality finish product and removed the perceived risk of relying on a personal 3D printer for a quantity of parts.

This resulted in changes in the design to remove as much material as possible as commercial 3D services charge by the cubic cm. This Design For Manufacture (DFM) step removed almost 50% from the price of the initial design.

i.MX53 QSB carriers with wiring loom
The i.MX6 design underwent a second iteration to allow for the heatsink to be mounted and not mechanically interfere with the hard drive (although the prototype carrier has been used successfully for a system that does not require a hard drive). The lesson learned here is to be aware that an design iteration or two is likely and that it is not without cost.

The initial installation was to have six i.MX53 and two i.MX6 this later changed to a five/four split, however the carrier solution allows for almost any combination, the only caveat (discovered later) is the imx53 carriers should be to the right hand side with the small 4HP gap at that end as they have a JTAG connector underneath the board which otherwise foul the hard drive of the next carrier.

Racked cards showing unwanted cable tails
A wiring loom was constructed for each board giving them a connector tail long enough to allow them to be removed. This was the wrong approach! if you implement this design (or when I do it again) the connector tails on the wiring loom should present all the connections to the rear at the same depth as the Ethernet connection.

The rack cables themselves should be long enough to allow the slides to be removed but importantly it is not desirable to have the trailing cable on the cards. I guess the original eurocard designers figured this out as they designed the cards around the standard fixed DIN connectors at the back of the card slots.

USB relay board with wiring loom attached
We will now briefly examine a misjudgement that caused the initially deployed solution to be reimplemented. As the design was going to use USB serial converters to access the serial console a USB connected relay board was selected to switch the power to each slot. I had previously used serial controlled relay boards with a USB serial convertor however these were no longer available.

Initial deployment with USB controlled relay board
All the available USB relay boards were HID controlled, this did not initially seem to be an issue and Linux software was written to provide a reasonable interface. However it soon became apparent that the firmware on the purchased board was very buggy and crashed the host computer's USB stack multiple times.

Deployed solutionOnce it became apparent that the USB controlled power board was not viable a new design was conceived. As the Ethernet switch had ports available Ethernet controlled relay boards were acquired.

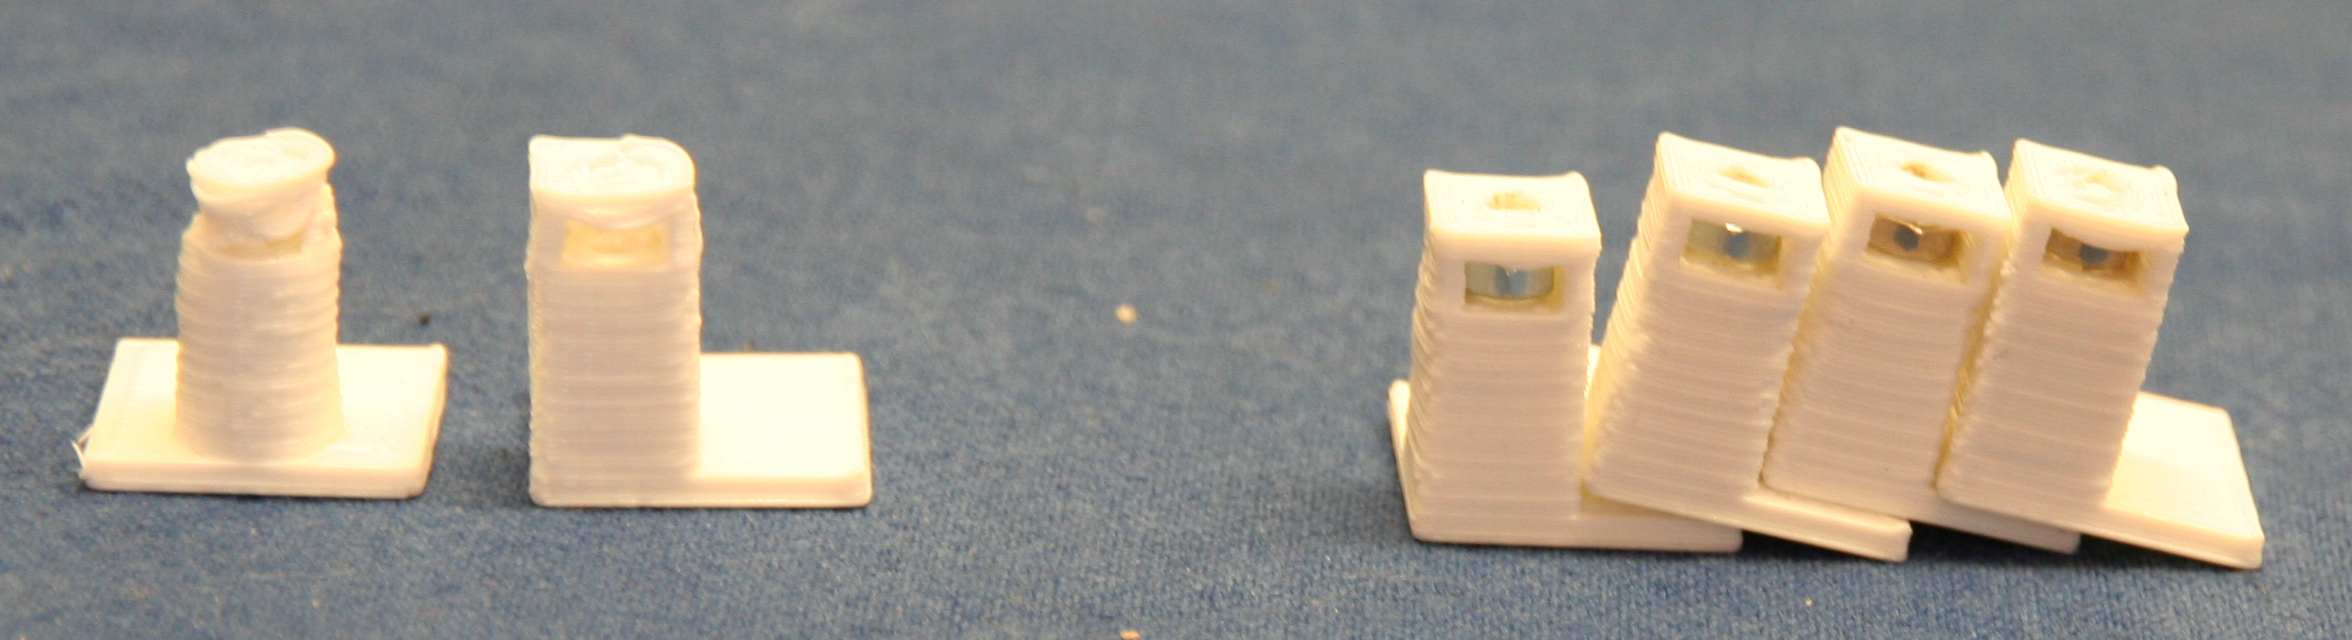
Evolution of 3mm PCB pillars
It did prove necessary to design and print some PCB support posts with M3 nut traps to allow the relay boards to be easily mounted using double sided adhesive pads.

By stacking the relay boards face to face and the Ethernet switch on top separated using nylon spacers it was possible to reduce the cable clutter and provide adequate cable routing space.

A busbar for Ground (black) and unswitched 12V (yellow) was constructed from two lengths of 5A chock block.

An issue with power supply stability was noted so a load resistor was added to the 12V supply and an adhesive thermal pad used to attach it to the aluminium base plate.

Completed redesign
It was most fortunate that the ethernet switch mounting holes lined up very well with the relay board mounting holes allowing for a neat stack.

This second edition is the one currently in use, it has proved reliable in operation and has been successfully updated with additional carriers.

The outstanding issues are mainly centered around the Raspberry Pi control board:
  • Needs its carrier fitting. It is currently just stuck to the subrack end plate.
  • Needs its Ethernet cable replacing. The existing one has developed a fault post installation.
  • Needs the USB hub supply separating from the device cable. The current arrangement lets the hub power the Pi which means you cannot power cycle it.
  • Connect its switched supply separately to the USB hub/devices.
Shopping listThe final bill of materials (excluding labour and workshop costs) which might be useful to anyone hoping to build their own version.

Prices are in GBP currency converted where appropriate and include tax at 20% and delivery to Cambridge UK and were correct as of April 2013.

The purchasing was not optimised and for example around 20GBP could be saved just by ordering all the shapeways parts in one order.
Base subrack
ItemSupplierQuantityLine Price
Schroff 24563-194 subrack kitFarnell141.28
Schroff 24560-351 guide railsFarnell313.65
Schroff rack rear horizontal railShapeways2100.00
1000mm length of 4mm threaded rodB and Q11.48
170mm x 431mm x 3mm Aluminium sheetinspired steel240.00
PSU mounting plateShapeways135.42
PCB standoffShapeways422.30
160mm Deep Modular PC supplyCCL155.76
TP-Link TL-SF1016DS 16-Port 10/100Mbps-SwitchCCL123.77
8 Channel 16A Relay Board Controlled Via EthernetRapid2126.00
Raspberry PiFarnell126.48
USB Serial convertersCCL1037.40
10 port strip style USB HUBEbay17.00
Parts for custom Ethernet cablesRS1326.00
Parts for custom molex power cables (salvaged from scrap ATX PSU)Workshop1111.00
33R 10W wirewound resistor for dummy loadRS11.26
24pin ATX female connector pre-wiredMaplin12.99
Akasa double sided thermal padMaplin15.00
Small cable tie basesMaplin16.49
Miscellaneous cable, connectors, nylon standoffs, solder, heatshrink, zip ties, nuts, washers etc. Workshop120.00
Total for subrack603.28

The carriers are similarly not optimally priced as over five GBP each can be saved by combining shipping on orders alone. Also the SSD drive selection was made some time ago and a newer model may be more suitable.
i.MX53 QSB carrier
ItemSupplierQuantityLine Price
i.MX53 QSBFarnell1105.52
Intel 320 SSD 80GCCL1111.83
Carrier boardShapeways130.00
combined sata data and power (15 to 20cm version)EBay15.00
Low profile right angle 5.5mm x 2.1mm barrel jackEBay10.25
Parts for 9pin serial cable extensionRS15.00
Miscellaneous solder, heatshrink, nylon nuts, bolts and washersWorkshop15.00
Total for carrier262.60

i.MX6 SABRE Lite carrier
ItemSupplierQuantityLine Price
i.MX6 SABRE LiteFarnell1128.06
Intel 320 SSD 80GCCL1111.83
Carrier boardShapeways135.00
combined sata data and power (15 to 20cm version)EBay15.00
Low profile right angle 5.5mm x 2.1mm barrel jackEBay10.25
Parts for 9pin serial cable modificationRS12.00
Miscellaneous solder, heatshrink, nylon nuts, bolts and washersWorkshop15.00
Total for carrier287.14
ConclusionThe solution works and in a 3U high 355mm deep subrack ten ARM development boards can be racked complete with local ethernet switching, power control and serial consoles.

Deployed system in situ configured as a build and test farm
The solution is neat and provides flexibility, density and reproducibility the "pile of stuff" solution failed to do.

For current prototype with nine filled slots the total cost was around 3000GBP or around 330GBP per slot which indicates a 100GBP per slot overhead over the "pile of stuff" solution. These figures omit the costs of the engineer and workshop time, which are estimated at an additional 1500GBP. Therefore a completed rack, fully filled with i.MX6 carriers costs around 5000GBP

Density could be increased if boards with lower height requirements were used however above twelve units there issues with Ethernet switch, power switch and USB port availability become a factor. For Example the 16 port Ethernet switch requires a port for uplink, one for each relay board and one for the console server which leaves only 12 ports for systems.

Addressing the outstanding issues would result in a much more user friendly solution. As the existing unit is in full time use and downtime is not easily scheduled for all ten systems, the issues are not likely to be fixed on the prototype and would have to be solved on a new build.

The solution is probably not suitable for turning into a product but that was not really the original aim. A commercial ARM blade server using this format would almost certainly use standard DIN connectors and a custom PCB design rather than adapting existing boards.

22 April 2013

Dmitrijs Ledkovs: abi-compliance-checker & dh / cdbs integration

dh-autoreconf is an amazing addon for running autoreconf, I just love it.
abi-compliance-checker is an amazing tool for tracking API/ABI.
Wouldn't it be great to glue abi-compliance-checker into dh / cdbs packaging?!
abi-compliance-checker (1.98.8-1~exp1) experimental; urgency=low
.
* New upstream release
* Add dh_acc to generate and compare library dumps at build time,
together with addons for dh(7) and cdbs.
* Bump standards version, bump debhelper to 9, use 3.0 (quilt) format,
update Vcs-Svn field to canonical form, remove obsolete
DM-Upload-Allowed.
* Apply a patch to allow suffixes on a-c-c abi dumps.
Horay! So how does one use it?

  • build-depend on dh-acc
  • In your debian/rules
    • call dh_acc somewhere appropriate
    • dh $@ --with acc
    • include /usr/share/cdbs/1/rules/acc.mk
  • In your debian/libpackage-dev.acc
    • Write a abi-compliance-checker descriptor (no need to include version)
  • Build your package
  • Copy the generated /usr/lib/$(multiarch)/dh-acc/*.abi.tar.gz as ./debian/lib-package-dev.abi.tar.gz.ARCH
  • Now at each build ABI/API checks will be executed and compat reports will be generated
An example xml descriptor for libapt-pkg-dev is:
<?xml version="1.0" encoding="utf-8"?>
<descriptor>
<headers>
./build/include/apt-pkg/
</headers>
<libs>
./build/bin/
</libs>
<skip_types>
SubstVar
</skip_types>
</descriptor>
I wonder if things can be improved, for example:
  • For trivial packages, don't require .acc at all & simply point abi-compiance-checker at ./debian/tmp/
  • I think logs currently pollute the unpacked source package
  • Multiple "base" ABI need checking. E.g. given versions A, B, C one can introduce a new symbol in B and drop it in C. Both B & C are compatible with A, but C is not compatible with B, thus an API/ABI break got introduced into the distribution if all A,B,C were ever published in the archive.
  • Maybe run these as DEP-8 autopkgtests as well?
On a wider scope of things abi-compliance-checker allows to create "system" abi dumps & also check applications for ABI/API compliance. For example, one could scan deb packages to see if they are still compatible between major Debian Releases for some known install type (e.g. a default full Gnome Desktop), or we could scan proprietary packages to see if they are compatible (e.g. games delivered via Steam by Valve to multiple Ubuntu releases), and we can continuously monitor OS ABI to make sure we don't unknowingly break it with security and bugfix updates.

Please, play around with dh-acc and let me know what you think =)

21 April 2013

Lisandro Dami&aacute;n Nicanor P&eacute;rez Meyer: On the road to Qt 5: Qt 5 base, tools, jsbackend and xmlpatterns in experimental

The first Qt 5 packages have been accepted in Debian experimental.

What's there
To start building Qt 5 apps you will need to export QT_SELECT=qt5, install the package qt5-defaults or read qtchooser's man page. Note that exporting QT_SELECT has precedence over installing qt5-defaults.

What's not there
ArchitecturesAMD64 is already there because it's the arch used by maintainers to build the packages. i386 should be following as soon as buildds catch up. Most surely ARM-based archs will be there at some point too.

Other archs will need some love. Not strange, the Qt project supports amd64, i386 and ARM, but we Debian have normally prepared patches to make it build in other archs. And yes, we try to push them upstream for everyone's benefit. So, if you are missing it in your arch, take a look. You may be the one who enables Qt 5 in it :-)

GLES2 and WaylandWe don't have GLES2 or Wayland support yet. Building it will most probably break the desktop for people using proprietary video drivers (or at least I was told so). I'll surely provide non-official packages with GLES2/Wayland enabled to allow people testing it, but not soon.

This also means that we are not currently able to split X11 and framebuffer support. But we have time to work on it :-)

Non DFSGs compliant files
If you get the original source code tarball from Debian you will notice that it has dfsg in it's name. That means that we had to remove some non DFSG compliant stuff from the original tarball, namely:

  • Every RFC.
  • Three files used for testing the build, which are made of RFCs.
  • Some fonts.

What's following
Other parts of Qt 5 are on the way. And remember, this packages would not have been possible if it weren't for the great Debian's pkg-kde team. My kudos to them.

Next.

Previous.